sauna 160, Ø200
TRANSCRIPT

Sauna 160, Ø200
Please read whole manualbefore You start.
All given measurements arein millimeters.

1
x2
4a
4b
4e4f
222 3a3b 6a
1600
*225
*95
Details list nr.1
x2x1
x1 x2
1400
*140
*42
1600
*120
*42
1600
*140
*42
1600
*140
*42
1600
*70*
42
1600
*70*
42
1600
*50*
50
Sauna 160, Ø200
6b
x1x22 x23
A
14c
x2
14d
x2
1690
*44*
44
680*44*4414
590*
1690
x1
655*43*18
1650
*43*
18
14a
x2
14b
x2
If equipped
If equipped
F
x3x1
G
x1
15
595*
700*
72
x1
16
595*
595*
10
Minerit
108
170*
44*4
4
x2X
Z
WY
450*
44*4
4
1900
*520
*88
x3
x1
x1 kmpl.
9
1500
*210
*88
x1
13
x1
350*
44*4
4
M
4,5x
90
H
4,5x
60
I
4,0x
50
J
3x40
K
3x30
x45x70x25x20x25~1kg
O
L
x50
L= 10
00
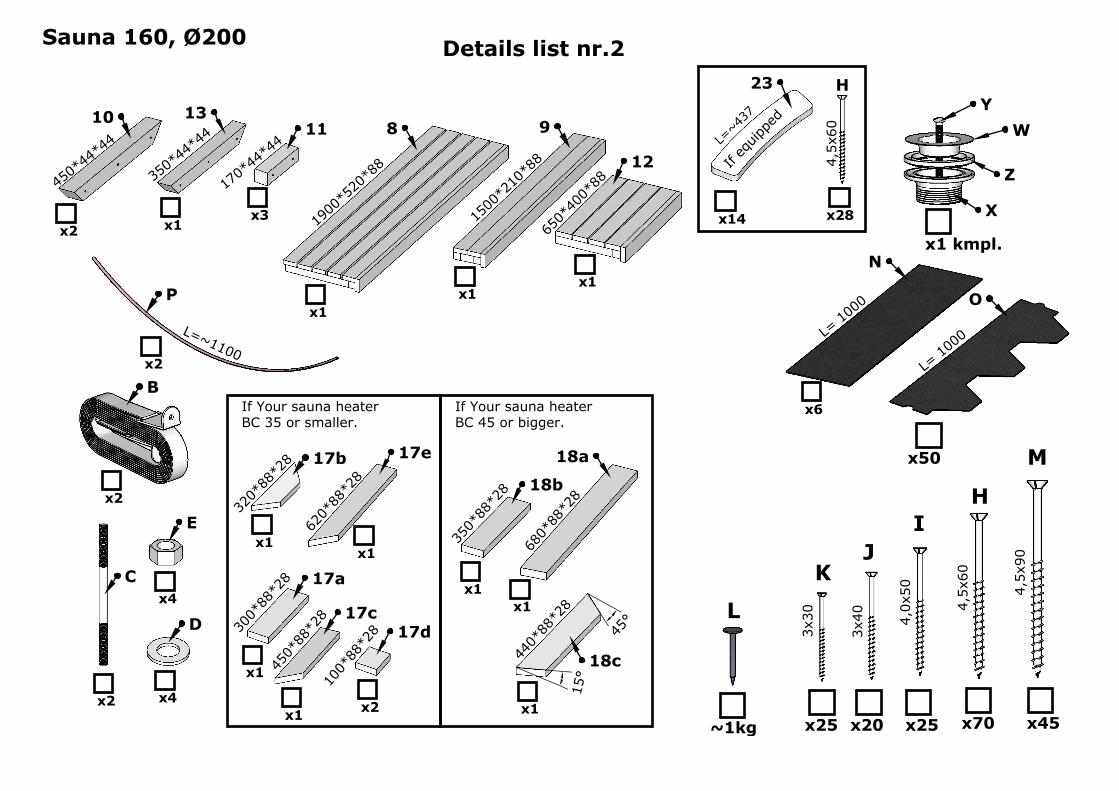
Details list nr.2Sauna 160, Ø200
P
x2
L=~1100
B
x2
C
E
Dx4
x4x2
11
12
650*
400*
88
x1N
L= 10
00
x6
23
x14
L=~43
7
If eq
uippe
d
H
4,5x
60
x28
17a
300*
88*2
8
17b
320*
88*2
8 17e
620*
88*2
8
17c17d
100*
88*2
8
450*
88*2
8
x1x1
x1
x1
x2
If Your sauna heaterBC 35 or smaller.
If Your sauna heaterBC 45 or bigger.
18b
350*
88*2
8
x1
18a
680*
88*2
8
x1
440*
88*2
8
18c
x1
45°
15°

4xM
4xM
2xDET 1
2xDET A
14
00
1600
mm=mm
1.
Sauna 160, Ø200

I 1x DET 2
II
2 3a3b
4 x DET 3a4 x DET 3b
100
100
2x M
X
Z
W
Y
2.
Sauna 160, Ø200
mm=mm

I
II
16x M
3.
Sauna 160, Ø200

2xDET P
90°
3a.
Sauna 160, Ø200
Drill 2 holes intoDET 2 Ø10mm.

II
I
6x I
6x I
4a
4b
4e
4f
4.
Sauna 160, Ø200
Wall configuration dependson the model. For half moon and front glass wall installation,please check extra pages.
Back
Back
Front
Front

4x H
NB! Arrow down.
5.
Sauna 160, Ø200
~7mm
Use waterlevel.
Wall configuration dependson the model.
Important!Keep distance!

I
II
8x DET 3a8x DET 3b
11x DET 3a 10x DET 3b
16xH
16xH
16 x H
6.
Sauna 160, Ø200
~7mm
Check page 6A
Important!Keep distance!

A/2
A
3b
3a
6b
6a
A/2
4xH(M)
A/2
A/2
DET 6a
DET 6b
6a.
Glue Use glue betweenboards.
Important !!!
Sauna 160, Ø200

I
II
C
D
E
~100
2x DET B
7.
During assembly and retighteningthe threaded rods, use oil(Würth HPS 1400 or similar)to avoid "cold welding" and it is also easier tightening.W
ürt
hoi
l
Important!Remove screws and use themon further sauna installation!
Remove
Use strap!
Removescrews
Removescrews
Sauna 160, Ø200

I
II
8.
Cut out, follow theguidelines.
Remove allbrackets.
Remove allbrackets.
Sauna 160, Ø200
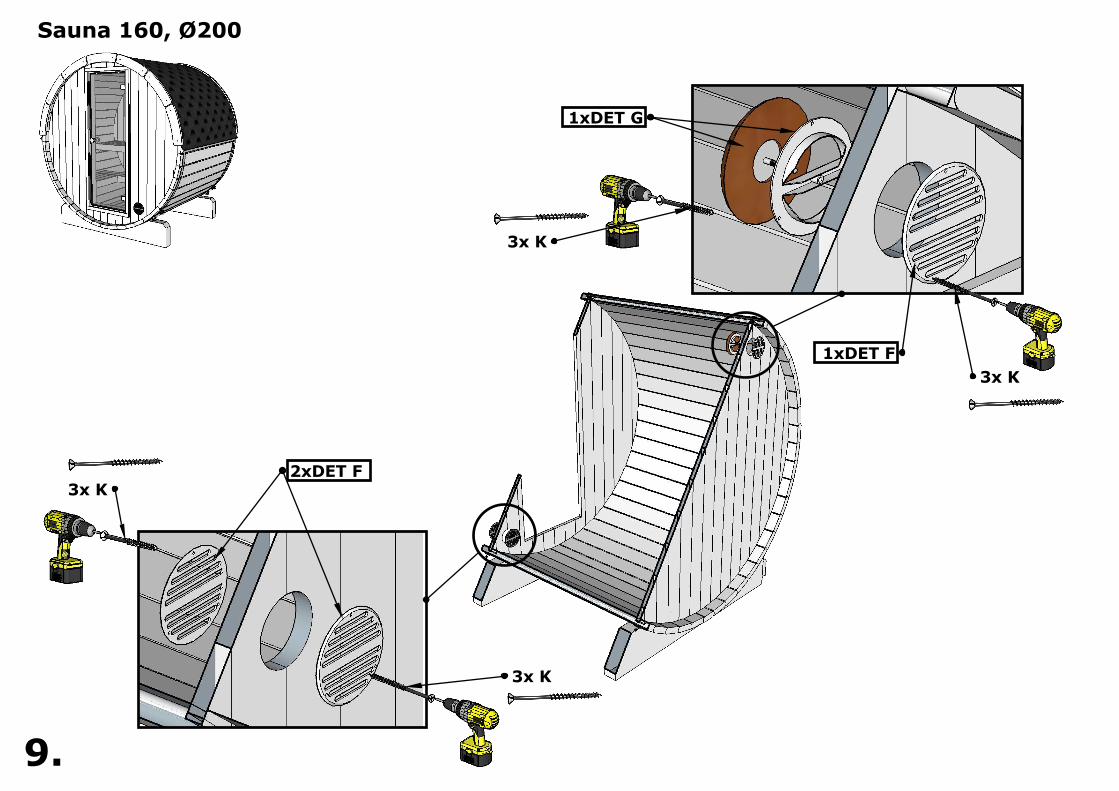
2xDET F
1xDET G
1xDET F
3x K
3x K
3x K
3x K
9.
Sauna 160, Ø200

II
I
1xDET 8
1xDET 9
2xDET 10
2xDET 11
6x H
4x H
1xDET 11
2x H
III
4x M
2x H
650
10.
Drill hole Ø4mmbefore screw
Drill hole Ø4mmbefore screw
Sauna 160, Ø200

2x M
4x H
I
1xDET 12
1xDET 13
4x M
2x DET 14c2x DET 14d
1x DET 14
II
28
III
11.
Sauna 160, Ø200

1x DET 14
III
18x H
2x DET 14a2x DET 14b
14x J 8x H
III IV1x DET 15
4x H
V
12.
Horizontally fix screwin every board.
Use waterlevel fordoor installation.
NB! Place doorfrom inside.
Push door againstthe wall and fix it from other side.
Sauna 160, Ø200

I
II
1x DET 16
1x DET 17a
1x DET 17b
1x DET 17c
1x DET 17e
8x I
1x DET 17d
3x I
2x H
1x DET 17d
13.
If Your sauna heater BC 35 or smaller.7x K
If Your sauna heater BC 45 or bigger.
1x DET 18a
1x DET 18b
NB! Drill holes Ø4mmbefore screw.
If Your sauna heater BC 35 or smaller. If Your sauna heater BC 45 or bigger.
1x DET 18c
4x I
NB! Drill holes Ø4mmbefore screw.
NB! Drill hole Ø4mmbefore screw.
NB! Place saunaheather first.
Sauna 160, Ø200
NB! Drill holes Ø4mmbefore screw.

8x H
2xDET 22
mm
=m
m
I
L
DET N
II
14.
Model with endboards.
~10mmNB! Check also shingles installationmanual inside shingles packages.
Sauna 160, Ø200

L
I
DET O
DET N
II
15.
Model with endboards.
14x DET 23
28x H III
IV
Cut off Cut and useit on other end
RemoveDET A
NB! Check also shingles installationmanual inside shingles packages.
Sauna 160, Ø200

8x H2xDET 22
mm
=m
m
I
16.
Sauna 160, Ø200
Model without endboards.NB! Check also shingles installationmanual inside shingles packages.
L
DET N
II ~10mm
50mm 50mm

17.
Sauna 160, Ø200
Model without endboards.NB! Check also shingles installationmanual inside shingles packages.
50mm 50mm
Cut off
I
Bend overlap to the edge and fix with clout nails
Bend overlap to the edge and fix with clout nails
DET O
II
Cut off Cut and useit on other side
L

18.
Sauna 160, Ø200
Model without endboards.NB! Check also shingles installationmanual inside shingles packages.
DET N
I
II Remove
DET A
L