science middle division - international bureau of education · reading • el1.c, el1.k ... •...
TRANSCRIPT

AREA OF STUDY: SCIENCE STANDARD 2
UNIT/THEME: THE UNIVERSECROSS-CURRICULAR OUTCOMES Pupils should: SP2.a Take part in group activities. SP2.b Express their opinions and feelings in a socially
acceptable way. SP2.c Help the group to achieve its goals. SP2.d Help to create consensus. CP1.a Examine information related to the
problem/issue.
AREA OF STUDY OUTCOMES Pupils should: ST1.a Understand some similarities and differences between
the earth, the planets, and other celestial bodies. ST6.a Understand time in relation to earth’s rotation and orbit
around the sun, and moon’s orbit around the earth.
CONTENT ORGANIZED INTO MANAGEABLE
SETS
SUGGESTED TEACHING/LEARNING STRATEGIES SUGGESTED STRATEGIES/ACTIVITIES FOR ASSESSMENT
1. Earth’s components consists of land, water & air
2. The Earth spins from
west to east on its north-south axis once every 24 hours. This rotation causes day and night.
1. Earth’s components: land, water & air • Experience movement by land, sea, air (field trip) • Use a globe to illustrate parts of the Earth
• Land masses • Bodies of water • Air (on land and water)
• Build a model of the Earth • Report on building a model
2. Earth’s rotation causes day and night • Use of flashlight and globe to show day and night • Shadow movement activity telling time by length of
shadows • Using the Sun to tell the time • When is the Sun’s position furthest/highest from the
horizon? • Discuss the direction of the Earth’s spinning. • Encourage individual children to demonstrate this
using a globe or other spherical object. • Written description of the Earth’s movement
1. Earth’s components: land, water & air • Build and compare models • Report on model and field trip • Make poetry and jingle of solar system • Keeping a weather journal • Expression of ideas in written composition on field
trip/solar system 2. Earth’s rotation causes day and night • Oral presentation explaining day and night • Discussion on contents of video • Cooperation within groups
- 1 - C:\Documents and Settings\NORA\My Documents\MIDDILE DIVISION UoW nelson\Science Middle Division1.doc

AREA OF STUDY: SCIENCE STANDARD 2
UNIT/THEME: THE UNIVERSECONTENT ORGANIZED
INTO MANAGEABLE SETS
SUGGESTED TEACHING/LEARNING STRATEGIES SUGGESTED STRATEGIES/ACTIVITIES FOR ASSESSMENT
3. Because of the direction of the Earth’s spin, the Sun appears to rise in the east and set in the west. The Sun’s position and location in the sky is dependent on the time of day, the time of the year and the observer’s location on Earth.
3. Earth’s spin, the rising and setting of the Sun and the Sun’s position and location in the sky • Discuss the sun’s rise and set • Given the direction of Earth’s rotation (spin) what
effect does this have on the direction in which the Sun appears to rise and set?
• Encourage children to observe the position of the sun in the morning, lunchtime and evening. Have them record their results. Discuss the sun’s position in the sky in relation to time of day.
• Children describe the sun’s position e.g. midday—highest above the horizon, morning—east and closer to the horizon, evening—west and closer to the horizon
• Children predict time based on the Sun’s position in the sky.
• Encourage children to create diagrams/paintings of the sun
• Using the globe, children explore and form hypotheses about the Sun’s position in the sky at different times of day, times of year, and locations on Earth
• Compare and contrast the position of the Sun in June and December in Belize
• Children observe the length of their shadows at different time intervals.
• Build a Sun Dial to show how the shadows created by the Sun’s position in the sky can be used to tell time.
3. Direction of Earth’s spin, the rising and setting of the Sun and the Sun’s position and location in the sky in relation to time of day, time of year and the observer’s location on Earth. • Ability to identify the position of the Earth • Clarity of information presented orally and written
peer assessment of the children’s ability to identify the Earth’s spin—west to east
• Student self-assessment of their diagram depicting the position of the sun—east in the mornings and west in the evenings
• Ability to interpret information and formulate an opinion
• Ability to state specific information about shadows based on their experiences
• To give and exchanging information clearly • Using observation to collect and analyse data
and to draw conclusions • How well Sun Dials are constructed • Team work in construction of Sun Dials • Inventiveness in construction of Sun Dials • Ability to use Sun Dials to tell time.
- 2 - C:\Documents and Settings\NORA\My Documents\MIDDILE DIVISION UoW nelson\Science Middle Division1.doc
AREA OF STUDY: SCIENCE STANDARD 2
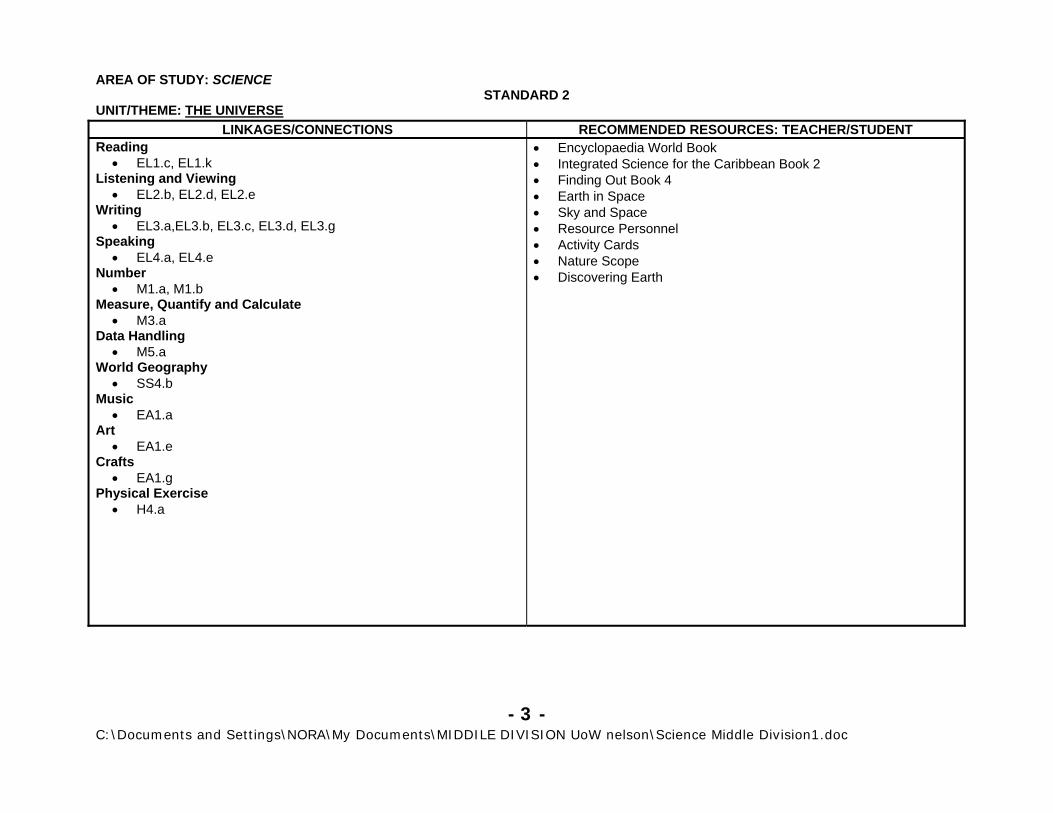
UNIT/THEME: THE UNIVERSELINKAGES/CONNECTIONS RECOMMENDED RESOURCES: TEACHER/STUDENT
Reading • EL1.c, EL1.k
Listening and Viewing • EL2.b, EL2.d, EL2.e
Writing • EL3.a,EL3.b, EL3.c, EL3.d, EL3.g
Speaking • EL4.a, EL4.e
Number • M1.a, M1.b
Measure, Quantify and Calculate • M3.a
Data Handling • M5.a
World Geography • SS4.b
Music • EA1.a
Art • EA1.e
Crafts • EA1.g
Physical Exercise • H4.a
• Encyclopaedia World Book • Integrated Science for the Caribbean Book 2 • Finding Out Book 4 • Earth in Space • Sky and Space • Resource Personnel • Activity Cards • Nature Scope • Discovering Earth
- 3 - C:\Documents and Settings\NORA\My Documents\MIDDILE DIVISION UoW nelson\Science Middle Division1.doc
AREA OF STUDY: SCIENCE STANDARD 2
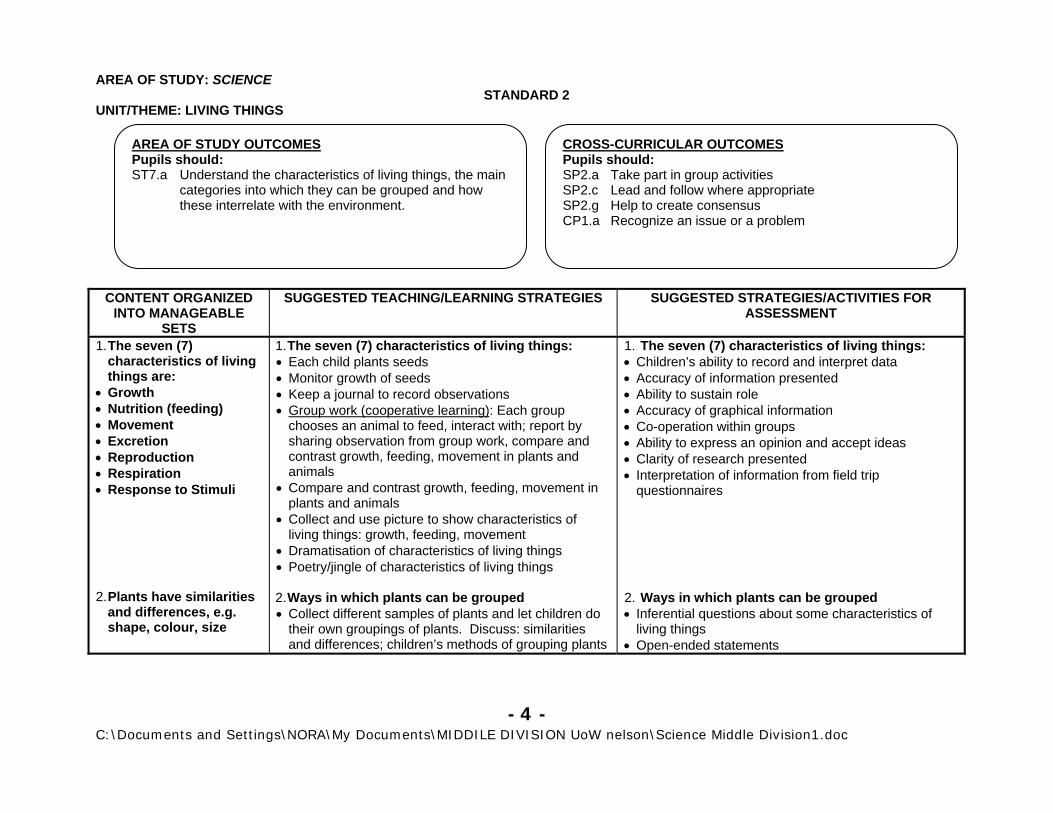
UNIT/THEME: LIVING THINGS
AREA OF STUDY OUTCOMES Pupils should: ST7.a Understand the characteristics of living things, the main
categories into which they can be grouped and how these interrelate with the environment.
CROSS-CURRICULAR OUTCOMES Pupils should: SP2.a Take part in group activities SP2.c Lead and follow where appropriate SP2.g Help to create consensus CP1.a Recognize an issue or a problem
CONTENT ORGANIZED INTO MANAGEABLE
SETS
SUGGESTED TEACHING/LEARNING STRATEGIES SUGGESTED STRATEGIES/ACTIVITIES FOR ASSESSMENT
1. The seven (7) characteristics of living things are:
• Growth • Nutrition (feeding) • Movement • Excretion • Reproduction • Respiration • Response to Stimuli 2. Plants have similarities
and differences, e.g. shape, colour, size
1. The seven (7) characteristics of living things: • Each child plants seeds • Monitor growth of seeds • Keep a journal to record observations • Group work (cooperative learning): Each group
chooses an animal to feed, interact with; report by sharing observation from group work, compare and contrast growth, feeding, movement in plants and animals
• Compare and contrast growth, feeding, movement in plants and animals
• Collect and use picture to show characteristics of living things: growth, feeding, movement
• Dramatisation of characteristics of living things • Poetry/jingle of characteristics of living things 2. Ways in which plants can be grouped • Collect different samples of plants and let children do
their own groupings of plants. Discuss: similarities and differences; children’s methods of grouping plants
1. The seven (7) characteristics of living things: • Children’s ability to record and interpret data • Accuracy of information presented • Ability to sustain role • Accuracy of graphical information • Co-operation within groups • Ability to express an opinion and accept ideas • Clarity of research presented • Interpretation of information from field trip
questionnaires 2. Ways in which plants can be grouped • Inferential questions about some characteristics of
living things • Open-ended statements
- 4 - C:\Documents and Settings\NORA\My Documents\MIDDILE DIVISION UoW nelson\Science Middle Division1.doc
AREA OF STUDY: SCIENCE STANDARD 2
UNIT/THEME: LIVING THINGSCONTENT ORGANIZED
INTO MANAGEABLE SETS
SUGGESTED TEACHING/LEARNING STRATEGIES SUGGESTED STRATEGIES/ACTIVITIES FOR ASSESSMENT
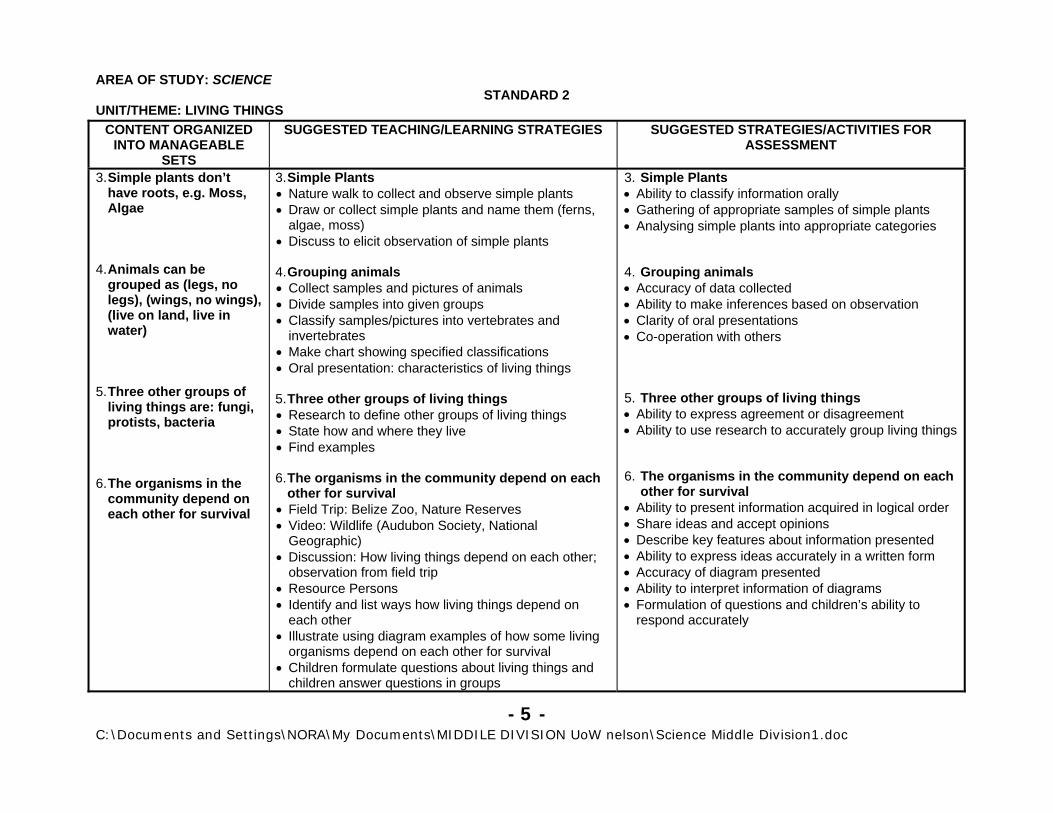
3. Simple plants don’t have roots, e.g. Moss, Algae
4. Animals can be
grouped as (legs, no legs), (wings, no wings), (live on land, live in water)
5. Three other groups of
living things are: fungi, protists, bacteria
6. The organisms in the
community depend on each other for survival
3. Simple Plants • Nature walk to collect and observe simple plants • Draw or collect simple plants and name them (ferns,
algae, moss) • Discuss to elicit observation of simple plants 4. Grouping animals • Collect samples and pictures of animals • Divide samples into given groups • Classify samples/pictures into vertebrates and
invertebrates • Make chart showing specified classifications • Oral presentation: characteristics of living things 5. Three other groups of living things • Research to define other groups of living things • State how and where they live • Find examples 6. The organisms in the community depend on each
other for survival • Field Trip: Belize Zoo, Nature Reserves • Video: Wildlife (Audubon Society, National
Geographic) • Discussion: How living things depend on each other;
observation from field trip • Resource Persons • Identify and list ways how living things depend on
each other • Illustrate using diagram examples of how some living
organisms depend on each other for survival • Children formulate questions about living things and
children answer questions in groups
3. Simple Plants • Ability to classify information orally • Gathering of appropriate samples of simple plants • Analysing simple plants into appropriate categories 4. Grouping animals • Accuracy of data collected • Ability to make inferences based on observation • Clarity of oral presentations • Co-operation with others 5. Three other groups of living things • Ability to express agreement or disagreement • Ability to use research to accurately group living things 6. The organisms in the community depend on each
other for survival • Ability to present information acquired in logical order • Share ideas and accept opinions • Describe key features about information presented • Ability to express ideas accurately in a written form • Accuracy of diagram presented • Ability to interpret information of diagrams • Formulation of questions and children’s ability to
respond accurately
- 5 - C:\Documents and Settings\NORA\My Documents\MIDDILE DIVISION UoW nelson\Science Middle Division1.doc
AREA OF STUDY: SCIENCE STANDARD 2
UNIT/THEME: LIVING THINGSCONTENT ORGANIZED
INTO MANAGEABLE SETS
SUGGESTED TEACHING/LEARNING STRATEGIES SUGGESTED STRATEGIES/ACTIVITIES FOR ASSESSMENT
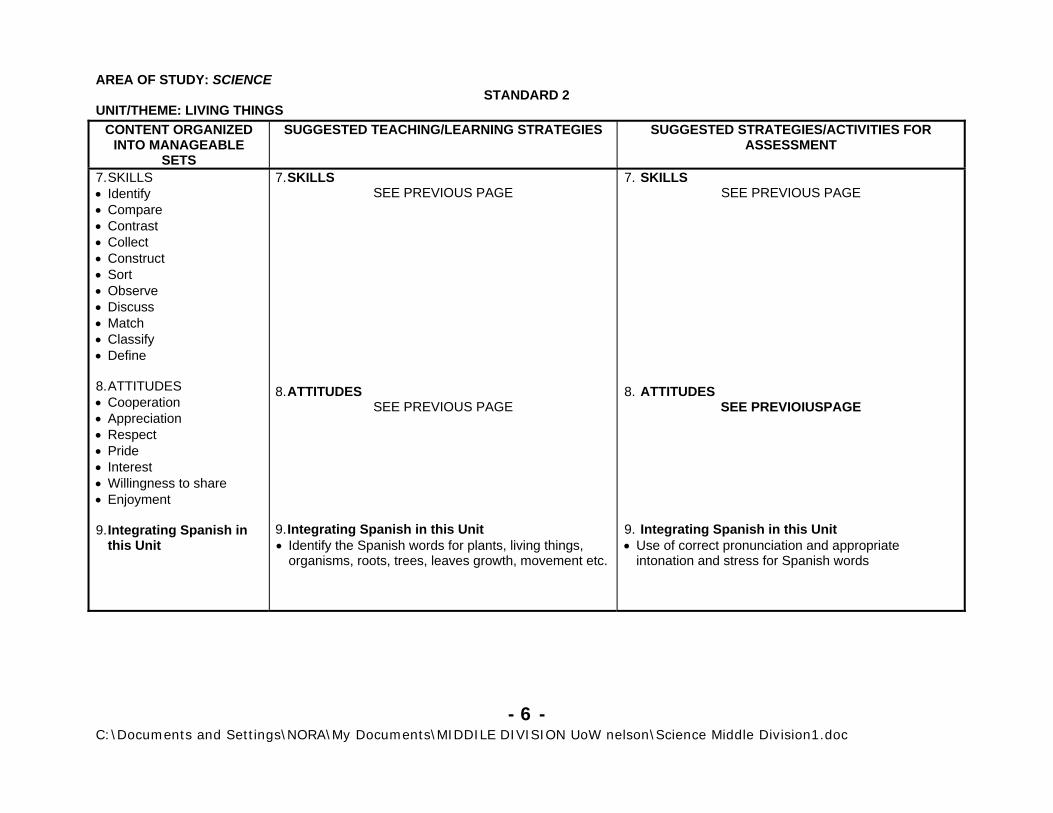
7. SKILLS • Identify • Compare • Contrast • Collect • Construct • Sort • Observe • Discuss • Match • Classify • Define 8. ATTITUDES • Cooperation • Appreciation • Respect • Pride • Interest • Willingness to share • Enjoyment 9. Integrating Spanish in
this Unit
7. SKILLS SEE PREVIOUS PAGE
8. ATTITUDES SEE PREVIOUS PAGE
9. Integrating Spanish in this Unit • Identify the Spanish words for plants, living things,
organisms, roots, trees, leaves growth, movement etc.
7. SKILLS SEE PREVIOUS PAGE
8. ATTITUDES
SEE PREVIOIUSPAGE 9. Integrating Spanish in this Unit • Use of correct pronunciation and appropriate
intonation and stress for Spanish words
- 6 - C:\Documents and Settings\NORA\My Documents\MIDDILE DIVISION UoW nelson\Science Middle Division1.doc

AREA OF STUDY: SCIENCE STANDARD 2
UNIT/THEME: LIVING THINGSLINKAGES/CONNECTIONS RECOMMENDED RESOURCES: TEACHER/STUDENT
• M5.a Collect, analyse, and present data • M4.a Make reasonable approximations • EA1.e Create visual images through the use of artistic tools • H4.a Engage in physical activities to promote interpersonal skills and
health of mind and body • WT5.a Identify a simple problem • WT5.b Design a device to meet need, solve a problem • WT5.c Construct a device to see if it meets a need/solves a problem • WT5.d Test a simple device to see if it meets a need/solves a
problem • SL4.c Use correct pronunciation, appropriate intonation and stress
• Discover Science Book 3, Chapters 1-3 • Accent on Science Units 1 & 5 • Focus on Science pages 3-62
- 7 - C:\Documents and Settings\NORA\My Documents\MIDDILE DIVISION UoW nelson\Science Middle Division1.doc

AREA OF STUDY: SCIENCE STANDARD 2
UNIT/THEME: MATERIALS AND SUBSTANCES
AREA OF STUDY OUTCOMES Pupils should: ST5.a Understand some of the basic changes which different
materials and substances can undergo.
CROSS-CURRICULAR OUTCOMES Pupils should: CP1.a Examine information related to the problem issue. SP2.a Take part in group activities SP2.b Express their opinions and feelings in a socially
acceptable way. SP2.e Lead and follow where appropriate SP2.f Help the group to achieve its goals
CONTENT ORGANIZED INTO MANAGEABLE
SETS
SUGGESTED TEACHING/LEARNING STRATEGIES SUGGESTED STRATEGIES/ACTIVITIES FOR ASSESSMENT
1. Everything that takes up space and has weight/mass is called matter.
1. Matter • Children write down at least three questions that
they would like to know about matter. • Collect cans or jars of different sizes. Children fill
the jars with anything that may be appropriate—e.g. sand, water or marbles. What happens to the space inside the can or jar as is it filled? (It becomes less as the sand, water or marbles take it up) Is the can or jar heavier or lighter after filling it with sand, water or marbles? Conclusion: The sand, water or marbles are examples of matter—they take up space and have weight/mass.
• Children list as many examples of materials/substances that take up space and have weight/mass. What makes these things matter?
• Can they think of any materials or substances that are not visible but take up space and have weight/mass?
• Matter is all around us. We eat it, breathe it, wear it sit on it. Everything is made of matter—including some things you can’t see (e.g. air).
1. Matter • Formulating oral, factual statement with reference to
matter • Infer from information presented observations made
during investigation and prior experience • Organise information logically • Share ideas and opinions
- 8 - C:\Documents and Settings\NORA\My Documents\MIDDILE DIVISION UoW nelson\Science Middle Division1.doc
AREA OF STUDY: SCIENCE STANDARD 2
UNIT/THEME: MATERIALS AND SUBSTANCESCONTENT ORGANIZED
INTO MANAGEABLE SETS
SUGGESTED TEACHING/LEARNING STRATEGIES SUGGESTED STRATEGIES/ACTIVITIES FOR ASSESSMENT
1. Everything that takes up space and has weight/mass is called matter…continued…
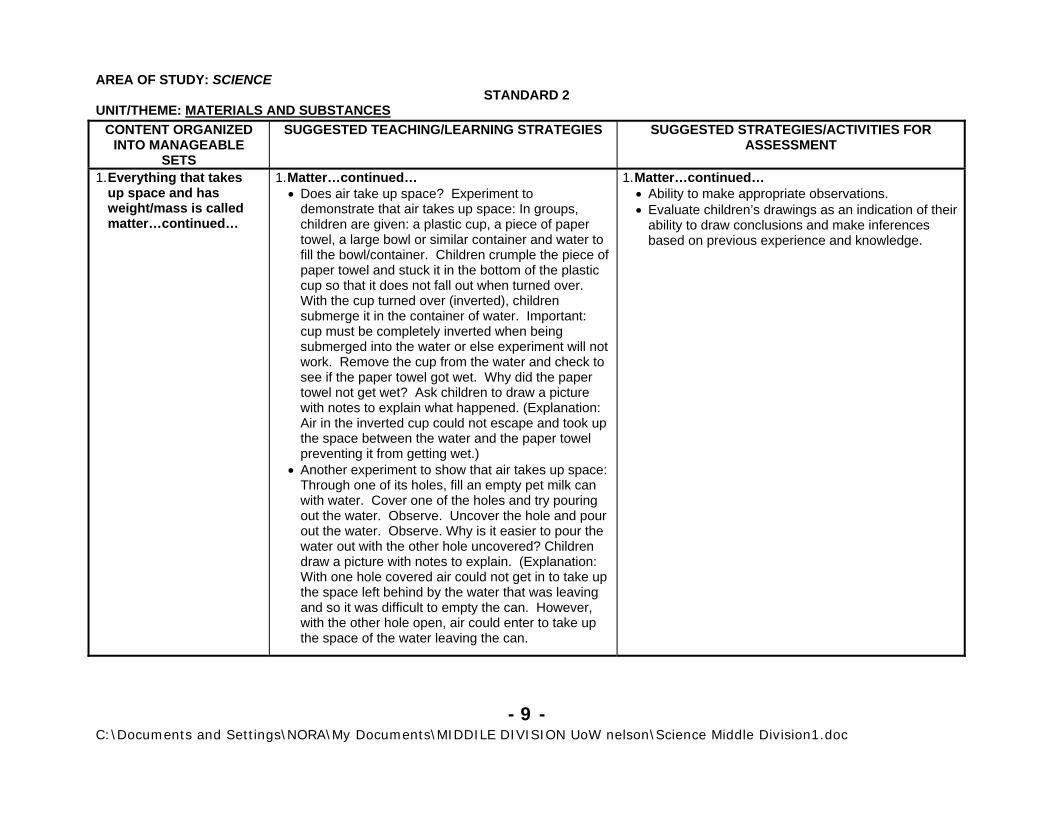
1. Matter…continued… • Does air take up space? Experiment to
demonstrate that air takes up space: In groups, children are given: a plastic cup, a piece of paper towel, a large bowl or similar container and water to fill the bowl/container. Children crumple the piece of paper towel and stuck it in the bottom of the plastic cup so that it does not fall out when turned over. With the cup turned over (inverted), children submerge it in the container of water. Important: cup must be completely inverted when being submerged into the water or else experiment will not work. Remove the cup from the water and check to see if the paper towel got wet. Why did the paper towel not get wet? Ask children to draw a picture with notes to explain what happened. (Explanation: Air in the inverted cup could not escape and took up the space between the water and the paper towel preventing it from getting wet.)
• Another experiment to show that air takes up space: Through one of its holes, fill an empty pet milk can with water. Cover one of the holes and try pouring out the water. Observe. Uncover the hole and pour out the water. Observe. Why is it easier to pour the water out with the other hole uncovered? Children draw a picture with notes to explain. (Explanation: With one hole covered air could not get in to take up the space left behind by the water that was leaving and so it was difficult to empty the can. However, with the other hole open, air could enter to take up the space of the water leaving the can.
1. Matter…continued… • Ability to make appropriate observations. • Evaluate children’s drawings as an indication of their
ability to draw conclusions and make inferences based on previous experience and knowledge.
- 9 - C:\Documents and Settings\NORA\My Documents\MIDDILE DIVISION UoW nelson\Science Middle Division1.doc

AREA OF STUDY: SCIENCE STANDARD 2
UNIT/THEME: MATERIALS AND SUBSTANCESCONTENT ORGANIZED
INTO MANAGEABLE SETS
SUGGESTED TEACHING/LEARNING STRATEGIES SUGGESTED STRATEGIES/ACTIVITIES FOR ASSESSMENT
1. Everything that takes up space and has weight/mass is called matter…continued…
2. Some Measurable
Physical Properties of Matter are Mass and Volume.
1. Matter…continued… • Investigation to show that air takes up space and
has weight. Teacher obtains a basketball, volleyball or football, a needle for pumping the ball, a bicycle pump for pumping the ball and a weighing scale. Deflate the ball using the needle. Weigh the deflated ball. Now pump the ball using the needle and pump. Observe the increase in size of the ball. Weigh the ball again. What explains the increase in size (amount of space taken up) and weight of ball? (Explanation: Air inside the ball takes up space and has weight. Air is matter too.)
2. Measuring Matter: Mass/weight and volume. • Mass/weight: How can we measure the amount of
mass/weight matter has? Mass is the amount of matter in a substance or material. We normally cannot measure the mass of matter but we can measure the weight of matter due to the force of gravity pulling on the mass. Therefore weight is directly related to mass and we can get an idea of the mass of a piece of a sample of matter through its weight. Weight is measured using a weighing scale or balance and can be measured in different units—pounds (lbs.), stones (Imperial System) or grams, kilograms etc. (Metric System)
1. Matter…continued… • Ability to make observations • Ability to draw conclusions/make inferences based
on previous experience and knowledge. 2. Measuring Matter: Mass/weight and volume. • Children know what the two systems of
measurement are. • Children know what device or instrument is used for
measuring weight.
- 10 - C:\Documents and Settings\NORA\My Documents\MIDDILE DIVISION UoW nelson\Science Middle Division1.doc

AREA OF STUDY: SCIENCE STANDARD 2
UNIT/THEME: MATERIALS AND SUBSTANCESCONTENT ORGANIZED
INTO MANAGEABLE SETS
SUGGESTED TEACHING/LEARNING STRATEGIES SUGGESTED STRATEGIES/ACTIVITIES FOR ASSESSMENT
2. Some Measurable Physical Properties of Matter
2. Measuring Matter: Mass/Weight and Volume…continued… • Teacher explains how weight is measured. When
you measure the weight of an object on a scale you are measuring it directly. This is called direct measurement because all you need is the object and the scale or balance. When measuring the mass of a liquid, you need to measure its weight indirectly. That is, you first need to weigh an empty container to obtain its weight without the liquid. Then you fill the container with the liquid, measure the total weight (combined liquid and container) and then subtract the weight of the container from the total to obtain the weight of the liquid alone.
• Ask children to bring different weighing devices or pictures of them. Which measuring system do the devices use? Children learn the basic symbols (e.g. pound = lb. & g = gram etc.) Children practice using units for measuring weight in each system: e.g. 16 oz = 1 lb. etc, and 1000 grams = 1 kilogram etc.
• Teacher and/or children collect different containers displaying on their labels the weight of the substances contained, e.g. tomato ketchup bottle; rice or sugar sack; and butter container or similar container in which materials are packages for distribution. Children arrange the containers in ascending or descending order according to weight marked.
2. Measuring Matter: Mass/Weight and Volume…continued… • Children can describe orally or in writing the process
for measuring weight for solids and liquids directly or indirectly.
• Children can identify different weighing devices. • Children familiar with basic units of weight in the
Imperial and Metric Systems. • Children able to arrange a sample of containers with
weights indicated on the labels in ascending or descending order.
- 11 - C:\Documents and Settings\NORA\My Documents\MIDDILE DIVISION UoW nelson\Science Middle Division1.doc
AREA OF STUDY: SCIENCE STANDARD 2
UNIT/THEME: MATERIALS AND SUBSTANCESCONTENT ORGANIZED
INTO MANAGEABLE SETS
SUGGESTED TEACHING/LEARNING STRATEGIES SUGGESTED STRATEGIES/ACTIVITIES FOR ASSESSMENT
2. Some Measurable Physical Properties of Matter…continued…
2. Measuring Matter: Mass/Weight and Volume…continued… • Children practice measuring and estimating weight
using suitable measuring devices. • When you want to measure the amount of space an
object takes up, you measure its volume. You also measure volume when you measure the space inside a container such as a spoon, a glass, a room, a tank, a vat or other similar container. Volume is measured in fluid ounces, cups, pints, quarts, gallons etc. in the Imperial System of measurement. In the Metric System, volume is measured in millilitres (ml or cubic centimetre—cc or centimetre cubed—cm3).
• Children learn different units in each system, e.g. 12 fluid ounces = 1 pint etc. or 1000 ml = 1 litre etc.
• Teacher and/or children collect different containers displaying on their labels the volume of the substances contained, e.g. empty milk can or carton, empty juice bottle, gallon bottle, quart bottle, coke bottle with millilitres indicated, measuring cup, cooking oil bottle. Children arrange in ascending or descending order according to volume marked.
2. Measuring Matter: Mass/Weight and Volume…continued… • Given an appropriate sample of matter (solid or
liquid) and a scale or balance, children are able to accurately measure its weight using direct and/or indirect methods.
• Children familiar with basic units of Volume in the Imperial and Metric Systems of Measurement.
• Children able to arrange a sample of containers with volume indicated on their labels in ascending or descending order.
- 12 - C:\Documents and Settings\NORA\My Documents\MIDDILE DIVISION UoW nelson\Science Middle Division1.doc
AREA OF STUDY: SCIENCE STANDARD 2
UNIT/THEME: MATERIALS AND SUBSTANCESCONTENT ORGANIZED
INTO MANAGEABLE SETS
SUGGESTED TEACHING/LEARNING STRATEGIES SUGGESTED STRATEGIES/ACTIVITIES FOR ASSESSMENT
2. Some Measurable Physical Properties of Matter…continued…
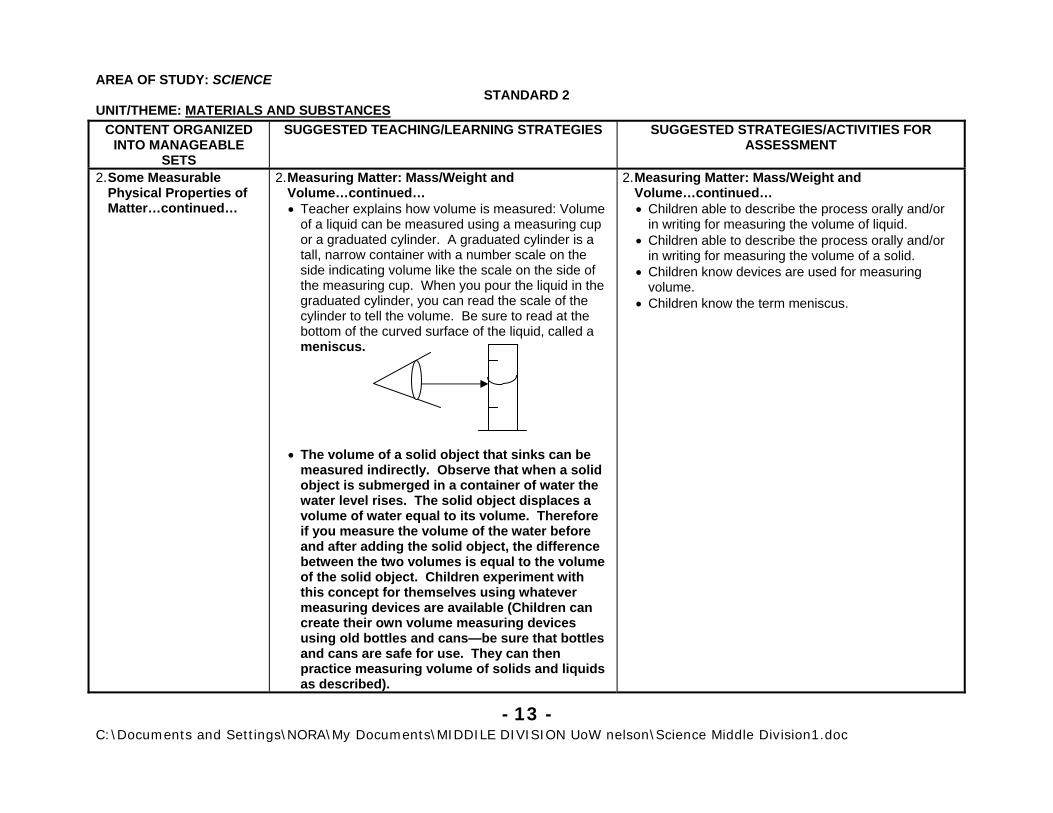
2. Measuring Matter: Mass/Weight and Volume…continued… • Teacher explains how volume is measured: Volume
of a liquid can be measured using a measuring cup or a graduated cylinder. A graduated cylinder is a tall, narrow container with a number scale on the side indicating volume like the scale on the side of the measuring cup. When you pour the liquid in the graduated cylinder, you can read the scale of the cylinder to tell the volume. Be sure to read at the bottom of the curved surface of the liquid, called a meniscus.
• The volume of a solid object that sinks can be
measured indirectly. Observe that when a solid object is submerged in a container of water the water level rises. The solid object displaces a volume of water equal to its volume. Therefore if you measure the volume of the water before and after adding the solid object, the difference between the two volumes is equal to the volume of the solid object. Children experiment with this concept for themselves using whatever measuring devices are available (Children can create their own volume measuring devices using old bottles and cans—be sure that bottles and cans are safe for use. They can then practice measuring volume of solids and liquids as described).
2. Measuring Matter: Mass/Weight and Volume…continued… • Children able to describe the process orally and/or
in writing for measuring the volume of liquid. • Children able to describe the process orally and/or
in writing for measuring the volume of a solid. • Children know devices are used for measuring
volume. • Children know the term meniscus.
- 13 - C:\Documents and Settings\NORA\My Documents\MIDDILE DIVISION UoW nelson\Science Middle Division1.doc
AREA OF STUDY: SCIENCE STANDARD 2
UNIT/THEME: MATERIALS AND SUBSTANCESCONTENT ORGANIZED
INTO MANAGEABLE SETS
SUGGESTED TEACHING/LEARNING STRATEGIES SUGGESTED STRATEGIES/ACTIVITIES FOR ASSESSMENT
3. Matter can exist in three states: solids, liquids or gases.
3. The Three States of Matter • Teacher brings some everyday samples of matter.
E.g. a stone, some water, a bone, a balloon filled with air, some orange juice, some cooking oil, a can of air freshener, a nail, some kerosene (take necessary precautions). Children, in groups of three or four, are asked to classify the samples of matter into groups according to similar characteristics (they determine the characteristics they wish to use).
• Children compare their classification system with other groups’ classification system and answer the following questions: How was your classification system similar to other groups’ systems? How was it different?
• Groups exchange classification systems and attempt to classify other samples of matter in the classroom and around the school.
• If any of the children’s classification systems closely approximated a classification based on the properties of solids, liquids and gases. Use that as a basis for discussion of the states that matter may exist in. Explain that matter can exist in three states—solids, liquids or gases. Ask children to identify examples of solids, examples of liquids and example of gases from everyday experience.
3. The Three States of Matter • Children choose suitable characteristics for
classifying samples of matter. • Children able to use characteristics for classifying
samples of matter. • Children can identify appropriate examples of
different states of matter.
- 14 - C:\Documents and Settings\NORA\My Documents\MIDDILE DIVISION UoW nelson\Science Middle Division1.doc

AREA OF STUDY: SCIENCE STANDARD 2
UNIT/THEME: MATERIALS AND SUBSTANCESCONTENT ORGANIZED
INTO MANAGEABLE SETS
SUGGESTED TEACHING/LEARNING STRATEGIES SUGGESTED STRATEGIES/ACTIVITIES FOR ASSESSMENT
3. Matter can exist in three states: solids, liquids or gases…continued…
3. The Three States of Matter…continued… • How are solids, liquids and gases different? Obtain
a plastic bag, a solid of some sort—e.g. a stone, and a plastic cup with water. Place the stone in the plastic bag. Does the stone change shape, size (volume) or weight when placed in the bag? Remove the stone. On the cup, mark the level of water. Now pour the water into the bag. Does the water change shape, size/volume? To check if it has changed size/volume, pour the water back into the cup and note if the cup is filled to the same level (except for the drops of water left in the bag). Blow air into the bag and hold closed. What shape does the air take? Open the bag—what happens to the air? Children observe and record in a table as follows:
3. Some Measurable Physical Properties of Matter…continued… • Children able to fill in the table with appropriate
observations about the properties of the different states of matter.
• Children draw conclusions about the properties of matter based on the investigation.
Solid
Liquid
Mass
?
Fixed
Size/space taken up
Fixed
?
?
Shape of container
?
Shape
Fills container
? Gas
- 15 - C:\Documents and Settings\NORA\My Documents\MIDDILE DIVISION UoW nelson\Science Middle Division1.doc

AREA OF STUDY: SCIENCE STANDARD 2
UNIT/THEME: MATERIALS AND SUBSTANCESCONTENT ORGANIZED
INTO MANAGEABLE SETS
SUGGESTED TEACHING/LEARNING STRATEGIES SUGGESTED STRATEGIES/ACTIVITIES FOR ASSESSMENT
4. SKILLS • Collecting, observing,
manipulating, classifying, experimenting, describing, discussing, measuring, reporting, recording, explaining, organising, examining, labelling, following directions, questioning, identifying, estimating, making connections, leading, predicting, comparing/contrasting, recognising, communicating, collecting data, classifying, inferring, making models, hypothesising, investigating
5. ATTITUDES • Application, sharing,
awareness, satisfaction, interest, responsibility, cooperation, leadership, participation, team work, patience, persistence, independence
4. SKILLS SEE PREVIOUS PAGES THIS UNIT
5. ATTITUDES
SEE PREVIOUS PAGES
4. SKILLS SEE PREVIOUS PAGES THIS UNIT
5. ATTITUDES
SEE PREVIOIUS PAGES
- 16 - C:\Documents and Settings\NORA\My Documents\MIDDILE DIVISION UoW nelson\Science Middle Division1.doc
AREA OF STUDY: SCIENCE STANDARD 2
UNIT/THEME: MATERIALS AND SUBSTANCESLINKAGES/CONNECTIONS RECOMMENDED RESOURCES: TEACHER/STUDENT
• CP1.b Examine information related tot he problem/issue • SP2.d Take part in group activities • SP3.a Assess their needs/interests • EL1.a Use context clues to read a selection • EL1.h Identify cause and effect relationships • EL2.a Identify main ideas and supporting details • EL3.a Demonstrate their ability to write grammatically correct
sentences • EL3.d Produce work that is legible and acceptable • EL3.h Apply the “writing process” to their work • EL4.d Use correct grammatical structures • M3.a Measure capacity, distance, weight, and time using standard
and non-standard measuring devices • M4.a Make reasonable approximations based on relevant life
experiences • ST5.b Understand some sources and uses of various forms of
energy • WT2.a Understand the elements which contribute to the
effectiveness of work • WT4.a Identify an area of need • WT5.a Identify a simple problem/need • SL4.b Ask questions for information and understanding
• Internet: http/www.ssi.colorado.edu/exploring space/plasma state of matter/1.html
• Scott Foresman, Discovery Science • Finding Out Primary Science for the Caribbean Book 5 • Teaching Science Through Discovery (5th Edition), Carin Sund
- 17 - C:\Documents and Settings\NORA\My Documents\MIDDILE DIVISION UoW nelson\Science Middle Division1.doc

AREA OF STUDY: SCIENCE STANDARD 2
UNIT/THEME: Simple Machines
CONTENT ORGANIZED INTO MANAGEABLE
SETS
SUGGESTED TEACHING/LEARNING STRATEGIES SUGGESTED STRATEGIES/ACTIVITIES FOR ASSESSMENT
1. Machines make work seem easier. They reduce the amount or change the direction of force one needs to apply to move an object or to change its shape or speed or direction. Simple machines have few or no moving parts. Some examples of simple machines include: • Wheels (and axles):
Wheels spin around axle that supports load to be carried.
• Levers: rod that rests on a pivot or fulcrum. When you push/pull (effort) one end of the rod, the other end moves in the opposite direction moving the load. Levers vary according to position of load, fulcrum and effort.
1. Simple machines: Wheel (and axles) and Levers • Introduce the term Simple Machines. Explain that
machines make work seem easier and that simple machines have few or no moving parts.
• Wheels (and axles): Secure some pan covers such as Milo pans covers (or similar covers). Children try pushing them, with their rim down, along the floor or similar flat, horizontal surface. Ask them to note how hard it is to push along the floor.
• Now secure some marbles of the same size. Have children place marbles under the cover rim and push along the floor as before. Is it easier or harder to push the covers along with the marbles beneath? Children hypothesise and share ideas why the marbles make it easier to push the cover along. Based on this discussion, teacher elicits or explains that the marbles act like wheels, which reduce friction between two objects sliding past each other. Friction is reduced because only a small part of the wheel is in contact with the surface over which it slides.
• Note: Care should be taken with marbles as people can slip and injure themselves if they step on marbles lying around. Also, marbles should not be placed in mouth to avoid risk of swallowing and blocking air passages.
1. Simple Machines: Wheels (and axles) and Levers • Observation (checklist or anecdotal record) of
children’s ability to make observations. • Ability of children (through discussion and anecdotal
record) to draw conclusions and make hypotheses based on their observations.
CROSS-CURRICULAR OUTCOMES Pupils should: CP1.a Recognise an issue or problem. CP1.b Examine information related to the issue or problem. SP2.a Take part in group activities.
AREA OF STUDY OUTCOMES Pupils should: ST6.b Know the basic components and functions of simple
machines in changing the speed and force of objects.
- 18 - C:\Documents and Settings\NORA\My Documents\MIDDILE DIVISION UoW nelson\Science Middle Division1.doc

AREA OF STUDY: SCIENCE STANDARD 2
UNIT/THEME: Simple MachinesCONTENT ORGANIZED
INTO MANAGEABLE SETS
SUGGESTED TEACHING/LEARNING STRATEGIES SUGGESTED STRATEGIES/ACTIVITIES FOR ASSESSMENT
1. Simple Machines: Wheels (and axles) and Levers...continued...
1. Simple Machines: Wheels (and axles) and Levers…continued… • Children experiment making various vehicles with
wheels. Example: A cart with wheels can be made by obtaining a wooden box or similar container and attaching cotton reels as wheels to it. Cotton (thread) reels can be fitted with ‘rubber tires’ by sliding and rolling a section of old bicycle tire over them. You will need a wooden box or other similar container or even a flat sheet of board, four 3” or 4: nails, 8 fencing staples (‘U-shaped’) two strips of wood to fasten to bottom of box with about 6 appropriately sized nails, 4 cotton reels and some old bicycle tubing. See diagrams below:
FRONT OR BACK VIEW
Strip of Wood Box
Cotton reel Nail (3” or 4”)
Nails to fasten strip of wood (axle) with cotton reels (wheels) to
bottom of box ‘U-shaped’
staples for fastening cotton reels to strip of wood
1. Simple Machines: Wheels (and axles) and Levers…continued… • Use observation checklist to assess child/children’s
ability to follow instructions. • Use observation checklist or anecdotal record to
assess child/children’s cooperation in activity. •
- 19 - C:\Documents and Settings\NORA\My Documents\MIDDILE DIVISION UoW nelson\Science Middle Division1.doc

AREA OF STUDY: SCIENCE STANDARD 2
UNIT/THEME: Simple MachinesCONTENT ORGANIZED
INTO MANAGEABLE SETS
SUGGESTED TEACHING/LEARNING STRATEGIES SUGGESTED STRATEGIES/ACTIVITIES FOR ASSESSMENT
1. Simple Machines: Wheels (and axles) and Levers…continued…
1. Simple Machines: Wheels (and axles) and Levers…continued…
BOTTOM VIEW • Rubber tubing from a used bicycle tire can be rolled
unto the cotton reels before fixing them to the strips of wood. The rubber will make for a smoother ride. The ends of an appropriate piece of string of appropriate length can be attached to each side of the front to allow for pulling. Ask students to consider how much easier it would be to pull a load in the box with wheels (cart) as opposed to a load in the box alone (without wheels).
• Children analyse the component parts of this model wheeled-vehicle. The wheels (cotton reels) on the end are connected to each other by an axle (strips of wood with nails that allow wheels to spin) which supports the weight of the load (the cart). This is a good example of wheel and axle.
1. Simple Machines: Wheels (and axles) and Levers…continued… • Assess children’s creativity/ingenuity in constructing
the cart. • Ability of children to analyse the component parts of
the cart telling what each part does/how each part functions (orally or in writing with the aid of diagrams if possible).
- 20 - C:\Documents and Settings\NORA\My Documents\MIDDILE DIVISION UoW nelson\Science Middle Division1.doc

AREA OF STUDY: SCIENCE STANDARD 2
UNIT/THEME: Simple MachinesCONTENT ORGANIZED
INTO MANAGEABLE SETS
SUGGESTED TEACHING/LEARNING STRATEGIES SUGGESTED STRATEGIES/ACTIVITIES FOR ASSESSMENT
1. Simple Machines: Wheels (and axles) and Levers…continued…
1. Simple Machines: Wheels (and axles) and Levers…continued… • You will need several empty Milo or Powdered Milk
cans with lids. Fill the cans with sand and cover. Trying pushing them along the floor while they stand up. Now turn them on their side and roll them. Children note how easy it is to roll them on their sides as opposed to pushing them when standing up.
• Making a ‘stone crusher-roller’: Empty the cans. Pierce a hole at the centre of the bottom of the cans and at the centre of the lids. Now thread a piece of string or wire through the holes in the bottom of the can and through the lid. Tie both ends of the string. Next, fill each can with sand or stones and close the lid. Children can practice pulling the ‘stone crusher-rollers’ and can use it to pretend to be smoothing make-believe roads the way real rollers are used in building/fixing roads. ‘Stone crusher-rollers’ can be linked up by a passing a piece of string through two or more cans and tying the ends of the string. The first can in the series must also have a string through it for pulling. Children can play with and enjoy their ‘Stone crusher-rollers’!
• Teacher explains that the ‘roller’ is just like a wheel. It is easier to move the load in the can when it acts like a wheel because a wheel reduces friction between two objects sliding against each other.
• Children analyse their ‘stone crusher-rollers’ in terms of wheel and axle and load. Ask children to analyse some common everyday wheeled-vehicles for the component parts of the wheel and axle.
1. Simple Machines: Wheels (and axles) and Levers…continued…
SEE PREVIOUS TWO PAGES • Ability of children to explain orally and in writing,
with the aid of diagrams if possible how wheels reduce friction.
- 21 - C:\Documents and Settings\NORA\My Documents\MIDDILE DIVISION UoW nelson\Science Middle Division1.doc

AREA OF STUDY: SCIENCE STANDARD 2
UNIT/THEME: Simple MachinesCONTENT ORGANIZED
INTO MANAGEABLE SETS
SUGGESTED TEACHING/LEARNING STRATEGIES SUGGESTED STRATEGIES/ACTIVITIES FOR ASSESSMENT
1. Simple Machines: Wheels (and axles) and Levers…continued…
1. Simple Machines: Wheels (and axles) and Levers…continued… • Levers: Teacher and/or pupils bring an empty Milo,
Powdered Milk or similar can with lid to school. In groups or pairs, ask children to attempt to open the lid with their bare hands. Now let them pierce a hole in the centre of the lid with a nail and thread a suitable piece of string or wire through the hole. Tie a nail, match stick or small piece of stick to the string or wire on the inside of the lid. Replace the lid. Ask them to pull on the string to try to open up the can. How easy is it to try to open the can with their bare hands? With the piece of string? (Should be fairly difficult).
• Now ask children to think of and try other ways to open the can that might be easier. Most children are likely to use a nail, a spoon or other similar implement to pry the lid open. Ask children draw diagram with suitable notes to record in their notebooks or worksheet exactly what they did to open the lid and what happened to the lid as they did so. Sample diagram and notes:
Push down Lid lifts up
nail Can edge provides support
over which nails move Note: ‘I put the tip of a nail (or spoon) under the lid and on top the edge of the can. I then pushed down on the other end of the nail. As I did the nail move over the can edge and the lid was pushed up and forced open.’
1. Simple Machines: Wheels (and axles) and Levers…continued… • Assess child/children’s ability to make observations
and draw conclusions/make hypotheses.
- 22 - C:\Documents and Settings\NORA\My Documents\MIDDILE DIVISION UoW nelson\Science Middle Division1.doc

AREA OF STUDY: SCIENCE STANDARD 2
UNIT/THEME: Simple MachinesCONTENT ORGANIZED
INTO MANAGEABLE SETS
SUGGESTED TEACHING/LEARNING STRATEGIES SUGGESTED STRATEGIES/ACTIVITIES FOR ASSESSMENT
1. Simple Machines: Wheels (and axles) and Levers…continued…
1. Simple Machines: Wheels (and axles) and Levers…continued… • Allow children to present and explain their diagrams
to the class/other groups. • Using the children’s diagrams, analyse the
components of the lever and introduce appropriate terminology. The lever consists of a bar or other suitable implement with an object (load) to be moved at one point, a point of pivot (fulcrum) around which movement takes place and force (effort) applied at another point. Draw diagram to represent this analysis:
Effort—force applied (e.g. force you apply)
Load to be moved (e.g. pan lid)
Pivot or fulcrum (e.g. pan edge)
• Children will think of see-saw levers in the
playground. Ask them think of how the distance from load to fulcrum and the distance from effort to fulcrum affect the effort required. Ask them to hypothesise theories/ideas about this. They can use their see-saw experience to think about this. If a see-saw is available nearby, a trip to play/experiment with it would be a useful, enjoyable activity.
1. Simple Machines: Wheels (and axles) and Levers…continued… • Assess children’s ability to explain, orally or in
writing and with the use of diagrams, how they used an implement as a lever to open up the lid of the can.
• Assess children’s ability to analyse and explain the components of a lever orally and in writing and with the use of diagrams.
• Through direct questioning assess children’s/child’s ability to formulate hypotheses based on previous knowledge and experience.
- 23 - C:\Documents and Settings\NORA\My Documents\MIDDILE DIVISION UoW nelson\Science Middle Division1.doc

AREA OF STUDY: SCIENCE STANDARD 2
UNIT/THEME: Simple MachinesCONTENT ORGANIZED
INTO MANAGEABLE SETS
SUGGESTED TEACHING/LEARNING STRATEGIES SUGGESTED STRATEGIES/ACTIVITIES FOR ASSESSMENT
1. Simple Machines: Wheels (and axles) and Levers…continued…
1. Simple Machines: Wheels (and axles) and Levers…continued… • Children will use rulers, pencils (or suitable
substitute) and coins (shillings or dollar coins or other suitable substitute) or bottle caps to create simple levers to conduct experiments to explore the relationship between load, effort and distance of load and effort from fulcrum. Example: • Children will tape pencil to middle bottom surface
of ruler as shown. Pencil Tape Ruler
• Children will flip the apparatus over with pencil serving as the pivot (or fulcrum) for the ruler.
• They will place shillings, dollar coins or bottle caps at a certain point on one side of the fulcrum. They will then experiment to see where they need to put an equal number of coins or bottle caps on the opposite side of the fulcrum to achieve balance (use one type of coin or bottle cap for standardisation of comparisons).
• Add 4 coins or bottle caps at a fixed distance from the fulcrum on the left side. Explore as many ways of causing balance or tipping the ruler to the right by adding a number coins or bottle caps on the right side at different distances from the fulcrum to balance them or to tip the ruler to the right (see diagram next page). Repeat experiment with different numbers of coins or bottle caps on the left side at different distances from the fulcrum. Record your results in the table on next page.
1. Simple Machines: Wheels (and axles) and Levers…continued… • Assess children’s ability to follow instructions using
an observation checklist. • Assess children’s perseverance in task using an
observation checklist or anecdotal record. • Ability of children to record results given a suitable
format to follow. • Accuracy of recording in format provided.
- 24 - C:\Documents and Settings\NORA\My Documents\MIDDILE DIVISION UoW nelson\Science Middle Division1.doc

AREA OF STUDY: SCIENCE STANDARD 2
UNIT/THEME: Simple MachinesCONTENT ORGANIZED
INTO MANAGEABLE SETS
SUGGESTED TEACHING/LEARNING STRATEGIES SUGGESTED STRATEGIES/ACTIVITIES FOR ASSESSMENT
1. Simple Machines: Wheels (and axles) and Levers…continued…
1. Simple Machines: Wheels (and axles) and Levers…continued…
distance from fulcrum coins
add coins different distances from fulcrum on this side
ruler pencil
• Table for recording observations:
• Do you need the same number of coins or bottle caps on each side? Explain your answer. What can you conclude about the relationship between load, effort and position of fulcrum? Think about your observations in this experiment and your experience with see-saws.
1. Simple Machines: Wheels (and axles) and Levers…continued… • Assess ability of children to make and draw
reasoned conclusions based on explanations offered for observations and direct questioning about the relationship between the positions of the load, fulcrum and effort.
On the left side On the right sideNo. of coins
No. of coins
Distance from fulcrum
10cm
5cm
2cm
4
4
6
6cm 6
Distance from fulcrum
- 25 - C:\Documents and Settings\NORA\My Documents\MIDDILE DIVISION UoW nelson\Science Middle Division1.doc

AREA OF STUDY: SCIENCE STANDARD 2
UNIT/THEME: Simple MachinesCONTENT ORGANIZED
INTO MANAGEABLE SETS
SUGGESTED TEACHING/LEARNING STRATEGIES SUGGESTED STRATEGIES/ACTIVITIES FOR ASSESSMENT
1. Simple Machines: Wheels (and axles) and Levers…continued…
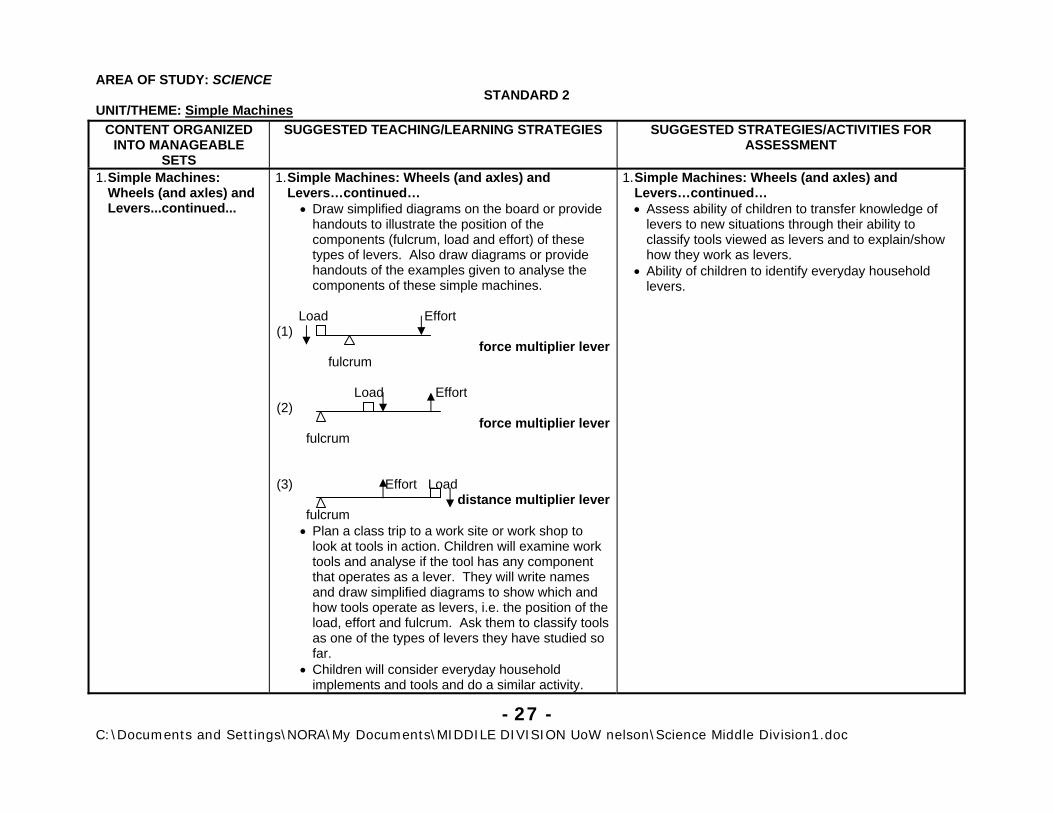
1. Simple Machines: Wheels (and axles) and Levers…continued… • Classification of levers: Explain that levers can be
classified according to the position of the effort, load and fulcrum in relation to each other and according to whether a small force acting over a big distance is used to generate a bigger force to move the load over a smaller distance or a big force acting over a short distance is used to generate a smaller force to move the load over a bigger distance. • (1) Levers in which the fulcrum is between the
load and effort and (2) levers in which the load is between the fulcrum and the effort are known as force multipliers. They take small forces (effort) acting over big distances to generate bigger forces to move loads over smaller distances. Crowbar is an example of (1) and a wheel barrow is an example of (2).
• (3) Levers in which the effort is between the fulcrum and the load are known as distance multipliers. They take bigger forces acting over small distances to generate smaller forces to move loads over bigger distances. Example a fishing pole or the even the human arm.
1. Simple Machines: Wheels (and axles) and Levers…continued…
- 26 - C:\Documents and Settings\NORA\My Documents\MIDDILE DIVISION UoW nelson\Science Middle Division1.doc
AREA OF STUDY: SCIENCE STANDARD 2
UNIT/THEME: Simple MachinesCONTENT ORGANIZED
INTO MANAGEABLE SETS
SUGGESTED TEACHING/LEARNING STRATEGIES SUGGESTED STRATEGIES/ACTIVITIES FOR ASSESSMENT
1. Simple Machines: Wheels (and axles) and Levers...continued...
1. Simple Machines: Wheels (and axles) and Levers…continued… • Draw simplified diagrams on the board or provide
handouts to illustrate the position of the components (fulcrum, load and effort) of these types of levers. Also draw diagrams or provide handouts of the examples given to analyse the components of these simple machines.
Load Effort (1)
force multiplier lever fulcrum Load Effort (2)
force multiplier lever fulcrum (3) Effort Load
distance multiplier lever fulcrum
• Plan a class trip to a work site or work shop to look at tools in action. Children will examine work tools and analyse if the tool has any component that operates as a lever. They will write names and draw simplified diagrams to show which and how tools operate as levers, i.e. the position of the load, effort and fulcrum. Ask them to classify tools as one of the types of levers they have studied so far.
• Children will consider everyday household implements and tools and do a similar activity.
1. Simple Machines: Wheels (and axles) and Levers…continued… • Assess ability of children to transfer knowledge of
levers to new situations through their ability to classify tools viewed as levers and to explain/show how they work as levers.
• Ability of children to identify everyday household levers.
- 27 - C:\Documents and Settings\NORA\My Documents\MIDDILE DIVISION UoW nelson\Science Middle Division1.doc
AREA OF STUDY: SCIENCE STANDARD 2
UNIT/THEME: Simple MachinesCONTENT ORGANIZED
INTO MANAGEABLE SETS
SUGGESTED TEACHING/LEARNING STRATEGIES SUGGESTED STRATEGIES/ACTIVITIES FOR ASSESSMENT
1. Simple Machines: Wheels (and axles) and Levers…continued…
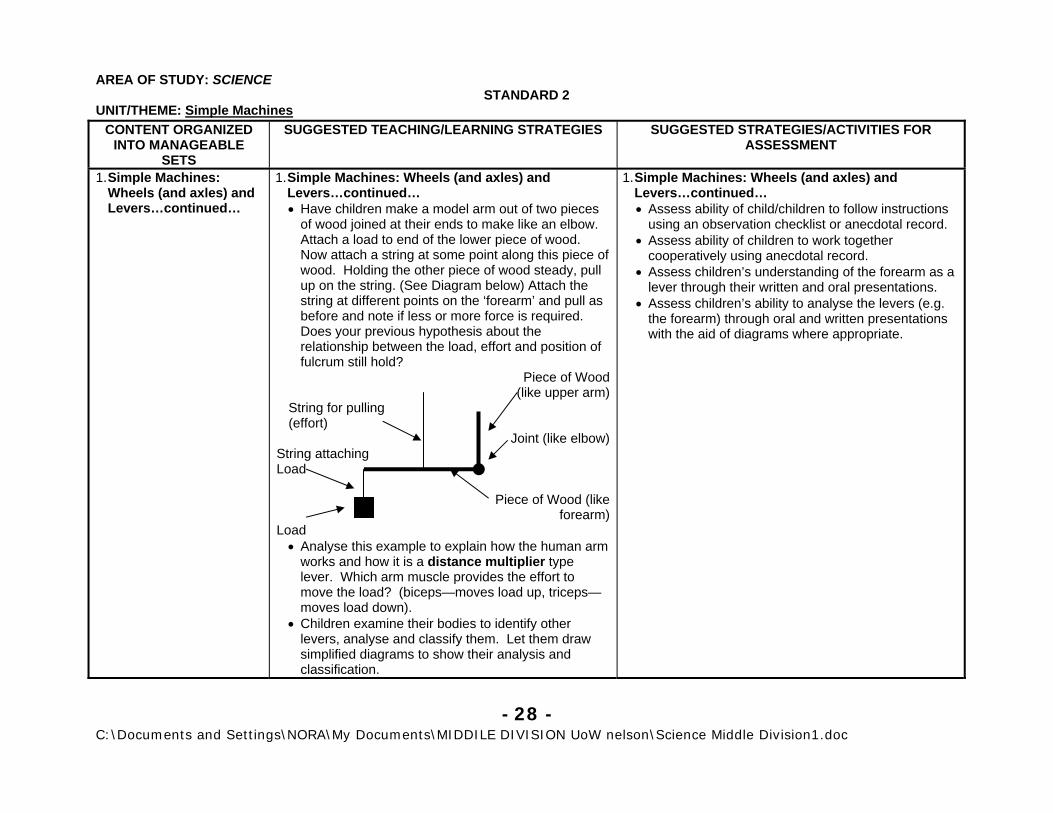
1. Simple Machines: Wheels (and axles) and Levers…continued… • Have children make a model arm out of two pieces
of wood joined at their ends to make like an elbow. Attach a load to end of the lower piece of wood. Now attach a string at some point along this piece of wood. Holding the other piece of wood steady, pull up on the string. (See Diagram below) Attach the string at different points on the ‘forearm’ and pull as before and note if less or more force is required. Does your previous hypothesis about the relationship between the load, effort and position of fulcrum still hold?
Piece of Wood (like upper arm)
String for pulling (effort)
Joint (like elbow) String attaching Load
Piece of Wood (like forearm)
Load • Analyse this example to explain how the human arm
works and how it is a distance multiplier type lever. Which arm muscle provides the effort to move the load? (biceps—moves load up, triceps—moves load down).
• Children examine their bodies to identify other levers, analyse and classify them. Let them draw simplified diagrams to show their analysis and classification.
1. Simple Machines: Wheels (and axles) and Levers…continued… • Assess ability of child/children to follow instructions
using an observation checklist or anecdotal record. • Assess ability of children to work together
cooperatively using anecdotal record. • Assess children’s understanding of the forearm as a
lever through their written and oral presentations. • Assess children’s ability to analyse the levers (e.g.
the forearm) through oral and written presentations with the aid of diagrams where appropriate.
- 28 - C:\Documents and Settings\NORA\My Documents\MIDDILE DIVISION UoW nelson\Science Middle Division1.doc

AREA OF STUDY: SCIENCE STANDARD 2
UNIT/THEME: THE ENVIRONMENT
CONTENT ORGANIZED INTO MANAGEABLE
SETS
SUGGESTED TEACHING/LEARNING STRATEGIES SUGGESTED STRATEGIES/ACTIVITIES FOR ASSESSMENT
1. Living things need energy and nutrients for living (carrying out the characteristics of living things): • Living things get their
energy from food. • Different living things
get their food from the environment in different ways.
• Green plants produce their own food using sunlight and other materials from the environment.
• All living things depend in some way on plants for food.
1. Living things need energy and nutrients for living • Children make list of foods eaten for breakfast,
lunch or dinner (tea, dinner, tea); children identify if foods came from plants or animals.
• Have children cut pictures of different types of food (fruits, vegetables, meats etc.—the food groups) from magazines and make posters showing foods that come from animals and that come from plants or a combination of both.
• Teacher asks why do we and other animals need food? [Answer: For energy and nutrients to carry out our living activities.] Children discuss all the activities they and other animals do that require energy and nutrients (see characteristics of living things).
• Teacher elicits through questioning/discussion what animals feed on, tracing back the source of all food to plants. Plants are the ultimate source of all foods—some animals feed on plants, some animals eat animals that feed on plants, some animals eat plants and other animals that feed on plants.
• Discussion: If animals get energy from the food (other animals and plants) they eat. Where do the plants get food for energy? Do plants eat like animals? [Answer: Plants make their own food using sunlight energy and other materials (nutrients) obtained from the environment].
1. Living things need energy for living • Willingness to accept opinions • Sharing of ideas • Ability to respond orally in clear logical order and to
make connections from previous learning and experience
• Ability to share information, formulate and ask questions
• Ability to explain orally and in writing what energy and nutrients are used for by living things—give examples.
CROSS-CURRICULAR OUTCOMES Pupils should: CP1.a Recognise an issue or problem. CP1.b Examine information related to the problem/issue.SP1.c Take action based on principle. SP2.a Take part in group activities.
AREA OF STUDY OUTCOMES Pupils should: ST8.a Understand the natural processes which support and
maintain the environment.
- 29 - C:\Documents and Settings\NORA\My Documents\MIDDILE DIVISION UoW nelson\Science Middle Division1.doc

AREA OF STUDY: SCIENCE STANDARD 2
UNIT/THEME: THE ENVIRONMENT CONTENT ORGANIZED
INTO MANAGEABLE SETS
SUGGESTED TEACHING/LEARNING STRATEGIES SUGGESTED STRATEGIES/ACTIVITIES FOR ASSESSMENT
1. Living things need energy and nutrients for living…continued… • Animals and most
micro-organisms (tiny living things too small to be seen by the naked eye) obtain their energy and nutrients only by eating other living things. They are called consumers.
• The Sun is the ultimate source of energy for living things.
1. Living things need energy and nutrients for living…continued… • Experiment to show that plants need Sunlight to live:
Have children germinate some kidney bean seeds. When the seeds have grown up enough into bean plants (have two leaves), transplant them into soil. Assist the children to divide the number of plants they have into two groups containing more or less the same number of plants. Ensure that the plants in each group are equally healthy—i.e. one group should NOT have very strong, healthy plants and the other weak ones—the two groups of plants should be as equal as possible in every way. Place one group of plants in a place where it will get Sunlight but where it will not be damaged or eaten by animals. Place the other group under a box (seal all parts of the box to ensure no light can get in) and ensure also that plants will not be damaged or eaten by animals. Organise children into groups to take care of plants over a two-week period, i.e. to water them daily etc. Each day ask all children to record what happens to each group of plants. The plants that receive Sunlight should grow and be green. The other plants will turn pale and eventually die. Ask children to explain why they think that has happened. [This should prove that plants need Sunlight to live.] Explain that plants need Sunlight (or light) to make the food for energy and nutrients.
1. Living things need energy and nutrients for living…continued… • Use a checklist or make anecdotes of children
responsibility in caring for plants. • Assess children’s observation skills through
oral questioning and discussion. • Assess their recording skills by reviewing
their recorded observations.
- 30 - C:\Documents and Settings\NORA\My Documents\MIDDILE DIVISION UoW nelson\Science Middle Division1.doc

AREA OF STUDY: SCIENCE STANDARD 2
UNIT/THEME: THE ENVIRONMENT CONTENT ORGANIZED
INTO MANAGEABLE SETS
SUGGESTED TEACHING/LEARNING STRATEGIES SUGGESTED STRATEGIES/ACTIVITIES FOR ASSESSMENT
1. Living things need energy and nutrients for living…continued…
1. Living things need energy and nutrients for living…continued… • Explain the term nutrients as materials contained in
foods and that they ultimately come from the environment when plants make food, just as the energy in the food we eat ultimately comes from the Sun when plants make food.
• Draw a diagram or use pictures to show how energy and nutrients (materials) flow from the environment through living things when they feed.
• Explain that all energy in living things ultimately
come from the Sun and that the nutrients ultimately come from the environment. Sunlight energy passes from the Sun to plants, which use it to make food for itself. The energy in the food made by plants is used by plants for living. When animals eat plants that energy passes to the animals in the food and so on. Nutrients pass from the environment to plants when they make food. Animals obtain these nutrients when they eat plants and so on.
1. Living things need energy and nutrients for living…continued… • Ability of children to explain orally or in writing, using
diagram, how energy from the Sun is used by plants to make food and that energy is passed onto animals when they eat the food of plants.
• Ability of children to explain orally or writing, using diagram, how nutrients from the environment are used by plants to make food and those nutrients are passed to animals when they eat the food of plants.
• Children able to construct simple diagrams or use pictures to create posters to show the flow of energy and nutrients from Sun and environment respectively through living things.
SUN Plants use Sunlight energy & nutrients from the environment to make food for itself,
Plus nutrients from the
environment
Lion gets energy and nutrients from rabbit (food) it eats
Rabbit gets energy and nutrients from carrot (food) it eats
- 31 - C:\Documents and Settings\NORA\My Documents\MIDDILE DIVISION UoW nelson\Science Middle Division1.doc

AREA OF STUDY: SCIENCE STANDARD 2
UNIT/THEME: THE ENVIRONMENT LINKAGES/CONNECTIONS RECOMMENDED RESOURCES: TEACHER/STUDENT
Reading • EL1.a, EL1.g, EL1.h, EL1.j, EL1.k
Listening and Viewing • EL2.b, EL2.c, EL2.d
Writing • EL3.d, EL3.g
Speaking • EL4.a, EL4.c, EL4.d, EL4.e
Spanish • SL4.b
Mathematics • M4.b, M5.a
Art • EA1.e
Crafts • EA1.g
Work and Technology • WT5.c
• Life Sciences, Teachers’ Edition • Science Probe 3 • Biology for CXC • Concepts in Science • Science Activities for Children (1) • Earth and Its Resources, New Science Library
- 32 - C:\Documents and Settings\NORA\My Documents\MIDDILE DIVISION UoW nelson\Science Middle Division1.doc

AREA OF STUDY: SCIENCE STANDARD 2
UNIT/THEME: THE ENVIRONMENT
AREA OF STUDY OUTCOMES Pupils should: ST8.b Understand the need for protection, care and
responsible use of the environment
CROSS-CURRICULAR OUTCOMES Pupils should: SP2.a Take part in group activities SP2.b Express their opinions and feelings in a socially
acceptable way SP2.h Accept major decisions SP3.a Assess their needs/interests.
CONTENT ORGANIZED INTO MANAGEABLE
SETS
SUGGESTED TEACHING/LEARNING STRATEGIES SUGGESTED STRATEGIES/ACTIVITIES FOR ASSESSMENT
1. The environment is all the conditions and surroundings of life
2. Natural resources are
land, water, air, minerals, plants and animals
3. The environment is
affected by pollution and continuous distribution by man
1. The Environment • Take nature walks/field trips to different
biomes/ecosystems. Discuss similarities and differences
2. Natural Resources • Elicit from children different things that exist in the
environment naturally • Children brainstorm and list examples of natural
resources • Encourage children in groups to list uses and
importance of land, water, air, minerals, animals and plants
3. Pollution and destruction of the environment • Discuss pollution of air, water, land. Encourage
children to identify and list how each of these is polluted.
• Children write stories and poems about protecting/conserving the natural resources
1. The Environment • Observations—ability to note similarities and
differences. • Make factual statements on similarities and
differences of ecosystems. • Description of ecosystems.
2. Natural Resources • Ability to make inferences • Cooperation in groups • Apply information to real life experiences • Share information and accept opinions
3. Pollution and Destruction of the environment • Ability to organise information logically • Ability to use information to make conclusions
- 33 - C:\Documents and Settings\NORA\My Documents\MIDDILE DIVISION UoW nelson\Science Middle Division1.doc

AREA OF STUDY: SCIENCE STANDARD 2
UNIT/THEME: THE ENVIRONMENT CONTENT ORGANIZED
INTO MANAGEABLE SETS
SUGGESTED TEACHING/LEARNING STRATEGIES SUGGESTED STRATEGIES/ACTIVITIES FOR ASSESSMENT
4. Conservation is the preservation of the natural environment
5. Countless species of
plants and animals are being put at risk, not only by pollution but also by the destruction of their habitat.
4. Conservation of the Natural Environment • Define and discuss conservation. Encourage
children to identify the conservation laws of Belize. Children describe how air, water and land can be conserved.
5. Species at risk from pollution and habitat destruction • Encourage children to identify how species of plant
and animals are destroyed by pollution of the air, water and land.
• Discuss harmful uses of pesticides that pollute plants and animal habitats.
• Children write short paragraphs explaining how plants and animals are affected by pollution.
• Discuss some agricultural practices e.g. spraying herbicides, which affects plant and animal life.
• Encourage children to draw posters depicting pollution in the environment and possible alternatives.
• Ask children to think of ways that they can help to prevent of discourage pollution or destruction of habitats.
• Encourage students to develop learning centres showing why plants and animals should be conserved.
• Encourage children to identify the harmful effects of destroying the forest. Brainstorm why the need for preservation of the habitat of wildlife and plants is important
• Encourage children to role play a wild animals response to destruction of its habitat
4. Conservation of the Natural Environment • Ability to share ideas and opinions • Ability to draw conclusions
5. Species at risk from pollution and habitat
destruction • Ability to make inferences • Ability to express information in writing • Clarity of ideas • Ability to share ideas and gather information through
interviewing or research • Creativity of design of posters • Creativity and use of materials to create a
meaningful interpretation of the need to conserve (learning centres)
• Ability to work as a team in implementing ideas about learning centres.
• Ability to share ideas and organise information in a logical manner
• Ability to sustain a role and cooperation with others
- 34 - C:\Documents and Settings\NORA\My Documents\MIDDILE DIVISION UoW nelson\Science Middle Division1.doc

AREA OF STUDY: SCIENCE STANDARD 2
UNIT/THEME: THE ENVIRONMENT CONTENT ORGANIZED
INTO MANAGEABLE SETS
SUGGESTED TEACHING/LEARNING STRATEGIES SUGGESTED STRATEGIES/ACTIVITIES FOR ASSESSMENT
6. The burning of fuel in power stations and motor vehicle engines is harmful to the environment
7. There is need for
responsible care and protection of the environment—e.g. preventing over-fishing, preventing destruction of forestry, preventing over pollution by man
6. Harmfulness of fuel burning to environment • Encourage children to describe the colour and smell
of exhaust seen coming from the end of a vehicle's exhaust pipe or fumes seen coming from the power station.
• Brainstorm why these gases are harmful • Discuss building up of carbon dioxide gases in the
air, trapping of the Sun’s heat and the Greenhouse Effect
• Encourage children to discuss how alternative fuel use –e.g. solar energy, water and wind power can help to protect the Earth from over-pollution.
• Encourage children to design a device to meet this need.
7. Need for responsible care and protection of the
environment • Children brainstorm and discuss need for the
preservation of our Cayes, etc. • Discuss the need to prevent over-fishing, over-
hunting,, over-logging • Children discuss the effect of destruction of the
forest—especially plant life and timber. • Encourage children to identify how man can prevent
pollution of the environment • Children identify ways how they can contribute to
the development of awareness for the need to conserve the environment
6. Harmfulness of fuel burning to environment • Ability to make inferences • Sharing ideas and opinions • Development of awareness for the need to conserve • Identifying alternative sources of energy • Ability to design a device to meet a need/solve a
problem 7. Need for responsible care and protection of the
environment • Awareness for the need to conserve the
environment • Ability to identify ways how the environment can be
conserved • Ability to make inferences • Involvement in clean-up campaigns in the
environment
- 35 - C:\Documents and Settings\NORA\My Documents\MIDDILE DIVISION UoW nelson\Science Middle Division1.doc
AREA OF STUDY: SCIENCE STANDARD 2
UNIT/THEME: THE ENVIRONMENT LINKAGES/CONNECTIONS RECOMMENDED RESOURCES: TEACHER/STUDENT
• CP1.b Examine information related to the problem/issue. • CP1.c Suggest way of dealing with the problem/issue. • SP1.a Recognise the values associated with choices. • SP2.a Take part in group activities. • SP2.d Respond to the feelings of others. • SP2.g Help to create consensus. • EL1.d Use context clues to interpret a selection. • EL1.i Identify a sequence of events. • EL2.a Identify main ideas and supporting details. • EL3.d Produce work that is legible and acceptable. • EL4.b Use the correct pronunciation and appropriate intonation and
stress. • M4.a Make reasonable approximations based on relevant life
experiences. • ST8.a Understand the natural process which support and maintain
the environment. • ST8.b Understand the need for protection, care and responsible
use of the environment. • WT4.a Identify a simple problem/need. • EA1.e Explore and experiment to create visual images through use
of a variety of artistic tools and media. • EA1.g Explore and experiment to create visual images through the
use of a variety of materials in the environment.
• Geography of Belize, Cubola Productions. • Biology Visualising Life, Annotated Teachers’ Edition, Holt-
Rinehart-Wilson. • Earth and Its Resources, Volume 2, New Science Library. • Nature Crafts and Activities, Publications International Ltd. • Selected Topics in Biology: Ecology, T.J, King, Nelson. • Science Activities for Children, George C. Lorbeer & Leslie W.
Nelson, Volume 1, 9th Edition.
- 36 - C:\Documents and Settings\NORA\My Documents\MIDDILE DIVISION UoW nelson\Science Middle Division1.doc

AREA OF STUDY: SCIENCE STANDARD 2
UNIT/THEME: CHANGES IN LIVING THINGS AND THEIR ENVIRONMENT
AREA OF STUDY OUTCOMES Pupils should: ST1.a Understand some of the changes in living things and
their environment from pre-historic (life before mankind) to the present.
CROSS-CURRICULAR OUTCOMES Pupils should: SP1.a Recognise the values associated with choices. SP2.a Take part in group activities. SP2.b Express their feelings and opinions in a socially
acceptable way.
CONTENT ORGANIZED INTO MANAGEABLE
SETS
SUGGESTED TEACHING/LEARNING STRATEGIES SUGGESTED STRATEGIES/ACTIVITIES FOR ASSESSMENT
1. Time-line introduced: Scientists divide the Earth’s past into four geologic eras.
1. Time-line: Earth’s geological time-line • Children will draw time-line and interpret past
geologic eras. Design and identify periods within eras (e.g. Pre-cambric, Palaeozoic, Mesozoic & Cenozoic with Mesozoic having Triassic, Jurassic and Cretaceous Periods).
1. Time-line: Earth’s geological time-line • Ability to explain the time-line orally using a
diagram. • Ability to differentiate characteristics of different
periods.
- 37 - C:\Documents and Settings\NORA\My Documents\MIDDILE DIVISION UoW nelson\Science Middle Division1.doc
AREA OF STUDY: SCIENCE STANDARD 2
UNIT/THEME: CHANGES IN LIVING THINGS AND THEIR ENVIRONMENTCONTENT ORGANIZED
INTO MANAGEABLE SETS
SUGGESTED TEACHING/LEARNING STRATEGIES SUGGESTED STRATEGIES/ACTIVITIES FOR ASSESSMENT
2. Living things are adapted to their environment. If we examine the earth’s environment today we will see that living things adapt to different environments in different ways. If we compare the adaptations of living things to different environments today with the adaptations of the living things to environments of the past (prehistoric), we will note that the environment has changed and so has the adaptations of living things.
2. Adaptation of living things to their environment and Evolution: • Role play: students will pretend to be different
animals and/or plants and role-play/explain what adaptations they have to in order to survive in the environment. (The living things and the environment used for this activity should vary between present day and prehistoric times.)
• Children research and explain how particular animals and plants were adapted to live in different environments over geologic time.
• Children research and explain how particular animals and plants are adapted to their present day environments.
• Creating posters: Children divide poster board into two columns; cut out and paste pictures from magazines showing forms of adaptations displayed by living things—THEN & NOW.
2. Adaptation of living things to their environment and Evolution: • Ability to sustain role in role-play. • Matching living thing with form of adaptation. • Role-play show capacity to imagine/consider what a
fictional situation might be like. • Ability to explain how living things adapt to changes
in their environment. • Clarity of organisation of poster. • Creativity in depicting poster. • Ability to interpret and apply visual information.
- 38 - C:\Documents and Settings\NORA\My Documents\MIDDILE DIVISION UoW nelson\Science Middle Division1.doc

AREA OF STUDY: SCIENCE STANDARD 2
UNIT/THEME: CHANGES IN LIVING THINGS AND THEIR ENVIRONMENTCONTENT ORGANIZED
INTO MANAGEABLE SETS
SUGGESTED TEACHING/LEARNING STRATEGIES SUGGESTED STRATEGIES/ACTIVITIES FOR ASSESSMENT
3. SKILLS • Arrange, classify,
discuss, explain, label, restate, predict, experiment, infer, question, value, design, select, sort, manipulate, observe
4. ATTITUDES • Appreciate changes in
living things • Respond to the need of
others • Appreciate different
views • Develop willingness to
participate in group activities
• Express awareness of the natural changes in our environment
• Respond to care for the environment and conservation of species.
3. SKILLS SEE PREVIOUS PAGES THIS UNIT
4. ATTITUDES
SEE PREVIOUS PAGES THIS UNIT
3. SKILLS SEE PREVIOUS PAGES THIS UNIT
4. ATTITUDES
SEE PREVIOUS PAGES THIS UNIT
- 39 - C:\Documents and Settings\NORA\My Documents\MIDDILE DIVISION UoW nelson\Science Middle Division1.doc

AREA OF STUDY: SCIENCE STANDARD 2
UNIT/THEME: CHANGES IN LIVING THINGS AND THEIR ENVIRONMENTLINKAGES/CONNECTIONS RECOMMENDED RESOURCES: TEACHER/STUDENT
• SP1.a Recognise the values associated with choices. • SP2.a Take part in group activities. • SP2.g Help create consensus. • EL2.c Predict what will happen in a sequence of events. • M4.a Make reasonable approximations based on relevant life
experiences. • M5.a Collect, analyse and present data using charts, graphs table
and diagrams. • SS4.a Understand how the movement of the earth causes changes
in time and seasons. • CP1.c Suggest ways of dealing with the problem/issue. • SP2.b Express their opinions and feelings in a socially acceptable
way. • EL2.e Interpret and respond appropriately to messages conveyed
through visual images and tone of voice. • ST7.a Understand the characteristics of living things, the main
categories into which they can be grouped, and how these interrelate with the environment.
• ST8.b Understand the need for protection, care and responsible use of the environment.
• SL4.c Use correct pronunciation, appropriate intonation and stress. • SL4.b Ask questions for information and understanding. • EL4.d Use correct grammatical structures. • SP3.a Assess their needs/interests. • EL1.d Use context clues to interpret a selection. • EL1.i Identify a sequence of events. • EL1.j Make inferences and draw conclusions. • M4.a Make reasonable approximations based on relevant life
experiences. • M4.b Use logical reasoning based on meaningful data to draw
conclusion about the likely occurrence of an event. • EA1.g Explore and experiment to create visual images through the
use of a variety of concrete materials in the environment.
• Unit 3 Evolution, Chapters 10-12 in Biology-The Living Science, Prentice Hall.
• Biology-Visualising Life, Annotated Teacher’s Edition, Johnson-Holt-Rinehart-Wilson.
• Tarbuck Lutgens, Earth Science, 3rd Edition, Merrill. • Discover Science, Scott Foresman. • A Geography of Belize, the Land and Its People, Cubola
- 40 - C:\Documents and Settings\NORA\My Documents\MIDDILE DIVISION UoW nelson\Science Middle Division1.doc

AREA OF STUDY: SCIENCE STANDARD 3
UNIT/THEME: THE UNIVERSE
CONTENT ORGANIZED INTO MANAGEABLE
SETS
SUGGESTED TEACHING/LEARNING STRATEGIES SUGGESTED STRATEGIES/ACTIVITIES FOR ASSESSMENT
1. Each complete orbit the Earth makes around the Sun is called one revolution. It takes about 365 days to make one revolution. We call this one year. (Year is the time it takes the Earth to complete one revolution around the Sun.) The Sun (a star) is centre of the Solar System which includes nine other planets and other heavenly bodies (e.g. Earth’s Moon)
1. Earth’s orbit around the Sun and the Solar System. • Definition of terms: Sun, Solar System, axis,
rotation, orbit, revolution. Give concrete examples (e.g. top spinning = rotation)
• Demonstrate with model of Solar System how the Earth revolves around the Sun. Emphasise the Sun (not Earth) as the centre of the Solar System (hence the name Solar).
• Review how the rotation of the Earth causes day/ night though it appears that it is the Sun revolving around the Earth that causes day/night. Use globe and flashlight or other light source to demonstrate this phenomena again. Question and ask students to explain/demonstrate to ensure that they understand that it is the Earth’s rotation that causes day and night and that the Sun does not revolve around the Earth to cause this.
• Children draw pictures to show how certain parts of the Earth receive sunlight (day) at one time while others do not (night) and that as the Earth rotates on its axis the parts the receive sunlight (day) and do not receive sunlight (night) alternate.
• Create a mobile of the Solar System
1. Earth’s orbit around the Sun and the Solar System • Interpret a picture chart showing the position of the
sun at different times of the day. • Match terms to definitions. • Ability to explain terms • Explain/report how the Earth revolves around the
Sun using the Solar System model. • Be able to distinguish between rotation and
revolution given concrete examples. • Be able to explain that by the time the Earth
completes one revolution around the Sun it would have rotated on its axis 365 times—hence we say it takes about 365 days (1 year) to for the Earth to revolve around the Sun.
• Accuracy of mobile Solar System created (correct positioning and relative size of the planets)
• Creativity in designing mobile.
CROSS-CURRICULAR OUTCOMES Pupils should: SP2.a Take part in group activities. SP2.b Express their opinions and feelings in a socially
acceptable way. SP2.e Lead and follow where appropriate. SP2.f Help the group achieve its goals. CP1.b Examine information related to the problem/issue.
AREA OF STUDY OUTCOMES Pupils should: ST2.a Understand some similarities and differences between
the earth, the planets and other celestial bodies. ST6.a Understand time in relation to Earth’s rotation and orbit
around the Sun and the Moon’s orbit around the Earth.
- 41 - C:\Documents and Settings\NORA\My Documents\MIDDILE DIVISION UoW nelson\Science Middle Division1.doc
AREA OF STUDY: SCIENCE STANDARD 3
UNIT/THEME: THE UNIVERSECONTENT ORGANIZED
INTO MANAGEABLE SETS
SUGGESTED TEACHING/LEARNING STRATEGIES SUGGESTED STRATEGIES/ACTIVITIES FOR ASSESSMENT
1. Earth’s orbit around the Sun and the Solar System…continued…
1. Earth’s orbit around the Sun and the Solar System…continued… • Make a model of the Sun • Children organise themselves in the classroom or
on the play ground as a miniature Solar System---1 child or the teacher plays the role of the Sun at the centre, while others play the planets revolving around the Sun. Activity can be made fun by asking students to rotate (spin around) as they revolve. Children observe and share findings about how often their face is toward the “Sun” at the centre and how often their back is toward “Sun.” Question them about which side would be receiving sunlight and which not and how this causes day/night. Children observe that the same movements occur for other planets only they occur at different rates (e.g. the further away a planet is the longer it takes to revolve around the Sun.).
• Assign different planets to different students or groups of students and ask them to research information on their characteristics—distance from sun, size, weight, climate etc. and any other unique or interesting about the planets.
• Children report their findings in a written and/or oral report.
• Children watch video on space and the Solar System.
• Children make collages with pictures of Solar System from magazines.
1. Earth’s orbit around the Sun and the Solar System…continued… • Creativity of Models created (Sun, Earth, Moon) • Write poetry or jingle about Solar System to capture
knowledge acquired during study of Solar System (e.g. to depict aspects about the size of the Solar System, the planets that make it up, the importance of the Sun).
• Research on planets—ability to explain orally and in writing information gained through research on planets. Organisation of reports/presentations.
• Teamwork/cooperation in research reports.
- 42 - C:\Documents and Settings\NORA\My Documents\MIDDILE DIVISION UoW nelson\Science Middle Division1.doc
AREA OF STUDY: SCIENCE STANDARD 3
UNIT/THEME: THE UNIVERSECONTENT ORGANIZED
INTO MANAGEABLE SETS
SUGGESTED TEACHING/LEARNING STRATEGIES SUGGESTED STRATEGIES/ACTIVITIES FOR ASSESSMENT
2. The Moon is called a satellite of the Earth because it revolves around the Earth. The Moon does not produce its own light. We can view four phases of the Moon at different times of the Month.
2. The Moon, Earth’s natural satellite and its phases. • Define the term satellite. Explain what a natural
satellite. Explain what man-made satellites are. • Children observe at night man-made satellites in the
sky (small lights resembling stars that move across the sky at night).
• Man-made satellites serve a variety of purposes—weather satellites, communications etc.
• The moon and other satellites shine as lights in the sky because they reflect sunlight. They do not produce their own light. It is because of this reflected sunlight that we see them.
• View moon with binoculars or telescopes at different times of the day.
• Have students explore and demonstrate using a globe, a light source (e.g. flashlight) as the sun, an another spherical object (such as a ball) as the Moon, how the Moon reflects light and is seen from Earth.
• Using this same demonstration show that depending on the Moon’s position in relation to the Sun and Earth the portion of reflected light that we see varies and this accounts for the size and shape of the Moon that we are able to see on Earth. These variations in size and shape of reflected light from Moon are what distinguish the phases of the Moon.
• Children observe the Moon’s size and shape over the period of a month and record their observations.
• Children complete a questionnaire on their observation of the Moon.
• Children associate names with different phases of the Moon.
• Children create chart to show different phases.
2. The Moon, Earth’s natural satellite and its phases.• Children compare and contrast natural and man-
made satellites. • Given a chart of the phases of the Moon, children
interpret and explain the diagram orally and/or in writing.
• Children create a song or jingle about natural and/or man-made satellites or about phases of the Moon. Accuracy and creativity of the song or jingle created.
- 43 - C:\Documents and Settings\NORA\My Documents\MIDDILE DIVISION UoW nelson\Science Middle Division1.doc

AREA OF STUDY: SCIENCE STANDARD 3
UNIT/THEME: THE UNIVERSE
CONTENT ORGANIZED INTO MANAGEABLE
SETS
SUGGESTED TEACHING/LEARNING STRATEGIES SUGGESTED STRATEGIES/ACTIVITIES FOR ASSESSMENT
3. SKILLS • Observing,
communicating, collecting data, inferring, predicting, interpreting data, investigating, hypothesising, reporting, composing, constructing, compare, discuss, draw, arrange
4. ATTITUDES • Sharing,
understanding, participating, willingness, ability to use models, develop interest, cooperation, respect for others
3. SKILLS
SEE PREVIOUS PAGES IN THIS UNIT
4. ATTITUDES
SEE PREVIOUS PAGES IN THIS UNIT
3. SKILLS
SEE PREVIOUS PAGES IN THIS UNIT
4. ATTITUDES
SEE PREVIOUS PAGES IN THIS UNIT
- 44 - C:\Documents and Settings\NORA\My Documents\MIDDILE DIVISION UoW nelson\Science Middle Division1.doc

AREA OF STUDY: SCIENCE STANDARD 3
UNIT/THEME: THE UNIVERSE
LINKAGES/CONNECTIONS RECOMMENDED RESOURCES: TEACHER/STUDENT Reading • EL1.c, EL1.e, EL1.g, EL1.h
Listening and Viewing • EL3.a, EL3.d, EL3.g
Writing • EL4.a, EL4.c, EL4.e, EL4.f
Number • M1.c
Spatial Relationship • M2.c
Measure, quantify and calculate. • M3.a
Estimate and make predictions • M4.a, M4.b
Data Handling • M5.a
Music • EA1.a
Art & Craft • EA1.e, EA1.g
Physical Exercise • H4.a
• Encyclopaedia World Book • Integrated Science for Caribbean Schools Book 2 • Finding Out Book 4 • Earth in Space, Sky and Space • Resource Personnel • Activity Cards
- 45 - C:\Documents and Settings\NORA\My Documents\MIDDILE DIVISION UoW nelson\Science Middle Division1.doc

AREA OF STUDY: SCIENCE STANDARD 3
UNIT/THEME: LIVING THINGS
CONTENT ORGANIZED INTO MANAGEABLE
SETS
SUGGESTED TEACHING/LEARNING STRATEGIES SUGGESTED STRATEGIES/ACTIVITIES FOR ASSESSMENT
1. The Seven Characteristics of Living Things are: • Growth • Nutrition (feeding) • Movement • Excretion • Reproduction • Respiration • Response to Stimuli • Respiration: Physical
(breathing—obtaining of oxygen, removal of carbon dioxide and water) and Chemical (obtaining energy from food). Physical process of breathing allows us to obtain oxygen that is combined with food in our bodies to produce the energy we need.
1. The Seven Characteristics of Living Things: • Review characteristics of growth, feeding,
movement of animals as covered in Standard 2. Clarify any misconceptions.
• Brainstorm definitions of growth—increase in size (height, volume, weight), change in form and complexity.
• Children measure growth (height, volume, weight) of a given living thing (plant or animal) over a period of time and plot changes on a graph. Children also observe any changes in the structure (form) and complexity of the living thing over that same time.
• Ask children to think of what accounts for the growth of the animals. (Children may answer that the food eaten by animals accounts for their growth. Ask them what about plants)
1. The Seven Characteristics of Living Things: • Skill and precision in measuring growth. • Chart growth on a graph. • Interpret graph. • Observations recorded—how observant. • Participation in discussions. • Ability to make hypotheses and draw conclusions. • Cooperation and team work in group work. • Children’s understanding of the concepts as elicited
through oral questioning in class, through the ideas they share and are able to brainstorm.
• Concept maps. • Written work. • Creativity in art work.
CROSS-CURRICULAR OUTCOMES Pupils should: SP2.a Take part in group activities. SP2.c Lead and follow where appropriate. SP2.g Help to create consensus. CP1.a Recognise an issue or problem.
AREA OF STUDY OUTCOMES Pupils should: ST7.a Understand the characteristics of living things, the main
categories into which they can be grouped and how these inter-relate with the environment.
- 46 - C:\Documents and Settings\NORA\My Documents\MIDDILE DIVISION UoW nelson\Science Middle Division1.doc
AREA OF STUDY: SCIENCE STANDARD 3
UNIT/THEME: LIVING THINGSCONTENT ORGANIZED
INTO MANAGEABLE SETS
SUGGESTED TEACHING/LEARNING STRATEGIES SUGGESTED STRATEGIES/ACTIVITIES FOR ASSESSMENT
1. The Seven Characteristics of Living Things…continued…
• Excretion: removal of bodily wastes—waste products from processes occurring inside the body to prevent the build-up of harmful toxins in the body.
1. The Seven Characteristics of Living Things…continued… • Experiment to show importance of sunlight to plant
growth: Children grow some bean plants. Place some in Sunlight and others in dark and observe what happens. Children observe, record and draw conclusions of what happens to plants with/without sunlight? Students can carry out a similar experiment to note the effect of watering and not watering two different groups of bean plants.
• Brainstorm concept of feeding/nutrition—expand concept beyond mere obtaining of food. What is the source of food for animals? (other animals and plants) For plants? What happens to food after animals eat it? Food in plants—where does it come from—how is it made—what is needed? How is food used in plants and animals?
1. The Seven Characteristics of Living Things:
SEE PREVIOUS PAGE
- 47 - C:\Documents and Settings\NORA\My Documents\MIDDILE DIVISION UoW nelson\Science Middle Division1.doc

AREA OF STUDY: SCIENCE STANDARD 3
UNIT/THEME: LIVING THINGSCONTENT ORGANIZED
INTO MANAGEABLE SETS
SUGGESTED TEACHING/LEARNING STRATEGIES SUGGESTED STRATEGIES/ACTIVITIES FOR ASSESSMENT
1. The Seven Characteristics of Living Things…continued…
1. The Seven Characteristics of Living Things…continued… • Introduce other characteristics of living things:
Respiration and Excretion. • Concept of Respiration—physical process of
breathing for gaseous exchange (obtain oxygen/remove carbon dioxide & water) and chemical process of burning (oxidising) absorbed food to obtain energy.
• Physical breathing (gas exchange): Children observe each other’s breathing. Children observe the breathing of animals (e.g. pets at home). Children record observations and note similarities and differences.
• Class discussion of observations and similarities and differences noted.
• Children practice blowing into balloons, plastic bags and observe body structures that are involved.
• Based on observations and using a chart/diagram of the respiratory system, discuss mechanism of breathing—chest expands, diaphragm flattens resulting in an increase in volume and decrease in pressure of lungs so that air rushes in. The reverse process happens on exhalation.
• Make a working model of the lungs. • Discuss why it is important for us to breathe in air.
What do we breathe in? What do we exhale? Why? • Distinguish between the physical process of
respiration (breathing) and the chemical process of respiration (obtaining energy from food). How are the two linked?
1. The Seven Characteristics of Living Things…continued…
SEE PREVIOUS PAGES OF THIS UNIT
- 48 - C:\Documents and Settings\NORA\My Documents\MIDDILE DIVISION UoW nelson\Science Middle Division1.doc
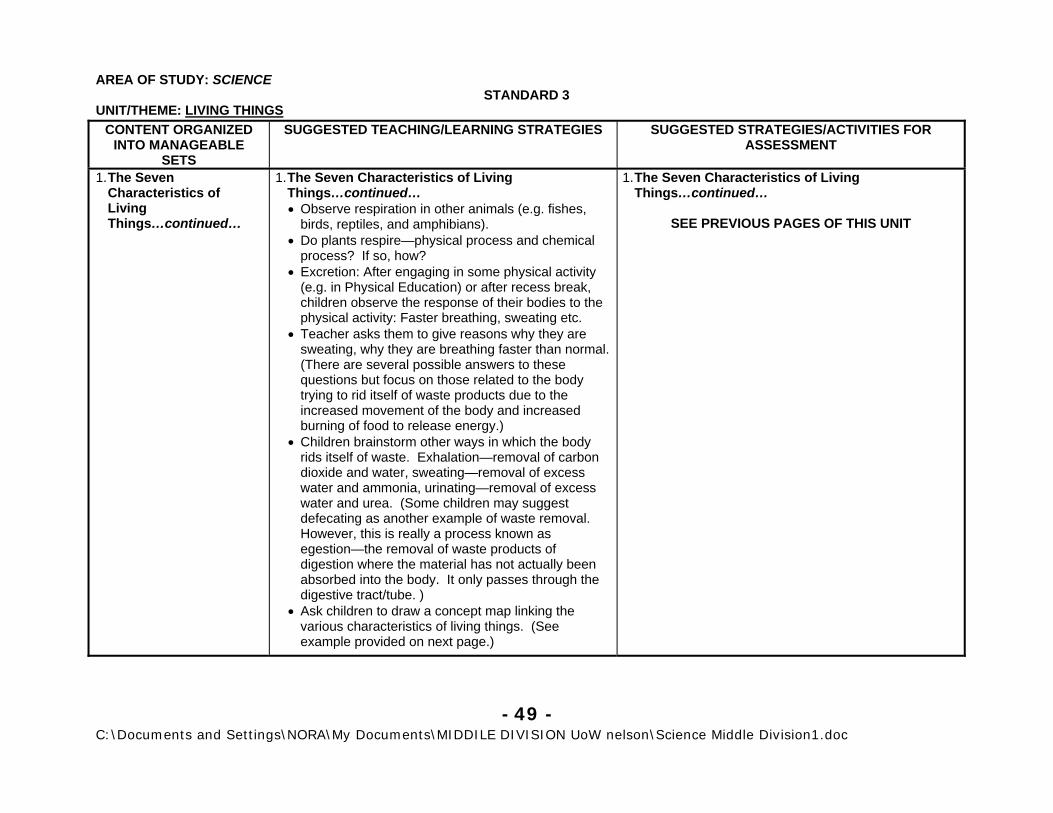
AREA OF STUDY: SCIENCE STANDARD 3
UNIT/THEME: LIVING THINGSCONTENT ORGANIZED
INTO MANAGEABLE SETS
SUGGESTED TEACHING/LEARNING STRATEGIES SUGGESTED STRATEGIES/ACTIVITIES FOR ASSESSMENT
1. The Seven Characteristics of Living Things…continued…
1. The Seven Characteristics of Living Things…continued… • Observe respiration in other animals (e.g. fishes,
birds, reptiles, and amphibians). • Do plants respire—physical process and chemical
process? If so, how? • Excretion: After engaging in some physical activity
(e.g. in Physical Education) or after recess break, children observe the response of their bodies to the physical activity: Faster breathing, sweating etc.
• Teacher asks them to give reasons why they are sweating, why they are breathing faster than normal. (There are several possible answers to these questions but focus on those related to the body trying to rid itself of waste products due to the increased movement of the body and increased burning of food to release energy.)
• Children brainstorm other ways in which the body rids itself of waste. Exhalation—removal of carbon dioxide and water, sweating—removal of excess water and ammonia, urinating—removal of excess water and urea. (Some children may suggest defecating as another example of waste removal. However, this is really a process known as egestion—the removal of waste products of digestion where the material has not actually been absorbed into the body. It only passes through the digestive tract/tube. )
• Ask children to draw a concept map linking the various characteristics of living things. (See example provided on next page.)
1. The Seven Characteristics of Living Things…continued…
SEE PREVIOUS PAGES OF THIS UNIT
- 49 - C:\Documents and Settings\NORA\My Documents\MIDDILE DIVISION UoW nelson\Science Middle Division1.doc
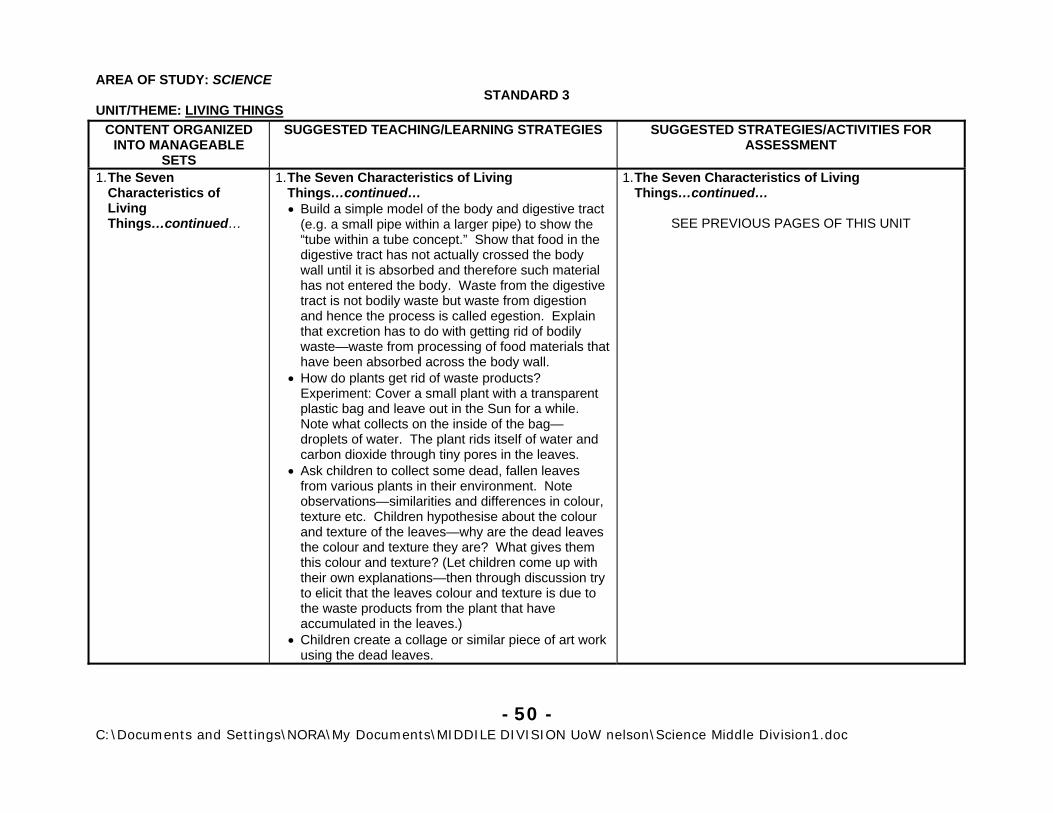
AREA OF STUDY: SCIENCE STANDARD 3
UNIT/THEME: LIVING THINGSCONTENT ORGANIZED
INTO MANAGEABLE SETS
SUGGESTED TEACHING/LEARNING STRATEGIES SUGGESTED STRATEGIES/ACTIVITIES FOR ASSESSMENT
1. The Seven Characteristics of Living Things…continued…
1. The Seven Characteristics of Living Things…continued… • Build a simple model of the body and digestive tract
(e.g. a small pipe within a larger pipe) to show the “tube within a tube concept.” Show that food in the digestive tract has not actually crossed the body wall until it is absorbed and therefore such material has not entered the body. Waste from the digestive tract is not bodily waste but waste from digestion and hence the process is called egestion. Explain that excretion has to do with getting rid of bodily waste—waste from processing of food materials that have been absorbed across the body wall.
• How do plants get rid of waste products? Experiment: Cover a small plant with a transparent plastic bag and leave out in the Sun for a while. Note what collects on the inside of the bag—droplets of water. The plant rids itself of water and carbon dioxide through tiny pores in the leaves.
• Ask children to collect some dead, fallen leaves from various plants in their environment. Note observations—similarities and differences in colour, texture etc. Children hypothesise about the colour and texture of the leaves—why are the dead leaves the colour and texture they are? What gives them this colour and texture? (Let children come up with their own explanations—then through discussion try to elicit that the leaves colour and texture is due to the waste products from the plant that have accumulated in the leaves.)
• Children create a collage or similar piece of art work using the dead leaves.
1. The Seven Characteristics of Living Things…continued…
SEE PREVIOUS PAGES OF THIS UNIT
- 50 - C:\Documents and Settings\NORA\My Documents\MIDDILE DIVISION UoW nelson\Science Middle Division1.doc
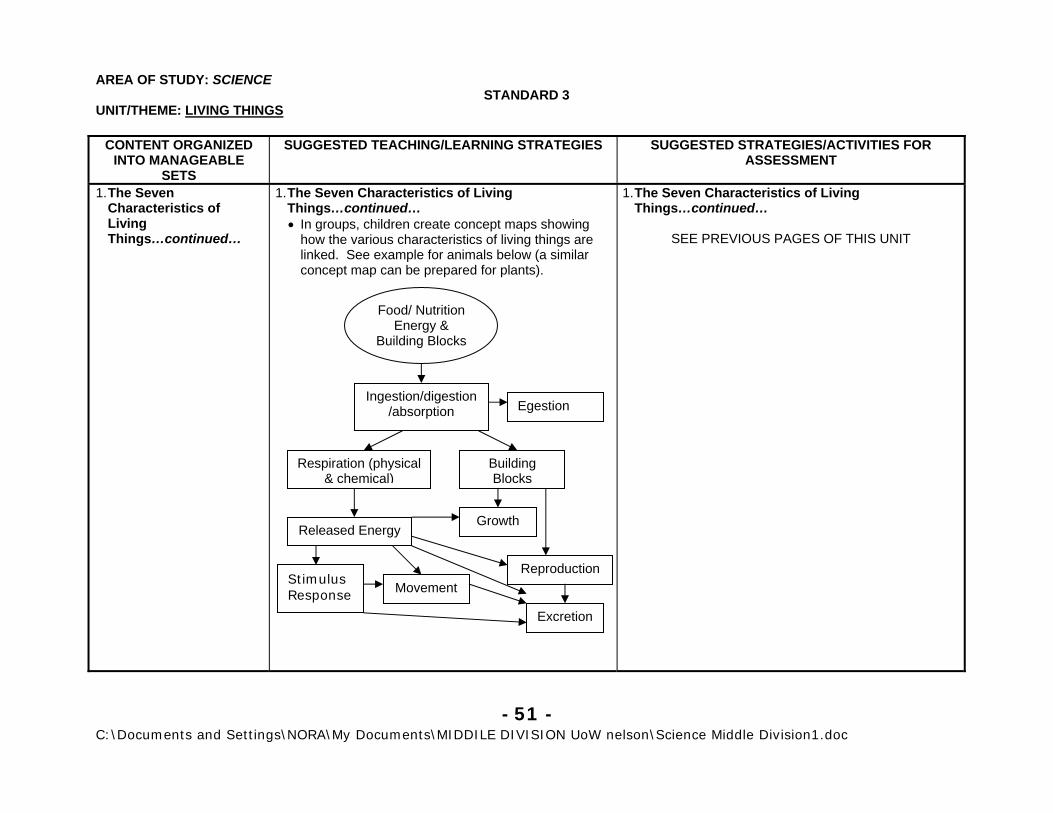
AREA OF STUDY: SCIENCE STANDARD 3
UNIT/THEME: LIVING THINGS
CONTENT ORGANIZED INTO MANAGEABLE
SETS
SUGGESTED TEACHING/LEARNING STRATEGIES SUGGESTED STRATEGIES/ACTIVITIES FOR ASSESSMENT
1. The Seven Characteristics of Living Things…continued…
1. The Seven Characteristics of Living Things…continued… • In groups, children create concept maps showing
how the various characteristics of living things are linked. See example for animals below (a similar concept map can be prepared for plants).
1. The Seven Characteristics of Living Things…continued…
SEE PREVIOUS PAGES OF THIS UNIT
Ingestion/digestion/absorption
Respiration (physical & chemical)
Building Blocks
Released EnergyGrowth
Excretion
MovementReproduction
Stimulus Response
Egestion
Food/ Nutrition Energy &
Building Blocks
- 51 - C:\Documents and Settings\NORA\My Documents\MIDDILE DIVISION UoW nelson\Science Middle Division1.doc

AREA OF STUDY: SCIENCE STANDARD 3
UNIT/THEME: LIVING THINGSCONTENT ORGANIZED
INTO MANAGEABLE SETS
SUGGESTED TEACHING/LEARNING STRATEGIES SUGGESTED STRATEGIES/ACTIVITIES FOR ASSESSMENT
2. Plants can be classified as flowering and non-flowering.
2. Classification of Plants—Flowering and Non-flowering. • Review simple plants. • Discuss the significance of flowers. Flowers are
important in the reproduction of plants as they contain the reproductive parts of the plant. It is from the flowers that seeds and fruits are produced. Seed grow into new plants (reproduction).
• Children observe plants in their environment—do they all produce flowers. Identify some that don’t.
• Research assignment: Do all plants have flowers? How do non-flowering plants reproduce? Children research ways in which plants reproduce without flowers, fruits or seeds and give examples—e.g. budding in sugar cane, cuttings etc.
• Define flowering plants. • Classify as flowering or non-flowering. • Similarities and differences of flowering and non-
flowering plants. • Children observe flowers and note similarities and
differences. Using a razor blade and with proper safety precautions, children dissect flowers, make observations and drawings of what they see. What structures of the flower are important in reproduction? Male and female parts of the flower?
• Collection of seeds and fruits (various types). • Classify seeds into monocotyledons and
dicotyledons. • What parts of the flower become the fruit and the
seed(s) after successful pollination? • Children observe fruits and/or seeds and note
similarities and differences.
2. Classification of Plants—Flowering and Non Flowering • Understanding of the concepts as expressed
through oral responses to questioning and through written work.
• Ability to make noteworthy observations. • Practice of safe procedures during dissection of
flower (no playing with razor blades etc.). • Diversity in research—identify various ways in which
non-flowering plants reproduce. • Field journal of observations made as blossoms
become fruits and seeds. • Drawing and labelling of flowers and seeds.
- 52 - C:\Documents and Settings\NORA\My Documents\MIDDILE DIVISION UoW nelson\Science Middle Division1.doc
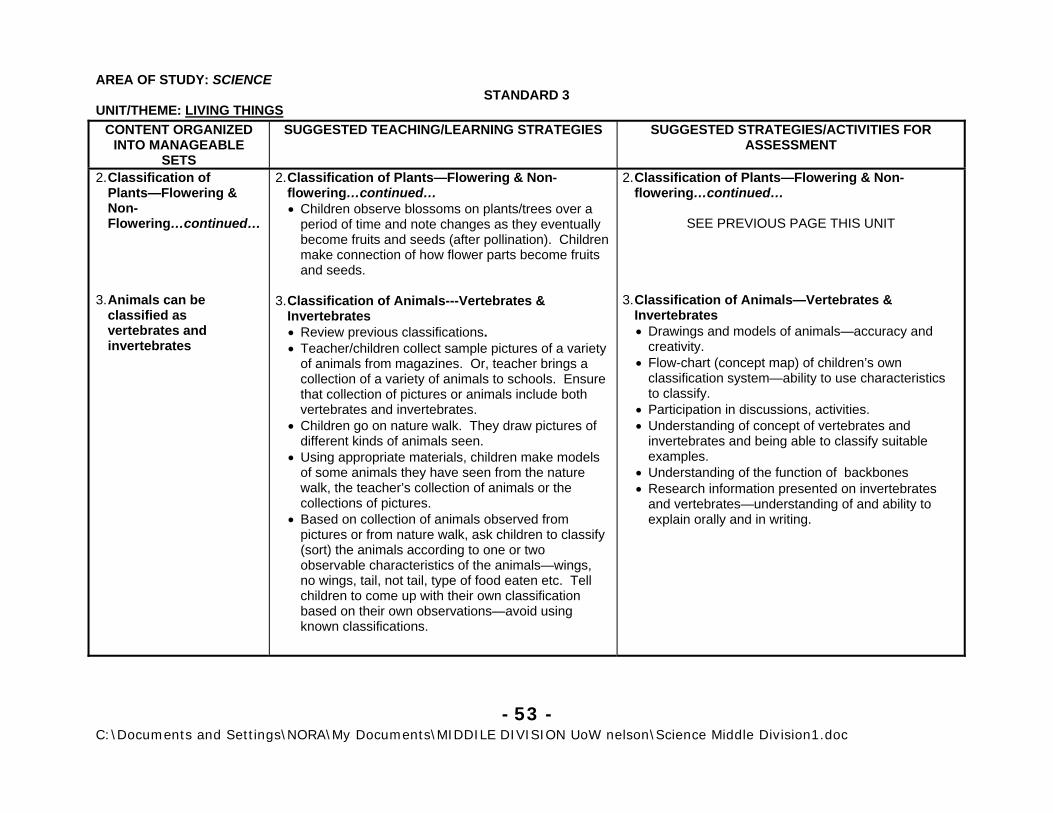
AREA OF STUDY: SCIENCE STANDARD 3
UNIT/THEME: LIVING THINGSCONTENT ORGANIZED
INTO MANAGEABLE SETS
SUGGESTED TEACHING/LEARNING STRATEGIES SUGGESTED STRATEGIES/ACTIVITIES FOR ASSESSMENT
2. Classification of Plants—Flowering & Non-Flowering…continued…
3. Animals can be
classified as vertebrates and invertebrates
2. Classification of Plants—Flowering & Non-flowering…continued… • Children observe blossoms on plants/trees over a
period of time and note changes as they eventually become fruits and seeds (after pollination). Children make connection of how flower parts become fruits and seeds.
3. Classification of Animals---Vertebrates &
Invertebrates • Review previous classifications. • Teacher/children collect sample pictures of a variety
of animals from magazines. Or, teacher brings a collection of a variety of animals to schools. Ensure that collection of pictures or animals include both vertebrates and invertebrates.
• Children go on nature walk. They draw pictures of different kinds of animals seen.
• Using appropriate materials, children make models of some animals they have seen from the nature walk, the teacher’s collection of animals or the collections of pictures.
• Based on collection of animals observed from pictures or from nature walk, ask children to classify (sort) the animals according to one or two observable characteristics of the animals—wings, no wings, tail, not tail, type of food eaten etc. Tell children to come up with their own classification based on their own observations—avoid using known classifications.
2. Classification of Plants—Flowering & Non-flowering…continued…
SEE PREVIOUS PAGE THIS UNIT
3. Classification of Animals—Vertebrates &
Invertebrates • Drawings and models of animals—accuracy and
creativity. • Flow-chart (concept map) of children’s own
classification system—ability to use characteristics to classify.
• Participation in discussions, activities. • Understanding of concept of vertebrates and
invertebrates and being able to classify suitable examples.
• Understanding of the function of backbones • Research information presented on invertebrates
and vertebrates—understanding of and ability to explain orally and in writing.
- 53 - C:\Documents and Settings\NORA\My Documents\MIDDILE DIVISION UoW nelson\Science Middle Division1.doc

AREA OF STUDY: SCIENCE STANDARD 3
UNIT/THEME: LIVING THINGSCONTENT ORGANIZED
INTO MANAGEABLE SETS
SUGGESTED TEACHING/LEARNING STRATEGIES SUGGESTED STRATEGIES/ACTIVITIES FOR ASSESSMENT
3. Classification of Animals—Vertebrates & Invertebrates …continued…
3. Classification of Animals—Vertebrates & Invertebrates…continued… • Have children draw flow chart (concept map)
showing classification system they have devised, for e.g.:
• Children use their classification system to classify
animals in sample and evaluate how effective their system is at classifying the animals.
• (Similar system could be devised for plants.) • Introduce children to terms—Vertebrates (animals
with backbones) and Invertebrates (animals without backbones).
• Brainstorm, discuss the importance of backbones—support and form to animals. Ask what would happen without backbones?
• What gives support and form for animals without backbones? Exoskeleton (Insects, Crustaceans), Hydroskeleton (e.g. Sea Anemone—jellyfish)
• Children research on vertebrates and invertebrates.
3. Classification of Animals—Vertebrates & Invertebrates…continued…
SEE PREVIOUS PAGE THIS UNIT
Animals
Wings No Wings
6 legs 2 legs
Plants
Living Things
- 54 - C:\Documents and Settings\NORA\My Documents\MIDDILE DIVISION UoW nelson\Science Middle Division1.doc

AREA OF STUDY: SCIENCE STANDARD 3
UNIT/THEME: LIVING THINGSCONTENT ORGANIZED
INTO MANAGEABLE SETS
SUGGESTED TEACHING/LEARNING STRATEGIES SUGGESTED STRATEGIES/ACTIVITIES FOR ASSESSMENT
4. Three other groups of living things are: Fungi, protist, bacteria
4. Bacteria, Fungi and Protists • Dampen some bread and set it to mold in a dark
corner. • Have children observe mold using a magnifying
glass or some other suitable magnifier. • Explain that mold is an example of another type of
living thing called Fungi. Ask children to research and bring pictures or drawings of other types of Fungi.
• Go on a nature walk—look for other types of Fungi—e.g. “toad stools” or mushrooms (Not all mushrooms are safe to eat—some are POISONOUS!)
• Children make drawings or write stories about fungi example a story about the “toad stool.” How do you think it got its name?
• Make some yoghurt or allow some milk to curdle. How does the milk become yoghurt? What makes it curdle? Explain that there are tiny living things (too small to be seen with the naked eyes) called bacteria that are responsible the milk curdling or turning to yoghurt.
• Children research some beneficial effects and harmful effects of bacteria.
• Collect and observe some sea weed. Sea weed is an example of a protist. What are other examples? Children research other examples? Teacher provides pictures of other examples and discusses them.
• Children write short stories on examples of bacteria, fungi and protists to demonstrate their benefits (uses) or harmful effects.
4. Bacteria, Fungi and Protists • Participation • Short stories show creativity and/or understanding • Presentations based on research
- 55 - C:\Documents and Settings\NORA\My Documents\MIDDILE DIVISION UoW nelson\Science Middle Division1.doc

AREA OF STUDY: SCIENCE STANDARD 3
UNIT/THEME: LIVING THINGSCONTENT ORGANIZED
INTO MANAGEABLE SETS
SUGGESTED TEACHING/LEARNING STRATEGIES SUGGESTED STRATEGIES/ACTIVITIES FOR ASSESSMENT
5. Organisms in a community depend on each other for survival (e.g. for food and habitat)
6. Integrating Spanish
5. Interdependence of organisms in a community • Children describe orally or in writing where they live:
type of house, street, neighbourhood • Children brainstorm where living things live—think of
where a variety of living things live. • Teacher explains that where a living thing lives is
called its habitat. Define what is a habitat and give examples from a variety of living things.
• Describe different types of habitats—what other types of living things are found there?
• Children draw, paint pictures or make models of different habitats or places where animals live.
• Review units dealing with natural processes that support and maintain the environment from Standard 2.
• Discuss concept of producers and consumers in a food chain. Why are plants producers?
• Write a story on the importance of plants as producers.
• In groups, think of ways and make flow charts showing how producers and consumers depend on each other.
6. Integrating Spanish • Write and pronounce the Spanish words for:
animals, growth, feeding, movement, respiration, excretion
5. Interdependence of organisms in a community • Ability to communicate effectively orally and in
writing. • Creativity of drawing, painting or model. • Flow chart showing interdependence of producers
and consumers—accurately identifies the producers and consumers.
6. Integrating Spanish • Correct pronunciation, appropriate intonation and
stress. • Word recognition. • Match picture to word or vice versa.
- 56 - C:\Documents and Settings\NORA\My Documents\MIDDILE DIVISION UoW nelson\Science Middle Division1.doc

AREA OF STUDY: SCIENCE STANDARD 3
UNIT/THEME: LIVING THINGSCONTENT ORGANIZED
INTO MANAGEABLE SETS
SUGGESTED TEACHING/LEARNING STRATEGIES SUGGESTED STRATEGIES/ACTIVITIES FOR ASSESSMENT
7. Skills • Arrange, record,
recognise, investigate, compose, create, identify, compare & contrast, collect, construct, sort, observe, discuss, match, classify, define
8. Attitudes • Cooperation • Appreciation • Respect • Pride • Interest • Willingness to share • Experiment • Leadership
7. Skills
SEE PREVIOUS PAGES THIS UNIT 8. Attitudes
SEE PREVIOUS PAGES THIS UNIT
7. Skills
SEE PREVIOUS PAGES THIS UNIT 8. Attitudes
SEE PREVIOUS PAGES THIS UNIT
- 57 - C:\Documents and Settings\NORA\My Documents\MIDDILE DIVISION UoW nelson\Science Middle Division1.doc

AREA OF STUDY: SCIENCE STANDARD 3
UNIT/THEME: LIVING THINGSLINKAGES/CONNECTIONS RECOMMENDED RESOURCES: TEACHER/STUDENT
• M5.a Collect, analyse and present data. • SS2.e Understand how people use natural resources of Belize. • SL4.c Use correct pronunciation, appropriate intonation and stress. • EL1.h Identify cause and effect relationship. • EL4.e Ask questions and give information. • WT4.a Identify an area of need. • WT5.b Design a device to meet a need/solve a problem. • EA1.g Create visual images using concrete materials.
• Chapter 13, Discover Science Book 3, Scott Foresman • Units 1 and 5, Accent on Science • Focus on Science, pp. 3-62
- 58 - C:\Documents and Settings\NORA\My Documents\MIDDILE DIVISION UoW nelson\Science Middle Division1.doc
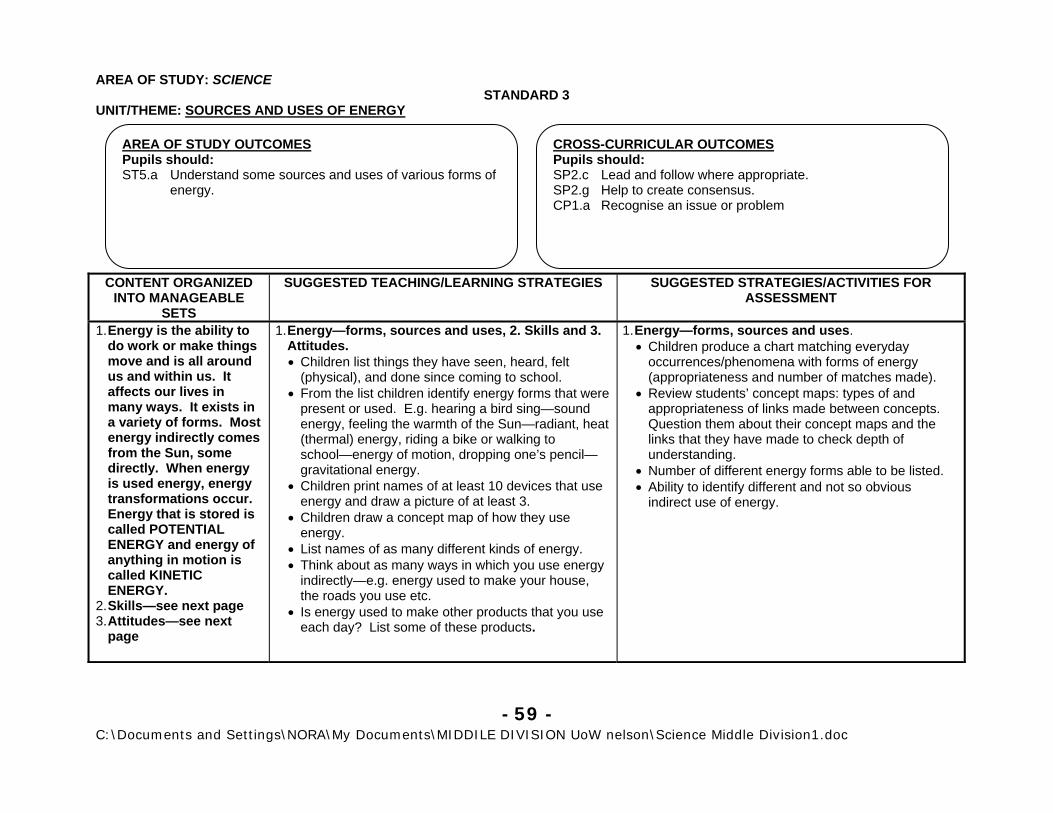
AREA OF STUDY: SCIENCE STANDARD 3
UNIT/THEME: SOURCES AND USES OF ENERGY
AREA OF STUDY OUTCOMES Pupils should: ST5.a Understand some sources and uses of various forms of
energy.
CROSS-CURRICULAR OUTCOMES Pupils should: SP2.c Lead and follow where appropriate. SP2.g Help to create consensus. CP1.a Recognise an issue or problem
CONTENT ORGANIZED INTO MANAGEABLE
SETS
SUGGESTED TEACHING/LEARNING STRATEGIES SUGGESTED STRATEGIES/ACTIVITIES FOR ASSESSMENT
1. Energy is the ability to do work or make things move and is all around us and within us. It affects our lives in many ways. It exists in a variety of forms. Most energy indirectly comes from the Sun, some directly. When energy is used energy, energy transformations occur. Energy that is stored is called POTENTIAL ENERGY and energy of anything in motion is called KINETIC ENERGY.
2. Skills—see next page 3. Attitudes—see next
page
1. Energy—forms, sources and uses, 2. Skills and 3. Attitudes. • Children list things they have seen, heard, felt
(physical), and done since coming to school. • From the list children identify energy forms that were
present or used. E.g. hearing a bird sing—sound energy, feeling the warmth of the Sun—radiant, heat (thermal) energy, riding a bike or walking to school—energy of motion, dropping one’s pencil—gravitational energy.
• Children print names of at least 10 devices that use energy and draw a picture of at least 3.
• Children draw a concept map of how they use energy.
• List names of as many different kinds of energy. • Think about as many ways in which you use energy
indirectly—e.g. energy used to make your house, the roads you use etc.
• Is energy used to make other products that you use each day? List some of these products.
1. Energy—forms, sources and uses. • Children produce a chart matching everyday
occurrences/phenomena with forms of energy (appropriateness and number of matches made).
• Review students’ concept maps: types of and appropriateness of links made between concepts. Question them about their concept maps and the links that they have made to check depth of understanding.
• Number of different energy forms able to be listed. • Ability to identify different and not so obvious
indirect use of energy.
- 59 - C:\Documents and Settings\NORA\My Documents\MIDDILE DIVISION UoW nelson\Science Middle Division1.doc

AREA OF STUDY: SCIENCE STANDARD 3
UNIT/THEME: SOURCES AND USES OF ENERGYCONTENT ORGANIZED
INTO MANAGEABLE SETS
SUGGESTED TEACHING/LEARNING STRATEGIES SUGGESTED STRATEGIES/ACTIVITIES FOR ASSESSMENT
1. Energy—forms, sources and uses, 2. Skills and 3. Attitudes …continued…
1. Energy—forms, sources and uses, 2. Skills and 3. Attitudes…continued… • Ask children to brainstorm where the energy they
observe in various forms come from. For e.g. where does the energy in light bulb or a lit candle come from? Where does the mechanical motion of a paper clip come from when you place a magnet close to it?
• Children will observe a light bulb or a candle and observe any other sources of energy, besides light, that are associated with it (e.g. thermal energy).
• Provide children with a worksheet containing the 10 common forms of energy and spaces for writing next to the forms of energy. Set up stations with different common, everyday devices around the classroom. Ask children to visit the stations and record on their worksheets next to the appropriate energy form the devices associated with that energy form—either by using it or producing it. Any given device may be associated with more than one energy form.
• Request children to write a short story telling what life on Earth would be like without one or more forms of energy.
1. Energy—forms, sources and uses…continued… • Ability of children to brainstorm (hypothesise)
different sources of energy for everyday forms of energy they observe. Can children trace the energy to its ultimate source?
• Quality of children’s observations—ability to observe fine details (i.e. make not so obvious observations) when observing energy given off by light bulb or lit candle.
• Ability of children to classify common everyday devices according to form of energy used or produced as one of the 10 common forms using a worksheet provided.
• Ask children to offer reasons for their classification to check understanding.
• Creativity of short story and ability to predict consequences of life on Earth without one or more forms of energy (Specify minimum number consequences to be looked for and also assess the quality of the consequences predicted—i.e. ability to go beyond obvious consequences).
- 60 - C:\Documents and Settings\NORA\My Documents\MIDDILE DIVISION UoW nelson\Science Middle Division1.doc
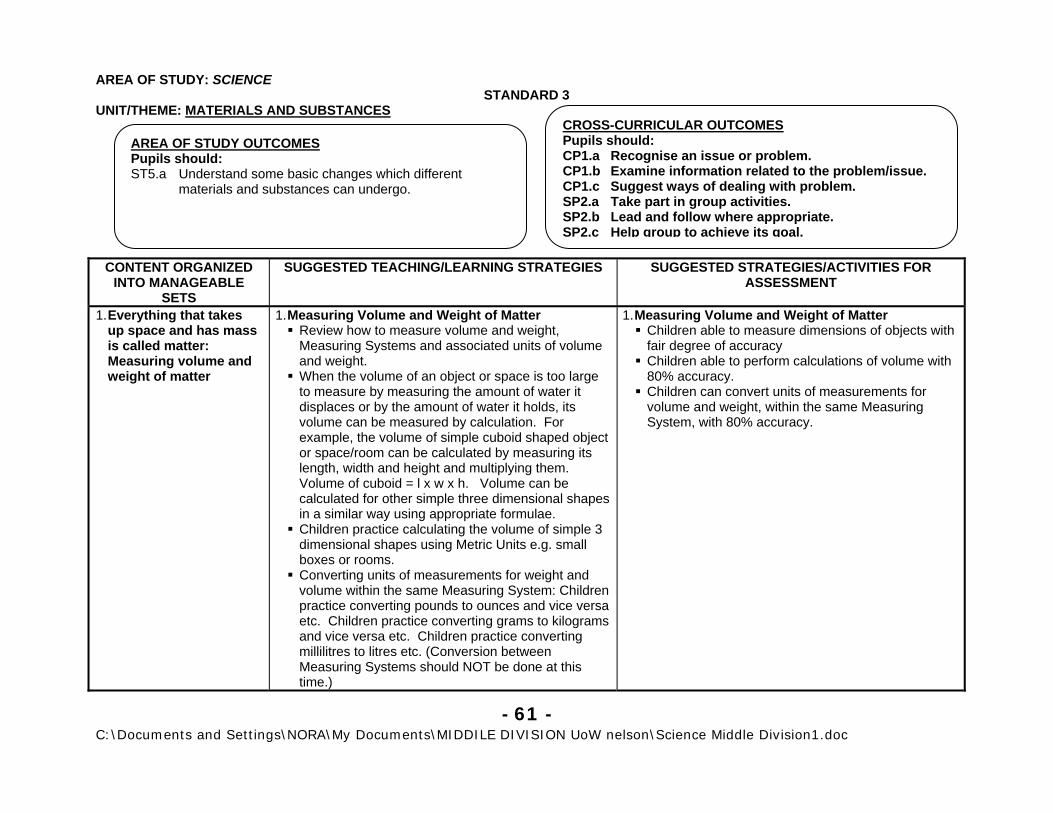
AREA OF STUDY: SCIENCE STANDARD 3
UNIT/THEME: MATERIALS AND SUBSTANCES
CONTENT ORGANIZED INTO MANAGEABLE
SETS
SUGGESTED TEACHING/LEARNING STRATEGIES SUGGESTED STRATEGIES/ACTIVITIES FOR ASSESSMENT
1. Everything that takes up space and has mass is called matter: Measuring volume and weight of matter
1. Measuring Volume and Weight of Matter Review how to measure volume and weight, Measuring Systems and associated units of volume and weight.
When the volume of an object or space is too large to measure by measuring the amount of water it displaces or by the amount of water it holds, its volume can be measured by calculation. For example, the volume of simple cuboid shaped object or space/room can be calculated by measuring its length, width and height and multiplying them. Volume of cuboid = l x w x h. Volume can be calculated for other simple three dimensional shapes in a similar way using appropriate formulae.
Children practice calculating the volume of simple 3 dimensional shapes using Metric Units e.g. small boxes or rooms.
Converting units of measurements for weight and volume within the same Measuring System: Children practice converting pounds to ounces and vice versa etc. Children practice converting grams to kilograms and vice versa etc. Children practice converting millilitres to litres etc. (Conversion between Measuring Systems should NOT be done at this time.)
1. Measuring Volume and Weight of Matter Children able to measure dimensions of objects with fair degree of accuracy
Children able to perform calculations of volume with 80% accuracy.
Children can convert units of measurements for volume and weight, within the same Measuring System, with 80% accuracy.
CROSS-CURRICULAR OUTCOMES Pupils should: CP1.a Recognise an issue or problem. CP1.b Examine information related to the problem/issue. CP1.c Suggest ways of dealing with problem. SP2.a Take part in group activities. SP2.b Lead and follow where appropriate. SP2.c Help group to achieve its goal.
AREA OF STUDY OUTCOMES Pupils should: ST5.a Understand some basic changes which different
materials and substances can undergo.
- 61 - C:\Documents and Settings\NORA\My Documents\MIDDILE DIVISION UoW nelson\Science Middle Division1.doc

AREA OF STUDY: SCIENCE STANDARD 3
UNIT/THEME: Simple Machines
CONTENT ORGANIZED INTO MANAGEABLE
SETS
SUGGESTED TEACHING/LEARNING STRATEGIES SUGGESTED STRATEGIES/ACTIVITIES FOR ASSESSMENT
1. Machines make work seem easier. They reduce the amount of or change the direction of force one needs to apply to move an object or to change its shape or speed or direction. Simple machines have few or no moving parts. Some examples of simple machines include: Inclined planes (aka ramp or steep): a simple consisting of a ramp (a flat surface higher at one end than the other) on which objects can be moved from a lower to higher place,
Wedges: an inclined plane used to cut or split things.
1. Simple Machines: Inclined planes and Wedges • Inclined planes: Teacher brings a poster/s (or
picture/s) showing people using inclined planes. Examples of posters might be workmen using a ramp to load a truck with something heavy, a car driving up a hill side, a car or other vehicle going up a bridge. Tell the children that all of these are inclined planes—a flat surface with one end higher than the other. Ask them to think what the inclined planes in the pictures allow us to do. (Explanation: to go from a lower place to a higher place.)
• Show the children a picture of a man loading a truck as follows.
Heavy Load
Ramp(Inclined Plane) • Ask the children to think why the man is using a
ramp (inclined plane) and through class discussion elicit that the inclined plane (ramp) makes it easier to lift the load to a higher place (rather than just lifting it straight up).
1. Simple Machines: Inclined planes and Wedges • Ability to make inferences based on experience and
previous knowledge. • Willingness to share ideas and opinions and to
participate. • Willingness to listen to other people’s ideas and
opinions.
CROSS-CURRICULAR OUTCOMES Pupils should: CP1.a Recognize an issue or problem. CP1.b Examine information related to the problem or
issue. SP2.a Take part in group activities. SP2.e Lead and follow where appropriate.
AREA OF STUDY OUTCOMES Pupils should: ST6.b Know the basic components and function of simple
machines in changing the speed or force of objects.
- 62 - C:\Documents and Settings\NORA\My Documents\MIDDILE DIVISION UoW nelson\Science Middle Division1.doc

AREA OF STUDY: SCIENCE STANDARD 3
UNIT/THEME: Simple MachinesCONTENT ORGANIZED
INTO MANAGEABLE SETS
SUGGESTED TEACHING/LEARNING STRATEGIES SUGGESTED STRATEGIES/ACTIVITIES FOR ASSESSMENT
1. Simple Machines: Inclined Planes and Wedges…continued…
1. Simple Machines: Inclined Planes and Wedges…continued… • Making a force meter. It would be useful in
learning about inclined planes to have force meter to be able to measure and compare forces used in lifting loads with and without an inclined plane. The following provides instructions for making a simple force meter for use in later activities. You will need a fairly stiff piece of cardboard, a scissors and/or razor blade, pen, rubber bands, ruler, a piece of wire and a drinking straw. (A simple spring scale can also serve as a Force Meter.) Children can work in groups on this activity. Care should be taken with sharp objects (razor blade and scissors).
• Cut a suitable piece of cardboard about 8” by 3”. About 2” from the top to about one 1” from the bottom cut out a narrow rectangular slit—no more than about quarter inch wide—in the middle. The piece of cardboard should now look like the following:
Cardboard (8”x3”)
Rectangular slit (approx. 2” from top & 1” from bottom & quarter inch wide) • Instructions continued next page.
1. Simple Machines: Inclined Planes and Wedges…continued… • Observe and record pupil’s ability to follow
instructions carefully (use checklist) and to follow safety precautions (use anecdotal records).
• Observe and record pupil’s cooperation in the group. Leading and following where appropriate. (use anecdotal records).
• Observe and record pupil’s ability to manipulate instruments and materials (use checklist or rating scale).
- 63 - C:\Documents and Settings\NORA\My Documents\MIDDILE DIVISION UoW nelson\Science Middle Division1.doc

AREA OF STUDY: SCIENCE STANDARD 3
UNIT/THEME: Simple MachinesCONTENT ORGANIZED
INTO MANAGEABLE SETS
SUGGESTED TEACHING/LEARNING STRATEGIES SUGGESTED STRATEGIES/ACTIVITIES FOR ASSESSMENT
1. Simple Machines: Inclined Planes and Wedges…continued…
1. Simple Machines: Inclined Planes and Wedges…continued…
• Next obtain a rubber band (or more than one rubber bands—with more rubber bands you would be able to measure heavier loads/forces) and staple one end of it (them) to the top middle of the cardboard so that the other end(s) reach about the top of the slit. See below.
Staple rubber band(s) here Rubber band(s) Piece of wire hooked to rubber band (s) & passing through the straw
Piece of straw (taped or glued to cardboard) • Cut a piece of drinking straw about 1” in length and
tape it (without flattening it) to the cardboard below the slit (see above).
• Take the piece of wire (must be long enough to stretch from the bottom end of the rubber band/s to beyond the straw) and form a hook at one end. Insert the wire through the straw and attach the end with the hook to the rubber band(s). Now form a hook at the other end of the wire (see above).
• Instructions continued next page.
1. Simple Machines: Inclined Planes and Wedges…continued…
SEE PREVIOUS PAGE THIS UNIT
- 64 - C:\Documents and Settings\NORA\My Documents\MIDDILE DIVISION UoW nelson\Science Middle Division1.doc

AREA OF STUDY: SCIENCE STANDARD 3
UNIT/THEME: Simple MachinesCONTENT ORGANIZED
INTO MANAGEABLE SETS
SUGGESTED TEACHING/LEARNING STRATEGIES SUGGESTED STRATEGIES/ACTIVITIES FOR ASSESSMENT
1. Simple Machines: Inclined Planes and Wedges…continued…
1. Simple Machines: Inclined Planes and Wedges…continued… • Now lap and glue a piece of paper or cardboard
around the wire at the top near the rubber band(s) so that it protrudes on the other side of the slit in the cardboard. This will be the pointer for the meter. (see below)
Piece of paper or cardboard folded around the wire Piece of wire • Next use a ruler to mark a scale on the front so that
the finished force meter would look like the diagram in the next column. Note: A scale drawn in this way is arbitrary and non-standard. You can make it less arbitrary by marking the scale according to known weights. That is, you can attach known weights to the wire hook and then put a mark corresponding to that known weight on scale. Then by increasing the weights you can make more marks corresponding to the new known weights. Such a scale will still be less arbitrary but still non-standard unless you use standard weights from the Imperial or Metric Systems.
• The completed Force Meter (which can also be used as a scale) will be useful in many experiments to measure the amount of force required to move different objects/loads. It will be useful in the experiments to measure force required to move objects on different inclined planes as opposed to lifting them straight up.
1. Simple Machines: Inclined Planes and Wedges…continued…
SEE PREVIOUS PAGES THIS UNIT
• Assess the quality of the finished product. Use
criteria for judging the finished product such as neatly constructed, parts properly connected and held together well, force meter works effectively.
Rubber band(s)
Paper or cardboardPointer
Scale Wire with hook Hanging weight
Front View of finished Force Meter
- 65 - C:\Documents and Settings\NORA\My Documents\MIDDILE DIVISION UoW nelson\Science Middle Division1.doc

AREA OF STUDY: SCIENCE STANDARD 3
UNIT/THEME: Simple MachinesCONTENT ORGANIZED
INTO MANAGEABLE SETS
SUGGESTED TEACHING/LEARNING STRATEGIES SUGGESTED STRATEGIES/ACTIVITIES FOR ASSESSMENT
1. Simple Machines: Inclined Planes and Wedges…continued…
1. Simple Machines: Inclined Planes and Wedges…continued… • Ask children to bring toy cars/ trucks to school.
Obtain some pieces of flat wood to use as ramps. Organise children into groups and have them set up ramps with the flat pieces of wood using stacks of books or other suitable materials as supports for one end. Using the force meters created in the previous activity or using a regular spring scale. Measure how much ‘force’ is required to lift the toy car or truck from the floor to the top of the stack of books or other support. If toy cars or trucks are not available or too light to be significantly measured using the force meter or scale, fill them with appropriate weights to increase their weight and therefore the amount of force required or use blocks of wood as substitute for the toy cars or trucks.
Force Meter (Or Spring Scale)
Lift truck vertically
Toy Truck Ramp (Inclined Plane)
Stack of Books
1. Simple Machines: Inclined Planes and Wedges…continued…
SEE NEXT PAGE
- 66 - C:\Documents and Settings\NORA\My Documents\MIDDILE DIVISION UoW nelson\Science Middle Division1.doc

AREA OF STUDY: SCIENCE STANDARD 3
UNIT/THEME: Simple MachinesCONTENT ORGANIZED
INTO MANAGEABLE SETS
SUGGESTED TEACHING/LEARNING STRATEGIES SUGGESTED STRATEGIES/ACTIVITIES FOR ASSESSMENT
1. Simple Machines: Inclined Planes and Wedges…continued…
1. Simple Machines: Inclined Planes and Wedges…continued… • Then with the force meter attached to the front have
them pull the toy car, truck or block of wood up the ramp (inclined plane) and record how much force is needed. Is the force required greater or lesser using the inclined plane (ramp) than lifting straight up? What is the distance moved by the load (toy car, truck or block of wood) when you lift it straight up to the top of the books? What is the distance moved by the load (toy car, truck or block of wood) when you use the inclined plane—measure from the beginning of the inclined plane to the top of it? Which distance is greater? Record your results in the table as shown below.
• Ask children to hypothesise (suggest a suitable
explanation for) the relationship between the force and distance with and without using the inclined plane (ramp).
• Analyse the inclined plane in terms of the direction of the force applied and the direction of movement of load.
1. Simple Machines: Inclined Planes and Wedges…continued… • Child’s ability to make and record observations
accurately (evidence from filling in table). • Child’s ability to draw conclusions and make
hypothesis based on observations (of the relationship between force and distance with and without using the inclined plane). This can be assessed through discussion or by questioning the child/children.
• On a worksheet or with real examples, give children some sample problems with different inclined planes and loads (objects) to be moved from a lower to a higher place and ask them questions regarding whether more force or less force would be required. Use this to judge their understanding of the relationship between force and distance in relation to using the inclined plane simple machine to move loads/objects.
• Children able to draw, annotate and explain orally a diagram of how the force and load move in an inclined plane as below. Question children orally individually or in groups to assess understanding.
Force Load Load moves in same direction as force.
Distance Moved
? ?
Using the inclined plane
When lifted straight up
? ?
Force required
- 67 - C:\Documents and Settings\NORA\My Documents\MIDDILE DIVISION UoW nelson\Science Middle Division1.doc

AREA OF STUDY: SCIENCE STANDARD 3
UNIT/THEME: Simple MachinesCONTENT ORGANIZED
INTO MANAGEABLE SETS
SUGGESTED TEACHING/LEARNING STRATEGIES SUGGESTED STRATEGIES/ACTIVITIES FOR ASSESSMENT
1. Simple Machines: Inclined Planes and Wedges…continued…
1. Simple Machines: Inclined Planes and Wedges…continued… • Try other similar experiments with inclined planes,
for example, setting the incline (ramp) at different angles (steepness) including flat surface and seeing how much force is required to move objects/loads of given weights. Record your results in a table as shown in the shown below. (N.B. Steepness can be measured as an angle or as the ratio of the ‘rise’ over the ‘run’—i.e. how high the inclined plane climbs divided by the distance along the base.)
‘rise’ (height)
‘run’ • Ask children to hypothesise (suggest a reasonable
explanation for) the relationship between the steepness of the incline and the amount of force required to move the object/load up it. Elicit through discussion their hypotheses about this relationship. Where possible ask them to draw on their own experience when climbing or riding up steep slopes. Ask them which would be easier to climb: A very steep slope or a not so steep slope. Comparisons can be made with steepness of Maya Temple stairs and their own stairs at home.
1. Simple Machines: Inclined Planes and Wedges…continued… • Child’s ability to make and record observations
accurately (evidence from filling in table). • Child’s ability to draw conclusions and make
hypothesis based on observations (of the relationship between force and steepness of the inclined plane). This can be assessed through discussion or by questioning the child/children.
• On a worksheet or with real examples, give children some sample problems with different inclined planes and loads (objects) to be moved from a lower to a higher place and ask them questions regarding whether more force or less force would be required. Use this to judge their understanding of the relationship between force and distance in relation to using the inclined plane simple machine to move loads/objects.
Steepness Force required
?
?
?
?
??
- 68 - C:\Documents and Settings\NORA\My Documents\MIDDILE DIVISION UoW nelson\Science Middle Division1.doc

AREA OF STUDY: SCIENCE STANDARD 3
UNIT/THEME: Simple MachinesCONTENT ORGANIZED
INTO MANAGEABLE SETS
SUGGESTED TEACHING/LEARNING STRATEGIES SUGGESTED STRATEGIES/ACTIVITIES FOR ASSESSMENT
1. Simple Machines: Inclined planes and Wedges…continued…
1. Simple Machines: Inclined Planes and Wedges…continued… • Wedges: Teacher or children bring pictures of
wedges to school e.g., axes, sledge hammers, chisels. Teacher may wish to bring samples of tools that are wedges or use wedges (e.g. axes, sledge hammers, chisels) for display only. Where children are from rural agricultural area examples of farm tools used as wedges would be useful, if from an area where other type of work is done try to bring examples of that. (N.B. If children are asked to handle these tools they must be carefully supervised to prevent any injuries—cuts scrapes etc. to them.) Have children examine the pictures or samples and describe what they notice about the tools. What do the tools do? [Axe used to split wood, chisel to cut/split wood, sledge hammer to split wood, machete to cut, pick axe to split stone or soil.]
• Ask children to identify the part of the tool that does the splitting or cutting. Have them draw it in outline e.g. when the axe or chisel head is viewed from the side it has V-shape turned on its side. This V-shape is essentially an inclined plane.
• For enrichment, help children to recognise wedges in unusual places—e.g. the bow of a boat, the shape of the nose of some jet-liners or fighter planes, the shape of some fishes, the shape of earthworms that burrow in the ground. Other wedges include knives, saws, the pegs that are driven in the ground in constructing tents.
1. Simple Machines: Inclined Planes and Wedges…continued… • Students’ ability to identify wedges in common
places. • Students ability to identify wedges in unusual
places.
- 69 - C:\Documents and Settings\NORA\My Documents\MIDDILE DIVISION UoW nelson\Science Middle Division1.doc

AREA OF STUDY: SCIENCE STANDARD 3
UNIT/THEME: Simple MachinesCONTENT ORGANIZED
INTO MANAGEABLE SETS
SUGGESTED TEACHING/LEARNING STRATEGIES SUGGESTED STRATEGIES/ACTIVITIES FOR ASSESSMENT
1. Simple Machines: Inclined Planes and Wedges…continued…
2. Skills • Observing,
classifying, investigating, predicting, manipulating, defining, communicating, comparing, experimenting, following procedures and instructions, cooperating, participating, inferring and sharing.
3. Attitudes • Appreciating/respecting
one another • Team work • Neatness, self-control • Responsibility • Self-esteem
1. Simple Machines: Inclined Planes and Wedges…continued… • Explain the how the wedge works: When force is
applied to the pack of the wedge its two surfaces force apart the material before it. The tip of the wedge is narrow and so is able to gain entry into the material and as it is pushed forward, the rest of the wedge gets wider and wider and so forces apart the material. Ask children to draw diagrams like below to show how a wedge works.
(force applied here)
wedge (e.g. axe or
chisel) narrow tip of wedge allows easy entry As more force is applied the wider part of wedge forces the material apart
1. Simple Machines: Inclined Planes and Wedges…continued… • Children able to draw a diagram with notes to show
how the wedge works (e.g. an axe) when asked to do so on their own and can orally explain their diagram. Asking them questions of about their diagrams and notes to assess understanding of how the wedge works.
- 70 - C:\Documents and Settings\NORA\My Documents\MIDDILE DIVISION UoW nelson\Science Middle Division1.doc

AREA OF STUDY: SCIENCE STANDARD 3
UNIT/THEME: Simple MachinesLINKAGES/CONNECTIONS RECOMMENDED RESOURCES: TEACHER/STUDENT
WT5.c Construct a simple device to meet a need/solve a problem. EL1.h Identify cause and effect relationships. EL4.a Express ideas and opinions. WT2.a Understand the elements which contribute to the effectiveness
of work. WT4.a Identify an area of need. SP2.a A take part in group activities. SP2.d Respond to feelings of others. SS2.c Understand how people use the resources of their environment. EA1.e Explore and experiment to create visual images through use of
a variety of artistic tools and media. EL4.d Use correct grammatical structures. H4.a Engage in physical activities that promote interpersonal skills
and health of mind and body. EL1.g Predict what will happen in a sequence of events. EL2.d Follow instructions/directions. EL2.b Identify a sequence of events.
Make it Work! Machines, Action Publishing Experiment with Movement, Action Publishing Science, Teacher’s Edition 3, Silver Burdett Exploring Science: An Introduction to CXC Sciences, Book 3,
Thomas Nelson and Sons.
- 71 - C:\Documents and Settings\NORA\My Documents\MIDDILE DIVISION UoW nelson\Science Middle Division1.doc

AREA OF STUDY: SCIENCE STANDARD 3
UNIT/THEME: Natural Processes
AREA OF STUDY OUTCOMES Pupils should: ST8.a Understand the natural processes which support and
maintain the environment.
CROSS-CURRICULAR OUTCOMES Pupils should: CP1.a Recognise an issue or a problem. SP2.a Take part in group activities. SP2.b Express their opinion & feelings in a socially acceptable
way.
CONTENT ORGANIZED INTO MANAGEABLE
SETS
SUGGESTED TEACHING/LEARNING STRATEGIES SUGGESTED STRATEGIES/ACTIVITIES FOR ASSESSMENT
1. Energy and nutrients pass from living to living thing in a food chain. • When any living thing
eats, energy and nutrients pass from one living thing to another
• Living things linked through the transfer of energy from one to another through feeding/eating form a food chain. Each one in the food chain depends on the one before it for its food (energy and nutrients).
• Most living things are part of more than one food chain. Linked food chains form food webs in the environment.
1. Energy and nutrients pass from living thing to living thing in a food chain. • Review the characteristics of living things. Review
that living things need energy and nutrients to do these activities. Review that all energy ultimately comes from the Sun when plants make food and this energy is passed animals when animals eat plants and so on. Review that nutrients all come ultimately from the environment when plants use them to make food and animals get them when they eat plants. Question and answer session: Teacher writes questions on strips of paper (ask children to come up with some of their own questions). Place questions in a bag or box. Children get to come up to draw a question from the box/bag and to answer it one by one. After each question let children discuss each answer given and clarify if necessary.
• Explain that because plants produce their own food they are called producers.
1. Energy and nutrients pass from living thing to living thing in a food chain • Identification of food chains from the food web • Creation of a food chain using pictures or names of
animals and plants • Written test: Matching exercise on definition of terms• Ability to identify various food chains in a food web • Ability to interpret how some living things survive • Be able to explain orally and/or in writing that energy
and nutrients come from food and that all energy in the environment ultimately comes from the Sun and all nutrients come from the environment.(Written or Oral test/quiz)
• Ability to trace the path of energy from the Sun through a sample food chain and to explain orally or in writing.
- 72 - C:\Documents and Settings\NORA\My Documents\MIDDILE DIVISION UoW nelson\Science Middle Division1.doc

AREA OF STUDY: SCIENCE STANDARD 3
UNIT/THEME: Natural ProcessesCONTENT ORGANIZED
INTO MANAGEABLE SETS
SUGGESTED TEACHING/LEARNING STRATEGIES SUGGESTED STRATEGIES/ACTIVITIES FOR ASSESSMENT
1. Energy and Nutrients pass from living to living things in food chain…continued…
1. Energy and Nutrients pass from living thing to living thing in a food chain…continued… • Explain that animals and other tiny living things
(micro-organisms) are called consumers because they obtain their energy by eating other living things (plants and other animals).
• Explain that living things linked through the transfer of energy and nutrients from one to another through feeding/eating form a food chain. In the environment, linked food chains form food webs.
• Definition of terms: food chain, producer, food web, consumer, carnivores, omnivores, decomposers, herbivores. Create a Science Dictionary—use words and pictures where possible.
• Have children collect pictures of plants and animals. In groups, have them organise them on posters to form food chains and food webs. Label the producers, consumers (herbivores, omnivores and carnivores).
• On the posters created trace the path of energy from the Sun through the food chain including that which is lost to the environment as heat at each level.
• What is the first source of energy in any food chain/web? [Answer: The Sun]
1. Energy and Nutrients pass from living thing to living thing in food chain…continued…
SEE PREVIOUS PAGE
- 73 - C:\Documents and Settings\NORA\My Documents\MIDDILE DIVISION UoW nelson\Science Middle Division1.doc

AREA OF STUDY: SCIENCE STANDARD 3
UNIT/THEME: Natural ProcessesLINKAGES/CONNECTIONS RECOMMENDED RESOURCES: TEACHER/STUDENT
Reading • EL1.g, EL1.h, EL1.i, EL1.j, EL1.k
Listening and Viewing • EL2.a, EL2.c, EL2.d, EL2.e
Writing • EL3.a, EL3.d, EL3.g
Speaking • EL4.a, EL4.c, EL4.e, EL4.f
Spanish • SL4.b
Mathematics • M5.a
Social Studies • SS2.a
Music • EA1.a
Art • EA1.c
Crafts • EA1.g
Design and Technology • WT5.b, WT5.c
Health and Physical Education • H4.a
• Life Sciences, Teachers’ Edition • Science Probe 8 (2nd Edition) • Life Science • New Biology for Tropical Schools • Biology for CXC • Science Activities for Children (1) • Earth and Its Resources, New Science Library
- 74 - C:\Documents and Settings\NORA\My Documents\MIDDILE DIVISION UoW nelson\Science Middle Division1.doc

AREA OF STUDY: SCIENCE STANDARD 3
UNIT/THEME: Protection of the Environment
CONTENT ORGANIZED INTO MANAGEABLE
SETS
SUGGESTED TEACHING/LEARNING STRATEGIES SUGGESTED STRATEGIES/ACTIVITIES FOR ASSESSMENT
1. The natural environment consists of living and non-living things that depend on each other.
1. The natural environment consists of living and non-living things, which depend on each other. • Children are divided into buzz-groups and define the
term environment. • Define the term environment. • Children do collages to represent their environment. • Children go for nature walk to observe the
environment. • Children create an environment given instructions • Children describe orally and in writing why the
environment should be protected. • Children discuss factual statements why organisms
depend on each other. • Children are asked to brainstorm how we use the
living and non-living things in the environment as natural resources in our lives—e.g. for food, for shelter, for energy (petroleum, wind, water as energy sources) etc.
• Children do a research project and presentation on how we use one natural resource in our lives to include where the natural resource comes from, how it is obtained, what do we use it for and what are the effects of our obtaining it and using it—good & bad.
1. The natural environment consists of living and non-living things, which depend on each other. • Ability to cooperate within groups. • Clarity of definition. • Creativity of design. • Organise information into clear logical order. • Ability to present data in a clear and concise format.
CROSS-CURRICULAR OUTCOMES Pupils should: SP2.a Take part in group activities. SP2.c Identify feelings. SP2.e Lead and follow where appropriate. CP1.a Recognise an issue or a problem.
AREA OF STUDY OUTCOMES Pupils should: ST8.b Understand the need for protection, care and
responsible use of the environment.
- 75 - C:\Documents and Settings\NORA\My Documents\MIDDILE DIVISION UoW nelson\Science Middle Division1.doc
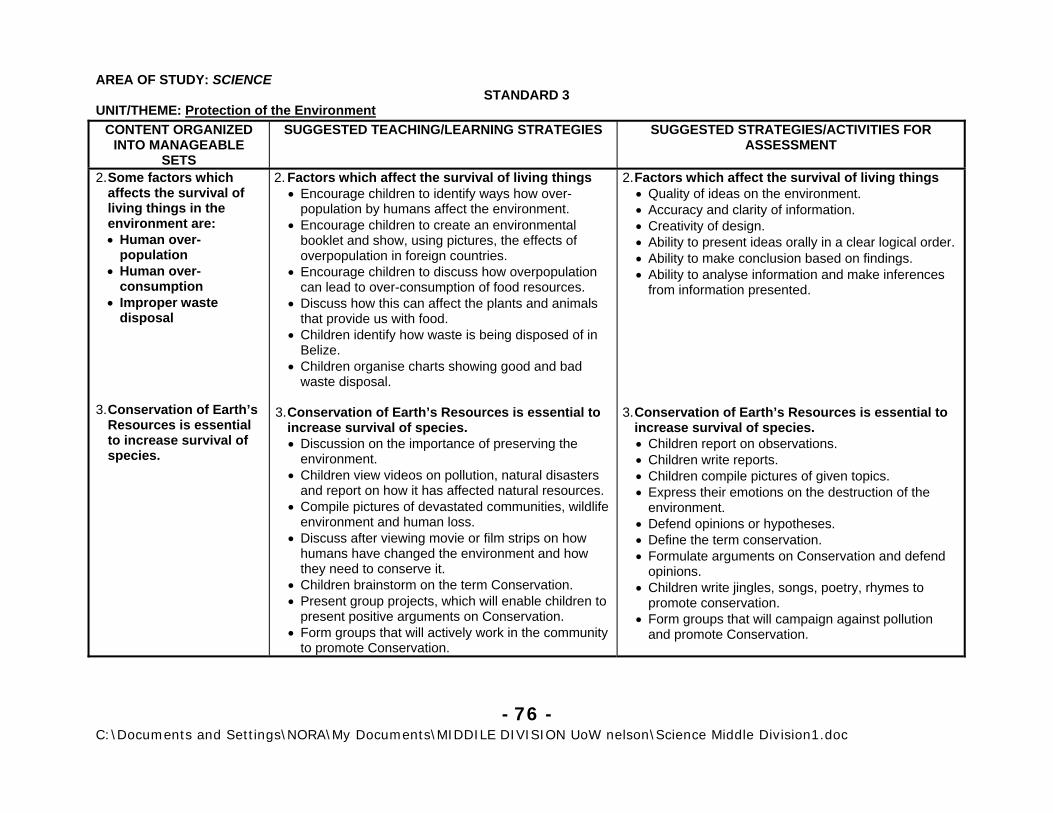
AREA OF STUDY: SCIENCE STANDARD 3
UNIT/THEME: Protection of the EnvironmentCONTENT ORGANIZED
INTO MANAGEABLE SETS
SUGGESTED TEACHING/LEARNING STRATEGIES SUGGESTED STRATEGIES/ACTIVITIES FOR ASSESSMENT
2. Some factors which affects the survival of living things in the environment are: • Human over-
population • Human over-
consumption • Improper waste
disposal 3. Conservation of Earth’s
Resources is essential to increase survival of species.
2. Factors which affect the survival of living things • Encourage children to identify ways how over-
population by humans affect the environment. • Encourage children to create an environmental
booklet and show, using pictures, the effects of overpopulation in foreign countries.
• Encourage children to discuss how overpopulation can lead to over-consumption of food resources.
• Discuss how this can affect the plants and animals that provide us with food.
• Children identify how waste is being disposed of in Belize.
• Children organise charts showing good and bad waste disposal.
3. Conservation of Earth’s Resources is essential to
increase survival of species. • Discussion on the importance of preserving the
environment. • Children view videos on pollution, natural disasters
and report on how it has affected natural resources. • Compile pictures of devastated communities, wildlife
environment and human loss. • Discuss after viewing movie or film strips on how
humans have changed the environment and how they need to conserve it.
• Children brainstorm on the term Conservation. • Present group projects, which will enable children to
present positive arguments on Conservation. • Form groups that will actively work in the community
to promote Conservation.
2. Factors which affect the survival of living things • Quality of ideas on the environment. • Accuracy and clarity of information. • Creativity of design. • Ability to present ideas orally in a clear logical order. • Ability to make conclusion based on findings. • Ability to analyse information and make inferences
from information presented. 3. Conservation of Earth’s Resources is essential to
increase survival of species. • Children report on observations. • Children write reports. • Children compile pictures of given topics. • Express their emotions on the destruction of the
environment. • Defend opinions or hypotheses. • Define the term conservation. • Formulate arguments on Conservation and defend
opinions. • Children write jingles, songs, poetry, rhymes to
promote conservation. • Form groups that will campaign against pollution
and promote Conservation.
- 76 - C:\Documents and Settings\NORA\My Documents\MIDDILE DIVISION UoW nelson\Science Middle Division1.doc

AREA OF STUDY: SCIENCE STANDARD 3
UNIT/THEME: Protection of the EnvironmentCONTENT ORGANIZED
INTO MANAGEABLE SETS
SUGGESTED TEACHING/LEARNING STRATEGIES SUGGESTED STRATEGIES/ACTIVITIES FOR ASSESSMENT
4. The Flora and Fauna in our Natural Environment are important to each other’s coexistence.
4. The importance of Flora and Fauna to each others coexistence • Take a field trip to observe plants and animals. Ask
children to observe how plants and animals depend on each other.
• Upon return to class list observations made by children of interdependence of plants and animals in the environment.
• Ask children to predict what would happen if a particular plant and/or animal were taken out of the particular environment. How might it affect other plants and animals in the environment? Discuss children’s hypotheses.
• Tell children that they will be making a book about 30 Good Reasons for Plants. Organise them into groups of five or six. Collect a number of resources—books, newspaper articles, journals, magazines etc. having information on the importance of trees in the environment. Distribute these resources to the different group. Have them set a time limit for each group to come up with 5-8 good reasons for plants in the environment—have them think of plants in a variety of environments—urban, rural and rain-forest. Have a coordinating committee that will collect all the reasons, eliminate duplications between groups and prepare a revised list. Have them distribute copies of the revised list of reasons to each group. Have groups think of things people who read the book might do in order to help trees. Again have the coordinating committee eliminate duplications and prepare a revised list.
4. The importance of Flora and Fauna to each others coexistence • Ability of children to make observations—
assess through oral questioning/discussion. • Ability to predict based on observations and
previous knowledge. • Ability to carry our investigation (research) • Cooperation in groups (use anecdotal records,
rating scale). • Sharing of ideas and respect for others opinion
(use anecdotal records, rating scales). • Observe and record, using anecdotal record,
how children help the group to arrive at consensus.
- 77 - C:\Documents and Settings\NORA\My Documents\MIDDILE DIVISION UoW nelson\Science Middle Division1.doc

AREA OF STUDY: SCIENCE STANDARD 3
UNIT/THEME: Protection of the EnvironmentCONTENT ORGANIZED
INTO MANAGEABLE SETS
SUGGESTED TEACHING/LEARNING STRATEGIES SUGGESTED STRATEGIES/ACTIVITIES FOR ASSESSMENT
4. The Flora and Fauna in our Natural Environment are important to each other’s coexistence…continued…
5. Belize’s Environmental
Protection Laws
4. The importance of Flora and Fauna to each other’s coexistence…continued… • Get volunteers to write up the final text of good
reasons for trees and for things that can be done to help trees. Divide the remaining tasks among other students—designing a cover, preparing a table of contents and illustrating the text.
• Have a Publication Party to celebrate presentation of the book to the Library—include a healthy snack at least part of which comes from trees.
• Have students write to newspapers and so on to invite others to read the book “30 Good Reasons for Trees.’ Have them write their ideas on ways to help trees on large construction paper leaves. Create a large construction paper tree in the classroom and have them pin their leaves onto it.
• A similar activity can be done on the topic ‘Plants Need Animals Too’ or ‘How Animals Help Plants’
• Have children build models of ecosystems. 5. Belize’s Environmental Protection Laws • Invite a guest speaker from the Ministry of Natural
Resources, the Belize Audubon Society or other conservation agency to talk about the Belize’s Environmental Protection Laws.
• Have children prepare a list of questions before hand that they would like to know about Belize’s Environmental Protection Laws and about conservation efforts in Belize.
• Ask children to do a research project on one aspect of Belize’s Conservation Law or Conservation Efforts in Belize considering such questions as what, why, how, who, when, where.
4. The importance of Flora and Fauna to each other’s coexistence…continued… • Neatness and attention to detail in preparing the
final text. • Willingness to share and receive ideas. • Creativity in design of cover and in illustrating the
text. • Cooperation of students when working together
(assess through anecdotal record or rating scale) • Ability to express ideas clearly in writing using
persuasive language. 5. Belize’s Environmental Protection Laws • Ability to formulate and ask reasonable questions. • Ability to conduct a research/investigation—
variety of sources utilised, clarity of organisation, usage of different forms of communication where appropriate—diagrams charts etc.
- 78 - C:\Documents and Settings\NORA\My Documents\MIDDILE DIVISION UoW nelson\Science Middle Division1.doc

AREA OF STUDY: SCIENCE STANDARD 3
UNIT/THEME: Protection of the EnvironmentCONTENT ORGANIZED
INTO MANAGEABLE SETS
SUGGESTED TEACHING/LEARNING STRATEGIES SUGGESTED STRATEGIES/ACTIVITIES FOR ASSESSMENT
6. Effects of deforestation
6. Effects of deforestation • Conduct a demonstration to show the effects of
deforestation. You will need: two large empty milk cartons (or suitable substitute), some grass sod (this can be commercially obtained or you can simply cut out a square portion of the top layer of soil including the grass from a grassy area), two containers filled with water (empty gallon bottles) and some soil without grass on top. Cut out one face of the milk cartons and insert the grass sod up to about half way in one of them. Do the same with the soil (without grass) in the other one. Now raise the un-open end of the cartons by placing on a brick or suitable block of wood. Place the other open end in a collecting tray of some sort. Now pour water over both—the grass sod and the soil without grass. Have children observe what happens. [The soil without grass washes away easily and flows down with the water causing erosion and the soil pollutes the water ‘down stream.’ On the other hand the soil in the grass sod does not wash away as readily.]
• Ask children to consider and answer the following questions: What is it about the grass that held the soil together. In which carton did the water flow down more quickly? How does the grass act like trees would in the forest—especially along mountain and hill sides? What effects would removing the trees (deforestation) have on the soil on hill and mountain sides? [Flooding down stream and pollution of waters and the sea down stream]
6. Effects of deforestation • Ability to make observation, make inferences and
draw conclusions based on such observations. • Ability to predict consequences of deforestation
using support from observations made of demonstration.
• Ability to hypothesise how grass helps to keep soil together and how trees in prevent soil erosion and flooding.
- 79 - C:\Documents and Settings\NORA\My Documents\MIDDILE DIVISION UoW nelson\Science Middle Division1.doc

AREA OF STUDY: SCIENCE STANDARD 3
UNIT/THEME: Protection of the EnvironmentLINKAGES/CONNECTIONS RECOMMENDED RESOURCES: TEACHER/STUDENT
CP1.b Examine information related to the problem/issue. CP1.c Suggest ways of dealing with the problem issue. SP1.a Recognise the values associated with choices. SP2.a Take part in group activities. SP2.d Respond to the feeling of others. SP2.g Help to create consensus. SP2.h Accept major decisions. SP3.a Assess their needs/interests. EL1.d Use context clues to interpret a selection. EL1.i Identify a sequence of events. EL2.a Identify main ideas and supporting details. EL3.d Produce work that is legible and acceptable. EL3.f Demonstrate the ability to use a variety of words and phrases to
express thoughts and feelings. EL4.b Use the correct pronunciation and appropriate intonation and
stress. EL4.e Ask questions and give information. M4.a Make reasonable approximations based on relevant life
experiences. ST8.a Understand the natural processes which support and maintain
the environment. WT4.a Identify an area of need. WT5.a Identify a simple problem/need. EA1.g Explore and experiment to create visual images through the
use of a variety of concrete materials in the environment. SL4.a Express thoughts and feelings using simple structures and
vocabulary appropriate to audience. H4.a Engage in physical activities that promote interpersonal skills
and health of mind and body.
Geography of Belize, Cubola Biology—Visualising Life, Annotated Teachers’ Edition, Holt-
Rinehart-Winston. New Science Library, Earth and Its Resources, Volume 2 365 Nature Crafts & Activities Publications International Ltd. Selected topics in Biology: Ecology, T.J. King, Nelson. Science Activities for Children, George C. Lorbeer, Leslie W.
Nelson, Volume 1, 9th Edition.
- 80 - C:\Documents and Settings\NORA\My Documents\MIDDILE DIVISION UoW nelson\Science Middle Division1.doc

AREA OF STUDY: SCIENCE STANDARD 3
UNIT/THEME: CHANGES IN LIVING THINGS (NATURAL HISTORY)
AREA OF STUDY OUTCOMES Pupils should: ST1.a Understand some of the changes in living things and
their environment from prehistoric (life before mankind) to the present.
CROSS-CURRICULAR OUTCOMES Pupils should: SP2.a Take part in group activities. SP2.e Lead and follow where appropriate. SP2.f Help the group to achieve its goals. SP2.g Help to create consensus.
CONTENT ORGANIZED INTO MANAGEABLE
SETS
SUGGESTED TEACHING/LEARNING STRATEGIES SUGGESTED STRATEGIES/ACTIVITIES FOR ASSESSMENT
1. Time Line: Scientists have divided Earth’s past into four geological eras.
1. Time line: Earth’s past (geological eras) • Children will draw time line and interpret past
geological eras. Design line and identify periods with eras (i.e., Pre-Cambian, Palaeozoic, Mesozoic & Cenozoic with Mesozoic having Triassic, Jurassic and Cretaceous periods).
• Children reinforce data through play, e.g., hopscotch, pictionary, spinning wheel with names/pictures of prehistoric living things. (Spinner names the living thing chosen or verbally explains about that epoch).
• Children describe time line orally. • Children identify differences between time lines.
1. Time line: Earth’s past (geological eras) • Ability to explain time line, using a diagram, orally
and in writing—clarity of explanations. • Cooperation when playing or working in groups. • Ability to make inferences based on information
given about time lines. • Label a blank time line. • Accuracy of data when playing time line games. • Make factual statements from information.
- 81 - C:\Documents and Settings\NORA\My Documents\MIDDILE DIVISION UoW nelson\Science Middle Division1.doc

AREA OF STUDY: SCIENCE STANDARD 3
UNIT/THEME: CHANGES IN LIVING THINGS (NATURAL HISTORY)CONTENT ORGANIZED
INTO MANAGEABLE SETS
SUGGESTED TEACHING/LEARNING STRATEGIES SUGGESTED STRATEGIES/ACTIVITIES FOR ASSESSMENT
2. Some changes in living things through the geologic eras.
3. Skills • Describe, Design,
organise, select, draw, assemble, sort, distinguish, infer, estimate, hypothesise, investigate, observe, participate, revise, evaluate, question.
4. Attitudes • Appreciate changes in
living things. • Respond to the needs
of others. • Appreciate different
views. • Develop respect for
others. • Develop willingness to
participate in group activities.
• Express awareness of natural changes in our environment.
• Respond to care for then environment and conservation of species.
2. Some changes in living things through the geologic eras. Organise children into groups. Assign each group to create a segment of a time-line, showing the various geologic time periods. The completed time line should be large enough to be posted on the classroom wall. Each group will research the time-period they are assigned. They will find (or draw) pictures and find general information of the living things that lived at different points in the time period assigned and will also describe in writing and with the aid of pictures the characteristics of the physical (non-living) environment at the time. Each group gets a chance to explain the types of living organisms that lived in the period and what the physical environment, weather/climate was like at the time. Hold a class discussion on how the living things and their environments have changed within the time periods and from period to period. What were some of these changes? Why did they occur? (Children’s research should allow them to discuss and answer some of these questions.) (See Note in next column.)
Explain how conditions in the natural environment affected living things and what happened when those conditions changed. Have children write a short story describing a day in the life of a living thing (plant or animal) that lived in one of the geologic period emphasising how it was adapted to its environment.
3. & 4. Skills and Attitudes (See activities for 1 & 2)
2. Some changes in living things through the geologic eras. • Accuracy of children’s presentations. • Variety of sources of information used in
presentations. • Creative ideas used for presenting information. • Children formulate, ask and answer questions. • Creativity of short story. • Use of language in the short story. Assess children’s cooperation and participation in groups using a rating scale or anecdotal record.
Assess children’s ability to investigate/research information—use a variety of sources, select and condense relevant information in writing.
Assess children’s ability to explain orally how living things and the physical environment has changed over time.
Note: The teacher should be well versed on the various eras and should use the children’s work as a basis for discussing the different eras, the living things that existed at the time and the changes that took place from era to era and what caused these changes. 3. & 4. Skills and Attitudes
(See activities for 1 & 2).
- 82 - C:\Documents and Settings\NORA\My Documents\MIDDILE DIVISION UoW nelson\Science Middle Division1.doc

AREA OF STUDY: SCIENCE STANDARD 3
UNIT/THEME: CHANGES IN LIVING THINGS (NATURAL HISTORY)LINKAGES/CONNECTIONS RECOMMENDED RESOURCES: TEACHER/STUDENT
ST7.a Understand the characteristics of living things, the main categories into which they can be grouped, and how these inter-relate with the environment.
ST8.b Understand the need for protection, care and responsible use of the environment.
EL1.i Identify a sequence of events. EL2.c Predict what will happen in a sequence of events. SL4.a Collect analyse and present data using charts, graphs, tables
and diagrams. SL4.b Ask questions for information and understanding. SP2.b Express their opinions and feelings in a socially acceptable
way. SP2.f Help the group to achieve its goals. SP3.b Assess progess in relation to achievement of goals and adjust
goals and strategies as necessary. EL1.k Interpret and follow instructions/directions. EL3.e Demonstrate the ability to use a variety of styles and forms. EL4.e Ask questions and give information. EL4.f Express ideas and opinions. EL4.g Use correct pronunciation, appropriate intonation and stress.
- 83 - C:\Documents and Settings\NORA\My Documents\MIDDILE DIVISION UoW nelson\Science Middle Division1.doc

AREA OF STUDY: SCIENCE STANDARD 4
UNIT/THEME: THE UNIVERSE
CONTENT ORGANIZED INTO MANAGEABLE
SETS
SUGGESTED TEACHING/LEARNING STRATEGIES SUGGESTED STRATEGIES/ACTIVITIES FOR ASSESSMENT
1. There are similarities and differences between the Earth and other planets: • Distance from the Sun • Composition of each
Planet • Atmosphere • Number of Moons • Temperature Range • Time of orbit
1. Similarities and differences between the Earth and other planets. • Review the characteristics of the different planets
that were studied in Standard 3. • Distance from the Sun. • Composition of each planet. • Atmosphere of planet. • Number of Moons. • Temperature range. • Time of orbit. • Other special characteristics.
• Based on these characteristics have children imagine/brainstorm/hypothesise whether humans could live on these planets as they live on Earth. If humans cannot live on the planets as they live on Earth, what might they need to do on the specific planet to live their—e.g. build special houses, where special suits, carry oxygen tanks etc. Let children’s imagination run wild.
• Children write short stories on (a) What it would be like to live on another planet (b) What kind of beings might live on other planets.
1. Similarities and differences between Earth and other planets. • Expression of ideas orally. • Willingness to participate in discussions and to
share and listen to each other’s ideas. • Ability to express ideas in writing considering: • Creativity of ideas/imaginativeness • Make logical connections between knowledge of
the characteristics of planets and what life would have to be like on the planet.
CROSS-CURRICULAR OUTCOMES Pupils should: SP2.a Take part in group activities. SP2.b Express their opinions and feelings in a socially
acceptable way. SP2.c Help the group to achieve its goals. SP2.d Help to create consensus. CP1.a Examine information related to the
problem/issue.
AREA OF STUDY OUTCOMES Pupils should: ST2.a Understand some similarities and differences between
the Earth, the planets and other celestial bodies. ST6.a Understand time in relation to Earth’s rotation & orbit
around the Sun and the Moon’s orbit around the Earth.
- 84 - C:\Documents and Settings\NORA\My Documents\MIDDILE DIVISION UoW nelson\Science Middle Division1.doc

AREA OF STUDY: SCIENCE STANDARD 4
UNIT/THEME: THE UNIVERSECONTENT ORGANIZED
INTO MANAGEABLE SETS
SUGGESTED TEACHING/LEARNING STRATEGIES SUGGESTED STRATEGIES/ACTIVITIES FOR ASSESSMENT
2. Other Celestial Bodies in the Solar System.
2. Other Celestial Bodies in the Solar System. • Assignment: ask children to observe the night sky
(on a clear night) and to record what they observe. These might include man-made satellites and meteors. They may have to observe for several nights to be able to record any peculiar observations related to man-made satellites and meteors.
• Discuss observations the following day. Discuss what man-made satellites are—what they are used for (weather and communications satellites etc. launched into space to orbit the Earth).
• View pictures or video of space shuttle and astronauts launching or repairing satellites in space.
• Discuss what meteors/meteorites are. Explain that they are pieces of rocks etc. that are floating in space and that enter the Earth’s atmosphere and as they fall to Earth due to Earth’s gravitational pull they burn up. The colour of light given off when a meteor burns in the atmosphere is due to the material that makes it up. Explain that sometimes if a meteor is big enough, it falls to Earth without completely burning up in the atmosphere and may actually hit the Earth’s surface. A meteorite that hits the Earth’s surface (doesn’t completely burn in the atmosphere) is called a meteorite. Discuss some huge craters left in the Earth caused by fallen meteorites. Have children study the Moon’s surface on a clear night of full Moon—notice the darker points on the Moon’s surface—some of these have been caused by Meteorites hitting the Moon. Discuss the meteorite theory about the extinction of the dinosaurs.
• View pictures or videos of meteors/meteorites.
2. Other Celestial Bodies in the Solar System. • Ability/willingness to formulate, ask and answer
questions (participation). • Respect for each other’s opinions.
- 85 - C:\Documents and Settings\NORA\My Documents\MIDDILE DIVISION UoW nelson\Science Middle Division1.doc

AREA OF STUDY: SCIENCE STANDARD 4
UNIT/THEME: THE UNIVERSECONTENT ORGANIZED
INTO MANAGEABLE SETS
SUGGESTED TEACHING/LEARNING STRATEGIES SUGGESTED STRATEGIES/ACTIVITIES FOR ASSESSMENT
2. Other Celestial Bodies…continued…
2. Other Celestial Bodies…continued… • Discuss comets. Explain what a comet is and that
they orbit the Sun too. • View pictures or videos of comets. • Children write fiction stories about comets, satellites,
meteors and/or asteroids. • Children create artwork or models of comets,
satellites, asteroids and meteorites. • Children do research on comets, satellites, asteroids
and meteorites.
2. Other Celestial Bodies…continued… • Creativity and imaginativeness of fiction stories. • Ability to express themselves effectively in writing. • Assess children’s research for data collection
(variety of sources used), ability to interpret information from sources and make it their own, ability to organise information logically using different forms of presentation.
- 86 - C:\Documents and Settings\NORA\My Documents\MIDDILE DIVISION UoW nelson\Science Middle Division1.doc

AREA OF STUDY: SCIENCE STANDARD 4
UNIT/THEME: THE UNIVERSELINKAGES/CONNECTIONS RECOMMENDED RESOURCES: TEACHER/STUDENT
EL1.c Read fluently with appropriate intonation and expression for information and pleasure.
EL1.j Make inferences and draw conclusions. EL1.k Interpret and follow instructions/directions. EL2.b Identify a sequence of events. EL2.d Follow instructions/directions. EL2.e Interpret and respond appropriately to messages conveyed
through visual images and tone of voice. EL3.a Demonstrate their ability to write grammatically correct
sentences. EL3.d Produce work that is legible and acceptable. EL3.e Demonstrate the ability to use a variety of styles and forms. EL4.a Express ideas and opinions. EL4.c Use language to share ideas, to convince and express feelings. EL4.e Ask questions and give information. EL4.g Use body language and gestures appropriate to speech. M2.c Understand degrees as a measure of turn. M3.a Measure capacity, distance, weight and time using standard
and non-standard measuring devices. M3.c Add and subtract whole numbers and decimals to solve
problems. M4.b Use logical reasoning based on meaningful data to draw
conclusions about the likely occurrence of an event. M5.a Collect, analyse and present data using charts, graphs, tables
and diagrams. SS4.a Understand how the movement of the Earth causes changes in
time and seasons. EA1.e Explore and experiment to create visual images through use of
a variety of artistic tools and media. EA1.g Explore and experiment to create visual images through use of
a variety of concrete materials in the environment.
• Encyclopaedia World Book • Integrated Science for Caribbean Schools Book 2 • Finding Out Book 4 • Earth in Space • Sky and Space • Resource Personnel • Weather Bureau • Ranger Rick’s Nature Scope • Discovering Earth – Day and Night • The World Book Encyclopaedia of Science – Volume 1
- 87 - C:\Documents and Settings\NORA\My Documents\MIDDILE DIVISION UoW nelson\Science Middle Division1.doc
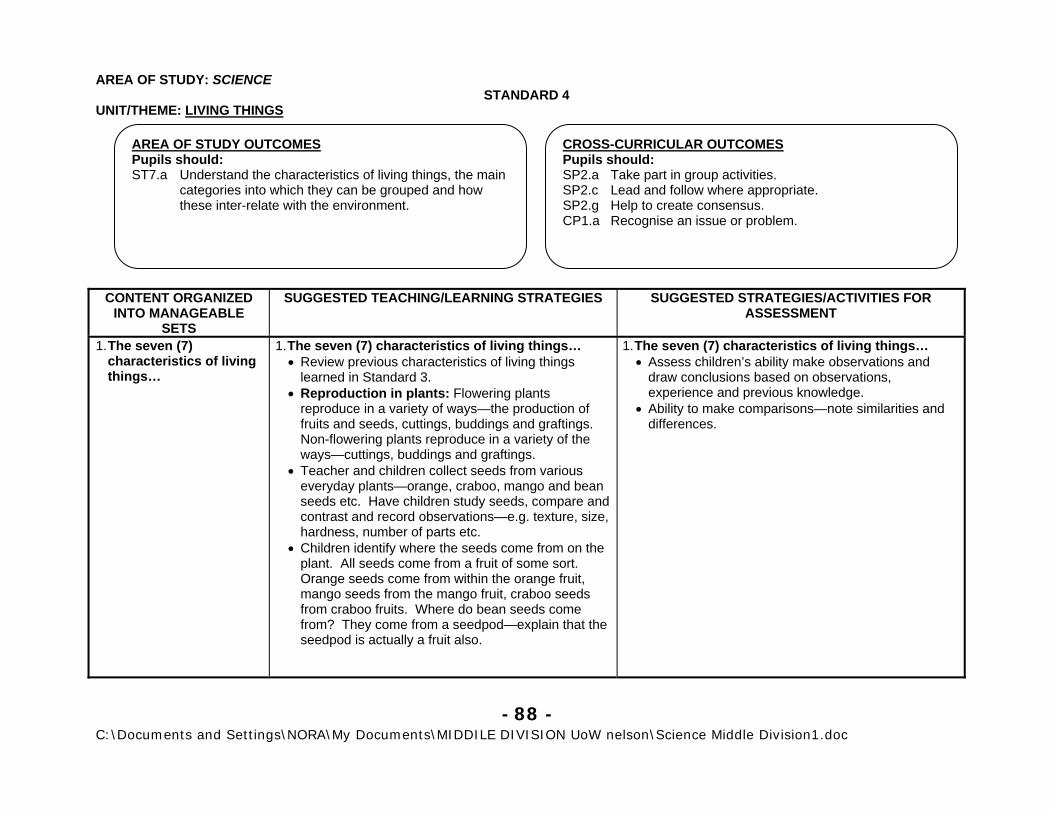
AREA OF STUDY: SCIENCE STANDARD 4
UNIT/THEME: LIVING THINGS
AREA OF STUDY OUTCOMES Pupils should: ST7.a Understand the characteristics of living things, the main
categories into which they can be grouped and how these inter-relate with the environment.
CROSS-CURRICULAR OUTCOMES Pupils should: SP2.a Take part in group activities. SP2.c Lead and follow where appropriate. SP2.g Help to create consensus. CP1.a Recognise an issue or problem.
CONTENT ORGANIZED INTO MANAGEABLE
SETS
SUGGESTED TEACHING/LEARNING STRATEGIES SUGGESTED STRATEGIES/ACTIVITIES FOR ASSESSMENT
1. The seven (7) characteristics of living things…
1. The seven (7) characteristics of living things… • Review previous characteristics of living things
learned in Standard 3. • Reproduction in plants: Flowering plants
reproduce in a variety of ways—the production of fruits and seeds, cuttings, buddings and graftings. Non-flowering plants reproduce in a variety of the ways—cuttings, buddings and graftings.
• Teacher and children collect seeds from various everyday plants—orange, craboo, mango and bean seeds etc. Have children study seeds, compare and contrast and record observations—e.g. texture, size, hardness, number of parts etc.
• Children identify where the seeds come from on the plant. All seeds come from a fruit of some sort. Orange seeds come from within the orange fruit, mango seeds from the mango fruit, craboo seeds from craboo fruits. Where do bean seeds come from? They come from a seedpod—explain that the seedpod is actually a fruit also.
1. The seven (7) characteristics of living things… • Assess children’s ability make observations and
draw conclusions based on observations, experience and previous knowledge.
• Ability to make comparisons—note similarities and differences.
- 88 - C:\Documents and Settings\NORA\My Documents\MIDDILE DIVISION UoW nelson\Science Middle Division1.doc

AREA OF STUDY: SCIENCE STANDARD 4
UNIT/THEME: LIVING THINGSCONTENT ORGANIZED
INTO MANAGEABLE SETS
SUGGESTED TEACHING/LEARNING STRATEGIES SUGGESTED STRATEGIES/ACTIVITIES FOR ASSESSMENT
1. The seven (7) characteristics of living things…continued…
1. The seven (7) characteristics of living things…continued… • Children and teacher bring sample fruits and seed
pods. In groups, children dissect and analyse parts of fruits/seed pods—the outer skin, the inner flesh, the seed. Children draw and label. Have some extra fruit for children to enjoy afterwards.
• Children observe some seeds growing into plants—e.g. beans, young mango plants, etc. Visit to a farm or plant nursery might be useful here.
• Where do seeds and fruits come from on the plant? Explain that the seeds and fruits develop from flowers on the plant.
• In groups, have students study/dissect different flowers to know their component parts—e.g. petals, sepals, stamen (male part that gives off pollen), pistil (female part) that receives pollen. Observe pollen with hand lens. Cut open ovary at the base of the pistil and observe contents. Children draw and label parts.
• Explain in simple terms that the pollen serves to fertilise the ova (tiny little structures inside the ovary) and that these then turn into seeds when fertilised, while the ovary develops into a fruit around them.
• Examine some flowers on plants that are in various stages of developing into fruits. Collect some of these in various stages and have children study and dissect them.
• Children create posters showing flowers, seeds and fruits with diagrams explaining the process of reproduction.
1. The seven (7) characteristics of living things…continued… • Use a checklist to assess, through observation of
child/children, the ability to follow directions and to observe safety precautions when dissecting.
• Review children’s written observations for thoroughness and relevance.
• Assess children’s posters for neatness, presentation style and clarity and accuracy of diagrams and explanations.
• Discuss/question children individually about their posters to check understanding of the process of fruit and seed development from flower pollination.
- 89 - C:\Documents and Settings\NORA\My Documents\MIDDILE DIVISION UoW nelson\Science Middle Division1.doc
AREA OF STUDY: SCIENCE STANDARD 4
UNIT/THEME: LIVING THINGSCONTENT ORGANIZED
INTO MANAGEABLE SETS
SUGGESTED TEACHING/LEARNING STRATEGIES SUGGESTED STRATEGIES/ACTIVITIES FOR ASSESSMENT
1. The seven (7) characteristics of living things…continued…
1. The seven (7) characteristics of living things…continued… • Explain that seeds contain all the information
(instructions) for forming new plants as well as stored energy.
• Have children dissect a kidney bean seed, before during and after germination. Let them observe and record using notes and drawings what they observe. (They should note that eventually the two halves of the seed—cotyledons—shrivel up as the stored food inside is used for the growth of the plant.) Explain that when we eat beans it is this stored food that we are actually eating.
• Explore some other ways of reproduction in plants—cuttings, graftings buddings. Bring examples of these and have children study them and try growing plants from them. Visit a farm, nursery or other site where this is done—e.g. some children may have parents who are into gardening and who practice these ways of plant reproduction. (This is a good way to build a good relationship with the parent/home and the school/child’s education).
• Reproduction in animals: Children will explore where young animals come from –e.g. baby chicks come from eggs, lizards come from eggs, kittens from the mother cat without a visible egg, puppies from mother dog without a visible egg, they came from their mother without a visible egg. (N.B. this is a good lesson to link with Health Education dealing with human sexuality etc.).
1. The seven (7) characteristics of living things…continued…
SEE PREVIOUS PAGE
- 90 - C:\Documents and Settings\NORA\My Documents\MIDDILE DIVISION UoW nelson\Science Middle Division1.doc

AREA OF STUDY: SCIENCE STANDARD 4
UNIT/THEME: LIVING THINGSCONTENT ORGANIZED
INTO MANAGEABLE SETS
SUGGESTED TEACHING/LEARNING STRATEGIES SUGGESTED STRATEGIES/ACTIVITIES FOR ASSESSMENT
1. The seven (7) characteristics of living things...continued…
1. The seven (7) characteristics of living things…continued… • Collect some lizard eggs or fertile chickens eggs
and incubate them (i.e. keep them warm by placing in a suitable container with some source of heat e.g. an incandescent light bulb). Have children observe the eggs over a time recording observations daily including how long it took for eggs to hatch from start of incubation. Children should observe that baby chickens or lizards hatch from the eggs. The eggs were laid by the female chicken (hen) or lizard. Explain that the female carries eggs inside of her and that these are fertilised (similar to the pollination process in plants) when she and the male mate. The young animals (chicken or lizard) develop inside the egg after it is laid.
• What about cats, dogs and humans? Do they lay eggs—No! They give birth to live young ones. The young cats, dogs and humans develop inside the mother’s womb until they are ready to be borne (not hatched). For a baby to develop inside the mother dog, cat or human, the ovum (kind of egg) must be fertilised by a male through copulation (mating/intercourse). The fertilised ovum (egg) then develops into a young one inside the womb of the mother—however it does not exist inside an eggshell like other lizard and the chicken. Instead it is born alive not hatched. Linking with Health Education (human sexuality), discuss human reproduction and associated health and social issues. Use resources and resource persons from relevant sources. It would be good to consult with parents on this matter and invite them to participate in the discussions with their children.
1. The seven (7) characteristics of living things…continued… • Assess using a checklist, rating scale or anecdotal
record responsibility of children in making daily observations and record these.
• Assess using a checklist, rating scale or anecdotal record child’s/children’s participation in discussion by formulating, asking and answering questions.
• Assess using a checklist, rating scale or anecdotal record child’s/children’s respect for each other’s opinions.
- 91 - C:\Documents and Settings\NORA\My Documents\MIDDILE DIVISION UoW nelson\Science Middle Division1.doc

AREA OF STUDY: SCIENCE STANDARD 4
UNIT/THEME: LIVING THINGSCONTENT ORGANIZED
INTO MANAGEABLE SETS
SUGGESTED TEACHING/LEARNING STRATEGIES SUGGESTED STRATEGIES/ACTIVITIES FOR ASSESSMENT
1. The seven (7) characteristics of living things…continued…
1. The seven (7) characteristics of living things…continued… • Response (irritability) in plants: Plants respond to
different things in their environment. Have children germinate some kidney beans into bean plants. Obtain a cardboard box big enough to hold about ten of the bean plants. Cut out half of one side of the box. Place the plants in the box and cover so that the only light that reaches the plants are through the cut side of the box. Children should care for the plants daily and observe the growth of the plants. In a few days they should note that the plants have grown towards the light—i.e., their stems have curved so that their leaves are all pointing to towards the light. Conclusion: plant stems respond to light by growing towards it.
Plants stems grow towards light Light • Organise children into groups. Each group will need
a cork, some cotton or other suitable absorbent tissue, a common pin, some glue (e.g. crazy glue), a piece of cardboard (e.g. the side of a cardboard box), a pair of scissors, a 2” nail and some red kidney beans seeds.
• Cut a circle about 3” in diameter from the cardboard. Push the nail through the centre of the circle and push it into the rest of the cardboard so that the circle can be turned around on the cardboard backing. See diagram in the next column.
1. The seven (7) characteristics of living things…continued… • Use anecdotal records, checklist or rating scales to
assess children’s care for plants. • Review children’s written observations to assess
their ability to make and record observations in a systematic way.
• Through direct questioning assess children’s ability to draw conclusions from the observations they make.
Cardboard circle
Cardboard backing Nail
- 92 - C:\Documents and Settings\NORA\My Documents\MIDDILE DIVISION UoW nelson\Science Middle Division1.doc

AREA OF STUDY: SCIENCE STANDARD 4
UNIT/THEME: LIVING THINGSCONTENT ORGANIZED
INTO MANAGEABLE SETS
SUGGESTED TEACHING/LEARNING STRATEGIES SUGGESTED STRATEGIES/ACTIVITIES FOR ASSESSMENT
1. The seven (7) characteristics of living things…continued…
1. The seven (7) characteristics of living things…continued… • Next glue the cork to the centre of the circle as
shown in the diagram below. cork
bean root
bean seed Cardboard circle Cardboard backing • Children germinate some bean seeds. As the
beans begin to sprout, they will select one suitable sprout, wrap it in moistened cotton or other tissue being careful to give the root space to grow. They will then pin the see to the cork using the common pin so that the root is horizontal (see above) Tape the circle so that it does not move. They will then water the sprout over the next few days and observe the growth of the root. It should grow downwards. Then when the root has begun to grow downwards, they will rotate the circle 180 degrees so that the root tip is pointing upwards. Then they will continue to water and care for the been sprout and make observations. They should note that the root will grow downwards in a few days.
• When this has happened, have them rotate the circle 180 degrees. Continue to care for the seeds and record observations. The root should once again begin to grow downwards.
1. The seven (7) characteristics of living things…continued… • Use anecdotal records, checklist or rating scales to
assess children’s care for plants. • Review children’s written observations to assess
their ability to make and record observations in a systematic way.
• Through direct questioning assess children’s ability to draw conclusions from the observations they make.
- 93 - C:\Documents and Settings\NORA\My Documents\MIDDILE DIVISION UoW nelson\Science Middle Division1.doc

AREA OF STUDY: SCIENCE STANDARD 4
UNIT/THEME: LIVING THINGSCONTENT ORGANIZED
INTO MANAGEABLE SETS
SUGGESTED TEACHING/LEARNING STRATEGIES SUGGESTED STRATEGIES/ACTIVITIES FOR ASSESSMENT
1. The seven (7) characteristics of living things…continued…
1. The seven (7) characteristics of living things…continued… • Teacher and children discuss the results of their two
experiments. Observations should lead to the conclusion that plant stems grow towards light. Ask children to think of what factor in the environment might cause the roots to grow downward. (Answer: gravity.) The roots grow towards gravity. Therefore the stems of plants respond to light in the environment by growing towards it whereas the roots respond to gravity by growing towards the pull of gravity.
1. The seven (7) characteristics of living things…continued…
SEE PREVIOUS PAGES THIS UNIT
- 94 - C:\Documents and Settings\NORA\My Documents\MIDDILE DIVISION UoW nelson\Science Middle Division1.doc
AREA OF STUDY: SCIENCE STANDARD 4
UNIT/THEME: LIVING THINGSLINKAGES/CONNECTIONS RECOMMENDED RESOURCES: TEACHER/STUDENT
EL1.k Interpret and follow events. EL3.f Use a variety of words and phrases to express thoughts and
feelings. ST5.a Understand some basic changes different materials can
undergo. M5.a Collect, analyse and present data. EA1.g Create visual images through the use of variety of materials. SL4.c Use correct pronunciation, appropriate intonation and stress.
• Discover Science Book 3, Chapters 1-3 • Accent on Science, Units 1 and 5 • Focus a Science, Pages 3-62
- 95 - C:\Documents and Settings\NORA\My Documents\MIDDILE DIVISION UoW nelson\Science Middle Division1.doc

AREA OF STUDY: SCIENCE STANDARD 4
UNIT/THEME: MATERIALS AND SUBSTANCES
CONTENT ORGANIZED INTO MANAGEABLE
SETS
SUGGESTED TEACHING/LEARNING STRATEGIES SUGGESTED STRATEGIES/ACTIVITIES FOR ASSESSMENT
1. The Three (3) States of Matter and changes in the states of matter
1. The Three (3) States of Matter and changes in the state of matter • In a small metal container (e.g. a can with the lid
removed) heat a small amount of water (where a stove or other suitable heat source is not available consider heating the container using a cigarette lighter). TAKE ALL SAFETY PRECAUTIONS WHEN WORKING WITH HEAT OR FIRE! Ask children to observe and record what happens to the water in the can over time (e.g. bubbles/boils, then steam is given off etc.). What is steam? (Steam is water in a gas state or water vapour) Why do we see steam when water is boiled but not when the water on the wet floor or water in puddle ‘disappears.’ (Explanation: Steam is hot and when it meets the cooler air it cools and appears a bit whitish like smoke).
• Hold a suitable piece of foil paper, a mirror or piece of glass over the top of the can of boiling water. Children observe and record what happens. What happens to the steam as it comes into contact with the piece of foil? (The steam changes into liquid water that collects on the foil, mirror or glass.)
1. The Three (3) States of Matter and changes in the states of matter • Review children’s observations recorded to assess
their observation skills. • Through direct questioning, assess children’s ability
to make hypotheses • Ability to draw conclusions/make inferences based
on previous experience and knowledge.
CROSS-CURRICULAR OUTCOMES Pupils should: CP1.a Recognise an issue or a problem. CP1.b Examine information related to the problem/issue. CP1.c Suggest ways of dealing with the problem. SP2.a Take part in group activities. SP2.b Lead and follow where appropriate. SP2.c Help the group to achieve its goal.
AREA OF STUDY OUTCOMES Pupils should: ST5.a Understand some basic changes which different
materials can undergo.
- 96 - C:\Documents and Settings\NORA\My Documents\MIDDILE DIVISION UoW nelson\Science Middle Division1.doc

AREA OF STUDY: SCIENCE STANDARD 4
UNIT/THEME: MATERIALS AND SUBSTANCESCONTENT ORGANIZED
INTO MANAGEABLE SETS
SUGGESTED TEACHING/LEARNING STRATEGIES SUGGESTED STRATEGIES/ACTIVITIES FOR ASSESSMENT
1. The Three (3) States of Matter and changes in the states of matter…continued…
1. The Three States of Matter and changes in the state of matter…continued… • From their observations and discussions of liquid
water changing into water vapour (gaseous water), or liquid water changing into solid water (ice) ask children to draw a diagram, with relevant notes, to show how the relationship between the three states of matter, using water as an example.
Cooling Heating
sublimation sublimation Cooling Heating • Note: At this time it is not necessary to go into
explanations about freezing/solidification/melting or evaporation/condensation or sublimation. However, you could mention that changes in state are related to changes in the temperature of the substance—heating or cooling.
• Have children brainstorm other examples of matter in different states and draw or cut out pictures to show these different states (e.g. solid candle wax vs. liquid candle wax, solid rock of a mountain vs. molten lava of volcano, liquid gasoline vs. gaseous fumes of gasoline, solid iron vs. molten iron).
1. The Three (3) States of Matter and changes in the states of matter…continued…
SEE PREVIOUS PAGE
gas
liquid
solid
- 97 - C:\Documents and Settings\NORA\My Documents\MIDDILE DIVISION UoW nelson\Science Middle Division1.doc

AREA OF STUDY: SCIENCE STANDARD 4
UNIT/THEME: MATERIALS AND SUBSTANCESCONTENT ORGANIZED
INTO MANAGEABLE SETS
SUGGESTED TEACHING/LEARNING STRATEGIES SUGGESTED STRATEGIES/ACTIVITIES FOR ASSESSMENT
2. Other changes and the Properties and classification of Matter
2. Other Changes and the Properties and Classification of Matter • Obtain different substances such as cooking oil, salt,
sugar, sand, pack of cool aid. Have children mix these substances with water separately in glass jars and observe and record what happens in each case. They should note that the cooking oil and water do not mix and that when shaken the oil breaks up into little globules that float around in the water. However, with the sugar, salt and cool aid when shaken or stirred the sugar, salt or cool aid grains are not seen at all. The water takes on the colour and flavour of the cool aid, and takes on the taste of the salt or the sugar.
• Obtain a tomato and put blend it in a blender to make tomato juice. Have children observe and describe the substance that results. It is a liquid with lots of substances floating in it. This is also a mixture, but the substances in it are not dissolved and can be seen floating around.
• Explain that when mixtures are formed, no new substances are formed and so we call this a physical change. We know this because the mixture has retains the characteristics of its component parts—e.g. the salt solution has properties of water and of salt and we can use these properties to separate the mixture. Therefore, in a physical change such as a mixture, we can easily separate the substances that make up the mixture. Because the mixture retains the properties of the water and the salt we can utilise the property of the water to evaporate it leaving behind the salt. In the tomato juice mixture, we can strain out the solids particles floating in the liquid.
2. Other Changes and the Properties and Classification of Matter • Assess through direct questioning, children’s ability
to form hypotheses about what happens when salt and water or sugar and water are mixed as opposed to sand and water or oil and water.
• Orally or in writing, assess children’s ability to explain what is meant by a physical change and to give examples.
- 98 - C:\Documents and Settings\NORA\My Documents\MIDDILE DIVISION UoW nelson\Science Middle Division1.doc

AREA OF STUDY: SCIENCE STANDARD 4
UNIT/THEME: MATERIALS AND SUBSTANCESCONTENT ORGANIZED
INTO MANAGEABLE SETS
SUGGESTED TEACHING/LEARNING STRATEGIES SUGGESTED STRATEGIES/ACTIVITIES FOR ASSESSMENT
2. Properties and classification of matter…continued…
2. Properties and classification of matter…continued… • Explain that in some mixtures, one substance blends
in perfectly into the other and become completely mixed. The substance that mixes completely is said to dissolve and is called the solute. The substance into which it dissolves is called the solvent. The mixture looks like a single substance. Such mixtures are called solutions—e.g. salt and water and sugar and water. Explain that in other mixtures the substances do not mix completely or perfectly and there are solid pieces scattered throughout. These mixtures are called suspensions—e.g. tomato juice. Ask children to draw a concept or mind map to show how matter is classified into pure substances and mixtures. (See below.)
2. Properties and classification of matter…continued… • Assess children’s understanding of the classification
of matter and of pure substances, mixtures (Suspensions and solutions) through questioning about their concept maps.
• Short quiz on the definitions, properties and examples of mixtures, pure substances, suspensions, solutions, solutes and solvents.
Matter (has mass and volume)
Mixtures (have properties that can change)
Pure Substances (have properties that are
always the same)
Suspensions (have solid pieces scattered
throughout, look cloudy) (e.g. tomato juice)
Solutions (look like a single
substance) (e.g. Cool Aid)
- 99 - C:\Documents and Settings\NORA\My Documents\MIDDILE DIVISION UoW nelson\Science Middle Division1.doc
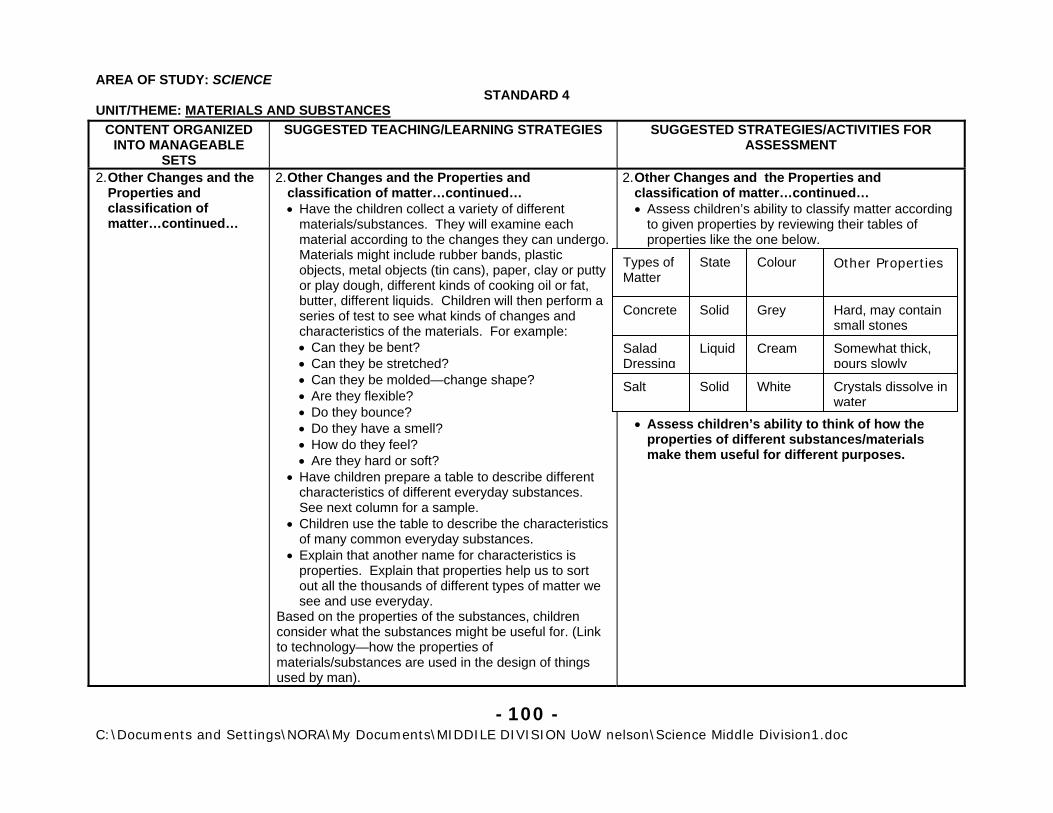
AREA OF STUDY: SCIENCE STANDARD 4
UNIT/THEME: MATERIALS AND SUBSTANCESCONTENT ORGANIZED
INTO MANAGEABLE SETS
SUGGESTED TEACHING/LEARNING STRATEGIES SUGGESTED STRATEGIES/ACTIVITIES FOR ASSESSMENT
2. Other Changes and the Properties and classification of matter…continued…
2. Other Changes and the Properties and classification of matter…continued… • Have the children collect a variety of different
materials/substances. They will examine each material according to the changes they can undergo. Materials might include rubber bands, plastic objects, metal objects (tin cans), paper, clay or putty or play dough, different kinds of cooking oil or fat, butter, different liquids. Children will then perform a series of test to see what kinds of changes and characteristics of the materials. For example: • Can they be bent? • Can they be stretched? • Can they be molded—change shape? • Are they flexible? • Do they bounce? • Do they have a smell? • How do they feel? • Are they hard or soft?
• Have children prepare a table to describe different characteristics of different everyday substances. See next column for a sample.
• Children use the table to describe the characteristics of many common everyday substances.
• Explain that another name for characteristics is properties. Explain that properties help us to sort out all the thousands of different types of matter we see and use everyday.
Based on the properties of the substances, children consider what the substances might be useful for. (Link to technology—how the properties of materials/substances are used in the design of things used by man).
2. Other Changes and the Properties and classification of matter…continued… • Assess children’s ability to classify matter according
to given properties by reviewing their tables of properties like the one below.
• Assess children’s ability to think of how the
properties of different substances/materials make them useful for different purposes.
Types of Matter
State Colour
Concrete Solid Grey Hard, may contain small stones
Salad Dressing
Liquid Cream Somewhat thick, pours slowly
Crystals dissolve in water
White Solid Salt
Other Properties
- 100 - C:\Documents and Settings\NORA\My Documents\MIDDILE DIVISION UoW nelson\Science Middle Division1.doc
AREA OF STUDY: SCIENCE STANDARD 4
UNIT/THEME: MATERIALS AND SUBSTANCESCONTENT ORGANIZED
INTO MANAGEABLE SETS
SUGGESTED TEACHING/LEARNING STRATEGIES SUGGESTED STRATEGIES/ACTIVITIES FOR ASSESSMENT
3. Skills • Collecting, observing,
manipulating, classifying, experimenting, describing, discussing, measuring, reporting, recording, explaining, organising, examining, labelling, following directions, questioning, identifying, estimating, making connections, leading, predicting, comparing/contrasting, recognising, communication, collecting data, classifying, inferring, making models, hypothesising, investigating.
4. Attitudes • Application, sharing,
awareness, satisfaction, interest, responsibility, cooperation, leadership, participation, teamwork, patience, persistence, independence.
3. Skills • See previous pages this unit.
4. Attitudes • See previous pages this unit.
3. Skills SEE PREVIOUS PAGES THIS UNIT
4. Attitudes SEE PREVIOUS PAGES THIS UNIT
- 101 - C:\Documents and Settings\NORA\My Documents\MIDDILE DIVISION UoW nelson\Science Middle Division1.doc

AREA OF STUDY: SCIENCE STANDARD 4
UNIT/THEME: MATERIALS AND SUBSTANCESLINKAGES/CONNECTIONS RECOMMENDED RESOURCES: TEACHER/STUDENT
WT2.a Understanding the elements which contribute to the effectiveness of the work.
WT4.a Identify an area of need. SL4.a Identify a simple problem/need. SL4.b Ask questions for information and understanding. SP1.a Recognise the values associated with choices. SP2.g Help to create consensus. EL1.f Discriminate between fact and fiction. EL1.j Make inferences and draw conclusions. EL1.k Interpret and follow instructions and directions. EL4.c Predict what will happen in a sequence of events. EL4.d Produce work that is legible and acceptable. EL4.e Ask questions and give information. M4.b Use logical reasoning based on meaningful data to draw.
- 102 - C:\Documents and Settings\NORA\My Documents\MIDDILE DIVISION UoW nelson\Science Middle Division1.doc

AREA OF STUDY: SCIENCE STANDARD 4
UNIT/THEME: SIMPLE MACHINES
CONTENT ORGANIZED INTO MANAGEABLE
SETS
SUGGESTED TEACHING/LEARNING STRATEGIES SUGGESTED STRATEGIES/ACTIVITIES FOR ASSESSMENT
1. Machines make work seem easier. They reduce the amount of or change the direction of force one needs to apply to move an object or to change its shape, speed or direction. Simple machines have few or no moving parts. Some examples of simple machines include: • Screws—a screw is an
inclined plane wrapped around a shaft.
• Pulleys—a pulley is a wheel with a rope wrapped around it. The rope fits into a groove on the wheel. When we pull on the string, it pulls on the load on the other side of the wheel lifting it.
1. Simple Machines: Screws and Pulleys • Screws: Ask children if they have ever gone up a
spiral stairs where the steps go around a central support shaft.
• Visit a site where a spiral stair exists and have children climb up and down it taking care. Children observe that the stair is just like a regular stair except that it goes round a central shaft that provides support. Note that it does not take up as much space as a regular stair.
• Using a used paper towel roll and pieces of cardboard or construction paper, children make a spiral staircase. (This could be part of a design and technology project in which they design the parts of the spiral stair and then proceed to make it).
• Explain that regular stairs are like inclined planes. Spiral stairs are like inclined planes too except that they are spiral.
• Bring some screws to school—the bigger the better. Have children observe them—note the spiral threading of the screws. It is just like the spiral stairs wound around a central shaft.
1. Simple Machines: Screws and Pulleys • Assess children’s ability to design and plan the
making of the staircase from identification of needs to making a plan of what they will make, to carrying out the plan.
CROSS-CURRICULAR OUTCOMES Pupils should: SP2.a Recognise an issue or a problem. SP2.b Examine information related to the problem or issue. SP2.c Take part in group activities. SP2.e Lead and follow where appropriate.
AREA OF STUDY OUTCOMES Pupils should: ST6.b Know the basic components and function of simple
machines in changing the speed or force of objects.
- 103 - C:\Documents and Settings\NORA\My Documents\MIDDILE DIVISION UoW nelson\Science Middle Division1.doc

AREA OF STUDY: SCIENCE STANDARD 4
UNIT/THEME: SIMPLE MACHINESCONTENT ORGANIZED
INTO MANAGEABLE SETS
SUGGESTED TEACHING/LEARNING STRATEGIES SUGGESTED STRATEGIES/ACTIVITIES FOR ASSESSMENT
1. Simple Machines: Screws and Pulleys…continued…
1. Simple Machines: Screws and Pulleys…continued… • Have students draw an inclined plane using a
marker or crayons to outline it. Cut out the shape of the inclined plane drawn. Next have them wrap it around their pencils so that the outline in crayons or marker shows.
• Have children observe that the outline of the inclined
plane around the pencil are just like the threading around the screw.
• Explain that the screw works just like the inclined plane in that when we turn a screw into wood or other material it brings the wood or other material to the top or the screw goes in. In this way screws hold materials together.
• Have children practice using screwdrivers to put some screws into wood.
• Examine other examples of screws. Many jars and other containers have screw tops for secure closing and ease of opening.
• Pulleys: Bring some sample pulleys to school or have children make their own using cotton reels, small dowels (round sticks) and wire. See example in the next column.
• Children put string over pulleys and attach a load and pull to see how they work.
1. Simple Machines: Screws and Pulleys…continued…
Wire support and hook
Dowel Cotton reel
N.B. If you use hanger wire you can substitute for the dowel since the hanger wire is strong enough to act as axle.
- 104 - C:\Documents and Settings\NORA\My Documents\MIDDILE DIVISION UoW nelson\Science Middle Division1.doc

AREA OF STUDY: SCIENCE STANDARD 4
UNIT/THEME: SIMPLE MACHINESCONTENT ORGANIZED
INTO MANAGEABLE SETS
SUGGESTED TEACHING/LEARNING STRATEGIES SUGGESTED STRATEGIES/ACTIVITIES FOR ASSESSMENT
1. Simple Machines: Screws and Pulleys…continued…
1. Simple Machines: Screws and Pulleys…continued… • Analyse how a simple pulley works. You pull down
on the rope on one side and the load lifts up on the other side. Let children draw an annotated diagram to show their analysis of how the pulley works.
Effort: pull down
Load • In this single pulley set-up children should note that
the distance moved the load and the effort are the same. The only advantage gained is that you can use your body muscles to greater effect. You still have to apply the same force. This can be tested using the force meter created in Standard 3. The same force is required to lift the load with or without the pulley.
1. Simple Machines: Screws and Pulleys…continued… • Assess children’s understanding of how the simple
pulley works by discussing their drawings with them. Ask them to explain their drawings to you orally.
- 105 - C:\Documents and Settings\NORA\My Documents\MIDDILE DIVISION UoW nelson\Science Middle Division1.doc

AREA OF STUDY: SCIENCE STANDARD 4
UNIT/THEME: SIMPLE MACHINESCONTENT ORGANIZED
INTO MANAGEABLE SETS
SUGGESTED TEACHING/LEARNING STRATEGIES SUGGESTED STRATEGIES/ACTIVITIES FOR ASSESSMENT
1. Simple Machines: Screws and Pulleys…continued…
1. Simple Machines: Screws and Pulleys…continued… • Have children explore different combinations of
pulleys as follows. Does it become easier to move the load the more pulleys are combine to lift the load? Does the load move the same distance as the effort the more pulleys are combined in the following ways? Create a table (as in the next column) and record your observations with respect to the distance moved by the effort as opposed to the load. If you have a force meter or spring scale you can also measure the force needed the more pulleys are combined to lift the load. Some possible combinations are as follows. (a) (b) (c)
(a) Effort = Load (Distances moved are the same) (b) Effort = Half of Load (through twice the distance) (c) Effort = Quarter of Load (through 4 times the
distance)
1. Simple Machines: Screws and Pulleys…continued… • Assess children’s ability to follow directions using a
checklist or rating scale. • Assess children’s ability to manipulate pulleys and
string to create different combinations using a checklist.
• Assess children’s ability to observe and record observations by reviewing and questioning them about their table of results.
No. of pulleys
Distance moved by Effort
Distance moved by Load
1
2
4
Force required
- 106 - C:\Documents and Settings\NORA\My Documents\MIDDILE DIVISION UoW nelson\Science Middle Division1.doc

AREA OF STUDY: SCIENCE STANDARD 4
UNIT/THEME: SIMPLE MACHINESCONTENT ORGANIZED
INTO MANAGEABLE SETS
SUGGESTED TEACHING/LEARNING STRATEGIES SUGGESTED STRATEGIES/ACTIVITIES FOR ASSESSMENT
1. Simple Machines: Screws and Pulleys…continued…
1. Simple Machines: Screws and Pulleys…continued… • Children play a pulley game. You will need two
broomsticks and a piece of rope as below. Tie one end of the rope to one of the broomsticks. Then, loop the rope around the two broomsticks in a criss-cross fashion as shown. Three children can take turns pulling on the broomsticks and rope as shown. Child 1 and Child 2 try to pull the two broom sticks apart while Child 3 pulls on the rope to try to pull the two broom sticks and other two children together. Have children experiment to see if the number of loops around the sticks make a difference. (It should--just as the number of pulleys linked together make a difference in the amount of force needed to lift or move a load.)
Child 3 Pulls here
Child 1 pulls here
Child 2 pulls here
1. Simple Machines: Screws and Pulleys…continued… • Children have fun experimenting with the broom
sticks and rope pulley game. • Assess willingness of children to share and take
turns (use anecdotal record).
- 107 - C:\Documents and Settings\NORA\My Documents\MIDDILE DIVISION UoW nelson\Science Middle Division1.doc

AREA OF STUDY: SCIENCE STANDARD 4
UNIT/THEME: SIMPLE MACHINESLINKAGES/CONNECTIONS RECOMMENDED RESOURCES: TEACHER/STUDENT
WT5.c Construct a simple device to meet a need/solve a problem. EL1.h Identify cause and effect relationships. EL4.a Express ideas and opinions. WT2.a Understand the elements which contribute to the effectiveness
of work. WT4.a Identify an area of need. SP2.a A take part in group activities. SP2.d Respond to feelings of others. SS2.c Understand how people use the resources of their environment. EA1.e Explore and experiment to create visual images through use of
a variety of artistic tools and media. EL4.d Use correct grammatical structures. H4.a Engage in physical activities that promote interpersonal skills
and health of mind and body. EL1.g Predict what will happen in a sequence of events. EL2.d Follow instructions/directions. EL2.b Identify a sequence of events.
Make it Work! Machines, Action Publishing Experiment with Movement, Action Publishing Science, Teacher’s Edition 3, Silver Burdett Exploring Science: An Introduction to CXC Sciences, Book 3,
Thomas Nelson and Sons. Discover Science 3, Scott Foresman & Company.
- 108 - C:\Documents and Settings\NORA\My Documents\MIDDILE DIVISION UoW nelson\Science Middle Division1.doc

AREA OF STUDY: SCIENCE STANDARD 4
UNIT/THEME: NATURAL PROCESSES
AREA OF STUDY OUTCOMES Pupils should: ST.a Understand the natural processes which support and
maintain the environment.
CONTENT ORGANIZED INTO MANAGEABLE
SETS
SUGGESTED TEACHING/LEARNING STRATEGIES SUGGESTED STRATEGIES/ACTIVITIES FOR ASSESSMENT
1. Energy and nutrients are passed from living thing to living thing in a food chain. Some of the energy is lost along the way in various ways.
Nutrients are returned to the environment through waste produced by organisms and through the death of the living things.
Water is a nutrient that is also cycled between the environment and living things.
1. Energy is lost to the environment in every food chain and nutrients are recycled through waste produced by living things and through death of living things Review food chains and food webs studied in Standard 3.
Children discuss what happens to the food they eat and other animals eat. Some of it goes to allow the body to grow, reproduce, move, respond to stimuli etc. However as the body carries out these functions some of the energy is lost as heat. Ask children how they feel after they have been playing at recess—they are sweating and hot. Explain to them that they used up a lot of energy they got from food for moving around on the school yard. Some of the energy was used for them to move around in the school yard, but a lot is lost as heat and that is why they feel hot. (Their body sweats to try to cool them down.) Explain that this happens in other living things as well. Therefore, a lot of the energy in the food eaten by living things is lost as heat to the environment and is unavailable for other animals who might eat these living things—so at each level in a food chain there is less energy than there was in a previous level.
1. Energy is lost to the environment in every food chain.
Direct questioning of students during lesson to check understanding or any misconceptions.
CROSS-CURRICULAR OUTCOMES Pupils should: CP1.a Recognise an issue or a problem. SP1.a Take part in group activities. SP1.b Express their opinion and feeling in a socially
acceptable way.
- 109 - C:\Documents and Settings\NORA\My Documents\MIDDILE DIVISION UoW nelson\Science Middle Division1.doc

AREA OF STUDY: SCIENCE STANDARD 4
UNIT/THEME: NATURAL PROCESSESCONTENT ORGANIZED
INTO MANAGEABLE SETS
SUGGESTED TEACHING/LEARNING STRATEGIES SUGGESTED STRATEGIES/ACTIVITIES FOR ASSESSMENT
1. Energy loss and cycling of nutrients…continued…
1. Energy loss and cycling of nutrients…continued… Have children cut pictures to put together a diagram/poster based on the following information. Have children take turns in explaining their diagrams.
Key: Energy flow (some lost as heat or in waste to the environment in each transfer) Nutrient flow (nutrients are cycled through the food chain—they are returned to soil through waste and dead organisms that are decomposed by micro-organisms. They are then once again available for use by plants)
1. Energy loss and cycling of nutrients…continued… Assess children’s diagrams—through direct questioning check for understanding or misconceptions. Clarify if necessary.
Short quiz on definitions and understanding of food chains, producers, consumers etc. (Review of Standard 3).
Microorganisms decompose waste and dead animals and plants. Nutrients return to the soil to be taken up by plants
Sun
Jaguar
Deer
Trees, Bushes & Grasses
- 110 - C:\Documents and Settings\NORA\My Documents\MIDDILE DIVISION UoW nelson\Science Middle Division1.doc

AREA OF STUDY: SCIENCE STANDARD 4
UNIT/THEME: NATURAL PROCESSESCONTENT ORGANIZED
INTO MANAGEABLE SETS
SUGGESTED TEACHING/LEARNING STRATEGIES SUGGESTED STRATEGIES/ACTIVITIES FOR ASSESSMENT
1. Energy loss and cycling of nutrients…continued…
2. Skills
Ask, apply, analyse, compile, communicate, create, contribute, discuss, draw, describe, distinguish, explain, examine, formulate, help, identify, interact, list, listen, manipulate, name, organise, plan, predict, relate, recognise, record, read, suggest, share, speak, solve, use, view, write
3. Attitudes Awareness, willingness to share, participate, cooperate, interest, appreciate, enjoyment, respect.
1. Energy loss and cycling of nutrients…continued… Discuss where water comes from. The rain, the streams, the rivers, the ponds, the oceans etc. might all be possible answers. Ask how come the world has not run out of water yet and it seems that we always seem to have the same amount of water in the world? What happens to the water you drink? (You pass it out as urine as sweat.)
Explain that water too is cycled like other nutrients. Explain the process of the water cycle using an annotated diagram.
2. Skills and 3. Attitudes.
See activities above and on previous pages.
1. Energy loss and cycling of nutrients…continued… Ask children to draw and explain the water cycle orally and/or in writing.
Question children directly to clarify any misconceptions.
2. Skills and 3. Attitudes
See activities above and on previous pages.
- 111 - C:\Documents and Settings\NORA\My Documents\MIDDILE DIVISION UoW nelson\Science Middle Division1.doc

AREA OF STUDY: SCIENCE STANDARD 4
UNIT/THEME: NATURAL PROCESSESLINKAGES/CONNECTIONS RECOMMENDED RESOURCES: TEACHER/STUDENT
Reading • EL1.g, EL1.h, EL1.i, EL1.j, EL1.k
Listening and Viewing • EL2.a, EL2.c, EL2.d, EL2.e
Writing • EL3.a, EL3.d, EL3.g
Speaking • EL4.a, EL4.c, EL4.e, EL4.f
Spanish • SL4.b
Mathematics • M5.a
Social Studies • SS2.a
Music • EA1.a
Art • EA1.c
Crafts • EA1.g
Design and Technology • WT5.b, WT5.c
Health and Physical Education • H4.a
• Life Sciences, Teachers’ Edition • Science Probe 8 (2nd Edition) • Life Science • New Biology for Tropical Schools • Biology for CXC • Science Activities for Children (1) • Earth and Its Resources, New Science Library
- 112 - C:\Documents and Settings\NORA\My Documents\MIDDILE DIVISION UoW nelson\Science Middle Division1.doc

AREA OF STUDY: SCIENCE STANDARD 4
UNIT/THEME: NATURAL HISTORY
CONTENT ORGANIZED INTO MANAGEABLE
SETS
SUGGESTED TEACHING/LEARNING STRATEGIES SUGGESTED STRATEGIES/ACTIVITIES FOR ASSESSMENT
1. Living things and their environment have changed over time.
2. Skills
Infer, predict, hypothesise, organise, investigate, ask, identify, build, select, sort, locate, practise, create, illustrate.
3. Attitudes
Appreciate changes in living things, respond to needs of others, appreciate different views, respect for others, willingness to participate in group activities, awareness of the natural changes in our environment, respond to care for and conservation of the environment.
1. Living things and their environment have changed over time. Study the fossil history of a known animal or plant—e.g. the horse, to see how it has changed from prehistoric times to present. In groups, children do a research on changes in the horse (or other animal or plant) since prehistoric times to present. Attention should be paid to how the changes that occurred matched the changes in the environment of the horse enabling it to survive in the environment. (Children could also to research on changes in humans from prehistoric man to present)
2. Skills and 3. Attitudes
SEE PREVIOUS PAGES THIS UNIT
1. Living things and their environment have changed over time.
Assess children’s ability to investigate/research information—use a variety of sources, select and condense relevant information in writing.
Assess children’s ability to explain orally how living things and the physical environment has changed over time.
2. Skills and 3. Attitudes
SEE PREVIOUS PAGES THIS UNIT
CROSS-CURRICULAR OUTCOMES Pupils should: SP2.a Take part in group activities. SP2.b Express their opinions and feelings in a socially
acceptable way. SP2.e Lead and follow where appropriate.
AREA OF STUDY OUTCOMES Pupils should: ST1.a Understand some of the changes in living things and
their environment from prehistoric time (before mankind) to the present.
- 113 - C:\Documents and Settings\NORA\My Documents\MIDDILE DIVISION UoW nelson\Science Middle Division1.doc

AREA OF STUDY: SCIENCE STANDARD 4
UNIT/THEME: NATURAL HISTORYLINKAGES/CONNECTIONS RECOMMENDED RESOURCES: TEACHER/STUDENT
SP1.a Recognise the values associated with choices. SP2.g Help create consensus. EL2.c Predict what will happen in a sequence of events. M4.a Make reasonable approximations based on relevant life
experiences. M5.a Collect, analyse and present data using charts, graphs, tables
and diagrams. ST8.a Understand the characteristics of living things, the main
categories into which they can be grouped, and how these interrelate with the environment.
ST8.b Understand the need for protection, care and responsible use of the environment.
Discover Science, Scott-Foresman Earth Science, 3rd Ed., Tarbuck Lutgens, Merrill Environmental Science: Living within the System of Nature, 2nd Ed. Science in Daily Life The Science Teachers’ Handbook, Andy Byers, Ann Childs, Chris Laine
Moody Introduction to Evolution, 3rd Ed., Harper & Row Concepts in Science, Harcourt and Brace The Living Science, Unit 3, Chapter 10-12 Ranger Rick’s, Nature Scope Digging into Dinosaurs
- 114 - C:\Documents and Settings\NORA\My Documents\MIDDILE DIVISION UoW nelson\Science Middle Division1.doc