sonicos 6.5 quick configuration · configuring a static ip address with nat enabled using nat to...
TRANSCRIPT
SonicWall® SonicOS 6.5 Quick Configuration
1Contents
Part 1. About Quick Configuration Guides
Using SonicWall Quick Configuration Guides . . . . . . . . . . . . . . . . . . . . . . . . . . . . . . . . . . . . . . . . . . . . . 5About the Quick Configuration Guides . . . . . . . . . . . . . . . . . . . . . . . . . . . . . . . . . . . . . . . . . . . . . . . . . . . . 5
Configuring a Static IP Address with NAT Enabled . . . . . . . . . . . . . . . . . . . . . . . . . . . . . . . . . . . . . . . 5Launching the Guides . . . . . . . . . . . . . . . . . . . . . . . . . . . . . . . . . . . . . . . . . . . . . . . . . . . . . . . . . . . . . . 6Navigating through the Guides . . . . . . . . . . . . . . . . . . . . . . . . . . . . . . . . . . . . . . . . . . . . . . . . . . . . . . . 7
Part 2. Guides
Using the Setup Guide . . . . . . . . . . . . . . . . . . . . . . . . . . . . . . . . . . . . . . . . . . . . . . . . . . . . . . . . . . . . . . . 9Setup Guide . . . . . . . . . . . . . . . . . . . . . . . . . . . . . . . . . . . . . . . . . . . . . . . . . . . . . . . . . . . . . . . . . . . . . . . . . . 9
Accessing the Setup Guide . . . . . . . . . . . . . . . . . . . . . . . . . . . . . . . . . . . . . . . . . . . . . . . . . . . . . . . . . 10Deployment Scenario (Wireless Platforms only) . . . . . . . . . . . . . . . . . . . . . . . . . . . . . . . . . . . . . . . . 10Change Administrator Password . . . . . . . . . . . . . . . . . . . . . . . . . . . . . . . . . . . . . . . . . . . . . . . . . . . . . 11Time Zone . . . . . . . . . . . . . . . . . . . . . . . . . . . . . . . . . . . . . . . . . . . . . . . . . . . . . . . . . . . . . . . . . . . . . . . 11Configure Modular Device Type . . . . . . . . . . . . . . . . . . . . . . . . . . . . . . . . . . . . . . . . . . . . . . . . . . . . . 12Configure 3G/4G/LTE . . . . . . . . . . . . . . . . . . . . . . . . . . . . . . . . . . . . . . . . . . . . . . . . . . . . . . . . . . . . . . 13Configure Modem . . . . . . . . . . . . . . . . . . . . . . . . . . . . . . . . . . . . . . . . . . . . . . . . . . . . . . . . . . . . . . . . 15WAN Failover Dialup Connection . . . . . . . . . . . . . . . . . . . . . . . . . . . . . . . . . . . . . . . . . . . . . . . . . . . . 16WAN Network Mode . . . . . . . . . . . . . . . . . . . . . . . . . . . . . . . . . . . . . . . . . . . . . . . . . . . . . . . . . . . . . . 17LAN Settings . . . . . . . . . . . . . . . . . . . . . . . . . . . . . . . . . . . . . . . . . . . . . . . . . . . . . . . . . . . . . . . . . . . . . 22LAN DHCP Settings . . . . . . . . . . . . . . . . . . . . . . . . . . . . . . . . . . . . . . . . . . . . . . . . . . . . . . . . . . . . . . . . 22Regulatory Domain Registration (Wireless Platforms only) . . . . . . . . . . . . . . . . . . . . . . . . . . . . . . 23WLAN Radio Settings (Wireless Platforms only) . . . . . . . . . . . . . . . . . . . . . . . . . . . . . . . . . . . . . . . . 24WLAN Security Settings (Wireless Platforms only) . . . . . . . . . . . . . . . . . . . . . . . . . . . . . . . . . . . . . . 28WPA/WPA2 Mode Settings (Wireless Platforms only) . . . . . . . . . . . . . . . . . . . . . . . . . . . . . . . . . . . 29WLAN VAP (Virtual Access Point) Settings (Wireless Platforms only) . . . . . . . . . . . . . . . . . . . . . . . 30Ports Assignment . . . . . . . . . . . . . . . . . . . . . . . . . . . . . . . . . . . . . . . . . . . . . . . . . . . . . . . . . . . . . . . . . 31Configuration Summary . . . . . . . . . . . . . . . . . . . . . . . . . . . . . . . . . . . . . . . . . . . . . . . . . . . . . . . . . . . . 34Setup Guide Complete . . . . . . . . . . . . . . . . . . . . . . . . . . . . . . . . . . . . . . . . . . . . . . . . . . . . . . . . . . . . . 35
Using the PortShield Interface Guide . . . . . . . . . . . . . . . . . . . . . . . . . . . . . . . . . . . . . . . . . . . . . . . . . . . 36PortShield Interface Guide . . . . . . . . . . . . . . . . . . . . . . . . . . . . . . . . . . . . . . . . . . . . . . . . . . . . . . . . . . . . . 36
Using the Public Server Guide . . . . . . . . . . . . . . . . . . . . . . . . . . . . . . . . . . . . . . . . . . . . . . . . . . . . . . . . 40Public Server Guide . . . . . . . . . . . . . . . . . . . . . . . . . . . . . . . . . . . . . . . . . . . . . . . . . . . . . . . . . . . . . . . . . . . 40
Public Server Type . . . . . . . . . . . . . . . . . . . . . . . . . . . . . . . . . . . . . . . . . . . . . . . . . . . . . . . . . . . . . . . . 41Private Network . . . . . . . . . . . . . . . . . . . . . . . . . . . . . . . . . . . . . . . . . . . . . . . . . . . . . . . . . . . . . . . . . . 42Server Public Information . . . . . . . . . . . . . . . . . . . . . . . . . . . . . . . . . . . . . . . . . . . . . . . . . . . . . . . . . . 43Public Server Configuration Summary . . . . . . . . . . . . . . . . . . . . . . . . . . . . . . . . . . . . . . . . . . . . . . . . 43
Using the VPN Guide . . . . . . . . . . . . . . . . . . . . . . . . . . . . . . . . . . . . . . . . . . . . . . . . . . . . . . . . . . . . . . . . 46VPN Guide . . . . . . . . . . . . . . . . . . . . . . . . . . . . . . . . . . . . . . . . . . . . . . . . . . . . . . . . . . . . . . . . . . . . . . . . . . 46
Configuring a Site-to-Site VPN . . . . . . . . . . . . . . . . . . . . . . . . . . . . . . . . . . . . . . . . . . . . . . . . . . . . . . 46
SonicOS 6.5 Quick ConfigurationContents
2
Creating a WAN GroupVPN . . . . . . . . . . . . . . . . . . . . . . . . . . . . . . . . . . . . . . . . . . . . . . . . . . . . . . . . . 52
Using the Wireless Guide (Wireless Platforms only) . . . . . . . . . . . . . . . . . . . . . . . . . . . . . . . . . . . . . . 57Wireless Guide . . . . . . . . . . . . . . . . . . . . . . . . . . . . . . . . . . . . . . . . . . . . . . . . . . . . . . . . . . . . . . . . . . . . . . . 57
Regulatory Domain Registration . . . . . . . . . . . . . . . . . . . . . . . . . . . . . . . . . . . . . . . . . . . . . . . . . . . . . 58Wireless LAN Settings . . . . . . . . . . . . . . . . . . . . . . . . . . . . . . . . . . . . . . . . . . . . . . . . . . . . . . . . . . . . . 58WLAN Radio Settings . . . . . . . . . . . . . . . . . . . . . . . . . . . . . . . . . . . . . . . . . . . . . . . . . . . . . . . . . . . . . . 60WLAN Security Settings . . . . . . . . . . . . . . . . . . . . . . . . . . . . . . . . . . . . . . . . . . . . . . . . . . . . . . . . . . . . 64WPA Mode Settings . . . . . . . . . . . . . . . . . . . . . . . . . . . . . . . . . . . . . . . . . . . . . . . . . . . . . . . . . . . . . . . 65WLAN VAP (Virtual Access Point) Settings . . . . . . . . . . . . . . . . . . . . . . . . . . . . . . . . . . . . . . . . . . . . . 66WLAN VAP (Virtual Access Point) Settings — VAP SSID . . . . . . . . . . . . . . . . . . . . . . . . . . . . . . . . . . 67WLAN VAP (Virtual Access Point) Settings — VAP WPA Mode Settings . . . . . . . . . . . . . . . . . . . . . 68WLAN VAP (Virtual Access Point) Settings > WLAN Subnet and Zone . . . . . . . . . . . . . . . . . . . . . . . 69Wireless Configuration Summary . . . . . . . . . . . . . . . . . . . . . . . . . . . . . . . . . . . . . . . . . . . . . . . . . . . . 70
Using the App Rule Guide . . . . . . . . . . . . . . . . . . . . . . . . . . . . . . . . . . . . . . . . . . . . . . . . . . . . . . . . . . . . 71App Rule Guide . . . . . . . . . . . . . . . . . . . . . . . . . . . . . . . . . . . . . . . . . . . . . . . . . . . . . . . . . . . . . . . . . . . . . . 71
App Rule Policy Type . . . . . . . . . . . . . . . . . . . . . . . . . . . . . . . . . . . . . . . . . . . . . . . . . . . . . . . . . . . . . . 72
Using the WXA Setup Guide . . . . . . . . . . . . . . . . . . . . . . . . . . . . . . . . . . . . . . . . . . . . . . . . . . . . . . . . . . 80WXA Setup Guide . . . . . . . . . . . . . . . . . . . . . . . . . . . . . . . . . . . . . . . . . . . . . . . . . . . . . . . . . . . . . . . . . . . . 80
Getting Started . . . . . . . . . . . . . . . . . . . . . . . . . . . . . . . . . . . . . . . . . . . . . . . . . . . . . . . . . . . . . . . . . . . 81Interface Page . . . . . . . . . . . . . . . . . . . . . . . . . . . . . . . . . . . . . . . . . . . . . . . . . . . . . . . . . . . . . . . . . . . . 81Enable Acceleration Page . . . . . . . . . . . . . . . . . . . . . . . . . . . . . . . . . . . . . . . . . . . . . . . . . . . . . . . . . . 83Groups Page . . . . . . . . . . . . . . . . . . . . . . . . . . . . . . . . . . . . . . . . . . . . . . . . . . . . . . . . . . . . . . . . . . . . . 83WXAs Page . . . . . . . . . . . . . . . . . . . . . . . . . . . . . . . . . . . . . . . . . . . . . . . . . . . . . . . . . . . . . . . . . . . . . . 84Acceleration Components . . . . . . . . . . . . . . . . . . . . . . . . . . . . . . . . . . . . . . . . . . . . . . . . . . . . . . . . . . 85VPNs Page . . . . . . . . . . . . . . . . . . . . . . . . . . . . . . . . . . . . . . . . . . . . . . . . . . . . . . . . . . . . . . . . . . . . . . . 86Routes Page . . . . . . . . . . . . . . . . . . . . . . . . . . . . . . . . . . . . . . . . . . . . . . . . . . . . . . . . . . . . . . . . . . . . . 86Done Page . . . . . . . . . . . . . . . . . . . . . . . . . . . . . . . . . . . . . . . . . . . . . . . . . . . . . . . . . . . . . . . . . . . . . . . 87
WFS for Signed SMB Setup Guide . . . . . . . . . . . . . . . . . . . . . . . . . . . . . . . . . . . . . . . . . . . . . . . . . . . . . . . 87Select the Dedicated WXA . . . . . . . . . . . . . . . . . . . . . . . . . . . . . . . . . . . . . . . . . . . . . . . . . . . . . . . . . . 88Enable Extended Support . . . . . . . . . . . . . . . . . . . . . . . . . . . . . . . . . . . . . . . . . . . . . . . . . . . . . . . . . . 89Domain Details . . . . . . . . . . . . . . . . . . . . . . . . . . . . . . . . . . . . . . . . . . . . . . . . . . . . . . . . . . . . . . . . . . . 89Join the Domain . . . . . . . . . . . . . . . . . . . . . . . . . . . . . . . . . . . . . . . . . . . . . . . . . . . . . . . . . . . . . . . . . . 90Configure Shares . . . . . . . . . . . . . . . . . . . . . . . . . . . . . . . . . . . . . . . . . . . . . . . . . . . . . . . . . . . . . . . . . 91Configure Local File Servers . . . . . . . . . . . . . . . . . . . . . . . . . . . . . . . . . . . . . . . . . . . . . . . . . . . . . . . . 92Configure Remote File Servers . . . . . . . . . . . . . . . . . . . . . . . . . . . . . . . . . . . . . . . . . . . . . . . . . . . . . . 93Add Domain Records . . . . . . . . . . . . . . . . . . . . . . . . . . . . . . . . . . . . . . . . . . . . . . . . . . . . . . . . . . . . . . 94Done Page . . . . . . . . . . . . . . . . . . . . . . . . . . . . . . . . . . . . . . . . . . . . . . . . . . . . . . . . . . . . . . . . . . . . . . . 95
Part 3. Appendix
SonicWall Support . . . . . . . . . . . . . . . . . . . . . . . . . . . . . . . . . . . . . . . . . . . . . . . . . . . . . . . . . . . . . . . . . . 97About This Document . . . . . . . . . . . . . . . . . . . . . . . . . . . . . . . . . . . . . . . . . . . . . . . . . . . . . . . . . . . . . . . . . 98
SonicOS 6.5 Quick ConfigurationContents
3
SonicOS 6.5 Quick ConfigurationAbout Quick Configuration Guides
Part 1
4
About Quick Configuration Guides
• Using SonicWall Quick Configuration Guides

1
Using SonicWall Quick ConfigurationGuides
• About the Quick Configuration Guides on page 5
About the Quick Configuration Guides
Quick Configuration provides easy-to-use configuration guides (wizards) to assist you with initial policy and security creation:
• Securing your internet connection
• Selecting initial ports assignment for PortShield (TZ Series and SOHO Series security appliances only)
• Providing public access to an external server
• Creating site-to-site VPN policies
• Configuring network settings and security features of the WAN radio interface (TZ W series and SOHO W series security appliances only)
• Configuring App Rules for security
• Configuring a WXA series appliance (for installing WXA appliances on SonicWall security appliances only)
Topics:
• Configuring a Static IP Address with NAT Enabled on page 5
• Launching the Guides on page 6
• Navigating through the Guides on page 7
Configuring a Static IP Address with NAT EnabledUsing NAT to set up your SonicWall eliminates the need for public IP addresses for all computers on your LAN. It is a way to conserve IP addresses available from the pool of IPv4 addresses for the Internet. NAT also allows you to conceal the addressing scheme of your network. If you do not have enough individual IP addresses for all computers on your network, you can use NAT for your network configuration.
Essentially, NAT translates the IP addresses in one network into those for a different network. As a form of packet filtering for security appliances, it protects a network from outside intrusion from hackers by replacing the internal (LAN) IP address on packets passing through a SonicWall with a “fake” one from a fixed pool of addresses. The actual IP addresses of computers on the LAN are hidden from outside view.
IMPORTANT: The initial Setup Guides launched when setting up new SonicWall security appliances are different from the Quick Configuration guides displayed by clicking Quick Configuration from the SonicOS Management Interface. For information about the initial Setup Guides, see the Getting Started Guide for the new security appliance.
SonicOS 6.5 Quick ConfigurationUsing SonicWall Quick Configuration Guides
5
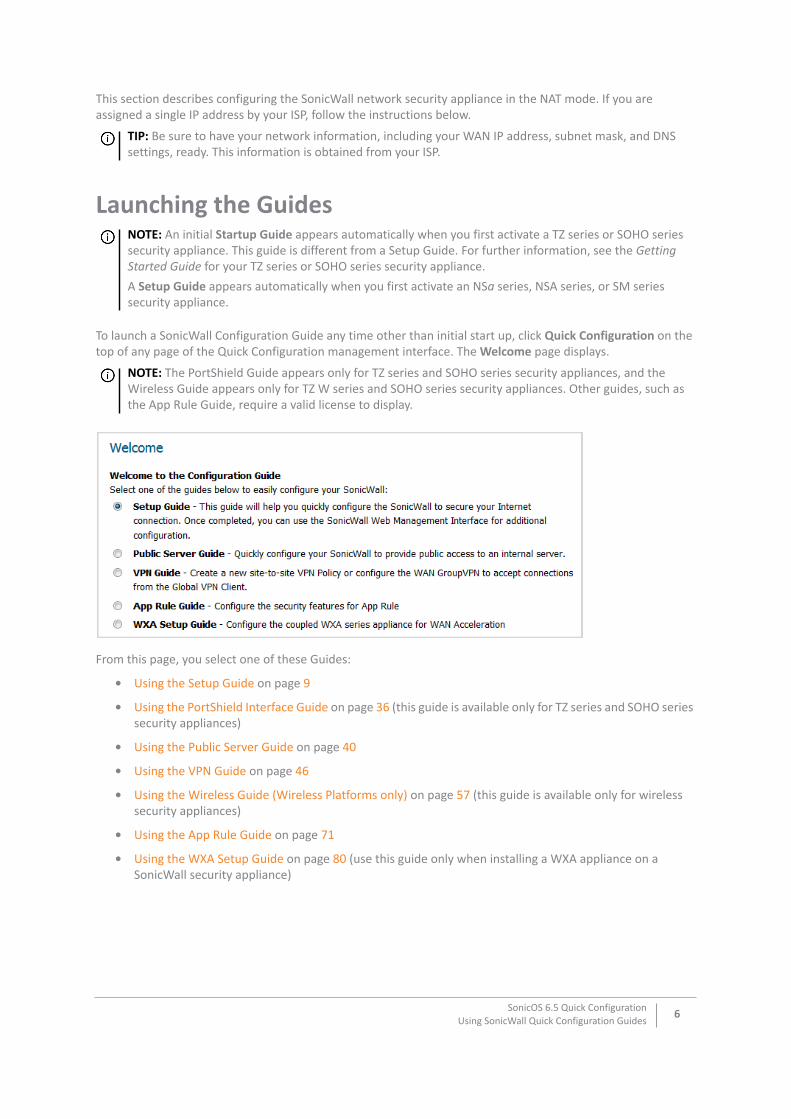
This section describes configuring the SonicWall network security appliance in the NAT mode. If you are assigned a single IP address by your ISP, follow the instructions below.
Launching the Guides
To launch a SonicWall Configuration Guide any time other than initial start up, click Quick Configuration on the top of any page of the Quick Configuration management interface. The Welcome page displays.
From this page, you select one of these Guides:
• Using the Setup Guide on page 9
• Using the PortShield Interface Guide on page 36 (this guide is available only for TZ series and SOHO series security appliances)
• Using the Public Server Guide on page 40
• Using the VPN Guide on page 46
• Using the Wireless Guide (Wireless Platforms only) on page 57 (this guide is available only for wireless security appliances)
• Using the App Rule Guide on page 71
• Using the WXA Setup Guide on page 80 (use this guide only when installing a WXA appliance on a SonicWall security appliance)
TIP: Be sure to have your network information, including your WAN IP address, subnet mask, and DNS settings, ready. This information is obtained from your ISP.
NOTE: An initial Startup Guide appears automatically when you first activate a TZ series or SOHO series security appliance. This guide is different from a Setup Guide. For further information, see the Getting Started Guide for your TZ series or SOHO series security appliance.A Setup Guide appears automatically when you first activate an NSa series, NSA series, or SM series security appliance.
NOTE: The PortShield Guide appears only for TZ series and SOHO series security appliances, and the Wireless Guide appears only for TZ W series and SOHO series security appliances. Other guides, such as the App Rule Guide, require a valid license to display.
SonicOS 6.5 Quick ConfigurationUsing SonicWall Quick Configuration Guides
6
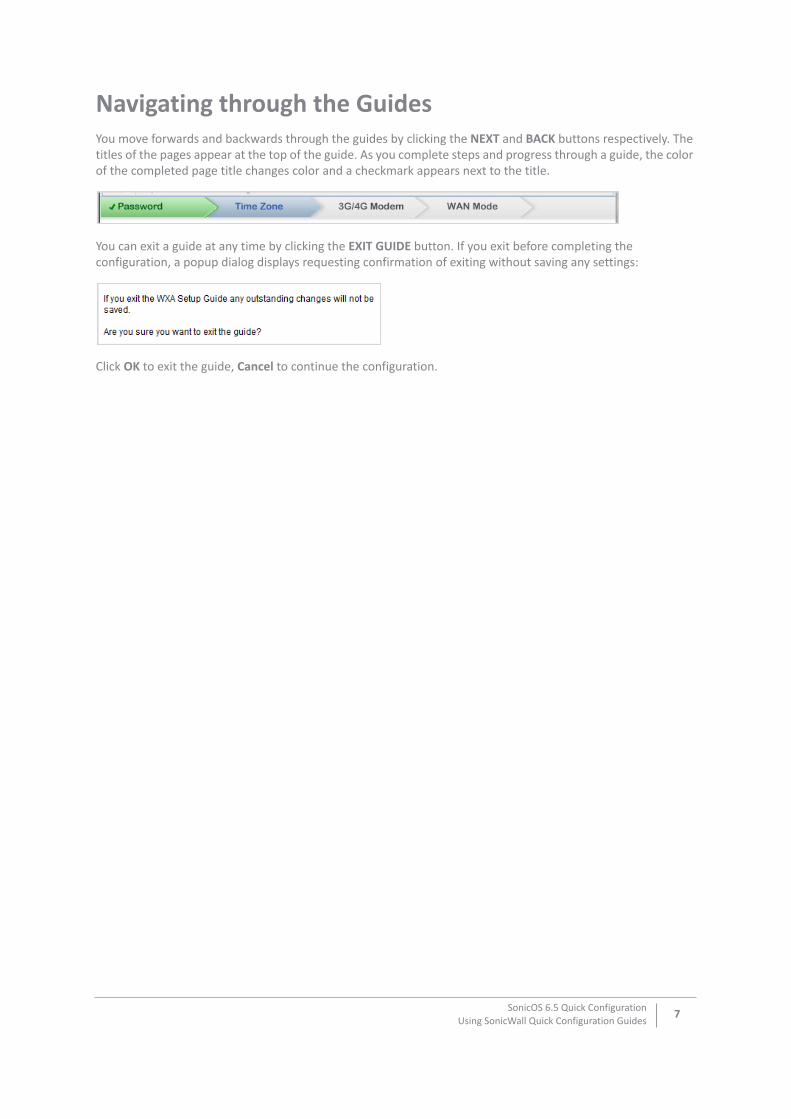
Navigating through the GuidesYou move forwards and backwards through the guides by clicking the NEXT and BACK buttons respectively. The titles of the pages appear at the top of the guide. As you complete steps and progress through a guide, the color of the completed page title changes color and a checkmark appears next to the title.
You can exit a guide at any time by clicking the EXIT GUIDE button. If you exit before completing the configuration, a popup dialog displays requesting confirmation of exiting without saving any settings:
Click OK to exit the guide, Cancel to continue the configuration.
SonicOS 6.5 Quick ConfigurationUsing SonicWall Quick Configuration Guides
7
SonicOS 6.5 Quick ConfigurationGuides
Part 2
8
Guides
• Using the Setup Guide
• Using the PortShield Interface Guide
• Using the Public Server Guide
• Using the VPN Guide
• Using the Wireless Guide (Wireless Platforms only)
• Using the App Rule Guide
• Using the WXA Setup Guide

2
Using the Setup Guide
• Setup Guide on page 9
Setup Guide
The first time you log into your NSa series, NSA Series, or SuperMassive series security appliance, an initial Setup Guide is launched automatically. For all NSa series, SuperMassive series, NSA series, TZ series, and SOHO series security appliances, you can launch the Setup Guide at any time from the management interface, by clicking QUICK CONFIGURATION at the top of the SonicOS Management Interface.
The Setup Guide helps you configure these settings:
• Deployment Scenario (wireless security appliances only)
• Administrator password and time zone
• Type of modular device
• WAN networking mode and WAN network configuration
• LAN network configuration
• LAN DHCP settings
• Ports assignment (TZ series and SOHO series security appliances only)
Topics:
• Accessing the Setup Guide on page 10
• Deployment Scenario (Wireless Platforms only) on page 10
• Change Administrator Password on page 11
• Time Zone on page 11
• Configure Modular Device Type on page 12
• WAN Network Mode on page 17
• Configure 3G/4G/LTE on page 13
• LAN Settings on page 22
• LAN DHCP Settings on page 22
• Regulatory Domain Registration (Wireless Platforms only) on page 23
NOTE: An Initial Startup Guide appears when you first activate your TZ series or SOHO series security appliance. This guide is described in the Getting Started Guide for your TZ series or SOHO series security appliance.
TIP: You can also configure all your WAN and network settings from the MANAGE view of the SonicWall Management Interface
SonicOS 6.5 Quick ConfigurationUsing the Setup Guide
9
• WLAN Radio Settings (Wireless Platforms only) on page 24
• WLAN Security Settings (Wireless Platforms only) on page 28
• WPA/WPA2 Mode Settings (Wireless Platforms only) on page 29
• Ports Assignment on page 31
• Configuration Summary on page 34
• Setup Guide Complete on page 35
Accessing the Setup Guide
To configure settings with the Setup Guide:
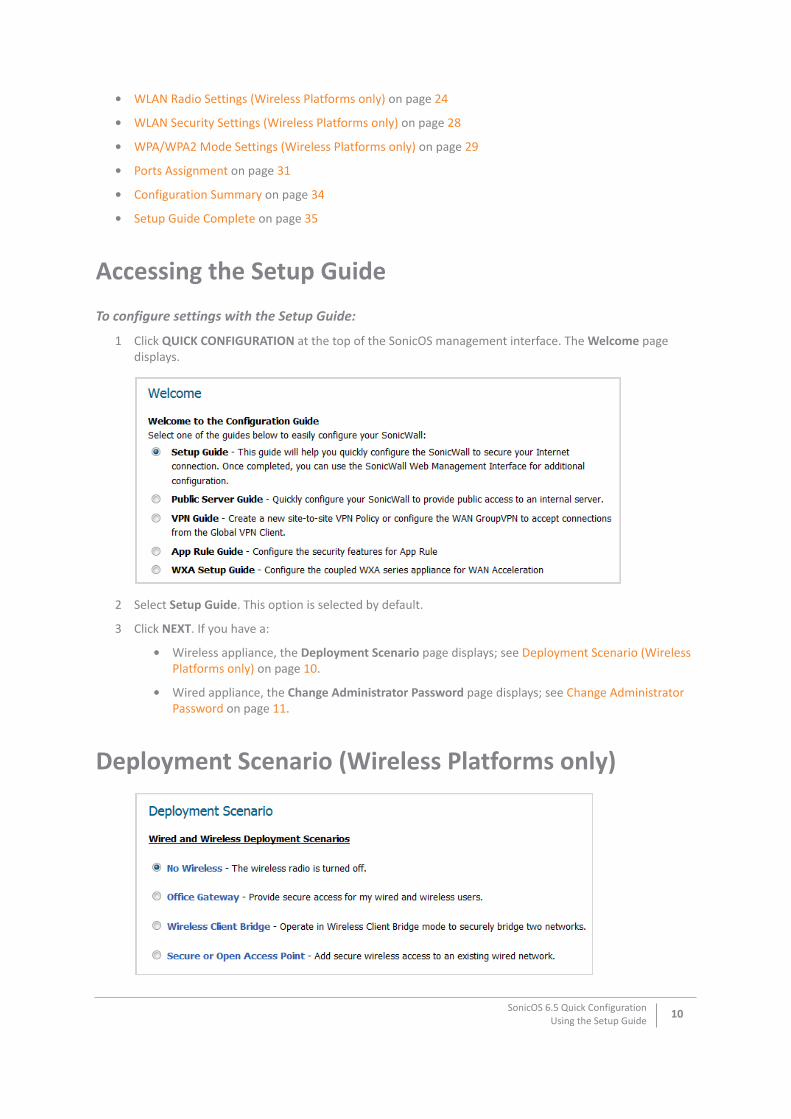
1 Click QUICK CONFIGURATION at the top of the SonicOS management interface. The Welcome page displays.
2 Select Setup Guide. This option is selected by default.
3 Click NEXT. If you have a:
• Wireless appliance, the Deployment Scenario page displays; see Deployment Scenario (Wireless Platforms only) on page 10.
• Wired appliance, the Change Administrator Password page displays; see Change Administrator Password on page 11.
Deployment Scenario (Wireless Platforms only)
SonicOS 6.5 Quick ConfigurationUsing the Setup Guide
10
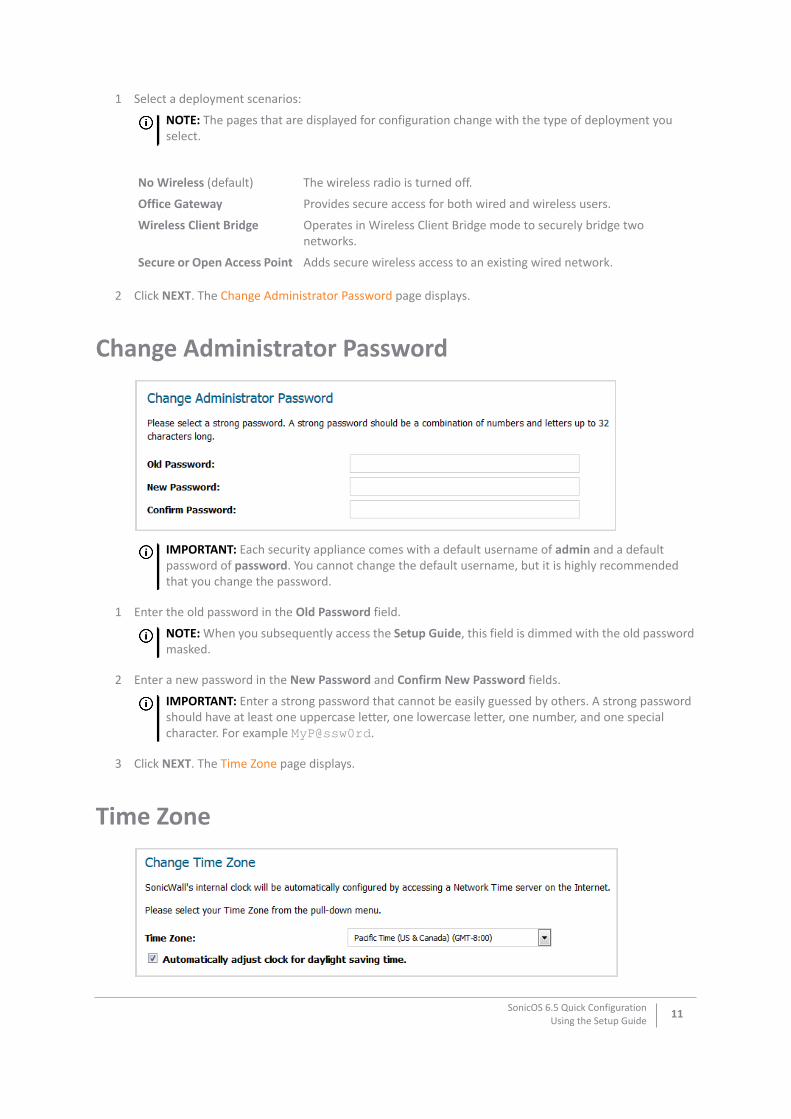
1 Select a deployment scenarios:
2 Click NEXT. The Change Administrator Password page displays.
Change Administrator Password
1 Enter the old password in the Old Password field.
2 Enter a new password in the New Password and Confirm New Password fields.
3 Click NEXT. The Time Zone page displays.
Time Zone
NOTE: The pages that are displayed for configuration change with the type of deployment you select.
No Wireless (default) The wireless radio is turned off.
Office Gateway Provides secure access for both wired and wireless users.
Wireless Client Bridge Operates in Wireless Client Bridge mode to securely bridge two networks.
Secure or Open Access Point Adds secure wireless access to an existing wired network.
IMPORTANT: Each security appliance comes with a default username of admin and a default password of password. You cannot change the default username, but it is highly recommended that you change the password.
NOTE: When you subsequently access the Setup Guide, this field is dimmed with the old password masked.
IMPORTANT: Enter a strong password that cannot be easily guessed by others. A strong password should have at least one uppercase letter, one lowercase letter, one number, and one special character. For example MyP@ssw0rd.
SonicOS 6.5 Quick ConfigurationUsing the Setup Guide
11
1 Select the appropriate time zone from Time Zone. The SonicWall’s internal clock is set automatically to the correct time for this time zone by a Network Time Server on the Internet.
2 Optionally, select Automatically adjust clock for daylight savings time. This is selected by default.
3 Click NEXT.
4 The page that is displayed depends on the type of security appliance you have and, if a wireless security appliance, the deployment you selected:
• Non-wired security appliance that contains a USB slot, the Configure Modular Device Type page displays.
• Non-wired security appliance that contains a 3G/4G/LTE device, the Configure 3G/4G/LTE page displays.
• Wired security appliance or this deployment selected for a wireless security appliance: No Wireless, Office Gateway, or Secure or Open Access Point, the Configure Modular Device Type page displays.
• Wired security appliance with this deployment selected: Wireless Client Bridge, the LAN Settings page displays.
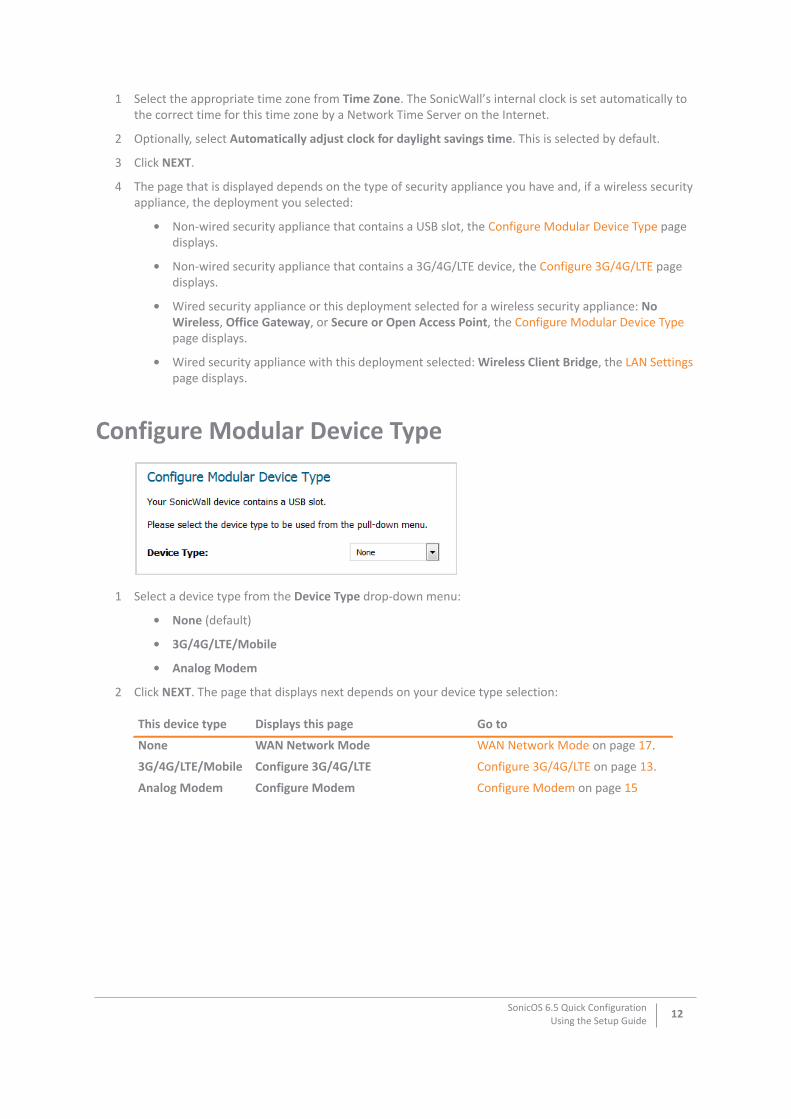
Configure Modular Device Type
1 Select a device type from the Device Type drop-down menu:
• None (default)
• 3G/4G/LTE/Mobile
• Analog Modem
2 Click NEXT. The page that displays next depends on your device type selection:
This device type Displays this page Go to
None WAN Network Mode WAN Network Mode on page 17.
3G/4G/LTE/Mobile Configure 3G/4G/LTE Configure 3G/4G/LTE on page 13.
Analog Modem Configure Modem Configure Modem on page 15
SonicOS 6.5 Quick ConfigurationUsing the Setup Guide
12
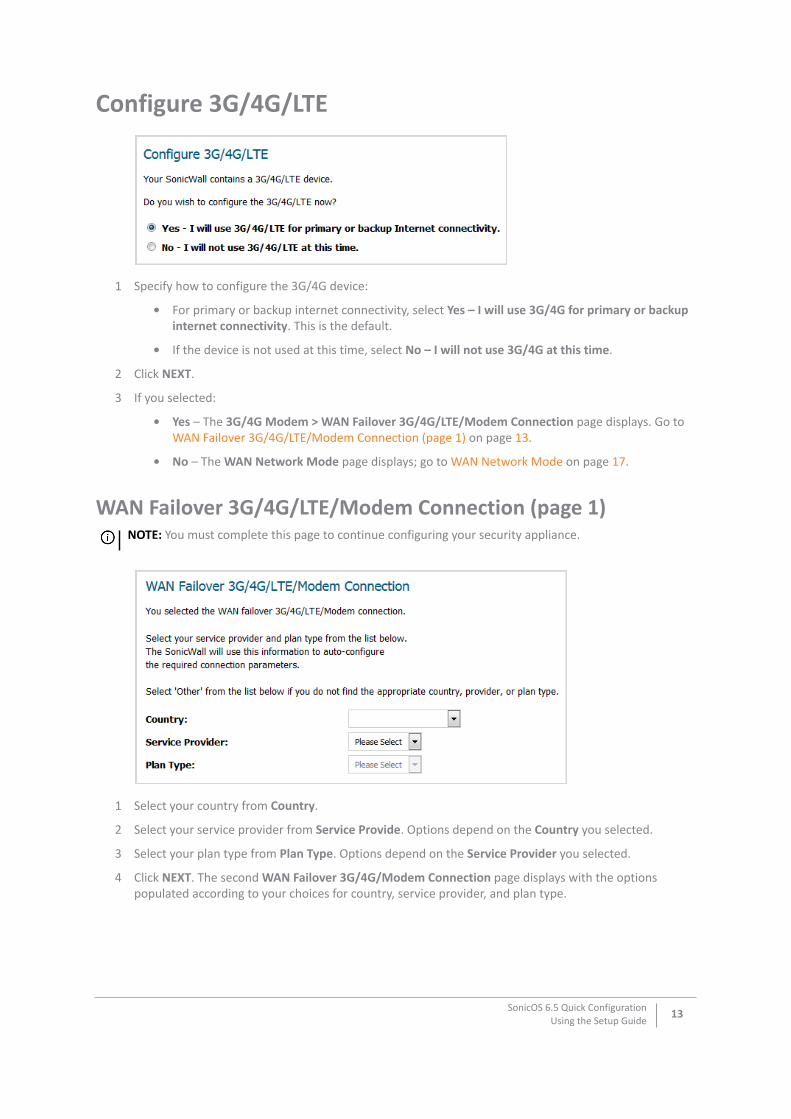
Configure 3G/4G/LTE
1 Specify how to configure the 3G/4G device:
• For primary or backup internet connectivity, select Yes – I will use 3G/4G for primary or backup internet connectivity. This is the default.
• If the device is not used at this time, select No – I will not use 3G/4G at this time.
2 Click NEXT.
3 If you selected:
• Yes – The 3G/4G Modem > WAN Failover 3G/4G/LTE/Modem Connection page displays. Go to WAN Failover 3G/4G/LTE/Modem Connection (page 1) on page 13.
• No – The WAN Network Mode page displays; go to WAN Network Mode on page 17.
WAN Failover 3G/4G/LTE/Modem Connection (page 1)
1 Select your country from Country.
2 Select your service provider from Service Provide. Options depend on the Country you selected.
3 Select your plan type from Plan Type. Options depend on the Service Provider you selected.
4 Click NEXT. The second WAN Failover 3G/4G/Modem Connection page displays with the options populated according to your choices for country, service provider, and plan type.
NOTE: You must complete this page to continue configuring your security appliance.
SonicOS 6.5 Quick ConfigurationUsing the Setup Guide
13
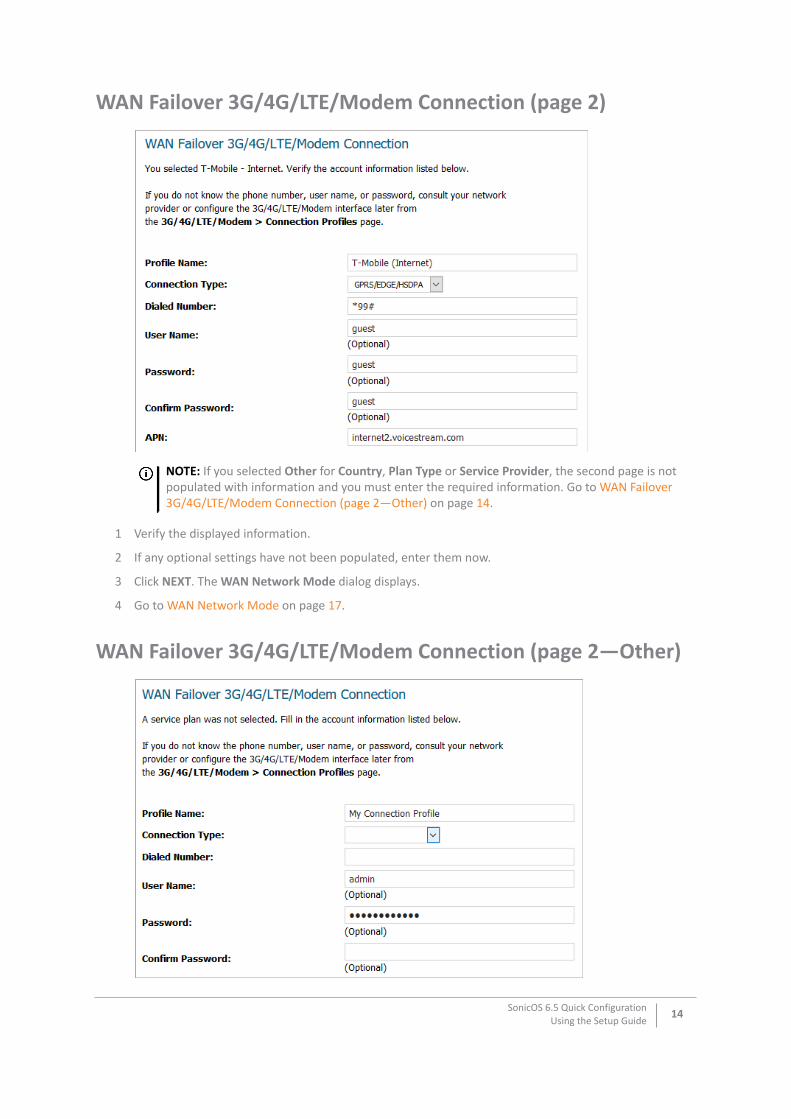
WAN Failover 3G/4G/LTE/Modem Connection (page 2)
1 Verify the displayed information.
2 If any optional settings have not been populated, enter them now.
3 Click NEXT. The WAN Network Mode dialog displays.
4 Go to WAN Network Mode on page 17.
WAN Failover 3G/4G/LTE/Modem Connection (page 2—Other)
NOTE: If you selected Other for Country, Plan Type or Service Provider, the second page is not populated with information and you must enter the required information. Go to WAN Failover 3G/4G/LTE/Modem Connection (page 2—Other) on page 14.
SonicOS 6.5 Quick ConfigurationUsing the Setup Guide
14
1 If you selected Other for Country, Service Provider, or Plan Type, the second page is not populated with information, and you must provide the required information:
• Profile Name – Enter a friendly name for the profile in this field; the default is My Connection Profile.
• Connection Type – Select the connection type from the drop-down menu.
• Dialed Number – Enter the dialup number the appliance uses to connect to the internet in this field.
• User Name (optional) – Enter your ISP user name in this field.
• Password (optional) – Enter your ISP password in this field.
• Confirm Password (optional) – Reenter your ISP password in this field.
2 Click NEXT. The WAN Network Mode page displays.
3 Go to WAN Network Mode on page 17.
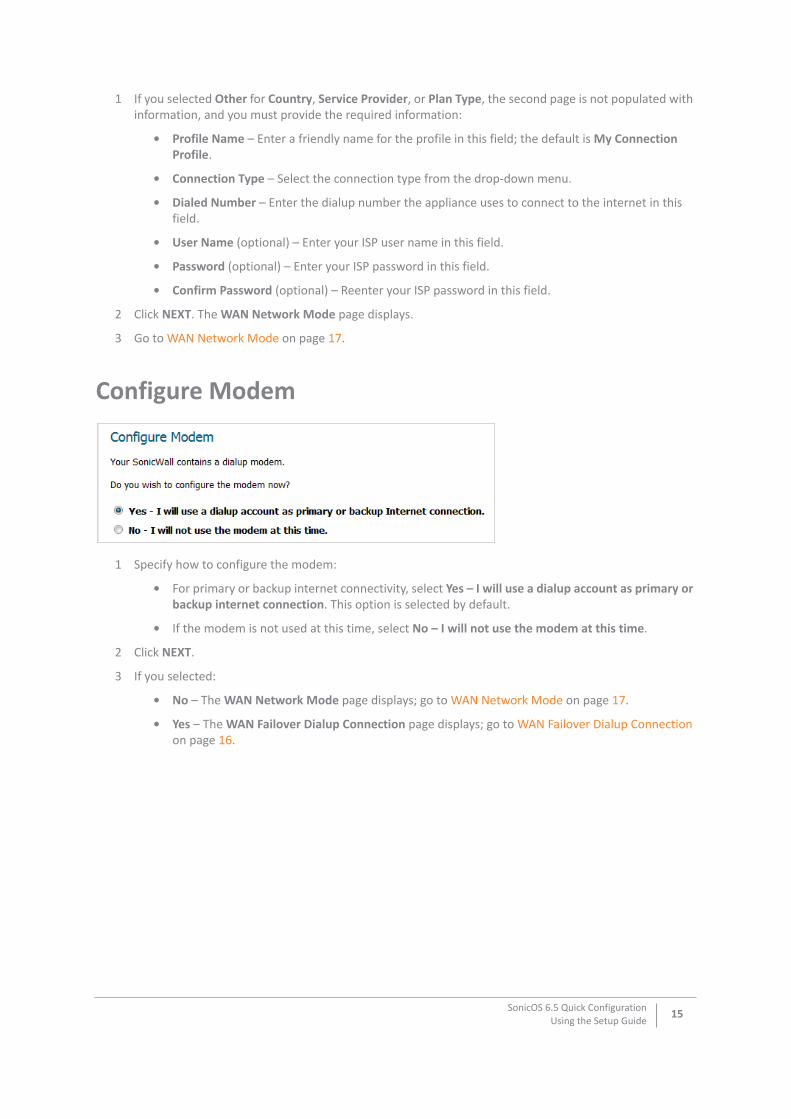
Configure Modem
1 Specify how to configure the modem:
• For primary or backup internet connectivity, select Yes – I will use a dialup account as primary or backup internet connection. This option is selected by default.
• If the modem is not used at this time, select No – I will not use the modem at this time.
2 Click NEXT.
3 If you selected:
• No – The WAN Network Mode page displays; go to WAN Network Mode on page 17.
• Yes – The WAN Failover Dialup Connection page displays; go to WAN Failover Dialup Connection on page 16.
SonicOS 6.5 Quick ConfigurationUsing the Setup Guide
15
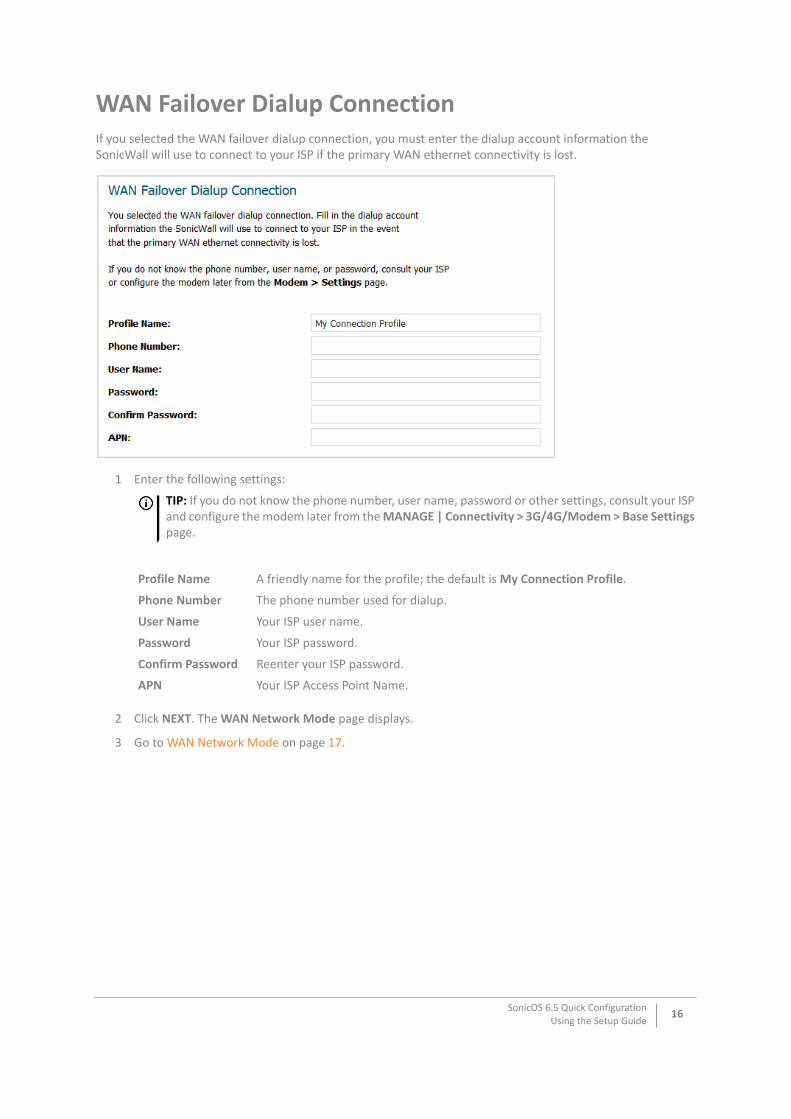
WAN Failover Dialup Connection If you selected the WAN failover dialup connection, you must enter the dialup account information the SonicWall will use to connect to your ISP if the primary WAN ethernet connectivity is lost.
1 Enter the following settings:
2 Click NEXT. The WAN Network Mode page displays.
3 Go to WAN Network Mode on page 17.
TIP: If you do not know the phone number, user name, password or other settings, consult your ISP and configure the modem later from the MANAGE | Connectivity > 3G/4G/Modem > Base Settings page.
Profile Name A friendly name for the profile; the default is My Connection Profile.
Phone Number The phone number used for dialup.
User Name Your ISP user name.
Password Your ISP password.
Confirm Password Reenter your ISP password.
APN Your ISP Access Point Name.
SonicOS 6.5 Quick ConfigurationUsing the Setup Guide
16
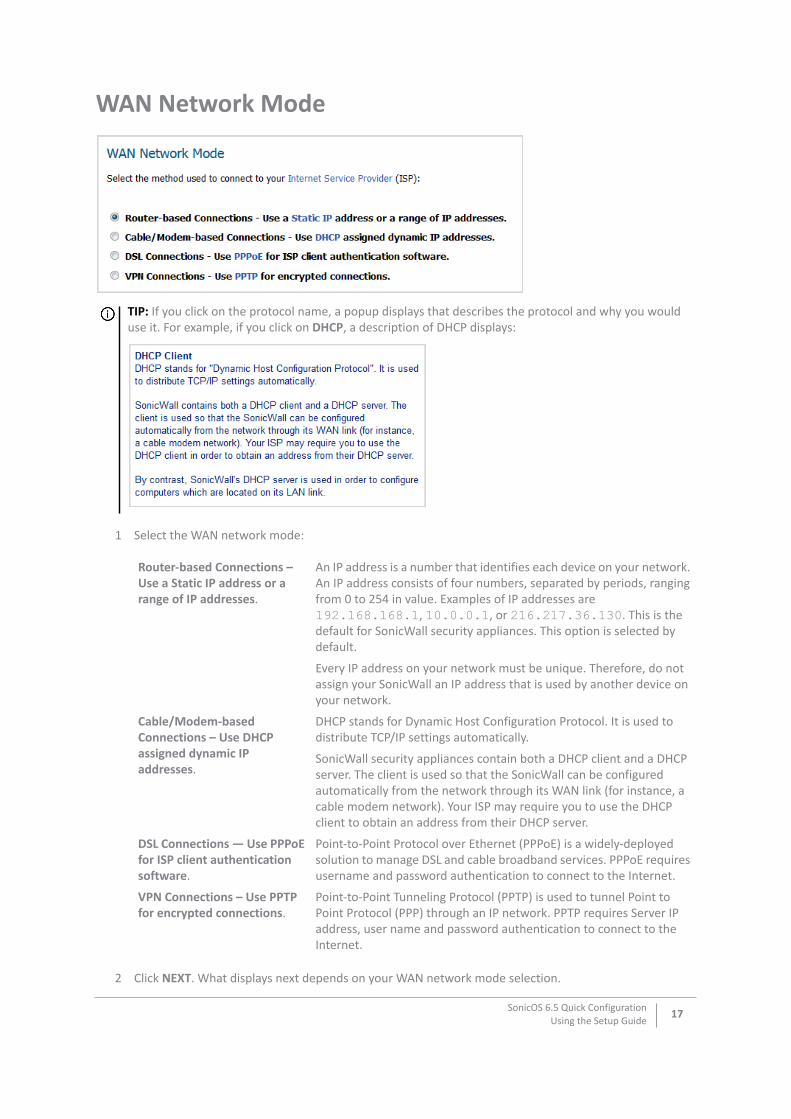
WAN Network Mode
1 Select the WAN network mode:
2 Click NEXT. What displays next depends on your WAN network mode selection.
TIP: If you click on the protocol name, a popup displays that describes the protocol and why you would use it. For example, if you click on DHCP, a description of DHCP displays:
Router-based Connections – Use a Static IP address or a range of IP addresses.
An IP address is a number that identifies each device on your network. An IP address consists of four numbers, separated by periods, ranging from 0 to 254 in value. Examples of IP addresses are 192.168.168.1, 10.0.0.1, or 216.217.36.130. This is the default for SonicWall security appliances. This option is selected by default.
Every IP address on your network must be unique. Therefore, do not assign your SonicWall an IP address that is used by another device on your network.
Cable/Modem-based Connections – Use DHCP assigned dynamic IP addresses.
DHCP stands for Dynamic Host Configuration Protocol. It is used to distribute TCP/IP settings automatically.
SonicWall security appliances contain both a DHCP client and a DHCP server. The client is used so that the SonicWall can be configured automatically from the network through its WAN link (for instance, a cable modem network). Your ISP may require you to use the DHCP client to obtain an address from their DHCP server.
DSL Connections — Use PPPoE for ISP client authentication software.
Point-to-Point Protocol over Ethernet (PPPoE) is a widely-deployed solution to manage DSL and cable broadband services. PPPoE requires username and password authentication to connect to the Internet.
VPN Connections – Use PPTP for encrypted connections.
Point-to-Point Tunneling Protocol (PPTP) is used to tunnel Point to Point Protocol (PPP) through an IP network. PPTP requires Server IP address, user name and password authentication to connect to the Internet.
SonicOS 6.5 Quick ConfigurationUsing the Setup Guide
17
3 If you selected:
• Router-based Connections, go to WAN Network Mode: NAT Enabled on page 18
• Cable/Modem-based Connections, go to WAN Network Mode: NAT with DHCP Client on page 19.
• DSL Connections, go to WAN Network Mode – NAT with PPPoE Client on page 20.
• VPN Connections, go to WAN Network Mode: NAT with PPTP Client on page 21.
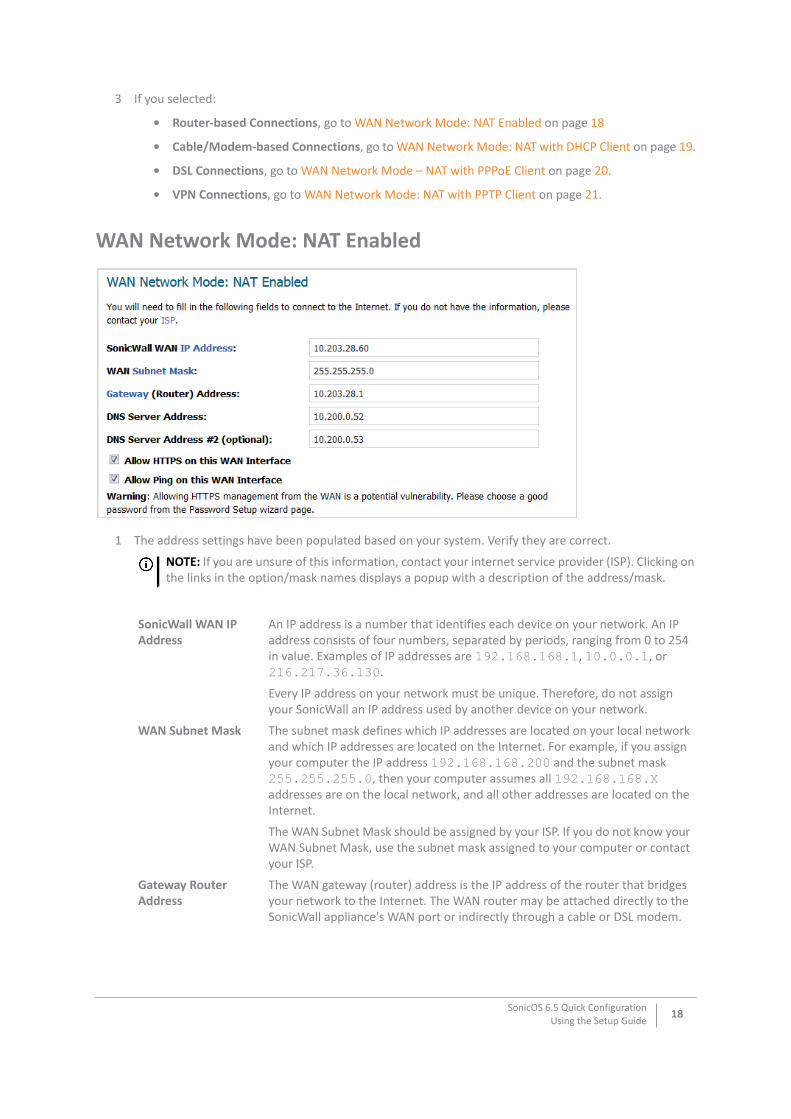
WAN Network Mode: NAT Enabled
1 The address settings have been populated based on your system. Verify they are correct.
NOTE: If you are unsure of this information, contact your internet service provider (ISP). Clicking on the links in the option/mask names displays a popup with a description of the address/mask.
SonicWall WAN IP Address
An IP address is a number that identifies each device on your network. An IP address consists of four numbers, separated by periods, ranging from 0 to 254 in value. Examples of IP addresses are 192.168.168.1, 10.0.0.1, or 216.217.36.130.
Every IP address on your network must be unique. Therefore, do not assign your SonicWall an IP address used by another device on your network.
WAN Subnet Mask The subnet mask defines which IP addresses are located on your local network and which IP addresses are located on the Internet. For example, if you assign your computer the IP address 192.168.168.200 and the subnet mask 255.255.255.0, then your computer assumes all 192.168.168.X addresses are on the local network, and all other addresses are located on the Internet.
The WAN Subnet Mask should be assigned by your ISP. If you do not know your WAN Subnet Mask, use the subnet mask assigned to your computer or contact your ISP.
Gateway Router Address
The WAN gateway (router) address is the IP address of the router that bridges your network to the Internet. The WAN router may be attached directly to the SonicWall appliance's WAN port or indirectly through a cable or DSL modem.
SonicOS 6.5 Quick ConfigurationUsing the Setup Guide
18
2 To allow HTTPS, select Allow HTTPS on this WAN Interface. This option is selected by default.
3 To allow ping, select Allow Ping on this WAN Interface. This option is selected by default.
4 Click NEXT. The LAN Settings page displays.
5 Go to LAN Settings on page 22.
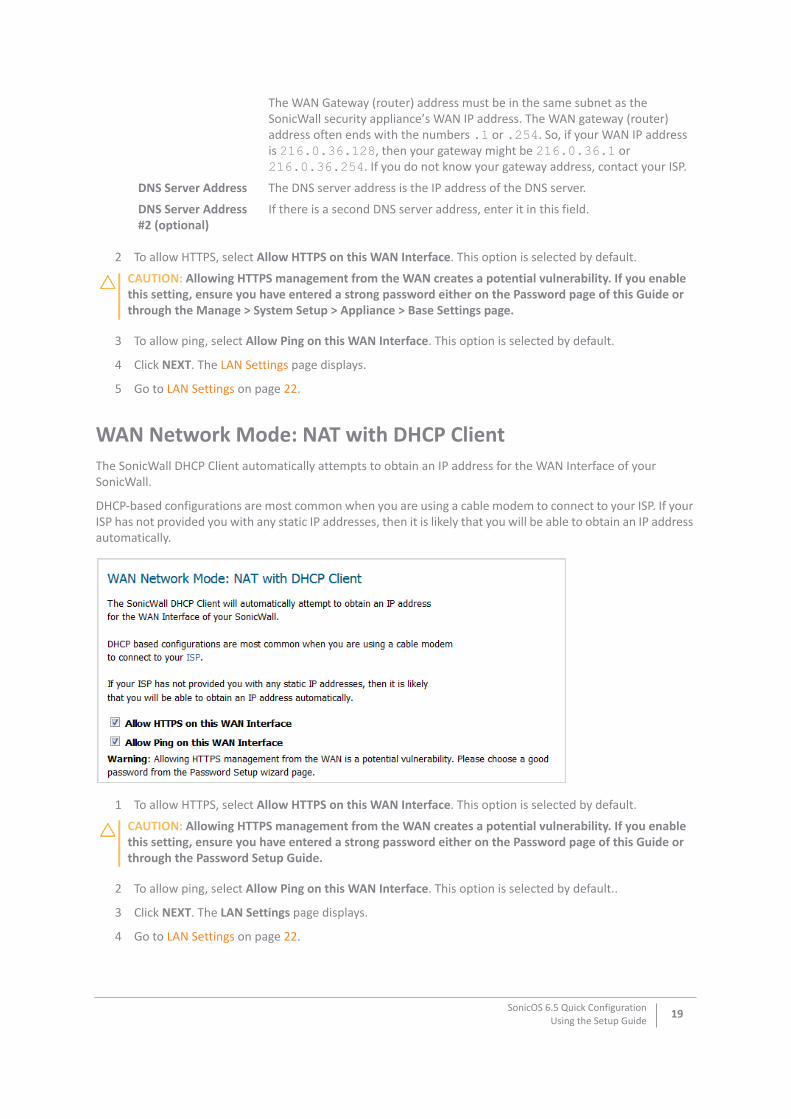
WAN Network Mode: NAT with DHCP ClientThe SonicWall DHCP Client automatically attempts to obtain an IP address for the WAN Interface of your SonicWall.
DHCP-based configurations are most common when you are using a cable modem to connect to your ISP. If your ISP has not provided you with any static IP addresses, then it is likely that you will be able to obtain an IP address automatically.
1 To allow HTTPS, select Allow HTTPS on this WAN Interface. This option is selected by default.
2 To allow ping, select Allow Ping on this WAN Interface. This option is selected by default..
3 Click NEXT. The LAN Settings page displays.
4 Go to LAN Settings on page 22.
The WAN Gateway (router) address must be in the same subnet as the SonicWall security appliance’s WAN IP address. The WAN gateway (router) address often ends with the numbers .1 or .254. So, if your WAN IP address is 216.0.36.128, then your gateway might be 216.0.36.1 or 216.0.36.254. If you do not know your gateway address, contact your ISP.
DNS Server Address The DNS server address is the IP address of the DNS server.
DNS Server Address #2 (optional)
If there is a second DNS server address, enter it in this field.
CAUTION: Allowing HTTPS management from the WAN creates a potential vulnerability. If you enable this setting, ensure you have entered a strong password either on the Password page of this Guide or through the Manage > System Setup > Appliance > Base Settings page.
CAUTION: Allowing HTTPS management from the WAN creates a potential vulnerability. If you enable this setting, ensure you have entered a strong password either on the Password page of this Guide or through the Password Setup Guide.
SonicOS 6.5 Quick ConfigurationUsing the Setup Guide
19
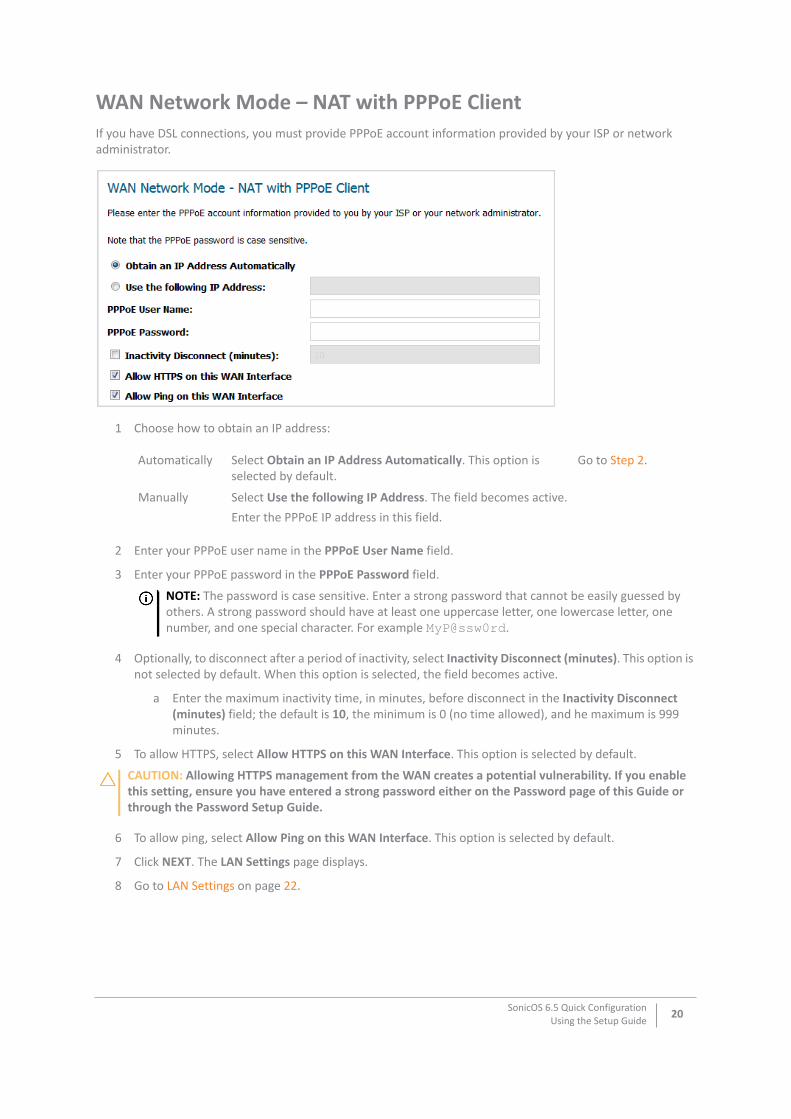
WAN Network Mode – NAT with PPPoE ClientIf you have DSL connections, you must provide PPPoE account information provided by your ISP or network administrator.
1 Choose how to obtain an IP address:
2 Enter your PPPoE user name in the PPPoE User Name field.
3 Enter your PPPoE password in the PPPoE Password field.
4 Optionally, to disconnect after a period of inactivity, select Inactivity Disconnect (minutes). This option is not selected by default. When this option is selected, the field becomes active.
a Enter the maximum inactivity time, in minutes, before disconnect in the Inactivity Disconnect (minutes) field; the default is 10, the minimum is 0 (no time allowed), and he maximum is 999 minutes.
5 To allow HTTPS, select Allow HTTPS on this WAN Interface. This option is selected by default.
6 To allow ping, select Allow Ping on this WAN Interface. This option is selected by default.
7 Click NEXT. The LAN Settings page displays.
8 Go to LAN Settings on page 22.
Automatically Select Obtain an IP Address Automatically. This option is selected by default.
Go to Step 2.
Manually Select Use the following IP Address. The field becomes active.Enter the PPPoE IP address in this field.
NOTE: The password is case sensitive. Enter a strong password that cannot be easily guessed by others. A strong password should have at least one uppercase letter, one lowercase letter, one number, and one special character. For example MyP@ssw0rd.
CAUTION: Allowing HTTPS management from the WAN creates a potential vulnerability. If you enable this setting, ensure you have entered a strong password either on the Password page of this Guide or through the Password Setup Guide.
SonicOS 6.5 Quick ConfigurationUsing the Setup Guide
20
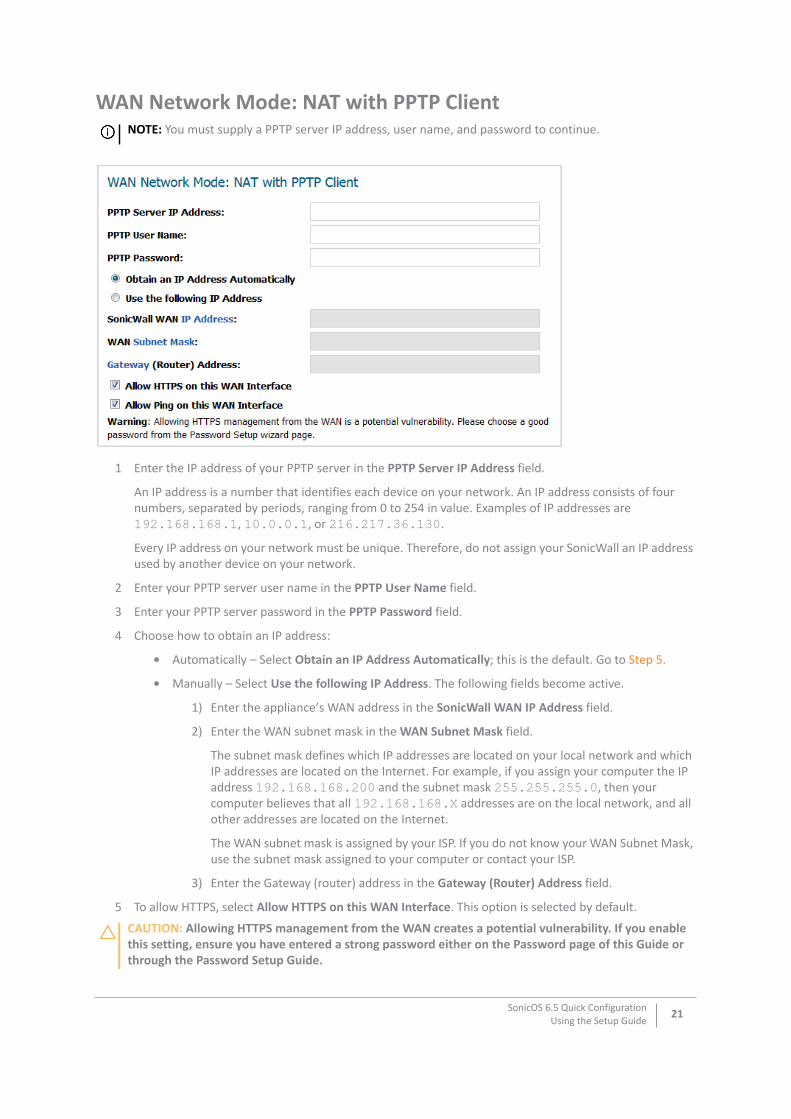
WAN Network Mode: NAT with PPTP Client
1 Enter the IP address of your PPTP server in the PPTP Server IP Address field.
An IP address is a number that identifies each device on your network. An IP address consists of four numbers, separated by periods, ranging from 0 to 254 in value. Examples of IP addresses are 192.168.168.1, 10.0.0.1, or 216.217.36.130.
Every IP address on your network must be unique. Therefore, do not assign your SonicWall an IP address used by another device on your network.
2 Enter your PPTP server user name in the PPTP User Name field.
3 Enter your PPTP server password in the PPTP Password field.
4 Choose how to obtain an IP address:
• Automatically – Select Obtain an IP Address Automatically; this is the default. Go to Step 5.
• Manually – Select Use the following IP Address. The following fields become active.
1) Enter the appliance’s WAN address in the SonicWall WAN IP Address field.
2) Enter the WAN subnet mask in the WAN Subnet Mask field.
The subnet mask defines which IP addresses are located on your local network and which IP addresses are located on the Internet. For example, if you assign your computer the IP address 192.168.168.200 and the subnet mask 255.255.255.0, then your computer believes that all 192.168.168.X addresses are on the local network, and all other addresses are located on the Internet.
The WAN subnet mask is assigned by your ISP. If you do not know your WAN Subnet Mask, use the subnet mask assigned to your computer or contact your ISP.
3) Enter the Gateway (router) address in the Gateway (Router) Address field.
5 To allow HTTPS, select Allow HTTPS on this WAN Interface. This option is selected by default.
NOTE: You must supply a PPTP server IP address, user name, and password to continue.
CAUTION: Allowing HTTPS management from the WAN creates a potential vulnerability. If you enable this setting, ensure you have entered a strong password either on the Password page of this Guide or through the Password Setup Guide.
SonicOS 6.5 Quick ConfigurationUsing the Setup Guide
21
6 To allow ping, select Allow Ping on this WAN Interface. This option is selected by default.
7 Click NEXT. The LAN Settings page displays.
8 Go to LAN Settings on page 22.
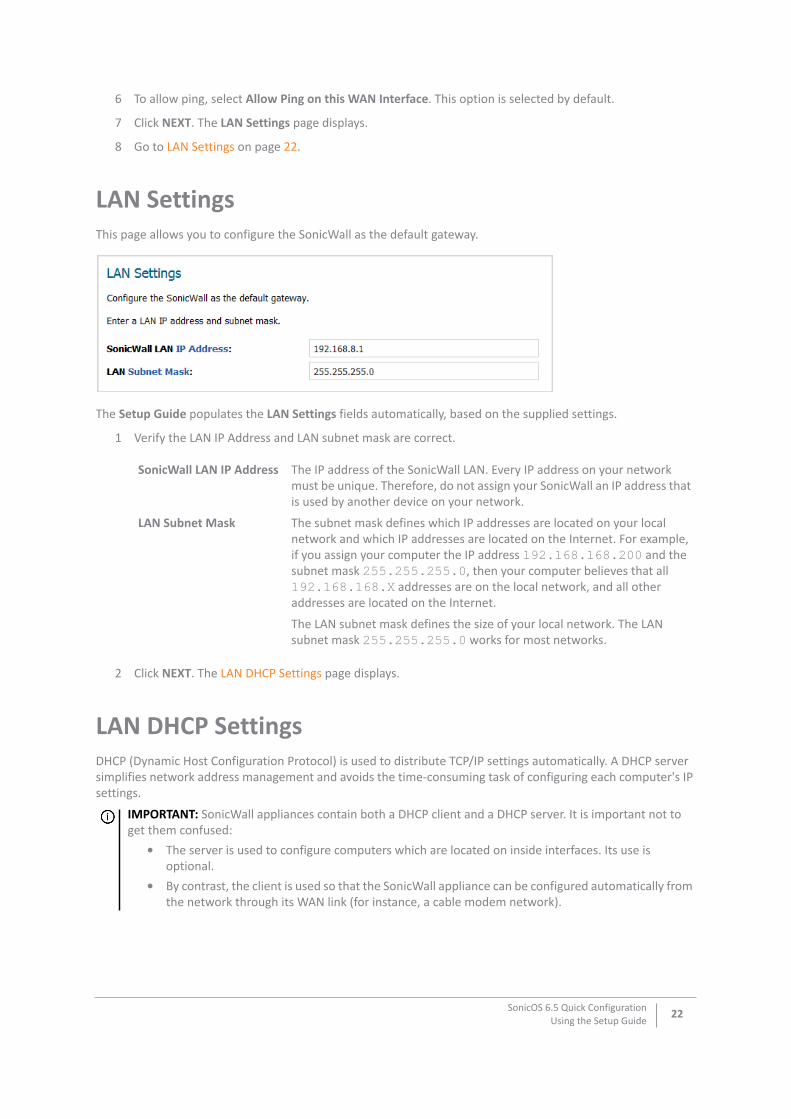
LAN SettingsThis page allows you to configure the SonicWall as the default gateway.
The Setup Guide populates the LAN Settings fields automatically, based on the supplied settings.
1 Verify the LAN IP Address and LAN subnet mask are correct.
2 Click NEXT. The LAN DHCP Settings page displays.
LAN DHCP SettingsDHCP (Dynamic Host Configuration Protocol) is used to distribute TCP/IP settings automatically. A DHCP server simplifies network address management and avoids the time-consuming task of configuring each computer's IP settings.
SonicWall LAN IP Address The IP address of the SonicWall LAN. Every IP address on your network must be unique. Therefore, do not assign your SonicWall an IP address that is used by another device on your network.
LAN Subnet Mask The subnet mask defines which IP addresses are located on your local network and which IP addresses are located on the Internet. For example, if you assign your computer the IP address 192.168.168.200 and the subnet mask 255.255.255.0, then your computer believes that all 192.168.168.X addresses are on the local network, and all other addresses are located on the Internet.
The LAN subnet mask defines the size of your local network. The LAN subnet mask 255.255.255.0 works for most networks.
IMPORTANT: SonicWall appliances contain both a DHCP client and a DHCP server. It is important not to get them confused:
• The server is used to configure computers which are located on inside interfaces. Its use is optional.
• By contrast, the client is used so that the SonicWall appliance can be configured automatically from the network through its WAN link (for instance, a cable modem network).
SonicOS 6.5 Quick ConfigurationUsing the Setup Guide
22
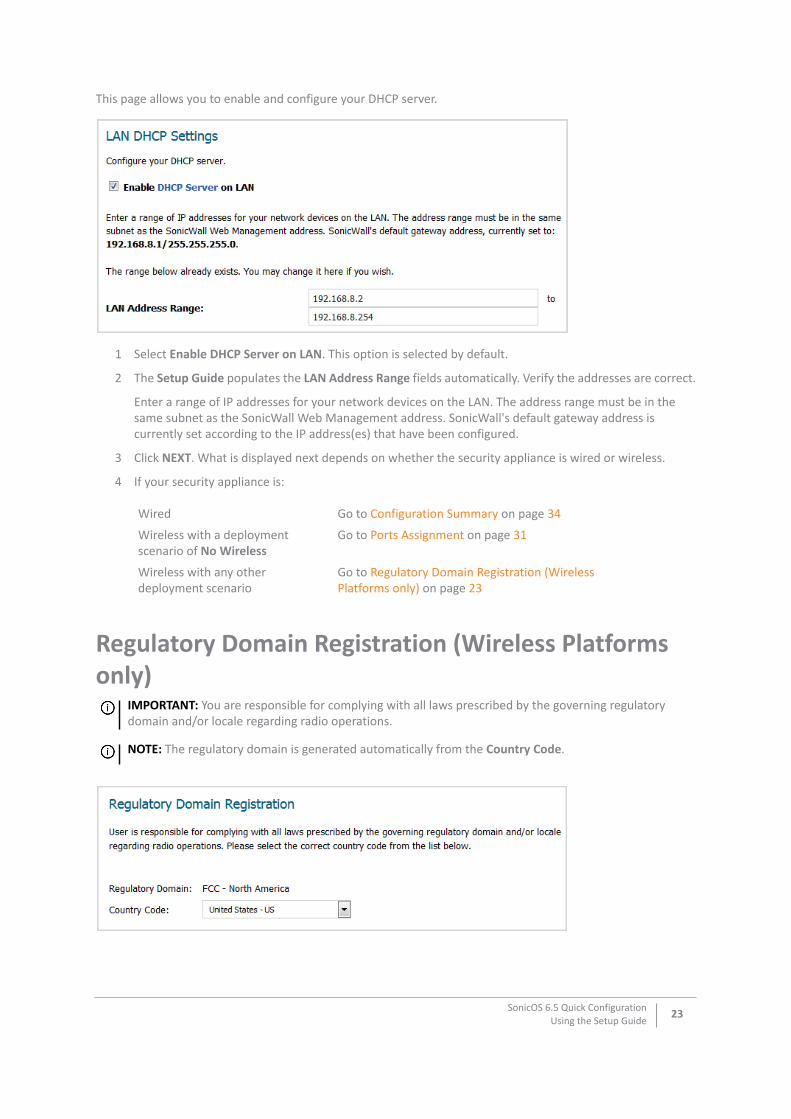
This page allows you to enable and configure your DHCP server.
1 Select Enable DHCP Server on LAN. This option is selected by default.
2 The Setup Guide populates the LAN Address Range fields automatically. Verify the addresses are correct.
Enter a range of IP addresses for your network devices on the LAN. The address range must be in the same subnet as the SonicWall Web Management address. SonicWall's default gateway address is currently set according to the IP address(es) that have been configured.
3 Click NEXT. What is displayed next depends on whether the security appliance is wired or wireless.
4 If your security appliance is:
Regulatory Domain Registration (Wireless Platforms only)
Wired Go to Configuration Summary on page 34
Wireless with a deployment scenario of No Wireless
Go to Ports Assignment on page 31
Wireless with any other deployment scenario
Go to Regulatory Domain Registration (Wireless Platforms only) on page 23
IMPORTANT: You are responsible for complying with all laws prescribed by the governing regulatory domain and/or locale regarding radio operations.
NOTE: The regulatory domain is generated automatically from the Country Code.
SonicOS 6.5 Quick ConfigurationUsing the Setup Guide
23
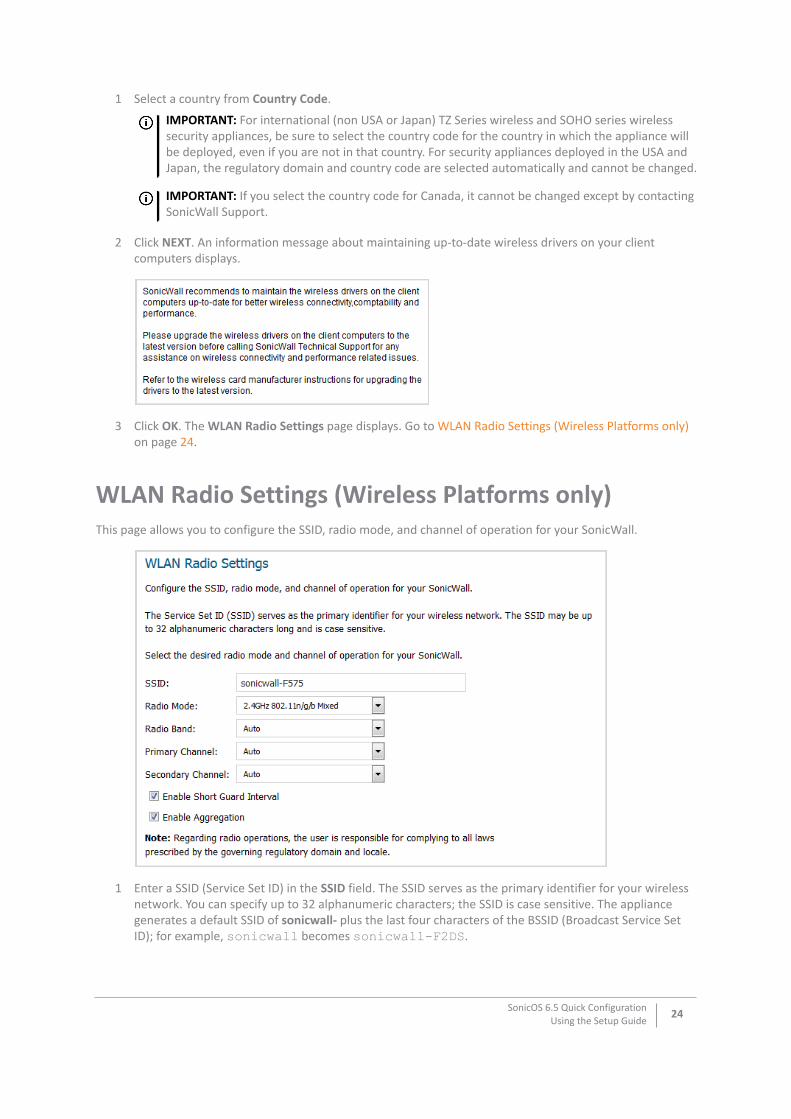
1 Select a country from Country Code.
2 Click NEXT. An information message about maintaining up-to-date wireless drivers on your client computers displays.
3 Click OK. The WLAN Radio Settings page displays. Go to WLAN Radio Settings (Wireless Platforms only) on page 24.
WLAN Radio Settings (Wireless Platforms only)This page allows you to configure the SSID, radio mode, and channel of operation for your SonicWall.
1 Enter a SSID (Service Set ID) in the SSID field. The SSID serves as the primary identifier for your wireless network. You can specify up to 32 alphanumeric characters; the SSID is case sensitive. The appliance generates a default SSID of sonicwall- plus the last four characters of the BSSID (Broadcast Service Set ID); for example, sonicwall becomes sonicwall-F2DS.
IMPORTANT: For international (non USA or Japan) TZ Series wireless and SOHO series wireless security appliances, be sure to select the country code for the country in which the appliance will be deployed, even if you are not in that country. For security appliances deployed in the USA and Japan, the regulatory domain and country code are selected automatically and cannot be changed.
IMPORTANT: If you select the country code for Canada, it cannot be changed except by contacting SonicWall Support.
SonicOS 6.5 Quick ConfigurationUsing the Setup Guide
24
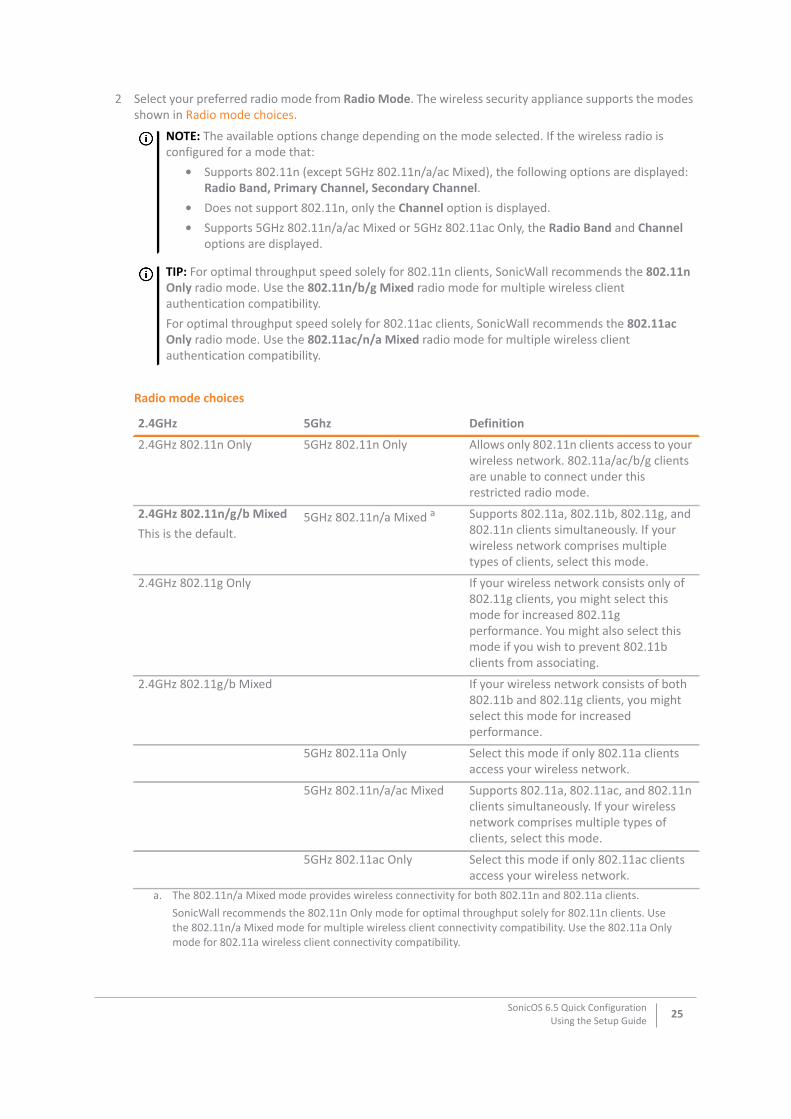
2 Select your preferred radio mode from Radio Mode. The wireless security appliance supports the modes shown in Radio mode choices.
NOTE: The available options change depending on the mode selected. If the wireless radio is configured for a mode that:
• Supports 802.11n (except 5GHz 802.11n/a/ac Mixed), the following options are displayed: Radio Band, Primary Channel, Secondary Channel.
• Does not support 802.11n, only the Channel option is displayed.• Supports 5GHz 802.11n/a/ac Mixed or 5GHz 802.11ac Only, the Radio Band and Channel
options are displayed.
TIP: For optimal throughput speed solely for 802.11n clients, SonicWall recommends the 802.11n Only radio mode. Use the 802.11n/b/g Mixed radio mode for multiple wireless client authentication compatibility. For optimal throughput speed solely for 802.11ac clients, SonicWall recommends the 802.11ac Only radio mode. Use the 802.11ac/n/a Mixed radio mode for multiple wireless client authentication compatibility.
Radio mode choices
2.4GHz 5Ghz Definition
2.4GHz 802.11n Only 5GHz 802.11n Only Allows only 802.11n clients access to your wireless network. 802.11a/ac/b/g clients are unable to connect under this restricted radio mode.
2.4GHz 802.11n/g/b Mixed This is the default.
5GHz 802.11n/a Mixed a
a. The 802.11n/a Mixed mode provides wireless connectivity for both 802.11n and 802.11a clients. SonicWall recommends the 802.11n Only mode for optimal throughput solely for 802.11n clients. Use the 802.11n/a Mixed mode for multiple wireless client connectivity compatibility. Use the 802.11a Only mode for 802.11a wireless client connectivity compatibility.
Supports 802.11a, 802.11b, 802.11g, and 802.11n clients simultaneously. If your wireless network comprises multiple types of clients, select this mode.
2.4GHz 802.11g Only If your wireless network consists only of 802.11g clients, you might select this mode for increased 802.11g performance. You might also select this mode if you wish to prevent 802.11b clients from associating.
2.4GHz 802.11g/b Mixed If your wireless network consists of both 802.11b and 802.11g clients, you might select this mode for increased performance.
5GHz 802.11a Only Select this mode if only 802.11a clients access your wireless network.
5GHz 802.11n/a/ac Mixed Supports 802.11a, 802.11ac, and 802.11n clients simultaneously. If your wireless network comprises multiple types of clients, select this mode.
5GHz 802.11ac Only Select this mode if only 802.11ac clients access your wireless network.
SonicOS 6.5 Quick ConfigurationUsing the Setup Guide
25
3 If the mode you selected supports:
• 802.11a Only, 802.11g only, or 80211g/b Mixed, go to Step 4
• 5GHz802.11ac Only and 5GHz 802.11n/a/ac Mixed, go to Step 6
• 802.11n Only or 802.11n Mixed (except for 5GHz 802.11n/a/ac Mixed), go to Step 8
4 Only for 802.11a/g: Select the channel for the radio from Channel:
5 Go to Step 11.
6 For 802.11ac, the Radio Band and Channel/Standard Channel options display.
From Radio Band, select the radio band for the 802.11a or 802.11ac radio:
7 Go to Step 11.
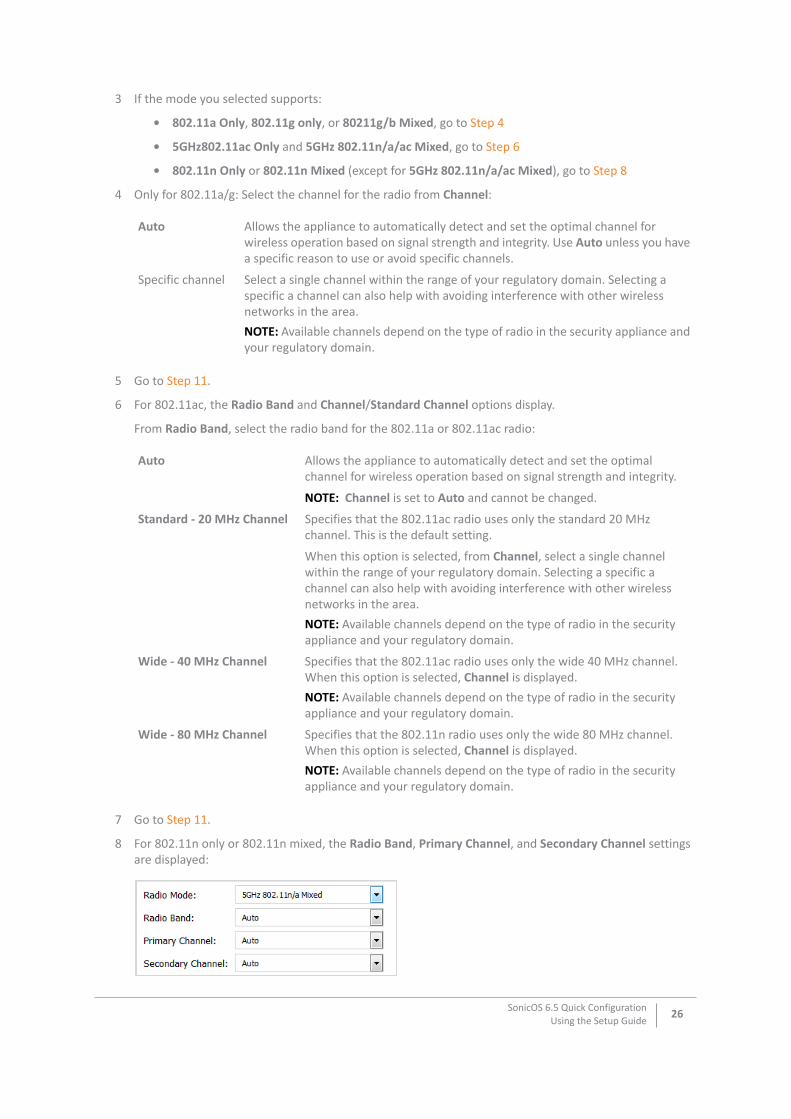
8 For 802.11n only or 802.11n mixed, the Radio Band, Primary Channel, and Secondary Channel settings are displayed:
Auto Allows the appliance to automatically detect and set the optimal channel for wireless operation based on signal strength and integrity. Use Auto unless you have a specific reason to use or avoid specific channels.
Specific channel Select a single channel within the range of your regulatory domain. Selecting a specific a channel can also help with avoiding interference with other wireless networks in the area.NOTE: Available channels depend on the type of radio in the security appliance and your regulatory domain.
Auto Allows the appliance to automatically detect and set the optimal channel for wireless operation based on signal strength and integrity.
NOTE: Channel is set to Auto and cannot be changed.
Standard - 20 MHz Channel Specifies that the 802.11ac radio uses only the standard 20 MHz channel. This is the default setting.
When this option is selected, from Channel, select a single channel within the range of your regulatory domain. Selecting a specific a channel can also help with avoiding interference with other wireless networks in the area.NOTE: Available channels depend on the type of radio in the security appliance and your regulatory domain.
Wide - 40 MHz Channel Specifies that the 802.11ac radio uses only the wide 40 MHz channel. When this option is selected, Channel is displayed.NOTE: Available channels depend on the type of radio in the security appliance and your regulatory domain.
Wide - 80 MHz Channel Specifies that the 802.11n radio uses only the wide 80 MHz channel. When this option is selected, Channel is displayed.NOTE: Available channels depend on the type of radio in the security appliance and your regulatory domain.
SonicOS 6.5 Quick ConfigurationUsing the Setup Guide
26
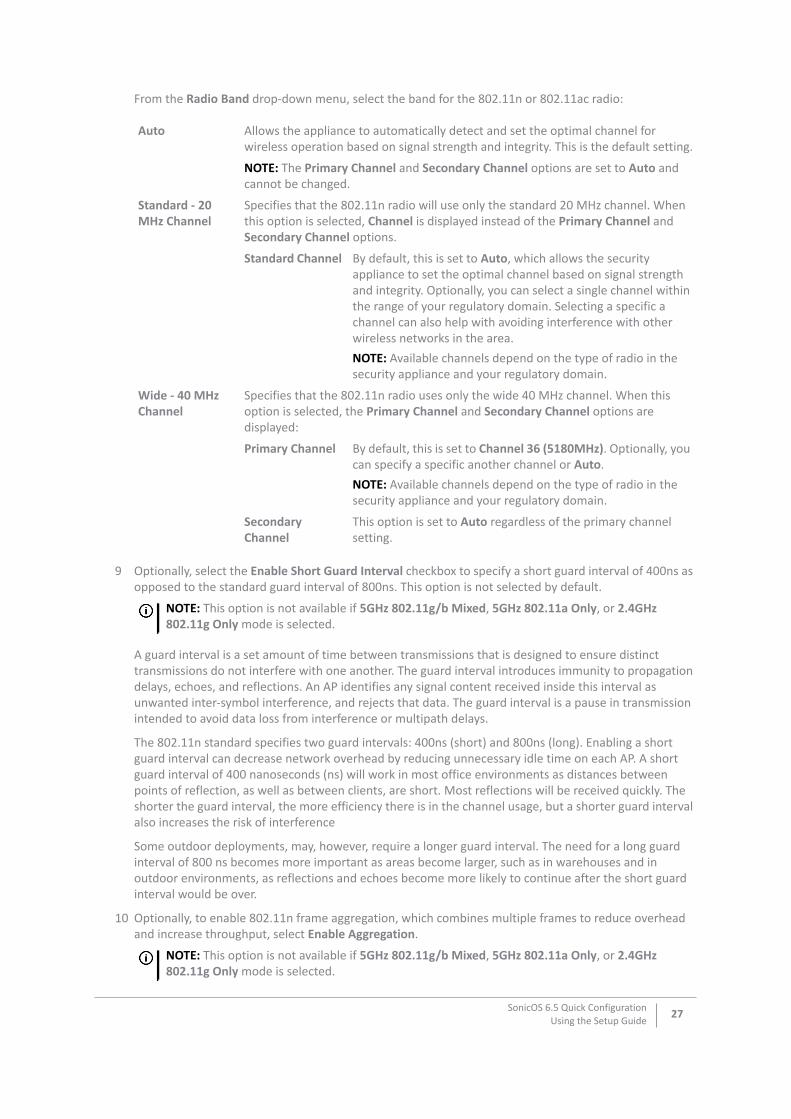
From the Radio Band drop-down menu, select the band for the 802.11n or 802.11ac radio:
9 Optionally, select the Enable Short Guard Interval checkbox to specify a short guard interval of 400ns as opposed to the standard guard interval of 800ns. This option is not selected by default.
A guard interval is a set amount of time between transmissions that is designed to ensure distinct transmissions do not interfere with one another. The guard interval introduces immunity to propagation delays, echoes, and reflections. An AP identifies any signal content received inside this interval as unwanted inter-symbol interference, and rejects that data. The guard interval is a pause in transmission intended to avoid data loss from interference or multipath delays.
The 802.11n standard specifies two guard intervals: 400ns (short) and 800ns (long). Enabling a short guard interval can decrease network overhead by reducing unnecessary idle time on each AP. A short guard interval of 400 nanoseconds (ns) will work in most office environments as distances between points of reflection, as well as between clients, are short. Most reflections will be received quickly. The shorter the guard interval, the more efficiency there is in the channel usage, but a shorter guard interval also increases the risk of interference
Some outdoor deployments, may, however, require a longer guard interval. The need for a long guard interval of 800 ns becomes more important as areas become larger, such as in warehouses and in outdoor environments, as reflections and echoes become more likely to continue after the short guard interval would be over.
10 Optionally, to enable 802.11n frame aggregation, which combines multiple frames to reduce overhead and increase throughput, select Enable Aggregation.
Auto Allows the appliance to automatically detect and set the optimal channel for wireless operation based on signal strength and integrity. This is the default setting.
NOTE: The Primary Channel and Secondary Channel options are set to Auto and cannot be changed.
Standard - 20 MHz Channel
Specifies that the 802.11n radio will use only the standard 20 MHz channel. When this option is selected, Channel is displayed instead of the Primary Channel and Secondary Channel options.
Standard Channel By default, this is set to Auto, which allows the security appliance to set the optimal channel based on signal strength and integrity. Optionally, you can select a single channel within the range of your regulatory domain. Selecting a specific a channel can also help with avoiding interference with other wireless networks in the area.NOTE: Available channels depend on the type of radio in the security appliance and your regulatory domain.
Wide - 40 MHz Channel
Specifies that the 802.11n radio uses only the wide 40 MHz channel. When this option is selected, the Primary Channel and Secondary Channel options are displayed:
Primary Channel By default, this is set to Channel 36 (5180MHz). Optionally, you can specify a specific another channel or Auto. NOTE: Available channels depend on the type of radio in the security appliance and your regulatory domain.
Secondary Channel
This option is set to Auto regardless of the primary channel setting.
NOTE: This option is not available if 5GHz 802.11g/b Mixed, 5GHz 802.11a Only, or 2.4GHz 802.11g Only mode is selected.
NOTE: This option is not available if 5GHz 802.11g/b Mixed, 5GHz 802.11a Only, or 2.4GHz 802.11g Only mode is selected.
SonicOS 6.5 Quick ConfigurationUsing the Setup Guide
27
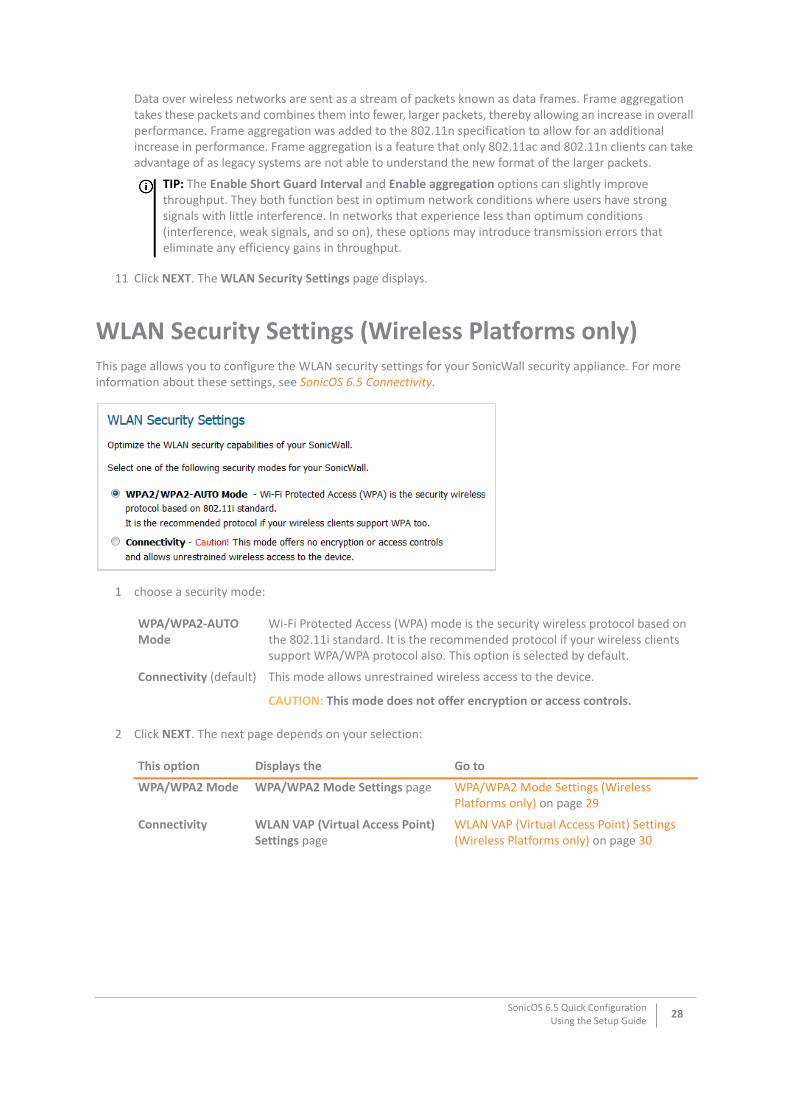
Data over wireless networks are sent as a stream of packets known as data frames. Frame aggregation takes these packets and combines them into fewer, larger packets, thereby allowing an increase in overall performance. Frame aggregation was added to the 802.11n specification to allow for an additional increase in performance. Frame aggregation is a feature that only 802.11ac and 802.11n clients can take advantage of as legacy systems are not able to understand the new format of the larger packets.
11 Click NEXT. The WLAN Security Settings page displays.
WLAN Security Settings (Wireless Platforms only)This page allows you to configure the WLAN security settings for your SonicWall security appliance. For more information about these settings, see SonicOS 6.5 Connectivity.
1 choose a security mode:
2 Click NEXT. The next page depends on your selection:
TIP: The Enable Short Guard Interval and Enable aggregation options can slightly improve throughput. They both function best in optimum network conditions where users have strong signals with little interference. In networks that experience less than optimum conditions (interference, weak signals, and so on), these options may introduce transmission errors that eliminate any efficiency gains in throughput.
WPA/WPA2-AUTO Mode
Wi-Fi Protected Access (WPA) mode is the security wireless protocol based on the 802.11i standard. It is the recommended protocol if your wireless clients support WPA/WPA protocol also. This option is selected by default.
Connectivity (default) This mode allows unrestrained wireless access to the device.
CAUTION: This mode does not offer encryption or access controls.
This option Displays the Go to
WPA/WPA2 Mode WPA/WPA2 Mode Settings page WPA/WPA2 Mode Settings (Wireless Platforms only) on page 29
Connectivity WLAN VAP (Virtual Access Point) Settings page
WLAN VAP (Virtual Access Point) Settings (Wireless Platforms only) on page 30
SonicOS 6.5 Quick ConfigurationUsing the Setup Guide
28
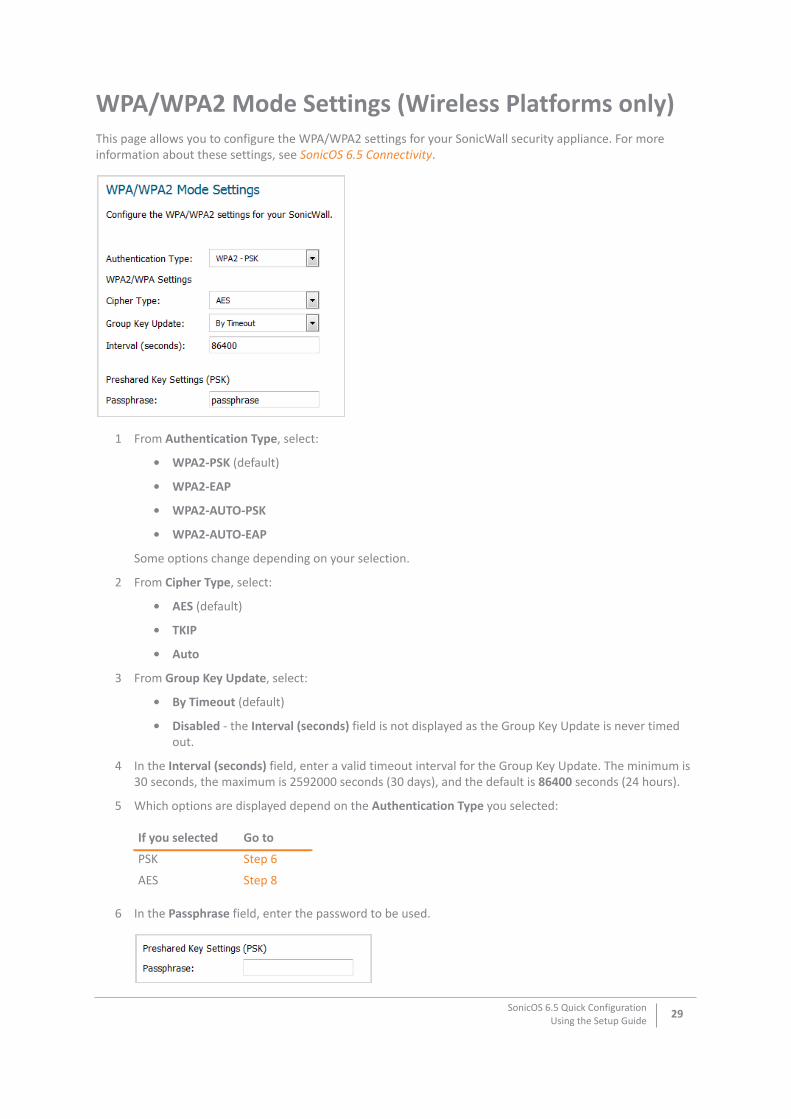
WPA/WPA2 Mode Settings (Wireless Platforms only)This page allows you to configure the WPA/WPA2 settings for your SonicWall security appliance. For more information about these settings, see SonicOS 6.5 Connectivity.
1 From Authentication Type, select:
• WPA2-PSK (default)
• WPA2-EAP
• WPA2-AUTO-PSK
• WPA2-AUTO-EAP
Some options change depending on your selection.
2 From Cipher Type, select:
• AES (default)
• TKIP
• Auto
3 From Group Key Update, select:
• By Timeout (default)
• Disabled - the Interval (seconds) field is not displayed as the Group Key Update is never timed out.
4 In the Interval (seconds) field, enter a valid timeout interval for the Group Key Update. The minimum is 30 seconds, the maximum is 2592000 seconds (30 days), and the default is 86400 seconds (24 hours).
5 Which options are displayed depend on the Authentication Type you selected:
6 In the Passphrase field, enter the password to be used.
If you selected Go to
PSK Step 6
AES Step 8
SonicOS 6.5 Quick ConfigurationUsing the Setup Guide
29
7 Go to Step 11.
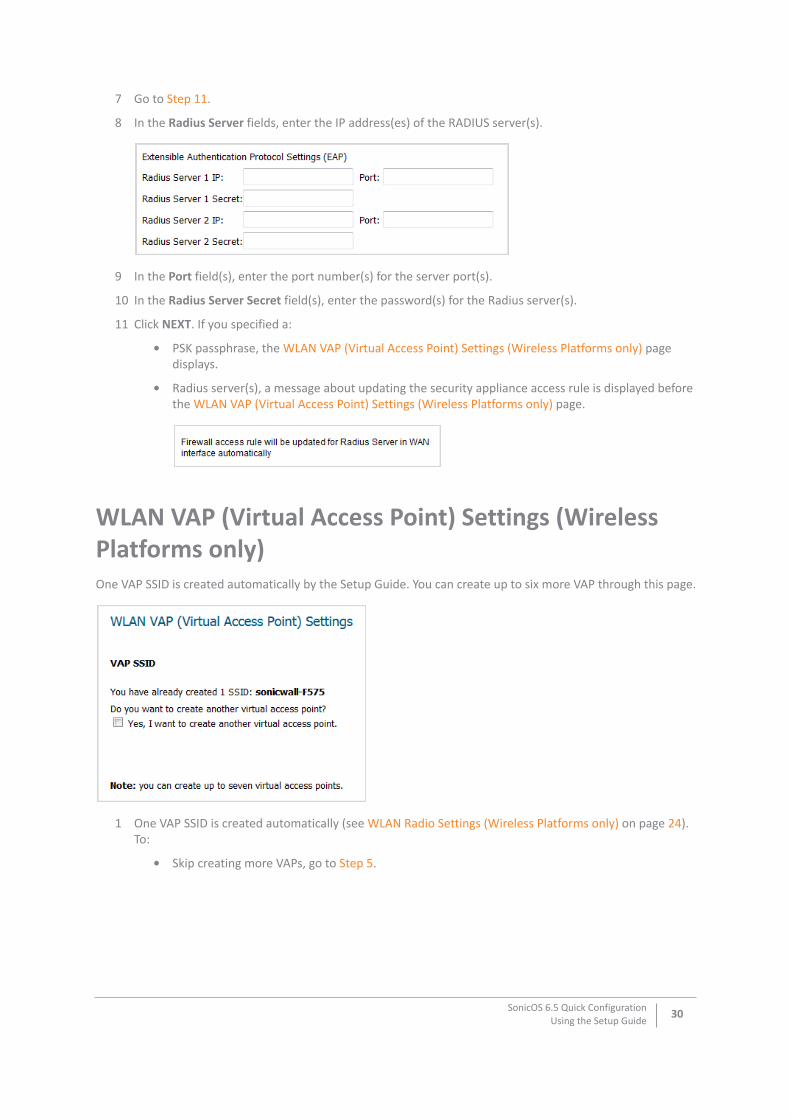
8 In the Radius Server fields, enter the IP address(es) of the RADIUS server(s).
9 In the Port field(s), enter the port number(s) for the server port(s).
10 In the Radius Server Secret field(s), enter the password(s) for the Radius server(s).
11 Click NEXT. If you specified a:
• PSK passphrase, the WLAN VAP (Virtual Access Point) Settings (Wireless Platforms only) page displays.
• Radius server(s), a message about updating the security appliance access rule is displayed before the WLAN VAP (Virtual Access Point) Settings (Wireless Platforms only) page.
WLAN VAP (Virtual Access Point) Settings (Wireless Platforms only)One VAP SSID is created automatically by the Setup Guide. You can create up to six more VAP through this page.
1 One VAP SSID is created automatically (see WLAN Radio Settings (Wireless Platforms only) on page 24). To:
• Skip creating more VAPs, go to Step 5.
SonicOS 6.5 Quick ConfigurationUsing the Setup Guide
30
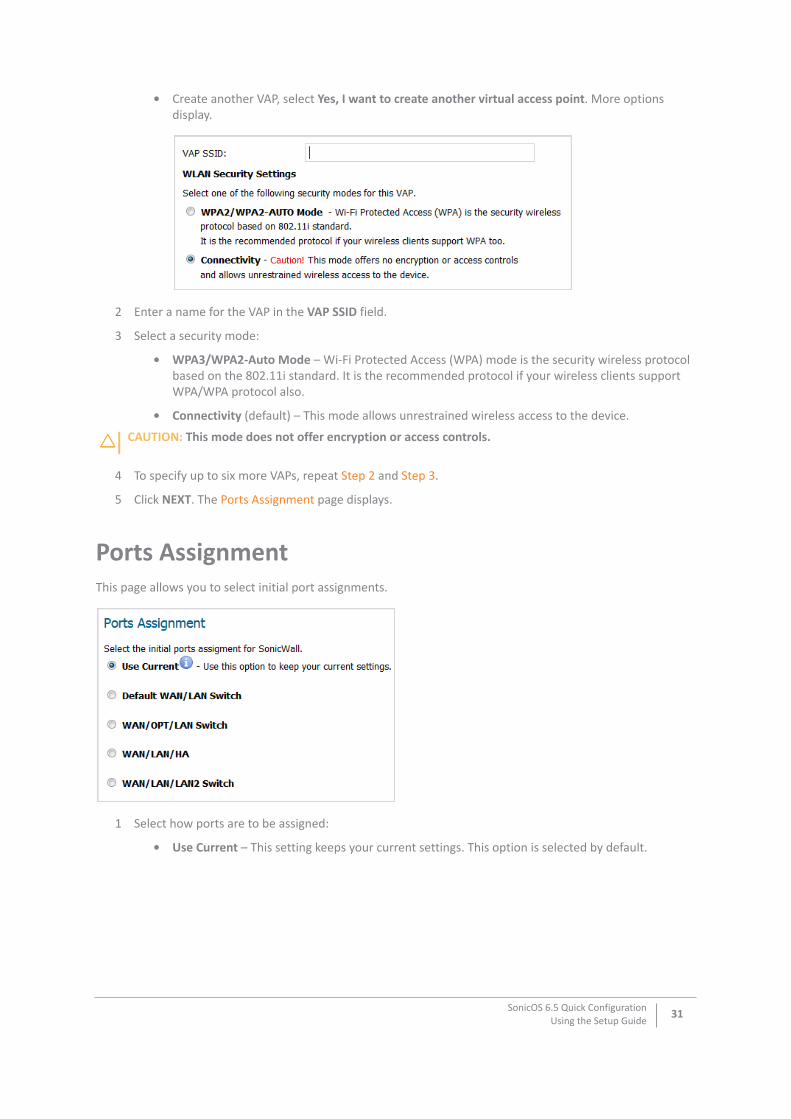
• Create another VAP, select Yes, I want to create another virtual access point. More options display.
2 Enter a name for the VAP in the VAP SSID field.
3 Select a security mode:
• WPA3/WPA2-Auto Mode – Wi-Fi Protected Access (WPA) mode is the security wireless protocol based on the 802.11i standard. It is the recommended protocol if your wireless clients support WPA/WPA protocol also.
• Connectivity (default) – This mode allows unrestrained wireless access to the device.
4 To specify up to six more VAPs, repeat Step 2 and Step 3.
5 Click NEXT. The Ports Assignment page displays.
Ports AssignmentThis page allows you to select initial port assignments.
1 Select how ports are to be assigned:
• Use Current – This setting keeps your current settings. This option is selected by default.
CAUTION: This mode does not offer encryption or access controls.
SonicOS 6.5 Quick ConfigurationUsing the Setup Guide
31
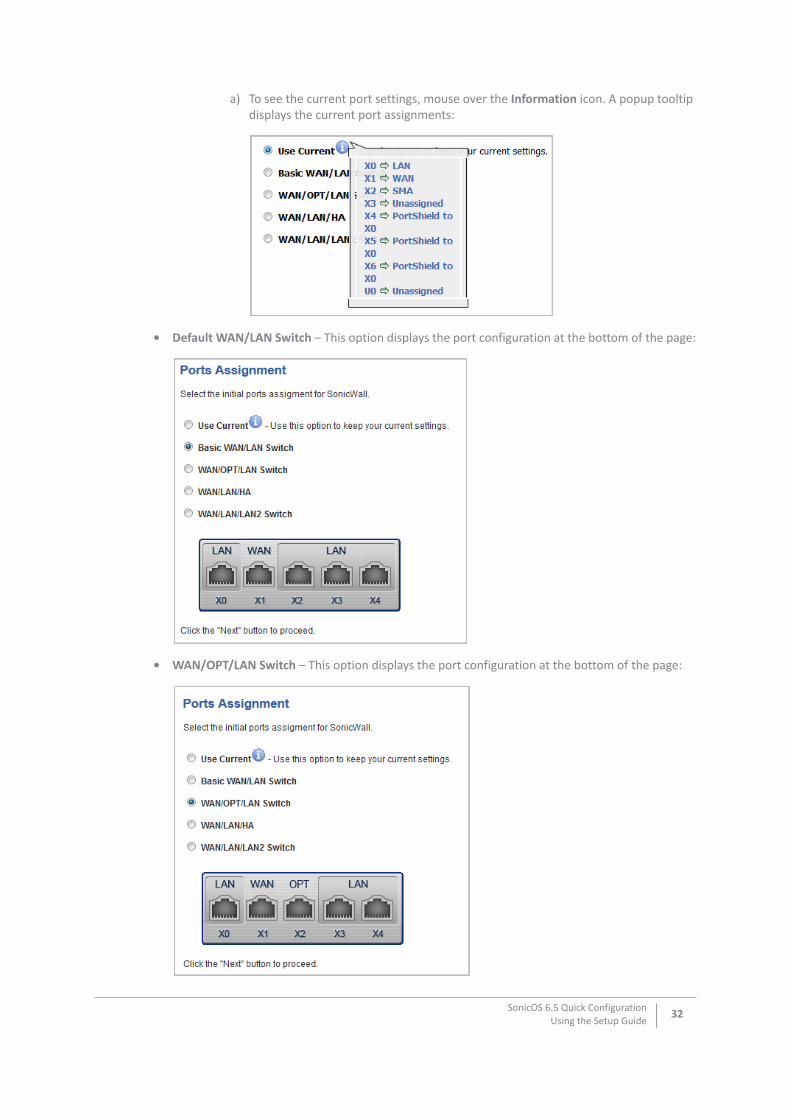
a) To see the current port settings, mouse over the Information icon. A popup tooltip displays the current port assignments:
• Default WAN/LAN Switch – This option displays the port configuration at the bottom of the page:
• WAN/OPT/LAN Switch – This option displays the port configuration at the bottom of the page:
SonicOS 6.5 Quick ConfigurationUsing the Setup Guide
32
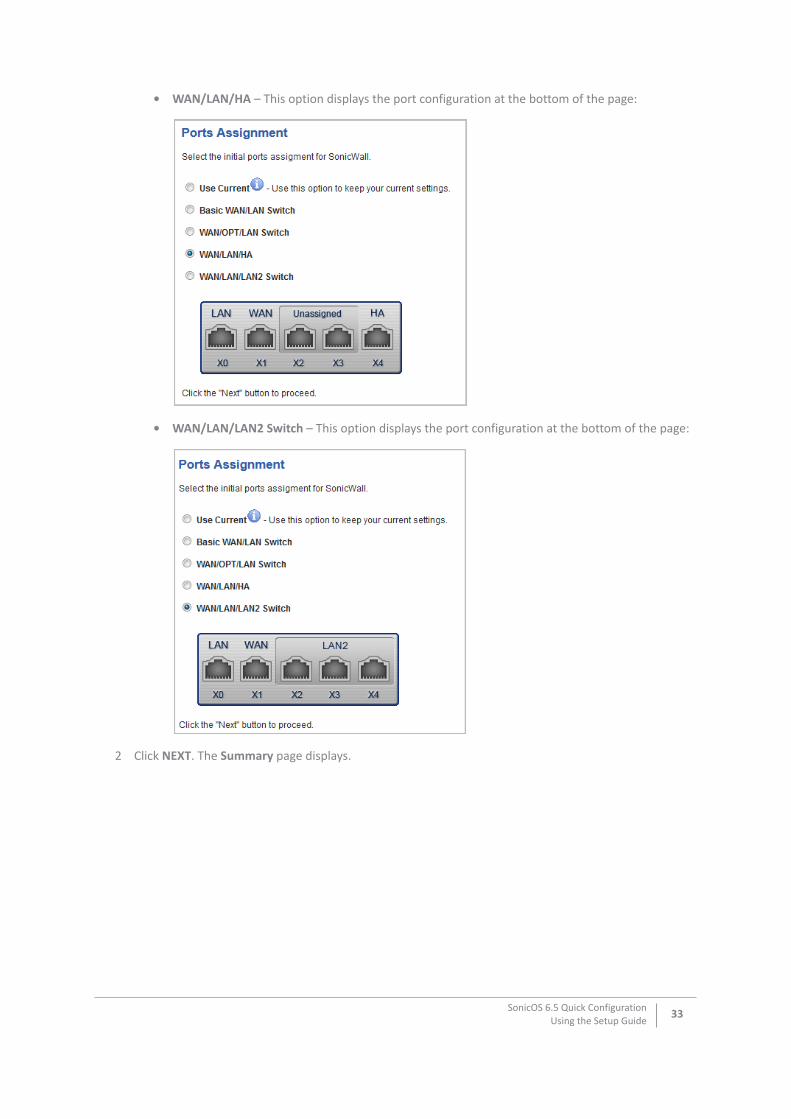
• WAN/LAN/HA – This option displays the port configuration at the bottom of the page:
• WAN/LAN/LAN2 Switch – This option displays the port configuration at the bottom of the page:
2 Click NEXT. The Summary page displays.
SonicOS 6.5 Quick ConfigurationUsing the Setup Guide
33
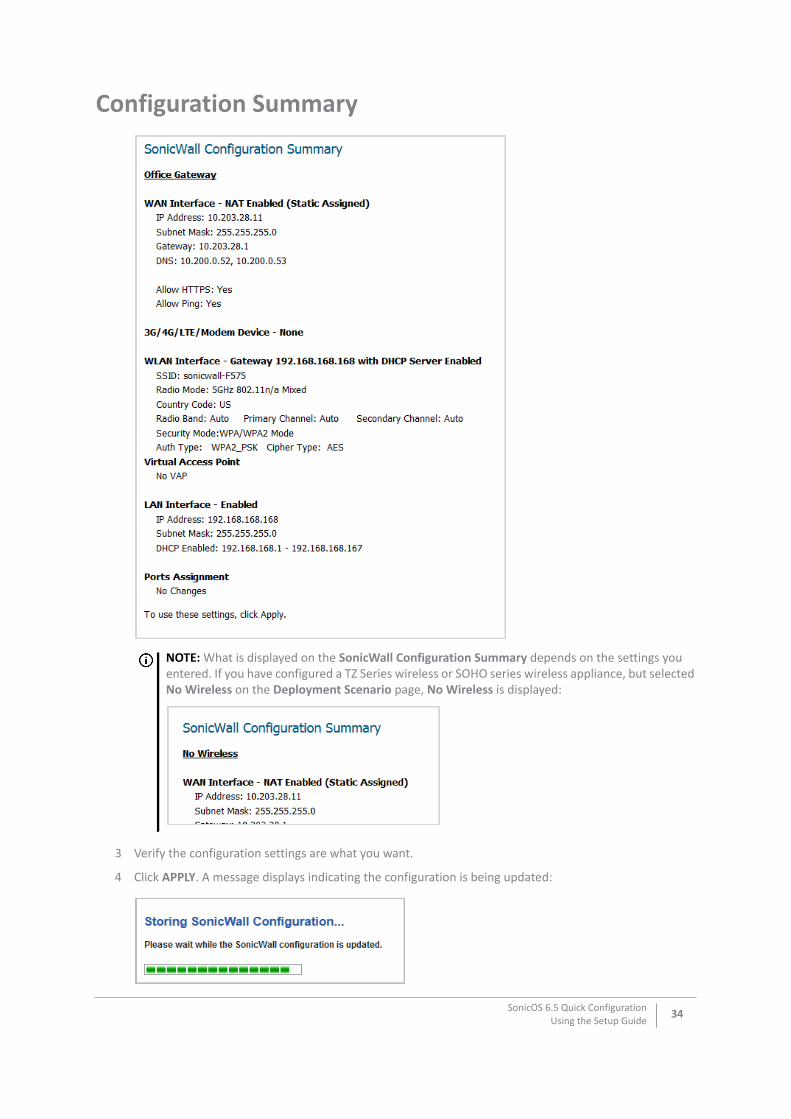
Configuration Summary
3 Verify the configuration settings are what you want.
4 Click APPLY. A message displays indicating the configuration is being updated:
NOTE: What is displayed on the SonicWall Configuration Summary depends on the settings you entered. If you have configured a TZ Series wireless or SOHO series wireless appliance, but selected No Wireless on the Deployment Scenario page, No Wireless is displayed:
SonicOS 6.5 Quick ConfigurationUsing the Setup Guide
34
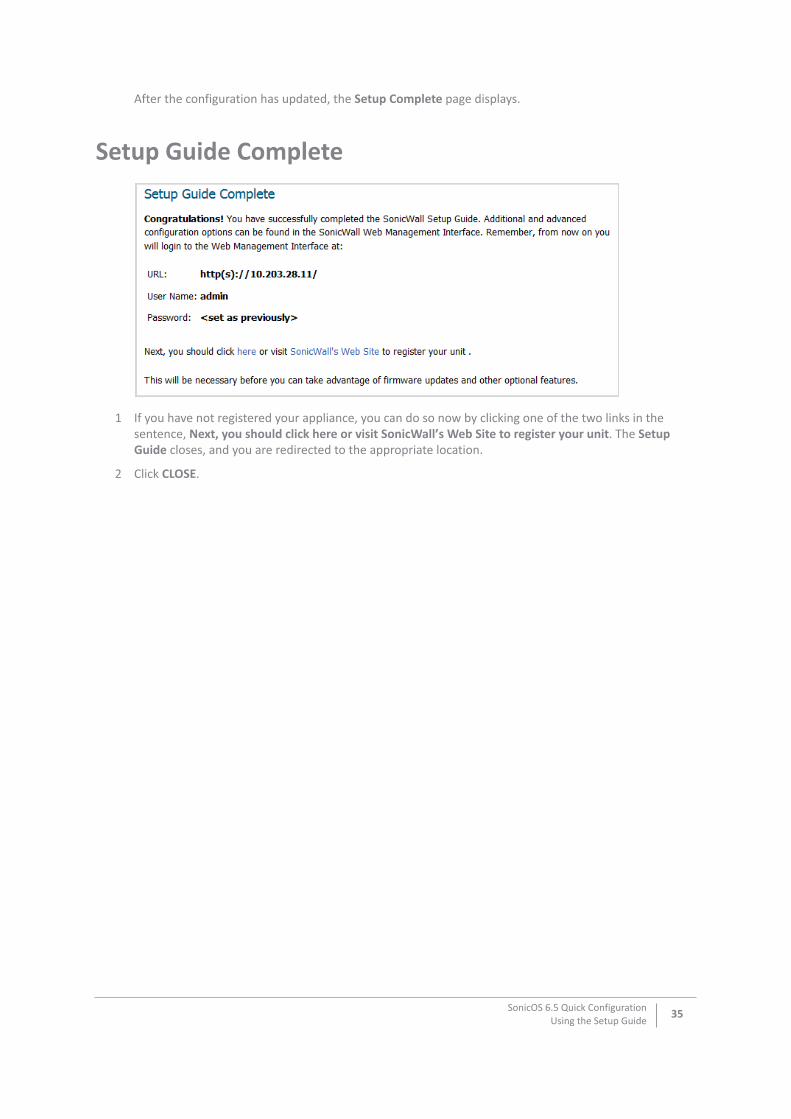
After the configuration has updated, the Setup Complete page displays.
Setup Guide Complete
1 If you have not registered your appliance, you can do so now by clicking one of the two links in the sentence, Next, you should click here or visit SonicWall’s Web Site to register your unit. The Setup Guide closes, and you are redirected to the appropriate location.
2 Click CLOSE.
SonicOS 6.5 Quick ConfigurationUsing the Setup Guide
35
3
Using the PortShield Interface Guide
• PortShield Interface Guide on page 36
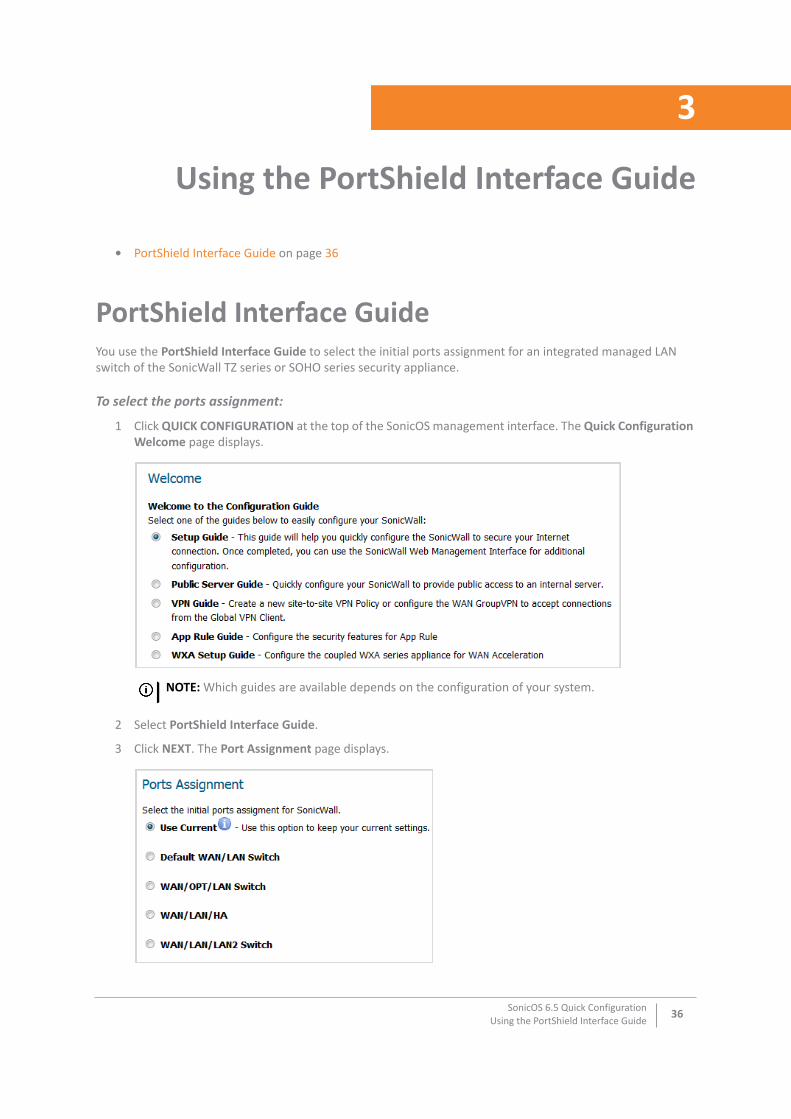
PortShield Interface Guide You use the PortShield Interface Guide to select the initial ports assignment for an integrated managed LAN switch of the SonicWall TZ series or SOHO series security appliance.
To select the ports assignment:
1 Click QUICK CONFIGURATION at the top of the SonicOS management interface. The Quick Configuration Welcome page displays.
2 Select PortShield Interface Guide.
3 Click NEXT. The Port Assignment page displays.
NOTE: Which guides are available depends on the configuration of your system.
SonicOS 6.5 Quick ConfigurationUsing the PortShield Interface Guide
36
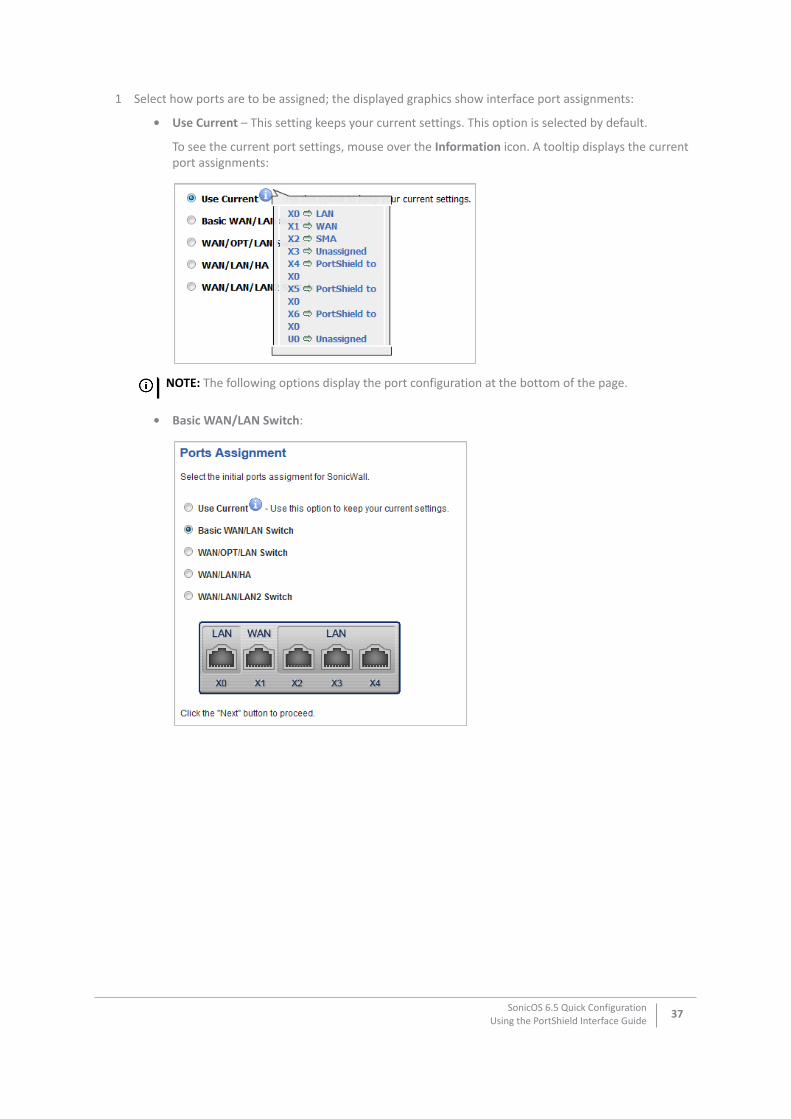
1 Select how ports are to be assigned; the displayed graphics show interface port assignments:
• Use Current – This setting keeps your current settings. This option is selected by default.
To see the current port settings, mouse over the Information icon. A tooltip displays the current port assignments:
• Basic WAN/LAN Switch:
NOTE: The following options display the port configuration at the bottom of the page.
SonicOS 6.5 Quick ConfigurationUsing the PortShield Interface Guide
37
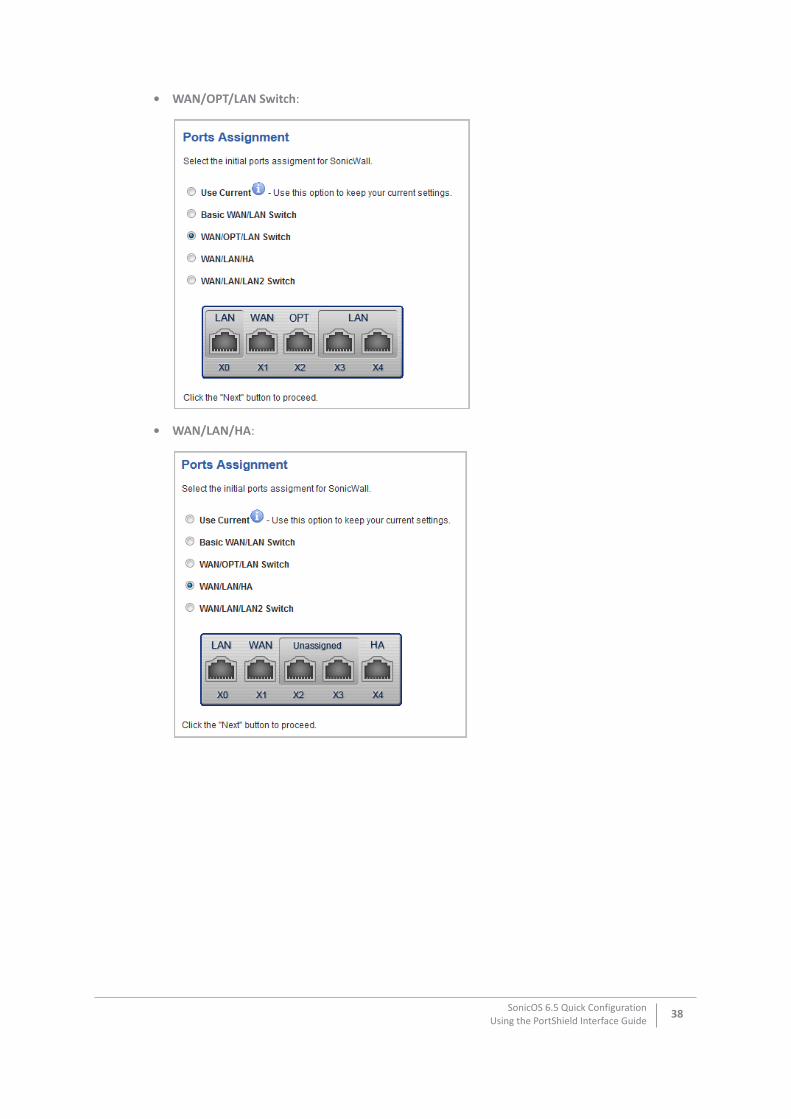
• WAN/OPT/LAN Switch:
• WAN/LAN/HA:
SonicOS 6.5 Quick ConfigurationUsing the PortShield Interface Guide
38
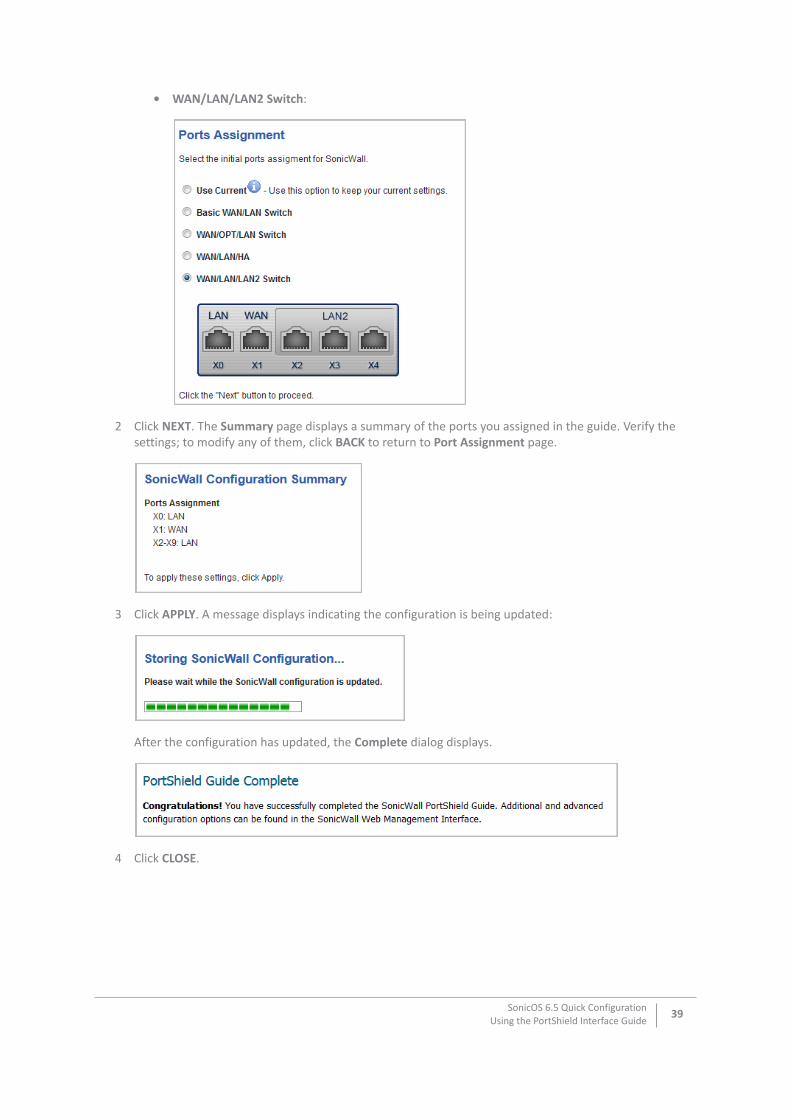
• WAN/LAN/LAN2 Switch:
2 Click NEXT. The Summary page displays a summary of the ports you assigned in the guide. Verify the settings; to modify any of them, click BACK to return to Port Assignment page.
3 Click APPLY. A message displays indicating the configuration is being updated:
After the configuration has updated, the Complete dialog displays.
4 Click CLOSE.
SonicOS 6.5 Quick ConfigurationUsing the PortShield Interface Guide
39
4
Using the Public Server Guide
• Public Server Guide on page 40
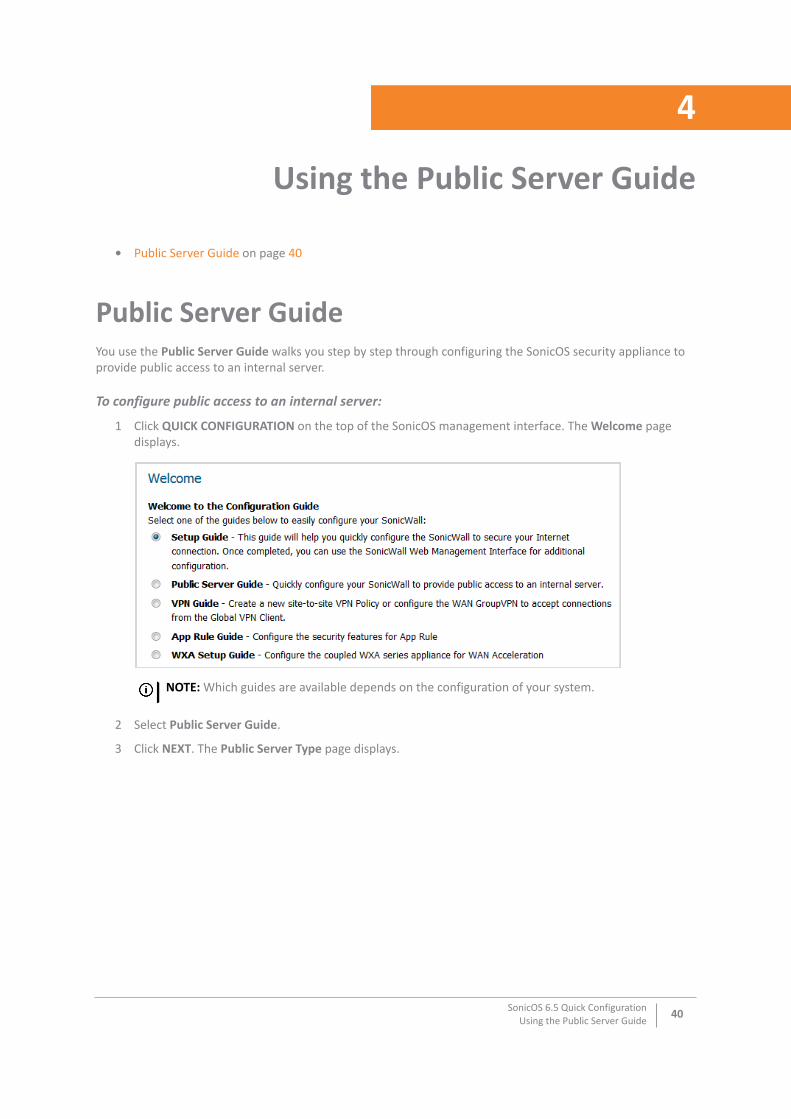
Public Server GuideYou use the Public Server Guide walks you step by step through configuring the SonicOS security appliance to provide public access to an internal server.
To configure public access to an internal server:
1 Click QUICK CONFIGURATION on the top of the SonicOS management interface. The Welcome page displays.
2 Select Public Server Guide.
3 Click NEXT. The Public Server Type page displays.
NOTE: Which guides are available depends on the configuration of your system.
SonicOS 6.5 Quick ConfigurationUsing the Public Server Guide
40

Public Server Type
1 Select the server type from Server Type:
• Web Server (default)
• FTP Server
• Mail Server
• Terminal Services Server
• Other
2 Select the services to use from the Services options. The choices depend on the server type. You can select more than one service except for FTP Server and Other. By default, all services are selected, except if Other is selected as a Server Type.
Server type Choices
Web Server • HTTP (TCP 80) • HTTPS (TCP 443)
CAUTION: Allowing HTTPS management from the WAN creates a potential vulnerability.
FTP Server • FTP (TCP 21)
Mail Server • SMTP (TCP 25) • POP3 (TCP 110) • IMAP (TCP 143)
Terminal Services Server • Microsoft RDP (TCP 3389) • Citrix ICA (TCP 1494)
SonicOS 6.5 Quick ConfigurationUsing the Public Server Guide
41
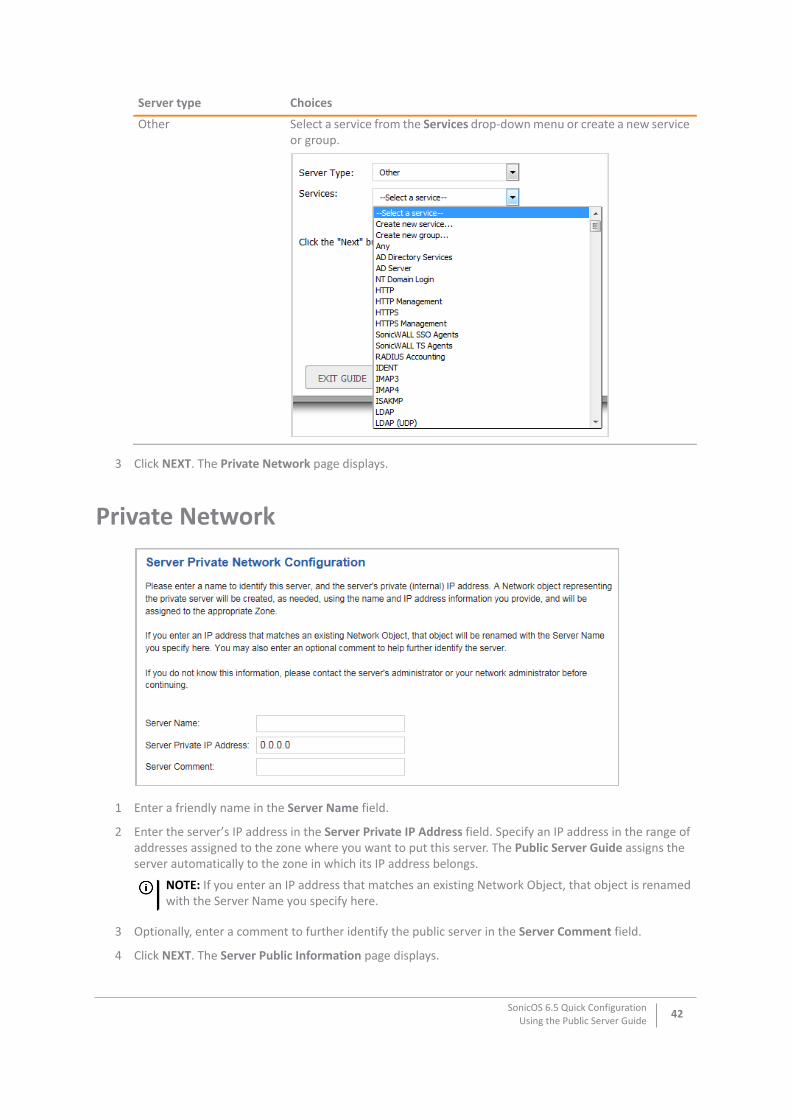
3 Click NEXT. The Private Network page displays.
Private Network
1 Enter a friendly name in the Server Name field.
2 Enter the server’s IP address in the Server Private IP Address field. Specify an IP address in the range of addresses assigned to the zone where you want to put this server. The Public Server Guide assigns the server automatically to the zone in which its IP address belongs.
3 Optionally, enter a comment to further identify the public server in the Server Comment field.
4 Click NEXT. The Server Public Information page displays.
Other Select a service from the Services drop-down menu or create a new service or group.
NOTE: If you enter an IP address that matches an existing Network Object, that object is renamed with the Server Name you specify here.
Server type Choices
SonicOS 6.5 Quick ConfigurationUsing the Public Server Guide
42
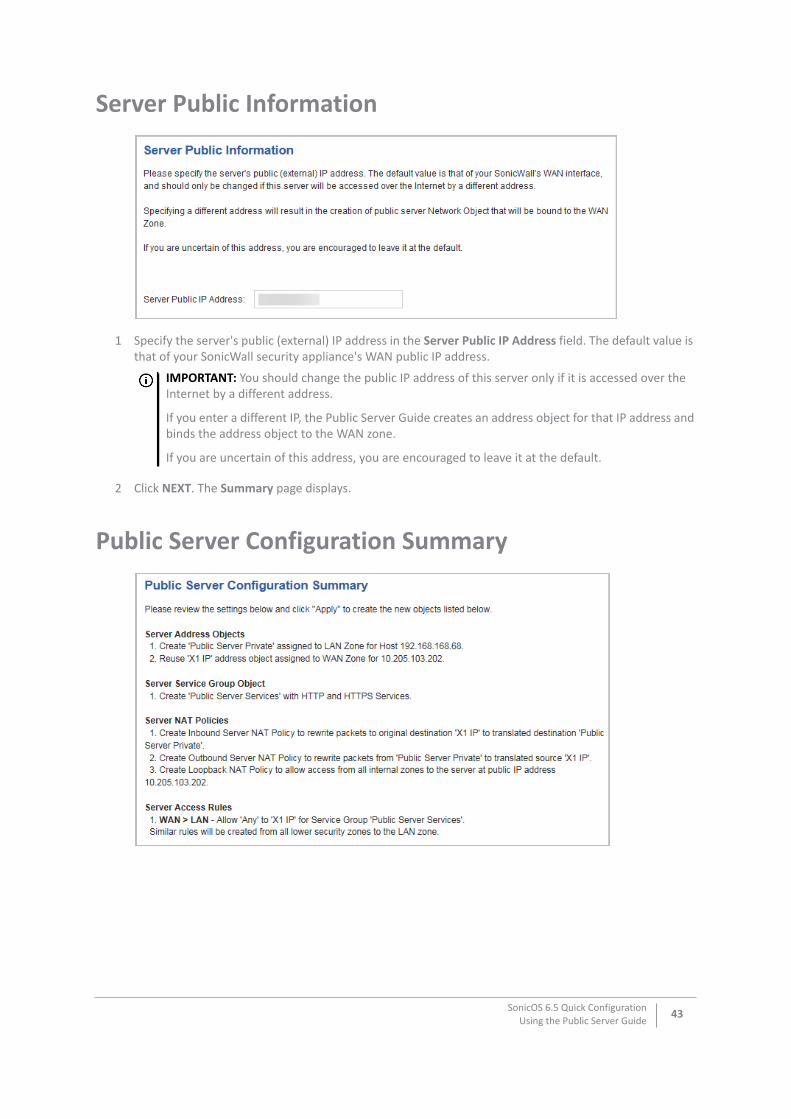
Server Public Information
1 Specify the server's public (external) IP address in the Server Public IP Address field. The default value is that of your SonicWall security appliance's WAN public IP address.
2 Click NEXT. The Summary page displays.
Public Server Configuration Summary
IMPORTANT: You should change the public IP address of this server only if it is accessed over the Internet by a different address.
If you enter a different IP, the Public Server Guide creates an address object for that IP address and binds the address object to the WAN zone.
If you are uncertain of this address, you are encouraged to leave it at the default.
SonicOS 6.5 Quick ConfigurationUsing the Public Server Guide
43

1 The Summary page displays a summary of the configuration you selected in the guide. Verify the settings; to modify any of them, click Back to return to the appropriate page.
2 Click APPLY. A message displays indicating the configuration is being updated:
For this object The guide creates
Server Address Objects The address object for the new server. Because the IP address of the server added in the example is in the IP address range assigned to the DMZ, the guide binds the address object to the DMZ zone. It gives the object a name of the name you specified for the server plus _private.
If you specify an IP in the range of another zone, it will bind the address object to that zone. If you specify an IP address out of the range of any zone you have configured, the guide will bind the address object to the LAN zone.
Because the server in the example used the default WAN IP address for the Server Public IP Address, the guide states that it will use the existing WAN address object when constructing policies between the new server and the WAN. If you specify another address, the server will create an object for that address bound to the WAN zone and assign the new address object a name of the name you specified for the server plus _public.
Server Service Group Object A service group object for the services used by the new server. Because the server in the example is a Web server, the service group includes HTTP and HTTPS. This way, you have a convenient group to refer to when creating or editing access policies for this server.
Server NAT Policies A NAT policy to translate the destination addresses of all incoming packets with one of the services in the new service group and addressed to the WAN address to the address of the new server. Therefore, in this example, if a packet with service type of HTTPS comes in addressed to the WAN interface (10.0.93.43), the NAT policy will translate its address to 172.22.2.44.
The guide also creates a Loopback NAT policy to translate HTTP and HTTPS traffic from inside your network addressed to the WAN IP address back to the address of the mail server.
Server Access Rules An access policy allowing all mail traffic service traffic from the WAN zone to the DMZ.
SonicOS 6.5 Quick ConfigurationUsing the Public Server Guide
44
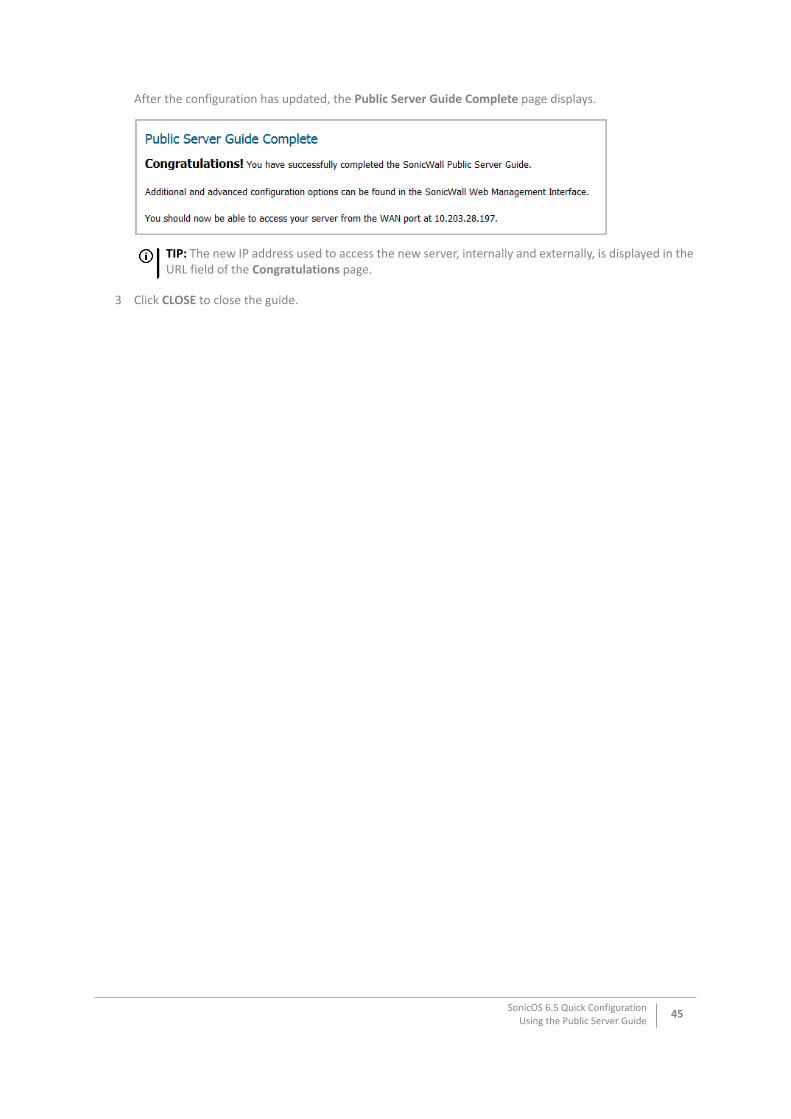
After the configuration has updated, the Public Server Guide Complete page displays.
3 Click CLOSE to close the guide.
TIP: The new IP address used to access the new server, internally and externally, is displayed in the URL field of the Congratulations page.
SonicOS 6.5 Quick ConfigurationUsing the Public Server Guide
45
5
Using the VPN Guide
• VPN Guide on page 46
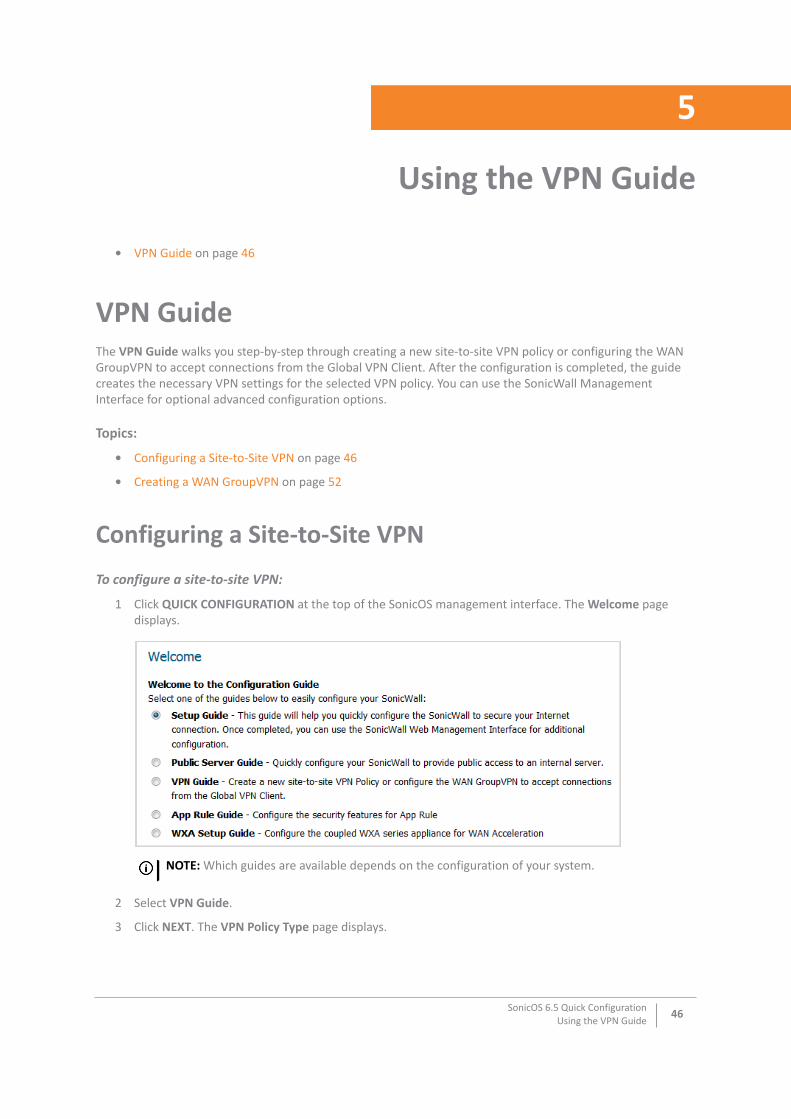
VPN GuideThe VPN Guide walks you step-by-step through creating a new site-to-site VPN policy or configuring the WAN GroupVPN to accept connections from the Global VPN Client. After the configuration is completed, the guide creates the necessary VPN settings for the selected VPN policy. You can use the SonicWall Management Interface for optional advanced configuration options.
Topics:
• Configuring a Site-to-Site VPN on page 46
• Creating a WAN GroupVPN on page 52
Configuring a Site-to-Site VPN
To configure a site-to-site VPN:
1 Click QUICK CONFIGURATION at the top of the SonicOS management interface. The Welcome page displays.
2 Select VPN Guide.
3 Click NEXT. The VPN Policy Type page displays.
NOTE: Which guides are available depends on the configuration of your system.
SonicOS 6.5 Quick ConfigurationUsing the VPN Guide
46
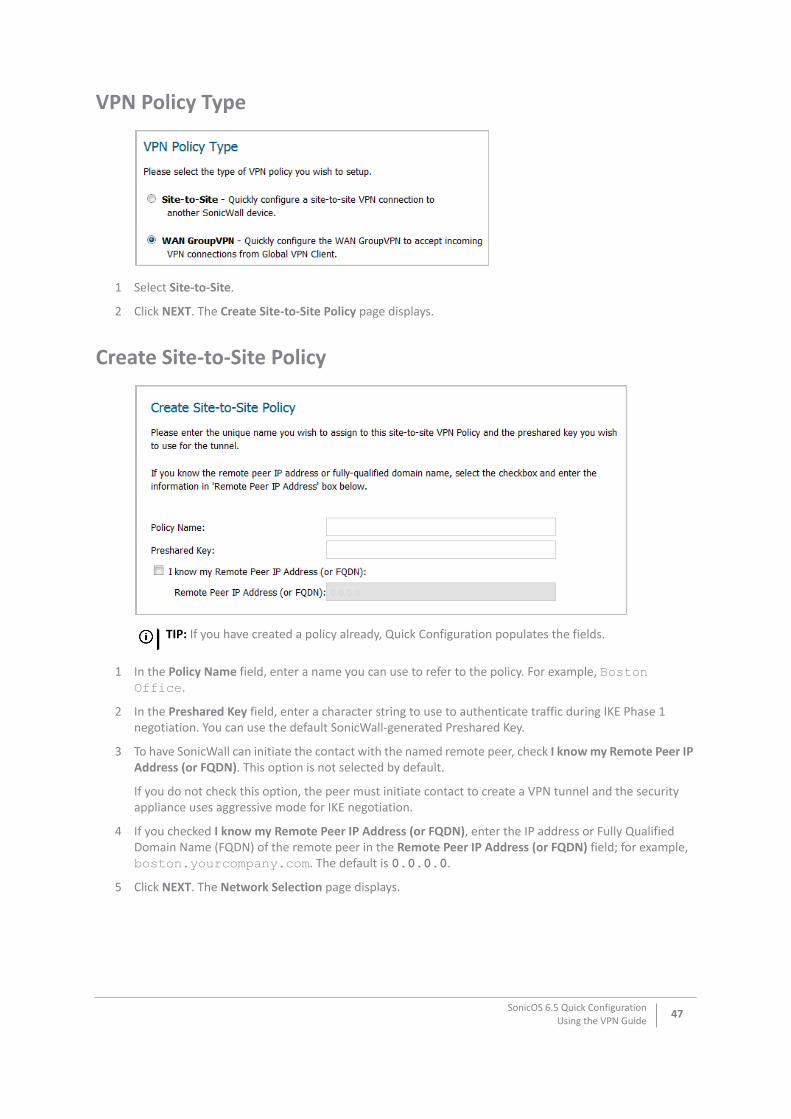
VPN Policy Type
1 Select Site-to-Site.
2 Click NEXT. The Create Site-to-Site Policy page displays.
Create Site-to-Site Policy
1 In the Policy Name field, enter a name you can use to refer to the policy. For example, Boston Office.
2 In the Preshared Key field, enter a character string to use to authenticate traffic during IKE Phase 1 negotiation. You can use the default SonicWall-generated Preshared Key.
3 To have SonicWall can initiate the contact with the named remote peer, check I know my Remote Peer IP Address (or FQDN). This option is not selected by default.
If you do not check this option, the peer must initiate contact to create a VPN tunnel and the security appliance uses aggressive mode for IKE negotiation.
4 If you checked I know my Remote Peer IP Address (or FQDN), enter the IP address or Fully Qualified Domain Name (FQDN) of the remote peer in the Remote Peer IP Address (or FQDN) field; for example, boston.yourcompany.com. The default is 0.0.0.0.
5 Click NEXT. The Network Selection page displays.
TIP: If you have created a policy already, Quick Configuration populates the fields.
SonicOS 6.5 Quick ConfigurationUsing the VPN Guide
47
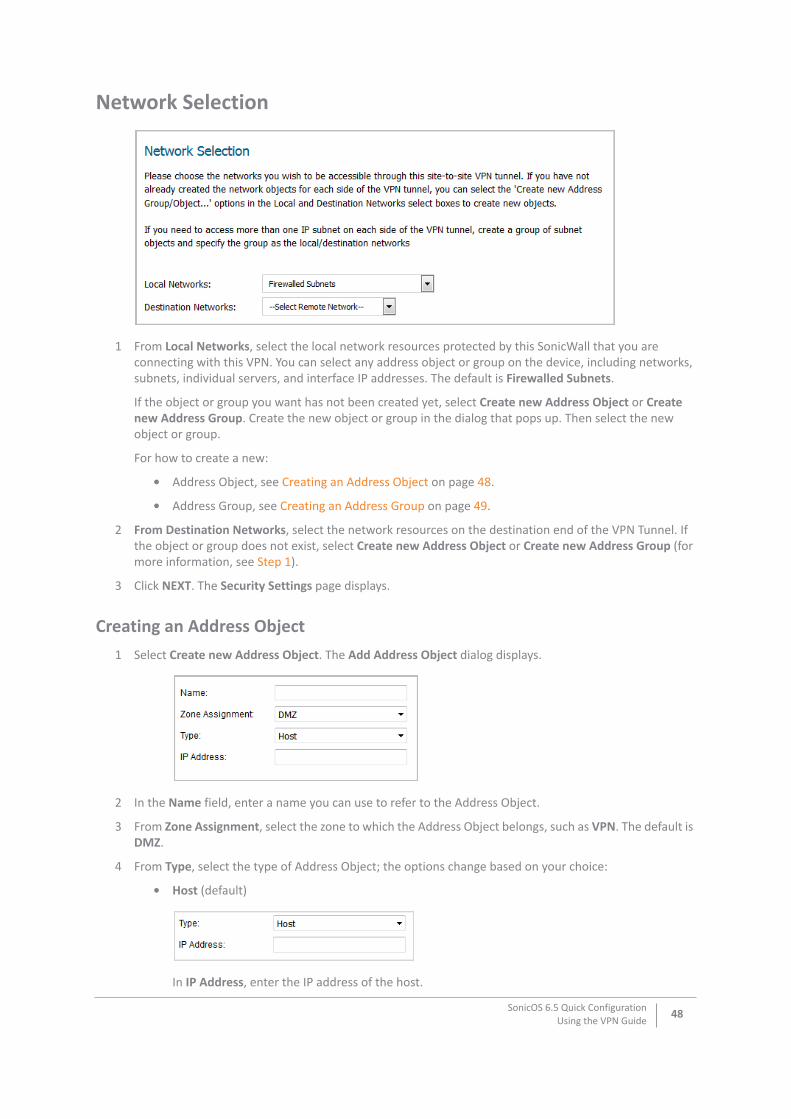
Network Selection
1 From Local Networks, select the local network resources protected by this SonicWall that you are connecting with this VPN. You can select any address object or group on the device, including networks, subnets, individual servers, and interface IP addresses. The default is Firewalled Subnets.
If the object or group you want has not been created yet, select Create new Address Object or Create new Address Group. Create the new object or group in the dialog that pops up. Then select the new object or group.
For how to create a new:
• Address Object, see Creating an Address Object on page 48.
• Address Group, see Creating an Address Group on page 49.
2 From Destination Networks, select the network resources on the destination end of the VPN Tunnel. If the object or group does not exist, select Create new Address Object or Create new Address Group (for more information, see Step 1).
3 Click NEXT. The Security Settings page displays.
Creating an Address Object1 Select Create new Address Object. The Add Address Object dialog displays.
2 In the Name field, enter a name you can use to refer to the Address Object.
3 From Zone Assignment, select the zone to which the Address Object belongs, such as VPN. The default is DMZ.
4 From Type, select the type of Address Object; the options change based on your choice:
• Host (default)
In IP Address, enter the IP address of the host.
SonicOS 6.5 Quick ConfigurationUsing the VPN Guide
48

• Range
Enter the starting and ending IP addresses in the Starting IP Address and Ending IP Address fields.
• Network
Enter the network IP address and netmask/prefix length in the Network and Netmask/Prefix Length fields.
5 Click OK to create the group and return to the Network Selection page.
6 From Destination Networks, select the newly created group.
Creating an Address Group1 Select Create new Address Group. The Add Address Object Group dialog displays.
2 In the Name field, enter a name you can use to refer to the Address Group, such as LAN Group.
3 From the list on the left, select LAN Subnets.
4 Click the Right Arrow button.
5 Click OK to create the group and return to the Network Selection page.
6 From Destination Networks, select the newly created group.
SonicOS 6.5 Quick ConfigurationUsing the VPN Guide
49
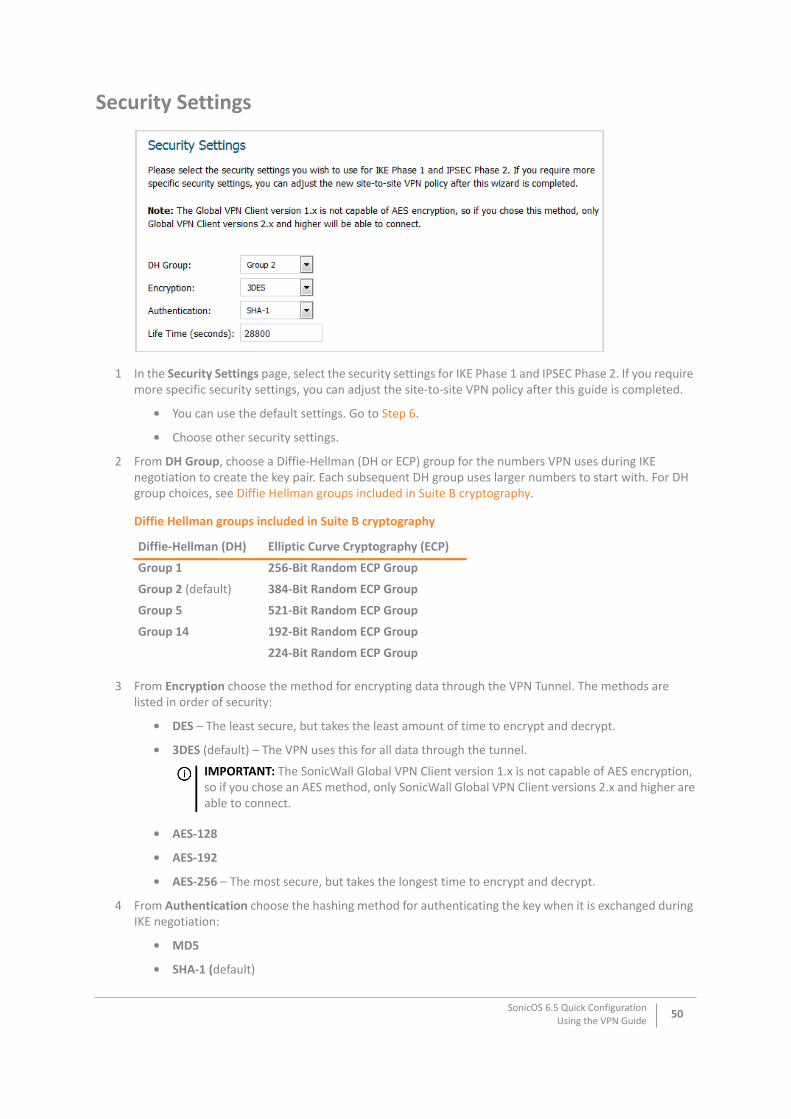
Security Settings
1 In the Security Settings page, select the security settings for IKE Phase 1 and IPSEC Phase 2. If you require more specific security settings, you can adjust the site-to-site VPN policy after this guide is completed.
• You can use the default settings. Go to Step 6.
• Choose other security settings.
2 From DH Group, choose a Diffie-Hellman (DH or ECP) group for the numbers VPN uses during IKE negotiation to create the key pair. Each subsequent DH group uses larger numbers to start with. For DH group choices, see Diffie Hellman groups included in Suite B cryptography.
3 From Encryption choose the method for encrypting data through the VPN Tunnel. The methods are listed in order of security:
• DES – The least secure, but takes the least amount of time to encrypt and decrypt.
• 3DES (default) – The VPN uses this for all data through the tunnel.
• AES-128
• AES-192
• AES-256 – The most secure, but takes the longest time to encrypt and decrypt.
4 From Authentication choose the hashing method for authenticating the key when it is exchanged during IKE negotiation:
• MD5
• SHA-1 (default)
Diffie Hellman groups included in Suite B cryptography
Diffie-Hellman (DH) Elliptic Curve Cryptography (ECP)
Group 1 256-Bit Random ECP Group
Group 2 (default) 384-Bit Random ECP Group
Group 5 521-Bit Random ECP Group
Group 14 192-Bit Random ECP Group
224-Bit Random ECP Group
IMPORTANT: The SonicWall Global VPN Client version 1.x is not capable of AES encryption, so if you chose an AES method, only SonicWall Global VPN Client versions 2.x and higher are able to connect.
SonicOS 6.5 Quick ConfigurationUsing the VPN Guide
50
• SHA256
• SHA384
• SHA512
5 In Life Time (seconds), enter the length of time the VPN tunnel stays open before needing to re-authenticate. The default is 28800 seconds (eight hours), the maximum is 9999999 seconds (2777 hours), and the minimum is 120 seconds (2 minutes).
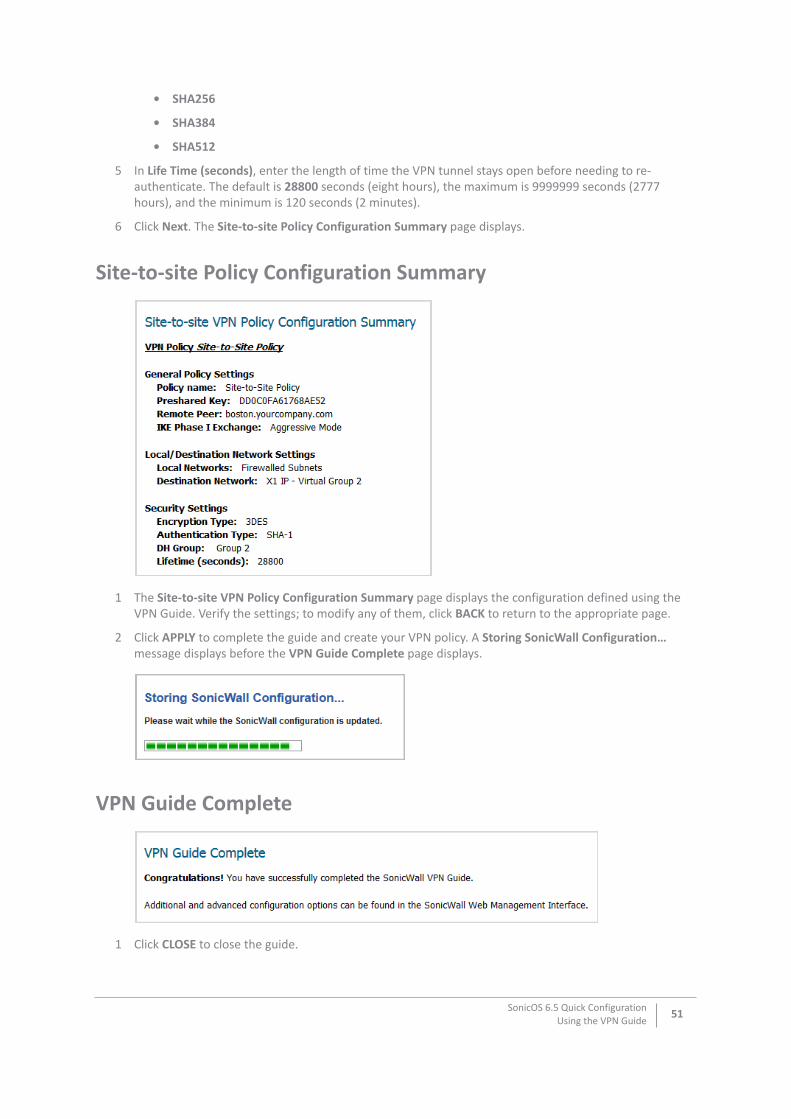
6 Click Next. The Site-to-site Policy Configuration Summary page displays.
Site-to-site Policy Configuration Summary
1 The Site-to-site VPN Policy Configuration Summary page displays the configuration defined using the VPN Guide. Verify the settings; to modify any of them, click BACK to return to the appropriate page.
2 Click APPLY to complete the guide and create your VPN policy. A Storing SonicWall Configuration… message displays before the VPN Guide Complete page displays.
VPN Guide Complete
1 Click CLOSE to close the guide.
SonicOS 6.5 Quick ConfigurationUsing the VPN Guide
51
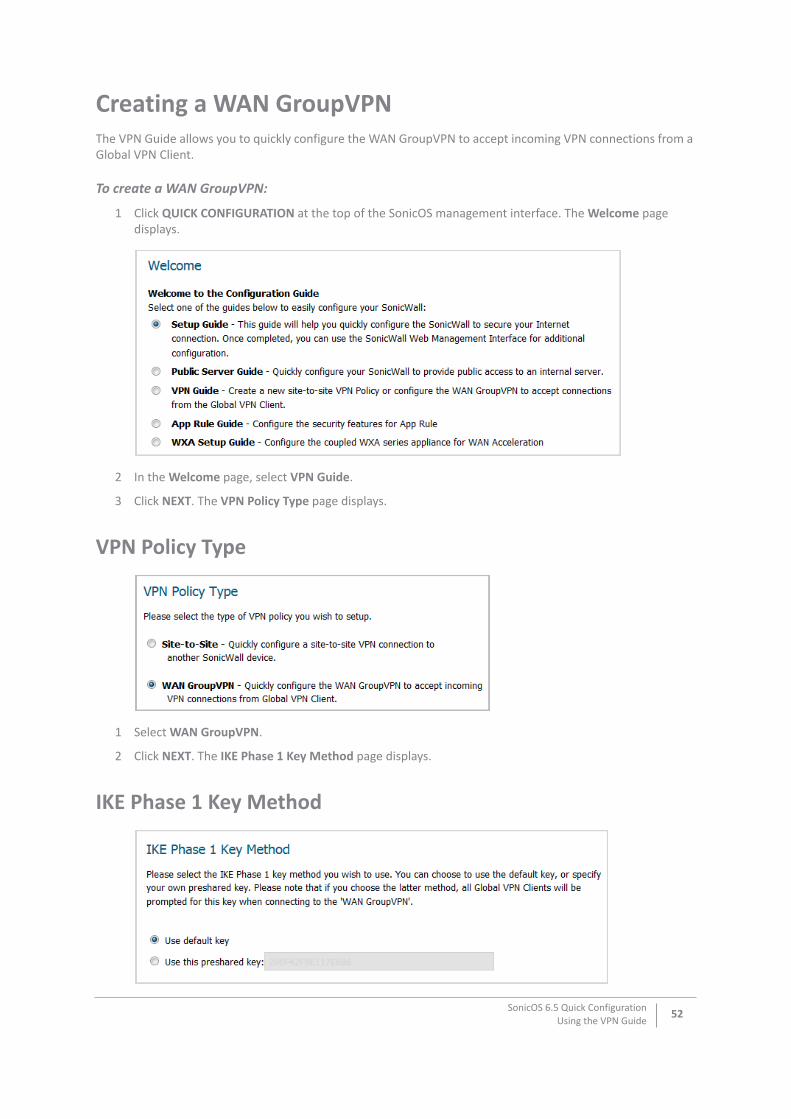
Creating a WAN GroupVPN The VPN Guide allows you to quickly configure the WAN GroupVPN to accept incoming VPN connections from a Global VPN Client.
To create a WAN GroupVPN:
1 Click QUICK CONFIGURATION at the top of the SonicOS management interface. The Welcome page displays.
2 In the Welcome page, select VPN Guide.
3 Click NEXT. The VPN Policy Type page displays.
VPN Policy Type
1 Select WAN GroupVPN.
2 Click NEXT. The IKE Phase 1 Key Method page displays.
IKE Phase 1 Key Method
SonicOS 6.5 Quick ConfigurationUsing the VPN Guide
52
1 In the IKE Phase 1 Key Method page, you select the authentication key to use for this VPN policy:
• Use default key: – All Global VPN Clients automatically use the default key generated by the security appliance to authenticate with the SonicWall security appliance. This option is selected by default.
• Use this preshared key: You must distribute the key to every Global VPN Client because the user is prompted for this key when connecting to the WAN GroupVPN. Specify a custom preshared key in the Use this preshared key field; a default custom key is generated by the security appliance, such ECE38B6AB8188A5D,
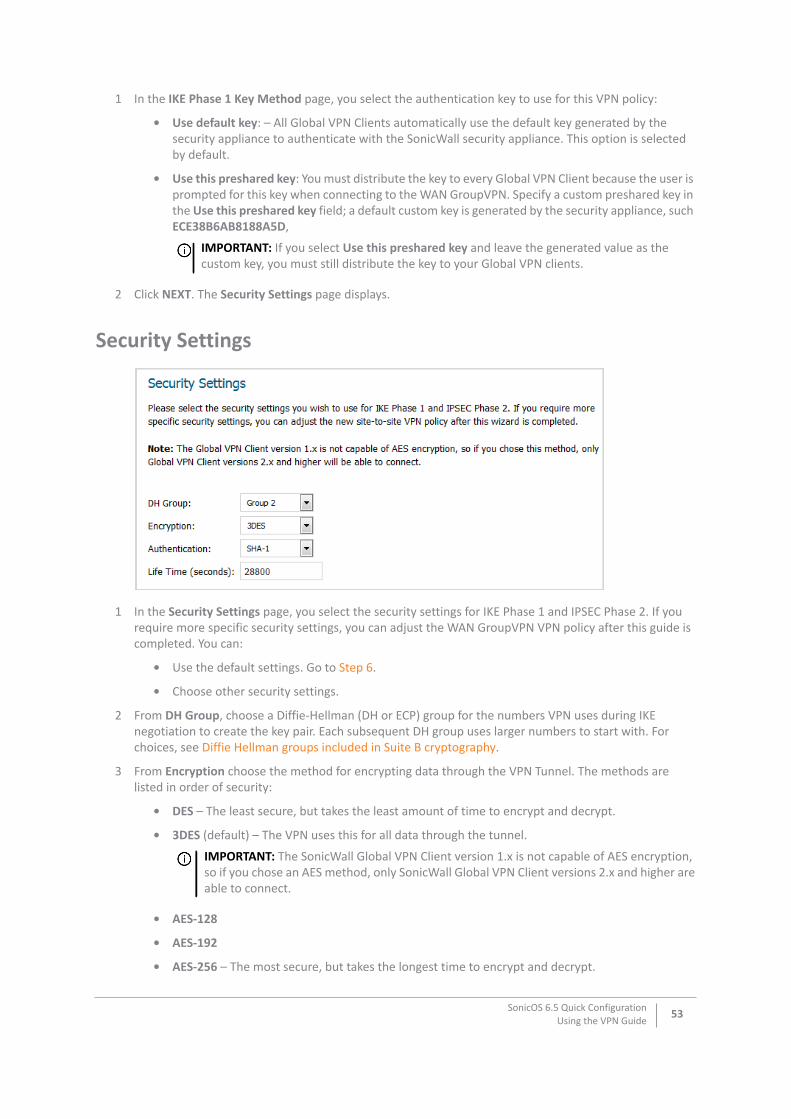
2 Click NEXT. The Security Settings page displays.
Security Settings
1 In the Security Settings page, you select the security settings for IKE Phase 1 and IPSEC Phase 2. If you require more specific security settings, you can adjust the WAN GroupVPN VPN policy after this guide is completed. You can:
• Use the default settings. Go to Step 6.
• Choose other security settings.
2 From DH Group, choose a Diffie-Hellman (DH or ECP) group for the numbers VPN uses during IKE negotiation to create the key pair. Each subsequent DH group uses larger numbers to start with. For choices, see Diffie Hellman groups included in Suite B cryptography.
3 From Encryption choose the method for encrypting data through the VPN Tunnel. The methods are listed in order of security:
• DES – The least secure, but takes the least amount of time to encrypt and decrypt.
• 3DES (default) – The VPN uses this for all data through the tunnel.
• AES-128
• AES-192
• AES-256 – The most secure, but takes the longest time to encrypt and decrypt.
IMPORTANT: If you select Use this preshared key and leave the generated value as the custom key, you must still distribute the key to your Global VPN clients.
IMPORTANT: The SonicWall Global VPN Client version 1.x is not capable of AES encryption, so if you chose an AES method, only SonicWall Global VPN Client versions 2.x and higher are able to connect.
SonicOS 6.5 Quick ConfigurationUsing the VPN Guide
53
4 From Authentication choose the hashing method for authenticating the key when it is exchanged during IKE negotiation:
• MD5
• SHA-1 (default)
• SHA256
• SHA384
• SHA512
5 In Life Time (seconds), enter the length of time the VPN tunnel stays open before needing to re-authenticate. The default is 28800 seconds (eight hours), the maximum is 9999999 seconds (2777 hours), and the minimum is 120 seconds (2 minutes).
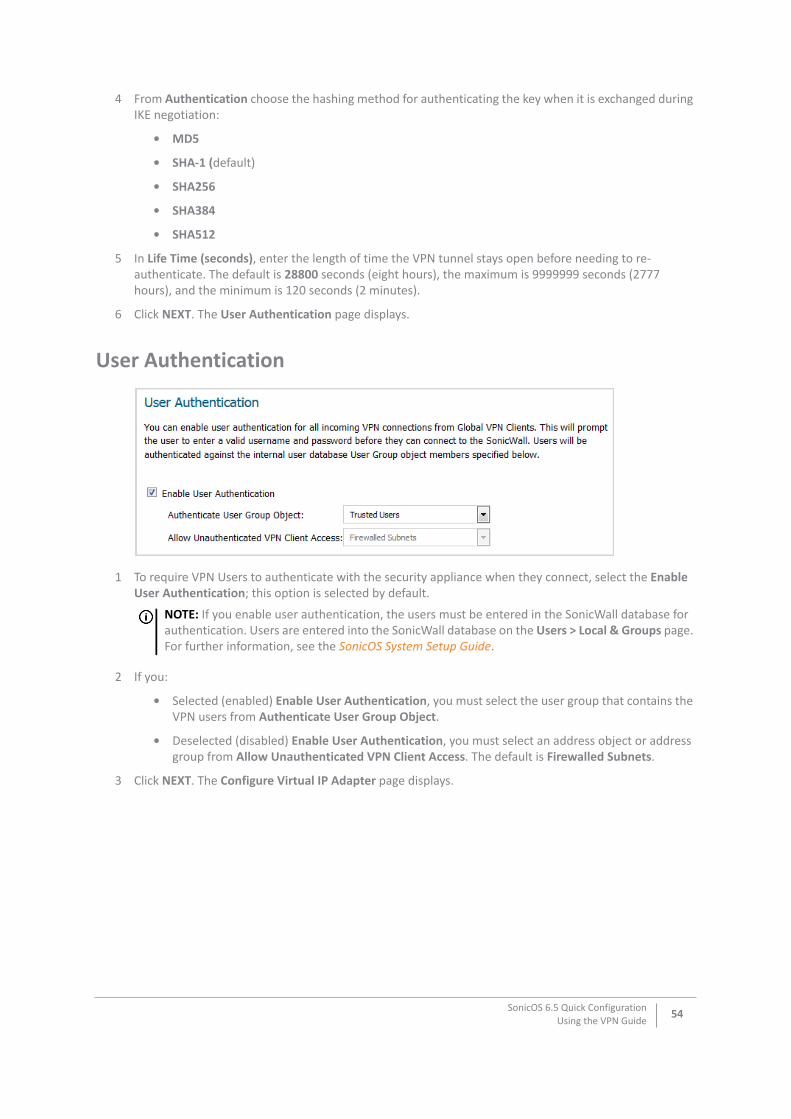
6 Click NEXT. The User Authentication page displays.
User Authentication
1 To require VPN Users to authenticate with the security appliance when they connect, select the Enable User Authentication; this option is selected by default.
2 If you:
• Selected (enabled) Enable User Authentication, you must select the user group that contains the VPN users from Authenticate User Group Object.
• Deselected (disabled) Enable User Authentication, you must select an address object or address group from Allow Unauthenticated VPN Client Access. The default is Firewalled Subnets.
3 Click NEXT. The Configure Virtual IP Adapter page displays.
NOTE: If you enable user authentication, the users must be entered in the SonicWall database for authentication. Users are entered into the SonicWall database on the Users > Local & Groups page. For further information, see the SonicOS System Setup Guide.
SonicOS 6.5 Quick ConfigurationUsing the VPN Guide
54
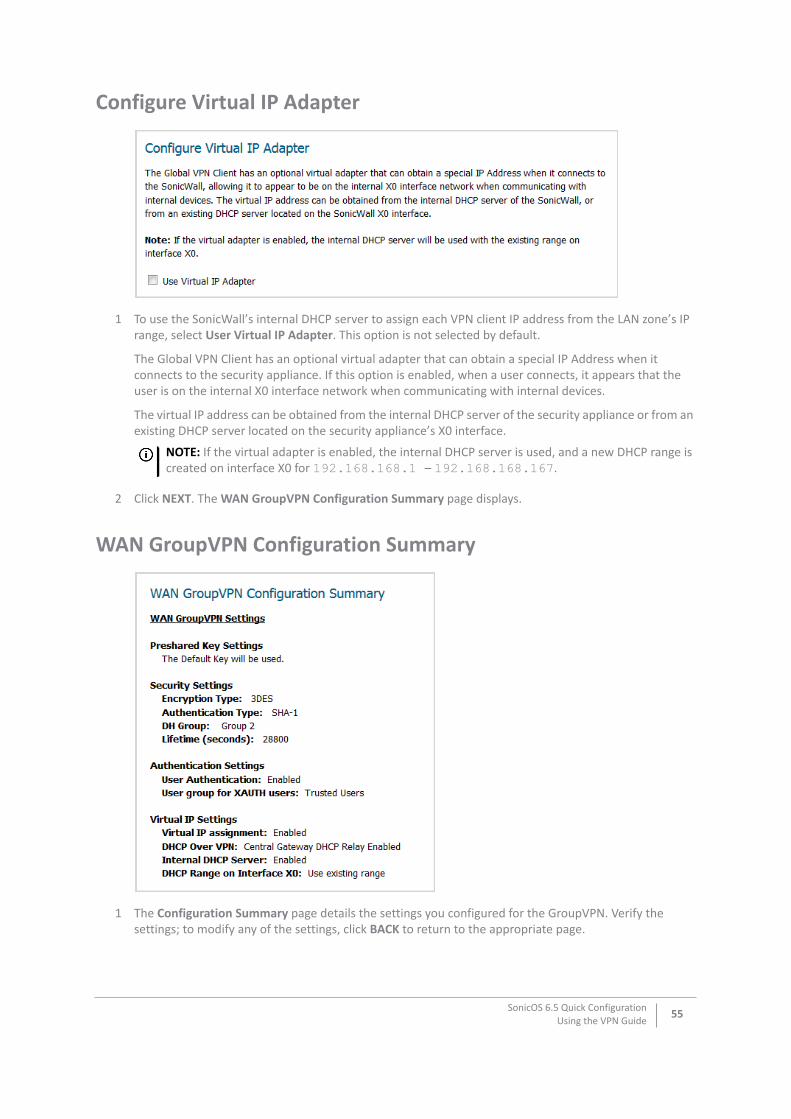
Configure Virtual IP Adapter
1 To use the SonicWall’s internal DHCP server to assign each VPN client IP address from the LAN zone’s IP range, select User Virtual IP Adapter. This option is not selected by default.
The Global VPN Client has an optional virtual adapter that can obtain a special IP Address when it connects to the security appliance. If this option is enabled, when a user connects, it appears that the user is on the internal X0 interface network when communicating with internal devices.
The virtual IP address can be obtained from the internal DHCP server of the security appliance or from an existing DHCP server located on the security appliance’s X0 interface.
2 Click NEXT. The WAN GroupVPN Configuration Summary page displays.
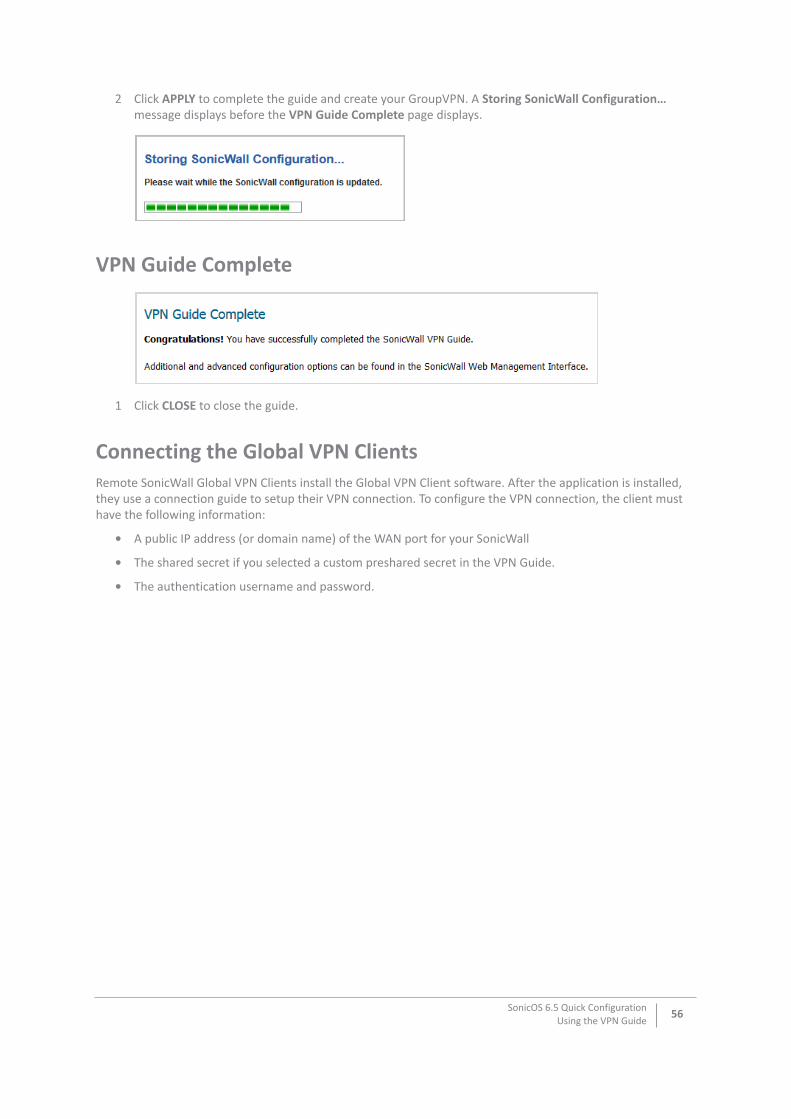
WAN GroupVPN Configuration Summary
1 The Configuration Summary page details the settings you configured for the GroupVPN. Verify the settings; to modify any of the settings, click BACK to return to the appropriate page.
NOTE: If the virtual adapter is enabled, the internal DHCP server is used, and a new DHCP range is created on interface X0 for 192.168.168.1 – 192.168.168.167.
SonicOS 6.5 Quick ConfigurationUsing the VPN Guide
55
2 Click APPLY to complete the guide and create your GroupVPN. A Storing SonicWall Configuration… message displays before the VPN Guide Complete page displays.
VPN Guide Complete
1 Click CLOSE to close the guide.
Connecting the Global VPN ClientsRemote SonicWall Global VPN Clients install the Global VPN Client software. After the application is installed, they use a connection guide to setup their VPN connection. To configure the VPN connection, the client must have the following information:
• A public IP address (or domain name) of the WAN port for your SonicWall
• The shared secret if you selected a custom preshared secret in the VPN Guide.
• The authentication username and password.
SonicOS 6.5 Quick ConfigurationUsing the VPN Guide
56
6
Using the Wireless Guide (WirelessPlatforms only)
• Wireless Guide on page 57
Wireless Guide The Wireless Guide steps you through configuring the network settings and security features of the WLAN radio interface.
To configure network settings and security features:
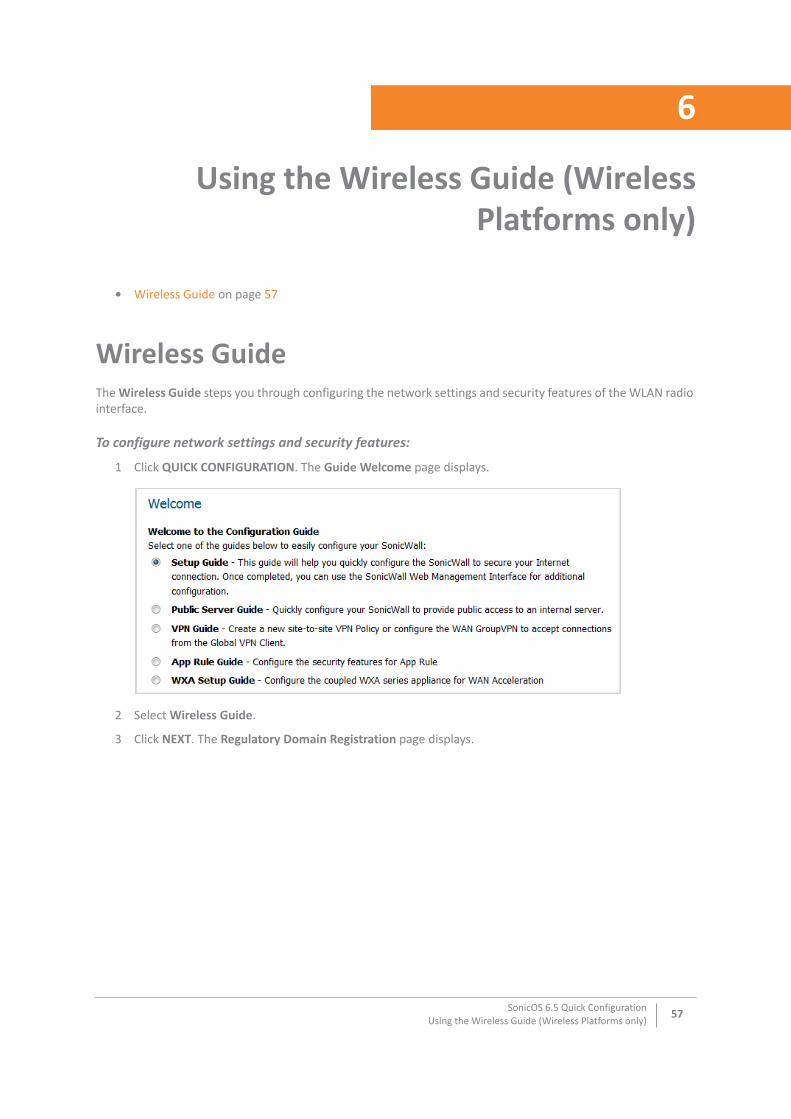
1 Click QUICK CONFIGURATION. The Guide Welcome page displays.
2 Select Wireless Guide.
3 Click NEXT. The Regulatory Domain Registration page displays.
SonicOS 6.5 Quick ConfigurationUsing the Wireless Guide (Wireless Platforms only)
57
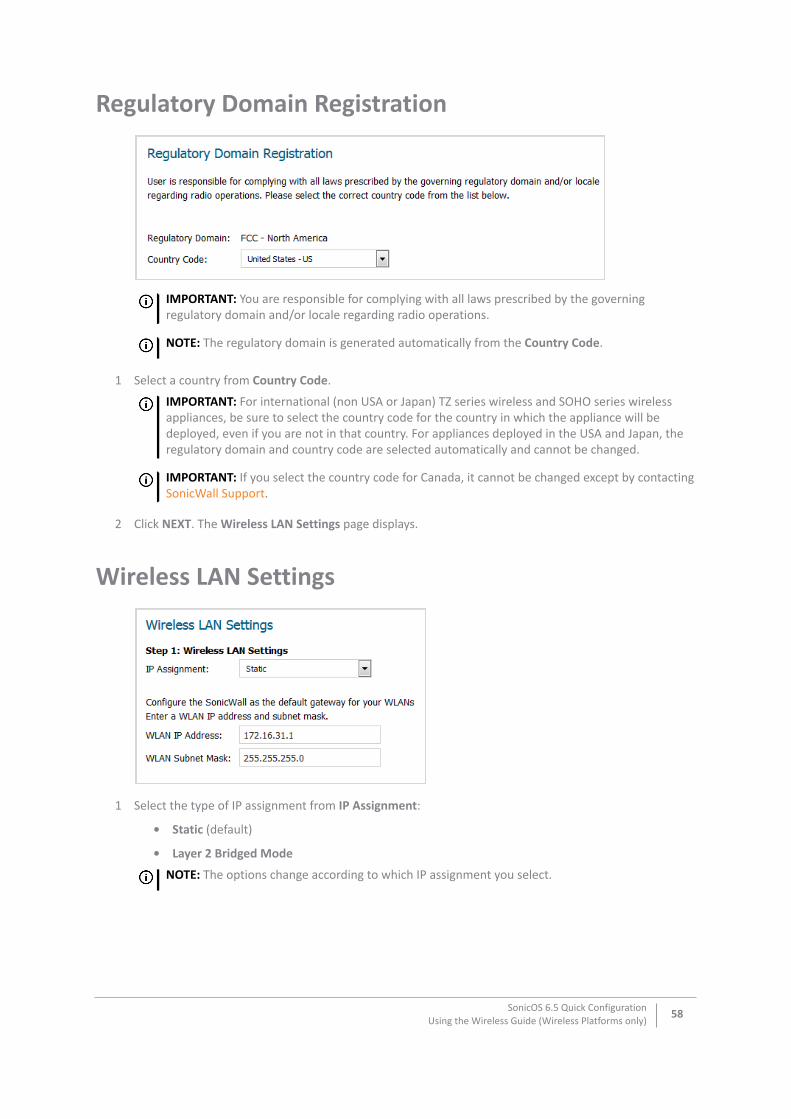
Regulatory Domain Registration
1 Select a country from Country Code.
2 Click NEXT. The Wireless LAN Settings page displays.
Wireless LAN Settings
1 Select the type of IP assignment from IP Assignment:
• Static (default)
• Layer 2 Bridged Mode
IMPORTANT: You are responsible for complying with all laws prescribed by the governing regulatory domain and/or locale regarding radio operations.
NOTE: The regulatory domain is generated automatically from the Country Code.
IMPORTANT: For international (non USA or Japan) TZ series wireless and SOHO series wireless appliances, be sure to select the country code for the country in which the appliance will be deployed, even if you are not in that country. For appliances deployed in the USA and Japan, the regulatory domain and country code are selected automatically and cannot be changed.
IMPORTANT: If you select the country code for Canada, it cannot be changed except by contacting SonicWall Support.
NOTE: The options change according to which IP assignment you select.
SonicOS 6.5 Quick ConfigurationUsing the Wireless Guide (Wireless Platforms only)
58
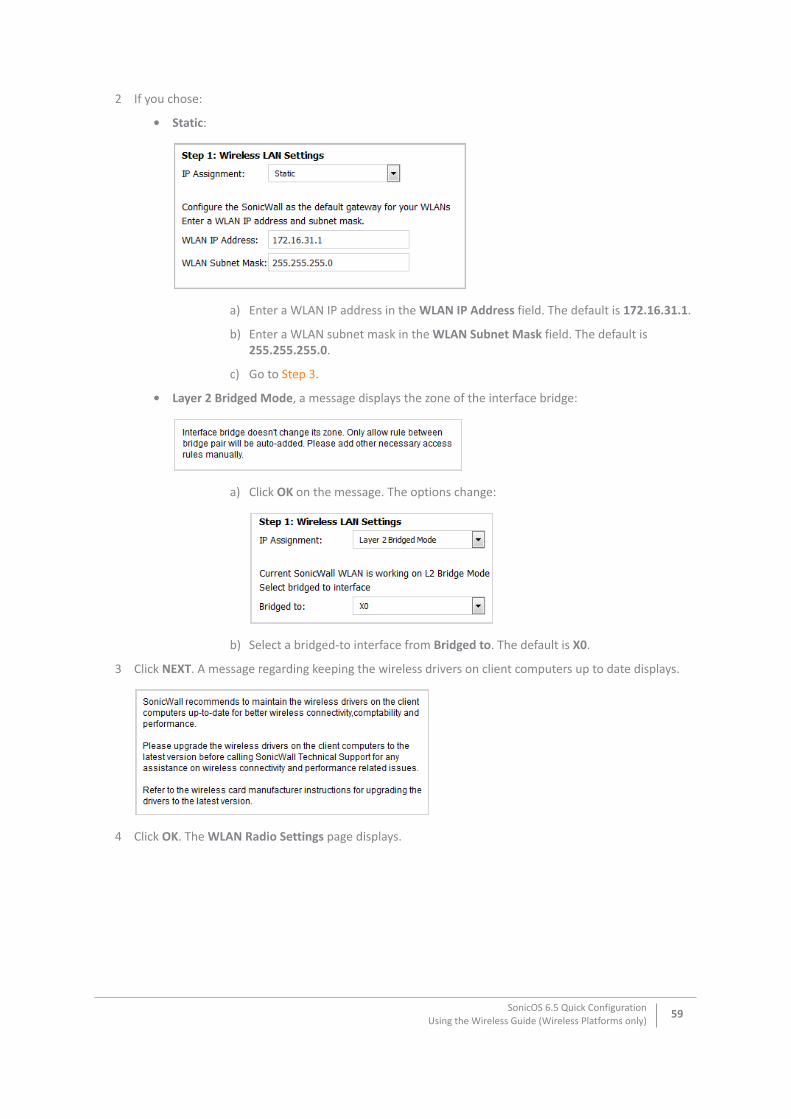
2 If you chose:
• Static:
a) Enter a WLAN IP address in the WLAN IP Address field. The default is 172.16.31.1.
b) Enter a WLAN subnet mask in the WLAN Subnet Mask field. The default is 255.255.255.0.
c) Go to Step 3.
• Layer 2 Bridged Mode, a message displays the zone of the interface bridge:
a) Click OK on the message. The options change:
b) Select a bridged-to interface from Bridged to. The default is X0.
3 Click NEXT. A message regarding keeping the wireless drivers on client computers up to date displays.
4 Click OK. The WLAN Radio Settings page displays.
SonicOS 6.5 Quick ConfigurationUsing the Wireless Guide (Wireless Platforms only)
59
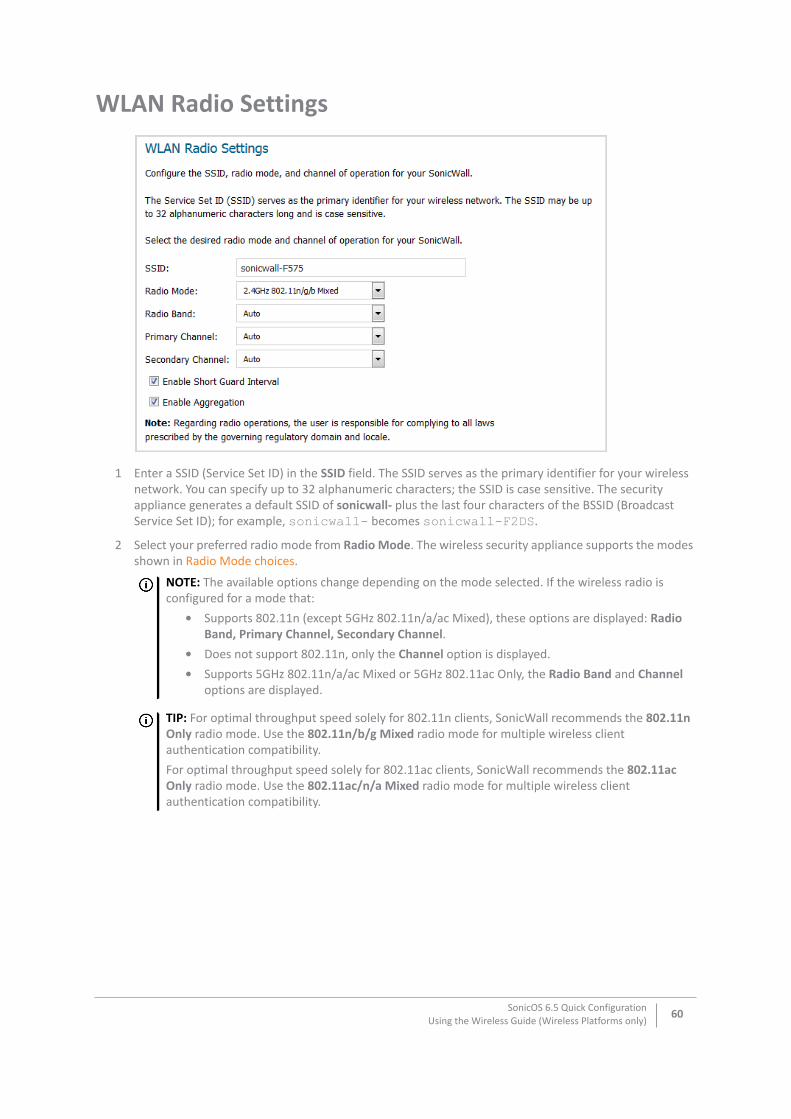
WLAN Radio Settings
1 Enter a SSID (Service Set ID) in the SSID field. The SSID serves as the primary identifier for your wireless network. You can specify up to 32 alphanumeric characters; the SSID is case sensitive. The security appliance generates a default SSID of sonicwall- plus the last four characters of the BSSID (Broadcast Service Set ID); for example, sonicwall- becomes sonicwall-F2DS.
2 Select your preferred radio mode from Radio Mode. The wireless security appliance supports the modes shown in Radio Mode choices.
NOTE: The available options change depending on the mode selected. If the wireless radio is configured for a mode that:
• Supports 802.11n (except 5GHz 802.11n/a/ac Mixed), these options are displayed: Radio Band, Primary Channel, Secondary Channel.
• Does not support 802.11n, only the Channel option is displayed.• Supports 5GHz 802.11n/a/ac Mixed or 5GHz 802.11ac Only, the Radio Band and Channel
options are displayed.
TIP: For optimal throughput speed solely for 802.11n clients, SonicWall recommends the 802.11n Only radio mode. Use the 802.11n/b/g Mixed radio mode for multiple wireless client authentication compatibility. For optimal throughput speed solely for 802.11ac clients, SonicWall recommends the 802.11ac Only radio mode. Use the 802.11ac/n/a Mixed radio mode for multiple wireless client authentication compatibility.
SonicOS 6.5 Quick ConfigurationUsing the Wireless Guide (Wireless Platforms only)
60
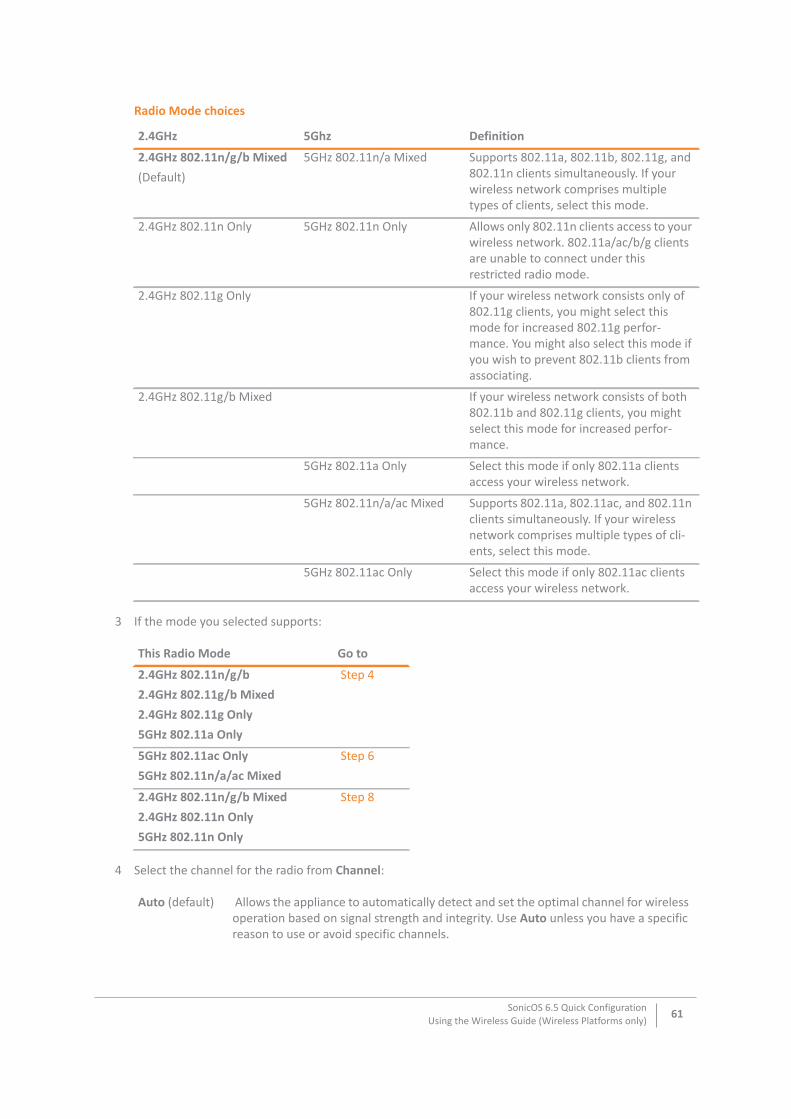
3 If the mode you selected supports:
4 Select the channel for the radio from Channel:
Radio Mode choices
2.4GHz 5Ghz Definition
2.4GHz 802.11n/g/b Mixed (Default)
5GHz 802.11n/a Mixed Supports 802.11a, 802.11b, 802.11g, and 802.11n clients simultaneously. If your wireless network comprises multiple types of clients, select this mode.
2.4GHz 802.11n Only 5GHz 802.11n Only Allows only 802.11n clients access to your wireless network. 802.11a/ac/b/g clients are unable to connect under this restricted radio mode.
2.4GHz 802.11g Only If your wireless network consists only of 802.11g clients, you might select this mode for increased 802.11g perfor-mance. You might also select this mode if you wish to prevent 802.11b clients from associating.
2.4GHz 802.11g/b Mixed If your wireless network consists of both 802.11b and 802.11g clients, you might select this mode for increased perfor-mance.
5GHz 802.11a Only Select this mode if only 802.11a clients access your wireless network.
5GHz 802.11n/a/ac Mixed Supports 802.11a, 802.11ac, and 802.11n clients simultaneously. If your wireless network comprises multiple types of cli-ents, select this mode.
5GHz 802.11ac Only Select this mode if only 802.11ac clients access your wireless network.
This Radio Mode Go to
2.4GHz 802.11n/g/b 2.4GHz 802.11g/b Mixed 2.4GHz 802.11g Only 5GHz 802.11a Only
Step 4
5GHz 802.11ac Only 5GHz 802.11n/a/ac Mixed
Step 6
2.4GHz 802.11n/g/b Mixed 2.4GHz 802.11n Only 5GHz 802.11n Only
Step 8
Auto (default) Allows the appliance to automatically detect and set the optimal channel for wireless operation based on signal strength and integrity. Use Auto unless you have a specific reason to use or avoid specific channels.
SonicOS 6.5 Quick ConfigurationUsing the Wireless Guide (Wireless Platforms only)
61
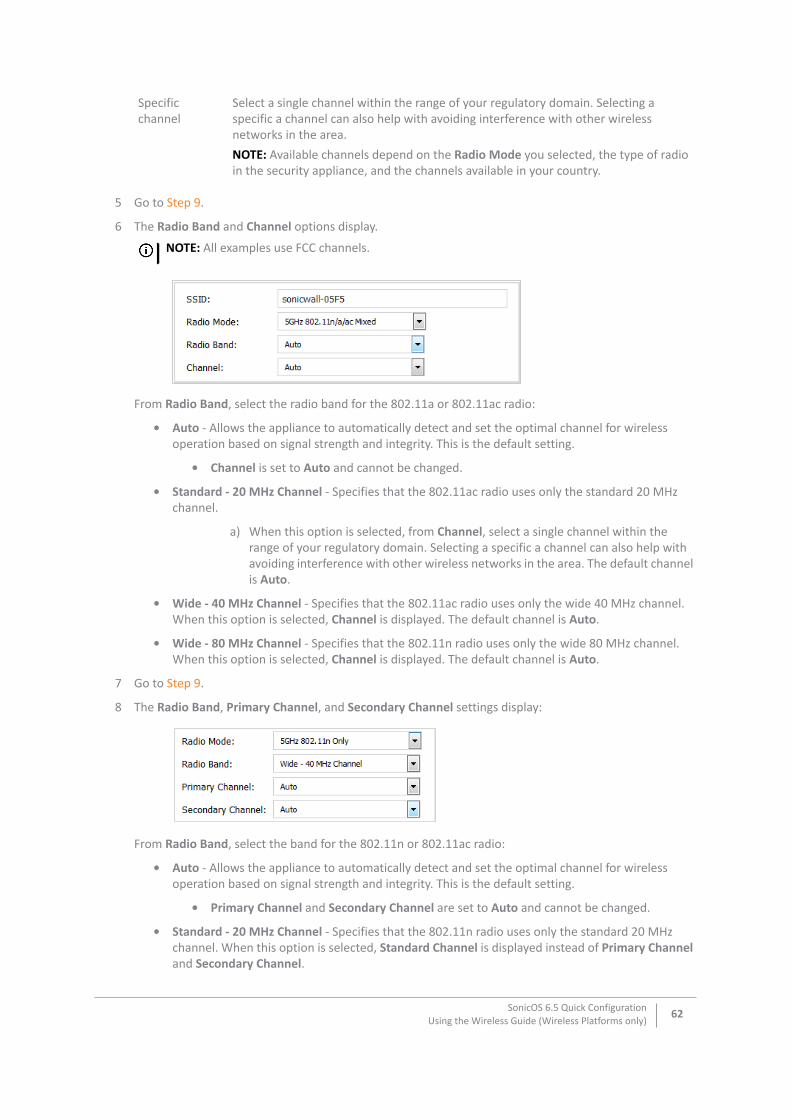
5 Go to Step 9.
6 The Radio Band and Channel options display.
From Radio Band, select the radio band for the 802.11a or 802.11ac radio:
• Auto - Allows the appliance to automatically detect and set the optimal channel for wireless operation based on signal strength and integrity. This is the default setting.
• Channel is set to Auto and cannot be changed.
• Standard - 20 MHz Channel - Specifies that the 802.11ac radio uses only the standard 20 MHz channel.
a) When this option is selected, from Channel, select a single channel within the range of your regulatory domain. Selecting a specific a channel can also help with avoiding interference with other wireless networks in the area. The default channel is Auto.
• Wide - 40 MHz Channel - Specifies that the 802.11ac radio uses only the wide 40 MHz channel. When this option is selected, Channel is displayed. The default channel is Auto.
• Wide - 80 MHz Channel - Specifies that the 802.11n radio uses only the wide 80 MHz channel. When this option is selected, Channel is displayed. The default channel is Auto.
7 Go to Step 9.
8 The Radio Band, Primary Channel, and Secondary Channel settings display:
From Radio Band, select the band for the 802.11n or 802.11ac radio:
• Auto - Allows the appliance to automatically detect and set the optimal channel for wireless operation based on signal strength and integrity. This is the default setting.
• Primary Channel and Secondary Channel are set to Auto and cannot be changed.
• Standard - 20 MHz Channel - Specifies that the 802.11n radio uses only the standard 20 MHz channel. When this option is selected, Standard Channel is displayed instead of Primary Channel and Secondary Channel.
Specific channel
Select a single channel within the range of your regulatory domain. Selecting a specific a channel can also help with avoiding interference with other wireless networks in the area. NOTE: Available channels depend on the Radio Mode you selected, the type of radio in the security appliance, and the channels available in your country.
NOTE: All examples use FCC channels.
SonicOS 6.5 Quick ConfigurationUsing the Wireless Guide (Wireless Platforms only)
62
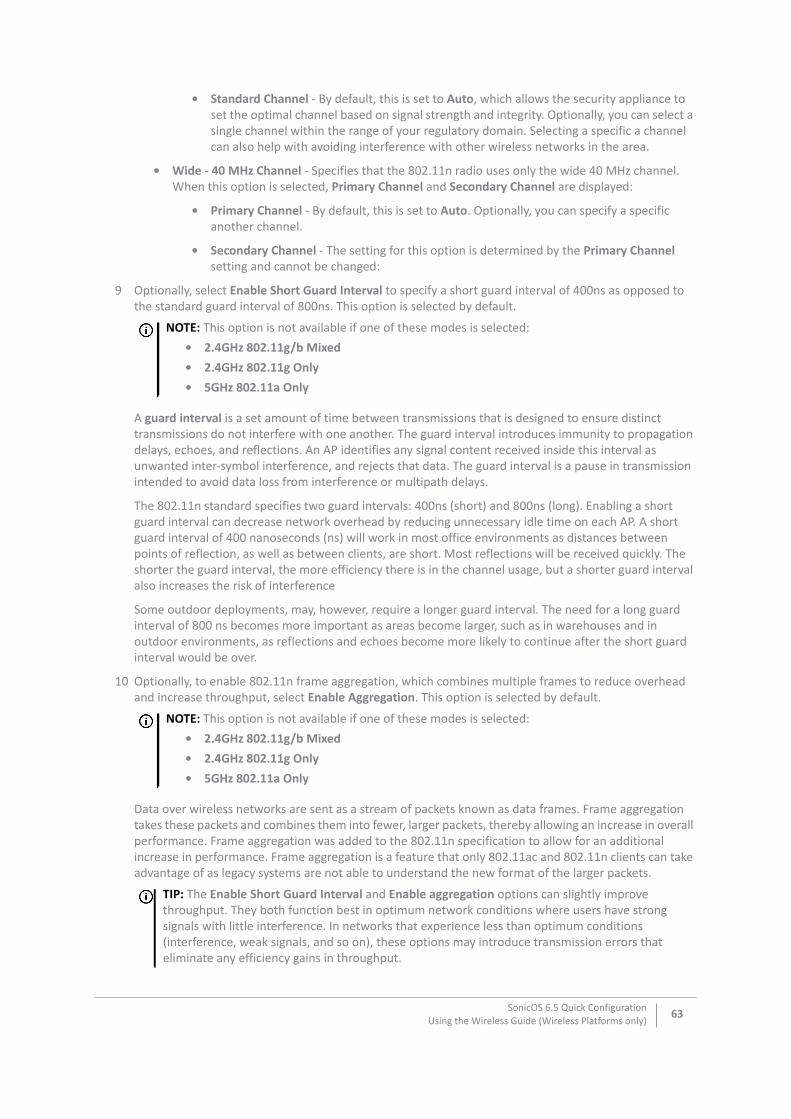
• Standard Channel - By default, this is set to Auto, which allows the security appliance to set the optimal channel based on signal strength and integrity. Optionally, you can select a single channel within the range of your regulatory domain. Selecting a specific a channel can also help with avoiding interference with other wireless networks in the area.
• Wide - 40 MHz Channel - Specifies that the 802.11n radio uses only the wide 40 MHz channel. When this option is selected, Primary Channel and Secondary Channel are displayed:
• Primary Channel - By default, this is set to Auto. Optionally, you can specify a specific another channel.
• Secondary Channel - The setting for this option is determined by the Primary Channel setting and cannot be changed:
9 Optionally, select Enable Short Guard Interval to specify a short guard interval of 400ns as opposed to the standard guard interval of 800ns. This option is selected by default.
A guard interval is a set amount of time between transmissions that is designed to ensure distinct transmissions do not interfere with one another. The guard interval introduces immunity to propagation delays, echoes, and reflections. An AP identifies any signal content received inside this interval as unwanted inter-symbol interference, and rejects that data. The guard interval is a pause in transmission intended to avoid data loss from interference or multipath delays.
The 802.11n standard specifies two guard intervals: 400ns (short) and 800ns (long). Enabling a short guard interval can decrease network overhead by reducing unnecessary idle time on each AP. A short guard interval of 400 nanoseconds (ns) will work in most office environments as distances between points of reflection, as well as between clients, are short. Most reflections will be received quickly. The shorter the guard interval, the more efficiency there is in the channel usage, but a shorter guard interval also increases the risk of interference
Some outdoor deployments, may, however, require a longer guard interval. The need for a long guard interval of 800 ns becomes more important as areas become larger, such as in warehouses and in outdoor environments, as reflections and echoes become more likely to continue after the short guard interval would be over.
10 Optionally, to enable 802.11n frame aggregation, which combines multiple frames to reduce overhead and increase throughput, select Enable Aggregation. This option is selected by default.
Data over wireless networks are sent as a stream of packets known as data frames. Frame aggregation takes these packets and combines them into fewer, larger packets, thereby allowing an increase in overall performance. Frame aggregation was added to the 802.11n specification to allow for an additional increase in performance. Frame aggregation is a feature that only 802.11ac and 802.11n clients can take advantage of as legacy systems are not able to understand the new format of the larger packets.
NOTE: This option is not available if one of these modes is selected:• 2.4GHz 802.11g/b Mixed • 2.4GHz 802.11g Only • 5GHz 802.11a Only
NOTE: This option is not available if one of these modes is selected:• 2.4GHz 802.11g/b Mixed • 2.4GHz 802.11g Only • 5GHz 802.11a Only
TIP: The Enable Short Guard Interval and Enable aggregation options can slightly improve throughput. They both function best in optimum network conditions where users have strong signals with little interference. In networks that experience less than optimum conditions (interference, weak signals, and so on), these options may introduce transmission errors that eliminate any efficiency gains in throughput.
SonicOS 6.5 Quick ConfigurationUsing the Wireless Guide (Wireless Platforms only)
63
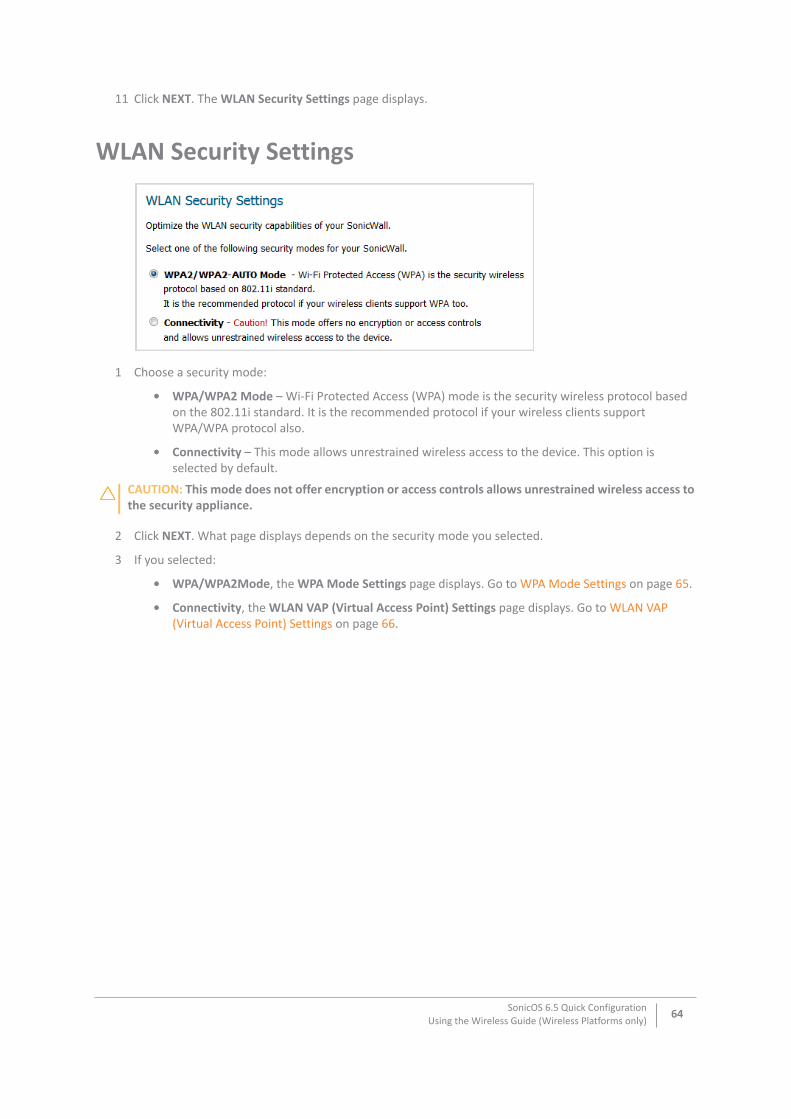
11 Click NEXT. The WLAN Security Settings page displays.
WLAN Security Settings
1 Choose a security mode:
• WPA/WPA2 Mode – Wi-Fi Protected Access (WPA) mode is the security wireless protocol based on the 802.11i standard. It is the recommended protocol if your wireless clients support WPA/WPA protocol also.
• Connectivity – This mode allows unrestrained wireless access to the device. This option is selected by default.
2 Click NEXT. What page displays depends on the security mode you selected.
3 If you selected:
• WPA/WPA2Mode, the WPA Mode Settings page displays. Go to WPA Mode Settings on page 65.
• Connectivity, the WLAN VAP (Virtual Access Point) Settings page displays. Go to WLAN VAP (Virtual Access Point) Settings on page 66.
CAUTION: This mode does not offer encryption or access controls allows unrestrained wireless access to the security appliance.
SonicOS 6.5 Quick ConfigurationUsing the Wireless Guide (Wireless Platforms only)
64
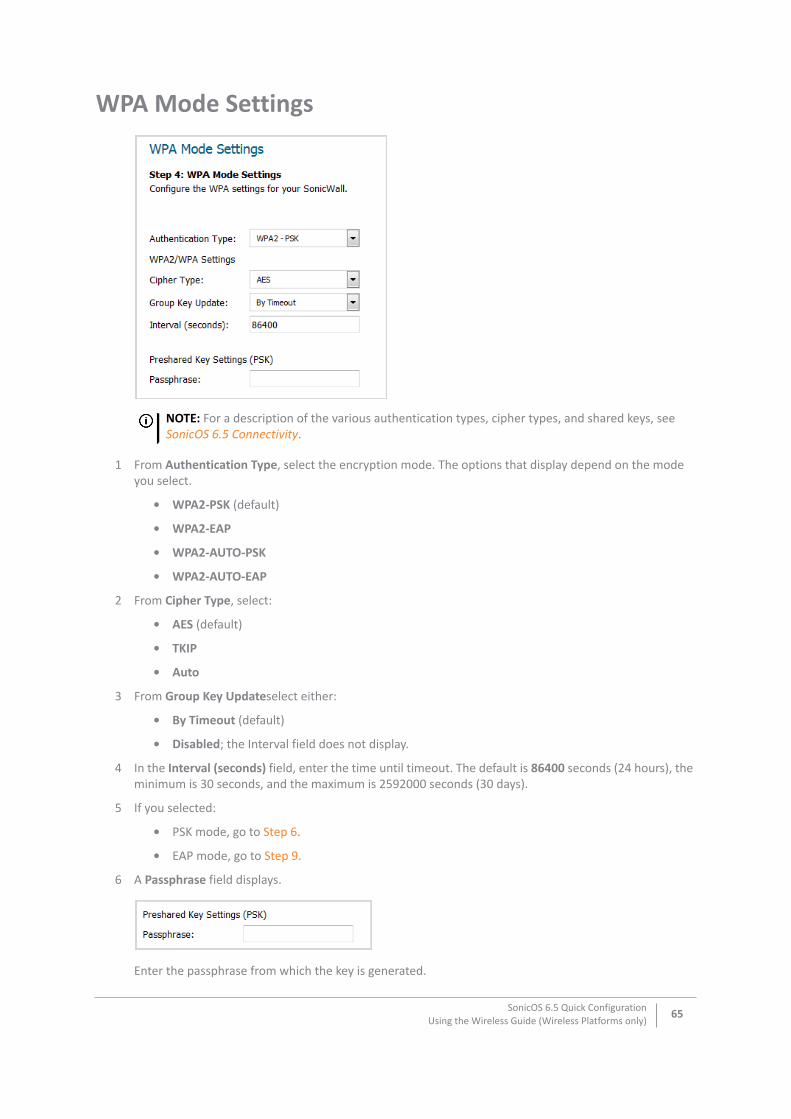
WPA Mode Settings
1 From Authentication Type, select the encryption mode. The options that display depend on the mode you select.
• WPA2-PSK (default)
• WPA2-EAP
• WPA2-AUTO-PSK
• WPA2-AUTO-EAP
2 From Cipher Type, select:
• AES (default)
• TKIP
• Auto
3 From Group Key Updateselect either:
• By Timeout (default)
• Disabled; the Interval field does not display.
4 In the Interval (seconds) field, enter the time until timeout. The default is 86400 seconds (24 hours), the minimum is 30 seconds, and the maximum is 2592000 seconds (30 days).
5 If you selected:
• PSK mode, go to Step 6.
• EAP mode, go to Step 9.
6 A Passphrase field displays.
Enter the passphrase from which the key is generated.
NOTE: For a description of the various authentication types, cipher types, and shared keys, see SonicOS 6.5 Connectivity.
SonicOS 6.5 Quick ConfigurationUsing the Wireless Guide (Wireless Platforms only)
65
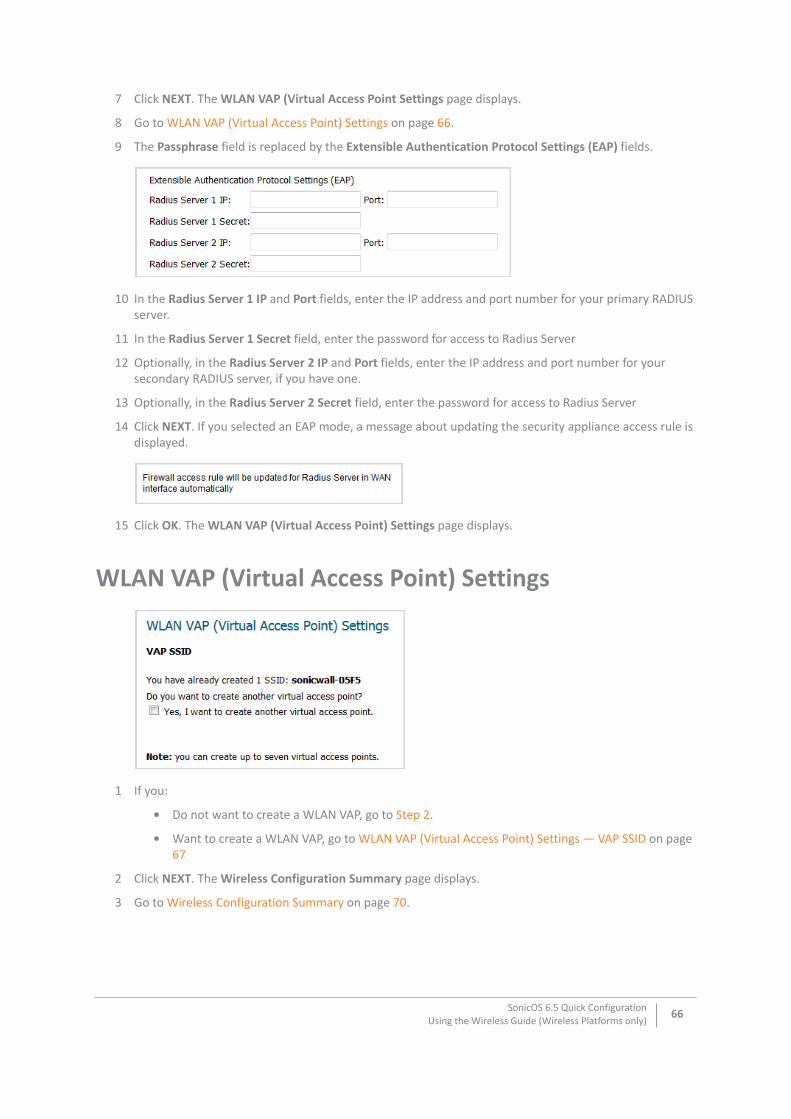
7 Click NEXT. The WLAN VAP (Virtual Access Point Settings page displays.
8 Go to WLAN VAP (Virtual Access Point) Settings on page 66.
9 The Passphrase field is replaced by the Extensible Authentication Protocol Settings (EAP) fields.
10 In the Radius Server 1 IP and Port fields, enter the IP address and port number for your primary RADIUS server.
11 In the Radius Server 1 Secret field, enter the password for access to Radius Server
12 Optionally, in the Radius Server 2 IP and Port fields, enter the IP address and port number for your secondary RADIUS server, if you have one.
13 Optionally, in the Radius Server 2 Secret field, enter the password for access to Radius Server
14 Click NEXT. If you selected an EAP mode, a message about updating the security appliance access rule is displayed.
15 Click OK. The WLAN VAP (Virtual Access Point) Settings page displays.
WLAN VAP (Virtual Access Point) Settings
1 If you:
• Do not want to create a WLAN VAP, go to Step 2.
• Want to create a WLAN VAP, go to WLAN VAP (Virtual Access Point) Settings — VAP SSID on page 67
2 Click NEXT. The Wireless Configuration Summary page displays.
3 Go to Wireless Configuration Summary on page 70.
SonicOS 6.5 Quick ConfigurationUsing the Wireless Guide (Wireless Platforms only)
66
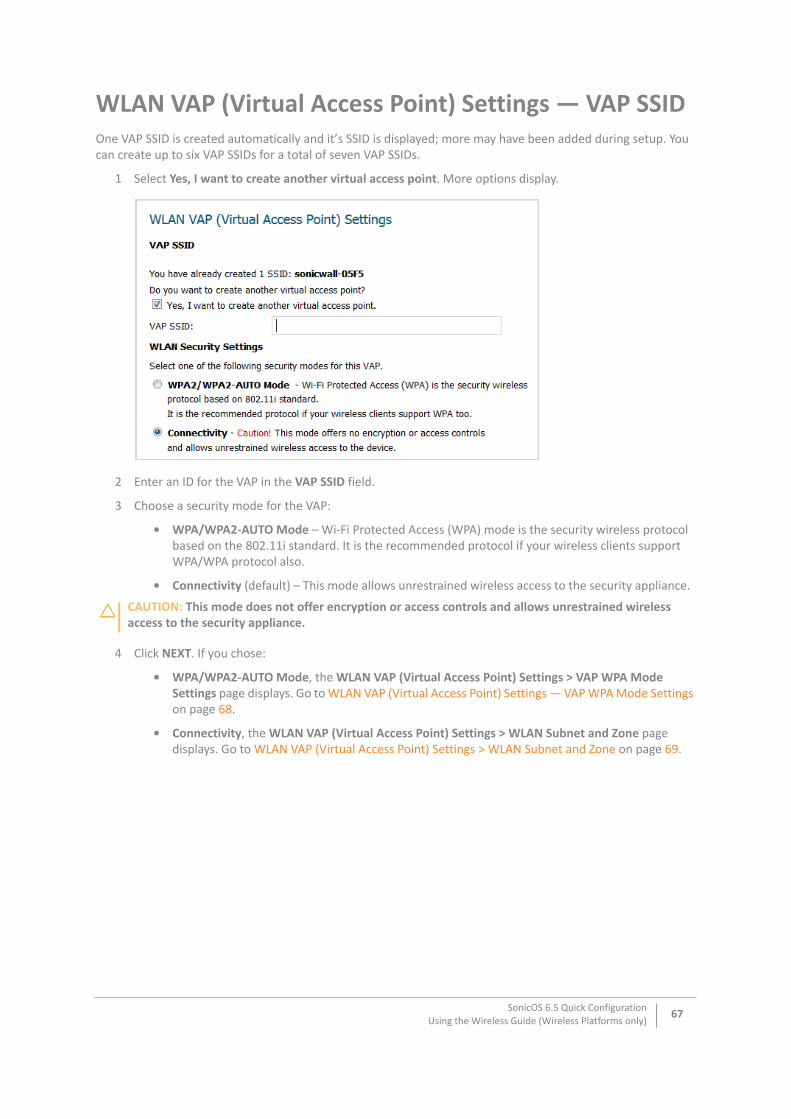
WLAN VAP (Virtual Access Point) Settings — VAP SSIDOne VAP SSID is created automatically and it’s SSID is displayed; more may have been added during setup. You can create up to six VAP SSIDs for a total of seven VAP SSIDs.
1 Select Yes, I want to create another virtual access point. More options display.
2 Enter an ID for the VAP in the VAP SSID field.
3 Choose a security mode for the VAP:
• WPA/WPA2-AUTO Mode – Wi-Fi Protected Access (WPA) mode is the security wireless protocol based on the 802.11i standard. It is the recommended protocol if your wireless clients support WPA/WPA protocol also.
• Connectivity (default) – This mode allows unrestrained wireless access to the security appliance.
4 Click NEXT. If you chose:
• WPA/WPA2-AUTO Mode, the WLAN VAP (Virtual Access Point) Settings > VAP WPA Mode Settings page displays. Go to WLAN VAP (Virtual Access Point) Settings — VAP WPA Mode Settings on page 68.
• Connectivity, the WLAN VAP (Virtual Access Point) Settings > WLAN Subnet and Zone page displays. Go to WLAN VAP (Virtual Access Point) Settings > WLAN Subnet and Zone on page 69.
CAUTION: This mode does not offer encryption or access controls and allows unrestrained wireless access to the security appliance.
SonicOS 6.5 Quick ConfigurationUsing the Wireless Guide (Wireless Platforms only)
67
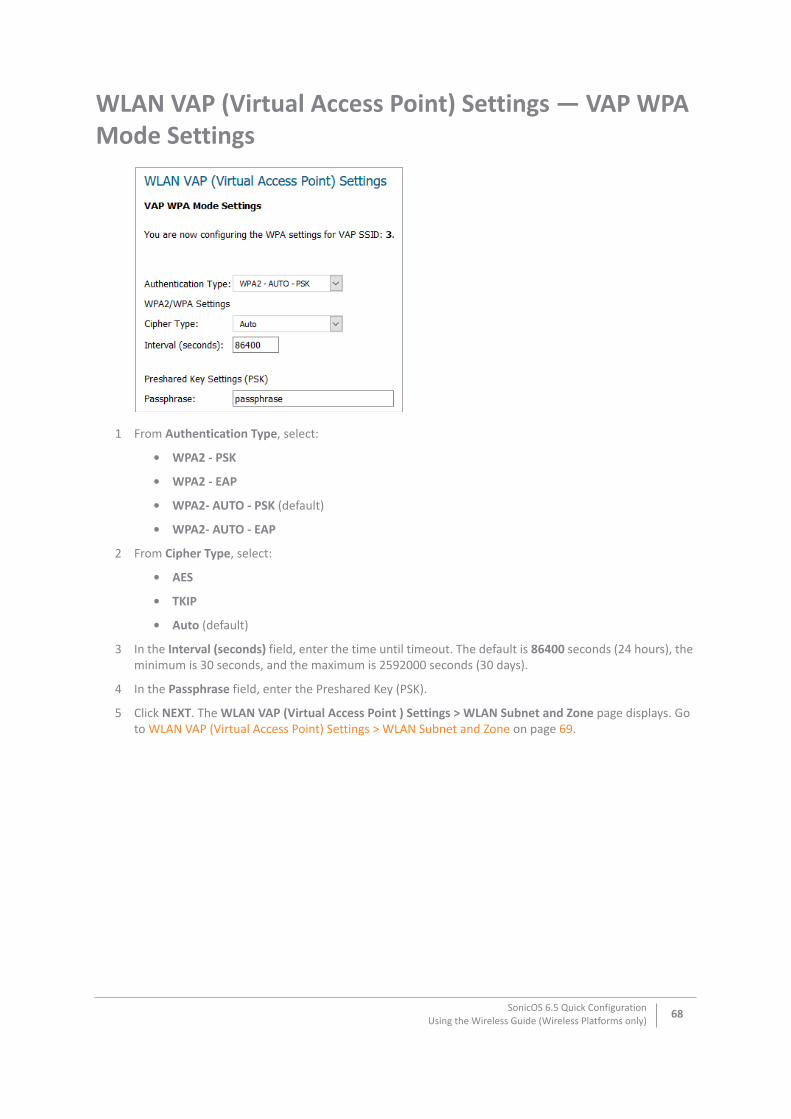
WLAN VAP (Virtual Access Point) Settings — VAP WPA Mode Settings
1 From Authentication Type, select:
• WPA2 - PSK
• WPA2 - EAP
• WPA2- AUTO - PSK (default)
• WPA2- AUTO - EAP
2 From Cipher Type, select:
• AES
• TKIP
• Auto (default)
3 In the Interval (seconds) field, enter the time until timeout. The default is 86400 seconds (24 hours), the minimum is 30 seconds, and the maximum is 2592000 seconds (30 days).
4 In the Passphrase field, enter the Preshared Key (PSK).
5 Click NEXT. The WLAN VAP (Virtual Access Point ) Settings > WLAN Subnet and Zone page displays. Go to WLAN VAP (Virtual Access Point) Settings > WLAN Subnet and Zone on page 69.
SonicOS 6.5 Quick ConfigurationUsing the Wireless Guide (Wireless Platforms only)
68
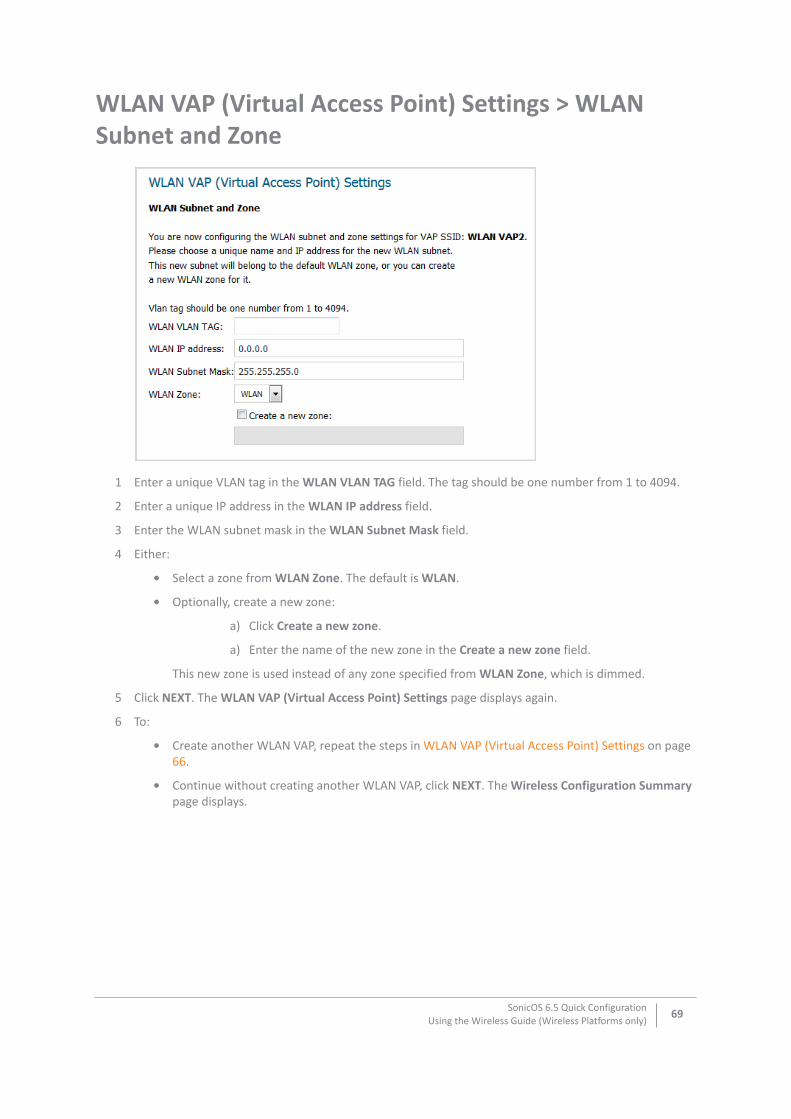
WLAN VAP (Virtual Access Point) Settings > WLAN Subnet and Zone
1 Enter a unique VLAN tag in the WLAN VLAN TAG field. The tag should be one number from 1 to 4094.
2 Enter a unique IP address in the WLAN IP address field.
3 Enter the WLAN subnet mask in the WLAN Subnet Mask field.
4 Either:
• Select a zone from WLAN Zone. The default is WLAN.
• Optionally, create a new zone:
a) Click Create a new zone.
a) Enter the name of the new zone in the Create a new zone field.
This new zone is used instead of any zone specified from WLAN Zone, which is dimmed.
5 Click NEXT. The WLAN VAP (Virtual Access Point) Settings page displays again.
6 To:
• Create another WLAN VAP, repeat the steps in WLAN VAP (Virtual Access Point) Settings on page 66.
• Continue without creating another WLAN VAP, click NEXT. The Wireless Configuration Summary page displays.
SonicOS 6.5 Quick ConfigurationUsing the Wireless Guide (Wireless Platforms only)
69
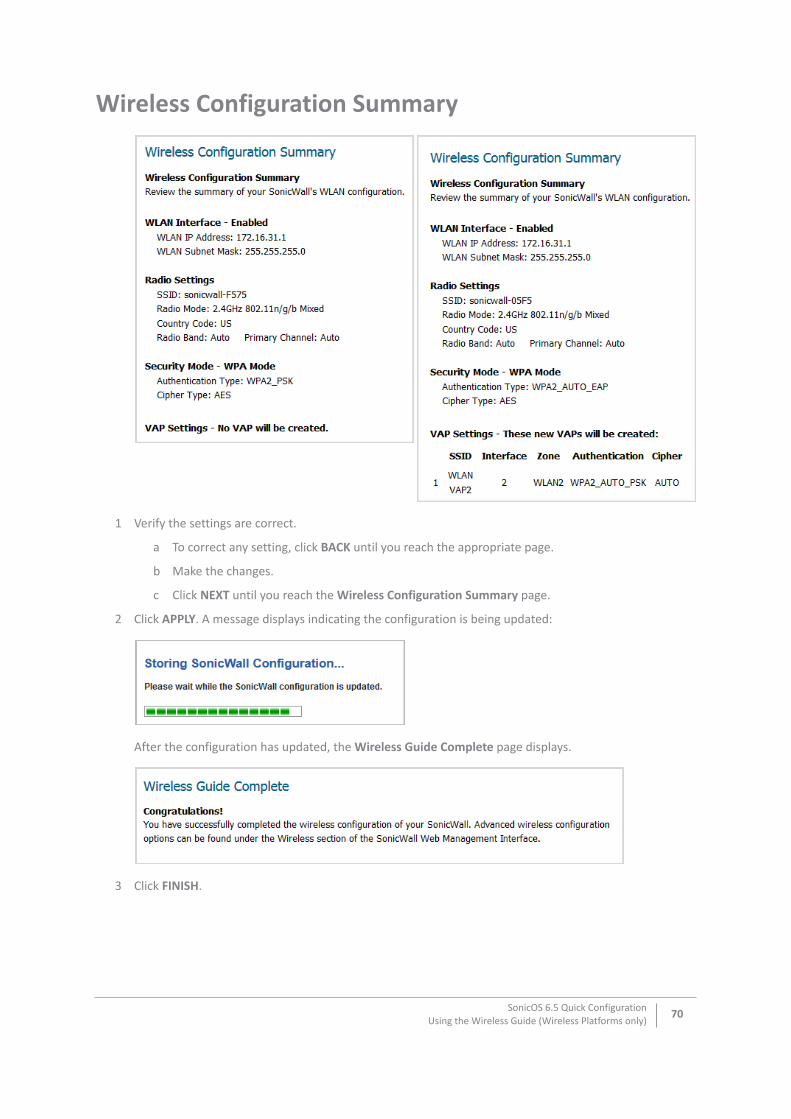
Wireless Configuration Summary
1 Verify the settings are correct.
a To correct any setting, click BACK until you reach the appropriate page.
b Make the changes.
c Click NEXT until you reach the Wireless Configuration Summary page.
2 Click APPLY. A message displays indicating the configuration is being updated:
After the configuration has updated, the Wireless Guide Complete page displays.
3 Click FINISH.
SonicOS 6.5 Quick ConfigurationUsing the Wireless Guide (Wireless Platforms only)
70
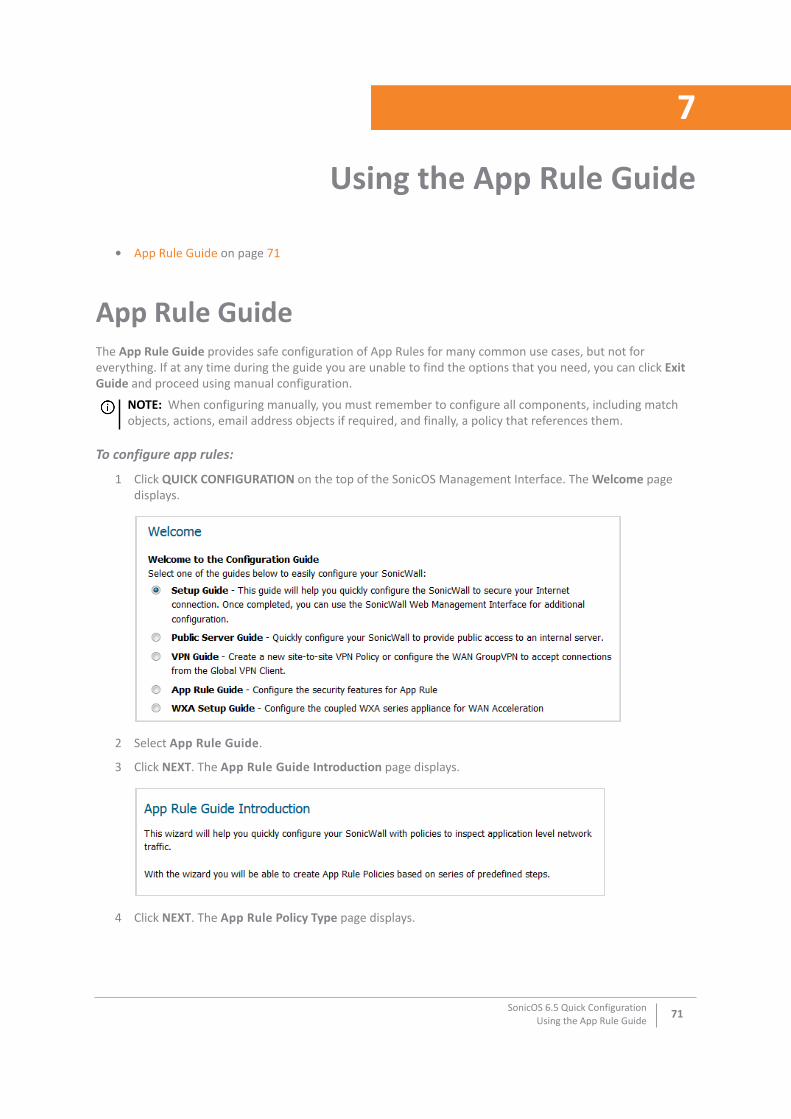
7
Using the App Rule Guide
• App Rule Guide on page 71
App Rule GuideThe App Rule Guide provides safe configuration of App Rules for many common use cases, but not for everything. If at any time during the guide you are unable to find the options that you need, you can click Exit Guide and proceed using manual configuration.
To configure app rules:
1 Click QUICK CONFIGURATION on the top of the SonicOS Management Interface. The Welcome page displays.
2 Select App Rule Guide.
3 Click NEXT. The App Rule Guide Introduction page displays.
4 Click NEXT. The App Rule Policy Type page displays.
NOTE: When configuring manually, you must remember to configure all components, including match objects, actions, email address objects if required, and finally, a policy that references them.
SonicOS 6.5 Quick ConfigurationUsing the App Rule Guide
71

App Rule Policy Type
1 Choose the type of network application to configure:
• I would like to apply a policy to SMTP e-mail (default)
• I would like to apply a policy to incoming POP3 e-mail
• I would like to apply a policy to Web Access
• I would like to apply a policy to an FTP file transfer
2 Click NEXT.
3 The next page varies depending on your choice of policy type. If you chose I would like to apply a policy to:
• SMTP email, go to Select SMTP/POP3 Rule for App Rule on page 72.
• POP3 email, go to Select SMTP/POP3 Rule for App Rule on page 72
• Web Access, go to Select Web Access Rule for App Rule on page 73
• FTP file transfer, go to Select FTP Rule for App Rule on page 74
Select SMTP/POP3 Rule for App Rule
Select SMTP Rules for App Rule
TIP: The POP3 rules are a subset of the SMTP rules.
SonicOS 6.5 Quick ConfigurationUsing the App Rule Guide
72
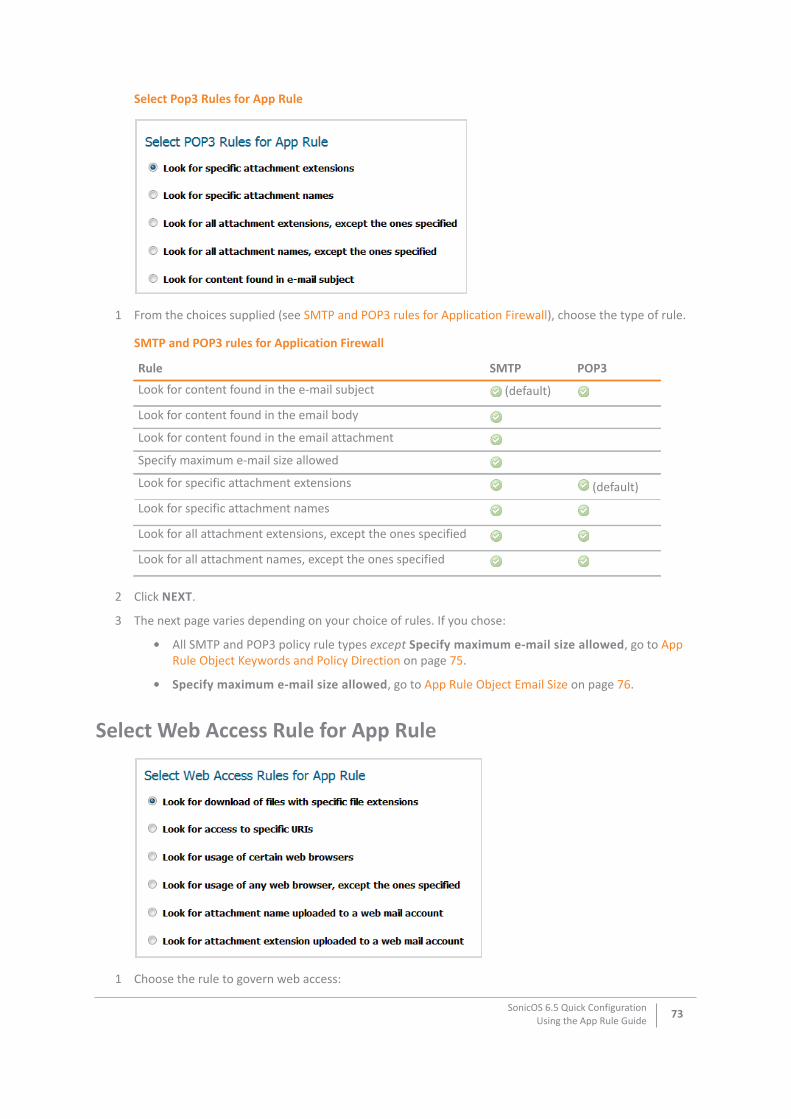
Select Pop3 Rules for App Rule
1 From the choices supplied (see SMTP and POP3 rules for Application Firewall), choose the type of rule.
2 Click NEXT.
3 The next page varies depending on your choice of rules. If you chose:
• All SMTP and POP3 policy rule types except Specify maximum e-mail size allowed, go to App Rule Object Keywords and Policy Direction on page 75.
• Specify maximum e-mail size allowed, go to App Rule Object Email Size on page 76.
Select Web Access Rule for App Rule
1 Choose the rule to govern web access:
SMTP and POP3 rules for Application Firewall
Rule SMTP POP3
Look for content found in the e-mail subject (default)
Look for content found in the email body
Look for content found in the email attachment
Specify maximum e-mail size allowed
Look for specific attachment extensions (default)
Look for specific attachment names
Look for all attachment extensions, except the ones specified
Look for all attachment names, except the ones specified
SonicOS 6.5 Quick ConfigurationUsing the App Rule Guide
73
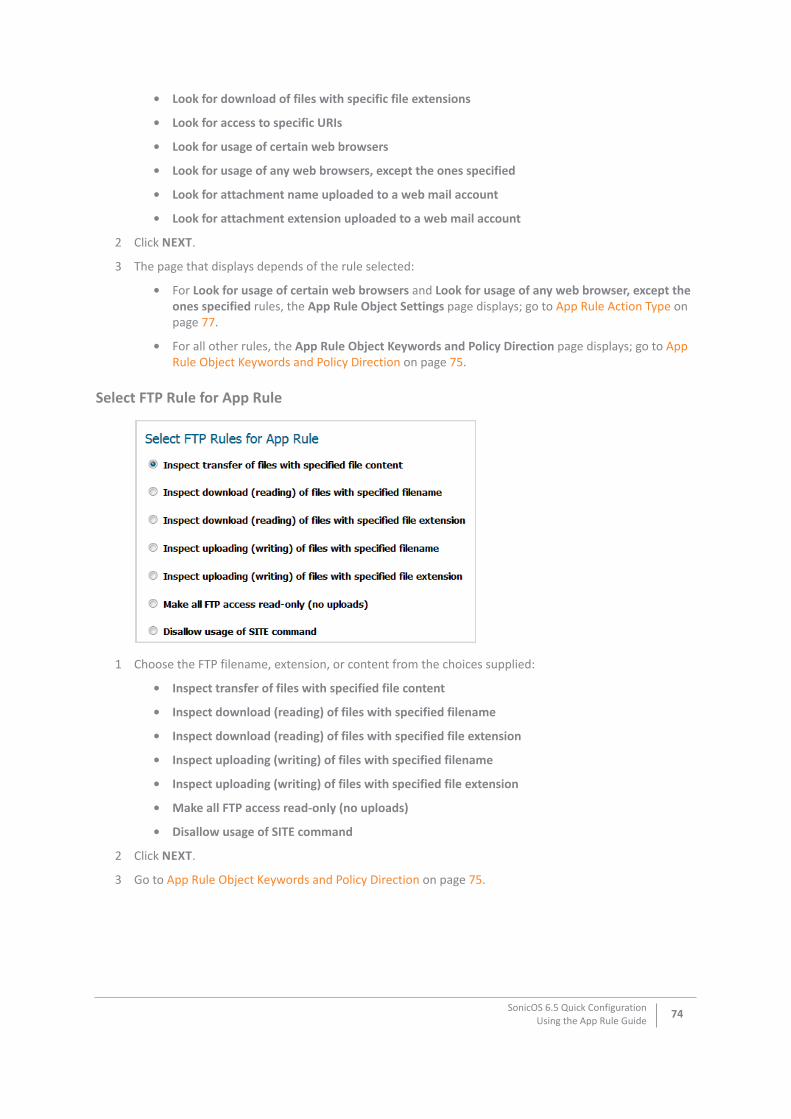
• Look for download of files with specific file extensions
• Look for access to specific URIs
• Look for usage of certain web browsers
• Look for usage of any web browsers, except the ones specified
• Look for attachment name uploaded to a web mail account
• Look for attachment extension uploaded to a web mail account
2 Click NEXT.
3 The page that displays depends of the rule selected:
• For Look for usage of certain web browsers and Look for usage of any web browser, except the ones specified rules, the App Rule Object Settings page displays; go to App Rule Action Type on page 77.
• For all other rules, the App Rule Object Keywords and Policy Direction page displays; go to App Rule Object Keywords and Policy Direction on page 75.
Select FTP Rule for App Rule
1 Choose the FTP filename, extension, or content from the choices supplied:
• Inspect transfer of files with specified file content
• Inspect download (reading) of files with specified filename
• Inspect download (reading) of files with specified file extension
• Inspect uploading (writing) of files with specified filename
• Inspect uploading (writing) of files with specified file extension
• Make all FTP access read-only (no uploads)
• Disallow usage of SITE command
2 Click NEXT.
3 Go to App Rule Object Keywords and Policy Direction on page 75.
SonicOS 6.5 Quick ConfigurationUsing the App Rule Guide
74
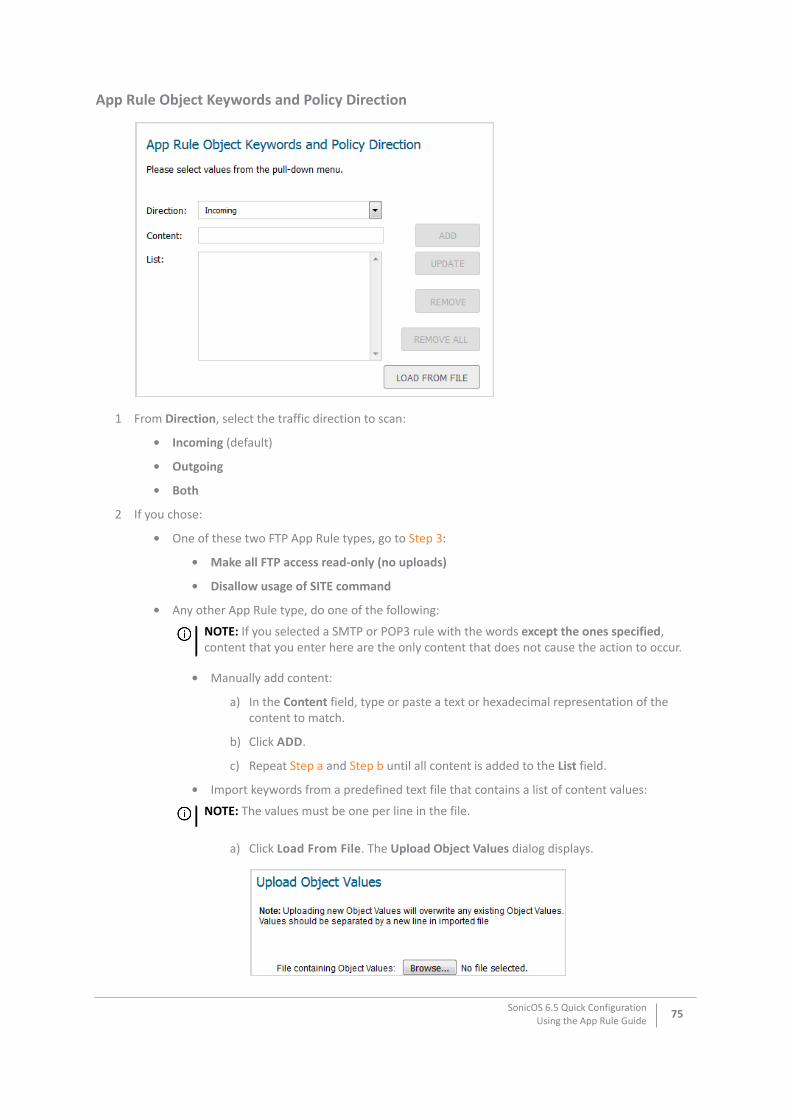
App Rule Object Keywords and Policy Direction
1 From Direction, select the traffic direction to scan:
• Incoming (default)
• Outgoing
• Both
2 If you chose:
• One of these two FTP App Rule types, go to Step 3:
• Make all FTP access read-only (no uploads)
• Disallow usage of SITE command
• Any other App Rule type, do one of the following:
• Manually add content:
a) In the Content field, type or paste a text or hexadecimal representation of the content to match.
b) Click ADD.
c) Repeat Step a and Step b until all content is added to the List field.
• Import keywords from a predefined text file that contains a list of content values:
a) Click Load From File. The Upload Object Values dialog displays.
NOTE: If you selected a SMTP or POP3 rule with the words except the ones specified, content that you enter here are the only content that does not cause the action to occur.
NOTE: The values must be one per line in the file.
SonicOS 6.5 Quick ConfigurationUsing the App Rule Guide
75
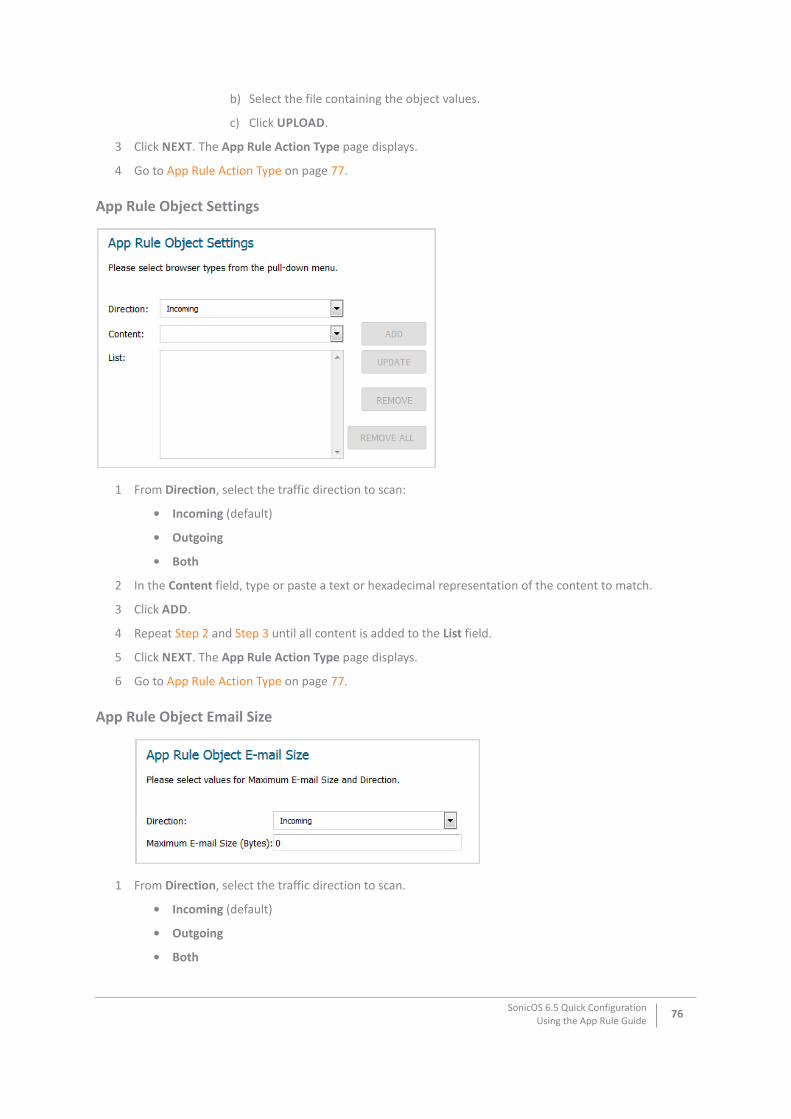
b) Select the file containing the object values.
c) Click UPLOAD.
3 Click NEXT. The App Rule Action Type page displays.
4 Go to App Rule Action Type on page 77.
App Rule Object Settings
1 From Direction, select the traffic direction to scan:
• Incoming (default)
• Outgoing
• Both
2 In the Content field, type or paste a text or hexadecimal representation of the content to match.
3 Click ADD.
4 Repeat Step 2 and Step 3 until all content is added to the List field.
5 Click NEXT. The App Rule Action Type page displays.
6 Go to App Rule Action Type on page 77.
App Rule Object Email Size
1 From Direction, select the traffic direction to scan.
• Incoming (default)
• Outgoing
• Both
SonicOS 6.5 Quick ConfigurationUsing the App Rule Guide
76
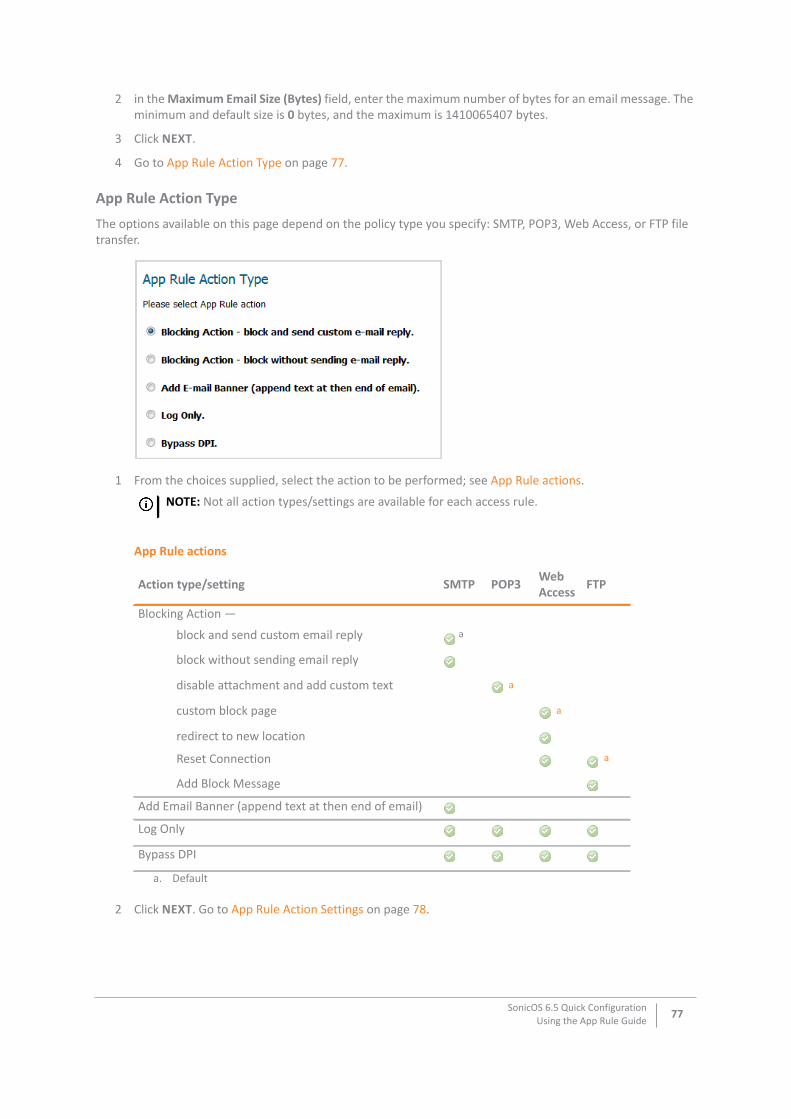
2 in the Maximum Email Size (Bytes) field, enter the maximum number of bytes for an email message. The minimum and default size is 0 bytes, and the maximum is 1410065407 bytes.
3 Click NEXT.
4 Go to App Rule Action Type on page 77.
App Rule Action Type
The options available on this page depend on the policy type you specify: SMTP, POP3, Web Access, or FTP file transfer.
1 From the choices supplied, select the action to be performed; see App Rule actions.
2 Click NEXT. Go to App Rule Action Settings on page 78.
NOTE: Not all action types/settings are available for each access rule.
App Rule actions
Action type/setting SMTP POP3 Web Access FTP
Blocking Action —
block and send custom email reply a
a. Default
block without sending email reply
disable attachment and add custom text a
custom block page a
redirect to new location
Reset Connection a
Add Block Message
Add Email Banner (append text at then end of email)
Log Only
Bypass DPI
SonicOS 6.5 Quick ConfigurationUsing the App Rule Guide
77
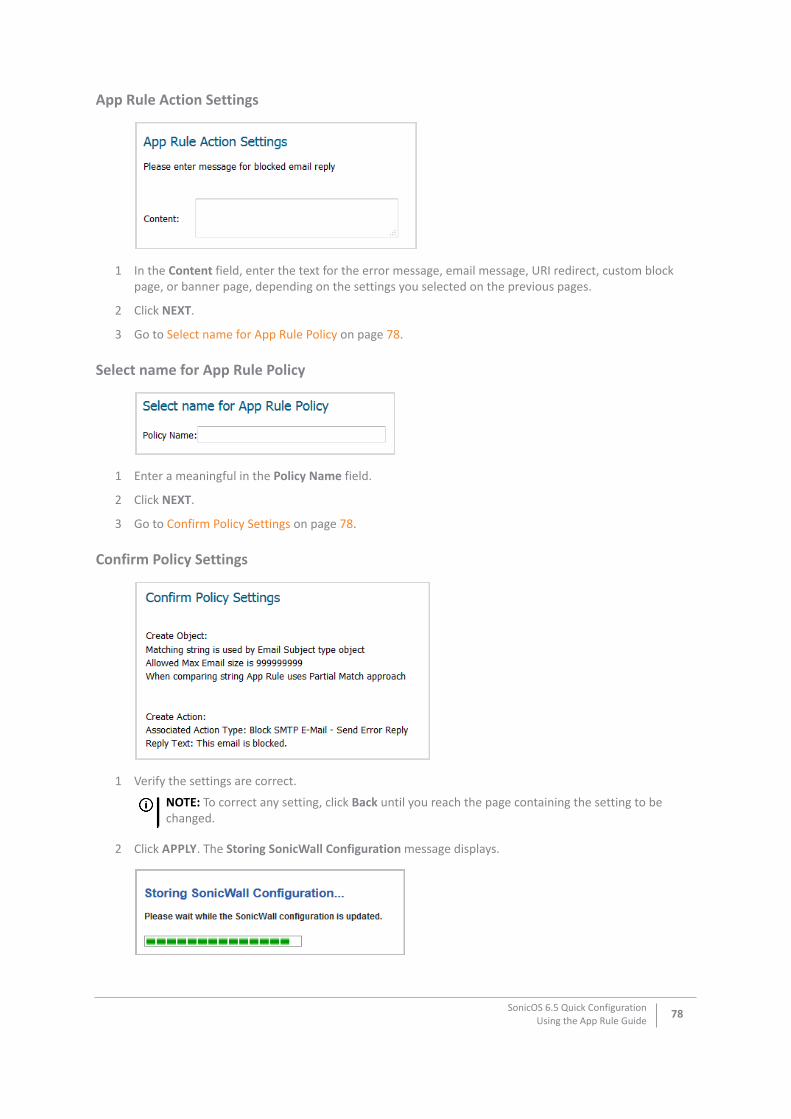
App Rule Action Settings
1 In the Content field, enter the text for the error message, email message, URI redirect, custom block page, or banner page, depending on the settings you selected on the previous pages.
2 Click NEXT.
3 Go to Select name for App Rule Policy on page 78.
Select name for App Rule Policy
1 Enter a meaningful in the Policy Name field.
2 Click NEXT.
3 Go to Confirm Policy Settings on page 78.
Confirm Policy Settings
1 Verify the settings are correct.
2 Click APPLY. The Storing SonicWall Configuration message displays.
NOTE: To correct any setting, click Back until you reach the page containing the setting to be changed.
SonicOS 6.5 Quick ConfigurationUsing the App Rule Guide
78
After the configuration has updated, the App Rule Policy Complete page displays.
3 Click CLOSE.
SonicOS 6.5 Quick ConfigurationUsing the App Rule Guide
79
8
Using the WXA Setup Guide
• WXA Setup Guide on page 80
• WFS for Signed SMB Setup Guide on page 87
WXA Setup Guide NSa series, SuperMassive series, and NSA series appliances use one or more WXA series appliances in a cluster to provide WAN Acceleration. Each WXA uses a range of components to accelerate TCP connections across the WAN, remote file sharing operations, and web browsing. The WXA Setup Guide steps you through the initial setup and configuration of the SonicWall security appliance so that, when coupled with a cluster of WXAs, it can deliver WAN Acceleration to local users.
TZ series and SOHO series appliances support a single connected WXA series appliance to provide WAN Acceleration. They do not support WXA clustering.
Consider the following before using the WXA Setup Guide:
• The SonicWall security appliance must be setup, configured, and licensed.
• Except for the Web Cache, the Guide assumes traffic to be accelerated is over site-to-site VPNs. The WXA series appliance, therefore, must not be set up in a routing or layer 2 bridge mode. Although this configuration can be used with the WXA series appliance, it is not supported by the WXA Setup Guide. Only site-to-site Virtual Private Networks (VPN) are compatible with this Guide.
• IPv6 is not supported. Traffic passing through and accelerated by the WXA series appliance must use IPv4.
• Using the WXA Setup Guide overwrites any existing configuration.
• The WXA series appliance should not be powered up before using this the WXA Setup Guide. You will be directed to power up the appliance as you are guided through the WXA Setup Guide.
To configure the WXA appliance:
• Getting Started on page 81
• Interface Page on page 81
• Enable Acceleration Page on page 83
• Groups Page on page 83
• Acceleration Components on page 85
• VPNs Page on page 86
• Done Page on page 87
• WFS for Signed SMB Setup Guide on page 87
SonicOS 6.5 Quick ConfigurationUsing the WXA Setup Guide
80
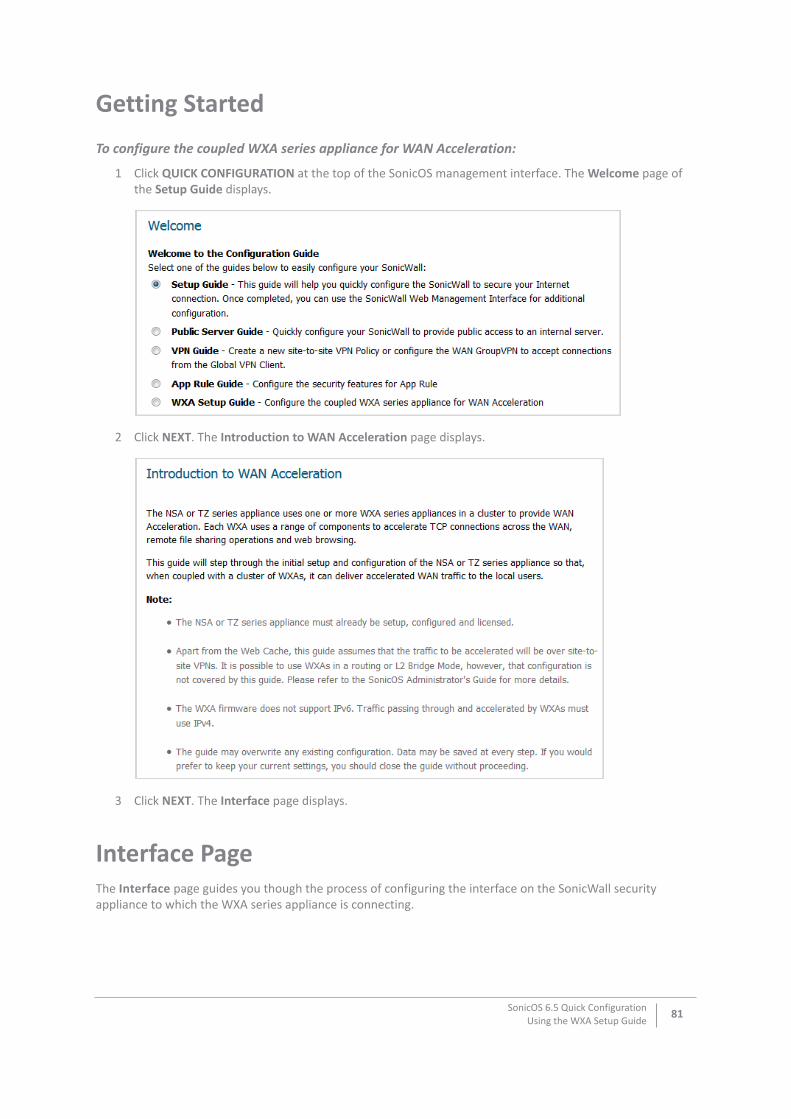
Getting Started
To configure the coupled WXA series appliance for WAN Acceleration:
1 Click QUICK CONFIGURATION at the top of the SonicOS management interface. The Welcome page of the Setup Guide displays.
2 Click NEXT. The Introduction to WAN Acceleration page displays.
3 Click NEXT. The Interface page displays.
Interface Page The Interface page guides you though the process of configuring the interface on the SonicWall security appliance to which the WXA series appliance is connecting.
SonicOS 6.5 Quick ConfigurationUsing the WXA Setup Guide
81
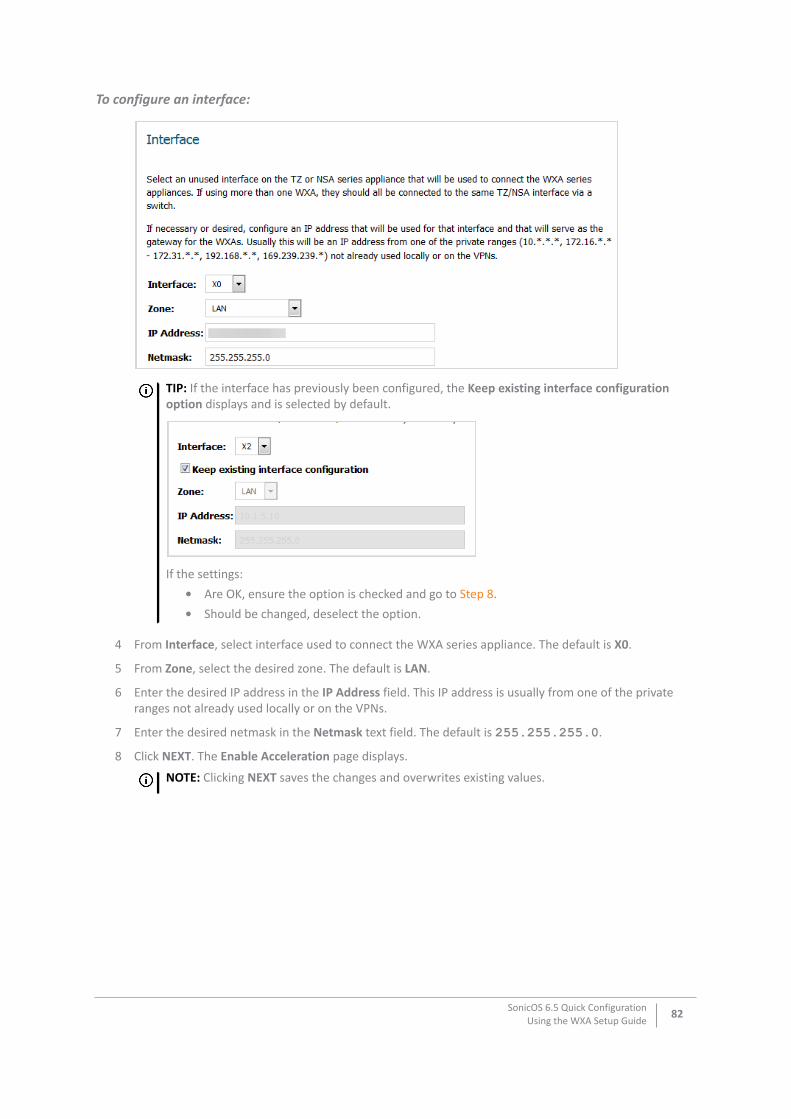
To configure an interface:
4 From Interface, select interface used to connect the WXA series appliance. The default is X0.
5 From Zone, select the desired zone. The default is LAN.
6 Enter the desired IP address in the IP Address field. This IP address is usually from one of the private ranges not already used locally or on the VPNs.
7 Enter the desired netmask in the Netmask text field. The default is 255.255.255.0.
8 Click NEXT. The Enable Acceleration page displays.
TIP: If the interface has previously been configured, the Keep existing interface configuration option displays and is selected by default.
If the settings:• Are OK, ensure the option is checked and go to Step 8. • Should be changed, deselect the option.
NOTE: Clicking NEXT saves the changes and overwrites existing values.
SonicOS 6.5 Quick ConfigurationUsing the WXA Setup Guide
82
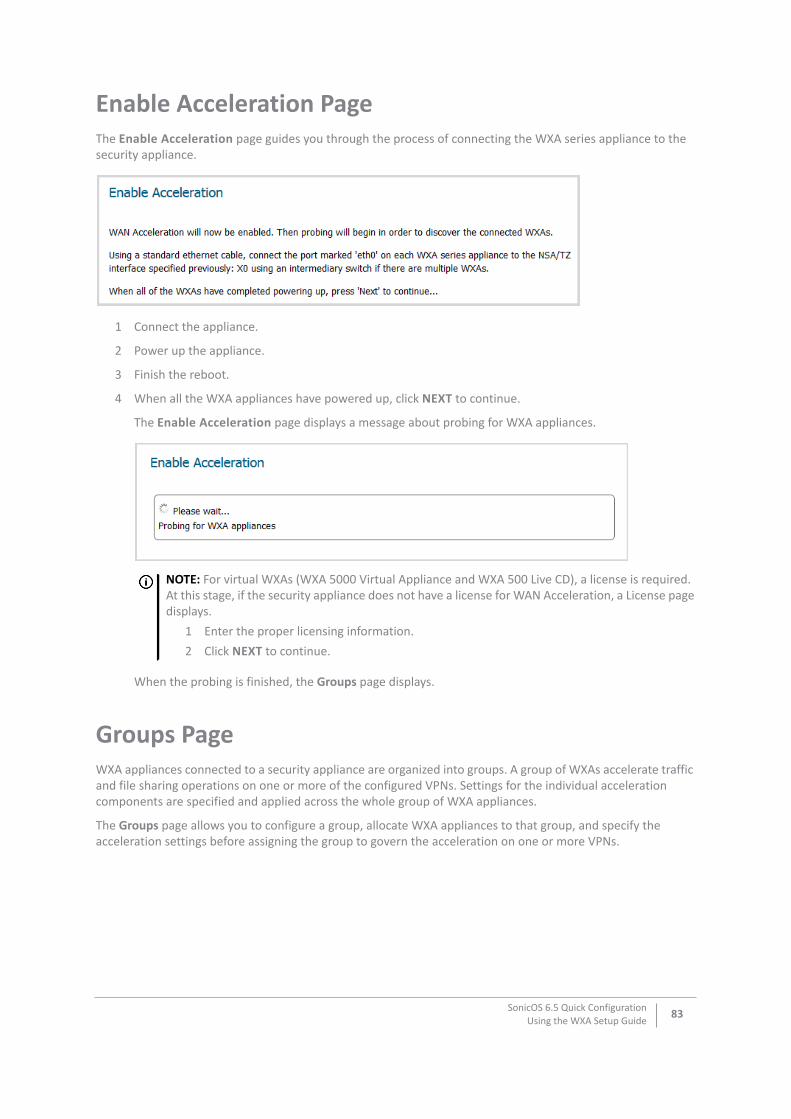
Enable Acceleration PageThe Enable Acceleration page guides you through the process of connecting the WXA series appliance to the security appliance.
1 Connect the appliance.
2 Power up the appliance.
3 Finish the reboot.
4 When all the WXA appliances have powered up, click NEXT to continue.
The Enable Acceleration page displays a message about probing for WXA appliances.
When the probing is finished, the Groups page displays.
Groups PageWXA appliances connected to a security appliance are organized into groups. A group of WXAs accelerate traffic and file sharing operations on one or more of the configured VPNs. Settings for the individual acceleration components are specified and applied across the whole group of WXA appliances.
The Groups page allows you to configure a group, allocate WXA appliances to that group, and specify the acceleration settings before assigning the group to govern the acceleration on one or more VPNs.
NOTE: For virtual WXAs (WXA 5000 Virtual Appliance and WXA 500 Live CD), a license is required. At this stage, if the security appliance does not have a license for WAN Acceleration, a License page displays.
1 Enter the proper licensing information. 2 Click NEXT to continue.
SonicOS 6.5 Quick ConfigurationUsing the WXA Setup Guide
83
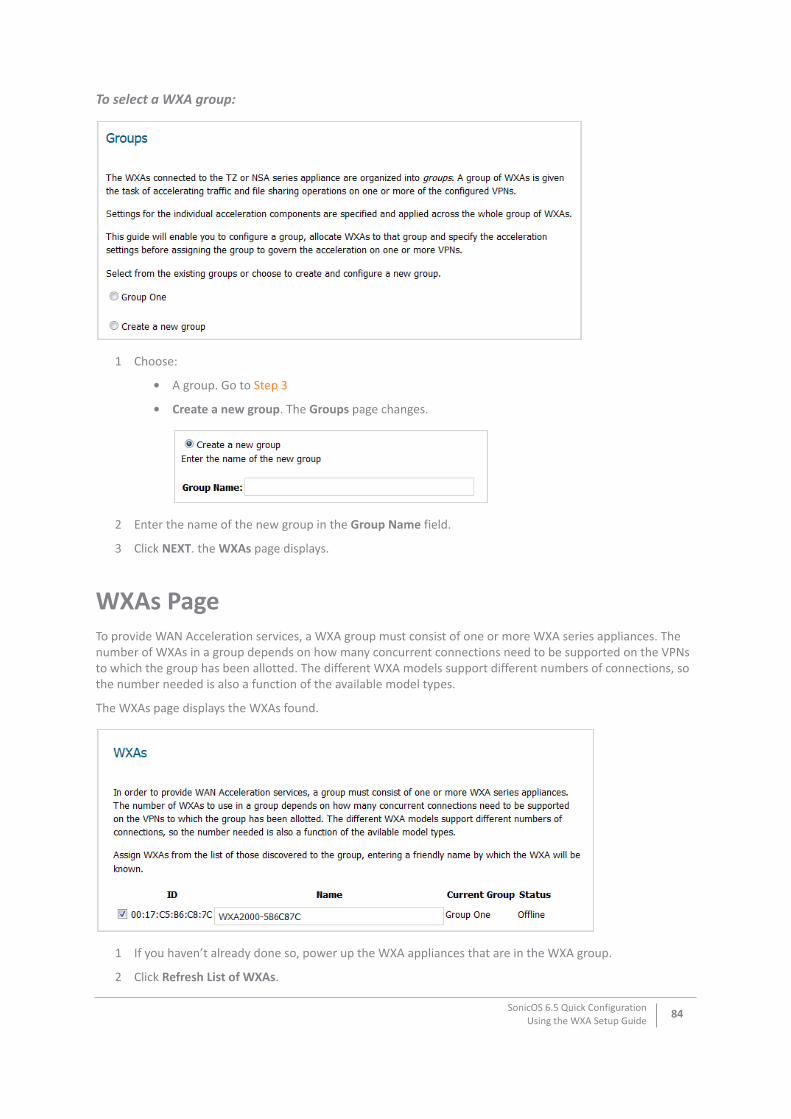
To select a WXA group:
1 Choose:
• A group. Go to Step 3
• Create a new group. The Groups page changes.
2 Enter the name of the new group in the Group Name field.
3 Click NEXT. the WXAs page displays.
WXAs PageTo provide WAN Acceleration services, a WXA group must consist of one or more WXA series appliances. The number of WXAs in a group depends on how many concurrent connections need to be supported on the VPNs to which the group has been allotted. The different WXA models support different numbers of connections, so the number needed is also a function of the available model types.
The WXAs page displays the WXAs found.
1 If you haven’t already done so, power up the WXA appliances that are in the WXA group.
2 Click Refresh List of WXAs.
SonicOS 6.5 Quick ConfigurationUsing the WXA Setup Guide
84
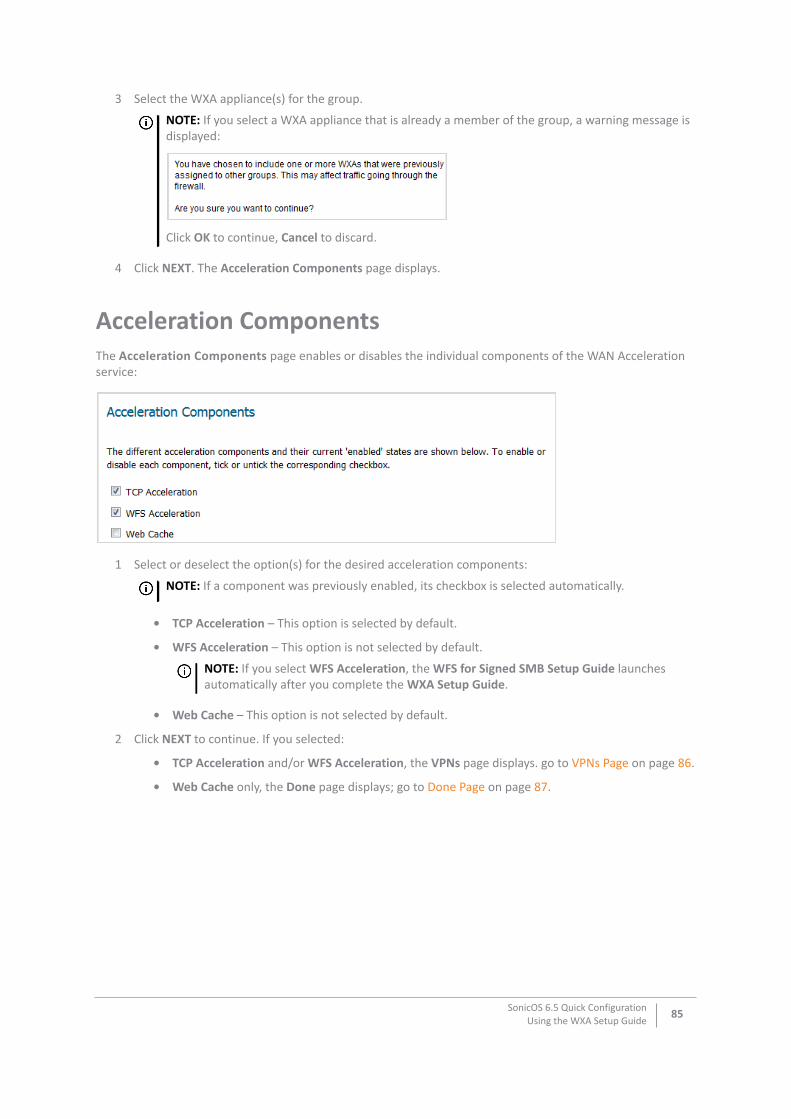
3 Select the WXA appliance(s) for the group.
4 Click NEXT. The Acceleration Components page displays.
Acceleration ComponentsThe Acceleration Components page enables or disables the individual components of the WAN Acceleration service:
1 Select or deselect the option(s) for the desired acceleration components:
• TCP Acceleration – This option is selected by default.
• WFS Acceleration – This option is not selected by default.
• Web Cache – This option is not selected by default.
2 Click NEXT to continue. If you selected:
• TCP Acceleration and/or WFS Acceleration, the VPNs page displays. go to VPNs Page on page 86.
• Web Cache only, the Done page displays; go to Done Page on page 87.
NOTE: If you select a WXA appliance that is already a member of the group, a warning message is displayed:
Click OK to continue, Cancel to discard.
NOTE: If a component was previously enabled, its checkbox is selected automatically.
NOTE: If you select WFS Acceleration, the WFS for Signed SMB Setup Guide launches automatically after you complete the WXA Setup Guide.
SonicOS 6.5 Quick ConfigurationUsing the WXA Setup Guide
85
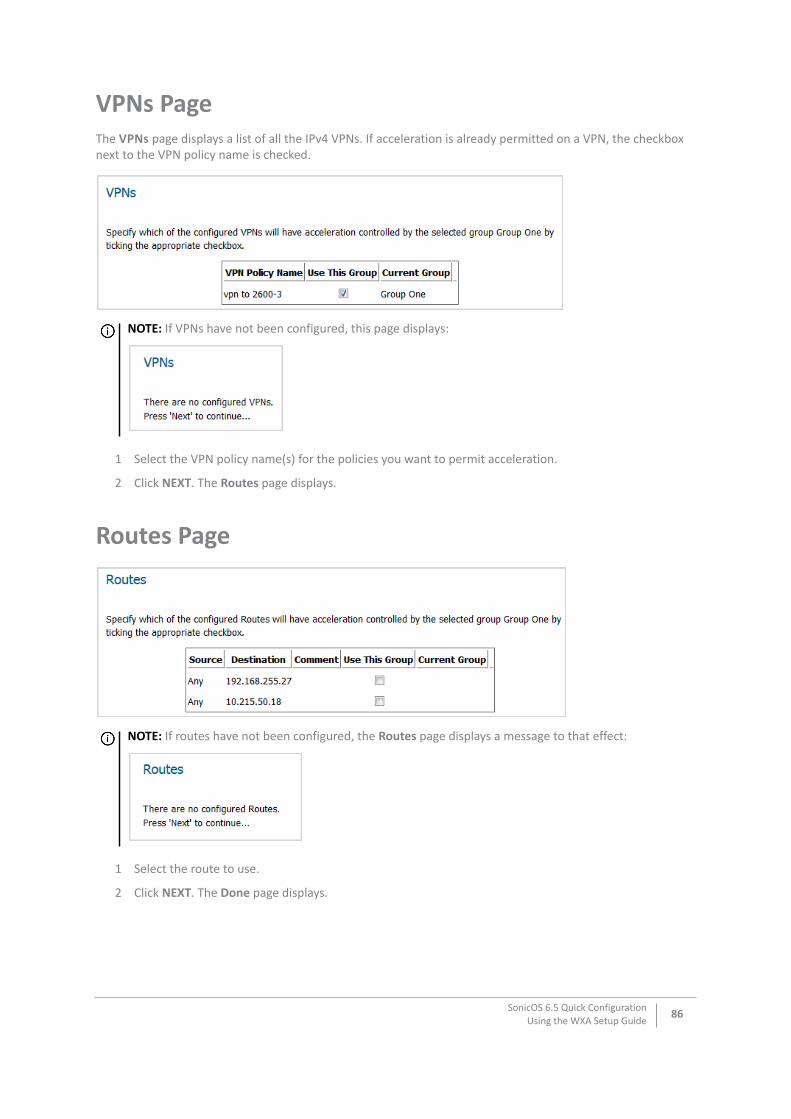
VPNs PageThe VPNs page displays a list of all the IPv4 VPNs. If acceleration is already permitted on a VPN, the checkbox next to the VPN policy name is checked.
1 Select the VPN policy name(s) for the policies you want to permit acceleration.
2 Click NEXT. The Routes page displays.
Routes Page
1 Select the route to use.
2 Click NEXT. The Done page displays.
NOTE: If VPNs have not been configured, this page displays:
NOTE: If routes have not been configured, the Routes page displays a message to that effect:
SonicOS 6.5 Quick ConfigurationUsing the WXA Setup Guide
86
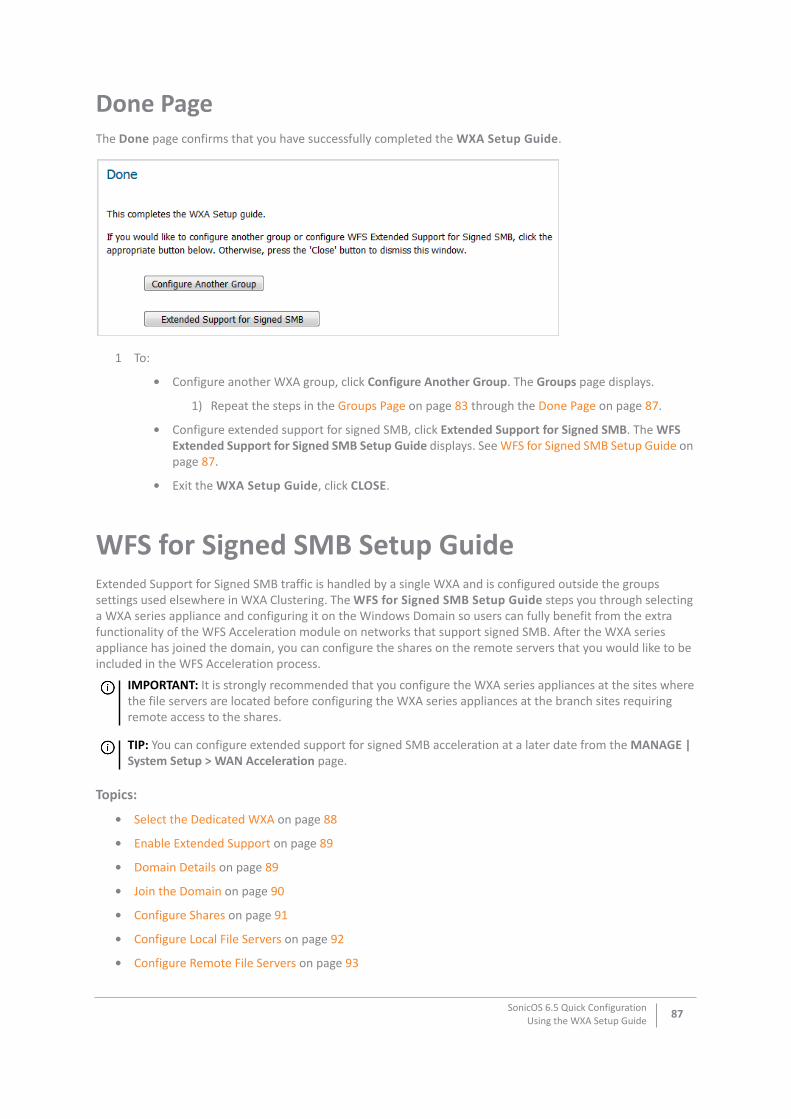
Done PageThe Done page confirms that you have successfully completed the WXA Setup Guide.
1 To:
• Configure another WXA group, click Configure Another Group. The Groups page displays.
1) Repeat the steps in the Groups Page on page 83 through the Done Page on page 87.
• Configure extended support for signed SMB, click Extended Support for Signed SMB. The WFS Extended Support for Signed SMB Setup Guide displays. See WFS for Signed SMB Setup Guide on page 87.
• Exit the WXA Setup Guide, click CLOSE.
WFS for Signed SMB Setup GuideExtended Support for Signed SMB traffic is handled by a single WXA and is configured outside the groups settings used elsewhere in WXA Clustering. The WFS for Signed SMB Setup Guide steps you through selecting a WXA series appliance and configuring it on the Windows Domain so users can fully benefit from the extra functionality of the WFS Acceleration module on networks that support signed SMB. After the WXA series appliance has joined the domain, you can configure the shares on the remote servers that you would like to be included in the WFS Acceleration process.
Topics:
• Select the Dedicated WXA on page 88
• Enable Extended Support on page 89
• Domain Details on page 89
• Join the Domain on page 90
• Configure Shares on page 91
• Configure Local File Servers on page 92
• Configure Remote File Servers on page 93
IMPORTANT: It is strongly recommended that you configure the WXA series appliances at the sites where the file servers are located before configuring the WXA series appliances at the branch sites requiring remote access to the shares.
TIP: You can configure extended support for signed SMB acceleration at a later date from the MANAGE | System Setup > WAN Acceleration page.
SonicOS 6.5 Quick ConfigurationUsing the WXA Setup Guide
87
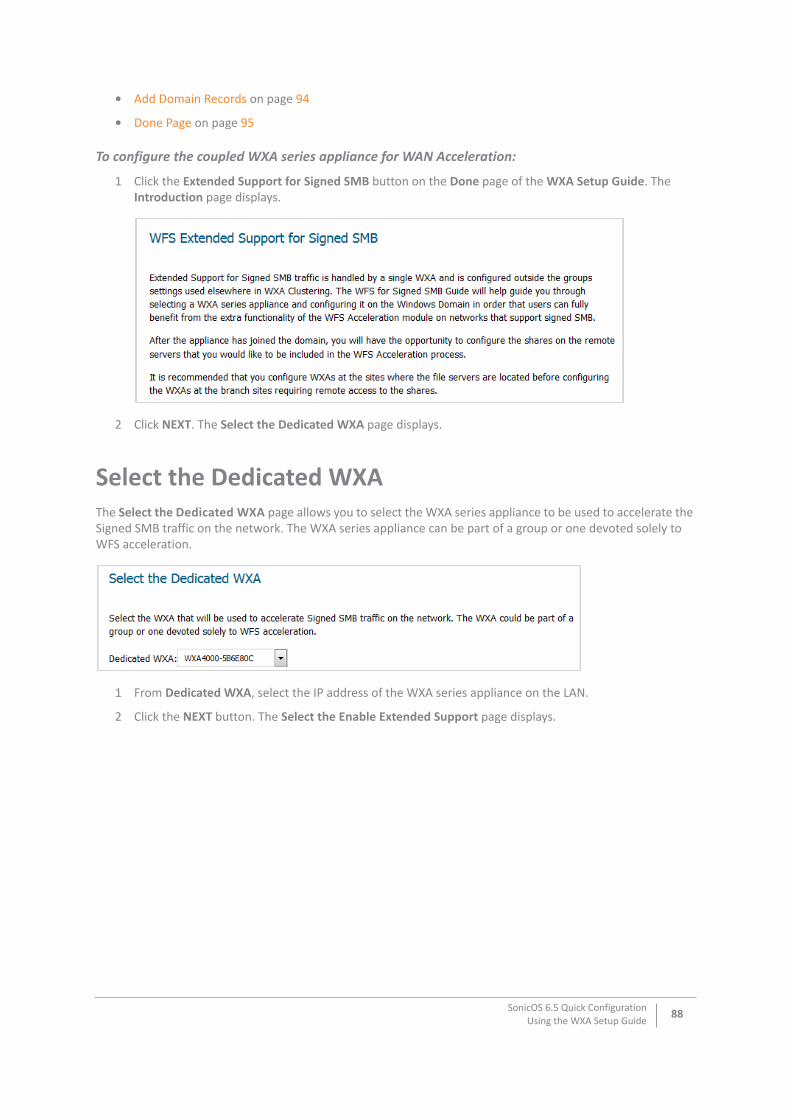
• Add Domain Records on page 94
• Done Page on page 95
To configure the coupled WXA series appliance for WAN Acceleration:
1 Click the Extended Support for Signed SMB button on the Done page of the WXA Setup Guide. The Introduction page displays.
2 Click NEXT. The Select the Dedicated WXA page displays.
Select the Dedicated WXAThe Select the Dedicated WXA page allows you to select the WXA series appliance to be used to accelerate the Signed SMB traffic on the network. The WXA series appliance can be part of a group or one devoted solely to WFS acceleration.
1 From Dedicated WXA, select the IP address of the WXA series appliance on the LAN.
2 Click the NEXT button. The Select the Enable Extended Support page displays.
SonicOS 6.5 Quick ConfigurationUsing the WXA Setup Guide
88
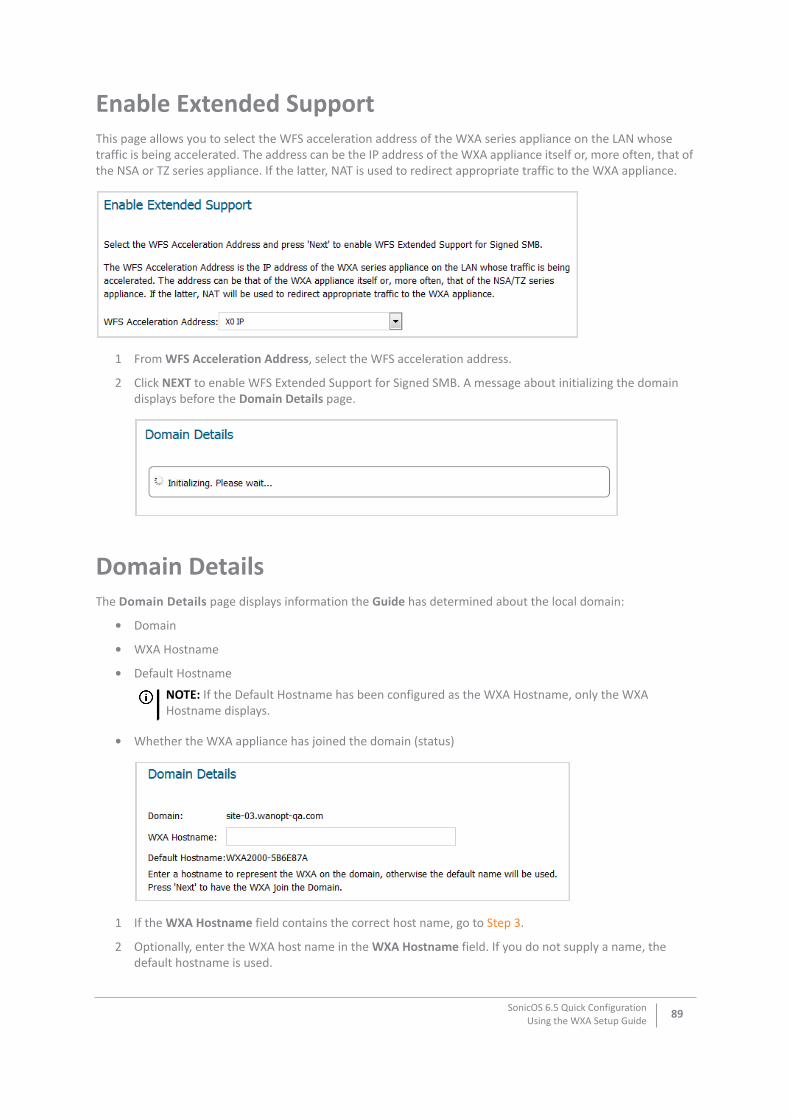
Enable Extended SupportThis page allows you to select the WFS acceleration address of the WXA series appliance on the LAN whose traffic is being accelerated. The address can be the IP address of the WXA appliance itself or, more often, that of the NSA or TZ series appliance. If the latter, NAT is used to redirect appropriate traffic to the WXA appliance.
1 From WFS Acceleration Address, select the WFS acceleration address.
2 Click NEXT to enable WFS Extended Support for Signed SMB. A message about initializing the domain displays before the Domain Details page.
Domain DetailsThe Domain Details page displays information the Guide has determined about the local domain:
• Domain
• WXA Hostname
• Default Hostname
• Whether the WXA appliance has joined the domain (status)
1 If the WXA Hostname field contains the correct host name, go to Step 3.
2 Optionally, enter the WXA host name in the WXA Hostname field. If you do not supply a name, the default hostname is used.
NOTE: If the Default Hostname has been configured as the WXA Hostname, only the WXA Hostname displays.
SonicOS 6.5 Quick ConfigurationUsing the WXA Setup Guide
89
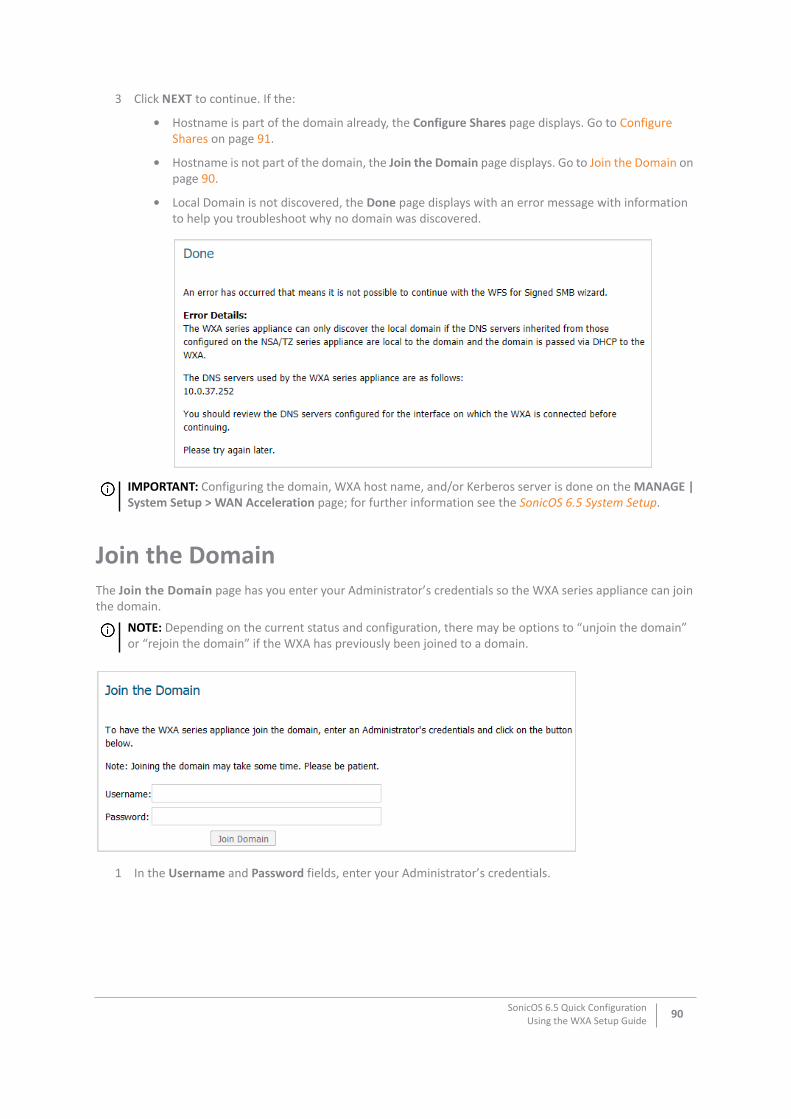
3 Click NEXT to continue. If the:
• Hostname is part of the domain already, the Configure Shares page displays. Go to Configure Shares on page 91.
• Hostname is not part of the domain, the Join the Domain page displays. Go to Join the Domain on page 90.
• Local Domain is not discovered, the Done page displays with an error message with information to help you troubleshoot why no domain was discovered.
Join the DomainThe Join the Domain page has you enter your Administrator’s credentials so the WXA series appliance can join the domain.
1 In the Username and Password fields, enter your Administrator’s credentials.
IMPORTANT: Configuring the domain, WXA host name, and/or Kerberos server is done on the MANAGE | System Setup > WAN Acceleration page; for further information see the SonicOS 6.5 System Setup.
NOTE: Depending on the current status and configuration, there may be options to “unjoin the domain” or “rejoin the domain” if the WXA has previously been joined to a domain.
SonicOS 6.5 Quick ConfigurationUsing the WXA Setup Guide
90
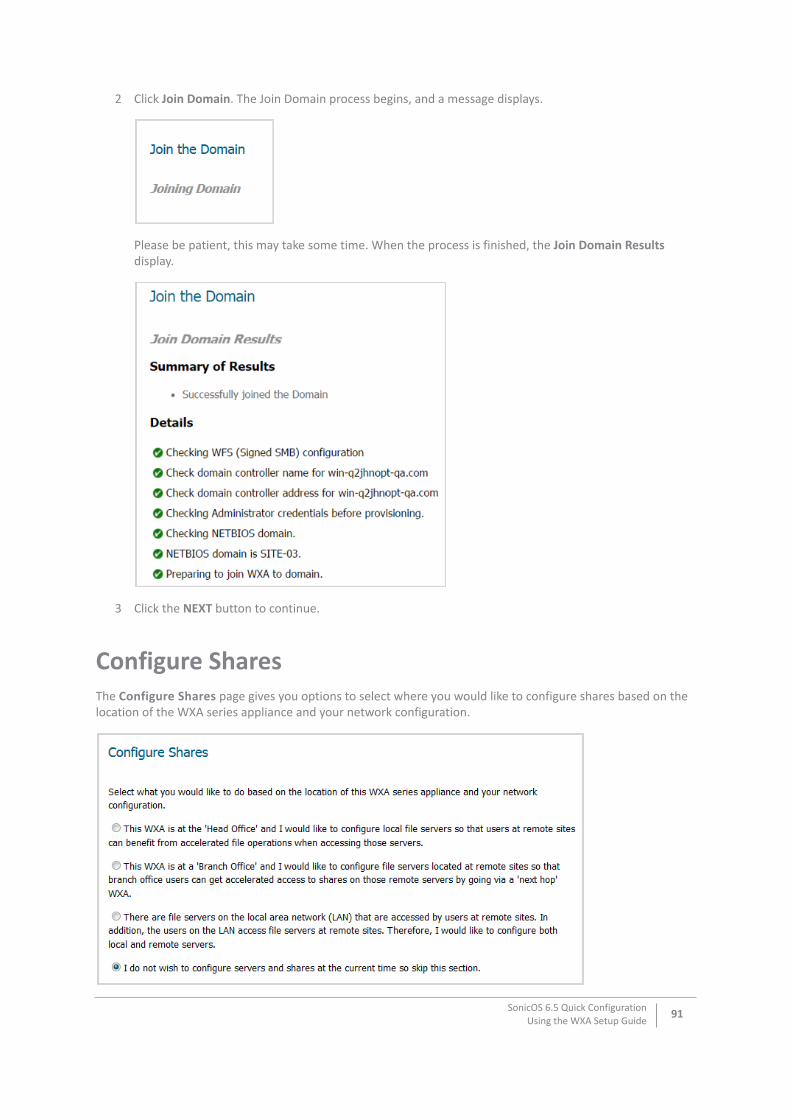
2 Click Join Domain. The Join Domain process begins, and a message displays.
Please be patient, this may take some time. When the process is finished, the Join Domain Results display.
3 Click the NEXT button to continue.
Configure SharesThe Configure Shares page gives you options to select where you would like to configure shares based on the location of the WXA series appliance and your network configuration.
SonicOS 6.5 Quick ConfigurationUsing the WXA Setup Guide
91
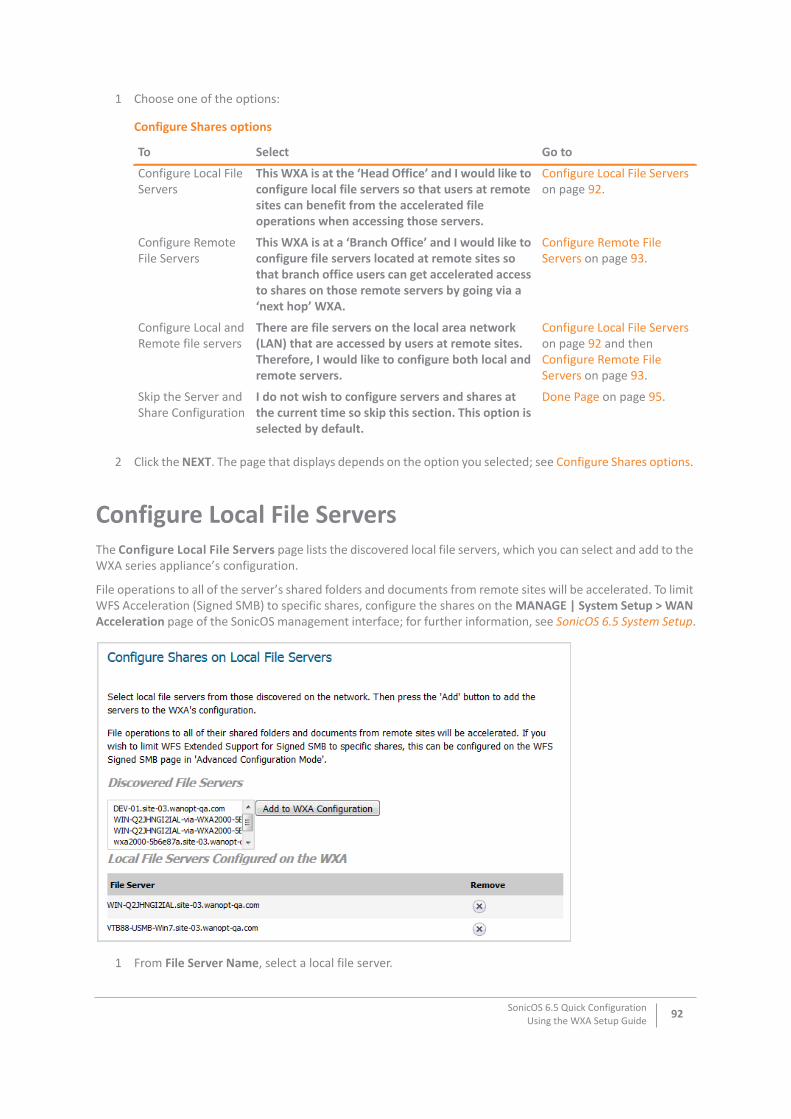
1 Choose one of the options:
2 Click the NEXT. The page that displays depends on the option you selected; see Configure Shares options.
Configure Local File ServersThe Configure Local File Servers page lists the discovered local file servers, which you can select and add to the WXA series appliance’s configuration.
File operations to all of the server’s shared folders and documents from remote sites will be accelerated. To limit WFS Acceleration (Signed SMB) to specific shares, configure the shares on the MANAGE | System Setup > WAN Acceleration page of the SonicOS management interface; for further information, see SonicOS 6.5 System Setup.
1 From File Server Name, select a local file server.
Configure Shares options
To Select Go to
Configure Local File Servers
This WXA is at the ‘Head Office’ and I would like to configure local file servers so that users at remote sites can benefit from the accelerated file operations when accessing those servers.
Configure Local File Servers on page 92.
Configure Remote File Servers
This WXA is at a ‘Branch Office’ and I would like to configure file servers located at remote sites so that branch office users can get accelerated access to shares on those remote servers by going via a ‘next hop’ WXA.
Configure Remote File Servers on page 93.
Configure Local and Remote file servers
There are file servers on the local area network (LAN) that are accessed by users at remote sites. Therefore, I would like to configure both local and remote servers.
Configure Local File Servers on page 92 and then Configure Remote File Servers on page 93.
Skip the Server and Share Configuration
I do not wish to configure servers and shares at the current time so skip this section. This option is selected by default.
Done Page on page 95.
SonicOS 6.5 Quick ConfigurationUsing the WXA Setup Guide
92
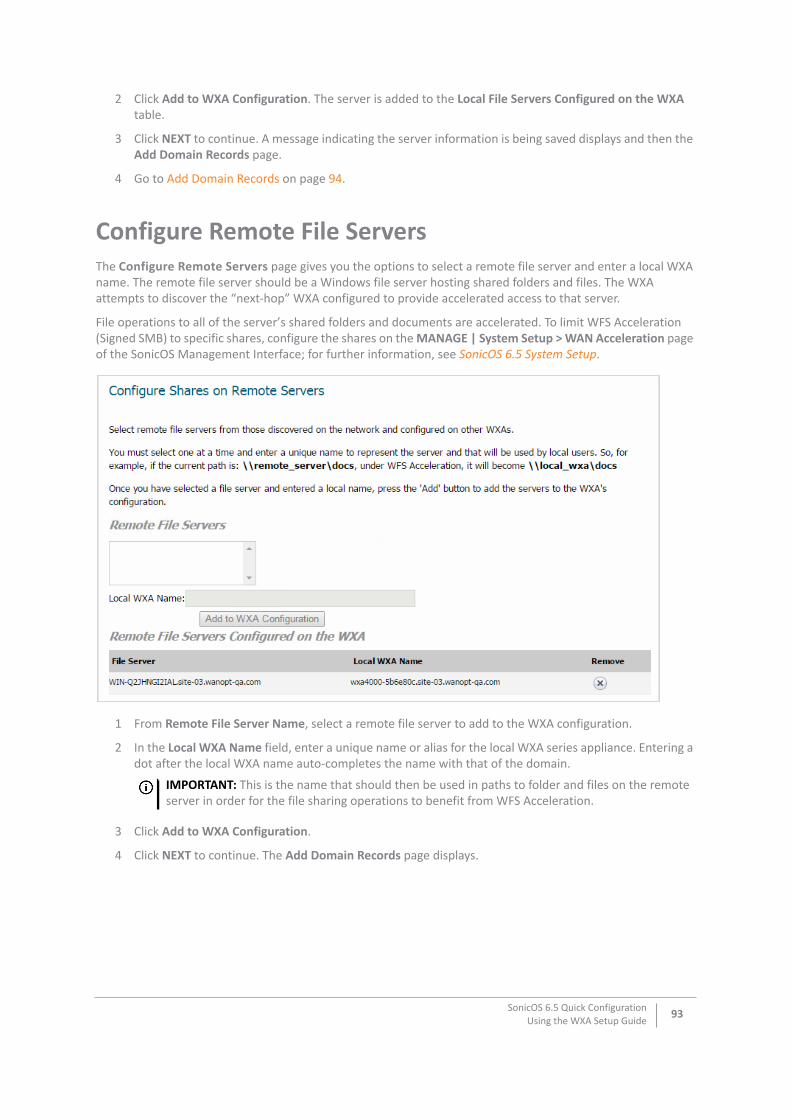
2 Click Add to WXA Configuration. The server is added to the Local File Servers Configured on the WXA table.
3 Click NEXT to continue. A message indicating the server information is being saved displays and then the Add Domain Records page.
4 Go to Add Domain Records on page 94.
Configure Remote File ServersThe Configure Remote Servers page gives you the options to select a remote file server and enter a local WXA name. The remote file server should be a Windows file server hosting shared folders and files. The WXA attempts to discover the “next-hop” WXA configured to provide accelerated access to that server.
File operations to all of the server’s shared folders and documents are accelerated. To limit WFS Acceleration (Signed SMB) to specific shares, configure the shares on the MANAGE | System Setup > WAN Acceleration page of the SonicOS Management Interface; for further information, see SonicOS 6.5 System Setup.
1 From Remote File Server Name, select a remote file server to add to the WXA configuration.
2 In the Local WXA Name field, enter a unique name or alias for the local WXA series appliance. Entering a dot after the local WXA name auto-completes the name with that of the domain.
3 Click Add to WXA Configuration.
4 Click NEXT to continue. The Add Domain Records page displays.
IMPORTANT: This is the name that should then be used in paths to folder and files on the remote server in order for the file sharing operations to benefit from WFS Acceleration.
SonicOS 6.5 Quick ConfigurationUsing the WXA Setup Guide
93
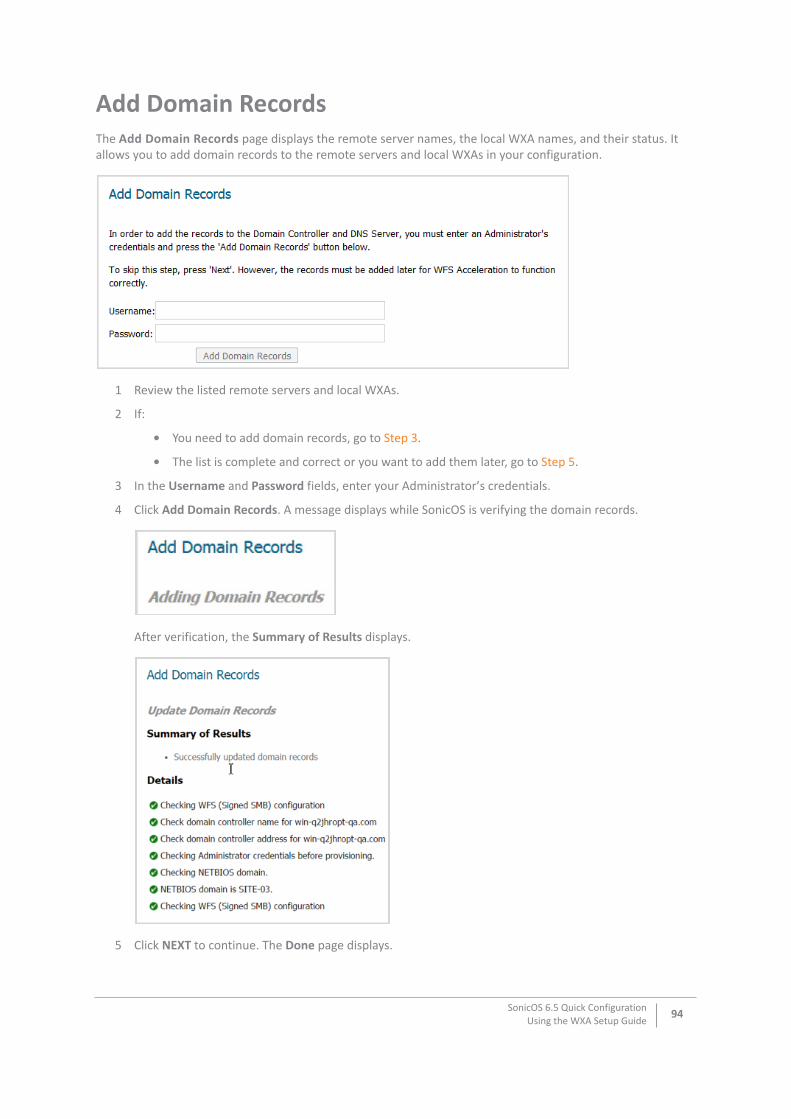
Add Domain RecordsThe Add Domain Records page displays the remote server names, the local WXA names, and their status. It allows you to add domain records to the remote servers and local WXAs in your configuration.
1 Review the listed remote servers and local WXAs.
2 If:
• You need to add domain records, go to Step 3.
• The list is complete and correct or you want to add them later, go to Step 5.
3 In the Username and Password fields, enter your Administrator’s credentials.
4 Click Add Domain Records. A message displays while SonicOS is verifying the domain records.
After verification, the Summary of Results displays.
5 Click NEXT to continue. The Done page displays.
SonicOS 6.5 Quick ConfigurationUsing the WXA Setup Guide
94
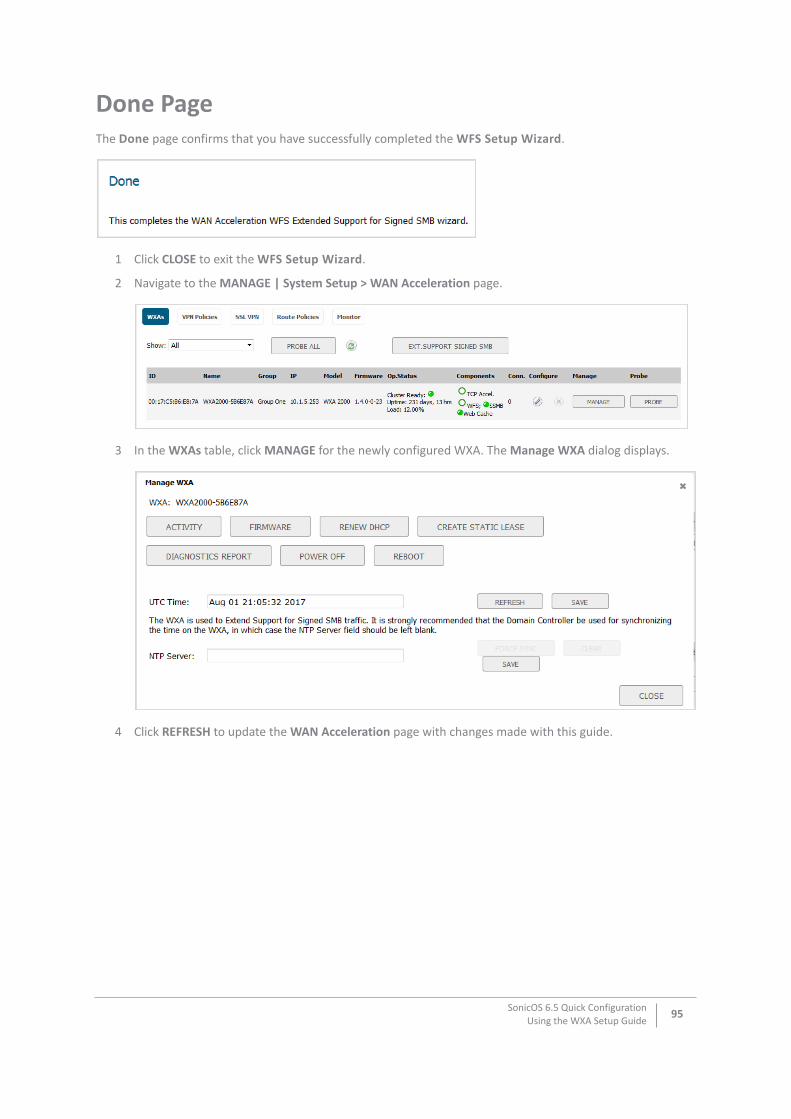
Done PageThe Done page confirms that you have successfully completed the WFS Setup Wizard.
1 Click CLOSE to exit the WFS Setup Wizard.
2 Navigate to the MANAGE | System Setup > WAN Acceleration page.
3 In the WXAs table, click MANAGE for the newly configured WXA. The Manage WXA dialog displays.
4 Click REFRESH to update the WAN Acceleration page with changes made with this guide.
SonicOS 6.5 Quick ConfigurationUsing the WXA Setup Guide
95
SonicOS 6.5 Quick ConfigurationAppendix
Part 3
96
Appendix
• SonicWall Support
A
SonicWall Support
Technical support is available to customers who have purchased SonicWall products with a valid maintenance contract and to customers who have trial versions.
The Support Portal provides self-help tools you can use to solve problems quickly and independently, 24 hours a day, 365 days a year. To access the Support Portal, go to https://support.sonicwall.com.
The Support Portal enables you to:
• View knowledge base articles and technical documentation
• View video tutorials
• Access MySonicWall
• Learn about SonicWall professional services
• Review SonicWall Support services and warranty information
• Register for training and certification
• Request technical support or customer service
To contact SonicWall Support, refer to https://support.sonicwall.com/contact-support.
SonicOS 6.5 Quick ConfigurationSonicWall Support
97
About This Document
SonicWall Quick ConfigurationUpdated - February 2019Software Version - 6.5.4232-001872-04 Rev A
Copyright © 2019 SonicWall Inc. All rights reserved.
SonicWall is a trademark or registered trademark of SonicWall Inc. and/or its affiliates in the U.S.A. and/or other countries. All other trademarks and registered trademarks are property of their respective ownersThe information in this document is provided in connection with SonicWall Inc. and/or its affiliates’ products. No license, express or implied, by estoppel or otherwise, to any intellectual property right is granted by this document or in connection with the sale of SonicWall products. EXCEPT AS SET FORTH IN THE TERMS AND CONDITIONS AS SPECIFIED IN THE LICENSE AGREEMENT FOR THIS PRODUCT, SONICWALL AND/OR ITS AFFILIATES ASSUME NO LIABILITY WHATSOEVER AND DISCLAIMS ANY EXPRESS, IMPLIED OR STATUTORY WARRANTY RELATING TO ITS PRODUCTS INCLUDING, BUT NOT LIMITED TO, THE IMPLIED WARRANTY OF MERCHANTABILITY, FITNESS FOR A PARTICULAR PURPOSE, OR NON- INFRINGEMENT. IN NO EVENT SHALL SONICWALL AND/OR ITS AFFILIATES BE LIABLE FOR ANY DIRECT, INDIRECT, CONSEQUENTIAL, PUNITIVE, SPECIAL OR INCIDENTAL DAMAGES (INCLUDING, WITHOUT LIMITATION, DAMAGES FOR LOSS OF PROFITS, BUSINESS INTERRUPTION OR LOSS OF INFORMATION) ARISING OUT OF THE USE OR INABILITY TO USE THIS DOCUMENT, EVEN IF SONICWALL AND/OR ITS AFFILIATES HAVE BEEN ADVISED OF THE POSSIBILITY OF SUCH DAMAGES. SonicWall and/or its affiliates make no representations or warranties with respect to the accuracy or completeness of the contents of this document and reserves the right to make changes to specifications and product descriptions at any time without notice. SonicWall Inc. and/or its affiliates do not make any commitment to update the information contained in this document.For more information, visit https://www.sonicwall.com/legal.
End User Product AgreementTo view the SonicWall End User Product Agreement, go to: https://www.sonicwall.com/en-us/legal/license-agreements.
Open Source CodeSonicWall is able to provide a machine-readable copy of open source code with restrictive licenses such as GPL, LGPL, AGPL when applicable per license requirements. To obtain a complete machine-readable copy, send your written requests, along with certified check or money order in the amount of US 25.00 payable to “SonicWall Inc.”, to:
General Public License Source Code Request SonicWall Inc. Attn: Jennifer Anderson1033 McCarthy BlvdMilpitas, CA 95035
Legend
WARNING: A WARNING icon indicates a potential for property damage, personal injury, or death.
CAUTION: A CAUTION icon indicates potential damage to hardware or loss of data if instructions are not followed.
IMPORTANT, NOTE, TIP, MOBILE, or VIDEO: An information icon indicates supporting information.
SonicOS 6.5 Quick ConfigurationSonicWall Support
98