sonicwall sonicos 6.5.2 · sonicwall sonicos 6.5.2.1 is a major release that provides more than 32...
TRANSCRIPT
SonicWall® SonicOS 6.5.2.1Release NotesJune 2018
These release notes provide information about the SonicWall® SonicOS 6.5.2.1 release.
Topics:
• About SonicOS 6.5.2.1
• Supported Platforms
• New Hardware Support
• New Features
• Resolved Issues
• Known Issues
• System Compatibility
• Product Licensing
• Upgrading Information
• SonicWall Support
About SonicOS 6.5.2.1SonicWall SonicOS 6.5.2.1 is a major release that provides more than 32 new features, including support for Dell® N-Series Switches. SonicOS 6.5.2.1 also introduces support for new NSa Series appliances.
Supported PlatformsSonicOS 6.5.2.1 is supported on the following SonicWall appliances:
• NSa 9650 • SuperMassive 9600 • TZ600
• NSa 9450 • SuperMassive 9400 • TZ500/TZ500 Wireless
• NSa 9250 • SuperMassive 9200 • TZ400/TZ400 Wireless
• NSa 6650 • NSA 6600 • TZ300/TZ300 Wireless
• NSa 5650 • NSA 5600
• NSa 4650 • NSA 4600 • SOHO Wireless
• NSa 3650 • NSA 3600
• NSa 2650 • NSA 2600
SonicWall SonicOS 6.5.2.1Release Notes
1
New Hardware SupportSonicOS 6.5.2.1 supports the following new high-end and mid-range network security appliances:
• NSa 6650
• NSa 9250
• NSa 9450
• NSa 9650
New FeaturesThis section describes the new features introduced in SonicOS 6.5.2.
Topics:
• Decryption Services Features
• SonicWave Features
• N-Series Switches Support
• App-Based Routing
• Capture ATP Blocking Behavior
• DNS Sinkhole Support
• LAN Bypass
• Firmware Backup on Secondary Storage Devices
• Global Search Enhancements
• High Availability Heartbeat over MGMT Interface
• Dynamic Botnet HTTP Authentication
• LHM RESTful API
• URI List Groups
• Quota Control for all Users
• Flexible Storage Module Support
• TACACS+ Support
• Enhanced User Login Reporting
• WeChat Support
• Access Point Visualization Enhancements
• VLAN Enhancements for LAG
Decryption Services FeaturesNumerous features have been added to SonicOS DPI-SSL and DPI-SSH decryption services.
Topics:
• DPI-SSL Granular Control
SonicWall SonicOS 6.5.2.1Release Notes
2
• Access Rules-Based DPI-SSL Control
• TLS Certificate Status Request Extension
• Support for Local CRL
• Enhanced DPI-SSL Certificate Verification
• Support for ECDSA-Related Ciphers
• DPI-SSL and CFS HTTPS Content Filtering now Work Independently
• Blocking of SSH X11 Forwarding
• Retaining Original Port Numbers in Decrypted Packets
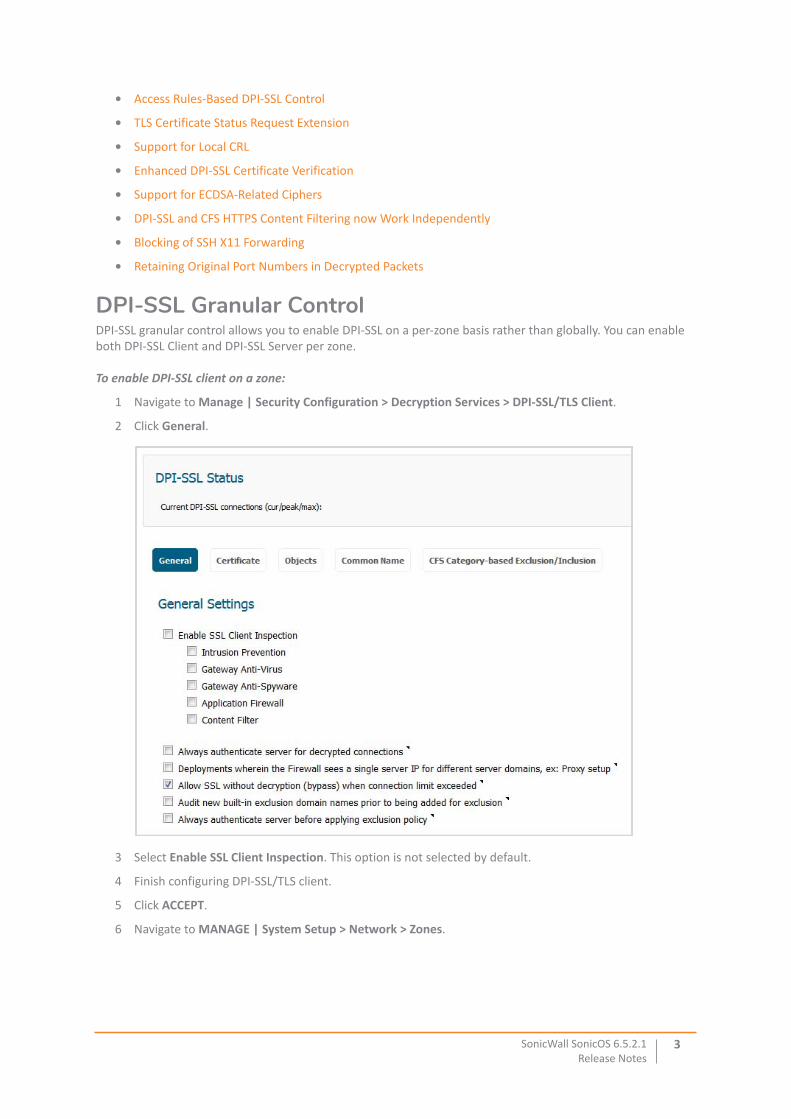
DPI-SSL Granular ControlDPI-SSL granular control allows you to enable DPI-SSL on a per-zone basis rather than globally. You can enable both DPI-SSL Client and DPI-SSL Server per zone.
To enable DPI-SSL client on a zone:
1 Navigate to Manage | Security Configuration > Decryption Services > DPI-SSL/TLS Client.
2 Click General.
3 Select Enable SSL Client Inspection. This option is not selected by default.
4 Finish configuring DPI-SSL/TLS client.
5 Click ACCEPT.
6 Navigate to MANAGE | System Setup > Network > Zones.
SonicWall SonicOS 6.5.2.1Release Notes
3
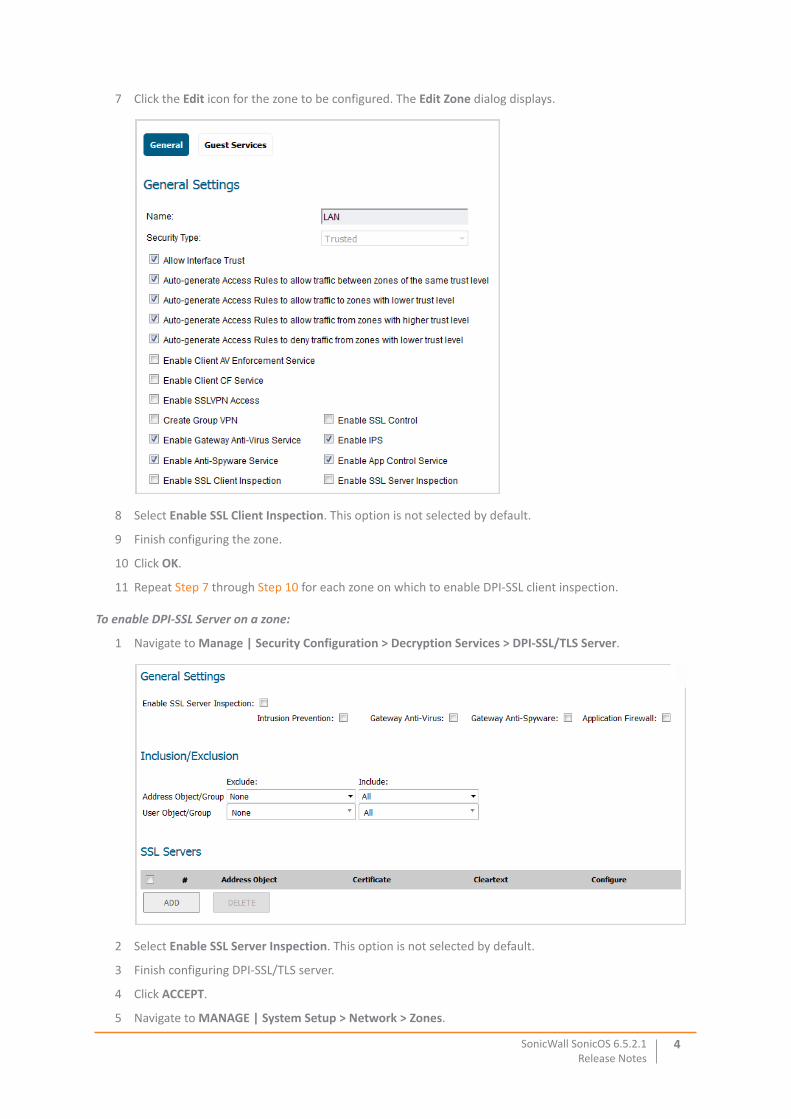
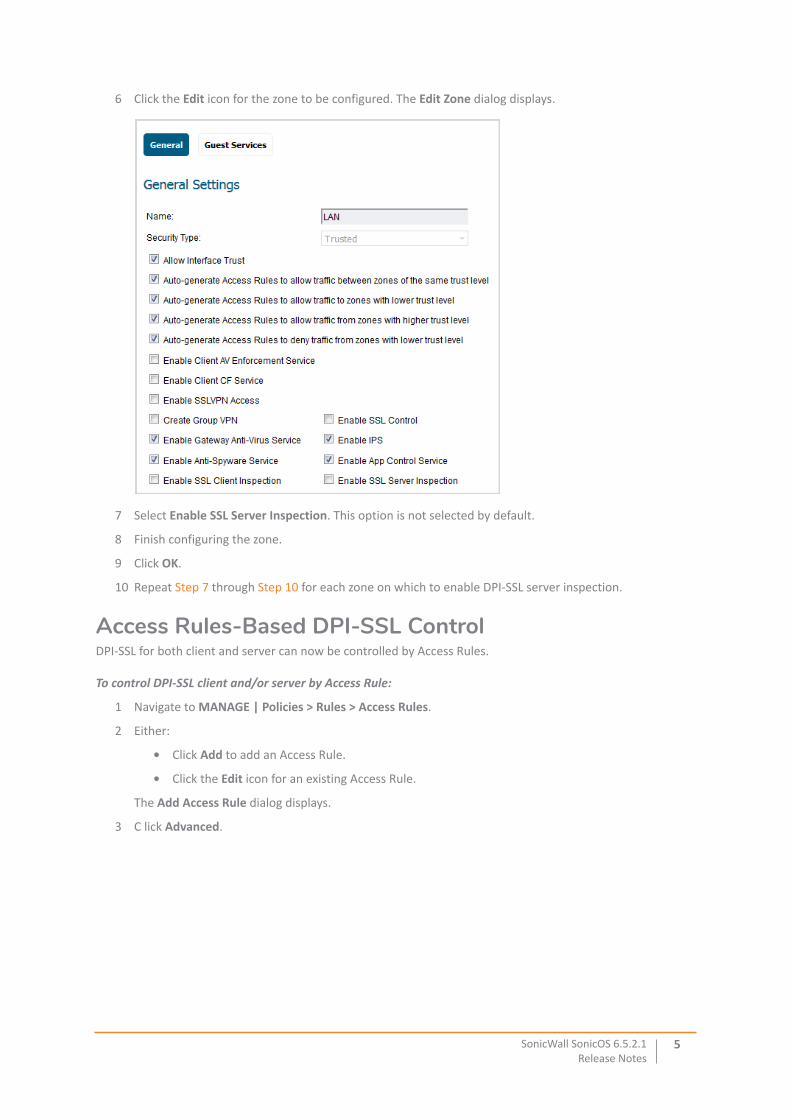
7 Click the Edit icon for the zone to be configured. The Edit Zone dialog displays.
8 Select Enable SSL Client Inspection. This option is not selected by default.
9 Finish configuring the zone.
10 Click OK.
11 Repeat Step 7 through Step 10 for each zone on which to enable DPI-SSL client inspection.
To enable DPI-SSL Server on a zone:
1 Navigate to Manage | Security Configuration > Decryption Services > DPI-SSL/TLS Server.
2 Select Enable SSL Server Inspection. This option is not selected by default.
3 Finish configuring DPI-SSL/TLS server.
4 Click ACCEPT.
5 Navigate to MANAGE | System Setup > Network > Zones.
SonicWall SonicOS 6.5.2.1Release Notes
4
6 Click the Edit icon for the zone to be configured. The Edit Zone dialog displays.
7 Select Enable SSL Server Inspection. This option is not selected by default.
8 Finish configuring the zone.
9 Click OK.
10 Repeat Step 7 through Step 10 for each zone on which to enable DPI-SSL server inspection.
Access Rules-Based DPI-SSL ControlDPI-SSL for both client and server can now be controlled by Access Rules.
To control DPI-SSL client and/or server by Access Rule:
1 Navigate to MANAGE | Policies > Rules > Access Rules.
2 Either:
• Click Add to add an Access Rule.
• Click the Edit icon for an existing Access Rule.
The Add Access Rule dialog displays.
3 C lick Advanced.
SonicWall SonicOS 6.5.2.1Release Notes
5
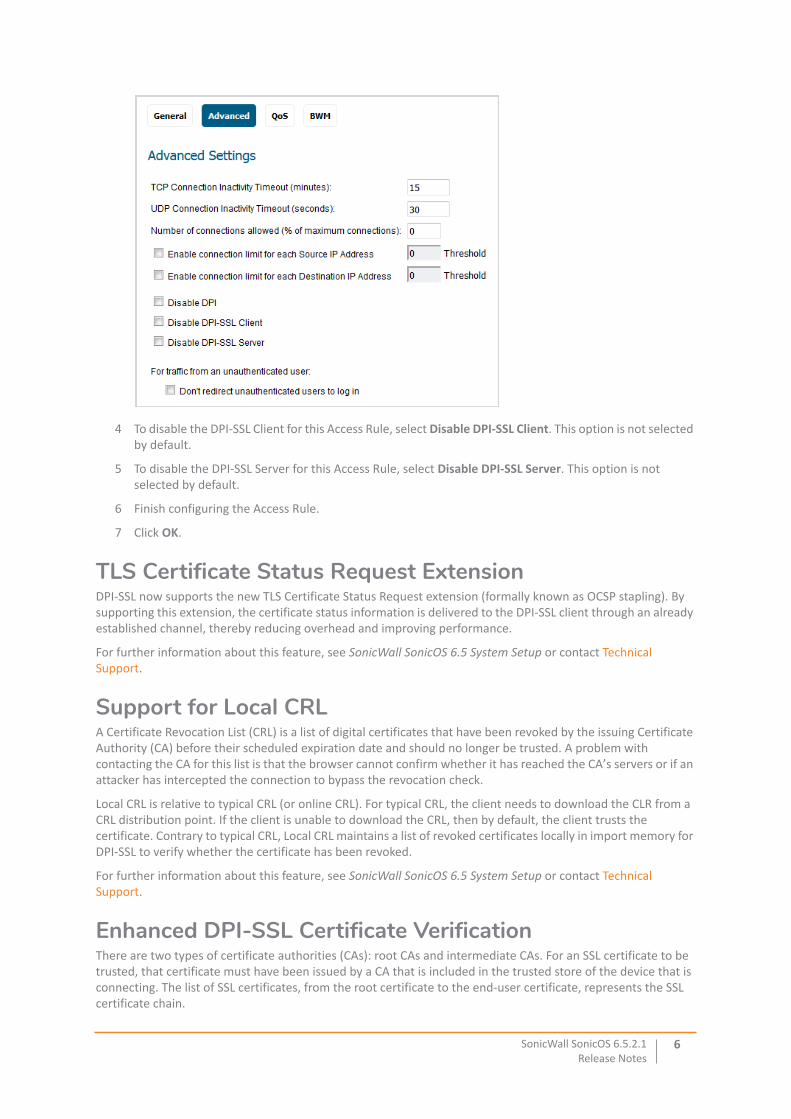
4 To disable the DPI-SSL Client for this Access Rule, select Disable DPI-SSL Client. This option is not selected by default.
5 To disable the DPI-SSL Server for this Access Rule, select Disable DPI-SSL Server. This option is not selected by default.
6 Finish configuring the Access Rule.
7 Click OK.
TLS Certificate Status Request ExtensionDPI-SSL now supports the new TLS Certificate Status Request extension (formally known as OCSP stapling). By supporting this extension, the certificate status information is delivered to the DPI-SSL client through an already established channel, thereby reducing overhead and improving performance.
For further information about this feature, see SonicWall SonicOS 6.5 System Setup or contact Technical Support.
Support for Local CRL A Certificate Revocation List (CRL) is a list of digital certificates that have been revoked by the issuing Certificate Authority (CA) before their scheduled expiration date and should no longer be trusted. A problem with contacting the CA for this list is that the browser cannot confirm whether it has reached the CA’s servers or if an attacker has intercepted the connection to bypass the revocation check.
Local CRL is relative to typical CRL (or online CRL). For typical CRL, the client needs to download the CLR from a CRL distribution point. If the client is unable to download the CRL, then by default, the client trusts the certificate. Contrary to typical CRL, Local CRL maintains a list of revoked certificates locally in import memory for DPI-SSL to verify whether the certificate has been revoked.
For further information about this feature, see SonicWall SonicOS 6.5 System Setup or contact Technical Support.
Enhanced DPI-SSL Certificate VerificationThere are two types of certificate authorities (CAs): root CAs and intermediate CAs. For an SSL certificate to be trusted, that certificate must have been issued by a CA that is included in the trusted store of the device that is connecting. The list of SSL certificates, from the root certificate to the end-user certificate, represents the SSL certificate chain.
SonicWall SonicOS 6.5.2.1Release Notes
6
This feature allows DPI-SSL to verify the certificate chain if the intermediate certificate is not in the trusted root CAs stored by DPI-SSL. Verifying a certificate chain is the process of ensuring that a specific certificate chain is well-formed, valid, correctly signed, and trustworthy.
Support for ECDSA-Related CiphersPreviously, DPI-SSL Client supported only RSA-related ciphers, such as TLS_ECDHE_RSA_WITH_AES_128_GCM_SHA256. DPI-SSL Client now supports ECDSA (Elliptic Curve Digital Signature Algorithm) ciphers:
• TLS_ECDHE_ECDSA_WIATH_AES_128_GCM_SHA256
• TLS_ECDH_RSA_WITH_AES_128_GCM_SHA256
DPI-SSL and CFS HTTPS Content Filtering now Work IndependentlyPreviously, DPI-SSL and CFS HTTPS content filtering were mutually exclusive and could not be enabled together. Now, both features can be enabled at the same time and function as follows:
• If DPI-SSL Client Inspection is disabled, Content Filter Service filters HTTPS connections.
• If DPI-SSL Client Inspection is enabled, but the Content Filter option is not selected, Content Filter Service filters HTTPS connections.
• If DPI-SSL Client Inspection is enabled and the Content Filter option is selected, CFS does not filter HTTPS connections.
Blocking of SSH X11 ForwardingX is a popular window system for Unix workstations. Using X, a user can run remote X applications that open their windows on the user’s local display (and vice versa, running local applications on remote displays). If the remote server is outside after a firewall and administrator have blocked remote connections, user can still use SSH tunneling to get the X display on a local machine. A user can thus circumvent the application-based security policies on the firewall, thereby creating security risks.
As X protocol sessions between applications and X servers are not encrypted while being transmitted over a network, an X11 protocol connection can be routed through an SSH connection to provide security and stronger authentication. This feature is called X11 forwarding
An SSH client requests X forwarding when it connects to an SSH server (assuming X forwarding is enabled in the client). If the server allows X forwarding for this connection, login proceeds normally, but the server takes some special steps behind the scenes. In addition to handling the terminal session, the server sets itself up as a proxy X server running on the remote machine and sets the DISPLAY environment variable in the remote shell to point to the proxy X display. If an X client program is run, it connects to the proxy. The proxy behaves just like a real X server, and in turn instructs the SSH client to behave as a proxy X client, connecting to the X server on the local machine. The SSH client and server then cooperate to pass X protocol information back and forth over the SSH pipe between the two X sessions, and the X client program appears on your screen just as if it had connected directly to your display.
DPI-SSH X11 forwarding supports the following clients:
• SSH client for Cygwin
• Putty
• secureCRT
• SSH on Ubutu
• SSH on centos
DPI-SSH X11 Forwarding supports the SSH servers on
• Fedora
SonicWall SonicOS 6.5.2.1Release Notes
7
• Ubuntu
SSH X11 Forwarding supports both route mode and wire mode. For:
• Wire mode, SSH X11 Forwarding is only supported in the secure (active DPI of inline traffic) mode.
• Route mode, there is no limitation.
The maximum number of connections supported for SSH X11 Forwarding is same as for DPI-SSH: 1000.
DPI-SSH X11 Forwarding requires a valid SonicWall DPI-SSH license.
To block SSH X11 forwarding:
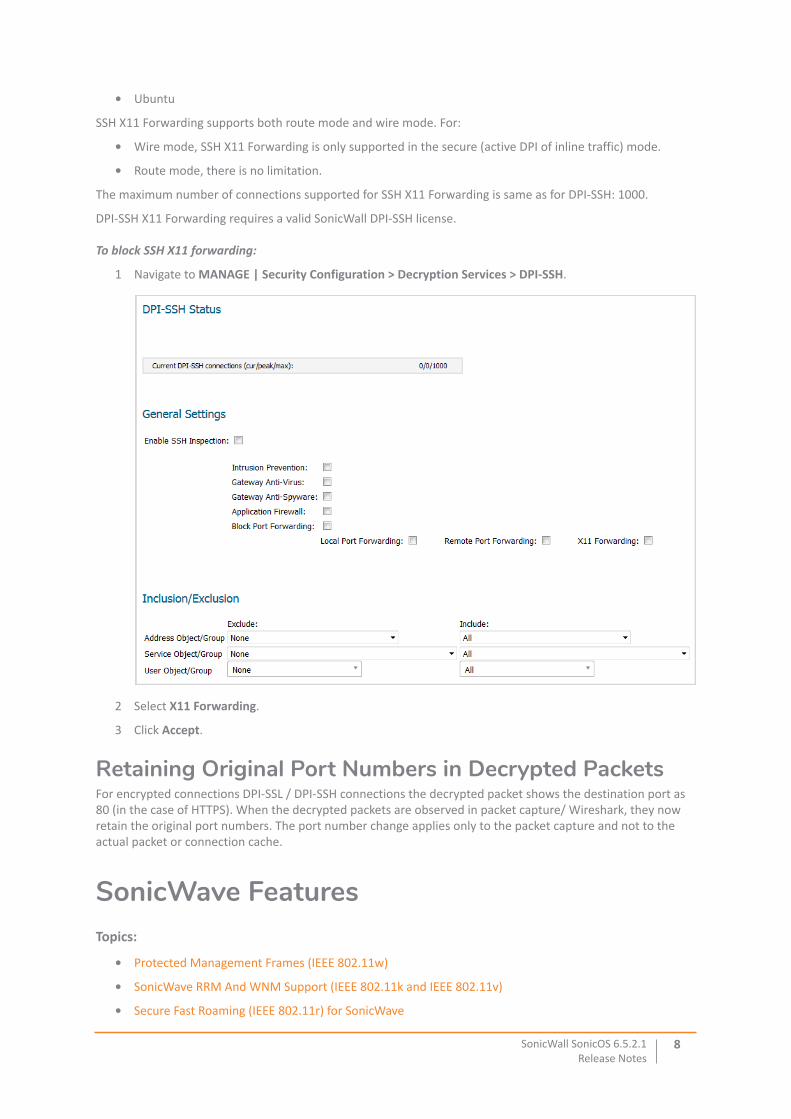
1 Navigate to MANAGE | Security Configuration > Decryption Services > DPI-SSH.
2 Select X11 Forwarding.
3 Click Accept.
Retaining Original Port Numbers in Decrypted PacketsFor encrypted connections DPI-SSL / DPI-SSH connections the decrypted packet shows the destination port as 80 (in the case of HTTPS). When the decrypted packets are observed in packet capture/ Wireshark, they now retain the original port numbers. The port number change applies only to the packet capture and not to the actual packet or connection cache.
SonicWave FeaturesTopics:
• Protected Management Frames (IEEE 802.11w)
• SonicWave RRM And WNM Support (IEEE 802.11k and IEEE 802.11v)
• Secure Fast Roaming (IEEE 802.11r) for SonicWave
SonicWall SonicOS 6.5.2.1Release Notes
8
• KRACK Detection and Prevention
• Advanced LTE Modem Support
• Firmware Management Support
• Load Balancing among Multiple USB Modems
• RSSI Threshold Support
• RADIUS Server Authentication Cache
Protected Management Frames (IEEE 802.11w)WLAN is vulnerable to attacks because all wireless devices share the same wireless medium. Attackers can easily monitor and spoof wireless frames. To resolve the security problem, IEEE developed WEP as the authentication and encryption method, which has now been replaced by 802.11i, which uses 802.1X for authentication and CCMP for encryption.
If frames are encrypted, even though attackers can still capture frames, they cannot decrypt frames to obtain the initial data. However, 802.11i can only protect data frames. Management frames such as authentication, de-authentication, association, dissociation, beacons, and probes are used by wireless clients to initiate and tear down sessions for network services. Unlike data traffic, which can be encrypted to provide a level of confidentiality, these frames must be heard and understood by all clients and therefore must be transmitted as open or unencrypted. While these frames cannot be encrypted, they must be protected from forgery to protect the wireless medium from attacks. For example, if an attacker obtains the MAC address of a client, it can send a disassociation request to the client in the name of an AP, or send a reassociation request to an AP in the name of the client. The client is logged off in either situation.
IEEE 802.11w-2009 is an approved amendment to the IEEE 802.11 standard to protect wireless management frames. It is also known as the Protected Management Frames (PMF) standard. The 802.11w protocol applies only to a set of robust management frames that are protected by the Protected Management Frames (PMF) service. These include Disassociation, De-authentication, and Robust Action frames. 802.11w protects only specific management frames and does not affect the communication between APs and clients. 802.11w can only take effect when both APs and clients have 802.11w enabled.
802.11w provides the following benefits:
802.11w protects only specific management frames and does not affect the communication between APs and clients. It can only take effect when both APs and clients have 802.11w enabled.
Confidentiality Encrypts unicast management frames:
• Uses same PTK as for data frames
• Protects the previously unencrypted frame header via additional authentication data (AAD)
• Extended AES-CCM to handle unicast management frames
• Separate Receive Sequence Counter (RSC) for replay protection
Group addressed frame protection
Broadcast/Multicast Integrity Protocol (BIP) protects the integrity of broadcasts and multi casts, prevents replay attacks, and protects clients from spoofing broadcast/multicast attacks. For Broad-/Multi casts Management Frames:
• Uses new Integrity Group Temporal Key (IGTK) received during WPA key handshake
• New Algorithm: Broadcast Integrity Protocol (BIP)
• New Information Element: Management MIC IE with Sequence Number + Cryptographic Hash (AES128-CMAC based)
Connection protection Security Association (SA) Query can prevent clients from going offline caused by spoofing re-association requests.
SonicWall SonicOS 6.5.2.1Release Notes
9
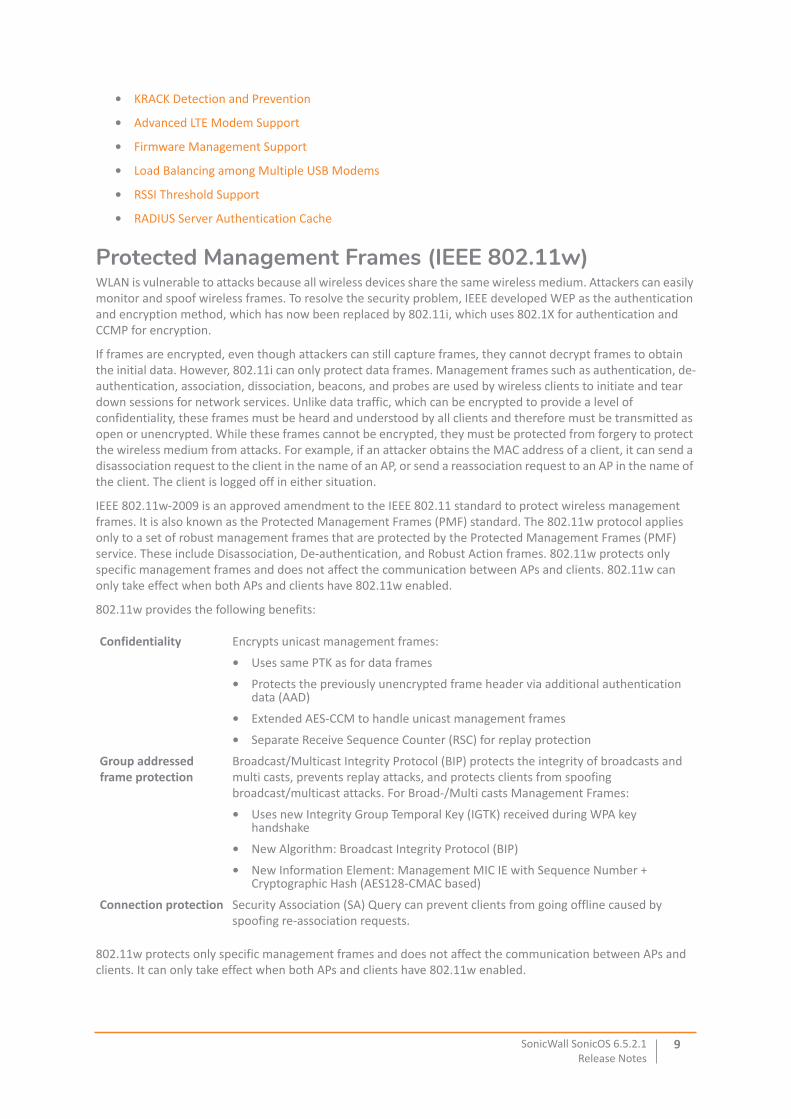
To enable 802.11w protected management frames:
1 Navigate to MANAGE | Connectivity > Access Points > Base Settings.
2 Scroll to the SonicPoint/SonicWave Provisioning table.
3 Click the Configure icon for SonicWave. The Edit SonicWave Profile – SonicWave dialog displays.
4 Click 5GHz Radio Basic.
5 Scroll to Wireless Security.
6 For Authentication Type, select a WPA-related authentication type.
7 From PMF Option, select either:
• Enabled – The service is optional for clients.
• Required – Clients must enable the service before connecting to the AP.
8 Click 2.4GHz Radio Basic.
9 Repeat Step 5 through Step 7.
10 Click OK.
SonicWave RRM And WNM Support (IEEE 802.11k and IEEE 802.11v)Wireless LAN (WLAN) Radio Measurements enable Stars to understand the radio environment in which they exist through observation and data gathering on radio link performance and on the radio environment. A STA may choose to make measurements locally, request a measurement from another STA, or may be requested by another STA to make one or more measurements and return the results. Radio Measurement data is made available to STA management and upper protocol layers where it may be used for a range of applications. The measurements enable adjustment of STA operation to better suit the radio environment. The Radio Measurement service includes measurements that extend the capability, reliability, and maintainability of
IMPORTANT: For protected management frames to function, the authentication type must be a WPA-related type.
SonicWall SonicOS 6.5.2.1Release Notes
10
WLANs by providing standard measurements across vendors, and the service provides the resulting measurement data to upper layers in the communications stack.
In addition to featuring standard measurements and delivering measurement information to upper layers, there are applications, such as VoIP, video over IP, and location-based applications, that require quantifiable radio environment measurements to attain the necessary performance levels.
To address the mobility requirements of technologies, such as VoIP and video streaming, Radio Measurements, such as Channel Load request/report and the Neighbor Request/report, may be used to collect transition information, which can drastically speed up hand offs between BSSs within the same ESS. By accessing and using this information, the STAs (either in APs or in non-AP STAs) can make intelligent decisions about the most effective way to utilize the available spectrum, power, and bandwidth for their communications.
IEEE 802.11 Wireless Network Management (Amendment 8) is an amendment to the IEEE 802.11 standard to allow configuration of client devices while connected to wireless networks. Stations that support WNM (Wireless Network Management) can exchange information with each other (Access Points and wireless clients) to improve their performance of the wireless network. 802.11v allows client devices to exchange information about the network topology, including information about the RF environment, making each client network aware, facilitating overall improvement of the wireless network.
Stations use WNM protocols to exchange operational data so that each station is aware of the network conditions, allowing stations to be more cognizant of the topology and state of the network. WNM protocols provide a means for Stations to be aware of the presence of collocated interference, and enable stations to manage RF parameters based on network conditions.
In addition to providing information on network conditions, WNM also provides a means to exchange location information, provide support for multiple BSSID capability on the same wireless infrastructure, support efficient delivery of group addressed frames, and enable a WNM-Sleep mode in which a STA can sleep for long periods without receiving frames from the AP.
The Neighbor Report request is sent from a client to an AP. The AP returns a Neighbor Report report containing information about neighboring APs that are known candidates for the client to reassociate with (should the client choose to do so). Therefore, the Neighbor Report request/report pair enables the client to collect information about the neighboring APs of the AP it is currently associated to, and this information may be used as identification of potential candidates for a new point of attachment while roaming.
The benefits of the neighbor/request report are:
• Speeds up scanning – Instead of the client engaging in time-consuming scanning activity (either actively probing for APs or passively listening to every channel for beacons), the client can instead narrow its list to the known available neighbors. This is especially useful in high-density environments where multiple WLANs can be heard by the client
• Reduces client power consumption – The time taken by scanning (especially active scanning) also consumes battery power for the client. As the neighbor report provides information before roaming, less power may be consumed
• More efficient use of WLAN air time – Active scanning is not only time consuming from the perspective of client resources (such as CPU, memory, radio), it's also air-time consuming. For example, a client that is not neighbor aware will likely engage in so-called wildcard probe requests (some clients will burst these). In this scenario, typically every AP that hears the probe request generates a probe response. In other words, for a single client, N number of APs generate N probe responses. If multiple clients engage in wildcard probing, then the RF environment can quickly become polluted with management traffic simply because the clients are not using neighbor request. This has a negative impact for the entire WLAN.
BSS Max idle period management has been supported by our SonicPoints. SonicWave supports two more WNM services to improve the performance of wireless network.
• BSS transition management – Enables an AP to request a voice client to transition to a specific AP, or suggest a set of preferred APs to a voice client, due to network load balancing or BSS termination. This helps the voice client identify the best AP to which that client should transition to as that client roams.
The BSS Transition capability can improve throughput, data rates and QoS for the voice clients in a network by shifting (via transition) the individual voice traffic loads to more appropriate points of association within the ESS.
SonicWall SonicOS 6.5.2.1Release Notes
11
802.11v BSS Transition Management Request is a suggestion given to the client. The client can make its own decision whether to follow the suggestion or not.
Frame Types; BSS Transition Management uses these frame types:
• Query – A Query frame is sent by the voice client that supports BSS transition management requesting a BSS transition candidate list to its associated AP, if the associated AP indicates that it supports the BSS transition capability.
• Request – An AP that supports BSS Transition Management responds to a BSS Transition Management Query frame with a BSS Transition Management Request frame. The AP may also send an unsolicited BSS Transition Management Request frame to a voice client at any time, if the client supports the BSS Transition Management capability. The Request frame also contains a Disassociation flag. If the flag is set, then the AP forcefully disassociates the client after specified interval.
• Response – A Response frame is sent by the voice client back to the AP, informing whether it accepts or denies the transition.
802.11k and 802.11v Clients – For 802.11k capable clients, the client management framework uses the actual beacon report generated by the client in response to a beacon report request sent by the AP. This beacon report replaces the virtual beacon report for that client. For 802.11v capable clients, the controller uses the 802.11v BSS Transition message to steer clients to the desired AP upon receiving a client steer trigger from the AP.
• WNM-Sleep mode – An extended power-save mode for non-access point (non-AP) stations (STAs) whereby a non-AP STA need not listen for every delivery traffic indication message (DTIM) Beacon frame, and does not perform group temporal key/integrity group temporal key (GTK/IGTK) updates.
WNM-Sleep mode enables a non-AP STA to signal to an AP that it will be sleeping for a specified time. This enables a non-AP STA to reduce power consumption and remain associated while the non-AP STA has no traffic to send to or receive from the AP.
To enable RRM And WNM support in a SonicWave provisioning profile:
1 Navigate to MANAGE | Connectivity > Access Points > Base Settings.
2 Scroll to the SonicPoint/SonicWave Provisioning table.
3 Click the Configure icon for SonicWave. The Edit SonicWave Profile – SonicWave dialog displays.
IMPORTANT: If the WNM-Sleep mode is enabled and the station supports WNM-Sleep mode, update the station to avoid Key Reinstallation Attack.
SonicWall SonicOS 6.5.2.1Release Notes
12
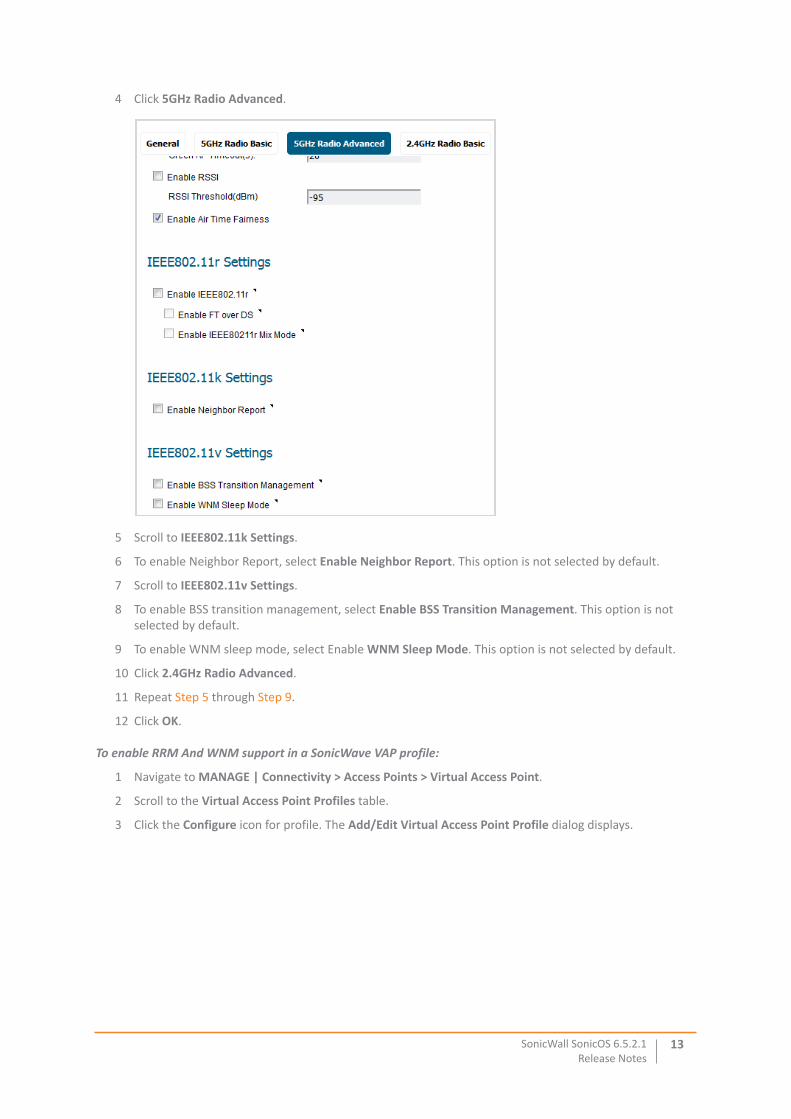
4 Click 5GHz Radio Advanced.
5 Scroll to IEEE802.11k Settings.
6 To enable Neighbor Report, select Enable Neighbor Report. This option is not selected by default.
7 Scroll to IEEE802.11v Settings.
8 To enable BSS transition management, select Enable BSS Transition Management. This option is not selected by default.
9 To enable WNM sleep mode, select Enable WNM Sleep Mode. This option is not selected by default.
10 Click 2.4GHz Radio Advanced.
11 Repeat Step 5 through Step 9.
12 Click OK.
To enable RRM And WNM support in a SonicWave VAP profile:
1 Navigate to MANAGE | Connectivity > Access Points > Virtual Access Point.
2 Scroll to the Virtual Access Point Profiles table.
3 Click the Configure icon for profile. The Add/Edit Virtual Access Point Profile dialog displays.
SonicWall SonicOS 6.5.2.1Release Notes
13
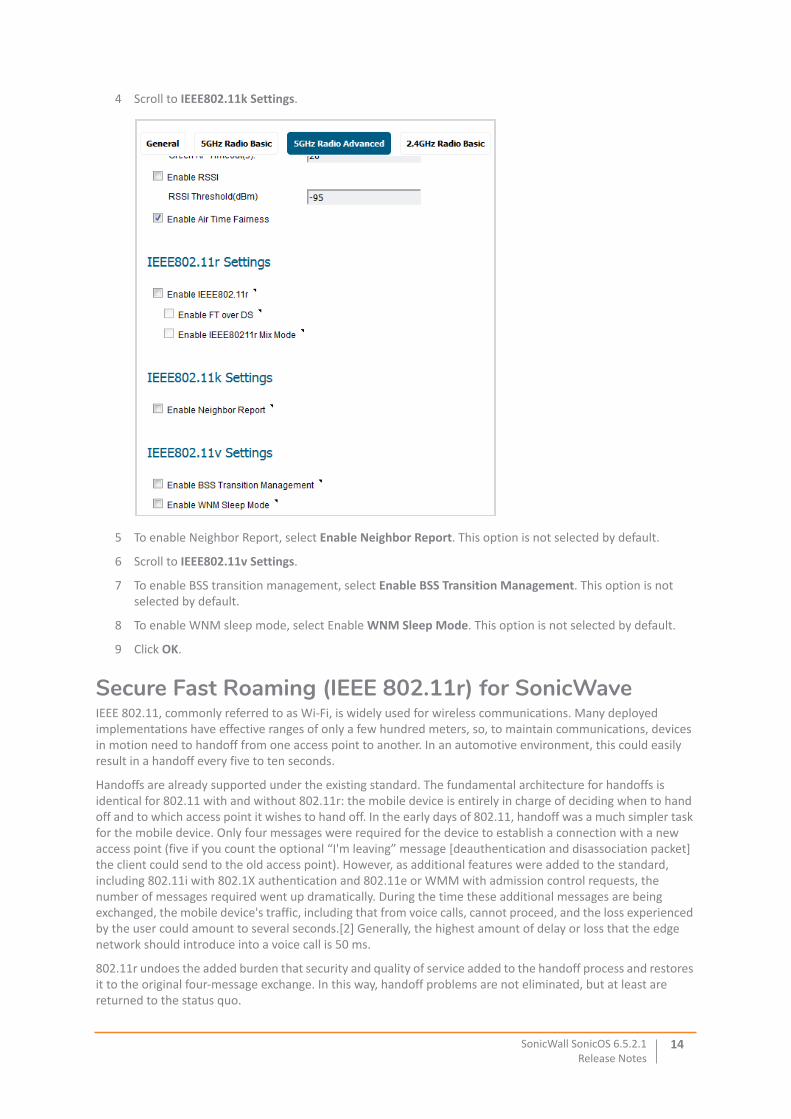
4 Scroll to IEEE802.11k Settings.
5 To enable Neighbor Report, select Enable Neighbor Report. This option is not selected by default.
6 Scroll to IEEE802.11v Settings.
7 To enable BSS transition management, select Enable BSS Transition Management. This option is not selected by default.
8 To enable WNM sleep mode, select Enable WNM Sleep Mode. This option is not selected by default.
9 Click OK.
Secure Fast Roaming (IEEE 802.11r) for SonicWaveIEEE 802.11, commonly referred to as Wi-Fi, is widely used for wireless communications. Many deployed implementations have effective ranges of only a few hundred meters, so, to maintain communications, devices in motion need to handoff from one access point to another. In an automotive environment, this could easily result in a handoff every five to ten seconds.
Handoffs are already supported under the existing standard. The fundamental architecture for handoffs is identical for 802.11 with and without 802.11r: the mobile device is entirely in charge of deciding when to hand off and to which access point it wishes to hand off. In the early days of 802.11, handoff was a much simpler task for the mobile device. Only four messages were required for the device to establish a connection with a new access point (five if you count the optional “I'm leaving” message [deauthentication and disassociation packet] the client could send to the old access point). However, as additional features were added to the standard, including 802.11i with 802.1X authentication and 802.11e or WMM with admission control requests, the number of messages required went up dramatically. During the time these additional messages are being exchanged, the mobile device's traffic, including that from voice calls, cannot proceed, and the loss experienced by the user could amount to several seconds.[2] Generally, the highest amount of delay or loss that the edge network should introduce into a voice call is 50 ms.
802.11r undoes the added burden that security and quality of service added to the handoff process and restores it to the original four-message exchange. In this way, handoff problems are not eliminated, but at least are returned to the status quo.
SonicWall SonicOS 6.5.2.1Release Notes
14
The primary application currently envisioned for the 802.11r standard is voice over IP (VOIP) via mobile phones designed to work with wireless Internet networks, instead of (or in addition to) standard cellular networks.
To configure fast transition (IEEE 802.11r):
1 Navigate to MANAGE | Connectivity > Access Points > Virtual Access Point.
2 Scroll to the SonicPoint / SonicWave Provisioning Profiles table.
3 Click the Configure icon for SonicWave. The Edit SonicWave Profile dialog displays.
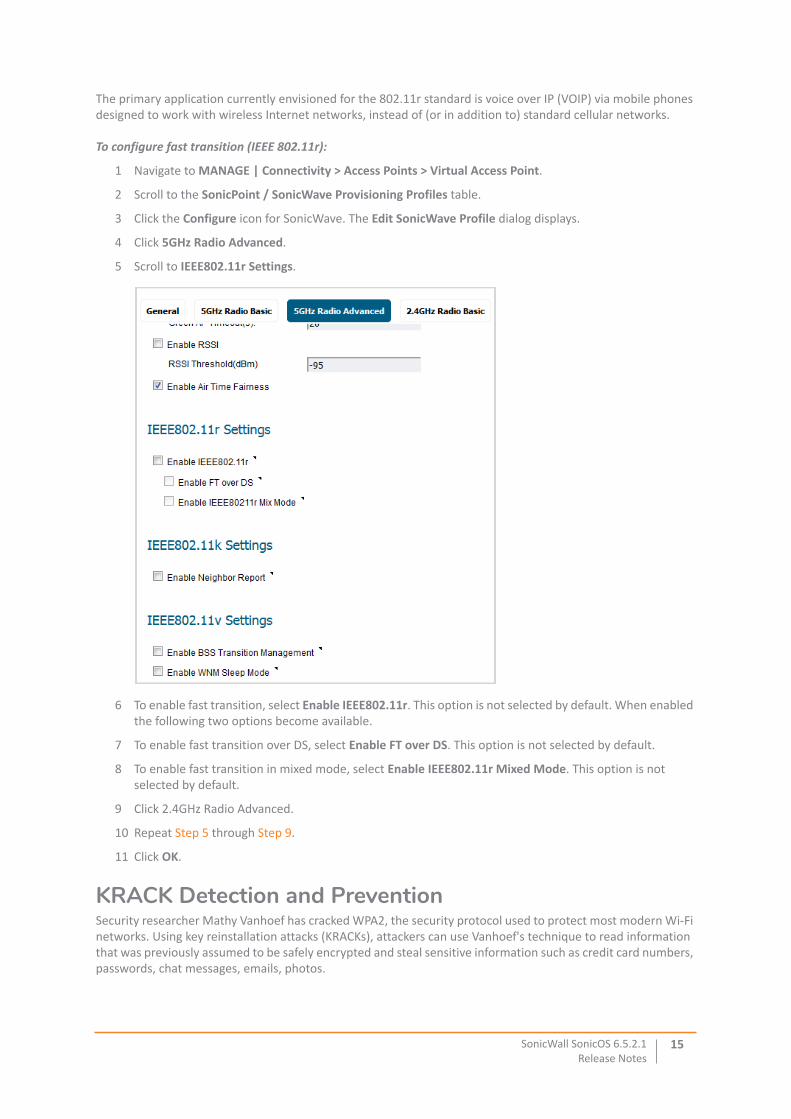
4 Click 5GHz Radio Advanced.
5 Scroll to IEEE802.11r Settings.
6 To enable fast transition, select Enable IEEE802.11r. This option is not selected by default. When enabled the following two options become available.
7 To enable fast transition over DS, select Enable FT over DS. This option is not selected by default.
8 To enable fast transition in mixed mode, select Enable IEEE802.11r Mixed Mode. This option is not selected by default.
9 Click 2.4GHz Radio Advanced.
10 Repeat Step 5 through Step 9.
11 Click OK.
KRACK Detection and PreventionSecurity researcher Mathy Vanhoef has cracked WPA2, the security protocol used to protect most modern Wi-Fi networks. Using key reinstallation attacks (KRACKs), attackers can use Vanhoef's technique to read information that was previously assumed to be safely encrypted and steal sensitive information such as credit card numbers, passwords, chat messages, emails, photos.
SonicWall SonicOS 6.5.2.1Release Notes
15
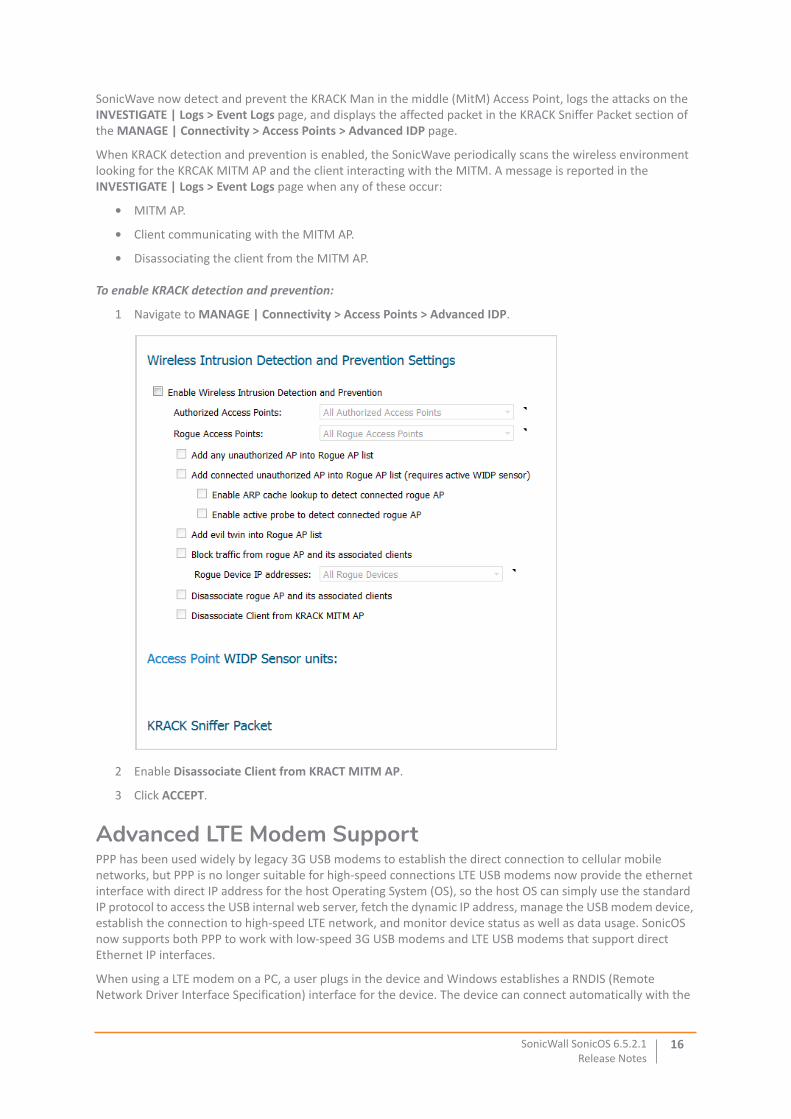
SonicWave now detect and prevent the KRACK Man in the middle (MitM) Access Point, logs the attacks on the INVESTIGATE | Logs > Event Logs page, and displays the affected packet in the KRACK Sniffer Packet section of the MANAGE | Connectivity > Access Points > Advanced IDP page.
When KRACK detection and prevention is enabled, the SonicWave periodically scans the wireless environment looking for the KRCAK MITM AP and the client interacting with the MITM. A message is reported in the INVESTIGATE | Logs > Event Logs page when any of these occur:
• MITM AP.
• Client communicating with the MITM AP.
• Disassociating the client from the MITM AP.
To enable KRACK detection and prevention:
1 Navigate to MANAGE | Connectivity > Access Points > Advanced IDP.
2 Enable Disassociate Client from KRACT MITM AP.
3 Click ACCEPT.
Advanced LTE Modem SupportPPP has been used widely by legacy 3G USB modems to establish the direct connection to cellular mobile networks, but PPP is no longer suitable for high-speed connections LTE USB modems now provide the ethernet interface with direct IP address for the host Operating System (OS), so the host OS can simply use the standard IP protocol to access the USB internal web server, fetch the dynamic IP address, manage the USB modem device, establish the connection to high-speed LTE network, and monitor device status as well as data usage. SonicOS now supports both PPP to work with low-speed 3G USB modems and LTE USB modems that support direct Ethernet IP interfaces.
When using a LTE modem on a PC, a user plugs in the device and Windows establishes a RNDIS (Remote Network Driver Interface Specification) interface for the device. The device can connect automatically with the
SonicWall SonicOS 6.5.2.1Release Notes
16
ISP and provide Internet access for the host in seconds without manual interference. SonicOS maintains this ease-of-use for Hi-Link modems and also consistency with legacy modems.
When a LTE USB modem is connected to a SonicWall security appliance, SonicOS detects the model and displays a U0 interface in the MANAGE | System Setup > Network > Interfaces page. This interface belongs to the WAN zone by default and can be used for Failover and Load Balancing as well as for configuring the LTE connection, profiles and advanced settings.
When configuring a non-PPP connection profile on the 3G/4G/LTE Configuration dialog (MANAGE | Connectivity > 3G/4G/LTE > Connection Profiles), the Preferred Network Technology option replaces the Connection Type, Dialed Number, User Name, and User Password options.
When a LTE modem is detected, it is displayed on the MONITOR | Current Status > 3G/4G/LTE Status page. You configure the modem settings on this page.
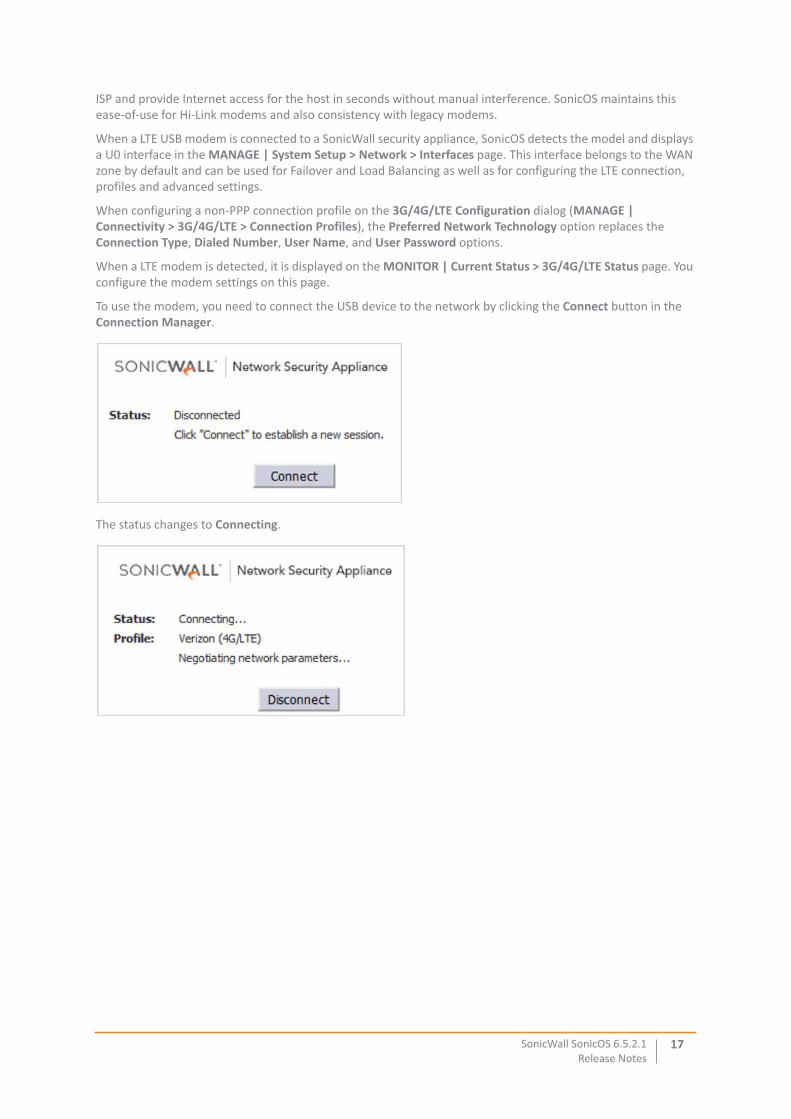
To use the modem, you need to connect the USB device to the network by clicking the Connect button in the Connection Manager.
The status changes to Connecting.
SonicWall SonicOS 6.5.2.1Release Notes
17
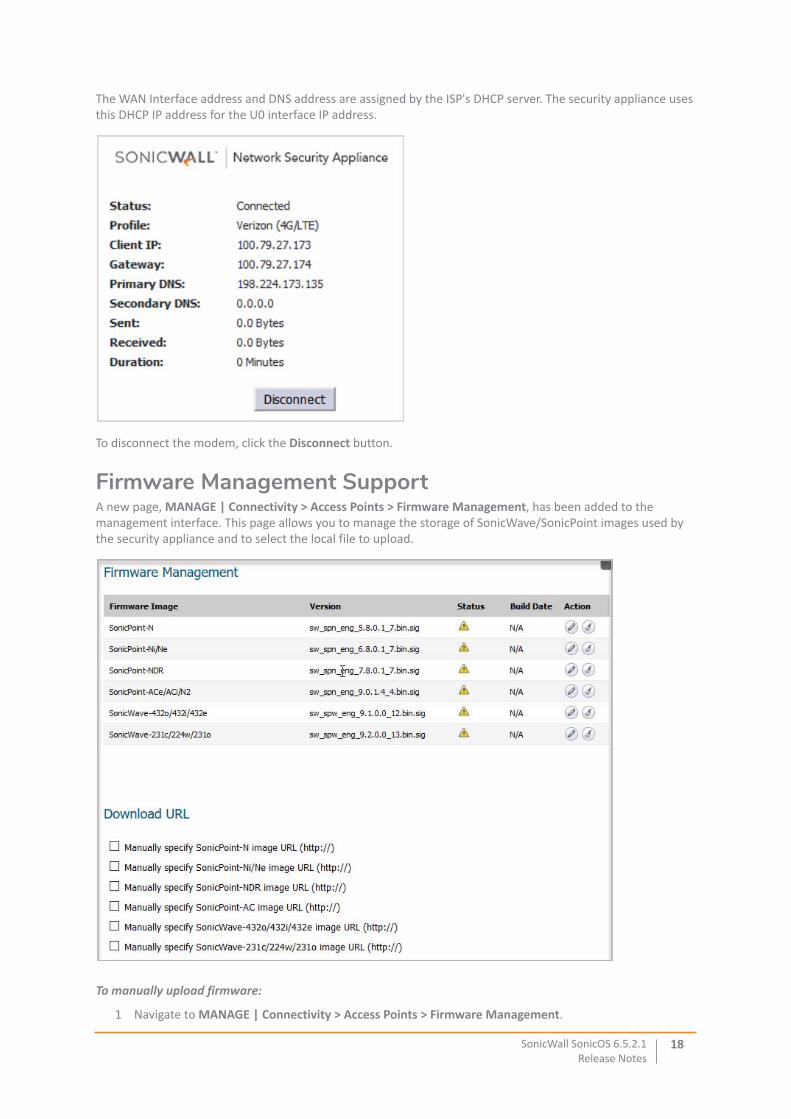
The WAN Interface address and DNS address are assigned by the ISP's DHCP server. The security appliance uses this DHCP IP address for the U0 interface IP address.
To disconnect the modem, click the Disconnect button.
Firmware Management Support A new page, MANAGE | Connectivity > Access Points > Firmware Management, has been added to the management interface. This page allows you to manage the storage of SonicWave/SonicPoint images used by the security appliance and to select the local file to upload.
To manually upload firmware:
1 Navigate to MANAGE | Connectivity > Access Points > Firmware Management.
SonicWall SonicOS 6.5.2.1Release Notes
18
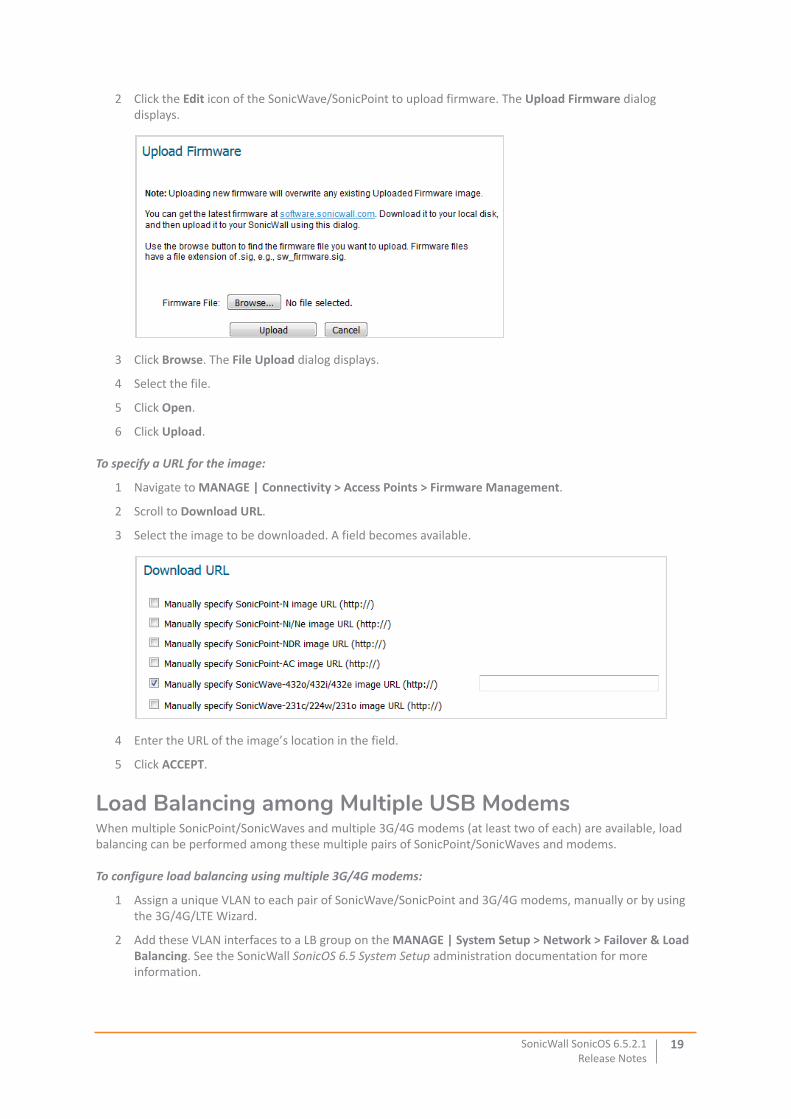
2 Click the Edit icon of the SonicWave/SonicPoint to upload firmware. The Upload Firmware dialog displays.
3 Click Browse. The File Upload dialog displays.
4 Select the file.
5 Click Open.
6 Click Upload.
To specify a URL for the image:
1 Navigate to MANAGE | Connectivity > Access Points > Firmware Management.
2 Scroll to Download URL.
3 Select the image to be downloaded. A field becomes available.
4 Enter the URL of the image’s location in the field.
5 Click ACCEPT.
Load Balancing among Multiple USB ModemsWhen multiple SonicPoint/SonicWaves and multiple 3G/4G modems (at least two of each) are available, load balancing can be performed among these multiple pairs of SonicPoint/SonicWaves and modems.
To configure load balancing using multiple 3G/4G modems:
1 Assign a unique VLAN to each pair of SonicWave/SonicPoint and 3G/4G modems, manually or by using the 3G/4G/LTE Wizard.
2 Add these VLAN interfaces to a LB group on the MANAGE | System Setup > Network > Failover & Load Balancing. See the SonicWall SonicOS 6.5 System Setup administration documentation for more information.
SonicWall SonicOS 6.5.2.1Release Notes
19
RSSI Threshold SupportSome areas are large enough to require multiple access points to provide good Wi-Fi coverage across the whole area. Most people expect their Wi-Fi client (laptop or tablet) to detect and move to the closest access point. Unfortunately, many Wi-Fi clients do not exhibit this expected behavior. Instead, they tend to hang on to the original access point they associated with, rather than moving to a nearby access point that would generally be a better choice for them. This behavior is referred to as sticky behavior and results in a low RSSI (Received Signal Strength Indicator) and a high SNR (Signal-to-Noise Ratio). The farther away from the original access point the client moves, its RSSI gets weaker, SNR gets worse, retransmissions occur, dynamic rate-shifting happens, and the client communicates at a much lower data-rate. A lower data-rate consumes more air-time to transfer the same information, resulting in higher channel utilization. Ideally, the client would roam to the closest access point, and the resulting RF space would be better for everyone. SonicOS solves the problem with optimized roaming, where when the client reaches either a certain RSSI, Data-Rate, or both, the access point disassociates from the client and the client then associates to the closer access point. The RSSI is from the perspective of the access point. Both RSSI and Data-rate are configurable.
RSSI measurements represent the relative quality of a received signal on a device. RSSI indicates the power level being received after any possible loss at the antenna and cable level. The higher the RSSI value, the stronger the signal. When measured in negative numbers, the number that is closer to zero usually means better signal. As an example -50 is a pretty good signal, -75 is fairly reasonable, and -100 is no signal at all.
Even though RSSI and dBm are different units of measurement they both indicate the signal strength. The dBm is a power ratio of the measured power as references to one mW (milliwatt). While dBm is an absolute index, the RSSI is a relative one.
For the meaningful good quality signal measurement subtract the noise on the line from signal power. A higher difference of signal to noise means better WiFi signal strength.
To configure the RSSI threshold:
1 Navigate to MANAGE | Connectivity > Access Points > Base Settings.
2 Scroll to SonicPoint/SonicWave Provisioning Profiles.
3 Click the Edit icon for the SonicPoint/SonicWave. The Edit SonicPoint/SonicWave Profile dialog displays.
SonicWall SonicOS 6.5.2.1Release Notes
20
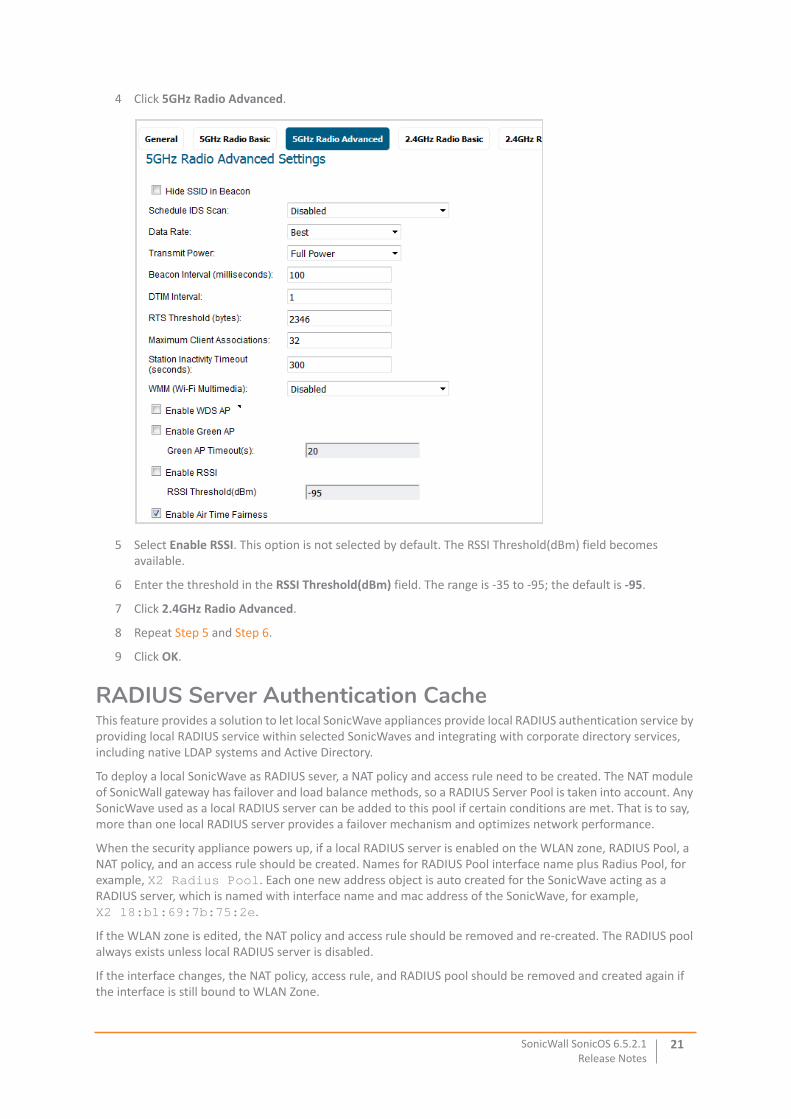
4 Click 5GHz Radio Advanced.
5 Select Enable RSSI. This option is not selected by default. The RSSI Threshold(dBm) field becomes available.
6 Enter the threshold in the RSSI Threshold(dBm) field. The range is -35 to -95; the default is -95.
7 Click 2.4GHz Radio Advanced.
8 Repeat Step 5 and Step 6.
9 Click OK.
RADIUS Server Authentication CacheThis feature provides a solution to let local SonicWave appliances provide local RADIUS authentication service by providing local RADIUS service within selected SonicWaves and integrating with corporate directory services, including native LDAP systems and Active Directory.
To deploy a local SonicWave as RADIUS sever, a NAT policy and access rule need to be created. The NAT module of SonicWall gateway has failover and load balance methods, so a RADIUS Server Pool is taken into account. Any SonicWave used as a local RADIUS server can be added to this pool if certain conditions are met. That is to say, more than one local RADIUS server provides a failover mechanism and optimizes network performance.
When the security appliance powers up, if a local RADIUS server is enabled on the WLAN zone, RADIUS Pool, a NAT policy, and an access rule should be created. Names for RADIUS Pool interface name plus Radius Pool, for example, X2 Radius Pool. Each one new address object is auto created for the SonicWave acting as a RADIUS server, which is named with interface name and mac address of the SonicWave, for example, X2 18:b1:69:7b:75:2e.
If the WLAN zone is edited, the NAT policy and access rule should be removed and re-created. The RADIUS pool always exists unless local RADIUS server is disabled.
If the interface changes, the NAT policy, access rule, and RADIUS pool should be removed and created again if the interface is still bound to WLAN Zone.
SonicWall SonicOS 6.5.2.1Release Notes
21
N-Series Switches SupportTopics:
• About N-Series Switches
• Configuring the N-Series Switch
• Provisioning an N-Series Switch as an Extended Switch
• Significance of Uplink Interfaces
• Provisioning an N-Series Switch
• Configuring an Extended Switch in PortShield
About N-Series SwitchesBeginning with SonicOS 6.5.2.1, all platforms except the NSA 2600 and SOHO W platforms support these Dell® N-Series switches and the N-Series integration:
One of the major pain-points for customers has been the need to manage critical network elements such as the security appliance and switch individually. Dell N-Series switches and Dell N-Series integration allow unified management of both the security appliance and the N-Series switch using the security appliance’s management interface and GMS. With Dell N-Series integration, ports on the N-Series switch can be viewed as extended interfaces of the security appliance, thereby increasing the number of available interfaces.
One fundamental difference between N-Series switches and N-Series integration, is the method by which the switch is programmed by the security appliance;
• N-Series integration uses XML API as the mechanism for the security appliance to push/retrieve configuration to/from the switch.
• N-Series integration uses CLI as the mechanism to configure the switch and retrieve config from the switch.
The functionality of the N-Series integration supported SonicWall security appliance platforms is on a par with the feature set of the N-Series integration supported on these platforms and is similar to the Dell X-Series Switch Solution. In SonicOS 6.5.2, a maximum of four N-Series switches is supported. In the scenario where both N-series switches are integrated with the same firewall, a maximum of four N-series switches combined can be supported. Daisy-chaining of N-series switches is also supported.
Below are the key set of features supported with the initial phase of Dell Switch Integration solution:
• Provisioning of N-Series Switch as Extended Switch
• PortShield Functionality
• Configuration of N-Series Switch Interface Settings
• Manageability of basic N-Series Switch Global Parameters
• Manageability of Extended Switch using GMS
N1100 • N1108T-ON • N1108P-ON
• N1124T-ON • N1124P-ON
• N1148T-ON • N1148P-ON
N1500 • N1524 • N1524P
• N1548 • N1548P
N2000 • N2024 • N2024P
• N2048 • N2048P
• N2128PX-ON
N3000 • N3024 • N3024P • N3024F
• N3048 • N3048P
• N3132PX-ON
SonicWall SonicOS 6.5.2.1Release Notes
22
• High Availability plus PortShield
• Diagnostics Support for N-Series switch
• Daisy-Chaining of N-Series switches
Configuring the N-Series SwitchN-Series switches delivered from the factory by default have no IP address configured and DHCP enabled. For example, the configuration from a N1524 switch booted from default settings:
console#show running-config
!Current Configuration:!System Description "Dell Networking N1524, 6.2.5.3, Linux 3.6.5"!System Software Version 6.2.5.3!configurestackmember 1 1 ! N1524exitinterface vlan 1ip address dhcpexitsnmp-server engineid local 800002a203f48e3807701eexit
console#
After the N-Series switch reboots, you can configure the initial setup using the Dell Easy Setup Wizard. The wizard guides you through the initial switch configuration and gets you up and running as quickly as possible.
For how to configure the N-Series switch with the Dell Easy Setup Wizard, see the Dell Getting Started Guide for your switch.
Provisioning an N-Series Switch as an Extended SwitchTo add an N-Series switch as an external, extended switch to your SonicWall security appliance, you must enable SSH on the N-Series switch and enter the following commands:
console(config)#crypto key generate dsaconsole(config)#crypto key generate rsaconsole(config)#ip ssh serverconsole(config)#crypto certificate 1 generateconsole(config-crypto-cert)#key-generateconsole(config-crypto-cert)#exit
NOTE: You can exit the setup wizard at any point by entering Ctrl Z.
TIP: You can skip the setup wizard, and enter CLI mode to manually configure the switch.
IMPORTANT: You must respond to this question to run the setup wizard within 60 seconds:
Would you like to run the setup wizard (you must answer this question within 60 seconds)? (y/n) y
Otherwise, the system continues with normal operation using the default system configuration. Reset the switch with an empty startup configuration to rerun the Dell Easy Setup Wizard.
NOTE: Be aware of the Reserved VLAN ID limitations when adding an external switch. An external switch cannot be added if any virtual interfaces are using VLAN IDs within the reserved range.
SonicWall SonicOS 6.5.2.1Release Notes
23
For full configuration information on the N-Series switch, see http://www.dell.com/support/article/us/en/19/how10399/how-to-set-up-management-access-for-the-n2000-n3000-and-n4000-series-switches?lang=en
Significance of Uplink Interfaces Uplink Interfaces can be viewed as trunk ports setup to carry tagged/untagged traffic. When an Extended Switch is added with firewall uplink and switch uplink parameters, the port on the security appliance configured as the firewall uplink and the port on the extended switch configured as the switch uplink are setup to receive/send tagged traffic for all IDV VLANs automatically. The IDV VLAN of the tagged traffic allows SonicOS to derive the ingress interface, that is, the PortShield host interface, for the traffic.
When configuring an interface as a firewall uplink, the interface:
• Should be a physical interface; virtual interfaces are not allowed.
• Should be a switch interface (on some platforms, some security appliance interfaces are not connected to the switch; such interfaces are excluded).
• Cannot be a PortShield host (some other security appliance interfaces cannot be portshielded to it) or cannot be a PortShield member (cannot be portshielded to another security appliance interface).
• Cannot be a bridge primary or bridge secondary interface.
• Cannot have any children (it cannot be a parent interface for other child interfaces).
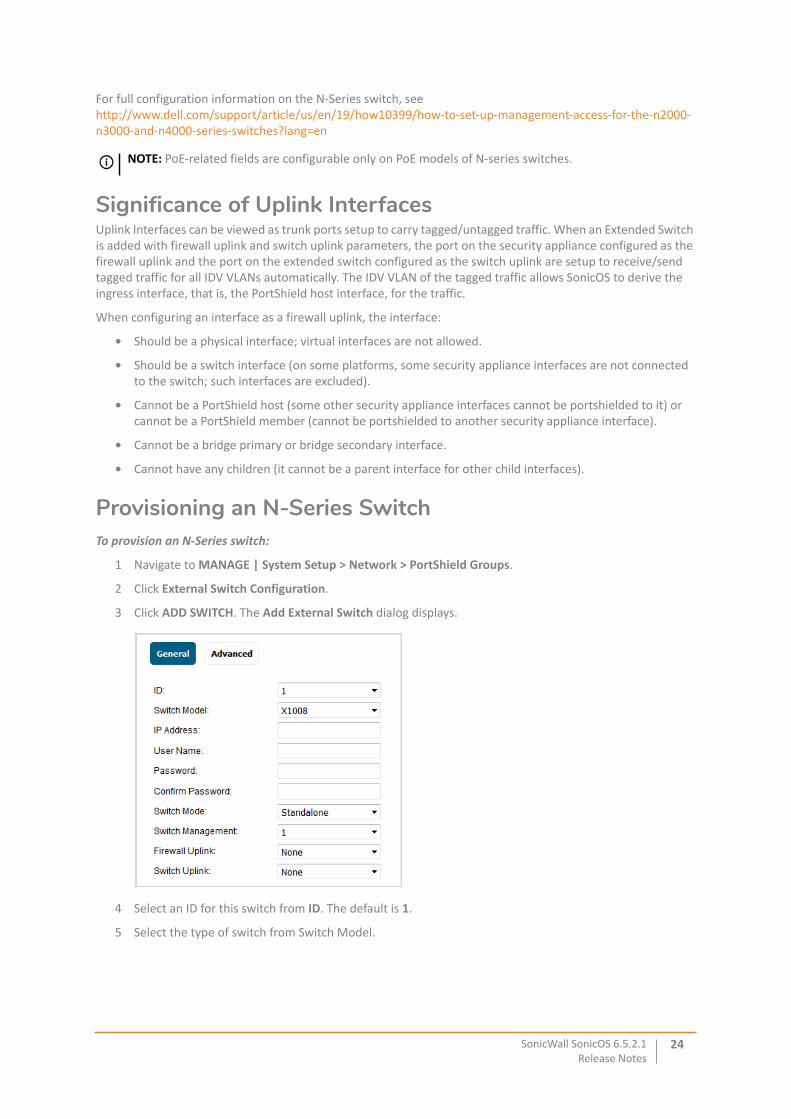
Provisioning an N-Series SwitchTo provision an N-Series switch:
1 Navigate to MANAGE | System Setup > Network > PortShield Groups.
2 Click External Switch Configuration.
3 Click ADD SWITCH. The Add External Switch dialog displays.
4 Select an ID for this switch from ID. The default is 1.
5 Select the type of switch from Switch Model.
NOTE: PoE-related fields are configurable only on PoE models of N-series switches.
SonicWall SonicOS 6.5.2.1Release Notes
24
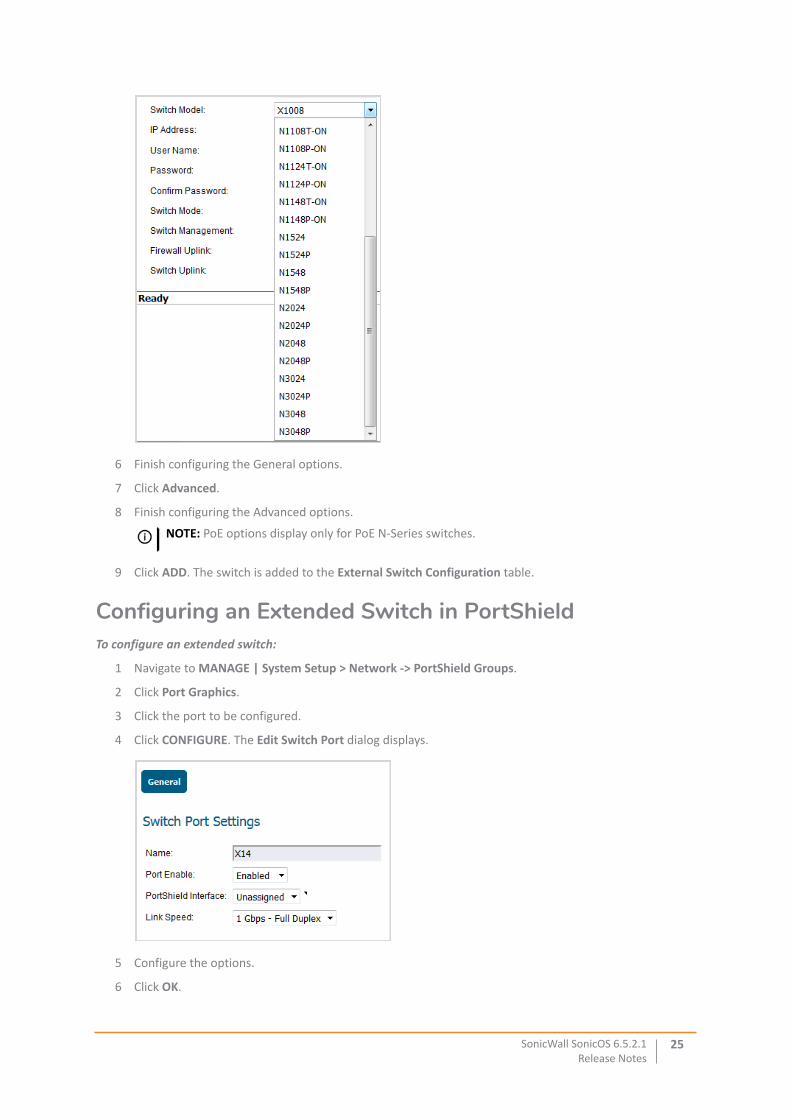
6 Finish configuring the General options.
7 Click Advanced.
8 Finish configuring the Advanced options.
9 Click ADD. The switch is added to the External Switch Configuration table.
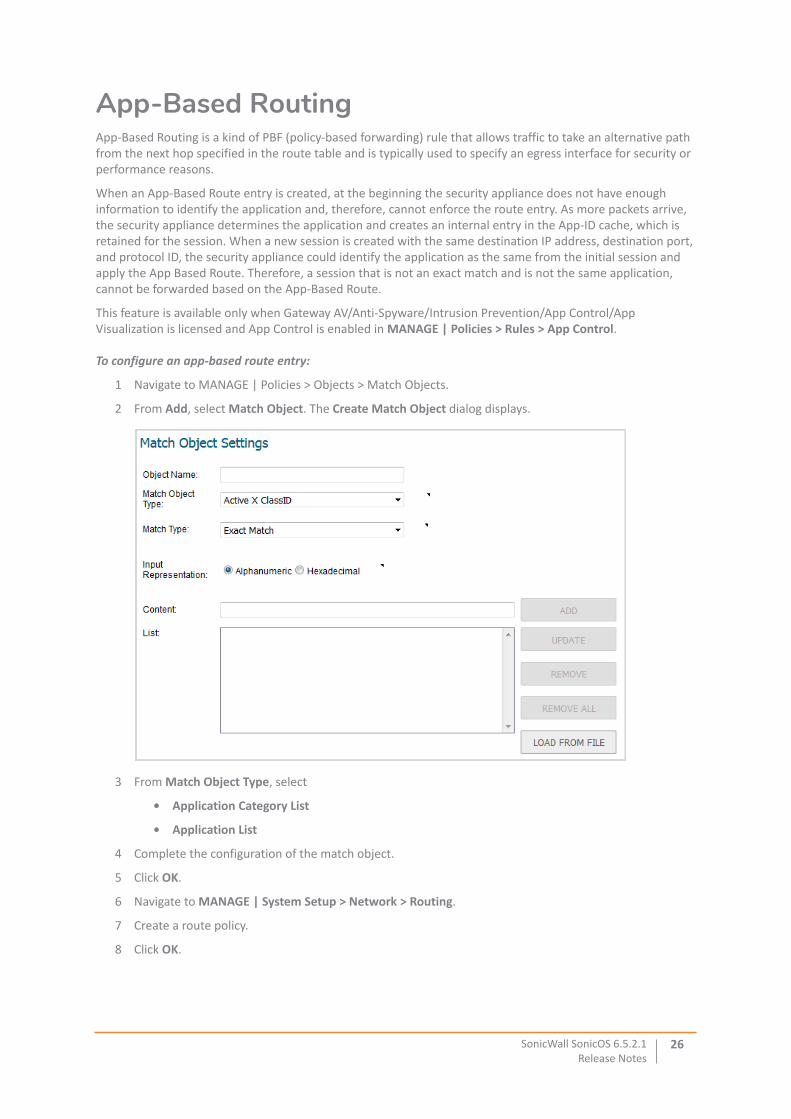
Configuring an Extended Switch in PortShieldTo configure an extended switch:
1 Navigate to MANAGE | System Setup > Network -> PortShield Groups.
2 Click Port Graphics.
3 Click the port to be configured.
4 Click CONFIGURE. The Edit Switch Port dialog displays.
5 Configure the options.
6 Click OK.
NOTE: PoE options display only for PoE N-Series switches.
SonicWall SonicOS 6.5.2.1Release Notes
25
App-Based RoutingApp-Based Routing is a kind of PBF (policy-based forwarding) rule that allows traffic to take an alternative path from the next hop specified in the route table and is typically used to specify an egress interface for security or performance reasons.
When an App-Based Route entry is created, at the beginning the security appliance does not have enough information to identify the application and, therefore, cannot enforce the route entry. As more packets arrive, the security appliance determines the application and creates an internal entry in the App-ID cache, which is retained for the session. When a new session is created with the same destination IP address, destination port, and protocol ID, the security appliance could identify the application as the same from the initial session and apply the App Based Route. Therefore, a session that is not an exact match and is not the same application, cannot be forwarded based on the App-Based Route.
This feature is available only when Gateway AV/Anti-Spyware/Intrusion Prevention/App Control/App Visualization is licensed and App Control is enabled in MANAGE | Policies > Rules > App Control.
To configure an app-based route entry:
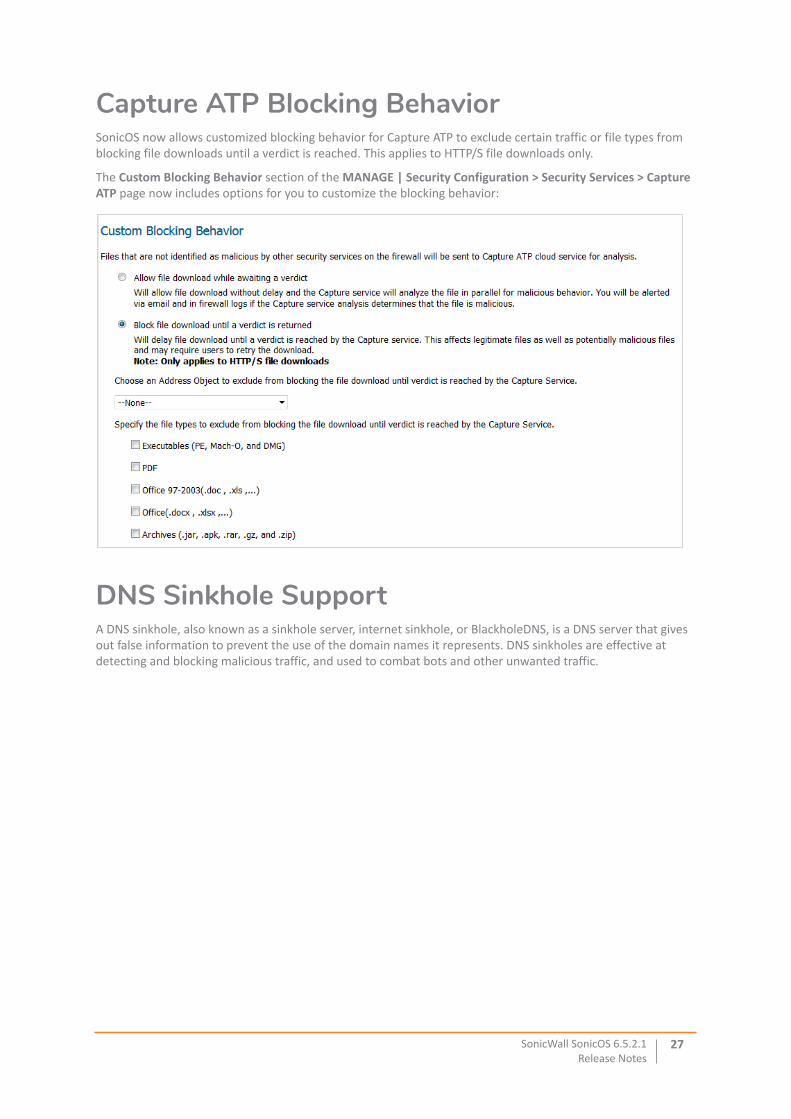
1 Navigate to MANAGE | Policies > Objects > Match Objects.
2 From Add, select Match Object. The Create Match Object dialog displays.
3 From Match Object Type, select
• Application Category List
• Application List
4 Complete the configuration of the match object.
5 Click OK.
6 Navigate to MANAGE | System Setup > Network > Routing.
7 Create a route policy.
8 Click OK.
SonicWall SonicOS 6.5.2.1Release Notes
26
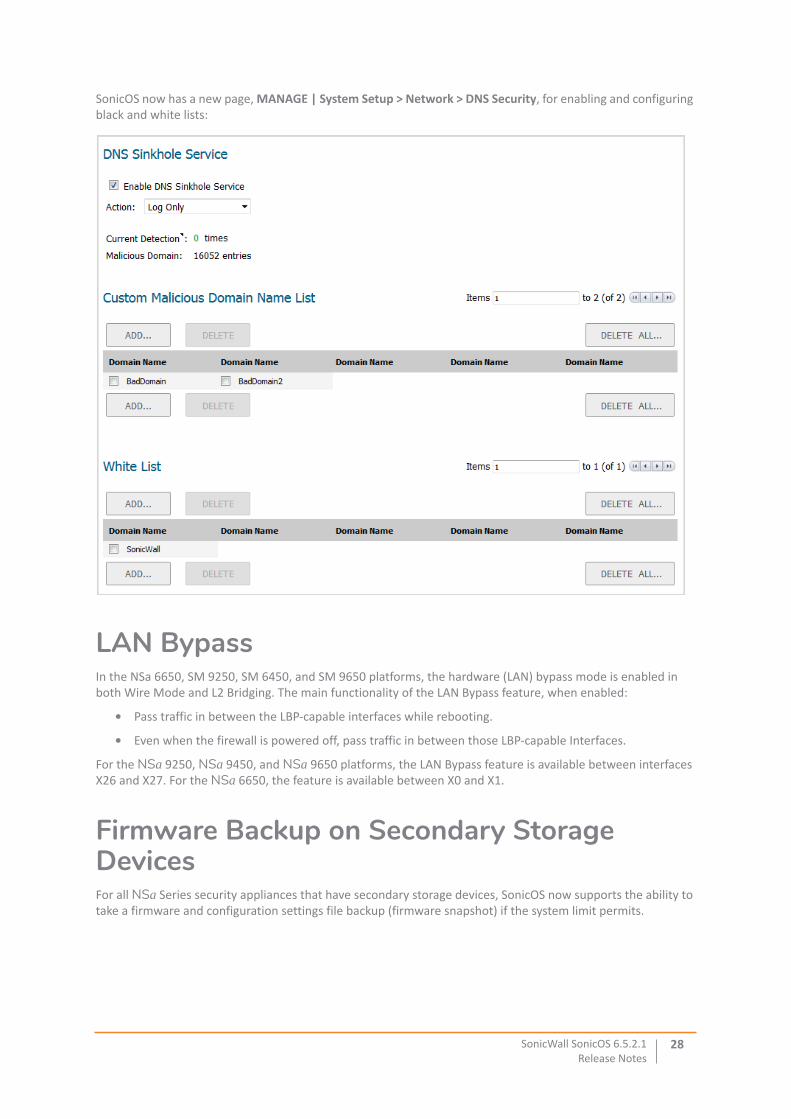
Capture ATP Blocking BehaviorSonicOS now allows customized blocking behavior for Capture ATP to exclude certain traffic or file types from blocking file downloads until a verdict is reached. This applies to HTTP/S file downloads only.
The Custom Blocking Behavior section of the MANAGE | Security Configuration > Security Services > Capture ATP page now includes options for you to customize the blocking behavior:
DNS Sinkhole SupportA DNS sinkhole, also known as a sinkhole server, internet sinkhole, or BlackholeDNS, is a DNS server that gives out false information to prevent the use of the domain names it represents. DNS sinkholes are effective at detecting and blocking malicious traffic, and used to combat bots and other unwanted traffic.
SonicWall SonicOS 6.5.2.1Release Notes
27
SonicOS now has a new page, MANAGE | System Setup > Network > DNS Security, for enabling and configuring black and white lists:
LAN BypassIn the NSa 6650, SM 9250, SM 6450, and SM 9650 platforms, the hardware (LAN) bypass mode is enabled in both Wire Mode and L2 Bridging. The main functionality of the LAN Bypass feature, when enabled:
• Pass traffic in between the LBP-capable interfaces while rebooting.
• Even when the firewall is powered off, pass traffic in between those LBP-capable Interfaces.
For the NSa 9250, NSa 9450, and NSa 9650 platforms, the LAN Bypass feature is available between interfaces X26 and X27. For the NSa 6650, the feature is available between X0 and X1.
Firmware Backup on Secondary Storage DevicesFor all NSa Series security appliances that have secondary storage devices, SonicOS now supports the ability to take a firmware and configuration settings file backup (firmware snapshot) if the system limit permits.
SonicWall SonicOS 6.5.2.1Release Notes
28
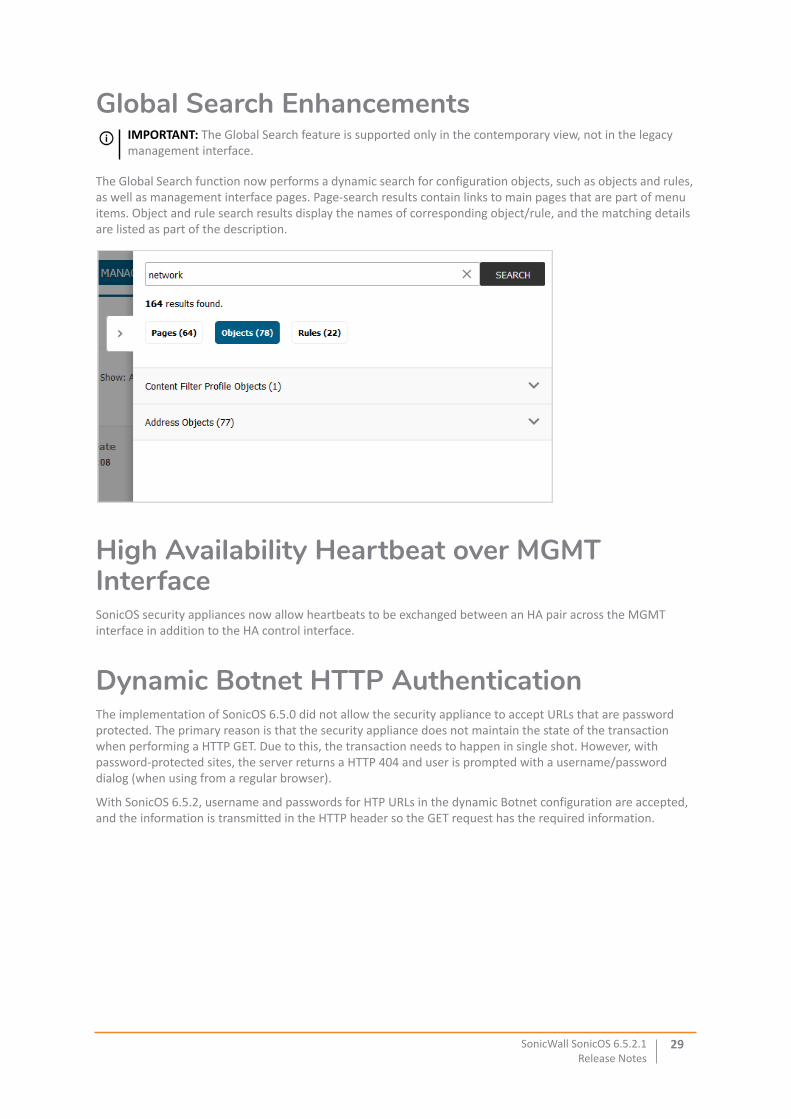
Global Search Enhancements
The Global Search function now performs a dynamic search for configuration objects, such as objects and rules, as well as management interface pages. Page-search results contain links to main pages that are part of menu items. Object and rule search results display the names of corresponding object/rule, and the matching details are listed as part of the description.
High Availability Heartbeat over MGMT InterfaceSonicOS security appliances now allow heartbeats to be exchanged between an HA pair across the MGMT interface in addition to the HA control interface.
Dynamic Botnet HTTP AuthenticationThe implementation of SonicOS 6.5.0 did not allow the security appliance to accept URLs that are password protected. The primary reason is that the security appliance does not maintain the state of the transaction when performing a HTTP GET. Due to this, the transaction needs to happen in single shot. However, with password-protected sites, the server returns a HTTP 404 and user is prompted with a username/password dialog (when using from a regular browser).
With SonicOS 6.5.2, username and passwords for HTP URLs in the dynamic Botnet configuration are accepted, and the information is transmitted in the HTTP header so the GET request has the required information.
IMPORTANT: The Global Search feature is supported only in the contemporary view, not in the legacy management interface.
SonicWall SonicOS 6.5.2.1Release Notes
29
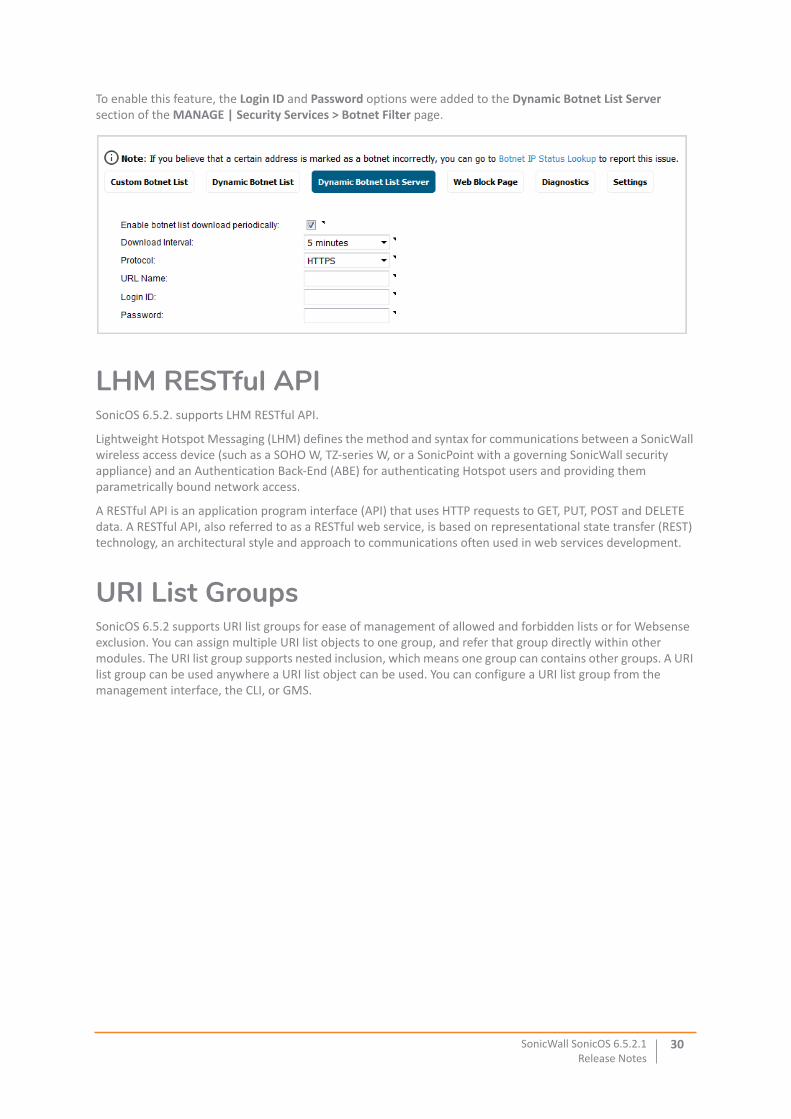
To enable this feature, the Login ID and Password options were added to the Dynamic Botnet List Server section of the MANAGE | Security Services > Botnet Filter page.
LHM RESTful APISonicOS 6.5.2. supports LHM RESTful API.
Lightweight Hotspot Messaging (LHM) defines the method and syntax for communications between a SonicWall wireless access device (such as a SOHO W, TZ-series W, or a SonicPoint with a governing SonicWall security appliance) and an Authentication Back-End (ABE) for authenticating Hotspot users and providing them parametrically bound network access.
A RESTful API is an application program interface (API) that uses HTTP requests to GET, PUT, POST and DELETE data. A RESTful API, also referred to as a RESTful web service, is based on representational state transfer (REST) technology, an architectural style and approach to communications often used in web services development.
URI List GroupsSonicOS 6.5.2 supports URI list groups for ease of management of allowed and forbidden lists or for Websense exclusion. You can assign multiple URI list objects to one group, and refer that group directly within other modules. The URI list group supports nested inclusion, which means one group can contains other groups. A URI list group can be used anywhere a URI list object can be used. You can configure a URI list group from the management interface, the CLI, or GMS.
SonicWall SonicOS 6.5.2.1Release Notes
30

A new section is added to MANAGE | Objects > Content Filter Objects.
You can configure up to 128 URI groups, and the maximum length of a group name is 49 characters. You can assigned up to 128 objects and/or groups to a URI group. The maximum number of deduplicated URIs is 5000, and the maximum number of deduplicated keywords is 100.
Quota Control for all UsersThe quota control for users feature provides quota control based on the user’s account. The quota can be specified as a session lifetime, or a transmit and/or receive traffic limit. With a cyclic quota, a user can not access the internet upon meeting the account quota until the next cycle (day, week, or month) begins. If the quota cycle is Non Cyclic, the user is unable to access the internet upon meeting the quota.
Previously, the quota control was supported only for guest users. With SonicOS 6.5.2, quota control can be specified for all local users as well.
To specify quota control for local users:
1 Navigate to MANAGE | System Setup > Users > Local Users & Groups.
2 Click Local Users.
3 Click Add. The Add User dialog displays.
SonicWall SonicOS 6.5.2.1Release Notes
31
4 Click User Quota.
5 Configure the options.
6 Click OK.
Flexible Storage Module SupportAll NSa Series platforms support the built-in storage module. This module is a storage device like the Built-in storage module and is used to read/write data to it. The Flexible storage module is a shared device than can be used by multiple security appliances provided it is successfully activated on each security appliance. In the Flexible storage module, a top-level directory is created with the security appliance serial number as the directory name. All applications create sub-directories inside this top-level directory and store their data there.
With the availability of two storage modules, Built-in and Flexible, you now have a choice to use for features. The switching of storage at run time may not be available for all features, and thus it may involve a reboot. For example, for the Log Monitor feature, to switch the storage device from one to the other involves a reboot. For logging, the option to choose the storage device is available in the MANAGE | Logs & Reporting > Log Settings > Base Setup page; by default, the Built-in storage module is used if both modules are available.
If the storage is mounted successfully, its serial number and statistics are displayed on the MONITOR | Current Status > System Status page, otherwise, the page displays Storage Unavailable.
TACACS+ SupportSonicOS 6.5.2 now supports TACACS+ (Terminal Access Controller Access-Control System latest generation) for user authentication. The main characteristics of TACACS+ are:
• Provides separate authentication, authorization and accounting (AAA) services.
SonicWall SonicOS 6.5.2.1Release Notes
32
• Uses TCP for its transport.
• Entire TACACS+ body may be protected by the encryption.
To configure TACACS+:
1 Navigate to MANAGE | System Setup > Users > Settings.
2 From User authentication method, select either:
• TACACS+
• TACACS+ + Local User
3 Click Configure TACACS+. The TACACS+ Configuration dialog displays.
4 Configure the options.
5 Click OK.
Enhanced User Login ReportingSonicOS 6.5.2 now supports reporting this information on the MONITOR | Current Status > System Status page:
• Administrative user's last logon timestamp and location.
• Total number of an administrative user's successful logon attempts during defined time period.
• Total number of all users’s successful logon attempts during defined time period.
• Administrative user's current privilege.
• Total number of an administrative user's unsuccessful logon attempts during defined time period.
• Notification of administrative user's privilege change since last logon.
To enable reporting of login information:
1 Navigate to MANAGE | System Setup > Users > Settings.
2 Click Authentication.
SonicWall SonicOS 6.5.2.1Release Notes
33
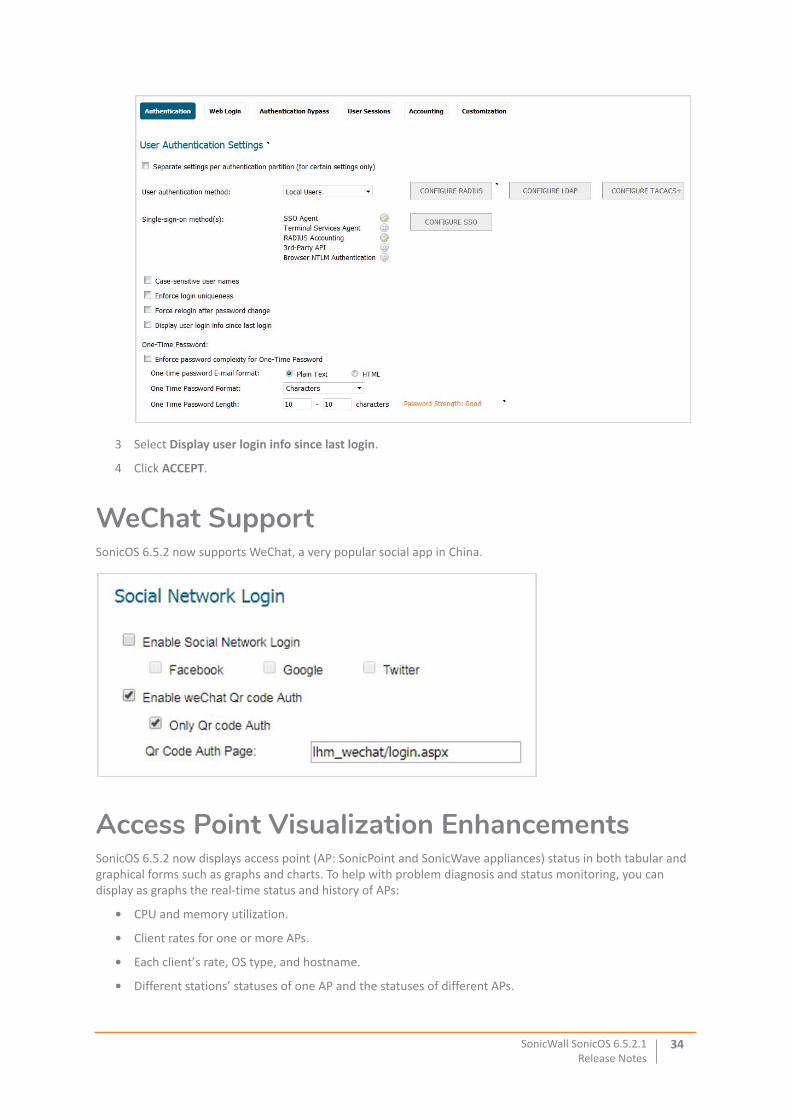
3 Select Display user login info since last login.
4 Click ACCEPT.
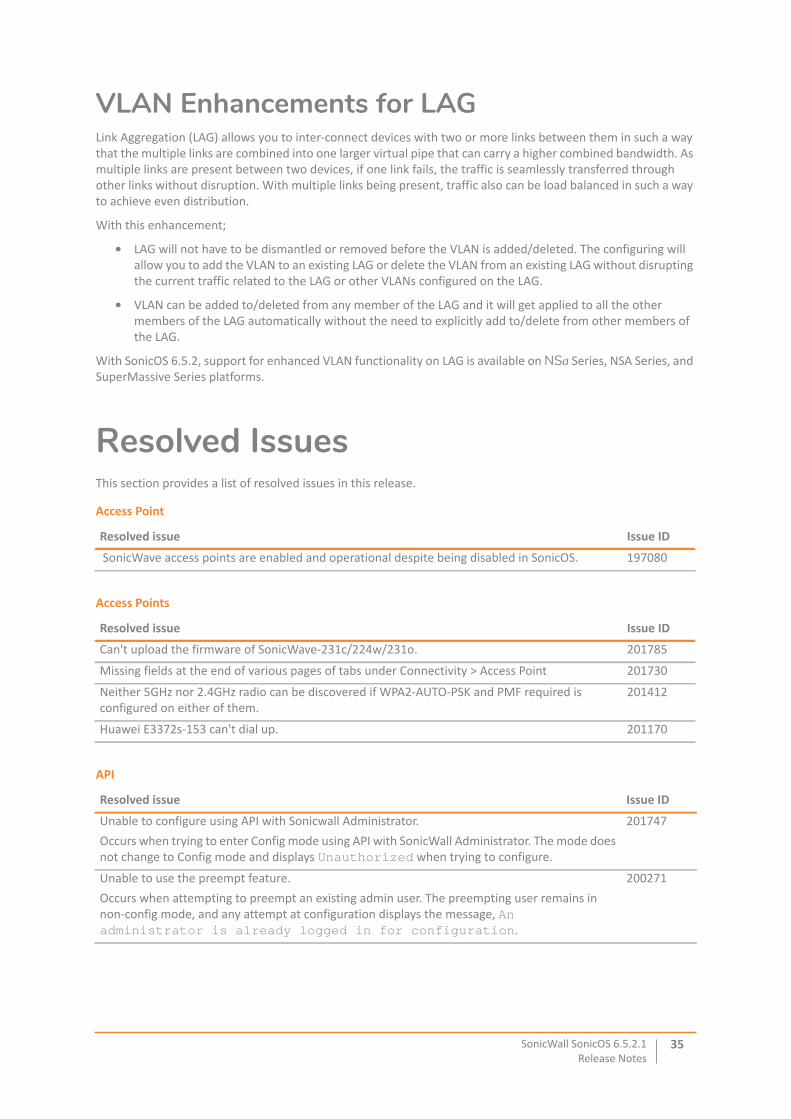
WeChat SupportSonicOS 6.5.2 now supports WeChat, a very popular social app in China.
Access Point Visualization EnhancementsSonicOS 6.5.2 now displays access point (AP: SonicPoint and SonicWave appliances) status in both tabular and graphical forms such as graphs and charts. To help with problem diagnosis and status monitoring, you can display as graphs the real-time status and history of APs:
• CPU and memory utilization.
• Client rates for one or more APs.
• Each client’s rate, OS type, and hostname.
• Different stations’ statuses of one AP and the statuses of different APs.
SonicWall SonicOS 6.5.2.1Release Notes
34
VLAN Enhancements for LAGLink Aggregation (LAG) allows you to inter-connect devices with two or more links between them in such a way that the multiple links are combined into one larger virtual pipe that can carry a higher combined bandwidth. As multiple links are present between two devices, if one link fails, the traffic is seamlessly transferred through other links without disruption. With multiple links being present, traffic also can be load balanced in such a way to achieve even distribution.
With this enhancement;
• LAG will not have to be dismantled or removed before the VLAN is added/deleted. The configuring will allow you to add the VLAN to an existing LAG or delete the VLAN from an existing LAG without disrupting the current traffic related to the LAG or other VLANs configured on the LAG.
• VLAN can be added to/deleted from any member of the LAG and it will get applied to all the other members of the LAG automatically without the need to explicitly add to/delete from other members of the LAG.
With SonicOS 6.5.2, support for enhanced VLAN functionality on LAG is available on NSa Series, NSA Series, and SuperMassive Series platforms.
Resolved IssuesThis section provides a list of resolved issues in this release.
Access Point
Resolved issue Issue ID
SonicWave access points are enabled and operational despite being disabled in SonicOS. 197080
Access Points
Resolved issue Issue ID
Can't upload the firmware of SonicWave-231c/224w/231o. 201785
Missing fields at the end of various pages of tabs under Connectivity > Access Point 201730
Neither 5GHz nor 2.4GHz radio can be discovered if WPA2-AUTO-PSK and PMF required is configured on either of them.
201412
Huawei E3372s-153 can't dial up. 201170
API
Resolved issue Issue ID
Unable to configure using API with Sonicwall Administrator.Occurs when trying to enter Config mode using API with SonicWall Administrator. The mode does not change to Config mode and displays Unauthorized when trying to configure.
201747
Unable to use the preempt feature.Occurs when attempting to preempt an existing admin user. The preempting user remains in non-config mode, and any attempt at configuration displays the message, An administrator is already logged in for configuration.
200271
SonicWall SonicOS 6.5.2.1Release Notes
35
AppFlow
Resolved issue Issue ID
AppFlow Logs: Selecting Data Source as ppFlow Server2 or GMSFlow Server2 redirects to Local Data Source.
201808
AppFlow Monitor: No data for URLs (URL, Domain Name, Rating). 198988
LDAP
Resolved issue Issue ID
The field used to filter users by location when importing from LDAP is missing. 195781
Log
Resolved issue Issue ID
It failed to save the configuration on MANAGE | Logs & Reporting > Log Setting page for NSa 3650/4650.
201315
Networking
Resolved issue Issue ID
Auto-add Access Rules for adding a static route bound to TI interface does not work 201707
The priority of new added custom NAT policy is lower than the default one 201255
The DNS server response shouldn't be dropped. 200277
NetBIOS: The name query response is dropped after add a netbios policy. 200221
The enabled RIP showed disable after restarting the security appliance. 200129
Overriding MAC for NAT policy fails to add custom NAT Policy with override MAC due to Error: Cannot modify NAT policy.
199984
Editing/deleting/disabling the default NAT policy results in Error: Cannot modify NAT policy.
199855
SSL VPN
Resolved issue Issue ID
Multiple errors prompt when attempt to enable SSLVPN on a WLAN zone by clicking the zone named WLAN.
201095
IPv6 SSL VPN fails to connect to the interface IP in LACP group; connection fails with console message, dp_stack_output:1259: Need to free this WQE!!!
194566
System
Resolved issue Issue ID
Avoid restart of the security appliance when M2 storage serial numbers are not added onto the backend
201359
SonicOS API
Resolved issue Issue ID
DNS cannot be configured back to inherit from WAN if already manually configured. 199430
SonicWall SonicOS 6.5.2.1Release Notes
36
Known IssuesThis section provides a list of known issues in this release.
User Interface
Resolved issue Issue ID
In the Wizard, the 2.5G speed is missing for X8-X15, X26-X27 copper ports in port configuration page.
200798
Global Search: search record shows 0 in IE11 when search anything. 201407
Users
Resolved issue Issue ID
The password of local user can't be changed successfully. 200972
Can't create user and error message popped out on SM9650. 200467
Wireless
Resolved issue Issue ID
Enable DAT option under Guest Services tab on WLAN Zone is Missing 201733
Guest Users’ Enforce Login Uniqueness feature not working. 201625
Captive portal authentication fails in 6.5.2.1-8n, 6.5.1.1-36n 201305
X-Series switch
Resolved issue Issue ID
Overlapping VLANs between firewall uplink on one switch and dedicated link on another switch is not possible.
200805
AV Client
Known issue Issue ID
[AV Client Upgrade] [6.2.7.1/6.2.9.2-6.5.2.1] AV client excluded list settings are lost. 206384
DPI SSL
Known issue Issue ID
Client DPI-SSL: The websites get excluded from DPI interception when Reject common name .sonicwall.com and access some websites with *.sonicwall.com.
201605
Client DPI SSL: Skip authenticating the server for common name can't work. 201525
Skip CFS Category-based Exclusion does not work. 199845
SonicWall SonicOS 6.5.2.1Release Notes
37
System CompatibilityThis section provides additional information about hardware and software compatibility with this release.
Wireless 3G/4G Broadband DevicesSonicOS 6.5.2 provides support for a wide variety of PC cards, USB devices and wireless service providers. For the most recent list of supported devices, see:
https://www.sonicwall.com/en-us/support/knowledge-base/170505473051240
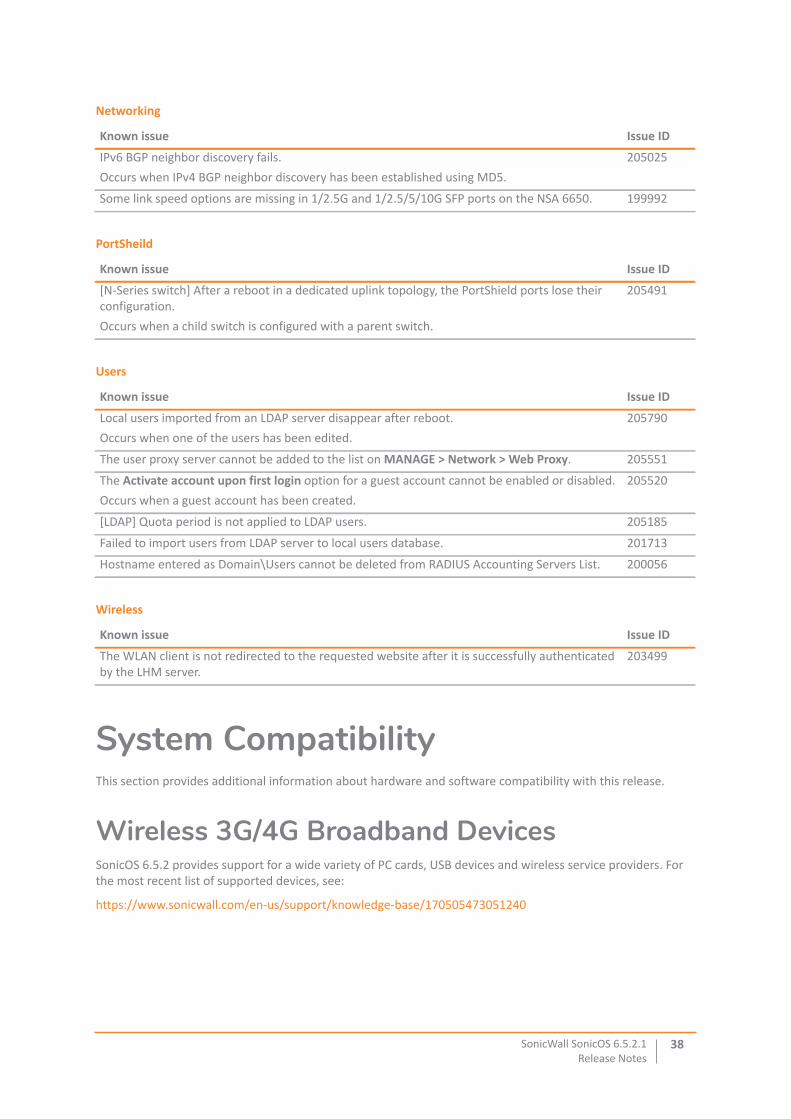
Networking
Known issue Issue ID
IPv6 BGP neighbor discovery fails.Occurs when IPv4 BGP neighbor discovery has been established using MD5.
205025
Some link speed options are missing in 1/2.5G and 1/2.5/5/10G SFP ports on the NSA 6650. 199992
PortSheild
Known issue Issue ID
[N-Series switch] After a reboot in a dedicated uplink topology, the PortShield ports lose their configuration.Occurs when a child switch is configured with a parent switch.
205491
Users
Known issue Issue ID
Local users imported from an LDAP server disappear after reboot.Occurs when one of the users has been edited.
205790
The user proxy server cannot be added to the list on MANAGE > Network > Web Proxy. 205551
The Activate account upon first login option for a guest account cannot be enabled or disabled.Occurs when a guest account has been created.
205520
[LDAP] Quota period is not applied to LDAP users. 205185
Failed to import users from LDAP server to local users database. 201713
Hostname entered as Domain\Users cannot be deleted from RADIUS Accounting Servers List. 200056
Wireless
Known issue Issue ID
The WLAN client is not redirected to the requested website after it is successfully authenticated by the LHM server.
203499
SonicWall SonicOS 6.5.2.1Release Notes
38
GMS SupportSonicWall Global Management System (GMS) management of SonicWall security appliances running SonicOS 6.5.2 requires GMS 8.4 for management of firewalls using the new features in SonicOS 6.5.2. SonicWall GMS 8.3 SP1 supports management of all features in SonicOS 6.2.9.2 and earlier releases.
WAN Acceleration / WXA SupportThe SonicWall WXA series appliances (WXA 6000 Software, WXA 500 Live CD, WXA 5000 Virtual Appliance, WXA 2000/4000 Appliances) are supported for use with SonicWall security appliances running SonicOS 6.5.2. The recommended firmware version for the WXA series appliances is WXA 1.3.2.
Browser SupportSonicOS with Visualization uses advanced browser technologies such as HTML5, which are supported in most recent browsers. SonicWall recommends using the latest Chrome, Firefox, Internet Explorer, or Safari browsers for administration of SonicOS. This release supports the following Web browsers:
• Chrome 45.0 and higher
• Firefox 25.0 and higher
• IE Edge or IE 10.0 and higher
• Safari 10.0 and higher running on non-Windows machines
Product LicensingSonicWall network security appliances must be registered on MySonicWall to enable full functionality and the benefits of SonicWall security services, firmware updates, and technical support. Log in or register for a MySonicWall account at https://mysonicwall.com.
Upgrading InformationFor information about obtaining the latest firmware, upgrading the firmware image on your SonicWall appliance, and importing configuration settings from another appliance, see the SonicOS 6.5 Upgrade Guide available on the Support portal at https://www.sonicwall.com/en-us/support/technical-documentation.
SonicWall SupportTechnical support is available to customers who have purchased SonicWall products with a valid maintenance contract and to customers who have trial versions.
The Support Portal provides self-help tools you can use to solve problems quickly and independently, 24 hours a day, 365 days a year. To access the Support Portal, go to https://www.sonicwall.com/support.
NOTE: On Windows machines, Safari is not supported for SonicOS management.
NOTE: Mobile device browsers are not recommended for SonicWall appliance system administration.
SonicWall SonicOS 6.5.2.1Release Notes
39

The Support Portal enables you to:
• View knowledge base articles and technical documentation
• View video tutorials
• Access MySonicWall
• Learn about SonicWall professional services
• Review SonicWall Support services and warranty information
• Register for training and certification
• Request technical support or customer service
To contact SonicWall Support, visit https://www.sonicwall.com/support/contact-support.
SonicWall SonicOS 6.5.2.1Release Notes
40
Copyright © 2018 SonicWall Inc. All rights reserved.
This product is protected by U.S. and international copyright and intellectual property laws. SonicWall is a trademark or registered trademark of SonicWall Inc. and/or its affiliates in the U.S.A. and/or other countries. All other trademarks and registered trademarks are property of their respective owners.
The information in this document is provided in connection with SonicWall Inc. and/or its affiliates' products. No license, express or implied, by estoppel or otherwise, to any intellectual property right is granted by this document or in connection with the sale of SonicWall products. EXCEPT AS SET FORTH IN THE TERMS AND CONDITIONS AS SPECIFIED IN THE LICENSE AGREEMENT FOR THIS PRODUCT, SONICWALL AND/OR ITS AFFILIATES ASSUME NO LIABILITY WHATSOEVER AND DISCLAIMS ANY EXPRESS, IMPLIED OR STATUTORY WARRANTY RELATING TO ITS PRODUCTS INCLUDING, BUT NOT LIMITED TO, THE IMPLIED WARRANTY OF MERCHANTABILITY, FITNESS FOR A PARTICULAR PURPOSE, OR NON-INFRINGEMENT. IN NO EVENT SHALL SONICWALL AND/OR ITS AFFILIATES BE LIABLE FOR ANY DIRECT, INDIRECT, CONSEQUENTIAL, PUNITIVE, SPECIAL OR INCIDENTAL DAMAGES (INCLUDING, WITHOUT LIMITATION, DAMAGES FOR LOSS OF PROFITS, BUSINESS INTERRUPTION OR LOSS OF INFORMATION) ARISING OUT OF THE USE OR INABILITY TO USE THIS DOCUMENT, EVEN IF SONICWALL AND/OR ITS AFFILIATES HAVE BEEN ADVISED OF THE POSSIBILITY OF SUCH DAMAGES. SonicWall and/or its affiliates make no representations or warranties with respect to the accuracy or completeness of the contents of this document and reserve the right to make changes to specifications and product descriptions at any time without notice. SonicWall Inc. and/or its affiliates do not make any commitment to update the information contained in this document.
For more information, visit https://www.sonicwall.com/legal.
To view the SonicWall End User Product Agreement, go to: https://www.sonicwall.com/legal/eupa. Select the language based on your geographic location to see the EUPA that applies to your region.
Last updated: 6/27/18
232-004425-00 Rev A
Legend
WARNING: A WARNING icon indicates a potential for property damage, personal injury, or death.
CAUTION: A CAUTION icon indicates potential damage to hardware or loss of data if instructions are not followed.
IMPORTANT NOTE, NOTE, TIP, MOBILE, or VIDEO: An information icon indicates supporting information.
SonicWall SonicOS 6.5.2.1Release Notes
41