stonerex ement- onded parti le oard installation guide
TRANSCRIPT
STONEREX CEMENT-BONDED PARTICLEBOARD Installation guide
for wood and steel frame
www.StoneREX.com / Tel: +372 56 87 5992 / E-mail: [email protected] 2
Content
1. StoneREX board installer quick overview! ................................................................................................... 3
2. Introduction and applications ...................................................................................................................... 5
3. StoneREX board maintenance ...................................................................................................................... 6
4. Storage and handling of StoneREX boards ................................................................................................... 7
5. Installation of cement-bonded particleboards on a wooden frame ............................................................ 8
6. Installation of cement-bonded particleboards on a metal frame .............................................................. 10
7. Cutting and pre – drilling the holes ............................................................................................................ 12
8. Fixing the boards ........................................................................................................................................ 13
9. Appearance and color of the board ........................................................................................................... 13
www.StoneREX.com / Tel: +372 56 87 5992 / E-mail: [email protected] 3
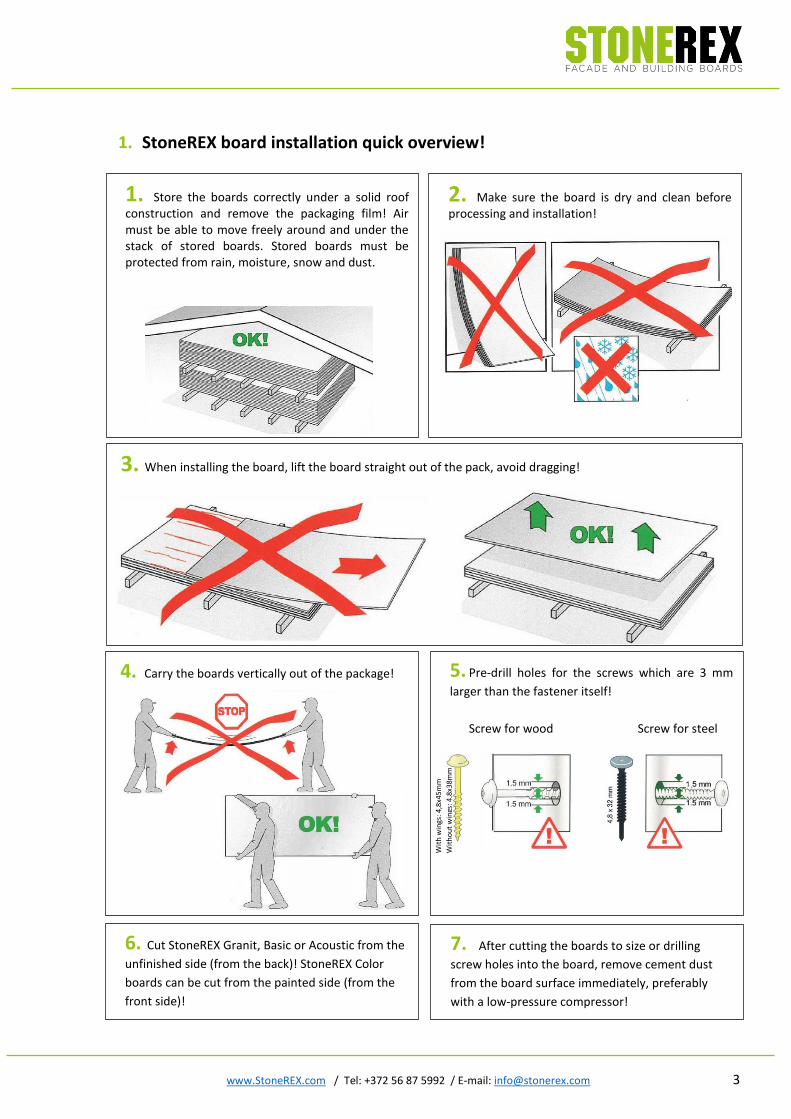
1. StoneREX board installation quick overview!
1. Store the boards correctly under a solid roof construction and remove the packaging film! Air must be able to move freely around and under the stack of stored boards. Stored boards must be protected from rain, moisture, snow and dust.
2. Make sure the board is dry and clean before processing and installation!
3. When installing the board, lift the board straight out of the pack, avoid dragging!
4. Carry the boards vertically out of the package!
5. Pre-drill holes for the screws which are 3 mm
larger than the fastener itself!
Screw for wood Screw for steel
6. Cut StoneREX Granit, Basic or Acoustic from the
unfinished side (from the back)! StoneREX Color
boards can be cut from the painted side (from the
front side)!
7. After cutting the boards to size or drilling
screw holes into the board, remove cement dust
from the board surface immediately, preferably
with a low-pressure compressor!
Wit
h w
ings
: 4,8
x45m
m
Wit
ho
ut
win
gs: 4
,8x3
8mm
www.StoneREX.com / Tel: +372 56 87 5992 / E-mail: [email protected] 4
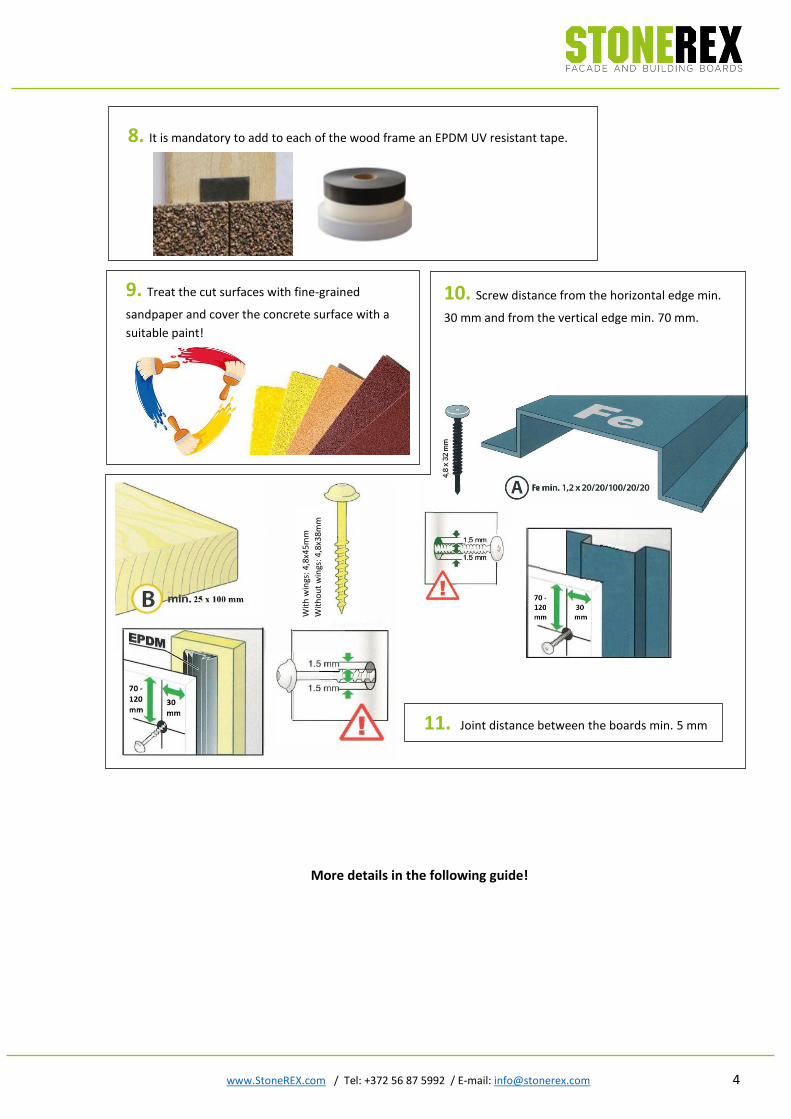
More details in the following guide!
10. Screw distance from the horizontal edge min.
30 mm and from the vertical edge min. 70 mm.
11. Joint distance between the boards min. 5 mm
9. Treat the cut surfaces with fine-grained
sandpaper and cover the concrete surface with a
suitable paint!
8. It is mandatory to add to each of the wood frame an EPDM UV resistant tape.
Wit
h w
ings
: 4,
8x4
5mm
Wit
ho
ut
win
gs:
4,8x
38m
m
www.StoneREX.com / Tel: +372 56 87 5992 / E-mail: [email protected] 5
2. Introduction and application
Thanks to their excellent strength and weather resistant properties cement-bonded particleboards can be used for covering walls, floors and ceilings in internal and external conditions. The boards are fireproof, impact resistant and have very good sound insulation properties. As the facade claddings with the boards reduce energy consumption of the building, facilitate ventilation of the facades, buildings are moisture proof and fungal resistant, cement-bonded particleboard with various surface finishing are widely used mostly for insulation and renovation work of the buildings. Thanks to their excellent properties the boards can be used for building private and apartment buildings, but also large public buildings, industrial and storage facilities. Cement-bonded particleboards are used for cladding interior surfaces in applications, where the surface must be durable, wear-resistant and with good sound insulation properties plus moisture proof and fungus resistant.
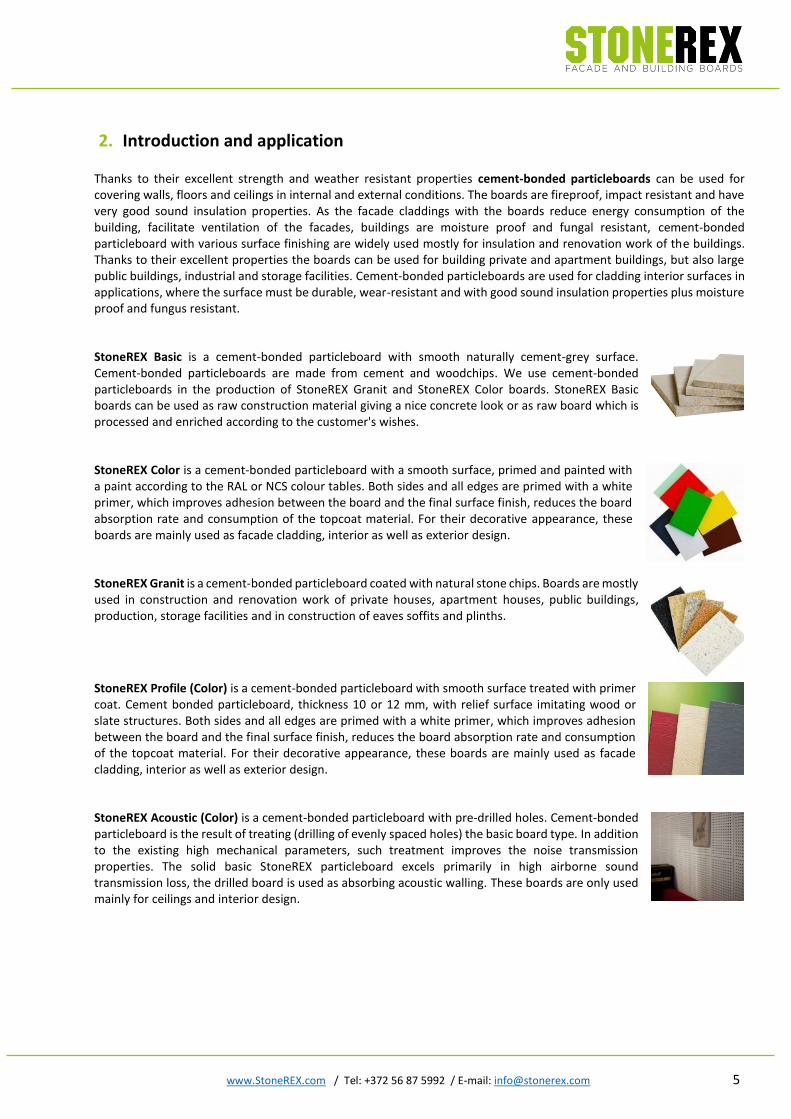
StoneREX Basic is a cement-bonded particleboard with smooth naturally cement-grey surface. Cement-bonded particleboards are made from cement and woodchips. We use cement-bonded particleboards in the production of StoneREX Granit and StoneREX Color boards. StoneREX Basic boards can be used as raw construction material giving a nice concrete look or as raw board which is processed and enriched according to the customer's wishes.
StoneREX Color is a cement-bonded particleboard with a smooth surface, primed and painted with a paint according to the RAL or NCS colour tables. Both sides and all edges are primed with a white primer, which improves adhesion between the board and the final surface finish, reduces the board absorption rate and consumption of the topcoat material. For their decorative appearance, these boards are mainly used as facade cladding, interior as well as exterior design.
StoneREX Granit is a cement-bonded particleboard coated with natural stone chips. Boards are mostly used in construction and renovation work of private houses, apartment houses, public buildings, production, storage facilities and in construction of eaves soffits and plinths.
StoneREX Profile (Color) is a cement-bonded particleboard with smooth surface treated with primer coat. Cement bonded particleboard, thickness 10 or 12 mm, with relief surface imitating wood or slate structures. Both sides and all edges are primed with a white primer, which improves adhesion between the board and the final surface finish, reduces the board absorption rate and consumption of the topcoat material. For their decorative appearance, these boards are mainly used as facade cladding, interior as well as exterior design.
StoneREX Acoustic (Color) is a cement-bonded particleboard with pre-drilled holes. Cement-bonded particleboard is the result of treating (drilling of evenly spaced holes) the basic board type. In addition to the existing high mechanical parameters, such treatment improves the noise transmission properties. The solid basic StoneREX particleboard excels primarily in high airborne sound transmission loss, the drilled board is used as absorbing acoustic walling. These boards are only used mainly for ceilings and interior design.
www.StoneREX.com / Tel: +372 56 87 5992 / E-mail: [email protected] 6
3. StoneREX board maintenance
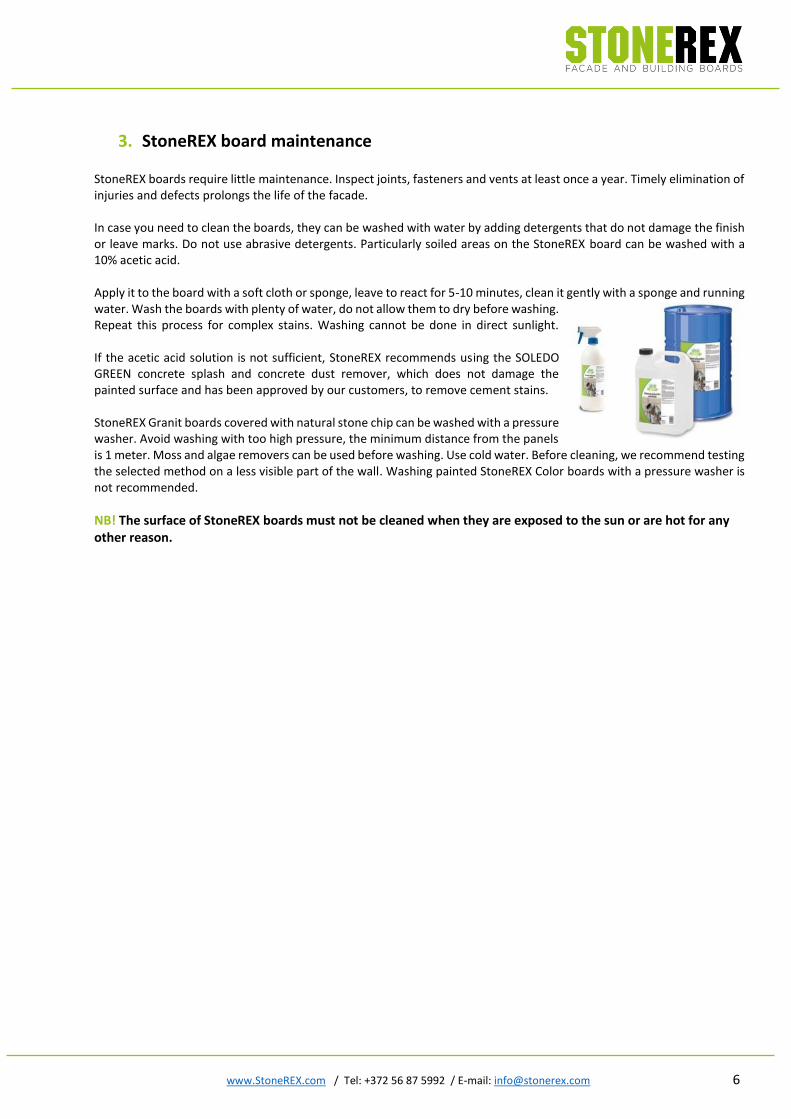
StoneREX boards require little maintenance. Inspect joints, fasteners and vents at least once a year. Timely elimination of injuries and defects prolongs the life of the facade. In case you need to clean the boards, they can be washed with water by adding detergents that do not damage the finish or leave marks. Do not use abrasive detergents. Particularly soiled areas on the StoneREX board can be washed with a 10% acetic acid. Apply it to the board with a soft cloth or sponge, leave to react for 5-10 minutes, clean it gently with a sponge and running water. Wash the boards with plenty of water, do not allow them to dry before washing. Repeat this process for complex stains. Washing cannot be done in direct sunlight. If the acetic acid solution is not sufficient, StoneREX recommends using the SOLEDO GREEN concrete splash and concrete dust remover, which does not damage the painted surface and has been approved by our customers, to remove cement stains. StoneREX Granit boards covered with natural stone chip can be washed with a pressure washer. Avoid washing with too high pressure, the minimum distance from the panels is 1 meter. Moss and algae removers can be used before washing. Use cold water. Before cleaning, we recommend testing the selected method on a less visible part of the wall. Washing painted StoneREX Color boards with a pressure washer is not recommended.
NB! The surface of StoneREX boards must not be cleaned when they are exposed to the sun or are hot for any other reason.
www.StoneREX.com / Tel: +372 56 87 5992 / E-mail: [email protected] 7
4. Storage and handling of StoneREX boards
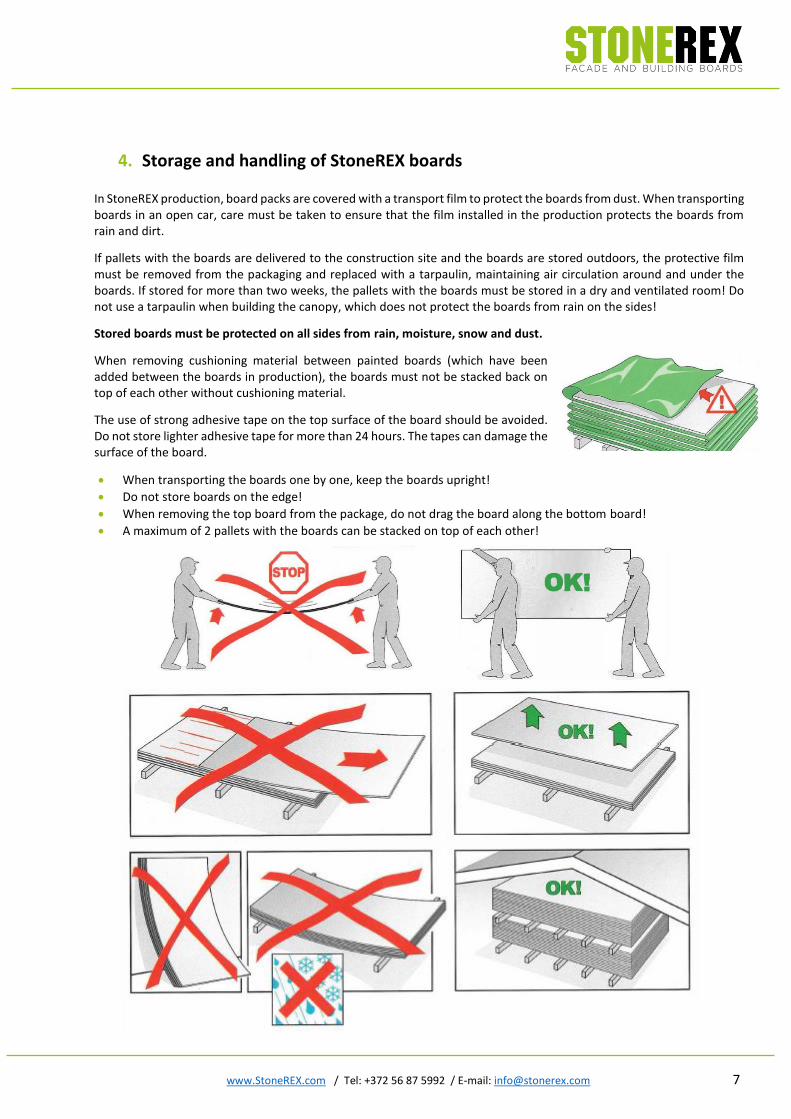
In StoneREX production, board packs are covered with a transport film to protect the boards from dust. When transporting boards in an open car, care must be taken to ensure that the film installed in the production protects the boards from rain and dirt.
If pallets with the boards are delivered to the construction site and the boards are stored outdoors, the protective film must be removed from the packaging and replaced with a tarpaulin, maintaining air circulation around and under the boards. If stored for more than two weeks, the pallets with the boards must be stored in a dry and ventilated room! Do not use a tarpaulin when building the canopy, which does not protect the boards from rain on the sides!
Stored boards must be protected on all sides from rain, moisture, snow and dust.
When removing cushioning material between painted boards (which have been added between the boards in production), the boards must not be stacked back on top of each other without cushioning material.
The use of strong adhesive tape on the top surface of the board should be avoided. Do not store lighter adhesive tape for more than 24 hours. The tapes can damage the surface of the board.
• When transporting the boards one by one, keep the boards upright!
• Do not store boards on the edge!
• When removing the top board from the package, do not drag the board along the bottom board!
• A maximum of 2 pallets with the boards can be stacked on top of each other!

www.StoneREX.com / Tel: +372 56 87 5992 / E-mail: [email protected] 8
5. Installation of cement-bonded particleboards on a wooden frame
www.StoneREX.com / Tel: +372 56 87 5992 / E-mail: [email protected] 9
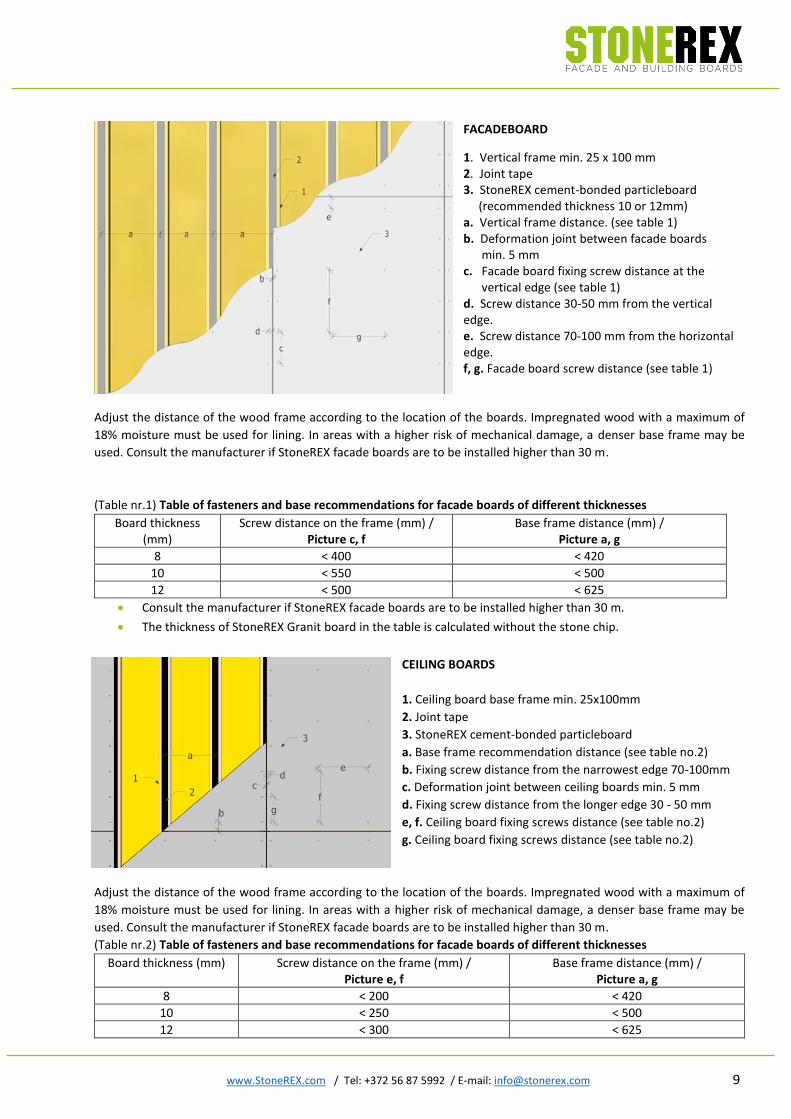
FACADEBOARD
1. Vertical frame min. 25 x 100 mm 2. Joint tape 3. StoneREX cement-bonded particleboard (recommended thickness 10 or 12mm) a. Vertical frame distance. (see table 1) b. Deformation joint between facade boards min. 5 mm c. Facade board fixing screw distance at the vertical edge (see table 1) d. Screw distance 30-50 mm from the vertical edge. e. Screw distance 70-100 mm from the horizontal edge. f, g. Facade board screw distance (see table 1)
Adjust the distance of the wood frame according to the location of the boards. Impregnated wood with a maximum of
18% moisture must be used for lining. In areas with a higher risk of mechanical damage, a denser base frame may be
used. Consult the manufacturer if StoneREX facade boards are to be installed higher than 30 m.
(Table nr.1) Table of fasteners and base recommendations for facade boards of different thicknesses
Board thickness (mm)
Screw distance on the frame (mm) / Picture c, f
Base frame distance (mm) / Picture a, g
8 < 400 < 420
10 < 550 < 500
12 < 500 < 625
• Consult the manufacturer if StoneREX facade boards are to be installed higher than 30 m.
• The thickness of StoneREX Granit board in the table is calculated without the stone chip.
CEILING BOARDS
1. Ceiling board base frame min. 25x100mm
2. Joint tape
3. StoneREX cement-bonded particleboard
a. Base frame recommendation distance (see table no.2)
b. Fixing screw distance from the narrowest edge 70-100mm
c. Deformation joint between ceiling boards min. 5 mm
d. Fixing screw distance from the longer edge 30 - 50 mm
e, f. Ceiling board fixing screws distance (see table no.2)
g. Ceiling board fixing screws distance (see table no.2)
Adjust the distance of the wood frame according to the location of the boards. Impregnated wood with a maximum of
18% moisture must be used for lining. In areas with a higher risk of mechanical damage, a denser base frame may be
used. Consult the manufacturer if StoneREX facade boards are to be installed higher than 30 m.
(Table nr.2) Table of fasteners and base recommendations for facade boards of different thicknesses
Board thickness (mm) Screw distance on the frame (mm) / Picture e, f
Base frame distance (mm) / Picture a, g
8 < 200 < 420
10 < 250 < 500
12 < 300 < 625
www.StoneREX.com / Tel: +372 56 87 5992 / E-mail: [email protected] 10
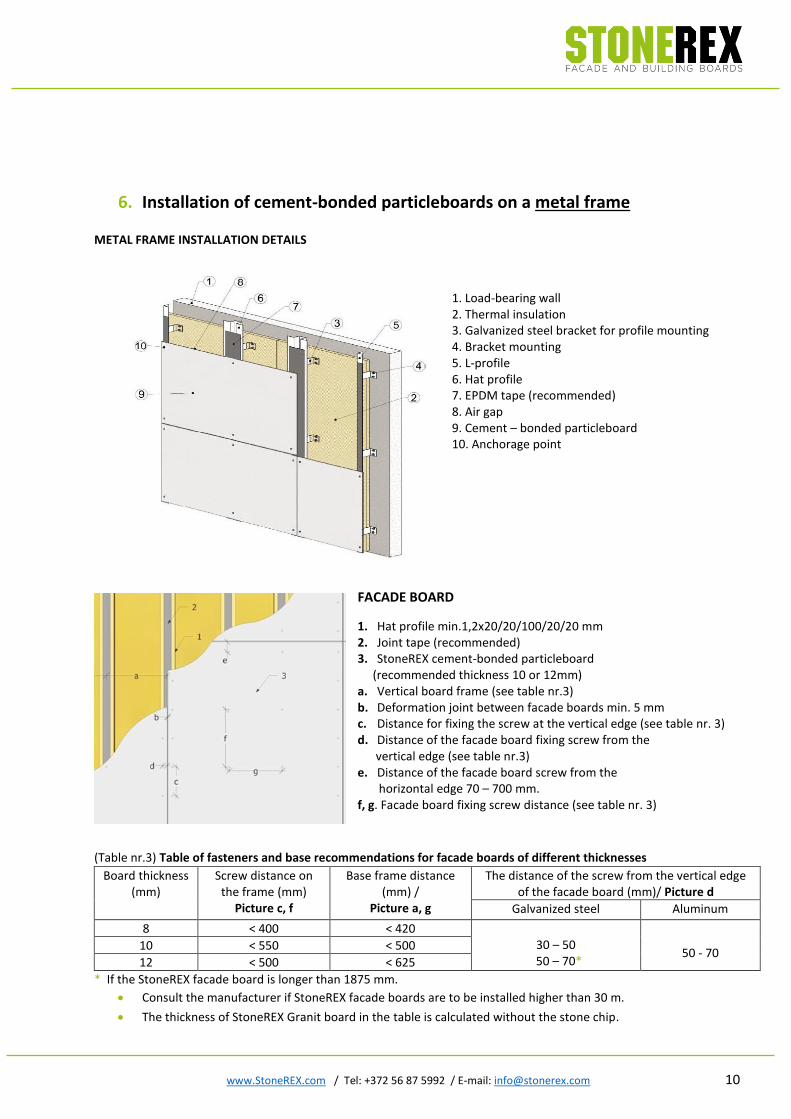
6. Installation of cement-bonded particleboards on a metal frame
METAL FRAME INSTALLATION DETAILS
1. Load-bearing wall 2. Thermal insulation 3. Galvanized steel bracket for profile mounting 4. Bracket mounting 5. L-profile 6. Hat profile 7. EPDM tape (recommended) 8. Air gap 9. Cement – bonded particleboard 10. Anchorage point
FACADE BOARD
1. Hat profile min.1,2x20/20/100/20/20 mm 2. Joint tape (recommended) 3. StoneREX cement-bonded particleboard (recommended thickness 10 or 12mm) a. Vertical board frame (see table nr.3) b. Deformation joint between facade boards min. 5 mm c. Distance for fixing the screw at the vertical edge (see table nr. 3) d. Distance of the facade board fixing screw from the vertical edge (see table nr.3) e. Distance of the facade board screw from the horizontal edge 70 – 700 mm. f, g. Facade board fixing screw distance (see table nr. 3)
(Table nr.3) Table of fasteners and base recommendations for facade boards of different thicknesses
Board thickness (mm)
Screw distance on the frame (mm)
Picture c, f
Base frame distance (mm) /
Picture a, g
The distance of the screw from the vertical edge of the facade board (mm)/ Picture d
Galvanized steel Aluminum
8 < 400 < 420 30 – 50
50 – 70*
50 - 70 10 < 550 < 500
12 < 500 < 625
* If the StoneREX facade board is longer than 1875 mm.
• Consult the manufacturer if StoneREX facade boards are to be installed higher than 30 m.
• The thickness of StoneREX Granit board in the table is calculated without the stone chip.
www.StoneREX.com / Tel: +372 56 87 5992 / E-mail: [email protected] 11
The maximum length of metal profiles is 3350 mm. Facade board joints must follow
the metal profile joints, in the facade board must not exceed the metal profile joint
and be attached to two different metal profiles. In areas with a higher risk of
mechanical damage, a denser base frame may be used.
CEILING BOARDS
1. Hat profile min. 25 x 100 mm
2. Joint tape (recommended)
3. StoneREX cement-bonded particleboard
a. Ceiling board base recommendation distance (see table
nr. 4)
b. The distance of the fixing screw from the narrowest edge
is 70-100 mm
c. Deformation joint between ceiling boards min. 5 mm
d. Distance of the fixing screw from the longer edge 30-
50mm
e, f. Ceiling board fixing screws step (see table no. 4)
g. Ceiling board fixing screws step (see table no. 4)
(Table nr. 4) Table of fasteners and base recommendations for ceiling boards of different thicknesses
Board thickness (mm) Screw distance on the frame (mm) Picture e, f
Base frame distance (mm) Picture a, g
8 < 200 < 420
10 < 250 < 500
12 < 300 < 625
www.StoneREX.com / Tel: +372 56 87 5992 / E-mail: [email protected] 12
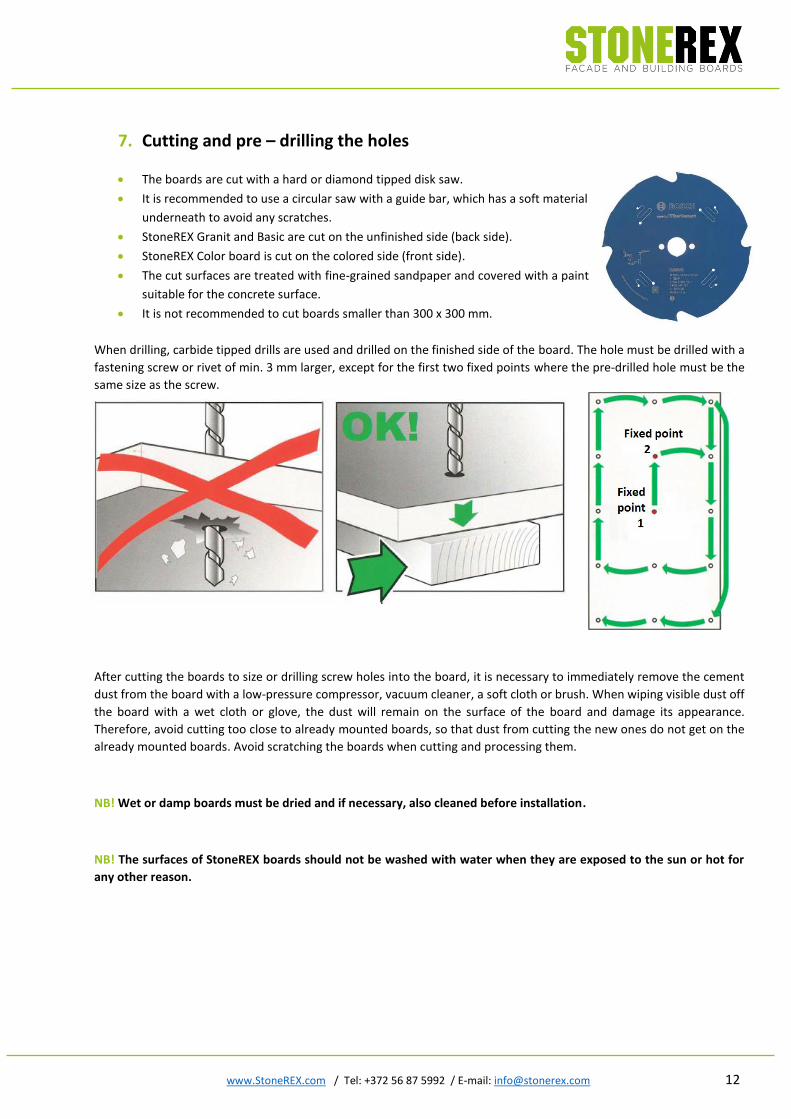
7. Cutting and pre – drilling the holes
• The boards are cut with a hard or diamond tipped disk saw.
• It is recommended to use a circular saw with a guide bar, which has a soft material
underneath to avoid any scratches.
• StoneREX Granit and Basic are cut on the unfinished side (back side).
• StoneREX Color board is cut on the colored side (front side).
• The cut surfaces are treated with fine-grained sandpaper and covered with a paint
suitable for the concrete surface.
• It is not recommended to cut boards smaller than 300 x 300 mm.
When drilling, carbide tipped drills are used and drilled on the finished side of the board. The hole must be drilled with a
fastening screw or rivet of min. 3 mm larger, except for the first two fixed points where the pre-drilled hole must be the
same size as the screw.
After cutting the boards to size or drilling screw holes into the board, it is necessary to immediately remove the cement
dust from the board with a low-pressure compressor, vacuum cleaner, a soft cloth or brush. When wiping visible dust off
the board with a wet cloth or glove, the dust will remain on the surface of the board and damage its appearance.
Therefore, avoid cutting too close to already mounted boards, so that dust from cutting the new ones do not get on the
already mounted boards. Avoid scratching the boards when cutting and processing them.
NB! Wet or damp boards must be dried and if necessary, also cleaned before installation.
NB! The surfaces of StoneREX boards should not be washed with water when they are exposed to the sun or hot for
any other reason.
www.StoneREX.com / Tel: +372 56 87 5992 / E-mail: [email protected] 13
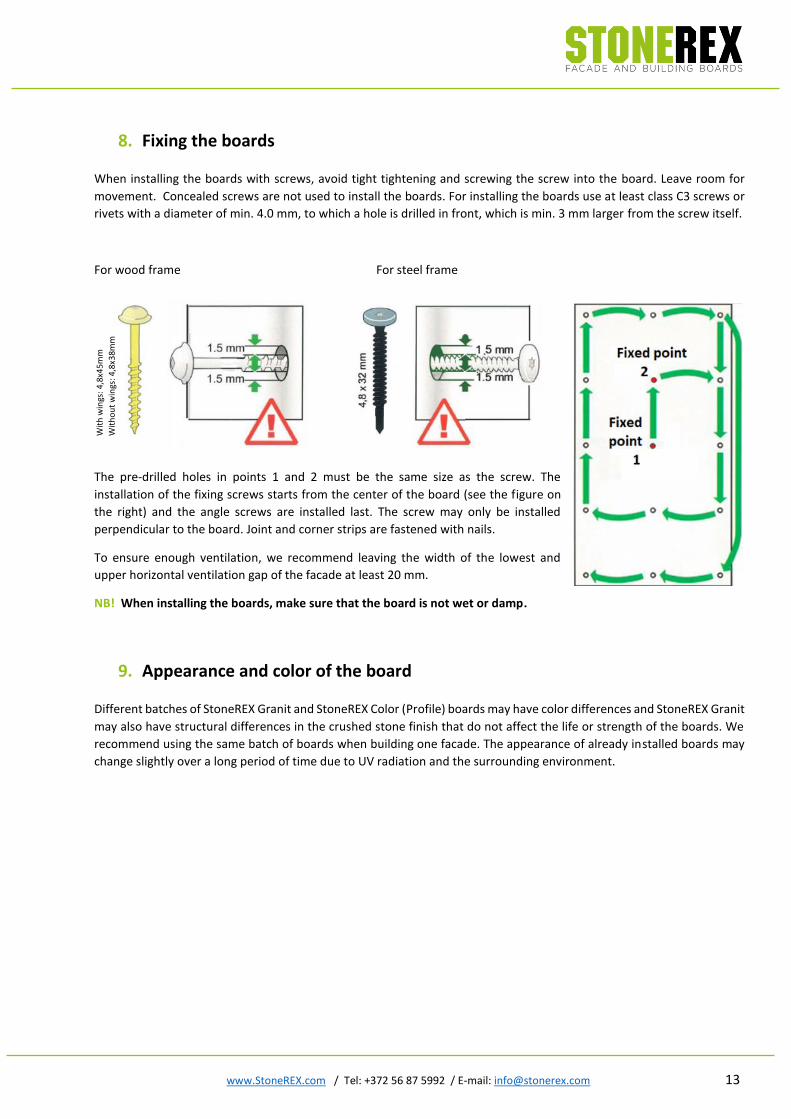
8. Fixing the boards
When installing the boards with screws, avoid tight tightening and screwing the screw into the board. Leave room for
movement. Concealed screws are not used to install the boards. For installing the boards use at least class C3 screws or
rivets with a diameter of min. 4.0 mm, to which a hole is drilled in front, which is min. 3 mm larger from the screw itself.
For wood frame For steel frame
The pre-drilled holes in points 1 and 2 must be the same size as the screw. The
installation of the fixing screws starts from the center of the board (see the figure on
the right) and the angle screws are installed last. The screw may only be installed
perpendicular to the board. Joint and corner strips are fastened with nails.
To ensure enough ventilation, we recommend leaving the width of the lowest and
upper horizontal ventilation gap of the facade at least 20 mm.
NB! When installing the boards, make sure that the board is not wet or damp.
9. Appearance and color of the board
Different batches of StoneREX Granit and StoneREX Color (Profile) boards may have color differences and StoneREX Granit
may also have structural differences in the crushed stone finish that do not affect the life or strength of the boards. We
recommend using the same batch of boards when building one facade. The appearance of already installed boards may
change slightly over a long period of time due to UV radiation and the surrounding environment.
Wit
h w
ings
: 4,
8x4
5m
m
Wit
ho
ut
win
gs: 4
,8x3
8mm