t34 world news - leehedges.com · t34 world news 2012 edition #21 ... t34 obsession over the past...
TRANSCRIPT
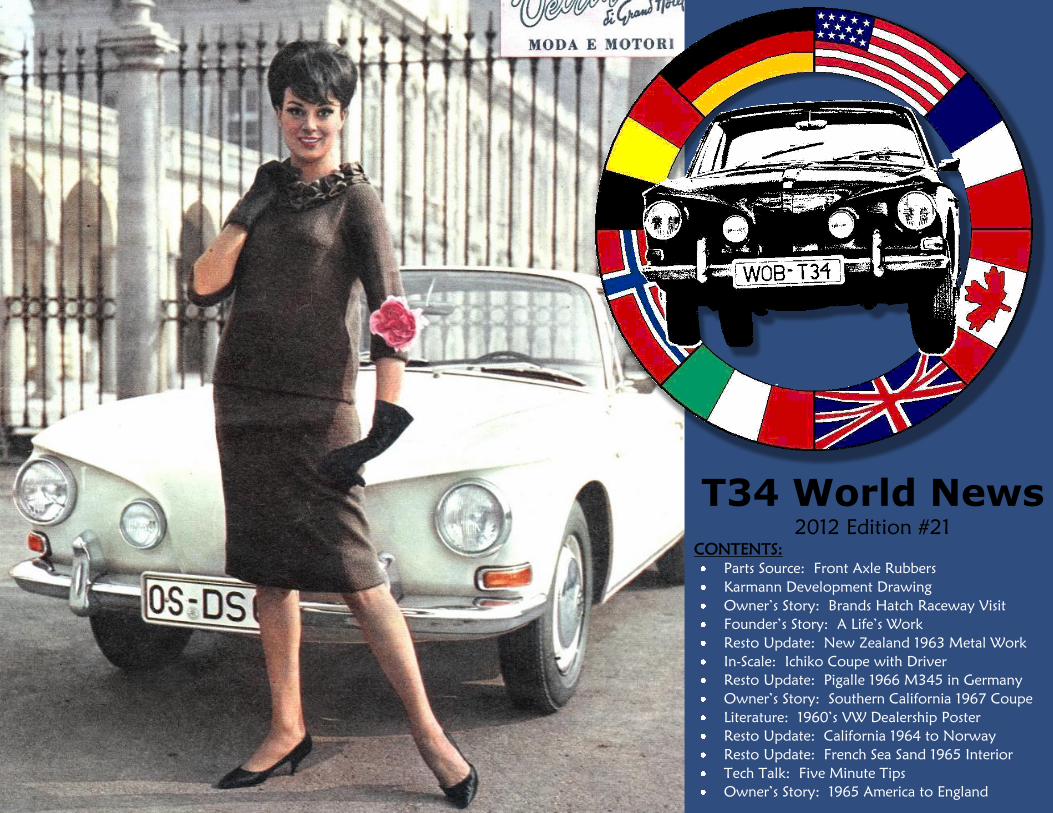
T34 World News 2012 Edition #21
CONTENTS:
Parts Source: Front Axle Rubbers
Karmann Development Drawing
Owner’s Story: Brands Hatch Raceway Visit
Founder’s Story: A Life’s Work
Resto Update: New Zealand 1963 Metal Work
In-Scale: Ichiko Coupe with Driver
Resto Update: Pigalle 1966 M345 in Germany
Owner’s Story: Southern California 1967 Coupe
Literature: 1960’s VW Dealership Poster
Resto Update: California 1964 to Norway
Resto Update: French Sea Sand 1965 Interior
Tech Talk: Five Minute Tips
Owner’s Story: 1965 America to England

Founder’s Thoughts:
Front cover is an extremely rare 1962 Italian advertisement comparing
the models modern clothing & style to the T34. Thanks to Franck
Boutier for finding it! Back cover image is a magical nocturnal scene
from Kévin Diesel in Las Vegas Nevada USA.
I try to maintain a humble perspective of my involvement in the T34
marque. I’m the messenger, the cheerleader, and the educator. My
restorations are nothing special compared to the detailed top-shelf
restorations that we’ve seen over the years. Over the past couple
years I’ve tried to find T34 owners that have been influential to T34s
and feature them in-detail for all to appreciate. This month I decided
to share my own story so you all can understand how I developed my
T34 obsession over the past 25 years and why I do what I do.
I’ve witnessed some amazing T34 restorations over the past couple
decades, but I’d be hard-pressed to find one that has been as well
documented than John Kanters’ 1963 Coupe in New Zealand. John
told me when he bought it from California that he’d really put in
some creative work to restore it. What impresses me most, beyond
his fantastic metal-smithing skills, is his willingness to share each task
with great photos & information. This is one of the things that makes
our monthly magazine so worthwhile for every T34 owner to gain
insight & inspiration for their own restorations. So if you have not
been paying attention to his detailed progress on our forum &
magazine articles then you should. This is one epic restoration!
Now anyone can own a rust-free T34! CSP has just announced their
amazing racer is now available as a paper fold-up car (right center)!
Visit CSP’s site at (www.csp-shop.com) and with every purchase a T34
cut-out will be included for free.
It’s pretty obvious that I’m seriously obsessed with T34s but when I
saw the tattoo (right) of Frans Nuninga from Alblasserdam in the
southern Netherlands, I was blown away by his dedication! My hat’s
off to you, Frans. That’s the first T34 tattoo I’ve seen! And to think
he doesn’t even own a T34 … yet! Amazing! Frans said “I just LOVE
the Karmann Ghia T34 & I would like the own a 1967 in rat-look
style. That’s my dream ... so I’ve been looking and searching. My
tattoo is the way I can express how much I like VWs. I currently own
a rat 1967 Beetle with sliding roof, a rat 1967 sliding door Split Bus
Ambulance, and my daily driver car is a VW 181 Thing.”

BELGIUM:
Jurgen Magdelyns ([email protected])
Paul Peeters ([email protected])
Jimmy Vernelen ([email protected])
Mike Zanella - Liège ([email protected])
AUSTRALIA:
Queensland - James Kramer ([email protected])
Victoria - Patrick Duane ([email protected])
UK: Mark Poulton ([email protected])
BRAZIL: Fernando Mendonca ([email protected])
CANADA: Ron Buckley ([email protected])
DENMARK: Morten Christensen ([email protected])
FINLAND: Timo Tanhuanpää ([email protected])
FRANCE: Franck Boutier ([email protected])
INDONESIA: Iwan Sadono ([email protected])
ITALY: Antonio Pellegrino ([email protected])
JAPAN: Toru Ebine ([email protected])
MEXICO: Antonio Martinez ([email protected])
NETHERLANDS: Remco de Bruijn ([email protected])
NEW ZEALAND: John Kanters ([email protected])
NORWAY: Dag Henriksen ([email protected])
PHILIPPINES: Dindo Razonable ([email protected])
SOUTH AFRICA: Greg Davids ([email protected])
SWITZERLAND: Philip Egger ([email protected])
THAILAND: Nam Xanasongkram ([email protected])
If you live in a country that is not yet represented and you would like to
contribute to the T34 World team, please contact Lee Hedges.
T34 World International Team
The key to the success of T34 World will be maintaining an active
group and the support of T34 owners in many different countries
speaking many different languages. Our team of 34 dedicated T34
reps in 21 countries will help T34 owners in their regions, reporting
back on events in their areas, and maintaining contacts with parts
sources. Here’s your international team! Please contact them
directly for assistance & advice.
ADMINISTRATOR: Lee Hedges ([email protected])
GERMANY:
Cabriolets – Jörg Fischer ([email protected])
Western – Carsten Klein ([email protected])
Southern – Michael Mosinger ([email protected])
NorthEast – Matthias Andree ([email protected])
NorthWest – Klaus Morsch ([email protected])
UNITED STATES:
Southern Calif – Bob Walton ([email protected])
Central Calif - Tom Reay ([email protected])
Northern Calif - Larry Edson ([email protected])
Mountain States - Paul Colbert ([email protected])
NorthWest USA - Jason Weigel ([email protected])
Central USA - Bob Dervin ([email protected])
NorthEast USA - Rick Hasse ([email protected])

Repro Sources: Front Axle Rubbers
For those of you rebuilding your T34s front end, here’s a great new
repro source! Each T34 needs two pair of these seals that keep things
quiet & smooth up front.
They’ve now been reproduced by Mario Steinhauser in Germany who
runs Type 3 Headquarter (www.type3headquarter.de). These are part
#311 899 115 & #311 899 117 and have been professionally done as they
used NOS parts to make the technical drawings, then tested the original
material and developing the molds. The price for the pair is 39 € plus
5,50 € shipping worldwide. For international orders please email Mario
Steinhauser for details.

Parts Source: KARMANN Script & Ghia Shield
The early-1962 T34s (up to VIN #0 058 489) were fitted with this
Ghia shield & KARMANN script on the lower right fender. European
orders please contact Heiko Thum at [email protected] and cost
is €25 (shield) & €50 (script) + shipping. North American orders
email Lee Hedges at [email protected] and cost is US$40
(shield) & US$55 (script) + shipping.
Parts Source: Early-1962 Nose Emblem
European orders please contact Heiko Thum at [email protected]
and cost is 26€ + 5.50€ shipping. North American orders email
[email protected] and cost is US$50 shipping included.
Parts Source: Headliner Kits
Coupe is 270 Euro (US$340) & Sunroof is 300 Euro (US$377). The A
& C pillar material is included. Shipping cost is 31 Euro to USA. Plus
5% if PayPal is used. Contact [email protected]
Parts Source: Vent Window Bolt
A repro of the vent window bolts are available, done in stainless steel
in Germany by our German rep Michael Moesinger! Although this
part is not chromed, it is an excellent replacement to the rusty
original ones. Email [email protected] with your address and
he will send his account information or PayPal address for the
payment. Cost is 7.50€ each + shipping cost.
Parts Source: Vent Window Pivot Screw
The vent window inner screws are now available for US$7.50 each.
They’ve been made from stainless steel so they will never rust again.
European orders please email [email protected] and PayPal is
available. North American orders email [email protected]

Karmann Development Drawing
This rear drawing by Karmann is undated and unsigned. It was photographed in 2000 during
a private tour of the Karmann Archives. It was part of a series of drawings in the T34 “Lyon”
project folder, including variations on bumpers, license plate lights, headlights, and rear
decklid design proposals that never made it onto the final T34.
You can see the T34 rear fenders in this design, if you look closely. And you can also see the
design in the 1958 Chevrolet Corvette (right).

Owner’s Story: Brands Hatch Raceway Visit
Brands Hatch is a motor racing circuit near Swanley in Kent, England. It
was first used as a racing circuit by a group of motorcyclists in the late-
1920’s. After WWII bombing runs destroyed it, the land was renovated
by 1950 for use with race cars. And in July 1964 Brands Hatch held its
first Formula One World Championship race. It has been a favorite
raceway for decades in England with many historic cars racing.
Stephen Thirkettle finished the restoration of his Gobi Beige & Black
1968 RHD Coupe. And in mid-September he had the rare opportunity
to cruise around the historic race track with VolksWorld's 25th
Anniversary Party. Stephen’s T34 looks right at home on the track …

Founder’s Story: A Life’s Work
By Lee Hedges from San Diego, California USA
Although the T34 community is a small one, there are many
owners that don’t know my story. So I thought I’d share how
my T34 obsession began 25 years ago, how it developed as
technology improved, and what drives me to keep doing it.
VW GENETICS: I was born in 1963 as the first child of three to
parents living in Manhattan Beach in Southern California. They
loved to backpack in the mountains, canoe down rivers, travel
into remote regions of the SouthWest USA and Mexico. They
owned a Pearl White 1962 VW Panel Van (below) with no
interior so my dad cut a plywood frame to hold my crib while
they drove. Those were the 1960’s, a time of love, happiness,
freedom, but not one of safety. I survived my early years and
by 1972 my dad surprised the family with a new 1972 VW
Westfalia Camper, in Niagra Blue & White, with a roof rack,
refrigerator, full bed, and seat belts. I learned to drive on the
Westy and it survived my first car accident at 16 years old.
MY VWS: Since I learned to drive on a VW manual shift I was destined to
own one as my first car. For college I borrowed $1200 from my parents
to buy a Gemini Blue metallic 1971 VW SuperBeetle AutoStick from a
neighbor. I drove it in Santa Barbara during college and Southern
California after college with my new family. When the engine seized I
sold the Beetle and bought a 1962 VW Beetle Sedan for $1200. I took a
new job opportunity with Xerox in 1985 in San Diego and immediately
found a Ruby Red 1963 VW Beetle Cabriolet for $600. I drove the
Cabriolet for a year and attended my first VW Classic show in 1986,
which introduced me to T34s. Bored of the convertible and wanting
something more unique I looked through the Auto Trader magazine each
week to see what might fit that desire and concluded that either a
Notchback or T34 would do. Then I saw a Sea Blue & White 1964 T34
Coupe (below) locally for $2500 and sold the convertible to pay for my
first T34. I loved driving the T34 as my daily transportation for ten years.

T34 CLUB SCENE: I quickly discovered that there was little
information available on T34s and found the Type 3 Ghia Enthusiasts
Network group (25 owners) loosely organized by Chip Wimer in
Southern California. I volunteered to publish their newsletter, as I
worked for Xerox’s Electronic Publishing division. Great programs &
free printing meant I could print it for free. I bought T3 & T34 Parts
List books and reproduced the combined sections for owners.
ADOPTING SIX OLD VWS: Driving a vintage VW around town I
often got stopped by passers-by asking if I wanted to buy their
vintage VW. So over the next several years I bought a Cognac 1959
T14, a Henna Red 1965 T14, a pair of Pearl White 1963 Notchbacks,
a Turquoise 1963 Deluxe Microbus, and a Pearl White 1963 Double
Cab truck (top right). I restored the truck to original & loved it.
THREE MORE T34S: In 1990 I’d been contacted by a surfer dude
who needed to sell his Terra Brown 1964 Coupe so for $700 I now
had two. I had the Brown one painted Black and the kids named it
“Blackie” (below), and it became my daily driver. Then a guy from
Nevada called to say he had T34 #0 007 300 for sale at $800, at the
time it was the world’s oldest known T34, so I had him deliver it.
This was a rough one with rusty pans, damaged tail light, but it was
running & had matching numbers. It was named “Old Man”. A year
later another T34 owner in Orange County begged me to buy his Sea
Blue late-1962 Coupe (top right), so I traded him my 1965 T14. So at
one point my home had six vintage VWs parked in the garage &
street. When it came time to buy my first home in 1997, I sold
everything to raise the down-payment. Sad but necessary …
T34 REGISTRY: I formed the T34 Registry in 1988 and managed the
T34 owners group for 16 years. My intentions were to build a
database registry of the surviving T34s and share information to help
owners with their restorations. I began publishing the Razor’s Edge
newsletter on an old 8088 computer and printed the pages on a dot-
matrix printer. I hand-assembled the pages by cutting & pasting the
paragraphs & photos onto each booklet page. As the number of
T34s grew so did the membership. Our US$25 annual subscription
barely paid for the printing/postage costs. We had 25 international
reps in many active countries and we all got to know each other over
the years. Many of these owners are still helping T34 World today.
SEA BLUE 1965: In 1997 Roger Bourke begged me to buy his original
unrestored Sea Blue 1965 Coupe with 80K-miles. It was one of the
nicest original T34s in Southern California so we settled on a price of
$5750 and I was a T34 owner once again. It was a beautiful T34
and I truly loved how well-preserved it was.

REPLICA CABRIOLET: What should I drive now that I’d survived a
catastrophic accident? I chose to build a replica T34 Cabriolet, of
course! A year before the crash, in the summer of 1999, I’d
discovered the world’s oldest surviving T34, #0 001 776. It was
living in the high-desert of Los Angeles called Sylmar. My good
buddy Scott Perry & I drove up to inspect it and agreed to buy it for
$2000. A wrecked 1966 Electric Sunroof was also on the property
which I agreed to buy for an extra $500, which came with an NOS
rear panel. Both T34s were delivered to San Diego for $200 more.
We ended parting-out the M345 and it went to many other owners.
I dove into the Cabriolet restoration and over the next 12 months
completed it. We painted it Ruby Red, its original color, so she was
named “Ruby”. I wanted this T34 to be an accurate replica to the
prototype 1961 T34 Cabriolet on display at the Frankfurt Auto Show
when the T34s were first unveiled. Without a folding metal roof
frame, I decided not to attempt building one and finished the roof
cover in the “down” position. It was featured in several magazines
and was the first T34 ever featured on the cover of Hot VW’s
magazine. It won shows for the first year and then I retired it from
the show judging, so other T34s could enjoy the awards for their
hard work. Ruby now has 12K miles since her restoration and she
still looks great 12 years later, getting out for events, cruises, and
weekend drives along the Pacific Coast.
But in 2000 while driving home on the freeway it was involved in a
double roll-over, landing on its roof and sliding 30 yards down the
freeway. A woman had entered the freeway and cut across all five
lanes right in front of me, forcing me to avoid her which put the T34
into a series of avoidance maneuvers. On the last turn the bias-ply
rear tire tucked under flipping the T34 into the air. When the chaos
ended I was still strapped-in with the stock lap belts suspended
upside-down. I unclipped the belt and fell to the roof, then saw a
tiny opening (what was left of the driver’s window) and crawled out
from the wreckage. The T34 was still running, rear wheels spinning,
and there was glass & seats everywhere. Amazingly I didn’t even stay
overnight at the hospital. How? The A-pillar collapsed halfway and
the C-pillar bases held strong, allowing the space for my head & torso
inside. My beautiful T34 was a totaled mess, but it saved my life
which I will always be grateful for. At that point I knew that I would
continue to work tirelessly for T34s as long as possible, to repay the
debt paid by my beautiful unrestored Sea Blue 1965 Coupe.

DREAM CAR: In 2004, when the T34 Registry ceased publishing the
Razor’s Edge magazines and went “free”, I founded the PureT34
organization. It was dedicated to original T34s in an effort to
support the declining trend vs all the customs being done. I’d noticed
how few RHD Electric Sunroof cars were still alive, so I decided to
pursue buying an early one. I had been receiving the KGOC-GB’s
Karmann Komment magazines and while reading one I noticed an ad
for a “1964 RHD Electric Sunroof” in England. I tried several times to
establish contact with the seller to no avail, then asked Andy Holmes
(below) to contact him for me. Andy graciously agreed to inspect the
T34 in Leeds two and a half hours away. When Andy gave the
“green light” I agreed to buy it right away for £3600 (US$6400).
Andy received the M346, which was actually an early-1965, and
handled all the arrangements to get it shipped to California in May
2004. I was very thankful for Andy’s assistance.
The body was very rusty along the lower 5”, requiring most of it to
be cut-out and replaced with repro panels & good used panels. The
body welding was done by Sean Roper and he did a splendid job.
The final bodywork & paint was done by fellow T34 owner Chemo
Ordaz (above). He had the M346 for 4 years and applied the Cherry
Red L554 and Black L41 paint himself. Since 2009 it’s been stored in
my garage and very little has been done to get it reassembled.
When it arrived in late-May I took the train to the shipping port and
drove it home, blissfully happy about owning an M346 and the
world’s second oldest one as well! I quickly began prepping it for the
VW Classic show debut, and as Andy was visiting for that event I
wanted it to be reliable so he could enjoy driving it in the USA. Two
weeks after the show I’d spent two weekends completely
disassembling it, not wanting to wait long for the frame-off
restoration process. This would be my first (and last) frame-off resto.

T34 WORLD: By 2010 the T34 scene was lifeless & inactive so in the
summer of 2010 when Antonio Pellegrino was visiting from Italy we
discussed forming a new organization called T34 World that would
be active & dedicated to all T34s around the world. By January 2011
I launched the new organization along with the support of 30
international T34 owners acting as reps for their countries. I decided
that the best way to maintain the activity was to publish a monthly
magazine. Since there were no membership dues, it was clear that the
magazine needed to be electronic. So the T34 World News began its
monthly 34-page PDF editions in January 2011 and today celebrates
its 21st edition. It has been overwhelmingly well-received and
continues to attract T34 owners from around the world. We have
begun reproducing parts as well, led by Heiko Thum, which has made
previously unavailable parts now inexpensive for all owners. I’m very
pleased with the results thus far and am confident that it’ll get better.
LIFE’S WORK: When I bought my first T34 in 1986 I really had no
idea how much of a life’s work this T34 hobby would become. My
detail-oriented tendencies, access to electronic publishing software,
and organizational skills led me to take on a management role.
Learning web design (thanks to Paul Colbert) has given me the skills
to share T34 information on a worldwide level. And my love for
historical research has led to my crusade to learn as much as possible
about T34 history & their progressive refinements. At almost 50
now I can see my second-half of life continuing what I’ve begun,
reassembling my M346, and enjoying life as retirement approaches.
I love visiting T34 owners in different countries and have fond
memories of the Karmann Archives in 2000 with Scott Perry & Dag
Henriksen, the KG Int’l in 2003 with Jon House visiting Andy &
Clive/Janet & Derek, Darmstadt in 2009 to visit Jorg & Tobias, and
the overwhelming T34 50th Anniversary in Georgsmarienhütte
Germany in 2011 with 154 T34 owners. As none of my five children
have developed an interest in T34s, I can only hope that someone
else will step-up to take on the T34 World organization and
improve it as I get too old to manage things. Until that time comes
I’m content to know I’ve done all I can to be the champion of the
T34 marque and help T34 owners around the world.

Resto Update: New Zealand 1963
An ongoing series by John Kanters of New Zealand
I had the front half of the body media-blasted as the weather
really has conspired against me for the past 3-4 months. So I
decided rather than waste more time waiting for better days I sent
the body off to the blasters to strip all the paint and rust off the
front half. It came back all clean & gray (above) … just beautiful!
I hope to be at the point where all rust repairs are done within
the next couple of months at which time I'll drag the floorpan out
for a change of scenery. But there is still a lot of work to do and
quite a few more holes found after the media-blasting. Some
parts look like Swiss cheese but the important areas are fine.
Filled some small holes in the inner heater channel plate and
welding on the rear lower fender as well as the wiring tube and
front heater outlet pipe. All these parts I made a while ago so it
was real easy just placing them and welding it together. Once
that was done and seam-sealed I re-primed the inner rocker so
that it will be dry tomorrow so I can weld the outer skin on.
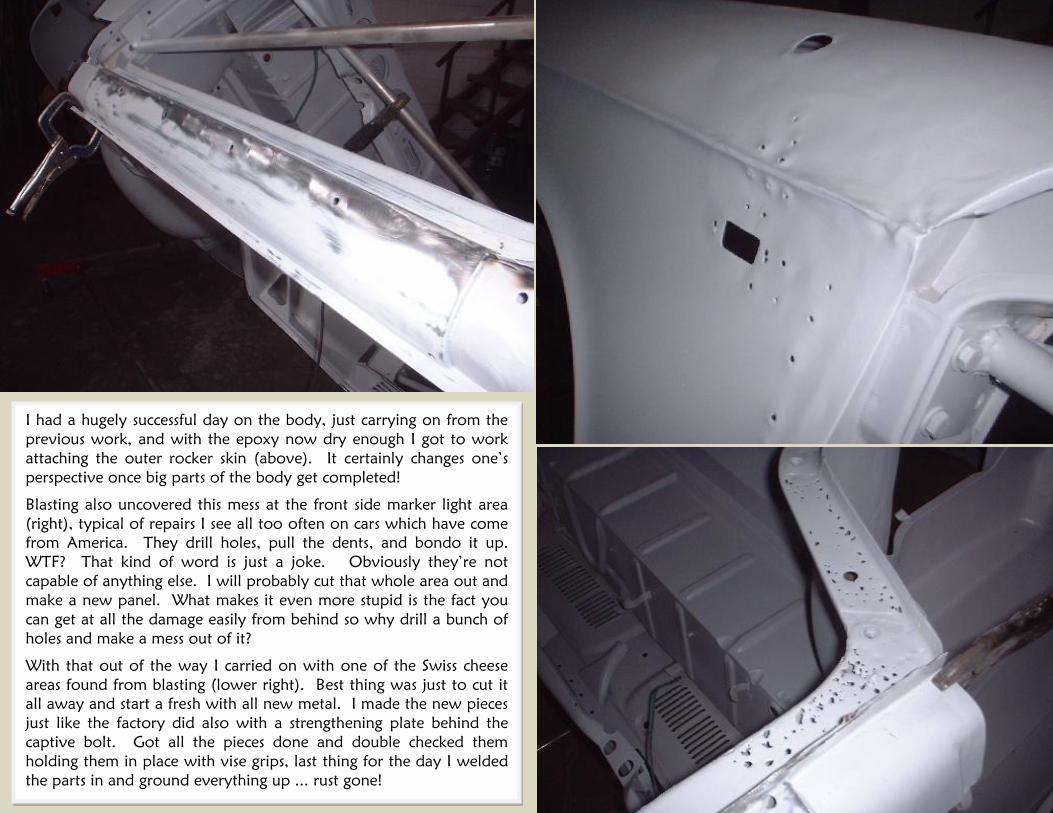
I had a hugely successful day on the body, just carrying on from the
previous work, and with the epoxy now dry enough I got to work
attaching the outer rocker skin (above). It certainly changes one’s
perspective once big parts of the body get completed!
Blasting also uncovered this mess at the front side marker light area
(right), typical of repairs I see all too often on cars which have come
from America. They drill holes, pull the dents, and bondo it up.
WTF? That kind of word is just a joke. Obviously they’re not
capable of anything else. I will probably cut that whole area out and
make a new panel. What makes it even more stupid is the fact you
can get at all the damage easily from behind so why drill a bunch of
holes and make a mess out of it?
With that out of the way I carried on with one of the Swiss cheese
areas found from blasting (lower right). Best thing was just to cut it
all away and start a fresh with all new metal. I made the new pieces
just like the factory did also with a strengthening plate behind the
captive bolt. Got all the pieces done and double checked them
holding them in place with vise grips, last thing for the day I welded
the parts in and ground everything up ... rust gone!

Even some of the hold-down straps for the
front compartment wiring had rusted away
(left) but at least they were a 5 minute job
to re-make and weld on. I'm gaining on the
rust, slowly it’s going away!
Had some pretty epic progress made
welding its face back together. It helps
having all the pieces already made so I got
started drilling holes in it for the plug welds
and then lining up the new panel on the
body and holing it in place with panel
clamps and vise grips. It’s important to
double-check everything before tacking it in
place, and took me quite a bit of time to
make this lower nose, so the last thing I
need is to screw it up welding it back into
place! I began removing the clamps one by
one welding as I went being careful not to
build up too much heat. I concentrated on
the center section and worked outwards,
grinding up each area and metal finishing as
I went along, being that there's a big hole
just underneath the weld area it made it a
lot easier to work the panel with the
dolly/slapstick. Seeing it all come together
was an awesome feeling, not often I'm
impressed with what I've done but I'm
pretty stoked.
Next I started looking at repairing the spare
wheel tub which was dented & rusted
through at the bottom. As you can see it’s
quite a mess of dents and rust holes. It may
be easier to find another wheel tub but it’s
almost impossible in NZ so I'd have to
import one which takes time and $$ so I'll
just fix what I have instead. These pics
(lower left) show the before & after with
about an hour’s worth of work using the
dolly/slapstick method.

I worked on the tyre well every night this week so
far. Monday I hammered out the dents on the
other side and then cut a big hole in the center
where the worst rust was. I took three tries at if
before I figured out where to shrink / stretch the
patch metal to get it to go where I wanted it.
With some more work in the English Wheel it
started to look ok so I began welding it in place,
working it with hammer / dolly as I went.
There were two other rusted out parts to replace
also which were easy enough once the main panel
was in. Quite a few test-fits in the body to make
sure it was still going to fit in the hole before final
welding the whole thing. Just about there,
decided to stick at it tonight and finish the damn
thing, in all there's 8-10 hours work just repairing
this stupid piece. Welded up the un-needed drain
holes, drilling one main hole at the lowest point.
The front compartment (below) is finished after
welding up lots of pin holes and replacing a
couple of smaller areas which were too big to just
fill. I got the other side trunk corner welded in
and completed. It sure feels good to complete
sections of the body! We are getting somewhere.
With all the structural repairs done I decided now was the time to
cut out the X brace that I’d put in at the start. I need to get at the
dash. In a slight bit of panic I did wonder if the whole thing would
go booooiiiinnnggg when the X brace was removed but no such
thing happened … solid as a rock. The dash (above), well I can't
say I've ever had a rusty dash on any VW but this one is rusty.
There are holes along the top edge of the dash above the glovebox
and at the corners near the A-pillar. The last job for today was to
cut-out the rusty areas. Next week I will begin making the patches.

In-Scale: Ichiko Coupe with Driver
The majority of Ichiko large-scale tin models are police cruisers, so when a standard Coupe is
discovered it’s a rare item. But when a driver is inside & it has a side view mirror on the
fender it becomes an extremely rare item. That was the case with this Pacific blue Coupe with
driver seen on ebay from Denmark [discovered by Franck Boutier from France]. Even though
it was missing a rear tail light, it was going to be a valuable T34 model, and the ebay bidders
did not disappoint. Final bid was expected to be high … and ended at US$385 (301 Euro).

Resto Update: Pigalle 1966
Michael Mösinger from Bayreuth Germany has been hard at work with
the reassembly of his 1966 Coupe with Pigalle interior. The restored
chassis looks like a new one, ready for the body to be reintroduced. He
started with the wiring harness, then installed the lights and bumpers to
test the connections. Door & vent windows were fitted next.
Michael’s girlfriend Melanie’s son Franz (13) has big dreams
about driving the Pigalle 1966 when it’s completed. Franz
(below) is sitting in the driver’s seat holding the Pigalle steering
wheel. Imagine being the teenage kid of someone like Michael!

Wedding Team: Frank Schneider , Robert Mullee, Berthold
Flurer, Jürgen Barthels, Udo Beil, Werner Artinger, Guenter
Weller, Peter Schiefel, & Michael Moesinger. They are all
members from the Karmannfreunde (www.karmannfreunde.de).
The wedding of the body & chassis was a chance for the friends
to spend 6 hours together, enjoying white sausages with pretzels
& a tasty homemade cake by Michael’s girlfriend Melanie.

Owner’s Story: Southern California 1967 Coupe
Karl & Sheryl Schmidt are from Riverside California USA. He’s owned
many VWs over the years including Oval Window Beetles, T14 Ghia’s,
Buses, & Squarebacks. It seems that there have always been VWs in their
life. In 2004 Sheryl’s T14 KG was hit head-on and destroyed so they
were VW fans without a VW. Then in October 2005 he got a call from
a friend asking if he knew what a T34 looked like. Karl had heard of
them but had never seen one in person so he drove down to San Diego
and came home with this 1967 Coupe. The opportunity was just too
good to pass up even though he had never done a restoration of this
level, but Karl was up to the challenge.
His 1967 T34 Coupe had been stored in a garage in San Diego for 15
years. It had been painted a dark wine color but not reassembled, and
all the parts were in many boxes. Karl spent four years working on it
and by 2010 it was ready to drive again.
After receiving the birth certificate he learned it had originally been
delivered to the Netherlands, painted Lotus White, and had options
M139 (dual circuit drum brakes), M271 (MPH speedo), M256 (laminated
windshield), & M274 (sealed beam headlights & solid red rear lenses).
The original upholstery was Indian Red leatherette (bottom right) but
was too fragile to reuse.
They participated in the 2012 Treffen in Oxnard California and met Tom
Reay (1965 M345) & Bata Mataja (1968 M343). Driving their T34 along
the Pacific Ocean (above) made the cruise really special.
The biggest lesson they’ve learned is to “plan on any short trip
taking longer than expected so you can take the time to talk to
people that wonder what it is, then they can't believe it’s a VW.
It’s great watching the smiles on people's faces as they pass you
on the road with a thumbs up. We have a great time taking the
car to shows and just driving around town.

Pismo Beach photoshoot during the 2012 Treffen Cruise

The one part they’ve had trouble finding is a good 1967-69 rear view
mirror. They have the original mirror but don't want to put it in as the
plastic cracks easily. They’ve fitted an earlier chrome one at the present
time but are on the search for a nice black-head mirror. He’s also
planning to source an original radio. They’d like to make their 1967
T34 as original as possible, and they’ve learned a lot along the way.

Literature: 1960’s VW Dealership Poster
When the T34s were offered from 1962-69 the dealerships had large color posters
on the walls. You can see this poster on the dealership showroom wall (right).

Resto Update: California 1964 to Norway
Lars Aksel Thingelstad is a Norwegian born in 1967 and educated at
the University of Trondheim, Norway and Aachen, Germany; M.Sc.
in Mechanical Design. He worked about 6 years for ABB designing,
manufacturing and commissioning trains & locomotives. For the past
15 years he has been working with liquid food packaging machinery.
If you look for the ‘PurePak’ logo in the top of milk (above) and
juice cartons then he has probably had something to do with the
machine producing it. This novel process allows processed food to
keep for long periods of time without preservatives, as long as they
are not opened. The aseptic packages are typically a mix of paper
(70%), polyethylene (LDPE) (24%), and aluminum (6%), with a
tight polyethylene inside layer. Together the materials form a tight
seal against microbiological organisms, contaminants, and
degradation, eliminating the need for refrigeration. This process has
radically changed the premium juice market in Europe.
His early-1964 has VIN #0 295 625 and the engine number is #0 741
204, which is not the original engine. It has a Cerulean Blue interior
with cloth seats and cloth door panels.
The most recent work he’s done is to get the front seat frames blasted
and powder-coated. Also he started reproducing the levers for the
seat adjustment as these were rusted, bent, and broken.
If you know anything about the history of this unique T34, please
email [email protected]
Lars started with VW’s when he got his driver’s license. His first car
was a 1971 T2a Bus. Along the way he has now gathered five
Beetles, three T2a’s, a 914, and 2 years ago finally bought this T34.
In addition to the classic VWs he has a Jaguar XJ series 3 V12 (which
he says really makes you appreciate German engineering). His daily
driver is a long T4 Transporter.

Lars has been spending the last two years completing the bumpers and
getting them straightened and re-chromed. He has also been searching
for missing parts and worked on the seats and interior. The body is very
sound and people who have seen it are amazed of the lack of rust. The
floors have to be replaced, but he thinks this is a minor problem since
the body will be lifted off anyway. The seats and inner panels are in
really bad shape because the car has been sitting outside without
windows. This is also the reason for the bad floors that were rusted
from inside. His biggest obstacles are going to be finding the dash pads,
door top pads, and the armrests.
He purchased the car from Corey Bloom in California in 2010, but the
title is issued on James L. Paine stamped July 14th 1981. I have the blue
California license plates. Among the receipts and papers following the
car was a fax from Lee to Ed Abbott dated January 27th 1995 regarding
finding various parts. It’s a small world. According to the seller, the
front had been damaged and the complete front was professionally
replaced. Lars can see signs of welding at the top of the A-pillars and in
the door sills. The front clip was green and the rest is Sea Blue.
But the most interesting thing about this 1964 is the unique aftermarket
sunroof. It’s a Hollandia roof by Webasto that slides back & forth
manually. This same wide sunroof has been seen in two
Squarebacks/Variants in the USA. It was commonly fitted to any model
of car in the 1960’s. Lars’ is one of two T34s fitted with the Hollandia
steel sliding sunroof worldwide. The other is in The Netherlands.
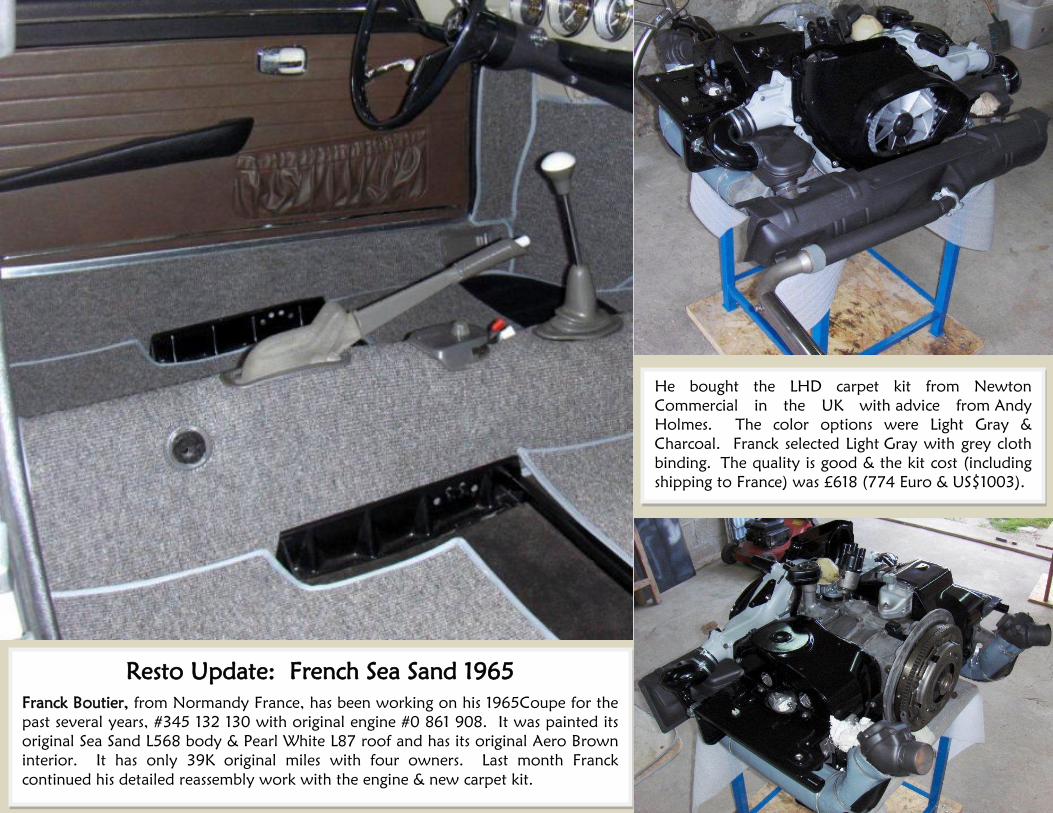
Resto Update: French Sea Sand 1965
Franck Boutier, from Normandy France, has been working on his 1965Coupe for the
past several years, #345 132 130 with original engine #0 861 908. It was painted its
original Sea Sand L568 body & Pearl White L87 roof and has its original Aero Brown
interior. It has only 39K original miles with four owners. Last month Franck
continued his detailed reassembly work with the engine & new carpet kit.
He bought the LHD carpet kit from Newton
Commercial in the UK with advice from Andy
Holmes. The color options were Light Gray &
Charcoal. Franck selected Light Gray with grey cloth
binding. The quality is good & the kit cost (including
shipping to France) was £618 (774 Euro & US$1003).

Above left: you can see the new A-pillar door edge seals and the inner door check strap
fitted before the interior panels were installed.
Above right: With the carpet kit installed and the Aero Brown interior panels back into
place, the T34 reassembly is starting to near completion. The early ivory cupped door
window winder handles are authentic for 1965, the last year for these fragile handles. And
you can see the tach fitted next to the speedo while the clock is in the far-right position.
Left: The original rear seat has its original one-year-only upholstery. There’s simply
nothing quite like original interior & seat upholstery on a restored T34. Very nice!

Tech Talk: Five Minute Tips
By Graham Filmer from Ireland
DODGY GAUGE LIGHTS
Having re-fitted my 1967 dash gauges, it was clear that all was
not quite as it should be. The warning lights were dim and the
petrol gauge would travel up and down dependent upon
what button was being pushed. My first thought was the fuel
tank wasn’t grounded and it’s easy to run a ground wire from
under a retaining bolt on the top of the fuel sender to a point
on the body. However, on my T34 this had no effect.
The solution was in the gauge itself. The three dash gauges are
held in place by a metal clamp that is tightened by hand with
a small finger nut. These clamps act as the ground point, with
the metal clamp tightened up against the back of the metal
from the dashboard. Having refurbished the dashboard, the
clamp was not making a good contact with the back of the
dash. Removing a little of the excess wood finish material that
had been flapped around the gauge hole and a quick emery
cloth of the retaining clamp and back of dash area, refitted
and bingo, bright lights & a normal fuel gauge.
EAU DE PETROL
At the back of the petrol tank is a small breather connection
125mm hose pipe (part #311 201 153A), About five inches
long, it’s one of those pipes that I overlooked until I came to
fill up with petrol – then my nose noticed it!
With the tank full with fuel it was clear that the pipe was
breaking down and was fitting badly, and the result was fuel
spilt down the inside of my under bonnet area. This produced
some interesting fumes while driving! If you suffer from slight
fumes in the car it may be worth checking this hose.
As a quick fix, it is possible to drain off some fuel and simply
run with a three quarter full tank, but the real solution is to
check and change the pipe. It literally takes five minutes, with
just the covers over the fuel tank needing to be removed – oh
and do check it is properly seated each and every time the
tank is removed or propped up for under tank repairs.

HORN ON ALL THE TIME In a previous article I wrote about how I got my horn
working correctly as VW intended, rather than using an
under dash switch. I was very pleased with myself!
Well pride before a fall, as they say. No sooner was
everything working than a problem arose. I press the
horn and off she went loud and proud, but then
STAYED ON! The only way to stop things was to
disconnect the battery. My pride was now hurting.
Having re-built the horn, I knew that this indicated that
pressing the horn button activated the earth (because the
whole system is reverse wired, with the horn
permanently live). But why was it staying on? It took
me weeks to finally isolate the problem, during which
time I rewired the column earth wire (again), checked
every live feed, dropped the column, removed the
steering wheel, and indictor stalk. Still nothing solved it.
Almost by accident I discovered the problem (but not
the solution). The column was just permanently
earthed. Previous checks with a test light and even my
multimeter had not picked this up. However, with a
better quality test light in the dark, I realised that there
was just the faintest dim glow when testing the column
for an earth. Just run a test light from the horn fuse
spade to the column to test this. The slight earth was
not enough to complete the circuit on its own, however,
once the horn button activated the horn, the slight earth
was enough to maintain the circuit. A search to find
something earthing the column proved fruitless.
The solution proved to be quite unlikely and a relatively
easy fix, changing the rubber steering coupling (part 3 in
the exploded diagram above-right). There was no logic
in this, since in essence this suggests that the rubber is
conductive, but it was an easy part to get to and just I
had decided to check this part Mark Poulton posted this
possibility on the forum, as he experienced a similar
problem. In my case once the old part was removed,
the earthing problem was identified straight away.

CHANGING THE STEERING COUPLING
Under the front bonnet, prop up the petrol tank, and the steering
coupling is clearly in view. The rubber coupling links two parts of
the steering column and is held in place by four nuts and bolts, one
of which (parts 4, 5,6,7,9 in the diagram) carries the bridging earth
that comes from the steering box and travels through the inner
steering wheel column to the horn ring. Note the way parts 1 and 2
form a ‘cross’ either side of the coupling, they do not bolt together.
Part 1 is the earth carrier, whilst part 2 must remain earth-free.
It’s not necessary to disconnect any other part of the steering
mechanism to change this part, but do disconnect the battery and
ensure the steering lock is off, which will make locating the new part
very much easier. Removal is simply a matter of unbolting the four
nuts/bolts and washers and ‘jiggling’ out the old coupling. The
coupling part no 111-415-417 is easily sourced, with an original VW
part costing £12. There are other options, but if it was good enough
for VW then it is good enough for me. I also changed the nuts and
bolts to new shiny high tensile items with a 13mm spanner/socket.
Fitting the new part is very straight-forward. Push in the new
coupling, ensuring that parts 1 & 2 are set opposite one another and
insert the replacement nuts/bolts and washers. In essence you are
bolting the coupling to part 1 and then bolting part 2 to the
coupling. Push the bolts upwards and tightening the nuts in place,
remembering to include the earth spade connector on the relevant
bolt, going through part 1 from the schematic. Install each bolt and
then go for that final tighten on each one, before connecting the
earth wire.
One final note, before bolting the petrol tank back in place, check
the horn works. Mark advised me that he experienced this problem
when fitting a new coupling! In my case on re-connecting the
battery, everything worked perfectly.
Quite why the rubber coupling created the earth I have no idea.
From the photo of the old parts, you may just be able to see a thin
rust stain that ran through the coupling. Could this have been
enough to create the problem? So now I have a working horn and
let’s hope it stays that way.
Next project: I’m off to look at the heat exchanger plumbing, carbs,
door seals and much more!

Owner’s Story: 1965 America to England
Michael “Mick” Gilbert lives in England and has owned three T34s
over the past decades so he’d already been bitten by the T34 bug. He
drove an early-1962 Black & White Coupe and a Gobi Beige 1969 RHD
Coupe (recently restored by Stephen Thirkettle). And in 2000 he
owned one of the world’s nicest originals, a Smoke Gray early-1965
RHD Coupe. He loved the Black 1962 but never had the funds to
restore it properly.
In 2011 he decided to get a T34 again. He moved to a house with two
garages, one for his Capri and a spare that needed filling. He’d
recently retired this year so he decided to spend a bit of his pension on
a classic car. And he had never really gotten T34's out of his system.
So he looked at four T34s in the UK, all rotten and/or overpriced. He
realized that broadening his search would make sense. He saw
theSamba ad for the Arizona 1965 and decided it was worth buying.
As for driving a LHD in a RHD country, Mick feels it’s not really a
problem since the T34 is relatively slow & has great visibility.
His 1965 (#345 128 845) was built in Germany, ended up in Arizona,
then Alabama, then to California, back to Arizona, and now lives in
England. It was originally Henna Red (as per the paint in the headlight
& fog light bowls) but Mick plans to go with Sea Blue & Black roof.
You can see the original Henna Red paint inside the door shell. The
restored floorpans look fantastic. Mick’s 1965 should be a fun project.
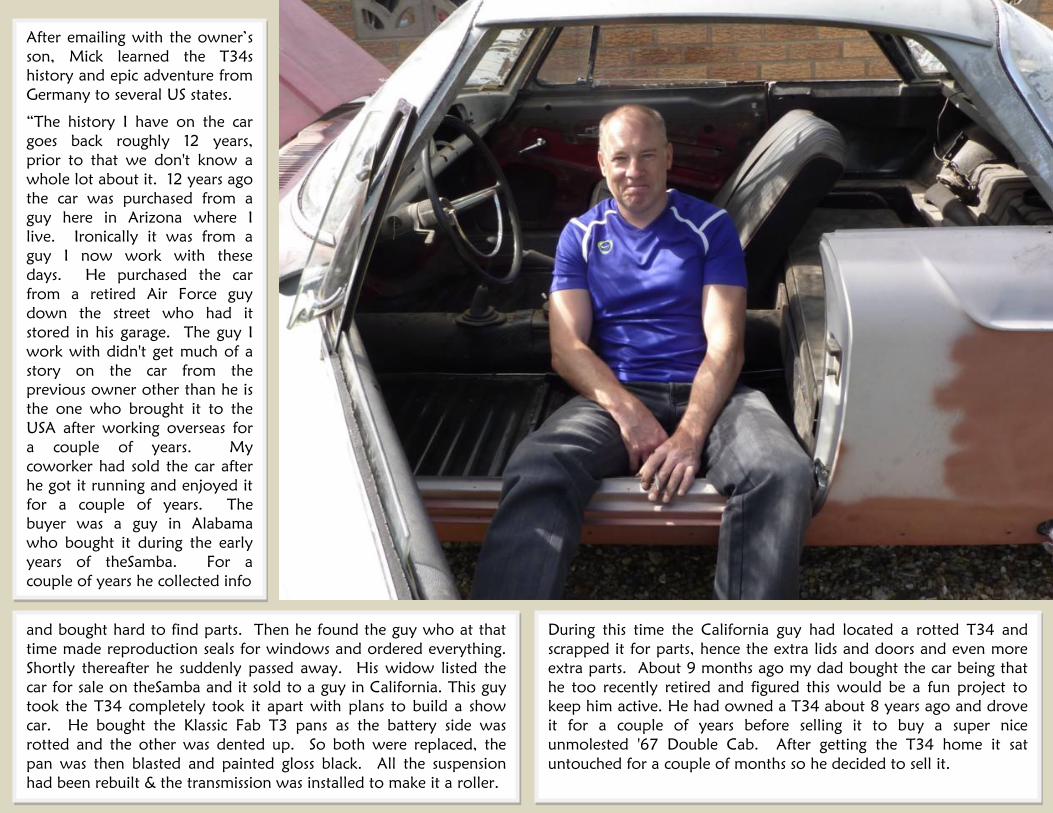
After emailing with the owner’s
son, Mick learned the T34s
history and epic adventure from
Germany to several US states.
“The history I have on the car
goes back roughly 12 years,
prior to that we don't know a
whole lot about it. 12 years ago
the car was purchased from a
guy here in Arizona where I
live. Ironically it was from a
guy I now work with these
days. He purchased the car
from a retired Air Force guy
down the street who had it
stored in his garage. The guy I
work with didn't get much of a
story on the car from the
previous owner other than he is
the one who brought it to the
USA after working overseas for
a couple of years. My
coworker had sold the car after
he got it running and enjoyed it
for a couple of years. The
buyer was a guy in Alabama
who bought it during the early
years of theSamba. For a
couple of years he collected info
and bought hard to find parts. Then he found the guy who at that
time made reproduction seals for windows and ordered everything.
Shortly thereafter he suddenly passed away. His widow listed the
car for sale on theSamba and it sold to a guy in California. This guy
took the T34 completely took it apart with plans to build a show
car. He bought the Klassic Fab T3 pans as the battery side was
rotted and the other was dented up. So both were replaced, the
pan was then blasted and painted gloss black. All the suspension
had been rebuilt & the transmission was installed to make it a roller.
During this time the California guy had located a rotted T34 and
scrapped it for parts, hence the extra lids and doors and even more
extra parts. About 9 months ago my dad bought the car being that
he too recently retired and figured this would be a fun project to
keep him active. He had owned a T34 about 8 years ago and drove
it for a couple of years before selling it to buy a super nice
unmolested '67 Double Cab. After getting the T34 home it sat
untouched for a couple of months so he decided to sell it.

He wanted to clear the two cars out of the garage so my mom's new
car could be in there as well as give him room for his motorcycle and
room to tinker with it. He told me he was getting too old to crawl
under cars so the motorcycle was better for him as it sat up on a
table. So I brought it to my house and listed it for sale for him. If I
could afford it I would buy the car from him but I already have a
couple of other money pits awaiting my attention”. Good history!
Mick has already shipped it back to the UK with the used spares
which he will be keen to sort through and swap for the bits he needs
for his restorations. He plans a stock restoration in Sea Blue with a
Black roof and Black interior. That color combination is extremely
rare, perfect for Mick who likes to have unique cars. I’m sure we’ll
see more progress over the next year …
