table of contentsdocument.sorensonvrs.com/svrs/user_guides/user... · connection” messages were...
TRANSCRIPT

ntouch VP2
User Guide
Version 1.3October 12, 2018
Firmware 1.3
Copyright © 2018 Sorenson Communications. All Rights Reserved.
Any trademarks mentioned herein are the property of their respective owners. All names and phone numbers used herein are fictitious and are not intended to refer to actual persons, businesses, or numbers.
Table of Contents • New 1.3 Features ......................................................................... 2
• Hardware Overview .................................................................... 3
• Home Screen ................................................................................ 6
• In-Call Screen ................................................................................ 13
• Call History Screen ...................................................................... 27
• Phonebook Screen ...................................................................... 38
• SignMail Screen ........................................................................... 51
• Video Center Screen ................................................................... 64
• Changing Settings ...................................................................... 67
• Making Group Calls .................................................................... 92
• Selecting a Phone Theme ......................................................... 98

New 1.3 Features
2ntouch VP2 1.3
New 1.3 FeaturesWhat’s New in 1.3?
Sorenson's ntouch VP2 Firmware Version 1.3 offers these new features:
• Sorenson Reflex Video (SRV) — SRV is a new technology developed by Sorenson to provide improved video quality, with much less blurriness and freezing of the video image. SRV is available in calls made between ntouch VP2s running the 1.3 firmware and in calls with the 8.6 releases of the ntouch Desktop and Mobile apps.
• Sorenson Server Offline Calling — You can now make and receive point-to-point (P2P) and SVRS calls even if Sorenson’s servers are temporarily unavailable. In these situations, you can make and receive calls and you can see the existing entries in your Call History, Contacts, Favorites, and Block Lists. However, you cannot save changes to any of these lists, cannot access some of the Settings screens, and cannot directly send a SignMail video message.
• Seasons Screensaver — A new “Seasons” screensaver option is available. This option will automatically change the screensaver image to match the current season. The image will automatically be changed by Sorenson about every two months.
• User Interface Improvements — You will benefit from a variety of UI changes:
• Hidden Video Playback Controls — The video playback controls are hidden until the OK button is pressed during Video Center and SignMail playbacks.
• More In-Call Options Bar Settings — New options for 15 and 30 seconds were added to the In-Call Options bar setting. The default setting is now 8 seconds.
• Quick-Close Video Playback — You can press the remote control’s red Hang Up button to immediately close a SignMail or Video Center playback window.
• New Screen Saver Notifications — New “Do Not Disturb” and “No Connection” messages were added to the screensaver’s Time/Temperature box.
• Delete All SignMails Warning Option — A new checkbox was added to enable/disable the warning dialog when you choose to delete all SignMails.
• Video Center Shows Full Titles — The complete video name is now shown in the Video Center’s video detail dialog rather than a shortened name.
• Improved On-Screen Keyboard — The on-screen keyboard is now smaller, with a new 2-row design, to show you more context of what you are editing.
• New Videophone Restart Button — A new Restart videophone button was added to the About this device screen to let you reboot without unplugging the power cord.

Videophone Hardware Overview
3User Guide
Videophone Hardware OverviewThis section describes the hardware for Sorenson’s new ntouch VP2 videophone.
About the Remote ControlA new, smaller remote control is provided with the VP2 videophone.
Figure 1 — ntouch VP2 remote control
You can use the keys on the remote control to perform the following functions:
• Use the Back key to return to the previous screen or exit a function.
• Use the Home key to return to go directly to the Home screen.
• Use the Arrow keys to move to an button, field or control on the screen.
• Use the OK key to return to select the highlighted button, field or control.
• Use the Dialpad/Number keys to enter numbers into fields on the screen.
• Use the Auto-Focus key to automatically adjust the videophone’s camera focus.
• Use the Flash Remote LightRing key to flash the LightRing on the videophone of the other Sorenson user in an active call.
• Use the Video Privacy key to toggle the Video Privacy feature on and off.
Videophone Hardware Overview
4ntouch VP2 1.3
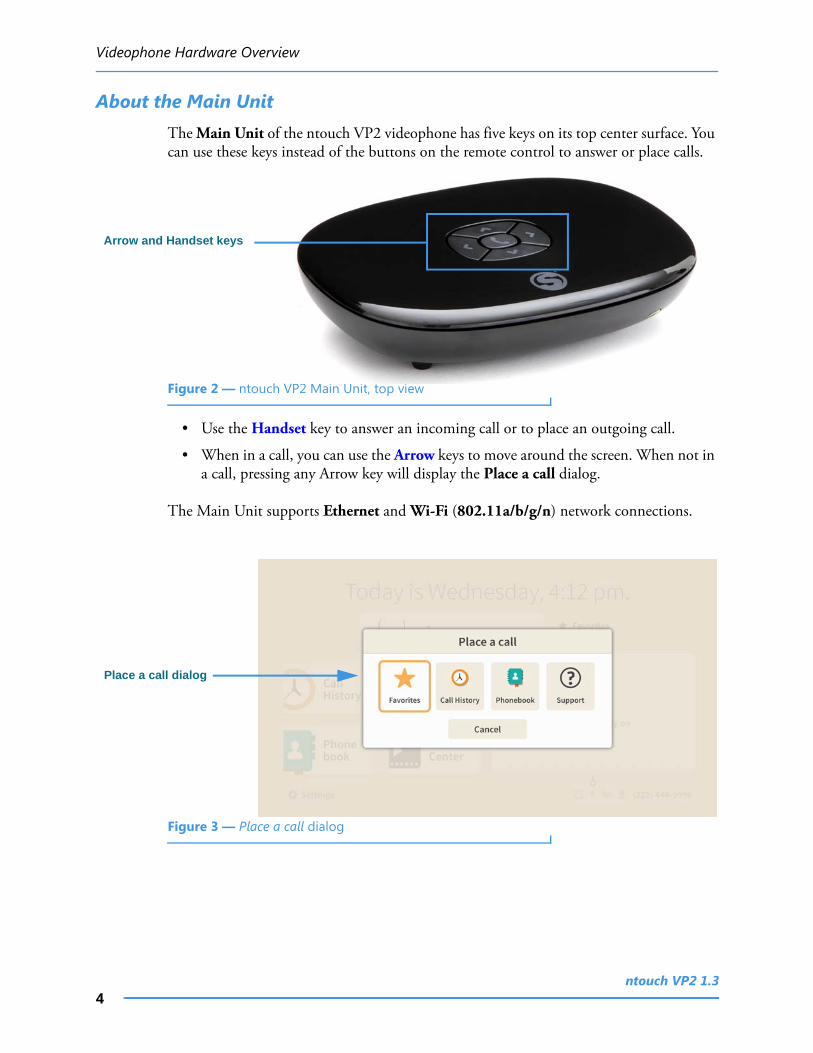
About the Main UnitThe Main Unit of the ntouch VP2 videophone has five keys on its top center surface. You can use these keys instead of the buttons on the remote control to answer or place calls.
Figure 2 — ntouch VP2 Main Unit, top view
• Use the Handset key to answer an incoming call or to place an outgoing call.
• When in a call, you can use the Arrow keys to move around the screen. When not in a call, pressing any Arrow key will display the Place a call dialog.
The Main Unit supports Ethernet and Wi-Fi (802.11a/b/g/n) network connections.
Figure 3 — Place a call dialog
Arrow and Handset keys
Place a call dialog

Videophone Hardware Overview
5User Guide
About the Remote Camera Unit
The Remote Camera Unit is connected to the Main Unit by a long cord as shown below. A metal clasp bracket on the back of the unit is used to hold the camera to the top of your video display or HDTV.
Figure 4 — Remote Camera Unit
The image below shows the Remote Camera Unit attached to the top of a small display and the Main Unit and its power supply on the table below the display.
Figure 5 — nVP2 Main Unit, power supply and camera on video display
LightRing
Metal clasp bracket
New SignMail icon/light
Missed Call icon/light

Home Screen
6ntouch VP2 1.3
Home ScreenFollow the steps below to take a quick look at the features of the Home screen.
Step 1. Turn on ntouch VP2 to open the Home screen shown below.
Figure 6 — Features of the ntouch VP2 Home screen
Notice the buttons, fields, and areas on the ntouch VP2 Home screen. The Call History button is shown selected (highlighted) in this example image. You use the remote control’s arrow keys to move to the various fields and buttons on the screen. The Status Bar icons are next to your phone number at the bottom-right corner. Not all icons will appear all the time. The table below shows the meaning of the icons when they appear.
Dial field
Four main feature buttons
Self-View image Status bar icons and phone number
Settings button
Greeting text
Favorites button
Icon Description Icon Description
Video Privacy is turned on Video Privacy is turned off
Microphone is enabled and on Microphone is enabled, but turned off
Ethernet is enabled and connected Ethernet is enabled, but is disconnected
Wi-Fi is enabled and connected with a high signal strength (one or two dark bars means weaker signal strength)
Wi-Fi is enabled, but disconnected
Bluetooth is enabled, but is not connected to a device
Bluetooth is enabled and connected to a device
Hide My Caller ID feature is turned on Do Not Disturb mode is on. This icon will appear at the top of the top of the Home screen next to a message that says Do Not Disturb mode is on.

Home Screen
7User Guide
Step 2. Move to the SignMail button to see the screen shown below.
Figure 7 — SignMail button selected
You can move to each of the main feature buttons to see what doing so looks like. When finished, move to the Dial field where you can enter a phone number to be dialed.
Step 3. Move to the Dial field to see the screen shown below.
Figure 8 — Dial field selected
Notice that when you moved to the Dial field, the Call button was revealed. The message at the top of the screen has also changed to ask, “Who do you want to call?”
SignMail button selected
Dial field selected
Call button revealed
Home Screen
8ntouch VP2 1.3
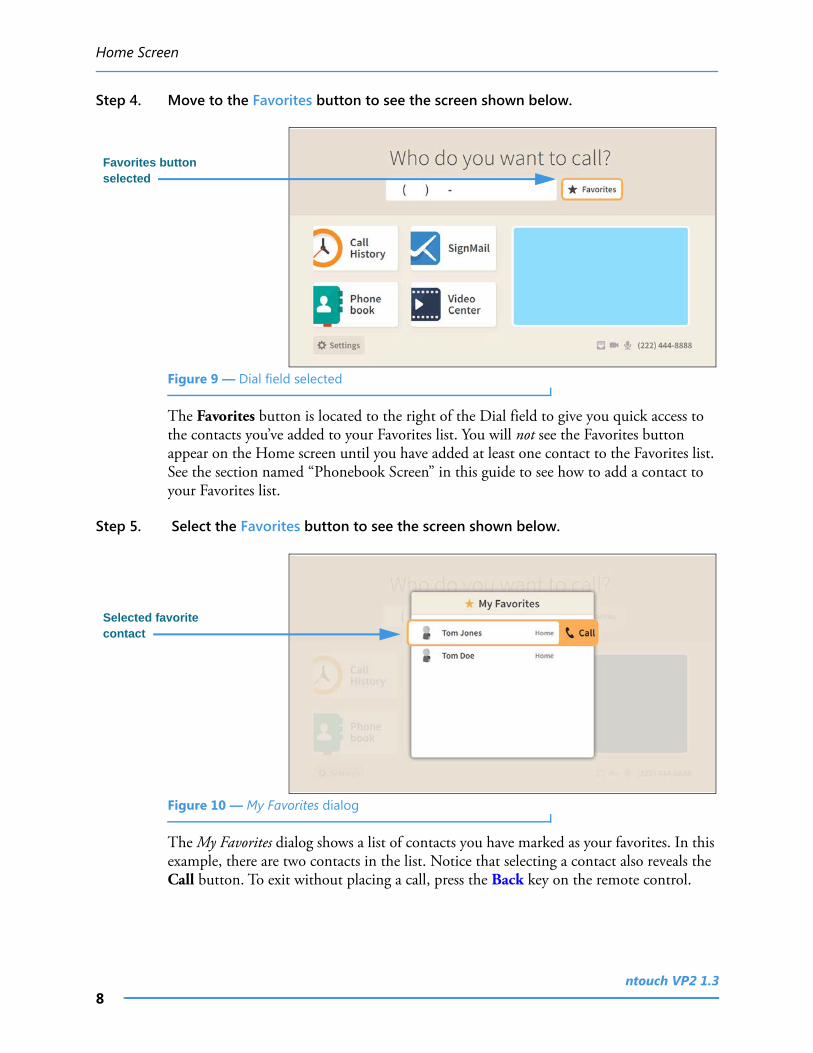
Step 4. Move to the Favorites button to see the screen shown below.
Figure 9 — Dial field selected
The Favorites button is located to the right of the Dial field to give you quick access to the contacts you’ve added to your Favorites list. You will not see the Favorites button appear on the Home screen until you have added at least one contact to the Favorites list. See the section named “Phonebook Screen” in this guide to see how to add a contact to your Favorites list.
Step 5. Select the Favorites button to see the screen shown below.
Figure 10 — My Favorites dialog
The My Favorites dialog shows a list of contacts you have marked as your favorites. In this example, there are two contacts in the list. Notice that selecting a contact also reveals the Call button. To exit without placing a call, press the Back key on the remote control.
Favorites button selected
Selected favorite contact

Home Screen
9User Guide
Step 6. Back at the Home screen, move to the Dial field to see the screen shown below.
Figure 11 — Dial field selected
If you want to see a list of numbers you have recently called, you can move to the Call History button. You can also directly open the Call History screen by selecting the Dial field’s Call button when the field is empty.
Step 7. Leave the Dial field empty, and then select the Call button to see the screen below.
Figure 12 — Call history record selected on Call History screen
The Call History screen is described in the next section of this guide. Selecting the Call button for a selected call record will place a call to that number. To exit the screen without placing a call, press the Back key on the remote control.
Dial field selected
Selected call record

Home Screen
10ntouch VP2 1.3
Step 8. Back at the Home screen, move to the Dial field and then enter a phone number to be dialed using the remote control as shown below.
Figure 13 — Phone number entered in Dial field
Step 9. Select the Dial field’s Call button to place a call to the phone number you entered.
Note: See the next section named “In-Call Screens” in this guide for details about the features you can see and use when you are in an active videophone call.
Step 10. Back at the Home screen, move to the Video image to see the screen shown below.
Figure 14 — Video image selected
Notice that selecting the Video image reveals a Camera Controls button.
Dial field selected
Video image selected

Home Screen
11User Guide
Step 11. Select the Camera Controls button to see the screen shown below.
Figure 15 — Camera controls revealed
Selecting the Camera Controls button reveals these video controls:
• Selecting the Focus button reveals the camera focus controls.
• Selecting the Zoom & Pan button reveals the camera zoom and pan controls.
• Selecting the Brightness/Saturation button reveals the video image controls.
Step 12. Select the Zoom & Pan button to open the controls shown below.
Figure 16 — Zoom and Pan controls revealed
• Use the Zoom control (Up/Down keys on remote control) to zoom the camera image in and out.
• Press the OK key on the remote control to switch between the Zoom and Pan controls.
• Use the Pan control (Arrow keys) to move the camera image up, down, left or right.
View controls buttons
Zoom and Pan controls

Home Screen
12ntouch VP2 1.3
Step 13. Select the Focus button to open the controls shown below.
Figure 17 — Focus controls revealed
• Use the Focus control to manually adjust the camera’s focus.
• Select the Auto Focus button to activate the camera’s auto focus function.
When you use Auto Focus, remember to sit very still to let the camera find the best focus. If needed, you can select Auto Focus again until you get a satisfactory image.
Step 14. Select the Brightness and Saturation button to open the controls shown below.
Figure 18 — Brightness and Saturation controls revealed
• Use the Brightness control to manually adjust the camera’s brightness level.
• Use the Saturation control to manually adjust the camera’s color saturation level.
Step 15. When finished making changes to the Camera Controls, press the Back key on the remote control to return to the Home screen.
Focus controls
Brightness and Saturation controls

In-Call Screen
13User Guide
In-Call ScreenFollow the steps below to take a quick look at the features of the In-Call screen.
Step 1. Start at the Home screen. Move to the Dial field to see the screen shown below.
Figure 19 — Dial field selected
Notice that when you moved to the Dial field, the Call button was revealed. The message at the top of the screen has also changed to ask, “Who do you want to call?”
Step 2. Enter the phone number to be dialed using the remote control as shown below.
Figure 20 — Phone number entered in Dial field
In the example screen images that follow, the Self-view image is shown in light blue and the Received video image is shown in black.
Dial field selected
Number entered

In-Call Screen
14ntouch VP2 1.3
Step 3. Select the Dial field’s Call button to place a call as shown below.
Figure 21 — Ringing screen
When a call is ringing, the Number of rings indicator appears in the middle of the screen. The Self-view image is at the top-left. This is the default View mode named “Full-screen with Self-view.” The Hang Up button is at the bottom-center of the screen. Select the Skip to SignMail button to cancel the call and record a SignMail instead.
Step 4. When the call is answered, the screen will change as shown below.
Figure 22 — In-call screen, options bar shown
Notice that when the call begins, a message appears at the bottom of the screen telling you to press the OK key on the remote control to show the In-call options. This message will disappear after a few seconds.
The phone number and name (taken from the Caller ID information or contact record) and the Interpreter ID (if this is an SVRS call) of the person you called are displayed at the top-left of the screen during a call. If the name is too long for the display area, the name will scroll across the display area.
Number of rings indicator
Hang Up button
Self-view image
Name and phone number of person you’re calling
Message appears briefly
Self-view image
Caller ID and Interpreter ID if an SVRS call

In-Call Screen
15User Guide
Step 5. Press the OK key on the remote control to show In-call options bar as shown below.
Figure 23 — In-call screen, In-Call options displayed
Notice that the Self-view image now shows its Move picture controls. To move the Self-view image around the four corners of the screen, you must first move to the image.
Step 6. Move to the Self-view image to highlight it as shown below.
Figure 24 — Self-view image highlighted
In-call options bar
Self-view image with Move picture controls
Self-view image with Move picture controls highlighted

In-Call Screen
16ntouch VP2 1.3
Step 7. Use the arrow keys on the remote control to move the Self-view image down the screen as shown below.
Figure 25 — Self-view image moved to bottom-right of screen
Notice that the Self-view image has moved to the bottom-right of the screen. You can move the image to any of the four corners of the screen.
If you want to hide the Self-view image, you must change the View mode. To do so, you must first open the In-call options bar by pressing the OK key on the remote control.
Step 8. Press the OK key on the remote control to show In-call options bar and then move to the Video button as shown below.
Figure 26 — Video button in In-call options bar
You must select the Video button to see the available options.
Self-view image moved to bottom-right corner
Video button in the In-call options bar

In-Call Screen
17User Guide
Step 9. Select the Video button to open the Video menu as shown below.
Figure 27 — Video options open
The Video menu lets you choose to adjust these video settings during a call:
• Use the Zoom & Pan button to zoom or move the image being recorded by the camera.
• Use the View Mode button to select the active View mode. The three choices are: Full-screen with Self-view, Split-screen and Full-screen without Self-view.
• Use the Focus control to adjust the camera’s focus. The received video image will stay on the screen as the self-view image shows the refocusing of the camera.
• Use the Brightness/Saturation control to adjust the camera’s brightness and color saturation levels.
• Use the Status Off/On control to turn on or off the display of call data transmission status. When on, the percent packet loss and the Sent/Received frames per second (fps) and kilobits per second (kbps) will be displayed for troubleshooting purposes.
The Focus and Brightness/Saturation options work the same way during an active videophone call as was shown earlier for setting these options before you start a call. The Pan/Zoom controls also work the same way as shown earlier, but these controls also have a remote control shortcut feature described below.
Pan/Zoom Remote Control Shortcuts
You can press the remote control’s Up or Down Arrow keys during an active call to display the on-screen Zoom controls and then zoom the Self-view image in (Up key) or out (Down key) one step. Continued pressing on the Up or Down Arrow keys on the remote control will adjust the zoom level of the Self-view image. You can press the remote control’s Right or Left Arrow key during an active call to display the on-screen Pan controls and then pan the Self-view image right (Right key) or left (Left key) one step. Continued pressing on the Right, Left, Up or Down Arrow keys on the remote control will adjust the pan position of the Self-view image.
Video menu open

In-Call Screen
18ntouch VP2 1.3
Step 10. Move to the View Mode button as shown below.
Figure 28 — View Mode button highlighted
Step 11. Select the View Mode button to change to the Split-screen mode as shown below.
Figure 29 — Split-screen View mode
View Mode button highlighted
Received and Self-view images are side-by-side

In-Call Screen
19User Guide
Step 12. Select the View Mode button again to change to the Full-screen without Self-view mode as shown below.
Figure 30 — Full-screen without Self-view View mode
You can continuing selecting the View Mode button to toggle through the three View mode options: Full-screen with Self-view, Split-screen and Full-screen without Self-view.
When finished selecting the View mode, press the Back key on the remote control to return to the full In-call options bar.
Step 13. Move to the Phonebook button in the In-call options bar as shown below.
Figure 31 — Phonebook button in In-call options bar
Full-screen without Self-view
Phonebook button

In-Call Screen
20ntouch VP2 1.3
Step 14. Select the Phonebook button to open the Phonebook menu as shown below.
Figure 32 — Phonebook menu open
The Phonebook menu lets you add a contact or share a contact during a call.
• Use the Add to Phonebook button to add a new contact record for this call. If this option is not available, you already have the current caller in your Phonebook.
• Use the Share from Phonebook button to select a contact to share with this caller.
• If the option is available for your user account, you can use the Share from Directory button to select a contact from your company’s or institution’s directory.
Step 15. Move to and select the Add to Phonebook button to open the dialog shown below.
Figure 33 — New contact dialog
You can use the New contact or the Add to existing contact buttons to add the phone number of the current, active videophone call to a new or existing contact record.
Phonebook menu open
New contact and Add to existing contact buttons

In-Call Screen
21User Guide
Step 16. Move to and select the New contact button to open the dialog shown below.
Figure 34 — Select number type dialog
You must choose to assign the phone number of the current, active videophone call as the Home, Work or Mobile number for the new contact record.
Step 17. Select the Home button to open the dialog shown below.
Figure 35 — Contact Added to Phonebook message
This message shows that the phone number and Caller ID information for the current, active videophone call have been added to a new contact record in the Phonebook.
Select number type buttons
Contact added message

In-Call Screen
22ntouch VP2 1.3
Step 18. Move to the Share from Phonebook button as shown below.
Figure 36 — Share from Phonebook button in In-call options bar
You can use the Share from Phonebook option to select an existing contact record from your Phonebook and show that contact’s information to the person you called.
Step 19. Select the Share from Phonebook button to open the dialog shown below.
Figure 37 — Contacts dialog
You can select any existing contact from your Phonebook’s Contacts list to share with the other caller. After you have highlighted a contact, select the Share button. The contact will be shown on the other caller’s screen. If the other caller is also using an ntouch VP2, the option to save the contact record will be shown to that caller.
Share from Phonebook button
Contacts list
In-Call Screen
23User Guide
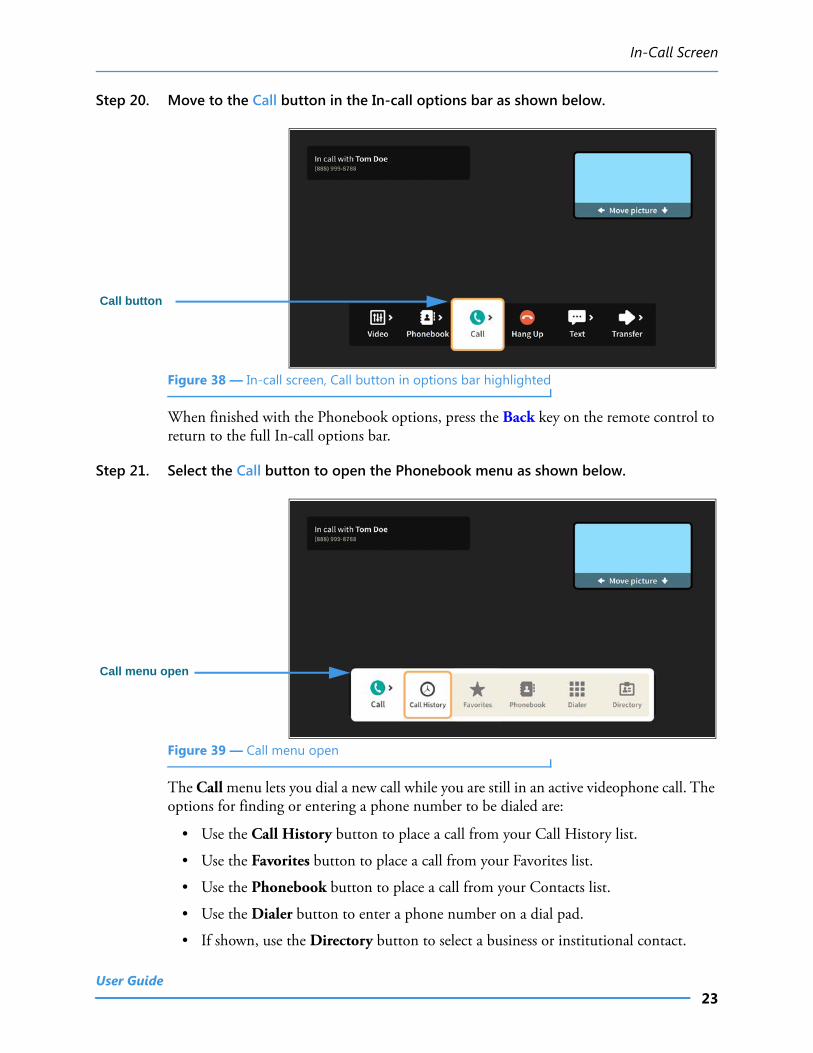
Step 20. Move to the Call button in the In-call options bar as shown below.
Figure 38 — In-call screen, Call button in options bar highlighted
When finished with the Phonebook options, press the Back key on the remote control to return to the full In-call options bar.
Step 21. Select the Call button to open the Phonebook menu as shown below.
Figure 39 — Call menu open
The Call menu lets you dial a new call while you are still in an active videophone call. The options for finding or entering a phone number to be dialed are:
• Use the Call History button to place a call from your Call History list.
• Use the Favorites button to place a call from your Favorites list.
• Use the Phonebook button to place a call from your Contacts list.
• Use the Dialer button to enter a phone number on a dial pad.
• If shown, use the Directory button to select a business or institutional contact.
Call button
Call menu open

In-Call Screen
24ntouch VP2 1.3
Note: Remember, when you dial a new call, the first call will be on hold unless that caller hangs up. You can return to the first call by hanging up on the second call.
Step 22. Move to the Text button in the In-call options bar as shown below.
Figure 40 — Text button in In-call options bar
Step 23. Select the Text button to open the Text menu as shown below.
Figure 41 — Text menu open
The Text menu lets you share text with the other caller during an active videophone call. The options are:
• Use the Clear Text button to clear all received and sent text from the screen.
• Use the Keyboard button to display the on-screen keyboard and text fields.
• Use the Saved Text button to select a saved text item to share with the caller.
You will not see the Saved Text button until you have added at least one saved text item,
Text button
Text menu open

In-Call Screen
25User Guide
You can use the on-screen keyboard, or a connected Bluetooth keyboard, to send text to the other caller if he/she is using a Sorenson endpoint. The other caller can also send text to you from a Sorenson endpoint using the Share feature on their endpoint.
Step 24. Move to the Transfer button in the In-call options bar as shown below.
Figure 42 — Transfer button in In-call options bar
Step 25. Select the Transfer button to open the Transfer menu as shown below.
Figure 43 — Transfer menu open
The Transfer menu lets you transfer the current call to another phone number. The options for entering a phone number are:
• Use the Dialer button to enter a number on a dial pad.
• Use the Call History button to select a number from your Call History list.
• Use the Favorites button to select a number from your Favorites list.
• If shown, use the Directory button to select a business or institutional contact.
Transfer button
Transfer menu open

In-Call Screen
26ntouch VP2 1.3
If you have turned on the Point-to-Point audio feature in the Device Options Settings, you will see a Mic Off/On button in the In-call options bar. You can use this button to turn ntouch VP2’s microphone on or off during an active videophone call.
Step 26. Move to the Mic Off button in the In-call options bar as shown below.
Figure 44 — Mic Off button in In-call options bar
Step 27. Select the Mic Off button to turn on the microphone as shown below.
Figure 45 — Mic On button in In-call options bar
Notice that the button now shows that the microphone is on. The Self-view image also shows the audio meter (because this option was turned on in Device Options Settings).
Step 28. When finished with your call, open the In-call options bar and select Hang Up.
Mic Off button
Mic On button

Call History Screen
27User Guide
Call History ScreenFollow the steps below to take a quick look at the features of the Call History screen.
Step 1. Start at the Home screen as shown below.
Figure 46 — Call History button on Home screen
The Call History button is selected (highlighted in yellow) in this example image.
Step 2. Select the Call History button to open the screen shown below.
Figure 47 — Features of the Call History screen
The Call History screen lets you see a list of calls you’ve dialed, received or missed. You can use the filtering buttons to select to view All calls, Missed calls, Incoming calls, or Outgoing calls. The call info area at the top-right shows details about the selected call record. The three function buttons below the call info area let you Save a new contract record (or Edit the record), Block calls from this number or Delete the call record.
Call History button
Call info area
List filtering buttons
List of calls made to/from this number
Function buttons

Call History Screen
28ntouch VP2 1.3
Step 3. Move to the Save button for the selected call record as shown below.
Figure 48 — Save button selected
The caller’s phone number and name taken from the Caller ID information or from a saved contact record are displayed as part of the Call History record.
Notice that the call info area for the selected call shows the number you dialed and that this was a dialed call to an “Unknown” person (i.e., there is no contact record for this number). You can add a new contact record using the Save button.
Step 4. Select the Save button to open the dialog shown below.
Figure 49 — New contact dialog
The New contact dialog lets you choose either to create a new contact record or add the phone number of the selected call record to an existing contact record.
Save button
Caller ID information
New contact button

Call History Screen
29User Guide
Step 5. Select the New contact button to open the dialog shown below.
Figure 50 — Select number type dialog
This Select number type dialog lets you choose which type of number will be saved. The options are Home, Work and Mobile.
Step 6. Select the Home option to open screen shown below.
Figure 51 — New Contact screen
Notice the Name field is selected and the Edit button is revealed.
Number type buttons
Name field, Edit button

Call History Screen
30ntouch VP2 1.3
Step 7. Select the Name field Edit button to open screen shown below.
Figure 52 — On-screen keyboard for text entry
Selecting to edit the Name field has opened the on-screen keyboard. You will enter text using your remote control to type characters using the on-screen keyboard. Use the Backspace and Clear buttons to delete characters one at a time or to clear the entire field. If you have a Bluetooth keyboard connected to your ntouch VP2 you can use it to enter text instead of the on-screen keyboard.
Step 8. Enter a name for this contact using the on-screen keyboard as shown below.
Figure 53 — Contact name entered in text entry field
Notice the Done button at the top-right of the on-screen keyboard.
On-screen keyboard
Backspace and Clear buttons
Done button

Call History Screen
31User Guide
Step 9. Select the Done button to return to the main screen as shown below.
Figure 54 — Contact name entered
The text you entered using the on-screen keyboard now appears in the Name field. You can move to the other fields and controls on the screen to enter other information for this contact and to set certain options.
Step 10. Move to the Home phone field as shown below.
Figure 55 — Home phone field selected
Selecting the Home phone field also reveals the Edit button. Select the Edit button to edit (change) the phone number. Because you are adding a new contact from the Call History list, you will likely not need to edit the phone number.
Text in Name field
Home phone field

Call History Screen
32ntouch VP2 1.3
Step 11. Select the Home phone field’s Edit button to open the screen shown below.
Figure 56 — Home phone field and action button
Selecting to edit the Home phone field has opened the on-screen keyboard. You will enter the number using your remote control to type characters using the on-screen keyboard. Use the Done button when ready to exit the keyboard.
Step 12. Back at the main screen, move to the Home phone Action button as shown below.
Figure 57 — Home phone field and action button
The Action button (right-arrow icon) is used to reveal two options for the phone number.
Home phone field
Action button

Call History Screen
33User Guide
Step 13. Select the Action button as shown below.
Figure 58 — Options in action button revealed
Selecting the Action button has revealed the Block and Favorite buttons. You can use these two buttons to mark this phone number as one of your favorites or to block calls from the number. All three of the phone number fields on the New Contact screen have these two options that can be revealed by selecting their Action buttons.
Step 14. Select the Favorite button to mark this number as a favorite as shown below.
Figure 59 — Home phone field and Favorite icon
Selecting the Favorite button has added a gold star icon to the left of the Action button in the Home phone field. The star icon shows that you have marked this number as a favorite.
Favorite button
Home phone field
Favorite icon
Call History Screen
34ntouch VP2 1.3
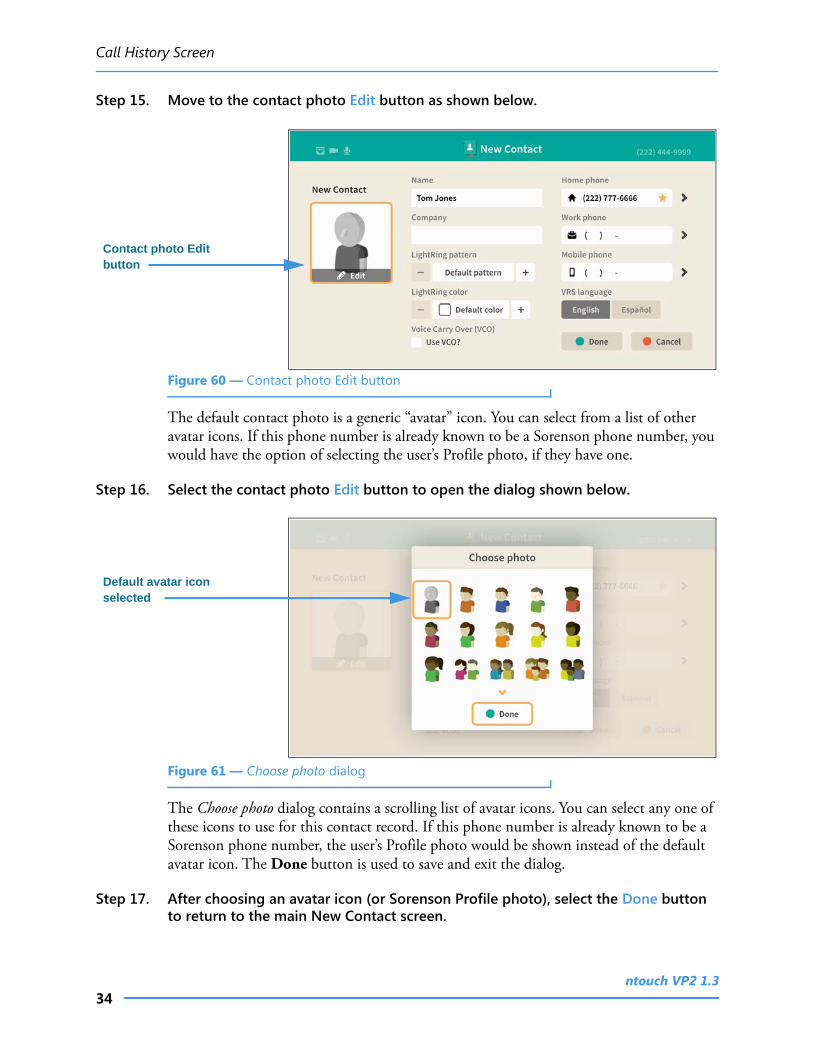
Step 15. Move to the contact photo Edit button as shown below.
Figure 60 — Contact photo Edit button
The default contact photo is a generic “avatar” icon. You can select from a list of other avatar icons. If this phone number is already known to be a Sorenson phone number, you would have the option of selecting the user’s Profile photo, if they have one.
Step 16. Select the contact photo Edit button to open the dialog shown below.
Figure 61 — Choose photo dialog
The Choose photo dialog contains a scrolling list of avatar icons. You can select any one of these icons to use for this contact record. If this phone number is already known to be a Sorenson phone number, the user’s Profile photo would be shown instead of the default avatar icon. The Done button is used to save and exit the dialog.
Step 17. After choosing an avatar icon (or Sorenson Profile photo), select the Done button to return to the main New Contact screen.
Contact photo Edit button
Default avatar icon selected

Call History Screen
35User Guide
Step 18. Move to the LightRing pattern control as shown below.
Figure 62 — LightRing pattern control
Moving to the LightRing pattern control has highlighted the + button. You can use this, and the - button, to move through the pattern options. This example image shows the “Wipe” option selected. The LightRing color control works the same way.
Step 19. Move to the LightRing color control as shown below.
Figure 63 — LightRing color control
You can use the + button and the - button to move through the pattern options. This example image shows the “Teal” option selected.
LightRing pattern control
LightRing pattern + button
LightRing color control
LightRing color + button

Call History Screen
36ntouch VP2 1.3
Step 20. Move to the Use VCO? checkbox as shown below.
Figure 64 — Use VCO? checkbox
Moving to the Use VCO? checkbox has highlighted the checkbox. If you select the checkbox, you will enable the VCO feature for this contact.
Step 21. Move to the LightRing color control as shown below.
Figure 65 — LightRing color control
You can use the VRS language buttons to select the default interpreter for this contact.
The Done button is used to save and exit the screen.
Use VCO? checkbox
VRS language buttons

Call History Screen
37User Guide
Step 22. Select the Done button to return to the Call History screen as shown below.
Figure 66 — Call History screen after adding a contact
Notice that an Edit button is now shown for the selected call history record. However, the name that you entered for the new contact record you created for this call record is not shown on the screen. This is because the Call History list shows only the information that is available to it at the time the call was recorded, therefore the list is not changed by the addition of a new contact record. However, you can select any of the call records to see whether a “Save” or “Edit” button is shown for that record.
The Save new contact feature on the Call History screen works exactly the same as the New Contact feature on the Phonebook screen. The only difference is that when adding a contact record from the Call History screen, you begin the process by selecting the phone number for an existing call record. In the Phonebook, you start by entering the contact’s name and phone number(s) yourself.
Edit button

Phonebook Screen
38ntouch VP2 1.3
Phonebook ScreenFollow the steps below to take a quick look at the features of the Phonebook screen.
Step 1. Start at the Home screen as shown below.
Figure 67 — Phonebook button on Home screen
The Phonebook button is selected (highlighted in yellow) in this example image.
Step 2. Select the Phonebook button to open the screen shown below.
Figure 68 — Features of the Phonebook screen
The Phonebook screen lets you see a list of your contacts, favorites and blocked numbers. You can use the filtering buttons to select to view a list of the Contacts you’ve saved or to see lists of your Favorites or Blocked contacts. The contact info area at the top-right shows details about the selected contact record. The New Contact button opens the New Contact screen which looks and works almost the same as when accessed from the Call History screen. The two function buttons at the bottom-right let you Edit or Delete the selected contact record.
Phonebook button
Selected contact in Contact list
New Contact button
Function buttons
Info about selected contact
List filtering buttons

Phonebook Screen
39User Guide
Step 3. Move to the selected contact’s phone number button as shown below.
Figure 69 — A contact’s phone number field selected
Selecting a contacts’ phone number has revealed the Call button. Selecting the button lets you place a call to this number. Also notice the Action button.
Step 4. Move to the Action button as shown below.
Figure 70 — Action button highlighted
Selected contact
Phone number field
Action button
Action button highlighted

Phonebook Screen
40ntouch VP2 1.3
Step 5. Select the Action button as shown below.
Figure 71 — Options in action button revealed
Selecting the Action button has revealed the Block and Favorite buttons. The Favorite button appears because this phone number is not marked as a favorite. To exit without selecting a button, press the Back key on the remote control.
Step 6. Move to the Edit button as shown below.
Figure 72 — Edit button highlighted
Favorite button
Edit button

Phonebook Screen
41User Guide
Step 7. Select the Edit button to open the screen shown below.
Figure 73 — Edit Contact screen
Notice that the Edit Contact screen looks almost exactly the same as the New Contact screen. You can use this screen to make changes to an existing contact record.
Step 8. Select the Cancel button to exit this screen and return to the Phonebook screen.
Step 9. Move to the Contacts button as shown below.
Figure 74 — Contacts button on Phonebook screen
When you moved to the Contacts button, the list in the center of the screen changes to show a list of all your saved contact records. If you have many contacts, you can move to the alphabet column to quickly select a group of contacts by their first letter.
Note: The list filtering option that was most recently used will be used when reopening the Phonebook. For example, if the Favorites list filter was last used, it will be selected the next time you open the Phonebook screen.
Contacts button
List of all saved contacts
Alphabet column

Phonebook Screen
42ntouch VP2 1.3
Step 10. Move to the Favorites button to open the screen shown below.
Figure 75 — Favorites list shown on Phonebook screen
The Favorites list shows only those contacts which you have marked as your favorites.
The New Favorite button opens the New Contact screen so that you can add a new contact and mark it as a favorite.
The Rearrange button lets you change the ordering of the favorites already in the list.
Step 11. Move to the Rearrange button as shown below.
Figure 76 — Rearrange button on Favorites List screen
New Favorite and Rearrange buttons
List of favorite contacts
Favorites button
Rearrange button

Phonebook Screen
43User Guide
Step 12. Select the Rearrange button to open screen shown below.
Figure 77 — Rearrange favorites dialog
In this example image, there are two favorites shown in the Rearrange favorites dialog. You can swap the ordering of these two contacts using the controls in the dialog. To do so, first select the contact that you want to move (either up or down). The “Tom Doe” contact is selected in this example image. Next, notice the “up and down arrows” icon located to the right of the selected contact’s name. This icon represents the Rearrange button.
Step 13. Move to the Rearrange button as shown below.
Figure 78 — Rearrange button selected
Notice that moving to the Rearrange button has highlighted its up and down arrows. This means that you can now move the selected contact up or down in the list simply by using the arrow keys on the remote control.
Selected contact
Rearrange icon selected

Phonebook Screen
44ntouch VP2 1.3
Step 14. Use arrow key to move the selected contact down in the list as shown below.
Figure 79 — Contact moved down in the list
Notice that the “Tom Doe” contact is down listed below the “Tom Jones” contact. If there were more contacts in your Favorites list, you could rearrange their ordering in the same way. That is, first select a contact, next move to the Rearrange button and then move the contact up or down in the list by using the arrow keys on the remote control. When finished rearranging contacts, select the Done button.
Step 15. Select the Done button to return to the main Favorites list as shown below.
Figure 80 — Contact moved down in the list
Notice that the “Tom Doe” contact now appears below the “Tom Jones” contact on the main Favorites list screen. The Rearrange button will still be selected as shown here.
Contact moved down
Favorites rearranged

Phonebook Screen
45User Guide
Step 16. Move to the Blocked button to open screen shown below.
Figure 81 — Blocked list shown on Phonebook screen
The Blocked list shows the contacts you have marked to be blocked from calling you.
In this example image, there is only one blocked number named “Solicitor.”
The Block a Number button opens the Block a Number dialog in which you can enter a new number to be added to the Blocked list.
Step 17. Move to the Block a Number button as shown below.
Figure 82 — Block a Number button highlighted
Blocked button
List of blocked numbers
Block a Number button
Block a Number button

Phonebook Screen
46ntouch VP2 1.3
Step 18. Select the Block a Number button to open screen shown below.
Figure 83 — Block a Number dialog
There are two fields in the Block a Number dialog: the Name/Description and the Phone Number fields. You must make an entry in both of the fields to add it the Blocked list. The Edit button for the Name/Description field is selected for you by default.
Step 19. Select the Name/Description field Edit button to open screen shown below.
Figure 84 — On-screen keyboard for Name/Description field
Selecting to edit the Name/Description field has opened the on-screen keyboard. You will enter text using your remote control to type characters using the on-screen keyboard. Use the Backspace and Clear buttons to delete characters one at a time or to clear the entire text field.
Name/Description field
On-screen keyboard

Phonebook Screen
47User Guide
Step 20. Enter a name/description using the on-screen keyboard as shown below.
Figure 85 — Description entered in text entry field
Notice the Done button at the top-right of the on-screen keyboard.
Step 21. Select the Done button to return to the main screen as shown below.
Figure 86 — Description entered in field
The text you entered now appears in the Name/Description field.
Done button
Text entered in field

Phonebook Screen
48ntouch VP2 1.3
Step 22. Move to the Phone Number field as shown below.
Figure 87 — Phone Number field selected
Selecting the Phone Number field reveals its Edit button. Select the Edit button to enter the phone number you want to block.
Step 23. Select the Phone Number field Edit button to open screen shown below.
Figure 88 — On-screen keyboard for Name/Description field
Selecting to edit the Phone Number field has opened the on-screen keyboard. You will enter a number using your remote control to type characters using the on-screen keyboard.
Phone Number field
On-screen keyboard

Phonebook Screen
49User Guide
Step 24. Enter a phone number using the on-screen keyboard as shown below.
Figure 89 — Phone number entered in text entry field
Notice the Done button at the top-right of the on-screen keyboard.
Step 25. Select the Done button to return to the main screen as shown below.
Figure 90 — Block a Number dialog, both fields filled
Notice that the number you entered using the on-screen keyboard now appears in the Phone Number field. Selecting the Done button returns you to the Block list screen.
Done button
Both fields now contain entries

Phonebook Screen
50ntouch VP2 1.3
Step 26. Select the Done option to open screen shown below.
Figure 91 — Blocked list shown on Phonebook screen
The list now shows the name (but not the phone number) that you just entered into the Block list.
Blocked number in list

SignMail Screen
51User Guide
SignMail ScreenFollow the steps below to take a quick look at the features of the SignMail screen.
Step 1. Start at the Home screen as shown below.
Figure 92 — SignMail button on Home screen
The Settings button is selected (highlighted in yellow) in this example image. The number badges over the Call History and SignMail buttons (the number “3” in this example) show three missed calls and three new SignMail videos.
Step 2. Select the SignMail button to open the screen shown below.
Figure 93 — SignMail screen
The SignMail screen lets you see a list of All SignMails you’ve received or just the Unwatched. Selecting a SignMail reveals its Watch button. The SignMail preview area shows the first frame of the recorded video. The caller’s phone number and name (and the Interpreter ID if this is an SVRS call) are displayed as part of the SignMail record.
SignMail button
Caller ID information
List filtering buttons
SignMail preview area

SignMail Screen
52ntouch VP2 1.3
Step 3. Select the Watch button for a selected video to play back the video as shown below.
Figure 94 — SignMail Play screen
The elapsed time indicator is at the top-right. The video playback area is at the center. The playback controls are at the bottom. You can use the Reply button to send a SignMail to the sender or the Call button to call the sender. You can use the Speed button to speed up or slow down the playback of the video. If you press the remote control’s red Hang Up button, the playback window will immediately close.
Step 4. When finished watching a video, press the Back key on the remote control to exit.
Step 5. Move to the New SignMail button as shown below.
Figure 95 — New SignMail button on SignMail screen
You can use the New SignMail button to send a SignMail video message directly to the sender of any SignMail in your SignMail list or to any number in your Favorites, Contact, or Call History lists. You can also manually enter a number to be dialed. These options are available to you after you select the New SignMail button as shown next.
Playback controls
Video playback area
Elapsed time indicator
New SignMail button

SignMail Screen
53User Guide
Step 6. Select the New SignMail button to open the screen shown below.
Figure 96 — Send a new SignMail to dialog
Select one of the send-to option buttons on the left-hand side of the dialog to select a number from one of the lists or to manually enter a number to be dialed. In this example, the All SignMails option button is selected, so the center of the screen shows a list of the currently available SignMails (in this case, there was only one SignMail in the list).
Step 7. Move to the one of the SignMails in the list as shown below.
Figure 97 — Record button revealed
Moving to one of the SignMails in the list in the center of the screen (in this case, the example “Tom Doe”) has revealed a Record button. If you select this button, you will proceed to record a SignMail message which will be sent directly to the contact named “Tom Doe” without having to first place a call to that person.
The Contacts, Call History, and Favorites options work in the same way as the All SignMails option. The Dialer option displays a field in which you can enter the phone number to which you want to send the SignMail.
Send to option buttons
Search field
Record button

SignMail Screen
54ntouch VP2 1.3
Step 8. Select or dial a number using one of the options. You’ll then see the screen below.
Figure 98 — SignMail Record dialog
This SignMail Record dialog lets you record up to a 2-minute video message. Notice the message which briefly appears to explain how to display the options bar and how to immediately send the recording.
Step 9. When you end the recording you will see the screen shown below.
Figure 99 — SignMail Send/Re-record/Cancel dialog
The options bar which has appeared lets you choose to Send the recorded video message, Re-record the video, or Cancel (throw away) the recording. The self-view video image will appear behind the options bar and time counter (the gray area shown in this sample image).
Message briefly appears
Name and number of person who will receive the SignMail
Options bar

SignMail Screen
55User Guide
Step 10. If you are the receiver of a SignMail video message which was sent directly to you, the SignMail list screen will look like the sample shown below.
Figure 100 — SignMail screen, sample SignMails sent directly
As shown in the sample above, a unique new icon will appear next to any SignMail video message that was sent directly to you. You can view these SignMails just as you do any other SignMail you receive. The blue dots show the unwatched SignMails. The number icon (in this case, “2”) shows the number of unwatched SignMails.
Step 11. Notice the function buttons area of the screen as shown below.
Figure 101 — Function buttons on the SignMail screen
The Reply button lets you record and directly send a SignMail in reply to the SignMail message currently highlighted in the list. The Call back button lets you place a call to the sender of the highlighted SignMail. The Delete, Block and Edit Contact buttons let you delete just the highlighted SignMail, add the sender to your Block list, or open and edit the contact record for the sender. If you want to delete all the SignMails in the current list, you can select the Delete all button. Remember, you cannot recovered deleted SignMails.
Icon showing this SignMail was sent directly to you
Function buttons
Delete all button

SignMail Screen
56ntouch VP2 1.3
Step 12. If a phone number that you entered or selected cannot receive SignMail videos, you will see the dialog shown below.
Figure 102 — Can’t send SignMail dialog
This dialog reminds you that you cannot send a SignMail video message to hearing phone numbers or to third-party (non-Sorenson) numbers. You also cannot send a SignMail to a Sorenson endpoint that is blocking calls from your phone number or to an endpoint that is set to Public mode.
The Call this number button in the dialog allows you to place a call to the number instead (either an SVRS call or a point-to-point call).
Step 13. Move to the Set Greeting Message button as shown below.
Figure 103 — New SignMail button on SignMail screen
You can use the Set Greeting Message button to set the type of SignMail greeting you want to use. You can use the default Sorenson Greeting message or record a personal greeting video yourself. You can also choose to create a text-only message or add text to your personal greeting.
When the Set greeting message button is highlighted, the type of greeting currently selected is shown at the top-right corner of the screen. In this example, the default Sorenson Greeting message is selected.
Set Greeting Message button

SignMail Screen
57User Guide
Step 14. Select the Set Greeting Message button to open the screen shown below.
Figure 104 — SignMail greetings screen, Sorenson greeting selected
The Sorenson greeting is selected by default. The other options are: Personal greeting, Text only and No greeting. The controls for the selected greeting type appear underneath the selection (the Play button is shown in this example). A Personal greeting video can also include a text message, but a Text only greeting does not include a video image.
Step 15. Select the Personal greeting radio button as shown below.
Figure 105 — SignMail greetings screen, Personal greeting selected
Notice that selecting the Personal greeting type has revealed a Record new button.
No greeting checkbox
Greeting type buttons
Controls for selected greeting type
Personal greeting type selected
Controls for selected greeting type

SignMail Screen
58ntouch VP2 1.3
Step 16. Select the Record new button to open the screen shown below.
Figure 106 — Personal greeting record screen
The controls for recording a Personal greeting appear at the bottom of the screen:
• Select the Start record button to begin to record a video. • Select the Video button to reveal the Pan & Zoom, Focus and Brightness/
Saturation control buttons. • Select the Text button to reveal an on-screen keyboard in which you can enter a text
message to be displayed over the video recording as shown in the example above.
Step 17. Move to and select the Video button as shown below.
Figure 107 — Personal greeting record screen, Video controls revealed
You can use the video controls to adjust the video image just like you can do during a call:
• Select the Zoom & Pan button to reveal the camera zoom and pan controls. • Select the Focus button to reveal the camera focus controls. • Select the Brightness/Saturation button to reveal the video image controls.
Video image area
Controls for selected greeting type
Video controls revealed

SignMail Screen
59User Guide
Step 18. When finished making changes to the Video controls, press the Back key on the remote control to return to the main SignMail record screen.
Step 19. Move to the Text button as shown below.
Figure 108 — Text button highlighted
Step 20. Select the Text button to open the screen shown below.
Figure 109 — On-screen keyboard for text entry field
Selecting the Text button has opened the on-screen keyboard. You can now enter a text message to be displayed along with the video image as your personal greeting. In this example, the message reads: “Please leave me a SignMail message. Thanks!”
Notice the Done button at the top-right of the on-screen keyboard.
Step 21. Select the Done button to return to the main Personal greeting record screen.
Text display area
Text button highlighted
On-screen keyboard

SignMail Screen
60ntouch VP2 1.3
Step 22. Move to the Start record button as shown below.
Figure 110 — Personal greeting record screen, Start record button
Step 23. Select the Start record button to start recording as shown below.
Figure 111 — Personal greeting record screen
The self-view video image being recorded will appear in the center of the screen (shown as gray in this example). The Elapsed time indicator shows how much of the 30-second video you have recorded so far. The Stop record button ends the recording.
Start record button
Recorded video image
Stop record button
Elapsed time indicator

SignMail Screen
61User Guide
Step 24. When finished, press the Stop record button to open the dialog shown below.
Figure 112 — Save Greeting? dialog
Select Save to save the recording as your Personal SignMail greeting. Select Review to play back the recording. Select Discard to throw away the recording and exit. Select Record to discard the recording and start a new recording.
Step 25. Select Save to save the current recording as your personal greeting. You will then see a screen similar to the one shown below.
Figure 113 — SignMail greetings screen, Personal greeting saved
Notice that the Play button has appeared under the preview image of the personal SignMail greeting you just saved. You can play back the greeting video to check it before choosing to record a new video or use one of the other types of greetings.
Save button
Preview image of saved personal greeting
Play button
SignMail Screen
62ntouch VP2 1.3
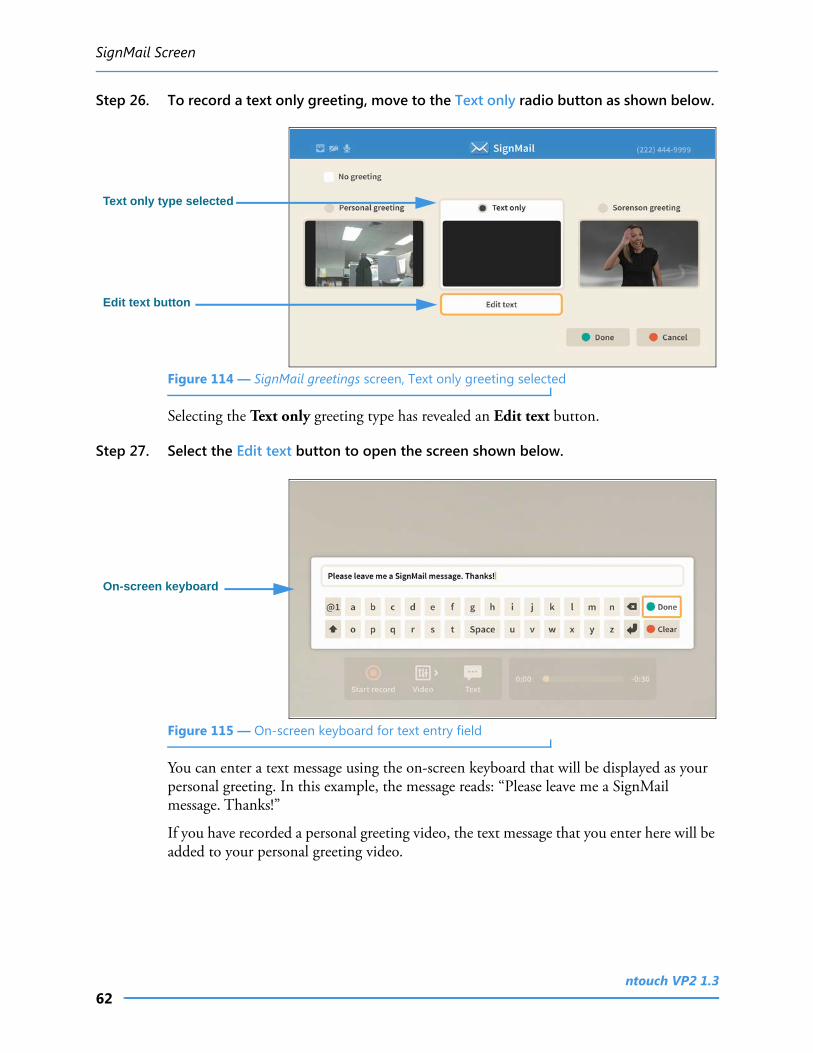
Step 26. To record a text only greeting, move to the Text only radio button as shown below.
Figure 114 — SignMail greetings screen, Text only greeting selected
Selecting the Text only greeting type has revealed an Edit text button.
Step 27. Select the Edit text button to open the screen shown below.
Figure 115 — On-screen keyboard for text entry field
You can enter a text message using the on-screen keyboard that will be displayed as your personal greeting. In this example, the message reads: “Please leave me a SignMail message. Thanks!”
If you have recorded a personal greeting video, the text message that you enter here will be added to your personal greeting video.
Text only type selected
Edit text button
On-screen keyboard

SignMail Screen
63User Guide
Step 28. Select the Done button to return to the screen shown below.
Figure 116 — SignMail greetings screen, Text only greeting selected
Notice that the Play button has appeared under the preview image of the Text only SignMail greeting which you just saved. Also, because you saved a Personal greeting video, the entered text message has also been added to that video as an “overlay” image.
Step 29. Select the No greeting checkbox to display the screen shown below.
Figure 117 — SignMail greetings screen, No greeting selected
Notice that selecting the No greeting checkbox has grayed-out the other options. The Personal greeting and/or text you saved have not been deleted, they are only inactive. If you do not choose to use any greeting, your callers will be sent directly to the SignMail recording screen when the system answers their calls when you are not available.
Step 30. When finished, press the Home key on the remote control to return to the Home screen.
Text greeting
Play button
Grayed-out options
No greeting checkbox

Video Center Screen
64ntouch VP2 1.3
Video Center ScreenFollow the steps below to take a quick look at the features of the Video Center screen.
Step 1. Start at the Home screen as shown below.
Figure 118 — Video Center button on Home screen
The Video Center button is selected (highlighted in yellow) in this example image. The star badge over the button shows that there are new videos in the Video Center.
Step 2. Select the Video Center button to open the screen shown below.
Figure 119 — Video Center screen
When the Video Center screen is first opened, a Featured video will be shown at the top of the screen. To play the featured video, select the Play button.
The Channel buttons are shown at the bottom-left of the screen.
Video Center button
Channel buttons
Featured video

Video Center Screen
65User Guide
Step 3. Move to the SN (Sorenson Network) button as shown below.
Figure 120 — Video Center screen, SN channel button selected
Notice that moving to the SN channel button has removed the Featured video from the screen. The Programs on the selected channel are shown in the middle of the screen. The Episode name is shown at the bottom of the preview button.
Step 4. Move to the Handmade program button as shown below.
Figure 121 — Video Center screen, Homemade episode button selected
Notice that moving to the Handmade episode has highlighted the button and revealed the More Info button. The blue dot indicates that this video has not yet been viewed.
Channel buttons
Program button
Episode name
Program button
Video Center Screen
66ntouch VP2 1.3
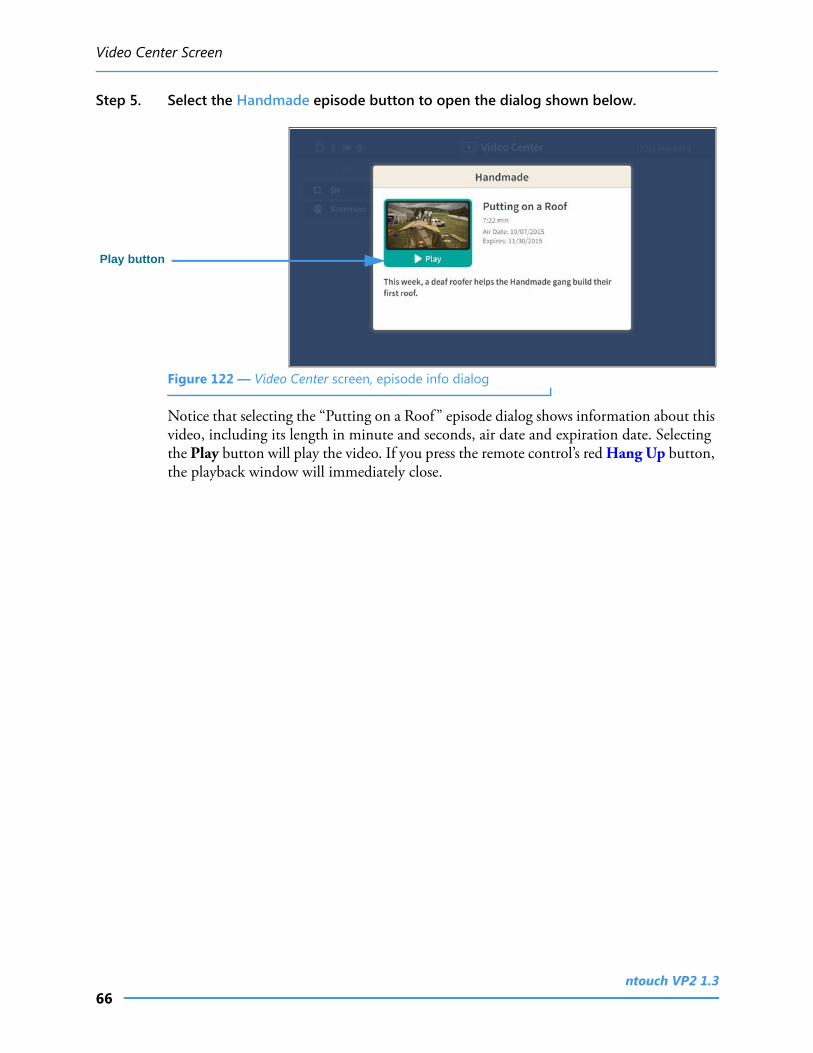
Step 5. Select the Handmade episode button to open the dialog shown below.
Figure 122 — Video Center screen, episode info dialog
Notice that selecting the “Putting on a Roof” episode dialog shows information about this video, including its length in minute and seconds, air date and expiration date. Selecting the Play button will play the video. If you press the remote control’s red Hang Up button, the playback window will immediately close.
Play button

Changing Settings
67User Guide
Changing SettingsFollow the steps below to change the settings of your ntouch VP2 videophone.
Step 1. Start at the Home screen as shown below.
Figure 123 — Settings button on Home screen
The Settings button is selected (highlighted in yellow) in this example image.
Step 2. Select the Settings button to open the screen shown below.
Figure 124 — Settings screen, Call Options button selected
When the Settings screen is first opened, the Call Options button is selected as shown in the above image. There are five other large buttons on the screen from left-to-right, top-to-bottom: Personal Info, Support, Device Options, Controls and Network/Admin.
Notice the two small buttons at the bottom-right of the screen: Do not disturb and About this device. You use these buttons to turn on the Do not disturb feature or to see technical information about the videophone or look for a software update.
Settings button
Call Options button selected

Changing Settings
68ntouch VP2 1.3
Step 3. Select the Call Options button to open the screen shown below.
Figure 125 — Call Options Settings screen, In-call Options
When the Call Options Settings screen is first opened, the In-call Options button is selected as shown in the above image. There are three other Call Options buttons: Saved Text, Voice Carry Over and VRS Announce. The controls for the selected subheading are shown in the center of the screen.
Step 4. To see and change the Call Option settings, first select the subheading button that you want to change. You can then make changes to the selected feature using the controls that appear in the center of the screen.
The In-call Options controls [and the possible settings for each control] are:
• Turn on call waiting? [enable/disable the call waiting feature]
• Show a hint in my options bar when my call starts? [enable/disable the hint]
• How long should I display my options bar? [select 2, 4, 6, 8, 15, or 30 seconds]
Call Options heading
Subheading buttons
Controls for selected subheading

Changing Settings
69User Guide
Step 5. Select the Saved Text button to open the screen shown below.
Figure 126 — Call Options Settings screen, Saved Text
Selecting the Saved Text button reveals these controls [and possible settings]:
• Saved Text 1 — 5 [enter text to be saved in these fields]
• Saved Text 6— 10 [enter text to be saved in these fields]
Step 6. Move to the Saved Text 1 button to open the screen shown below.
Figure 127 — Call Options Settings screen, Saved Text 1
Moving to the Saved Text 1 field has revealed the Add button. You use this button to add text that you want to save for reuse during active videophone calls.
Saved Text button
Saved Text fields
Saved Text 1 field and button

Changing Settings
70ntouch VP2 1.3
Step 7. Select the Saved Text 1 field Add button to open the keyboard shown below.
Figure 128 — On-screen keyboard for text entry
Selecting to add text in the Saved Text 1 field has opened the on-screen keyboard. You can now use the keyboard to enter any text you want to save. In this example image, some text has been entered to show a possible use of this feature (i.e., saving an account number).
Step 8. Select the Done button to return to the main screen as shown below.
Figure 129 — Call Options Settings screen, text saved in field
After returning to the main screen, you can see part of the text that you just entered in the Saved Text 1 field. You can return to this screen to edit any of the Saved Text fields at any time in the future.
On-screen keyboard
Text entry field
Backspace and Clear buttons
Saved text shown in field

Changing Settings
71User Guide
Step 9. Select the Voice Carry Over button to open the screen shown below.
Figure 130 — Call Options Settings screen, Voice Carry Over
Selecting the Voice Carry Over button reveals these controls [and possible settings]:
• Turn on Voice Carry Over (VCO)? [enable/disable the VCO feature]
• VCO audio choices [select the 1-line or the 2-line VCO option]
• What is my 2-line VCO call back number? [edit callback number for 2-line]
Step 10. Select the VRS Announce button to open the screen shown below.
Figure 131 — Call Options Settings screen, VRS Announce
Selecting the VRS Announce button reveals two announcement options:
• Please wait while your call is connected. Thank you.
• You have called someone who uses sign language to communicate. I will interpret the call for you.
Voice Carry Over button
Controls for selected subheading
VRS Announce button
Announcement options

Changing Settings
72ntouch VP2 1.3
Step 11. When finished making changes to the Call Options Settings screen, press the Back key on the remote control to return to the main Settings screen.
Step 12. Move to the Personal Info button as shown below.
Figure 132 — Personal Info button selected on Settings screen
Step 13. Select the Personal Info button to open the screen shown below.
Figure 133 — Personal Info Settings screen, User Account
When the Personal Info Settings screen is first opened, the User Account button is selected as shown in the above image. There is one other Personal Info button: Profile Photo. The fields and controls for the selected subheading are shown in the center of the screen.
The User Account fields and controls [and possible settings] are:
• Street Address, City, State, ZIP [all of these fields are editable]
• Name, Caller ID Videophone number [none of these fields are editable]
• Time zone [select time zone from the pop-up dialog]
Personal Info button selected
Personal Info heading
Subheading buttons
Fields and controls for selected subheading

Changing Settings
73User Guide
Step 14. Select the Profile Photo button to open the screen shown below.
Figure 134 — Personal Info Settings screen, Profile Photo
Selecting the Profile Photo button reveals these controls [and possible settings]:
• Take new photo [select to take your own photo using the videophone’s camera]
• Browse photos [select to use an avatar or a previously saved photo]
• Remove this photo [select to remove the saved photo]
• Share my profile photo? [share with everyone or only with Phonebook contacts]
Step 15. When finished making changes to the Personal Info Settings screen, press the Back key on the remote control to return to the main Settings screen.
Step 16. Move to the Support button as shown below.
Figure 135 — Settings screen, Support button selected
Profile Photo button
Controls for selected subheading
Support button selected

Changing Settings
74ntouch VP2 1.3
Step 17. Select the Support button to open the screen shown below.
Figure 136 — Support Settings screen, Customer Service
When the Support Settings screen is first opened, the Customer Service button is selected as shown in the above image. There is one other Support button: Technical Support. The controls for the selected subheading are shown in the center of the screen.
The Customer Service controls [and possible uses] are:
• Call Customer Service [select to dial a call to Sorenson Customer Service (CIR)]
Step 18. Select the Technical Support button to open the screen shown below.
Figure 137 — Support Settings screen, Technical Support
Selecting the Technical Support button reveals these controls [and possible uses]:
• Call Technical Support [select to dial a call to Sorenson Technical Support]
Step 19. When finished making changes to the Personal Info Settings screen, press the Back key on the remote control to return to the main Settings screen.
Support heading
Subheading buttons
Technical Support button

Changing Settings
75User Guide
Step 20. Move to the Device Options button as shown below.
Figure 138 — Settings screen, Device Options button
Step 21. Select the Device Options button to open the screen shown below.
Figure 139 — Device Options Settings screen, LightRing
When the Device Options Settings screen is first opened, the LightRing button is selected as shown in the image. There are five other Device Options buttons: Sound, Screen Controls, Privacy/Notifications, myPhone and Bluetooth. The controls for the selected subheading are shown in the center of the screen.
The LightRing fields and controls [and possible settings] are:
• What is my default LightRing pattern? [select one of the available patterns]
• What is my LightRing brightness? [select from Low, Medium and High]
• What is my default LightRing color? [select one of the available colors]
Device Options button selected
Device Options heading
Subheading buttons
Controls for selected subheading

Changing Settings
76ntouch VP2 1.3
Step 22. Select the Sound button to open the screen shown below.
Figure 140 — Device Options Settings screen, Sound
Selecting the Sound button reveals these controls [and possible settings]:• Use point-to-point audio? [enable/disable sending sound in P2P calls]• Show audio meter? [enable/disable display of the audio meter]• Play ringer sounds? [enable/disable ringer sounds]• What is my phone’s ringer volume? [select from Low, Medium and High]• What is my phone’s ringer pitch? [select from Low, Medium and High]
Step 23. Select the Screen Controls button to open the screen shown below.
Figure 141 — Device Options Settings screen, TV Display
Selecting the Screen Controls button reveals these controls [and possible settings]:• What is my screen saver? [select one of the available screen savers]• Play screensaver after [select 30 seconds to 10 minutes]• Allow incoming calls to turn on TV? (Use TV CEC) [enable/disable]• What is my phone theme? [select one of the available themes]
Sound button
Controls for selected subheading
Screen Controls button
Controls for selected subheading

Changing Settings
77User Guide
Step 24. Select the Privacy/Notifications button to open the screen shown below.
Figure 142 — Device Options Settings screen, Privacy/Notifications
Selecting the Privacy/Notifications button reveals these controls [and possible settings]:
• Always answer calls in Privacy mode? [enable/disable Privacy for all calls]
• Hide my caller ID? [enable/disable display of your Caller ID during calls]
• Don’t accept anonymous calls? [enable/disable reject of calls without Caller ID]
• Don’t show SignMail and Missed Call LED notifications? [enable/disable display of these two types of notifications]
Step 25. Select the myPhone button to open the screen shown below.
Figure 143 — Device Options Settings screen, myPhone
Selecting the myPhone button reveals this control [and possible uses]:
• Create a myPhone group [select to dial a call to Sorenson CIR for assistance]
Privacy/Notifications button
Controls for selected subheading
myPhone button
Controls for selected subheading

Changing Settings
78ntouch VP2 1.3
Step 26. Select the Bluetooth button to open the screen shown below.
Figure 144 — Device Options Settings screen, Bluetooth
Selecting the Bluetooth button reveals this control [and possible uses]:
• Allow Bluetooth devices? [select to turn on the Bluetooth feature]
Step 27. Move to and select the Allow Bluetooth devices? control to open the screen below.
Figure 145 — Device Options Settings screen, Bluetooth enabled
Selecting the Allow Bluetooth devices box reveals these controls [and possible uses]:
• Scan for devices [select to start a new scan for Bluetooth devices]
• Available Bluetooth devices [shows a list of discovered Bluetooth devices]
• List of discovered devices [select a device from the list to connect to it]
Step 28. When finished making changes to the Device Options Settings screen, press the Back key on the remote control to return to the main Settings screen.
Bluetooth button
Controls for selected subheading
Allow Bluetooth devices? control

Changing Settings
79User Guide
Step 29. Move to the Controls button as shown below.
Figure 146 — Settings screen, Controls button
Step 30. Select the Controls button to open the screen shown below.
Figure 147 — Controls Settings screen
Selecting the Controls screen reveals these controls [and possible settings]:
• Clear call history [select to delete all call history records]• Show contact photos? [enable/disable showing contact photos]• Turn on Spanish features? [enable/disable the Spanish VRS contact]• Tell me about new videos? [enable/disable notification of new videos]• Play SignMail greetings after [select from 1 to 12 rings]
• Warn me when I delete all my SignMails? [enable/disable warning dialog]
• Send me SignMail alerts? [enable/disable sending SignMail alert emails]
• Send an alert to this email address: [enter up to two email addresses for alerts]
Controls button selected
Controls heading
Available controls

Changing Settings
80ntouch VP2 1.3
Step 31. When finished making changes to the Controls Settings screen, press the Back key on the remote control to return to the main Settings screen.
Step 32. Move to the Network/Admin button as shown below.
Figure 148 — Settings screen, Network/Admin button
Step 33. Select the Network/Admin button to open the screen shown below.
Figure 149 — Controls Settings screen
When the Network/Admin Settings screen is first opened, the Connection Type button is selected as shown in the above image. There are two other Network/Admin buttons: IP Settings and HTTP Proxy. The controls for the selected subheading are shown in the center of the screen.
The Connection Type fields and controls [and possible settings] are:
• What is my connection type? [select Wired or Wireless]
Network/Admin button selected
Network/Admin heading
Subheading buttons
Controls for selected subheading

Changing Settings
81User Guide
Step 34. Move to and select the Wireless button to open the screen below.
Figure 150 — Network/Admin Settings screen, Wireless enabled
Selecting the Wireless button reveals these controls [and possible uses]:
• Scan for networks... [select to start a new scan for Wi-Fi networks]
• Other... [select to enter an SSID for a network not transmitting its SSID]
Step 35. Select the Wireless button to open the screen shown below.
Figure 151 — Choose a network screen, Other button highlighted
The Choose a network dialog shows the videophone is searching for nearby wireless networks. The discovered wireless networks will be shown in a list with the strongest network at the top of the list. The Other button is used to manually enter an SSID. This function is useful if you want to quickly enter the desired network SSID and its key (password) or if you need to connect to a “hidden” wireless network (i.e., one that is not broadcasting its SSID).
Wireless button
Other button
Other button

Changing Settings
82ntouch VP2 1.3
Step 36. The image below shows an example of the dialog with a list of discovered networks.
Figure 152 — Choose a network screen, discovered networks list
In this example, the network named “public” is highlighted in the middle of the list. To connect to the highlighted network, press the OK key on the remote control.
The gray icon to the right of the network names shows the relative strength of each network’s signal. If a padlock icon appears, the network requires a password (key). If a discovered network is not supported by ntouch VP2, its name will be grayed-out.
Step 37. Select the desired network button to attempt to connect to that network. If a network password (key) is required, the screen shown below will appear.
Figure 153 — Enter password dialog
Notice that the Edit button for the network password field is now shown.
Step 38. Select the Edit button. Enter the password for this network using the on-screen keyboard. Then, select the Done button to attempt to connect to the network.
Step 39. If the network connection is successful, go one to Step 49 on Page 85.
Discovered networks list
Edit button

Changing Settings
83User Guide
Step 40. To manually enter the SSID of a hidden network, select the Other button in the screen shown in Figure 150 to open the screen shown below.
Figure 154 — Add a new network dialog, Network name (SSID) Edit button
Notice that the Edit button for the Network name (SSID) field is now shown.
Step 41. Select the Edit button. Enter the SSID of this network using the on-screen keyboard.
Step 42. Select the Done button to return to the Add a new network screen. Move to the Security type Edit button as shown below.
Figure 155 — Add a new network screen, Security type Edit button
Notice that the Edit button for the Security type field is now shown.
Edit button
Edit button

Changing Settings
84ntouch VP2 1.3
Step 43. Select the Edit button to open the screen shown below.
Figure 156 — Security type screen
The three buttons on this screen, None, WEP, and WPA/WPA2, let you select which type of security protocol is being used by the wireless network (SSID).
Step 44. Select the type of security protocol that is being used by the specified SSID.
Step 45. Select the Done button to return to the screen shown below.
Figure 157 — Add a new network screen, Security type selected
Check to make sure that the entries in the Network name (SSID) and Security type fields are correct.
Step 46. Select the Done button to attempt to connect to the wireless network (SSID).
Security type buttons

Changing Settings
85User Guide
Step 47. If you selected either the WEP or WPA/WPA2 security types, you will be asked to enter the network key (password) as shown below.
Figure 158 — Enter password dialog
Step 48. Enter the network password (key) using the on-screen keyboard.
Step 49. If the videophone is able to connect to the wireless network and Sorenson’s servers, you will see the screen shown below.
Figure 159 — Network connection screen, Network connected message
Step 50. You will then be returned to the Network/Admin Settings screen.Instead of using the Wireless network feature, you can set the ntouch VP2 to use DHCP or a static IP address. The steps that follow below show how to do so.
Note: Do not make changes to the IP settings unless you are instruction to do so by Sorenson Technical Support!
Edit button
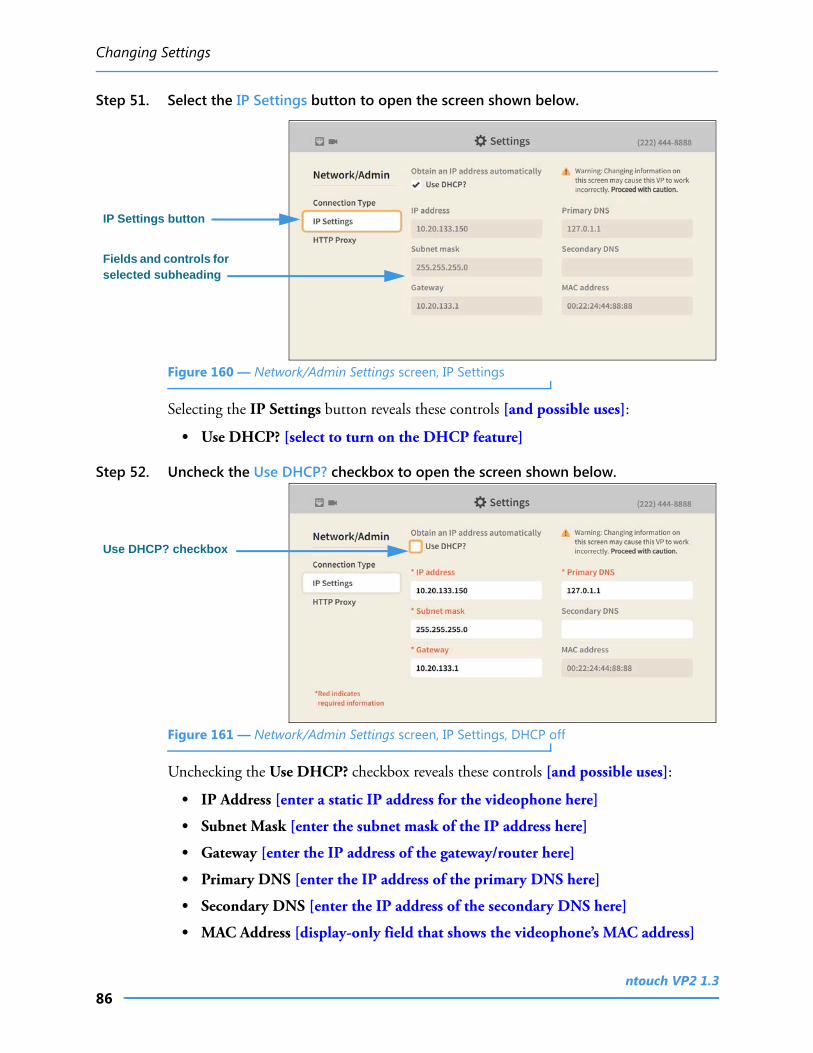
Changing Settings
86ntouch VP2 1.3
Step 51. Select the IP Settings button to open the screen shown below.
Figure 160 — Network/Admin Settings screen, IP Settings
Selecting the IP Settings button reveals these controls [and possible uses]:
• Use DHCP? [select to turn on the DHCP feature]
Step 52. Uncheck the Use DHCP? checkbox to open the screen shown below.
Figure 161 — Network/Admin Settings screen, IP Settings, DHCP off
Unchecking the Use DHCP? checkbox reveals these controls [and possible uses]:
• IP Address [enter a static IP address for the videophone here]
• Subnet Mask [enter the subnet mask of the IP address here]
• Gateway [enter the IP address of the gateway/router here]
• Primary DNS [enter the IP address of the primary DNS here]
• Secondary DNS [enter the IP address of the secondary DNS here]
• MAC Address [display-only field that shows the videophone’s MAC address]
IP Settings button
Fields and controls for selected subheading
Use DHCP? checkbox

Changing Settings
87User Guide
Step 53. Select the HTTP Proxy button to open the screen shown below.
Figure 162 — Network/Admin Settings screen, HTTP Proxy
Selecting the HTTP Proxy button reveals these controls [and possible uses]:
• Proxy address [enter the IP address of a proxy server]
• Proxy port [enter the port of the proxy server to connect to]
Note: Do not make changes to the HTTP Proxy settings unless you are instructed to do so by Sorenson Technical Support!
Step 54. When finished making changes to the Network/Admin Settings screen, press the Back key on the remote control to return to the main Settings screen.
Step 55. Move to the Support button as shown below.
Figure 163 — Settings screen, Do not disturb button selected
HTTP Proxy button
Fields and controls for selected subheading
Do not disturb button

Changing Settings
88ntouch VP2 1.3
Step 56. Select the Do not disturb button to open the screen shown below.
Figure 164 — Do not disturb dialog
The Do Not Disturb dialog warns you that activating this feature will send all incoming calls directly to SignMail. The LightRing will not flash when this feature is active.
Step 57. Select OK to turn on the Do not disturb feature or Cancel to exit. You will return to the main Settings screen as shown below.
Figure 165 — Do not disturb message on Home screen
When the Do not disturb feature is turned on, the Home screen will show a Turn off Do not disturb button next to the Settings button. You can use that button to turn off the feature without having to return to the Settings screen.
The active screensaver will also show a “Do not disturb” message above the clock.
Turn off button

Changing Settings
89User Guide
Step 58. Move to the About this device button as shown below.
Figure 166 — Settings screen, About this device button selected
Step 59. Select the About this device button to open the screen shown below.
Figure 167 — About this device screen, Check for updates... button
The About this device Settings screen shows the software and boot versions of the videophone and information about its IP and MAC addresses.
The Check for updates... and View agreements and Restart videophone buttons are located at the right side of the screen. The Restart videophone button lets you reboot the videophone without having to unplug the power cord.
About this device button
Group of buttons

Changing Settings
90ntouch VP2 1.3
Step 60. Select the Restart videophone button to open the dialog shown below.
Step 61. Select the Restart videophone button to begin the restart (reboot) process or Cancel to exit the operation. When completed, you will be back at the Home screen.
Step 62. Select the View agreements button to open the screen shown below.
Figure 168 — Consents and Disclaimers agreement screen
You can view three screens, starting with the Consents and Disclaimers screen shown above. There is also a End-User License Agreement screen and a Self-Certification screen.
Select the Scroll down button to through the text. Select the OK button to move to the next agreements screen. After viewing the third screen, you will return to the About this device screen.
Restart videophone button
Scroll down button
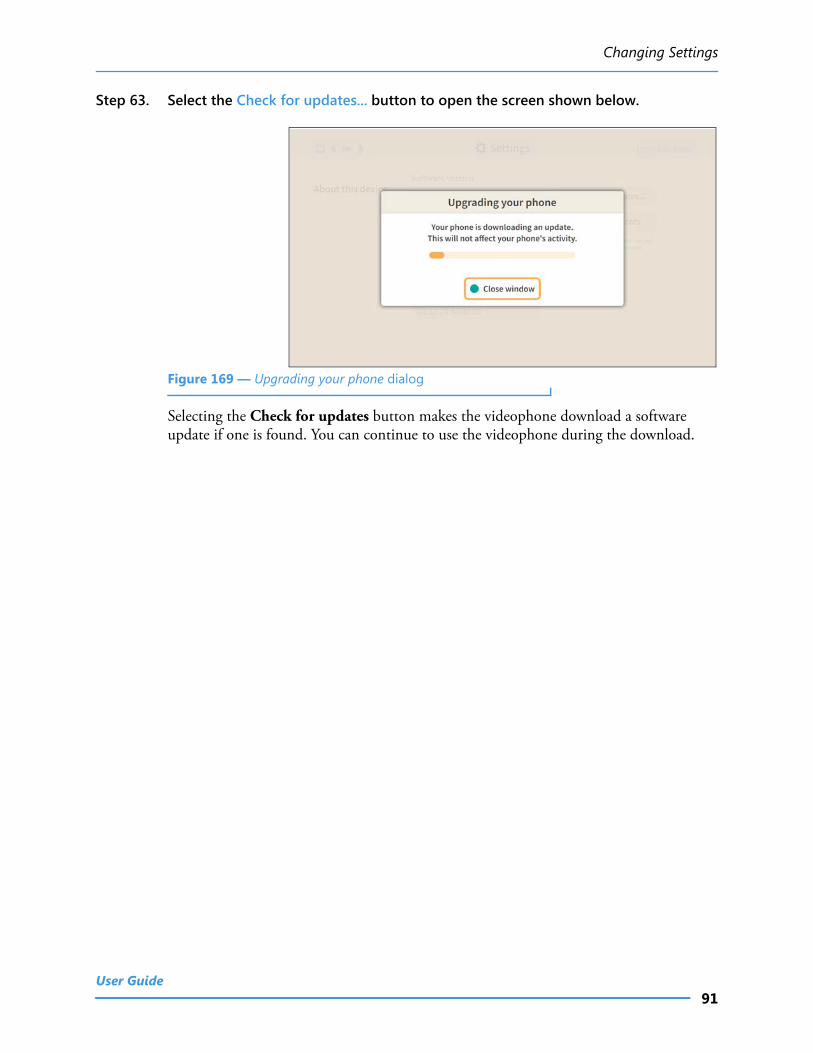
Changing Settings
91User Guide
Step 63. Select the Check for updates... button to open the screen shown below.
Figure 169 — Upgrading your phone dialog
Selecting the Check for updates button makes the videophone download a software update if one is found. You can continue to use the videophone during the download.

Making Group Calls
92ntouch VP2 1.3
Making Group CallsYou can use the Group Call feature to have a conversation with up 4 other people at one time. A group call begins when you “join” two calls together into one call. You can then add up to 2 other calls (for a total of 4 calls) at once. You can use the ntouch VP2 Group Call feature with all Sorenson endpoints during a point-to-point call. The Group Call feature does not work with Sorenson Video Relay Service (SVRS) calls.
The example images below show the Video Privacy mode enabled on all endpoints. This was done to make it easier to see how to use the feature.
Step 1. When in an active call, press the OK key on the remote control to open the In-call options bar as shown below.
Figure 170 — In-call screen, In-call options bar displayed
Step 2. Move to the Call button as shown below.
Figure 171 — Call button in the In-call options bar
In-call options bar
Call button

Making Group Calls
93User Guide
Step 3. Select the Call button to open the Call menu as shown below.
Figure 172 — Call menu open, Call History button highlighted
You can choose to make a call from your Call History list, Favorites list, Phonebook Contacts list or dial a number using the on-screen keypad.
Step 4. Select the Call History button to open the dialog shown below.
Figure 173 — Call History list opened
Call menu open
Call History list open

Making Group Calls
94ntouch VP2 1.3
Step 5. Select a phone number (or name) from the list to dial a call as shown below.
Figure 174 — Dialing new call
Step 6. When the new call is answered, you will see a message like that shown below.
Figure 175 — New call answered, first call on hold
Call on hold, new call being dialed
In call with new caller, first caller on hold

Making Group Calls
95User Guide
Step 7. Press the OK key on the remote control to open the In-call options bar as shown below.
Figure 176 — In-call options bar opened
Step 8. Move to the Join button as shown below.
Figure 177 — Join button on In-call options bar
In-call options bar
Join button

Making Group Calls
96ntouch VP2 1.3
Step 9. Select the Join button to join the calls as shown below.
Figure 178 — Joining calls message
Step 10. As the calls are being joined, you will briefly see the message shown below.
Figure 179 — Group call being created message
Joining calls message
Group Call ID message

Making Group Calls
97User Guide
Step 11. After the calls are joined, you will see the received video images from both calls appear in the center of the screen as shown below.
Figure 180 — Group Call in process, total of 3 persons in call
Step 12. To add more calls to the Group Call, repeat Steps 1 through 10 above. You can add up to 2 other calls (for a total of 4 persons other than yourself) at one time. Everyone in the Group Call will see the same four images on their screens.
1st Received image
2nd Received image

Selecting a Phone Theme
98ntouch VP2 1.3
Selecting a Phone Thementouch VP2’s Theme feature that lets you choose from four different color settings for the videophone’s user interface. The themes are named “Sand Dune” (the default and the only option available in Firmware 1.0), “Ocean Tide,” “Contrast,” and “Thunderstorm.”
Step 1. Start at the Home screen. Move to the Settings button as shown below.
Figure 181 — Settings button on Home screen
Step 2. Move to the Device Options button as shown below.
Figure 182 — Settings screen, Device Options button
Settings button
Device Options button selected

Selecting a Phone Theme
99User Guide
Step 3. Select the Screen Controls button to open the screen shown below.
Figure 183 — Device Options Settings screen, Screen Control
Step 4. Move to the What is my phone theme? control buttons as shown below.
Figure 184 — What is my phone theme? controls
You can use the right and left arrow controls in the What is my phone theme? area to select a theme. In this example, the default “Sand Dune” theme is selected. All of the sample screens in the steps above show the Sand Dune theme’s “light-tan and white” color palette.
Screen Controls button
What is my phone theme? controls
Name of active theme
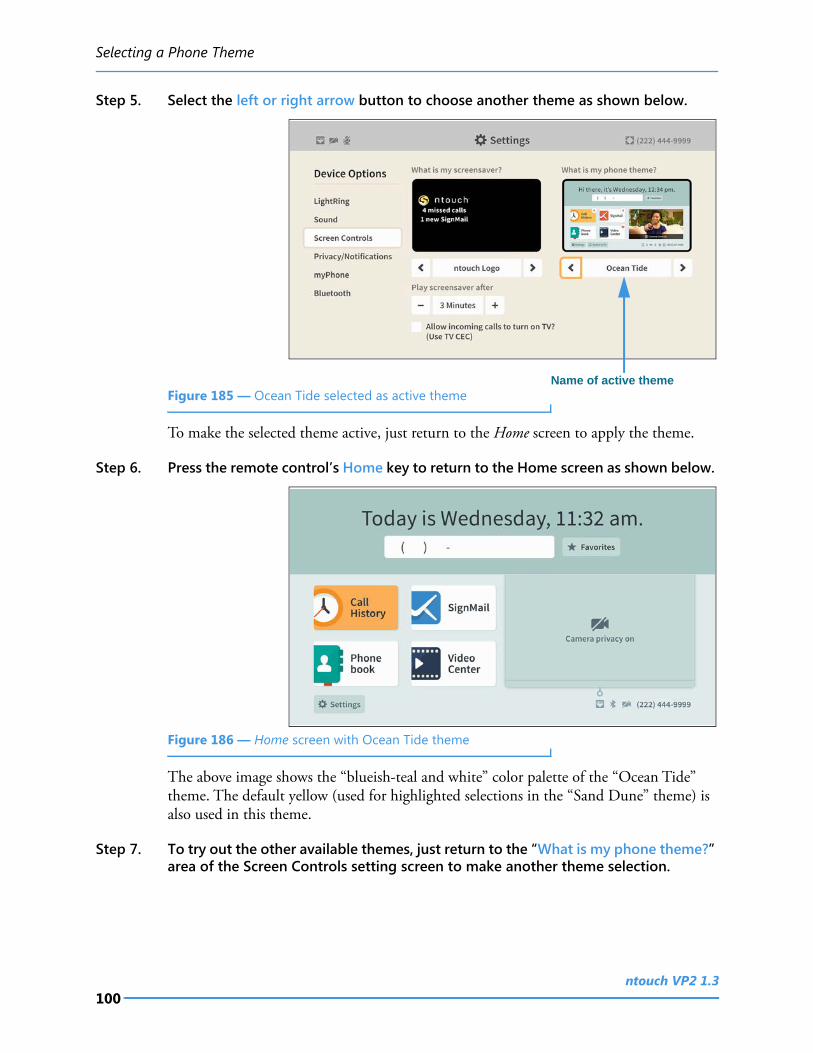
Selecting a Phone Theme
100ntouch VP2 1.3
Step 5. Select the left or right arrow button to choose another theme as shown below.
Figure 185 — Ocean Tide selected as active theme
To make the selected theme active, just return to the Home screen to apply the theme.
Step 6. Press the remote control’s Home key to return to the Home screen as shown below.
Figure 186 — Home screen with Ocean Tide theme
The above image shows the “blueish-teal and white” color palette of the “Ocean Tide” theme. The default yellow (used for highlighted selections in the “Sand Dune” theme) is also used in this theme.
Step 7. To try out the other available themes, just return to the “What is my phone theme?” area of the Screen Controls setting screen to make another theme selection.
Name of active theme

Selecting a Phone Theme
101User Guide
Step 8. Select the Contrast theme to make the Home screen appear as shown below.
Figure 187 — Home screen with Contrast theme
The above image shows the “black and white” color palette of the “Contrast” theme. The buttons, fields, and active areas of the screen are shown as dark gray areas against a black background, while active buttons are shown in a brighter yellow with black text. The text is either white or black to provide maximum visual contrast.
Step 9. Select the Thunderstorm theme to make the Home screen appear as shown below.
Figure 188 — Home screen with Thunderstorm theme
The above image shows the “black, gray and white” color palette of the “Thunderstorm” user interface theme. The overall look is similar to the “Contrast” theme, except a lighter gray is used in many areas, giving the UI an overall gray-themed look. The default yellow (used for highlighted selections in the “Sand Dune” theme) is also used in this theme.
The following few pages show example screen shots of the four available themes.

Selecting a Phone Theme
102ntouch VP2 1.3
Sand Dune Theme Example Screens
Figure 189 — Example screen shots of Sand Dune theme

Selecting a Phone Theme
103User Guide
Ocean Tide Theme Example Screens
Figure 190 — Example screen shots of Ocean Tide theme

Selecting a Phone Theme
104ntouch VP2 1.3
Contrast Theme Example Screens
Figure 191 — Example screen shots of Contrast theme

Selecting a Phone Theme
105User Guide
Thunderstorm Theme Example Screens
Figure 192 — Example screen shots of Thunderstorm theme

Selecting a Phone Theme
106ntouch VP2 1.3
This page is blank to allow for double-sided printing.