teacher: janine breen lesson: insect body parts -...
TRANSCRIPT

Teacher: Janine Breen Lesson: Insect Body Parts Grade: 1 Time: 80 minutes Lesson Overview The purpose of this lesson is to teach first grade students the main body parts of an insect. The students will learn that all insects have a head, a thorax, an abdomen, six jointed legs, two antennae and compound eyes. This lesson is the first in a series of lessons on insects so the Behavioral Model and the Direct Instruction Strategy will be used. National Standards National Science Education Standards 3 - Life Science As a result of activities in grades K-4, all students should develop an understanding of the characteristics of organisms, the life cycles of organisms, and organisms and environments. National Standards for English Language Arts 12 –Applying Language Skills Students use spoken, written, and visual language to accomplish their own purposes (e.g., for learning, enjoyment, persuasion, and the exchange of information). New York State Standards NYS Science Education Standards MST Standard 4 – Science Students will understand and apply scientific concepts, principles, and theories pertaining to the physical setting and living environment and recognize the historical development of ideas in science. The Living Environment Key Idea 1: Living things are both similar to and different from each other and nonliving things. Performance Indicator: Describe the characteristics of and variations between living and non-living things. NYS English Language Arts Standards ELA Standard 1: Students will read, write, listen and speak for information and understanding. Key Idea #1: Listening and reading to acquire information and understanding involves collecting data, facts, and ideas; discovering relationships, concepts, and generalizations; and using knowledge from oral, written, and electronic sources. Performance Indicator(s): Gather and interpret information from children’s reference books, magazines, textbooks, electronic bulletin boards, audio and media presentations, oral interviews, and from such forms as charts, graphs, maps, and diagrams. Select information appropriate to the purpose of their investigation and relate ideas from one text to another.

Key Idea #2: Speaking and writing to acquire and transmit information requires asking probing and clarifying questions, interpreting information in one’s own words, applying information from one context to another, and presenting the information and interpretation clearly, concisely, and comprehensibly. Performance Indicator(s): Present information clearly in a variety of oral and written forms such as summaries, paraphrases, brief reports, stories, posters, and charts. Use a few traditional structures for conveying information such as chronological order, cause and effect, and similarity and difference. Goal Students will understand and apply scientific concepts relating to insects and their body parts. Objectives
1) Given a diagram of an insect and a word bank, the student will correctly label 6 out of 6 main body parts.
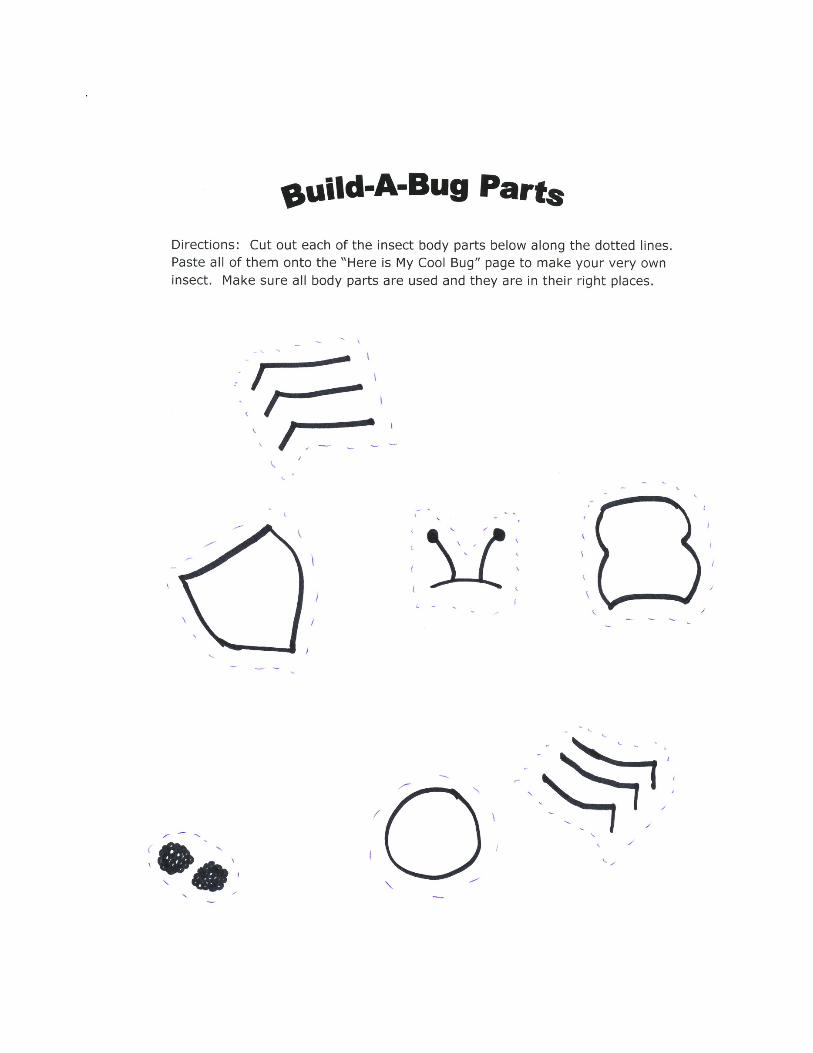
2) Given a set of insect body part cut-outs and the task of building an insect, the student will assemble an insect with all body parts correctly positioned and glued in place.
Materials Variety of plastic insects and spiders Paper bag Whiteboard and markers Glue Cootie Game by Milton Bradley 25 sets of insect body parts cut from construction paper (set: head, thorax, abdomen, 2 antennae, 6 legs, 2 eyes) 25 small plastic bags Poster and handout with “Head, Thorax, Abdomen” song lyrics Insect Body Parts Checklist (Version 1 and 2) Label Insect Parts worksheet (Version 1 and 2) Build-A-Bug Parts worksheet, Here is My Cool Bug worksheet
Technology PowerPoint presentation – “Insect Body Parts!” SmartBoard for showing PPT. (I will draw and write notes for emphasis on its screen.) Computer with Internet access for educational activities online Anticipatory Set I will ask students to sit on the rug in front of me and count backwards from 5 to focus their attention. I will then shake a paper bag containing 4 plastic insects to pique their curiosity. I will have student volunteers come up one at a time to pick an item out of the bag. Each time, I will ask

the student if they know the name of the critter they are holding. (I expect them to say the insect’s name, for example, grasshopper, bee, ant, fly.) If they say the correct name, I will write the name on the whiteboard. If they don’t know the name or they say the incorrect name, I will allow other students to take a guess. Then I will write the name on the board. These steps will be followed for all 4 plastic insects pulled from the bag. I will write the names on the board in the shape of a circle, so I can easily turn the notes into a concept map. Once all 4 names are on the board, I will draw a circle in the center of them and draw lines to connect each name with it. Note that I have purposely refrained from using the word “insect” thus far. I will draw the class’s attention to the concept map, and ask them if they can think of a name that can be used to describe all of the things that were pulled from the bag. (I expect them to say bugs or insects.) I will explain that all bugs are insects but not all insects are bugs, and that “Insects” is the name that scientists call them. Then I will write the word INSECTS in the circle. I will then ask students what they know about insects. I expect them to say something about what they do (ex: sting), where they live (ex: ant hill) or how they move (ex: crawl). I will ask them if they have ever seen an insect up-close in real-life. What did it look like? (I expect them to say what color they were, what body parts they saw, etc.) I will list their answers on the whiteboard. The concept map and brainstorming will help me assess students’ prior knowledge. Then I will pull a plastic spider out and say “Oops…it looks like there was something else in the bag.” Can anyone tell me what this is? (I expect them to say spider.) I will then say to the students: “Do you think a spider is an insect too? Give me a thumbs-up if you DO think a spider is an insect or a thumbs-down if you DO NOT think it is.” Based on majority vote, I will either add “spider” to the concept map or write it off to the side. I will say: “Later on in today’s lesson, we will come back to this spider and decide if it is where it belongs.” I will say “All animals on the Earth are grouped by the body parts they have. It is important that we understand how animals, like insects, are classified. Today, we are going to talk about what physical features make an insect, well, an insect. I will show you the body parts that ALL insects have in common. At the end of this lesson, you will be able to identify these special parts on an insect, and you will be able to create an insect of your very own using those body parts. Now, I will teach you how to do that.” Development The lesson reflects the Behaviorist Model of instruction. It will be taught using the Direct Instruction Strategy, plus lecture and modeling methods. (“I Do”) I will say “1-2-3 eyes on me” to signal to students that it is time to pay attention. (I expect them to respond “1-2 eyes on you.”) I will show students the first of 5 PowerPoint slides. Slide 1 contains an introduction. I will explain that insects have body parts just like we humans do. I will tell students that insects belong to a large group of animals called arthropods. I will explain that there are over 1 million types on insects on the earth, and that every single insect has the same main body parts in common. Then I will display Slide 2 - diagram of an insect. I will display the diagram on a SmartBoard so I can color in each body part as I discuss it. (If computer equipment is not available,
I will teach the same content using a poster with a large diagram of an insect.) I will tell students what each body part is called, point to it on the diagram, label it, and give a description of it. (Insect body part names and descriptions can be found on Slides 3 through 5.) Throughout the presentation, I will observe students to see if they are “getting” the material as teach it. I will start with: “We humans have bones on the inside, but insects have a hard covering on the outside of their body called an exoskeleton. It protects them like a knight’s armor.” I will then tell students that every insect is made up of 3 main body segments: a head, a middle part called a thorax, and an end part called an abdomen. I will point to each part on the insect diagram as I say it. I will explain: “All insects have a head, just like we do. But they have 2 antennae or feelers attached to their head that help them sense the world around them. They do the same job as our noses and ears.” I will point to the antennae on the head in the diagram and trace how they attach to the insect’s head. Next I will ask: “What else do you see on the insect’s head?” (I expect them to say eyes.) I will answer “Yes! But they are not just ordinary eyes, they are special eyes called compound eyes. They are made up of thousands of tiny eyes that help insects see lots of detail. Most insects have compound eyes and simple eyes on their head.” I will point to the eyes in the diagram, and color the parts on the SmartBoard. Next, I will point to the thorax and say: “This middle body segment is called a thorax. Every insect has 6 jointed legs that are attached to it. There are always 3 legs on each side. Count them with me. 1-2-3, 1-2-3.” I will point them out on each side of the thorax, and color them on the SmartBoard. I will add: “Many adult insects have 2 or 4 wings. If an insect has wings, they are attached to the thorax. Just remember, that insects may have wings, they do not have to have them. They are not a required body part.” Next I will point to the last body segment and explain: “This is called an insect’s abdomen. We call it our stomach or belly. It is where an insect digests food and makes eggs.” “OK, let’s quickly review what we’ve learned so far.” I will take out a cootie bug from the Milton Bradley game and use it to model where insect parts are. I will point to its head and ask: “Does anyone remember what this body part is called? Please raise your hand.” (I expect student to say head.) “Correct, it is the head. Can anyone tell me what you see on an insect’s head?” (I expect student to say antennae or eyes. For the latter I will prompt “what is the special name for those eyes?”) I will add those body parts to the model. I will point to the thorax and tell students: “This is the insect’s middle part, its thorax. Legs are attached to the thorax.” Next I will look for choral response to: “How many legs does an insect have?” (I expect them to say 6.) I will add 6 legs to the model one at a time and say: “Yes, always 6, no more, no less.” Lastly, I will point out the end segment of the cootie bug ask: “What is this end part called?” (I expect them to say abdomen). I will pay close attention to how students respond to these didactic questions. I will then ask all students to get up and shake themselves out. I will explain that there is a song called that will help them remember the names of insect body parts. I will place a poster with song lyrics to “Head, Thorax, Abdomen” in large print at the front of the classroom. I will sing the song once for them (to the same tune as “Head, Shoulders, Knees and Toes”), pointing out the words on the poster as I sing them. I will then sing it a second time adding the fun body movements. Next I will have students join in, and we will sing it a few times together. I will tell them “Great job!” and ask them to be seated on the rug. At this point I will say to the class: “I’m done with my presentation. Now it’s time to see how much you learned about insects and their body parts!”
Guided Practice (“We Do”) I will check for understanding by interspersing questions throughout Guided Practice activities. I will monitor students as they work and evaluate how well they display and apply their newly acquired knowledge. Activity 1. I will break students into groups of 3 and have them spread out. I will explain that each group is going to build an insect with their bodies. I will ask one group to come to the front of the room and show the class how they think it can be done. I will explain 2 requirements: 1) they have to include every body part mentioned in the song they just learned, and 2) they have to remain in a standing position. Once they are in place, I will ask them to explain the body parts they are representing. I will then ask the class to give me a thumbs-up if they think the group got it right. I will say: “OK, let’s double-check, does this insect have 3 body segments? (I expect them to say yes.) Can anyone tell me the name of one? How about another? And the last one?” (I expect them to say head, thorax, abdomen.) Next I will choose a popsicle stick and ask that student: “How many legs does this insect have?” (I expect student to answer 6). I will then draw their attention to the children’s 6 legs. I will then ask the class: “Insect eyes are very special, does anyone remember what we call them?” (I expect them to say compound eyes.) “Are compound eyes visible on this insect? How can we make them stand out? Let’s think of our body movements in the song.” (I expect students to cup their eyes with their hands shaped like “c’s”). “Yes! The head of this insect should make big compound eyes with their hands! And what else does an insect have on its head?” (I expect them to say antennae or feelers.) I will say: “Right, 2 antennae. The thorax should put up 2 “feelers” on the head.” I will then say: “OK, this insect model is correct! Now it is time all of the groups to give it a try.” I will walk around and check that each group is using the correct body parts and vocabulary. Each group member will have to tell me which body parts they are acting as. I will provide corrective feedback as needed. Once a group has successfully built their insect and has effectively described their parts verbally, I will have them trade places with each other and build their insects again. Activity 2. I will ask students to find a partner. Each pair of students will be given a plastic critter (grasshopper, bee, ant, or fly). I will tell them that they are going to work like scientists, and prove that the critter I gave them is an insect. I will ask the class if they remember the main body parts of an insect. I will select students with hands raised one at a time until all parts have been named. (I expect them to say head, thorax, abdomen, 6 legs, 2 antennae, 2 compound eyes.) Each group will then be given a checklist with every one of those body parts listed. I will emphasize that a creature must have all of them in order to be classified as an insect. Using my cootie bug, I will model for them how to check the first 2 items. I will say: “The first item on our checklist is “Head”. So let’s all look at our critters. Does yours have a head? Can you point to it?” (I expect them to say YES.) “If it does, then check the box next to the word “Head”. If it does not, leave the box blank. Let’s see, my cootie bug does have a head so I will make a check mark.” I will then move on to the next checklist item “Thorax”. I will ask: “Does your critter have a middle body part? What is it called again? Raise your hands please.” (I will call on a student and expect him/her to say thorax). “Does everyone agree with that answer? Jump up like a grasshopper if you do.” (I expect them to jump.) “It sure is a thorax. Now look at your critter, and if it has a thorax, make a check mark. If it does not, leave it blank.” “Now you will finish the remaining checklist items with your partners.” I will

walk around the room and monitor groups, making sure they can identify the body parts and fill out the checklist correctly. I will provide corrective feedback as needed. I will ask groups to raise their hands when they are done. At that point I will say: “Look at your checklist. If every body part has been checked, then guess what? You have an INSECT! If any check box is empty, then you do NOT have an insect. Please take a minute now to decide with your partner whether or not you have an insect.” Next I will ask groups to find other groups who studied the same critter. I will ask them to compare checklists and decide if they all reached the same conclusion. Combined groups will report their verdict to the class. For example: “We think a grasshopper is an insect because it contains all of the main insect body parts.” I will ask them to point to each body part on their critter. I will then circle the insect’s name on the concept web from Anticipatory Set and say “You have proven that a ____ is indeed an insect. Good work!” Activity 3. Students will work individually on a build-an-insect activity in class. As I hand out 1 sheet of construction paper and 1 plastic bag with body part cut-outs per student, I will say: “Now that you are familiar with insect body parts, you are going to build insects of your own. But it is very important that you follow my directions. So please listen carefully.” “Each bag has all of the body parts you need to create an insect. First, I only want you to arrange the body parts on the sheet of paper. Once you have done that, please raise your hand to signal to me that you are done. Once I review your work and you describe your insect to me using the correct body part names, I will give you the go-ahead to glue your parts down. You will build your insect by pasting all of the body parts onto the sheet of construction paper.” “If you get stuck, think of the song we learned today. It will help you along.” I will circulate among the students as they work and provide corrective feedback as needed. If students are done early, they can decorate and name their insects. Activity 4. This online activity will be incorporated into a daily learning center rotation to reinforce lesson concepts. During “computer center time,” students will work one at a time on a classroom computer. They will be given access to “Eee gads...a new bug!” so they can build insects of their own online. I will provide instruction for students, and give assistance as needed. I will ask students to describe their bug to me using correct insect terminology. Before concluding Guided Practice, I will ask students to stand up and say: “Let’s sing our “Head, Thorax, Abdomen” song one more time since you know insect body parts so well now.” To transition I will say “You sure have learned a lot about insect body parts. Now it’s time for our review.” Closure I will ask students to sit down, and to respond to these questions chorally:
1. An insect has 3 separate body sections. The 1st is…(I expect them to say “head”). The 2nd is...(I expect them to say “thorax”). The 3rd is...(I expect them to say abdomen).
2. How many antennae does an insect have? (I expect them to say 2). And where are they located? (I expect them to say “on its head”.)
3. How many legs must an insect have? (I expect them to say 6). And they are attached to its…(I expect them to say “thorax”).
4. What kind of eyes does an insect have? (I expect them to say “compound.”) “To wrap things up, let’s go back to that spider we talked about earlier. So what do you think class, based on what you’ve learned today about insect body parts, do you think a spider is an insect?” I will call on a student who said “no” aloud or shook his head no, and ask him to come up, hold the spider, and explain why it is not an insect. (I expect the student to point out that spiders have 8 legs, not 6, or that they have 2 body segments, not 3.) I will then ask the class to give me a thumbs-up if they agree with their classmate. Then I will say: “You are all absolutely right! A spider does not have what it takes to be an insect.” Then I will say: “You all did great work today. And now you can identify insect body parts like true scientists!” Evaluation Diagnostic: Concept map and brainstorming in Anticipatory Set. Formative: Observation, monitoring, didactic questions and checking for understanding in Development and Guided Practice. Q & A in Closure. Summative: Label Insect Body Parts worksheet (homework) and Build-A-Bug Parts/Here is My Cool Bug worksheet (in-class) in Independent Practice. Independent Practice (“You Do”) Activity 1. Time permitting, students will work at their seats on a “Build-A-Bug” worksheet. Each student will cut out the body parts and paste them correctly on the “Here is my Cool Insect!” worksheet, to create an anatomically-correct insect. I will say: “For this activity, I want you to think of the diagram of an insect. I want you to think of the plastic insects that you held in your hands and studied. Try to remember how they looked, and how an insect’s body parts fit together. If you get stuck, think of the song we learned today. It will help you along.” When everyone is done, I will collect their insects for evaluation. I will assess whether or not students were able to apply their knowledge of insect body parts to build an insect with all parts positioned correctly. Activity 2. For homework, I will give students a worksheet to take home called “Label Insect Body Parts.” Students will use the words from the word bank to label the main body parts of an insect. I will ask students to return their homework the following day for evaluation. I will assess whether or not students met objective of labeling all 6 insect body parts correctly. Accommodations/Modifications *Students with Reading problems: Will be paired up with non-disabled students who can read directions and worksheets with them. Teacher will also make sure to read all directions aloud.

*Students with Writing problems: Will be paired up with non-disabled students for group work. For Label Insect Body Parts worksheet, students will be allowed to draw arrows from body part name to location on diagram, rather than write out the body part names. *Students with Behavior problems: Will be seated at the front of the class to keep them focused on the lesson. Will be asked to be my helper during Anticipatory Set to promote positive involvement. *Students with Disabilities: Will receive modifications specified on their IEPs. *Visually-Impaired Students: Will be given front-row seating, and worksheets/handouts with have larger sized font. *Hearing-Impaired Students: Will be given front-row seating, a hard copy of the PowerPoint presentation, a handout with “Head, Thorax, Abdomen” lyrics. *English Language Learners: Will be given a modified version of the Insect Body Parts worksheet and Insect Body Parts checklist, with pictures accompanying body parts vocabulary. Teacher will also hold an insect model and point to each body part as “Head, Thorax, Abdomen” song is sung. *Less-Advanced Students (who have difficulty learning): Will be paired up with more advanced students who can provide assistance during Guided Practice activities. *More-Advanced Students (who complete assignments quickly): Will be allowed to draw a picture of an insect with all required body parts. They could color the insect, label the body parts, and then write a few sentences describing the insect’s physical features. Will also be allowed to extend their learning by accessing these websites on the classroom computer: Let’s Talk About Insects Video Insect Hunt Am I An Insect? Which is an Insect? Reflection 1) Were my standards, goals and objectives aligned? 2) Were my objectives (specifically my criteria) realistic for 1st graders? 3) Did I provide a good “grabber” for Anticipatory Set - shaking mystery bag? 4) Did concept web and brainstorming techniques provide a good framework for introducing the
lesson? 5) Did my PowerPoint slides enhance the presentation of material? 6) Was my poster with diagram of an insect a good visual aid for Development? 7) Did I provide clear directions and sufficient guidance for my Guided Practice activities? 8) Was my checklist an effective tool? Did it help students connect names to body parts? 9) Did my Closure reiterate most important points of the lesson? 10) Did my Independent Practice activities allow students to show mastery of the topic? 11) Were my Accommodations and Modifications appropriate and detailed enough? 12) Did my methods of Evaluation allow me to accurately assess student proficiency? 13) Were my CFUs well-worded and easily understood?
Head, Thorax, Abdomen, Abdomen
Head, Thorax, Abdomen
6 legs, 2 antennae, and compound eyes
Head, Thorax, Abdomen!

(Version 1)
Head
Thorax
Abdomen
6 legs
2 Antennae
2 Compound Eyes

(Version 2)
Head
Thorax
Abdomen
6 legs
2 Antennae
2 Compound Eyes
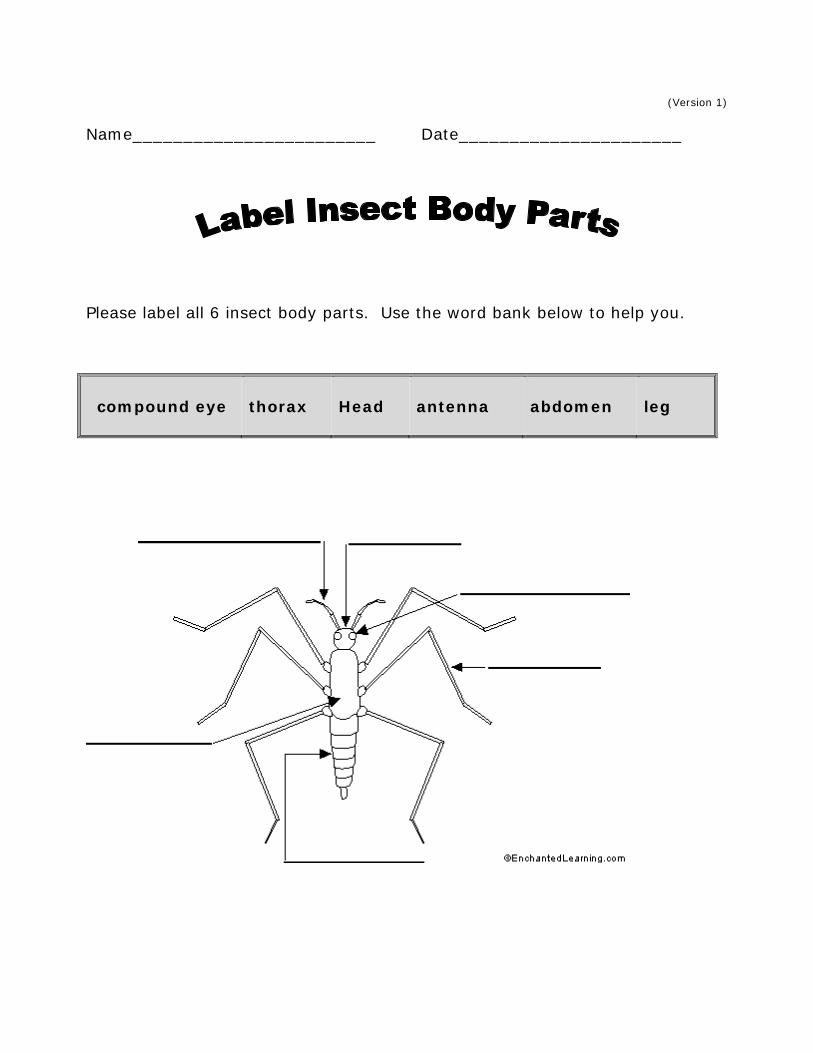
(Version 1)
Name________________________ Date______________________
Please label all 6 insect body parts. Use the word bank below to help you.
compound eye
thorax
Head
antenna
abdomen
leg

(Version 2)
Name________________________ Date______________________
Please label all 6 insect body parts. Use the word bank below to help you.
compound eye
thorax
head
antenna
abdomen
leg

Name________________________ Date______________________

Insect Body Parts!There are over 1,000,000 types of insects in the world. They may look very different but guess what?
They all have the same main body parts!
In today’s lesson,we will learn about those body parts.
My parts…..Head
Thorax
Abdomen
Legs (6)
Antennae (2)
Compound Eyes

3 Main Body Segments1) Head – has eyes, antennae and
mouth parts.
2) Thorax – middle, where legs and wings attach.
3) Abdomen – end, has stomach and eggs.
Other required equipment…
Legs – 6 jointed legs.
Antennae – 2 “feelers” to sense the world around them.
Compound Eyes – thousands of tiny little eyes to see detail.

Optional equipment…
Wings – 2 or 4 attached to thorax.