technical information masterchef collection cooktopsmasterchef collection cooktops 1.0 construction...
TRANSCRIPT
© 2004 Miele
TECHNICAL INFORMATION MasterChef Collection Cooktops

This page intentionally left blank.
MasterChef Collection Cooktops - Table of Contents
1.0 CONSTRUCTION & DESIGN
1.1 Summary of MasterChef Cooktops 1
1.2 Appliance Overview 3
1.2.1 KM342 Overview 3
1.2.2 KM344 Overview 5
1.2.3 KM421 Overview 7
1.2.4 KM424 Overview 8
1.2.5 KM427 Overview 11
1.2.6 KM452 Overview 13
1.2.6.1 KM452 Touchpad Controls 14
2.0 INSTALLATION
2.0 Installation 15
3.0 COMMISSION and OPERATION
3.1 KM342 and KM344 General Operating Information 17
3.1.1 Fast Ignition System 17
3.1.2 Operating a Burner 17
3.2 KM421, KM424 and KM 427 General Operating Information 18
3.2.1 Operating a Single Burner 18
3.2.2 Operating a Variable / Extended Burner 18
3.3 KM452 General Operating Information 19
3.3.1 Overview of Controls 19
3.3.2 Touch Controls 19
3.3.3 Turning On a Burner 20
3.3.4 Auto Heat Setting 20
3.3.5 Touch Controls – Automatic Reset 21
3.3.6 Touch Controls – Manual Rest 21
3.3.7 Residual Heat Indicator 21
3.3.8 Safety Lock 22

4.0 DESCRIPTION of FUNCTION
4.1 Electric Cooktops – General Information 23
4.1.1 Temperature Limiters 23
4.1.2 KM452 Safety Cut Out (Controls Covered) 23
4.1.3 KM452 Safety Cut Out Feature 24
4.1.4 KM452 Touch Controls – Resetting 25
4.1.4.1 Automatic Reset 25
4.1.4.2 Manual Reset 25
4.2 Electric Cooktops – Components 26
4.2.1 Regulator 26
4.2.2 Temperature Monitor 26
4.2.3 Operational Indicator 26
4.2.4 Residual Heat Indicators 26
4.2.5 Heater Elements 26
4.3 Gas Cooktops 27
4.3.1 Operation Overview of Ignition / Re-Ignition System 27
4.3.2 Burner Gas Regulators 30
4.3.3 Connecting to LP Gas 31
4.3.4 Burner Assemblies 31
4.3.4.1 Normal and Fast Burner Assembly 31
4.3.4.2 Super Burner Assembly 31
5.0 SERVICE and MAINTENANCE
5.1 Removing Cooktop for Service 34
6.0 FAULT DIAGNOSIS
6.0.1 Fault Diagnosis – Gas 35
6.0.2 Fault Diagnosis – Electric 36
MasterChef Cooktop Collection – List of Figures
1-1 KM342 Overview 3
1-2 KM344 Overview 5
1-3 KM421 Overview 7
1-4 KM424 Overview 9
1-5 KM427 Overview 11
1-6 KM452 Overview 13
1-7 KM452 Controls 14
2-1 Miele Installation Manual (Typical Cover) 15
3-1 KM452 Controls 19
4-1 Ignition / Re-Ignition System 28
4-2 Re-Ignition Control System 29
4-3 KM342 and KM344 Normal / High Speed Burner Components 30
4-4 KM342 and KM344 Wok Burner Components 31
5-1 Removing the Cooktop for Service 34
MasterChef Cooktop Collection – List of Tables 1-1 Summary of MasterChef Collection Cooktops 1
4-1 Safety Cut Out Setting and Operating Hours 24
This page intentionally left blank.
Technical Information
1
MasterChef Collection Cooktops
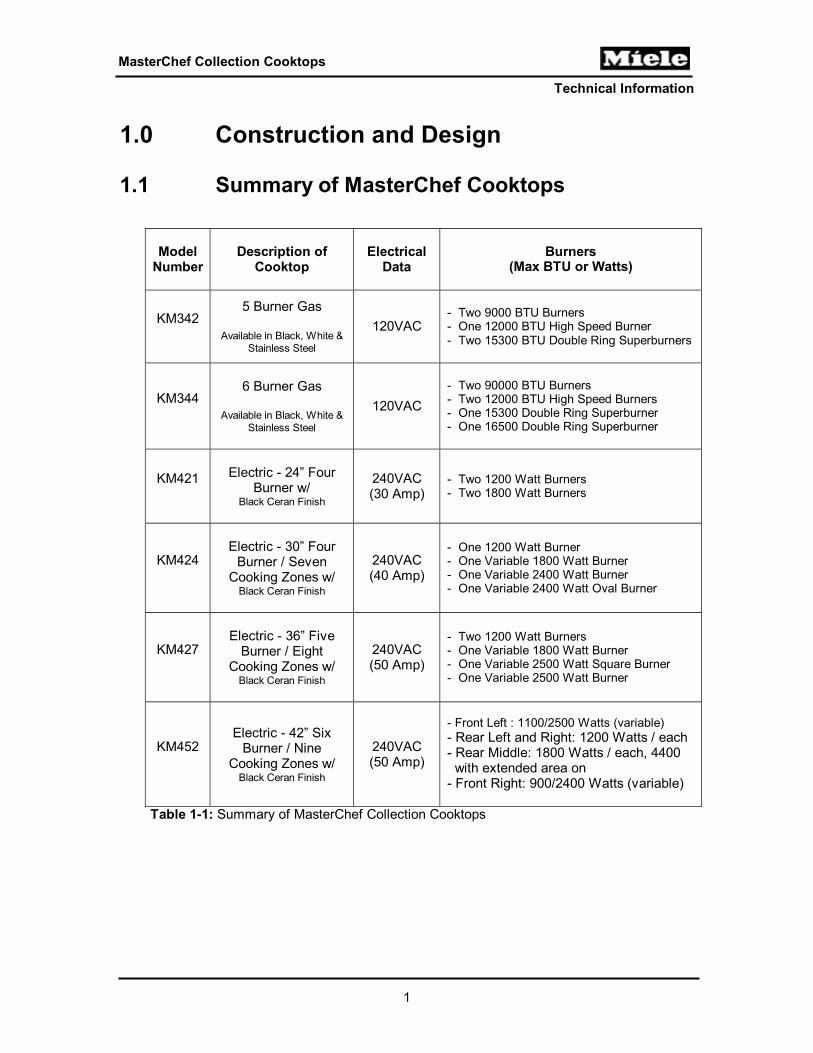
1.0 Construction and Design 1.1 Summary of MasterChef Cooktops
Table 1-1: Summary of MasterChef Collection Cooktops
Model Number
Description of Cooktop
Electrical Data
Burners
(Max BTU or Watts)
KM342
5 Burner Gas
Available in Black, White & Stainless Steel
120VAC
- Two 9000 BTU Burners - One 12000 BTU High Speed Burner - Two 15300 BTU Double Ring Superburners
KM344
6 Burner Gas
Available in Black, White & Stainless Steel
120VAC
- Two 90000 BTU Burners - Two 12000 BTU High Speed Burners - One 15300 Double Ring Superburner - One 16500 Double Ring Superburner
KM421
Electric - 24” Four
Burner w/ Black Ceran Finish
240VAC (30 Amp)
- Two 1200 Watt Burners - Two 1800 Watt Burners
KM424
Electric - 30” Four
Burner / Seven Cooking Zones w/
Black Ceran Finish
240VAC (40 Amp)
- One 1200 Watt Burner - One Variable 1800 Watt Burner - One Variable 2400 Watt Burner - One Variable 2400 Watt Oval Burner
KM427
Electric - 36” Five
Burner / Eight Cooking Zones w/
Black Ceran Finish
240VAC (50 Amp)
- Two 1200 Watt Burners - One Variable 1800 Watt Burner - One Variable 2500 Watt Square Burner - One Variable 2500 Watt Burner
KM452
Electric - 42” Six
Burner / Nine Cooking Zones w/
Black Ceran Finish
240VAC (50 Amp)
- Front Left : 1100/2500 Watts (variable) - Rear Left and Right: 1200 Watts / each - Rear Middle: 1800 Watts / each, 4400 with extended area on - Front Right: 900/2400 Watts (variable)

Technical Information
2
MasterChef Collection Cooktops
This page intentionally left blank.
Technical Information
3
MasterChef Collection Cooktops
1.2 Appliance Overview
Products are listed in numeric order by model number.
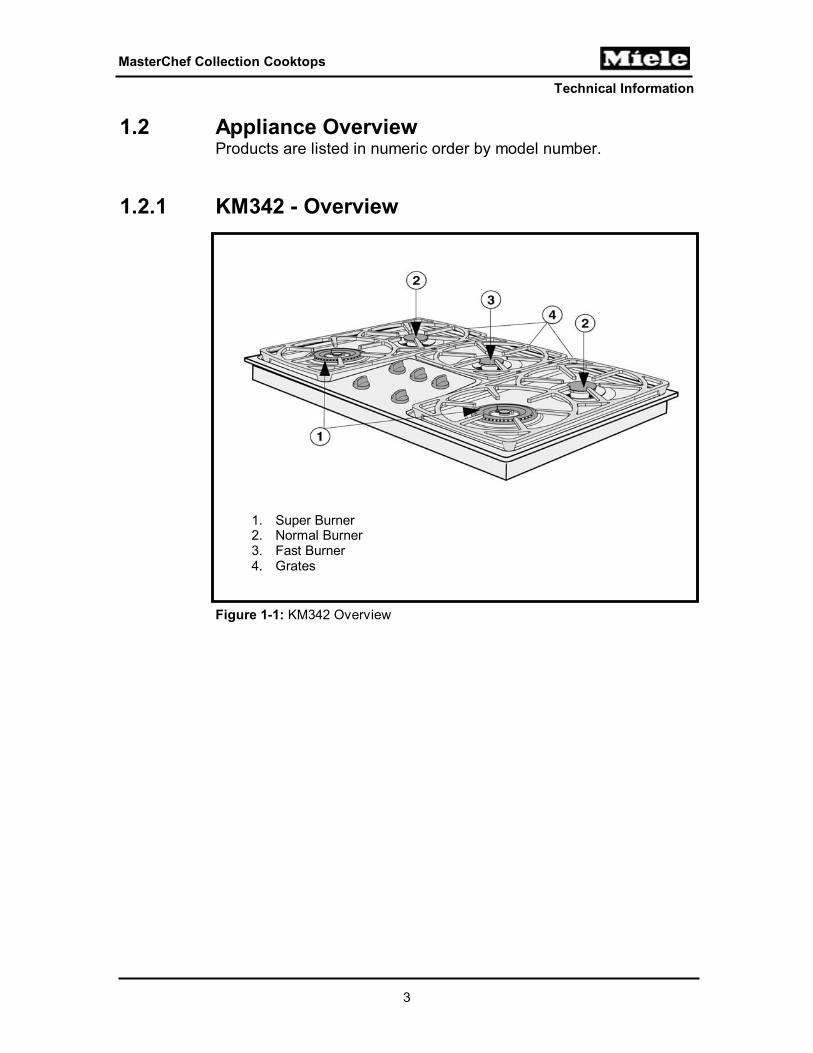
1.2.1 KM342 - Overview
1. Super Burner 2. Normal Burner 3. Fast Burner 4. Grates
Figure 1-1: KM342 Overview

Technical Information
4
MasterChef Collection Cooktops
This page intentionally left blank.
Technical Information
5
MasterChef Collection Cooktops
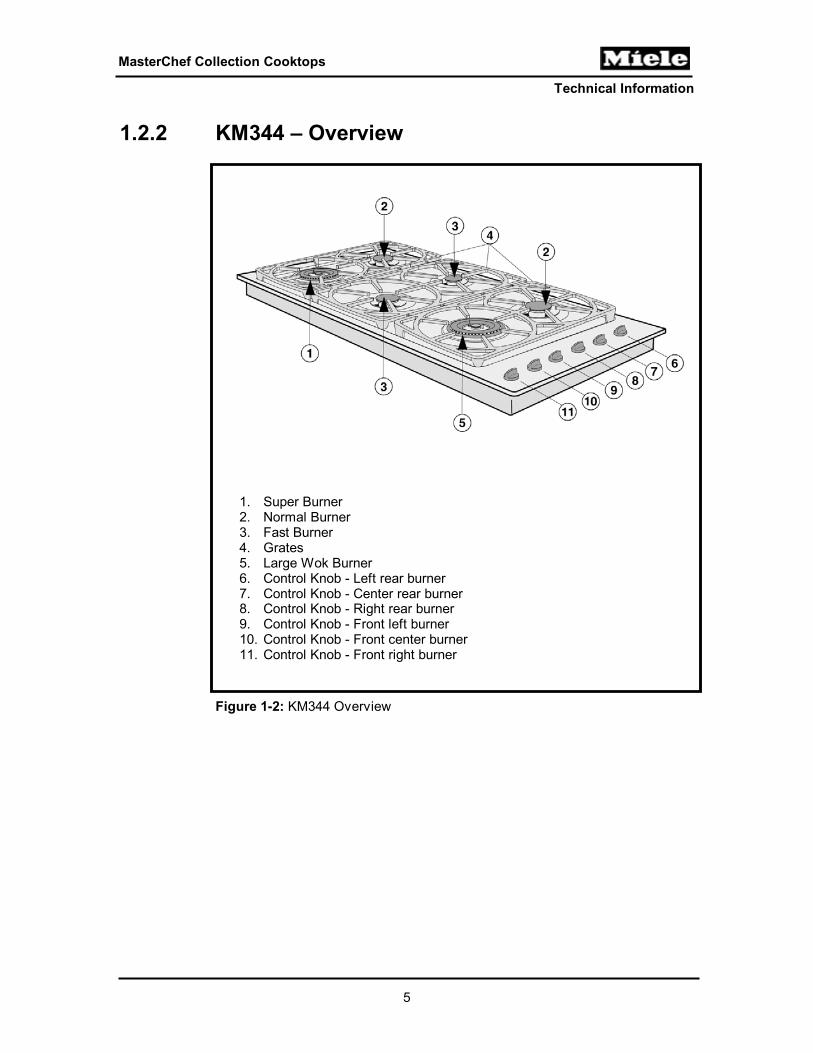
1.2.2 KM344 – Overview
1. Super Burner 2. Normal Burner 3. Fast Burner 4. Grates 5. Large Wok Burner 6. Control Knob - Left rear burner 7. Control Knob - Center rear burner 8. Control Knob - Right rear burner 9. Control Knob - Front left burner 10. Control Knob - Front center burner 11. Control Knob - Front right burner
Figure 1-2: KM344 Overview
Technical Information
6
MasterChef Collection Cooktops
This page intentionally left blank.
Technical Information
7
MasterChef Collection Cooktops
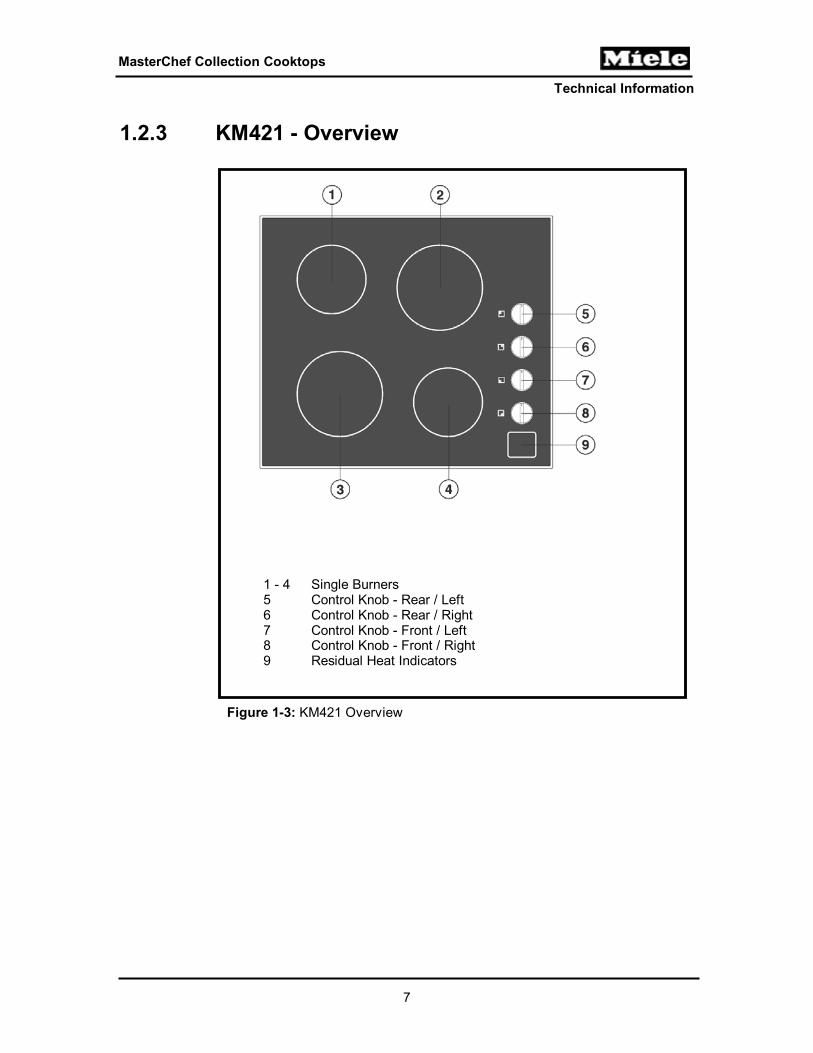
1.2.3 KM421 - Overview
1 - 4 Single Burners 5 Control Knob - Rear / Left 6 Control Knob - Rear / Right 7 Control Knob - Front / Left 8 Control Knob - Front / Right 9 Residual Heat Indicators
Figure 1-3: KM421 Overview
Technical Information
8
MasterChef Collection Cooktops
This page intentionally left blank.
Technical Information
9
MasterChef Collection Cooktops
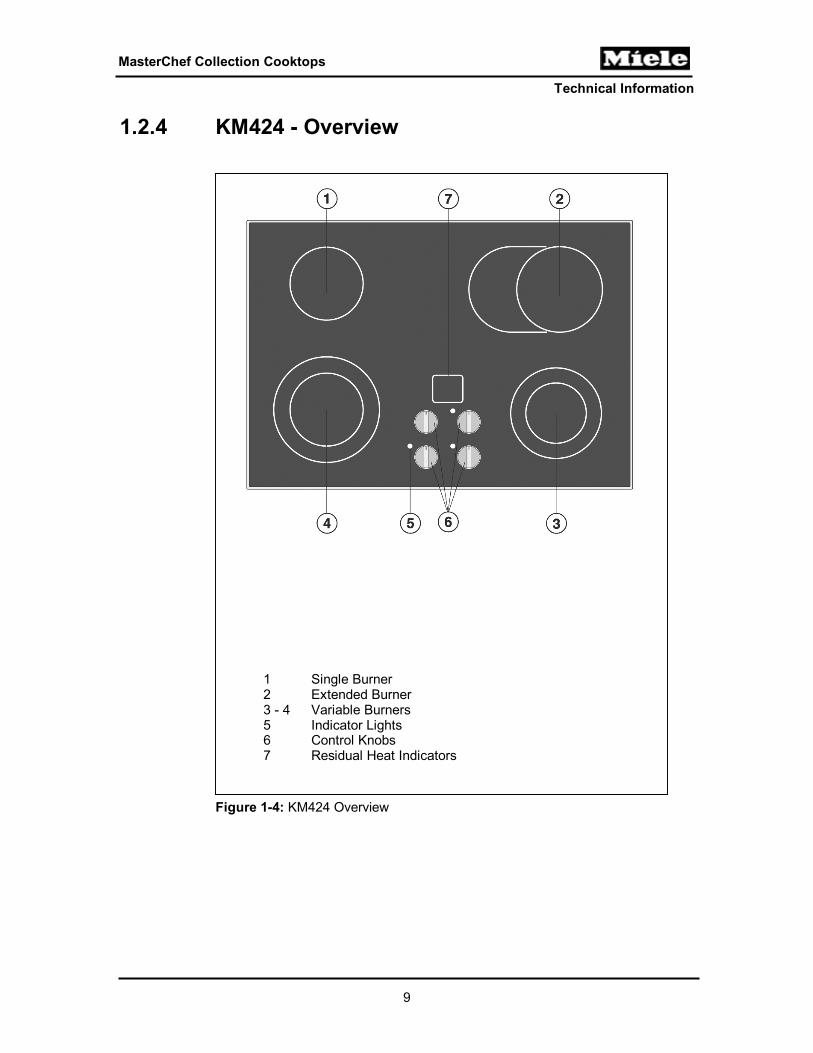
1.2.4 KM424 - Overview
1 Single Burner 2 Extended Burner 3 - 4 Variable Burners 5 Indicator Lights 6 Control Knobs 7 Residual Heat Indicators
Figure 1-4: KM424 Overview

Technical Information
10
MasterChef Collection Cooktops
This page intentionally left blank.
Technical Information
11
MasterChef Collection Cooktops
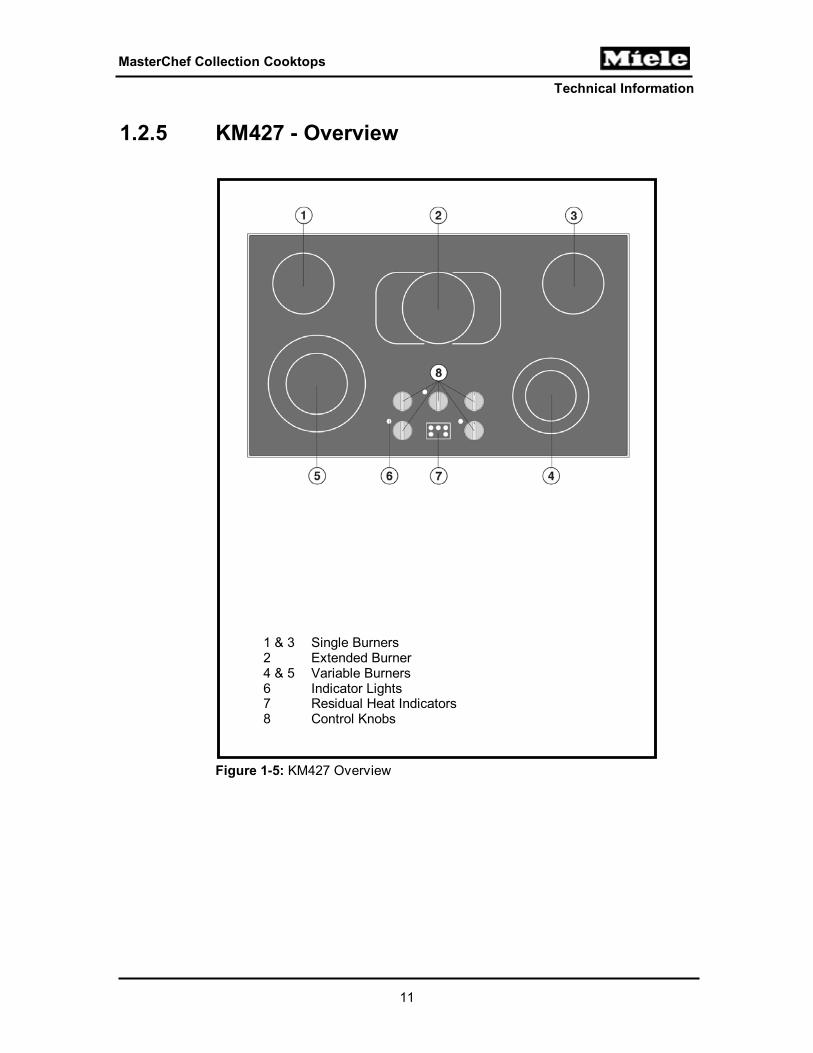
1.2.5 KM427 - Overview
1 & 3 Single Burners 2 Extended Burner 4 & 5 Variable Burners 6 Indicator Lights 7 Residual Heat Indicators 8 Control Knobs
Figure 1-5: KM427 Overview

Technical Information
12
MasterChef Collection Cooktops
This page intentionally left blank.
Technical Information
13
MasterChef Collection Cooktops
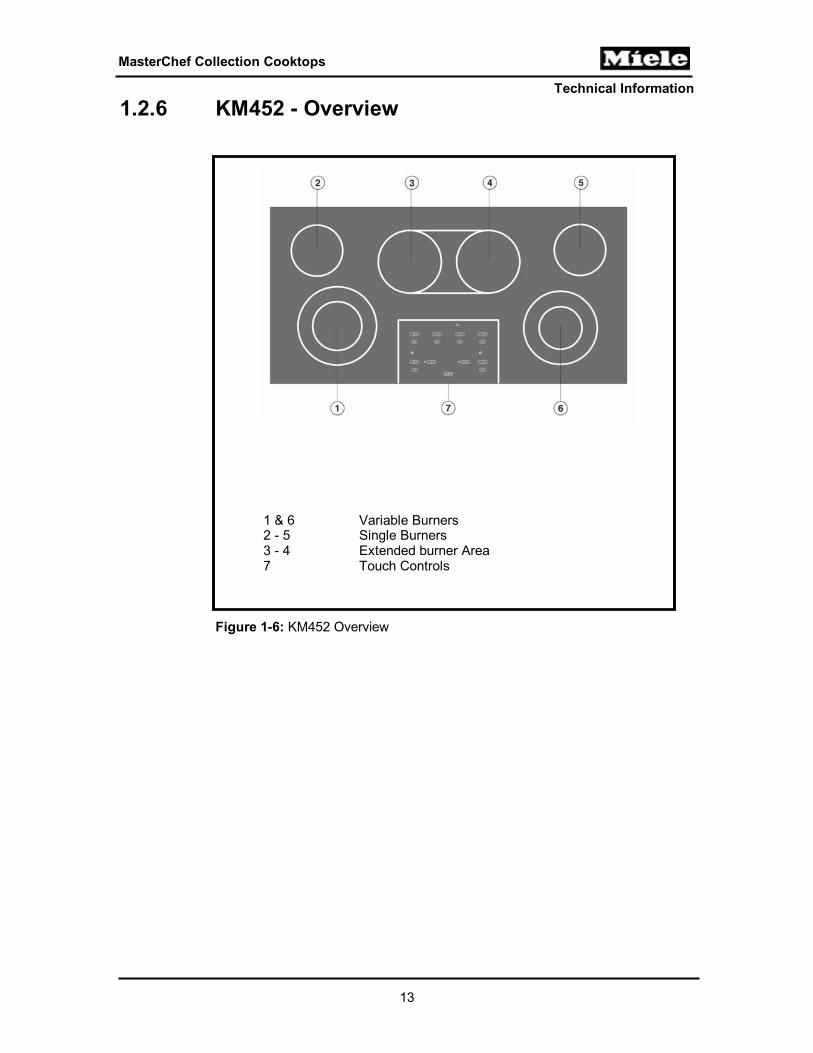
1.2.6 KM452 - Overview
1 & 6 Variable Burners 2 - 5 Single Burners 3 - 4 Extended burner Area 7 Touch Controls
Figure 1-6: KM452 Overview
Technical Information
14
MasterChef Collection Cooktops
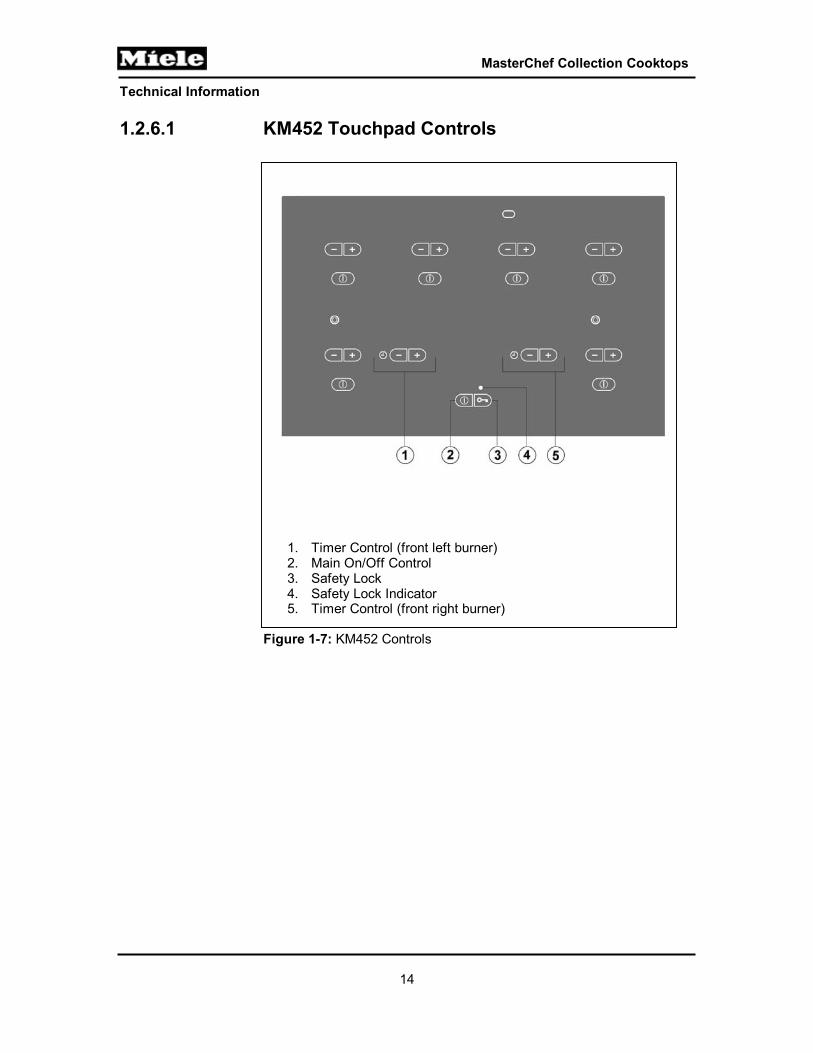
1.2.6.1 KM452 Touchpad Controls
1. Timer Control (front left burner) 2. Main On/Off Control 3. Safety Lock 4. Safety Lock Indicator 5. Timer Control (front right burner)
Figure 1-7: KM452 Controls

Technical Information
15
MasterChef Collection Cooktops
2.0 Installation
For information on appliance information refer to the Miele Installation Manual and the product specific Operating Manual.
Figure 2-1: Miele Installation Manual
Technical Information
16
MasterChef Collection Cooktops
This page intentionally left blank.
Technical Information
17
MasterChef Collection Cooktops
3.0 Commission and Operation 3.1 KM342 and KM 344 General Operating Information 3.1.1 Fast-Ignition-System
The gas cooktops are equipped with a Fast-Ignition-System incorporating the following features: The control knob can be released once it is turned to the largest
flame symbol. If the flame goes out during use, (i.e. from a draft) the burner will
automatically relight. If the re-ignition process is unsuccessful, the gas supply will automatically be shut off.
3.1.2 Operating a Burner
To Light a Burner Press down and turn the corresponding control knob counter-clockwise to the largest flame symbol and release the knob. The igniter will click and ignite the gas. The ignition process takes about 8 – 10 seconds. The flame should light within 4 seconds. The Fast-Ignition-System will click a few seconds after the flame is lit to ensure the safety system was activated.
To Adjust the Setting: Turn the knob without pressing down. Adjustment should be performed from the 9 o’clock position down. Failure to do so may result in the ignition being activated between the 9 and 12 o’clock positions.
To Extinguish a Burner Turn the control knob clockwise to the position.

Technical Information
18
MasterChef Collection Cooktops
3.2 KM421, KM424 & KM 427 General Operating Information
3.2.1 Operating a Single Burner
A burner without the symbol next to the control knob is turned on by pushing the control knob down and turning it clockwise or counter-clockwise to the desired setting. To adjust the setting, turn the knob without pressing down. The burner is turned off by turning the control knob clockwise or counterclockwise to "0".
3.2.2 Operating a Variable / Extended Burner
If a burner has the symbol next to the control knob, you can switch on an additional outer or extended heating circle. To Turn On a Burner: Push down and turn the control knob: Clockwise to the desired setting turns on one heating circle. Counter-clockwise to the desired setting to turn on both heating
circles. Note If both heating circles are turned on an indicator light will come on left of the control knob. To Adjust the Setting: Turn the knob without pressing down. To Turn the Burner Off: Turn the knob without pressing down to the "0" position.
Technical Information
19
MasterChef Collection Cooktops
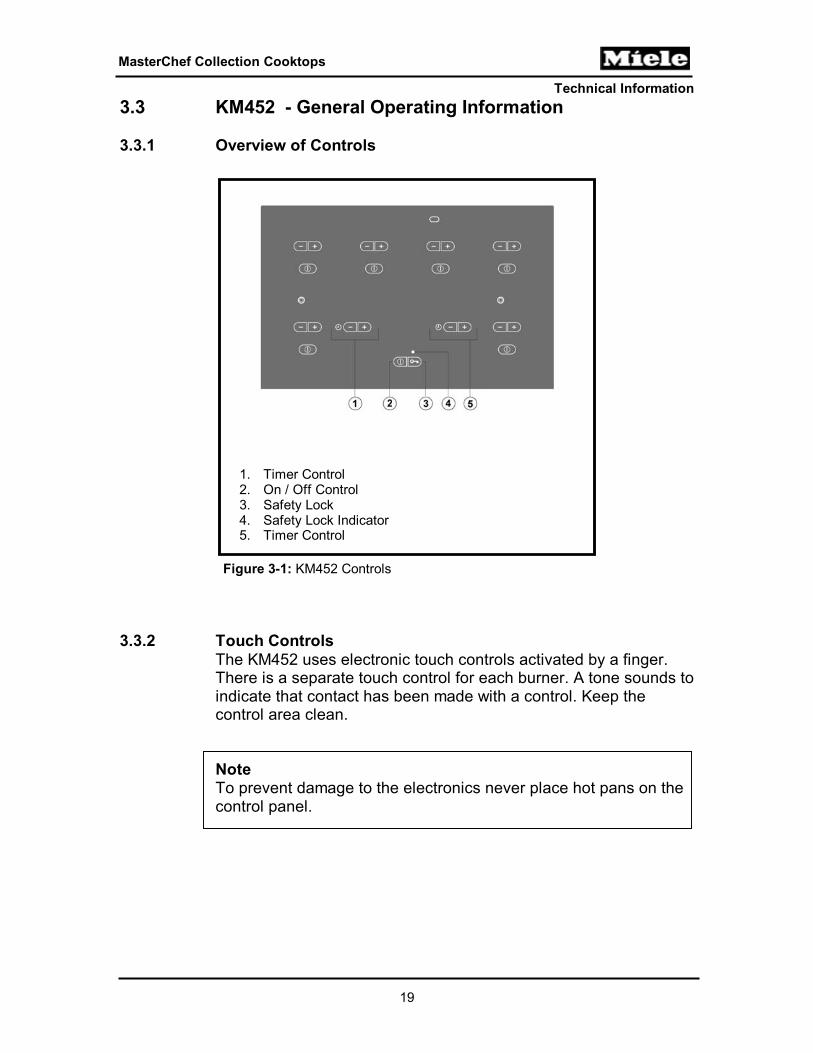
3.3 KM452 - General Operating Information 3.3.1 Overview of Controls
1. Timer Control 2. On / Off Control 3. Safety Lock 4. Safety Lock Indicator 5. Timer Control
Figure 3-1: KM452 Controls
3.3.2 Touch Controls
The KM452 uses electronic touch controls activated by a finger. There is a separate touch control for each burner. A tone sounds to indicate that contact has been made with a control. Keep the control area clean.
Note To prevent damage to the electronics never place hot pans on the control panel.
Technical Information
20
MasterChef Collection Cooktops
3.3.3 Turning On a Burner Once the cooktop is turned on, touch the "ON/OFF" control of the burner you wish to use. A 0 will appear in the burner display. Select the desired setting between 1 and 12 by touching the - or + touch controls.
Note Ensure only one control is touched at a time or the cooktop may not respond. When the cooktop is turned on the auto heat option can be selected by performing the following:
To cook using “auto heat”: Press the + control
To Cook without “auto heat”:
Press the – control
3.3.4 Auto Heat Setting
When auto heat is activated, the selected burner turns on automatically to the highest setting to bring the burner up to temperature. The burner then changes to the cooking setting selected by the user. The "heat-up" time depends on the cooking setting chosen.
Technical Information
21
MasterChef Collection Cooktops
3.3.5 Touch Controls – Automatic Reset
The cooktop automatically resets: after a power failure in response to changing light conditions – see note below.
Note Should the cooktop be installed in an environment that is brightly lit, or completely shaded; the touch controls may not function properly.
3.3.6 Touch Controls – Manual Reset
1. Shut off power to the appliance (i.e. turn circuit breaker off). 2. Wait at least one (1) minute. 3. Restore the power to the appliance.
3.3.7 Residual heat indicator
After the burners or the cooktop have been turned off, the residual heat of the burners which may still be hot are indicated by an in the display. The in the display goes out when the burners are safe to touch. Service Tip If the power supplied to the appliance is interrupted (i.e. breaker shut off, power outage…) the residual heat indicators will flash when power is restored.
Technical Information
22
MasterChef Collection Cooktops
3.3.8 Safety Lock
The Safety Lock can be activated; to prevent children or pets from turning on the burners or changing the settings. The safety lock can be activated as follows: If activated when the appliance is off - then the appliance
cannot be turned on If activated while the appliance is in use, then: the safety lock is
activated when the The settings for the burners and for the timer
cannot be altered. The burners and cooktop can still be turned off
but once turned off cannot be turned on again. To activate the safety lock: Touch the until the indicator lights. (The indicator will go out after a short period of time). If you touch the control for the safety lock or try to select a setting the light will come on again to show that the child safety lock has been activated.
To deactivate the safety lock: Touch the until the indicator goes out. Note If the power supplied to the appliance is interrupted (i.e. breaker shut off, power outage…) the safety lock will be deactivated.
Technical Information
23
MasterChef Collection Cooktops
4.0 Description of Function 4.1 Electric Cooktops – General Information 4.1.1 Temperature Limiters – Electric Cooktops
Each burner is equipped with a temperature limiter that turns off the heating element(s) before the ceramic surface become too hot. Once the surface cools to a safe temperature, the heating element(s) automatically turn back on. The overheating protection may activated when: Turning on a burner without putting a pan on it. Heating an empty pan. Pan / pot is not sitting evenly on the burner. The pan is not conducting heat properly.
If the heating elements cycle on and off, even at the highest setting, the overheat protection has been activated.
4.1.2 KM452 Safety Cut-Out - Controls are Covered
The cooktop will turn off automatically if any of the touch controls are covered for more than 10 seconds, for example by finger contact, food boiling over, or by an object such as an oven mitt or towel. When the cooktop turns itself off a tone will sound every 30 seconds (for a maximum of 10 minutes) and an F will flash in the display of the touch control which was covered.
Technical Information
24
MasterChef Collection Cooktops
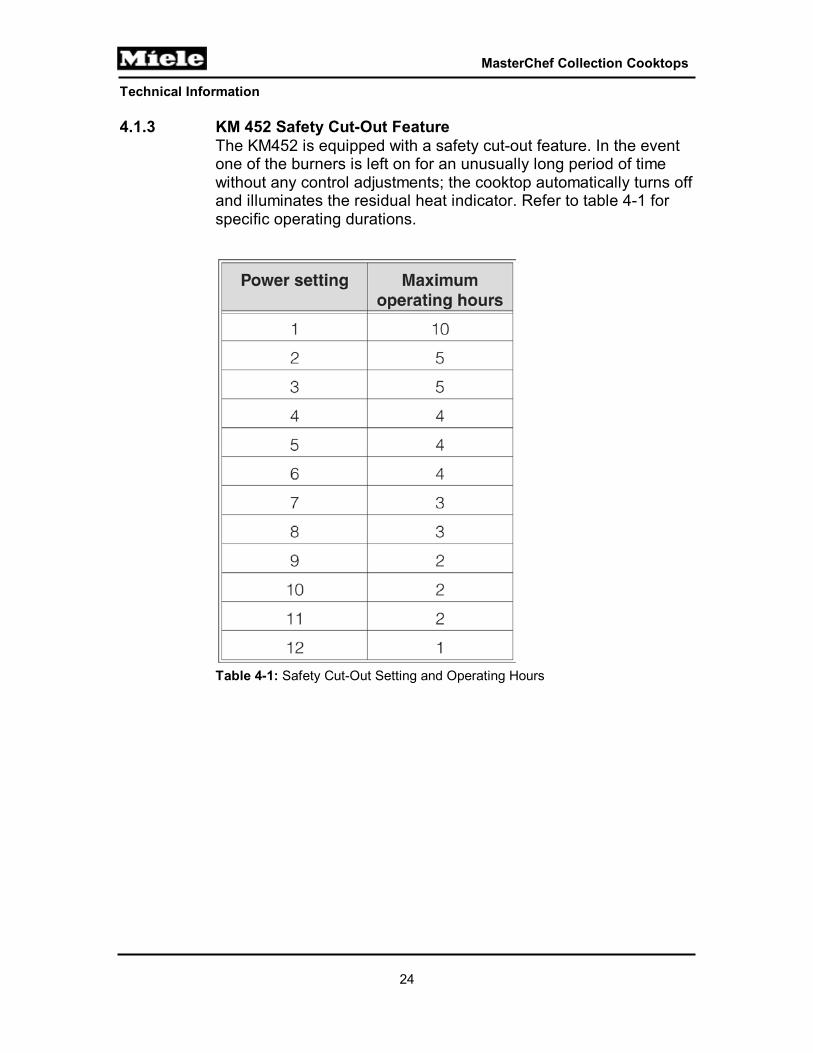
4.1.3 KM 452 Safety Cut-Out Feature
The KM452 is equipped with a safety cut-out feature. In the event one of the burners is left on for an unusually long period of time without any control adjustments; the cooktop automatically turns off and illuminates the residual heat indicator. Refer to table 4-1 for specific operating durations.
Table 4-1: Safety Cut-Out Setting and Operating Hours
Technical Information
25
MasterChef Collection Cooktops
4.1.4 KM452 Touch Controls - Resetting 4.1.4.1 Automatic Reset
The cooktop automatically resets: after a power failure in response to changing light conditions – see note below.
Note If the cooktop be installed in an environment that is brightly lit, or completely shaded; the touch controls may not function properly.
4.1.4.2 Manual Reset
1. Shut off power to the appliance (i.e. turn circuit breaker off). 2. Wait at least one (1) minute. 3. Restore the power to the appliance.
Technical Information
26
MasterChef Collection Cooktops
4.2 Electric Cooktops - Components
4.2.1 Regulator
On electric burner Combi-Sets user adjustable Regulators are used to control the power to the Heater Element. The power is regulated by the user via the adjustable control knobs.
On the KM452 the regulator system is integrated into the electronic. 4.2.2 Temperature Monitor
The Temperature Monitor; mounted (horizontally) across each Heater Element is responsible for monitoring the temperature at the Heater Element. Signals are provided to the Regulator to control the power to the Heater Element.
4.2.3 Operational Indicator The Operational Indicator illuminates when the appliance is switched on for usage.
4.2.4 Residual Heat Indicator(s)
The Residual Heat Indicator illuminates when the appliance reaches a specific temperature alerting the user the cooktop surface is hot. Even if the appliance is switched off; the indicator(s) remains illuminated until the appliance cools down.
4.2.5 Heater Elements
The Heater Elements are powered by 240VAC. The element assemblies are designed to disperse heat only toward the cooking surfaces. If the appliance is converted to operate at a lower voltage (i.e. 208 VAC) a decal indicating the same, should be affixed to the appliance near the data plate. Under no circumstances should a lower voltage unit be connected to higher voltages.
Technical Information
27
MasterChef Collection Cooktops
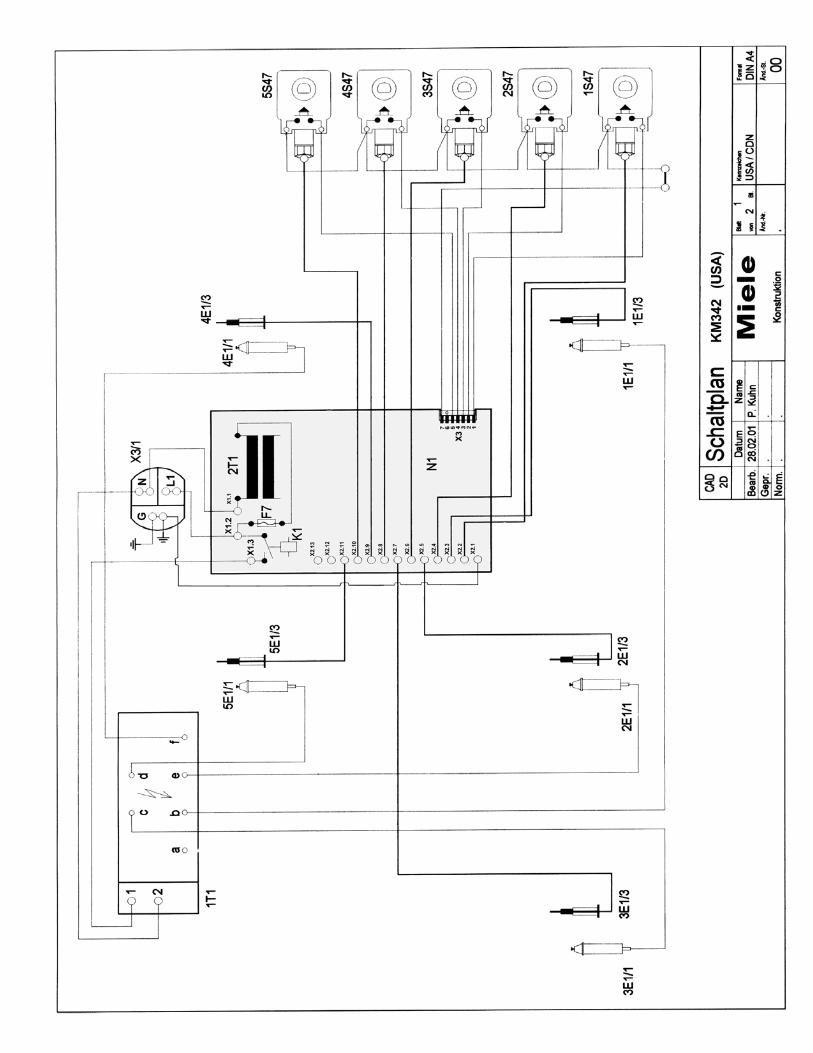
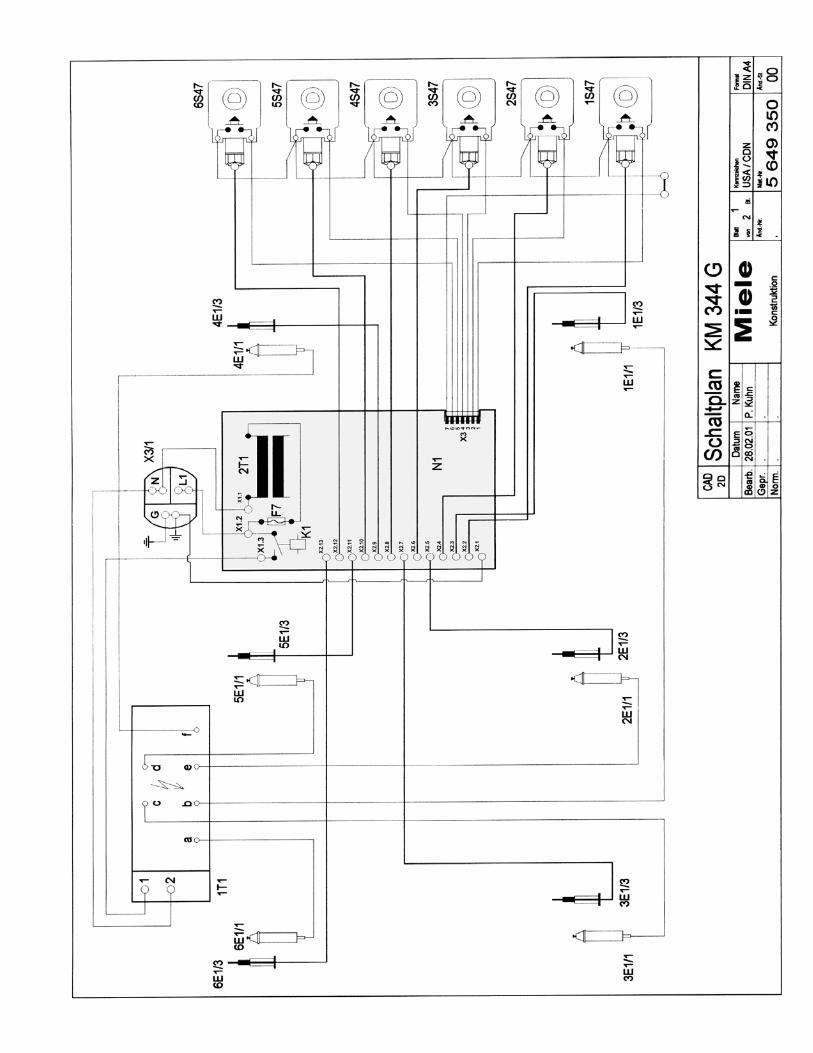
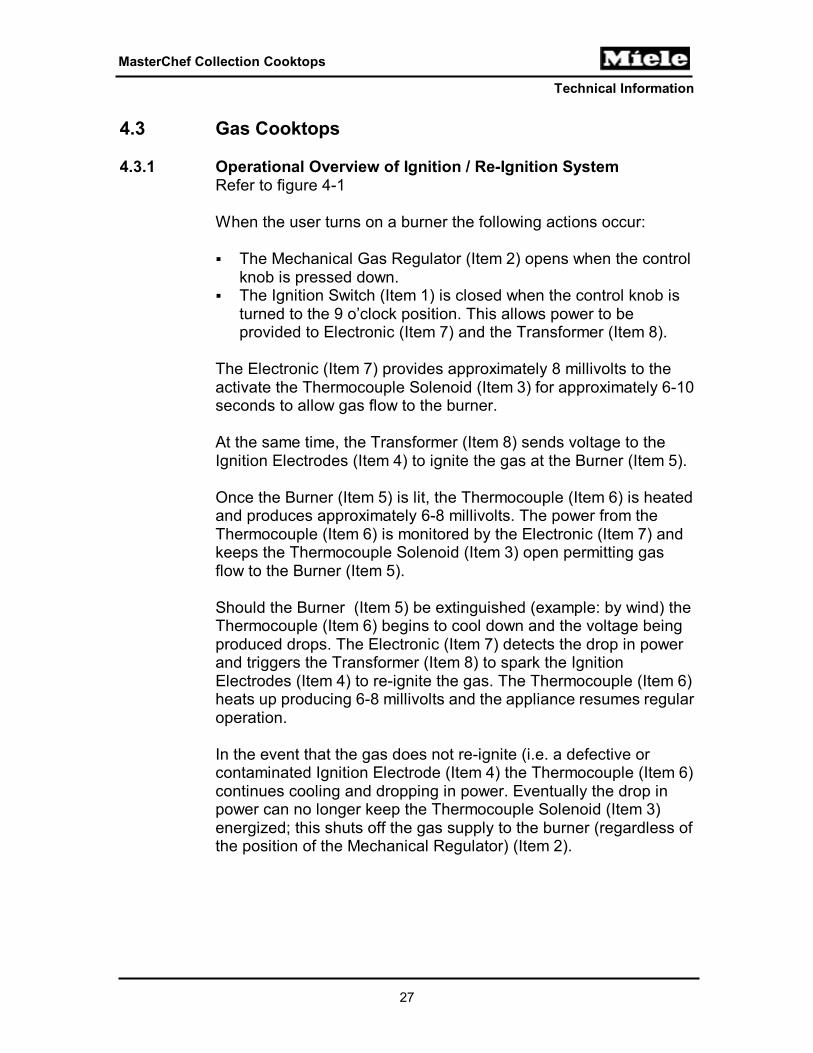
4.3 Gas Cooktops 4.3.1 Operational Overview of Ignition / Re-Ignition System
Refer to figure 4-1 When the user turns on a burner the following actions occur: The Mechanical Gas Regulator (Item 2) opens when the control
knob is pressed down. The Ignition Switch (Item 1) is closed when the control knob is
turned to the 9 o’clock position. This allows power to be provided to Electronic (Item 7) and the Transformer (Item 8).
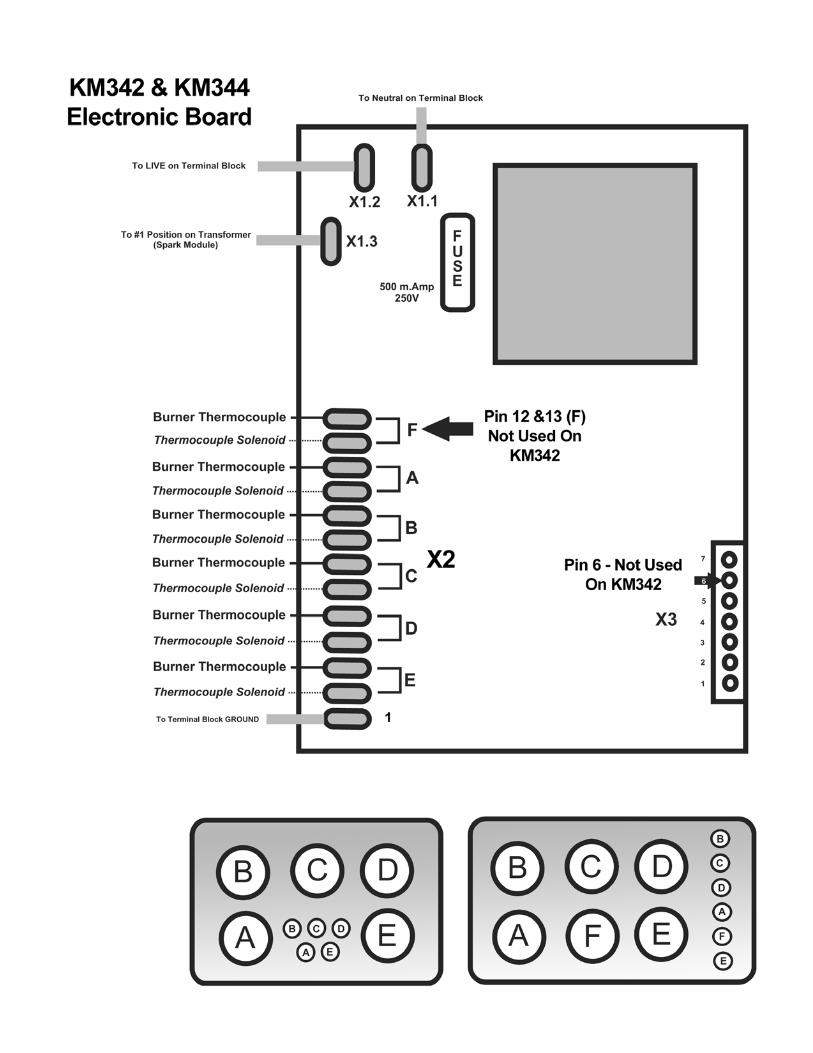
The Electronic (Item 7) provides approximately 8 millivolts to the activate the Thermocouple Solenoid (Item 3) for approximately 6-10 seconds to allow gas flow to the burner. At the same time, the Transformer (Item 8) sends voltage to the Ignition Electrodes (Item 4) to ignite the gas at the Burner (Item 5). Once the Burner (Item 5) is lit, the Thermocouple (Item 6) is heated and produces approximately 6-8 millivolts. The power from the Thermocouple (Item 6) is monitored by the Electronic (Item 7) and keeps the Thermocouple Solenoid (Item 3) open permitting gas flow to the Burner (Item 5). Should the Burner (Item 5) be extinguished (example: by wind) the Thermocouple (Item 6) begins to cool down and the voltage being produced drops. The Electronic (Item 7) detects the drop in power and triggers the Transformer (Item 8) to spark the Ignition Electrodes (Item 4) to re-ignite the gas. The Thermocouple (Item 6) heats up producing 6-8 millivolts and the appliance resumes regular operation. In the event that the gas does not re-ignite (i.e. a defective or contaminated Ignition Electrode (Item 4) the Thermocouple (Item 6) continues cooling and dropping in power. Eventually the drop in power can no longer keep the Thermocouple Solenoid (Item 3) energized; this shuts off the gas supply to the burner (regardless of the position of the Mechanical Regulator) (Item 2).
Technical Information
28
MasterChef Collection Cooktops
1 Ignition Switch 2 Mechanical Gas Regulator 3 Thermocouple Solenoid
4 Ignition Electrode 5 Burner Assembly 6 Thermocouple 7 Electronic
8 Transformer - - - - Control Voltage Figure 4-1: Ignition / Re-Ignition System
Technical Information
29
MasterChef Collection Cooktops
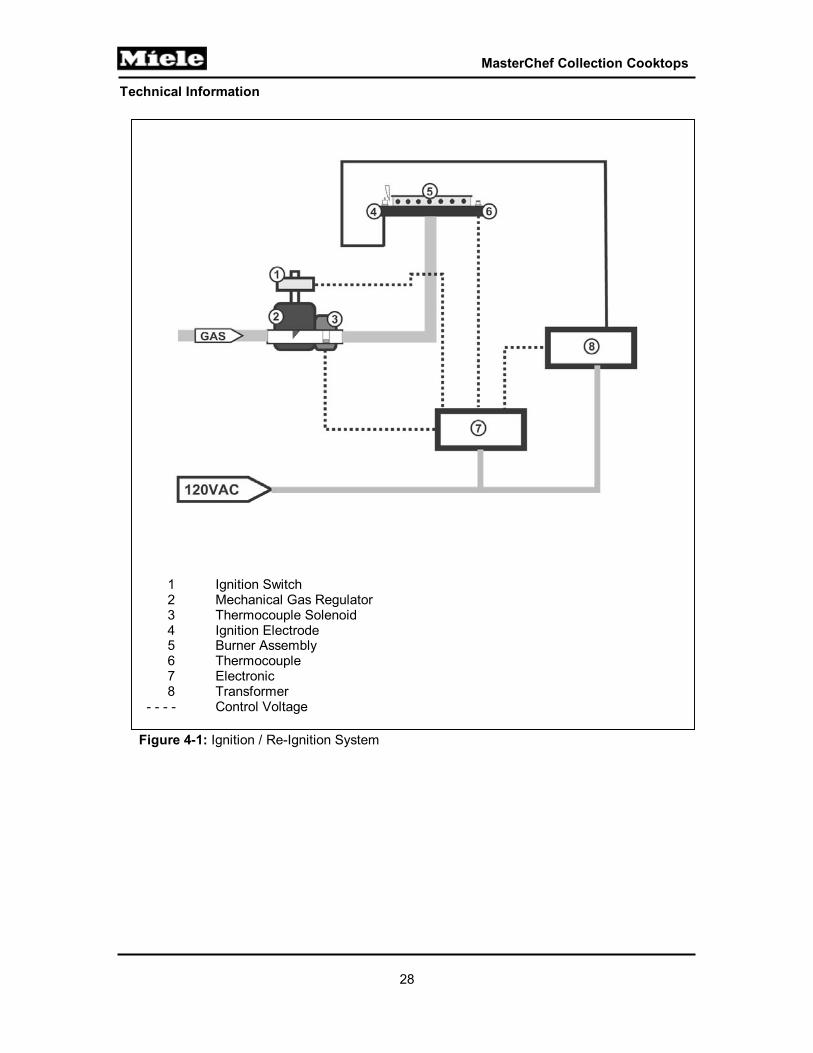
Figure 4-2: Re-Ignition / Control System Data
Technical Information
30
MasterChef Collection Cooktops
4.3.2 Burner Gas Regulators
Each burner is user controlled via a mechanical Gas Regulator. Each Regulator contains a connection port for the Thermocouple Solenoid, that works with the Ignition / Re-Ignition System (see 4.3.1). Even if the user control is placed into the fully open position no gas can flow from the Regulator unless the Thermocouple Solenoid is energized (in the open position).
4.3.3 Connecting to LP Gas
The KM342 and KM344 is ordered specific for the type of gas supply being used - field conversion is not possible.
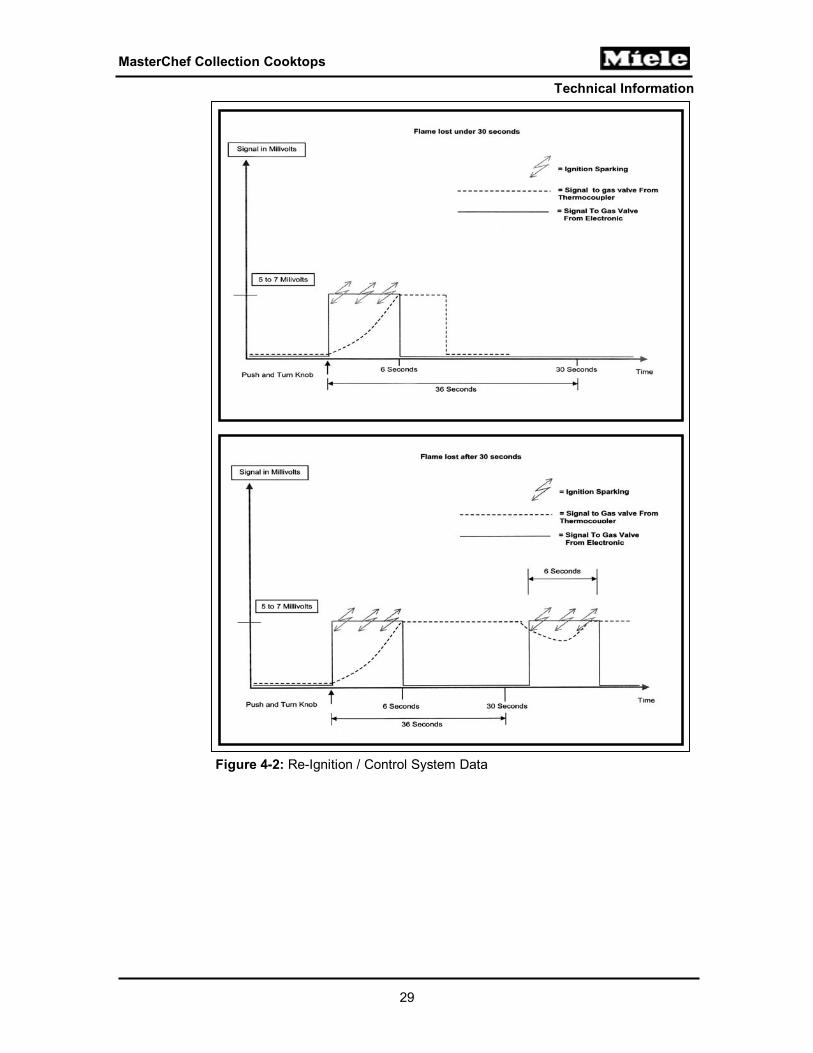
4.3.4 Burner Assemblies 4.3.4.1 Normal and Fast Burner Assembly
1. Burner Cap 2. Burner Base
Figure 4-3: KM342 & KM344 Normal / High Speed Burner Components
Technical Information
31
MasterChef Collection Cooktops
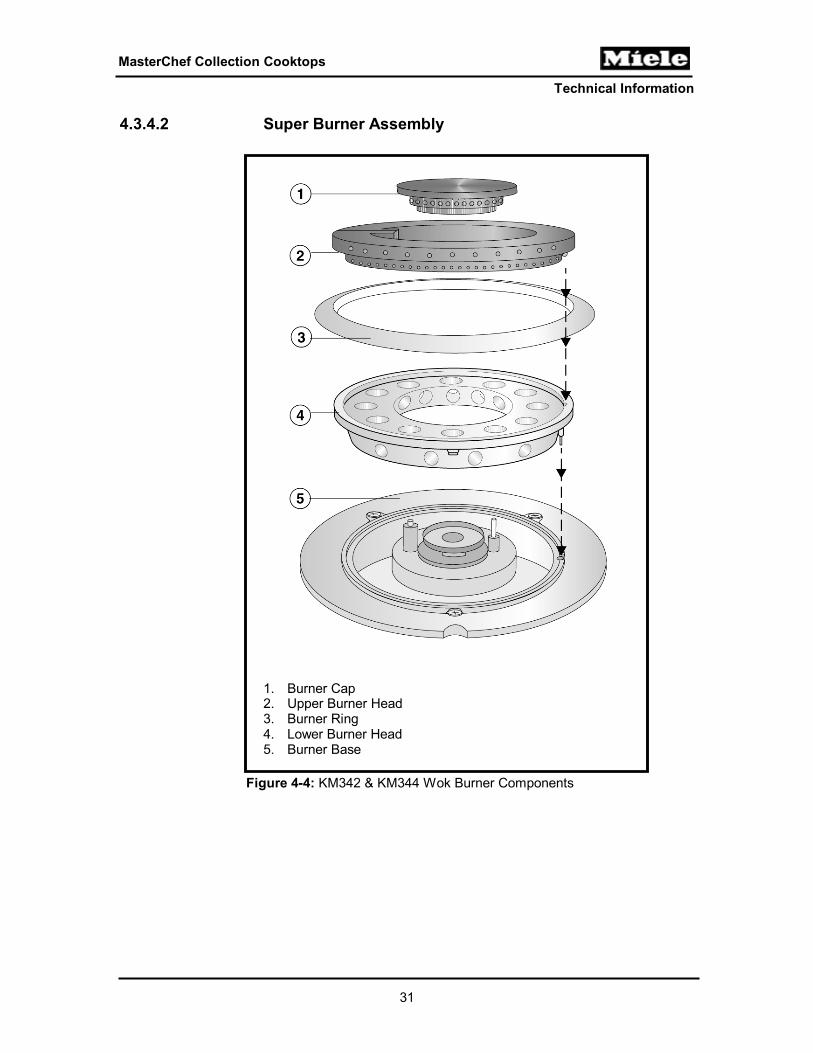
4.3.4.2 Super Burner Assembly
1. Burner Cap 2. Upper Burner Head 3. Burner Ring 4. Lower Burner Head 5. Burner Base
Figure 4-4: KM342 & KM344 Wok Burner Components

Technical Information
32
MasterChef Collection Cooktops
This page intentionally left blank.
Technical Information
33
MasterChef Collection Cooktops
5.0 Service and Maintenance Warning!
Service and repair work should only be performed by qualified personnel; in accordance with applicable regulations.
The appliance must be disconnected from the main power supply (i.e. unplugged, circuit breaker shut off) before any service work is performed.
The gas supply to the appliance must be shut off before performing any service on the KM342 and KM344. After service all gas connections should be checked to ensure they do not leak. Repair as necessary before any operation.
Where applicable by law, gas connections must be performed by qualified / licensed personnel.
Technical Information
34
MasterChef Collection Cooktops
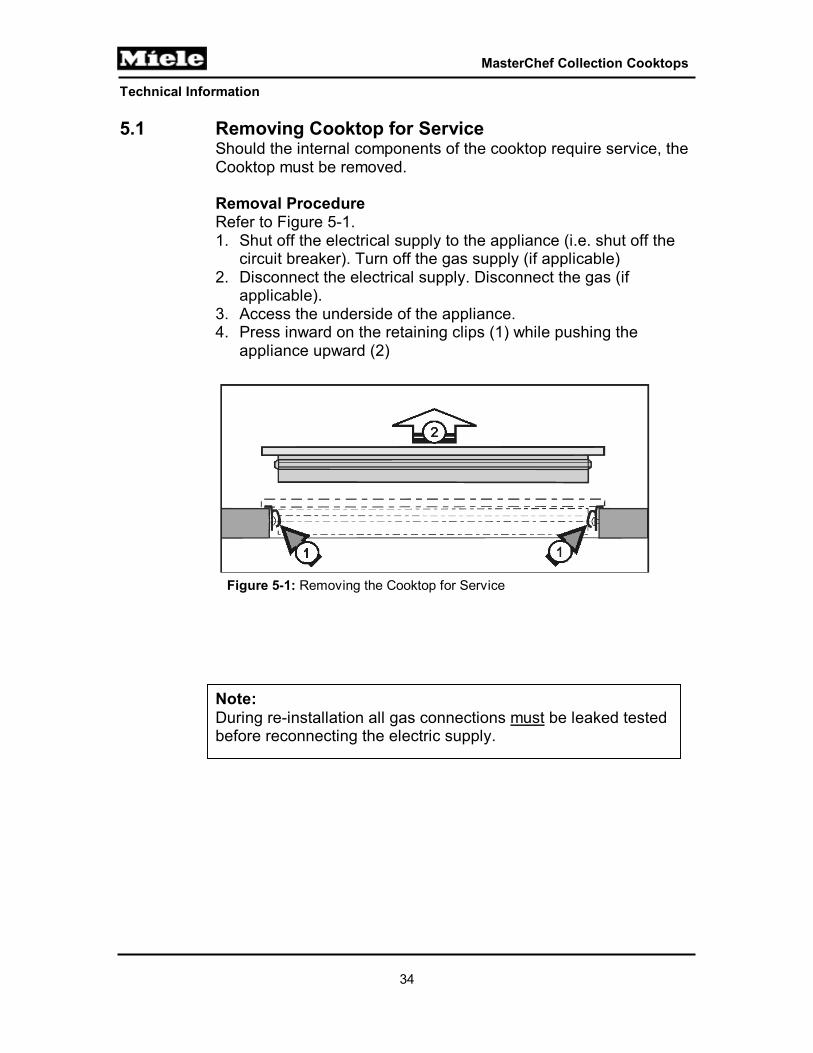
5.1 Removing Cooktop for Service
Should the internal components of the cooktop require service, the Cooktop must be removed. Removal Procedure
Refer to Figure 5-1. 1. Shut off the electrical supply to the appliance (i.e. shut off the
circuit breaker). Turn off the gas supply (if applicable) 2. Disconnect the electrical supply. Disconnect the gas (if
applicable). 3. Access the underside of the appliance. 4. Press inward on the retaining clips (1) while pushing the
appliance upward (2)
Note: During re-installation all gas connections must be leaked tested before reconnecting the electric supply.
Figure 5-1: Removing the Cooktop for Service
Technical Information
35
MasterChef Collection Cooktops
6.0 Fault Diagnosis 6.0.1 Fault Diagnosis - Gas Flame Not Igniting
Check for: Dirty burner head parts / Parts not seated correctly Dirty Ignition Electrode / Faulty Ignition Electrode Appliance is damp (spark current grounding within the unit) Faulty Transformer Faulty Ignition Switch Incorrect type of gas supply.
The Flame Goes Out When Using A Low Setting Dirty burner head parts
Uneven / Flickering Flame Dirty burner head parts / parts not seated correctly Gas pressure not in specification Faulty Gas Regulator
Unusual Color Flames Dirty burner head parts Contaminated Gas Supply
Flame not visible around the entire burner or uneven flames Parts not seated correctly Dirty Burner Components – carefully inspect all holes in burner
ring for contamination (i.e. food residues)
Flame Continuously Goes Out about 30 seconds after Igniting Dirty burner head parts. / Parts not seated correctly Dirty, damaged or defective Thermocouple Loose connections with the Thermocouple circuit

Technical Information
36
MasterChef Collection Cooktops
6.0.2 Fault Diagnosis - Electric
Appliance Inoperative – New Installation Ensure appliance is correctly connected to the electrical supply. Ensure the electric supply matches the requirements of the
appliance.
is Displayed While the Cooktop is Off (KM352) The Residual Heat Indicator is indicating that a burner is still
hot. Allow the Appliance to cool.
F is Displayed While the Cooktop is Off (KM352) The cooktop controls Controls are Covered
The cooktop will turn off automatically if any of the touch controls are covered for more than 10 seconds, for example by finger contact, food boiling over, or by an object such as an oven mitt or towel. When the cooktop turns itself off a tone will sound every 30 seconds (for a maximum of 10 minutes) and an F will flash in the display of the touch control which was covered. 4.1.2
KM452 – Cannot be operated
After intensive cleaning, the appliance cannot be operated for a period of 3 to 4 hours. After this time has elapsed or after switching the supply power off the appliance can be operated without any limitations. Numerous movements during may be detected by the electronic during extensive cleaning. This excessive data can cause an inoperative condition for about 3 to 4 hours.