the administrator's guide to currencyxchanger administrator's guide to currencyxchanger 1...
TRANSCRIPT

The Administrator's Guide to
CurrencyXchanger

The Administrator's Guide to CurrencyXchanger
Installation Instructions1
Installing CurrencyXchanger 71.1
Post-installation Instructions 131.2
Installing CX_SupportFiles 211.3
Importing North American Cities and States 241.4
Installing the API Plugin 301.5
Upgrading CurrencyXchanger to the latest version 331.6
Additional Programs to Install2
Installing TeamViewer QS 432.1
Installing Quicktime 472.2
Initial Setup3
Creating a client (workstation) profile 503.1
Setting up different print formats 523.2
Setup the Company Profile 563.3
Signing-in with a till 603.4
Client Preferences 633.5
Server Preferences 693.6

Users & Privileges4
Setting Up Users and Privileges 744.1
How to login as a normal user? 784.2
Switching the current user 794.3
Changing the Administrator Password 814.4
Running in Client/Server Mode5
Installing 4D Server 845.1
Running 4D Server 2004 855.2
Running 4D Client 2004 885.3
Activating 4D Server license (v13) 905.4
Backup & Restore6
Configuring Backup in standalone mode 956.1
Configuring Backup on the Server 986.2
Manual Backup 1036.3
Manual backup from the server. 1046.4
How to restore a backup file from 4D Server? 1066.5
How to restore a backup file from 4D Runtime (standalone users)? 1126.6
The backup log 1166.7
The database log (4D Server Log) 1186.8
More about the log file 1236.9

Advanced Settings7
Customizing the printable receipt template 1267.1
Customizing the printable cheque format 1297.2
Configuring the Picture ID folder 1307.3
Configuring the FTP setting 1407.4
Preset Fee Structures 1437.5
Adding Database Field Constraints 1467.6
Defining Rule-based Fee Structures 1487.7
Enabling the Application Log 1497.8
Deleting Transactions8
Deleting all transactions 1528.1
Deleting an invoice 1548.2
Importing & Exporting9
Exporting data 1579.1
Exporting reports into Excel 1589.2
Eporting through custom reports 1599.3
Importing 1609.4
Troubleshooting Common Problems10
Journal is not balanced error 16210.1

Constant Backup Failures: Causes and Remedies 16410.2
Error: License is expired! 16510.3
Error -10002: The database cannot be used (4D Client) 16610.4
Error -9913 or -9926: Connection to Server Failed 16910.5
Error -12: Maximum number of concurrent users reached (4D Client) 17010.6
Error: No more room to save the record! 17110.7
How to restart 4D Server? 17410.8
Picture IDs not visible 17710.9
Error: Cash Account is not valid! 17910.10
Window size is too small 18110.11
Using 4D Tools to repair data 18610.12
End of Year Procedure11
Splitting the data files 19411.1
Storing end of year balances 19811.2
FAQ12
Asking for Remote Support via TeamViewer 20812.1
How to request support in CurrencyXchanger? 21212.2
How to change the base currency? 21312.3

© Copyright 2012 Clear View Systems Ltd. CanadaThe Administrator's Guide to CurrencyXchanger - 6
Installation Instructions
© Copyright 2012 Clear View Systems Ltd. CanadaThe Administrator's Guide to CurrencyXchanger - 7
Installing CurrencyXchanger
This section explains how to install CurrencyXchanger on a client/server environment.
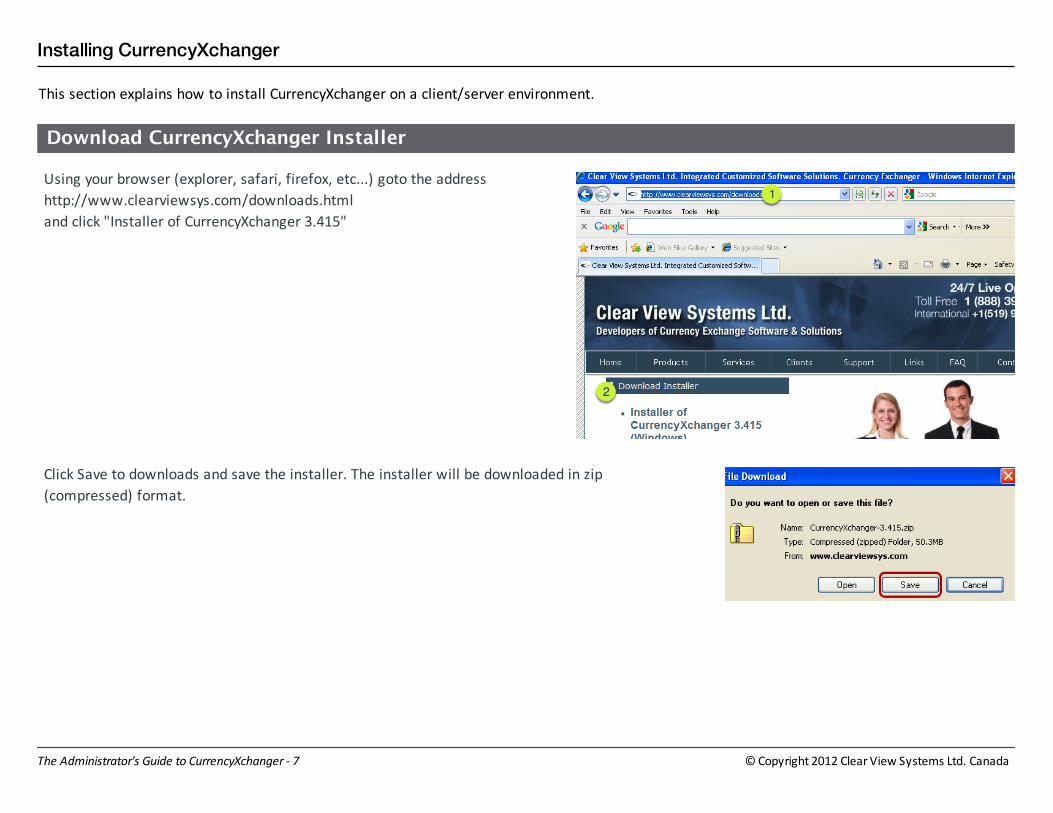
Download CurrencyXchanger Installer
Using your browser (explorer, safari, firefox, etc...) goto the address
http://www.clearviewsys.com/downloads.html
and click "Installer of CurrencyXchanger 3.415"
Click Save to downloads and save the installer. The installer will be downloaded in zip
(compressed) format.

© Copyright 2012 Clear View Systems Ltd. CanadaThe Administrator's Guide to CurrencyXchanger - 8
Save the installer on your desktop or somewhere that you could locate it
easily later (e.g. the Downloads folder)
The installer is about 50 MB and takes some time to downloads. Please wait while the
download is finished
Locate the compressed installer folder
The installer is downloaded in a compressed format and needs to be uncompressed. Locate the folder on your desktop and
double click the folder.

© Copyright 2012 Clear View Systems Ltd. CanadaThe Administrator's Guide to CurrencyXchanger - 9
Windows will show the content of the zipped folder. Drage the icon out of
the
Bypass the security warning
Once the installer is unzipped and ready, double click on the installer to start the installation process.
© Copyright 2012 Clear View Systems Ltd. CanadaThe Administrator's Guide to CurrencyXchanger - 10
Installation Process
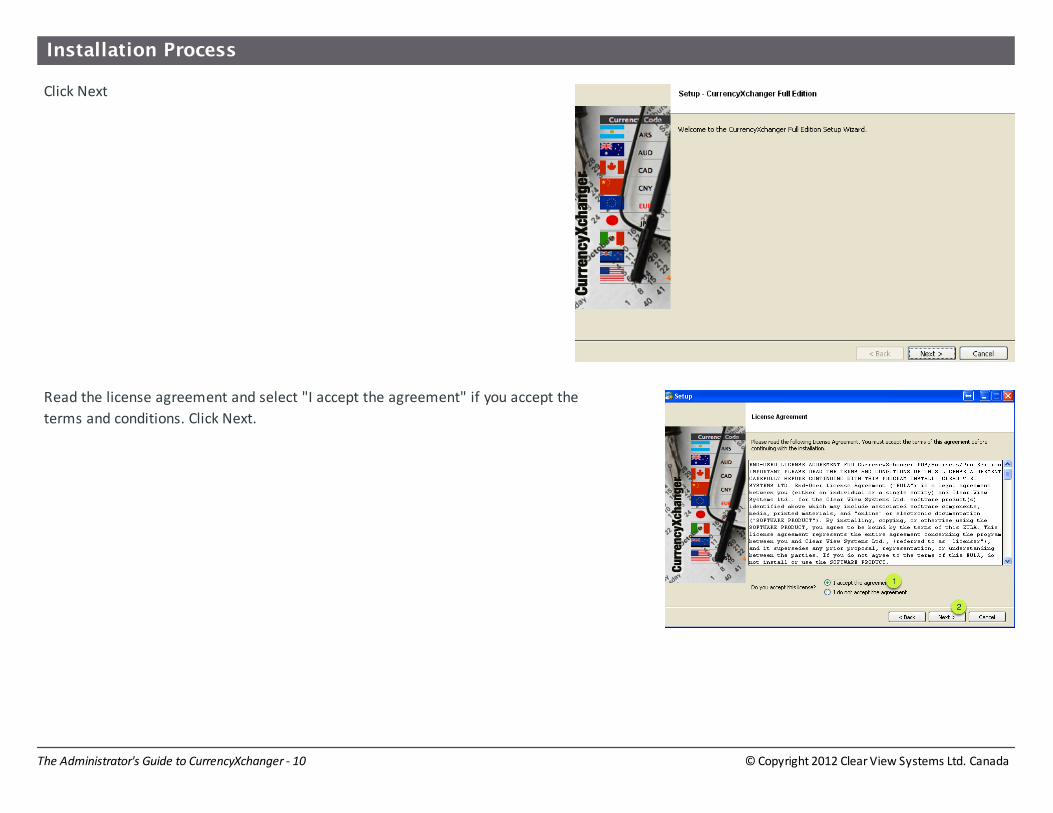
Click Next
Read the license agreement and select "I accept the agreement" if you accept the
terms and conditions. Click Next.

© Copyright 2012 Clear View Systems Ltd. CanadaThe Administrator's Guide to CurrencyXchanger - 11
The default installation location must be changed!
Depending on the OS that you are running the default installation could be
different. For consistency of installation change the installation directory to
the root directory of the main drive C:\
Delete the installation directory and make sure that you leave the root folder.
The program could also be installed on other drives (D: or F: if you have other
drives)
Select the components to install - Important
• If you are installing on the server machine, select all options.
• If you are installing on a client machine, select "4D Client" only
• If you are installing on a standalone machine, then select
"CurrencyXchanger Components" and "4D Runtime Interpreted"only.

© Copyright 2012 Clear View Systems Ltd. CanadaThe Administrator's Guide to CurrencyXchanger - 12
Wait for Installation to finish
Wait a few minutes and you are done with the installation. Sometimes after the
installation finishes, windows will ask you if the program installed correctly. In that
case select 'program installed correctly' .
What is installed?
After the installation is finished, there are two new folders created on
drive C:\.
© Copyright 2012 Clear View Systems Ltd. CanadaThe Administrator's Guide to CurrencyXchanger - 13
Post-installation Instructions
This section explains how to install CurrencyXchanger on a client/server environment.
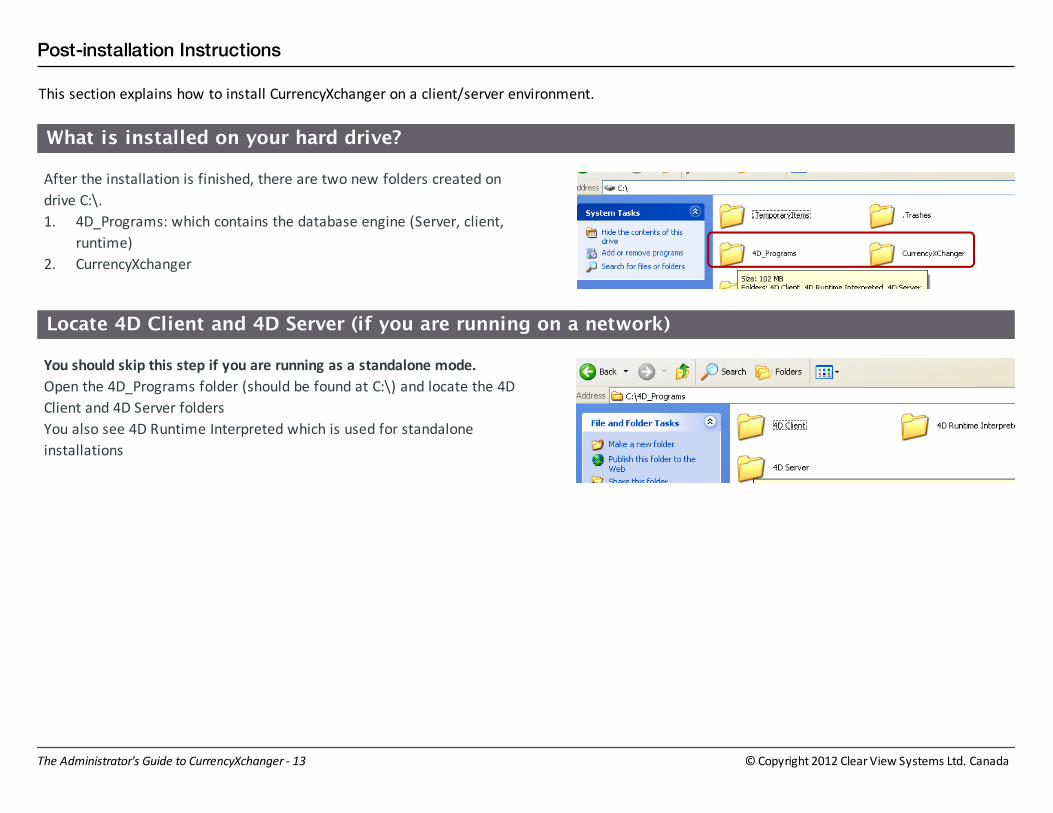
What is installed on your hard drive?
After the installation is finished, there are two new folders created on
drive C:\.
1. 4D_Programs: which contains the database engine (Server, client,
runtime)
2. CurrencyXchanger
Locate 4D Client and 4D Server (if you are running on a network)
You should skip this step if you are running as a standalone mode.
Open the 4D_Programs folder (should be found at C:\) and locate the 4D
Client and 4D Server folders
You also see 4D Runtime Interpreted which is used for standalone
installations

© Copyright 2012 Clear View Systems Ltd. CanadaThe Administrator's Guide to CurrencyXchanger - 14
Create a desktop shortcut of 4D Server
Once you open 4D Server folder, you should be able to see the application
4D Server. Right click on 4D Server and select 'Send To' and then 'Desktop
(create shortcut)'
Create a desktop Shortcut of 4D Client
Once you open 4D Client folder, you should be able to see the application
4D Client. Right click on 4D Client and select 'Send To' and then 'Desktop
(create shortcut)'

© Copyright 2012 Clear View Systems Ltd. CanadaThe Administrator's Guide to CurrencyXchanger - 15
Change properties of CurrencyXchanger
The next step is open the CurrencyXchanger folder. Right click on 'CurrencyXchanger.4DB'
(you may not see the extension .4DB) and select 'Properties'
Change the default application corresponding to CurrencyXchanger. The first time you
install the program, Windows wouldn't know how to open CurrencyXchanger.4DB. If you
see '4th Dimension' then everything is okay, but otherwise click 'Change'

© Copyright 2012 Clear View Systems Ltd. CanadaThe Administrator's Guide to CurrencyXchanger - 16
Assigning 4D Runtime Interpreted to CurrencyXchanger.4DB
Click Browse
Locate 4D Runtime Interpreted by Navigating to root directory of drive C:\
and looking for 4D_Programs.
Once you found it, open 4D Runtime Interpreted folder

© Copyright 2012 Clear View Systems Ltd. CanadaThe Administrator's Guide to CurrencyXchanger - 17
Select 4DRuntimeInterpreted and click Open
Navigate to C:\CurrencyXchanger and create a desktop shortcut of
CurrencyXchanger by right clicking on CurrencyXchanger.4DB icon.
You should see a desktop icon titled 'Shortcut to CurrencyXchanger'. Double click and run the program for the first time. The
first time you setup CurrencyXchanger, you should run it in standalone mode (even if you would like to run it in client/server
mode in the future).

© Copyright 2012 Clear View Systems Ltd. CanadaThe Administrator's Guide to CurrencyXchanger - 18
Creating the data files
The first time you run CurrencyXchanger it will ask you the location of the
data files. Click the 'New...' button and make sure that you save the new
data file inside the "DataFiles" folder.
You should pick a name for the datafile that corresponds to the exchange
company name (e.g. ABCCurrencyData)
Enter your company name, country and currency code
Once you created the data files, the system will prompt you to enter your
company name.
© Copyright 2012 Clear View Systems Ltd. CanadaThe Administrator's Guide to CurrencyXchanger - 19
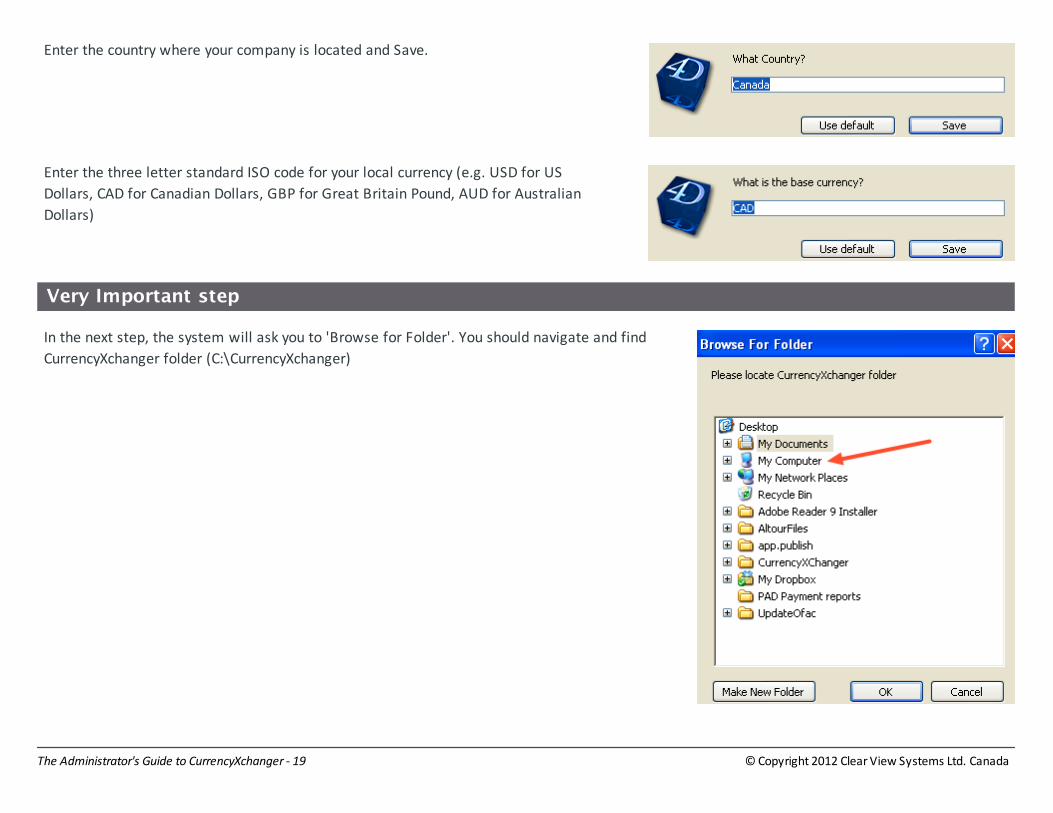
Enter the country where your company is located and Save.
Enter the three letter standard ISO code for your local currency (e.g. USD for US
Dollars, CAD for Canadian Dollars, GBP for Great Britain Pound, AUD for Australian
Dollars)
Very Important step
In the next step, the system will ask you to 'Browse for Folder'. You should navigate and find
CurrencyXchanger folder (C:\CurrencyXchanger)

© Copyright 2012 Clear View Systems Ltd. CanadaThe Administrator's Guide to CurrencyXchanger - 20
Once you have located the CurrencyXchanger folder (under C:\CurrencyXchanger) then click
OK. This step will load all flags into the system. If you don't do this step properly the flags
won't be showing up in the system.
Login Panel
You will now be presented with the User Login panel. Click on Administrator and use
the password 'admin' to login (the password for administrator is case-sensitive).

© Copyright 2012 Clear View Systems Ltd. CanadaThe Administrator's Guide to CurrencyXchanger - 21
Installing CX_SupportFiles
This section describes how to install the CX_SupportFiles. These steps must be done on the server. The CX_SupportFiles contains templates for
importing and exporting from different tables of the database.
Copy the folder
Copy the CX_Support folder from C:\CurrencyXchanger

© Copyright 2012 Clear View Systems Ltd. CanadaThe Administrator's Guide to CurrencyXchanger - 22
Open 4D Folder
You need to locate the 4D Folder which can be accessed from the above
menu. The location of the 4D Folder may be different depending on the
Operating System that is being used. Click on the Support menu and then
select 'Show 4D Folder'
The 4D Folder is a location that you need to intall CX_SupportFiles into.
From the next screen you need to copy CX_SupportFiles from the
CurrencyXchanger folder. See the next step is open the folder and paste
the support folder into it.

© Copyright 2012 Clear View Systems Ltd. CanadaThe Administrator's Guide to CurrencyXchanger - 23
Paste the CX_Support Files in 4D Folder
You 4D Folder may not look like the above screenshot. Also the path may
be different from what you see in this screen. Just paste the CX_Support
folder here.

© Copyright 2012 Clear View Systems Ltd. CanadaThe Administrator's Guide to CurrencyXchanger - 24
Importing North American Cities and States
In this section you learn how to import north american cities, states (provinces) and all countries of the world. Before attempting to do this step,
you should have installed CX_Support files in the 4D Folder as explained in previous section. These steps must be performed on the server.
Go to Support Menu
From within the application, click on the Support menu and then select Import Cities.
© Copyright 2012 Clear View Systems Ltd. CanadaThe Administrator's Guide to CurrencyXchanger - 25
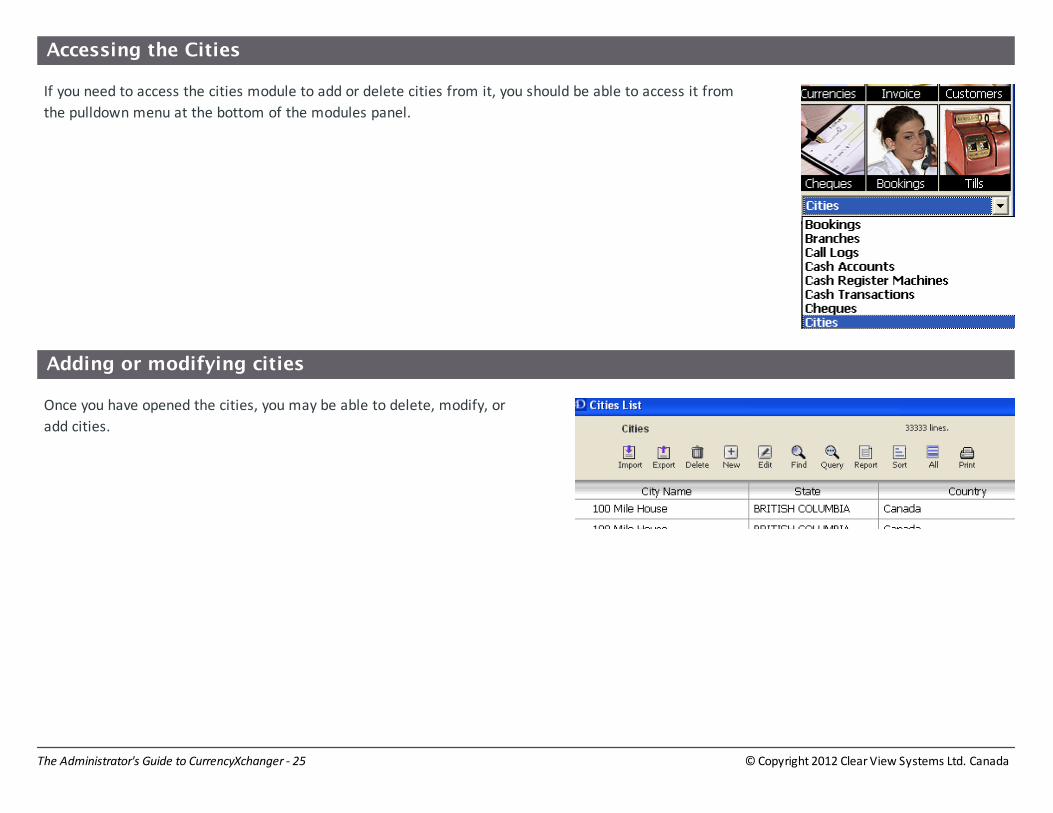
Accessing the Cities
If you need to access the cities module to add or delete cities from it, you should be able to access it from
the pulldown menu at the bottom of the modules panel.
Adding or modifying cities
Once you have opened the cities, you may be able to delete, modify, or
add cities.

© Copyright 2012 Clear View Systems Ltd. CanadaThe Administrator's Guide to CurrencyXchanger - 26
Locate the CX_SupportFiles
When the Import File dialog box open, select the CX_Support files from
C:\CurrencyXchanger\CX_SupportFiles
Select cities
Select the 'cities' files and click open
© Copyright 2012 Clear View Systems Ltd. CanadaThe Administrator's Guide to CurrencyXchanger - 27
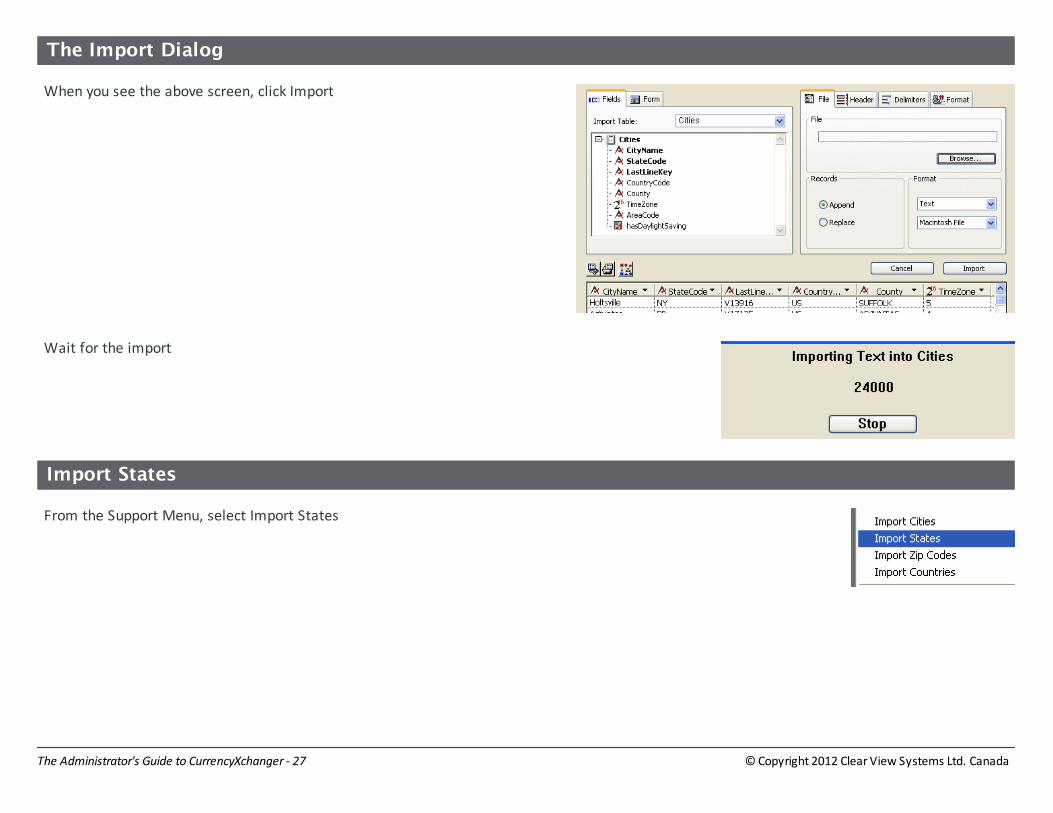
The Import Dialog
When you see the above screen, click Import
Wait for the import
Import States
From the Support Menu, select Import States

© Copyright 2012 Clear View Systems Ltd. CanadaThe Administrator's Guide to CurrencyXchanger - 28
Highlight 'States' and open the 'States' file
Click on the Import button to import all north america states and
provinces.

© Copyright 2012 Clear View Systems Ltd. CanadaThe Administrator's Guide to CurrencyXchanger - 29
Import Countries
Similarly, import all the countries into the database.

© Copyright 2012 Clear View Systems Ltd. CanadaThe Administrator's Guide to CurrencyXchanger - 30
Installing the API Plugin
This section how to install the API Plugins inside the Plugins folder.
Download the Plugin
Please go to the above URL to download the plugin
Click Save to save the compressed file
Save to Desktop
Save the API.zip to your desktop

© Copyright 2012 Clear View Systems Ltd. CanadaThe Administrator's Guide to CurrencyXchanger - 31
The zipped file should now be opened (double click)
By dragging the content out, you can unzip the file
Install the Plugin inside CurrencyXchanger folder
Drag the the unzipped file called 'API Pack.bundle' to the Plugins folder
inside CurrencyXchanger folder.

© Copyright 2012 Clear View Systems Ltd. CanadaThe Administrator's Guide to CurrencyXchanger - 32
The Plugins folder should contain the above bundles.
Clean up your traces by deleting the API.zip folder. Right click on the folder and select Delete.

© Copyright 2012 Clear View Systems Ltd. CanadaThe Administrator's Guide to CurrencyXchanger - 33
Upgrading CurrencyXchanger to the latest version
This section describes how to upgrade your structure file to the latest version of CurrencyXchanger. This process is the same for both server and
standalone editions.
Backup backup backup!
Before going on with this lesson, make sure that you backup first. For more information about backing up the database, check out the backup
section of this manual.
NEVER EVER TRY UPDATING THE DATABASE BEFORE BACKING UP FIRST.
Downloading the latest version
Ask Clear View Systems about the latest download URL (like the above
URL) and point your browser to that URL.
Click Save to download the latest version in zip format.

© Copyright 2012 Clear View Systems Ltd. CanadaThe Administrator's Guide to CurrencyXchanger - 34
Save the latest link to the desktop or somewhere that you can immediately
locate such as the Desktop.
Wait a few minutes for the program to download.

© Copyright 2012 Clear View Systems Ltd. CanadaThe Administrator's Guide to CurrencyXchanger - 35
Locate the zipped folder
Double click the latest downloaded folder (in zip).
Unzip the zip folder
To unzip the folder, you could open the folder and drag and drop the compressed file
out to your desktop.

© Copyright 2012 Clear View Systems Ltd. CanadaThe Administrator's Guide to CurrencyXchanger - 36
Replace the old structure file
Now open the CurrencyXchanger folder and replace the
CurrencyXchanger.4DB file with the new one on the desktop. Just drag
and drop the file into the folder.
You should see a confirmation window pop up to make sure that you are replacing the old
structure file with the new one. For this process to work 4D Runtime and/or 4D Server must
be closed, or else the datafile may become locked.
After you run the new program, by opening the CurrencyXchanger
shortcut, you will be prompted to reselect the datafile.

© Copyright 2012 Clear View Systems Ltd. CanadaThe Administrator's Guide to CurrencyXchanger - 37
Create a new LogFile
The log file is used to write all changes to the database since the last backup.
Create a new log file by clicking the 'New...' button
Click Save to save the logfile inside the DataFiles folder.
Backup
After creating a log file, a message will pop up on the screen to ask you to
backup. Click OK to backup. Refer to the backup section to see how to configute
your backup.

© Copyright 2012 Clear View Systems Ltd. CanadaThe Administrator's Guide to CurrencyXchanger - 38
Login page
Once you have upgraded the system, the password for the administrator will be reset to
'admin' (lowercase).

© Copyright 2012 Clear View Systems Ltd. CanadaThe Administrator's Guide to CurrencyXchanger - 39
Verify the upgrade version
Check the upgrade version on the top left to see if your upgrade was successful. The number 3.564 is the
version that is running.
Create a machine profile
After you startup the new version, the version will ask you to create a
computer profile (preference file).

© Copyright 2012 Clear View Systems Ltd. CanadaThe Administrator's Guide to CurrencyXchanger - 40
Create a new machine profile
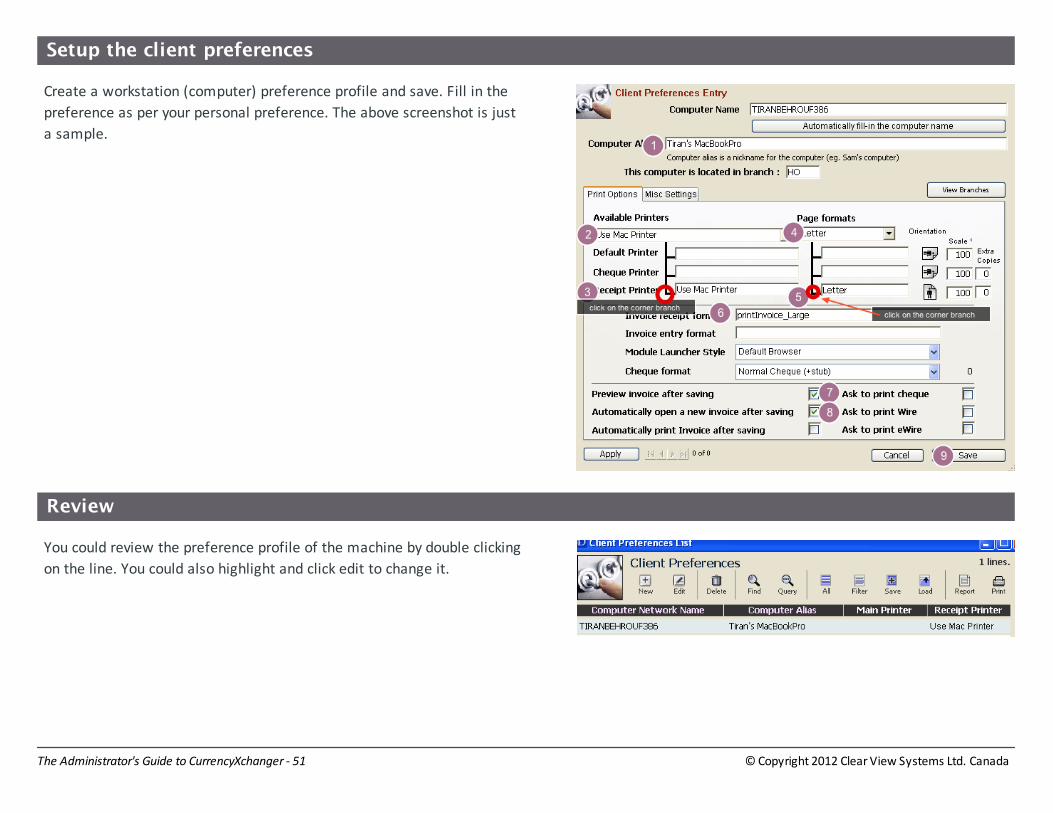
Setup the client preferences
Create a workstation (computer) preference profile and save. Fill in the
preference as per your personal preference. The above screenshot is just
a sample. Follow the steps as shown in the above screenshot (It's
important the you follow step 2 to 5 in the exact order).

© Copyright 2012 Clear View Systems Ltd. CanadaThe Administrator's Guide to CurrencyXchanger - 41
You could review the preference profile of the machine by double clicking
on the line. You could also highlight and click edit to change it.

© Copyright 2012 Clear View Systems Ltd. CanadaThe Administrator's Guide to CurrencyXchanger - 42
Additional Programs to Install

© Copyright 2012 Clear View Systems Ltd. CanadaThe Administrator's Guide to CurrencyXchanger - 43
Installing TeamViewer QS
Downloading and installing TeamViewer QuickSupport. TeamViewer QuickSupport is a secure remote access application which is FREE and has
great advantages in speed and functions compared to other solutions like PCanywhere, VNC, rAdmin. The package is very small, runing
immediately.
Go to ClearViewSys.com
Go to www.clearviewsys.com and click 'Support' without select the
submenus.

© Copyright 2012 Clear View Systems Ltd. CanadaThe Administrator's Guide to CurrencyXchanger - 44
Click the Remote Support
Click the Remote Support button to download TeamViewer QS.
Save to desktop
Save the file on your desktop
© Copyright 2012 Clear View Systems Ltd. CanadaThe Administrator's Guide to CurrencyXchanger - 45
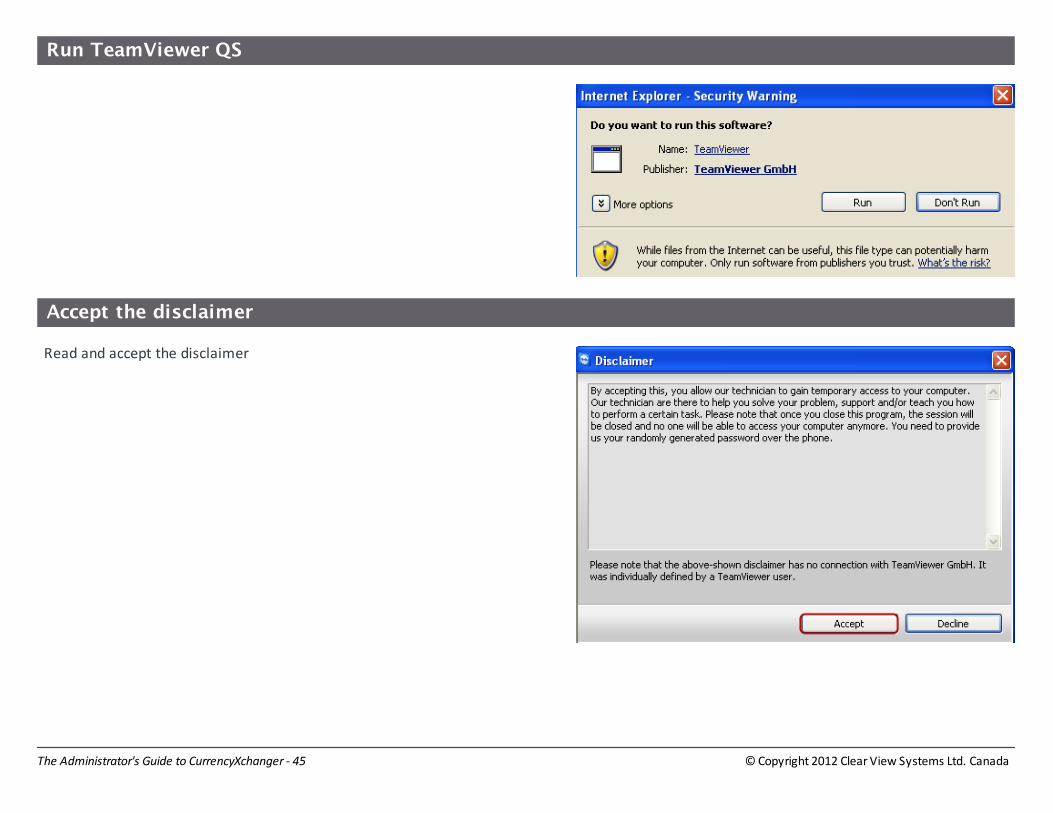
Run TeamViewer QS
Accept the disclaimer
Read and accept the disclaimer

© Copyright 2012 Clear View Systems Ltd. CanadaThe Administrator's Guide to CurrencyXchanger - 46
Provide ID and Password
You need to provide your TeamViewer ID and Password to Clear View Systems technicians
everytime you need help with the system. They can temporarily connect and solve any issues
related to CurrencyXchanger.

© Copyright 2012 Clear View Systems Ltd. CanadaThe Administrator's Guide to CurrencyXchanger - 47
Installing Quicktime
It is necessary to install quicktime before using CurrencyXchanger. The quicktime engine is used by the database to decode pictures and graphs.
Download quicktime
Goto to www.quicktime.com and download the installer.
Run Quicktime Installer
Run the installer.
© Copyright 2012 Clear View Systems Ltd. CanadaThe Administrator's Guide to CurrencyXchanger - 48
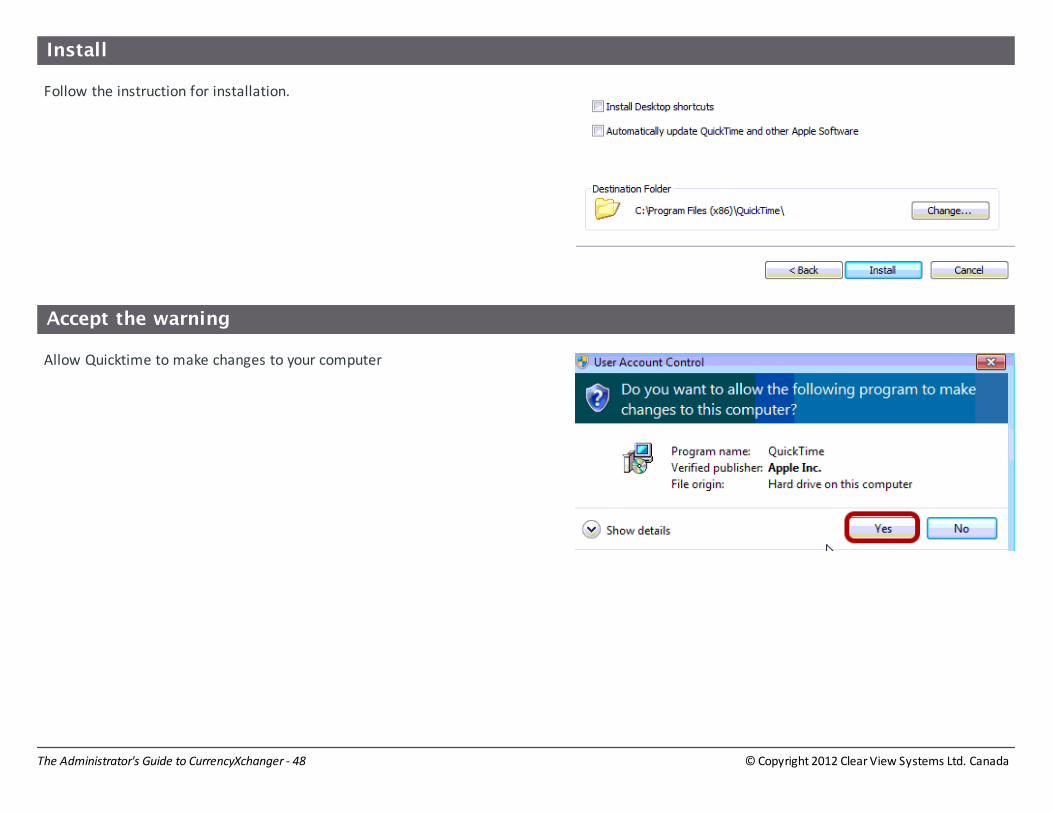
Install
Follow the instruction for installation.
Accept the warning
Allow Quicktime to make changes to your computer

© Copyright 2012 Clear View Systems Ltd. CanadaThe Administrator's Guide to CurrencyXchanger - 49
Initial Setup

© Copyright 2012 Clear View Systems Ltd. CanadaThe Administrator's Guide to CurrencyXchanger - 50
Creating a client (workstation) profile
The first time you upgrade the software and run CurrencyXchanger, the system may complain that you need to create a machine profile.
System complains about your computer profile
After you startup the new version, the system will complain about the
lack of a computer profile and will ask you to create one (preference file).
When you click OK the client preferences module will open automatically.
Create a new machine profile
© Copyright 2012 Clear View Systems Ltd. CanadaThe Administrator's Guide to CurrencyXchanger - 51
Setup the client preferences
Create a workstation (computer) preference profile and save. Fill in the
preference as per your personal preference. The above screenshot is just
a sample.
Review
You could review the preference profile of the machine by double clicking
on the line. You could also highlight and click edit to change it.

© Copyright 2012 Clear View Systems Ltd. CanadaThe Administrator's Guide to CurrencyXchanger - 52
Setting up different print formats
This lesson shows how to change the printing style for the invoices.
Make sure you are signed in as administrator.
Go to Client preferences
1) First select this computer by pressing the button in the bottom of the
page.
2) Highlight the computer by clicking on it
3) Click edit to change the computer preference profile (also known as
the client preferences)

© Copyright 2012 Clear View Systems Ltd. CanadaThe Administrator's Guide to CurrencyXchanger - 53
When you click on the Invoice receipt format, it will give you a list of
preformated receipts which you can pick from.
Select a print format that you like.

© Copyright 2012 Clear View Systems Ltd. CanadaThe Administrator's Guide to CurrencyXchanger - 54
Sample invoice formats
This is an example of a large format print

© Copyright 2012 Clear View Systems Ltd. CanadaThe Administrator's Guide to CurrencyXchanger - 55
This is a sample print of the "printinvoice_thermal" format. As you can see, the flags are not
showing.

© Copyright 2012 Clear View Systems Ltd. CanadaThe Administrator's Guide to CurrencyXchanger - 56
Setup the Company Profile
The following steps are necessary before you could use the system. After you have installed the program, run it in standalone mode (using 4D
Runtime Interpreted as the helper application).
Open CurrencyXchanger
Double click the CurrencyXchanger shortcut that you previously made.
© Copyright 2012 Clear View Systems Ltd. CanadaThe Administrator's Guide to CurrencyXchanger - 57
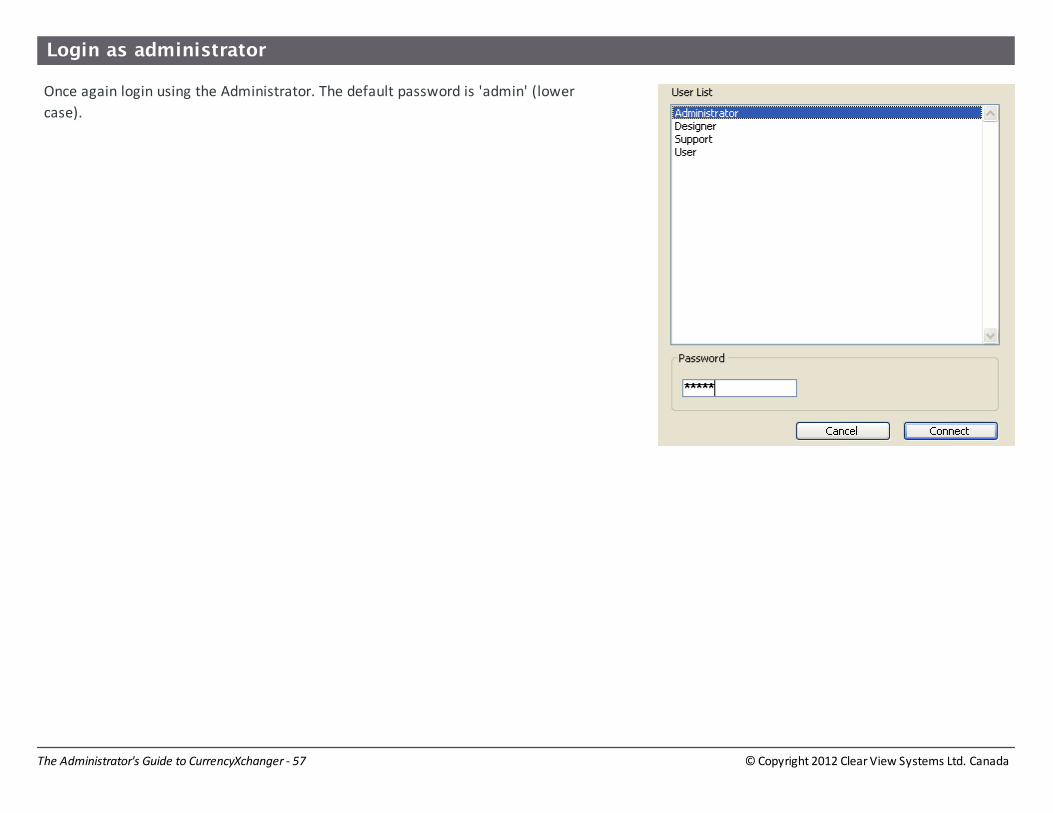
Login as administrator
Once again login using the Administrator. The default password is 'admin' (lower
case).
© Copyright 2012 Clear View Systems Ltd. CanadaThe Administrator's Guide to CurrencyXchanger - 58
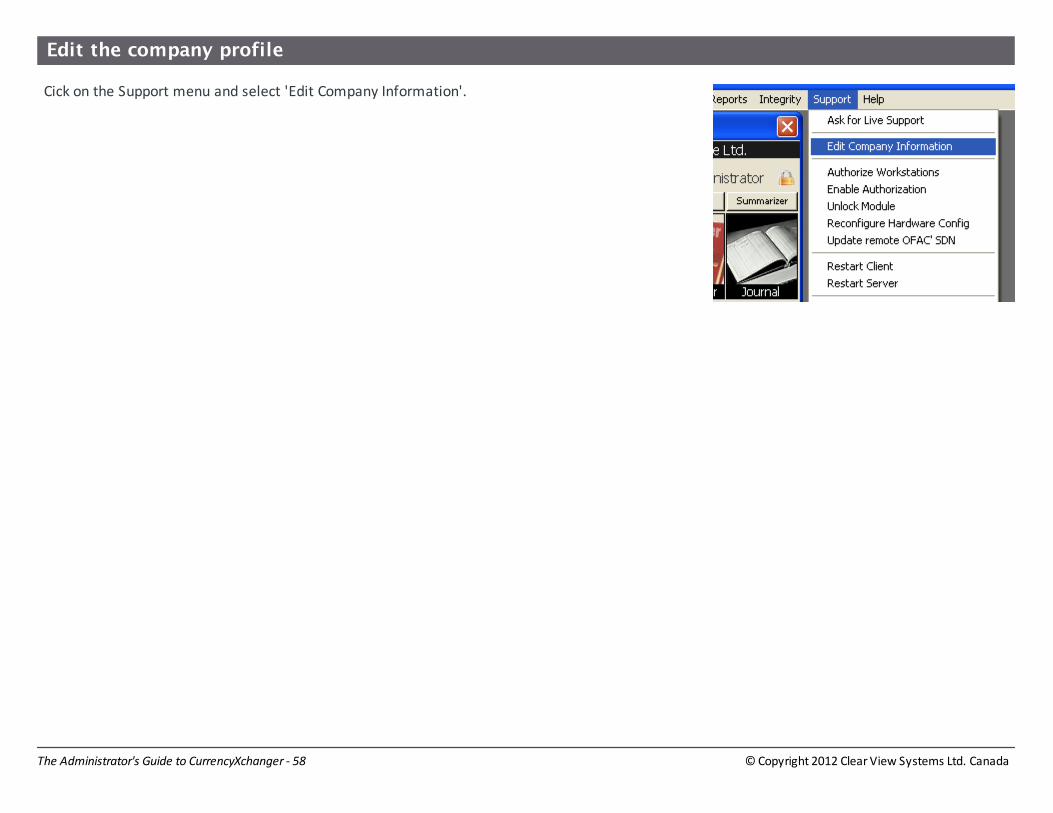
Edit the company profile
Cick on the Support menu and select 'Edit Company Information'.

© Copyright 2012 Clear View Systems Ltd. CanadaThe Administrator's Guide to CurrencyXchanger - 59
Setup the company profile
Enter the company information. The Client Code and Client Key should be
requested from your Vendor or Clear View Systems. You could
temporarily enter 'Demo' and 'DemoKey' and Save.

© Copyright 2012 Clear View Systems Ltd. CanadaThe Administrator's Guide to CurrencyXchanger - 60
Signing-in with a till
The following steps are necessary before you could use the system. After you have installed the program, run it in standalone mode (using 4D
Runtime Interpreted as the helper application).
The Tills module
Before you could enter an invoice, you should login with a Till. Open the Tills module.
Safe Deposit
You should see a cash register called 'safe deposit' without any signed-In
users. Double click the line.
Sign in
Click the 'Sign In' button and then close the window.

© Copyright 2012 Clear View Systems Ltd. CanadaThe Administrator's Guide to CurrencyXchanger - 61
Who is signed-in with the Safe Deposit?
You should now see Administrator as a signed in user.
Edit the till
Click the Till 00 and then press 'Edit'. Make sure that you check the 'automatically
create all cash accounts...' . This feature will allow the system to automatically
create cash accounts for every new currency that is added to the system.

© Copyright 2012 Clear View Systems Ltd. CanadaThe Administrator's Guide to CurrencyXchanger - 62
Create some currencies
Add some currencies into the system. Please refer to the user manual if
you don't know how to do this step.
Restart Client
After you done, select 'restart client' from the support menu or simple quite the program and reopen
it. Now you should be ready for entering transactions.

© Copyright 2012 Clear View Systems Ltd. CanadaThe Administrator's Guide to CurrencyXchanger - 63
Client Preferences
When CurrencyXchanger is running on multiple computers, it is said to be running in a Client/Server environment. The Server is the main
computer that stores all the data. The Clients are the workstations that execute the program. Each computer must have a "Client Profile" where
the administrator defined specific settings of that computer. We briefly explained this step in a previous lesson.
Changing the Client Preferences
Go to File on your tool bar and select Client Preferences from the drop down menu.
© Copyright 2012 Clear View Systems Ltd. CanadaThe Administrator's Guide to CurrencyXchanger - 64
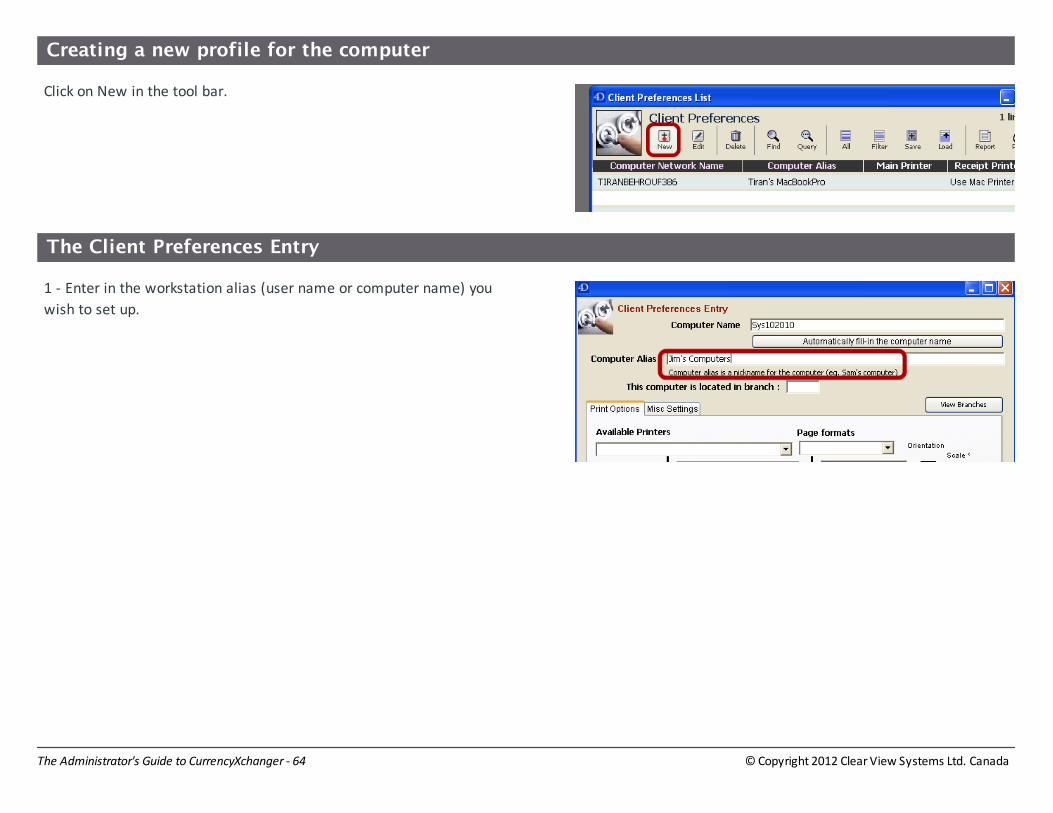
Creating a new profile for the computer
Click on New in the tool bar.
The Client Preferences Entry
1 - Enter in the workstation alias (user name or computer name) you
wish to set up.

© Copyright 2012 Clear View Systems Ltd. CanadaThe Administrator's Guide to CurrencyXchanger - 65
Pick a branch and a printer
2) If you run a multi-branch operation make sure to assign two letters for
each branch (e.g. HO for Head Office). This will determine which
computer is located in which branch.
3) Pick a printer from the list
4) click on the corner of thel black line to paste the printer name. You
could use a different printer for each one of the options (default, cheque,
receipt). However, we recommend not to use a printer for the default
printer (leave it blank).
5) Extra copies can be set for automatic printing.
Setting up the printer for Receipt Printing
1) Pick a page format.
2) Click on the corner of the line to use the page format
3) Click on the man icon to print in portrait (vs. landscape)

© Copyright 2012 Clear View Systems Ltd. CanadaThe Administrator's Guide to CurrencyXchanger - 66
Pick a receipt format
Once you click on the Invoice receipt format and form will open to ask
which format you wish to use. For larger prints use the
printInvoice_Large.
Pick a Cheque Template
If you are using computer cheque, usually you should pick the third option.
This format is compatible with most new accounting cheque printing
software (e.g. QuickBooks 2011)
Automatic printing...
The other options could be set using the check boxes. For example, you
could set the sytem to automatically print the invoices after saving (only
on the workstation that you are editing). Once you are done, click Save.

© Copyright 2012 Clear View Systems Ltd. CanadaThe Administrator's Guide to CurrencyXchanger - 67
The client preference profile
Once you saved a profile, you can edit it or dupplicate it. Clicking the
Duplicate button will create another profile so that you can use it for
another computer.
Duplicate Profile
A duplicate profile could be edited or reassigned to another computer. To
Edit the profile, highlight the line and then click Edit.

© Copyright 2012 Clear View Systems Ltd. CanadaThe Administrator's Guide to CurrencyXchanger - 68
Reassign the Duplicated Client Preference Profile
You can reassign another profile to the current computer by clicking on
the button shown above (1). Then you could rename the computer Alias
and leave everything else to be the same, or change as needed.

© Copyright 2012 Clear View Systems Ltd. CanadaThe Administrator's Guide to CurrencyXchanger - 69
Server Preferences
This section describes the Server Preferences. This option is also available in standalone mode. This is more like a global setting as opposed to a
'per computer' setting. After you have installed the system, you should make sure to check the server preferences. Compliance features are also
part of this section.
Changing the Server Preferences
Select 'Server Preferences' from the file menu. This feature is also available in standalone
mode.

© Copyright 2012 Clear View Systems Ltd. CanadaThe Administrator's Guide to CurrencyXchanger - 70
General Settings
You could setup your default buy and sell margins in this section. It is
recommended that you check the box (1) and also put a number less than
150 in field (2). If you leave the 'stop filter & queries to be 0, it will slow
down your searches.
FTP Setup for publishing rates online
You can setup the FTP accounts in the second tab. You should test FTP
setting to make sure that your configurations are okay.
© Copyright 2012 Clear View Systems Ltd. CanadaThe Administrator's Guide to CurrencyXchanger - 71
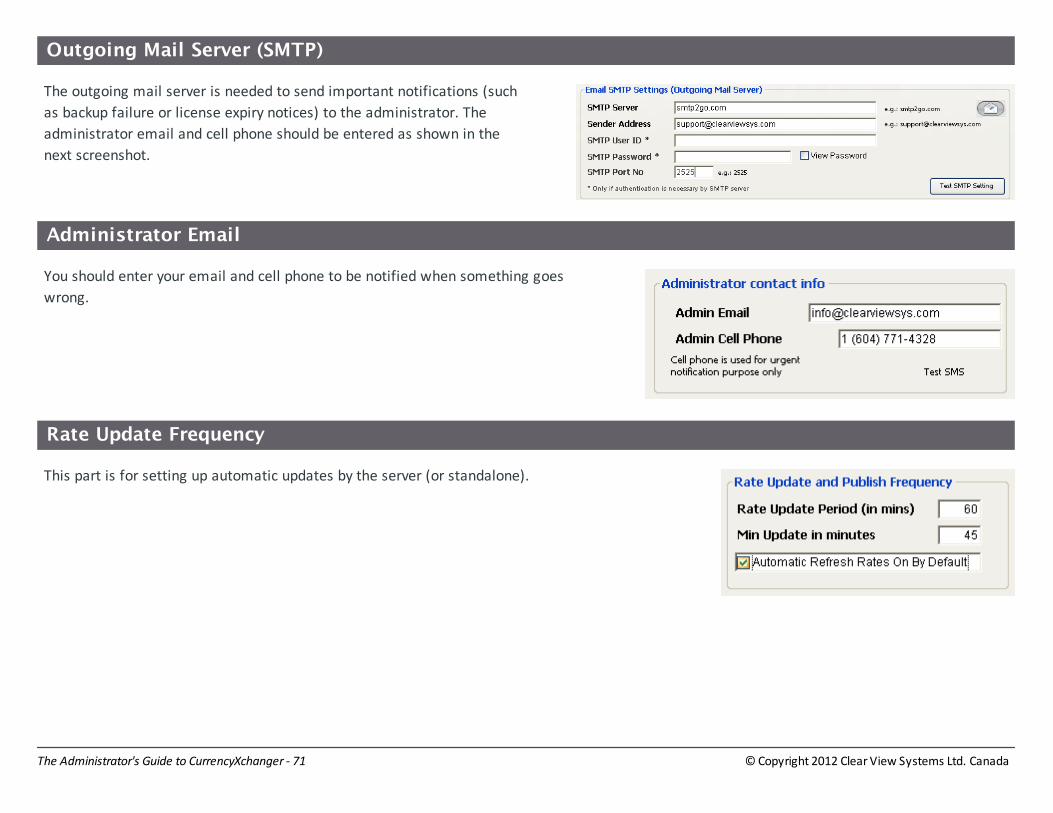
Outgoing Mail Server (SMTP)
The outgoing mail server is needed to send important notifications (such
as backup failure or license expiry notices) to the administrator. The
administrator email and cell phone should be entered as shown in the
next screenshot.
Administrator Email
You should enter your email and cell phone to be notified when something goes
wrong.
Rate Update Frequency
This part is for setting up automatic updates by the server (or standalone).

© Copyright 2012 Clear View Systems Ltd. CanadaThe Administrator's Guide to CurrencyXchanger - 72
Compliance and Warnings
The third tab in the Server Preferences panel is used to setup warning
level and AML Compliance thresholds. If you want the warnings to be
displayed, make sure that you set the Warning Tolerance Level to Normal
mode.
Override password
You can set the system to require a password when there is an incoming
cash larger than a set amount. For example, in some banks normal users
are not allowed to accept over 5000 cash, in which case, an
administrator or a manager could bypass that. This password can be
different from the administrator's own password so that it can be given
away to managers.

© Copyright 2012 Clear View Systems Ltd. CanadaThe Administrator's Guide to CurrencyXchanger - 73
Users & Privileges

© Copyright 2012 Clear View Systems Ltd. CanadaThe Administrator's Guide to CurrencyXchanger - 74
Setting Up Users and Privileges
One of the jobs of an administrator is to setup the users accounts. Each user may have a different set of privileges depending on his or her role in
the office. For example, an accountant may need to setup accounts, check the balance of accounts, print profit reports, and enter transactions.
Whereas, a front desk clerk may not need to access the
Adding new users and assigning privleges
Make sure you are logged in as the Administrator. Go to Admin on your
tool bar and select Setup Users & privileges from the drop down menu.
Click New from the tool bar to create a new user.

© Copyright 2012 Clear View Systems Ltd. CanadaThe Administrator's Guide to CurrencyXchanger - 75
Entering the privileges
1. Enter in the users name and password. You can also enter a
reminder in case the user misses entering the password more than 3
times.
2. If this user is allowed to modify exchange rates, check the
appropriate box and then you can then set what percentage the user
can change the exchange rate in the invoice.
3. Simply check the boxes to allow the user to have access to different
reports and special features (such as printing cheques).
4. The "Default Privileges" refer to the user's access level to each
module. In the above snapshot, the user is given the privilege to
VIEW, CREATE, MODIFY, and PRINT from all modules. However the
user is not allowed to DELETE any record.

© Copyright 2012 Clear View Systems Ltd. CanadaThe Administrator's Guide to CurrencyXchanger - 76
Adding Exceptions
Sometimes you want to have an exception with the user's access to
some modules. For example if we need to add a special case for the
Customers module, then we should:
1. Select the module that we need to add the exception for from the
module's list (in this case the Customers module)
2. Click Add an Exception
3. The Exception will be add to the table below. Now we need to set
the privileges for the Customers module only.
When you add an exception, then you need to specify the privileges of the
user's access on that particular module (Table). Exceptions always
override the default privilege. In this case, the user is not allowed to
create, modify, nor delete anything from the Currencies module.
However, the user has full access to the Customers module.

© Copyright 2012 Clear View Systems Ltd. CanadaThe Administrator's Guide to CurrencyXchanger - 77
Once you have set the user's privileges, you should save the settings.

© Copyright 2012 Clear View Systems Ltd. CanadaThe Administrator's Guide to CurrencyXchanger - 78
How to login as a normal user?
When you first login to the system, select 'User' from the User List panel and click
'Connect' (or enter). Make sure you don't enter any password at this stage.
Pick the user, enter the password and then enter (or click 'Login').

© Copyright 2012 Clear View Systems Ltd. CanadaThe Administrator's Guide to CurrencyXchanger - 79
Switching the current user
This section describes how to sign in as a different user without restarting the application.
Click on the user name as marked in the screenshot.
Alternatively, you could go to File menu and select Switch Current User from the drop down menu. You can
also use the CTRL+L shortcut on Windows (CMD+L on Mac).
You may also click on the name of the current signed-in user to switch (as shown in the previous step).

© Copyright 2012 Clear View Systems Ltd. CanadaThe Administrator's Guide to CurrencyXchanger - 80
Signing in as a non-administrator user
All users besides the administrator should select the "User" option to sign in. Select User and leave the Password
blank, then click on Connect.
Choose the user from the drop down menu. You can also enter the first letter of the name of the user
to quickly select it from the list without clicking on it.
Enter the password and click Login.
You will now see the User name has been changed on your main window.

© Copyright 2012 Clear View Systems Ltd. CanadaThe Administrator's Guide to CurrencyXchanger - 81
Changing the Administrator Password
When you first sign in to CurrencyXchanger, you will be presented with a list of users. The Administrator is person who is responsible for setting
up accounts, users, privileges, and has full privilege when using the system. It is recommended that you change the administrator default
password, especially if you have are not the only person using the system.
Login or Sign-in as Administrator
When you first use the software the Administrator the default password is "admin".
The administor's password is case-sensitive.
Select "Change Administrator Password" from the Admin menu.
© Copyright 2012 Clear View Systems Ltd. CanadaThe Administrator's Guide to CurrencyXchanger - 82
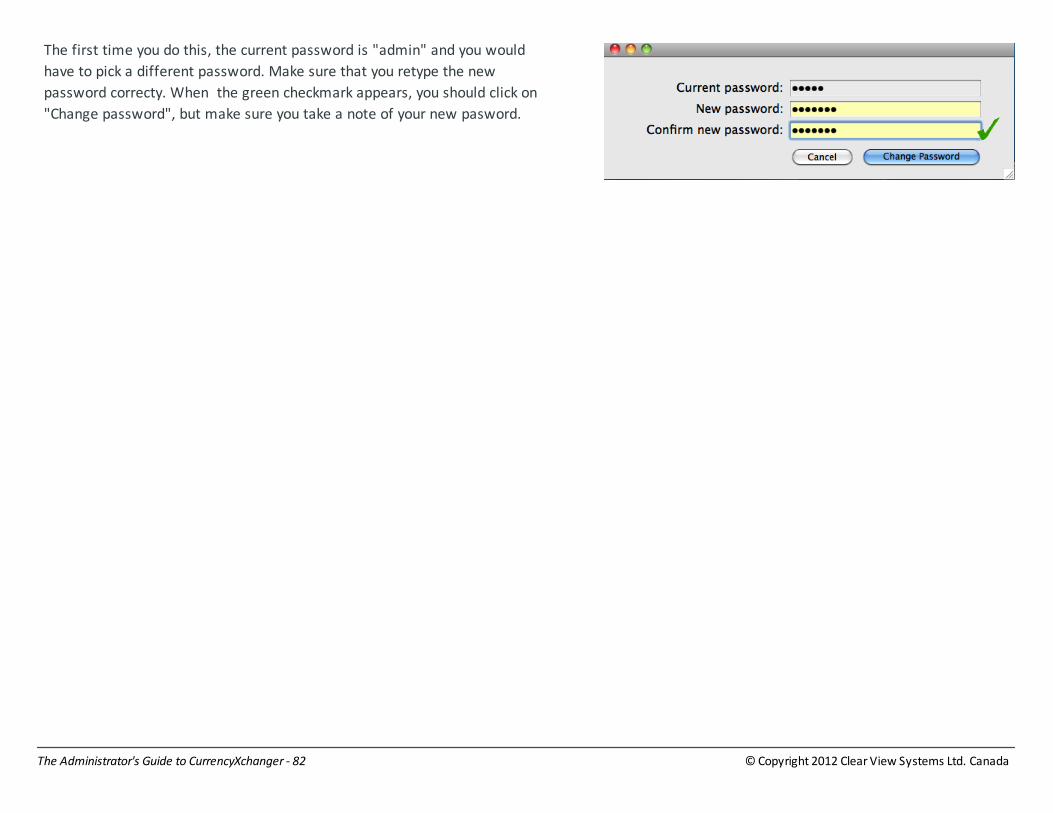
The first time you do this, the current password is "admin" and you would
have to pick a different password. Make sure that you retype the new
password correcty. When the green checkmark appears, you should click on
"Change password", but make sure you take a note of your new pasword.

© Copyright 2012 Clear View Systems Ltd. CanadaThe Administrator's Guide to CurrencyXchanger - 83
Running in Client/Server Mode

© Copyright 2012 Clear View Systems Ltd. CanadaThe Administrator's Guide to CurrencyXchanger - 84
Installing 4D Server

© Copyright 2012 Clear View Systems Ltd. CanadaThe Administrator's Guide to CurrencyXchanger - 85
Running 4D Server 2004
This section describes how to run CurrencyXchanger in server mode. You need to have installed 4D Server before proceeding. 4D Server is a
database server that allows CurrencyXchanger to be shared accross a network. 4D Server is a database that need to be registered with 4D. You
need to have a valid 4D Server license and register your 4D Server. For registration instructions, please refer to your registration email sent by
4D.com. You may also contact Clear View Systems for making sure that your database license is installed correctly.
Run 4D Server
Double click 4D Server.
© Copyright 2012 Clear View Systems Ltd. CanadaThe Administrator's Guide to CurrencyXchanger - 86
Opening the database
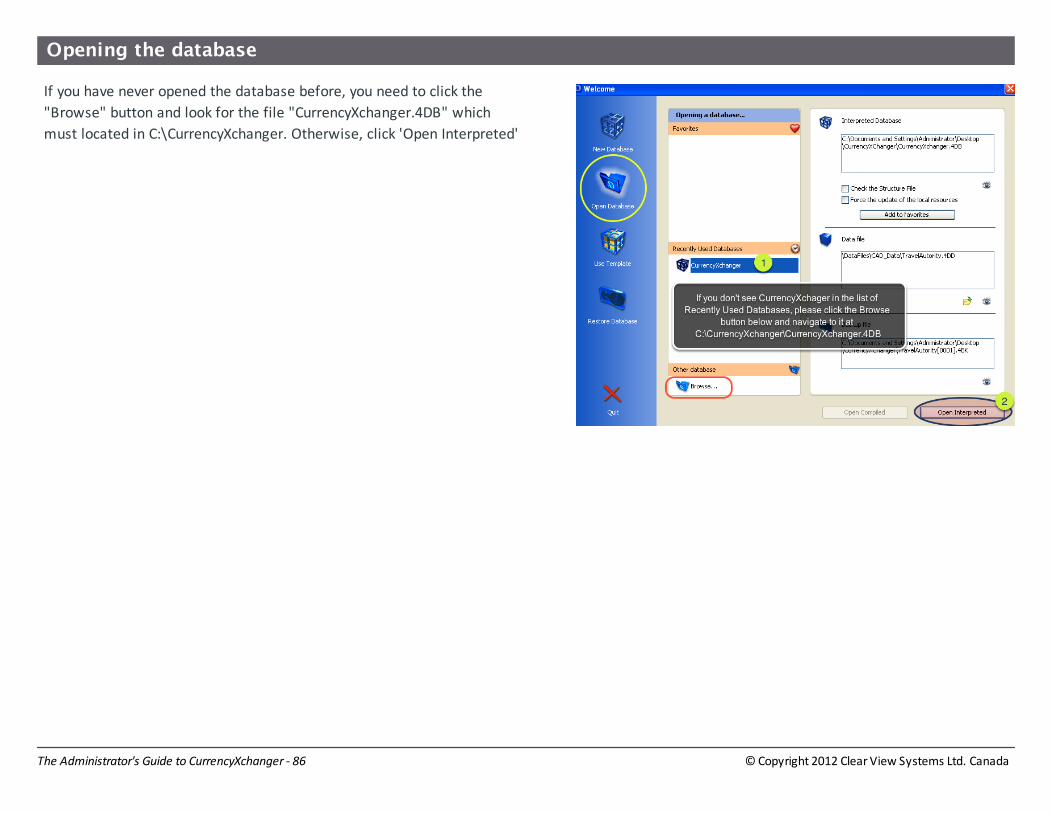
If you have never opened the database before, you need to click the
"Browse" button and look for the file "CurrencyXchanger.4DB" which
must located in C:\CurrencyXchanger. Otherwise, click 'Open Interpreted'

© Copyright 2012 Clear View Systems Ltd. CanadaThe Administrator's Guide to CurrencyXchanger - 87
Server Process Window
Once 4D Server is running, you should see a window called 'process
window'. It shows the database that is currently opened and the location
of the data files and log files on the disk. It also shows how many people
are connected to it. The server process window shows how many users
are connected and other information like the last backup date and time.

© Copyright 2012 Clear View Systems Ltd. CanadaThe Administrator's Guide to CurrencyXchanger - 88
Running 4D Client 2004
In the client/server mode of operation, you need to connect to the server using 4D Client.
Open 4D Client
Double click the shortcut for 4D Client that is on the desktop

© Copyright 2012 Clear View Systems Ltd. CanadaThe Administrator's Guide to CurrencyXchanger - 89
Verify active server
Select CurrencyXchanger and then click OK

© Copyright 2012 Clear View Systems Ltd. CanadaThe Administrator's Guide to CurrencyXchanger - 90
Activating 4D Server license (v13)
This lesson shows how to activate a 4D Server license (v13). Activating 4D Server 2004 is very similar to this. To actiate a 4D license you can also
follow 4D's own registration instruction. If you contact Clear View Systems, they will install 4D license for you, so you don't have follow these
steps.
Activating 4D

© Copyright 2012 Clear View Systems Ltd. CanadaThe Administrator's Guide to CurrencyXchanger - 91

© Copyright 2012 Clear View Systems Ltd. CanadaThe Administrator's Guide to CurrencyXchanger - 92
If you have an account with 4D, use your credentials, or else create an
account online.

© Copyright 2012 Clear View Systems Ltd. CanadaThe Administrator's Guide to CurrencyXchanger - 93

© Copyright 2012 Clear View Systems Ltd. CanadaThe Administrator's Guide to CurrencyXchanger - 94
Backup & Restore
© Copyright 2012 Clear View Systems Ltd. CanadaThe Administrator's Guide to CurrencyXchanger - 95
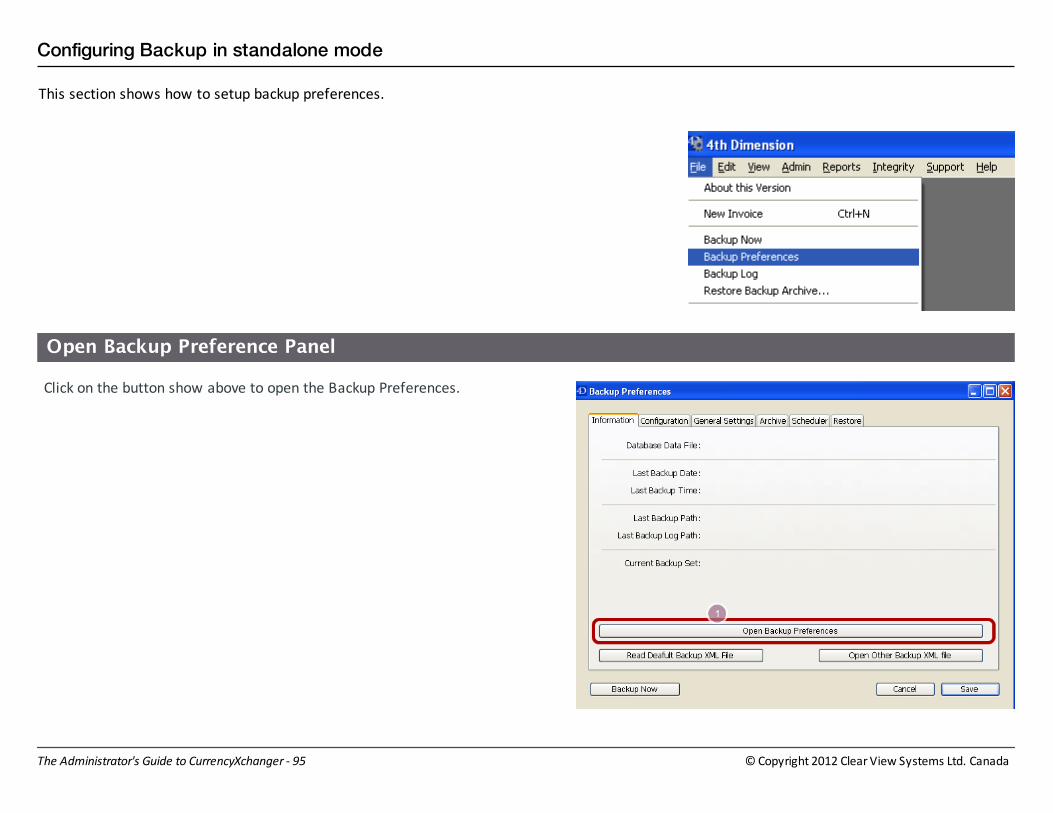
Configuring Backup in standalone mode
This section shows how to setup backup preferences.
Open Backup Preference Panel
Click on the button show above to open the Backup Preferences.

© Copyright 2012 Clear View Systems Ltd. CanadaThe Administrator's Guide to CurrencyXchanger - 96
Change the backup preferences
Change the backup preferences. Please check out the section 'Setting
Backup on the Server' to see how to schedule automatic backups. After
you are done click OK.

© Copyright 2012 Clear View Systems Ltd. CanadaThe Administrator's Guide to CurrencyXchanger - 97
Do NOT SAVE!
Click on the button show above to open the Backup Preferences.

© Copyright 2012 Clear View Systems Ltd. CanadaThe Administrator's Guide to CurrencyXchanger - 98
Configuring Backup on the Server
This section describes how to configure backup on the server.
Edit the Preferences on 4D Server
From the Edit Menu, select Preferences...

© Copyright 2012 Clear View Systems Ltd. CanadaThe Administrator's Guide to CurrencyXchanger - 99
Highlight the Backup icon
The backup configuration may be different case by case. However, make
sure that you check 'User Structure' and have a log file.

© Copyright 2012 Clear View Systems Ltd. CanadaThe Administrator's Guide to CurrencyXchanger - 100
Configure backup
Checkmark the 'User Structure File' (step 1) and then click on '...' (step 2)

© Copyright 2012 Clear View Systems Ltd. CanadaThe Administrator's Guide to CurrencyXchanger - 101
Pick a destination folder
You could pick the BackupFiles Folder in CurrencyXchanger folder, but it is much better to
pick a secondary physical drive (such as D:\) to make sure that the backup is done on a
separate drive. It is always recommended to have the backup on a different physical drive
as well as a remote drive (in case of a fire or theft of the system).
Scheduling the backup
Make sure you configure a schedule for the daily backup. The server must
be on for the backup to be perfomed.

© Copyright 2012 Clear View Systems Ltd. CanadaThe Administrator's Guide to CurrencyXchanger - 102
More backup configuration
Make sure to follow the above steps for the backup configuration. After
you are done, click OK.

© Copyright 2012 Clear View Systems Ltd. CanadaThe Administrator's Guide to CurrencyXchanger - 103
Manual Backup
You can do a manual back from 4D Client or 4D Runtime Interpreter (The engine that runs CurrencyXchanger in standalone mode).
File Menu
From the File menu select "Backup Now"
Confirm
Make sure that no one is using the system before doing a backup. Also,
you need to make sure that all windows are closed before doing a backup.
In a client/server environment all clients will freeze until the backup is
over. Depending on the size of the data file, the backup may take from a
few seconds to a few minutes. Please refer to the previous section on
how to setup automatic backups everyday.
© Copyright 2012 Clear View Systems Ltd. CanadaThe Administrator's Guide to CurrencyXchanger - 104
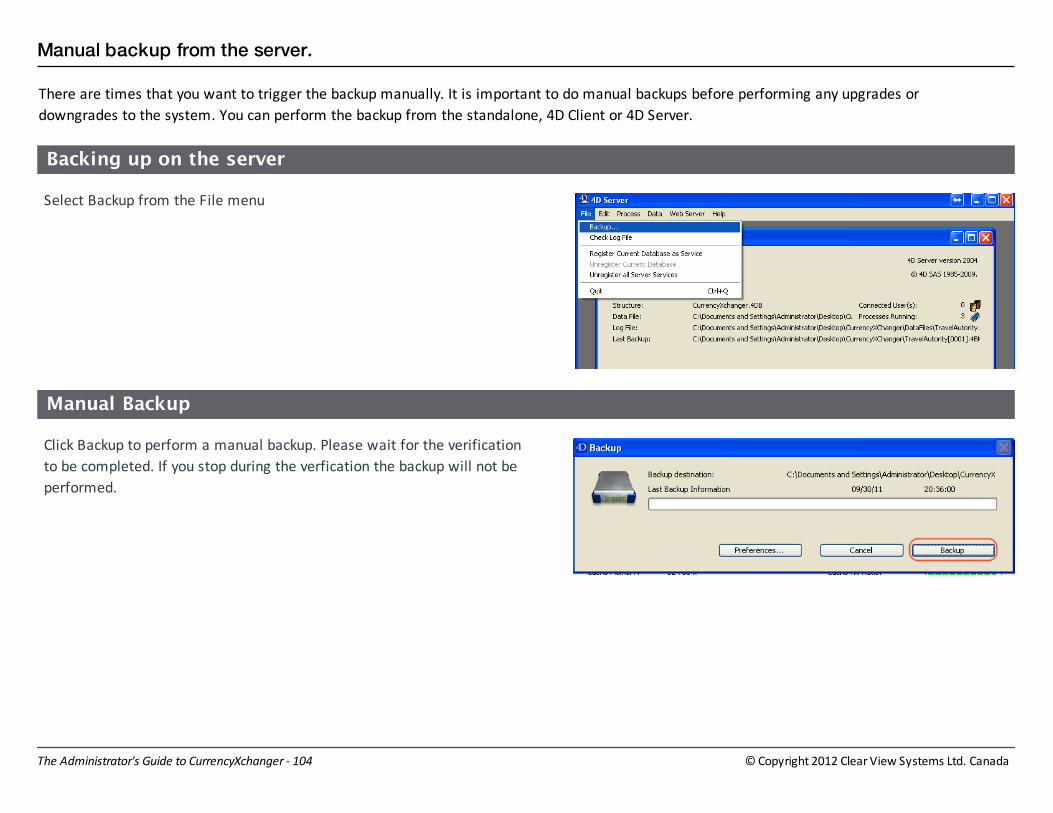
Manual backup from the server.
There are times that you want to trigger the backup manually. It is important to do manual backups before performing any upgrades or
downgrades to the system. You can perform the backup from the standalone, 4D Client or 4D Server.
Backing up on the server
Select Backup from the File menu
Manual Backup
Click Backup to perform a manual backup. Please wait for the verification
to be completed. If you stop during the verfication the backup will not be
performed.

© Copyright 2012 Clear View Systems Ltd. CanadaThe Administrator's Guide to CurrencyXchanger - 105
Backup status
The location of the last backup and the date and time of the last backup
is shows on the 4D Server

© Copyright 2012 Clear View Systems Ltd. CanadaThe Administrator's Guide to CurrencyXchanger - 106
How to restore a backup file from 4D Server?
This section describes how to restore your data from a backup file. A backup file had a .4BK extension. The location of the backup files depends
on your configuration. Before restoring a backup file, make sure that you are restoring the latest backup.
Where is the backup file saved?
The location of the last backup is always shown on 4D Server "Process
Window." If 4D Server is running but you cannot see this window, go to
the "Process" menu and select "Show Process Window". The
Find the latest backup file
The backup files may be saved in a "BackupFiles" folder
(C:\CurrencyXchanger\BackupFiles). It all depends on your backup
configurations.

© Copyright 2012 Clear View Systems Ltd. CanadaThe Administrator's Guide to CurrencyXchanger - 107
Quit 4D Server
Make sure you quit 4D Server if it is running.
Shutdown the Server
If there are other clients connected to the server, you should give them ample time to
save and quit. Usually the default is 10 mins. Click OK. If all users quit, 4D Server will
quit immediately and won't wait.

© Copyright 2012 Clear View Systems Ltd. CanadaThe Administrator's Guide to CurrencyXchanger - 108
Open 4D Server once again
Run 4D Server again.
Browse
Click Browse to navigate to the backup file (*.4BK).

© Copyright 2012 Clear View Systems Ltd. CanadaThe Administrator's Guide to CurrencyXchanger - 109
Select the latest backup
Highlight the file that you want to restore and click 'Open'.
Pick the destination folder
You could restore the backup file right into the CurrencyXchanger folder
to replace the old DataFile. It is recommended to restore the file right
were it was located.

© Copyright 2012 Clear View Systems Ltd. CanadaThe Administrator's Guide to CurrencyXchanger - 110
Restored Folder
You should now see a restored folder right were you restored the backup file.
What's inside the Restored folder?
The data folder (in the above snapshot it's called CAD_Data) holds all the
data. If you copy and paste this folder into the normal location of your
Data files are, your data will be replaced with the restored version.
Copy the data folder
Right click and copy the folder that is called Data_CAD.

© Copyright 2012 Clear View Systems Ltd. CanadaThe Administrator's Guide to CurrencyXchanger - 111
Paste the data folder
Paste the file onto the old data folder that you want to replace.
Replace
Replace the data folder with the new folder. Click YES or Yes to All.

© Copyright 2012 Clear View Systems Ltd. CanadaThe Administrator's Guide to CurrencyXchanger - 112
How to restore a backup file from 4D Runtime (standalone users)?
This section describes how to restore your data from a backup file using the standalone version of the software. A backup file had a .4BK
extension. The location of the backup files depends on your configuration. Before restoring a backup file, make sure that you are restoring the
latest backup.
Where is the backup file saved?
The location of the last backup is always shown on 4D Server "Process
Window." If 4D Server is running but you cannot see this window, go to
the "Process" menu and select "Show Process Window". The
Select Restore
Select 'Restore...' from the file menu. This only works if you are running
4D Runtime and not 4D Client.

© Copyright 2012 Clear View Systems Ltd. CanadaThe Administrator's Guide to CurrencyXchanger - 113
Find the latest backup file
The backup files may be saved in a "BackupFiles" folder
(C:\CurrencyXchanger\BackupFiles). It all depends on your backup
configurations.
Open the latest backup
Highlight and then click Open.
Pick the destination folder
You could restore the backup file right into the CurrencyXchanger folder
to replace the old DataFile. It is recommended to restore the file right
were it was located.

© Copyright 2012 Clear View Systems Ltd. CanadaThe Administrator's Guide to CurrencyXchanger - 114
Quit the program
Make sure that you quit CurrencyXchanger at this point. From the 'File' menu select 'Quit'.
The Restored Folder
You should now see a restored folder right were you restored the backup file.
What's inside the Restored folder?
The data folder (in the above snapshot it's called CAD_Data) holds all the
data. If you copy and paste this folder into the normal location of your
Data files are, your data will be replaced with the restored version.

© Copyright 2012 Clear View Systems Ltd. CanadaThe Administrator's Guide to CurrencyXchanger - 115
Copy the data folder
Right click and copy the folder that is called Data_CAD.
Paste the data folder
Paste the file onto the old data folder that you want to replace.
Replace
Replace the data folder with the new folder. Click YES or Yes to All. At this point you could
reopen the program as usual.

© Copyright 2012 Clear View Systems Ltd. CanadaThe Administrator's Guide to CurrencyXchanger - 116
The backup log
The backup log can show you the history of all backups. You can verify if a backup was completed or failed by looking at the backup log.
Open the Backup Log
You can access the Backup Log from the file menu.

© Copyright 2012 Clear View Systems Ltd. CanadaThe Administrator's Guide to CurrencyXchanger - 117
Backup Logs window
Each backup will log itself in the backup log. You can see the date and
time and whether the backup was successful or failed.

© Copyright 2012 Clear View Systems Ltd. CanadaThe Administrator's Guide to CurrencyXchanger - 118
The database log (4D Server Log)
The 4D Server Log file can be accessed from 4D Server File menu. The log file keeps a record of all transactions performed by the database since
the last backup. The database log is stored in a file with 4DL extension (e.g. ABC_CurrencyDatafile.4DL).
Accessing the database Log File
You can access the log file from the File menu of 4D Server.

© Copyright 2012 Clear View Systems Ltd. CanadaThe Administrator's Guide to CurrencyXchanger - 119
Every time 4D performs a backup the log file becomes empty. The log file
keeps the changes (additions, modification, deletion) to every table and
field of the database.

© Copyright 2012 Clear View Systems Ltd. CanadaThe Administrator's Guide to CurrencyXchanger - 120
Checking the log
The above log file shows transactions log of what changes and
modifications were done on the data. You could verify the log file for
checking if any modifications or deletions were performed. The log file is
managed by 4D database engine. Every change to the data will be
recorded in the log, even if the change has been done programmatically.

© Copyright 2012 Clear View Systems Ltd. CanadaThe Administrator's Guide to CurrencyXchanger - 121
Rollback
Rollback is a database level "Undo". You can go back in time to any
transaction that you wish. However, this is very advanced feature and you
should know what you are doing before using this feature. The rollback
feature is usefull to undo an accidential deletion or modification of
important records. The rollback will restore the last backup and start
implementing the changes in the log one by one until it reaches the point
of rollback.
Rolling back
In the above log file we notice that the last 4 transactions are "Delete"
transactions. We could undo the deletions by selecting the line 309 and
the pressing Rollback. Before performing a rollback, make sure that all
users are signed out and quit 4D client. This action can not be done while
users are using the system.

© Copyright 2012 Clear View Systems Ltd. CanadaThe Administrator's Guide to CurrencyXchanger - 122
Once you click OK, you cannot undo this. The system will undo the deleted
records by loading the last backup and implementing all the changes until it
reaches the point of undo. This is a very powerful feature but must be used only
with extra caution.

© Copyright 2012 Clear View Systems Ltd. CanadaThe Administrator's Guide to CurrencyXchanger - 123
More about the log file
Most of the content of this section is taken directly from 4D Doc Centre website.
Performing regular backups of data is important but does not allow (in case of incident) restoring data entered since the last backup. To respond
to this need, 4D now offers a specific tool: the log file. This file allows ensuring permanent security of database data.In addition, 4D works
continuously with a data cache in memory. Any changes made to the data of the database are stored temporarily in the cache before being
written to the hard disk. This accelerates the operation of applications; in fact, accessing memory is faster than accessing the hard disk.
If an incident occurs in the database before the data stored in the cache could be written to the disk, you must include the current log file in
order to restore the database entirely.Finally, 4D has functions that analyze the contents of the log file, making it possible to rollback the
operations carried out on the data of the database.
How the log file works?
The log file generated by 4D contains all operations performed on a
database, which are logged sequentially. As such, each operation
performed by a user causes two simultaneous actions: the first one in the
database (instruction is executed normally) and the second one in the log
file (the description of the operation is recorded). The log file is created
independently without disturbing or slowing down the work of the user. A
database can only work with one log file at a time. The log file records
the following types of operations:
• Opening and closing of the data file,
• Opening and closing of the process (contexts),
• Adding of records or BLOBs,
• Modifying of records,
• Deleting of records,
• Creating and closing of transactions,
For more information about these actions, refer to the Activity analysis
page. 4D manages the log file. It takes into account all operations that

© Copyright 2012 Clear View Systems Ltd. CanadaThe Administrator's Guide to CurrencyXchanger - 124
affect the data file equally, regardless of any manipulations performed
by a user, 4D methods, the SQL engine, 4D plug-ins (4D Write, 4D View,
etc.), or a Web browser.The following illustration sums up how the log
file works:
The current log file is automatically saved with the current data file. This mechanism has two distinct advantages:
• Its avoids saturating the disk volume where the log file is stored. Without a backup, the log file would get bigger and bigger with use,
and would eventually use all available disk space. For each data file backup, 4D or 4D Server closes the current log file and immediately
starts a new, empty file, thereby avoiding the risk of saturation. The old log file is then archived and eventually destroyed depending on
the mechanism for managing the backup sets.
• It keeps log files corresponding to backups in order to be able to parse or repair a database at a later point in time. The integration of a
log file can only be done in the database to which it corresponds. It is important, in order to be able to properly integrate a log file into a
backup, to have backups and log files archived simultaneously.

© Copyright 2012 Clear View Systems Ltd. CanadaThe Administrator's Guide to CurrencyXchanger - 125
Advanced Settings

© Copyright 2012 Clear View Systems Ltd. CanadaThe Administrator's Guide to CurrencyXchanger - 126
Customizing the printable receipt template
This section describes how to customize the receipt templates. Some customers occasionally want to add a signature line in the invoice, or
Customize Printed Receipt
From the Admin menu select 'Customize Printed Receipt'
Pick the right template
Select the receipt that you wish to customize. To change the printInvoice_Large you
should change the printInvoice_LargeHeaderLess first. In fact, the headerless form is
underlying template where the 'Large' format is based on, so changing the underlying
template would change the 'Large' template.
© Copyright 2012 Clear View Systems Ltd. CanadaThe Administrator's Guide to CurrencyXchanger - 127
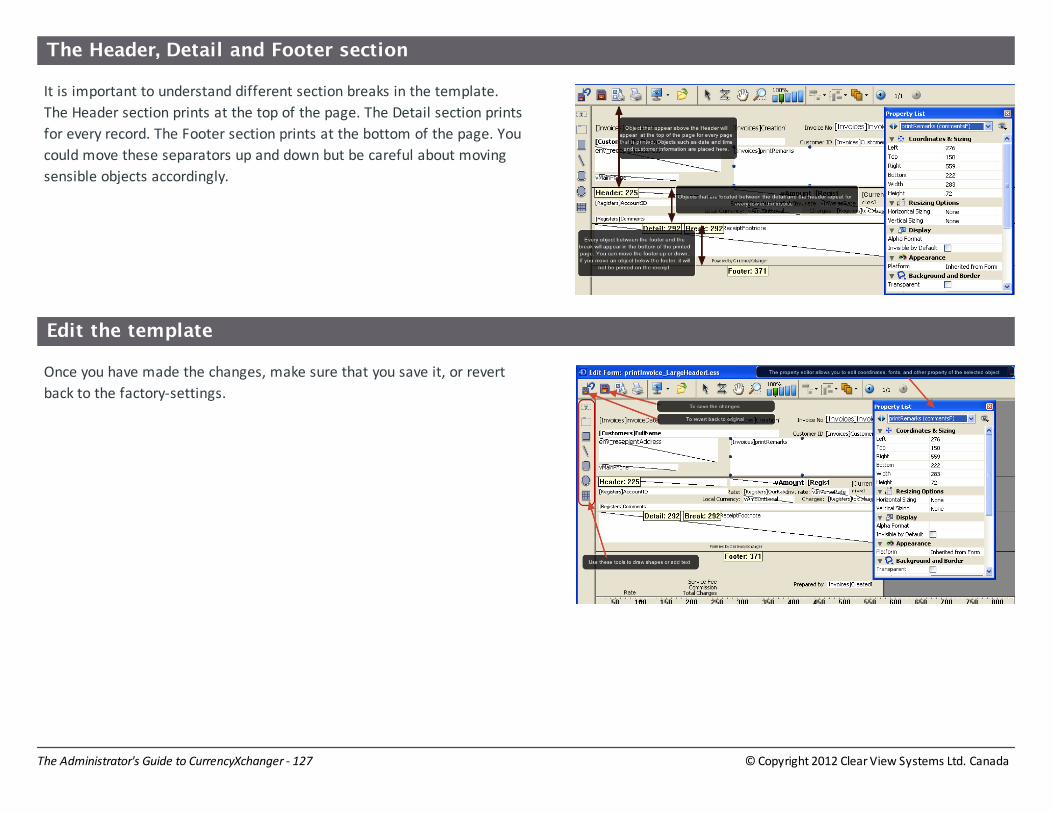
The Header, Detail and Footer section
It is important to understand different section breaks in the template.
The Header section prints at the top of the page. The Detail section prints
for every record. The Footer section prints at the bottom of the page. You
could move these separators up and down but be careful about moving
sensible objects accordingly.
Edit the template
Once you have made the changes, make sure that you save it, or revert
back to the factory-settings.

© Copyright 2012 Clear View Systems Ltd. CanadaThe Administrator's Guide to CurrencyXchanger - 128
Adding a signature line in the footer section.
In this snapshot we moved the Footer down and added a Signature text
and line.
© Copyright 2012 Clear View Systems Ltd. CanadaThe Administrator's Guide to CurrencyXchanger - 129
Customizing the printable cheque format
© Copyright 2012 Clear View Systems Ltd. CanadaThe Administrator's Guide to CurrencyXchanger - 130
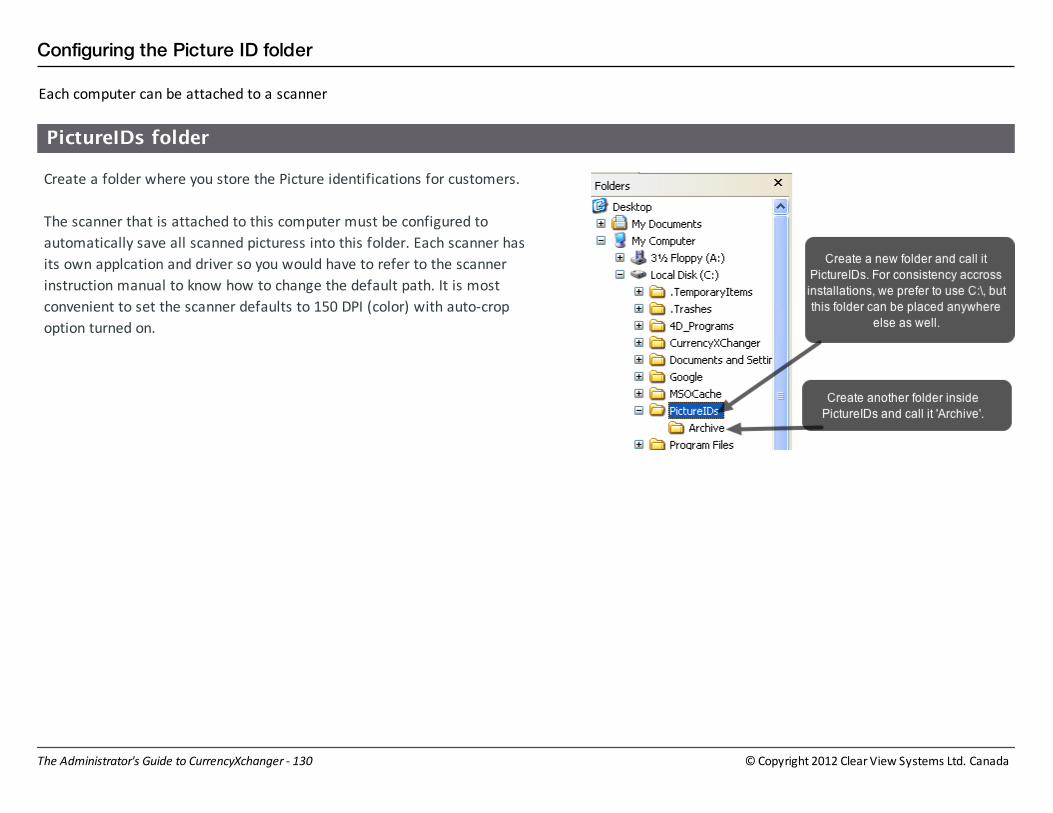
Configuring the Picture ID folder
Each computer can be attached to a scanner
PictureIDs folder
Create a folder where you store the Picture identifications for customers.
The scanner that is attached to this computer must be configured to
automatically save all scanned picturess into this folder. Each scanner has
its own applcation and driver so you would have to refer to the scanner
instruction manual to know how to change the default path. It is most
convenient to set the scanner defaults to 150 DPI (color) with auto-crop
option turned on.

© Copyright 2012 Clear View Systems Ltd. CanadaThe Administrator's Guide to CurrencyXchanger - 131
Sample Scanner configuration screen

© Copyright 2012 Clear View Systems Ltd. CanadaThe Administrator's Guide to CurrencyXchanger - 132
Define PictureIDs folder for CurrencyXchanger
Now it's time to setup CurrencyXchanger to recognize the PictureIDs folder as the default location to
lookup for scanned picture IDs.
From the File menu select Client Preferences.
Edit the Client Preference profile for your computer
Select your computer from the list and click Edit.

© Copyright 2012 Clear View Systems Ltd. CanadaThe Administrator's Guide to CurrencyXchanger - 133
Configuring the Source and Destination folder
1) Click on the 'Misc Settings' tab
2) The source folder is where the system will look for new scanned
picture IDs (e.g: C:\PictureIDs\)
3) The destination folder the where the system will move the picture IDs
once they are attached to the customer profile (e.g.
C:\PictureIDs\Archive\)

© Copyright 2012 Clear View Systems Ltd. CanadaThe Administrator's Guide to CurrencyXchanger - 134
Define the Source Folder (PictureIDs folder)
Assign the Source folder to your PictureIDs folder
Define the Destination Folder (Archive folder)
Assign the Destination Folder to the 'Archive' folder.

© Copyright 2012 Clear View Systems Ltd. CanadaThe Administrator's Guide to CurrencyXchanger - 135
Save the changes
Save the configuration once you have finished.
Scan a picture ID
After you scanned a new picture ID, the scanner should save it by default
to the "PictureIDs'" folder. You could also manually place a scanned
image inside that folder. For this example, we downloaded a picture from
the internet and manually placed in the PictureIDs folder.
© Copyright 2012 Clear View Systems Ltd. CanadaThe Administrator's Guide to CurrencyXchanger - 136
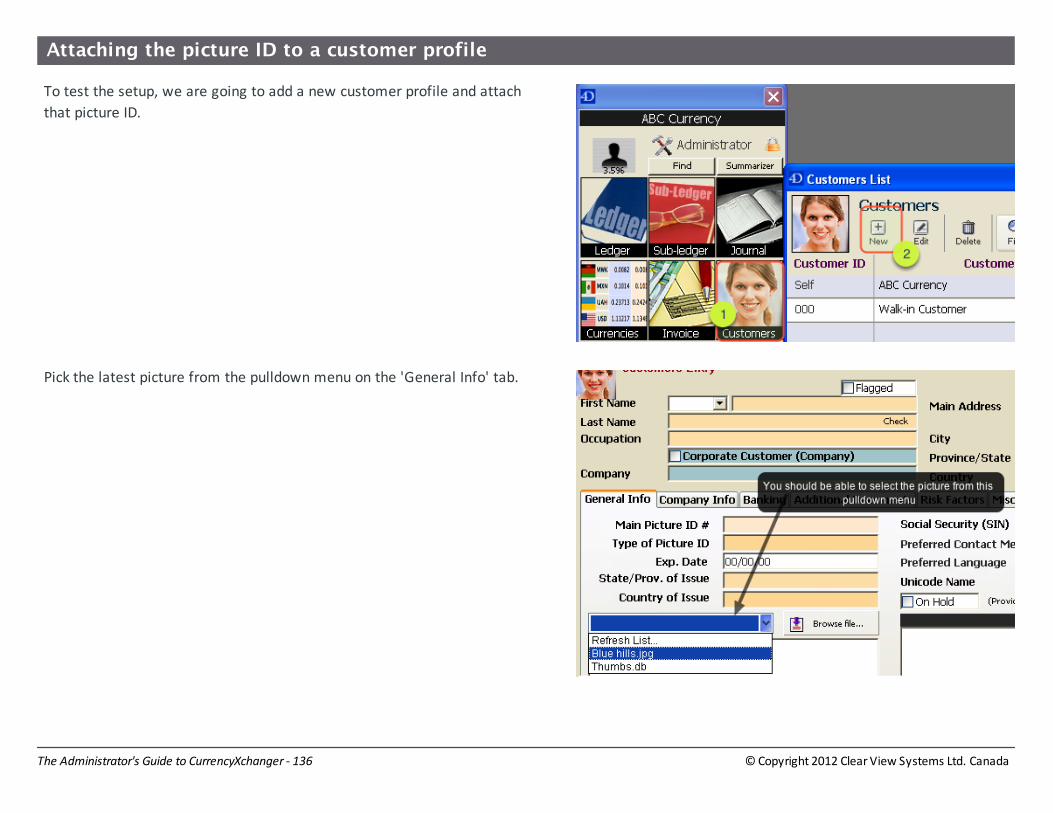
Attaching the picture ID to a customer profile
To test the setup, we are going to add a new customer profile and attach
that picture ID.
Pick the latest picture from the pulldown menu on the 'General Info' tab.
© Copyright 2012 Clear View Systems Ltd. CanadaThe Administrator's Guide to CurrencyXchanger - 137
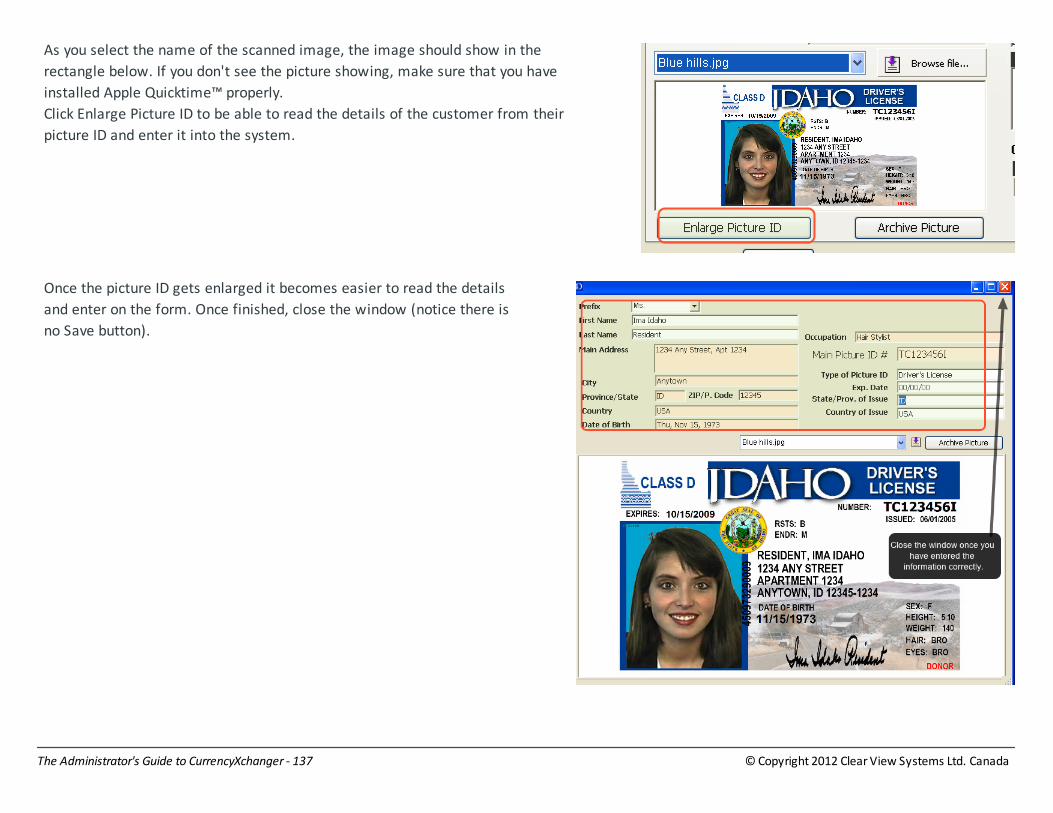
As you select the name of the scanned image, the image should show in the
rectangle below. If you don't see the picture showing, make sure that you have
installed Apple Quicktime™ properly.
Click Enlarge Picture ID to be able to read the details of the customer from their
picture ID and enter it into the system.
Once the picture ID gets enlarged it becomes easier to read the details
and enter on the form. Once finished, close the window (notice there is
no Save button).

© Copyright 2012 Clear View Systems Ltd. CanadaThe Administrator's Guide to CurrencyXchanger - 138
Archive the Picture ID
When you close the enlarged customer entry form, you will return the
normal customer entry form. At this point, you can continue entering
more information about the customer. When you are done, click the
'Archive Picture' button.
After pressing the 'Archive Picture' button, you need to confirm the action
by pressing 'Move and Rename'. At that point, the image will be moved
to the 'Archive' folder (C:\PictureIDs\Archive).

© Copyright 2012 Clear View Systems Ltd. CanadaThe Administrator's Guide to CurrencyXchanger - 139
The 'Archive' folder
If you go to the PictureIDs folder, you will notice the the picture ID is no
longer there. The archive process moved it into the 'Archive' folder. The
Archive keeps all your attached picture ids in one place.

© Copyright 2012 Clear View Systems Ltd. CanadaThe Administrator's Guide to CurrencyXchanger - 140
Configuring the FTP setting
This lesson shows you how to setup the Server Preferences to allow publishing of internet rates. This is an advance topic for administrators only.
Do not mess with these configurations if you are not sure how to set it up properly. This lession should be done on the server itself.
Make sure that you are signed in as "Administrator"
Select "Server Preferences" from the File menu.
Set flags image extension
Under the Server Preferences, make sure than the flags image extension
is set to either "gif", "JPG", "png", or "jpg" depending on the content of
the 'flags' folder that is uploaded to the website.
Caution: the flags extension is "case sensitive"so GIF is different from
gif.

© Copyright 2012 Clear View Systems Ltd. CanadaThe Administrator's Guide to CurrencyXchanger - 141
FTP Settings
Make sure you change the ftp settings under the server Preferences and
test the configuration. You may need to click 'Apply' before testing the
settings.
Test the FTP setting
You should get a success message, or else your configurations may be wrong.
Make sure you save the settings after you tested the ftp configurations.
Test the Publishing of rates from the Currencies module
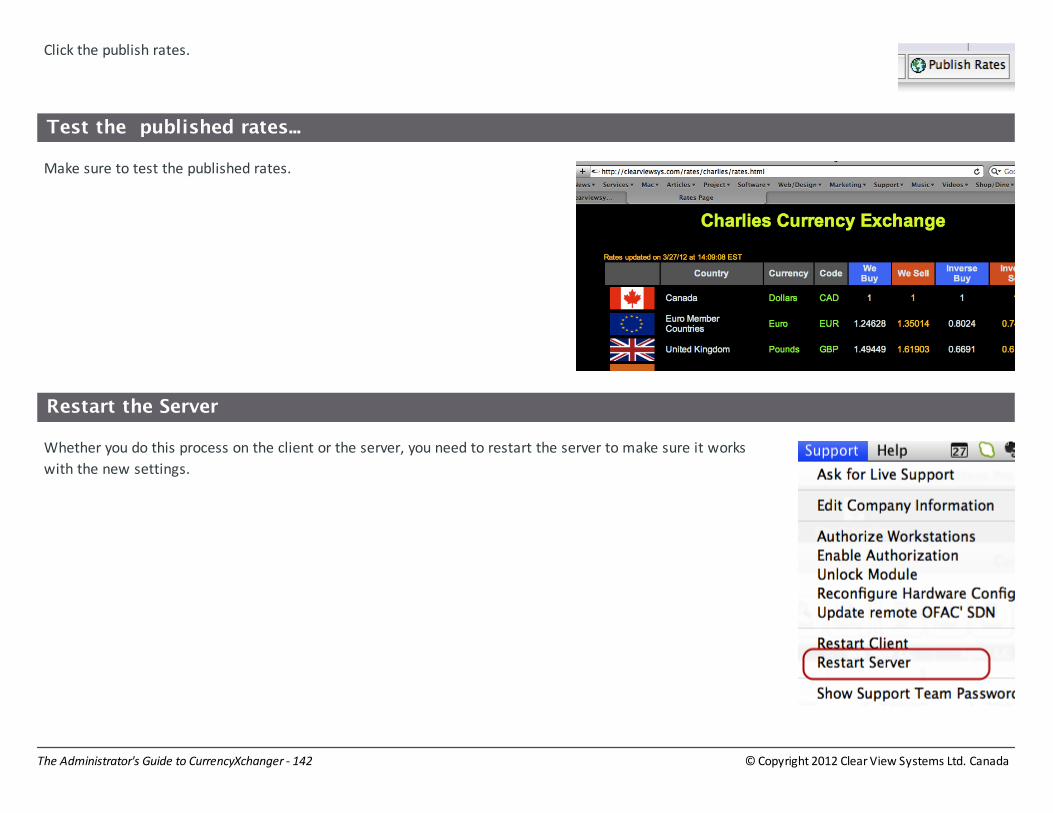
© Copyright 2012 Clear View Systems Ltd. CanadaThe Administrator's Guide to CurrencyXchanger - 142
Click the publish rates.
Test the published rates...
Make sure to test the published rates.
Restart the Server
Whether you do this process on the client or the server, you need to restart the server to make sure it works
with the new settings.
© Copyright 2012 Clear View Systems Ltd. CanadaThe Administrator's Guide to CurrencyXchanger - 143
Preset Fee Structures
Fee structures are a collection of preset values for the commission percentage and flat service fee. For example, a cheque cashing operation
may want to charge 2.5% and $3.00 on a cheque. In this section, we show you how to add a new fee structure. These fee structures must be
picked by the user (or teller) during the transaction. The system will not automatically pick the fee structure for the transaction. For automatic
fee structure, you need to check the 'rule-based' fee structures section in this manual.
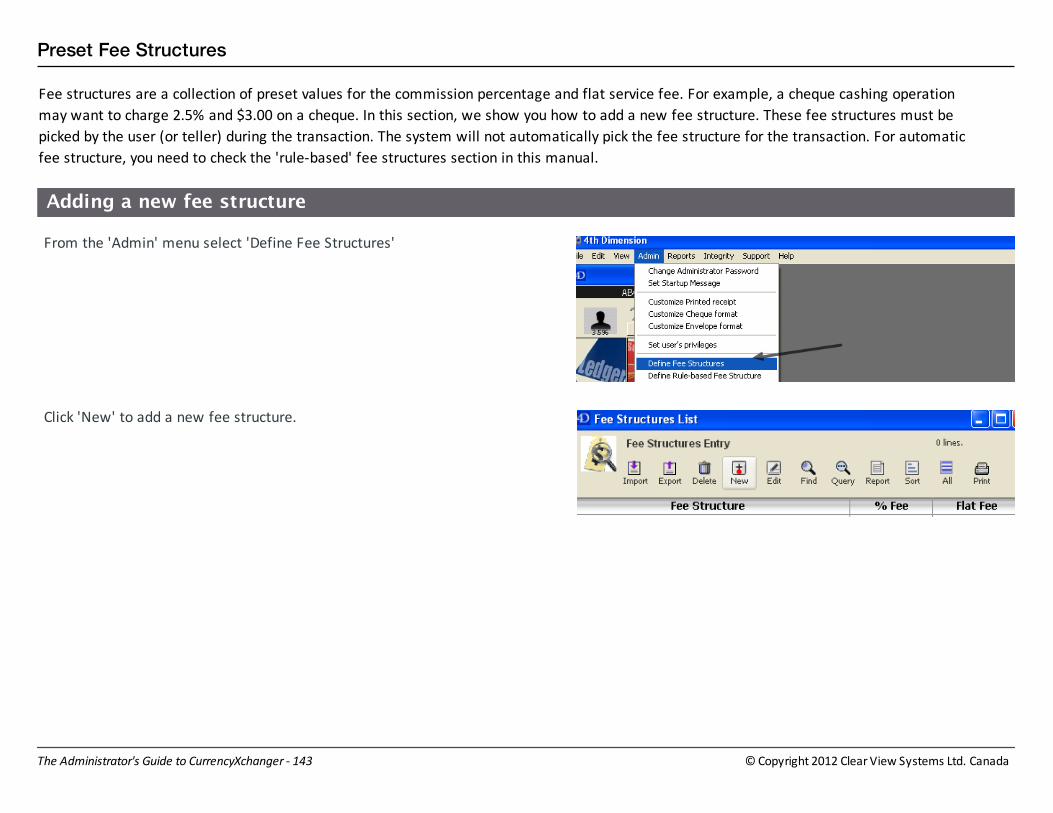
Adding a new fee structure
From the 'Admin' menu select 'Define Fee Structures'
Click 'New' to add a new fee structure.

© Copyright 2012 Clear View Systems Ltd. CanadaThe Administrator's Guide to CurrencyXchanger - 144
Define the fee structure
For our example, we will create a fee structure for cashing cheques from
customers.
1. Call the fee structure something that makes sense and doesn't confuse users
2. Add a percentage commission of 2.5 %
3. Add a flat service charge of $ 3.00
4. Save
You may have other fee structures for different purposes.

© Copyright 2012 Clear View Systems Ltd. CanadaThe Administrator's Guide to CurrencyXchanger - 145
How to pick a fee structure during invoicing
The commission and service fee will be automatically filled-in by the
system when you pick the fee structure. Fee structures are to facilitate
the entering of fees for the users. However, it is possible for the user to
modify the fees if they wish.
In this case the 'eWire local' service fee was picked.

© Copyright 2012 Clear View Systems Ltd. CanadaThe Administrator's Guide to CurrencyXchanger - 146
Adding Database Field Constraints
Sometimes, you may want to make an entry field mandatory or may want to warn the user if a field is empty. For such circumstances, you can
create database field constraints. Let's say we want to make the DOB (Date of Birth) field mandatory in the customer's entry form.
Highlight the 'Database field constraints' from the Admin menu.
Create a new constraint.

© Copyright 2012 Clear View Systems Ltd. CanadaThe Administrator's Guide to CurrencyXchanger - 147
Pick the table "Customers" and "DOB" as a field. Then pick the DOB from list fields.
Click the 'Mandatory' button and save the new entry.
In the above list you can see that DOB is mandatory and the citizenship
field is optional. However, when you add a constraint field as
non-mandatory, the system will still warn the user, if the field is left
black.

© Copyright 2012 Clear View Systems Ltd. CanadaThe Administrator's Guide to CurrencyXchanger - 148
Defining Rule-based Fee Structures

© Copyright 2012 Clear View Systems Ltd. CanadaThe Administrator's Guide to CurrencyXchanger - 149
Enabling the Application Log
The application log keeps a log of all transactions added, deleted, or modified along with a date stamp and user who made the changes.
Enabling this feature can bloat the size of the data file as thousands of records will be normally added to this log on a daily basis.

© Copyright 2012 Clear View Systems Ltd. CanadaThe Administrator's Guide to CurrencyXchanger - 150

© Copyright 2012 Clear View Systems Ltd. CanadaThe Administrator's Guide to CurrencyXchanger - 151
Deleting Transactions

© Copyright 2012 Clear View Systems Ltd. CanadaThe Administrator's Guide to CurrencyXchanger - 152
Deleting all transactions
This lessons shows how to delete all transactions in the system. Do not try this unless you are absolutely sure that you want to delete all
transactions. This is usually used after a period of practicing with a demo software.
Make sure that you are signed in as Administrator
Delete all transactions
From the Support menu select "Delete All Transactions".
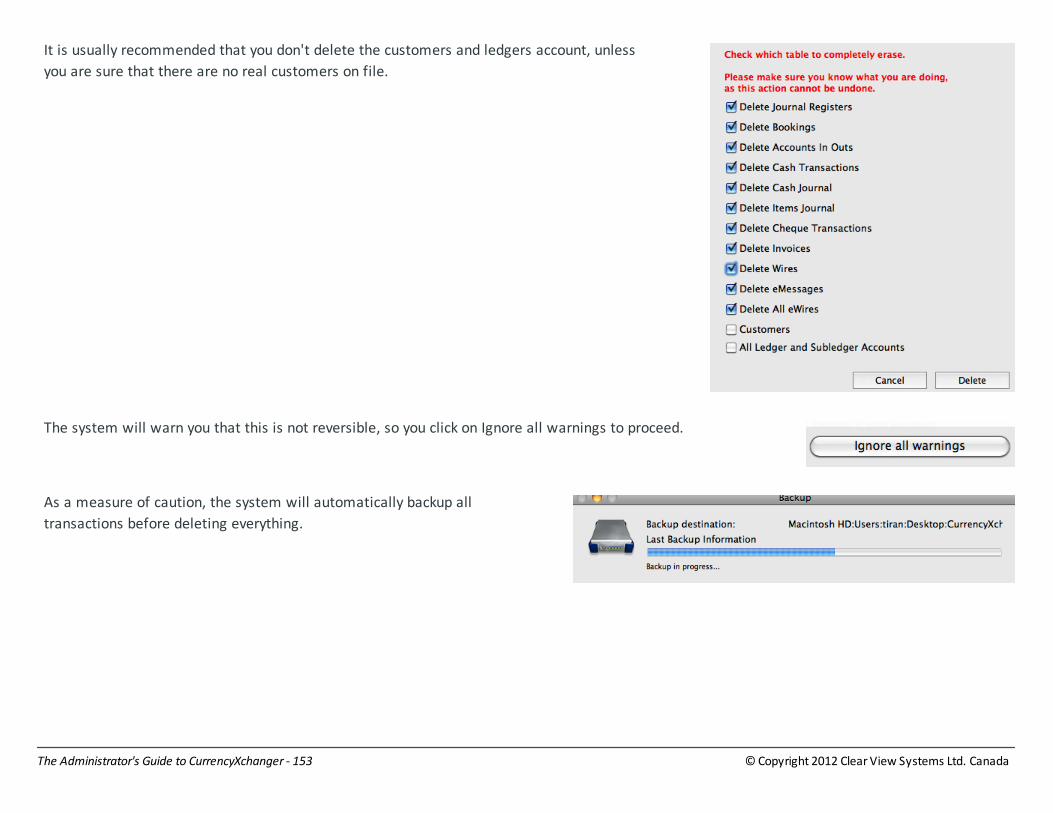
© Copyright 2012 Clear View Systems Ltd. CanadaThe Administrator's Guide to CurrencyXchanger - 153
It is usually recommended that you don't delete the customers and ledgers account, unless
you are sure that there are no real customers on file.
The system will warn you that this is not reversible, so you click on Ignore all warnings to proceed.
As a measure of caution, the system will automatically backup all
transactions before deleting everything.
© Copyright 2012 Clear View Systems Ltd. CanadaThe Administrator's Guide to CurrencyXchanger - 154
Deleting an invoice
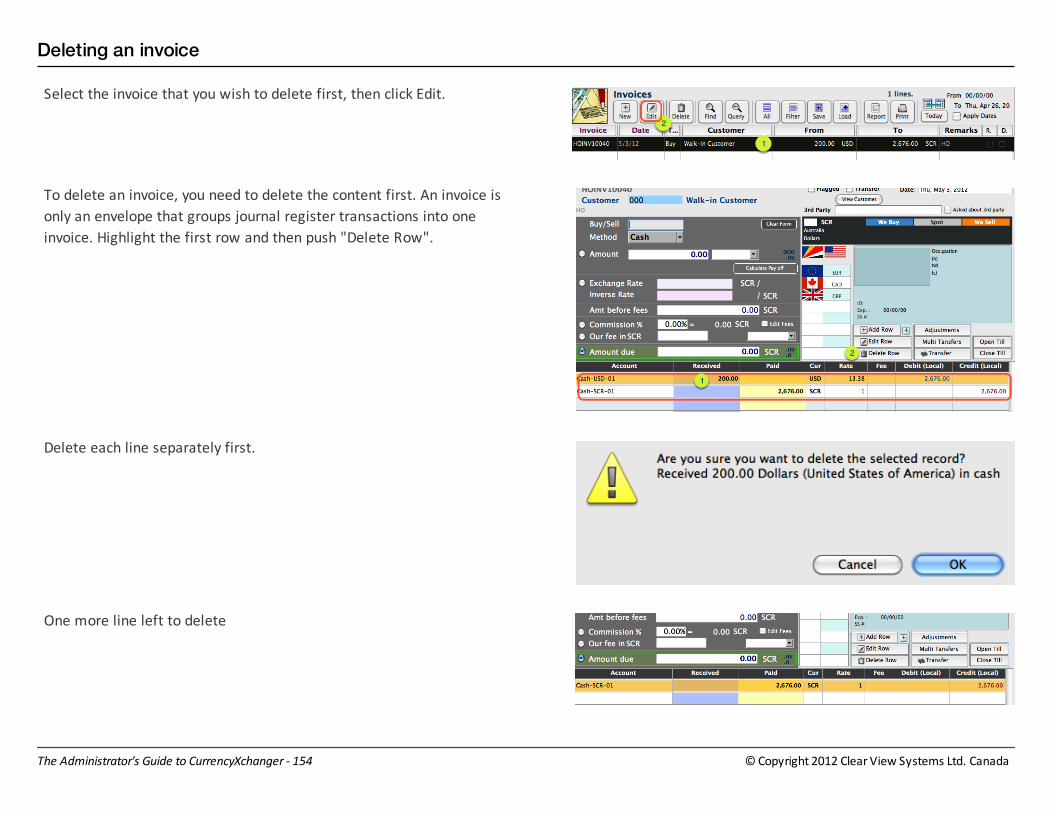
Select the invoice that you wish to delete first, then click Edit.
To delete an invoice, you need to delete the content first. An invoice is
only an envelope that groups journal register transactions into one
invoice. Highlight the first row and then push "Delete Row".
Delete each line separately first.
One more line left to delete

© Copyright 2012 Clear View Systems Ltd. CanadaThe Administrator's Guide to CurrencyXchanger - 155
Click OK to proceed.
Make sure to enter a note before saving the invoice. Once you have
entered the reason for deletion, clock on "Save Invoice"
Once you save the invoice, you will be back to the main list form. At this
point, you will notice that the "From" and "To" fields are empty, but the
invoice is still there.
If you want to really delete the invoice, you may need to select it and
then click "Delete" on the invoice module. Click Yes to continue. This step
is completely optional and it is actually not recommended as delete an
invoice, will create gaps in the numbering system.
Voila! the invoice is gone.

© Copyright 2012 Clear View Systems Ltd. CanadaThe Administrator's Guide to CurrencyXchanger - 156
Importing & Exporting

© Copyright 2012 Clear View Systems Ltd. CanadaThe Administrator's Guide to CurrencyXchanger - 157
Exporting data
© Copyright 2012 Clear View Systems Ltd. CanadaThe Administrator's Guide to CurrencyXchanger - 158
Exporting reports into Excel

© Copyright 2012 Clear View Systems Ltd. CanadaThe Administrator's Guide to CurrencyXchanger - 159
Eporting through custom reports

© Copyright 2012 Clear View Systems Ltd. CanadaThe Administrator's Guide to CurrencyXchanger - 160
Importing

© Copyright 2012 Clear View Systems Ltd. CanadaThe Administrator's Guide to CurrencyXchanger - 161
Troubleshooting Common
Problems

© Copyright 2012 Clear View Systems Ltd. CanadaThe Administrator's Guide to CurrencyXchanger - 162
Journal is not balanced error
Sometimes when you restart the system, you may encounter an error saying "The Journal is not balanced". This can happen due to several
reasons such as:
• A record being locked while being deleted
• A journal transactions being deleted from the Journal Registers table
• A bug in the system that kept the record from being completely cancelled when an invoice was not saved
• A transfer from account 1 to account 2 in which one of the accounts or lines were deleted from the journal registers table
Data Integrity Checks
You need to perform integrity checks on the data to see what is out of
order. Select display integrity check panel from the Integrity menu. Make
sure you are signed in as the administrator
Two of the most important integrity checks for finding journal imbalance
are: orphanedRegisters and unbalancedInvoiced.
• OrphanedRegsiters: This check verifies to see if there are some
registers that are not connected to any invoices. This can happen

© Copyright 2012 Clear View Systems Ltd. CanadaThe Administrator's Guide to CurrencyXchanger - 163
when an invoice gets deleted or gets canceled. There is also a bug in
the system that can cause orphaned registers.
• UnalancedInvoices: This check will fail when there are invoices that
are missing some lines. This can happen by deleting a line from the
registers table. There may be other way to get unbalanced invoices
as well.
Once you have picked the integrity checks, you need to run the data Integrity.
Wait till all records are checked.
Data integrity errors found
If any inconsistencies are found, they will be listed. In this case, those
records from the invoices table are missing a line or two. You can verify
each invoice by double clikcing on ti.

© Copyright 2012 Clear View Systems Ltd. CanadaThe Administrator's Guide to CurrencyXchanger - 164
Constant Backup Failures: Causes and Remedies

© Copyright 2012 Clear View Systems Ltd. CanadaThe Administrator's Guide to CurrencyXchanger - 165
Error: License is expired!
This lesson is not complete.

© Copyright 2012 Clear View Systems Ltd. CanadaThe Administrator's Guide to CurrencyXchanger - 166
Error -10002: The database cannot be used (4D Client)
You try to open 4D Client as usual but you get the error -10002. This is one of the most common problems with 4D Client. This error occurs when
4D Server is not running.
Error # -10002
When you see this error, it means that 4D client cannot connect to 4D
Server. Make Sure 4D Server is running. For more information on how to
restart 4D Server refer to the next section Restarting 4D Server.

© Copyright 2012 Clear View Systems Ltd. CanadaThe Administrator's Guide to CurrencyXchanger - 167
Run 4D Client again
Once you are sure that 4D Server is running, run 4D Client once again.
Click on the middle tab TCP/IP and wait for a few second.
Wait till CurrencyXchanger appears
After a while you should see CurrencyXchanger appear under Servers.
Once you see CurrencyXchanger appear, double click on it, or simply select
it and click OK.
If CurrencXchanger does not appear after 30 seconds, then your 4D server
may not be running. Once again, make sure you follow the instruction on
how to restart 4D Server.
If you are 100% sure 4D Server is running and 4D Client cannot detect it
under the TCP/IP tab, then make sure that your network connection is

© Copyright 2012 Clear View Systems Ltd. CanadaThe Administrator's Guide to CurrencyXchanger - 168
working. You can check that by trying accessing the Internet. Sometimes
Windows firewall configuration may interfere with 4D Client; you may
want to ask an IT personel to check that.
After a few seconds...
Double click CurrencyXchanger or highlight CurrencyXchanger and click OK.

© Copyright 2012 Clear View Systems Ltd. CanadaThe Administrator's Guide to CurrencyXchanger - 169
Error -9913 or -9926: Connection to Server Failed
This error occurs when CurrencyXchanger cannot connect to the sanction list and rate server. You need to be connected to the internet for the
system to be able to connect to the rate server and the sanction list server. Check your internet connection and make sure that you are connected
to the internet before calling Clear View Systems.
This error will not prevent you from working with the system. However,
when you enter a new customer , the system cannot perform the usual
sanction list checks on the customer. Furthermore, the system won't be
able to chekc the sanction

© Copyright 2012 Clear View Systems Ltd. CanadaThe Administrator's Guide to CurrencyXchanger - 170
Error -12: Maximum number of concurrent users reached (4D Client)
You are trying to connect to 4D Server using 4D client but the system doesn't let you. Every deployment of 4D Server has a maximum number of
concurrent users. If you try to connect more users than you have licenses for, then system will not let you. In that case, you have to either
purchase an additional 4D Client Extension license or simply ask one of the other users to quit the program so that you can connect.
Maximum number of users reached
Error -12

© Copyright 2012 Clear View Systems Ltd. CanadaThe Administrator's Guide to CurrencyXchanger - 171
Error: No more room to save the record!
If you ever try to save a record and get an error no more room to save a record and you are sure that the hard drive has enough space to save
data, it means that your data file has become larger than 2 Gigs and 4D needs to create another one. This was a limitation of older operating
systems (32 bit) which didn't allow a single file to be larger than 2 Gigabytes.
If you are running 4D Server, then go to the server program. From the 'Data' menu
select 'Segments...'
By default a datefile has about 2Gigs of capacity. If you exceed this
amount, you can create additional segments to be linked together to form
a datafile over 2 Gigs.

© Copyright 2012 Clear View Systems Ltd. CanadaThe Administrator's Guide to CurrencyXchanger - 172
Name your new segment file.
Now you can see the second line is linked to the first one.

© Copyright 2012 Clear View Systems Ltd. CanadaThe Administrator's Guide to CurrencyXchanger - 173
How to turn on automatic segment creation?
In order to make sure that you never encounter a segment full (or data
cannot be written error), you can check a box to allow automatic
segment creation.
Click the "create new datasegment as needed" checkbox.
You are done!

© Copyright 2012 Clear View Systems Ltd. CanadaThe Administrator's Guide to CurrencyXchanger - 174
How to restart 4D Server?
CurrencyXchanger by Clear View Systems Ltd. (The software that runs the Foreign Exchange operation) runs on a database server called 4D
Server. 4D Server must be running at all times to ensure the front desk clerks can use the system.
• 4D Server is a Database Server
• 4D Server is running on the Server Computer (back room)
• 4D Server must be running at all times
• All data is kept on the server (or on a location specified in the Backup Preference of 4D Server)
• All backups are done on the server
• If the Server is not running the 4D Cients cannot run
• Unless you really have to, do not quit 4D Server. Before quiting 4D Server warn users to save their data and exit the 4D Client
• If 4D Server is not running, 4D Client will send an error -10002 (Database cannot be used)
Open 4D Server
Double click 4D Server.exe shortcut.
A shortcut to 4D Server is usually placed on the desktop during the initial installations.
If you cannot find it on the desktop, look for the original file inside the C:\Program
Files\4D_Programs\4D Server

© Copyright 2012 Clear View Systems Ltd. CanadaThe Administrator's Guide to CurrencyXchanger - 175
Open CurrencyXchanger
Once you open 4D Server, you should be presented with a dialog box
similar to above.
Click the Open Interpreted button (2) or just double click
CurrencyXchanger (1).

© Copyright 2012 Clear View Systems Ltd. CanadaThe Administrator's Guide to CurrencyXchanger - 176
4D Server Monitor Window
When 4D Server is running, it displays a server monitor page like the
snapshot above. 4D Server shows the number of connected computers
(client computers) and active processes along with the percentage ratio
each project is taking.
Now 4D Clients should be able to connect to the server.

© Copyright 2012 Clear View Systems Ltd. CanadaThe Administrator's Guide to CurrencyXchanger - 177
Picture IDs not visible
If you encounter a situation where you cannot see the picture ID in the customer profile, but you are sure that it has been attached previously,
then most probaly the Apple Quicktime ® engine is not installed. Please refer to the installation instruction on how to install Quicktime on your
machine.

© Copyright 2012 Clear View Systems Ltd. CanadaThe Administrator's Guide to CurrencyXchanger - 178
If Quicktime is installed properly, then the picture ID should be visible on the
customer profile page.

© Copyright 2012 Clear View Systems Ltd. CanadaThe Administrator's Guide to CurrencyXchanger - 179
Error: Cash Account is not valid!
There is an error that happens occasionally during invoicing.
The error
Invoicing problem
If you see this error during 'Add Row' in the invoice, it could mean several
things:
• You may not be signed in with the till (make sure to sign-in with the
till)
• You may be signed in but the cash accounts are not assigned to the
user yet (restarting the program should fix this)
• You may not have created the currency in the system. (Add the
currency first, then restart the program)

© Copyright 2012 Clear View Systems Ltd. CanadaThe Administrator's Guide to CurrencyXchanger - 180
Changing a setting in the Server Preferences
It may help to change the Server Preference to warn the user if they are
not signed-in with a Till.

© Copyright 2012 Clear View Systems Ltd. CanadaThe Administrator's Guide to CurrencyXchanger - 181
Window size is too small
There are times that a user opens a window and sees a tiny window appear on the screen instead of a normal window size. This is quite a
common problem with many
The odd window
As you can see the window in the middle of the screen is not displaying
correctly. You would have to try to resize the window by dragging the
lower right corner.

© Copyright 2012 Clear View Systems Ltd. CanadaThe Administrator's Guide to CurrencyXchanger - 182
Odd resizing behavior
You will notice that as you resize the window, the window area doesn't
display the content properly. Don't despair at this point as you are doing
okay. Once the window is resized, the click on the close window (red
button) to close the window.
Don't Save
As you try to close the window, the system will ask you if you would like to save. If
this is the case, click "Don't Save"

© Copyright 2012 Clear View Systems Ltd. CanadaThe Administrator's Guide to CurrencyXchanger - 183
Second Attempt
Now the second time that you try to open the same window, you would
notice that the window is displaying its content correctly. However, as
you see on the above screen, it still is not properly resize, so we may
need to resize it a bit more.

© Copyright 2012 Clear View Systems Ltd. CanadaThe Administrator's Guide to CurrencyXchanger - 184
Second attempt at resizing
The shaded area is still not displaying corrently as we resize the window
in our second attempt. However, we are getting close to the original
screen size.

© Copyright 2012 Clear View Systems Ltd. CanadaThe Administrator's Guide to CurrencyXchanger - 185
Finally!
Finally, after our second attempt it looks like the window is displaying
correctly. Now you could do your business as usual.

© Copyright 2012 Clear View Systems Ltd. CanadaThe Administrator's Guide to CurrencyXchanger - 186
Using 4D Tools to repair data
4D Tools is a program that can help you fix damaged files and database structures.
Download 4D Tools
Download 4D Tools from the above URL
Unzip the 4D_Tools.zip folder and run 4DTools.exe

© Copyright 2012 Clear View Systems Ltd. CanadaThe Administrator's Guide to CurrencyXchanger - 187
Open the structure file "CurrencyXchanger.4DB"
The structure file needs to be opened with 4D Tools. Locate the file called
"CurrencyXchanger.4DB" and open it using 4D Tools.

© Copyright 2012 Clear View Systems Ltd. CanadaThe Administrator's Guide to CurrencyXchanger - 188
4D Tools at first glance
There are 4 tabs in 4D Tools: Information, Maitain, Repair, and Structure.
The maintenance tab is to check for damaged records and index tables.
Index tables are used by the database for searching important keywords.
Check the records and Indexes
Click on the second tab (Maintain) and then click Check All.

© Copyright 2012 Clear View Systems Ltd. CanadaThe Administrator's Guide to CurrencyXchanger - 189
Make sure everything is OK
After you check the structure and indexes, 4D Tools should display the above message.
Check the Structure File only
You can also check the Structure file separately by going to the
"Structure" tab and pushing "Check..."

© Copyright 2012 Clear View Systems Ltd. CanadaThe Administrator's Guide to CurrencyXchanger - 190
Make sure all steps are okay
4D Tools should display a checkmark for every check perfomed.

© Copyright 2012 Clear View Systems Ltd. CanadaThe Administrator's Guide to CurrencyXchanger - 191
Structure OK

© Copyright 2012 Clear View Systems Ltd. CanadaThe Administrator's Guide to CurrencyXchanger - 192
When a problem is detected by 4D Tools
When a problem is detected 4D Tools will notify you that something is
wrong and it will give you choices to fix/repair the damaged files or
records. In the above example, 4D Tools has detected damaged records.
Click on "Repair" and let 4D Tools go through repairing the data files.

© Copyright 2012 Clear View Systems Ltd. CanadaThe Administrator's Guide to CurrencyXchanger - 193
End of Year Procedure

© Copyright 2012 Clear View Systems Ltd. CanadaThe Administrator's Guide to CurrencyXchanger - 194
Splitting the data files
Prior to separating the datafiles, make sure that you close all 4D clients and then 4D Server (if running in Server mode). In stadalone situation,
make sure that you quit 4D Runtime or exit CurrencyXchanger.
You need to spot the "CurrencyXChanger" folder on your hard drive
(usually in the root folder C:\) and dupplicate the folder and rename it.
You could do this by copying the folder and the pasting it in the same
location.
When you PASTE the folder it will be renamed by the OS.
Rename it to something meaningful (Say add _2012 to distinguish between 2011 files and 2012 files).
IT IS VERY IMPORTANT TO NAME ALL THE FILES CONSISTENTLY.
Open the new folder and find the DataFiles folder and rename it too. The DataFiles folder is inside the
CurrencyXchanger folder.
Remember to be consistent with the renaming, say always add the same postfix (e.g._2012).
Now rename the structure file.

© Copyright 2012 Clear View Systems Ltd. CanadaThe Administrator's Guide to CurrencyXchanger - 195
And also rename the structure resource files. If you cannot see the extension of the file (.RSR) then you
should rename all files consistently. If you rename a file inconsistently this process will not work and the
database won't be able to work.
1) Open the new renamed structure file by clicking 'Browse' (see step
below)
2) Open the new data file (see two steps below)
3) Click 'Open Interpreted'.

© Copyright 2012 Clear View Systems Ltd. CanadaThe Administrator's Guide to CurrencyXchanger - 196
Opening the new structure file
Rename the datafile
If you pay attention, you can see that the data file in this step is still using 2011, although it is located in
the 2012 folder. By right clicking on the data file, you can rename it.
After you renamed the datafile, you can now open it.
Missing Log File
Since the datafile is renamed, 4D will not be able to associate the old log file to the
new data file, therefore it will give you the above error message. At this point you
have to create a new log file.

© Copyright 2012 Clear View Systems Ltd. CanadaThe Administrator's Guide to CurrencyXchanger - 197
Creating a new Log File
Create a new log file by clicking the new button.
Make sure that you rename the log file consistent with the data files and structure file (adding the
correct postfix 2012).
Backup
After you create a new log file, the database needs to backup.
One last check.
At this point, the structure file, data file, log file and backup file should all
be postfixed with _2012. Run 4D client and make sure that all data from
last year is still avaialable.

© Copyright 2012 Clear View Systems Ltd. CanadaThe Administrator's Guide to CurrencyXchanger - 198
Storing end of year balances
At this stage we assume that you have already created a new datafile for the new year and you are now ready to delete last years transactions.
Tosave time re-entering all opening balances from scratch, you can save them and reload them for the new year. This can be achieved by:
1) Saving all balances snapshot from last year (2011)
2) Deleting all transactions
3) Loading the closing balances from last year instead of re-entering them manually
Click New Invoice to create a new invoice.
Saving all the account balances
Click the "Adjustment" button (from withing a new invoice).

© Copyright 2012 Clear View Systems Ltd. CanadaThe Administrator's Guide to CurrencyXchanger - 199
Saving all balances
At the bottom of the "Adjustment" window there is a button for storing all
balances. Click the button.

© Copyright 2012 Clear View Systems Ltd. CanadaThe Administrator's Guide to CurrencyXchanger - 200
Save the balances, giving it a name (lable) that you can recall later. Since
these balances are End of Year 2011 balances, you can label it EOY-2011. If
you forget the label, you can not reload the balances later so it is
recommended that you write it down.
Important Alert!
You will receive an alert about saving this invoice. If you don't save the
invoices, the balances won't be stored.
At this point no adjustments were made so even after you apply the adjustment (next step) the invoice
looks completely empty. However, the snapshots of the account balances are stored in a storage area that
is not visitble in the invoice. It is important to remember to save the invoice after applying the
adjustments.
Since the invoice is emply, you cannot save the invoice without entering a
'printable remark', so enter some text in the printable remark and save
the invoice.

© Copyright 2012 Clear View Systems Ltd. CanadaThe Administrator's Guide to CurrencyXchanger - 201
Deleting last year's transactions
Delete all transactions.
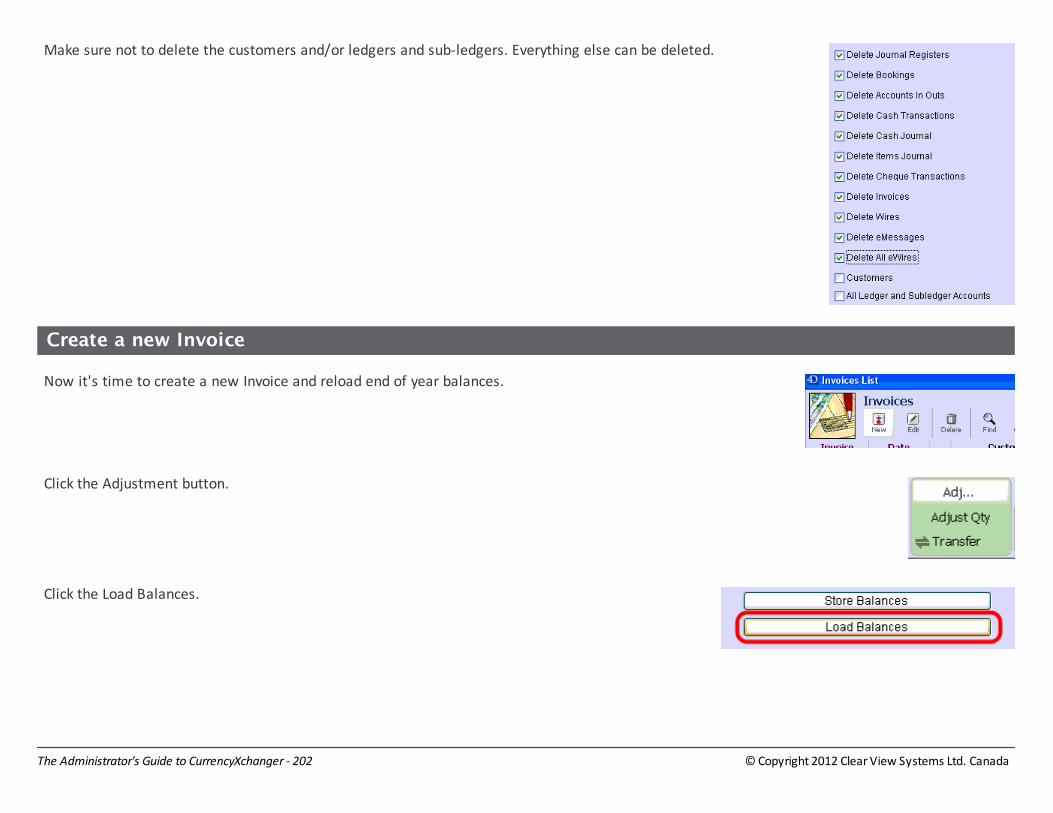
© Copyright 2012 Clear View Systems Ltd. CanadaThe Administrator's Guide to CurrencyXchanger - 202
Make sure not to delete the customers and/or ledgers and sub-ledgers. Everything else can be deleted.
Create a new Invoice
Now it's time to create a new Invoice and reload end of year balances.
Click the Adjustment button.
Click the Load Balances.
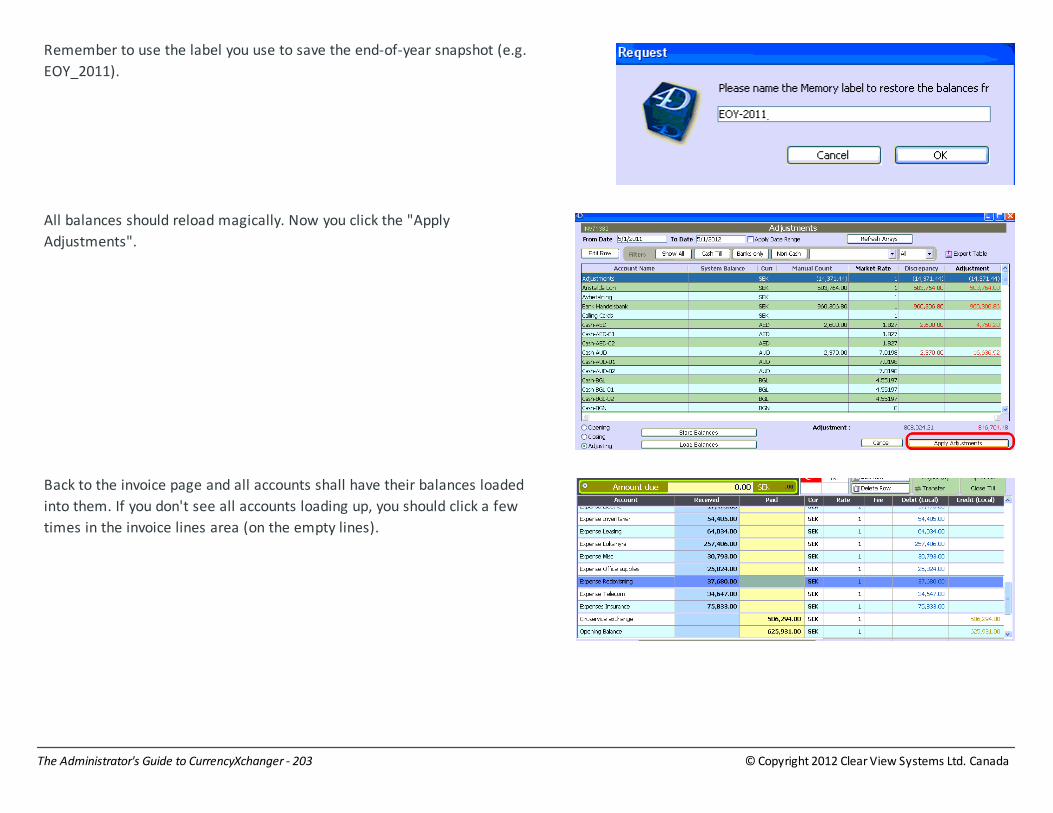
© Copyright 2012 Clear View Systems Ltd. CanadaThe Administrator's Guide to CurrencyXchanger - 203
Remember to use the label you use to save the end-of-year snapshot (e.g.
EOY_2011).
All balances should reload magically. Now you click the "Apply
Adjustments".
Back to the invoice page and all accounts shall have their balances loaded
into them. If you don't see all accounts loading up, you should click a few
times in the invoice lines area (on the empty lines).

© Copyright 2012 Clear View Systems Ltd. CanadaThe Administrator's Guide to CurrencyXchanger - 204
Deleting extra lines.
You should delete all the lines that include Expenses, Income and Opening Balance accounts as these
accounts shall not be transferred over to the new year.
Balance the Invoice
Once you have deleted the extra lines from the invoice, you should
balance out the invoice using the Opening balance and save it.

© Copyright 2012 Clear View Systems Ltd. CanadaThe Administrator's Guide to CurrencyXchanger - 205
Invoice Balanced!
Change the default data range in the Server Preferences.

© Copyright 2012 Clear View Systems Ltd. CanadaThe Administrator's Guide to CurrencyXchanger - 206
Save the Preferences.

© Copyright 2012 Clear View Systems Ltd. CanadaThe Administrator's Guide to CurrencyXchanger - 207
FAQ

© Copyright 2012 Clear View Systems Ltd. CanadaThe Administrator's Guide to CurrencyXchanger - 208
Asking for Remote Support via TeamViewer
Downloading and installing TeamViewer QuickSupport. TeamViewer QuickSupport is a secure remote access application which is FREE and has
great advantages in speed and functions compared to other solutions like PCanywhere, VNC, rAdmin. The package is very small, runing
immediately.
Go to ClearViewSys.com
Go to www.clearviewsys.com and click 'Support' without select the
submenus.
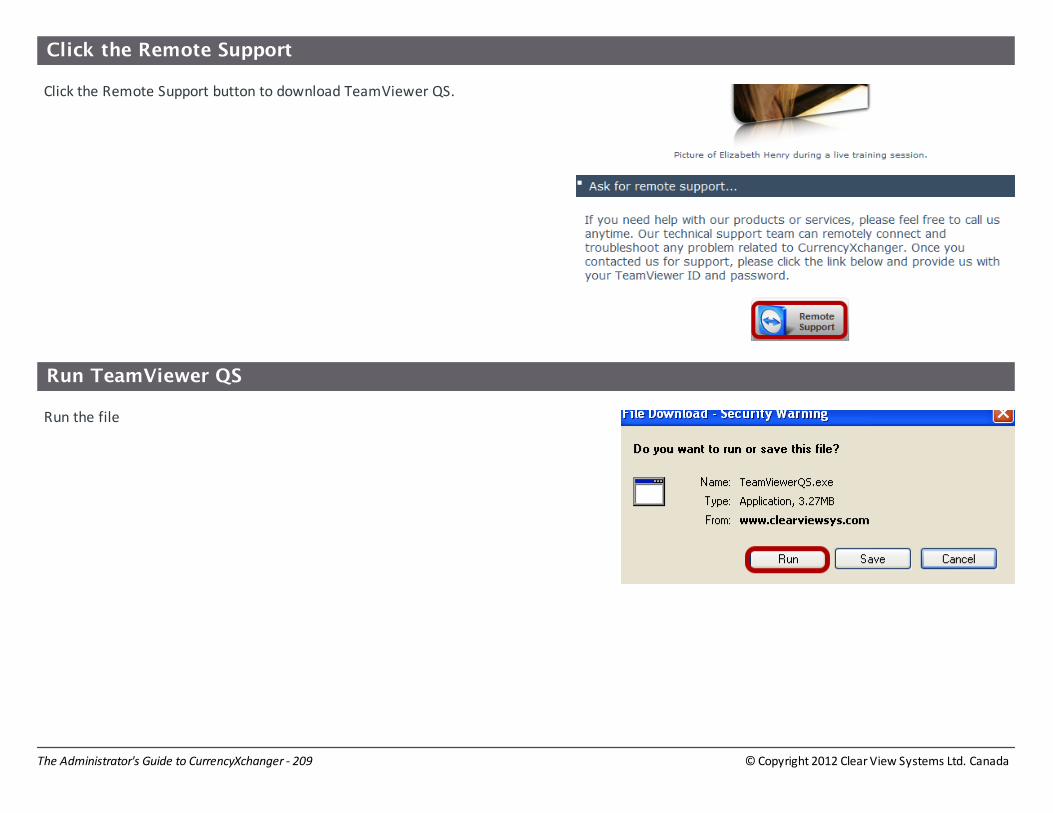
© Copyright 2012 Clear View Systems Ltd. CanadaThe Administrator's Guide to CurrencyXchanger - 209
Click the Remote Support
Click the Remote Support button to download TeamViewer QS.
Run TeamViewer QS
Run the file

© Copyright 2012 Clear View Systems Ltd. CanadaThe Administrator's Guide to CurrencyXchanger - 210
Confirm
Click Run again.
Accept the disclaimer
Read and accept the disclaimer

© Copyright 2012 Clear View Systems Ltd. CanadaThe Administrator's Guide to CurrencyXchanger - 211
Provide ID and Password
You need to provide your TeamViewer ID and Password to Clear View Systems technicians
everytime you need help with the system. They can temporarily connect and solve any issues
related to CurrencyXchanger.
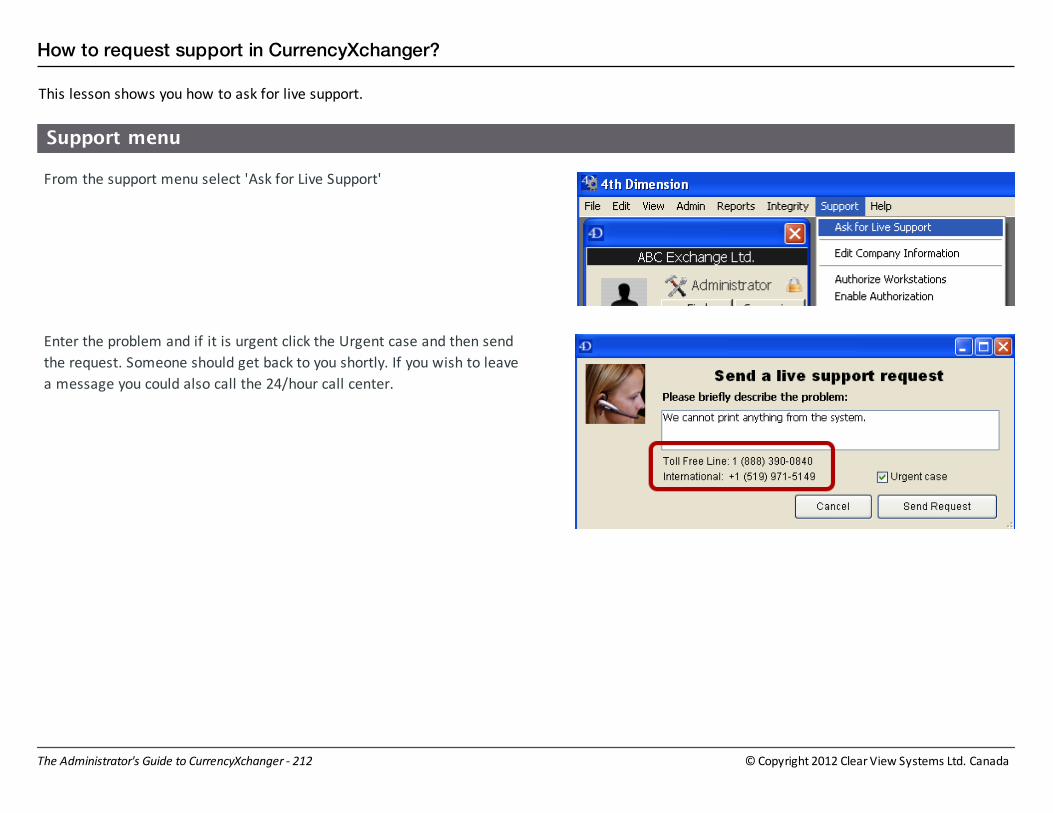
© Copyright 2012 Clear View Systems Ltd. CanadaThe Administrator's Guide to CurrencyXchanger - 212
How to request support in CurrencyXchanger?
This lesson shows you how to ask for live support.
Support menu
From the support menu select 'Ask for Live Support'
Enter the problem and if it is urgent click the Urgent case and then send
the request. Someone should get back to you shortly. If you wish to leave
a message you could also call the 24/hour call center.

© Copyright 2012 Clear View Systems Ltd. CanadaThe Administrator's Guide to CurrencyXchanger - 213
How to change the base currency?
The base currency is also called home currency or local currency. When you start using the system and recording transactions in the system, you
cannot change the base currency. However, if you delete all transactions, you are able to change the base currency. This lesson will show you the
necessary steps that you need to take to change the base currency.
Make sure that you are signed in as Administrator first. Then from the
Support menu, choose 'Edit Company Information'.
Try to change the Local Currency Code. If you're able to change it, it
means that you have not recorded any transactions yet, but otherwise the
field will be locked. If that case, continue to the next step.

© Copyright 2012 Clear View Systems Ltd. CanadaThe Administrator's Guide to CurrencyXchanger - 214
Deleting Transactions
From the Support menu select 'Delete All Transactions'.
Delete all transaction except the Customers and Accounts. After pressing Delete the system
will reconfirm and them backup the whole database before deleting.

© Copyright 2012 Clear View Systems Ltd. CanadaThe Administrator's Guide to CurrencyXchanger - 215
Now go back to the Support and this time 'Edit Company Information'.
You should now be able to change the local currency to a
different currency and 'Save' the form.
Rebuilding the Currencies table
Now go to the currencies module.
Select all the currencies by clicking on the first one and the holding down
the 'Shift' key and then clicking on the last one. This will highlight all the
currencies. You can also delete one by one but it will take more time.
When you highlight all currencies, you should see them all selected like
the above screenshot. Click on 'Delete'.

© Copyright 2012 Clear View Systems Ltd. CanadaThe Administrator's Guide to CurrencyXchanger - 216
All currencies should be deleted at this point.
Restart the client
Now restart the client from the 'Support' menu.

© Copyright 2012 Clear View Systems Ltd. CanadaThe Administrator's Guide to CurrencyXchanger - 217
The base currency is changed
At this point you should see the base currency appear with all buy/sell
rates to be 1.