touchstone master bath control - nuwhirl systems · pdf filetroubleshooting and servicing...
TRANSCRIPT

Page 1
TOUCHSTONE
Master Bath Control
Owner’s Manual
NuWhirl Systems Corp • www.nuwhirl.com • 951-817-5600 900150-CMBC-298-01-01-01-C2 REV B 9/10/15
CMBC-298-01-01-01
Configuration #2
Page 2
PLEASE READ CAREFULLY PRIOR TO Troubleshooting and Servicing Electrical Equipment
Definitions:
WARNING (May cause serious injuries or death) CAUTION (May cause property damage)
For information on NuWhirl Instructions, see: www.nuwhirl.com/docs/product-instructions.html
When installing and using this electrical equipment, basic safety precautions should always be followed, including:
Important Safety Instructions
WARNING: Keep dry. Replace control if exposed to water, moisture or contamination. WARNING: Use and follow these instructions along with all instructions that have been provided with your whirlpool bathtub in order to fully enjoy the bathtub safely. WARNING: Electronic control system components should be installed as per local and national Electrical Codes, in a location not to be subjected to splashing or flooding. Exposure to water or splashing will void all product certifications and warranties. There are no user serviceable parts inside. Opening, modifying, or tampering with control system components will void all product certifications and warranties. WARNING: Risk of electric shock. Connect only to a ground type receptacle or power supply junction box protected by a Ground-Fault Circuit Interrupter (GFCI). Contact a qualified electrician if you cannot verify that the power supply is protected by a GFCI. The GFCI should be tested on a routine basis. Consult the GFCI manufacturer’s instructions for correct testing and operation.
For electrical connections, see applicable wiring diagram. See www.nuwhirl.com/docs/product-instructions.html Do not use an extension cord to connect the product to the electric supply; provide a properly located receptacle or junction box. WARNING: Failure to install in strict accordance with each and every instruction above may compromise the system, which may cause injury to persons and/or property. The tub may be supplied from more than one power source. Before working on any electrical device, make sure all power to the control system is off. Use this unit only for its intended use as described in this manual. Do not use attachments not recommended by the manufacturer. Any improper installation or misuse of the equipment may result in injury to the user and will void the warranty. Do not run unit dry. Always be certain that the pump casing is filled with water before starting the unit. If pump fails to prime within 30 seconds, turn it off. Check if there is an airlock, clogged plumbing, or closed valve.
Save these instructions.
Page 3
TOUCHSTONE Master Bath Control System
Configuration #2 Owner’s Manual
Your whirlpool bathtub has been equipped with TOUCHSTONE Electronic and Mechanical Controls to provide features that allow you to customize your bathing experience to your individual preference. Please familiarize yourself with the features and operating instructions below in order to maximize the enjoyment you receive from your bath. These operating instructions should be used in conjunction with the other instructions and warnings provided with your whirlpool bathtub in order to fully understand and safely utilize the bathtub.
System Features
Air Button and Electronic Keypad
Options
Automatic 30-minute timer
Single Speed Pump
Single Speed Blower
Surface Heaters
Multicolor Tub Light
Air Button and Electronic Keypad Options
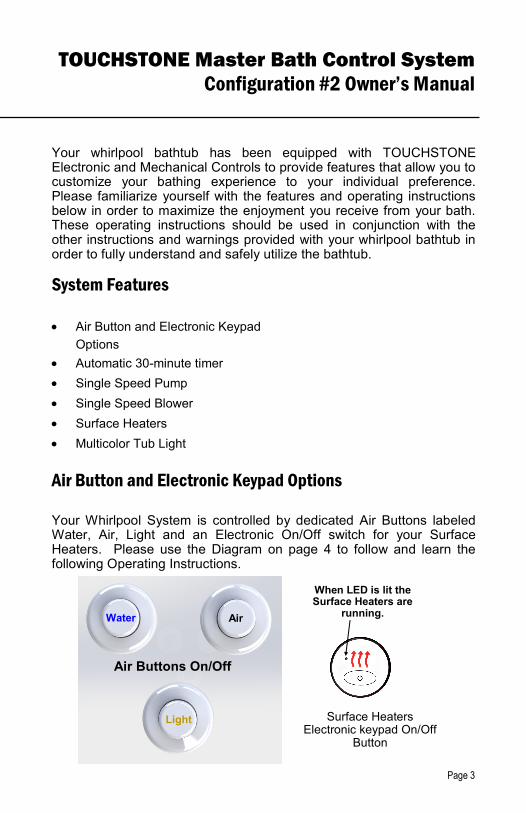
Your Whirlpool System is controlled by dedicated Air Buttons labeled Water, Air, Light and an Electronic On/Off switch for your Surface Heaters. Please use the Diagram on page 4 to follow and learn the following Operating Instructions.
Water Air
Light
Air Buttons On/Off
Surface Heaters Electronic keypad On/Off
Button
When LED is lit the Surface Heaters are
running.
Page 4
Operating Instructions Automatic 30-minute Timer
The 30-minute timer is activated by turning on any of the main
features (Water, Air, or Surface Heaters). At the end of the 30-
minutes the system will automatically turn off.
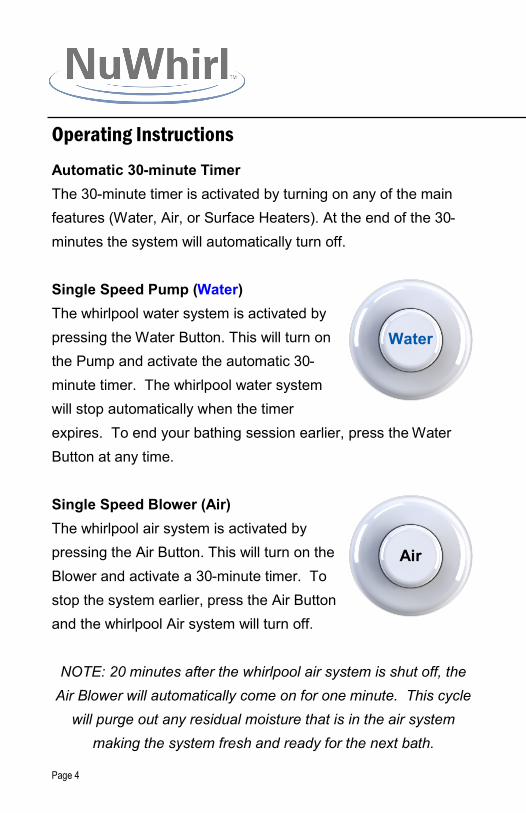
Single Speed Pump (Water)
The whirlpool water system is activated by
pressing the Water Button. This will turn on
the Pump and activate the automatic 30-
minute timer. The whirlpool water system
will stop automatically when the timer
expires. To end your bathing session earlier, press the Water
Button at any time.
Single Speed Blower (Air)
The whirlpool air system is activated by
pressing the Air Button. This will turn on the
Blower and activate a 30-minute timer. To
stop the system earlier, press the Air Button
and the whirlpool Air system will turn off.
NOTE: 20 minutes after the whirlpool air system is shut off, the
Air Blower will automatically come on for one minute. This cycle
will purge out any residual moisture that is in the air system
making the system fresh and ready for the next bath.
Water
Air

Page 5
TOUCHSTONE Master Bath Control System
Configuration #2 Owner’s Manual
Surface Heaters
It is recommended to turn the Surface Heater
ON 5-10 minutes prior to entering the tub.
Once the Heater Button is pressed the red
LED indicator will illuminate and start a 30-
minute timer. The Heater will begin to warm
the surface of the seat and/or back wall. The temperature will
increase to a comfortable level within a 5-10 minute period. To
turn off the Surface Heater earlier press the Surface Heater
button.
Multi-color Tub Light (Light)
The Multi-color Tub Light is activated by
pressing the Light Button at any time. The
first press will put the Light in a “Rainbow”
mode. Subsequent press and releases will
change the color to (White, Blue, Aqua,
Green, Yellow, Red and Magenta). To turn off the Light press
and hold the Light Button at any time.
Light

Page 6
System Identification: CMBC-298-01-01-01 Configuration #2 System features: Air Button activated/Electronic keypad (optional) Automatic 30Surface heaters, Multi-color Tub Lights Note: For instructions on setting the Configuration # see “Control Configuration Selection and Setting Guide
Installation Diagram:
Hoses to Air Buttons on tub
surface
Female Cord
TO HEATER PADS24VDC POWER CONNECTOR
Male Cord
TO 120V GFCI RECEPTACLE
15 AMPS Maximum current output
Plugs located
on REAR
Plugs located
on TOP
NOTES:
1. PUMPS/BLOWERS equipped with air switch must be in the “ON” position prior to plugging into the [CMBC2. Surface Heaters cannot be operated without the Electronic Keypad. 3. Connect cables to ports as shown. Installation may not require the use of all connection ports.Failure to connect cables to ports as shown, may damage the control box and its components.
Air
Light
Water
CMBC-298-01-01-01 Master Bath Control System
TO BLOWER
Max 10AMPS
Load
Page 7
Air Button activated/Electronic keypad (optional) Automatic 30-minute timer, Single Speed Pump, Blower,
Control Configuration Selection and Setting Guide”
TOUCHSTONE Master Bath Control System
Configuration #2 Owner’s Manual
CCBL-372
CCBL-366 x2 daisy chained
or CCBL-376 “Y” Splitter
TO HEATER PADS 24VDC POWER CONNECTOR
TO PUMP
Max 10AMPS
Load
Plugs located
on TOP
Connect to Heater Blanket only. Max 96 Watts Heater Blanket Load
ON” position prior to plugging into the [CMBC-298-01-01-01].
Connect cables to ports as shown. Installation may not require the use of all connection ports. Failure to connect cables to ports as shown, may damage the control box and its components.
CIDU-252-03-03-01 Surface Heaters/Light
Keypad
Female Cord
One or two CICL-297-01-01-01
LED Lights

Page 8
NuWhirl Systems Corp • www.nuwhirl.com • 951-817-5600 900150-CMBC-298-01-01-01-C2 REV B 9/10/15
Retain this manual for future reference
For your records and future reference
please fill in data below:
Manufacturer:
Model:
Serial:
Date of Installation: