tutorial 1 – creating a personal call flow - mitel...
TRANSCRIPT

NuPoint Unified Messaging Installation & Maintenance Course
Tutorial 1 – Creating a Personal Call Flow
This tutorial walks you through the creation of a personal (Mailbox) call flow for John, a typical office worker.
Planning the Call Flow
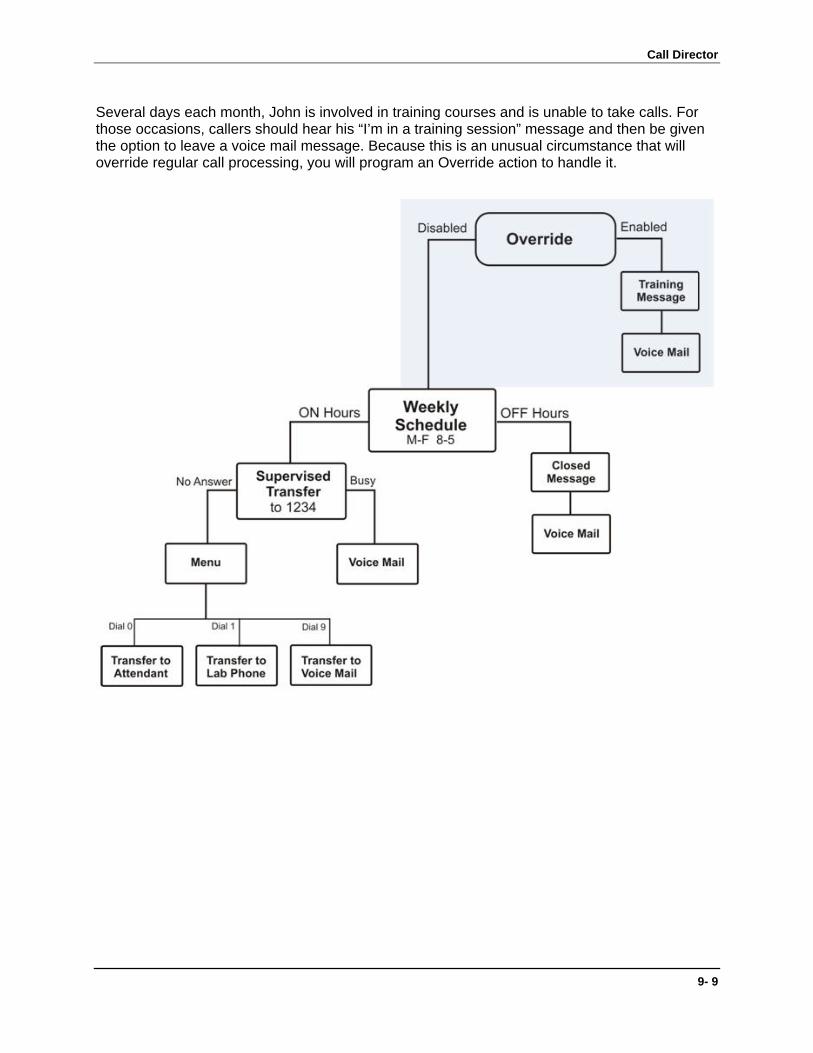
John wants all his calls to ring his extension during normal working hours, Monday through Friday. After hours and on weekends, callers should hear a “Sorry we’re closed” message and then be transferred to his voice mailbox.
When he's on the phone, he wants callers transferred to his voice mail. When he’s not answering, callers should be presented with a menu, allowing them to either call John’s lab phone, transfer to his voice mail, or return to the attendant. You can use the Schedule action to control this part of the flow:
9- 8 09_NP-UM_I&M_CallDirector.doc
Call Director
Several days each month, John is involved in training courses and is unable to take calls. For those occasions, callers should hear his “I’m in a training session” message and then be given the option to leave a voice mail message. Because this is an unusual circumstance that will override regular call processing, you will program an Override action to handle it.
9- 9
NuPoint Unified Messaging Installation & Maintenance Course
Programming the Call Flow
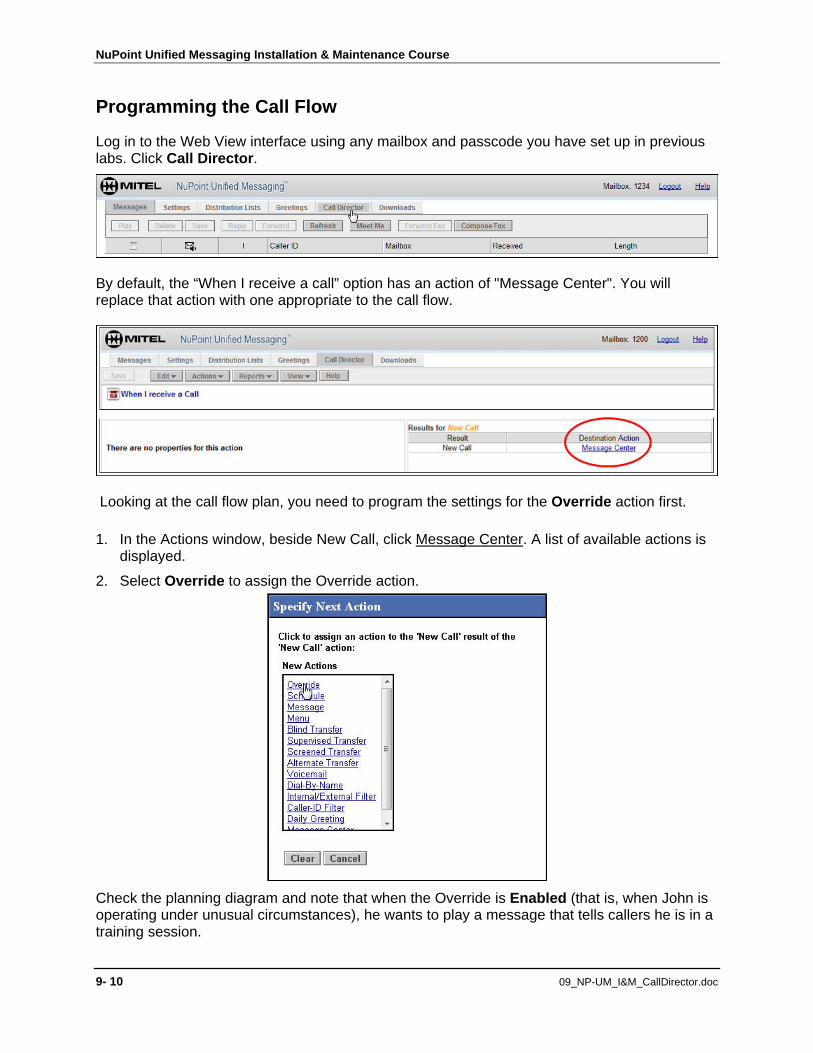
Log in to the Web View interface using any mailbox and passcode you have set up in previous labs. Click Call Director.
By default, the “When I receive a call” option has an action of "Message Center". You will replace that action with one appropriate to the call flow.
Looking at the call flow plan, you need to program the settings for the Override action first.
1. In the Actions window, beside New Call, click Message Center. A list of available actions is displayed.
2. Select Override to assign the Override action.
Check the planning diagram and note that when the Override is Enabled (that is, when John is operating under unusual circumstances), he wants to play a message that tells callers he is in a training session.
9- 10 09_NP-UM_I&M_CallDirector.doc
Call Director
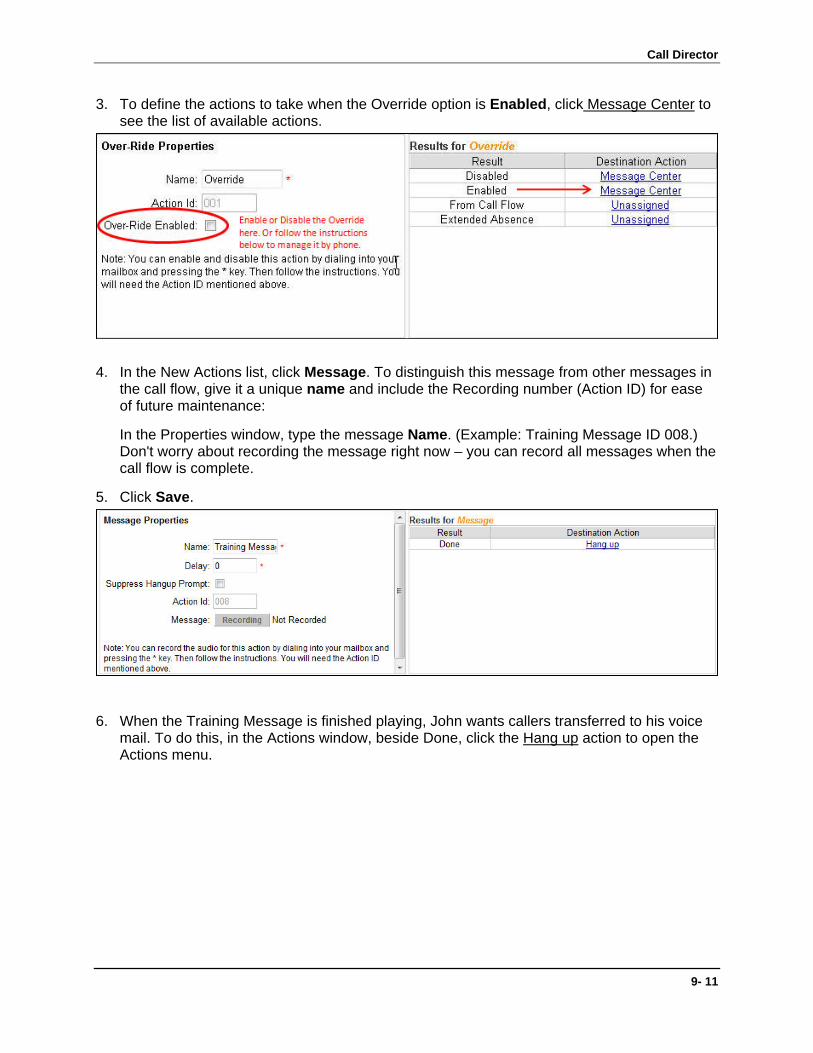
3. To define the actions to take when the Override option is Enabled, click Message Center to see the list of available actions.
4. In the New Actions list, click Message. To distinguish this message from other messages in the call flow, give it a unique name and include the Recording number (Action ID) for ease of future maintenance:
In the Properties window, type the message Name. (Example: Training Message ID 008.) Don't worry about recording the message right now – you can record all messages when the call flow is complete.
5. Click Save.
6. When the Training Message is finished playing, John wants callers transferred to his voice mail. To do this, in the Actions window, beside Done, click the Hang up action to open the Actions menu.
9- 11
NuPoint Unified Messaging Installation & Maintenance Course
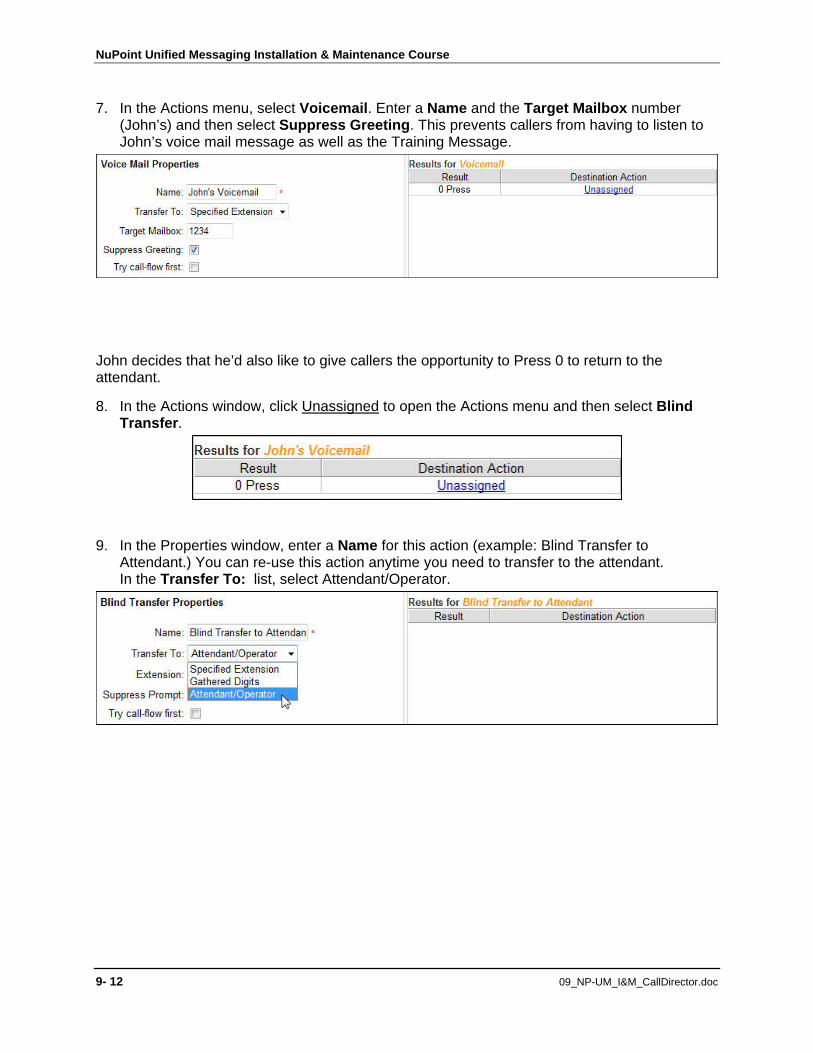
7. In the Actions menu, select Voicemail. Enter a Name and the Target Mailbox number (John’s) and then select Suppress Greeting. This prevents callers from having to listen to John’s voice mail message as well as the Training Message.
John decides that he’d also like to give callers the opportunity to Press 0 to return to the attendant.
8. In the Actions window, click Unassigned to open the Actions menu and then select Blind Transfer.
9. In the Properties window, enter a Name for this action (example: Blind Transfer to Attendant.) You can re-use this action anytime you need to transfer to the attendant. In the Transfer To: list, select Attendant/Operator.
9- 12 09_NP-UM_I&M_CallDirector.doc
Call Director
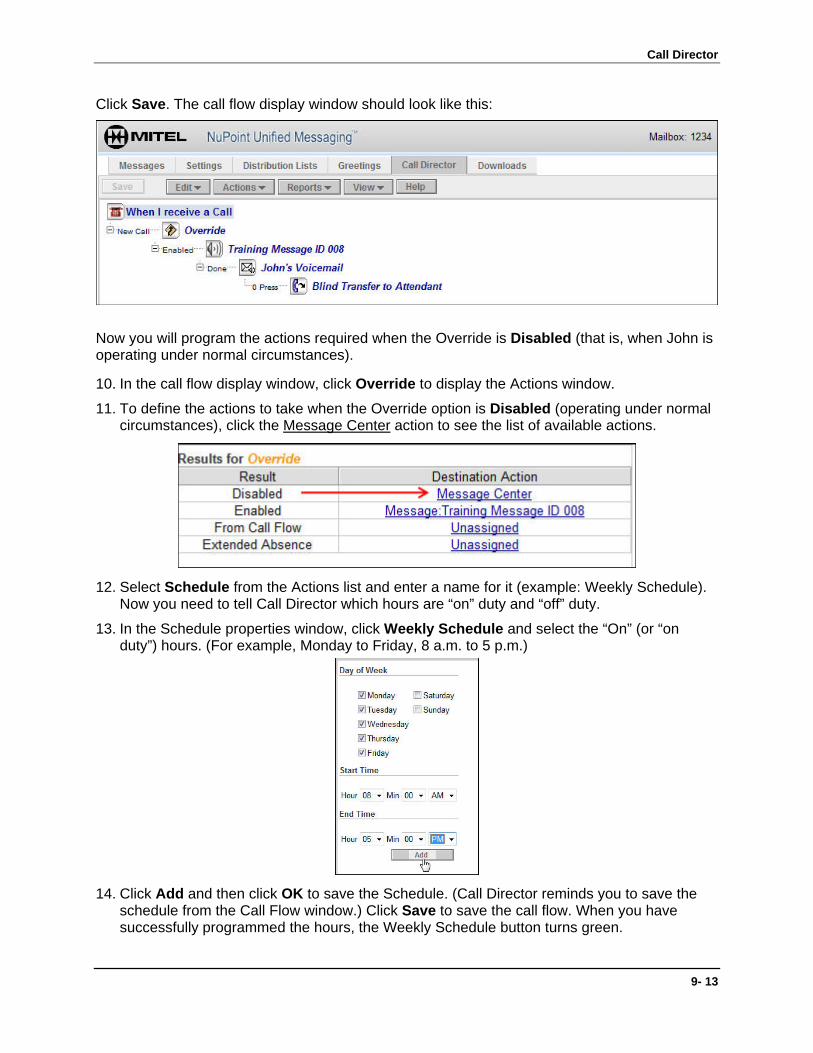
Click Save. The call flow display window should look like this:
Now you will program the actions required when the Override is Disabled (that is, when John is operating under normal circumstances).
10. In the call flow display window, click Override to display the Actions window.
11. To define the actions to take when the Override option is Disabled (operating under normal circumstances), click the Message Center action to see the list of available actions.
12. Select Schedule from the Actions list and enter a name for it (example: Weekly Schedule). Now you need to tell Call Director which hours are “on” duty and “off” duty.
13. In the Schedule properties window, click Weekly Schedule and select the “On” (or “on duty”) hours. (For example, Monday to Friday, 8 a.m. to 5 p.m.)
14. Click Add and then click OK to save the Schedule. (Call Director reminds you to save the schedule from the Call Flow window.) Click Save to save the call flow. When you have successfully programmed the hours, the Weekly Schedule button turns green.
9- 13
NuPoint Unified Messaging Installation & Maintenance Course
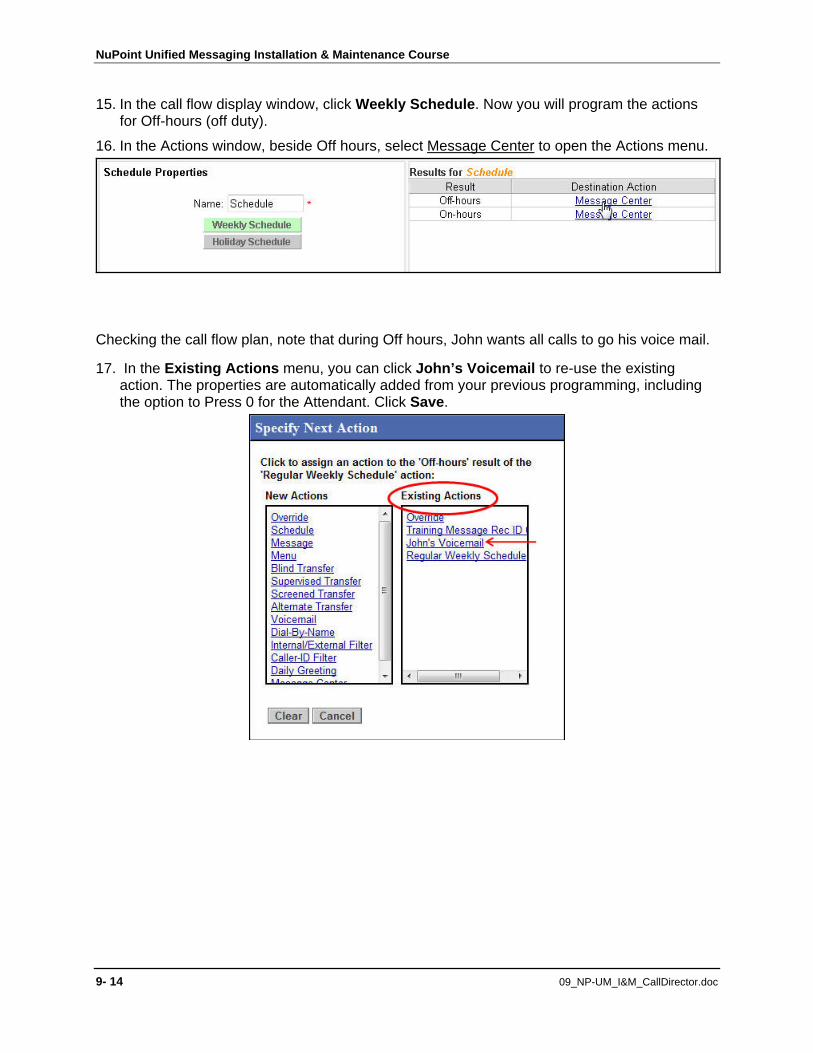
15. In the call flow display window, click Weekly Schedule. Now you will program the actions for Off-hours (off duty).
16. In the Actions window, beside Off hours, select Message Center to open the Actions menu.
Checking the call flow plan, note that during Off hours, John wants all calls to go his voice mail.
17. In the Existing Actions menu, you can click John’s Voicemail to re-use the existing action. The properties are automatically added from your previous programming, including the option to Press 0 for the Attendant. Click Save.
9- 14 09_NP-UM_I&M_CallDirector.doc
Call Director
18. Now you will program the On hours call flow.
19. In the call flow display window, click Regular Weekly Schedule.
20. In the Actions window, beside On hours, select Message Center to open the Actions menu.
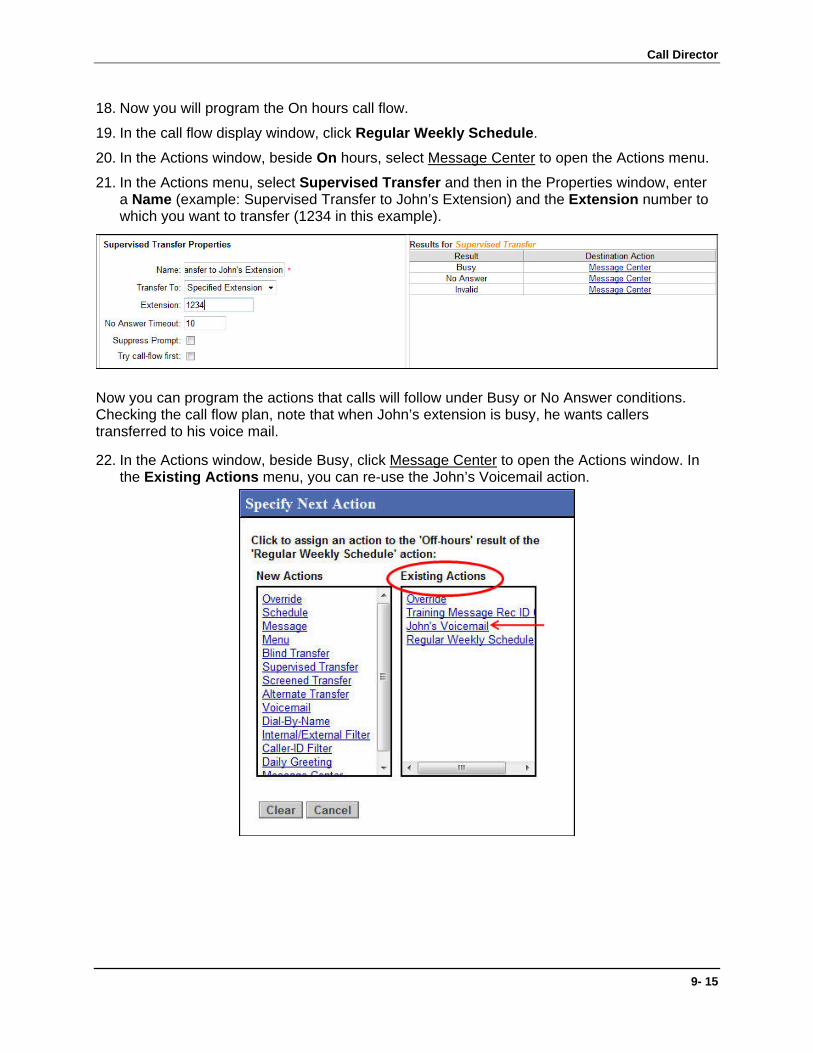
21. In the Actions menu, select Supervised Transfer and then in the Properties window, enter a Name (example: Supervised Transfer to John’s Extension) and the Extension number to which you want to transfer (1234 in this example).
Now you can program the actions that calls will follow under Busy or No Answer conditions. Checking the call flow plan, note that when John’s extension is busy, he wants callers transferred to his voice mail.
22. In the Actions window, beside Busy, click Message Center to open the Actions window. In the Existing Actions menu, you can re-use the John’s Voicemail action.
9- 15
NuPoint Unified Messaging Installation & Maintenance Course
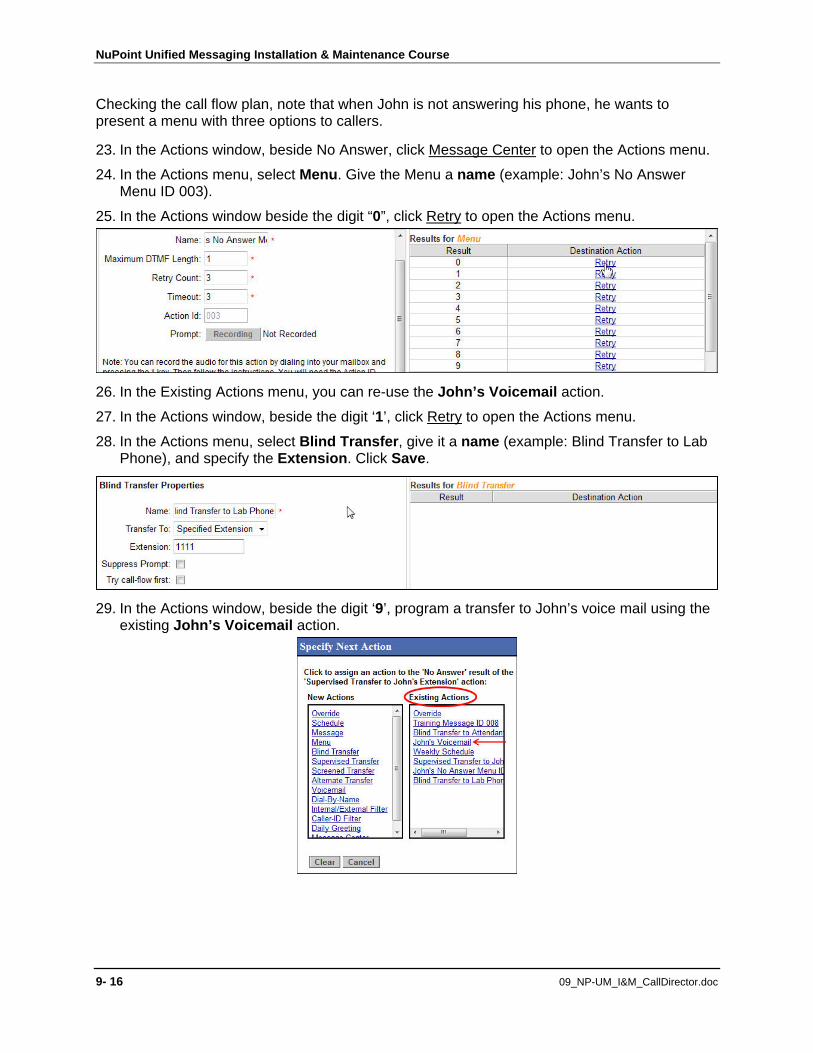
Checking the call flow plan, note that when John is not answering his phone, he wants to present a menu with three options to callers.
23. In the Actions window, beside No Answer, click Message Center to open the Actions menu.
24. In the Actions menu, select Menu. Give the Menu a name (example: John’s No Answer Menu ID 003).
25. In the Actions window beside the digit “0”, click Retry to open the Actions menu.
26. In the Existing Actions menu, you can re-use the John’s Voicemail action.
27. In the Actions window, beside the digit ‘1’, click Retry to open the Actions menu.
28. In the Actions menu, select Blind Transfer, give it a name (example: Blind Transfer to Lab Phone), and specify the Extension. Click Save.
29. In the Actions window, beside the digit ‘9’, program a transfer to John’s voice mail using the existing John’s Voicemail action.
9- 16 09_NP-UM_I&M_CallDirector.doc
Call Director
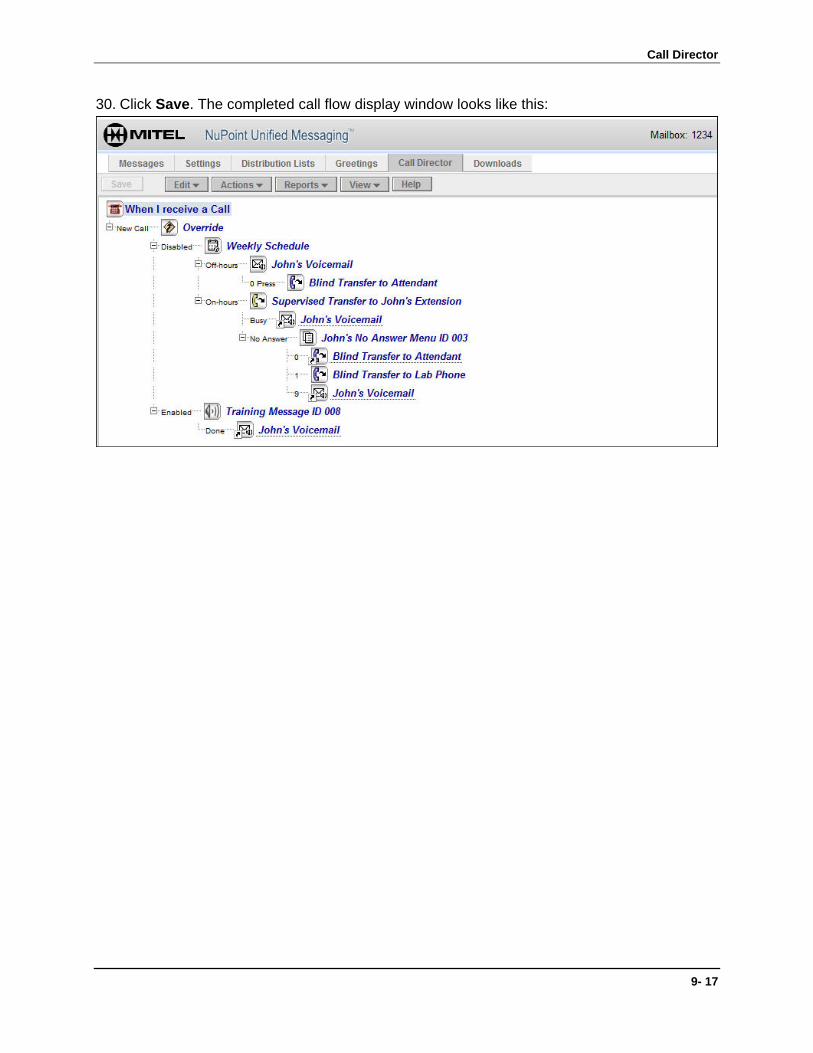
30. Click Save. The completed call flow display window looks like this:
9- 17
NuPoint Unified Messaging Installation & Maintenance Course
Recording Call Flow Messages and Greetings
Audio for call flow messages is recorded through the NuPoint UM Telephone User Interface (TUI). John's call flow requires recording two messages.
To record audio for the messages:
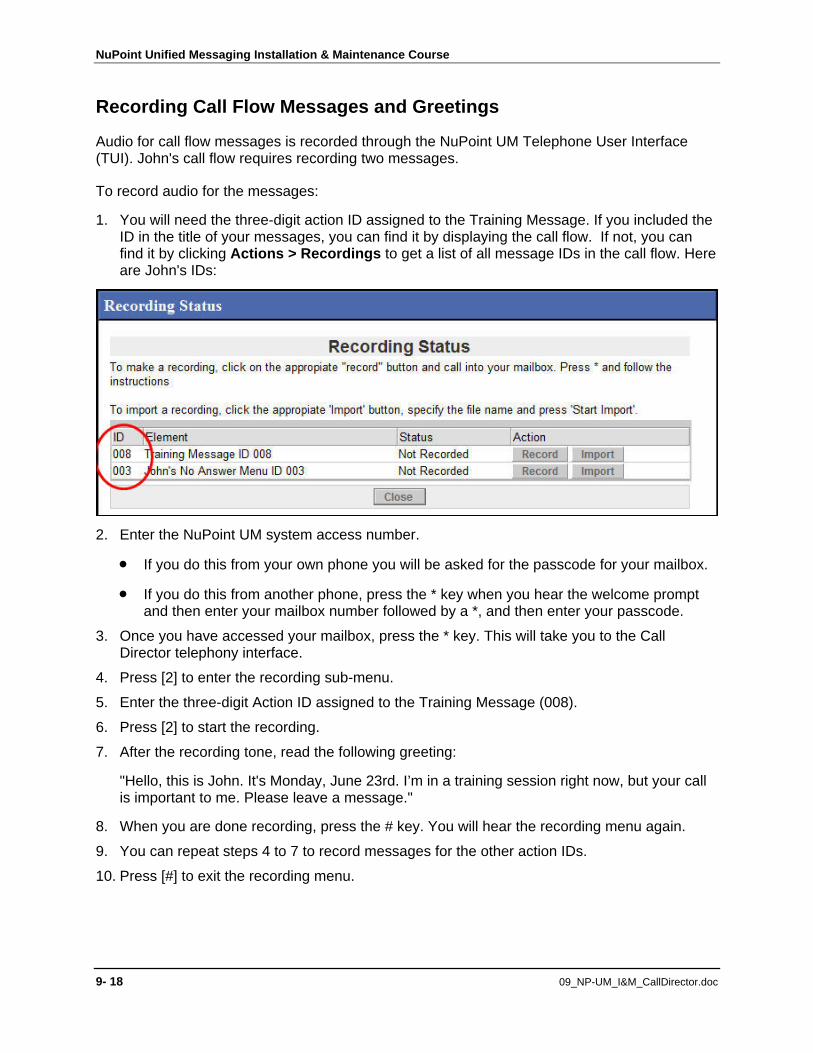
1. You will need the three-digit action ID assigned to the Training Message. If you included the ID in the title of your messages, you can find it by displaying the call flow. If not, you can find it by clicking Actions > Recordings to get a list of all message IDs in the call flow. Here are John's IDs:
2. Enter the NuPoint UM system access number.
If you do this from your own phone you will be asked for the passcode for your mailbox.
If you do this from another phone, press the * key when you hear the welcome prompt and then enter your mailbox number followed by a *, and then enter your passcode.
3. Once you have accessed your mailbox, press the * key. This will take you to the Call Director telephony interface.
4. Press [2] to enter the recording sub-menu.
5. Enter the three-digit Action ID assigned to the Training Message (008).
6. Press [2] to start the recording.
7. After the recording tone, read the following greeting:
"Hello, this is John. It's Monday, June 23rd. I’m in a training session right now, but your call is important to me. Please leave a message."
8. When you are done recording, press the # key. You will hear the recording menu again.
9. You can repeat steps 4 to 7 to record messages for the other action IDs.
10. Press [#] to exit the recording menu.
9- 18 09_NP-UM_I&M_CallDirector.doc
Call Director
9- 19
Testing Your Call Flow
If your extension is integrated with NuPoint Messaging, callers dialing your extension number are forwarded to your voice mailbox when your extension does not answer. Now that you have created a call flow for your extension, Call Director should direct the call when there is no answer at your extension, or when a Schedule or Override condition is met.
1. In the Edit Call Flow display window, click Override. In the Override Properties window, select Enable Override.
2. Place a call to John’s extension. Your call flow should answer the call with John’s “I’m on training” message and then forward you to his voice mail.
3. In the Edit Call Flow display window, click Override. In the Override Properties window, select Disable Override.
4. Ensure that the current time falls within the On hours schedule. Make John’s extension busy and then place a call to it. You should be transferred to the attendant.
5. In the Edit Call Flow display window, click Schedule and adjust the schedule so that the current day/time is NOT included in “on” hours.
6. Place a call to John’s extension. You should be directed to his voice mail.