user manual - images-na.ssl-images-amazon.com · user manual (available in a ) table of contents 1....
TRANSCRIPT
USB 3.0 to Dual SATA Hard Drive Docking Station
with Standalone Clone Function
Model 202014
Email: [email protected]
User Manual
(Available in a PDF file)

Table of Contents
1. INTRODUCTION………………………………………….…...1 1.1 Introduction
1.2 Copyright and Trademarks
1.3 FCC Compliance Statement
2. PRODUCT OVERVIEW
2.1 Package Contents
2.2 Product Description………………………………………………...2
2.3 Product Features
2.4 System Requirements
3. CONNECTION AND OPERATING INSTRUCTIONS ……...3
3.1 Diagram of connections
3.2 HDD Installation - USB Cable Mode …………..……………...….4
3.3 Formatting an HDD in Windows OS…………………………...….5
3.4 Formatting an HDD in MAC OS………………………...………....7
3.5 HDD Duplication - Cloning Mode………………………………….8
3.6 Troubleshooting Notes……………………………………………...9
4. TECHNICAL SPECIFICATIONS………………..…….…………....10
5. WARRANTY AND SUPPORT
5.1 Customer Support and Contact Information
5.2 Warranty Information
5.3 Limitations of Liability
Dual-SATA Docking Station with Cloning
www.cablematters.com

1
www.cablematters.com
Dual-SATA Docking Station with Cloning
1. Introduction
1.1 Introduction
Thank you for your purchase from Cable Matters® Inc., the ‘Reliable Connectivity’ company. This
User Manual provides an overview of the features and installation of your new
USB 3.0 to Dual-SATA Hard Drive Docking Station with Standalone Clone Function
Please read these instructions carefully before connecting, operating or configuring this product.
Please keep this manual for future reference.
Contact [email protected] for questions or product support.
1.2 Copyright and Trademarks
Specifications are subject to change without notice. Cable Matters is a registered trademark or
trademark of Cable Matters Inc. All rights reserved. All other trademarks are the property of their
respective owners.
1.3 FCC Compliance Statement
This equipment has been tested and found to comply with the limits for a Class B digital device,
pursuant to Part 15 of the FCC Rules.
2. PRODUCT OVERVIEW
2.1 Package Contents
Please check that the following items are contained in the package:
1 x Dual-Bay SATA HDD Dock & Clone Station
1 x USB 3.0 Type-A to Type-B Cable
1 x 12v 3A AC Power Adapter
1 x User Manual (available in a PDF from cablematters.com)

2
www.cablematters.com
Dual-SATA Docking Station with Cloning
2.2 Product Description The Cable Matters® Dual-Bay Dock & Clone Station supports 2.5” or 3.5” Hard Disk or Solid State SATA I/II/II drives without any tools or software drivers. Connect it to your computer or laptop for fast file transfers, data recovery or drive imaging at SuperSpeed USB 3.0 data transfer rates. Use the standalone one-button clone function for quick and secure sector by sector hard drive duplication without a computer host. The Dual-Bay Dock provides simultaneous read/write access to both drives, uses external power for stable drive performance and supports hot-swapping so you won’t need to reboot your computer.
2.3 Product Features
Supports 2.5" and 3.5" SSD/HDD SATA I/II/III hard drives up to 6TB Compact Docking Station weighs less than 1 pound One-Button standalone clone function provide fast drive duplication Supports SuperSpeed USB 3.0 data transfer rates up to 5Gbps Access both drives simultaneously from your computer Includes a bonus USB-A 3.0 cable to connect to legacy computers
2.4 System Requirements
Computer USB 3.1 computer port (with USB-C cable) USB 3.0/2.0 computer port (with USB-A cable) Supported OS Windows XP, Vista, 7, 8, 8.1, 10 Mac OS 10.6 or higher, Chrome OS Linux 2.6 or higher AC Power Available electrical outlet within 4 feet of Dock SSD/HDD 2.5 / 3.5 inch SATA I/II/III up to 4TB
3
www.cablematters.com
Dual-SATA Docking Station with Cloning
3. Connection and Operating Instructions
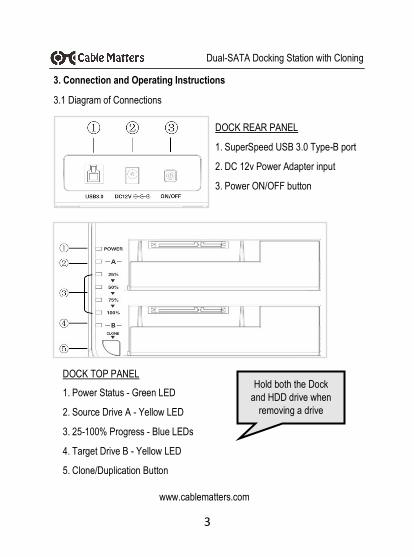
3.1 Diagram of Connections
DOCK REAR PANEL
1. SuperSpeed USB 3.0 Type-B port
2. DC 12v Power Adapter input
3. Power ON/OFF button
DOCK TOP PANEL
1. Power Status - Green LED
2. Source Drive A - Yellow LED
3. 25-100% Progress - Blue LEDs
4. Target Drive B - Yellow LED
5. Clone/Duplication Button
Hold both the Dock
and HDD drive when
removing a drive
4
www.cablematters.com
Dual-SATA Docking Station with Cloning
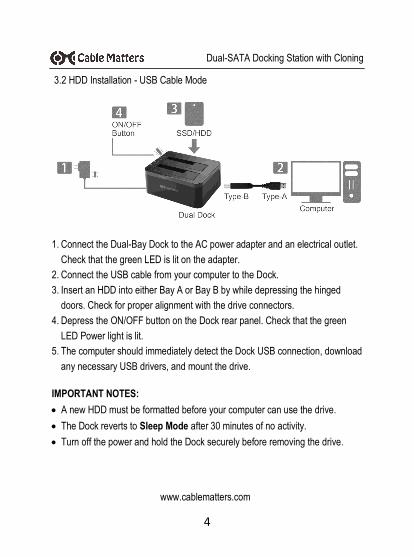
3.2 HDD Installation - USB Cable Mode
1. Connect the Dual-Bay Dock to the AC power adapter and an electrical outlet.
Check that the green LED is lit on the adapter.
2. Connect the USB cable from your computer to the Dock.
3. Insert an HDD into either Bay A or Bay B by while depressing the hinged
doors. Check for proper alignment with the drive connectors.
4. Depress the ON/OFF button on the Dock rear panel. Check that the green
LED Power light is lit.
5. The computer should immediately detect the Dock USB connection, download
any necessary USB drivers, and mount the drive.
IMPORTANT NOTES:
A new HDD must be formatted before your computer can use the drive.
The Dock reverts to Sleep Mode after 30 minutes of no activity.
Turn off the power and hold the Dock securely before removing the drive.
5
www.cablematters.com
Dual-SATA Docking Station with Cloning
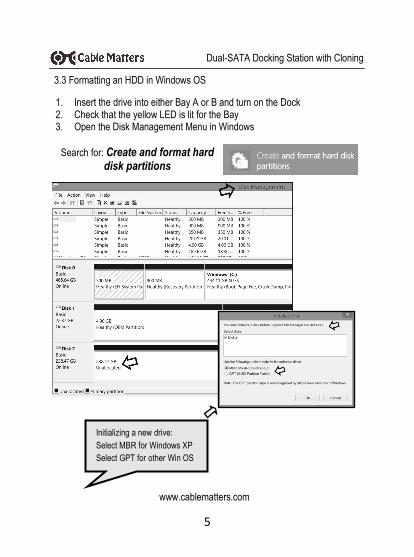
1. Insert the drive into either Bay A or B and turn on the Dock 2. Check that the yellow LED is lit for the Bay 3. Open the Disk Management Menu in Windows
Search for: Create and format hard disk partitions
3.3 Formatting an HDD in Windows OS
Initializing a new drive:
Select MBR for Windows XP
Select GPT for other Win OS

6
www.cablematters.com
Dual-SATA Docking Station with Cloning
Use the Simple Volume Wizard to perform the following functions: * Partition a drive * Format a drive * Change the drive letter * Shrink a partition * Delete a partition * Change a drive file system type
4. Initialize the drive, if prompted (see Page 5)
5. Right-Click on the unallocated drive and select New Simple Volume
6. Follow the instructions from the New Simple Volume Wizard
7. A notification window will list the successful operations. Click Finish.
The drive should now appear as Healthy in the Disk list 8. Open File Explorer to access the drive to transfer files.
9. Use the Safely Remove icon from the taskbar or the notification area before removing an HHD from the Dock
7
www.cablematters.com
Dual-SATA Docking Station with Cloning
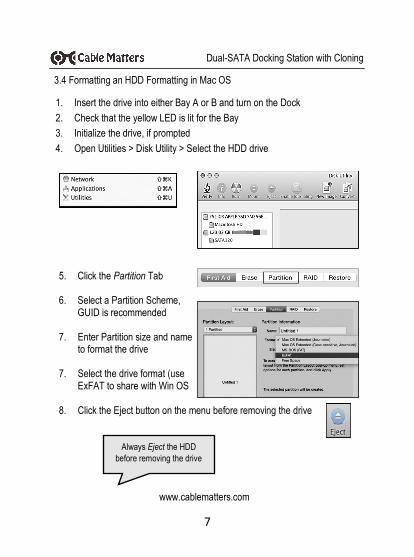
3.4 Formatting an HDD Formatting in Mac OS
1. Insert the drive into either Bay A or B and turn on the Dock
2. Check that the yellow LED is lit for the Bay
3. Initialize the drive, if prompted
4. Open Utilities > Disk Utility > Select the HDD drive
5. Click the Partition Tab 6. Select a Partition Scheme,
GUID is recommended 7. Enter Partition size and name
to format the drive 7. Select the drive format (use
ExFAT to share with Win OS 8. Click the Eject button on the menu before removing the drive
Always Eject the HDD
before removing the drive
8
www.cablematters.com
Dual-SATA Docking Station with Cloning
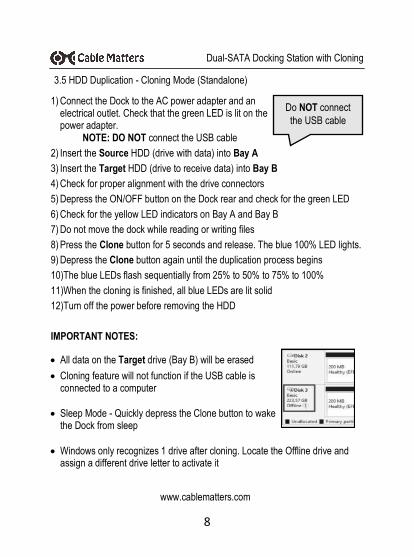
3.5 HDD Duplication - Cloning Mode (Standalone)
1) Connect the Dock to the AC power adapter and an electrical outlet. Check that the green LED is lit on the power adapter.
NOTE: DO NOT connect the USB cable
2) Insert the Source HDD (drive with data) into Bay A
3) Insert the Target HDD (drive to receive data) into Bay B
4) Check for proper alignment with the drive connectors
5) Depress the ON/OFF button on the Dock rear and check for the green LED
6) Check for the yellow LED indicators on Bay A and Bay B
7) Do not move the dock while reading or writing files
8) Press the Clone button for 5 seconds and release. The blue 100% LED lights.
9) Depress the Clone button again until the duplication process begins
10)The blue LEDs flash sequentially from 25% to 50% to 75% to 100%
11)When the cloning is finished, all blue LEDs are lit solid
12)Turn off the power before removing the HDD
IMPORTANT NOTES:
All data on the Target drive (Bay B) will be erased
Cloning feature will not function if the USB cable is connected to a computer
Sleep Mode - Quickly depress the Clone button to wake the Dock from sleep
Windows only recognizes 1 drive after cloning. Locate the Offline drive and assign a different drive letter to activate it
Do NOT connect
the USB cable
9
www.cablematters.com
Dual-SATA Docking Station with Cloning
3.6 Troubleshooting Notes
No Power: Check for the power adapter green LED. Press the ON/OFF button.
Cannot read the HDD in USB Mode: Ensure that the HDD is properly seated and the yellow Bay LED is lit
Unable to start Cloning: Target Bay B must have equal or greater storage capacity than Source Bay A. The USB cable must not be connected.
% LED indicators stop flashing during cloning: Source (A) or Target (B) may have bad data sectors preventing cloning
Drive A or B is unavailable and green power LED is blinking: Dock is in Sleep Mode. Depress Clone button quickly to resume activity.
Slow file transfer: Check that the computer host port supports USB 3.0
My computer does not recognize the adapter:
Windows: Search Device Manager > Storage controllers > USB SCSI (UAS) Mass Storage Device
Mac: Apple Menu > About this Mac > System Report > Hardware > USB > USB 3.0 SuperSpeed Bus ASMTxxxx
Contact [email protected] with a description of
your hardware configuration and your computer OS
10
www.cablematters.com
Dual-SATA Docking Station with Cloning
4. TECHNICAL SPECIFICATIONS
Hard Disk Drive Support: SATA I (1.5 Gbps), II (3 Gbps), III (6 Gbps) Hard Drives 2.5” and 3.5” SSD/HDD up to 4TB External Interfaces: USB 3.0 Type-B female Drive Connectors: SATA Data & Power Combo (7+15 pin) Receptacle Included Cable: 1 x USB 3.0 Type-A to Type-B - 4 Feet OS Support USB Host: Windows XP, Vista, 7, 8, 8.1, 10 Mac OS X 10.6 and up/ Google Chrome OS, Linux 2.6 and up Certifications: FCC, CE, RoHS Power Adapter I/O: 100-240 VAC, 50/60Hz /12v DC, 3000mA US Standard w/green LED - 4 Feet Dock LED Indicators: Green / Power Blue / Sector duplication activity Yellow / Bay A & B status activity Dock Dimensions: 5.9 x 4.5 x 2.4 Inches / 14 Ounces Warranty: Limited One-Year Note: Specifications are subject to change without notice
5. Warranty and Support
5.1 Customer Support and Contact Information
Cable Matters offers lifetime technical support as an integral part of our commitment to
provide industry leading solutions.
Email us with any questions at [email protected].
5.2 Warranty Information
This product is backed by a limited one-year warranty. The warranty covers parts and
labor costs only. Cable Matters does not warrant its products from defects or damages
arising from misuse, abuse, or normal wear.
5.3 Limitation of Liability In no event shall Cable Matters Inc. (including their officers, directors, employees or
agents) be liable for any damages (whether direct or indirect, special, punitive, incidental,
consequential, or otherwise), loss of profits, loss of business, or any pecuniary loss,
arising out of, or related to the use of this product exceeding the actual price paid for the
product (as allowed by state law).