user manual - rev - supercar lites€¦ · or aspen r102 fuel – grc lites 20 liter sunoco260 gt...
TRANSCRIPT

Page - 1 / 42
SuperCar Lites User Manual Rev.02
USER MANUAL - Rev.02

Page - 2 / 42
SuperCar Lites User Manual Rev.02
1 VIEWS OF SUPER CAR LITES ...................................................................... 3 2 DIMENSIONS .............................................................................................. 4 3 BODY COLOUR - OE ..................................................................................... 4 4 CLEANING................................................................................................... 4 5 CAPACITIES (from DRY) ............................................................................. 5 6 TECHNICAL SPECIFICATIONS ..................................................................... 5 7 SETUP ......................................................................................................... 6
7.1 SETUP ADJUSTMENT ............................................................................ 7 7.2 BELLCRANK SETTINGS ......................................................................... 8
7.2.1 FRONT BELLCRANK SETTINGS ....................................................... 8 7.2.2 REAR BELLCRANK SETTINGS ......................................................... 9
7.3 ANTI-ROLL BAR STIFFNESS SETTINGS ............................................... 10 7.3.1 FRONT ANTI-ROLL BAR STIFFNESS SETTINGS ............................ 10 7.3.2 REAR ANTI-ROLL BAR STIFFNESS SETTINGS ............................... 11
7.4 SUSPENSION SETTINGS ..................................................................... 12 7.4.1 DEFAULT SUSPENSION SETTINGS ............................................... 13
8 DASHBOARD ............................................................................................. 14 8.1 DASHBOARD INDICATOR AREAS ........................................................ 14 8.2 DASHBOARD SENSOR OUTPUT SCREENS ............................................ 15
9 EPAS ......................................................................................................... 16 9.1 CALIBRATION OF COLUMN ................................................................. 16
10 ENGINE ..................................................................................................... 17 10.1 ENGINE OPERATING INSTRUCTIONS ................................................. 17 10.2 OIL SPECIFICATION........................................................................... 18 10.3 ENGINE OPERATING BOUNDARIES .................................................... 18
11 POWER TRAIN .......................................................................................... 21 11.1 GEARBOX ........................................................................................... 21
11.1.1 GENERAL DETAILS....................................................................... 21 11.1.2 RATIO CHARTS ............................................................................ 21 11.1.3 DIFFERENTIAL ............................................................................ 21 11.1.4 LUBRICATION ............................................................................. 22 11.1.5 MAINTENTANCE .......................................................................... 22 11.1.6 DRAWINGS .................................................................................. 22
11.2 FRONT DIFFERENTIAL........................................................................ 32 11.2.1 GENERAL DETAILS....................................................................... 32 11.2.2 RATIO CHART .............................................................................. 32 11.2.3 DIFFERENTIAL ............................................................................ 32 11.2.4 LUBRICATION ............................................................................. 33 11.2.5 MAINTENANCE ............................................................................ 33 11.2.6 DRAWINGS .................................................................................. 33
11.3 REAR DISCONNECT CLUTCH ............................................................... 37 11.3.1 GENERAL DETAILS....................................................................... 37 11.3.2 TECHNICAL DETAILS ................................................................... 37 11.3.3 LUBRICATION ............................................................................. 37 11.3.4 DRAWINGS .................................................................................. 37
12 BRAKES .................................................................................................... 41 12.1 PRE-BEDDING AT ALCON ................................................................... 41 12.2 USE OF PRE_BEDDED DISCS IN COMPETITION .................................. 41 12.3 “RUNNING – IN” INSTRUCTIONS ....................................................... 42 12.4 WEAR ALLOWANCE AND MAINTENANCE ............................................ 42
12.4.1 BRAKE DISCS .............................................................................. 42 12.4.2 BRAKE PADS ................................................................................ 42
Page - 3 / 42
SuperCar Lites User Manual Rev.02
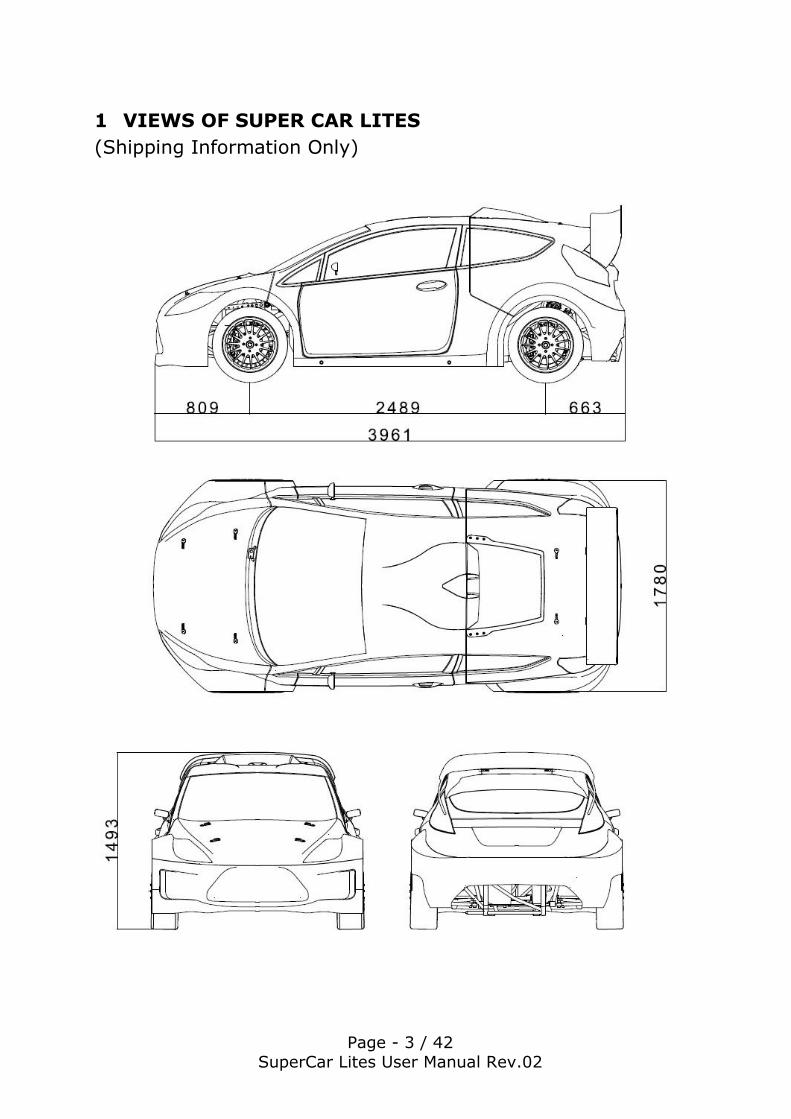
1 VIEWS OF SUPER CAR LITES
(Shipping Information Only)
Page - 4 / 42
SuperCar Lites User Manual Rev.02
2 DIMENSIONS
Overall Length 3.961 mm ±1%
Overall Width 1.780 mm ±1%
Front Axle Centerline 1.780 mm ±1%
Rear Axle Centerline 1.780 mm ±1%
Wheelbase 2.489 mm ±1%
Front Overhang 810 mm ±1%
Rear Overhang 663 mm ±1%
3 BODY COLOUR - OE
Chassis, Bonnet Front, Body Main, Body Rear, Spoiler: VW
LB9A
Wishbones, Pushrods, Bellcranks: Galvanized Coating, Color Silver Gray
Rear Progressive Pushrod: Cr3 Coating, Color Yellow
4 CLEANING
Care should be taken when using pressurized water to clean the car, especially around electronic sensors and wiring. Coils should be removed following washing and any water blown out of spark plug holes using compressed air.
The car should be started and run back to operating temperature after washing to help dry components out before storing for any length of time.

Page - 5 / 42
SuperCar Lites User Manual Rev.02
5 CAPACITIES (from DRY)
Products Quantity Specifications
Fuel (Championship depending)
20 liter P1 Racing 102RX or Aspen R102
Fuel – GRC Lites 20 liter Sunoco260 GT Plus
Engine Oil 6.7 liter 10W60
Gearbox Oil 4 liter 75W140
Coolant Distilled Water and anti–freeze
(80/20 mix)
Brake Fluid DOT4 Brake Fluid
Clutch Fluid DOT4 Brake Fluid
Rear Disconnect Clutch Oil
0.55 liter 75W140
Front Differential Oil 0.7 liter 75W140
6 TECHNICAL SPECIFICATIONS
Weight 1100 kg (non-homologated weight)
Front Suspension Push-Rod Independent Double Wishbone OHLINS TTX Adjustable
Rear Suspension Push-Rod Independent Double Wishbone OHLINS TTX Adjustable
Wheels Rims: KMC 17"X8" PCD4X108 ET60
Tires Cooper 215/40R17
Brakes ALCON 330mm ventilated brake discs with 4 piston brake calipers.
Engine 2.400 cc - SuperCar Lites
Power 310 BHP @7800rpm
Torque 300 Nm @5500rpm
Rev Cut @8000rpm
Oil Type 10W60
Page - 6 / 42
SuperCar Lites User Manual Rev.02
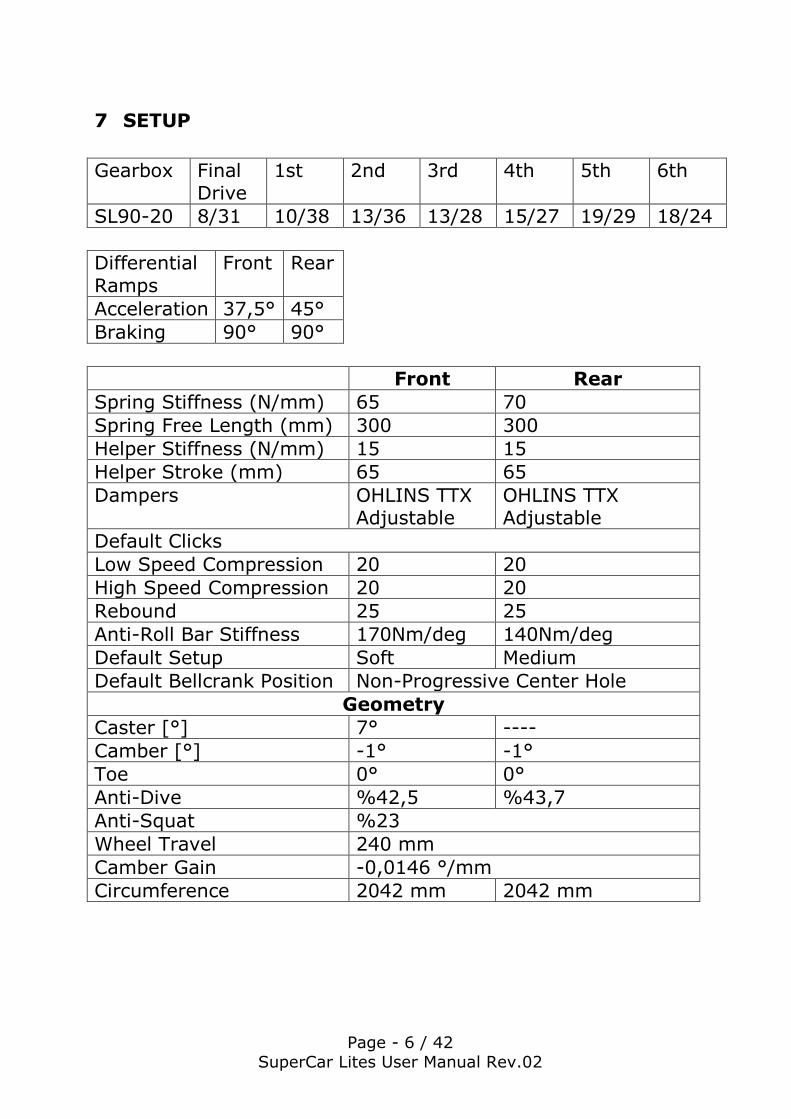
7 SETUP
Gearbox Final Drive
1st 2nd 3rd 4th 5th 6th
SL90-20 8/31 10/38 13/36 13/28 15/27 19/29 18/24
Differential Ramps
Front Rear
Acceleration 37,5° 45°
Braking 90° 90°
Front Rear
Spring Stiffness (N/mm) 65 70
Spring Free Length (mm) 300 300
Helper Stiffness (N/mm) 15 15
Helper Stroke (mm) 65 65
Dampers OHLINS TTX Adjustable
OHLINS TTX Adjustable
Default Clicks
Low Speed Compression 20 20
High Speed Compression 20 20
Rebound 25 25
Anti-Roll Bar Stiffness 170Nm/deg 140Nm/deg
Default Setup Soft Medium
Default Bellcrank Position Non-Progressive Center Hole
Geometry
Caster [°] 7° ----
Camber [°] -1° -1°
Toe 0° 0°
Anti-Dive %42,5 %43,7
Anti-Squat %23
Wheel Travel 240 mm
Camber Gain -0,0146 °/mm
Circumference 2042 mm 2042 mm
Page - 7 / 42
SuperCar Lites User Manual Rev.02
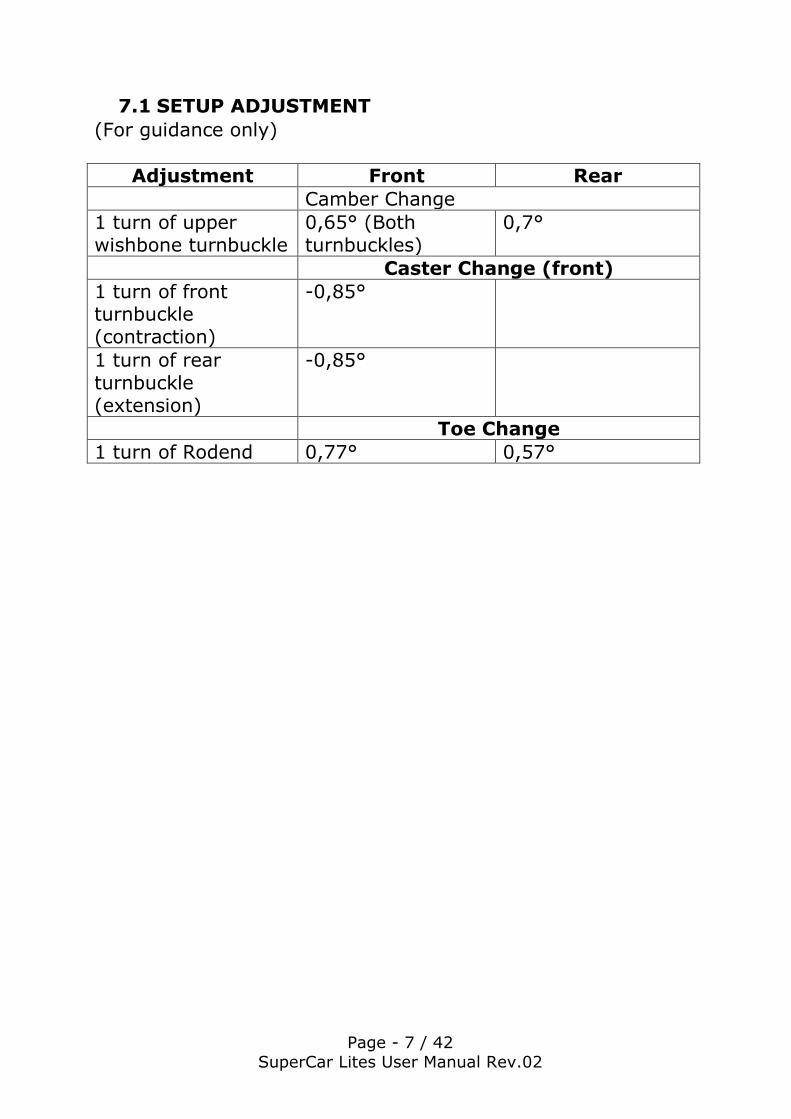
7.1 SETUP ADJUSTMENT
(For guidance only)
Adjustment Front Rear
Camber Change
1 turn of upper wishbone turnbuckle
0,65° (Both turnbuckles)
0,7°
Caster Change (front)
1 turn of front turnbuckle (contraction)
-0,85°
1 turn of rear
turnbuckle (extension)
-0,85°
Toe Change
1 turn of Rodend 0,77° 0,57°

Page - 8 / 42
SuperCar Lites User Manual Rev.02
7.2 BELLCRANK SETTINGS
7.2.1 FRONT BELLCRANK SETTINGS
There are two operations modes for the front suspension:
Suspension Mounted to Point A: Non-Progressive Motion Suspension Mounted to Point B: Progressive Motion
Both modes have three individual stiffness options providing different motion ratios, accompanied with different wheel travel values. Predifined front bellcrank positions and their effects on suspension motion ratios are:
Motion Ratio
Chassis Mounting
Point
Bellcrank Mounting
Point
Wheel Travel (mm)
Full Rebound
Full Compression
Non-Progressive Motion
A 1 240 0,58 0,71
A 2 210 0,66 0,83
A 3 180 0,76 1,00
Progressive Motion
B 4 240 0,52 0,83
B 5 210 0,58 1,00
B 6 180 0,66 1,25

Page - 9 / 42
SuperCar Lites User Manual Rev.02
7.2.2 REAR BELLCRANK SETTINGS
There are two operations modes for the rear suspension:
A) Pushrod Length l=300mm: Non-Progressive Motion Pushrod color: Silver Gray, code AV4015
B) Pushrod Length l=330mm: Progressive Motion
Pushrod color: Yellow, code AV4145 Both modes have three individual stiffness options providing different motion ratios, accompanied with different wheel travel values. Predefined rear bellcrank positions and their effects on suspension motion ratios are:
Motion Ratio
Pushrod Length
Bellcrank Mounting Point
Wheel Travel (mm)
Full Rebound
Full Compression
Non-Progressive Motion
A - 300mm 1 240 0,58 0,71
A - 300mm 2 210 0,66 0,83
A - 300mm 3 180 0,83 0,90
Progressive Motion
B - 330mm 4 240 0,50 0,77
B - 330mm 5 210 0,58 0,90
B - 330mm 6 180 0,66 1,11

Page - 10 / 42
SuperCar Lites User Manual Rev.02
7.3 ANTI-ROLL BAR STIFFNESS SETTINGS
7.3.1 FRONT ANTI-ROLL BAR STIFFNESS SETTINGS
There are 3 different stiffness settings for front Anti-Roll Bar:
Soft: Both (Left&Right) Anti-Roll Bar push rods on Position A.
Stiff: Both (Left&Right) Anti-Roll Bar push rods on Position B.
None: Removal of one Anti-Rollbar drop link.
Page - 11 / 42
SuperCar Lites User Manual Rev.02
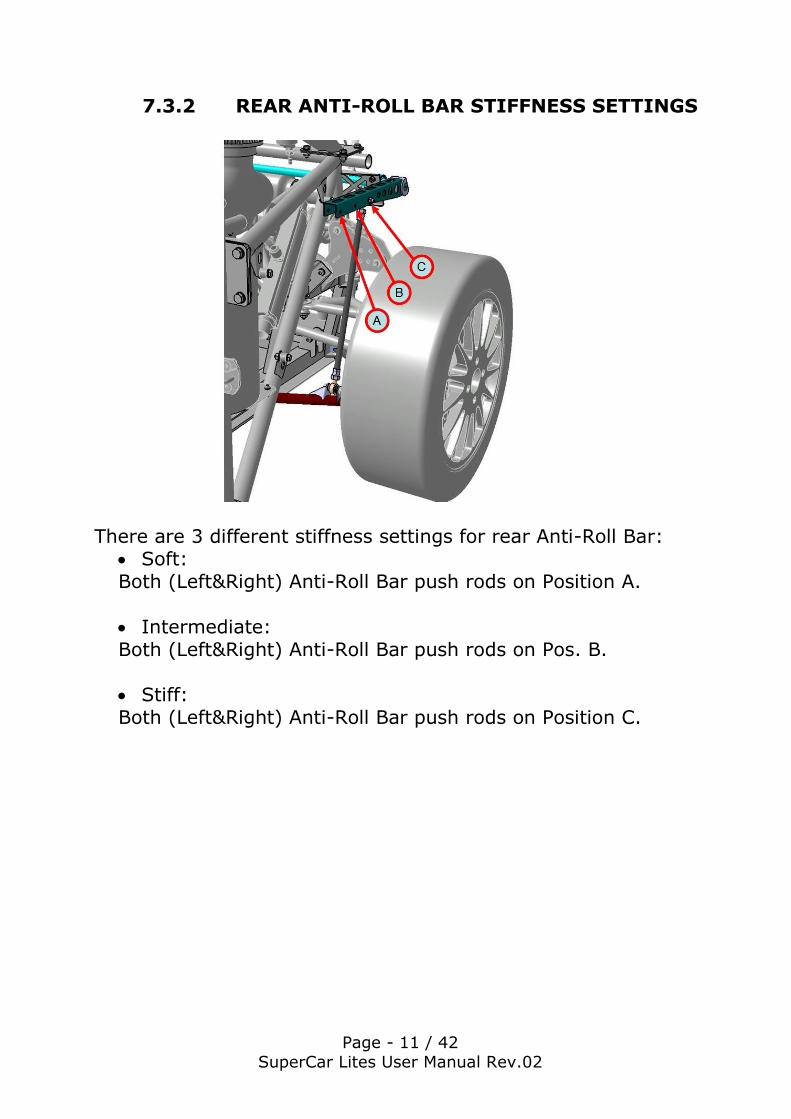
7.3.2 REAR ANTI-ROLL BAR STIFFNESS SETTINGS
There are 3 different stiffness settings for rear Anti-Roll Bar:
Soft: Both (Left&Right) Anti-Roll Bar push rods on Position A.
Intermediate: Both (Left&Right) Anti-Roll Bar push rods on Pos. B.
Stiff: Both (Left&Right) Anti-Roll Bar push rods on Position C.
Page - 12 / 42
SuperCar Lites User Manual Rev.02
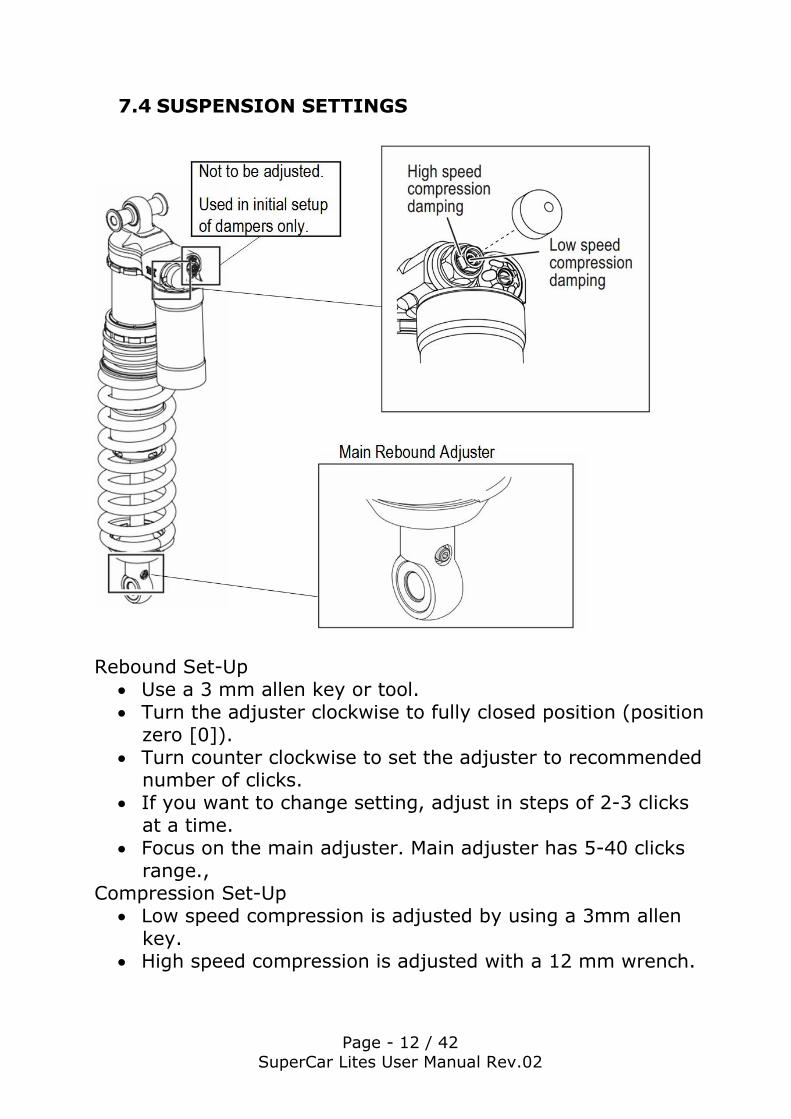
7.4 SUSPENSION SETTINGS
Rebound Set-Up
Use a 3 mm allen key or tool. Turn the adjuster clockwise to fully closed position (position
zero [0]). Turn counter clockwise to set the adjuster to recommended
number of clicks. If you want to change setting, adjust in steps of 2-3 clicks
at a time. Focus on the main adjuster. Main adjuster has 5-40 clicks
range., Compression Set-Up
Low speed compression is adjusted by using a 3mm allen key.
High speed compression is adjusted with a 12 mm wrench.

Page - 13 / 42
SuperCar Lites User Manual Rev.02
We recommend you to adjust low speed compression in steps of
2-3 clicks and high speed 3-5 clicks to fine tune the set up. The low speed adjuster has approximately 40 clicks and high speed 50 clicks. To reset compression
Turn the adjuster clockwise to fully closed position (position zero [0]). Then, turn counter clock-wise to open, and count the clicks until you reach the recommended number of clicks. See recommended Set-up data in the Mounting Instructions for each shock absorber/strut.
CAUTION Do not use force, delicate sealing surfaces can be damaged. Hand tighten only.
7.4.1 DEFAULT SUSPENSION SETTINGS
For Front and Rear Suspensions the default settings are as below:
Rebound High Speed
Compression
Low Speed
Compression
Front 25 20 20
Rear 25 20 20

Page - 14 / 42
SuperCar Lites User Manual Rev.02
8 DASHBOARD
8.1 DASHBOARD INDICATOR AREAS
RPM Indicator: Corresponding LEDs light up at indicated engine rpm.
Oil Pressure: Displays the current oil pressure. Oil Pressure Alarm: 3 LEDs light up if pressure is below 1,5
bar. Battery Voltage: Displays the current battery voltage. Menu Selection: Switches between sensor displays. Engine Coolant Temperature: Displays the current coolant
temperature. Engine Coolant Temperature Alarm: 3 LEDs light up if
temperature is above 100°C. EPAS Power Level Adjuster: Adjusts the power level of
EPAS. CW softer, CCW stiffer

Page - 15 / 42
SuperCar Lites User Manual Rev.02
8.2 DASHBOARD SENSOR OUTPUT SCREENS
Screens can be switched by using menu selection buttons.
Throttle Position: Displays the current throttle position over 100.
Lambda Sensor Output: Displays the current lambda sensor reading.
Oil Temperature: Displays the current oil temperature. Fuel Pressure: Displays the current fuel pressure.

Page - 16 / 42
SuperCar Lites User Manual Rev.02
9 EPAS
The vehicle is equipped with an Electrical Power Assist System. The user can adjust the level of assistance with the EPAS Power Level Adjuster next to the Dashboard pictured below: CW softer, CCW stiffer
9.1 CALIBRATION OF COLUMN
It is normal for the steering wheel to move on initial power up and during calibration. Do not attempt to hold the wheel at this time or the settings may become corrupted.
Set Power Level Adjuster fully counter clockwise. Switch on “Electronics +12v” until LED (next to the Power
Level Adjuster) lights up. Immediately switch off and then back on until LED lights again.
Continue to do this 3 more times until on the 4th time the LED lights and flashes, this is the calibration phase.
The LED will extinguish at the end of calibration when you
can now use the system. Calibration only needs to be carried out once at installation as the settings will be retained even when power is removed. If any unexpected behavior is observed with the EPAS, the owner shall contact the car manufacturer.

Page - 17 / 42
SuperCar Lites User Manual Rev.02
10 ENGINE
10.1 ENGINE OPERATING INSTRUCTIONS
The following should be carried out immediately prior to operating the engine:
The engine should be operated with Sunoco 260GT Plus fuel. Agreement to use another other fuel should be made with Mountune prior to engine operation.
Water level should be checked in the header tank and set
to the mid position on the sight gauge. Additives such as water wetter can be used, or antifreeze where allowed(80/20 mix).
With the ignition and fuel pumps on, the static fuel pressure should be set to 4bar by adjusting the fuel pressure regulator.
The engine should be cranked on the starter motor, with the ignition turned off to achieve oil pressure, (with the spark plugs removed to reduce the load on the big end bearings, if the engine is being started for the first time or after standing for a long period). The cranking duration
should be limited to 5 second duration. If oil pressure is not achieved after 3 cranking events, please contact Mountune before taking any other action.
If oil pressure is successfully achieved, switch ignition on and start the engine. Allow the engine to run until water temperature reaches 85C. Check during this warm up running that the engine and its installation are free from leaks.
Oil level should be checked following this warm up run. Complete installation lap (where possible). Check water temperature on track is within specified guidelines, and
adjust radiator blanks as required to achieve this. If an engine failure occurs please contact Mountune Racing before taking any action, so as to avoid the loss of any evidence which may help understand the failure.

Page - 18 / 42
SuperCar Lites User Manual Rev.02
10.2 OIL SPECIFICATION
A fully synthetic oil of viscosity range 10W60 should be used such as Castrol, Shell Racing, Royal Purple or Mobil 1.
10.3 ENGINE OPERATING BOUNDARIES
The following operating limits for the engine should be observed. Engine speed
Maximum – 8200 rpm Engine idle speed at operating temperature - 1800 rpm
(TPS should be set to 4 – 4.5%) Engine speed >9000 rpm – Advise engine is removed.
Water Temperature
Maximum temperature – 100°C* Desired operating range – 75-85°C *Short excursions / heat soak (less than 90 seconds) above
this temperature during start line procedures etc. will be accepted
Oil temperature
Maximum temperature – 130°C Desired operating range – 90 - 120°C
Oil pressure
Typical observed oil pressure at 110°C oil temp
Minimum oil pressure at engine idle speed – 1.5bar @ 1800 rpm

Page - 19 / 42
SuperCar Lites User Manual Rev.02
Fuel pressure
Static pressure – 4bar *If the above operating conditions are exceeded Mountune Racing will decide either to remove the engine, or to continue to use the engine with a reduced life. Engine Management Safety Strategies Mountune Racing utilizes a number of safety strategies within the engine management system to assist in protecting the engine from operation outside of the operating conditions. These are as follows: Engine Speed
Engine rev limit – set to 8200 rpm Engine rev cut – set to 8300 rpm Engine oil temp rev limit – below 65°C and above 130°C oil
temp a reduced rev limit is engaged – soft cut Engine coolant temp rev limit – below 65°C and above
100°C water temp a reduced rev limit is engaged – soft cut Pressure Protection
Low oil pressure – as oil pressure decreases below protect
value, an oil pressure cut trip timer is started. If oil pressure cut trip timer exceeds 1.5 seconds a complete engine cut is applied.
Oil Level
The oil level should be run just below the top baffle, or between 18-20cm from the bottom of the dry sump tank.

Page - 20 / 42
SuperCar Lites User Manual Rev.02
This should be checked before every run, it is the team’s
responsibility to do this. Data Analysis
AEM/engine data should be checked after every run to ensure maximum engine performance, this is the team’s responsibility.
Service Intervals The following service intervals should be observed:
Engine – Mountune recommend engines should be serviced at the end of each season
Oil and Filter - replace every 300km FEAD belt - replace on condition. Air filter – clean and inspect after every race, and replace
on condition, check airbox is sealing correctly Inlet – should be inspected and maintained after every
event. Sent back to mountune for servicing at the end of each season.
Alternator bracket o-ring bushes – replaced on condition, no longer than 3 events apart.
Water radiator and pipe work – pressure test, replace on
condition Oil cooler and pipe work – pressure test, replace on
condition Catalyst – replace on condition
Important: In the event of an engine failure - the complete oil system should be drained, flushed through and thoroughly cleaned. In this case the Laminova oil cooler should be replaced and NOT re-used. When the new engine is installed the AIM dash should be reset to ZERO engine running hours.
Page - 21 / 42
SuperCar Lites User Manual Rev.02
11 POWER TRAIN
11.1 GEARBOX
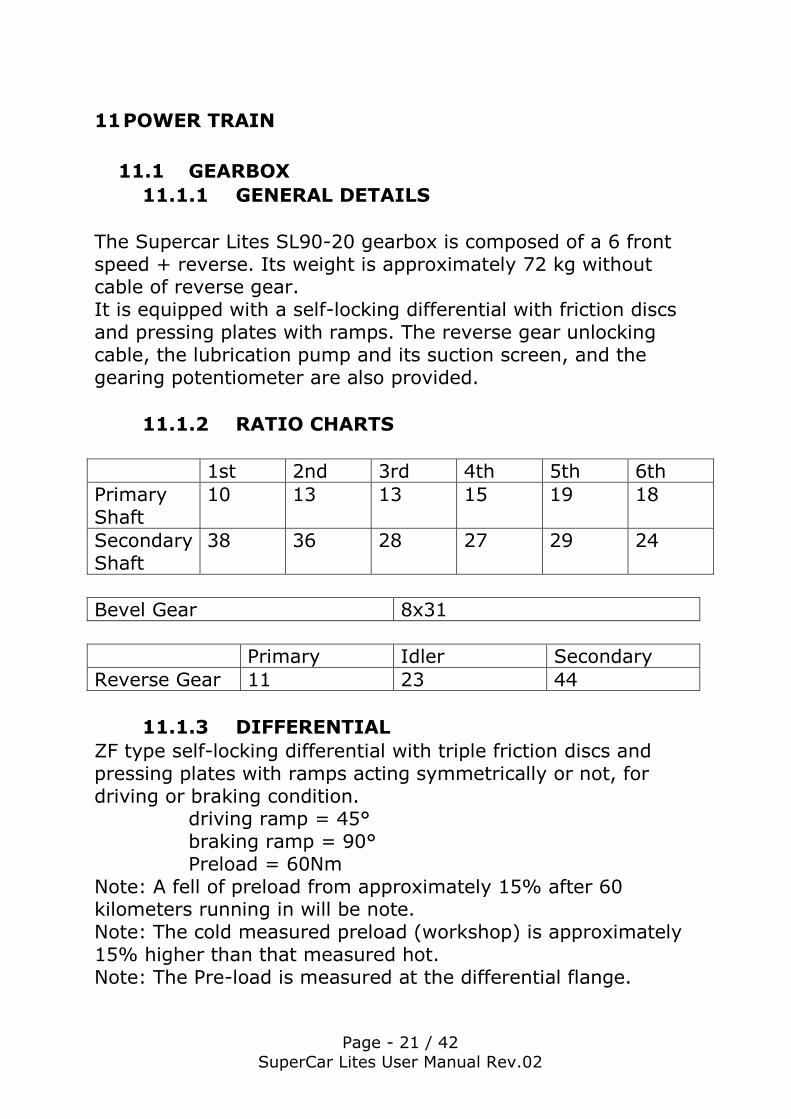
11.1.1 GENERAL DETAILS
The Supercar Lites SL90-20 gearbox is composed of a 6 front speed + reverse. Its weight is approximately 72 kg without cable of reverse gear. It is equipped with a self-locking differential with friction discs and pressing plates with ramps. The reverse gear unlocking cable, the lubrication pump and its suction screen, and the
gearing potentiometer are also provided.
11.1.2 RATIO CHARTS
1st 2nd 3rd 4th 5th 6th
Primary Shaft
10 13 13 15 19 18
Secondary Shaft
38 36 28 27 29 24
Bevel Gear 8x31
Primary Idler Secondary
Reverse Gear 11 23 44
11.1.3 DIFFERENTIAL
ZF type self-locking differential with triple friction discs and pressing plates with ramps acting symmetrically or not, for driving or braking condition.
driving ramp = 45° braking ramp = 90° Preload = 60Nm
Note: A fell of preload from approximately 15% after 60 kilometers running in will be note. Note: The cold measured preload (workshop) is approximately 15% higher than that measured hot. Note: The Pre-load is measured at the differential flange.
Page - 22 / 42
SuperCar Lites User Manual Rev.02
11.1.4 LUBRICATION
Oil Capacity (from dry): 4 Liters
1st Drain Drain Frequency Viscosity
After a 50km running-in
Each Meeting 75W140
- Particular Precautions No additives should be added to the oil. The resulting consequences are not in any circumstances covered by Supercar Lites. When topping up the rear differential oil, do not mix any other oil with that already in the box. Refill capacity may be lower than the dry capacity listed above. Overfilling will result with oil breather tank overflowing. - Storage and Use Be particularly careful with any bottles which are open when used:
Close the bottle again properly after use to prevent the introduction of water or dirt.
Store bottles horizontally, protected from severe weather. Do not store bottles close to a washing station.
Do not decant the oil into larger containers.
11.1.5 MAINTENTANCE
- Washing Under Pressure When the rear differential is removed, seal all openings correctly to prevent the ingress of water into the rear differential. - Glued components Glue components and tightening torque are shown in the 3D exploded view. WARNING: Glue components have been chosen during test sessions. Only ‘Loctite’ brand components must be used. Sadev can’t ensure consequences of false glue component choice.
11.1.6 DRAWINGS
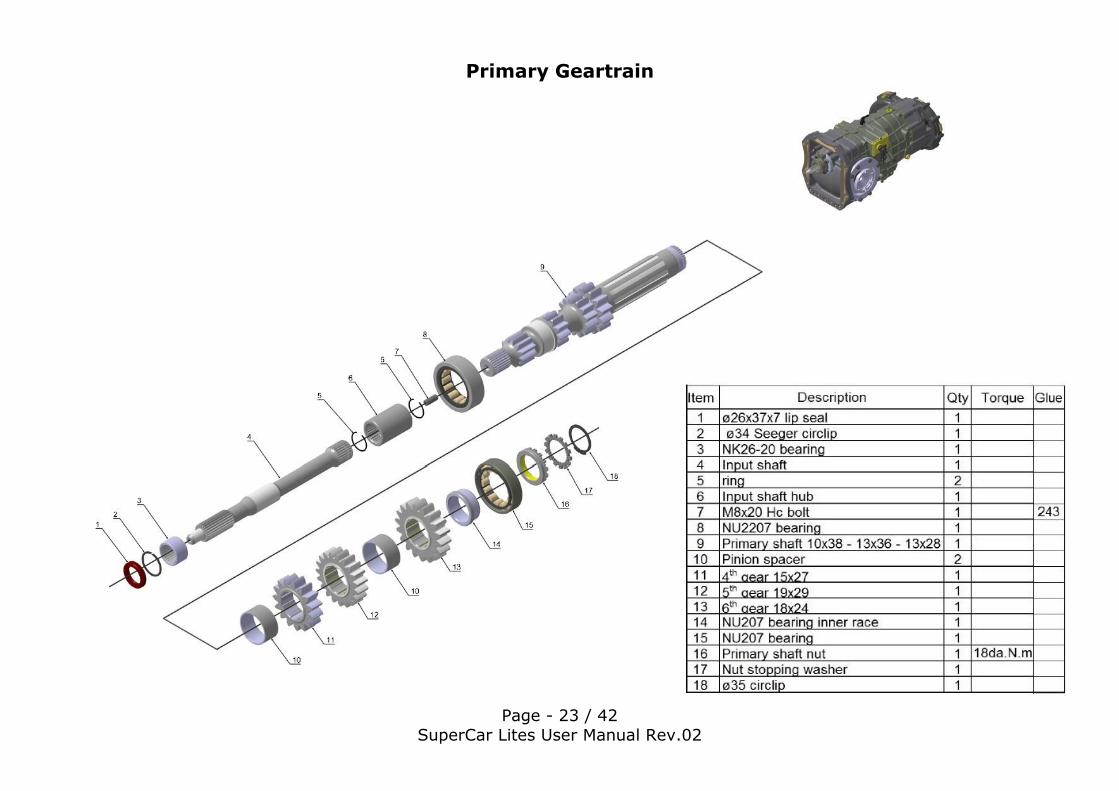
Page - 23 / 42
SuperCar Lites User Manual Rev.02
Primary Geartrain

Page - 24 / 42
SuperCar Lites User Manual Rev.02
Secondary Geartrain
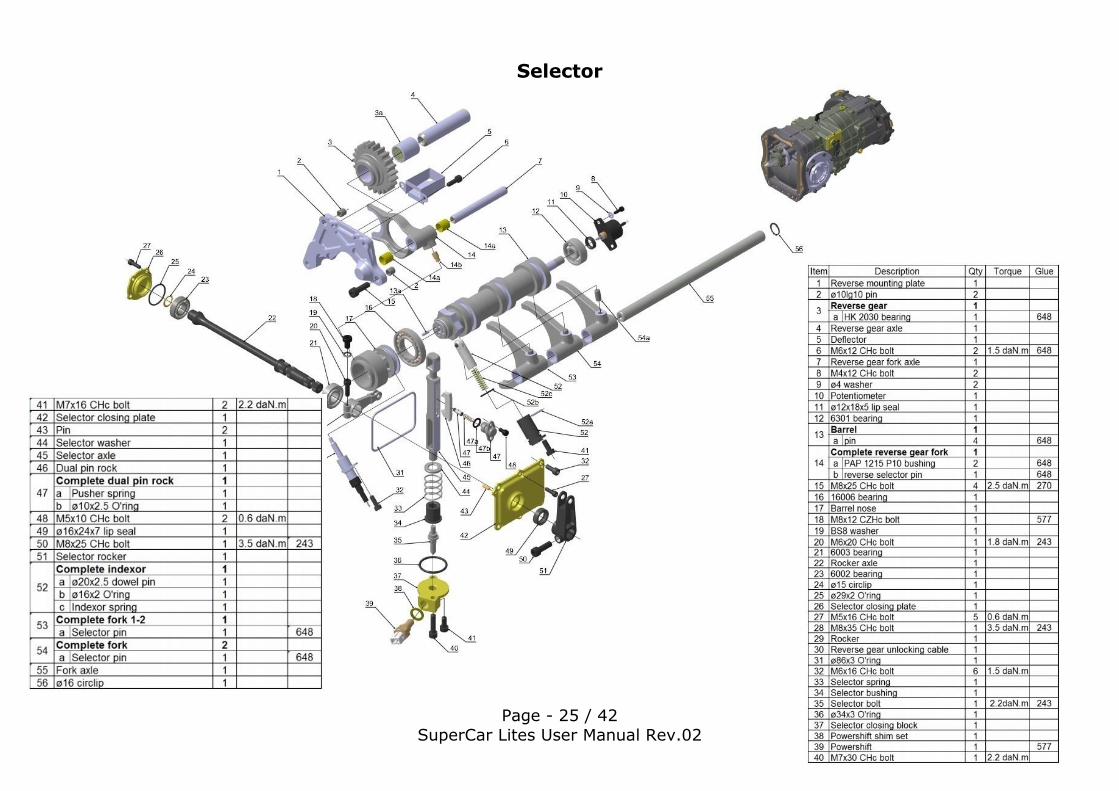
Page - 25 / 42
SuperCar Lites User Manual Rev.02
Selector
Page - 26 / 42
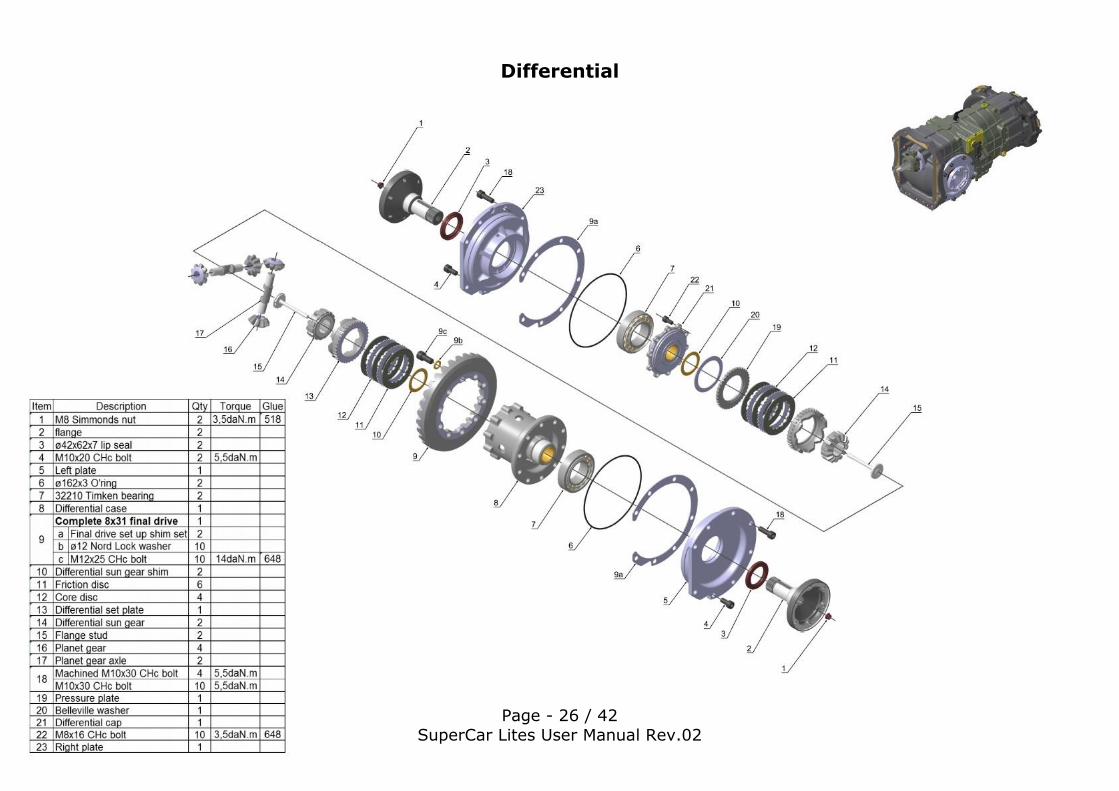
SuperCar Lites User Manual Rev.02
Differential

Page - 27 / 42
SuperCar Lites User Manual Rev.02
Rear Housing

Page - 28 / 42
SuperCar Lites User Manual Rev.02
Clutch Accessories
Page - 29 / 42
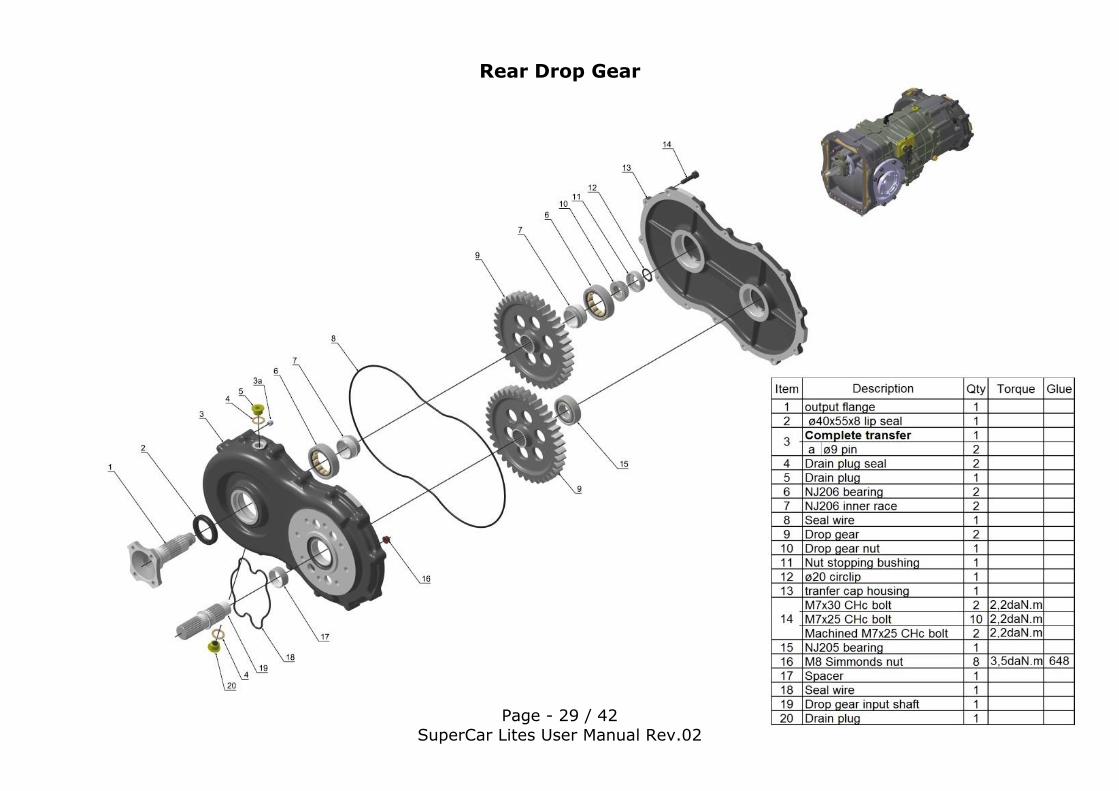
SuperCar Lites User Manual Rev.02
Rear Drop Gear

Page - 30 / 42
SuperCar Lites User Manual Rev.02
Rear and Front Driveshaft
Page - 31 / 42
SuperCar Lites User Manual Rev.02
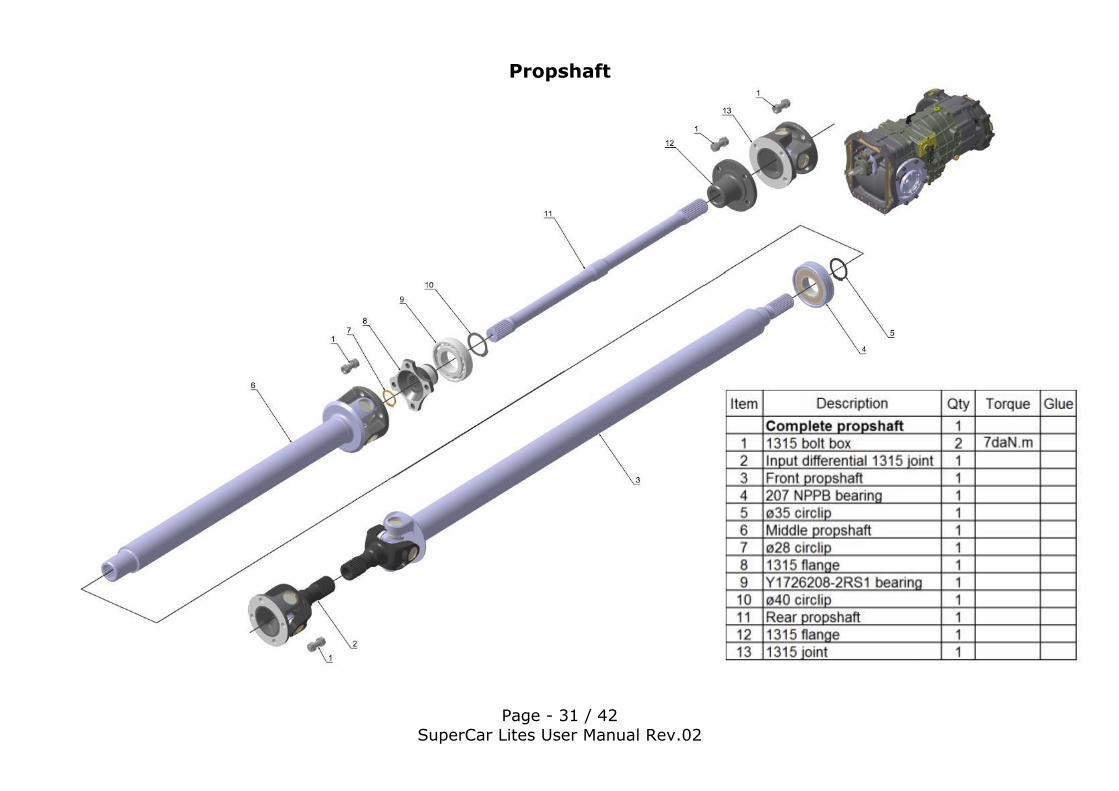
Propshaft
Page - 32 / 42
SuperCar Lites User Manual Rev.02
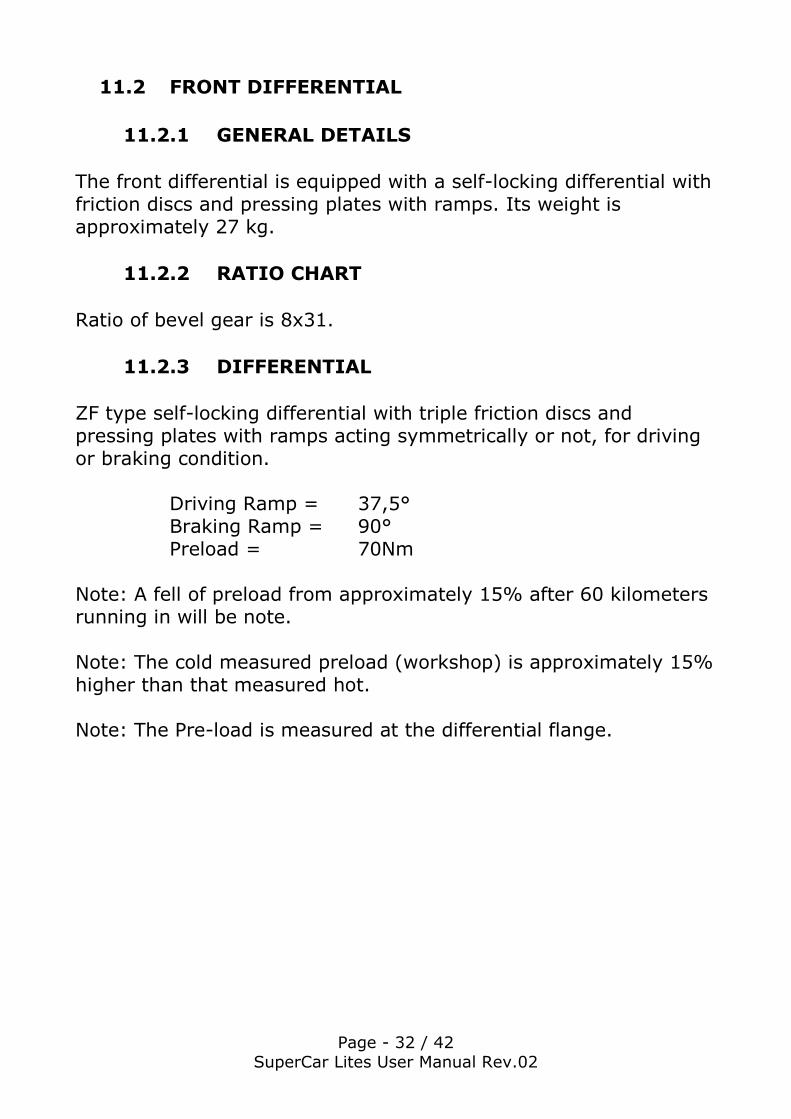
11.2 FRONT DIFFERENTIAL
11.2.1 GENERAL DETAILS
The front differential is equipped with a self-locking differential with friction discs and pressing plates with ramps. Its weight is approximately 27 kg.
11.2.2 RATIO CHART
Ratio of bevel gear is 8x31.
11.2.3 DIFFERENTIAL
ZF type self-locking differential with triple friction discs and pressing plates with ramps acting symmetrically or not, for driving or braking condition.
Driving Ramp = 37,5° Braking Ramp = 90° Preload = 70Nm
Note: A fell of preload from approximately 15% after 60 kilometers running in will be note. Note: The cold measured preload (workshop) is approximately 15% higher than that measured hot. Note: The Pre-load is measured at the differential flange.

Page - 33 / 42
SuperCar Lites User Manual Rev.02
11.2.4 LUBRICATION
Oil Capacity (from dry): 0,7 Liter
1st Drain Drain Frequency Viscosity
After a 50km running-in
Each Meeting 75W140
- Particular Precautions No additives should be added to the oil. The resulting consequences are not covered by Supercar Lites. When topping up the front differential oil, do not mix any other oil with that already in the box. Refill capacity may be lower than the dry capacity listed above.
Overfilling will result with oil breather tank overflowing. - Storage and Use Be particularly careful with any bottles which are open when used:
Close the bottle again properly after use to prevent the introduction of water or dirt.
Store bottles horizontally, protected from severe weather. Do not store bottles close to a washing station. Do not decant the oil into larger containers.
11.2.5 MAINTENANCE
- Washing Under Pressure When the front differential is removed, seal all openings correctly to prevent the ingress of water into the front differential. - Glued Components Glue components and tightening torque are shown in the 3D exploded view. WARNING: Glue components have been chosen during test sessions. Only
‘Loctite’ brand components must be used. Sadev can’t ensure consequences of false glue component choice.
11.2.6 DRAWINGS

Page - 34 / 42
SuperCar Lites User Manual Rev.02
Front Input Shaft

Page - 35 / 42
SuperCar Lites User Manual Rev.02
Front Differential
Page - 36 / 42
SuperCar Lites User Manual Rev.02
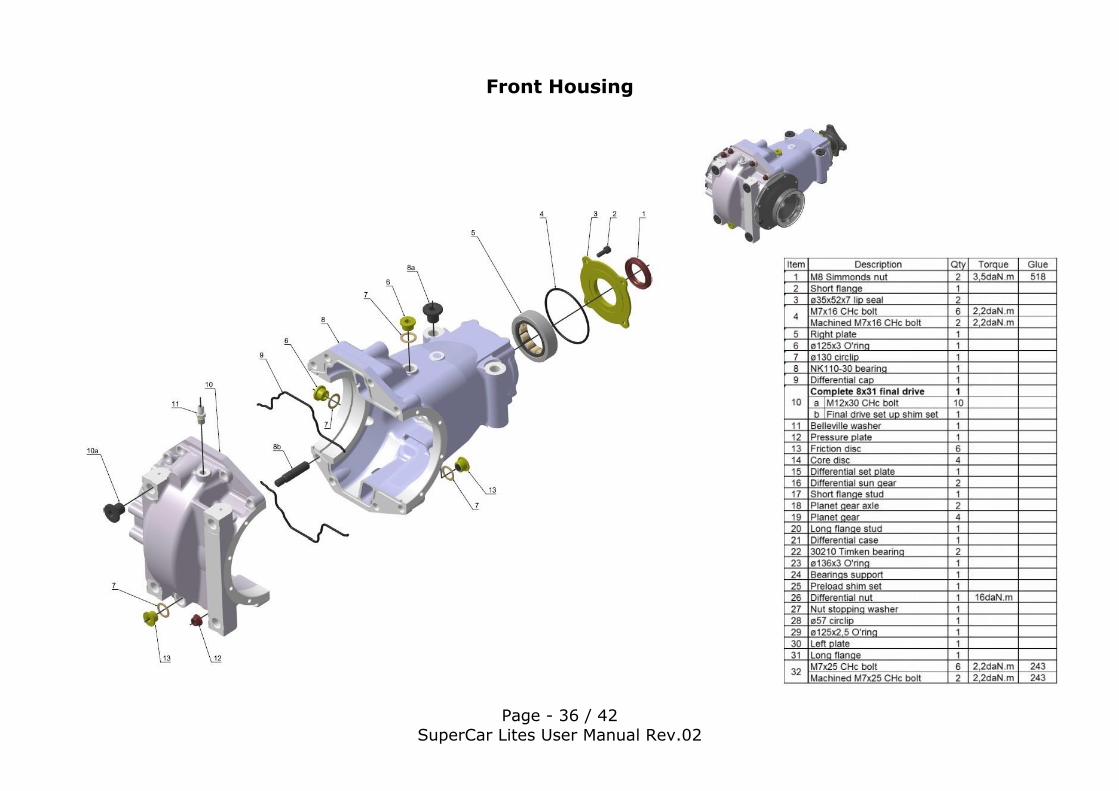
Front Housing

Page - 37 / 42
SuperCar Lites User Manual Rev.02
11.3 REAR DISCONNECT CLUTCH
11.3.1 GENERAL DETAILS
The rear disconnect clutch is to disconnect the rear differential when you use the hand brake. The weight is 7.5Kg.
11.3.2 TECHNICAL DETAILS
The rear disconnect is adjusted from Sadev on a hydraulic test bench. The minimum pressure to disconnect the rear differential is 35
bars. - Handbrake The Sadev handbrake is adjusted and tested on a bench. See the drawing to know the connectors. For this system the oil is dot4 or dextron. WARNING Be careful when you bleed the system. If you don't make it correctly the system will not disconnect the rear differential when you pull the handbrake.
11.3.3 LUBRICATION
Oil Capacity (from dry): 0.55 Liters The disconnect is delivered from SADEV with oil inside. Oil Viscosity: 75W140
11.3.4 DRAWINGS

Page - 38 / 42
SuperCar Lites User Manual Rev.02
Rear Differential Disconnector

Page - 39 / 42
SuperCar Lites User Manual Rev.02
Handbrake
Page - 40 / 42
SuperCar Lites User Manual Rev.02
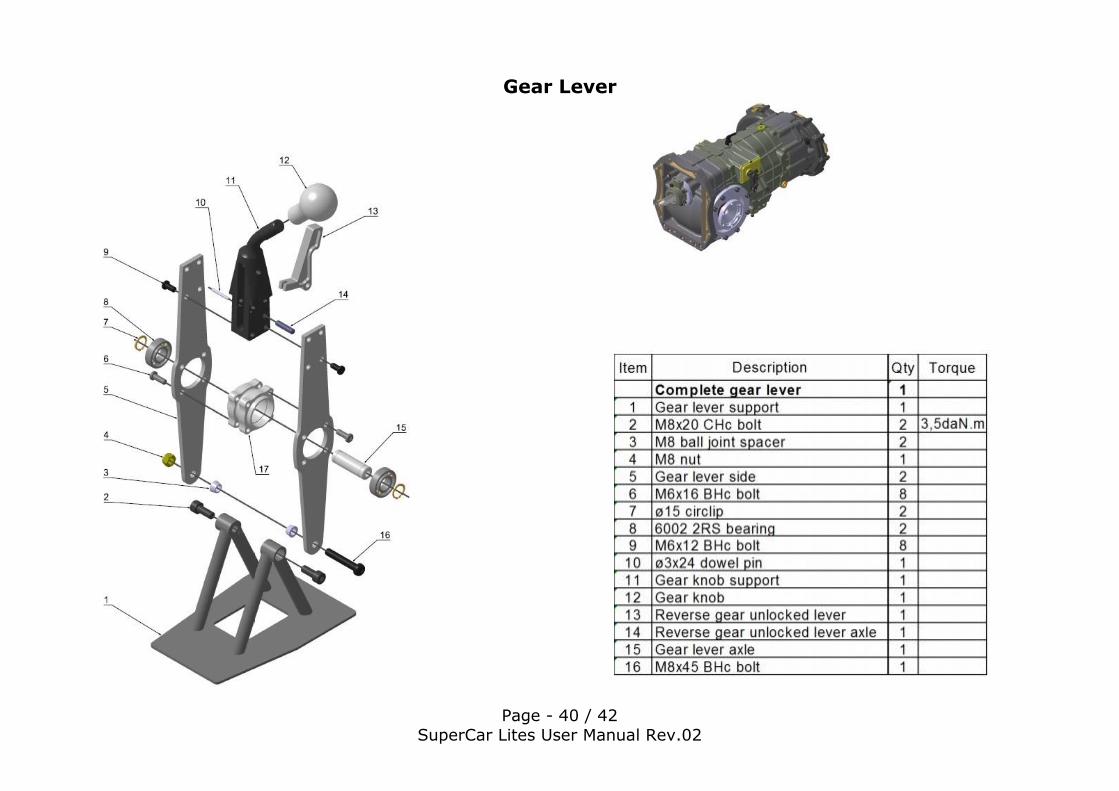
Gear Lever

Page - 41 / 42
SuperCar Lites User Manual Rev.02
12 BRAKES
12.1 PRE-BEDDING AT ALCON
Most discs and pads supplied by Alcon are pre-bedded. The purpose of pre-bedding the disc is to deposit an even transfer layer of friction material on to the surface of the disc. The secondary reason for prebedding the disc is to thermally condition the disc. The objective of pre-bedding the pad is to take the pad through a heat cycle during which the resins contained within the pad are cured, additionally, any high spots on the surface of the pad are removed.
After the discs have been pre-bedded and allowed to cool, the disc and pads can be bolted on to the car and should be ready for competition use providing that the discs and pads are “run-in” correctly.
12.2 USE OF PRE_BEDDED DISCS IN COMPETITION
Care needs to be taken during “running-in” to obtain the best performance and life from pre-bedded discs and pads. The running-in of discs and pads on the car immediately prior to competition use ensures that the face of the disc and pad are mated, removing any
high spots. Lightweight discs are particularly sensitive to potential problems during use, failure to correctly run-in the discs and pads can result in problems including:
Long pedal Poor feel and modulation Vibration Premature wear Disc cracking
All discs can suffer from premature cracking, this is normally caused by thermal shock, occurring when the disc is either cooled
or heated too quickly. Additionally, an excessive rate of disc temperature increase can result in failure of the heat to be absorbed into both braking faces and the vanes evenly. Any significant temperature variation between the opposing flanges, including the mounting flange, can cause and promote disc coning and stresses within the disc cheeks, normally leading the problems listed above.

Page - 42 / 42
SuperCar Lites User Manual Rev.02
Heavier-weight discs are more stable and less prone to these problems, due to the increased structural rigidity gained from 48
and 72 vane design and generally increased flange thickness. It is still advisable to run-in the discs carefully as per instructions to follow. To prevent these problems, an appropriate and proven “running-in” procedure needs to be followed, during rallies, races and tests. We suggest that the following procedures are employed:
12.3 “RUNNING – IN” INSTRUCTIONS
5 brake applies from slow speed and light pedal pressure to
complete system check. 15 brake applies from 80 to 40 kmh, light to moderate pedal
pressure. (2.5 - 3.0 seconds, line pressure 20 bar) 15 brake applies from 120 to 60kph, light to moderate pedal
pressure. (4.0 seconds, line pressure 20 bar)
12.4 WEAR ALLOWANCE AND MAINTENANCE
12.4.1 BRAKE DISCS
Wear allowance on brake discs should be considered as 1mm per face which sums up to 2 mm in total. Note: As a cautionary note, it is not just the thickness of the disc that should be used to consider its suitability for continued use. A brake disc which has been overheated can become distorted and/or display other signs such as cracking, both of which could give cause to replace the disc before its minimum thickness, indicated above, has been reached.
12.4.2 BRAKE PADS
PNR4441X702.4 brake pads should be replaced when they have 2mm friction material remaining. As a side note, thickness of the pad is 7mm as 5mm backplate and 2mm friction material.