using the richard joyner off-center jig
TRANSCRIPT

The Richard Joyner Off-Center Jig is a faceplate tool that provides a crea�ve
way to make small mul�-axis turnings. The jig has 8 centers and 24 index
posi�ons. It is especially useful when precision between cuts is needed for
intricate pa'erns and repeatability. A few typical items turned using the jig
include pendants, earrings, box lids, bo'le stoppers, refrigerator magnets
and compact mirrors.
The most typical use of the jig is to make pendants. The jig
provides a way to cut arcs into the surface of the pendant,
and also create an offset hole for a'aching to a necklace if
desired. There are a lot of interes�ng designs that can be
generated, from very simple with a pre'y piece of wood, to
very elaborate with a lot of intersec�ng arcs.
Using the Richard Joyner Off-Center Jig By Arnold Ward
The back plate is the piece with 8 offset holes. Each hole has a 3/8” thread
that fits a typical bo'le stopper mandrel. The four outside holes are used to
secure the indexing plate to the back plate.
Note: If you do not have the bo'le stopper mandrel, you can use a 3/8” bolt
threaded through a piece of wood that is held in a chuck or faceplate.
If you use a bo'le stopper mandrel with a morse taper, then I suggest you make a drawbar to ensure it
doesn’t vibrate loose. This is even more important if you are turning longer items that will produce more
vibra�on when cu2ng. The drawbar is made from 1/4” 20tpi threaded rod from
the hardware store. This screws into the back of the mandrel. Cut the rod to fit
the length of your headstock. I epoxied a nut into a wood ball that I can then
hand �ghten on the outboard side.
The Indexing plate has 24 indexing posi�ons. There are four counter-sunk
holes used to secure the wood to the plate. I prefer to use brass screws. These
won’t damage your tool edge as much if you should happen to cut into them.
The middle hole is used with a 3/8” bolt that can hold a bo'le stopper blank.

Hole Offset from
Hole 1 (inches)
Degrees from
Index 0
Lines up with
Index
2 0.385 0° 0
3 0.435 270° 6
5 0.485 198°
6 0.510 142°
7 0.535 90° 18
8 0.635 44° 1° from 21
4 0.760 232°
Offset from
Hole 1 (mm)
9.779
11.049
12.319
12.954
13.589
16.129
19.304
1 0.000 0.000 n/a n/a
In layman terms:
The distance from hole 1 to 2
is about 3/8”. The distance
between each hole from 2 to
8 is a li'le less than 1/16”
from the next hole. Holes 2,
3 and 7 line up with an index
number so they can be used
to shi; the piece without
changing the angle.
This next image is for the engineers and machinists who really want to know the numbers. Very few designs
actually require this level of informa�on, but there are some useful �dbits. For example, some�mes you just
want to shi; the piece on a specific axis a certain distance. I do this with hoop earrings when I want to
orient the grain and I need to offset the inside hole in a specific direc�on. To do this, I have to use two holes
that are aligned with an index posi�on so I can switch the back plate hole and then move the index so that
the turning stays on the same axis. Those are holes 2, 3, 7 and also 8 is a close approxima�on.

Turning a Pendant
There are two approaches for turning pendants. One is that you have a large piece of wood that you will
start with and will cut off pendants as you make them. The other approach is to start with a thin piece of
wood and use a waste block with double sided tape to hold the wood while you turn a single pendant. In
either case, the wood can be side grain or end grain. As with all turnings, the pre2er the wood, the pre2er
the pendant will be! Dense hardwoods and exo�cs work great.
If you are star�ng with a block of wood, make sure it is not too long. I
would suggest no more than about 5 inches. Any more and you will get
a lot of vibra�on. Secure the block to the indexing plate with 1/2” brass
screws. Pre-drill the holes and make sure the screws fit snug with no
stripping. If it doesn’t feel secure to you, use your best judgment and
get something stronger!
Line up the 0 index marks on the index
plate and back plate, and then a'ach the back plate using the four hex screws
or thumb screws.
A'ach the bo'le stopper chuck in the
headstock and secure it with a drawbar to
ensure it doesn’t vibrate loose. Screw the
center hole (#1) of the back plate to the
3/8” bo'le stopper bolt and use the
tailstock as support. You can now round
off the blank on the tailstock end to the size of the pendants you wish to
make. Leaving the headstock end thicker will reduce vibra�on. Remove the
tailstock and slightly round over the end of the block. This will be the face of
the pendant. The fla'er the face of the pendant, the longer the arcs will be.
Play with different surface curves to get an idea of the difference. I sand all
my faces to at least 400 grit or up to 1000 grit for harder woods.
When I want a hole in the pendant for the necklace string, I usually make it before cu2ng arcs. By making
the hole first you can be'er judge how the arcs will look on the hanging pendant. The hole for the string can
be large or small. If you want a large hole, you will want to move the back plate to a hole that is closer to the
center. If you want a small hole, you are probably best using the index hole that is closest to the edge. I
prefer that the edge of the hole be close enough to the edge of the
pendant that there is about a 1/8” of wood to �e the string around. Move
the back plate to a hole close to the edge. Then use a pencil to draw the
size of the hole, using your hand to turn the wood. In this way, you can
change your mind un�l you get the right size hole. WARNING, IF YOU TURN
ON THE LATHE NOW, THE WOOD IS OFF-CENTER AND WILL VIBRATE A
LOT. SLOW THE SPEED DOWN BEFORE YOU TURN ON THE LATHE.
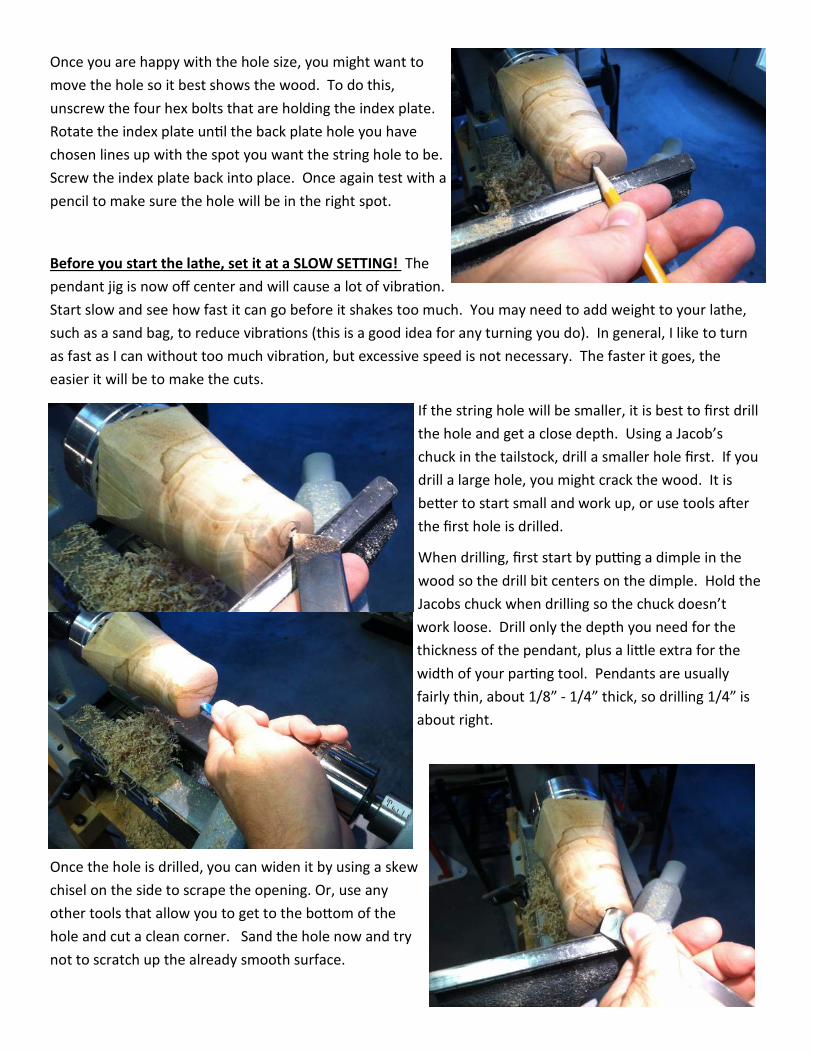
Once you are happy with the hole size, you might want to
move the hole so it best shows the wood. To do this,
unscrew the four hex bolts that are holding the index plate.
Rotate the index plate un�l the back plate hole you have
chosen lines up with the spot you want the string hole to be.
Screw the index plate back into place. Once again test with a
pencil to make sure the hole will be in the right spot.
Before you start the lathe, set it at a SLOW SETTING! The
pendant jig is now off center and will cause a lot of vibra�on.
Start slow and see how fast it can go before it shakes too much. You may need to add weight to your lathe,
such as a sand bag, to reduce vibra�ons (this is a good idea for any turning you do). In general, I like to turn
as fast as I can without too much vibra�on, but excessive speed is not necessary. The faster it goes, the
easier it will be to make the cuts.
If the string hole will be smaller, it is best to first drill
the hole and get a close depth. Using a Jacob’s
chuck in the tailstock, drill a smaller hole first. If you
drill a large hole, you might crack the wood. It is
be'er to start small and work up, or use tools a;er
the first hole is drilled.
When drilling, first start by pu2ng a dimple in the
wood so the drill bit centers on the dimple. Hold the
Jacobs chuck when drilling so the chuck doesn’t
work loose. Drill only the depth you need for the
thickness of the pendant, plus a li'le extra for the
width of your par�ng tool. Pendants are usually
fairly thin, about 1/8” - 1/4” thick, so drilling 1/4” is
about right.
Once the hole is drilled, you can widen it by using a skew
chisel on the side to scrape the opening. Or, use any
other tools that allow you to get to the bo'om of the
hole and cut a clean corner. Sand the hole now and try
not to scratch up the already smooth surface.

Once the hole is complete, any other arcs can be cut
on the front for decora�on. Change the back plate
hole and index plate to change the arc radius and
posi�on rela�ve to the string hole. Use a pencil to
mark the arc to make sure it is pleasing. Then cut the
groove using a diamond point tool. Make sure your
point is sharp and make a light cut. If you stop the
cut, it is some�mes difficult to find the same groove,
which makes it harder to do than commi2ng to a
single cut. But, you can stop and start and keep
making the cut deeper and longer if you need to.
The final step is to cut the pendant off with a par�ng
tool. If vibra�on is a problem, use a scrap block
between your tailstock and the face to provide
support without marring the surface. For end grain
pendants, you should use a hand saw to make the
final cut to free the pendant. If you part it off to the
middle, the wood will some�mes tear out at the last
li'le point of wood. That leaves a small hole that you
then have to sand down to.
The back side will s�ll need to be cleaned up. This can be done by using double side tape on the front of the
pendant to a'ach it to a scrap block. Use a power sander to quickly finish off the back side. You will
probably need to hand sand around the inside of the string hole to clean up rough edges, but it takes only a
few minutes. You may also need to clean off or sand off any tape residue from the front of the pendant.

A great alterna�ve to using natural wood is to use
laminated colored wood. The laminates can be
cut at an angle which provides interes�ng curves,
or they can be end grain, which results in a striped
face, or face grain laminate which allows for color
changes when cu2ng arcs into the pendants.
Source for blanks: Big Monk Lumber
(www.bigmonklumber.com)
To mount the laminate, use a waste block mounted to the index
plate. The face of the block should be flat and a li'le smaller in
size than the pendant. If you make the surface too small, it
won’t hold the pendant securely enough. But, if it’s too big, it
may be impossible to remove without breaking (especially if the
piece is end grain, which is much more fragile). Plus, with a
smaller surface, you will be able to clean up the edge.
The block is added using a good quality double sided tape. The
tape is pressure sensi�ve. So, when you apply the piece to the
waste block, apply it very lightly. You can then pull it back up
and reposi�on it un�l it is centered well enough to get the size of pendant you want.
Once it is centered, you need a second waste block
between your tailstock and the pendant to compress
the block to the tape. Leave this in place while the
piece is rounded off. The jarring of turning off the
sharp corners could pop it loose from the tape, but
once it is rounded down to size, there is much less
chance of it knocking loose.
Laminate cut at an angle End Grain and Side Grain Laminates

Once the surface of the blank is prepared, you can
follow the same steps as with a block of wood. Be
careful to make light cuts. Laminates are not a hard
wood and will tear out easily, especially if you cut
through the back side. I suggest suppor�ng the back of
the wood with painters tape if you are cu2ng the string
hole and there is no wood to support the cut on the
back side. It will reduce the tear-out.
When making cuts that require repeatability and
precision, it is best to mark the loca�on of the cu2ng
tool on the tool rest. This can be done by pu2ng
masking tape on the tool rest and then mark the
posi�on before the cut.
When using this trick, it is cri�cal that you do not move the tool rest. So, leave enough space that you can
s�ll remove the index plate and turn it, or f you need to change the back plate hole, you need enough room
to do that as well.
Using your mark as a guide, you can get pre'y good repeatability.

A handy Microso; Excel spreadsheet applica�on was put together by Bill Kloepping, from Greenville Texas.
This applica�on allows you to simulate the lines and arcs on a pendant by specifying the offset hole, index
hole and radius of the cut. You can save a lot of �me by working out the design you want in advance of
working on the lathe.
The spreadsheet can be found on the Big Monk Lumber website. Go to www.bigmonklumber.com. Detailed
instruc�ons on using the tool are in the spreadsheet. Some examples of the spreadsheet output are shown
below.
