validated reference design – netscaler and microsoft … · network architecture in arm, a...
TRANSCRIPT
1Citrix.com
Solution Guide
NetScaler VRD
Validated Reference Design NetScaler and Microsoft Azure
This guide focuses on providing guidelines to customers on implementing NetScaler on Microsoft Azure based on their use cases.
2Citrix.com | Solution Guide | Validated Reference Guide for NetScaler and Microsoft Azure
Solution GuideValidated Reference Design Guide for NetScaler and Microsoft Azure
Table of Contents
Overview NetScaler VPX 4Limitations and Usage Guidelines 4Use Cases 5Production Delivery 5Hybrid Cloud Designs 5Business Continuity 6Development and Testing 6Network Architecture 6How NetScaler VPX Works on Azure 7Traffic Flow Through Port Address Translation 8Traffic Flow Through Network Address Translation 9Scenario 10Port Usage Guidelines 12
Section 2: Configuration Steps 13Provisioning the Resource Group 13Create a Network Security Group 13Configuring a Virtual Network and Subnets 13Configuring the second subnet 13Configuring a Storage Account 14Provisioning the NetScaler Instance: 14Create a VM with multiple IP addresses using PowerShell 15Create a VM with multiple NICs using PowerShell 15Configure the NetScaler Port Translation 16Microsoft Azure Resource Manager Portal 17NetScaler Multi-NIC Overview 18NetScaler Multi-Nic Configuration 18Create the VNET and Subnets 19Create the Network Security Group 20Create VM and Attach vNICs 21NetScaler Multiple IP Addresses Overview 22Add a private IP address 22Add a public IP address 23Associate the public IP address resource to an existing VM 24NetScaler HA Overview 25NetScaler HA Configuration - Powershell 25NetScaler HA Configuration - Azure Portal 26Deploying Citrix NetScaler VPX on Microsoft Azure 30Microsoft Azure Documentation 30Assign multiple IP addresses to virtual machines using PowerShell 30Create a VM with multiple NICs using PoweShell 30Citrix Product Documentation 30
Section 3: Configuration Steps 31NetScaler GSLB and DBS AutoscalewithAzure Load Balancer 32GSLB and DBS Overview 33
3Citrix.com | Solution Guide | Validated Reference Guide for NetScaler and Microsoft Azure
Solution GuideValidated Reference Design Guide for NetScaler and Microsoft Azure
4Citrix.com | Solution Guide | Validated Reference Guide for NetScaler and Microsoft Azure
Solution GuideValidated Reference Design Guide for NetScaler and Microsoft Azure
Overview NetScaler VPX
Citrix NetScaler is an all-in-one application delivery controller that makes applications run up to five times better, reduces application ownership costs, optimizes the user experience and ensures that applications are always available by using:
• Advanced L4-7 load balancing and traffic management
• Proven application acceleration such as HTTP compression and caching
• An integrated application firewall for application security
• Server offloading to significantly reduce costs and consolidate servers
As an undisputed leader of service and application delivery, Citrix NetScaler is deployed in thousands of networks around the world to optimize, secure and control the delivery of all enterprise and cloud services. Deployed directly in front of web and database servers, NetScaler combines high-speed load balancing and content switching, http compression, content caching, SSL acceleration, application flow visibility and a power-ful application firewall into an integrated, easy-to-use platform. Meeting SLAs is greatly simplified with end-to-end monitoring that transforms network data into actionable business intelligence. NetScaler allows policies to
be defined and managed using a simple declarative policy engine with no programming expertise required.
Overview NetScaler in Microsoft Azure
The NetScaler VPX virtual appliance is available as an image in the Microsoft Azure Marketplace. NetScaler VPX on Microsoft Azure Resource Manager (ARM) enables customers to leverage Azure cloud computing capabilities and use NetScaler load balancing and traffic management features for their business needs. You can deploy NetScaler VPX instances on ARM either as standalone instances or as high availability pairs in active-active or active-standby modes.
Limitations and Usage Guidelines
• The Azure architecture does not accommodate support for the following features:
Clustering
IPv6
Gratuitous ARP (GARP)
L2 Mode
Tagged VLAN
Dynamic Routing
Virtual MAC (vMAC)
USIP
CloudBridge Connector
• The Intranet IP (IIP) feature is not supported, because Azure does not provide the pool of IP addresses
required for this feature. IIP is frequently used in VOIP, SIP, or server-initiated-connection deployment.
5Citrix.com | Solution Guide | Validated Reference Guide for NetScaler and Microsoft Azure
Solution GuideValidated Reference Design Guide for NetScaler and Microsoft Azure
• If you expect that you might have to shut down and temporarily deallocate the NetScaler VPX virtual
machine at any time, assign a static Internal IP address while creating the virtual machine. If you do not
assign a static internal IP address, Azure might assign the virtual machine a different IP address each time
it restarts, and the virtual machine might become inaccessible.
• In an Azure deployment, only the following NetScaler VPX models are supported: VPX 10, VPX 200, and VPX
1000. These virtual appliances can be deployed on any instance type that has two or more cores and more
than 2 GB memory. See the NetScaler VPX datasheet: https://www.citrix.com/content/dam/citrix/en_us/
documents/products-solutions/citrix-netscaler-vpx-data-sheet.pdf
• The 'deployment ID' that is generated by Azure during virtual machine provisioning is not visible to the
user in ARM. You cannot use the deployment ID to deploy NetScaler VPX appliance on ARM.
Use Cases
Compared to alternative solutions that require each service to be deployed as a separate virtual appliance,
NetScaler on Azure combines L4 load balancing, L7 traffic management, server offload, application acceleration,
application security and other essential application delivery capabilities in a single VPX instance, conveniently
available via the Azure Marketplace. Furthermore, everything is governed by a single policy framework and
managed with the same, powerful set of tools used to administer on-premise NetScaler deployments. The net
result is that NetScaler on Azure enables several compelling use cases that not only support the immediate
needs of today’s enterprises, but also the ongoing evolution from legacy computing infrastructures to enter-
prise cloud datacenters.
Production DeliveryEnterprises actively embracing Azure as an infrastructure- as-a-service (IaaS) offering for production delivery
of applications can now front-end those applications with the same cloud networking platform used by the
largest websites and cloud service providers in the world. Extensive offload, acceleration and security capabili-
ties can be leveraged to enhance performance and reduce costs.
Hybrid Cloud DesignsWith NetScaler on Azure, hybrid clouds that span enterprise datacenters and extend into Azure can benefit from
the same NetScaler cloud networking platform, significantly easing the transition of applications and workloads
back and forth between a private datacenter and Azure. The full suite of NetScaler capabilities, ranging from
intelligent database load balancing with DataStream to unprecedented application visibility with AppFlow® and
real-time monitoring and response with Action Analytics, can be leveraged with NetScaler on Azure.
6Citrix.com | Solution Guide | Validated Reference Guide for NetScaler and Microsoft Azure
Solution GuideValidated Reference Design Guide for NetScaler and Microsoft Azure
Business ContinuityEnterprises looking to use Azure as part of their disaster recovery and business continuity plans can rely upon
NetScaler global server load balancing running both on-premise and within Azure to continuously monitor
availability and performance of both enterprise datacenters and Azure environments, ensuring users are always
sent to the optimal location.
Development and TestingEnterprises running production delivery on-premise but using Azure for development and testing can now
include NetScaler within their Azure test environments, speeding time-to-production due to better mimicry of
the production implementation within their test environments. In each use case, network architects can also
leverage Citrix CloudBridge— configured either as a standalone instance or as feature of a NetScaler platinum
edition instance—to secure and optimize the connection between the enterprise datacenter(s) and the Azure
Cloud, thereby speeding data transfer/synchronization and minimizing network costs
Network Architecture
In ARM, a NetScaler VPX virtual machine (VM) resides in a virtual network. By default, a NetScaler VPX provi-
sioned in Azure will operate in single-IP mode described in the following section.
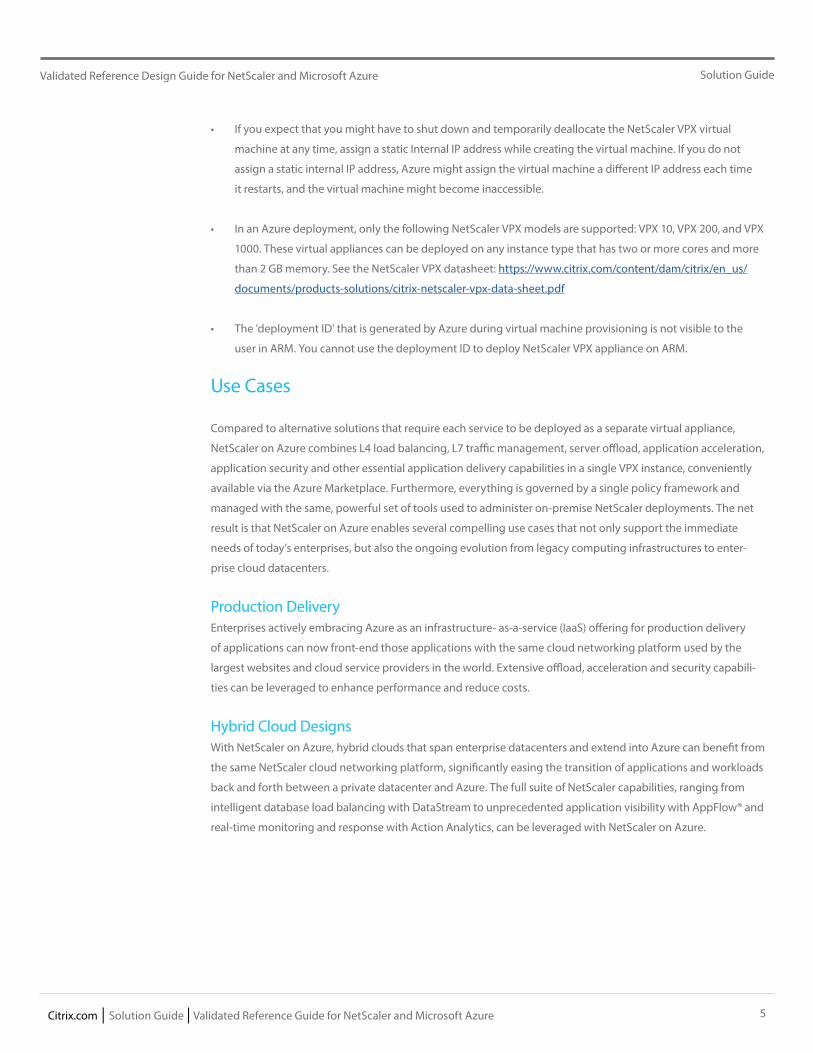
A virtual Network Interface Card (NIC) is created on each NetScaler VM. The network security group (NSG) con-
figured in the virtual network is bound to the NIC, and together they control the traffic flowing into the VM and
out of the VM.
The NSG forwards the requests to the NetScaler VPX instance, and the VPX instance sends them to the servers.
The responses from the servers follow the same path in reverse. You can configure NSG to control a single VPX
VM, or with subnets and virtual networks and control traffic in multiple VPX VM deployments.
The NIC contains network configuration details such as the virtual network, subnets, internal IP address and
Public IP address.
While on ARM, it is good to know the following IP addresses used to access the VMs:
• Public IP (PIP) address is the Internet-facing IP address configured directly on the virtual NIC of the NetS-
caler VM. This allows you to directly access a VM from the external network without the need to configure
inbound and outbound rules on the NSG.
• NetScaler IP (NSIP) address is internal IP address configured on the VM. It is non-routable.
• Virtual IP address (VIP) is configured by using the NSIP and a port number. Clients access NetScaler ser-
vices through the PIP address, and when the request reaches the NIC of the NetScaler VPX VM or the Azure
load balancer, the VIP gets translated to internal IP (NSIP) and internal port number.
7Citrix.com | Solution Guide | Validated Reference Guide for NetScaler and Microsoft Azure
Solution GuideValidated Reference Design Guide for NetScaler and Microsoft Azure
• Internal IP address is the private internal IP address of the VM from the virtual network’s address space
pool. This IP address cannot be reached from the external network. This IP address is by default dynamic
unless you set it to static. Traffic from the internet is routed to this address according to the rules created
on the NSG. The NSG works with the NIC to selectively send the right type of traffic to the right port on the
NIC, which depends on the services configured on the VM.
Note: In this document, PIP, VIP, and Instance Level PIP (ILPIP) mean the same thing and are used
interchangeably.
The following figure shows how traffic flows from a client to a server through a NetScaler VPX
instance provisioned in ARM.
How NetScaler VPX Works on Azure
In an on-premise deployment, a NetScaler VPX instance requires, at least three IP addresses:
• Management IP address, called the NetScaler IP (NSIP) address
• Subnet IP (SNIP) address for communicating with the server farm
• Virtual server IP (VIP) address for accepting client requests
In an Azure deployment, only one IP address (a private (internal) address) is assigned to an instance during
provisioning through DHCP.
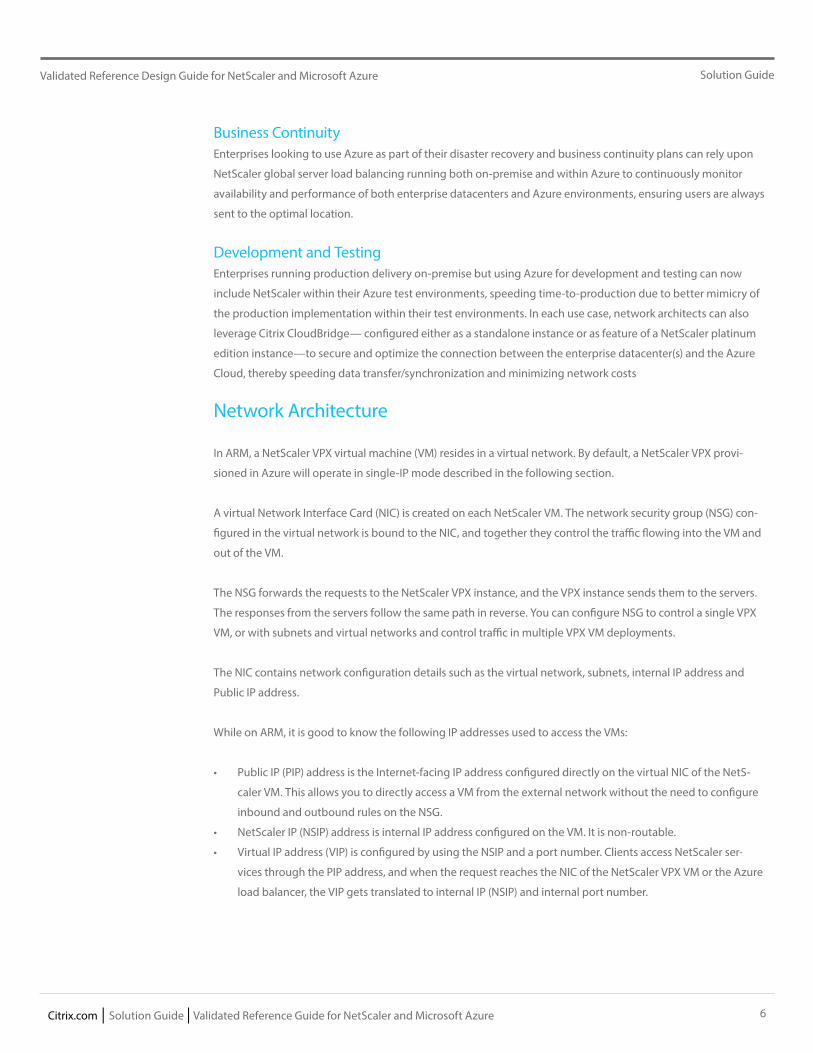
To avoid this limitation, you can deploy a NetScaler VPX instance in Azure with a single IP architecture, where
the three IP functions of a NetScaler appliance are multiplexed onto one IP address. This single IP address uses
different port numbers to function as the NSIP, SNIP, and VIP.
8Citrix.com | Solution Guide | Validated Reference Guide for NetScaler and Microsoft Azure
Solution GuideValidated Reference Design Guide for NetScaler and Microsoft Azure
Traffic Flow Through Port Address Translation
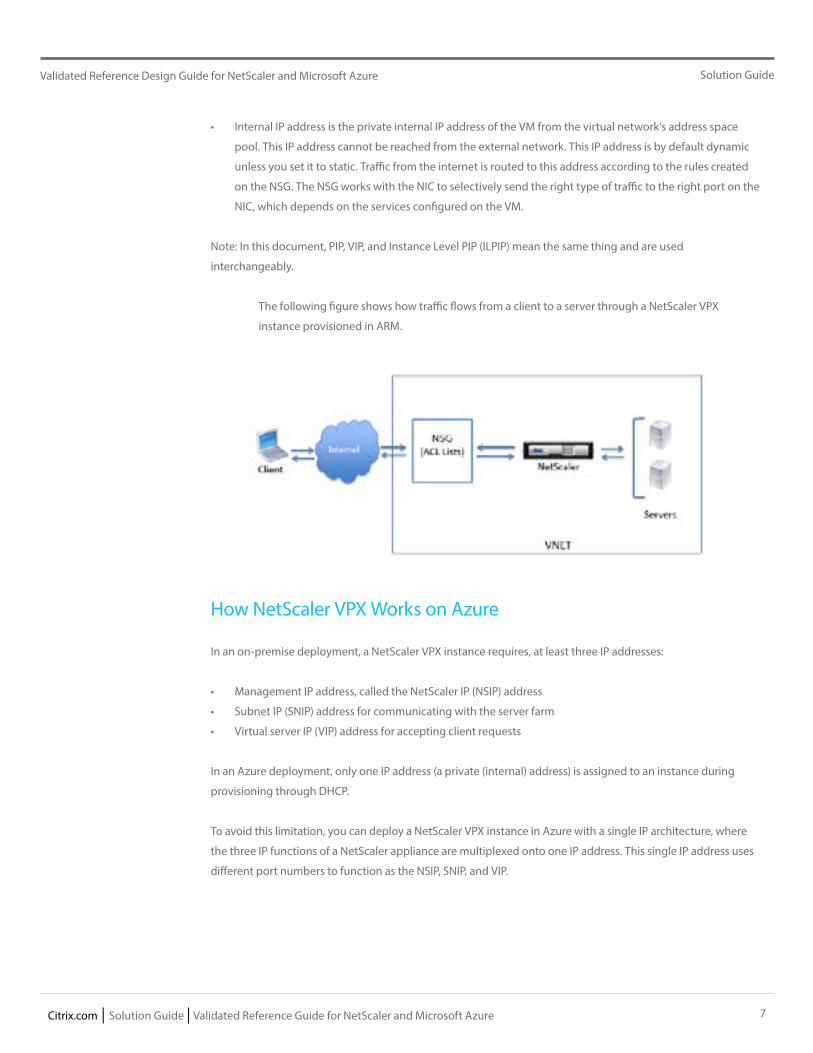
In an Azure deployment, when you provision the NetScaler VPX instance as a virtual machine (VM), Azure assigns a Public IP address and an internal IP address (non-routable) to the NetScaler virtual machine. Inbound and Outbound rules are defined on the NSG for the NetScaler instance, along with a public port and a private port for each rule defined. The NetScaler instance listens on the internal IP address and private port.
Any external request is received on the NetScaler VPX VM's virtual NIC. The NIC is bound to the NSG, which specifies the private IP and private port combination for where to translate the request's destination address and port (the Public IP address and port). ARM performs the port address translation (PAT) to map the Public IP address and port to the internal IP address and private port of the NetScaler virtual machine, and then forwards the traffic to the VM.
The following figure shows how Azure performs port address translation to direct traffic to the NetScaler internal IP address and private port.
The following image illustrates how a single IP address is used to perform the functions of
NSIP, SNIP, and VIP.
9Citrix.com | Solution Guide | Validated Reference Guide for NetScaler and Microsoft Azure
Solution GuideValidated Reference Design Guide for NetScaler and Microsoft Azure
In this example, the Public IP address is assigned to the VM is 140.x.x.x, and the internal IP address is 10.x.x.x.
When the inbound and outbound rules are defined, public HTTP port 80 is defined as the port on which the
client requests are received, and a corresponding private port, 10080, is defined as the port on which the
NetScaler VM listens. The client request is received on the Public IP address 140.x.x.x at port 80. Azure performs
port address translation to map this address and port to internal IP address 10.x.x.x on private port 10080 and
forwards the client request.
For information about port usage guidelines while, see Port Usage Guidelines.
For information about NSG and access control lists, see https://azure.microsoft.com/en-in/documentation/
articles/virtual-networks-nsg/.
Traffic Flow Through Network Address Translation
You can also request a Public IP (PIP) address for your NetScaler VM (instance level). If you use this direct PIP at
the VM level, you don’t need to define inbound and outbound rules to intercept the network traffic. The incom-
ing request from the Internet is received on the VM directly. Azure performs network address translation (NAT)
and forwards the traffic to the internal IP address of the NetScaler instance.
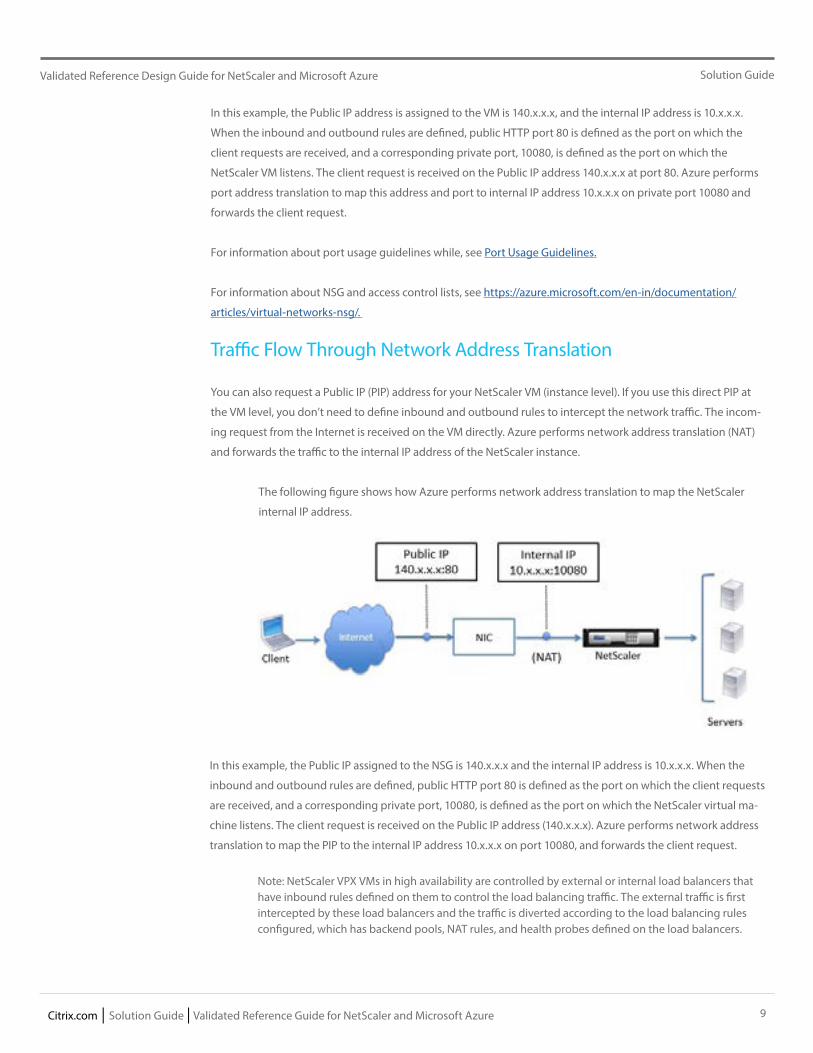
The following figure shows how Azure performs network address translation to map the NetScaler
internal IP address.
In this example, the Public IP assigned to the NSG is 140.x.x.x and the internal IP address is 10.x.x.x. When the
inbound and outbound rules are defined, public HTTP port 80 is defined as the port on which the client requests
are received, and a corresponding private port, 10080, is defined as the port on which the NetScaler virtual ma-
chine listens. The client request is received on the Public IP address (140.x.x.x). Azure performs network address
translation to map the PIP to the internal IP address 10.x.x.x on port 10080, and forwards the client request.
Note: NetScaler VPX VMs in high availability are controlled by external or internal load balancers that have inbound rules defined on them to control the load balancing traffic. The external traffic is first intercepted by these load balancers and the traffic is diverted according to the load balancing rules configured, which has backend pools, NAT rules, and health probes defined on the load balancers.
10Citrix.com | Solution Guide | Validated Reference Guide for NetScaler and Microsoft Azure
Solution GuideValidated Reference Design Guide for NetScaler and Microsoft Azure
Assign Multiple IP Addresses
An Azure Virtual Machine (VM) has one or more network interfaces (NIC) attached to it. Any NIC can
have one or more static or dynamic public and private IP addresses assigned to it. Assigning multiple
IP addresses to a VM enables the following capabilities:
• Hosting multiple websites or services with different IP addresses and SSL certificates on a single
server.
• Serve as a network virtual appliance, such as a firewall or load balancer.
• The ability to add any of the private IP addresses for any of the NICs to an Azure Load Balancer
back-end pool. In the past, only the primary IP address for the primary NIC could be added to
a back-end pool. To learn more about how to load balance multiple IP configurations, read the
Load balancing multiple IP configurations article.
Scenario
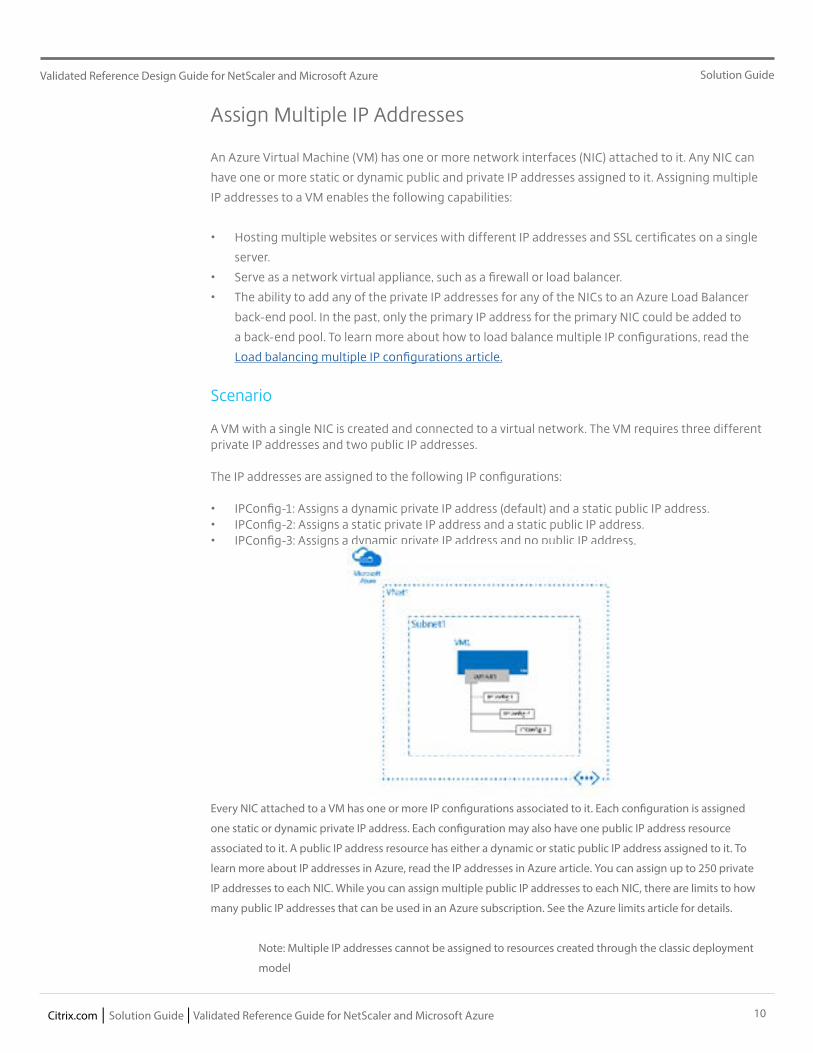
A VM with a single NIC is created and connected to a virtual network. The VM requires three different private IP addresses and two public IP addresses.
The IP addresses are assigned to the following IP configurations:
• IPConfig-1: Assigns a dynamic private IP address (default) and a static public IP address.• IPConfig-2: Assigns a static private IP address and a static public IP address.• IPConfig-3: Assigns a dynamic private IP address and no public IP address.
Every NIC attached to a VM has one or more IP configurations associated to it. Each configuration is assigned
one static or dynamic private IP address. Each configuration may also have one public IP address resource
associated to it. A public IP address resource has either a dynamic or static public IP address assigned to it. To
learn more about IP addresses in Azure, read the IP addresses in Azure article. You can assign up to 250 private
IP addresses to each NIC. While you can assign multiple public IP addresses to each NIC, there are limits to how
many public IP addresses that can be used in an Azure subscription. See the Azure limits article for details.
Note: Multiple IP addresses cannot be assigned to resources created through the classic deployment
model
11Citrix.com | Solution Guide | Validated Reference Guide for NetScaler and Microsoft Azure
Solution GuideValidated Reference Design Guide for NetScaler and Microsoft Azure
Create a VM with multiple NICs interfaces
You can create virtual machines (VMs) in Azure and attach multiple network interfaces (NICs) to each of your
VMs. Multi NIC is a requirement for many network virtual appliances, such as application delivery and WAN op-
timization solutions. Multi NIC also provides more network traffic management functionality, including isolation
of traffic between a front end NIC and back end NIC(s), or separation of data plane traffic from management
plane traffic.
Scenario
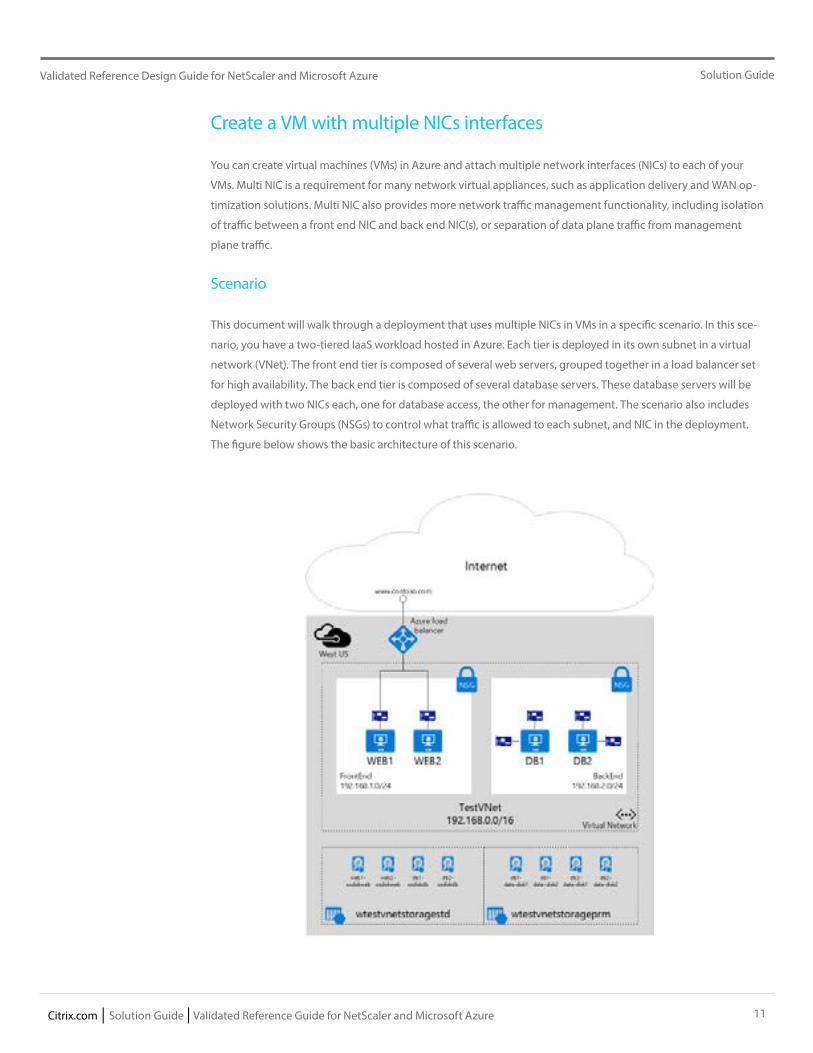
This document will walk through a deployment that uses multiple NICs in VMs in a specific scenario. In this sce-
nario, you have a two-tiered IaaS workload hosted in Azure. Each tier is deployed in its own subnet in a virtual
network (VNet). The front end tier is composed of several web servers, grouped together in a load balancer set
for high availability. The back end tier is composed of several database servers. These database servers will be
deployed with two NICs each, one for database access, the other for management. The scenario also includes
Network Security Groups (NSGs) to control what traffic is allowed to each subnet, and NIC in the deployment.
The figure below shows the basic architecture of this scenario.
12Citrix.com | Solution Guide | Validated Reference Guide for NetScaler and Microsoft Azure
Solution GuideValidated Reference Design Guide for NetScaler and Microsoft Azure
Port Usage Guidelines
You can configure additional inbound and outbound rules in NSG when creating the NetScaler VM or after the
VM is provisioned. Each inbound and outbound rule is associated with a public port and a private port.
Before configuring NSG rules, note the following guidelines regarding the port numbers you can use:
1. The following ports are reserved by the NetScaler virtual machine. You cannot define these as pri
vate ports when using the Public IP address for requests from the Internet.
Ports 21, 22, 80, 443, 8080, 67, 161, 179, 500, 520, 3003, 3008, 3009, 3010, 3011, 4001, 5061, 9000,
7000.
However, if you want Internet-facing services such as the VIP to use a standard port (for example,
port 443), you have to create port mapping by using the NSG. The standard port is then mapped to a
different port that is configured on the NetScaler for this VIP service.
For example, a VIP service might be running on port 8443 on the NetScaler instance but be mapped
to public port 443. So, when the user accesses port 443 through the Public IP, the request is actually
directed to private port 8443.
2. Public IP address does not support protocols in which port mapping is opened dynamically, such as
passive FTP or ALG.
3. Azure load balancer does not work with Public IP address. High availability does not work for traffic
that uses PIP associated with VPX instance instead of PIP configured on the load balancer. For more
information about configuring NetScaler VPX HA in ARM, see Configuring NetScaler VPX in High Avail
ability Mode in Azure.
4. In a NetScaler Gateway deployment, you need not configure a SNIP address, because the NSIP can
be used as a SNIP when no SNIP is configured.
Note: You must configure the VIP address by using the NSIP address and some nonstandard port number. For
call-back configuration on the backend server, the VIP port number has to be specified along with the VIP URL
(for example, url:port).
Note: In ARM, a NetScaler VPX VM is associated with two IP addresses. Public IP address and Internal IP
address. While the external traffic connects to the PIP, the internal IP address or the NSIP is non-routable. To
configure VIP in VPX, use this combination of internal IP address and port number.
Example: If the VPN virtual server FQDN is vip.test.com, and the VPN virtual server is running on port 8443, the
call-back URL will be: https://vip.test.com:8443.
13Citrix.com | Solution Guide | Validated Reference Guide for NetScaler and Microsoft Azure
Solution GuideValidated Reference Design Guide for NetScaler and Microsoft Azure
Section 2: Configuration Steps
Provisioning the Resource Group
On the Microsoft Azure Portal page (https://portal.azure.com), log into the Azure Resource Manager portal with your user
name and password. (In the ARM portal, clicking an option in one pane opens a new pane to the right. Navigate from one
pane to another to configure your device.)
Create a new resource group to serve as a container for all your resources. Use the resource group to deploy, manage, and
monitor your resources as a group.
Create a Network Security Group
Create a network security group (NSG) to assign inbound and outbound rules to control the incoming and outgoing traffic
within the virtual network. NSG allows you to define security rules for a single virtual machine and also to define security
rules for a virtual network subnet.
Configuring a Virtual Network and Subnets
Virtual networks in ARM provide a layer of security and isolation to your services. VMs and services that are part of the same
virtual network can access each other.
For example, create a virtual network with a reserved CIDR block of 192.168.0.0/16 and two subnets having CIDR blocks as
192.168.1.0/24 and 192.168.2.0/24 respectively.
In the Create virtual network pane, enter the following values, and then click Create.
• Name of the virtual network
• Address space – type the reserved IP address block for the virtual network
• Subnet – type the name of the first subnet (you will create the second subnet later in this step)
• Subnet address range – type the reserved IP address block of the subnet
• Resource group – select the resource group created earlier from the drop-down list
Configuring the second subnet
Select the newly created virtual network from the All Resources pane and in the Settings pane, click Subnets.
Click +Subnet and create the second subnet by entering the following details.
• Name of the second subnet
• Address range – type the Reserved IP address block of the second subnet
• Network security group – select the NSG from the drop-down list
14Citrix.com | Solution Guide | Validated Reference Guide for NetScaler and Microsoft Azure
Solution GuideValidated Reference Design Guide for NetScaler and Microsoft Azure
Configuring a Storage Account
The ARM IaaS infrastructure storage includes all services where we can store data in the form of blobs, tables, queues, and files. You can also create applications using these forms of storage data in ARM.
Create a storage account to store all your data.
Click +New > Storage > Storage account.
In the Create Storage account pane, enter the following details:
• Name of the account • Deployment mode – make sure to select Resource Manager • Account kind – select General purpose from the drop-down list • Replication – select Locally redundant storage from the drop-down list • Resource group – select the newly created resource group from the drop-down list • Click Create.
Configuring an Availability Set
An availability set guarantees that at least one VM is kept up and running in case of planned or unplanned maintenance. Two or more VMs under the same ‘availability set’ are placed on different fault domains to achieve redundant services.
Click +New and search for availability set.
Select Availability set entity from the list. Click Create.
In the Create availability set pane, enter the following details:
• Name of the set • Resource group – select the newly created resource group from the drop-down list • Click Create.
Provisioning the NetScaler Instance:
Create an instance of NetScaler VPX in the virtual network. Obtain the NetScaler VPX image from the Azure marketplace, and then use the Azure Resource Manager portal to create a NetScaler VPX instance.
Before you begin creating the NetScaler VPX instance, make sure that you have created a virtual network with required subnets in which the instance will reside. You can create virtual networks during VM provisioning, but without the flexibility to create different subnets. For information about creating virtual networks, see http://azure.microsoft.com/en-us/documentation/articles/create-virtual-network/.
Optional: Configure DNS server and VPN connectivity to allow a VM to access Internet resources.
Note: Citrix recommends that you create resource group, network security group, virtual network, and other entities before you provision the NetScaler VPX VM, so that the network information is available during provisioning.
• Click +New > Networking. • Click See All and in the Networking pane, click Citrix NetScaler VPX Bring Your Own License. • Click Create.
Note: As a quick way to find any entity on ARM portal, you can also type the name of the entity in the Azure Marketplace search box and press <Enter>. Type NetScaler in the search box to find the Citrix NetScaler images.
15Citrix.com | Solution Guide | Validated Reference Guide for NetScaler and Microsoft Azure
Solution GuideValidated Reference Design Guide for NetScaler and Microsoft Azure
• Select NetScaler 11.0 VPX Bring Your Own License. • Populate your details. • Purchase and Deploy my NetScaler, after passing the validation. • It is recommended to set your IP Addresses to Static.
Note: Ensure to select the latest image. Your Citrix NetScaler image might have the release number in the name.
Create a VM with multiple IP addresses using PowerShellThe steps that follow explain how to create an example VM with multiple IP addresses, as described in the sce-nario. Change variable names and IP address types as required for your implementation.
These configuration Steps covered are:
Create a VM with multiple IP addresses
Add IP addresses to a VM
Add IP addresses to a VM operating system
Validation (Windows)
Validation (Linux)
Please refer to the following Microsoft Azure documentation located here:
https://docs.microsoft.com/en-us/azure/virtual-network/virtual-network-multiple-ip-addresses-power-shell#a-name--createacreate-a-vm-with-multiple-ip-addresses
Create a VM with multiple NICs using PowerShellThe steps that follow explain how to create an example VM with multiple NIC interfaces, as described in the scenario. Change variable names and values as required for your implementation.
These configuration Steps covered are:
Create the back-end VMs
Start your script
Create necessary resources for your VMs
Create the NICs and back-end VMs
Run the script
Please refer to the following Microsoft Azure documentation located here:
https://docs.microsoft.com/en-us/azure/virtual-network/virtual-network-deploy-multinic-arm-ps
16Citrix.com | Solution Guide | Validated Reference Guide for NetScaler and Microsoft Azure
Solution GuideValidated Reference Design Guide for NetScaler and Microsoft Azure
Configure the NetScaler Port Translation • Click on Network Interfaces for your VM, the NetScaler. • Click on your Network security group. • Click on Inbound security rules. • Allow SSH and HTTP in the Security Group for Inbound connections.
At this point, you can log into the NetScaler instance and configure the features and settings desired for your Azure environment.
Note: When logging into the NetScaler for the first time, the wizard may ask for a Subnet IP address. This is not required on NetScaler Azure instances as they only use a single IP address for all functions. Skip this step when prompted and continue to the default configuration login page.
17Citrix.com | Solution Guide | Validated Reference Guide for NetScaler and Microsoft Azure
Solution GuideValidated Reference Design Guide for NetScaler and Microsoft Azure
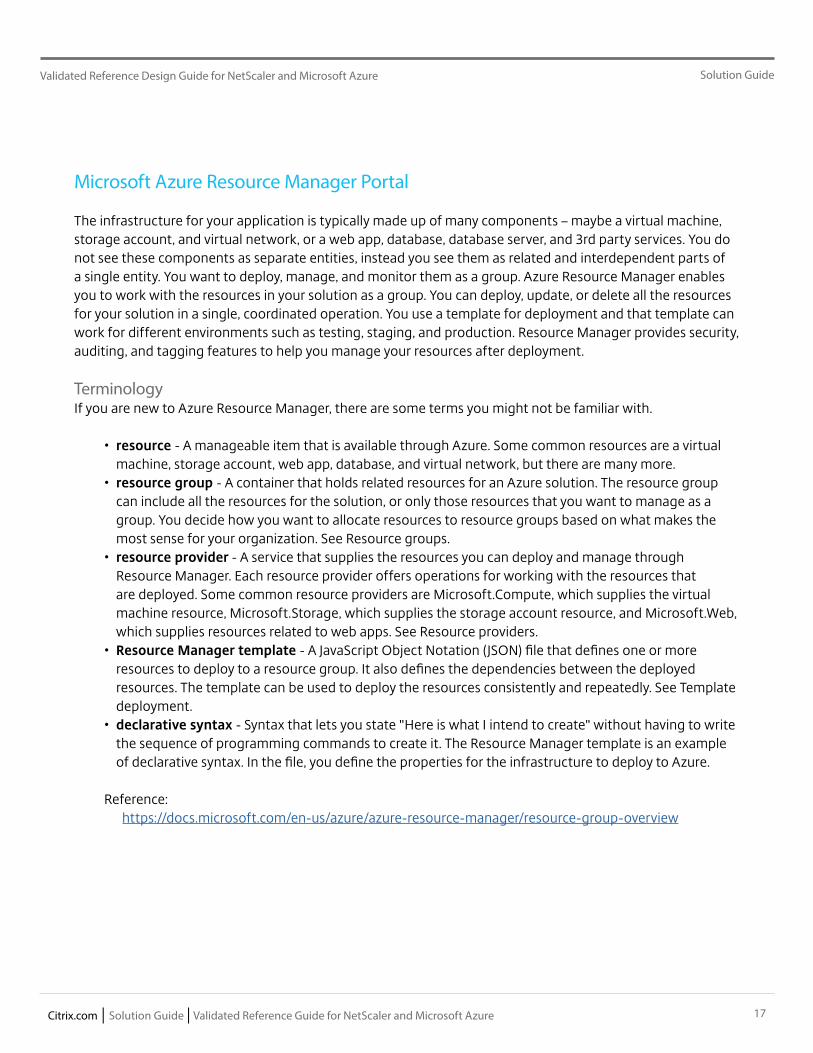
Microsoft Azure Resource Manager Portal
The infrastructure for your application is typically made up of many components – maybe a virtual machine, storage account, and virtual network, or a web app, database, database server, and 3rd party services. You do not see these components as separate entities, instead you see them as related and interdependent parts of a single entity. You want to deploy, manage, and monitor them as a group. Azure Resource Manager enables you to work with the resources in your solution as a group. You can deploy, update, or delete all the resources for your solution in a single, coordinated operation. You use a template for deployment and that template can work for different environments such as testing, staging, and production. Resource Manager provides security, auditing, and tagging features to help you manage your resources after deployment.
TerminologyIf you are new to Azure Resource Manager, there are some terms you might not be familiar with.
• resource - A manageable item that is available through Azure. Some common resources are a virtual machine, storage account, web app, database, and virtual network, but there are many more.
• resource group - A container that holds related resources for an Azure solution. The resource group can include all the resources for the solution, or only those resources that you want to manage as a group. You decide how you want to allocate resources to resource groups based on what makes the most sense for your organization. See Resource groups.
• resource provider - A service that supplies the resources you can deploy and manage through Resource Manager. Each resource provider offers operations for working with the resources that are deployed. Some common resource providers are Microsoft.Compute, which supplies the virtual machine resource, Microsoft.Storage, which supplies the storage account resource, and Microsoft.Web, which supplies resources related to web apps. See Resource providers.
• Resource Manager template - A JavaScript Object Notation (JSON) file that defines one or more resources to deploy to a resource group. It also defines the dependencies between the deployed resources. The template can be used to deploy the resources consistently and repeatedly. See Template deployment.
• declarative syntax - Syntax that lets you state "Here is what I intend to create" without having to write the sequence of programming commands to create it. The Resource Manager template is an example of declarative syntax. In the file, you define the properties for the infrastructure to deploy to Azure.
Reference:https://docs.microsoft.com/en-us/azure/azure-resource-manager/resource-group-overview

18Citrix.com | Solution Guide | Validated Reference Guide for NetScaler and Microsoft Azure
Solution GuideValidated Reference Design Guide for NetScaler and Microsoft Azure
NetScaler Multi-NIC Overview
NetScaler virtual instances running on the Azure platform are capable of attaching multiple virtual network interface cards “NIC’s” to a standalone virtual NetScaler appliance.
This is a common scenario when distributed architectures are desired in Azure, such as Application Tiers and Database Tiers. A second common NetScaler use case for multiple NIC’s, is the desire to segregate network zones in the Azure environment. An example of the segregation could be to allow internet sourced traffic to terminate on one interface (DMZ or Public), and the internal Web and Application services to be Private.
In this two-leg networking scenario, the NetScaler virtual appliance will require a minimum of two virtual NIC’s to be presented. One virtual NIC for the Public network and one virtual NIC for the Private network.
Additionally, the multi-nic configuration in Azure will require the use of multiple subnet networks to accom-modate the segregated NIC’s. This component is configured using the VNET component of the Azure Portal.
Example: Multiple vNIC’s attached to an Azure VM
Note:Different VM sizes support a varying number of NICs, so size your VM accordingly.https://docs.microsoft.com/en-us/azure/virtual-machines/linux/sizes
NetScaler Multi-Nic Configuration
The following procedure details the necessary steps to deploy a NetScaler virtual appliance on Azure with two virtual NIC’s.
Create the Resource Group
PowerShellCopyNew-AzureRmResourceGroup -Name "myResourceGroup" -Location "EastUS"
19Citrix.com | Solution Guide | Validated Reference Guide for NetScaler and Microsoft Azure
Solution GuideValidated Reference Design Guide for NetScaler and Microsoft Azure
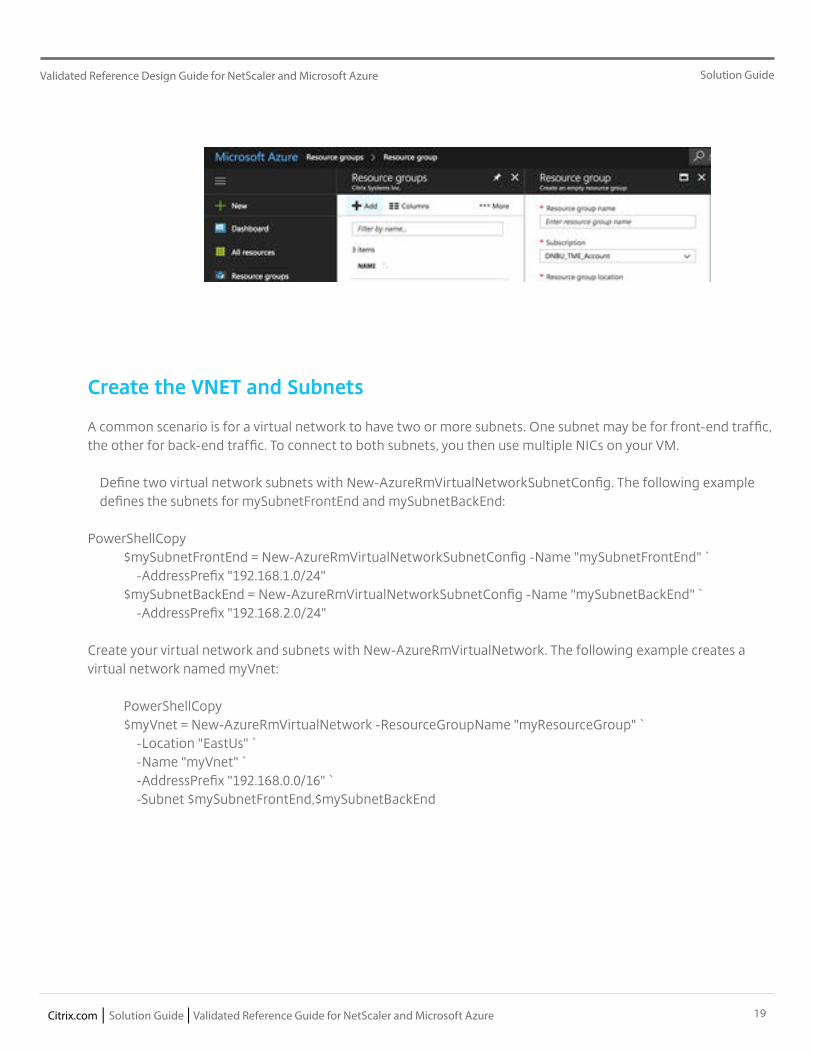
Create the VNET and Subnets
A common scenario is for a virtual network to have two or more subnets. One subnet may be for front-end traffic, the other for back-end traffic. To connect to both subnets, you then use multiple NICs on your VM.
Define two virtual network subnets with New-AzureRmVirtualNetworkSubnetConfig. The following example defines the subnets for mySubnetFrontEnd and mySubnetBackEnd:
PowerShellCopy$mySubnetFrontEnd = New-AzureRmVirtualNetworkSubnetConfig -Name "mySubnetFrontEnd" ` -AddressPrefix "192.168.1.0/24"$mySubnetBackEnd = New-AzureRmVirtualNetworkSubnetConfig -Name "mySubnetBackEnd" ` -AddressPrefix "192.168.2.0/24"
Create your virtual network and subnets with New-AzureRmVirtualNetwork. The following example creates a virtual network named myVnet:
PowerShellCopy$myVnet = New-AzureRmVirtualNetwork -ResourceGroupName "myResourceGroup" ` -Location "EastUs" ` -Name "myVnet" ` -AddressPrefix "192.168.0.0/16" ` -Subnet $mySubnetFrontEnd,$mySubnetBackEnd
20Citrix.com | Solution Guide | Validated Reference Guide for NetScaler and Microsoft Azure
Solution GuideValidated Reference Design Guide for NetScaler and Microsoft Azure
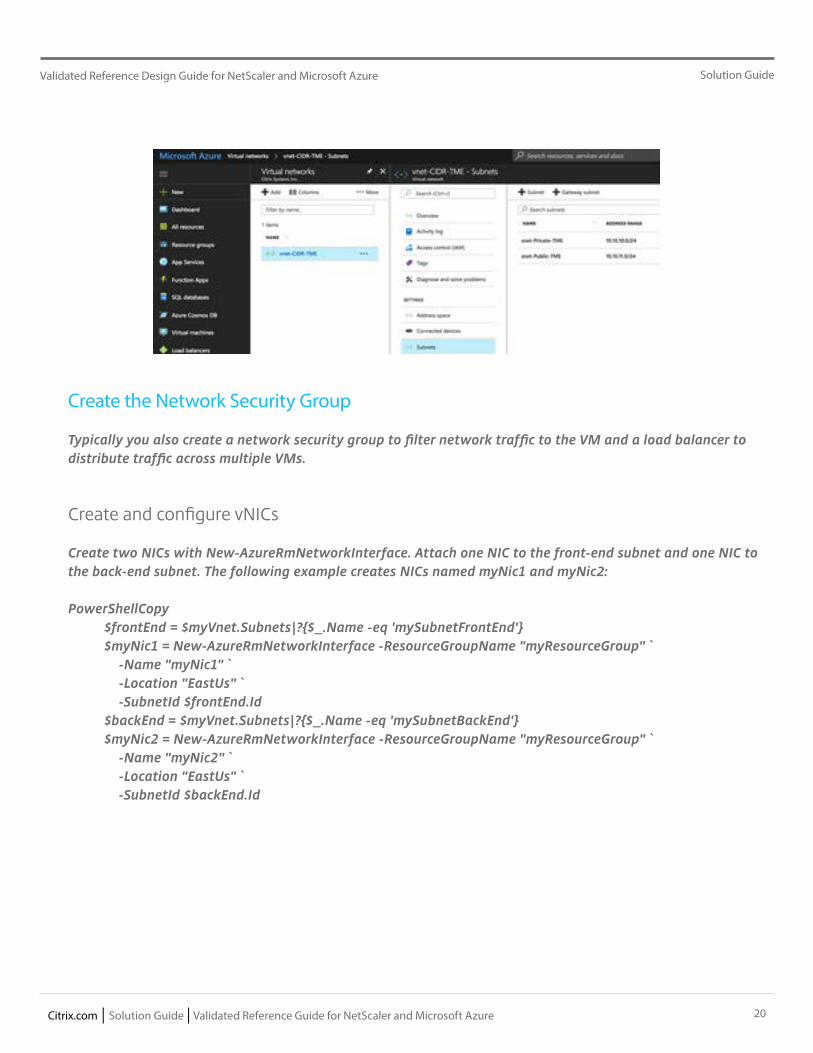
Create the Network Security Group
Typically you also create a network security group to filter network traffic to the VM and a load balancer to distribute traffic across multiple VMs.
Create and configure vNICs
Create two NICs with New-AzureRmNetworkInterface. Attach one NIC to the front-end subnet and one NIC to the back-end subnet. The following example creates NICs named myNic1 and myNic2:
PowerShellCopy$frontEnd = $myVnet.Subnets|?{$_.Name -eq 'mySubnetFrontEnd'}$myNic1 = New-AzureRmNetworkInterface -ResourceGroupName "myResourceGroup" ` -Name "myNic1" ` -Location "EastUs" ` -SubnetId $frontEnd.Id$backEnd = $myVnet.Subnets|?{$_.Name -eq 'mySubnetBackEnd'}$myNic2 = New-AzureRmNetworkInterface -ResourceGroupName "myResourceGroup" ` -Name "myNic2" ` -Location "EastUs" ` -SubnetId $backEnd.Id
21Citrix.com | Solution Guide | Validated Reference Guide for NetScaler and Microsoft Azure
Solution GuideValidated Reference Design Guide for NetScaler and Microsoft Azure
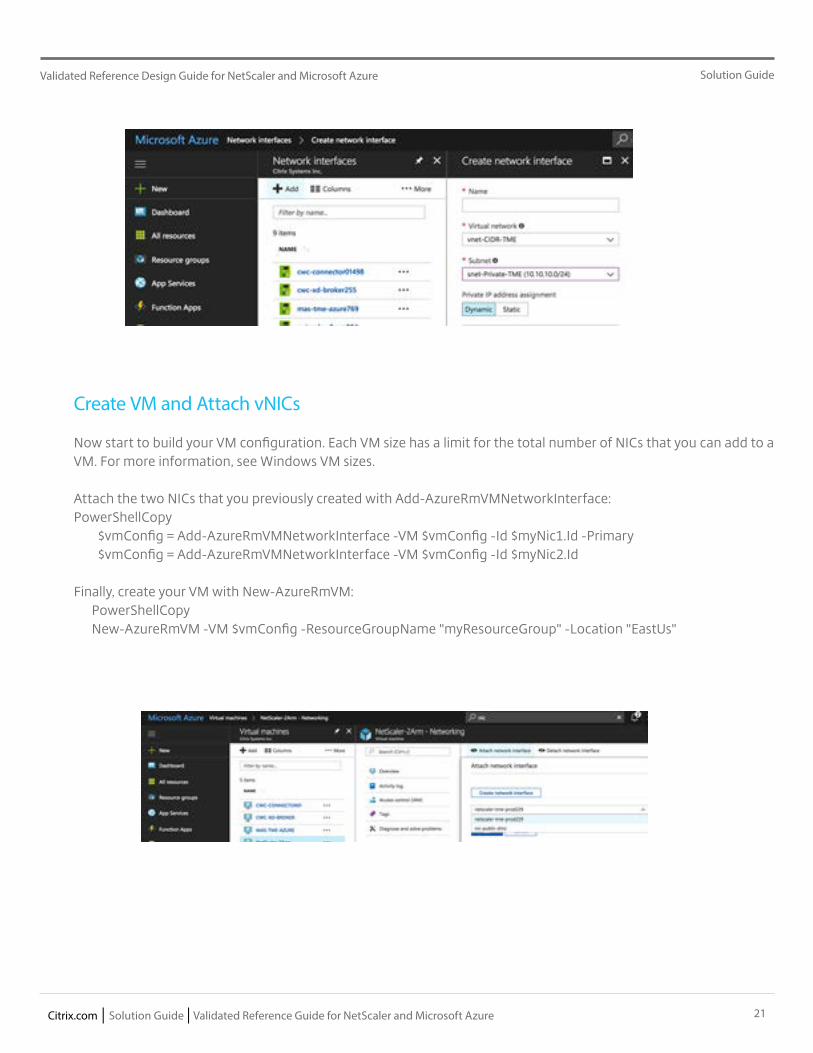
Create VM and Attach vNICs
Now start to build your VM configuration. Each VM size has a limit for the total number of NICs that you can add to a VM. For more information, see Windows VM sizes.
Attach the two NICs that you previously created with Add-AzureRmVMNetworkInterface:PowerShellCopy
$vmConfig = Add-AzureRmVMNetworkInterface -VM $vmConfig -Id $myNic1.Id -Primary$vmConfig = Add-AzureRmVMNetworkInterface -VM $vmConfig -Id $myNic2.Id
Finally, create your VM with New-AzureRmVM:PowerShellCopyNew-AzureRmVM -VM $vmConfig -ResourceGroupName "myResourceGroup" -Location "EastUs"
22Citrix.com | Solution Guide | Validated Reference Guide for NetScaler and Microsoft Azure
Solution GuideValidated Reference Design Guide for NetScaler and Microsoft Azure
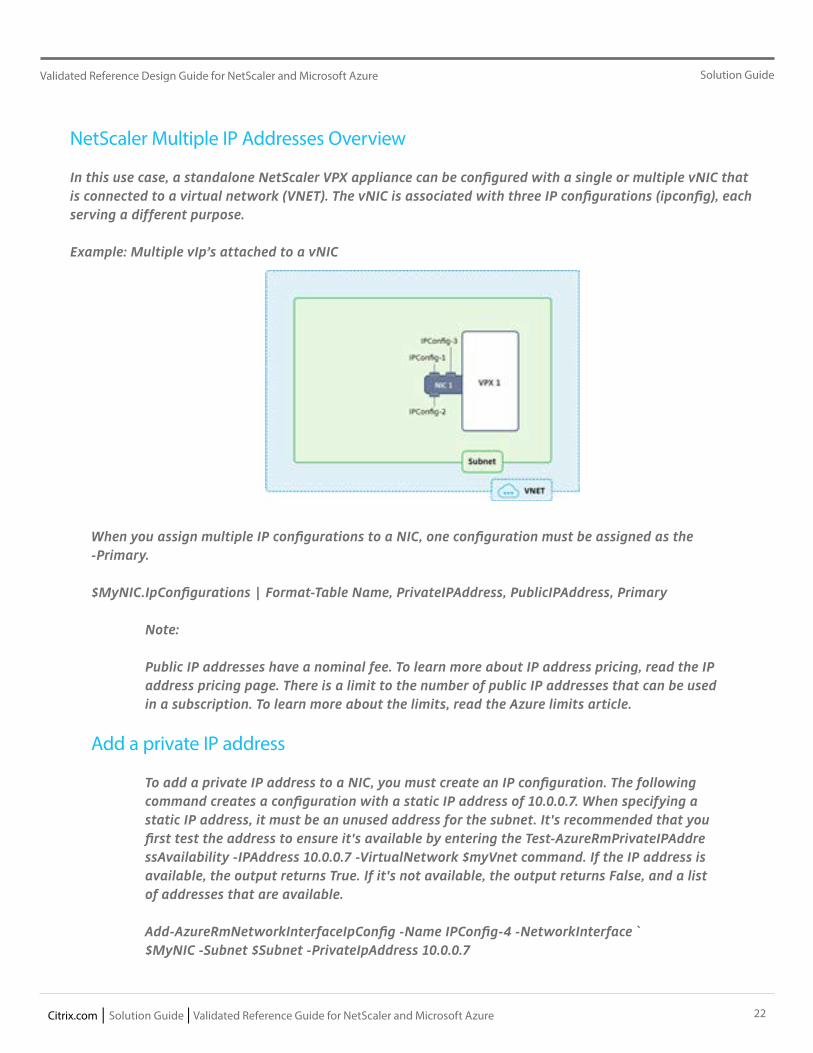
NetScaler Multiple IP Addresses Overview
In this use case, a standalone NetScaler VPX appliance can be configured with a single or multiple vNIC that is connected to a virtual network (VNET). The vNIC is associated with three IP configurations (ipconfig), each serving a different purpose.
Example: Multiple vIp’s attached to a vNIC
When you assign multiple IP configurations to a NIC, one configuration must be assigned as the -Primary.
$MyNIC.IpConfigurations | Format-Table Name, PrivateIPAddress, PublicIPAddress, Primary
Note:
Public IP addresses have a nominal fee. To learn more about IP address pricing, read the IP address pricing page. There is a limit to the number of public IP addresses that can be used in a subscription. To learn more about the limits, read the Azure limits article.
Add a private IP address
To add a private IP address to a NIC, you must create an IP configuration. The following command creates a configuration with a static IP address of 10.0.0.7. When specifying a static IP address, it must be an unused address for the subnet. It's recommended that you first test the address to ensure it's available by entering the Test-AzureRmPrivateIPAddressAvailability -IPAddress 10.0.0.7 -VirtualNetwork $myVnet command. If the IP address is available, the output returns True. If it's not available, the output returns False, and a list of addresses that are available.
Add-AzureRmNetworkInterfaceIpConfig -Name IPConfig-4 -NetworkInterface `$MyNIC -Subnet $Subnet -PrivateIpAddress 10.0.0.7

23Citrix.com | Solution Guide | Validated Reference Guide for NetScaler and Microsoft Azure
Solution GuideValidated Reference Design Guide for NetScaler and Microsoft Azure
Add a public IP address
A public IP address is added by associating a public IP address resource to either a new IP configuration or an existing IP configuration. Complete the steps in one of the sections that follow, as you require.
$MyPublicIp3 = New-AzureRmPublicIpAddress ` -Name "MyPublicIp3" ` -ResourceGroupName $RgName ` -Location $Location -AllocationMethod Static
24Citrix.com | Solution Guide | Validated Reference Guide for NetScaler and Microsoft Azure
Solution GuideValidated Reference Design Guide for NetScaler and Microsoft Azure
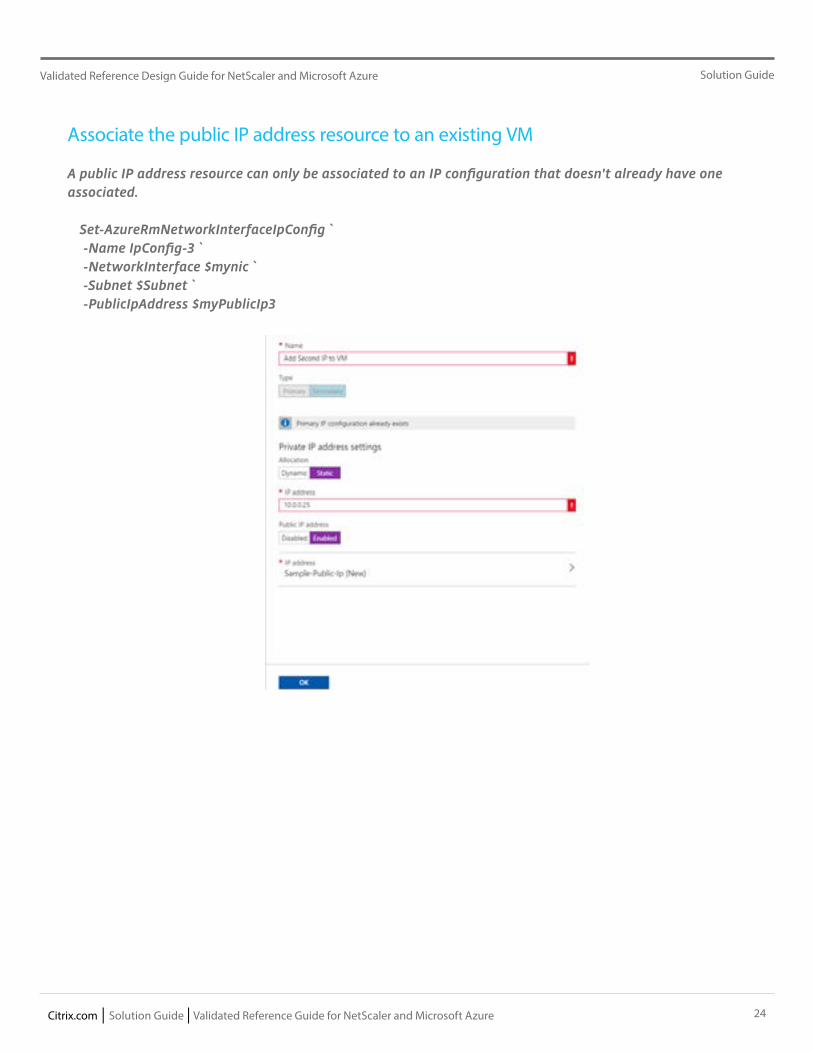
Associate the public IP address resource to an existing VM
A public IP address resource can only be associated to an IP configuration that doesn't already have one associated.
Set-AzureRmNetworkInterfaceIpConfig ` -Name IpConfig-3 ` -NetworkInterface $mynic ` -Subnet $Subnet ` -PublicIpAddress $myPublicIp3
25Citrix.com | Solution Guide | Validated Reference Guide for NetScaler and Microsoft Azure
Solution GuideValidated Reference Design Guide for NetScaler and Microsoft Azure
NetScaler HA Overview
You can deploy a pair of NetScaler virtual appliances with multiple NICs in an active-passive high availability (HA) setup on Azure. Each NIC can contain multiple IP addresses.An active-passive deployment requires:• An HA Independent Network Configuration (INC) configuration• The Azure Load Balancer (ALB) in Direct Server Return (DSR) mode All traffic goes through the primary node. The secondary node remains in standby mode until the primary node fails. In an active-passive deployment, the ALB floating public IP (PIP) addresses are added as the VIP addresses in each NetScaler node. In HA-INC configuration, the VIP addresses are floating and SNIP addresses are instance specific.ALB monitors each NetScaler instances by sending health probe at every 5 seconds and redirects traffic to that instance only that sends health probes response on regular interval. So in an HA setup, the primary node responds to health probes and secondary does not. If the primary instances misses two consecutive health probes, ALB does not redirect traffic to that instance. On failover, the new primary starts responding to health probes and the ALB redirects traffic to it. The standard NetScaler HA failover time is three seconds. The total failover time that might take for traffic switching can be maximum of 13 seconds.
You can deploy a NetScaler pair in active-passive HA mode in two ways by using:
• Citrix NetScaler Standard HA template: use this option to configure an HA pair with the default option of three subnets and six NICs.
• Windows PowerShell commands: use this option to configure an HA pair according to your subnet and NIC requirements.
NetScaler HA Configuration - Powershell
Please refer to the following link for the Azure Powershell commands:
https://docs.citrix.com/en-us/netscaler/12/deploying-vpx/deploy-vpx-on-azure/configure-ha-pair-using-powershell.html
26Citrix.com | Solution Guide | Validated Reference Guide for NetScaler and Microsoft Azure
Solution GuideValidated Reference Design Guide for NetScaler and Microsoft Azure
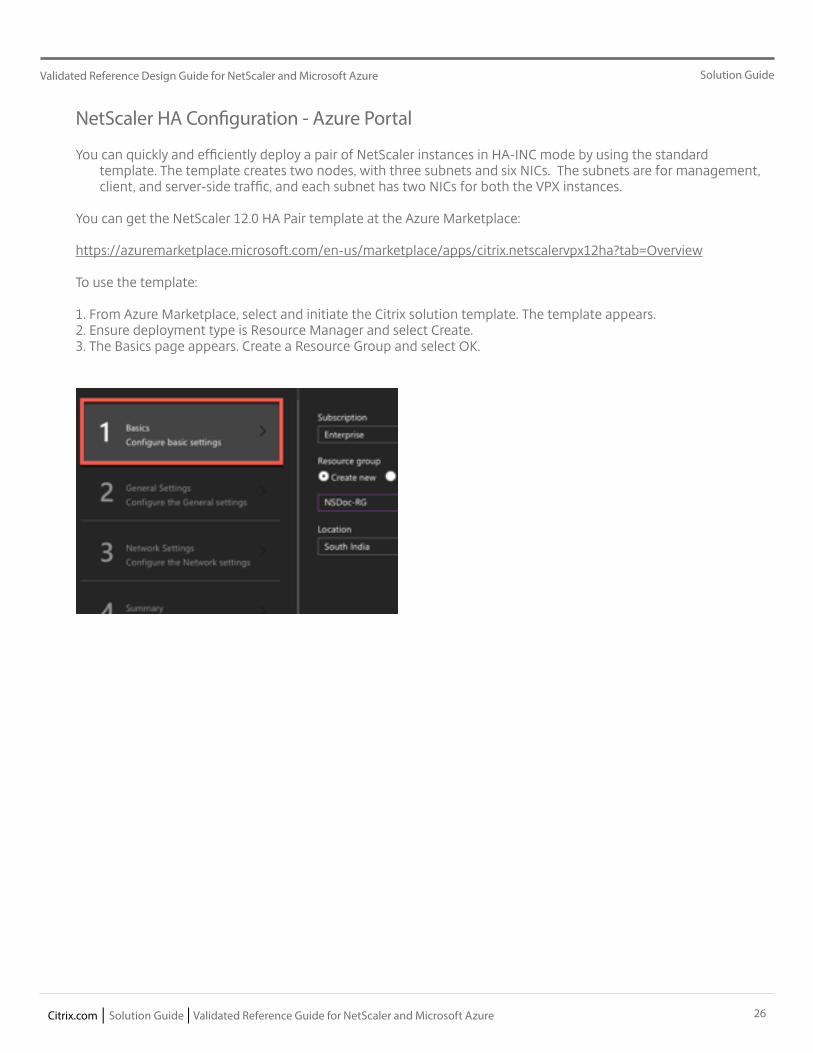
NetScaler HA Configuration - Azure Portal
You can quickly and efficiently deploy a pair of NetScaler instances in HA-INC mode by using the standard template. The template creates two nodes, with three subnets and six NICs. The subnets are for management, client, and server-side traffic, and each subnet has two NICs for both the VPX instances.
You can get the NetScaler 12.0 HA Pair template at the Azure Marketplace:
https://azuremarketplace.microsoft.com/en-us/marketplace/apps/citrix.netscalervpx12ha?tab=Overview
To use the template:
1. From Azure Marketplace, select and initiate the Citrix solution template. The template appears.2. Ensure deployment type is Resource Manager and select Create. 3. The Basics page appears. Create a Resource Group and select OK.
27Citrix.com | Solution Guide | Validated Reference Guide for NetScaler and Microsoft Azure
Solution GuideValidated Reference Design Guide for NetScaler and Microsoft Azure
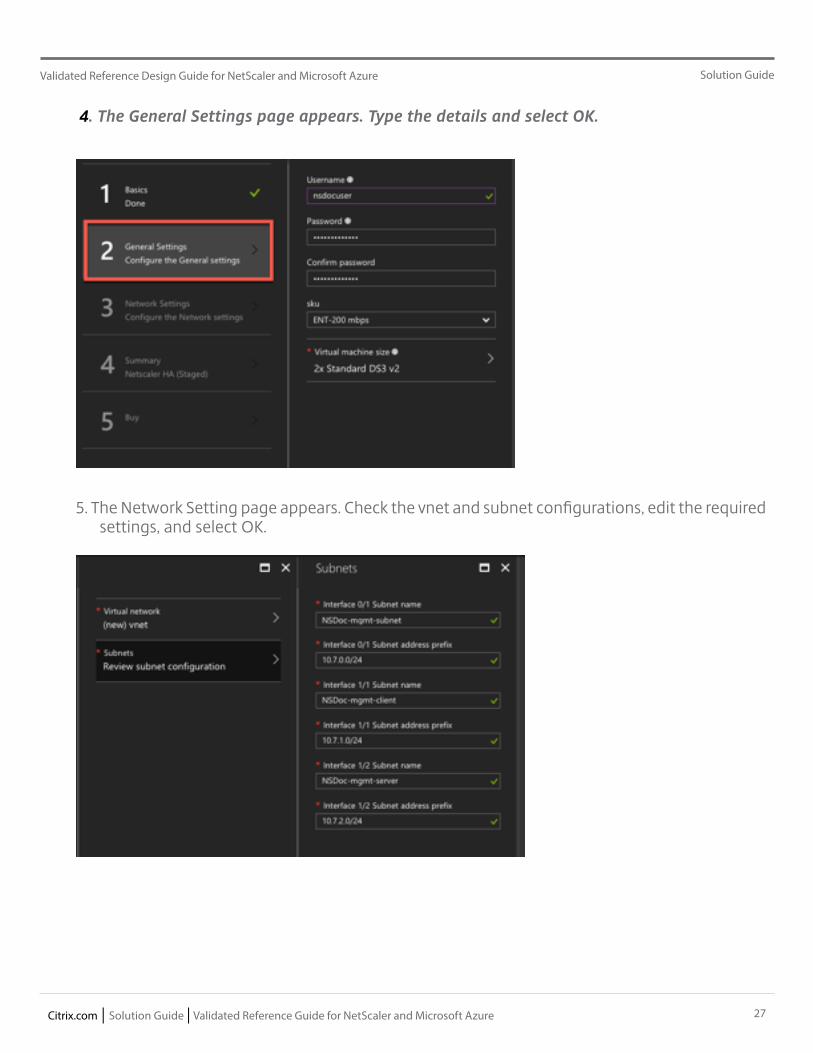
4. The General Settings page appears. Type the details and select OK.
5. The Network Setting page appears. Check the vnet and subnet configurations, edit the required settings, and select OK.
28Citrix.com | Solution Guide | Validated Reference Guide for NetScaler and Microsoft Azure
Solution GuideValidated Reference Design Guide for NetScaler and Microsoft Azure
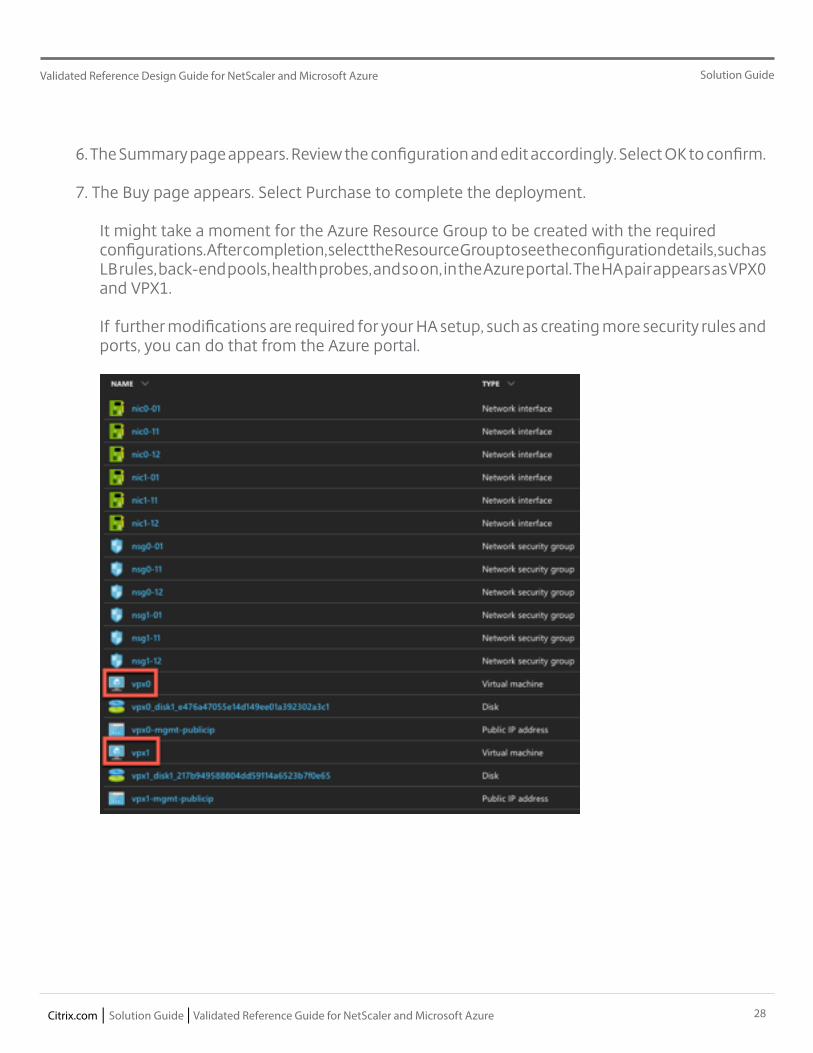
6. The Summary page appears. Review the configuration and edit accordingly. Select OK to confirm.
7. The Buy page appears. Select Purchase to complete the deployment.
It might take a moment for the Azure Resource Group to be created with the required configurations. After completion, select the Resource Group to see the configuration details, such as LB rules, back-end pools, health probes, and so on, in the Azure portal. The HA pair appears as VPX0 and VPX1.
If further modifications are required for your HA setup, such as creating more security rules and ports, you can do that from the Azure portal.
29Citrix.com | Solution Guide | Validated Reference Guide for NetScaler and Microsoft Azure
Solution GuideValidated Reference Design Guide for NetScaler and Microsoft Azure
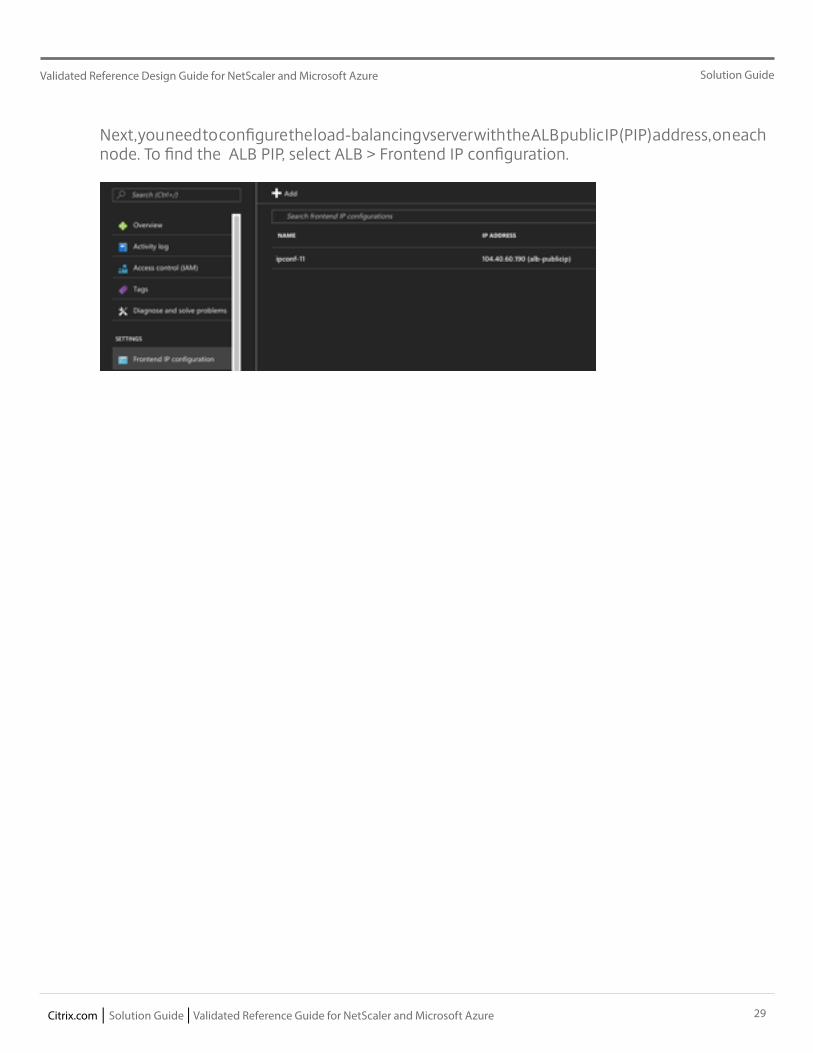
Next, you need to configure the load-balancing vserver with the ALB public IP (PIP) address, on each node. To find the ALB PIP, select ALB > Frontend IP configuration.
30Citrix.com | Solution Guide | Validated Reference Guide for NetScaler and Microsoft Azure
Solution GuideValidated Reference Design Guide for NetScaler and Microsoft Azure
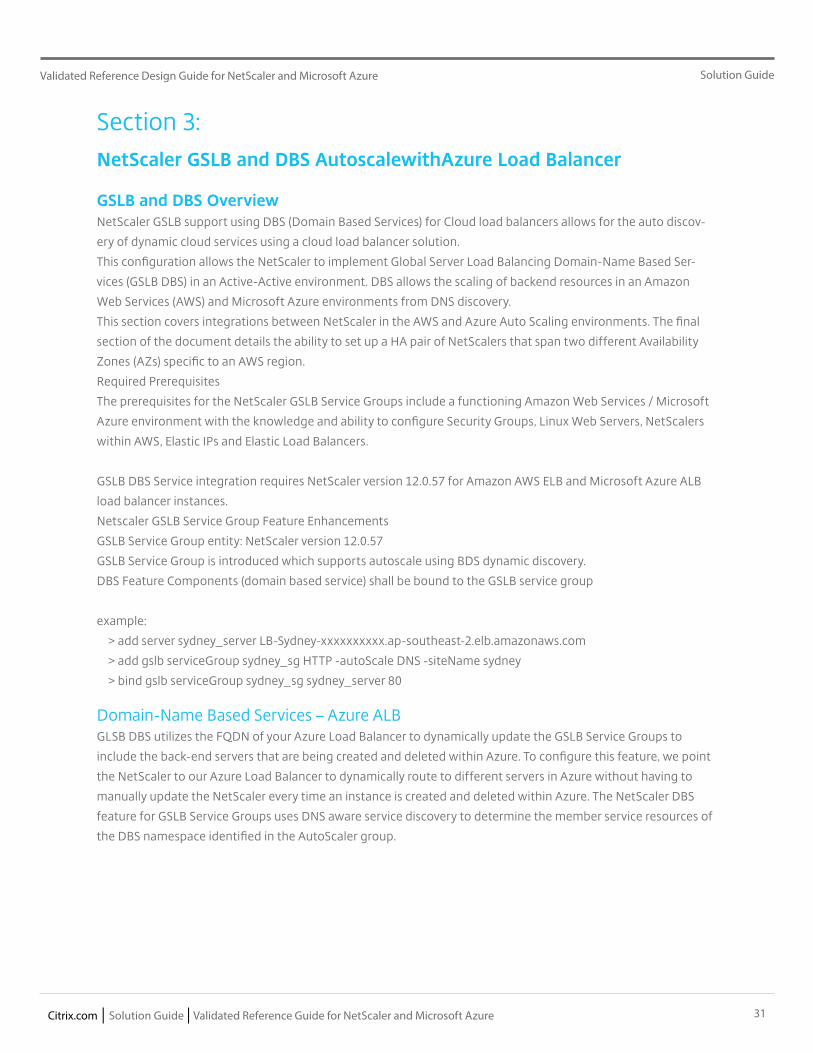
Netscaler GSLB Service Group Feature EnhancementsGSLB Service Group entity: NetScaler version 12.0.57GSLB Service Group is introduced which supports autoscale using BDS dynamic discovery.DBS Feature Components (domain based service) shall be bound to the GSLB service group example: > add server sydney_server LB-Sydney-xxxxxxxxxx.ap-southeast-2.elb.amazonaws.com > add gslb serviceGroup sydney_sg HTTP -autoScale DNS -siteName sydney > bind gslb serviceGroup sydney_sg sydney_server 80
31Citrix.com | Solution Guide | Validated Reference Guide for NetScaler and Microsoft Azure
Solution GuideValidated Reference Design Guide for NetScaler and Microsoft Azure
Section 3: NetScaler GSLB and DBS AutoscalewithAzure Load Balancer
GSLB and DBS OverviewNetScaler GSLB support using DBS (Domain Based Services) for Cloud load balancers allows for the auto discov-
ery of dynamic cloud services using a cloud load balancer solution.
This configuration allows the NetScaler to implement Global Server Load Balancing Domain-Name Based Ser-
vices (GSLB DBS) in an Active-Active environment. DBS allows the scaling of backend resources in an Amazon
Web Services (AWS) and Microsoft Azure environments from DNS discovery.
This section covers integrations between NetScaler in the AWS and Azure Auto Scaling environments. The final
section of the document details the ability to set up a HA pair of NetScalers that span two different Availability
Zones (AZs) specific to an AWS region.
Required Prerequisites
The prerequisites for the NetScaler GSLB Service Groups include a functioning Amazon Web Services / Microsoft
Azure environment with the knowledge and ability to configure Security Groups, Linux Web Servers, NetScalers
within AWS, Elastic IPs and Elastic Load Balancers.
GSLB DBS Service integration requires NetScaler version 12.0.57 for Amazon AWS ELB and Microsoft Azure ALB
load balancer instances.
Netscaler GSLB Service Group Feature Enhancements
GSLB Service Group entity: NetScaler version 12.0.57
GSLB Service Group is introduced which supports autoscale using BDS dynamic discovery.
DBS Feature Components (domain based service) shall be bound to the GSLB service group
example:
> add server sydney_server LB-Sydney-xxxxxxxxxx.ap-southeast-2.elb.amazonaws.com
> add gslb serviceGroup sydney_sg HTTP -autoScale DNS -siteName sydney
> bind gslb serviceGroup sydney_sg sydney_server 80
Domain-Name Based Services – Azure ALBGLSB DBS utilizes the FQDN of your Azure Load Balancer to dynamically update the GSLB Service Groups to
include the back-end servers that are being created and deleted within Azure. To configure this feature, we point
the NetScaler to our Azure Load Balancer to dynamically route to different servers in Azure without having to
manually update the NetScaler every time an instance is created and deleted within Azure. The NetScaler DBS
feature for GSLB Service Groups uses DNS aware service discovery to determine the member service resources of
the DBS namespace identified in the AutoScaler group.
32Citrix.com | Solution Guide | Validated Reference Guide for NetScaler and Microsoft Azure
Solution GuideValidated Reference Design Guide for NetScaler and Microsoft Azure
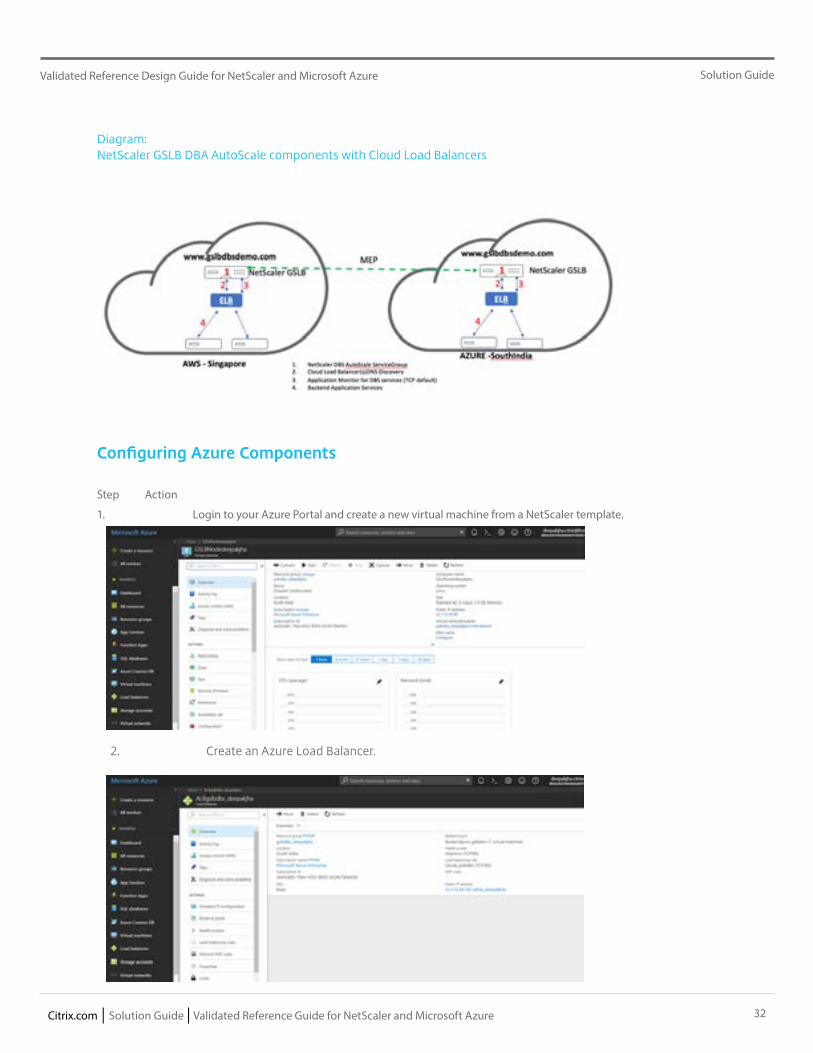
Diagram:NetScaler GSLB DBA AutoScale components with Cloud Load Balancers
Configuring Azure Components
Step Action
1. Login to your Azure Portal and create a new virtual machine from a NetScaler template.
2. Create an Azure Load Balancer.

33Citrix.com | Solution Guide | Validated Reference Guide for NetScaler and Microsoft Azure
Solution GuideValidated Reference Design Guide for NetScaler and Microsoft Azure
3. Add the created NetScaler to the Backend Pools.
4. Create a Health Probe for port 80.
Create a Load Balancing Rule utilizing the Frontend IP created from the Load Balancer. Protocol: TCPBackend Port: 80Backend pool: NetScaler created in step 1Health Probe: Created in step 5Session Persistence: None
Configure NetScaler GSLB Domain Based Service
Traffic Management configurations
Note:It is required to configure the NetScaler with either a nameserver or a dns vserver through which the ELB /ALB Domains will be resolved for the DBS Service Groups.
https://developer-docs.citrix.com/projects/netscaler-command-reference/en/12.0/dns/dns-nam-eserver/dns-nameserver/
34Citrix.com | Solution Guide | Validated Reference Guide for NetScaler and Microsoft Azure
Solution GuideValidated Reference Design Guide for NetScaler and Microsoft Azure
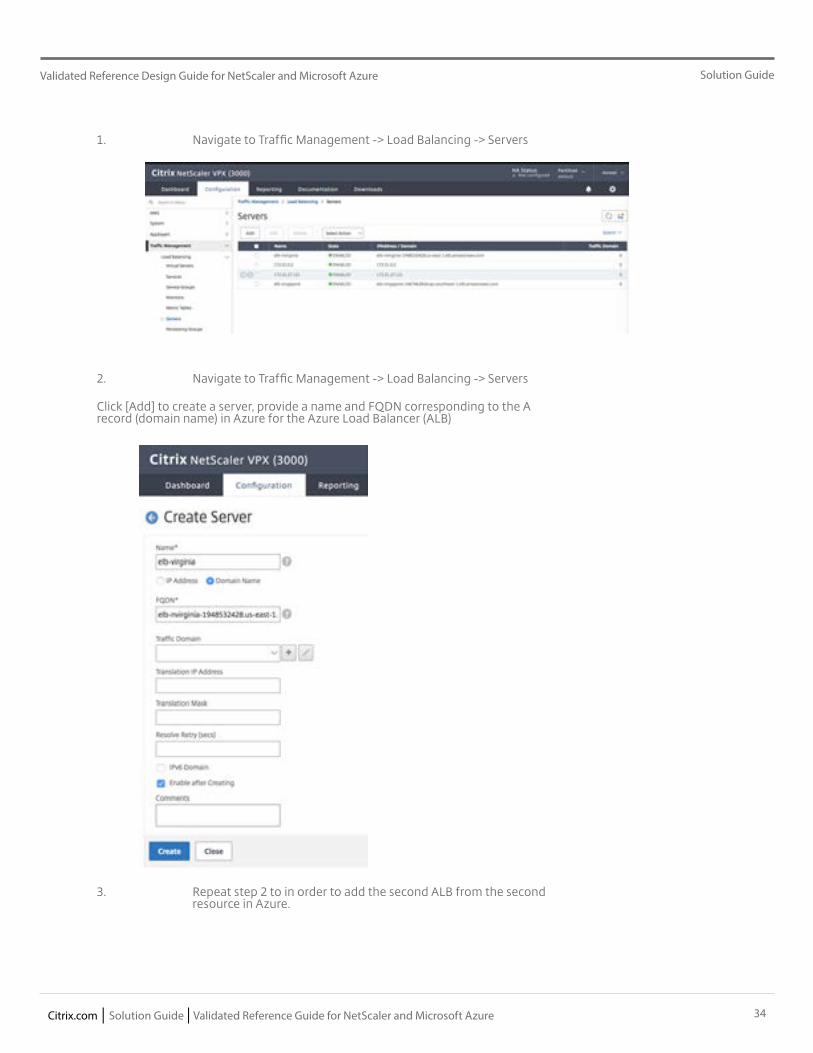
1. Navigate to Traffic Management -> Load Balancing -> Servers
2. Navigate to Traffic Management -> Load Balancing -> Servers
Click [Add] to create a server, provide a name and FQDN corresponding to the A record (domain name) in Azure for the Azure Load Balancer (ALB)
3. Repeat step 2 to in order to add the second ALB from the second resource in Azure.

35Citrix.com | Solution Guide | Validated Reference Guide for NetScaler and Microsoft Azure
Solution GuideValidated Reference Design Guide for NetScaler and Microsoft Azure
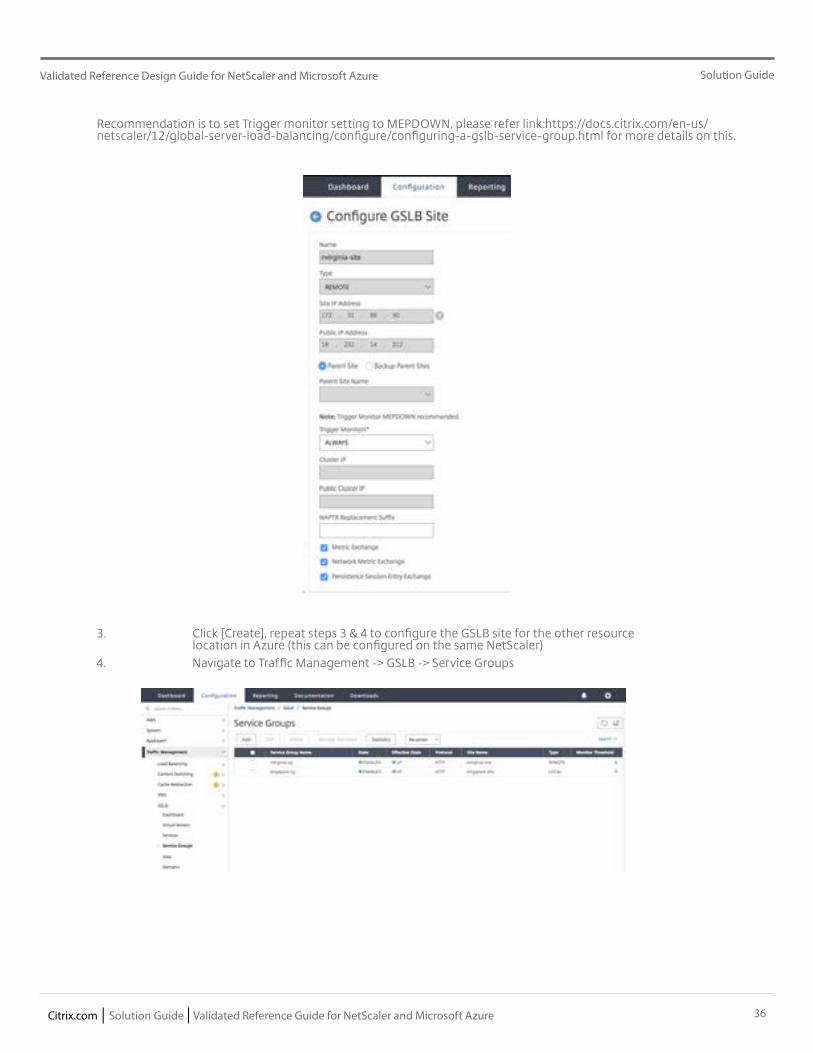
GSLB Configurations
1. Click the [Add] button to configure a GSLB Site2. Name the Site
Type is configured as Remote or Local based on which NetScaler you are configuring the site on. The Site IP Address is the IP address for the GSLB site. The GSLB site uses this IP address to communicate with the other GSLB sites. The Public IP address is required when using a cloud service where a particular IP is hosted on an external firewall or NAT device. The site should be configured as a Parent Site. Ensure the Trigger Monitors are set to ALWAYS and be sure to check off the three boxes at the bottom for Metric Exchange, Network Metric Exchange, and Persistence Session Entry Exchange.
Recommendation is to set Trigger monitor setting to MEPDOWN, please refer link:https://docs.citrix.com/en-us/netscaler/12/global-server-load-balancing/configure/configuring-a-gslb-service-group.html for more details on this.
36Citrix.com | Solution Guide | Validated Reference Guide for NetScaler and Microsoft Azure
Solution GuideValidated Reference Design Guide for NetScaler and Microsoft Azure
Recommendation is to set Trigger monitor setting to MEPDOWN, please refer link:https://docs.citrix.com/en-us/netscaler/12/global-server-load-balancing/configure/configuring-a-gslb-service-group.html for more details on this.
3. Click [Create], repeat steps 3 & 4 to configure the GSLB site for the other resource location in Azure (this can be configured on the same NetScaler)4. Navigate to Traffic Management -> GSLB -> Service Groups
37Citrix.com | Solution Guide | Validated Reference Guide for NetScaler and Microsoft Azure
Solution GuideValidated Reference Design Guide for NetScaler and Microsoft Azure
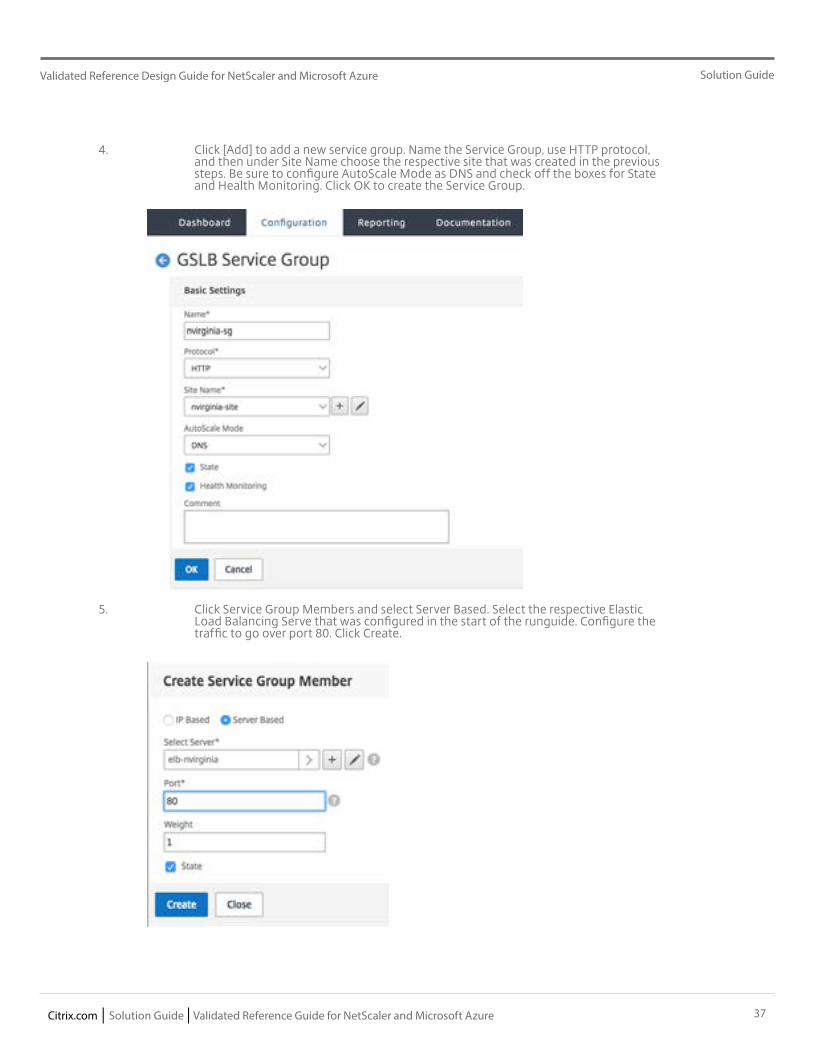
4. Click [Add] to add a new service group. Name the Service Group, use HTTP protocol, and then under Site Name choose the respective site that was created in the previous steps. Be sure to configure AutoScale Mode as DNS and check off the boxes for State and Health Monitoring. Click OK to create the Service Group.
5. Click Service Group Members and select Server Based. Select the respective Elastic Load Balancing Serve that was configured in the start of the runguide. Configure the traffic to go over port 80. Click Create.
38Citrix.com | Solution Guide | Validated Reference Guide for NetScaler and Microsoft Azure
Solution GuideValidated Reference Design Guide for NetScaler and Microsoft Azure
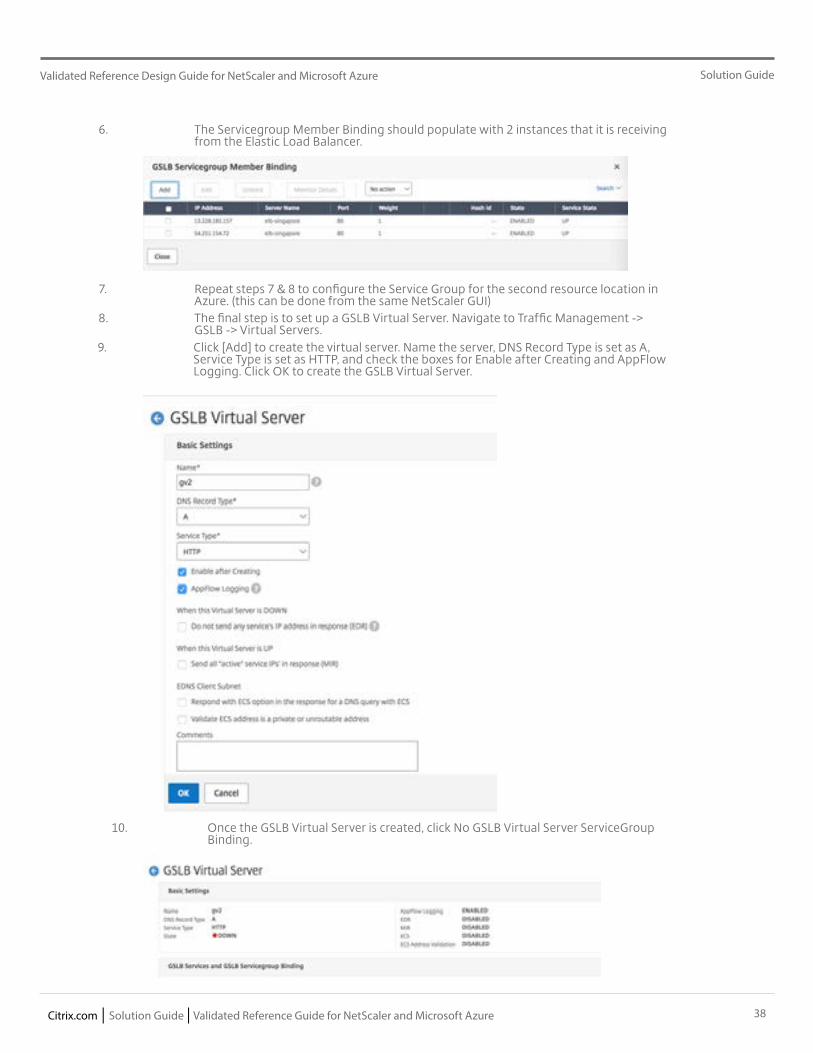
6. The Servicegroup Member Binding should populate with 2 instances that it is receiving from the Elastic Load Balancer.
7. Repeat steps 7 & 8 to configure the Service Group for the second resource location in Azure. (this can be done from the same NetScaler GUI)8. The final step is to set up a GSLB Virtual Server. Navigate to Traffic Management -> GSLB -> Virtual Servers.9. Click [Add] to create the virtual server. Name the server, DNS Record Type is set as A, Service Type is set as HTTP, and check the boxes for Enable after Creating and AppFlow Logging. Click OK to create the GSLB Virtual Server.
10. Once the GSLB Virtual Server is created, click No GSLB Virtual Server ServiceGroup Binding.
39Citrix.com | Solution Guide | Validated Reference Guide for NetScaler and Microsoft Azure
Solution GuideValidated Reference Design Guide for NetScaler and Microsoft Azure
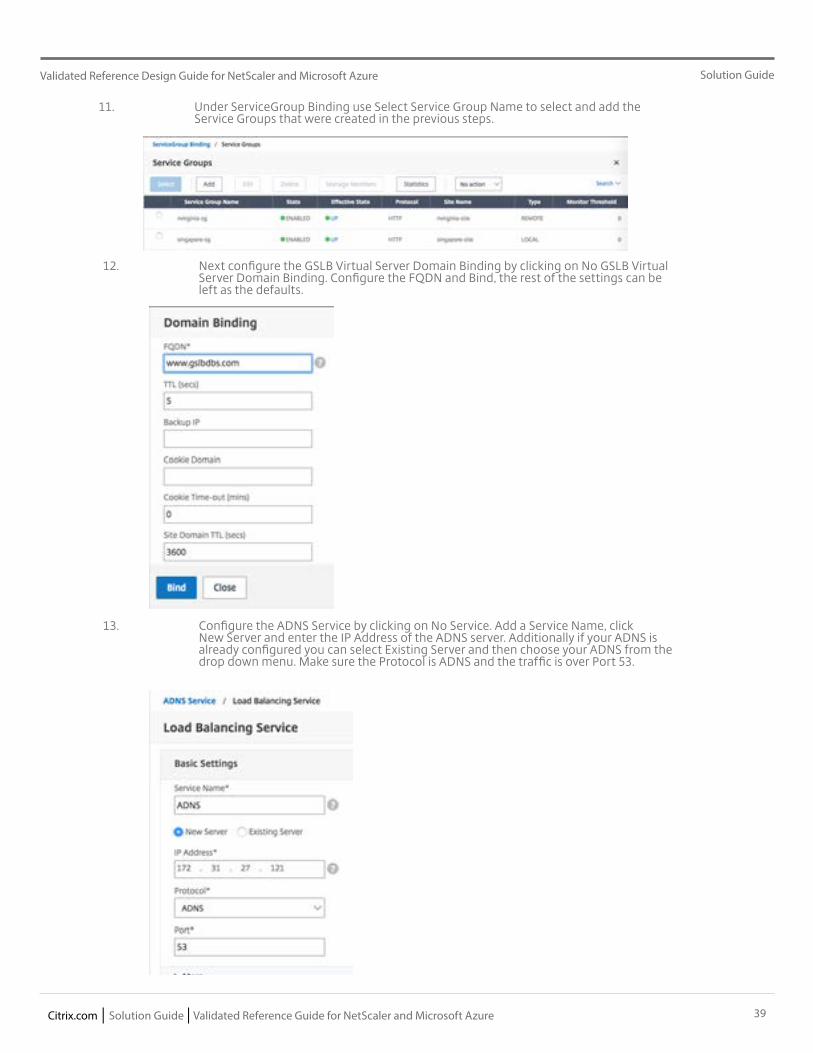
11. Under ServiceGroup Binding use Select Service Group Name to select and add the Service Groups that were created in the previous steps.
12. Next configure the GSLB Virtual Server Domain Binding by clicking on No GSLB Virtual Server Domain Binding. Configure the FQDN and Bind, the rest of the settings can be left as the defaults.
13. Configure the ADNS Service by clicking on No Service. Add a Service Name, click New Server and enter the IP Address of the ADNS server. Additionally if your ADNS is already configured you can select Existing Server and then choose your ADNS from the drop down menu. Make sure the Protocol is ADNS and the traffic is over Port 53.

40Citrix.com | Solution Guide | Validated Reference Guide for NetScaler and Microsoft Azure
Solution GuideValidated Reference Design Guide for NetScaler and Microsoft Azure
14. Configure the Method as LEASTCONNECTION and Backup Method as ROUNDROBIN
15. Click Done and verify that your GSLB Virtual Server is shown as Up
41Citrix.com | Solution Guide | Validated Reference Guide for NetScaler and Microsoft Azure
Solution GuideValidated Reference Design Guide for NetScaler and Microsoft Azure
Additional References
Deploying Citrix NetScaler VPX on Microsoft Azure
https://docs.citrix.com/en-us/netscaler/11/getting-started-with-vpx/deploy-vpx-on-azure.html#par_richtext_4
Microsoft Azure Documentation
http://azure.microsoft.com/en-us/documentation/
Assign multiple IP addresses to virtual machines using PowerShell
https://docs.microsoft.com/en-us/azure/virtual-network/virtual-network-multiple-ip-addresses-powershell#a-name--cre-ateacreate-a-vm-with-multiple-ip-addresses
Create a VM with multiple NICs using PoweShell
https://docs.microsoft.com/en-us/azure/virtual-network/virtual-network-deploy-multinic-arm-ps
Citrix Product Documentation
https://docs.citrix.com/en-us/netscaler/12/deploying-vpx/deploy-vpx-on-azure/configuring-multiple-ips-for-vpx-us-
ing-azure-resource-manager.html
https://docs.citrix.com/en-us/netscaler/12/deploying-vpx/deploy-vpx-on-azure/configuring-multiple-ips-for-vpx-in-standalone-mode.html
https://docs.citrix.com/en-us/netscaler/12/deploying-vpx/deploy-vpx-on-azure/configuring-multiple-vips-for-arm.html
42Citrix.com | Solution Guide | Validated Reference Guide for NetScaler and Microsoft Azure
Solution GuideValidated Reference Design Guide for NetScaler and Microsoft Azure
About Citrix
Citrix (NASDAQ:CTXS) is a leader in mobile workspaces, providing virtualization, mobility management, net-working and cloud services to enable new ways to work better. Citrix solutions power business mobility through secure, personal workspaces that provide people with instant access to apps, desktops, data and communica-tions on any device, over any network and cloud. This year Citrix is celebrating 25 years of innovation, making IT simpler and people more productive. With annual revenue in 2013 of $2.9 billion, Citrix solutions are in use at more than 330,000 organizations and by over 100 million users globally. Learn more at www.citrix.com.
Copyright © 2014 Citrix Systems, Inc. All rights reserved. Citrix, NetScaler MPX, NetScaler SDX, NetScaler, Cloud-Bridge and AppFlow are trademarks of Citrix Systems, Inc. and/or one of its subsidiaries, and may be registered in the U.S. and other countries. Other product and company names mentioned herein may be trademarks of their respective companies.