vnc viewer 4.4 enterprise edition for mac os x user guide
TRANSCRIPT
V N C V i e w e r 4 . 4
E n t e r p r i s e E d i t i o n f o r M a c O S X
U s e r G u i d e
- 2 -
Copyright © RealVNC Ltd 2008. All Rights Reserved.
Copyright and Confidentiality
Copyright Statement
Copyright © RealVNC Ltd, 2008. All rights reserved.
No part of this documentation may be reproduced in any form or by any means or be used to
make any derivative work (including translation, transformation or adaptation) without explicit
written consent of RealVNC.
Confidentiality Statement
All information contained in this document is provided in commercial confidence for the sole
purpose of use by an authorised user in conjunction with RealVNC’s products. The pages of this
document shall not be copied, published, or disclosed wholly or in part to any party without
RealVNC prior permission in writing, and shall be held in safe custody. These obligations shall not
apply to information which is published or becomes known legitimately from some source other
than RealVNC.
Registered office:
VNC House,
Sturton Street,
Cambridge,
CB1 2SN,
United Kingdom.
www.realvnc.com

Contents
Introduction to VNC ...................................................................................................................................................................... 4
Security ......................................................................................................................................................................................... 4
Authentication ...................................................................................................................................................................... 4
VNC link encryption ............................................................................................................................................................ 4
Installing VNC Viewer ................................................................................................................................................................... 6
Starting VNC Viewer ..................................................................................................................................................................... 6
Making a VNC Viewer connection ................................................................................................................................. 6
Configuration options .................................................................................................................................................................. 8
Display options .......................................................................................................................................................................... 9
Input options ............................................................................................................................................................................ 10
VNC Toolbar .................................................................................................................................................................................. 12
The VNC Address Book .............................................................................................................................................................. 13
To add an entry to the address book ......................................................................................................................... 13
To edit a VNC Viewer Address book entry: .............................................................................................................. 14
To change VNC Address Book settings ..................................................................................................................... 15
VNC Viewer F8 menu .................................................................................................................................................................. 16
Making a VNC Viewer connection using a web browser .............................................................................................. 18
Limitations of VNC Viewer for Java ............................................................................................................................. 19
Using the Listening Viewer ....................................................................................................................................................... 20
To start the VNC Viewer in listening mode .............................................................................................................. 20
To stop listening viewer mode ...................................................................................................................................... 20
Technical Support ........................................................................................................................................................................ 21
Acknowledgements ........................................................................................................................................................... 21
Appendix ......................................................................................................................................................................................... 22
Ports ............................................................................................................................................................................................. 22
IP Addresses .............................................................................................................................................................................. 23
Mac Version Support ............................................................................................................................................................. 24
- 3 -
Copyright © RealVNC Ltd 2008. All Rights Reserved.
- 4 -
Copyright © RealVNC Ltd 2008. All Rights Reserved.
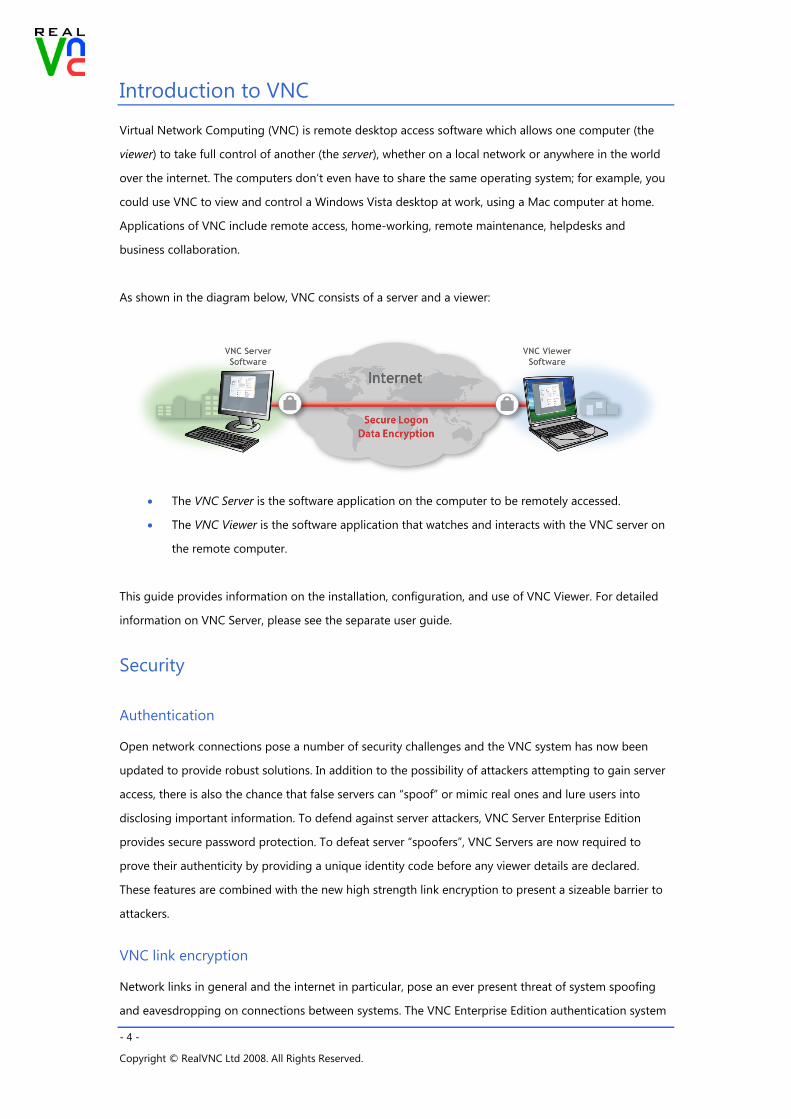
Introduction to VNC
Virtual Network Computing (VNC) is remote desktop access software which allows one computer (the
viewer) to take full control of another (the server), whether on a local network or anywhere in the world
over the internet. The computers don’t even have to share the same operating system; for example, you
could use VNC to view and control a Windows Vista desktop at work, using a Mac computer at home.
Applications of VNC include remote access, home-working, remote maintenance, helpdesks and
business collaboration.
As shown in the diagram below, VNC consists of a server and a viewer:
• The VNC Server is the software application on the computer to be remotely accessed.
• The VNC Viewer is the software application that watches and interacts with the VNC server on
the remote computer.
This guide provides information on the installation, configuration, and use of VNC Viewer. For detailed
information on VNC Server, please see the separate user guide.
Security
Authentication
Open network connections pose a number of security challenges and the VNC system has now been
updated to provide robust solutions. In addition to the possibility of attackers attempting to gain server
access, there is also the chance that false servers can “spoof” or mimic real ones and lure users into
disclosing important information. To defend against server attackers, VNC Server Enterprise Edition
provides secure password protection. To defeat server “spoofers”, VNC Servers are now required to
prove their authenticity by providing a unique identity code before any viewer details are declared.
These features are combined with the new high strength link encryption to present a sizeable barrier to
attackers.
VNC link encryption
Network links in general and the internet in particular, pose an ever present threat of system spoofing
and eavesdropping on connections between systems. The VNC Enterprise Edition authentication system

defeats the former threat, while strong data encryption of the type used by VNC presents a significant
barrier to eavesdroppers. When either VNC Viewer or VNC Server enables encryption, both parties
exchange encryption keys. From that moment, all information is encrypted prior to transmission.
- 5 -
Copyright © RealVNC Ltd 2008. All Rights Reserved.
- 6 -
Copyright © RealVNC Ltd 2008. All Rights Reserved.
Installing VNC Viewer
VNC Viewer is an optional component of the VNC Enterprise Edition for Mac OS X installer. It is
also available as a stand-alone program for download from our web site. The rest of this
document will assume that you have done a full install of VNC Enterprise Edition, including VNC
Viewer. Please see the VNC Server Enterprise Edition for Mac OS X user guide for details.
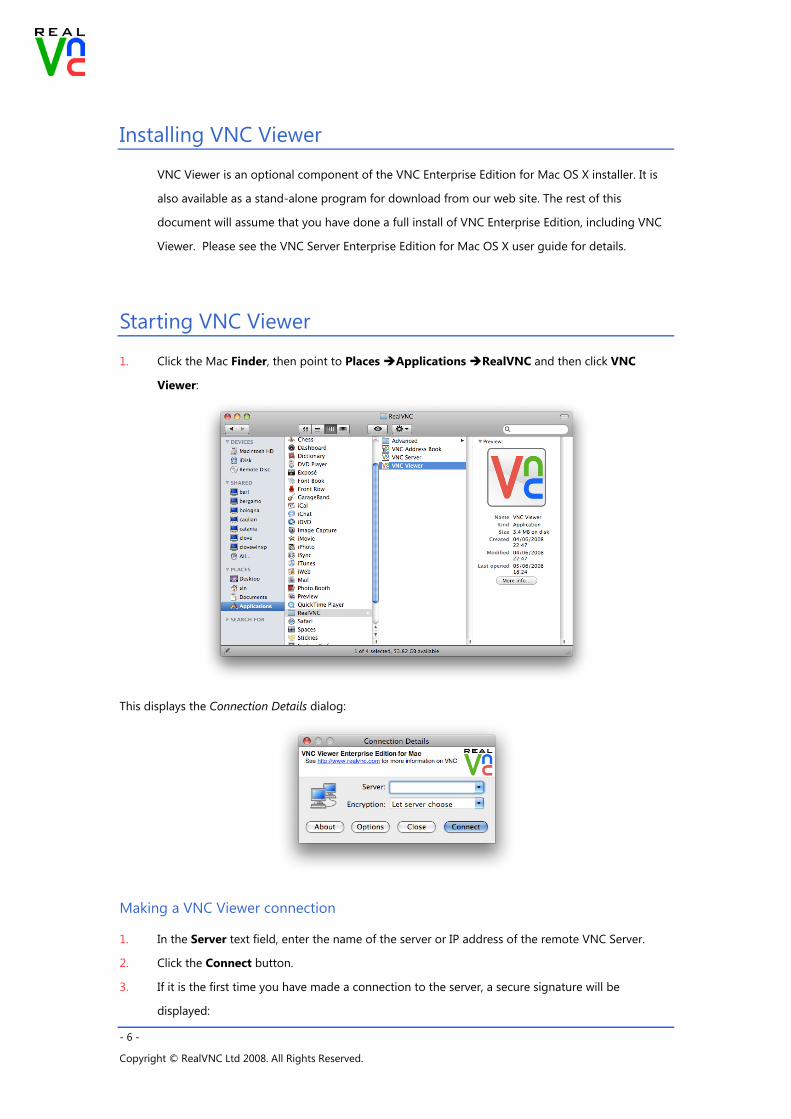
Starting VNC Viewer
1. Click the Mac Finder, then point to Places Applications RealVNC and then click VNC
Viewer:
This displays the Connection Details dialog:
Making a VNC Viewer connection
1. In the Server text field, enter the name of the server or IP address of the remote VNC Server.
2. Click the Connect button.
3. If it is the first time you have made a connection to the server, a secure signature will be
displayed:

4. Click Yes to accept the signature.
5. If required, the Authenticate dialog will be displayed, and you will be prompted to enter your
username and password for the remote server:
6. Enter the Username and Password for the remote server, and then click OK.
7. The VNC Viewer will show you the current desktop of the remote system, and will allow you to
control it:
VNC Viewer
toolbar
VNC Viewer
window
Your Mac
desktop
VNC Viewer icon in the Dock
NB: You can run two or more VNC Viewer Windows in order to view multiple remote systems.
- 7 -
Copyright © RealVNC Ltd 2008. All Rights Reserved.

- 8 -
Copyright © RealVNC Ltd 2008. All Rights Reserved.
Configuration options
On the Connection Details dialog, click Options. This displays the VNC Viewer Basic Options dialog as
shown below:
The first time that you start VNC Viewer, the Basic Options dialog will display in basic mode with the
most frequently used configuration options displayed. In order to display all of the available
configuration options, click the Advanced button. (To switch back to basic mode, click the Basic button
at any time).
THIS GUIDE WILL ASSUME THAT YOU ARE WORKING IN ADVANCED MODE.
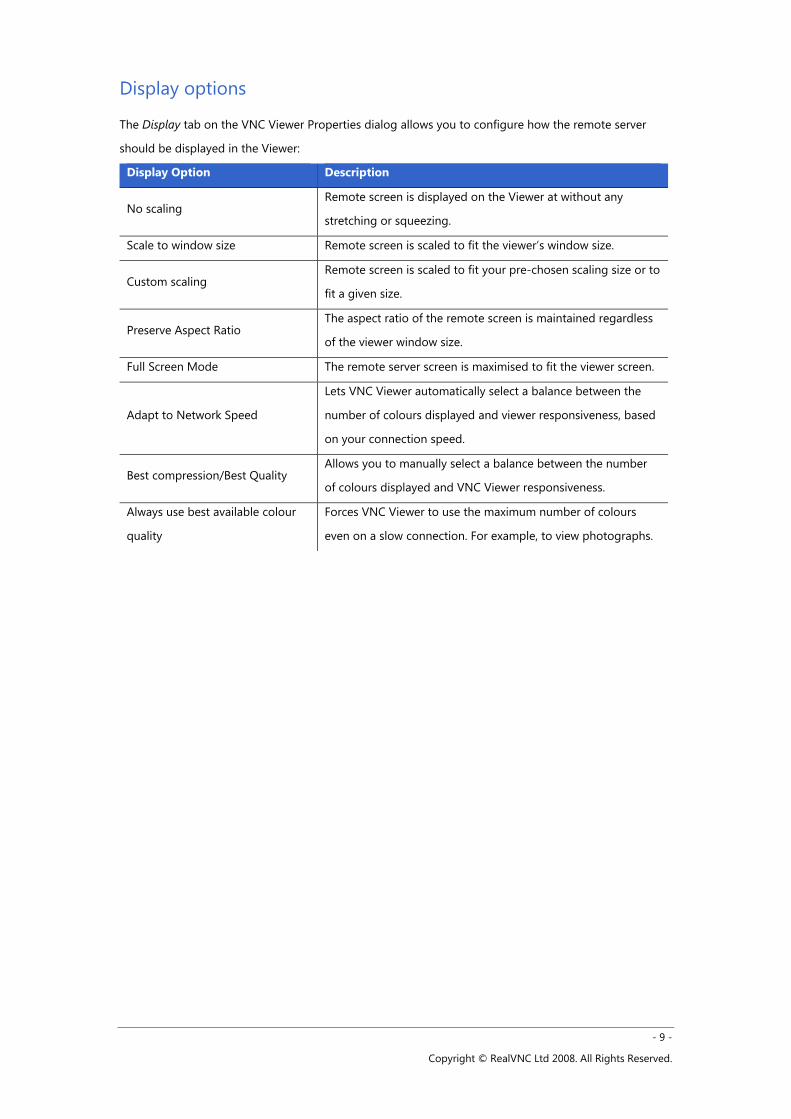
Display options
The Display tab on the VNC Viewer Properties dialog allows you to configure how the remote server
should be displayed in the Viewer:
Display Option Description
No scaling Remote screen is displayed on the Viewer at without any
stretching or squeezing.
Scale to window size Remote screen is scaled to fit the viewer’s window size.
Custom scaling Remote screen is scaled to fit your pre-chosen scaling size or to
fit a given size.
Preserve Aspect Ratio The aspect ratio of the remote screen is maintained regardless
of the viewer window size.
Full Screen Mode The remote server screen is maximised to fit the viewer screen.
Adapt to Network Speed
Lets VNC Viewer automatically select a balance between the
number of colours displayed and viewer responsiveness, based
on your connection speed.
Best compression/Best Quality Allows you to manually select a balance between the number
of colours displayed and VNC Viewer responsiveness.
Always use best available colour
quality
Forces VNC Viewer to use the maximum number of colours
even on a slow connection. For example, to view photographs.
- 9 -
Copyright © RealVNC Ltd 2008. All Rights Reserved.
- 10 -
Copyright © RealVNC Ltd 2008. All Rights Reserved.
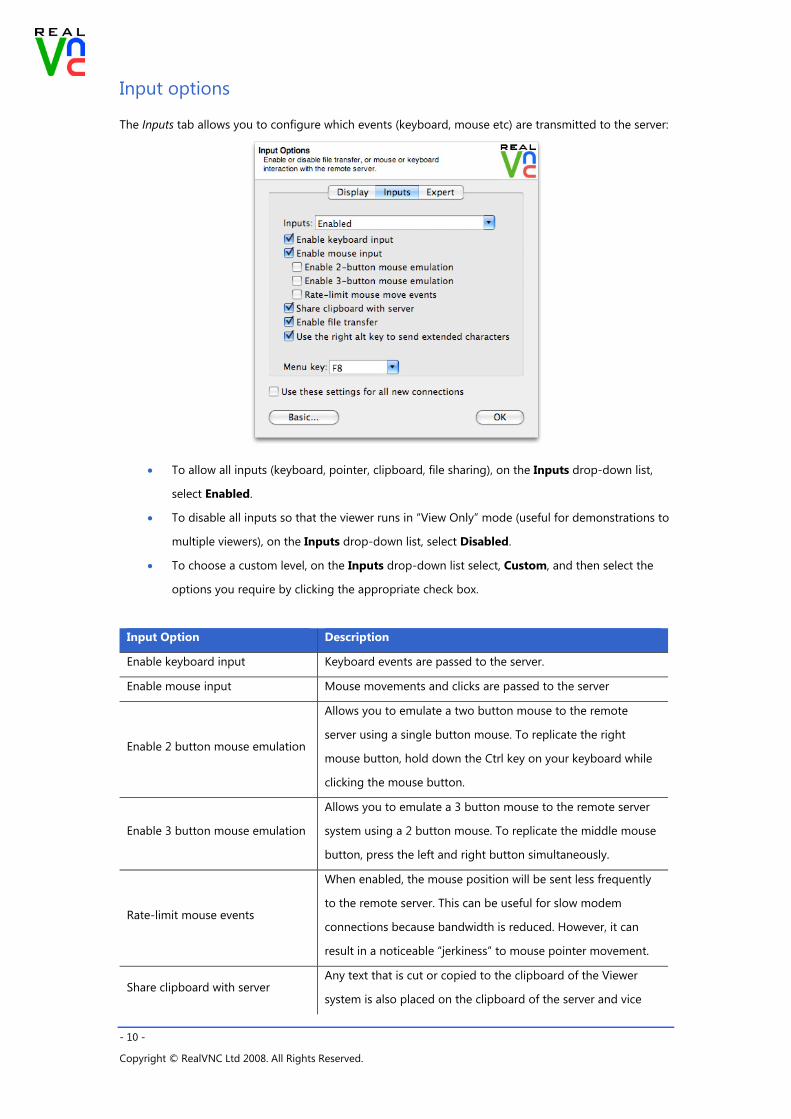
Input options
The Inputs tab allows you to configure which events (keyboard, mouse etc) are transmitted to the server:
• To allow all inputs (keyboard, pointer, clipboard, file sharing), on the Inputs drop-down list,
select Enabled.
• To disable all inputs so that the viewer runs in “View Only” mode (useful for demonstrations to
multiple viewers), on the Inputs drop-down list, select Disabled.
• To choose a custom level, on the Inputs drop-down list select, Custom, and then select the
options you require by clicking the appropriate check box.
Input Option Description
Enable keyboard input Keyboard events are passed to the server.
Enable mouse input Mouse movements and clicks are passed to the server
Enable 2 button mouse emulation
Allows you to emulate a two button mouse to the remote
server using a single button mouse. To replicate the right
mouse button, hold down the Ctrl key on your keyboard while
clicking the mouse button.
Enable 3 button mouse emulation
Allows you to emulate a 3 button mouse to the remote server
system using a 2 button mouse. To replicate the middle mouse
button, press the left and right button simultaneously.
Rate-limit mouse events
When enabled, the mouse position will be sent less frequently
to the remote server. This can be useful for slow modem
connections because bandwidth is reduced. However, it can
result in a noticeable “jerkiness” to mouse pointer movement.
Share clipboard with server Any text that is cut or copied to the clipboard of the Viewer
system is also placed on the clipboard of the server and vice
versa. This allows cut, copy, and paste to and from the remote
server and vice versa.
NB: Servers can be configured to refuse clipboard data from
viewers.
Enable file transfer Allows you to send and receive files between the viewer and
server.
Use the right alt key to send
extended characters
Allows you to use the right Alt key in combination with other
keys on your Mac keyboard to produce extended characters (i.e
characters that don’t have a corresponding key on your
keyboard, e.g. #, or accented characters).
NB: The left Alt key will always cause the server to act as if Alt
had been pressed.
Menu Key
Allows you to alter the function key, (usually F8) that displays
the option menu within the VNC Viewer window. Choose None
to disable this feature.
NB: On newer Mac keyboards, you may need to press the Fn +
F8 key to get the desired effect.
- 11 -
Copyright © RealVNC Ltd 2008. All Rights Reserved.

- 12 -
Copyright © RealVNC Ltd 2008. All Rights Reserved.
VNC Toolbar
The VNC Viewer Toolbar is always displayed at the top of the VNC Viewer window:
The toolbar gives you quick access to the most frequently used Viewer functions:
New Connection
Creates a new VNC Viewer connection to a remote server in another window.
Save
Saves the configuration settings for the current connection into the VNC Address
book.
Options
Displays the VNC Viewer Properties dialog.
Full Screen
Uses the entire screen to display the remote sever desktop. Click again to exit Full
Screen Mode.
Ctrl +Alt +Delete
Sends a Ctrl+Alt+Delete command to the remote server. You can also press
Shift+Ctrl+Alt+Delete.
Send Files
Sends a file from the local machine to the remote server. You can also copy files to
the clipboard.
Fetch Files
Fetches a file from the remote server to the local machine. This icon is green when
files are available.
Connection Information
Displays detailed information about the current VNC connection, including line speed
estimates, encoding, and the remote server etc.
Connection Encrypted
Displays whether or not the VNC connection is encrypted.
Activity
Displays the connection speed of the current VNC connection and indicates when
there is network activity.
Minimise toolbar
Immediately above the Activity button, this button minimises the VNC Viewer
toolbar.
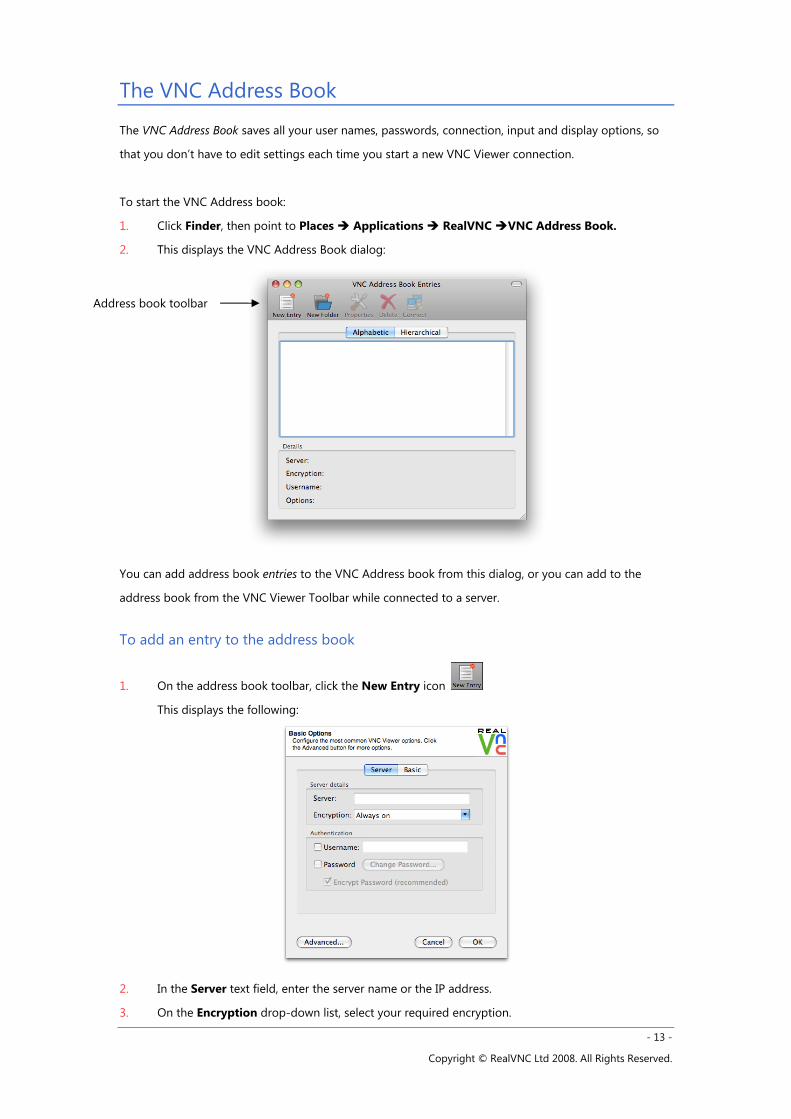
The VNC Address Book
The VNC Address Book saves all your user names, passwords, connection, input and display options, so
that you don’t have to edit settings each time you start a new VNC Viewer connection.
To start the VNC Address book:
1. Click Finder, then point to Places Applications RealVNC VNC Address Book.
2. This displays the VNC Address Book dialog:
Address book toolbar
You can add address book entries to the VNC Address book from this dialog, or you can add to the
address book from the VNC Viewer Toolbar while connected to a server.
To add an entry to the address book
1. On the address book toolbar, click the New Entry icon
This displays the following:
2. In the Server text field, enter the server name or the IP address.
3. On the Encryption drop-down list, select your required encryption.
- 13 -
Copyright © RealVNC Ltd 2008. All Rights Reserved.

4. If you would like to store your user name and password for this server, in the Authentication
area, enter the username and password for this server into the appropriate fields, and then
confirm your password.
5. If you would like your password to be encrypted, click the Encrypt password checkbox. You will
then be prompted to enter a master password:
A master password will be used to encrypt your VNC Address Book entries.
You will be prompted to create the master password when you first create an encrypted entry. In
the future when connecting to encrypted entries, you will only have to enter the master
password, and not have to remember all of the individual authentication details.
6. Click OK.
7. Your entry will now be listed in the VNC Address Book list:
8. To connect to this server, simply double click on the server’s name – in this case “example-
server”.
To edit a VNC Viewer Address book entry:
1. On the VNC Address Book toolbar, click Properties
This will display the VNC Viewer Properties dialog.
2. Configure the settings as required then click OK.
All of your settings for this connection will be saved.
- 14 -
Copyright © RealVNC Ltd 2008. All Rights Reserved.
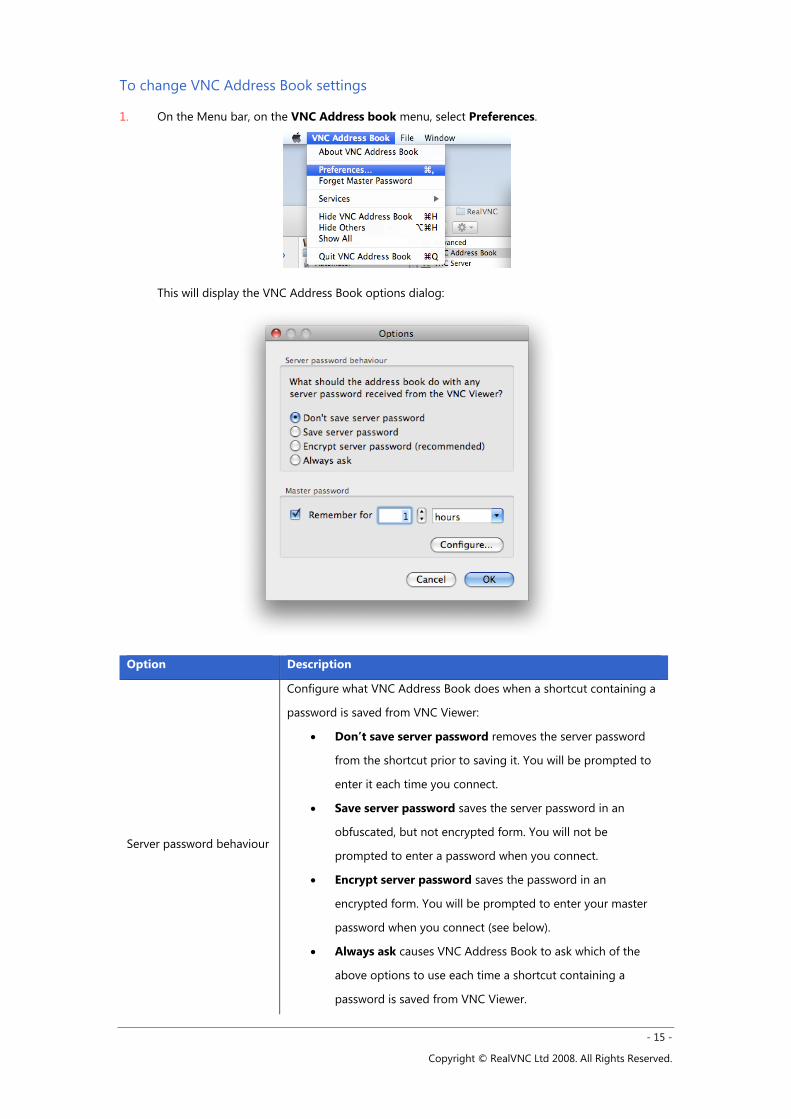
To change VNC Address Book settings
1. On the Menu bar, on the VNC Address book menu, select Preferences.
This will display the VNC Address Book options dialog:
Option Description
Server password behaviour
Configure what VNC Address Book does when a shortcut containing a
password is saved from VNC Viewer:
• Don’t save server password removes the server password
from the shortcut prior to saving it. You will be prompted to
enter it each time you connect.
• Save server password saves the server password in an
obfuscated, but not encrypted form. You will not be
prompted to enter a password when you connect.
• Encrypt server password saves the password in an
encrypted form. You will be prompted to enter your master
password when you connect (see below).
• Always ask causes VNC Address Book to ask which of the
above options to use each time a shortcut containing a
password is saved from VNC Viewer.
- 15 -
Copyright © RealVNC Ltd 2008. All Rights Reserved.

- 16 -
Copyright © RealVNC Ltd 2008. All Rights Reserved.
Master password
When you enter your master password, VNC Address Book can
remember it for a certain amount of time. If this option is enabled, you
will not be prompted for it again until this period has elapsed.
You can also change your master password here. Doing so will resave
all address book entries with encrypted passwords.
VNC Viewer F8 menu
In addition to the Viewer toolbar, VNC Viewer has a more extensive options menu. Press F8 to display
this:
NB: The F8 key setting can be altered to use any of the other function keys.
Full screen
Hides the OS X menu bar and the VNC Window so that the screen image of the remote system fills the
entire local desktop.
Relative pointer motion
In some cases (in particular, when connecting to a hardware-based VNC Server or when remotely
accessing an application that interprets mouse pointer input in particular ways) selecting
this option can resolve mouse pointer issues. Unless you are experiencing problems with the mouse
pointer on the VNC Server, such as excessive pointer acceleration, leave this option disabled.
Ctrl, Alt, and Command
These options allow you to enact CTRL and/or ALT and/or Command keypress sequences (in
combination with other keys) on the remote system that would otherwise be interpreted by the local
system. For instance, to quickly change between applications on the remote system you need to send
ALT and TAB. However, if you press ALT and TAB on the keyboard, your local system will respond.

If, however, you display the F8 menu, select the Alt option and then press the TAB key, the remote
system responds instead.
Send F8
This option allows you to send an F8 command to the remote system. This is necessary because F8 is
trapped at the VNC Viewer in order to provide access to the F8 menu and is not passed on to the
remote system. If the F8 key is changed as the access key to the menu, then this menu will reflect this.
Send F Key
Send Cmd+Alt+Esc
Send Cmd+Shift+Q
Send Ctrl+Alt+Del
Some key presses will always be processed by the local computer. To send these key presses to the
server, you can use the F8 menu.
Refresh Screen
Requests a complete screen refresh from the remote system.
Send Files to Server
Allows you to send a file from you local computer to the server.
Fetch Files from Server
Allows you to receive a file from the server to your local computer.
Save Connection
Saves the configuration settings for the current VNC connection.
New Connection...
Displays the Connection dialog which allows a new connection to an alternative system.
NB: The connection to the existing remote system will remain unaffected and both (or more)
connections can coexist simultaneously.
Options...
Displays the VNC Viewer Options dialog so that you can make changes to aspects of the current
connection.
Connection Info...
Displays numerous details about the current connection, which are mainly of use in support and
diagnostic situations.
- 17 -
Copyright © RealVNC Ltd 2008. All Rights Reserved.
- 18 -
Copyright © RealVNC Ltd 2008. All Rights Reserved.
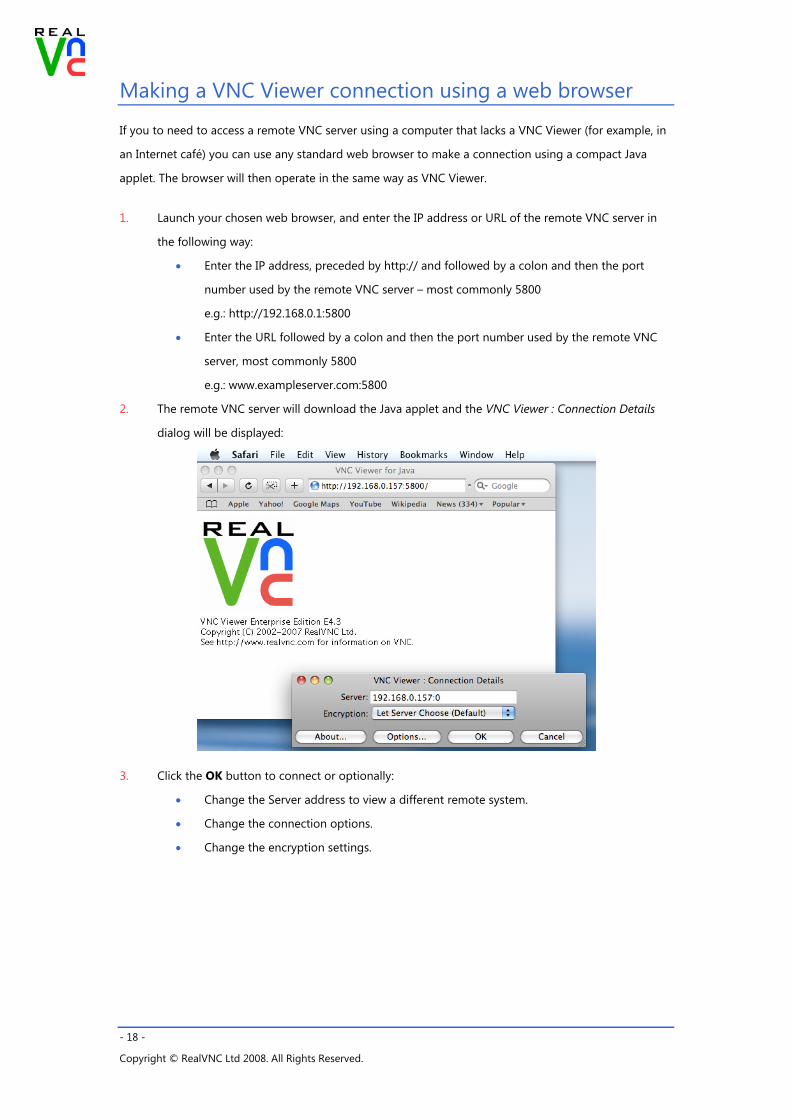
Making a VNC Viewer connection using a web browser
If you to need to access a remote VNC server using a computer that lacks a VNC Viewer (for example, in
an Internet café) you can use any standard web browser to make a connection using a compact Java
applet. The browser will then operate in the same way as VNC Viewer.
1. Launch your chosen web browser, and enter the IP address or URL of the remote VNC server in
the following way:
• Enter the IP address, preceded by http:// and followed by a colon and then the port
number used by the remote VNC server – most commonly 5800
e.g.: http://192.168.0.1:5800
• Enter the URL followed by a colon and then the port number used by the remote VNC
server, most commonly 5800
e.g.: www.exampleserver.com:5800
2. The remote VNC server will download the Java applet and the VNC Viewer : Connection Details
dialog will be displayed:
3. Click the OK button to connect or optionally:
• Change the Server address to view a different remote system.
• Change the connection options.
• Change the encryption settings.

4. If this is the first connection you have made to the remote VNC server, you browser may prompt
ask you to confirm that you trust the Java applet:
5. Click Trust to continue.
If you answer Don’t Trust, the Java applet will still operate, however, some of its advanced
features will be unavailable, most notably:
• You will only be able to connect to the VNC Server that supplied the Java applet,
• You will not be able to store the identity of the server to which you are connecting and
so will need to reconfirm its signature during any subsequent connections, and
• You will need to use the F8 menu in order to use the Mac clipboard to transfer
information between the local and remote systems.
6. Depending on the security settings of the remote VNC Server, the VNC Authentication dialog will
be displayed:
7. Enter a valid username and password, and then press Enter.
The viewer window will be displayed, and you can interact with the remote VNC server in just the
same was as if using a standard viewer connection.
Limitations of VNC Viewer for Java
VNC Viewer for Java supports all the security features of VNC Enterprise Edition such as encryption and
server and user authentication. However, it does not currently support scaling, file transfer, address book
integration. Press F8 for a menu of options.
- 19 -
Copyright © RealVNC Ltd 2008. All Rights Reserved.

- 20 -
Copyright © RealVNC Ltd 2008. All Rights Reserved.
Using the Listening Viewer
In certain situations it can be useful to allow a remote VNC server to initiate the connection to your VNC
Viewer, rather than the converse. Such instances could include:
• In a demonstration situation (classroom or seminar) where more than one viewer system will
simultaneously connect to a single server system.
• Where the firewall protecting the local network of the remote system will not allow incoming
connections to be made.
To allow this to occur, your VNC Viewer must be started in a special mode that leaves it dormant within
the Dock until an incoming connection is received from a remote VNC Server system. You can start and
use VNC Viewer in the usual manner alongside the special listening version.
NB: If the local viewer system is situated behind a firewall (i.e. the remote server system is external to the
viewer’s local network), then the firewall needs to allow incoming connections at port 5500.
To start the VNC Viewer in listening mode
1. Click Finder, then point to Places Applications RealVNC VNC Viewer.
A VNC Viewer icon will be added to the Dock.
2. Click the VNC Viewer icon in the Dock, and on the menu bar, from the VNCViewer menu, select
Launch listener.
The listening viewer will remain in this dormant state until a remote system initiates a connection - see
opposite.
To stop listening viewer mode
1. Ctrl+Click the VNC Viewer icon in the Dock, and on the context menu, select Quit.

Technical Support
If you have a problem, please refer to our online FAQ page on the RealVNC website. If you still cannot
find a solution, then please don’t hesitate to contact us for further assistance using the product support
request page
Support request
This section allows you to send queries directly to a VNC support representative:
www.realvnc.com/support.html
Please include as much information as possible about the problem, including the exact text of any error
messages you see (including the error number) and what you’re doing when you see them. Please also
include your customer number and registered email address and the version of VNC Server and VNC
Viewer that you are using, and operating system you are running at both ends of the connection.
Acknowledgements
VNC Enterprise Edition contains software from more than one source.
For full details of this software and the terms under which it is distributed, see the RealVNC website.
www.realvnc.com/products/enterprise/4.4/acknowledgements.html
- 21 -
Copyright © RealVNC Ltd 2008. All Rights Reserved.

- 22 -
Copyright © RealVNC Ltd 2008. All Rights Reserved.
Appendix
Ports
What is a port?
Not to be confused with a physical port (such as a USB, or printer port) to which you connect devices, a
Port in this context could be more accurately described as a ‘service contact point’. It provides an
indication of where to locate an appropriate known service that can deal with the kind of data being
transmitted.
Imagine the problem that exists for networking equipment. A disparate mixture of messages and
information are continually flowing from system to system, via gateways and routers, and each needs to
find the correct destination. In this process, the IP address plays a critical role in making sure that the
right items arrive at the right places, however, the unsung hero is definitely the port number. While the
IP address directs the postman to the correct building, it is the port number that gets the package
through the door of the correct apartment. Without the port number, there would be piles of unclaimed
packages filling the foyer.
Every application that sends or receives information across a network uses a port number. In many cases
they are fixed numbers that are always used by particular applications, and because they are not often
changed, they are not normally mentioned. For instance, if you send an email (via the most common
method), then your message will be marked with port number 25. Whenever you browse the Web, the
information will always be denoted with port number 80, and VNC applications almost always send and
receive using port number 5900. The systems at the receiving end then know to route messages marked
as port 25 to the email server, port 80 to the web server, port 5900 to the VNC server and so on. You
should not normally need to change the VNC port number within VNC Server, however, if you do, then
all viewers must specify the new port number when connecting to the the server system. For instance, if
the port number was changed to 5950, then to reach a server at IP address 192.168.0.2, the VNC Viewer
user would need to enter (note the double colons):
192.168.0.2::5950
Port numbers can range from 0 to 65,535 and are generally divided into three ranges:
• 0 to 1023 are well known ports
• 1024 to 49151 are registered ports
• 49152 to 65535 are dynamic and/or private ports
A list of valid port numbers and their uses is maintained by the Internet Assigned Numbers Authority
and can be viewed at http://www.iana.org/assignments/port-numbers. Port 5900 is officially registered
with IANA for VNC use.
IP Addresses
What is an IP address?
An IP address is a unique address given to every device connected to a network of any size: from a two
system link up at home, to every system on the Internet. IP addresses are written as four decimal
numbers separated by full stops, such as 192.168.0.4
This is called dotted decimal notation and is used as a means of concealing the equivalent real address
that is actually used by computers and networking equipment. At the inception of the Internet in the
1960s and 1970s, even by wildest estimates, no one ever expected they would need more than the
seemingly inexhaustible 4.2 billion unique address patterns. However, two factors have proved this to be
wrong:
1. The proliferation and expansion of the Internet,
2. The inefficient way in which those addresses were originally handed out to organisations and
companies.
The result was that by the early 1990s, it was already apparent that at the projected growth rates, the
reserve of 4.2 billion addresses would soon all be gone. In order to prolong the current stocks of
numbers, the allocation of addresses was greatly tightened and the idea of public and private addresses
was introduced. Of the 4.2 billion possible addresses, almost all of them are still used as unique public
addresses.
However, in the revised plan, three groups of addresses were held aside for use as private addresses:
• 10.0.0.0 to 10.255.255.255
• 172.16.0.0 to 172.31.255.255
• 192.168.0.0 to 192.168.255.255
To avoid confusion, these ranges are never used as public addresses. However, when company xyz needs
to connect their many internal computers to the Internet, they might only be given a single public
address, say 80.42.0.252. They would then connect a Gateway system to the Internet and give it that
unique public address. Situated on the other side of that gateway would be the company’s local network
and every system in that local network would receive a private IP address. For small local networks, the
most common private address range is that which starts at 192.168.0.0.
Every computer in the local network (or subnet) will use their number that is unique to them within the
local network. However, the public identity for all of those local systems, as they pass information out
across the Internet, will always be that of the gateway: 80.42.0.252. It is the job of the gateway to
translate addresses between the local and wider networks. The gateway must ensure that messages and
data are sent through to the correct locations without the private addresses ever leaking out. Assisting
with this task are port numbers. In this way, there are now many systems using similar private IP
addresses, however, because those numbers only ever exist in local domains, there is never any
- 23 -
Copyright © RealVNC Ltd 2008. All Rights Reserved.
- 24 -
Copyright © RealVNC Ltd 2008. All Rights Reserved.
confusion. Of course, most people never see an IP address. To make network addresses even more
memorable than the dotted decimal notations, they are usually converted into named addresses. Such
conversions are handled by the Domain Name System, and your browser uses it every time you visit a
web site.
Mac Version Support
VNC supports versions Mac OS X 10.3-10.5.