water/river set - smokefreeaces.comsmokefreeaces.com/unity/aquas/aquas_v1-3_manual.pdf ·...
TRANSCRIPT

Water/RIVER SetDocumentation
Based on AQUAS version 1.3

Table of contents
1.Introduction..................................................................................3
2.Quick Setup..................................................................................3
3.River Setup...................................................................................5
4.Manual Setup...............................................................................7
4.1.Shaders................................................................................................7
4.2.Setting up the Water............................................................................8 a)Parameters................................................................................................................9
4.3.Setting up Caustics...........................................................................11 a)Material Settings......................................................................................................12 b)Caustics & Multiple Water Levels............................................................................13
4.4.Underwater Effects............................................................................13 a)Basic Setup.............................................................................................................14 b)Parameters..............................................................................................................15 c)Multiple Water Levels..............................................................................................17
5.Setup via Gaia............................................................................18
6.Additional Tools.........................................................................19
6.1.Buoyancy Effect................................................................................19
6.2.Render Queue Controller..................................................................20
6.3.Screenshotter....................................................................................22
7.Trouble Shooting.......................................................................23
8.Additional Information..............................................................25
Documentation Page -3- of -25-________________________________________________________________________________
1. Introduction
Thank you for purchasing AQUAS! This documentation has been written to give you adetailed overview of the asset. AQUAS is a set of water shaders for all kinds ofenvironments and performance levels. It is aimed to be as flexible and customizable aspossible, while keeping the performance impact as low as possible.
In this manual you will learn how AQUAS works and how to set it up properly. It covers themost common setups to keep setup as quick and simple as possible. Of course no manualcan cover every eventuality, so if you need a setup that isn't described in thisdocumentation, please head over to the Forum Thread and leave a post.
2. Quick Setup
1. Import AQUAS
2. Open the Quick Setup window
– Under "Window" => "AQUAS" => "Quick Setup"
3. Add water to the scene
– Make sure to have a terrain in the scene (required for quick setup)
– Drag the terrain gameobject and drop it on the Terrain field in the QuickSetup window
– Drag the camera gameobject and drop it on the camera field in the QuickSetup window
– Specify a water level
– Click the "Add Water"-button
4. Add Underwater Effects
– Click the "Add Underwater Effects Button"

Documentation Page -4- of -25-________________________________________________________________________________
What the quick setup does, is it adds a waterplane to your scene with the triple textured(bumpy) material on it, positions it in the center of your terrain at the height, you'vespecified as the water level and scales it based on the terrain's size to exceed its bounds.The camera is being equipped with the AQUAS_Camera script, that enables depthrendering in forward, which is required on certain platforms and with certain graphics APIs.
It also adds the caustic projectors as child objects of the waterplane. Adding theunderwater effects adds all the components required to the camera, as well as theUnderwaterCameraEffects prefab as a child object of the camera. The underwater effectsneed borders at the bounds of the terrain to be balte to draw fog underwater, because fogrequires surfaces to be drawn on.
Once Water and underwater effects have been added, the water is fully functional in itsbasic configuration. Please also click the info buttons in the the Quick setup window foradditional information and hints.

Documentation Page -5- of -25-________________________________________________________________________________
3. River Setup
1. Import AQUAS
2. Open the River Setup window
– Under "Window" => "AQUAS" => "River Setup"
3. Add water to the scene
– Make sure to have a terrain in the scene (required for river setup)
– Drag the terrain gameobject and drop it on the Terrain field in the River Setupwindow
– Drag the camera gameobject and drop it on the camera field in the River Setupwindow
– Specify a water level
– Click the "Add River Plane"-button
4. Create river reference image
– Add the water plane to the "Water Plane" attribute in the River Setup if it hasn'tbeen added automatically
– Click the "Create river referenve image"-Button
– The reference Image will be saved in the folder "RiverReferences". AQUAS willcreate it, if it doesn't exist.
– Use an external tool like Flow Map Painter or Photoshop to create a flow mapbased on the river reference image and save the flow map somewhere in your"Assets"-folder
5. Add flow map to the river shader
– Select the river plane created
– Drag and drop the newly created flow map to the "Flow Map"-attribute in the plane'smaterial and set the flow speed property as desired (negative values will have theriver flow in the opposite direction)
– If working in linear color space, check the box that says "Using Linear Color Space",to make sure, flow maps can be read correctly

Documentation Page -6- of -25-________________________________________________________________________________
6. Add Underwater Effects
– Click the "Add Underwater Effects"-button
The river setup in AQUAS works similar to the quick setup. It adds a water plane to thescene and fits it to the terrain. A major difference here is that the plane added isn't round,but rectangular. It's a standard Unity plane that is being equipped with the river materialthat comes with AQUAS by default. It's advisable to copy the material and rename it beforeusing, because you can only use one material for one flow map, so when having multiplescenes with rivers in them, you need one material per river.
When creating the river reference image, a screenshot will be taken based on the size ofthe plane. In the screenshot, the plane will be shown with a dummy material that is onlymeant to help you use it as a blueprint when painting flow maps. Although painting flowmaps is possible with most advanced apps for image design such as Photoshop, using asimple free tool like "Flow Map Painter" might produce similarly good results with a lot lesseffort. After creating the flow map, make sure it is saved in the Assets-folder of yourproject, so you can drag it to the "Flow Map"-attribute of your river material.
IMPORTANT:
Flow maps can produce visible artifacts if they have a very high resolution andcompressed color information. It is advised to set the max texture resolution relatively lowin the flow map's import settings (256x256 or lower) and to set the format to "Truecolor".
Adding the underwater effects works as it does with the Quick setup, with the onlydifference being, that the water level detection is now being told that squared planes areused instead of round ones.
Documentation Page -7- of -25-________________________________________________________________________________
4. Manual Setup
The quick setup window helps you with the basic setup of AQUAS. However you mightwant to change some of the configuration, to adjust it to your environment and/orperformance level. The tripled textured shader that is being used when setting up AQUASvia quick setup might for instance not fit for a calm water like a swamp or a pond in thedesert. Also there are situations in which you have to do the setup manually, for instance ifyou want to add multiple lakes at different levels.
This chapter will give you a deeper understanding of how AQUAS works.
4.1. Shaders
The following shaders are avalable:
AQUAS
Bubble
Camera Effects
Under Water
Wet Lens
Caustics
Desktop and Web
Double-Sided
Double-Textured
Single-Textured
Triple-Textured Bumpy
One-Sided
Double-Textured
Single-Textured
Mobile
Bicolored
Bicolored Foamy
Single-Colored
Single-Colored Foamy

Documentation Page -8- of -25-________________________________________________________________________________
Here's a quick overview over the individual differences between the shaders:
– Mobile shaders don't actually refract light. Looking through the transparent partwon't distort what is beneath the surface. This is due to performance reasons onmobile devices.
– The shaders for web and desktop absorb light and thus have a depth-based coloras water does in reality. Since this is very performance intensive on mobiles, themobile shaders work with either one color for the entire water or two colors, one fordeep and one for shallow water, depending the target device's performance.
– Mobile shaders are available with and without foam, depending on the targetdevice's performance.
– The triple textured shader uses 3 normal maps for a realistic surface and is bestsuited for lively waters like oceans. The other shaders are best suited for calmwaters like ponds, lakes, swamps and basins, but can also be used in an oceanenvironment (e.g. in rts games).
– The tiling of the normal textures and the foam textures is not relative to the size ofthe water plane. Once set, the size of the waves will be constant even if you changethe size of the water plane.
– Some parameters have the same effect in all shaders. Higher quality shadersusually have additional parameters for higher customizability.
4.2. Setting up the Water
Setting up AQUAS materials works as it does with any other material. First create a newmaterial. Add the WaterPlane.prefab to you scene and position it. Drag & drop thematerial you just created on the water plane. The material will show up in the water plane'sinspector. Select the shader, you want to use. The package contains some ready-madematerials, that you can find in the Materials folder. You might want to use them as anorientation for customizing your own materials, or simply use them. It is recommendedhowever, that you don't change their parameters, without making backup copies of them.
IMPORTANT: Attach the AQUAS_Camera script to your camera, to make sure, depth rendering isenabled on all platforms and quality levels.

Documentation Page -9- of -25-________________________________________________________________________________
a) Parameters
This chapter gives you an overview of all parameters in all shaders. Some of them are notavailable in certain shaders and some are available in all of them. The following overviewshould help you customize your water.
Parameter Function
Normal Texture Sets the normal map for the shader
Small Waves Texture Sets the normal map for small waves (only double- and triple-textured shaders)
Medium Waves Texture Sets the normal map for small waves (only triple-textured shader)
Large Waves Texture Sets the normal map for small waves (only double- and triple-textured shaders)
Normal Tiling Sets the tiling of normal maps
Small Waves Tiling Sets the tiling of normal maps per map for small waves (only double- and triple-textured shaders)
Medium Waves Tiling Sets the tiling of normal maps per map for small waves (only triple-textured shader)
Large Waves Tiling Sets the tiling of normal maps per map for small waves (only double- and triple-textured shaders)
Offset (Small/Big+Small) Blends two normal maps with each other (double textured shader only)
Offset (Small/Big+Small/Big)
Blends two normal maps with each other (double textured shader only)
Main Color Color that is being absorbed.
Deep Water Color Darkest water color
Shallow Water Color Sets the color of shallow water (bicolored mobile only)
Shallow-Deep-Blend Sets the blending between the colors for deep and shallow water (bicolored mobile only)
Shallow-Deep-Fade Sets the fading between the colors for deep and shallow water (bicolored mobile only)
Fade Defines how quickly color is absorbed (Web & Desktop only)
Density Defines the intensity of the color absorption (Web & Desktop only)
Depth Transparency Sets the depth based transparency
Shore Fade Sets the transparency fade between zero level and the deepest point at which the water is still transparent
Shore Transparency Softens sharp edges at shore

Documentation Page -10- of -25-________________________________________________________________________________
Wave Blend Blends certain waves out at shore (triple textured shader only)
Wave Fade Fades certain waves out at shore (triple textured shader only)
Enable Reflections Enables/Disables reflections
Reflection Intensity Sets the reflection intensity
Distortion Sets the reflection distortion
Specular Sets the specularity
Specular Color Sets the specular color (except for the triple textures shader –this one uses the light color as specular color)
Gloss Sets the gloss
Light Wrapping Sets the light wrapping
Refraction Sets the refraction (mobile shaders only have a "pseudo-refraction")
Small Wave Refraction Per-texture refraction (only double- and triple-textured shaders)
Medium Wave Refraction Per-texture refraction (only triple-textured shaders)
Large Wave Refraction Per-texture refraction (only double- and triple-textured shaders)
Wave Speed Sets the wave speed
Small Waves Speed Per-texture wave speed (only double- and triple-textured shaders)
Medium Waves Speed Per-texture wave speed (only triple-textured shaders)
Large Waves Speed Per-texture wave speed (only double- and triple-textured shaders)
Emissive Color Sets the emissive color (single-colored mobile only) – can be used for things like lava
Emission Intensity Sets the emission intensity (single-colored mobile only)
Foam Texture Sets the foam texture
Foam Tiling Sets the foam tiling
Foam Blend Sets the foam blend from shore
Foam Visibility Sets the foam visibility (0 = only water is visible, 1 = only foamis visible)
Foam Color Sets the foam color
Foam Intensity Sets the foam intensity
Foam Contrast Sets the foam contrast
Foam Speed Sets the foam Speed
Foam Dist. Fade Sets the distance based tiling to avoid visible tiling at larger distances (only double- and triple-textured shaders)
Documentation Page -11- of -25-________________________________________________________________________________
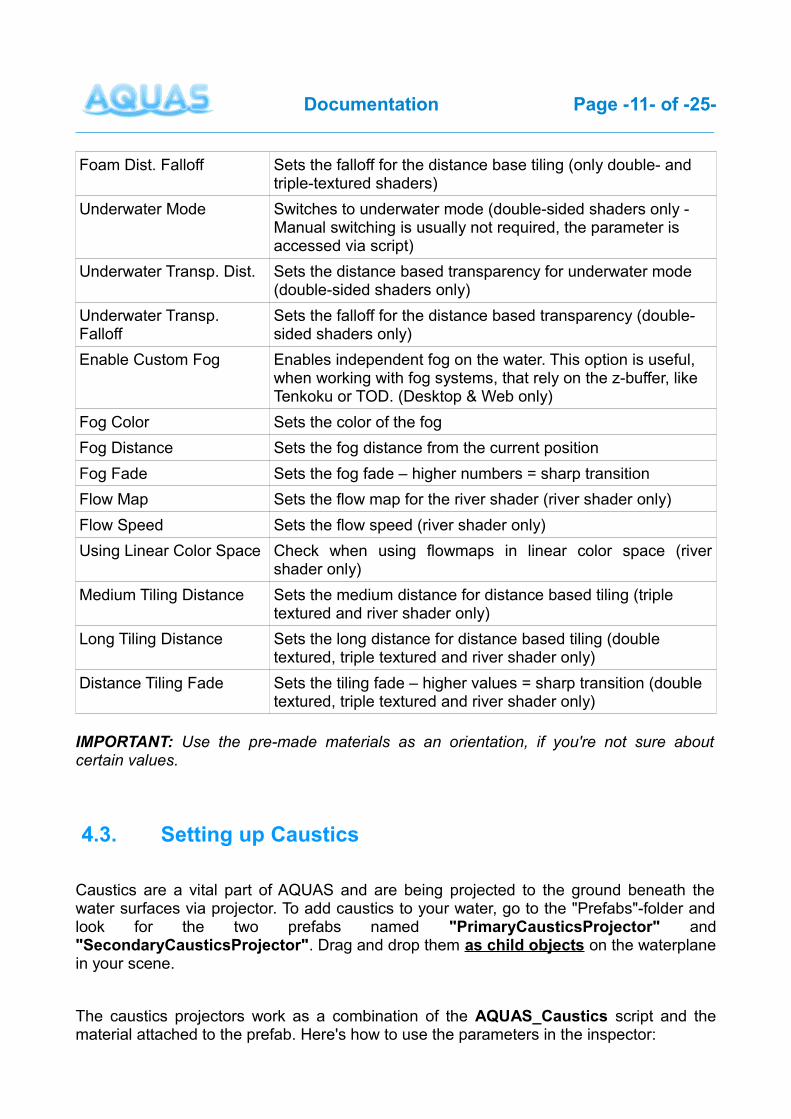
Foam Dist. Falloff Sets the falloff for the distance base tiling (only double- and triple-textured shaders)
Underwater Mode Switches to underwater mode (double-sided shaders only - Manual switching is usually not required, the parameter is accessed via script)
Underwater Transp. Dist. Sets the distance based transparency for underwater mode (double-sided shaders only)
Underwater Transp. Falloff
Sets the falloff for the distance based transparency (double-sided shaders only)
Enable Custom Fog Enables independent fog on the water. This option is useful, when working with fog systems, that rely on the z-buffer, like Tenkoku or TOD. (Desktop & Web only)
Fog Color Sets the color of the fog
Fog Distance Sets the fog distance from the current position
Fog Fade Sets the fog fade – higher numbers = sharp transition
Flow Map Sets the flow map for the river shader (river shader only)
Flow Speed Sets the flow speed (river shader only)
Using Linear Color Space Check when using flowmaps in linear color space (rivershader only)
Medium Tiling Distance Sets the medium distance for distance based tiling (triple textured and river shader only)
Long Tiling Distance Sets the long distance for distance based tiling (double textured, triple textured and river shader only)
Distance Tiling Fade Sets the tiling fade – higher values = sharp transition (double textured, triple textured and river shader only)
IMPORTANT: Use the pre-made materials as an orientation, if you're not sure aboutcertain values.
4.3. Setting up Caustics
Caustics are a vital part of AQUAS and are being projected to the ground beneath thewater surfaces via projector. To add caustics to your water, go to the "Prefabs"-folder andlook for the two prefabs named "PrimaryCausticsProjector" and"SecondaryCausticsProjector". Drag and drop them as child objects on the waterplanein your scene.
The caustics projectors work as a combination of the AQUAS_Caustics script and thematerial attached to the prefab. Here's how to use the parameters in the inspector:

Documentation Page -12- of -25-________________________________________________________________________________
AQUAS_Caustics (Script)
Parameter Function
FPS Controls the speed at which the caustic image sequence isbeing played back
Frames Array containing the caustic image sequence
Max Caustic Depth Controls how deep below the water surface, caustics are tobe seen.
a) Material Settings
The material settings of the caustic projectors are accessible, however most of them arebeing controlled by the AQUAS_Caustics script and don't need to be adjusted manually.Here's a brief overview over the material parameters:
Parameter Function
Tiling (x,y) Sets the tiling of the caustic texture. This value doesn't need to be adjusted in the material settings, when usingunderwater effects - more info in chapter 3.4.
Offset (x,y) Sets the offset of the caustic texture – normal case is to have itat (0,0) for the primary and at (0.5,0.5) for the secondaryprojector
Water Level Sets the y-position above which caustics are not to bedisplayed. This value is controlled by the AQUAS_Caustics script and doesn't need tobe changed.
Depth Fade Sets the y-position beneath the water below which caustics arenot to be displayed. This value is controlled by the AQUAS_Caustics script and doesn't need tobe changed.
Intensity Sets the intensity of the caustic display.This value doesn't need to be adjusted in the material settings, when usingunderwater effects - more info in chapter 3.4.
Distance Visibility Sets the distance to which caustics can be seen
Distance Fade Sets the fade of the caustic display
Note: if you have shore that is below the water level (e.g. in a mountain lake environment), you should change the orthographic size of the caustic projectors to not extend over your waterplane's boundaries, otherwise you'll see caustics outside of the water.

Documentation Page -13- of -25-________________________________________________________________________________
b) Caustics & Multiple Water Levels
When using multiple waterplanes at different levels, setting up caustics works almost thesame as with a single waterplane. In fact you could just set up a waterplane with causticsand simply duplicate the waterplane together with the caustic projectors to use themelsewhere.
However when using caustics at different water levels, you need to use another materialon each primary/secondary projector for each water level. The reason is, that the waterlevel is being controlled by the AQUAS_Caustics script, but stored in the material. Sowhen trying to use the same material for caustics at different water levels, theAQUAS_Caustics script on the projector objects will try to adjust the water level on thesame material to multiple values, which would result in a chattering effect.
Example:
Say you have two lakes with two different water levels. Create your waterplane with thecaustic projectors for one of the lakes and don't forget to adjust the orthographic size ofthe projectors.
Now copy the waterplane with the projectors and position it on your second lake. Nowsimply go to the materials folder, where the materials for the caustic projectors are storedand duplicate them. Now select the projectors in your second lake and select theduplicated material in the material parameter of your projector component.
Do that for the primary and the secondary caustics projector and the caustics shoulddisplay correctly at both water levels.
4.4. Underwater Effects
Manual setup for the underwater effects is a bit more complicated than it is for the waterplane and the caustics. Fortunately you will almost never have to do a fully manual setup. This chapter gives you an in-depth overview over the setup of the underwater effects in AQUAS.

Documentation Page -14- of -25-________________________________________________________________________________
a) Basic Setup
As mentioned above, you'll almost never have to do a full manual setup for the underwatereffects. The effects basically consist of two parts.
One part is a set of two planes that cover your viewport and use specific shaders. Thoseplanes are called lenses (water lens & air lens) and in effect they're "faked image effects"for underwater and afloat. They're attached to a prefab called"UnderWaterCameraEffects". Simply drag and drop the prefab as a child object on yourcamera gameobject and make sure, it's positioned at (0,0,0) in local space.
The second part of the underwater effects are a set of Unity's own image effects with aspecific configuration. Adding all those effects and configuring them manually can be verytime consuming, which isn't very productive. Fortunately you don't have to do it manually.You can always use the "Hook Up Camera"-button in the "Quick Setup" window, thatequips the specified camera with all the neccessary image effects and configures them.That configuration can of course be changed anytime.
Now before the underwater effects can work, we need to specify some missingparameters, that would have otherwise been provided by the quick setup:
1. Select the UnderWaterCameraEffects gameobject in the hirarchy.
2. In the inspector you can see 6 expandable groups of parameters in the"AQUAS_Lens Effects"-component. Expand the group "Gameobjects".
– Drag your camera gameobject to the missing "Main Camera" parameter.
– Open the subgroup "Water Planes"
– Drag and drop your waterplane from the hirarchy to the missing "Element 0"parameter
Now you have a basic setup for your underwater effects and should be able to test it inplay mode.

Documentation Page -15- of -25-________________________________________________________________________________
b) Parameters
Of course there are lots of adjustments, you can make now, that you have a basic setupfor your underwater effects. This chapter will give you an overview over the parameters onall the relevant components/materials as well as some additional information on how thecaustic controls, when using underwater effects.
First we will have a look at the parameters on the AQUAS_Lens Effect component:
Parameter Function
Parameter Group: Under Water Parameters
Fog Density Sets the fog density underwater
Fog Color Sets the fog color underwater
Bloom Sets the bloom intensity underwater
Parameter Group: Game Objects
Main Camera Main camera gameobject in the scene – Assign camera gameobject from the hirarchy to it, if empty
Water Lens Water lens gameobject
Air Lens Air lens gameobject
Bubble Bubble prefab
Water Planes Water planes array – Set Size = amount of waterplanes in the scene and assign the waterplanes from the hirarchy to it
Use Squared Planes Bool – sets whether to use squared or circular planes – required to determine if underwater – Don't mix squared and circular planes!
Parameter Group: Bubble Spawn Criteria
Min Bubble Count Sets minimum bubble count for initial dive
Max Bubble Count Sets maximum bubble count for initial dive
Max Spawn Distance Sets maximum bubble spawn distance from camera's position
Average Updrift Sets the average updrift of the bubbles
Base Scale Sets the base scale of the bubble
Avg Scale Summand Sets the basis for the scale randomization of the bubbles: Base Scale + random scale Summand (≈ Avg Scale Summand) = Bubble scale
Min Spawn Timer Sets the minimum spawn timer between bubbles for initial dive
Max Spawn Timer Sets the maximum spawn timer between bubbles for initial dive

Documentation Page -16- of -25-________________________________________________________________________________
Min Spawn Timer L Sets the minimum spawn timer between bubbles for long dive
Max Spawn Timer L Sets the maximum spawn timer between bubbles for long dive
Parameter Group: Wet Lens
Wet Time Sets how long the lens stays wet after surfacing
Drying Time Sets how long the lens takes to dry after wet time is up
Spray Frames Texture array containing the spray image sequence
Spray Frames Cutout Texture array containing the spray image sequence basis for alpha cutout via shader
Rundown Speed Sets how fast droplets run down the lens in FPS when surfacing
Parameter Group: Caustic settings
Caustic Intensity [Vector2] - sets the intensity of the caustic effects – [afloat value, underwater value] – (caustic intensity doesn't need to be adjusted in the projector's material, when using this)
Caustic Tiling [Vector2] - sets the tiling of the caustic texture – [afloat value, underwater value]
Max Caustic Depth Sets how deep below the water surface caustics are to be seen
Parameter Group: Sound Effects
Sounds Audio clip array containing sound files
Underwater Volume Audio volume for underwater sound effect
Surfacing Volume Audio volume for the surfacing splash sound effect
Dive Volume Audio volume for dive splash sound effect
Additional public variables
Float t Timer for afloat behaviour – set to zero to trigger wet lens effect
Bool rundown Set to true to trigger drops running down the lens
Bool underwater {get; private set;} - Get value to detect if underwater – use this to with custom code for underwater behaviour
Now let's have a look at the Material properties on the "lenses":
WaterLens Parameters
Parameter Function
Distortion Texture Sets the distortion texture (default is an alpha ellipse)
Distortion Intensity Sets the distortion intensity underwater
Distortion Speed Sets the speed of the rotating distortion

Documentation Page -17- of -25-________________________________________________________________________________
AirLens Parameters
Parameter Function
Main Color Sets the main color of the drops from the wet lens image sequence
Transparency Sets the transparency of the drops from the wet lens image sequence
Specular Sets the specularity of the drops from the wet lens image sequence
Gloss Sets the gloss of the drops from the wet lens image sequence
Cutout Cuts out the parts of the wet lens image sequence, that is not a drop
NOTE: The Air Lens Parameters are set to optimized values and shouldn't be changed if you don't know exactly what you're doing.
c) Multiple Water Levels
Setting up the underwater effects for multiple water levels is very easy:
1. Select the UnderWaterCameraEffects gameobject from the hirarchy.
2. In inspector expand the parameter group "Game Objects" in the "AQUAS_Lens Effect"-component.
3. Expand the "Water Planes"-array.
4. Change the size value to the amount of water planes you have.
5. Drag and drop all your waterplanes from the hirarchy to the empty elements of the "Water Planes"-array.
Now the underwater effects should display correctly with multiple waterplanes at different water levels.

Documentation Page -18- of -25-________________________________________________________________________________
5. Setup via Gaia
To set AQUAS up via Gaia, first create your terrain using Gaia, just as you would normallydo. Once you have your terrain ready, go to the Gaia Extensions (GX-button in the Gaiamanager). If you have AQUAS imported, it should be visible under "INSTALLED". If it's not,you might have to close and reopen the Gaia manager twice.
If you can see "Dogmatic" under "INSTALLED", expand it and expand "AQUAS". Theabout button contains basi information. To add water to the scene, simply click the "AddAquas"-button. Gaia provides all the neccessary information to AQUAS, so there's nothingelse you need to do in terms of scaling and positioning. Same goes if you click the "AddRiver"-button.
Creating a river reference image works the same way it does with AQUAS's own "RiverSetup", except you don't have to specify the waterplane to use – it's set automatically. Formore information on how to use it to create flowmaps, please read the chapter onAQUAS's "River Setup"-window.
Clicking the "Add Underwater Effects" button will add underwater effects. As with the quicksetup, the Gaia setup only gives you a basic setup for AQUAS that you can continue tocustomize, if you wish.

Documentation Page -19- of -25-________________________________________________________________________________
The "Hints"-button provides some information on how what to keep in mind, when workingwith custom lighting & fog systems.
6. Additional Tools
AQUAS comes with a set of tools that are not neccessarily required but can in some casesprove to be very useful. This chapter will cover how to use them.
6.1. Buoyancy Effect
AQUAS comes with a basic buoyancy feature. It works on any mesh and has beendesigned to be used on water with a constant water level. To use it, simply select theobject you want the buoyancy applied to in your hirarchy and click
"Add Component" => "AQUAS" => "Buoyancy".
The buoyancy script will also add a Rigidbody-Component to your object. The ObjectMUST have a Mesh-Filter-Component on it for the buoyancy script to work, because themesh is the basis for the script to calculate updrift forces.

Documentation Page -20- of -25-________________________________________________________________________________
The above image shows what the inspector should look like when you have the buoyancycomponent attached to an object. First specify the water density. The Water density wouldin reality be 1000, but since the updrift is always dependent on the object's mass and it'svolume too and those things in video games often have no physical significancewhatsoever, the density is often set to unrealistic values such as 10.
The Checkbox "Use Balance Factor" is only to be checked, when your object has nocollider component on it. AQUAS's buoyancy feature doesn't require a collider component,however without it the torque applied to your object by the updrift forces will be virtuallyinfinite. The balance factor arround all 3 axis will make use of numerical inaccuracy toreduce the torque to an acceptable level. If your object has a collider component attached,you will most likely not need this.
AQUAS's buoyancy feature is meant to be used on water with a constant water level. Thesliders "Dynamic Surface" and "Bounce frequency" are to be used to simulate a dynamicsurface and have your object bounce up and down slightly. The "Dynamic surface"-sliderdetermines the amplitude of the bounce and the "Bounce Frequency"-slider determineshow quickly your object bounces up and down. This simulation works based on altering thewater density over time.
Debugging can be useful to see if your mesh is recognized correctly by the buoyancyscript. You can debug the faces that are currently used to calculate the updrift forces, youcan visualize a representation of the currently applied updrift forces and you can debug avisual representation of the volume used to calculate the updrift forces.
Note:
The buoyancy feature works in conjunction with the Rigidbody component. Having a toohigh or a too low mass for the currently specified volume and/or water density might resultin unrealistic behaviour. Keep the drag forces at a natural level, so the object does neitherbounce around like crazy, nor behave as if thrown on a pillow.
6.2. Render Queue Controller
AQUAS's water shaders are all alpha-blended and thus can't use the z-buffer. Shaders that can't use the z-buffer instead use a fixed value for the render order. The higher this value, the higher the priority of the rendering.
Example: Say you have 2 objects with shaders that don't use the z-buffer. If one object hasa render queue index of 2000 and the other one has a render queue index of 3000. If those two objects are now in line with the camera view, the object with the render order of

Documentation Page -21- of -25-________________________________________________________________________________
3000 will always be rendered in front of the other object, because it has a higher render queue index. This will also happen, if the object with the lower render queue index is in front of the other object from the camera's view. In some situations this kind of behaviour isundesirable.
In AQUAS's case it can happen that from certain view angles the water is being rendered before tree billboards, if the billboard start distance on the terrain is very low and if the billboards have a lower render queue than the water. Here's what this looks like:
To solve this AQUAS comes with a render queue controller, that enables you to manipulateAQUAS's render queue even on runtime. The script is usually added to the waterplane automatically, but if it isn't, you can add it by selecting the waterplane and then clicking:
"Add Component" => "AQUAS" => "Render Queue Controller".
The component has only one inspector attribute called "Render Queue Index". When setto -1, the water will have it's default render queue, which is 3000. If AQUAS renders ofercertain object, such as billboards, simply set it to something lower, such as 2800 or reduceit as much as neccessary to see what you need to see:

Documentation Page -22- of -25-________________________________________________________________________________
Note:
Altering the render queue of the water can't harm your project, nor can it harm AQUAS, yet still you should use it with caution, because it might result in AQUAS being rendered behind things that should be underwater (e.g. Caustics).
6.3. Screenshotter
AQUAS comes with a basic Screenshot object, that can be used to quickly makescreenshots in the editor. Quickly creating screenshots can be useful to show your work toothers, as well as to ease support, when you're experiencing trouble with the package.
The Screenshotter comes as a prefab. Simply drag it from the "Prefabs"-folder and drop itinto your hirarchy. Drag and drop your main camera to the "Camera"-attribute of theScreenshotter's inspector, specify the desired outpu resolution of your screenshot and thedesired folder, resp. File name to save the screenshots to. The files will get a suffix to thefile name containing the date time, so you don't have to specify a new file name for eachscreenshot. Use the "F12"-key to take a screenshot in play mode.

Documentation Page -23- of -25-________________________________________________________________________________
7. Trouble Shooting
Problem:
I get this error in the console when trying to add/use underwater effects:
"Assets/AQUAS/Scripts/AQUAS_LensEffects.cs(256,53): error CS0246:The type or namespace name `GlobalFog' could not be found. Are youmissing a using directive or an assembly reference?"
Solution:
Open up the GlobalFog.cs script found at:
../Assets/Standard Assets/Effects/ImageEffects/Scripts
At line 9 replace
class GlobalFog : PostEffectsBase
by
public class GlobalFog : PostEffectsBase
Problem:
I'm getting strange image distortions, even when I'm afloat.
Solution:
Delete the "UnderWaterCameraEffects" object from the scene and add it again. You caneither add it manually (as described in 3.4.a) or via the Quick Setup window.
Problem:
My scene looks very bright when I add the underwater effects to the scene (washed out).

Documentation Page -24- of -25-________________________________________________________________________________
Solution:
That's a Unity bug that – as far as known – occurs on OS X whenever one is using multi-sample anti-aliasing (MSAA) and image effects in linear color space. The solution is eitherto upgrade Unity to a version that has this problem fixed or avoid working in linear colorspace when using AQUAS's underwater effects.
Please have a look at the following entries in the Unity bug tracker for more information:
"(Imageeffects) Image effect brightens scene in linear color space"
"(Grabpass) Material with grabpass shader renders much brighter on OpenGL in linear"
Problem:
I've added AQUAS to the scene, but the water is invisible.
Two possible solutions:
1. If you're working on DirectX9, please switch to DirectX11 or OpenGL. AQUAS usessurface effects, that are not supported on DirectX9.
2. Attach the AQUAS_Camera.cs script to your main camera. On some platforms(Android, Webplayer, WebGL) the water won't show in forward rendering mode,because it requires depth rendering to be enabled, which by default is only enabledin deferred rendering mode. The script enables depth rendering in forwardrendering mode.
Problem:
I've made a build for mobile, but the water has a jagged shoreline where it intersects withthe terrain.
Solution:
This behaviour occurs on certain mobile devices (e.g.: Nexus 5 & 6), while most devicesshow the water correctly. Unfortunately there's no actual solution to this yet, because it'suncertain, what's causing the problem. However there's a workaround that will minimizethe problem:
Reduce the Depth transparency in the inspector of the waterplane's material to 0. Thewater won't be transparent anymore, but the Shore Transparency parameter will still keepshore edges smooth – not an ideal solution but the only one for the time being.

Documentation Page -25- of -25-________________________________________________________________________________
Problem:
I'm using AQUAS on mobile, but it's very slow.
Solution:
Make sure, you're using one of the mobile shaders. The shaders for web & desktop aremuch more demanding, and will most likely bring mobile devices to their needs.
Problem:
I'm using the AQUAS mobile shader on mobile, but it's still very slow.
Solution:
AQUAS's mobile shaders are designed for today's mid- to high-end devices. Using it onolder devices or simply on low-end devices might result in bad performance. You canevaluate the performance on different devices by downloading this DEMO APK >>
8. Additional Information
• The current version of AQUAS is v1.3
• The scripts used in this package are as complete as they can be without limiting
you in the way you design your game, they are not enclosed though. You're free to
edit all included scripts to make them fit your exact needs
• Features to be added with future updates in the following order:
◦ Splashing particle effects
◦ Non-linear water waves
Note: AQUAS doesn't work with DirectX9. As fas as tests went, AQUAS supports all
platforms, except for Windows phone.
For video tutorials on the use of AQUAS, please visit the following link:
https://dogmaticgames.wordpress.com/products/aquas-water-shader-set/tutorials/