we want to move all the animation over a certain length of ... · web viewclick inside the white...
TRANSCRIPT

Making Motion Graphics with Special Effects
Open the Flash file from the website (Test07.fla)
First thing's first –Change the ESSENTIALS tab in the top right corner to ANIMATOR, to make things easier for you to navigate around, if it was already in classic mode then leave it as is.
Double check to make sure your timeline id set to 24 frames per second.
Now we’re all set.
1) Select the Text tool from the toolbar ( it looks like the letter T ). Notice the Character Family section in the Properties window on the far right. Click inside the white box and type in the word Impact to change the font to a nice thick and bold typeface.

2) Click on your stage and type out a word or any title you wish.
Make sure you’re happy with your text, because now we’re going to turn it into paint for the purposes of converting into button symbol.
Press V to activate the Selection Tool then click on the text and press Ctrl+B two times. This is to break apart the text into paint.
With the text still selected you can change the color of it now if you’d like.Towards the center of your screen you’ll see a box next to the paint bucket, click the color of your choice.
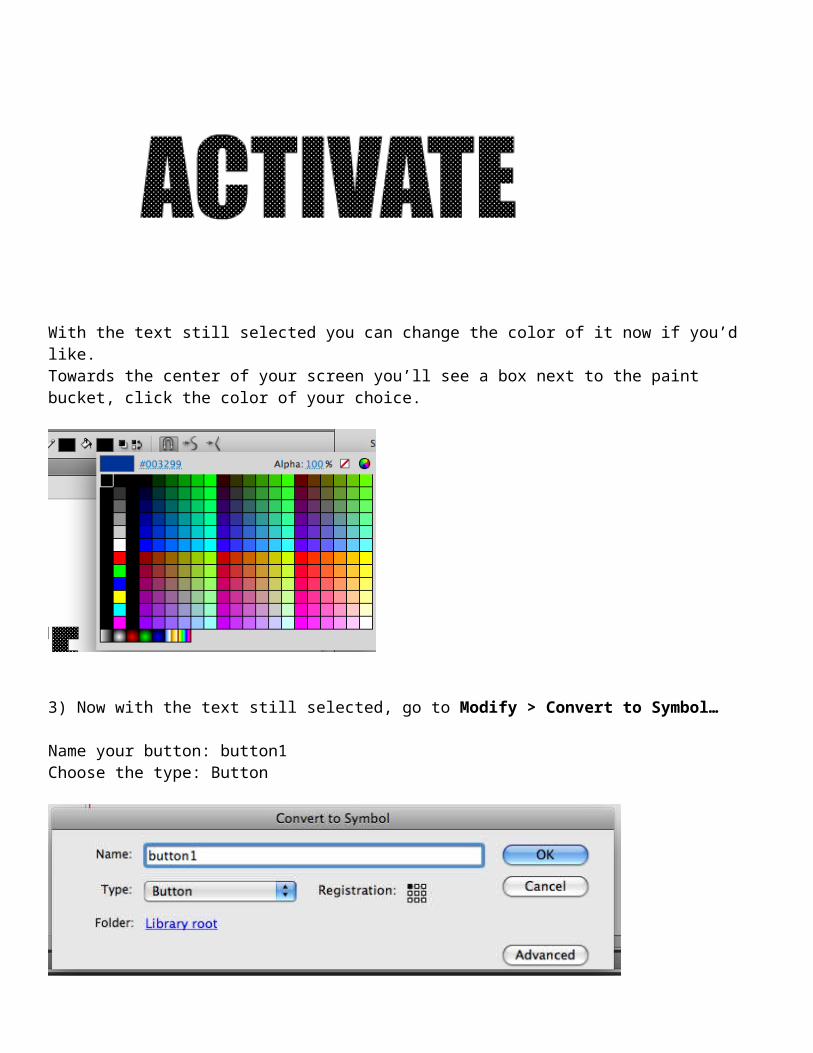
3) Now with the text still selected, go to Modify > Convert to Symbol…
Name your button: button1Choose the type: Button
Double click on the text - now you’re inside the button on a new timeline.
Create a new layer (found at the bottom baseline of your timeline, it looks like a piece of paper with a fold in it.
Then click and drag this layer to the bottom (under your original layer with the text on it).Now you have layer 2 selected and underneath the first layer.Select the Rectangle tool.
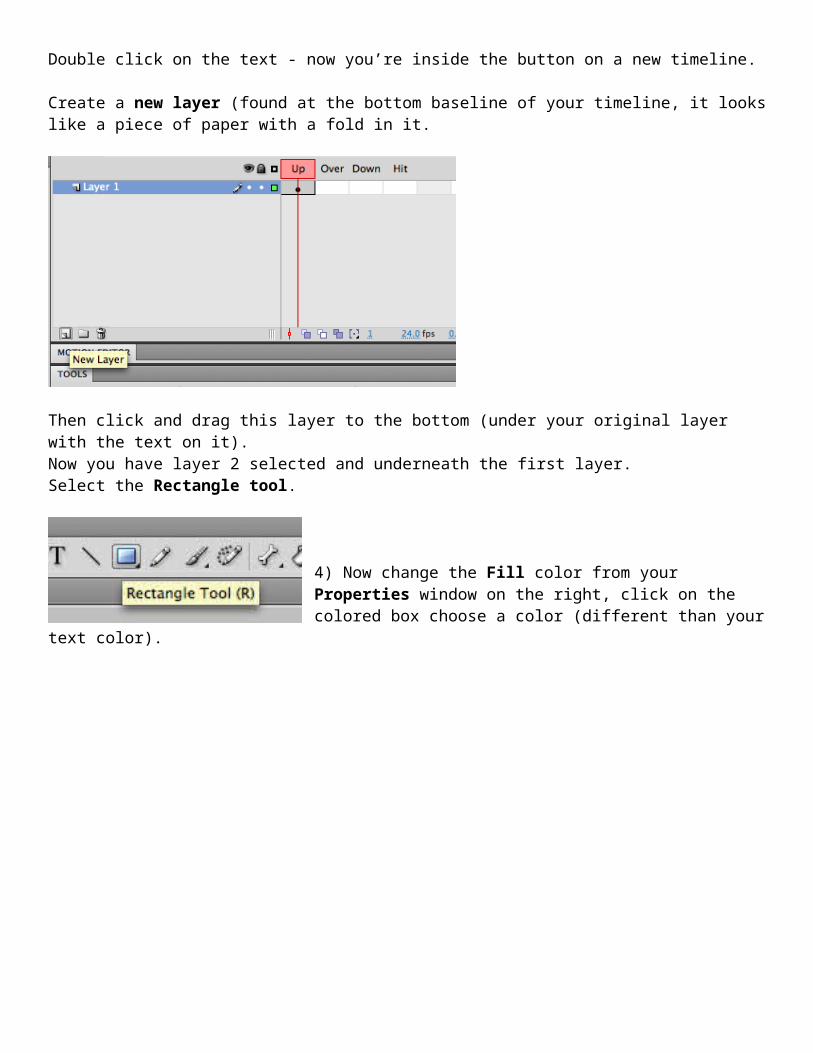
4) Now change the Fill color from your Properties window on the right, click on the colored box choose a color (different than your text color).
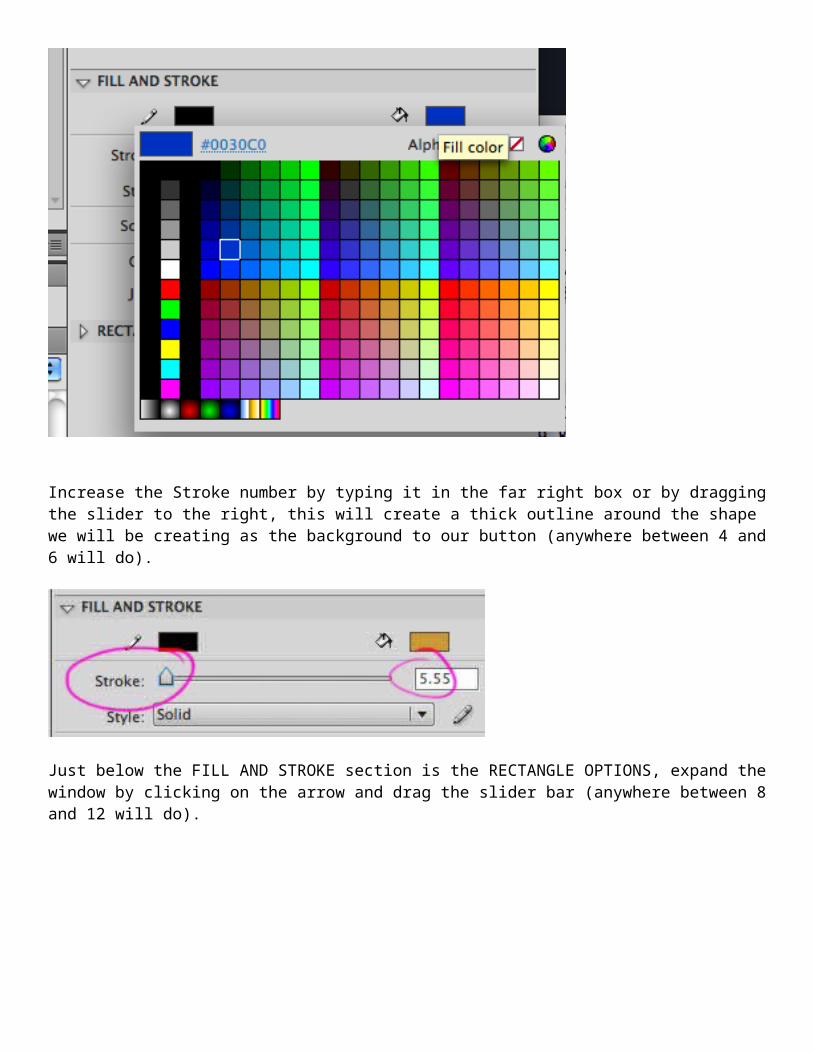
Increase the Stroke number by typing it in the far right box or by dragging the slider to the right, this will create a thick outline around the shape we will be creating as the background to our button (anywhere between 4 and 6 will do).
Just below the FILL AND STROKE section is the RECTANGLE OPTIONS, expand the window by clicking on the arrow and drag the slider bar (anywhere between 8 and 12 will do).
5) Now go to your stage and click and drag a shape around the text, any form will do. If you don’t like how it turned out, press Ctrl+Z to undo, then try again.
Let’s say you’re not happy with the colors, click and hold on the Paint Bucket icon in your tool bar to switch the tool to the Ink bottle, then you can change your color (either on the far right in the Properties window) or the color next to the pencil icon just to the right of your tool. Once a new color is selected click on the outline to change it.
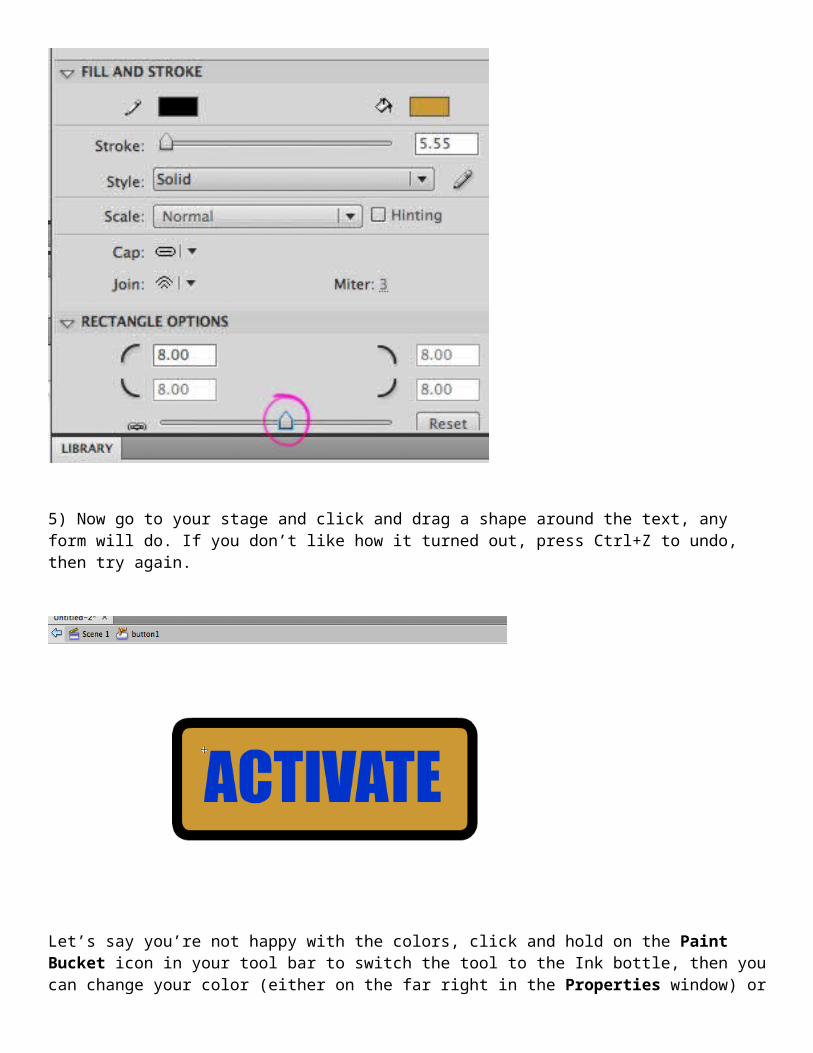
The same goes for the Fill color (mine here is a pale yellow-orange), click back to the Paint Bucket tool, change your color and click inside the box to change the color.
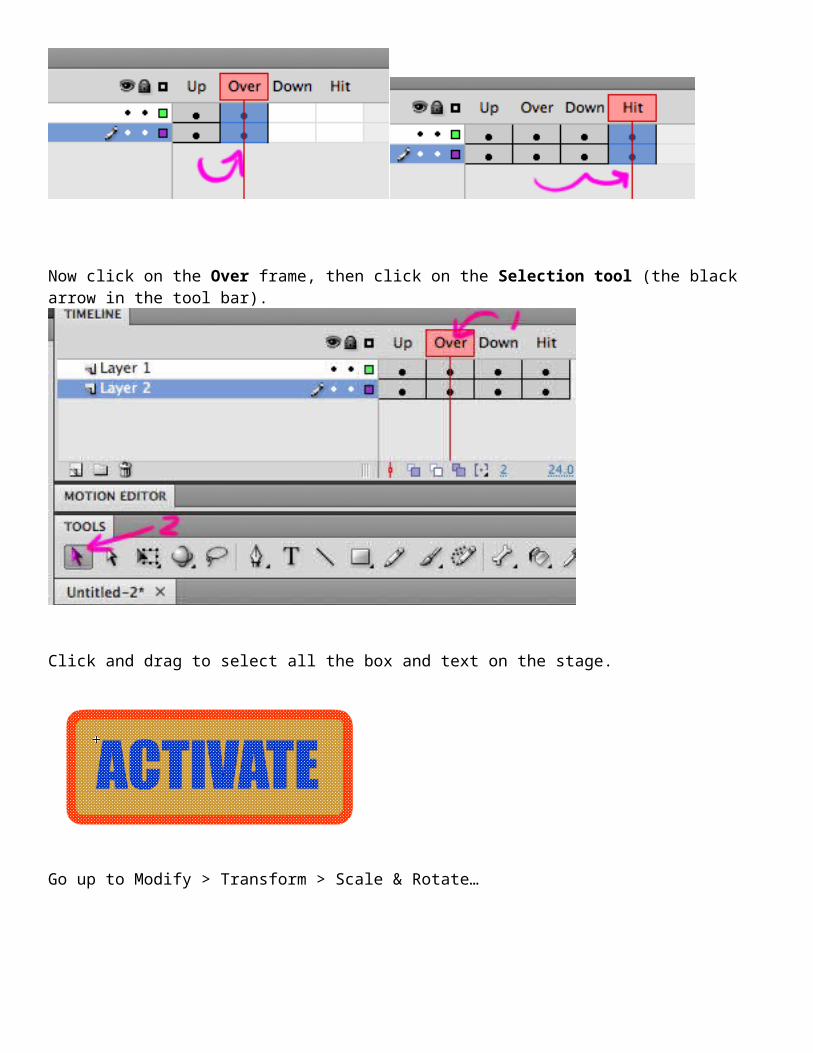
6) Now select your two keyframe on your timeline, just click and drag to select them both.Now hold down the ALT key and click and drag on the selected keys, then let go, this will copy the keys over to the next frame, do this again and again to have duplicates made for frames 3 and 4.Now you have the same image on the Up, Over, Down and Hit sections of the timeline.
Now click on the Over frame, then click on the Selection tool (the black arrow in the tool bar).

Click and drag to select all the box and text on the stage.
Go up to Modify > Transform > Scale & Rotate…
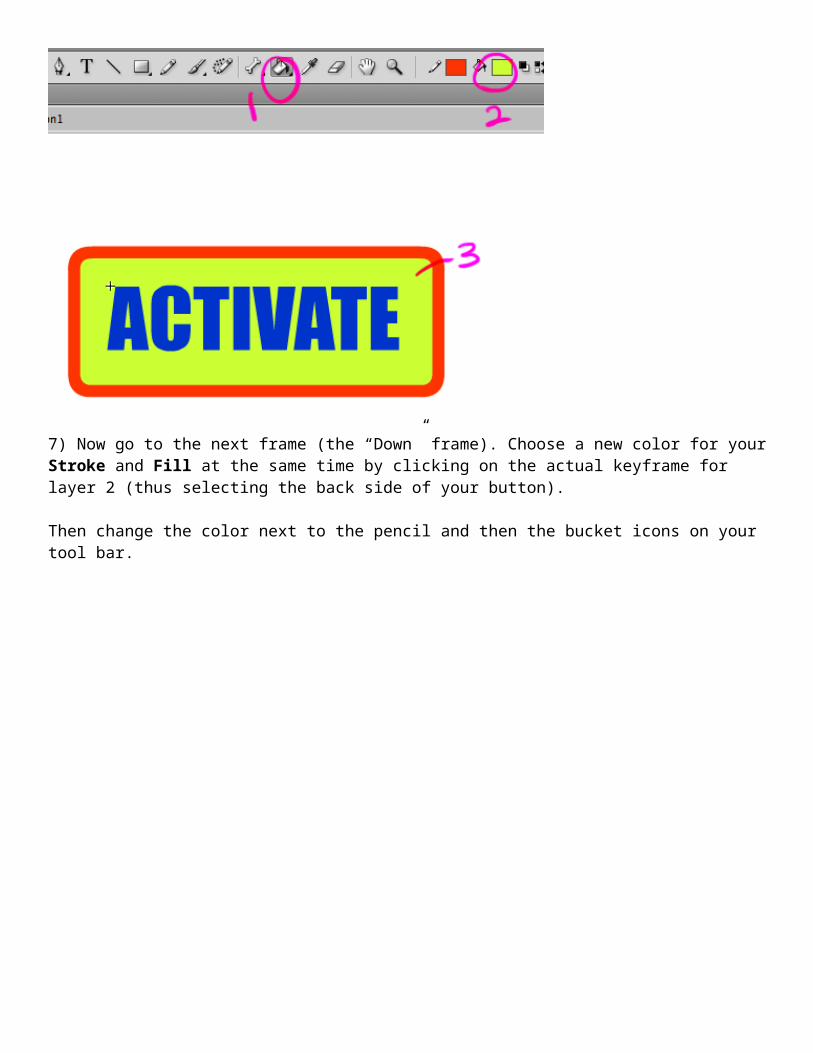
You only want to enlarge the button a tiny bit to make it look like it’s expanding when you roll over the button later upon completion, so type in 102% for the scale.
Select your Paint Bucket tool, change the color to a slightly lighter version, and click in the box of your button’s square shape.
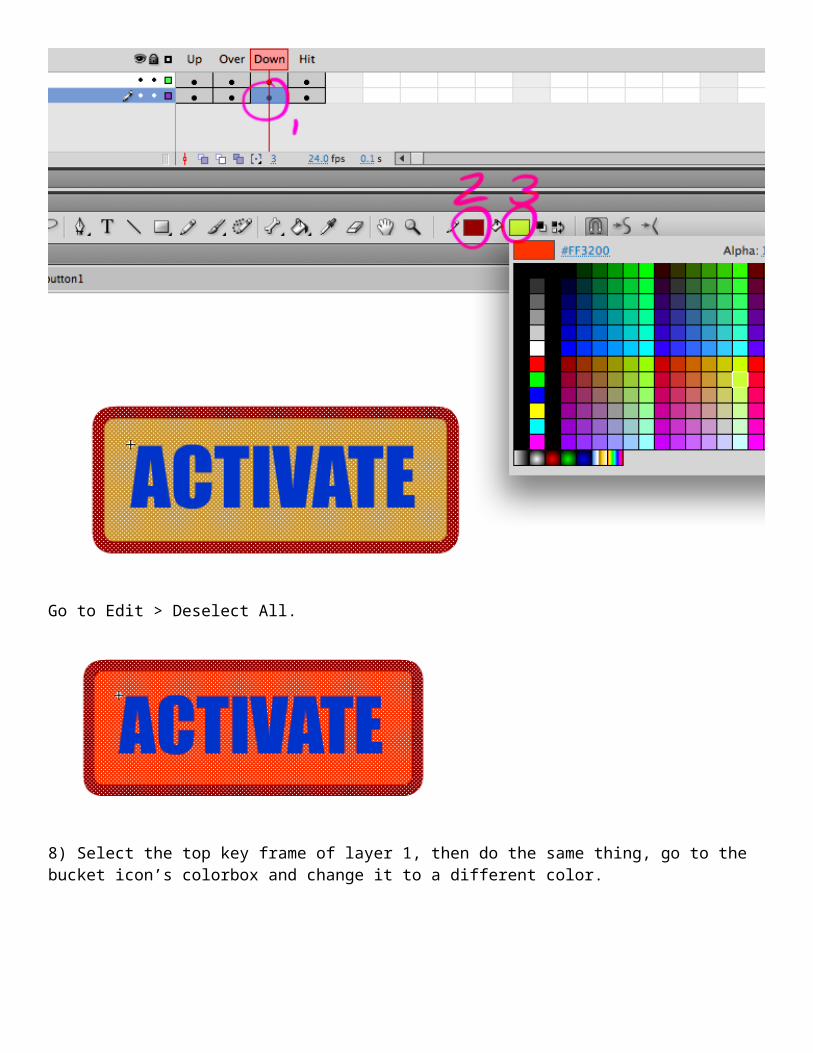
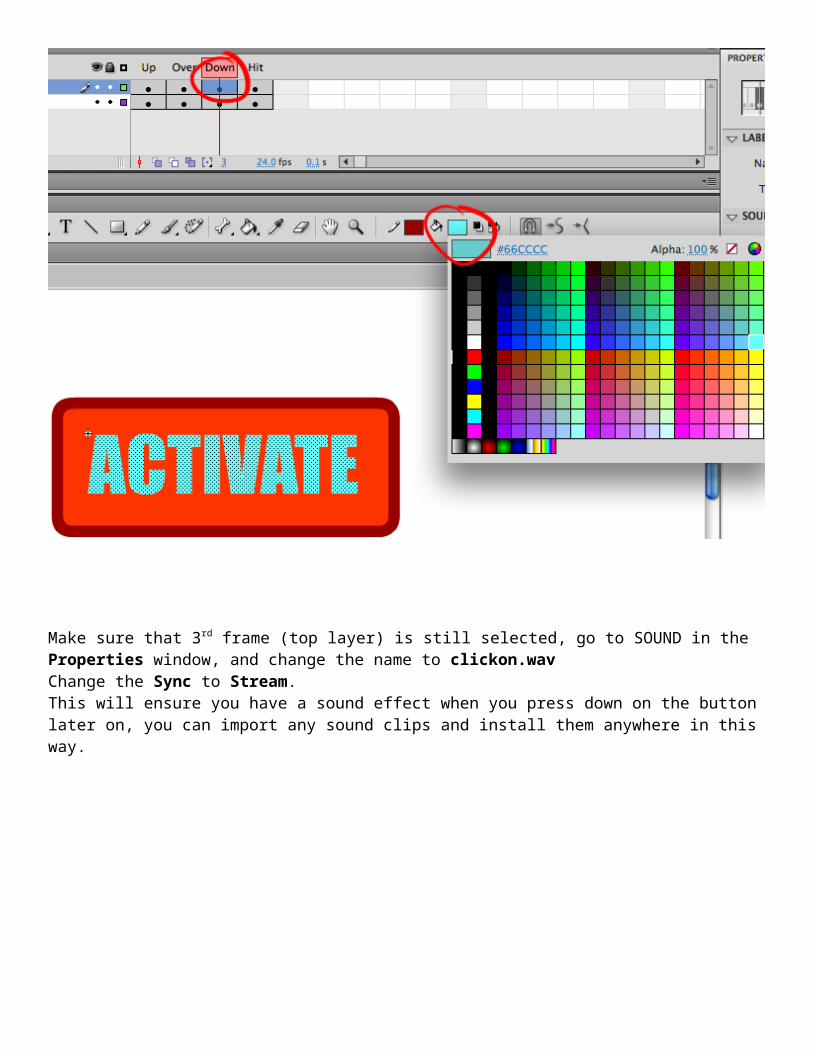
7) Now go to the next frame (the “Down” frame). Choose a new color for your Stroke and Fill at the same time by clicking on the actual keyframe for layer 2 (thus selecting the back side of your button).
Then change the color next to the pencil and then the bucket icons on your tool bar.

Go to Edit > Deselect All.
8) Select the top key frame of layer 1, then do the same thing, go to the bucket icon’s colorbox and change it to a different color.
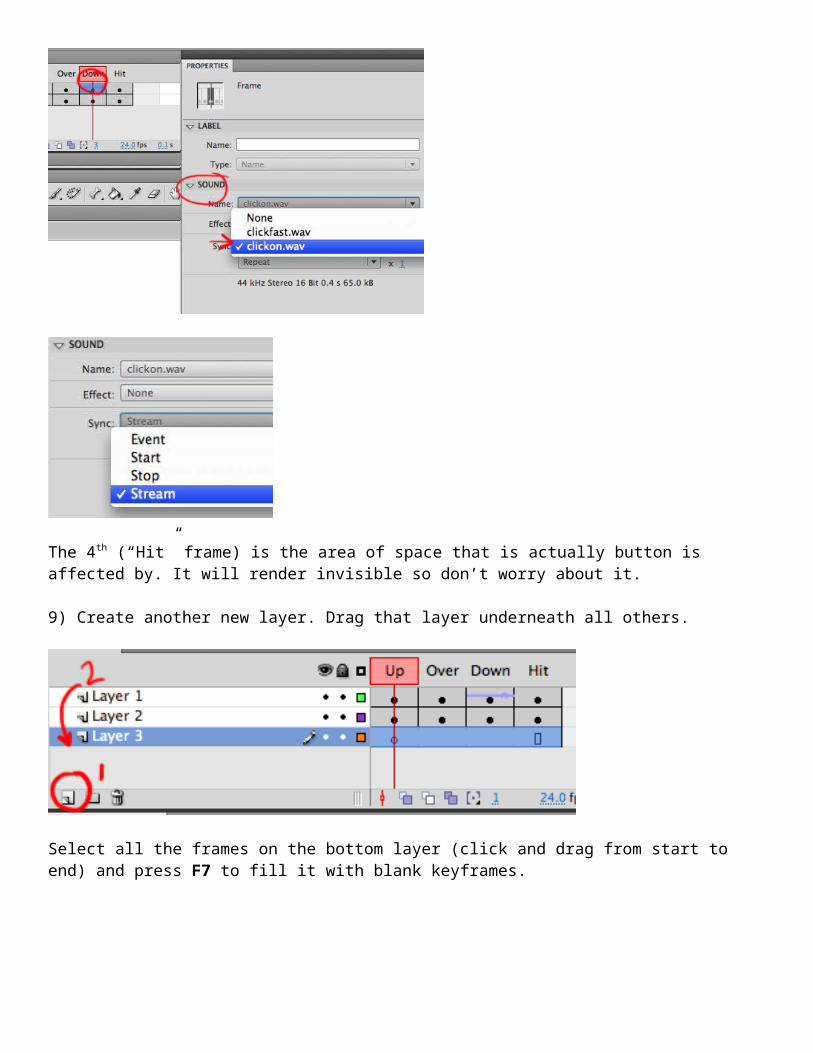
Make sure that 3rd frame (top layer) is still selected, go to SOUND in the Properties window, and change the name to clickon.wavChange the Sync to Stream.This will ensure you have a sound effect when you press down on the button later on, you can import any sound clips and install them anywhere in this way.
The 4th (“Hit” frame) is the area of space that is actually button is affected by. It will render invisible so don’t worry about it.
9) Create another new layer. Drag that layer underneath all others.
Select all the frames on the bottom layer (click and drag from start to end) and press F7 to fill it with blank keyframes.
10) Now click & drag (while holding down the ALT key) the 3rd “Down” keyframe to the bottom layer. Now you can make the top two layers temporarily invisible by click the “eye” icons for the top 2 layers.
So we’ve copied the “Down” frame on to another bottom layer, we will use this to add a “Glow” effect while you will be pressing down on the button upon completion.
11) With the box still selected, go up to the colored box next to the pencil icon to edit your stroke and choose the crossed out box to remove the outline. Then change the color of the fill (next to the bucket icon) to a brighter version of the color you had before.
Now you have a newly painted (without outlines) version of the box part of your button.
With the box still selected, go up to Modify > Convert to Symbol… and label your layer “Glow” and choose Movie Clip as the type.
12) Now to add a Photoshop-style glow to this box we go to the FILTERS section in your Properties window (you may have to click and drag the Library window out of the way to remove to see it at the bottom).
Click on the New Icon at the bottom and choose GLOW and increase the settings.I chose over 100 for the Blur, over 300% for the strength, Quality set to High, and you can change the color to whatever you’d like (the lighter and brighter the better).
That’s it. The button is now built. Click on the “Scene” button to get you back to the main timeline.

Press Ctrl+Enter to see a preview of the button in action.
If there’s anything you’re not happy with or any sort of glitch to it, go back into the symbol, go through frame-by-frame and try to see what went wrong to tweak it.
Now to make the button do stuff.
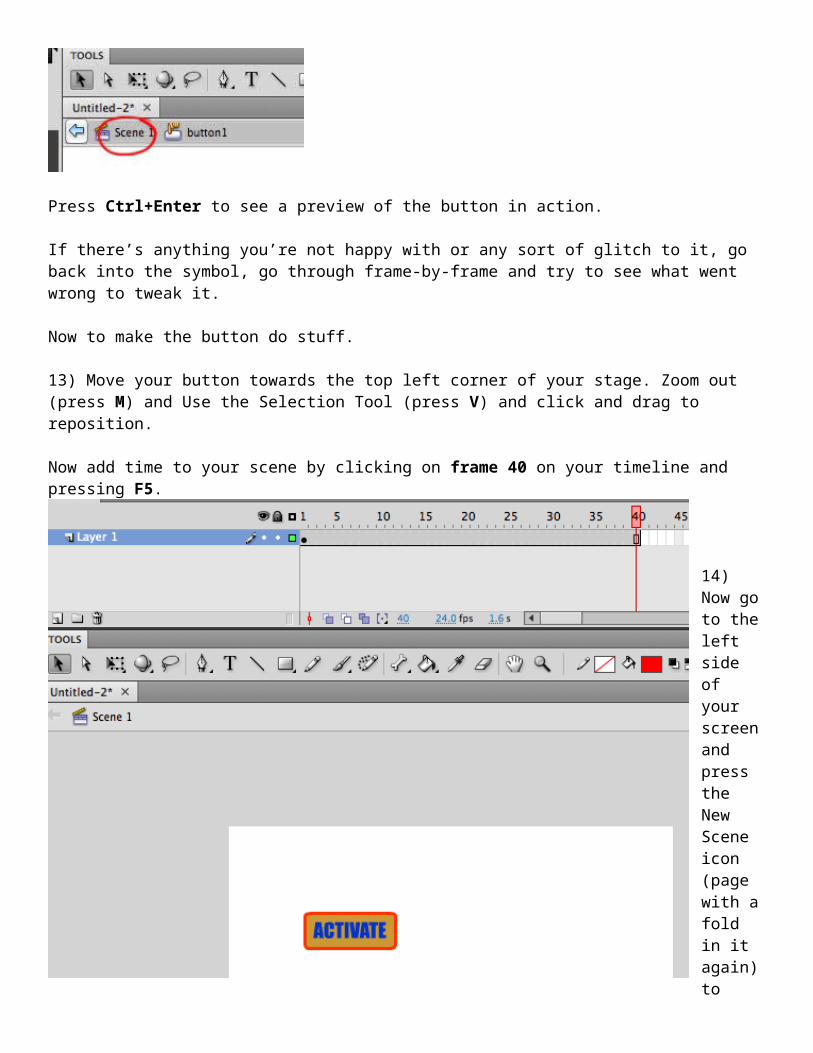
13) Move your button towards the top left corner of your stage. Zoom out (press M) and Use the Selection Tool (press V) and click and drag to reposition.
Now add time to your scene by clicking on frame 40 on your timeline and pressing F5.
14) Now go to the left side of your screen and press the New Scene icon (page with a fold in it again) to create a new scene (this is important for later since we’ll program the button to go there soon).
Now you van see Scene 1 and Scene 2 on the scene list, click on Scene 1 to get back to your button.
Create a new layer. Go to the last frame on timeline and press F6 to create a keyframe.This sets up the scene for us to program it to loop and NOT continue on to the next scene…

15) Now right click on that last keyframe and select Actions.
The Actions window will appear at the top, make sure the “Script Assist” button is on (you’ll know if it is if you see al that gray space at the top.

Now open up Global Functions > Timeline Controls, and drag the “goto” icon into the empty space to the right.
Leave the settings as they are:
And click the TIMELINE tab at the top to return to your button:
16) To set your button to go to the next scene, let’s right-click on the button and choose Actions.
Repeat the same process - open up Global Functions > Timeline Controls, and drag the “goto” icon into the empty space to the right. Change the Scene to Scene 2.
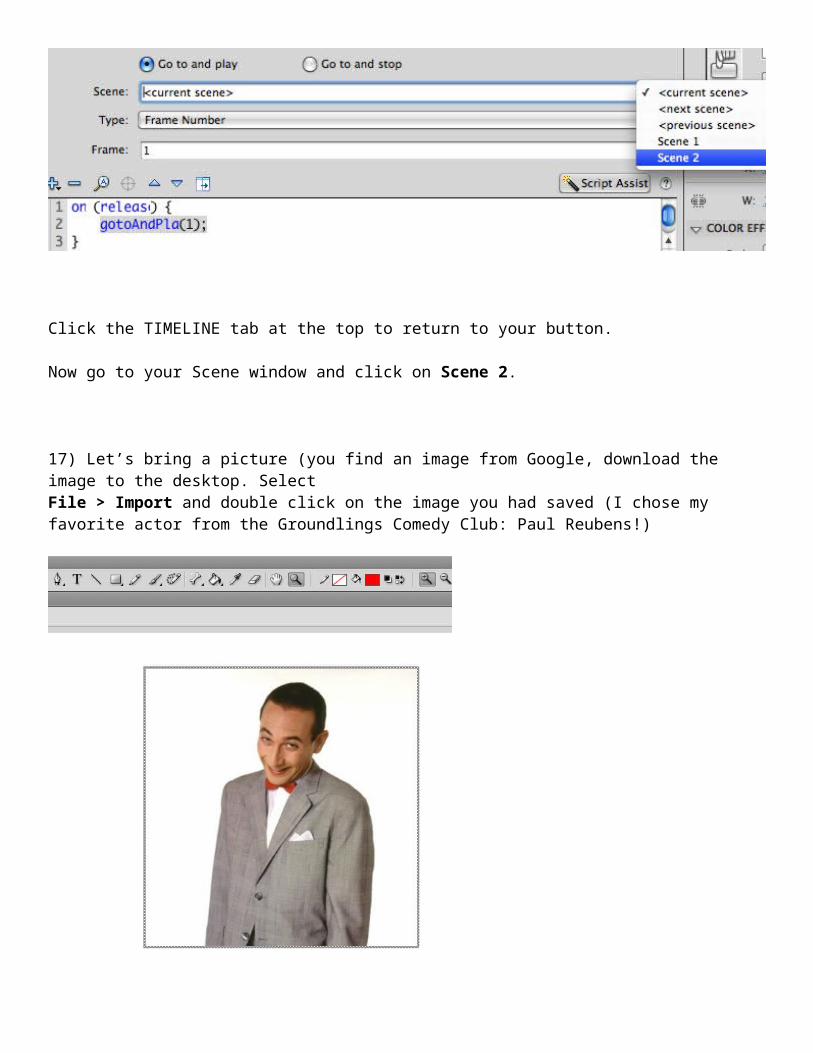
Click the TIMELINE tab at the top to return to your button.
Now go to your Scene window and click on Scene 2.

17) Let’s bring a picture (you find an image from Google, download the image to the desktop. Select File > Import and double click on the image you had saved (I chose my favorite actor from the Groundlings Comedy Club: Paul Reubens!)
With the image still selected, go to Modify > Convert to Symbol…
Choose Graphic as the type, then click OK.
18) Go to frame 120 and press F5 to extend the timeline.
Press F6 to lock in a keyframe.

Now right click on that last keyframe and select Actions.
The Actions window will appear at the top, Now open up Global Functions > Timeline Controls, and drag the “goto” icon into the empty space to the right.
Change the settings to: Scene 1
Click back to the Timeline tab.Scroll back to frame 1 on your timeline.
19) Go to frame 20, pres F6 to make a keyframe.Go back to the first frame, click on the image once with the Selection Tool (V).Hold down the SHIFT key and press the right arrow key on the keyboard a dozen times.
20) Now go over to the COLOR EFFECT section in the Properties window on the right.
Choose Style: Alpha and reduce it to 0%
Notice now your image symbol is completely transparent.

With your symbol still selected, right click on the first keyframe, ad choose Create Classic Tween.
You’ll notice now if you scroll through your timeline the image will move and fade in as you click and drag the cursor around on the timeline.
That’s it!You’re done.
If you press Ctrl+Enter you’ll get your interactive button tested out.Once you press on the button, and wait 5 seconds, the button will re-appear to loop back to the beginning.
Send your Flash file to the instructor.