web help desk getting started and evaluation guide · web help desk includes a 14-day evaluation...
TRANSCRIPT

INSTALLATION GUIDE
Web Help DeskVersion 12.5.2
Last Updated: November 15, 2017
Retrieve the latest version from: https://support.solarwinds.com/Success_Center/Web_Help_Desk_(WHD)/WHD_Documentation

© 2017 SolarWinds Worldwide, LLC. All rights reserved.
This document may not be reproduced by any means nor modified, decompiled, disassembled, published or distributed, in whole or in part, or translated to any electronic medium or other means without the prior written consent of SolarWinds. All right, title, and interest in and to the software and documentation are and shall remain the exclusive property of SolarWinds and its respective licensors.
SOLARWINDS DISCLAIMS ALL WARRANTIES, CONDITIONS OR OTHER TERMS, EXPRESS OR IMPLIED, STATUTORY OR OTHERWISE, ON SOFTWARE AND DOCUMENTATION FURNISHED HEREUNDER INCLUDING WITHOUT LIMITATION THE WARRANTIES OF DESIGN, MERCHANTABILITY OR FITNESS FOR A PARTICULAR PURPOSE, AND NONINFRINGEMENT. IN NO EVENT SHALL SOLARWINDS, ITS SUPPLIERS, NOR ITS LICENSORS BE LIABLE FOR ANY DAMAGES, WHETHER ARISING IN TORT, CONTRACT OR ANY OTHER LEGAL THEORY EVEN IF SOLARWINDS HAS BEEN ADVISED OF THE POSSIBILITY OF SUCH DAMAGES.
The SolarWinds and other SolarWinds marks, identified on the SolarWinds website, as updated from SolarWinds from time to time and incorporated herein, are registered with the U.S. Patent and Trademark Office and may be registered or pending registration in other countries. All other SolarWinds trademarks may be common law marks or registered or pending registration in the United States or in other countries. All other trademarks or registered trademarks contained and/or mentioned herein are used for identification purposes only and may be trademarks or registered trademarks of their respective companies.
November 15, 2017
page 2

Table of Contents
Introduction 6
Stand-alone installation 6
Integrated with the Orion Platform 7
Evaluation installation 9
Terminology 9
Product Licensing 9
Purchase a license 10
Plan for a production deployment 11
Pre-flight checklist 11
Installation requirements 14
Server sizing requirements 14
Server requirements 14
Operating system requirements 15
Web server requirements 16
Database requirements 16
SQL Server and MySQL server requirements 16
Oracle Java Database Connectivity (JDBC) driver requirements 17
Web browser requirements 17
SolarWinds product integration requirements 17
Discovery connector requirements 18
LDAP requirements 18
Mail server requirements 20
Web Help Desk Mobile requirements 20
Port requirements 20
Web Help Desk interfaces 20
INSTALLATION GUIDE: WEB HELP DESK
page 3

External and embedded databases 21
Email traffic 21
LDAP and Active Directory 22
Asset Discovery 22
Prepare the Web Help Desk database 23
Prepare the MySQL time zone tables 23
Enable TCP/IP on SQL Server 24
Create and configure your SQL Server database 24
Prepare the Web Help Desk server 25
Install Web Help Desk 27
Install Web Help Desk in a stand-alone deployment 27
Prepare for the install 27
Install Web Help Desk 28
Install Web Help Desk on a server running Microsoft Windows Server 28
Install Web Help Desk on a server running Mac OS X or macOS 28
Install Web Help Desk on a server running Red Hat Linux 64-bit 29
Complete the Installation 30
Microsoft Windows 36
macOS 37
Linux 37
Activate the license 38
Apply the activation key online 39
Apply the activation key offline 40
Integrate Web Help Desk into an Orion deployment 43
Install an Evaluation 47
Uninstall Web Help Desk 49
Access the Customer Portal 50
Create your user profile 50
page 4

Explore the Customer Portal 50
Get Help 52
INSTALLATION GUIDE: WEB HELP DESK
page 5

IntroductionSupported Version: SolarWinds® Web Help Desk® (WHD) 12.5.2
SolarWinds® Web Help Desk® is a web-based automated ticketing solution that helps you manage your IT support requests for both internal and external clients. Use Web Help Desk to create and manage tickets in your help desk operations.
Check out this video (1:23) for information about training and documentation resources available to help you implement Web Help Desk.
This guide supports the following installation scenarios:
l Stand-alone installation l Integrated with the Orion Platform l Evaluation installation
Stand-alone installationFor a stand-alone installation of Web Help Desk, install the product on a dedicated server with your choice of an embedded PostgreSQL database or an external database such as MySQL™ or Microsoft® SQL Server®. After configuration, you can use Web Help Desk as your ticketing system.
By default, the Web Help Desk Admin Console uses secure port 8443 to connect to the Web Help Desk server.
You can integrate a stand-alone installation at any time to an Orion Platform environment.
page 6

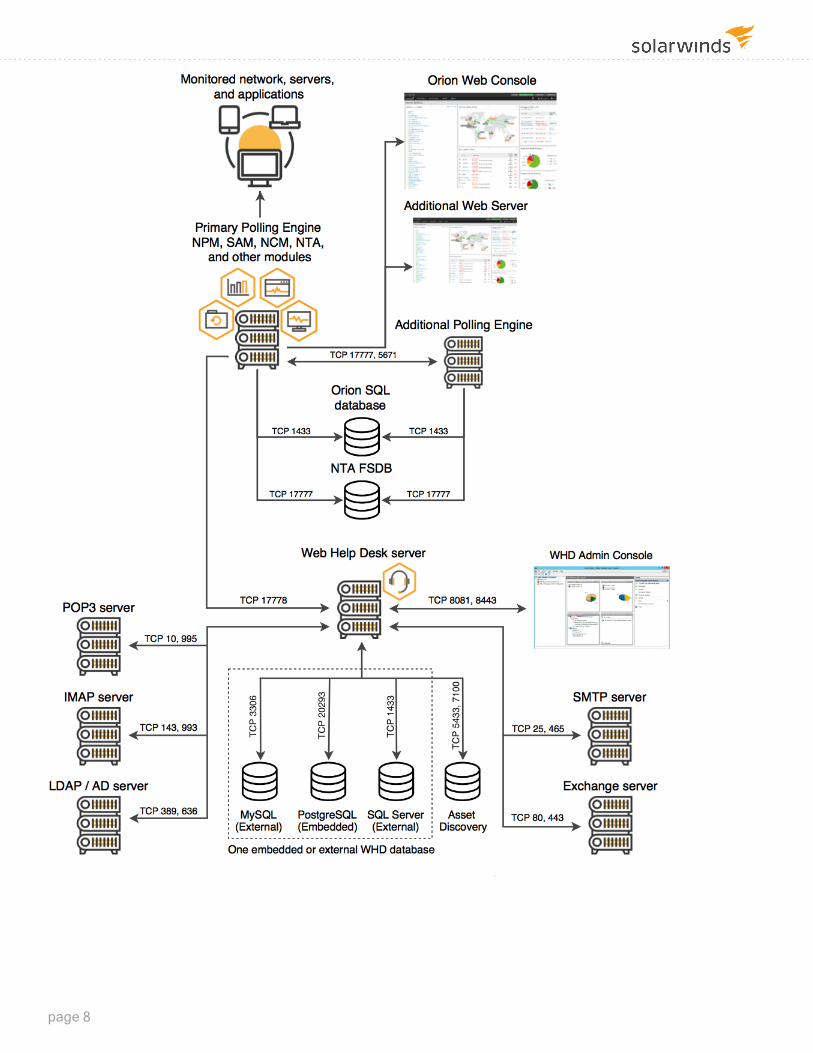
Integrated with the Orion PlatformWeb Help Desk supports an integrated installation into an existing Orion Platform. For this configuration, install the product on a dedicated server, select and implement an embedded or external database, and create a SolarWinds integrated connection in the Web Help Desk Admin Console to the Orion Platform. When you are finished, create or modify alerts in the Orion Platform to integrate with other SolarWinds Products and subscribers.
This configuration links Web Help Desk to SolarWinds Network Performance Monitor (NPM), Server and Application Monitor (SAM), and Network Configuration Manager (NCM) systems to automatically create new tickets from Orion platform alerts and dispatch the appropriate techs to address the issue.
This installation assumes that the Orion Platform and monitored products meet the SolarWinds product integration requirements. If your environment uses SolarWinds High Availability, see the High Availability requirements in the SolarWinds NCM Administrator Guide or the SolarWinds NPM Administrator Guide as part of the installation.
By default, the Web Help Desk Admin Console uses secure port 8443 to connect to the Web Help Desk server.
INSTALLATION GUIDE: WEB HELP DESK
page 7
page 8

Evaluation installationWeb Help Desk includes a 14-day evaluation license. During the evaluation period, you can create an unrestricted number of techs and access all product features. After the evaluation period, all tech accounts are deactivated. To continue using the product, you must purchase a full product license from SolarWinds Sales.
TerminologyThe following terms provide context for SolarWinds product architecture, roles, and components.
l Admins: techs with privileges to configure Web Help Desk, set up tech accounts, and configure tech groups.
l Clients: end users or customers who can open tickets in Web Help Desk. Clients can enter tickets through email or through the Web Help Desk Admin Console.
l Request Types: A classification that identifies the type of support request. Request types are used to automatically assign tickets to the appropriate tech group.
l Techs: Web Help Desk technicians who troubleshoot, resolve, and manage customer tickets. Techs can be members of a tech group who address specific request types.Techs can also create tickets. For example, when a client calls the IT Help Desk, the tech opens a ticket on the client's behalf. Additionally, techs can open tickets that are not associated with a client, such as tickets to schedule routine maintenance or system upgrades.
l Tech Groups: a group of techs with similar skills and expertise who address specific ticket request types, such as IT or Facilities. A tech group can include multiple levels so complex or difficult tickets can be escalated to more experienced techs.
l Tickets: support requests opened through and managed within Web Help Desk. Tickets can be initiated through email, created in the Web Help Desk Admin Console, or imported from another application.
Product LicensingSolarWinds licenses Web Help Desk on a tiered structure based on the number of seats (or technicians), and not end users.
The available license tiers include:
l 1 to 5 l 6 to 10 l 11 to 20 l 21 to 30 l 31 to 40
INSTALLATION GUIDE: WEB HELP DESK
page 9
l 41 to 50 l 51 to 75 l 76 to 100 l 100+
PURCHASE A LICENSEYou can request a quote or purchase a license from the Online Store. After your order is processed, you receive an email with your SolarWinds customer ID (SWID) and password along with your invoice (if purchased directly). The license includes a one-year maintenance contract.
Additionally, you can upgrade the product license to a larger license tier as you increase the number of techs. Contact Customer Sales for details.
Web Help Desk does not require a monthly cost. After you purchase Web Help Desk, you own the product with the option to renew the maintenance contract each year after the initial purchase.
page 10

Plan for a production deploymentThis section provides the following information:
l Pre-flight checklist l Installation requirements l Port requirements l Prepare the Web Help Desk database l Prepare the Web Help Desk server
Pre-flight checklistBefore you install Web Help Desk, complete the pre-installation checklist below. This checklist helps you:
l Verify that system requirements are met, all required software is installed, and required roles and features are enabled.
l Gather the information required to complete the installation.
Review the release notes
Review the Web Help Desk release notes and available documentation in the Success Center.
Create a standard access account (if required)
If you are new to SolarWinds, create a standard access account on the Customer Portal.
1. Locate the SolarWinds Customer ID (SWID) you received in your purchase confirmation email.
2. Open a Web browser and log in to the Customer Portal. 3. In the Log In box, enter your SWID (customer ID) and password. 4. Click Log in. 5. Review the information, and click Continue. 6. Complete the fields in the page to create your individual user account
(IUA). 7. Click Create Individual Profile. 8. Access your email account and follow the directions in the email to
verify your account. 9. Click Continue to Customer Portal.
10. Log out of the Customer Portal.
INSTALLATION GUIDE: WEB HELP DESK
page 11
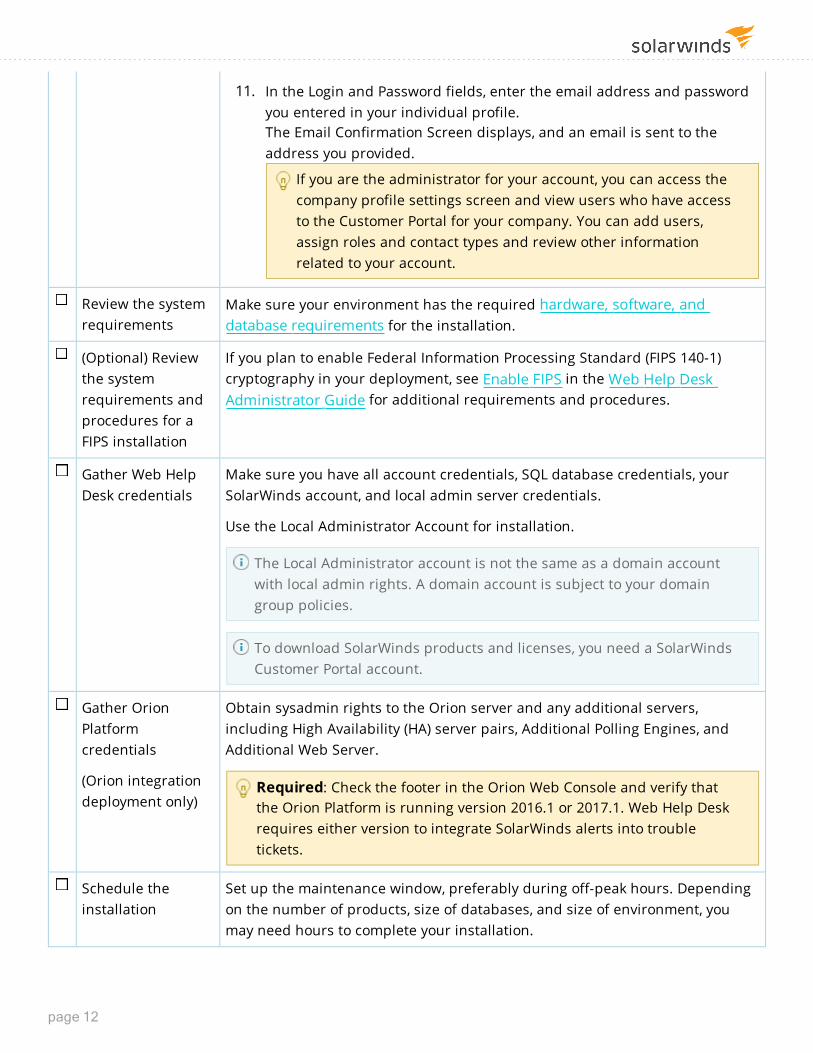
11. In the Login and Password fields, enter the email address and password you entered in your individual profile.The Email Confirmation Screen displays, and an email is sent to the address you provided.
If you are the administrator for your account, you can access the company profile settings screen and view users who have access to the Customer Portal for your company. You can add users, assign roles and contact types and review other information related to your account.
Review the system requirements
Make sure your environment has the required hardware, software, and database requirements for the installation.
(Optional) Review the system requirements and procedures for a FIPS installation
If you plan to enable Federal Information Processing Standard (FIPS 140-1) cryptography in your deployment, see Enable FIPS in the Web Help Desk Administrator Guide for additional requirements and procedures.
Gather Web Help Desk credentials
Make sure you have all account credentials, SQL database credentials, your SolarWinds account, and local admin server credentials.
Use the Local Administrator Account for installation.
The Local Administrator account is not the same as a domain account with local admin rights. A domain account is subject to your domain group policies.
To download SolarWinds products and licenses, you need a SolarWinds Customer Portal account.
Gather Orion Platform credentials
(Orion integration deployment only)
Obtain sysadmin rights to the Orion server and any additional servers, including High Availability (HA) server pairs, Additional Polling Engines, and Additional Web Server.
Required: Check the footer in the Orion Web Console and verify that the Orion Platform is running version 2016.1 or 2017.1. Web Help Desk requires either version to integrate SolarWinds alerts into trouble tickets.
Schedule the installation
Set up the maintenance window, preferably during off-peak hours. Depending on the number of products, size of databases, and size of environment, you may need hours to complete your installation.
page 12

Installations in an existing Orion Platform environment require polling engines and SolarWinds services to be offline for a length of time, causing you to lose a portion of polling data.
Notify your company
Send a message to your company about the installation schedule and maintenance window. If you need additional help, contact and allocate staff to be available.
Check for anti-virus software
Determine if any antivirus software is installed on the server or servers where you plan to install. To ensure the installation goes smoothly, exclude the SolarWinds directory.
For example, on Windows Server 2012 R2, exclude C:\ProgramData\SolarWinds\.
See Files and directories to exclude from antivirus scanning for a full list of antivirus exclusions,
Do not exclude executable files. SolarWinds assumes that C:\ is the default volume.
Open ports according to requirements
For the firewall and server ports, open ports according to the server port requirements listed in the installation requirements. SolarWinds uses these ports to send and receive data.
Prepare the product license
Review the current product license and determine if you need to make any changes. You can download updated license keys through the Customer Portal.
If you need to modify your licenses, contact your SolarWinds account manager or SolarWinds Customer Sales.
INSTALLATION GUIDE: WEB HELP DESK
page 13

Installation requirementsThis section describes the requirements for setting up a SolarWinds Web Help Desk deployment in a stand-alone or Orion deployment.
If you plan to enable Federal Information Processing Standard (FIPS) 140-2 compliant cryptography in your deployment, see the Web Help Desk Administrator Guide for specific requirements.
SERVER SIZING REQUIREMENTSUse the following table to determine the requirements for your Web Help Desk deployment size.
DEPLOYMENT SIZE REQUIREMENTS
20 tech sessions or fewer l A supported operating system l A 32-bit Java Virtual Machine (JVM) l 4 GB RAM (up to 3.7 GB for the tech sessions, JVM support,
operating system, and any additional services you need to run on the system)
This configuration supports 10 - 20 tech sessions with no on-board memory issues.
More than 20 tech sessions l A supported operating system l A 64-bit JVM l 3 GB RAM for 20 tech sessions plus 1GB RAM for each
additional 10 tech sessions
SERVER REQUIREMENTSThe following table lists the Web Help Desk server requirements for Web Help Desk.
COMPONENT REQUIREMENTS
CPU 64-bit Dual Core 2.0 GHz or faster
Memory 4 GB (up to 20 technicians)
3 GB (more than 20 technicians) plus 1 GB for every 10 additional technicians
Hard Drive Space 20 GB (recommended)
Oracle® Java™ Version 8.0
page 14

OPERATING SYSTEM REQUIREMENTSThe following table lists the supported operating systems for the Web Help Desk server.
If you installed macOS 10.3.x (High Sierra) on your Web Help Desk server, some Tomcat web applications will fail when you start Web Help Desk after the installation. See Tomcat web applications fail after upgrading to macOS 10.13.x (High Sierra) for a workaround.
PLATFORM SUPPORTED VERSIONS
Microsoft® Windows Server® Windows Server 2008 R2 (64-bit)
Windows Server 2012 (64-bit)
Windows Server 2012 R2 (64-bit)
Windows Server 2016 (64-bit)
Microsoft Windows
(Trial evaluation only)
Windows 7 (64-bit)
Windows 8.1 (64-bit)
Windows 10 (64-bit)
macOS 10.12.x (Sierra)
10.13.x (High Sierra)
Red Hat® Enterprise Linux (RHEL) RHEL 6.5 (64-bit)
RHEL 7.0 (64-bit)
CentOS™ CentOS 6.5 (64-bit)
CentOS 7.0 (64-bit)
Fedora™ Fedora 24 (64-bit)
Fedora 25 (64-bit)
Oracle Java Java 8.0
INSTALLATION GUIDE: WEB HELP DESK
page 15

WEB SERVER REQUIREMENTSThe following table lists the supported web servers for Web Help Desk.
PRODUCT VERSION
Apache™ Tomcat™ 7.0.82
DATABASE REQUIREMENTSWeb Help Desk uses an embedded PostgreSQL database as its standard database. The following table lists the supported databases for Web Help Desk.
DATABASE SUPPORTED VERSIONS
PostgreSQL PostgreSQL 9.2
PostgreSQL 9.3.2
PostgreSQL 9.4
PostgreSQL 9.6
MySQL™ MySQL 5.6
MySQL 5.7
Microsoft® SQL Server® SQL Server 2008 R2 SP3
SQL Server 2012 SP2
SQL Server 2014
For optimal external database performance, run Web Help Desk and a supported external database on separate servers.
SQL SERVER AND MYSQL SERVER REQUIREMENTS
The following table lists the minimum hardware requirements for a database server running a Microsoft SQL Server or MySQL database with Web Help Desk.
COMPONENT REQUIREMENTS
CPU 64-bit Dual Core 3.0 GHz or higher
Hard drive space 20 GB
RAM 3 GB with 1 GB additional RAM for every additional 10 techs
page 16
ORACLE JAVA DATABASE CONNECTIVITY (JDBC) DRIVER REQUIREMENTS
Web Help Desk for macOS includes an embedded Java Virtual Machine (JVM). If you are running an external Oracle JVM, Web Help Desk preserves your Java settings during the installation procedure and continues to use the external Oracle JVM.
If you are migrating from an external JVM to the embedded JVM included with Web Help Desk and you are using a MySQL database, ensure that the new embedded Java directory on your Web Help Desk server includes the Oracle Java Database Connectivity (JDBC) driver.
See the Oracle website to download the latest JDBC driver.
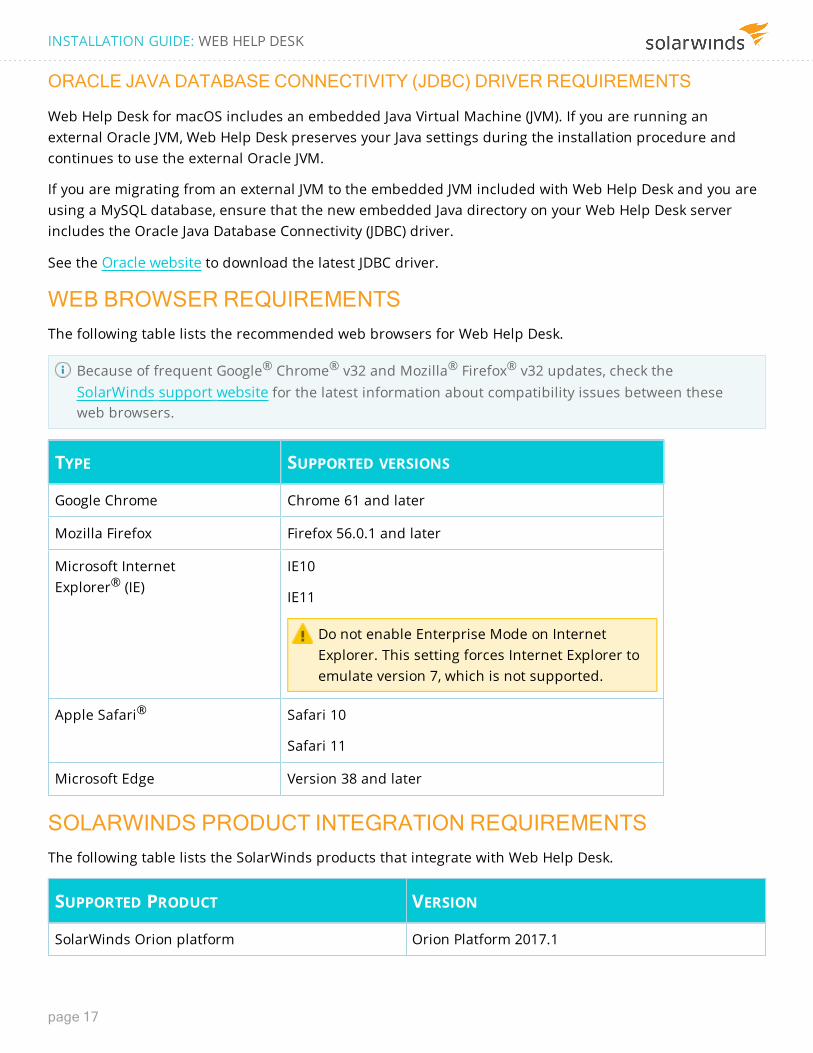
WEB BROWSER REQUIREMENTSThe following table lists the recommended web browsers for Web Help Desk.
Because of frequent Google® Chrome® v32 and Mozilla® Firefox® v32 updates, check the SolarWinds support website for the latest information about compatibility issues between these web browsers.
TYPE SUPPORTED VERSIONS
Google Chrome Chrome 61 and later
Mozilla Firefox Firefox 56.0.1 and later
Microsoft Internet Explorer® (IE)
IE10
IE11
Do not enable Enterprise Mode on Internet Explorer. This setting forces Internet Explorer to emulate version 7, which is not supported.
Apple Safari® Safari 10
Safari 11
Microsoft Edge Version 38 and later
SOLARWINDS PRODUCT INTEGRATION REQUIREMENTSThe following table lists the SolarWinds products that integrate with Web Help Desk.
SUPPORTED PRODUCT VERSION
SolarWinds Orion platform Orion Platform 2017.1
INSTALLATION GUIDE: WEB HELP DESK
page 17

SUPPORTED PRODUCT VERSION
SolarWinds Network Performance Monitor (NPM) NPM 12.0.1
SolarWinds Server and Application Monitor (SAM) SAM 6.4.2
SolarWinds Network Configuration Monitor (NCM) NCM 7.5
DameWare Mini Remote Control (MRC) DameWare MRC 12.0.3
DISCOVERY CONNECTOR REQUIREMENTSThe following table lists the supported discovery connectors used in Web Help Desk for asset discovery.
DISCOVERY CONNECTOR SUPPORTED VERSIONS
SolarWinds Network Configuration Manager (NCM) NCM 7.5
SolarWinds Network Performance Manager (NPM) NPM 12.0
SolarWinds Server and Application Monitor (SAM) SAM 6.2
SAM 6.2.3
Absolute Manage (HEAT Lanrev) Absolute Manager 7.3 (build 5642)
Apple Remote Desktop Remote Desktop 3.8
Casper Casper 9.96
Lansweeper Lansweeper 6.0.100.75
Microsoft System Center Configuration Manager
(SCCM)
SCCM 1511 (64-bit)
LDAP REQUIREMENTSThe following table lists the supported Lightweight Directory Access Protocol (LDAP) software products for Web Help Desk.
PRODUCT SUPPORTED VERSIONS
Microsoft Active Directory® Active Directory 2008
Active Directory 2012
Active Directory 2012 R2
page 18

PRODUCT SUPPORTED VERSIONS
Open Directory Open Directory 4
OpenLDAP® OpenLDAP 2.4
OpenLDAP 2.4.42
INSTALLATION GUIDE: WEB HELP DESK
page 19

MAIL SERVER REQUIREMENTSThe following table lists the supported mail server, versions, and protocols for Web Help Desk.
PRODUCT SUPPORTED VERSIONS SUPPORTED PROTOCOLS
Microsoft Exchange Server Exchange Server 2010
Exchange Server 2013 CU7
Exchange Server 2016
Office 365
IMAP
POP3
SMTP
WEB HELP DESK MOBILE REQUIREMENTSThe following table lists the supported client operating systems for the Web Help Desk Mobile software available on Apple iTunes.
PLATFORM SUPPORTED OPERATING SYSTEMS
Apple iOS 10
iOS 11
Port requirementsReview and open ports for Web Help Desk to support communications for the Web Help Desk server.
This section lists the secure and non-secure ports to access the following Web Help Desk resources:
l Web Help Desk interfaces l External and embedded databases l Email traffic l LDAP and Active Directory l Asset Discovery
See Port requirements for all SolarWinds products for more information.
WEB HELP DESK INTERFACES
The following table lists the Web Help Desk ports for secure and non-secure interface traffic.
page 20

PORT PROTOCOL DESCRIPTION
80 TCP HTTP communications with Microsoft Exchange Web Services (EWS)
443 TCP Secure traffic from the Web Help Desk Administrator Console
8081 TCP Non-secure traffic from the Web Help Desk Administrator Console (Windows, Linux, OS X)
8443 TCP (Default) Secure traffic from the Web Help Desk Administrator Console (Windows, Linux, OS X)
61616 TCP Web Help Desk Discovery engine (JMS queue port)
EXTERNAL AND EMBEDDED DATABASES
The following table lists the Web Help Desk ports for external and embedded database communications.
PORT PROTOCOL DESCRIPTION
1433 TCP Communications with a Microsoft SQL external database, including:
l Microsoft SQL Server l Microsoft Systems Management Server l Microsoft System Center Configuration Manager (SCCM) l SolarWinds Network Configuration Manager (NCM) l SolarWinds Network Performance Monitor (NCM) l SolarWinds Server and Application Monitor (SAM)
3306 TCP Communications with a MySQL external database (such as LANrev, and Casper 8 and lower)
5432 TCP Communications with an External PostgreSQL database
17778 TCP Communications from the SolarWinds Orion server (Orion integration only)
20293 TCP Communications with an embedded PostgreSQL database
EMAIL TRAFFIC
The following table lists the Web Help Desk ports for email traffic.
PORT PROTOCOL DESCRIPTION
25 TCP Traffic from the Web Help Desk server to the email server for automated email notifications
INSTALLATION GUIDE: WEB HELP DESK
page 21

PORT PROTOCOL DESCRIPTION
80 TCP Non-secure traffic with Microsoft Exchange Web Services (EWS)
110 TCP Non-secure traffic with the POP3 mail server
143 TCP Non-secure traffic with the Internet Message Access Protocol (IMAP) mail server
443 TCP Secure traffic with EWS
993 TCP Secure traffic with the IMAP mail server
995 TCP Secure traffic with the POP3 mail server
LDAP AND ACTIVE DIRECTORY
The following table lists the Web Help Desk ports for Lightweight Directory Access Protocol (LDAP) and Microsoft Active Directory.
PORT PROTOCOL DESCRIPTION
389 TCP Non-secure traffic from the Web Help Desk server to a designated server (usually a domain controller) for use with the Directory Service tool (LDAP, Active Directory)
636 TCP Secure traffic from the Web Help Desk server to a designated server (usually a domain controller) for use with the Directory Service tool (LDAP, Active Directory)
ASSET DISCOVERY
The following table lists the Web Help Desk ports for Asset Recovery.
PORT PROTOCOL DESCRIPTION
135 TCP Asset Discovery using Windows Management Instrumentation (WMI).
WMI calls uses port 135 and then choose a random port for further communication.
1521 TCP Communications with the Oracle Java Database Connectivity (JDBC) connector for asset discovery
3306 TCP Communications with the MySQL external database, LANrev, and Casper 8 and lower
4445 TCP Remote log server reader
page 22

PORT PROTOCOL DESCRIPTION
5433 TCP Communications with Apple Remote 3.2 for asset discovery
7100 TCP Communications with a Sybase database for asset discovery
Prepare the Web Help Desk databaseSolarWinds Web Help Desk supports the following databases:
l Embedded PostgreSQL l MySQL™ l Microsoft® SQL Server Standard or Enterprise Edition
If your Web Help Desk deployment requires database management features such as failover clusters, do not use the embedded PostgreSQL database included with Web Help Desk. Failover clusters are not available with the embedded PostgreSQL database.
If you choose embedded PostgreSQL as your primary database, Web Help Desk installs the database on the Web Help Desk server during the installation. No additional configuration is required.
If you choose non-embedded, non-default Microsoft SQL Server or MySQL as your primary database, install the database engine and management tools on a separate server prior to installing Web Help Desk. See the Microsoft Technet or MySQL website for installation instructions.
Install SQL Server or MySQL on a dedicated drive with at least 20 GB of space to accommodate the database engine, management tools, help desk tickets, and ticket file attachments. You can also configure Web Help Desk to use a new SQL Server database instance on an existing server running SQL Server.
After you install the MySQL software, prepare the MySQL time zone tables.
After you install the SQL Server software, enable TCP/IP on the SQL server and create and configure your SQL Server database.
PREPARE THE MYSQL TIME ZONE TABLESIf you choose non-embedded, non-default MySQL as your primary database, install the database and manually populate your time zone system tables.
You can search for tickets using two new qualifiers: Due Date and First Call Resolution. These qualifiers rely on data located in four MySQL system tables:
l time_zone
l time_zone_name
l time_zone_transition
l time_zone_transition_type
INSTALLATION GUIDE: WEB HELP DESK
page 23

These tables are created when you install MySQL in your deployment, but are not populated by default with data. Web Help Desk requires this data because Due Date and First Call Resolution qualifier logic is implemented from within the database. If the database is missing time zone data, these qualifiers do not work properly.
When you install your MySQL database, be sure to manually populate these system tables with time zone data. See the MySQL website and follow the instructions for MySQL Server time zone support.
You can check the system tables by executing the following query:
SELECT * FROM mysql.time_zone
If the query does not create new table rows, the tables are not populated with data.
ENABLE TCP/IP ON SQL SERVER Configure the following settings in the SQL Server Configuration Manager.
SETTING VALUE
TCP/IP Protocol Enabled in SQL Server Network Configuration > Protocols for SQL 20xx
IP Address 127.0.0.1 (if installed on the Web Help Desk server)
Server IP address (if installed on a separate server)
TCP Port 1433
IPAll
TCP Dynamic Ports Blank
TCP Port 1433
CREATE AND CONFIGURE YOUR SQL SERVER DATABASEConfigure the following settings in the SQL Server Management Studio for SQL Server to create and configure SQL Server to the Web Help Desk database instance.
SETTING VALUE
SQL Server and Windows Authentication Mode Enabled
Login Name whd
SQL Server Authentication: Password Enabled and configured
page 24

SETTING VALUE
SQL Server Authentication: Enforce password policy Disabled
SQL Server Authentication: Enforce password expiration Disabled
SQL Server Authentication: User must change password at next login
Disabled
Database name whd
Database owner whd
Prepare the Web Help Desk serverComplete the following checklist on the Web Help Desk server. This checklist helps you:
l Verify that the server is set up and configured for a Web Help Desk deployment l Gather the information required to complete the installation
1. Prepare a server for the Web Help Desk deployment
Verify that the server:
l Meets the CPU, RAM, and hard drive space requirements l Is running a supported operating system l Is not a domain controller l Is configured on your corporate network l Is accessible to all Web Help Desk techs and administrators l Can access the following servers:
l Active Directory or LDAP (for Windows deployments) l POP3 l IMAP l SMTP l Microsoft Exchange l External database (for MySQL or SQL Server deployments only)
2. Install the most recent updates for your operating system
Verify that all updates are installed on the server.
For Windows systems, check for the latest updates and service packs using Windows Update.
For macOS systems, check for updates using the Apple Software Update service or the Apple Store.
For Linux systems, check for updates by executing the following in a terminal window:
INSTALLATION GUIDE: WEB HELP DESK
page 25

sudo apt-get upgrade
If you installed macOS 10.3.x (High Sierra) on your Web Help Desk server, some Tomcat web applications will fail when you start the application. See Tomcat web applications fail after upgrading to macOS 10.13.x (High Sierra) for a workaround you can perform when the installation is completed.
3. Set the server to the correct time
Synchronize the server time with Greenwich Mean Time (GMT).
If the server time is off by five minutes in either direction from GMT, you must contact SolarWinds Customer Service to reset your license.
4. Set the Region and Language setting to English (United States)
See the documentation included with your operating system.
5. Open ports according to the requirements
For your server ports and firewall, open ports according to the port requirements.
Orion uses port 17778 TCP for the SolarWinds Orion integration.
6. Check for anti-virus software
Determine if any antivirus software is installed on the server or servers where you plan to install. To ensure the installation goes smoothly, exclude the SolarWinds directory.
For example, on Windows Server 2012 R2, exclude the following:
C:\ProgramData\SolarWinds\
See Files and directories to exclude from antivirus scanning for a complete list of antivirus exclusions.
page 26
Install Web Help DeskThis section provides the following information:
l Install Web Help Desk in a stand-alone deployment l Activate the license l Integrate Web Help Desk in an Orion deployment l Install an Evaluation
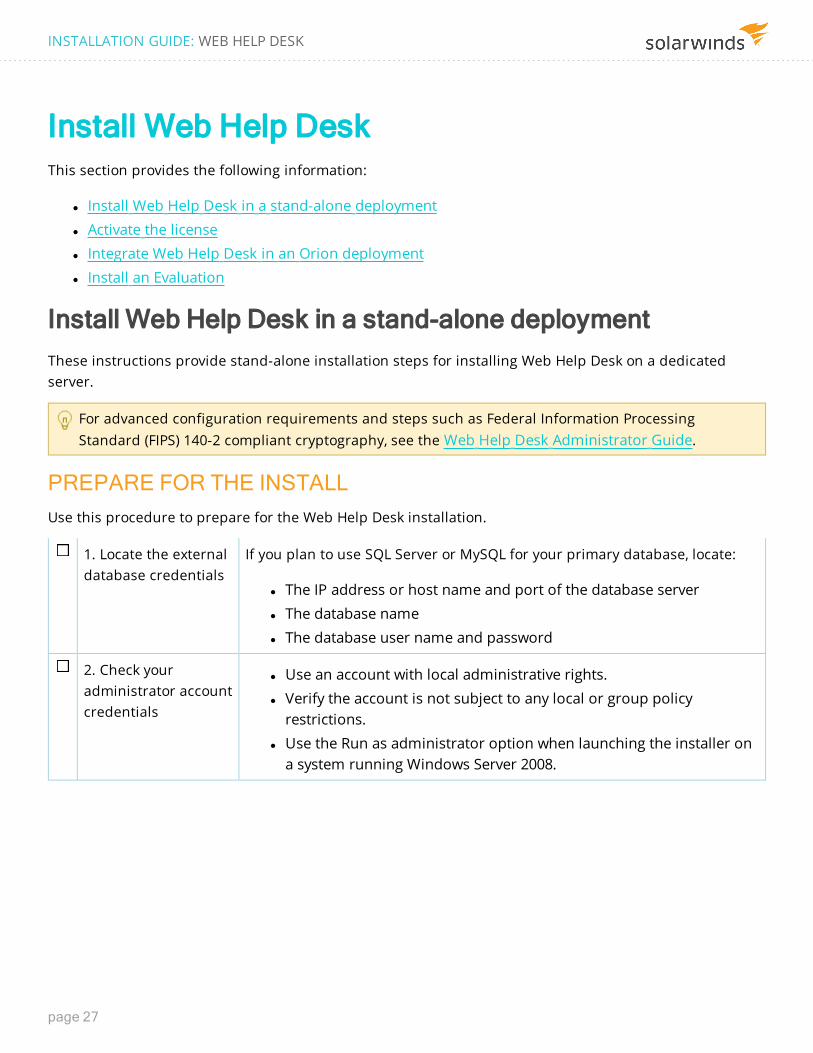
Install Web Help Desk in a stand-alone deploymentThese instructions provide stand-alone installation steps for installing Web Help Desk on a dedicated server.
For advanced configuration requirements and steps such as Federal Information Processing Standard (FIPS) 140-2 compliant cryptography, see the Web Help Desk Administrator Guide.
PREPARE FOR THE INSTALLUse this procedure to prepare for the Web Help Desk installation.
1. Locate the external database credentials
If you plan to use SQL Server or MySQL for your primary database, locate:
l The IP address or host name and port of the database server l The database name l The database user name and password
2. Check your administrator account credentials
l Use an account with local administrative rights. l Verify the account is not subject to any local or group policy
restrictions. l Use the Run as administrator option when launching the installer on
a system running Windows Server 2008.
INSTALLATION GUIDE: WEB HELP DESK
page 27

INSTALL WEB HELP DESKInstall Web Help Desk on a server running:
l Microsoft Windows Server l Mac OS X or macOS l Red Hat Linux
INSTALL WEB HELP DESK ON A SERVER RUNNING MICROSOFT WINDOWS SERVER
Use this procedure to install a production or evaluation copy of Web Help Desk on a server running Windows Server.
1. Download the ZIP from the Customer Portal
1. Log in to the Web Help Desk server as an administrator. 2. Quit all other programs. 3. Log in to the Customer Portal. 4. Download Server for Windows 64-bit.
2. Extract the file from the ZIP file
Extract the contents of the WebHelpDesk-12.5.x-x64.zip file. The ZIP file includes the following files:
l WebHelpDesk-12.5.x.x64.exe: installs Web Help Desk and the latest hotfix (if available) on a stand-alone 64-bit server.
l WHD-12.5.x.xxxx-Hotfix: contains the latest hotfix files (if available).
3. Run the installation file
1. Right-click webhelpdesk-12.5.x.64.exe and select Run as Administrator.
2. Complete the on-screen instructions. 3. When the installation is complete, click Done.
The Configuration Wizard opens the default browser.
4. Complete the Configuration Wizard
See Complete the installation.
INSTALL WEB HELP DESK ON A SERVER RUNNING MAC OS X OR MACOS
Use this procedure to install a production or evaluation copy of Web Help Desk on a server running Mac OS X or macOS.
1. Download the ZIP from the Customer Portal
1. Log in to the Web Help Desk server as an administrator. 2. Quit all other programs.
page 28

3. Log in to the Customer Portal. 4. Download Server for Mac OS X.
2. Extract the files from the ZIP file
Extract the contents of the webhelpdesk-12.5.x.64.pkg file. The ZIP file includes the following files.
l webhelpdesk-12.5.x.64.pkg: installs Web Help Desk and the latest hotfix (if available) for a standalone server.
l WHD-12.5.x.xxxx-Hotfix: contains the latest hotfix files (if available).
3. Run the installation file.
1. Double-click webhelpdesk-12.5.x.64.pkg.
2. Complete the on-screen instructions. 3. When the installation is complete, click Done.
The Configuration Wizard opens the default browser.
4. Complete the Configuration Wizard
See Complete the installation.
INSTALL WEB HELP DESK ON A SERVER RUNNING RED HAT LINUX 64-BIT
Use this procedure to install a production or evaluation copy of Web Help Desk on a server running Red Hat Linux.
1. Download the ZIP from the Customer Portal
1. Log in to the Web Help Desk server as an administrator. 2. Quit all other programs. 3. Log in to the Customer Portal. 4. Download Server for Red Hat Linux 64-bit.
2. Extract the files from the ZIP file
1. Extract the contents of the WebHelpDesk-12.5.x.xxxx.x86_64.rpm.gz file.
2. Open a terminal window and execute:gunzip webhelpdesk-12.5.X.x86_64.rpm
The unzipped file includes the following file:
WebHelpDesk-12.5.x.xxxx.x86_64.rpm
This file installs Web Help Desk for a standalone server.
2. Run the installation file
1. Open a terminal window and execute:rpm -ivh webhelpdesk-12.5.X.x86_64.rpm
INSTALLATION GUIDE: WEB HELP DESK
page 29

2. Open a web browser and navigate to:https://127.0.0.1:8443
Secure port 8443 is the default port. If you log in using unsecure port 8081, a warning displays, indicating that the connection is not private.
The Configuration Wizard displays.
3. Complete the installation.
See Complete the installation.
If you installed macOS 10.3.x (High Sierra) on your Web Help Desk server, some Tomcat web applications will fail. See Tomcat web applications fail after upgrading to macOS 10.13.x (High Sierra) for a workaround to complete the installation.
COMPLETE THE INSTALLATIONWhen the installation is completed, the Configuration Wizard runs on secure port 8443 in the default browser. Complete the wizard, and then enable and configure the 64-bit Java Virtual Machine (JVM) memory on the Web Help Desk server (if applicable).
If you log in using unsecure port 8081, a warning displays, indicating that the connection is not private.
1. Select a database
Select a database for your Web Help Desk installation.
If you select Use the PostgreSQL database (recommended), click Next and go to step 3.
If you select Use Custom SQL database (advanced), click Next and go to step 2.
page 30

2. Set up the custom SQL database
(SQL Server only)
1. In the Database field, select the database.
2. Complete the remaining fields, and then click Test to test the database connection.
3. To create an account on the database, click Create database and user account if necessary, enter the admin user name and password, and click Create.
4. When you establish a connection with the database, click Next.
INSTALLATION GUIDE: WEB HELP DESK
page 31

3. Set up the email accounts
1. Complete the fields as required to configure the incoming and outgoing email accounts. Each incoming mail account is associated with a specific request type, an optional tech group, and an outgoing mail account (SMTP server) used to deliver outgoing mail. For example, you could have an incoming mail account for all IT tickets, another account for HR tickets, and yet another for Facilities tickets. Web Help Desk checks the Incoming mail accounts each minute for new messages, processes the messages into tickets, and deletes the processed messages from the incoming mail server.
If you are not ready to set up email accounts, you can skip this step and configure them later from the Web Help Desk web console. To continue without configuring email, click Skip this step.
page 32

2. Expand Advanced to set up the incoming mail ports.The incoming mail ports menu displays.
3. In the Incoming Mail Port field, enter the port number for incoming mail.
By default, Web Help Desk uses your first configured incoming mail account request type as the default. After you complete the Getting Started Wizard, you can update your email account information at Setup > E-Mail.
4. In the SMTP port field, enter the port number for outgoing mail. 5. Complete the remaining fields and check boxes as required. 6. Click Test to test your email address.
If the email connection is good, a confirmation message displays.If the email connection is not good, verify the Test Email Addresses field value and then click Test.
7. Click Next to continue.
INSTALLATION GUIDE: WEB HELP DESK
page 33

4. Set up the Admin account
1. Complete the fields as required to create the default admin account.
The default admin account is a local super user account used to:
l Log in to SolarWinds Web Help Desk for the first time and configure the application.
l Access all Web Help Desk settings and accounts.Administrators with a default admin account can create all user accounts, including additional admin accounts. The default admin account includes tech account privileges, so you can create and process tickets with tech privileges. Techs can have either Tech or Tech Admin account privileges.
2. Click Next to continue.
After you click Next, the Getting Started Wizard is no longer accessible. To change your settings after you initialize the application, click Setup in the Web Help Desk Admin Console menu bar and select a setup option.
page 34

5. (Optional) Add custom request types
1. Create one or more request types.When you install Web Help Desk, the last step of the Web Help Desk Getting Started wizard allows you to add request types or edit preconfigured request types. This step of the wizard is optional. You may find it easier to add request types in the Tickets panel after Web Help Desk is configured.
SolarWinds recommends that you click Finish to bypass this step in the wizard and take time to plan the request types you need. See Plan tech groups and request types in the Web Help Desk Getting Started Guide for information about creating request types.
2. Click Finish.The Configuration Wizard applies your settings and configures the application.
This process may take several minutes to complete.
6. Continue the setup
1. Click Login as admin to continue the setup.
2. If you agree with the License Agreement, click Continue.The Wizard opens the Web Help Desk Admin Console on port 8443 using HTTPS. Web Help Desk is installed on your server.
3. Click Done to exit the installer.
INSTALLATION GUIDE: WEB HELP DESK
page 35

7. Enable the 64-bit Java Virtual Machine (JVM) memory
(64-bit systems only)
1. On the Web Help Desk server, navigate to the Web Help Desk conf directory.
l OS X and macOS: /Library/WebHelpDesk/conf l Microsoft Windows: \Program Files\WebHelpDesk\conf l Linux: /usr/local/webhelpdesk/conf
2. Open the whd.conf file with a text editor (such as Notepad). 3. Add the following argument to the JAVA_OPTS option:
JAVA_OPTS="-d64"
4. Save your changes.
8. Increase the JVM memory
(64-bit systems only)
Web Help Desk requires additional max heap memory than the JVM memory default. After you enable the JVM, increase the MAXIMUM_MEMORY value in the whd.conf file and restart Web Help Desk.
1. Determine the appropriate amount of memory for your deployment using the following formula:(Average number of concurrent techs x 150) + (Average number of concurrent users x 25) = MAXIMUM_MEMORY valueFor example, If the average number of concurrent techs is 10 and the average number of concurrent users is 50, the recommended MAXIMUM_MEMORY value is 2750 (which is 2.75 GB):(10 x 150 = 1500) + (50 x 25 = 1250) = 2750
The MAXIMUM_MEMORY value should not be greater than the total memory in the Web Help Desk server.
2. Update the whd.conf file for your operating system.
MICROSOFT WINDOWS
1. Navigate to the Web Help Desk directory located at:C:\Program Files\WebHelpDesk\
2. Open the \conf directory. 3. Open the whd.conf file in a text editor (such as Notepad). 4. In the whd.conf file, locate the MAXIMUM_MEMORY parameter. 5. Change the parameter value to the value you calculated in an earlier step. 6. Save and close the file. 7. Restart Web Help Desk.
a. In the WebHelpDesk directory, right-click whd_stop.bat and select Run as Administrator.
b. After the command prompt window closes, right-click whd_start.bat and select Run as Administrator.
page 36

MACOS
1. Using Finder, navigate to Applications > Utilities > Terminal and open the Terminal application.
2. Connect to the Virtual Appliance. 3. Change the directory to the Web Help Desk conf directory:
cd /Library/WebHelpDesk/conf
4. Open the whd.conf file by executing:sudo vi whd.conf
5. Enter the following command to change the maximum JVM to the value you calculated in a previous step: :%s/MAXIMUM_MEMORY=512/MAXIMUM_MEMORY=[memory in MB]/ :wqFor example, if you would like to use 2750 MB, execute::%s/MAXIMUM_MEMORY=512/MAXIMUM_MEMORY=2750/ :wq
6. Save and close the file. 7. Restart Web Help Desk.
a. Open a terminal window and execute: sudo /Library/WebHelpDesk/whd stop
b. In the terminal window, execute:sudo /Library/WebHelpDesk/whd start
LINUX
1. Open a terminal window 2. Change the directory to the Web Help Desk /conf directory.
Type:cd /usr/local/webhelpdesk/conf
3. Open the whd.conf file.Type:sudo vi whd.conf
4. Change the maximum JVM to the appropriate value.Execute::%s/MAXIMUM_MEMORY=512/MAXIMUM_MEMORY=[memory in MB]/ :wqFor example, if you want to change the value to 2750 MB, type::%s/MAXIMUM_MEMORY=512/MAXIMUM_MEMORY=2750/ :wq
5. Save and close the file.
INSTALLATION GUIDE: WEB HELP DESK
page 37

6. Restart Web Help Desk.
a. In the terminal window, execute:sudo service webhelpdesk stop
b. In the terminal window, execute:sudo service webhelpdesk start
Activate the licenseAfter you install Web Help Desk in a stand-alone deployment, log in and apply the activation key online or offline.
If you are evaluating Web Help Desk, you do not need to apply an activation key. For the next 14 days, you will have unlimited tech accounts. If you do not purchase and apply an activation key within 14 days, the tech accounts are deactivated.
To continue using the application, purchase a Web Help Desk license. After you apply the license key, the tech accounts, data, and product functionality are restored.
After you apply a license key, you cannot change the license back to a trial or free single-seat license.
page 38

APPLY THE ACTIVATION KEY ONLINEIf the Web Help Desk server is connected to the Internet, apply the activation key online.
1. Retrieve the activation key
1. Open a web browser and go to customerportal.solarwinds.com. 2. Enter your SWID (customer ID) and password. 3. Above the product list, click the View drop-down menu and select Web Help
Desk. 4. In the Your Selections menu, locate your product version. 5. Under License Activation information, locate the activation key.
6. Copy the activation key and save it to a file.
2. Log in to Web Help Desk
1. Verify that the Web Help Desk server is connected to the Internet. 2. On the Get Started panel, click Login as admin to continue setup.
3. Accept the terms of the license agreement.Web Help Desk starts.
3. Apply the license
1. Click Setup in the toolbar.
2. On the General panel, click License. 3. Click the padlock to edit the license settings.
INSTALLATION GUIDE: WEB HELP DESK
page 39

4. Enter the Activation Key, and click Activate.
The Web Help Desk license is activated.
APPLY THE ACTIVATION KEY OFFLINEIf the Web Help Desk server is not connected to the Internet, apply the activation key offline using another computer with internet access.
1. Log in to Web Help Desk
1. On the Get Started panel, click Login as admin to continue setup.
2. Accept the terms of the license agreement.Web Help Desk starts.
2. Locate the unique Machine ID code
1. Click Setup in the toolbar.
2. On the General panel, click License. 3. Click the padlock to edit the license settings.
page 40

4. Copy the unique Machine ID code in the Machine ID field to a text file (such as Notepad).
5. Save the file. 6. Transfer the file to another computer with Internet access.
3. Generate and download the license file
1. Using a separate computer with Internet access, log in to the SolarWinds Customer Portal.
2. Click Licenses > Manage Licenses. 3. Above the product table, click the View drop-down menu and select
Web Help Desk. 4. In the License Activation Information column, locate your Web Help Desk
license and click Activate license manually.The following example displays the license activation information for a one to five named users license.
INSTALLATION GUIDE: WEB HELP DESK
page 41

5. In the Activate license screen, generate a license key file.
a. Enter your name, email address, phone number, and the computer name.
b. Locate the text file with the Machine ID code from the Web Help Desk server.
c. Paste the unique machine ID code from your computer into the Unique Machine ID box.
The Customer Portal validates the code. If the code is valid, a validation message displays.
6. Click Generate License File. 7. Follow the prompts on your screen to download the license file. 8. Transfer the license file to the Web Help Desk server.
4. Upload the license file into the Web Help Desk Admin Console
1. On the Web Help Desk server, return to License Settings in Web Help Desk.
2. Click Choose File and select the license file. 3. Click Activate.
The Web Help Desk license is activated.
page 42

Integrate Web Help Desk into an Orion deploymentThese instructions provide installation steps for installing Web Help Desk in an Orion deployment.
For advanced configuration requirements and steps such as Federal Information Processing Standard (FIPS) 140-2 compliant cryptography, see the Web Help Desk Administrator Guide.
1. Install Web Help Desk on a dedicated server
Complete the procedures for installing Web Help Desk in a stand-alone deployment. After installing, you will integrate WHD into the Orion Platform.
2. Activate the license
Complete the procedures for activating the license.
3. Enable the SolarWinds Orion Platform to share alerts with SolarWinds Web Help Desk
Configure the SolarWinds Orion Platform to generate alerts triggered in SolarWinds NPM, NCM, and SAM when a network event occurs—for example, when a node fails for any reason. When specific alerts are shared with Web Help Desk, Web Help Desk automatically generates a ticket based on the alert.
1. Log in to the Orion Web Console. 2. Create a new alert or open an existing alert. 3. On the alert Summary page, expand Alert Integration.
4. Select the Integrate alert with other SolarWinds Products and subscribers check box.
5. Enter an alert subject.
You can use this name in the Alert subject field for the alert.
6. Click the Severity drop-down menu and select an alert severity.
This information is used to determine how Web Help Desk processes a shared alert.
7. Click Insert Variable and select any additional alert properties. 8. Click Insert Variable to save the additional properties. 9. Click Submit.
4. Prepare request types for alert-based tickets
A request type determines how alerts are routed to the appropriate tech for problem resolution. When you create your SolarWinds connection, select the request type that closely matches the connection.
INSTALLATION GUIDE: WEB HELP DESK
page 43

You can select one request type for one SolarWinds connection.
1. Ensure that you are logged in to the Web Help Desk Admin Console as an administrator.
2. In the toolbar, click Setup and select Tickets > Request Types.The Request Types window displays the current default request types.
3. Click New. 4. Enter a name to identify this request type.
For example, SolarWinds SAM alerts.
5. To create a nested request type, select the parent type (for example, IT General/Other). Optionally, click to copy values for the remaining fields from the parent type.
To create a top-level request type, leave this field blank.
6. Select the tech group that will handle this type of request. If the tech group has not been defined, leave this field blank. You can map the request type to a tech group when you define the tech group.
7. Specify the default priority and whether fields are hidden or required.
page 44

8. In the Detailed Instructions field, enter additional information to be displayed on the ticket. For example, you can provide specific instructions for creating this type of ticket, or explain the request type's purpose so a client can choose the correct type.
You can apply BBCode formatting to format lists, add emphasis, or include links to supporting information. See Customize tickets, notes, instructions, and emails with BBCode for details.
9. Clear the Visible to Clients check box so this type is selected only by techs.
11. Optionally, restrict this ticket type to specific companies, locations, or departments. Only clients or techs associated with your selections will see this request type.
15. Identify the tech who will receive the highest level escalation (after the tech group manager).
16. In the Survey field, select None to disable surveys for this ticket type.
17. Click Save.In this example, the request type is nested in the IT General/Other request type.
18. Repeat step 3 through step 17 to create request types for SolarWinds NCM and NPM alerts (if applicable).
5. Create a SolarWinds server link to the monitored source
This process creates a communications link between the Web Help Desk server and the monitored source (such as SolarWinds SAM). When an event occurs, Web Help Desk generates a ticket from the alert and forwards the ticket to the assigned tech group and tech for troubleshooting and resolution.
1. Log in to the Web Help Desk Admin Console as an administrator.
INSTALLATION GUIDE: WEB HELP DESK
page 45

2. Click Setup in the toolbar and select SolarWinds Integration > SolarWinds Connection.
3. Click Add new SolarWinds Source in the SolarWinds Connection screen.
4. Enter the connection source name in the Source Name field. 5. Click the WHD Request Type drop-down menu and select a request type.
For example, SolarWinds SAM alerts.
6. Enter the SolarWinds Server IP Address or Fully Qualified Domain Name (FQDN).
7. Enter the SolarWinds administrator user name and password.
To ensure Web Help Desk can access the required SolarWinds alerts, enter administrator-level SolarWinds account and credentials data into Web Help Desk.
8. Click Test.When Web Help Desk creates a connection with a SolarWinds Orion alert source, the checked areas in the window contain green check marks.
9. Click Next to continue.
6. Configure a filter
Configure an alert filter to recognize a specific issue in the Orion Platform and create a help desk ticket based on that issue.
7. Test the alert filtering rules
Configure and test the alert filter rules to ensure they are filtering the properties correctly. The test should include the severity and any alert fields that are configured in the filter rule.
page 46
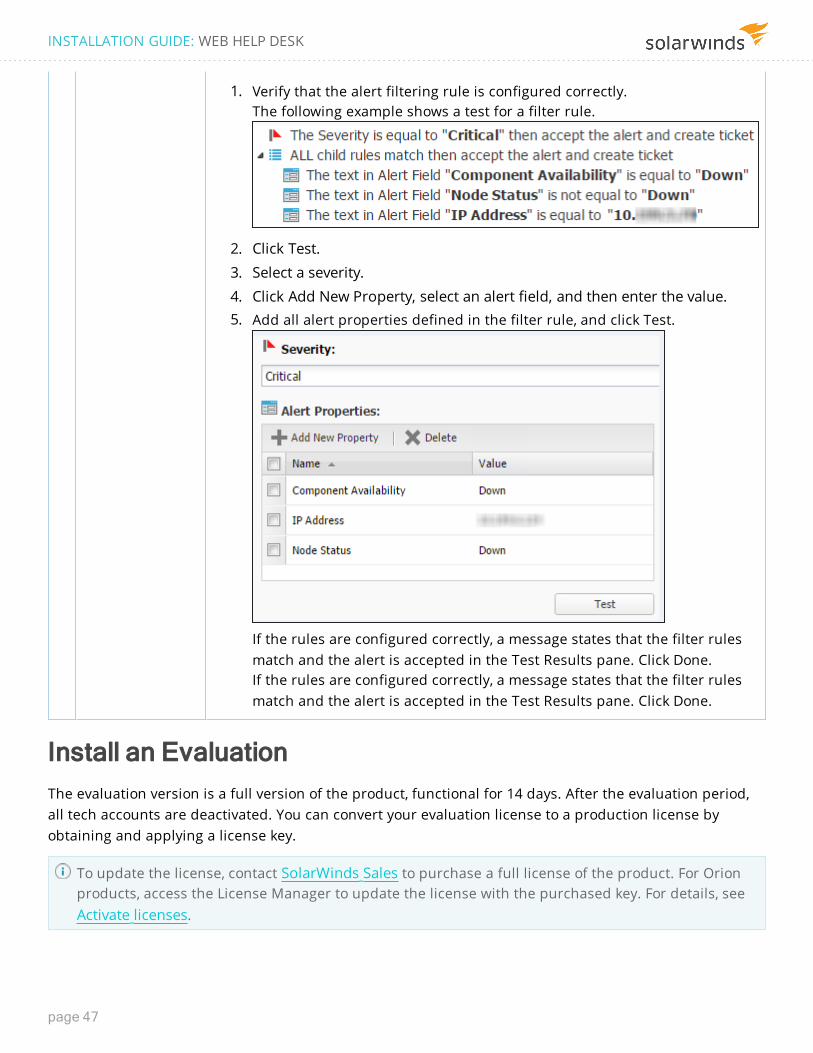
1. Verify that the alert filtering rule is configured correctly.The following example shows a test for a filter rule.
2. Click Test. 3. Select a severity. 4. Click Add New Property, select an alert field, and then enter the value. 5. Add all alert properties defined in the filter rule, and click Test.
If the rules are configured correctly, a message states that the filter rules match and the alert is accepted in the Test Results pane. Click Done.If the rules are configured correctly, a message states that the filter rules match and the alert is accepted in the Test Results pane. Click Done.
Install an EvaluationThe evaluation version is a full version of the product, functional for 14 days. After the evaluation period, all tech accounts are deactivated. You can convert your evaluation license to a production license by obtaining and applying a license key.
To update the license, contact SolarWinds Sales to purchase a full license of the product. For Orion products, access the License Manager to update the license with the purchased key. For details, see Activate licenses.
INSTALLATION GUIDE: WEB HELP DESK
page 47

For evaluation installations only, you can install the Orion server and the Microsoft® SQL Server® database on the same server. The installer automatically installs Microsoft SQL Server Express 2014. You can use that database or configure the server to use another Microsoft SQL Server database.
To use a separate Microsoft SQL Server database, or if you are installing this product into the production deployment of an existing Orion Platform, see Plan for a production deployment.
For evaluation installations only, installation on a desktop operating system is possible, but not supported. This product is intended for use in a production environment that meets the system requirements.
EVALUATION AND PRODUCTION ENVIRONMENTS
EVALUATION ENVIRONMENTS ONLY
Windows Server 2008 (64-bit) Windows 7 (64-bit)
Windows Server 2012 (64-bit) Windows 8.1 (64-bit)
Windows Server 2012 R2 (64-bit) Windows 10 (64-bit)
To install an evaluation copy of your product:
1. Download the evaluation file
Download the Web Help Desk evaluation file from the Web Help Desk website.
2. Install the evaluation Follow the standalone installation instructions, including the installation and configuration wizard.
To use the PostgreSQL database that installs with the product, click Use Embedded PostgreSQL database (recommended). To use your own Microsoft SQL Server database, click Use Custom SQL database (advanced).
3. Open the SolarWinds Web Help Desk Admin Console
If the console does not open automatically, launch the Web Help Desk Admin Console in your SolarWinds Web Help Desk program folder.
For security purposes, SolarWinds recommends that you change the password used for the SolarWinds Web Help Desk service.
page 48
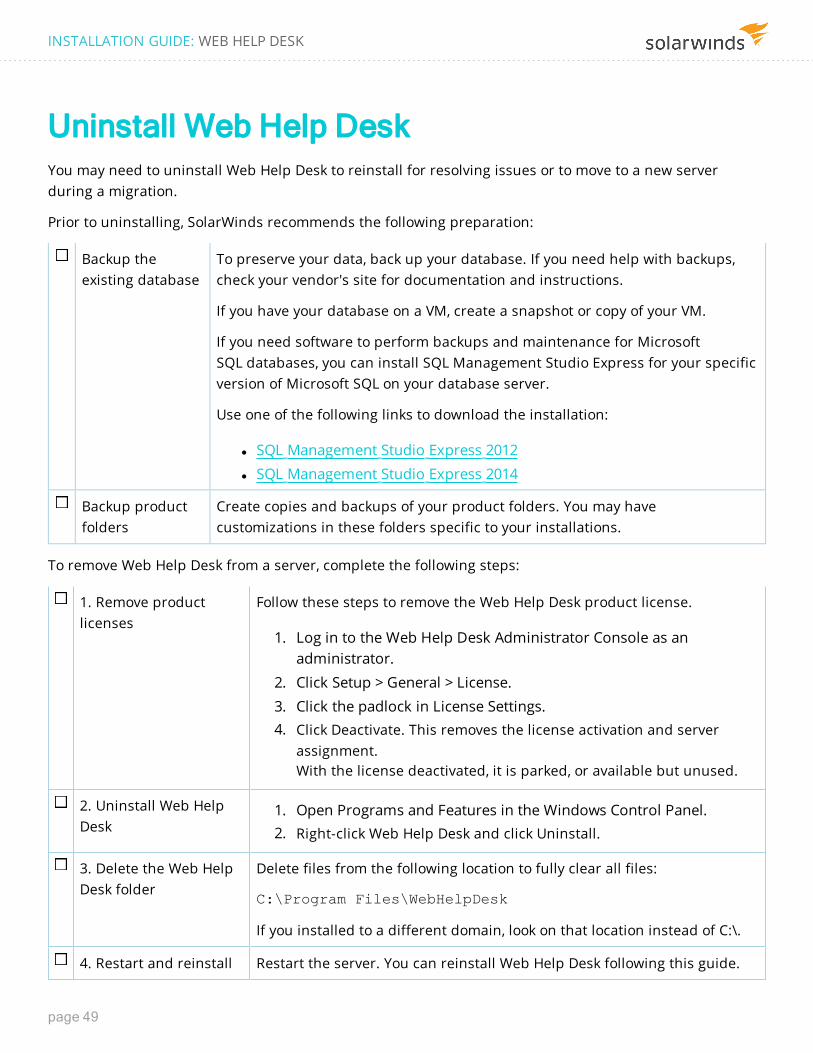
Uninstall Web Help DeskYou may need to uninstall Web Help Desk to reinstall for resolving issues or to move to a new server during a migration.
Prior to uninstalling, SolarWinds recommends the following preparation:
Backup the existing database
To preserve your data, back up your database. If you need help with backups, check your vendor's site for documentation and instructions.
If you have your database on a VM, create a snapshot or copy of your VM.
If you need software to perform backups and maintenance for Microsoft SQL databases, you can install SQL Management Studio Express for your specific version of Microsoft SQL on your database server.
Use one of the following links to download the installation:
l SQL Management Studio Express 2012 l SQL Management Studio Express 2014
Backup product folders
Create copies and backups of your product folders. You may have customizations in these folders specific to your installations.
To remove Web Help Desk from a server, complete the following steps:
1. Remove product licenses
Follow these steps to remove the Web Help Desk product license.
1. Log in to the Web Help Desk Administrator Console as an administrator.
2. Click Setup > General > License. 3. Click the padlock in License Settings. 4. Click Deactivate. This removes the license activation and server
assignment. With the license deactivated, it is parked, or available but unused.
2. Uninstall Web Help Desk
1. Open Programs and Features in the Windows Control Panel. 2. Right-click Web Help Desk and click Uninstall.
3. Delete the Web Help Desk folder
Delete files from the following location to fully clear all files:
C:\Program Files\WebHelpDesk
If you installed to a different domain, look on that location instead of C:\.
4. Restart and reinstall Restart the server. You can reinstall Web Help Desk following this guide.
INSTALLATION GUIDE: WEB HELP DESK
page 49

Access the Customer PortalThe SolarWinds Customer Portal provides access to license and maintenance information, support cases, and product downloads, as well as live and instructor-led virtual classroom training.
Create your user profileTo create a user profile, you must know the SolarWinds customer ID (SWID) issued to your company. If you are a SolarWinds customer but do not have a SWID, contact SolarWinds Customer Support.
Users with multiple SWIDs require only one user profile. Your user profile can be linked to multiple SWIDs.
1. Go to customerportal.solarwinds.com. 2. Click the Register tab. 3. Enter your organization's SWID and your email address.
If you have multiple SWIDs, enter any SWID to create your profile. Later, use the User Profile menu to link the other SWIDs to your profile.
The account administrator will review the request, and you will receive an email when it is approved.
For more information about creating an account, see this FAQ page.
Explore the Customer PortalWhen you log in to the Customer Portal, the Home page displays. From here, you can download a purchased product, renew a license, and access the support and training you need to use your SolarWinds products.
page 50

ITEM DESCRIPTION
1 Download a purchased product, trial, hotfix, or utility.
2 Manage licenses and add units to an existing license.
3 Renew a license, calculate maintenance renewal costs, and align renewal dates.
4 Search product documentation, submit a ticket, and review your support cases.
5 Register for a virtual class, view a SolarWinds Labs or training video, access the THWACK community, review the FAQs, and review recent product releases.
6 Update your user profile, link to another SolarWinds ID, view your invoices, and log out.
7 Access the latest downloads for your purchased products.
8 Open a support case and review existing cases.
INSTALLATION GUIDE: WEB HELP DESK
page 51

Get HelpAfter SolarWinds Web Help Desk is installed, access the following resources to get started using the product:
l Getting Started Guide: read the Web Help Desk Getting Started Guide first to learn how to use the product. This guide explains how to configure your environment, generate an inventory, update your systems, download and publish updates, and generate reports.
l Administrator Guide: see the Web Help Desk Administrator Guide for details about the Admin Console, inventory and reporting, and advanced configuration options.
l SolarWinds THWACK: interact with professionals who can answer your questions. l SolarWinds Success Center: access the SolarWinds Success Center for additional product
documentation and knowledge base articles. l Web Help Desk (WHD) site: access the WHD Documentation site for the latest product
information.
page 52