when upgrading your tapit software make sure that all call
TRANSCRIPT

When upgrading your TAPIT software make sure that all callaccounting data has been exported before you begin theinstallation process.
Registration Settings:
SERIAL NUMBER:
COMPUTER ID:
REGISTRATION NUMBER:
Once you have your TAPIT software functioning properly copy yourphone system settings onto this page and save it for future reference
PORT:
SPEED:
PARITY:
DATA BITS:
STOP BITS:
PBX TYPE:
DATE SELECTION (PBX ORCOMPUTER):


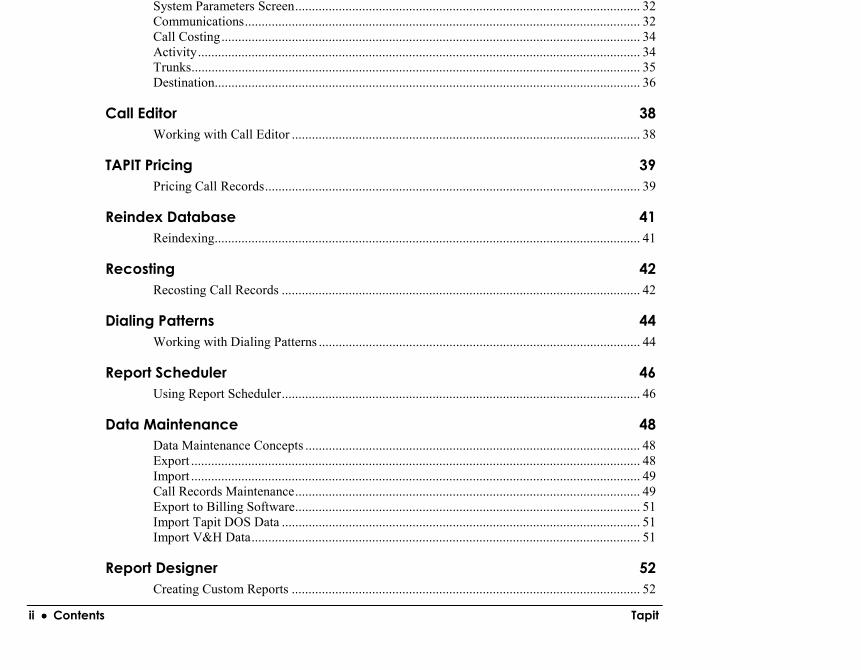
Tapit Contents •••• i
Introduction 1Introduction - Overview ............................................................................................................ 1System Requirements ................................................................................................................ 1
Installation 2Before installing your software ................................................................................................. 2Installing Tapit Single User....................................................................................................... 3Setting up TAPIT Single User................................................................................................... 4Installing Tapit Multi-User........................................................................................................ 5
Server Installation ....................................................................................................... 5Setting up Server Station............................................................................................. 5Client Installation ........................................................................................................ 6Setting up Client Station ............................................................................................. 6NOTE FOR NOVELL NETWARE 3.11 USERS....................................................... 7
Upgrading TAPIT 2000 using different serial number.............................................................. 8Upgrading TAPIT 2000 to a new version of TAPIT 2000 using same serial number............... 8Reinstalling TAPIT 2000 .......................................................................................................... 9Upgrading TAPIT for Windows to TAPIT 2000 ...................................................................... 9Upgrading TAPIT for DOS to TAPIT 2000............................................................................ 11Registration ............................................................................................................................. 11
Main Menu 14Main Menu - Overview ........................................................................................................... 14
Users/Departments 15Overview ................................................................................................................................. 15Users........................................................................................................................................ 15Departments............................................................................................................................. 17Hierarchy Tree......................................................................................................................... 19
Clients 20Managing Clients..................................................................................................................... 20
Reports 22Generating Reports.................................................................................................................. 22
ii •••• Contents Tapit
System Parameters Screen....................................................................................................... 32Communications...................................................................................................................... 32Call Costing............................................................................................................................. 34Activity.................................................................................................................................... 34Trunks...................................................................................................................................... 35Destination............................................................................................................................... 36
Call Editor 38Working with Call Editor ........................................................................................................ 38
TAPIT Pricing 39Pricing Call Records................................................................................................................ 39
Reindex Database 41Reindexing............................................................................................................................... 41
Recosting 42Recosting Call Records ........................................................................................................... 42
Dialing Patterns 44Working with Dialing Patterns ................................................................................................ 44
Report Scheduler 46Using Report Scheduler........................................................................................................... 46
Data Maintenance 48Data Maintenance Concepts .................................................................................................... 48Export ...................................................................................................................................... 48Import ...................................................................................................................................... 49Call Records Maintenance....................................................................................................... 49Export to Billing Software....................................................................................................... 51Import Tapit DOS Data ........................................................................................................... 51Import V&H Data.................................................................................................................... 51
Report Designer 52Creating Custom Reports ........................................................................................................ 52
Tapit Contents •••• iii
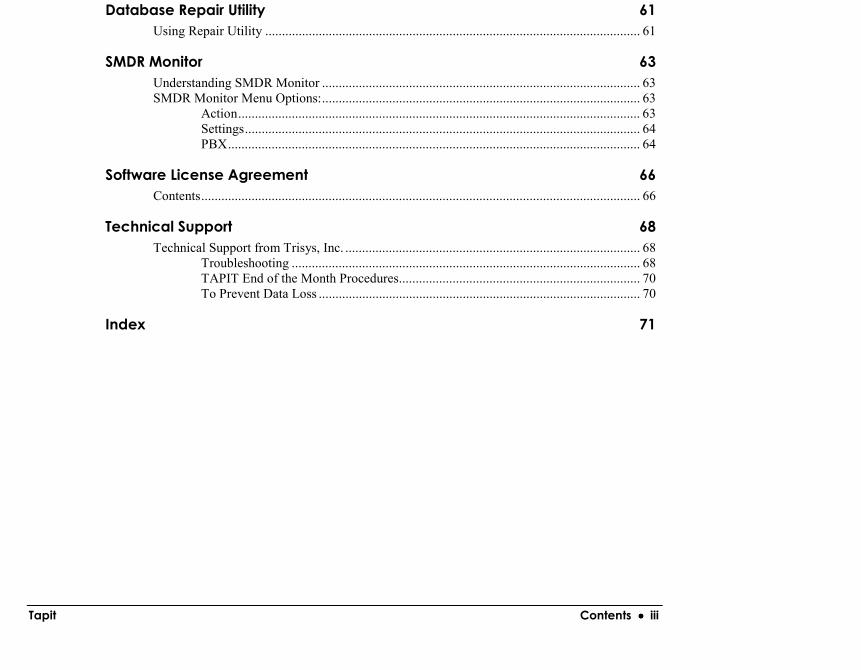
Database Repair Utility 61Using Repair Utility ................................................................................................................ 61
SMDR Monitor 63Understanding SMDR Monitor ............................................................................................... 63SMDR Monitor Menu Options:............................................................................................... 63
Action........................................................................................................................ 63Settings...................................................................................................................... 64PBX........................................................................................................................... 64
Software License Agreement 66Contents................................................................................................................................... 66
Technical Support 68Technical Support from Trisys, Inc. ........................................................................................ 68
Troubleshooting ........................................................................................................ 68TAPIT End of the Month Procedures........................................................................ 70To Prevent Data Loss ................................................................................................ 70
Index 71

Tapit Introduction •••• 1
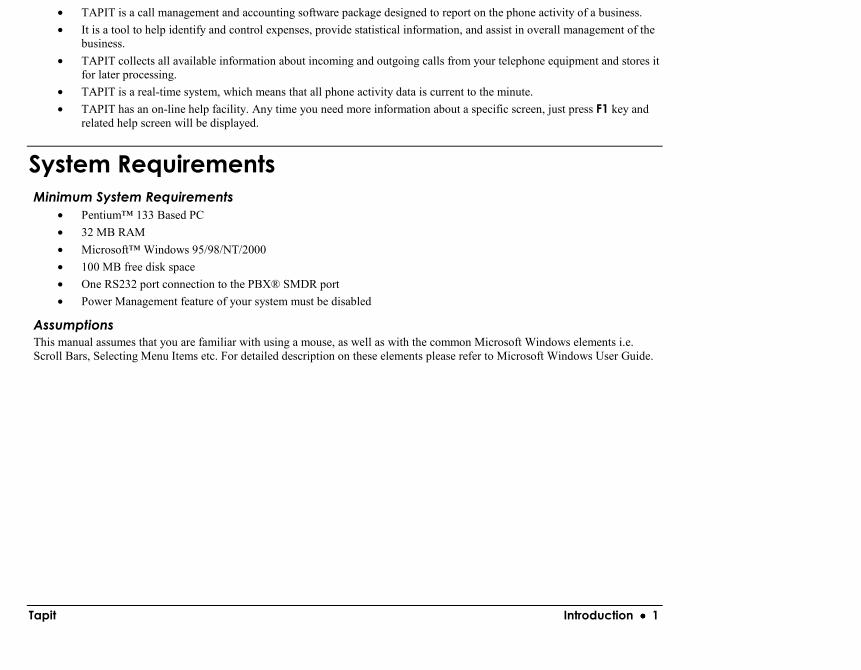
• TAPIT is a call management and accounting software package designed to report on the phone activity of a business.• It is a tool to help identify and control expenses, provide statistical information, and assist in overall management of the
business.• TAPIT collects all available information about incoming and outgoing calls from your telephone equipment and stores it
for later processing.• TAPIT is a real-time system, which means that all phone activity data is current to the minute.• TAPIT has an on-line help facility. Any time you need more information about a specific screen, just press F1 key and
related help screen will be displayed.
System RequirementsMinimum System Requirements
• Pentium™ 133 Based PC• 32 MB RAM• Microsoft™ Windows 95/98/NT/2000• 100 MB free disk space• One RS232 port connection to the PBX® SMDR port• Power Management feature of your system must be disabled
AssumptionsThis manual assumes that you are familiar with using a mouse, as well as with the common Microsoft Windows elements i.e.Scroll Bars, Selecting Menu Items etc. For detailed description on these elements please refer to Microsoft Windows User Guide.
2 •••• Installation Tapit
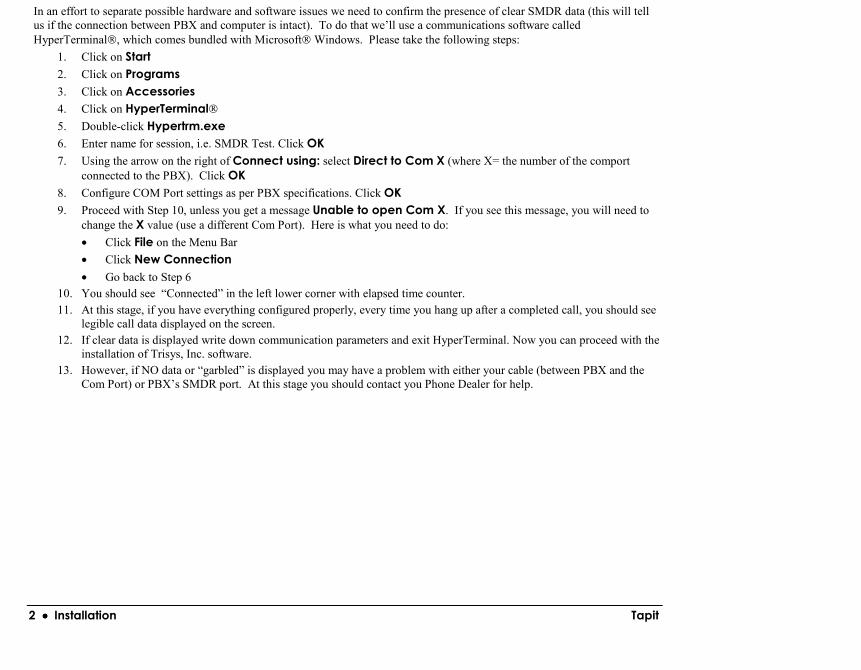
In an effort to separate possible hardware and software issues we need to confirm the presence of clear SMDR data (this will tellus if the connection between PBX and computer is intact). To do that we’ll use a communications software calledHyperTerminal, which comes bundled with Microsoft Windows. Please take the following steps:
1. Click on Start2. Click on Programs3. Click on Accessories4. Click on HyperTerminal5. Double-click Hypertrm.exe6. Enter name for session, i.e. SMDR Test. Click OK7. Using the arrow on the right of Connect using: select Direct to Com X (where X= the number of the comport
connected to the PBX). Click OK8. Configure COM Port settings as per PBX specifications. Click OK9. Proceed with Step 10, unless you get a message Unable to open Com X. If you see this message, you will need to
change the X value (use a different Com Port). Here is what you need to do:• Click File on the Menu Bar• Click New Connection• Go back to Step 6
10. You should see “Connected” in the left lower corner with elapsed time counter.11. At this stage, if you have everything configured properly, every time you hang up after a completed call, you should see
legible call data displayed on the screen.12. If clear data is displayed write down communication parameters and exit HyperTerminal. Now you can proceed with the
installation of Trisys, Inc. software.13. However, if NO data or “garbled” is displayed you may have a problem with either your cable (between PBX and the
Com Port) or PBX’s SMDR port. At this stage you should contact you Phone Dealer for help.

Tapit Installation •••• 3
2. Click on Install TAPIT 2000. TAPIT 2000 Setup screen appears.3. Click on Continue button. TAPIT 2000 is searching for the installed components.4. Click on OK button on the next screen to install TAPIT 2000 in TAPITW32 folder on drive C: or click on Change
Folder button to change a destination drive or folder (must be local drive with available required free disk space).TAPIT 2000 Setup screen appears.
5. Click on Install button/icon to continue (or click on Change Folder button to change a destination drive or folder).Program installs TAPIT files and updates your system.
6. Program displays a message asking if your TAPIT software has a serial number. If you have a serial number click onYES, otherwise click on NO and TAPIT will be installed as a trial version.
7. TAPIT displays Enter Serial Number screen. Enter your TAPIT software’s serial number consisting of 5alphanumeric characters followed by 4 digits, followed by 3 more digits.Click on OK
8. TAPIT 2000 processes the serial number. Product information message is displayed. Click on OK.9. Setup program displays a registration message as a reminder to register TAPIT software.
It is very important to register your TAPIT 2000 promptly since it will stop functioning if you fail to do so

4 •••• Installation Tapit
p g p y p g p ,phone system correctly.Open Setup program by clicking on Start/Programs/Tapit 2000/Tapit Setup.A message with product information is displayed. Click on OK.Setup program will ask you if you would like to store call records database in the default directory. We recommend thatdefault directory is accepted (which is where program files were installed). However, different drive and/or directorymay be specified if for example there is not enough free disk space on the drive where program files were created.
2. To accept default directory where program files are installed, click on Yes.
3. To change drive and/or directory click on No, find the database file in a file browser window, select it and click onOpen.
4. System Parameters screen is displayed
5. Click on the down arrow in the Port field to select a port the SMDR cable is connected to.6. Click on the down arrow icon in the Speed field to select a transmission speed the phone system is set at.7. Click on the down arrow icon in the Parity field to select a parity setting of the phone system.8. Click on 7 or 8 in the Data Bits fields to select data bits setting of the phone system.9. Click on 1 or 2 in the Stop Bits fields to select stop bits setting of the phone system.10. Click on the PBX or Computer in the Use Computer or Telephone System Date? Field to specify whether date
information for the call records is going to be processed based on the computer or PBX date.You can use PBX date only if it is a three-part date (i.e. mm/dd/yy).In case your phone system is not generating date information (or is generating an incomplete dateinformation) you must specify Computer date.
11. Click on the down arrow icon in the PBX Type field to select from the list a telephone system type the computer isreceiving data fromData will not be processed correctly or not at all if incorrect selection is made.
12. Click on the Telephone Number field and enter your main telephone number (do not use 800 number).13. Click on OK.
Setup program will ask if you have V&H Data Diskette. This is an optional pricing table that can be purchased withTAPIT.

Tapit Installation •••• 5
19. Upon completion of this process Tapit 2000 is ready to use.
Installing Tapit Multi-UserServer InstallationOne of the computers on the network must be configured as an administrative station. This is where data from the phoneequipment will be collected. Administrative station is the only computer that has to go through TAPIT registration process.To prepare the database folder go into Windows Explorer, find the TapitW32 folder, under TapitW32 create a new folder calledDATA. This folder DATA must be shared with read/write access on the network. Under DATA create a new folder called MAIN;this is the folder where the Tapit database has to be stored.
Note: Wherever you will decide to store your data the basic rule for Tapit Server setup is: Tapit Databasemust be stored in the subfolder of the shared folder.
1. Follow instructions from Installing Tapit Single User section above pt. 1 through 7.2. TAPIT 2000 processes the serial number. Product information message is displayed followed by the message:
Click on Yes ONLY if this particular machine is, or will be connected to the SMDR output from the PBX system.In case the computer is not going to be connected to PBX (client installation) click on NO.
3. Setup program displays a registration message as a reminder to register TAPIT software.
4. When installation is completed the Setup program displays a message “TAPIT 2000 Setup was completed successfully”.Click on OK. It is recommended to restart the computer.
Setting up Server Station1. The next step is to configure TAPIT 2000 on the administrative station, so it will communicate with the phone system
correctly.Open setup by clicking on Start/Programs/TAPIT 2000/TAPIT Setup. Product information screen is displayed.Click on OK.

6 •••• Installation Tapit
4. Follow instructions from Setting up TAPIT section pt.4 through 19 (page 4 of this manual).
Note that Users, Clients and Maintenance options can be accessed only on the TAPIT Server Computer. Alsowhen making any changes on the Maintenance Screen (i.e. Reindex or Data Maintenance) make sure thatall users on Client computers are not running TAPIT (they have to be disconnected from TAPIT’s Database).
Client InstallationClient installation has to be performed on every workstation that will be used to access TAPIT’s data.Insert TAPIT 2000 CD in the CD ROM drive. Trisys StartUp Manager screen is displayed.
1. Follow instructions from Installing Tapit Single User section above pt. 1 through 7.2. TAPIT 2000 processes the serial number. Product information message is displayed followed by the message:
Click on NO since this is a client computer and is not going to be connected to PBX.3. Setup program displays a registration message as a reminder to register TAPIT software.
ONLY computer running SMDR monitor needs to be registered. None of the client machines are required to go throughthe registration process.
4. When installation is completed the Setup program displays a message “TAPIT 2000 Setup was completed successfully”.Click on OK. It is recommended to restart the computer.
Setting up Client StationBefore running TAPIT Setup, at the Client Station map a network drive to the shared folder DATA on the host machine.For example, if you have mapped it as drive T: then the path to the Tapit database on the T: drive will look like:T:\MAIN\TAPITDB.MDB.
1. The next step is to configure TAPIT 2000 on the client station, so it will communicate with the database correctly.Open setup by clicking on Start/Programs/TAPIT 2000/TAPIT Setup. Product information screen is displayed.Click on OK.
2. Setup program displays the following message
Click on NO since this is a client computer and is not going to be connected to PBX.

Tapit Installation •••• 7
NOTE FOR NOVELL NETWARE 3.11 USERSAccess Locking and Novell NetWare 3.11When using data from a server back end, Access uses the locking facilities provided by that back end. There is a bug in NetWare3.11 TTS (Transaction Tracking System) that can result in a server's abending when running certain Access queries or otherwiserequesting a large number of locks. Each page of records Access locks uses one or more locks from the NetWare TTS. Thedefaults in NetWare allow a single workstation to have 500 locks at any given time. This results in a limit of 1M of data thatAccess can deal with in a single transaction. Since Access tries to lock every record involved in either an update or a delete querybefore actually carrying out the update or delete, it is quite possible to bump into this limit on a moderately large database.The problem is that NetWare 3.11 reacts rather poorly to having its lock limit exceeded. It appears to count a lock violation everytime it looks at the connection in question, which is still trying to lock more records. Eventually (in about 3-5 minutes) someinternal table overflows, and the entire server goes down, with a frightening message that instructs you to cycle the power. Thereare two things you can do if this happens to you. The first is to increase the number of locks available, and the second is to applythe NetWare patch that prevents the abend of the server. (Very large queries can still fail, but at least the server doesn't fail alongwith them.) To increase the number of locks available, enter the following commands at the file server console or in yourAUTOEXEC.NCF file:set maximum record locks per connection = 10000set maximum record locks = 200000The first parameter is the most locks any single connection can have, and the second is the most the entire server can keep trackof. These values (10,000 and 200,000) are the maximums that NetWare 3. 11 can accommodate. By setting the maximum recordlocks per connection to 10,000, Access can handle a transaction up to 20MB. To fix the server abend problem, you need todownload the latest NetWare 3.11 patch file. It can be found on CompuServe in the NOVFILES download area, as of this writing,the current version is 311PTD.ZIP. You will need to load two of the NLMs from this file, either directly from the server consoleor in your AUTOEXEC.NCF file:load patchman.nlmload ttsfix.nlmThis problem is specific to NetWare version 3.11 and has been fixed in later versions of NetWare.

8 •••• Installation Tapit
Upgrading TAPIT 2000 to a new version of TAPIT 2000using same serial number.Upgrading registered version of TAPIT 2000 on the same computer using the same serial number.
1. Click on the Maintenance icon on the TAPIT 2000 Main Menu of a current version of your software.2. Click on Data Maintenance. Data Maintenance screen opens up on Export tab by default.
Click All in the Export field for all data to be exported. The default folder is your current TAPIT 2000 folder. Youmay choose another folder if you wish. DO NOT Check “Delete Existing Data from Database”. Click Continue. Youwill receive “Data Export Completed” message.
3. Click on Call Records Maintenance tab. Click on Export & Keep Call Records. Then specify the filename forthe call records: Calls.txt. Click on Continue. At the filter screen, you must enter the date range for therecords you wish to keep and click on Continue. You will receive “Call Records Export Completed” message.Exit from Data Maintenance screen.
4. Close TAPIT 2000 and TAPIT SMDR Monitor.5. Go to Windows Explorer and locate the TAPITW32 folder. Rename the folder as TAPITOLD (if prompted with a
warning by the operating system click on OK). Find TAPIT.INI and SERIAL.TXT files. TAPIT. INI file resides in thesame folder where TAPIT database is located. If you are not sure of its whereabouts open TAPIT program and pressCTRL + F1 keys at the Main Menu screen. Copy both files to another folder as a backup.
6. Proceed with a new installation of TAPIT 2000.a. Insert TAPIT 2000 CD into the CD ROM drive. Trisys StartUp Manager screen is displayed.b. Click on Install TAPIT 2000. TAPIT 2000 Setup screen appears.c. Click on Continue button. TAPIT 2000 is searching for the installed components.d. Click on OK button to install TAPIT 2000 in TAPITW32 folder on drive C. (Note that Change Folder button
allows for setting TAPIT destination path to different than default.) TAPIT 2000 Setup screen appears.e. Click on Install button to continue. (Note that Change Folder button allows for setting TAPIT destination path
to different than default)Program installs TAPIT files and updates your system.
f. Program displays a following message: “Setup has found Serial Number (your current serial number). Is it yourcurrent valid Serial Number?” Click on YES.
g. Setup program displays a message “TAPIT 2000 Setup was completed successfully”. Click on OK. (If promptedby system restart the computer.)
7. Copy TAPIT.INI file from TAPITOLD folder into new TAPITW32 folder (where your TAPIT database files reside).Let it overwrite the existing file.
8. Go to START/Programs/TAPIT 2000 and run TAPIT Setup. Note that while running TAPIT Setup, System Parametersscreen reflects settings from your previous version of TAPIT. Do not change anything unless required. (For setupinstructions see Setting up TAPIT on page 4 of this manual.)

Tapit Installation •••• 9
If users or clients data has been imported click on Reindex. At the Reindex Options screen check the full reindexoption and click on Continue. Do not interrupt this process.
12. To confirm successful import of data, run a Detail Activity by Date report from the Report Menu.13. If everything is running smoothly after you have completed all the above, you may go back to Windows Explorer &
delete the TAPITOLD folder.
Reinstalling TAPIT 2000In case Trisys has to issue a new serial number for your software you will be advised to Technical Support and they will take youthrough the installation process. If you are reinstalling with the same serial number and have no data to export follow instructionsbelow.1. Open your Windows Explorer.2. Go to TAPITW32 folder.3. Select Setup folder and delete it.4. Now you can proceed with installing TAPIT 2000 - refer to the Installing TAPIT Single User (pg.3). Your system already has
information about previously used serial number. While reinstalling TAPIT, program will ask you to either accept or rejectexisting serial number. Accept the number provided by the system.
Upgrading TAPIT for Windows to TAPIT 2000In case you are upgrading TAPIT on the same computer:1. Click on the Maintenance icon on the TAPIT Main Menu of a current version of your software.2. Click on Data Maintenance and in the Export field click All for all data to be exported. The default folder is your
current TAPIT folder. You may choose another folder if you wish. DO NOT Check “Delete Existing Data from Database”.Click Continue. You will receive “Data Export Completed” message.
3. Click on Call Records Maintenance tab. Click on Export & Keep Call Records. Then specify the filename for thecall records, Calls.txt. Click on Continue. At the filter screen enter the date range criteria for the records you wish to keep(leave it blank for all) & click on Continue. You will receive “Call Records Export Completed” message. Exit DataMaintenance screen.
4. Close TAPIT for Windows and TAPIT SMDR Monitor.5. Go to Windows Explorer and locate the TAPITW folder. Rename the folder as TAPITOLD. Find TAPIT.INI. It resides in
the same folder where TAPIT database is located. If you are not sure of its whereabouts open TAPIT program and pressCTRL + F1 keys at the Main Menu screen. Copy both files to another folder as a backup.
6. Proceed with TAPIT 2000 installation.(see Installing TAPIT Single User on page.3)7. Copy TAPIT.INI from TAPITOLD folder into new TAPITW32 folder (whre TAPIT database files reside). Allow to
overwrite an existing file.
10 •••• Installation Tapit
C:\TapitOld. Go to File Name and enter the file name: Calls.txt. Click on Continue. At the filter screen, you mustenter the date range for the records you wish to keep and click on Continue. After the import is finished, you willreceive “Call Record Import Completed” message. Exit Call Records Maintenance screen.If users or clients data has been imported click on Reindex. At the Reindex Options screen check the full reindex optionand click on Continue. Do not interrupt this process.
12. To confirm successful import of data, run a Detail Activity by Date report from the Report Menu.13. If you have completed all the above and everything is running smoothly, you may go back to Windows Explorer & delete the
TAPITOLD folder. It is recommended to delete the old TAPIT for Windows program group from the START, Programsmenu (see MS Windows help).
In case you are upgrading TAPIT on the different computer:1. Click on the Maintenance icon on the TAPIT Main Menu.2. Click on Data Maintenance and in the Export field click All for all data to be exported. The default folder is your
current TAPIT folder. You may choose another folder if you wish. DO NOT Check “Delete Existing Data from Database”.Click on Continue. You will receive “Data Export Completed” message.
3. Click on Call Records Maintenance tab. Click on Export & Keep Call Records. Then specify the filename for thecall records, Calls.txt. Click Continue. At the filter screen enter the date range criteria for the records you wish to keep(leave it blank for all) & click on Continue. You will receive “Call Records Export Completed” message. Exit DataMaintenance screen.
4. Close TAPIT for Windows and TAPIT SMDR Monitor.5. Copy all the exported data files and TAPIT.INI file to an external storage. TAPIT.INI resides in the same folder where
TAPIT database is located. If you are not sure of its whereabouts open TAPIT program and press CTRL + F1 keys at theMain Menu screen. Keep this file as a backup.
6. Proceed with TAPIT 2000 installation on a new computer. (See Installing TAPIT Single User on page 3).7. Copy TAPIT.INI and all the exported data files from the external storage into new TAPITW32 folder. In case of TAPIT.INI
allow it to overwrite existing file.8. Run TAPIT Setup Program – START/Programs/TAPIT 2000/TAPIT Setup. Note that while running TAPIT Setup, System
Parameters screen will reflect settings from your previous version of TAPIT. Do not change anything unless required. (Forsetup instructions see Setting up TAPIT on page 4 of this manual).
9. After completing Setup program, go to START/Programs/TAPIT 2000/TAPIT 2000.TAPIT 2000 provides the following message: “TAPIT will be connected to the database…”. Click OK.
10. From the Main Menu, click on Maintenance, click on Data Maintenance, click on Import tab, and then check allthe boxes EXCEPT V&H Data. Do Not Check ALL. Go to Directory and set folder to C:\TAPITW32. Click Continue.After import is finished, you will receive “Data Import Completed” message.
11. Click on Call Records Maintenance. Click on Import Call Records. Go to Directory and change the folder toC:\TapitOld. Go to File Name and enter the file name: Calls.txt. Click on Continue. At the filter screen, you mustenter the date range for the records you wish to keep and click on Continue. After the import is finished, you willreceive “Call Record Import Completed” message. Exit Call Records Maintenance screen.If users or clients data has been imported click on Reindex. At the Reindex Options screen check the full reindex optionand click on Continue. Do not interrupt this process.

Tapit Installation •••• 11
software to TAPIT 2000.
1. Go to C:\Tapit> prompt and type TPDBEXP then press ENTER2. Start TAPIT for DOS3. Select 6 (System Maintenance)4. Select A (Export for Billing)5. Enter criteria for call records that you would like to be imported into TAPIT for Windows6. Enter 0 (Zero) in Select Billing Interface field and press F37. Exit TAPIT using F10 to the C:\TAPIT> prompt. You need to copy exported files to an external storage media. Floppy disk
is used here as an example of such media. Insert a floppy disk into your floppy drive. Proceed with coping exported files to afloppy disk. Type the following:copy tapit.txt a:\ - and press Entercopy client.txt a:\ - and press Entercopy dept.txt a:\ - and press Entercopy user.txt a:\ - and press Entercopy rates.txt a:\ - and press Enter
8. Install TAPIT 2000 – complete the instructions on page 3 of this manual.9. Run TAPIT Setup – see the instructions on page 4.10. Copy exported files from the floppy disk to TAPITW32 directory.11. Start TAPIT 2000 - Programs/TAPIT 2000/TAPIT 200012. Click on Maintenance icon located on the Main Menu screen.13. Click on Data Maintenance icon.14. Click on Import DOS data (Assumes .txt files are in TAPITW32 host folder)15. Click on OK when a message confirming the Import process is completed appears on the screen16. Click on Exit to leave Data Maintenance screen17. Run a Detail Activity by Date report to confirm import of call records.18. Close any running programs, and exit out of Windows & reboot the computer.
RegistrationIt is very important to register your TAPIT 2000 promptly; otherwise it will stop functioning within 30 days fromthe date of installation.
The Trisys, Inc. Software registration process consists of two steps:Step A: Obtaining a Registration number.
12 •••• Installation Tapit
Click on it if you need registration instructions.
Registration on the Internet: (Internet connection required)a. Click on the Registration on the Internet button. Online Registration screen appears.b. Click on Internet button. Your Internet browser will open the Trisys Home Page at
www.trisys.com.c. Select Registration from the menu.d. Select the software you want to register. The Online Registration page appears.e. Print the Online Registration page.f. Continue the online registration following the PRINTED instructions starting from Step 2.
Registration via E-mail, by Fax or Phone:a. Click on the Registration via E-mail, by Fax or Phone button.b. Fill in the on-screen registration form. Required fields are marked with an asterisk ( * ).
Note: The telephone number is required to complete ALL registrations. Fax number is requiredwhen registering by fax (Print option) and E-mail address is required when sending informationvia e-mail(E-mail option).Note: The following fields cannot be edited: Software Serial Number, Registration No. andComputer ID. Software Serial Number and Computer ID are generated by the installation process.Registration Number is displayed after software registration is completed.
When registering via e-mail:Click on the E-mail button. The registration program automatically generates an e-mail message ( thisoption will NOT work if a phone number or e-mail address is missing ) and sends it to Trisys TechnicalSupport. After Technical Support receives your request, they will e-mail a registration number to you.When registering by fax:Click on the Print button to print out the completed form (it will NOT print if a fax number or phonenumber are missing) and fax it to 973 360 2222. The form containing the registration number will befaxed back to you.
When registering by phone:Call Trisys Technical Support at 973 360 2300 to obtain a registration number.Note: To expedite the registration process, please have the registration form completed prior to callingTrisys Technical Support.
Step B.To complete registration:1. Once you have obtained a registration number, click on the Register button located on either Online

Tapit Installation •••• 13

14 •••• Main Menu Tapit
The Main Menu screen is displayed as soon as you start TAPIT.Buttons/Icons on the menu allow you to access different options by clicking on them.
Main menu option also offers access to each part of Tapit program.Window menu option gives a standard Windows’ functions:Tile, Cascade, Arrange Icons, Hide, Unhide and Size to Fit.Help menu option lets access TAPIT’s Help Screen alternatively to pressing F1 key.Clicking on the Exit button closes Tapit application. Make sure that Main Menu is the only screen open within Tapit beforeexiting.

Tapit Users/Departments •••• 15
The Users/Departments screen is used to define employees’ names and their extensions as well as to define and assigndepartment information.It is divided into two sections. The left section of the screen has 3 tabs: Hierarchy, Departments, Users. The right section is adetail information section and it is dependent on a selection made in a list(left) section. When clicked, Departments and Userstabs, display departments and users screens correspondingly. A list of departments, or users appears on a left-hand side. You cannavigate it by clicking on list's items. You can also sort it by clicking on the header labels of the list. When a particular record ishighlighted the right section of the User/Department screen displays its detail information This screen allows you to change,add, or delete department's, or user's data. Hierarchy tab shows Hierarchy of Departments tree on the left-hand side. Theright side initially displays instructions but when any of the tree nodes is selected the screen changes to an edit mode.
UsersUsers screen is used to maintain employees' records. It has two sections. Left section is a list of users. You can navigate it byclicking on list's items. You can also sort it by clicking on the header labels of the list. When a particular record is highlighted theright section displays user's detail information This screen allows you to change, add, or delete user's data.

16 •••• Users/Departments Tapit
or Surcharge Per Call field and enter dollar amounts or click on Multiplier and enter % (percentage value). Bysurcharge or multiplier we mean extra money that will be applied on the top of the rate table that is used to price calls.Note that two types of surcharges and multiplier may be used at the same time
5. Click on a down arrow next to Department text box to open departments' list. Select appropriate department and clickon it to assign it to the user.
6. Enter ext. number in the text box located below Add>> button. Click on Add>> or press Enter. Extension has beenassigned to the user and is displayed in Extension(s) list box. To remove extension number from the list, select it andclick on Remove<< button. Confirmation message appears. Click on Yes.
7. Click on Save.Note: pressing Enter saves any changes prior to it.
8. Click on Exit.
Editing or deleting users1. If not active click on the Users tab. The left section of the screen displays users' list. If you entered users screen for the
first time, or none of the users is highlighted, the right section of the screen displays instructions, otherwise user detailinformation screen appears.
2. From the users list select a user to be edited and click on it (you can sort users list by clicking on list's header labels).Go to the detail section.Navigate with Tab and type in new values in any of User Last Name/Company, User First Name, AuthorizationCode, Surcharge Per Minute, Surcharge Per Call and Multiplier fields.
3. To change or assign department click on a down arrow, next to Department text box, and open departments' list.Select appropriate department and click on it.
4. Enter ext. number in the text box located below Add>> button. Click on Add>> or press Enter. Extension has beenassigned to the user and is displayed in Extension(s) list box. To remove extension number from the list, select it andclick on Remove<< button. Confirmation message appears. Click on Yes.
5. In order to delete user's record, go to users' list and click on a user to be deleted.6. Click on Delete button. The confirmation message appears. Click on Yes. General instructions screen takes place of
the detail screen and user is no longer found in the list section.7. Click on Save.
Note: pressing Enter saves any changes prior to it.8. Click on Exit.
It is a good practice to run Reindex Database (Main Menu/Maintenance/Reindex Database) after adding,changing or deleting user records.
Printing users list1. Click on Print button. List of reports appears. You can print any listed report from this screen.2. Select List of Users from the list of reports.3. Click on Open Report.

Tapit Users/Departments •••• 17
g g g p y p y g pdata.
Adding new departments1. Click on the Departments tab. The left section of the screen displays departments' list. If you entered departments'
screen for the first time, or none of the departments is highlighted, the right section of the screen displays instructions,otherwise department detail information screen appears.
2. Click on New button located above the detail section of the screen.3. Type in department's name. If this is a sub-department check Parent check box. Click on a down arrow next to Parent
department text box and open departments' list. Select appropriate department and click on it.4. Click on Save.
Note: pressing Enter saves any changes prior to it.5. Click on Exit.

18 •••• Users/Departments Tapit
parent department click on a down arrow next to Parent department text box. Departments' list opens. Selectappropriate department and click on it.To remove parent department click on the Parent check box to uncheck it. Click on Save. Note: unlikeproceeding cases, removing parent department is not reflected in the left-hand side departments' list right away. Youhave to click on Save button to update the left section of the screen.
5. In order to delete a department: go to the list section and click on a department to be deleted.Click on Delete button. The confirmation message appears. Click on Yes. General instructions screen takes place ofthe detail screen and user is no longer found in a list section.
6. Click on Save.Note: pressing Enter saves any changes prior to it.
7. Click on Exit.
It is a good practice to run Reindex Database (Main Menu/Maintenance/Reindex Database) after adding,changing or deleting user records.
Printing departments list1. Click on Print button. List of reports appears. You can print any listed report from this screen2. Select List of Departments from the list of reports.3. Click on Open Report.4. Click on Options. Select Print and click on it.5. When report has finished printing close preview screen by clicking on Options and then Exit.
Tapit Users/Departments •••• 19
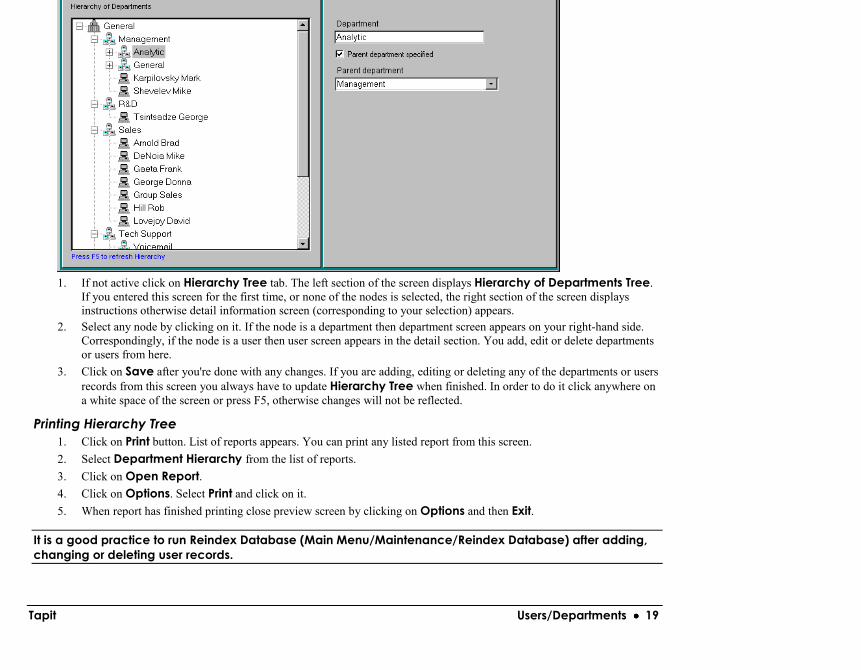
1. If not active click on Hierarchy Tree tab. The left section of the screen displays Hierarchy of Departments Tree.If you entered this screen for the first time, or none of the nodes is selected, the right section of the screen displaysinstructions otherwise detail information screen (corresponding to your selection) appears.
2. Select any node by clicking on it. If the node is a department then department screen appears on your right-hand side.Correspondingly, if the node is a user then user screen appears in the detail section. You add, edit or delete departmentsor users from here.
3. Click on Save after you're done with any changes. If you are adding, editing or deleting any of the departments or usersrecords from this screen you always have to update Hierarchy Tree when finished. In order to do it click anywhere ona white space of the screen or press F5, otherwise changes will not be reflected.
Printing Hierarchy Tree1. Click on Print button. List of reports appears. You can print any listed report from this screen.2. Select Department Hierarchy from the list of reports.3. Click on Open Report.4. Click on Options. Select Print and click on it.5. When report has finished printing close preview screen by clicking on Options and then Exit.
It is a good practice to run Reindex Database (Main Menu/Maintenance/Reindex Database) after adding,changing or deleting user records.

20 •••• Clients Tapit
The Client screen is used to enter, view and edit client’s information.It contains two sections. The left section of the screen displays a list of clients.You can navigate it by clicking on list's items. When a particular client's record is highlighted the right section of the Clientsscreen displays its detail information. The detail section allows you to add, edit or delete client's data.
Adding new client1. Click on New button located above the detail section.2. Enter data into Client Last Name/Company, Client First Name, Account Code and address fields. Press Tab
key to move to the next field.3. Click on Save.
Note: pressing Enter saves any changes prior to it.4. Click on Exit.
Editing or deleting clients1. From the clients' list select a client's record to be edited and click on it (you can sort clients list by clicking on header labels
of the list).
Tapit Clients •••• 21
number place a cursor on the telephone number to be erased and click on the Delete Phone button.5. In order to delete client's record, go to clients' list and click on a client to be deleted.6. Click on Delete button. The confirmation message appears. Click on Yes. General instructions screen takes place of the
detail screen and user is no longer found in the list section.7. Click on Save.
Note: pressing Enter saves any changes prior to it.8. Click on Exit.
It is a good practice to run Reindex Database (Main Menu/Maintenance/Reindex Database) after adding,changing or deleting user records.
Printing Clients List1. Click on Print button. List of reports appears. You can print any listed report from this screen.2. Select appropriate report from the list of reports.3. Click on Open Report.4. Click on Options. Select Print and click on it.5. When report has finished printing close preview screen by clicking on Options and then Exit.

22 •••• Reports Tapit
The Report Selection screen lists available report groups and individual report names that may be generated. We recommendthat you try all of the reports at least once to see the difference among the reports, and then choose reports that you will be runningin the future.Note Other Reports button located on the bottom of the Report Selection screen. Click on it to invoke SpecialReports screen. These additional reports cannot be modified or used with Report Scheduler.
Go back to the Reports Selection screen.Click on the report group buttons to see available reports. For example: All button displays all reports, User button brings up onlyuser related reports and clicking on Custom button displays reports built with a Report Designer ( see Report Designerchapter later in this manual).
Running a report1. Select a report (by clicking on its name) and click on Continue.2. Filter screen is displayed. Please note that the same screen is used in other parts of TAPIT, so please read the following
section carefully.
Click here to see theadditional set of custom
reports.Custom CallerID Deluxe
report is one of them..

Tapit Reports •••• 23
Available options are:1. Date
You must enter a start and end date for the data to be reported on the report or click on the button next to theword Date and make a selection from the pull down list.When the date selection or entry is made a + sign appears next to the Date field.To clear the selection click on the same button again. A + sign disappears.
2. TimeEnter start time and end time (leave these fields blank to generate a report without any time restrictions).
3. DirectionThe default value is Both for both incoming and outgoing calls types.You may click on the button next to the word Direction and select either Incoming or Outgoing calls. The buttondisplays a + sign. To reset to default click on same button again.
4. ExtensionsTo include all extensions on the report leave both fields empty.Otherwise, enter a range of extensions or for more flexibility click on the button next to the word Extension.The Enter List for Extension screen appears.
This screen allows you to create a list of extensions to be included or excluded from the report.Depending on what you need to do check one of the option buttons, Include or Exclude located on the top of theselection screen.
Click here to removeselected extension from
the list
Click here to indicate ifextensions are to be
included or excluded onthe report

24 •••• Reports Tapit
To remove extension selectionClick on the button next to the word Extension, click on the Clear button and click on the OK button.
5. DurationThis field is used to specify the duration of call records to be included in the report.For example:Enter 00:01:00 in the first field and 00:10:00 in the second field to display calls longer than 1 min. and shorter than 10min.Enter 00:05:00 in the first field and leave the second field blank to display all calls longer than 5 min.To clear both fields click on the button next to the word Duration.
6. DepartmentTo include all departments on the report leave both fields empty.To include or exclude departments, click on the button next to the word Department.The Select List of Department screen appears.
Depending on what you need to do check one of the option buttons, Include or Exclude, located on the top of theselection screen.Select department’s name from the list on the left side of the screen and transfer it to the list on the right side by clickingon the right arrow.Click on OK button to continue with the selection, Cancel to exit from this screen without any selection or Clearbutton to erase all changes and start over.If any selection is entered, a + sign appears on the button next to the word Department and a dotted line between thefields to indicate that it is a list of departments.
To edit department selectionClick on the button next to the word Department, make the modifications and click on the OK button
To remove department selectionClick on the button next to the word Department, click on the Clear button and click on the OK button
7. UserTo include all users on the report leave both fields empty.To include or exclude users, click on the button next to the word User.The Select List for User screen appears.
Click here to indicate ifdepartments are to beincluded or excluded onthe report
Click on the department name inthe column on the right and then
here to remove the departmentfrom the list
Click on the department name inthe column on the left and then
here to add the department to thelist

Tapit Reports •••• 25
Click on OK button to continue with the selection, Cancel to exit from this screen without any selection or Clearbutton to erase all changes and start over.If any selection is entered, a + sign appears on the button next to the word User and a dotted line between the fields toindicate that it is a list of users.
To edit user selectionClick on the button next to the word User, make the modifications and click on the OK button.
To remove user selectionClick on the button next to the word User, click on the Clear button and click on the OK button
8. ClientTo include all clients on the report leave both fields empty.To include or exclude clients, click on the button next to the word Client.The Enter List for Client screen appears.
Depending on what you need to do check one of the option buttons, Include or Exclude, located on the top of theselection screen.Select client’s name from the list on the left side of the screen and transfer it to the list on the right side by clicking onthe right arrow.Click on OK button to continue with the selection, Cancel to exit from this screen without any selection or Clearbutton to erase all changes and start over.If any selection is entered, a + sign appears on the button next to the word Client and a dotted line between the fields toindicate that it is a list of clients.
To edit client selectionClick on the button next to the word Client, make the modifications and click on the OK button
To remove client selectionClick on the button next to the word Client, click on the Clear button and click on the OK button
9. Account CodeTo include all account codes on the report leave both fields empty.Otherwise, enter a range of account codes that would appear on the report or for more flexibility click on the button nextto the word Account Codes.The Enter List for Account Code screen appears.
Click here to indicate if clients are to beincluded or excluded on the report
Click on the client name in the column on theright and then here to remove the clientfrom the list
Click on the client name in the column onthe left and then here to add the client to thelist

26 •••• Reports Tapit
This screen allows you to create the list of account codes to be included or excluded from the report.Depending on what you need to do check one of the option buttons, Include or Exclude, located on the top of theselection screen.In order to create account code listing enter account codes one at a time in a small text box on the left side of the screenand click on the right arrow to transfer it to the list on the right side of the screen.Click on OK button to continue with the selection, Cancel to exit from this screen without any selection or Clearbutton to erase all changes and start over.If any selection is entered, a + sign appears on the button next to the word Account Code and a dotted line betweenthe fields to indicate that it is a list of account codes.
To edit account code selectionClick on the button next to the word account code, make the modifications and click on the OK button
To remove account code selectionClick on the button next to the word account code, click on the Clear button and click on the OK button
10. TrunkTo include all trunks on the report leave both fields empty.Otherwise, enter a range of trunks that would appear on the report or for more flexibility click on the button next to theword Trunk.The Enter List for Trunk screen appears.This screen allows you to create the list of trunks to be included or excluded from the report.Depending on what you need to do check one of the option buttons, Include or Exclude, located on the top of theselection screen.In order to create trunk listing enter trunks, one at a time, in a small text box on the left side of the screen and click onthe right arrow to transfer it to the list on the right side of the screen.Click on OK button to continue with the selection, Cancel to exit from this screen without any selection or Clearbutton to erase all changes and start over.If any selection is entered, a + sign appears on the button next to the word Trunk and a dotted line between the fields toindicate that it is a list of trunks.

Tapit Reports •••• 27
Phone Number.The Enter List for Phone Number screen appears.
This screen allows you to create the list of phone numbers to be included or excluded from the report.Depending on what you need to check one of the option buttons, Include or Exclude, located on the top of theselection screen.In order to create phone number listing enter phone numbers, one at a time, in a text box on the left side of the screenand click on the right arrow to transfer it to the list on the right side of the screen.In order to generate global search for a particular exchange or a number use a space bar to move forward through thephone number field.For example: you are looking for phone numbers with an exchange of 512. You need to type the following in the phonenumber field:<space><space><space><space>512. When finished click on the right arrow button on the screen and the number willbe automatically transferred to the phone number list window. This number should read ????512 in order to beprocessed correctly (? in place of each space).Click on OK button to continue with the selection, Cancel to exit from this screen without any selection or Clearbutton to erase all changes and start over.If any selection is entered, a + sign appears on the button next to the word Phone Number to indicate that it is a list ofphone numbers.
To edit phone number selectionClick on the button next to the word phone number, make the modifications and click on the OK button
To remove phone number selectionClick on the button next to the word phone number, click on the Clear button and click on the OK button
12. CostEnter dollar amount values for call records to be included on the reportFor example:Enter .50 in the first field and 5.00 in the second field to display calls with cost over $.50 and less then $5.00.Enter 1.00 in the first field and leave the second field blank to display all calls with cost over $1.00.To clear both fields click on the button next to the word Cost.
13. Show Only Local Calls - check the box to display only local calls in the report.14. Do not Show Local Calls - check the box to exclude all local calls from the report
Click on the phone number in the list and then hereto remove a phone number from the list
Click here to add phone number to the list
Type here a full or partial phone number to be added tothe list. Indicate if it is a 1 or 0 plus the number call.
Click here to indicate if phone numbers are to beincluded or excluded on the report

28 •••• Reports Tapit
Continue – click on it to run the report.Clear - click on this button to erase all filter criteria.Cancel - click on it to exit filter screenClick on Predefined button to save your selection for the future use (such filters come handy when setting Report Scheduler).Enter the name of the filter in a Save Filter screen and click on OKThe Predefined Filters screen replaces the buttons on the right side of the screen.
Click on Continue to generate a report, Cancel if you do not want to run a report, Delete if you would like to delete a filter.You can also make some changes to the filter criteria and click on Save to overwrite old filter or create a new one by giving it adifferent name.Generated report is displayed in a preview mode. If it has more than one page you can navigate through them with arrows at thebottom of the report screen.
Report window is equipped with a menu with the following options:Print option will send report to the printer currently selected in the MS WINDOWS Print screen.Print Setup will take you to the MS WINDOWS Page Setup screen where you can control printer optionsOutput To File option will invoke the Save As Text screen. It enables you to save report in a file.Zoom will control the size of the displayed report.Go To Page will allow you to type a page number you would like to go to.Exit will close the report window.
Click here to save current selection. Youwill be prompted to enter anew name.
Click here to close this screenClick on the filter name in the list and thenhere to delete previously saved selection.
Click on the filter name in the list to recallpreviously saved selection and then here togenerate a report.
Click here to go to the previous page of the report Click here to go to the next page of the report

Tapit Statistics •••• 29
Statistics function provides a graphical representation for your call records data.To access statistics click on the Statistics icon on the Main Menu
To generate statistical graphFor top 20 values
1. Click on Top 20 Values in the report group2. Select a report category by clicking on its name on the Report Categories screen.
3. Select a report type by clicking on its name on the Report Type screen.
4. Select a chart type by clicking on its picture located on the Chart Types screen.
5. Click on Continue.6. Enter criteria on the filter screen.
How to use filter screen(see pg.17 on how to use filter screen)7. Click on Continue.
Chart will be displayed on your screen in a few moments.

30 •••• Statistics Tapit
3. Select a report type from the Report Type group.4. Select a chart type by clicking on one of the icons in Charts Type selection group.5. Click on Continue.6. Enter criteria on the filter screen.
How to use filter screen(see pg.17 on how to use filter screen)7. Click on Continue.
Chart will be displayed on your screen in a few moments8. For Date and Time - Detail9. Click on Date and Time - Detail in the report group10. Select a report category by choosing from Report Categories group.
11. Note that in addition to the category, you may select time or days category.12. Select a report type by clicking on its name.13. Select a chart type by clicking on its picture.14. Click on Continue.15. Enter criteria on the filter screen.
How to use filter screen(see pg.17 on how to use filter screen)16. Click on Continue.
Chart will be displayed on your screen in a few moments.
WE ENCOURAGE YOU TO RUN DIFFERENT STATISTICAL REPORTS TO SEE WHICH ONES SUIT YOUR NEEDS THE BEST.

Tapit System Maintenance •••• 31
System Maintenance - OverviewThe System Maintenance allows you to access different options by clicking on icons/buttons.
Clicking on the Exit button gets you back to the Main Menu screen.

32 •••• System Parameters Tapit
System Parameters screen will allow you to configure various settings of TAPIT system.Click on the Maintenance icon on the Main Menu and then click on the System Parameters icon.System Parameters screen will be displayed. It consists of five different screens: Communications, Call Costing,Activity, Trunks, and Destination.
CommunicationsThe Communications screen is displayed first as default.
1. Click on the down arrow icon in the Port field to select a port on the computer the SMDR cable is connected to.2. Click on the down arrow icon in the Speed field to select a transmission speed the phone system is set at.

Tapit System Parameters •••• 33
receiving data from.Data will not be processed correctly or not at all if incorrect selection is made.
MS Windows MUST be shut down and restarted when making any changes in the CommunicationsParameters Screen
8. Process Calls Every __ MinutesValue entered in this box would determine how often Tapit would process data (convert raw information into TAPITdatabase format). 20 minutes is the default value for this field.
9. Create Backup on exitWhen this box is checked TAPIT will create a backup copy of the main database every time you exit the software. Whenexiting TAPIT make sure that within the TAPIT application only Main Menu window is open.We recommend that you leave this box checked to secure the integrity of the database.
Note that depending on the size of the database this process may take some time.
10. Long Distance Support of One (1) and Zero - uncheck this box if your phone system is not sending either digit 1or 0 (zero) in the front of the long distance telephone number
11. Click on OK to save changes or Cancel to exit the screen without saving any changes12. From Communications screen the Password function may be accessed
Click on Password button
Enter the system password here
Re-enter the system password here to confirmthe system password’s correct spelling

34 •••• System Parameters Tapit
1. Click on the Telephone Number field and enter your main telephone number (do not use an 800 number)2. Tapit Default Carrier Call Costing in Increments will specify in how many seconds per increment Tapit will
price calls if Tapit Carrier is used to price the calls. This option will not apply to V&H pricing table if you are using one.Click on First Minute and enter a number of seconds Click on the Next Minute and enter a number of seconds for eachadditional minute
Only one form of increment can be specified for all calls being costed via TAPIT Carrier.
3. Default surcharges - numbers you will enter in these fields will appear automatically in surcharge and multiplierfields when adding a new user (see User setup)Click on Per Call field and enter dollar amount to apply per call surchargeClick on Per Minute field and enter dollar amount to apply per minute surchargeClick on Multiplier and a percentage value to apply as a surcharge
4. Zero Plus Pricing – this field holds prices and surcharges for operator assisted calls.5. Account Code Processed As - selection on this field will determine whether account codes generated by the phone
system will be associated will user name or client nameClick on Client Code to associate this number with client nameClick on User Authorization Code to associate this number with user nameIf Client Code is selected a Matter Code field is available (a sub-account code)Click on the Matter Code Length field to enter a number of digits of the matter codes used (this number must beshorter that a length of the account code)
6. Click on OK to save changes or Cancel to exit the screen without saving any changes
ActivityThis screen will allow you to specify what type of phone activity to include in or exclude from storing in TAPIT’s database
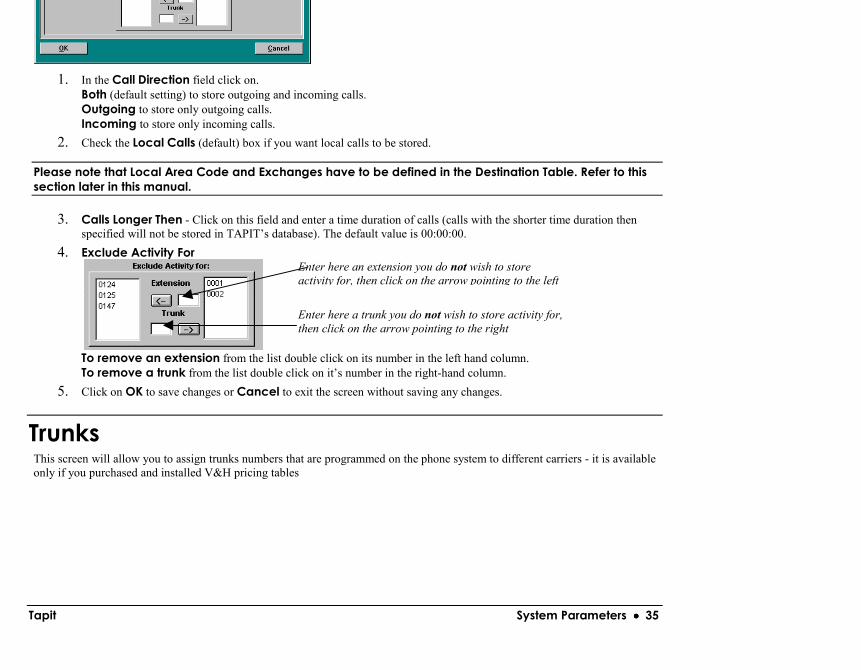
Tapit System Parameters •••• 35
1. In the Call Direction field click on.Both (default setting) to store outgoing and incoming calls.Outgoing to store only outgoing calls.Incoming to store only incoming calls.
2. Check the Local Calls (default) box if you want local calls to be stored.
Please note that Local Area Code and Exchanges have to be defined in the Destination Table. Refer to thissection later in this manual.
3. Calls Longer Then - Click on this field and enter a time duration of calls (calls with the shorter time duration thenspecified will not be stored in TAPIT’s database). The default value is 00:00:00.
4. Exclude Activity For
To remove an extension from the list double click on its number in the left hand column.To remove a trunk from the list double click on it’s number in the right-hand column.
5. Click on OK to save changes or Cancel to exit the screen without saving any changes.
TrunksThis screen will allow you to assign trunks numbers that are programmed on the phone system to different carriers - it is availableonly if you purchased and installed V&H pricing tables
Enter here an extension you do not wish to storeactivity for, then click on the arrow pointing to the left
Enter here a trunk you do not wish to store activity for,then click on the arrow pointing to the right

36 •••• System Parameters Tapit
Adding new trunks1. Click on New.2. Enter a trunk number in the Trunk field.3. Click on the down arrow next to the carrier field to select an appropriate carrier from the list.
Deleting trunks1. Click anywhere on the trunk field to select it for deletion.2. Click on Delete.
Printing a list of the trunks1. Click on the Print List button.2. Click on OK to save changes or Cancel to exit the screen.
DestinationThis screen will allow you to view, edit, add and delete records in the city and state destination table
Adding new destination record1. Click on New.2. Enter area code and exchange of the new record in the Destination field, press Enter.

Tapit System Parameters •••• 37
1. Place a cursor on a field you want to delete or click on Find button and enter area code and exchange to be deleted andclick on OKA record that you wish to delete should be highlighted
2. Click on Delete button
It is a good practice to run Reindex Database (Main Menu/Maintenance/Reindex Database) after adding,changing or deleting destination information.
Editing destination records1. Place a cursor on a field you want to edit or click on Find button and enter area code and exchange of record to be
edited and click on OKA record that you wish to edit should be highlighted.
2. Edit field value.
It is a good practice to run Reindex Database (Main Menu/Maintenance/Reindex Database) after adding,changing or deleting destination information.
To clear L codes in the Code field.If you purchased V&H pricing table, all local exchanges in your area code are going to be marked with an L code. You may notwish to process these calls as local therefore the Code button will allow you to remove this mark.
Click on OK to save changes and exit the screen
To remove ALL L codes click here
38 •••• Call Editor Tapit
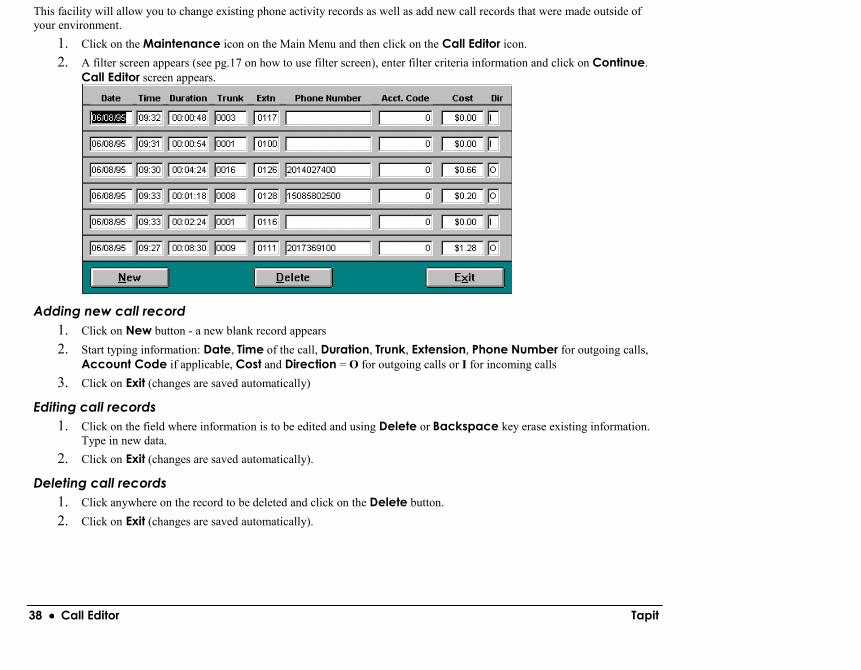
This facility will allow you to change existing phone activity records as well as add new call records that were made outside ofyour environment.
1. Click on the Maintenance icon on the Main Menu and then click on the Call Editor icon.2. A filter screen appears (see pg.17 on how to use filter screen), enter filter criteria information and click on Continue.
Call Editor screen appears.
Adding new call record1. Click on New button - a new blank record appears2. Start typing information: Date, Time of the call, Duration, Trunk, Extension, Phone Number for outgoing calls,
Account Code if applicable, Cost and Direction = O for outgoing calls or I for incoming calls3. Click on Exit (changes are saved automatically)
Editing call records1. Click on the field where information is to be edited and using Delete or Backspace key erase existing information.
Type in new data.2. Click on Exit (changes are saved automatically).
Deleting call records1. Click anywhere on the record to be deleted and click on the Delete button.2. Click on Exit (changes are saved automatically).

Tapit TAPIT Pricing •••• 39
Tapit Pricing Table will allow you to enter pricing information to apply cost to outgoing calls.Click on the Maintenance icon on the Main Menu and then click on the Tapit Pricing icon.The Tapit Pricing Table allows you to enter prices for the first minute and next minute for three different time periods.
If same prices apply 24 hours a day use the first section of the pricing table only leaving the From column as 00:00.

40 •••• TAPIT Pricing Tapit
Adding new pricing record1. Click on New button - cursor is inserted in a blank record line2. Type phone number in the Number Dialed field as area code (NPA) or area code and exchange (NPA NXX).3. Enter a start time for the first time period in the first From field. In case your time period is 24 hours long leave this
field at 00:00 value.4. Type rate for the first minute in the Rate Per Minute / First field. If Rate Per Minute / Next field is left empty then
this rate is applied flatly to all the calls for the specified phone number. That means that no matter how long the call is orwhat kind of increment has been entered in System Parameters screen any call record is going to be priced exactlythe rate of the first minute.
5. Type rate for each additional minute in the Rate Per Minute / Next field.6. Enter time and rates for the next Time Period only if they are different. Otherwise, TAPIT will assume that calls are
priced at the same rate all day long.7. Click on New to create a new record or Exit to leave the screen, changes are saved automatically.
In our example:• Calls made to area code 201 and exchange 593 (line two) would be priced at .25 cents for the first minute and .20 cents
for each additional minute between 8:00 AM and 11:00 AM; between 11:00 AM and 23:00 calls would be priced at .20cents for the first minute and .15 cents for each additional minute; after 23:00 until 8:00 AM the rate would be .11 centsfor the first minute and .08 cents for each additional minute.
• All other calls made to area code 201 (line one) would be priced at .30 cents for the first minute and .25 cents for eachadditional minute between 8:00 AM and 11:00 AM; between 11:00 AM and 23:00 calls would be priced at .25 cents forthe first minute and .23 cents for each additional minute; after 23:00 until 8:00 AM the rate would be .15 cents for thefirst minute and .10 cents for each additional minute.
• All 800 calls would be free of charge (line four)• All other calls would be priced at .55 cents a minute (line three)• User L as a Number Dialed to price all calls designated as Local in Destination Database.
Deleting pricing records1. Click anywhere on the record to be deleted and click on Delete button2. Click on Exit to leave the screen, changes are saved automatically
Finding specific record in the Number Dialed field1. Click anywhere on Number Dialed field.2. Click on Find button.3. Enter the value to look for in Look for text box.
You can also select from the list of previous searches by clicking on a down arrow.4. Click on OK.

Tapit Reindex Database •••• 41
This facility will allow you to reassign pointers in TAPIT’s Databases.
It is strongly recommended that your run this program after making any changes in User, Client, Department,Pricing or Destination Databases.
1. Click on the Maintenance icon on the Main Menu and then click on the Reindex Database icon. After clickingReindex Database icon filter screen appears(see pg.17 on how to use filter screen).Enter filter criteria information and click on continue
2. While your Database is being Reindexed it is very important that you do not reboot or shut down your computer. Thereindex process can sometimes take 20 to 30 minutes depending on your computer resources as well as the size of yourdatabase. If you interrupt this process your entire database will be corrupted.
3. When the reindexing is finished status screen appears with the appropriate message.4. Click on OK, TAPIT’s database has been reindexed.

42 •••• Recosting Tapit
Recosting function will allow you to recost existing phone activity based on your selection.1. Click on the Maintenance icon on the Main Menu and then click on the Recosting icon.2. A filter screen appears (see pg.17 on how to use filter screen), enter filter criteria information for calls to be recosted and
click on continue.3. The Recosting screen appears.
Using Custom option1. Click on Custom selector in Type of Recosting2. Click on either Decrement or Increment3. Click on Per Call or Per Minute4. Click on Percentage and enter percentage value in the Value field or click on Dollar value and enter dollar amount
in the Value field5. Click on OK6. Filter screen appears(see pg.17 on how to use filter screen).Enter filter criteria and click on Continue. TAPIT will start
recosting calls
Using Tapit Carrier option1. Click on Tapit Carrier option in Type of Recosting.2. Click on OK, TAPIT will start recosting calls according to the rates entered in TAPIT’s pricing table.
Using V&H Carrier option1. This option is available only if you have purchased TAPIT’s V&H Pricing table.2. Click on V&H Carrier selector in Type of Recosting.3. A list of available carriers appears on the screen. Click on the carrier you want to use for recosting and click on OK,
TAPIT will start recosting calls.
Tapit Recosting •••• 43

44 •••• Dialing Patterns Tapit
Dialing Patterns function will allow you to separate the actual telephone number from complex dialing digit sequences.Click on the Maintenance icon on the Main Menu and then click on the Dialing Patterns icon.
To define a dialing pattern you may use the following characters:T - represents one digit of the telephone number (0-9)0-9, #, * - indicates a one to one correspondence between the appropriate character and the dialing stringN - represents any one character of the dialing string that is not a part of the dialed numberX - ignores all characters from this point on, can be used only once and after the longest dialing patternC - indicates an authorization or account code that directly proceeds or follows the telephone number dialed on the SMDR string.When defining dialing patterns, please remember that it is important what digits are generated by your telephone system.Sometimes they do not match what you have dialed, i.e. dialing 1-202-593-8200 may generate494-1-202-593-8200. Correct pattern would be NNNTTTTTTTTTTT.
The following examples may already contain patterns that you can use. If not, they should at least help you to create correctpatterns for your environment:
DIALED COMBINATION PATTERN
1-201-593-8200 TTTTTTTTTTT
593-8200 TTTTTTT
9-593-8200-123 9TTTTTTTNNN
1-593-8200 1TTTTTTT
Cost IndicatorEnter/Edit Patterns in this field

Tapit Dialing Patterns •••• 45
1234-1201-593-8200 CCCCTTTTTTTTTTT
1202-593-82001234 TTTTTTTTTTCCCC
*In last two examples 1234 is an account code. This pattern can be used only if account or authorization code is generated withEVERY telephone number.
Adding new dialing pattern1. Click on New button2. Type in a new dialing pattern.3. Click on Cost Indicator to associated cost with applicable pattern4. Click on New button if you want to create a new dialing pattern or
on OK button to save changes and exit.Clicking on Cancel button will exit the screen without saving the changes.
Deleting dialing patterns1. Click on existing dialing pattern on the list.2. Click on Delete button.3. Click on OK button to save changes and exit.
Editing dialing patterns1. Click on existing dialing pattern on the list.2. Add new characters or overwrite existing ones in the Dialing Pattern field.3. Click on OK button to save changes and exit.
It is strongly recommended that you exit out of the TAPIT program as well as the SMDR Monitor and rebootthe computer for the dialing pattern changes to take effect. The changes will effect only the calls processedafter PC has been rebooted.
*
*

46 •••• Report Scheduler Tapit
Report Scheduler screen will allow you to schedule selected reports to be generated automatically.
TAPIT software has to be running in order for Report Scheduler to generate a report.
Click on the Maintenance icon on the Main Menu and then click on the Report Scheduler icon.
Adding new report1. Click on New button.
The Report Selection screen is displayed.2. Select the report name you want to add.3. Click on Continue.
The filter screen is displayed. It is the same screen used to filter data in Reports module of TAPIT software however itworks a little differently in this section. In order to apply filter criteria to reports generated by Report Scheduler youhave to save a filter as Predefined or use an existing Predefined filter. Click the following link to obtain moreinformation on how to accomplish this task (see pg.15 on how to use a filter screen).
4. Click on Continue.Report Selection screen will close. The name of a selected report and filter ( if used) will appear on the ReportScheduler screen in Scheduled Report and Applied Filter fields.
5. Enter time for the report to be generated in Time text box.6. Check the Print box if you want the report to be output to printer. Otherwise the report will be sent to a file Default.rpt
(you may click on File Name field and enter different file name).7. Confirm that both Scheduled Report and Applied Filter fields have the correct values entered.8. Click on Frequency button and select a frequency (how often) the report will be generated with.
Daily - a report is going to be generated every day at the specified time.Weekly - a report is going to be generated once a week at the specified time and day of the week.Monthly - a report is going to be generated once a month at the specified time and day of the month.
9. Click on Exit to leave the screen and save the changes

Tapit Report Scheduler •••• 47
1. Click on Time or File Name field on the report record you wish to delete.2. Click on the Delete button to delete a report record.3. Click on Exit to leave the screen and save the changes.

48 •••• Data Maintenance Tapit
Data Maintenance screen will allow you to maintain TAPIT’s data export and import functions.Click on the Maintenance icon on the Main Menu and then click on the Data Maintenance icon.
1. An Export/Import/Billing Data screen will be displayed. It consists of six different sections: Export, Import, CallRecords Maintenance, Export to Billing Software, Import Tapit DOS Data, Import V&H Data
2. Export screen is displayed first as a default
Export1. Export facility will allow you to export selected data for different categories to a file. Exported data can be used as a
back-up or it can be imported by TAPIT installed at another location.
2. Select data category to be exported in the Export Categories box (select All if you wish to export all categories).

Tapit Data Maintenance •••• 49
ImportImport feature allows you to import TAPIT’s data after it was exported as describe in Export section
Select a category to be imported in the Import Categories box (select All if you wish to import all categories)1. Click on Directory field and enter a source path (do not enter anything if data resides in C:\TAPITW32 directory)2. Click on Continue button3. TAPIT will start importing data. If appropriate files are not found in the specified directory TAPIT will notify you with
a message. Those files will not be imported. The files were not found most likely because they were not exported fromTAPIT or were exported to a different directory.When finished TAPIT will display “Data Import Completed” message.
Call Records MaintenanceCall Records Maintenance facility allows to export, purge, archive and import call records.

50 •••• Data Maintenance Tapit
1. Select Type of Calls MaintenanceAvailable options are:
2. Purge Call Records - selected call records (a filter screen will be displayed in the next step) will be deletedpermanently from TAPIT database.
3. Export and Remove Call Records - selected call records will be copied to the specified directory and deleted fromTAPIT database. A file name for exported records must be entered in the File Name box (i.e. 0896.txt for exportedrecords for August 1996). We recommend a .txt extension for this file.
Please keep track of all file names that are used when exporting since you will need to know them whenimporting records.
4. Export and Keep Call Records - selected call records will be copied to the specified directory. They will not bedeleted from TAPIT database. A file name for exported records must be entered in the File Name box (i.e. 0896.txt forexported records for August 1996). This option can be used if you would like to have a copy of the call records on adifferent location where TAPIT is installed. Note that when this option is used importing data from thenewly created export file will create duplicate call records.
Please keep track of all file names that are used when exporting since you will need to know them whenimporting records.
5. Import Call Records - choose this option to import call records that have been exported using either Export orRemove Call Records or Export and Keep Call Records utility. Type in the directory name in the Directorybox where file with call records are stored and the file name that was used when exporting call records in the FileNames box.
6. After the selection has been made click on Continue button.7. A filter screen will be displayed, enter criteria on the
filter screen and click on Continue. (see pg.19-28 on how to use filter screen)
We do not recommend exporting call records directly to floppy diskettes. The possibility exists that there willbe not enough room on the floppy disk when exporting and the results may be unpredictable. It is a betterpractice to export data to a hard drive and then copy it to an alternate location for extended storage (i.e.floppy disk, tape drive, file server, etc.)
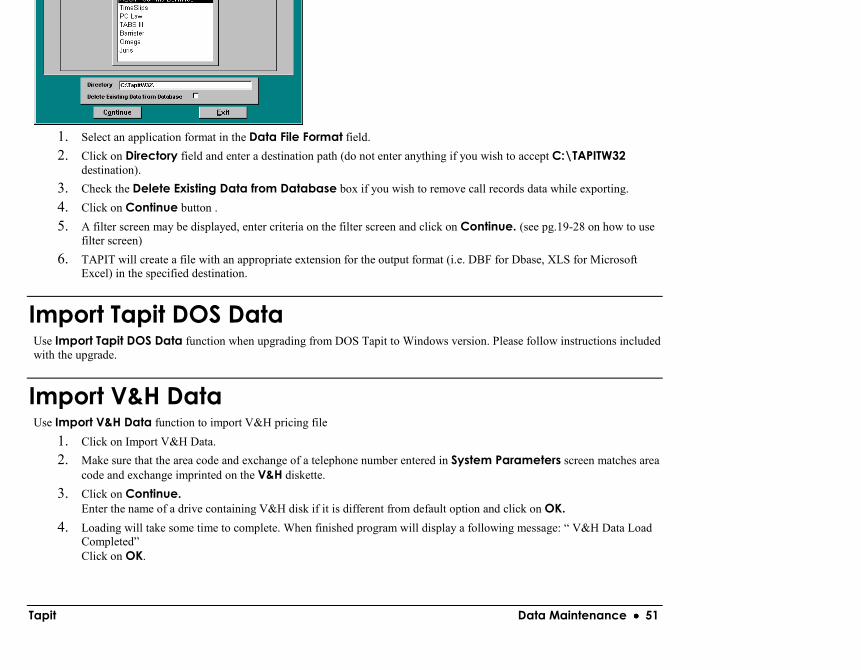
Tapit Data Maintenance •••• 51
1. Select an application format in the Data File Format field.2. Click on Directory field and enter a destination path (do not enter anything if you wish to accept C:\TAPITW32
destination).3. Check the Delete Existing Data from Database box if you wish to remove call records data while exporting.4. Click on Continue button .5. A filter screen may be displayed, enter criteria on the filter screen and click on Continue. (see pg.19-28 on how to use
filter screen)6. TAPIT will create a file with an appropriate extension for the output format (i.e. DBF for Dbase, XLS for Microsoft
Excel) in the specified destination.
Import Tapit DOS DataUse Import Tapit DOS Data function when upgrading from DOS Tapit to Windows version. Please follow instructions includedwith the upgrade.
Import V&H DataUse Import V&H Data function to import V&H pricing file
1. Click on Import V&H Data.2. Make sure that the area code and exchange of a telephone number entered in System Parameters screen matches area
code and exchange imprinted on the V&H diskette.3. Click on Continue.
Enter the name of a drive containing V&H disk if it is different from default option and click on OK.4. Loading will take some time to complete. When finished program will display a following message: “ V&H Data Load
Completed”Click on OK.

52 •••• Report Designer Tapit
Report Designer screen will allow you to create your own custom detail or summary reports.Click on the System Maintenance icon on the Main Menu and then click on the Report Designer icon.
Creating a new detail report1. Click on New button.2. Select a primary sort sequence (Date is a default) by clicking on the appropriate field in the Primary Sort Sequence
box.3. Click in the Order box on either Ascending or Descending to choose whether sort is to be ascending or
descending.4. Check the Page Break box if you wish to have a page break inserted after each field that has been selected as a
primary sort sequence.5. Select a secondary sort sequence by clicking on the appropriate field in the Secondary Sort Sequence box.6. Click in the Order box on either Ascending or Descending to select whether secondary sort is to be ascending or
descending.Check Subtotal box if you want to see secondary field to be subtotaled.
7. Available Fields box lists all fields available for the reports.Click on the field name to be included on the report and click on the right arrow to move field to Chosen Fields box(you may also double click the field name to add it to the list ).You can select as many fields as you wish (Page may print landscape in order to fit wide reports. Please note that theorder of selection is reflected in the order of columns on the report).If you make a mistake click on the field name in the Chosen Field box and click on the left arrow to remove a fieldfrom the Chosen Fields list (you may also double click the field name to remove it from the list).
8. Click on Save button.
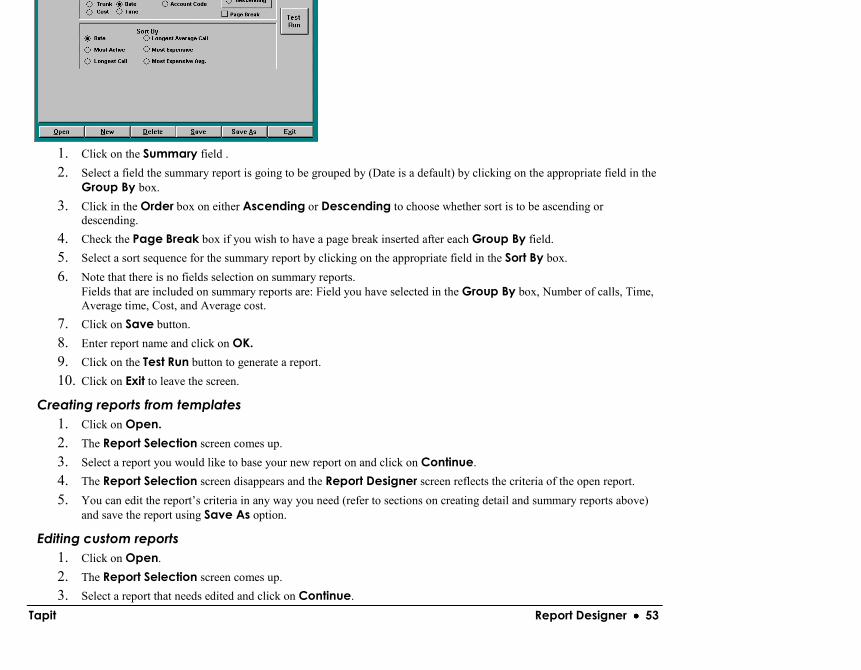
Tapit Report Designer •••• 53
1. Click on the Summary field .2. Select a field the summary report is going to be grouped by (Date is a default) by clicking on the appropriate field in the
Group By box.3. Click in the Order box on either Ascending or Descending to choose whether sort is to be ascending or
descending.4. Check the Page Break box if you wish to have a page break inserted after each Group By field.5. Select a sort sequence for the summary report by clicking on the appropriate field in the Sort By box.6. Note that there is no fields selection on summary reports.
Fields that are included on summary reports are: Field you have selected in the Group By box, Number of calls, Time,Average time, Cost, and Average cost.
7. Click on Save button.8. Enter report name and click on OK.9. Click on the Test Run button to generate a report.10. Click on Exit to leave the screen.
Creating reports from templates1. Click on Open.2. The Report Selection screen comes up.3. Select a report you would like to base your new report on and click on Continue.4. The Report Selection screen disappears and the Report Designer screen reflects the criteria of the open report.5. You can edit the report’s criteria in any way you need (refer to sections on creating detail and summary reports above)
and save the report using Save As option.
Editing custom reports1. Click on Open.2. The Report Selection screen comes up.3. Select a report that needs edited and click on Continue.
54 •••• Report Designer Tapit
Deleting existing custom reports1. Click on Open button.
Report Selection screen appears.2. Click on the report you wish to delete and click on OK button.3. Click on Delete button.
Note that Standard TAPIT Reports cannot be modified or deleted.
4. Click on Exit to leave the screen..

Tapit Fraud Alert •••• 55
Fraud Alert will notify you of unusual activity on the phone system according to the parameters specified.
TAPIT MUST BE RUNNING (EVEN MINIMIZED) IN ORDER FOR FRAUD ALERT TO WORK.
Click on the Maintenance icon on the Main Menu and then click on the Fraud Alert icon.
Fraud Alert will slow down your processing speed
ParametersThis facility allows you to define the parameters that will control Fraud Alert.To access Parameters click on the Parameters icon.
Fraud Alert will not function if the parameters are NOT defined or are not properly defined!
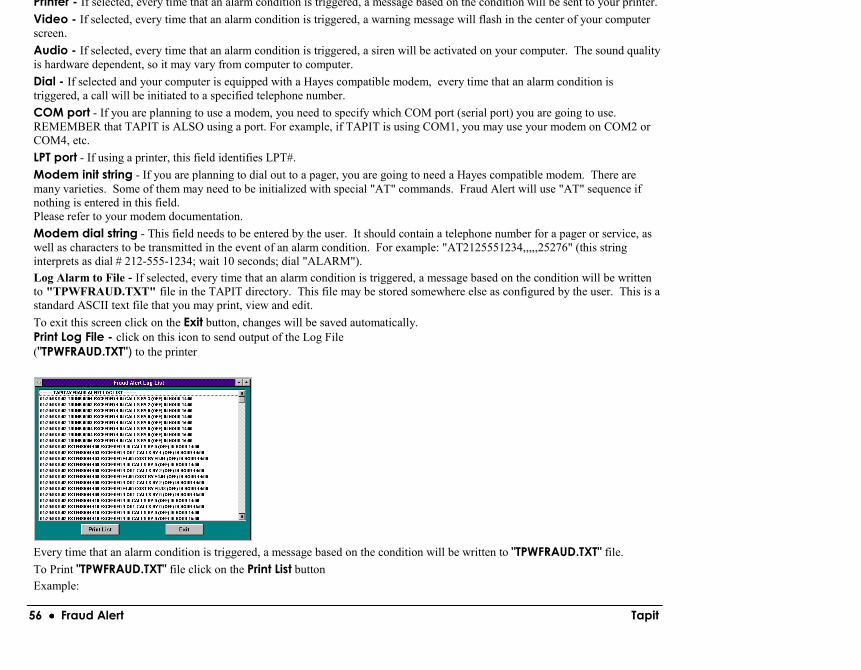
56 •••• Fraud Alert Tapit
Printer - If selected, every time that an alarm condition is triggered, a message based on the condition will be sent to your printer.Video - If selected, every time that an alarm condition is triggered, a warning message will flash in the center of your computerscreen.Audio - If selected, every time that an alarm condition is triggered, a siren will be activated on your computer. The sound qualityis hardware dependent, so it may vary from computer to computer.Dial - If selected and your computer is equipped with a Hayes compatible modem, every time that an alarm condition istriggered, a call will be initiated to a specified telephone number.COM port - If you are planning to use a modem, you need to specify which COM port (serial port) you are going to use.REMEMBER that TAPIT is ALSO using a port. For example, if TAPIT is using COM1, you may use your modem on COM2 orCOM4, etc.LPT port - If using a printer, this field identifies LPT#.Modem init string - If you are planning to dial out to a pager, you are going to need a Hayes compatible modem. There aremany varieties. Some of them may need to be initialized with special "AT" commands. Fraud Alert will use "AT" sequence ifnothing is entered in this field.Please refer to your modem documentation.Modem dial string - This field needs to be entered by the user. It should contain a telephone number for a pager or service, aswell as characters to be transmitted in the event of an alarm condition. For example: "AT2125551234,,,,,25276" (this stringinterprets as dial # 212-555-1234; wait 10 seconds; dial "ALARM").Log Alarm to File - If selected, every time that an alarm condition is triggered, a message based on the condition will be writtento "TPWFRAUD.TXT" file in the TAPIT directory. This file may be stored somewhere else as configured by the user. This is astandard ASCII text file that you may print, view and edit.To exit this screen click on the Exit button, changes will be saved automatically.Print Log File - click on this icon to send output of the Log File("TPWFRAUD.TXT") to the printer
Every time that an alarm condition is triggered, a message based on the condition will be written to "TPWFRAUD.TXT" file.To Print "TPWFRAUD.TXT" file click on the Print List buttonExample:

Tapit Fraud Alert •••• 57
advisable to delete this file periodically.Click on the Delete Log File button to delete "TPWFRAUD.TXT"
Test AlarmsAs we have mentioned earlier, there are several "alarms" available to you. They are defined on the Fraud Alert Parameters screen.To get a good feel for what they are, you may want to try them out first before using them. Also, if you plan to use a modem todial out to a pager in the event of Toll Fraud, you can test that process with this facility.Click on the Test Alarms button to test alarms
TrunksThis facility allows you to specify a condition for a particular Trunk which, if met, will trigger an alarm (please see "Alarm"section). You can use TAPIT Call Accounting software to get a feel for your normal Trunk activity prior to setting up theseconditions.
You may define several conditions for each trunk. Depending on the type of business you are in, there is an acceptable number ofcalls (incoming and outgoing) as well as the cost that occurs on a trunk during any particular hour (please remember the differencebetween work-hours and off-hours).The following is a description of fields that are available to you:Trunk - 4-character identification of a trunk (you should run TAPIT's Summary By Trunk report to see some valid Trunk IDs).Trunk Type - up to 30 characters describing a trunk (i.e. CO, TIE, FX, WATS, etc.). This field is optional.

58 •••• Fraud Alert Tapit
Hourly call volume exceeds - this number will set a number of calls that can be made on the trunk before an alarm istriggered, a different number can be used for work and off hours.
For Number of calls "0" value is valid. It will not trigger an alarm condition for that particular entry.
With call length Over/Under - this option will set duration for each call that is allowed to be made on the trunk before analarm is triggered.Hourly call cost exceeds - alarm will be triggered if specified amount of cost is exceeded during the work and off hoursregardless of number of calls made
Adding new trunk recordClick on New button and type in the desired information for a Trunk
Editing and retrieving existing trunk recordsClick on the arrow pointing down and select a Trunk from the drop down list. Type new or overwrite existing settings.
Deleting trunk recordsRetrieve an existing Trunk record and click on Delete buttonClick on Exit to leave Fraud Trunk Configuration screen
ExtensionsThis facility allows you to specify a condition for a particular Extension which, if met, will trigger an alarm (please see "Alarm"section). You can use TAPIT Call Accounting software to get a feel for your normal Extension activity prior to setting up theseconditions.
Following is the description of fields that are available to you:From Extension - 4-digit identification of this extension (it may be helpful to run TAPIT's Summary by Extension report to seesome valid Extensions).To Extension - when creating or deleting a range of Extensions, this field will contain the "To" Extension.

Tapit Fraud Alert •••• 59
Outgoing Calls - Alert ConditionsHourly call volume exceeds - this number will set a number of calls that can be made by a single extension or each extensionin the range before an alarm is triggered, a different number can be used for work and off hours.
For Number of calls "0" value is valid. It will not trigger an alarm condition for that particular entry.
With call length Over/Under - this option will set duration for each call that is allowed to be made by a single extension oreach extension in the range before an alarm is triggered.Hourly call cost exceeds - alarm will be triggered if specified amount of cost is exceeded during the work and off hoursregardless of number of calls made.
Adding new extension recordClick on New button and type in the desired information for an Extension or an Extension Range.
Editing and retrieving existing extension recordsClick on the arrow pointing down and select an Extension or Extension Range from the drop down list. Type new or overwriteexisting settings.
Deleting extension recordsRetrieve an existing Extension or Extension Range record and click on Delete button.Click on Exit to leave Fraud Alert Extension Configuration screen.
Dialed NumbersThis facility allows you to specify which Outgoing calls will trigger an alarm (please see "Alarm" section).
Depending on your type of business, you may be concerned with excessive international or long distance calls, or you may beinterested in monitoring calls to a particular Area Code, Country, or even a local exchange. Here you may set conditions for aparticular telephone number. For example, if you specify "411”, this entry will be processed EVERY time when someone dialsInformation. You can also specify an area code separately, such as “800” or “900” calls.You may define several conditions for each number dialed. You should know the acceptable number of outgoing calls as well asthe cost that occurs during any particular hour (please remember the difference between work-hours and off-hours).Following is the description of fields that are available to you:

60 •••• Fraud Alert Tapit
Hourly call cost exceeds - alarm will be triggered if specified amount of cost is exceeded during the work and off hoursregardless of number of calls made.
Adding new Number Dialed recordClick on New button and type in the desired information for a telephone number.
Editing and retrieving existing Number Dialed recordsClick on the arrow pointing down and select a Number Dialed record from the drop down list. Type new or overwrite existingsettings.
Deleting Number Dialed recordsRetrieve a Number Dialed record and click on Delete button.Click on Exit to leave Fraud Alert Extension Configuration screen.
Note that making a change on any of the configuration screens will cause the system to reset all thecounters for Fraud Alert.

Tapit Database Repair Utility •••• 61
Occasionally database may get damaged or corrupted. The most common reason for this type of situation is either a power outageor user action of shutting computer down when application is still open.TAPIT ships with a utility that will try to repair databases that were not closed properly.If you start getting error messages related to databases or if advised by our technical support staff:
1. Exit from TAPIT application.2. Run Scandisk.3. Go to Start\Tapit 2000\Tapit Repair.
Carefully read the message on your screen. If you are ready to run a repair utility click on OK.Tapit 2000 Repair Utility Screen appears.
It displays your system’s information.Click on Repair Database button.TAPIT will attempt to repair your database file. It will notify you with a message if the process has been successful.Restore Files button allows you to replace damaged files with backup files.When advised by Tech Support you can restore application files or database files using the above utility. To prevent data loss bevery careful and follow all TAPIT messages guiding you through the process.

62 •••• Database Repair Utility Tapit
Restoring damaged file:1. Check or uncheck the Restore from Default Backup Folders check box depending on what folder contains the
backup file.2. Select file you would like to restore from Select file to restore: list by clicking on it.
The correct path for both damaged and backup files will appear in text boxes below.If Repair Utility cannot locate the file it will notify you with a message and you will have to enter the correct pathmanually.
3. Click on Restore button.Try to recreate the problem when repairing is completed.

Tapit SMDR Monitor •••• 63
SMDR Monitor is a communication program that collects SMDR information generated by the PBX. It can also display theSMDR information on the screen of your computer in real time in the raw format.SMDR Monitor command line is added to the Microsoft Windows WIN.INI file Load statement, so every time MicrosoftWindows is started SMDR Monitor is loaded minimized and is ready to collect call records data.SMDR Monitor must be running in order for TAPIT to collect call activity information.To view SMDR data in real time double-click on SMDR Monitor minimized icon.SMDR Monitor screen is displayed.
SMDR Monitor Menu Options:Action
Connect - will allow you to connect to a specified serial port (see Settings).Disconnect - will allow you to disconnect from a specified serial port.Flush - will dump any SMDR data that may be currently in SMDR Monitor buffer.Print - will print a content of current screen.Exit - will exit program. TAPIT will stop collecting data.

64 •••• SMDR Monitor Tapit
Tapit COM Port Options1. Port - Click on the down arrow icon in the Port field to select a port on the computer the SMDR cable is connected to.2. Baud Rate - Click on the down arrow icon in the Baud Rate field to select a transmission speed the phone system
is set at.3. Data Bits - Click on the down arrow icon in the Data Bits field to select a data bits setting of the phone system.4. Parity - Click on the down arrow icon in the Parity field to select a parity setting of the phone system.5. Stop Bits - Click on the down arrow icon in the Stop Bits field to select a stop bits setting of the phone system.6. Flow Ctrl. - Check an appropriate box to select a flow control parameter that may be required by the PBX (refer to
PBX’s documentation).7. Com Buffer Size - a number of characters SMDR Monitor will hold in the memory buffer before saving data to the
hard disk of the computer (recommended setting is 80).
Control Options1. Write Log File TELMSG.DAT - check this box if you wish TAPIT to save a raw SMDR information in the separate file
(TELMSG.DAT in directory where TAPIT’s files reside).2. Display Errors - Check this box if you wish TAPIT to display communication errors in the SMDR Monitor window.3. Always on top - check this if you wish SMDR Monitor icon or window to be always on the foreground of the
desktop.
Display Options1. Autowrap - some PBX SMDR string is longer than can fit on the screen, check this option to force the string to wrap
to the next string when the right edge of the SMDR Monitor window is reached.2. Add Line Feed - Check this box if you wish to have a blank line inserted between SMDR call records (it may improve
readability of SMDR records displayed on the SMDR Monitor).
PBX
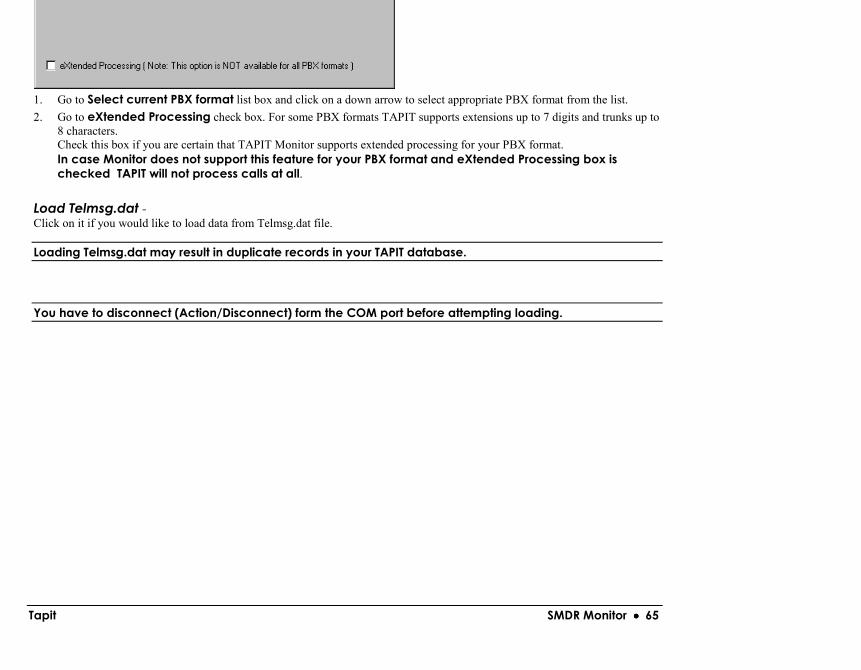
Tapit SMDR Monitor •••• 65
1. Go to Select current PBX format list box and click on a down arrow to select appropriate PBX format from the list.2. Go to eXtended Processing check box. For some PBX formats TAPIT supports extensions up to 7 digits and trunks up to
8 characters.Check this box if you are certain that TAPIT Monitor supports extended processing for your PBX format.In case Monitor does not support this feature for your PBX format and eXtended Processing box ischecked TAPIT will not process calls at all.
Load Telmsg.dat -Click on it if you would like to load data from Telmsg.dat file.
Loading Telmsg.dat may result in duplicate records in your TAPIT database.
You have to disconnect (Action/Disconnect) form the COM port before attempting loading.

66 •••• Software License Agreement Tapit
Software License AgreementTO PERSONS WHO PURCHASE OR USE THIS SOFTWARE:Carefully read all the terms and conditions of this agreement before opening this package. Opening of this package indicates youracceptance of the terms and conditions of this License Agreement.Parties. The Licenser is TRISYS, INC.215 Ridgedale Avenue, Florham Park, NJ 07932, and you are the Licensee.1. Grant of License.The Licensor grants to the Licensee a non-transferable, non-exclusive, non-assignable license to use the copyright materials andprograms as set forth herein for the purposes stated herein, and none other. The licensed program materials are identified as"TAPIT".2. Identification of Materials Subject to the License.The copyright materials and programs are identified as the "program materials", and include the program diskette and thedocumentation manual.3. Modification of the Program(s).Licensee may not alter, amend, change or otherwise modify the program, and any such change voids the license effective as of thedate of the licensee's first receipt of the program materials.4. No Copying Allowed.All program materials have been provided to the Licensee upon the strict condition that they may not be copied. The programmaterials have been provided to the Licensee upon the strict condition that they may not be distributed or modified in any waywithout the prior written approval of the Licensor. Any copies other than as set forth herein are illegal, and will cause the Licenseto be breached automatically.5. Ownership of the Program.Licensee acknowledges that the program materials identified herein are and remain the sole and exclusive property of theLicensor. The program materials may not be resold, given or otherwise transmitted by the Licensee to any other third party orparties, or reused by the Licensee in any other application without the express written consent of the Licensor.LICENSEE MAY NOT COPY, MODIFY, TRANSFER OR TRANSLATE THE PROGRAMS OR RELATEDDOCUMENTATION EXCEPT AS EXPRESSLY PROVIDED FOR IN THIS AGREEMENT.6. Copyright.The program materials are copyrighted. All other copies of the programs and their related documentation in the possession of theLicensee are in violation of this license, and Licensee agrees to destroy them, and/or allow the Licensor to destroy them if theLicensee is unable or unwilling to do so.7. Warranty.Licensor warrants that TAPIT will substantially conform to its current published specifications when installed and will be free ofdefects that substantially affect system performance.Licensor will correct substantial software errors at no charge, provided the Licensee returns complete TAPIT with a dated proof ofpurchase to Licensor within 3 years of delivery. These are the sole remedies for any breach of warranty.Licensee agrees that Licensor’s liability arising out of contract, negligence, strict liability in tort or warranty shall not exceed thethen existing dealer's cost of TAPIT at the time of the claim or the purchase, whichever is less.
Tapit Software License Agreement •••• 67
8. Governing Law.This Agreement shall be governed by the laws of the State of New Jersey, and of the United States, where applicable, and shallinure to the benefit the Licensor, its successors, administrators, heirs and assigns.9. Remedy - Limitation of Damages.The Licensee's obligations under this License are of a special and unique character which gives them a particular value, and theLicensor cannot be reasonably or adequately compensated in damages in an action at law in the event of the Licensee's breach ofthis License. Therefore, the Licensee expressly agrees that the Licensor shall be entitled to injunctive and other equitable relief inthe event of such breach or threatened breach in addition to any other rights or remedies which the Licensor may possess.Licensor’s entire obligation, and Licensee's exclusive remedy shall be the replacement by the Licensor of the diskette and/orbackup diskette supplied, if defective in materials or workmanship.IN NO EVENT SHALL THE LICENSER BE LIABLE FOR DIRECT, INDIRECT, INCIDENTAL, CONSEQUENTIAL ORSPECIAL DAMAGES ARISING OUT OF THIS LICENSE OR THE USE OR NON-USE OF THE PROGRAM MATERIALSOR THE EXISTENCE, FURNISHING, FUNCTIONING OR THE USE BY THE LICENSEE OF THE PROGRAMMATERIALS, AS LICENSED HEREIN.The Licensee agrees that the Licensor’s liability arising out of strict liability, negligence, tort or warranty shall not exceed anyamounts paid by the Licensee for the program materials.10. Indemnification.Licensor, at its own expense, will defend the Licensee in any action brought against same to the extent that said action is based ona claim of infringement against a patent, copyright or any other property right pertaining to the program materials. Licensorreserves the right to control the defense of any such claim, lawsuit or other proceeding. In no event shall the Licensee settle anyclaim, lawsuit or proceeding without the prior written consent of the Licensor.11. Supersedes All Prior Agreements.This license supersedes all prior understandings and agreements by and between the Licensor and Licensee related to the subjectmatter hereof, and is intended to be the exclusive and complete statement of the parties of the terms of this license.BY USING THIS SOFTWARE YOU SPECIFICALLY AND EXPRESSLY CONSENT TO THIS LICENSE AGREEMENT

68 •••• Technical Support Tapit
Free Technical Support is available, by calling 973.360.2300 to all registered users of TAPIT for 30 days from the date of thefirst call. Extended Technical Support plan is available, please contact your dealer or Trisys, Inc. for details.
Trisys, Inc.215 Ridgedale AvenueFlorham Park, NJ 07932
Our Fax on Demand option can provide you with answers to many common tech support questions. You can reach Fax onDemand by dialing973.360.2121.
Visit also Trisys Web site http:\\www.trisys.com when looking for help in troubleshooting your software.When calling Technical Support please have the following information ready in order to expedite your call.
• Serial number of the TAPIT software.• Version number.• Com Port Settings.• Cable specifics for PBX Connection (start to finish cable type/any adapters?).• PBX type (name and model).• Computer specs - your processor type and speed.• The amount of free disk space.• The amount of RAM.
TroubleshootingUnable to get the report to display on screenTAPIT program gets all of its printing capabilities from the printer setup within windows. In order for the report to come up to thescreen there must be a print driver installed and a default printer selected.
The monitor is not getting any SMDR Data1. Configure HyperTerminal session using TAPIT settings. SMDR Monitor has to be turned off at that time.2. Check the pin outs - DB-25 connector (3=receiving, 7=ground), DB-9 connector (2=receiving, 5=ground).3. The cable may not be functioning.4. The COM ports may be damaged.5. The PBX is not actually outputting the SMDR.
Error 3040 - "Disk I/O error" or "Disk I/O error during read".TAPIT is having difficulty putting data to the hard drive or getting data from it. This error is common to Windows and is mostoften caused by a misreporting of file size by the operating system. This can be corrected by running a Scandisk.

Tapit Technical Support •••• 69
reinstallation of the software when the proper sequence wasn't followed.1. Close all applications and restart the computer.2. Following restart run Scandisk including surface scan (Thorough Scandisk in Win95/98).3. Run Repair Database utility located in the TAPIT program group.
"NPA Summary"NPA stands for Numbering Plan Administration and this is an example of an Area Code being recognized by TAPIT but theExchange is unknown. The Exchange was most likely created after this version of TAPIT was released. Contact your vendorabout a City/State Update.
Error 3075 - Tapit 2000It mentions an illegal function but the program still loads.This error shows that some other program or your operating system has loaded newer common files than TAPIT 2000 wasexpecting. Please visit our web site www.trisys.com. Go to Tech Support and select Product Update Downloads. Click on TAPIT2000 and download the Tapitapp.bak file for your installation ( it is available as a single file or ziped in multidisk format). It willneed to be installed on each machine running TAPIT 2000 in multi-user environments. If you have any further questions pleasecontact Trisys Tech Support at 973 360 2300.
Error 3197 - "Data has changed - Operation Stopped"This message appears following a failed upgrade, an upgrade by incorrect methods, or in limited cases - data corruption. Thecorrective action is completely dependent on the cause. Please contact our technical support at 973.360.2300.
Error Message “CONNECTION FAILED” when Monitor opensThe following message will appear when SMDR Monitor is opened, if there is a conflict with that comport (any other program orhardware device using that comport); or you have selected a comport that is not in your computer
Monitor shows gibberish for call recordsDo you see gibberish (symbols, not clear readable records) across the screen when you receive a call record?You need to double-check your parameters. Gibberish across the screen means that the Parity, Stop Bits, Data Bits, or BaudRate are not matched with what the PBX is sending out. Again go to Action and select disconnect and then go to Settings andselect the proper parameters.DO NOT CHANGE THE COMPORT SETTING!!!If you are still getting gibberish across the screen contact your PBX manufacturer for proper settings, or have the COM portchecked for proper operation.
Error 2202 There is no default printer.TAPIT cannot create reports or print to file without the use of your computers print drivers.
1. Go to Control Panel.2. Select Printers.3. Select a default printer or install one.

70 •••• Technical Support Tapit
2. Select Data Maintenance.3. Select Call Records Maintenance.4. Select Export and Remove Calls.5. Enter the correct archive drive (normally d: which is your zip drive) and directory (root directory is ok). Example: d:\.6. Enter file name (april.txt).7. Click on Continue.8. Enter the correct dates in the filter screen (04/01/1998 – 04/30/1998).9. Click on Continue.10. After the process is complete, exit TAPIT program (only SMDR Monitor should be running).11. Run scandisk utility on drive c:.12. Run Database Repair.13. Run defrag utility on drive c:.14. Restart the computer.
To Prevent Data Loss1. Consider installing an uninterrupted power supply (UPS) for the computer running TAPIT 2000.2. Close TAPIT 2000 during non-business hours.3. Backup all user/client data following initial input and periodically after changes/updates are done.4. Close program and restart MS Windows on a periodic basis to refresh system resources and update operating system to
current file statistics. Suggested every 1-2 weeks of operation.5. “Export and Keep” call records on a regular basis to provide backup in the event of system failure.6. “Export and Remove” call records that are not needed in the current, active database. These records can be imported
back into the active database if reporting or research needs to be done.7. Copy Exported calls files to floppy to allow for system rebuild in the event of a hard drive failure.8. Run Repair Database after each “Export and Remove” session to compress database and return available space to the
hard drive.9. Run Thorough Scandisk on monthly, or more frequent, basis to advise on system storage integrity.10. Run Defrag to improve system speed and efficiency.

Tapit Index •••• 71
Before installing your software 2
CCall Editor 38Clients 20
Add a new client 20Edit or delete a client 20Print Clients List 21
Custom Reports 52
DData Maintenance 48
Call Records Maintenance 49Export 48Export to Billing Software 51Import 49Import Tapit DOS Data 51Import V&H Data 51
Database Repair Utility 61Departments 17
Add a new department 17Edit or delete a department 18Print departments list 18
Dialing patterns 44Add a dialing pattern 45Delete a dialing pattern 45Edit a dialing pattern 45
DOS Data 51
FFilter - reports 22Fraud Alert 55
Delete Log File 57Dialed numbers 59Extensions 58Parameters 55
Installing Tapit Multi-User 5Installing Tapit Single User 3Introduction 1
MMain Menu 14Monitor 63
Action 63PBX 64Settings 64
OOverview 15
PPricing
Add new pricing record 40Delete pricing record 40Find a specific record 40Special calls 40
Pricing Call Records 39
RRecosting 42
Using Custom option 42Using Tapit Carrier option 42Using V&H Carrier option 42
Reindexing 41Reinstalling TAPIT 2000 9Report Designer 52
Custom ReportsCreating reports from templates 53Delete an existing custom report 54Detail report 52Editing custom reports 53
72 •••• Index Tapit
SMDR Monitor 63Software License Agreement 66Statistics 29
Graphs 29For Date and Time 30For Date and Time - Detail 30For top 20 values 29
System Maintenance 31System Parameters 4, 32
Activity 34Call Costing 34Communications 32Destination 36Trunks 35
System Requirements 1
TTechnical Support 68Troubleshooting 68
UUpgrading TAPIT 2000 – different serial number 8Upgrading TAPIT 2000 – same serial number 8Upgrading TAPIT for DOS 11Upgrading TAPIT for Windows 9Users 15
Add a new user 16Edit or delete a user 16Print Hierarchy Tree 19Printing users list 16
VV&H Data - Import 51