wine tote
TRANSCRIPT

8/3/2019 Wine Tote
http://slidepdf.com/reader/full/wine-tote 1/8
Kathryn Goodman
½ yard of light to mid-weight cotton fabric for the exterior and handle•
½ yard of light to mid-weight cotton in a coordinating fabric for the interior and handle•
lining (This pattern can also be made from 2 coordinating fat quarters)
½ yard of insulated batting, such as Insul-Brite•
1 spool of coordinating thread•
Wine Tote
Scissors or rotary cutter•
Yardstick or long straight-edge ruler at least 18” in length•
Straight pins•
Fabric marker or chalk•
Turning tool or wooden chopstick•
Blind hem/edge foot (helpful, but not required)•
Note: Wash and iron fabrics before cutting. Use 1/2" seam allowance throughout unless otherwisestated. Seam allowance is included in pattern measurements.

8/3/2019 Wine Tote
http://slidepdf.com/reader/full/wine-tote 2/8
1. Cut a 15" square from each of thefabrics and the batting. Cut a rectangle
3” x 10” from each of the fabrics (there
is no need to cut a strip of batting).
2. Baste the insulated batting to the
exterior fabric:
Place the batting panel onto the wrong
side of the exterior fabric piece. Pin into
place. Machine baste ¼” away fromedges around the entire fabric piece.
Press lightly with a steam iron from the
fabric side of the basted panel.
Cutting
3. Construct the tote handle:
Place the right sides of the tote handle and
fabric strips together, sew together along
one long edge. Press the seam open.
Sewing

8/3/2019 Wine Tote
http://slidepdf.com/reader/full/wine-tote 3/8
5. Fold the wrong sides of the handle
together along the seam line. Press
and pin into place.
4. Next, fold the opposite long edges inby ½” and press.
6. Edge stitch along each long edge. (If
you have a blind hem/edge foot for your
sewing machine, use it now—it makesfor a super-neat finish! If you don’t have
one, just stitch about ¹⁄₈” away from
the edge.) Now add two more rows of
stitching, each ¼” away from the rows of
stitching along the edge. Set wine tote
handle aside.
8/3/2019 Wine Tote
http://slidepdf.com/reader/full/wine-tote 4/8
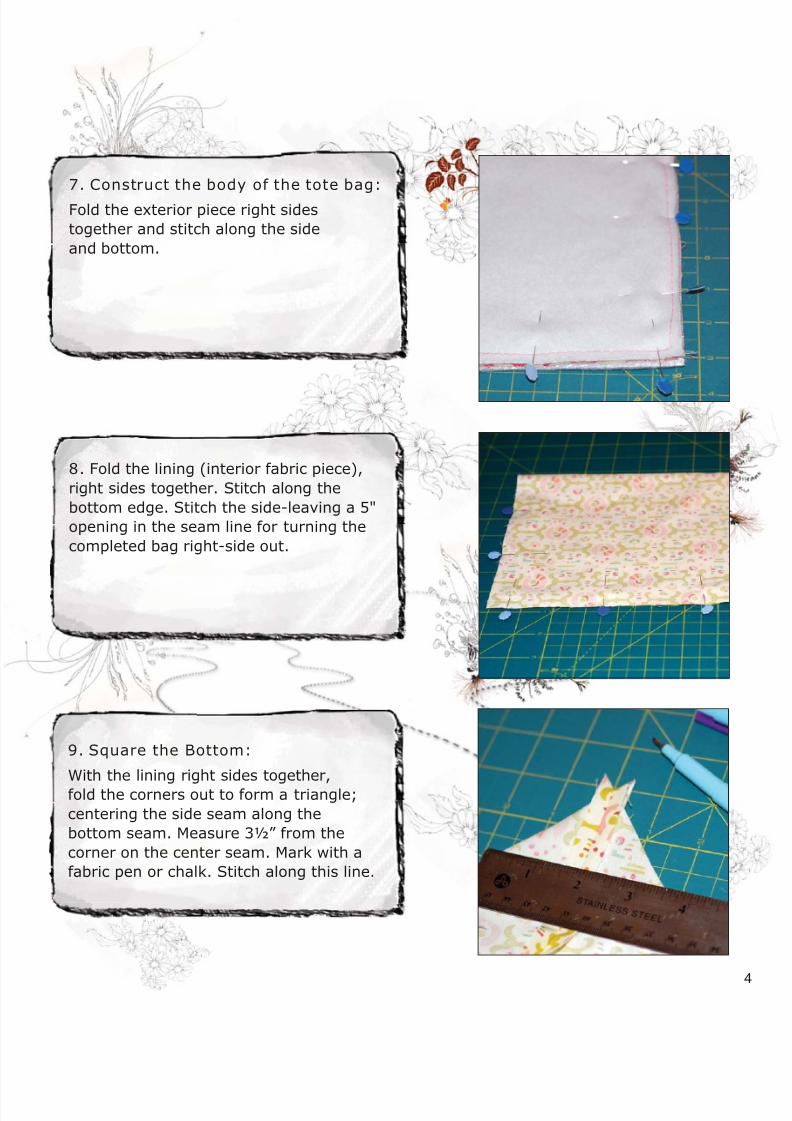
7. Construct the body of the tote bag:
Fold the exterior piece right sides
together and stitch along the side
and bottom.
8. Fold the lining (interior fabric piece),
right sides together. Stitch along the
bottom edge. Stitch the side-leaving a 5"
opening in the seam line for turning the
completed bag right-side out.
9. Square the Bottom:
With the lining right sides together,
fold the corners out to form a triangle;
centering the side seam along the
bottom seam. Measure 3½” from the
corner on the center seam. Mark with a
fabric pen or chalk. Stitch along this line.

8/3/2019 Wine Tote
http://slidepdf.com/reader/full/wine-tote 5/8
10. Trim seam line to ¼”. Turn bag right
side out, gently pushing the corners out
with the turning tool. Set aside.
11. Repeat the previous two steps on
the exterior bag section.
12. Attach the tote handle to the
exterior of the bag:
Center one end of the handle over the
exterior bag seam and pin into place.
8/3/2019 Wine Tote
http://slidepdf.com/reader/full/wine-tote 6/8
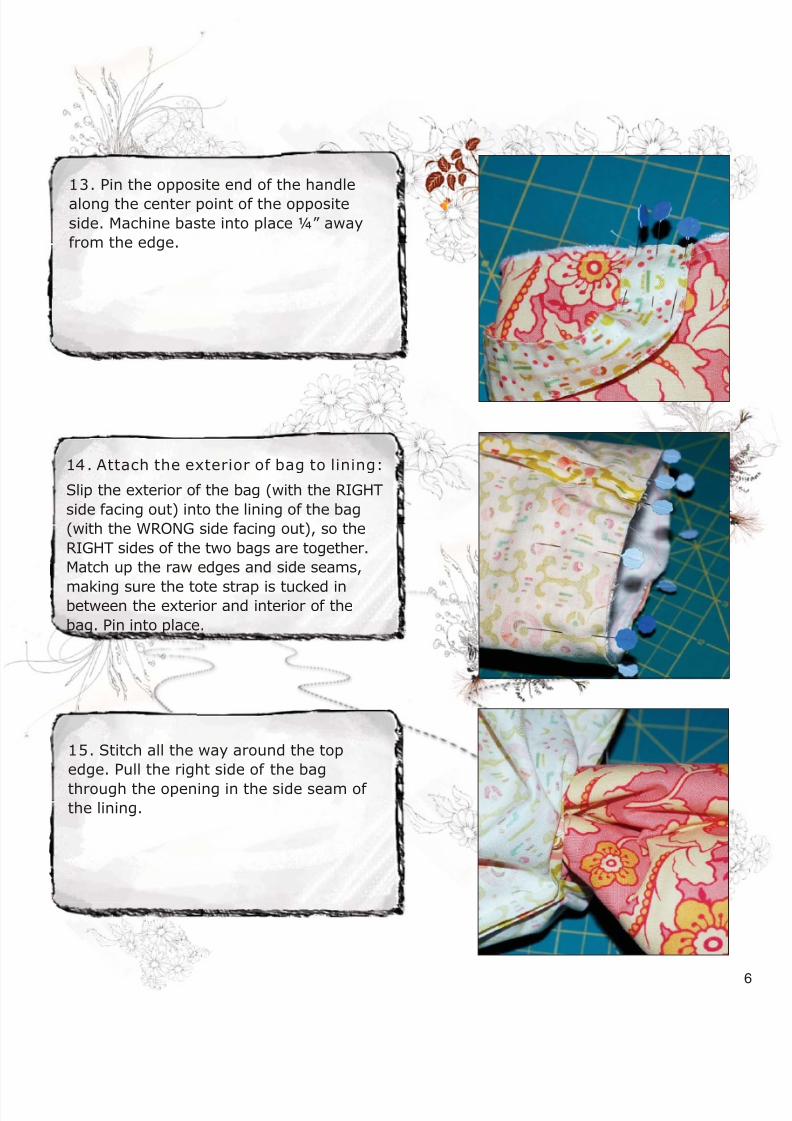
13. Pin the opposite end of the handle
along the center point of the opposite
side. Machine baste into place ¼” away
from the edge.
14. Attach the exterior of bag to lining:
Slip the exterior of the bag (with the RIGHT
side facing out) into the lining of the bag
(with the WRONG side facing out), so the
RIGHT sides of the two bags are together.
Match up the raw edges and side seams,
making sure the tote strap is tucked inbetween the exterior and interior of the
bag. Pin into place.
15. Stitch all the way around the top
edge. Pull the right side of the bag
through the opening in the side seam of the lining.

8/3/2019 Wine Tote
http://slidepdf.com/reader/full/wine-tote 7/8
16. Hand stitch the opening in the lining
closed. Now, slip the lining down into
the bag.
Finishing touches:
Press the bag along the top edge and
edge stitch along the top. Lightly press
the entire bag for a nice finished look!

8/3/2019 Wine Tote
http://slidepdf.com/reader/full/wine-tote 8/8