work breakdown structure planning in netpoint
TRANSCRIPT
PMATechnologies
ADD A WORK BREAKDOWN STRUCTURE
The new NetPoint WBS
PMATechnologies
BASICS OF A NETPOINT WBS Overview
2

PMATechnologies
WBS1. Cohesive hierarchy for project summary 2. Pending fix: Summary data of nodes and object 3. Allows multiple levels of subcategories/children4. Only assigned in WBS tab of the Codes Manager5. Assign objects to a single WBS node and multiple
subcategories/children6. Edit WBS properties and assignments at any time7. WBS automatically transfers to P6 (no option to
exclude WBS at transfer) 8. All project WBS info transfers from P6 9. WBS level colors for layout swim lanes aligned to
P6 default WBS colors10. Import WBS structure from xml via List menu11. Linked NPT excel reports do not apply to WBS
Codes 1. Codes are not necessarily related each other 2. No summary data based on codes available3. Only 1 level of sub-categories or “values”4. Assigned in property box, code manager, or SPFSO5. Only values can be assigned to activities, not codes
themselves6. Cannot edit code behavior once assigned7. Option to include as project code at export to P6,
excluded by default 8. Only assigned project-level codes import from P69. No referenced default color for layout swim lanes for
codes10. Codes do not import from xml 11. Define/assign in separate linked NPT excel reports
DIFFERENCES BETWEEN WBS VS CODES Overview
3
WBS & Codes: 1. May be assigned, defined, edited, and viewed in the Codes Manager 2. May be the basis to structure layouts into swim lanes via Layout Manager using Structure > Derive lanes from 3. Object selection in Manager list scrolls to/highlights the object on canvas (Turn off scrolling from List menu).

PMATechnologies
DEFINE A WBS
Overview
4

PMATechnologies
SOURCES & VIEWS OF A WBS
WBS Views, View Features, and Reports
Assignment View
This view is the location to define, organize, and edit WBS levels, and assign to objects. All elements & assignments may be edited at any time. NetPoint will also scroll to and highlight an object selected in the lower window.
Roll-upView
This view displays summaries of WBS levels based on: description, ID, start & finish dates, duration, resource cost, total cost, resource assigned, float values, grid number, # of assigned object, and object type. May also edit WBS here.
Modify & Sort Tables
Right click on the table headers in the WBS tab to edit displayed fields and drag and drop header fields to reorder in the tab lists or the expanded table view.
View & Export Tables
Right click on the header row for options to export the list or click the Export to Excel option to export the expanded table. Use the expand icon to see a larger pop-out of the list. Any column customization is lost at close of Codes Manager.
WBS Sources
Define WBS in NetPoint
A WBS is defined for each NetPoint plan in the WBS tab of the Codes Manager. Thisis the only location to define and assign a WBS in NetPoint.
Import WBS Import a WBS structure and assignments from xml, or import WBS from an xer
5
PMATechnologies
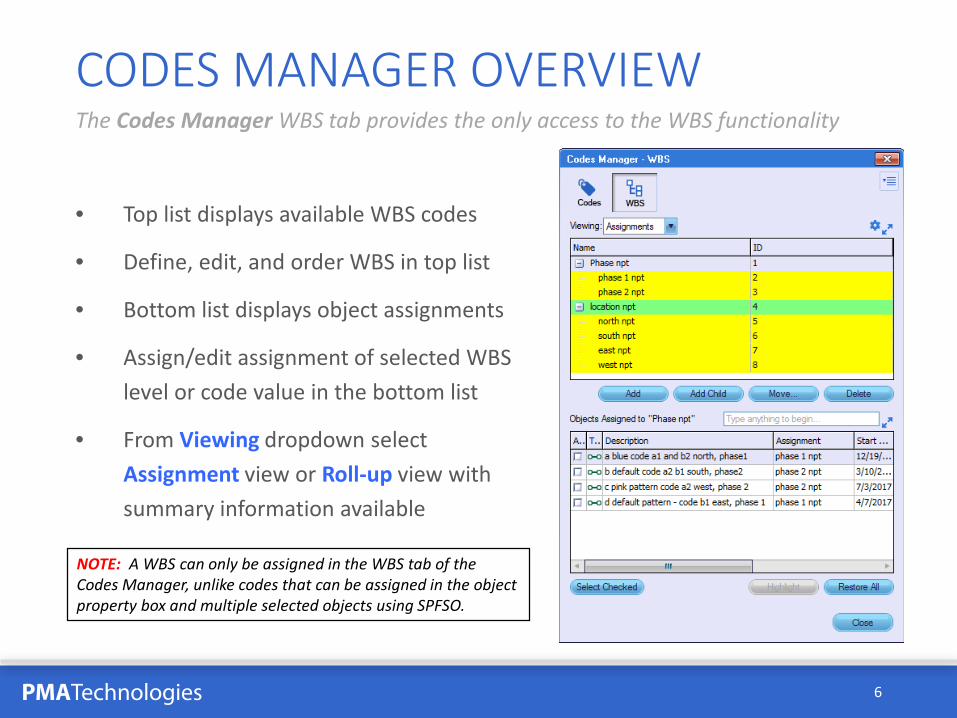
• Top list displays available WBS codes
• Define, edit, and order WBS in top list
• Bottom list displays object assignments
• Assign/edit assignment of selected WBS level or code value in the bottom list
• From Viewing dropdown select Assignment view or Roll-up view with summary information available
6
CODES MANAGER OVERVIEWThe Codes Manager WBS tab provides the only access to the WBS functionality
NOTE: A WBS can only be assigned in the WBS tab of the Codes Manager, unlike codes that can be assigned in the object property box and multiple selected objects using SPFSO.
PMATechnologies
Steps
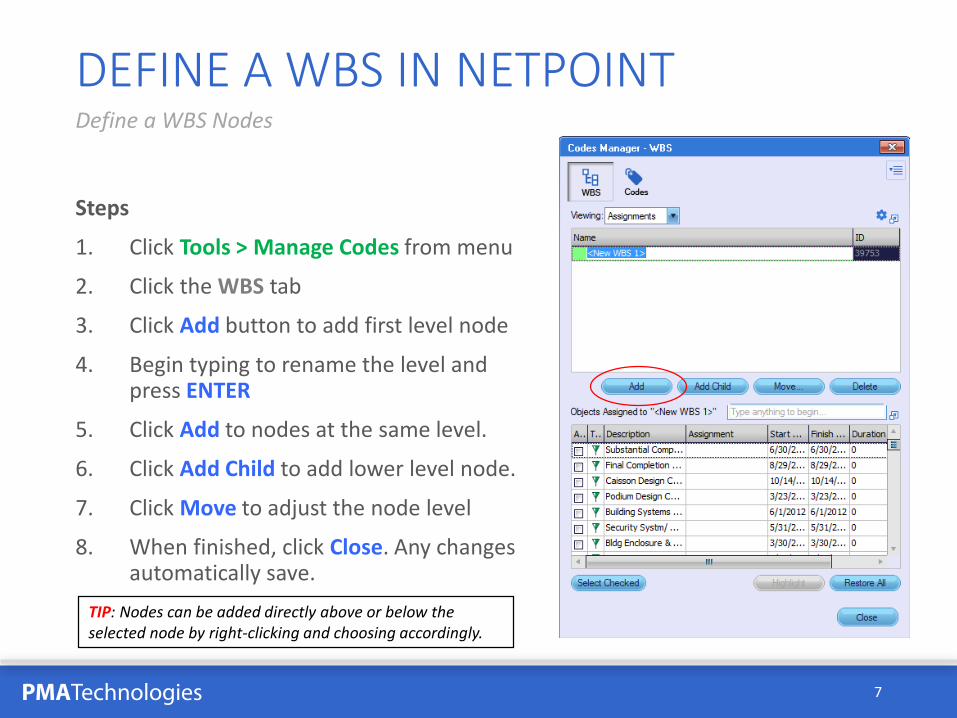
1. Click Tools > Manage Codes from menu
2. Click the WBS tab
3. Click Add button to add first level node
4. Begin typing to rename the level and press ENTER
5. Click Add to nodes at the same level.
6. Click Add Child to add lower level node.
7. Click Move to adjust the node level
8. When finished, click Close. Any changes automatically save.
7
DEFINE A WBS IN NETPOINTDefine a WBS Nodes
TIP: Nodes can be added directly above or below the selected node by right-clicking and choosing accordingly.
PMATechnologies
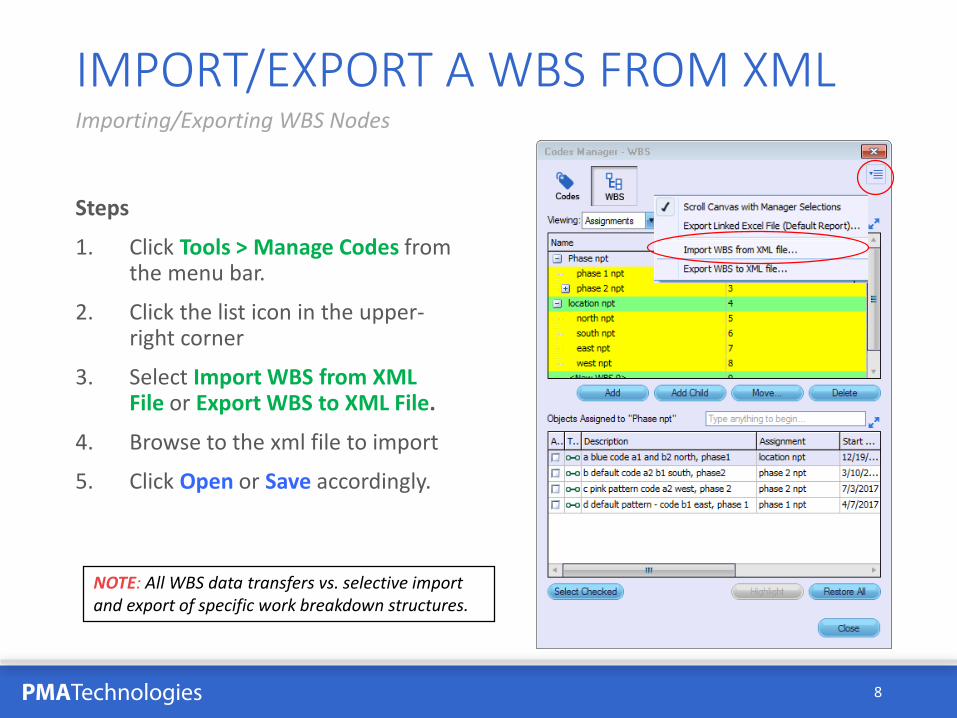
Steps
1. Click Tools > Manage Codes from the menu bar.
2. Click the list icon in the upper-right corner
3. Select Import WBS from XML File or Export WBS to XML File.
4. Browse to the xml file to import
5. Click Open or Save accordingly.
8
IMPORT/EXPORT A WBS FROM XML Importing/Exporting WBS Nodes
NOTE: All WBS data transfers vs. selective import and export of specific work breakdown structures.

PMATechnologies
Steps
1. Click Tools > Manage Codes from the menu bar.
2. Left-click on the node label.
3. Hold mouse click, drag up or down to see a red line with two arrows to indicate where it will be placed.
4. Release the mouse.
5. When finished, click Close. All changes automatically save.
9
REORDER WBS NODESReorder in same WBS level by drag and drop
NOTE: Nodes cannot be reordered to different parents or levels, only within the same level .

PMATechnologies
Steps
1. Click Tools > Manage Codes from the menu bar.
2. Left-click on the desired node.
3. Click the Move button
4. Choose In Level or Out Level accordingly
5. When finished, click Close. All changes save automatically.
10
CHANGE NODE LEVELS
TIP: A node and their children can be expanded and collapsed by right-click on a node box icon with at least 2 levels of children.
PMATechnologies
ASSIGN, VIEW THE WBS & LAYOUT BY WBS
11

PMATechnologies
Steps
1. Click Tools > Manage Codes from the menu bar.
2. Select node in top list.
3. In the bottom list, check or uncheck to objects.
4. Filter the bottom list using the Filter box above the list. Clear filter field to refresh list.
5. When finished, click Close. Any changes save automatically.
12
ASSIGN TO A WBS NODEIn Viewing > Assignments
TIP: To view a larger version, click the Expandicon above. Any customization of the columns is lost upon closing of the Codes Manager.

PMATechnologies
Steps
1. Click Tools > Manage Codes from menu.
2. In the WBS tab, go to Viewingdropdown select Roll-up.
Modify displayed fields
1. Right-click header row to see field list.
2. Check or uncheck fields to display.
3. Order by drag and drop of field labels in header row.
4. When finished, click Close.
13
VIEW THE WBS ROLL-UPSee summary data In Viewing > Roll-up
NOTE: Column customization of order and inclusion/ exclusion resets to default when Codes Manager is closed.

PMATechnologies 14
AVAILABLE FIELDS OF WBS ROLL-UP VIEW
Column Definition
Type An image representing the type of object.
Name The text field for describing the object.
ID The user-entered unique identifier.
Start Date The date and/or time the object begins.
Finish Date The date and/or time the object will be finished.
Duration The amount of time the activity takes to complete.
Resource Consumption The amount consumed of the chosen resource.
# Activities The number of activities assigned to the node.
Cost The cost according to the chosen resource.
Total Cost The cost across all resources.
Drift The amount of time the object can gain before advancing the start of the project.
Float The amount of time the object can be delayed before delaying project completion.
No summary data available, only object data
PMATechnologies
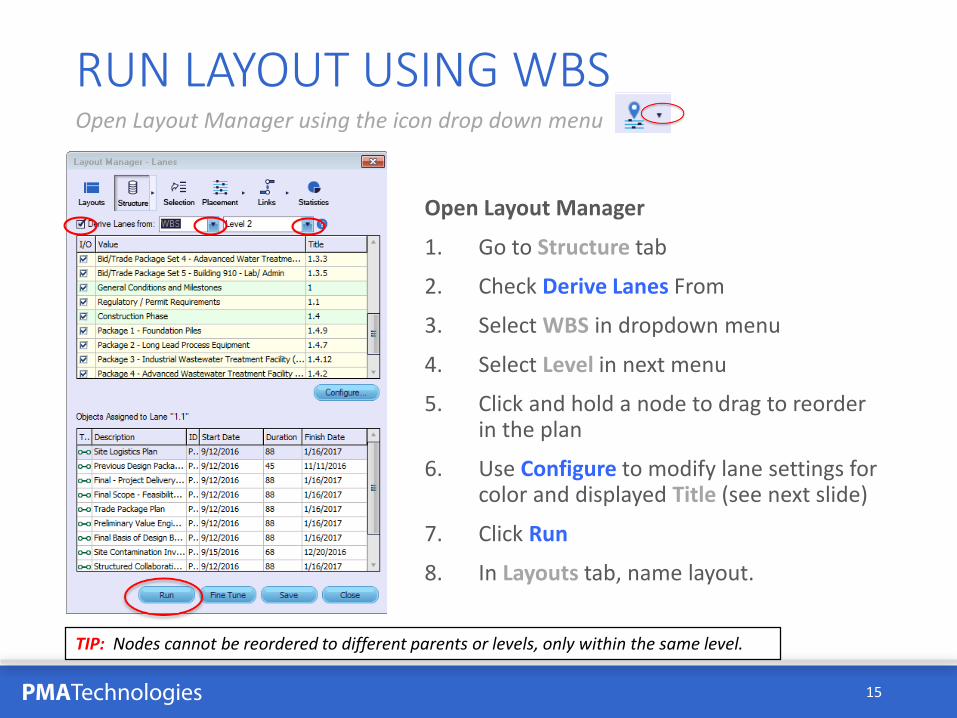
Open Layout Manager
1. Go to Structure tab
2. Check Derive Lanes From
3. Select WBS in dropdown menu
4. Select Level in next menu
5. Click and hold a node to drag to reorder in the plan
6. Use Configure to modify lane settings for color and displayed Title (see next slide)
7. Click Run
8. In Layouts tab, name layout.
15
RUN LAYOUT USING WBSOpen Layout Manager using the icon drop down menu
TIP: Nodes cannot be reordered to different parents or levels, only within the same level.

PMATechnologies
Steps
1. Click Tools > Manage Codes from the menu bar.
2. Click Settings above upper list.
3. Click down arrow next to level.
4. Choose a preset or click Other.
5. When Other opens: a) Select color from pallet in Standard tab b) or go to Custom tab and slide the color
to a lighter shade of default color.
6. Click OK to save lane Settings.
16
MODIFY WBS NODE/LANE COLORSThe default P6 level colors can be modified for NPT layout
TIP: For visual consistency of the WBS with the typical P6 color, use step 5b to lighten the default color of each level.
PMATechnologies
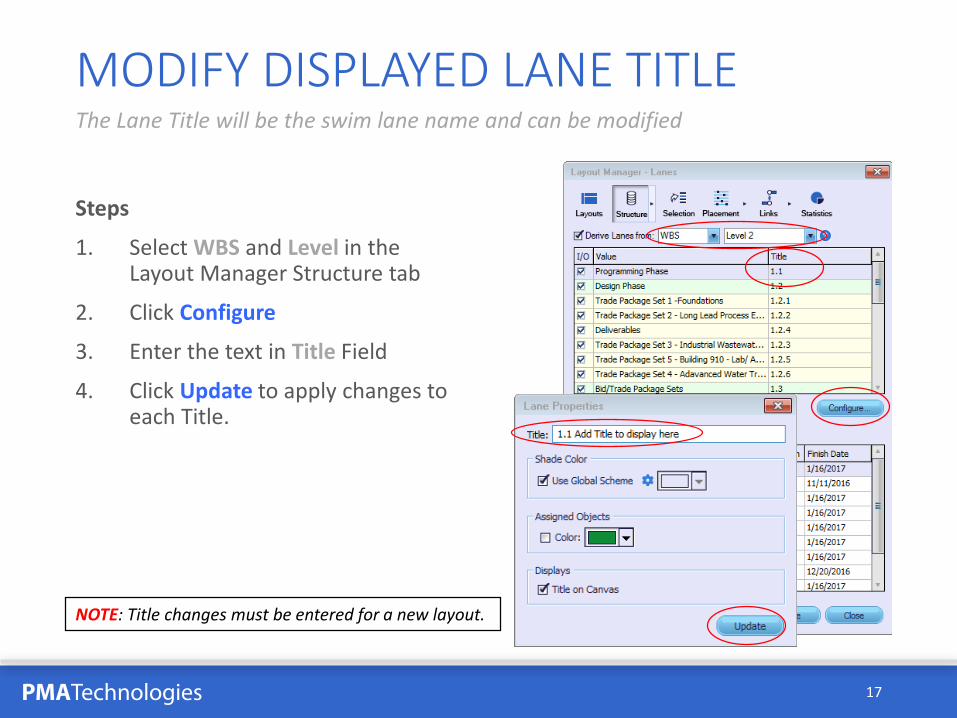
Steps
1. Select WBS and Level in the Layout Manager Structure tab
2. Click Configure
3. Enter the text in Title Field
4. Click Update to apply changes to each Title.
17
MODIFY DISPLAYED LANE TITLEThe Lane Title will be the swim lane name and can be modified
NOTE: Title changes must be entered for a new layout.

PMATechnologies
VIEW & EXPORT TABLES FOR REPORTS
18
PMATechnologies
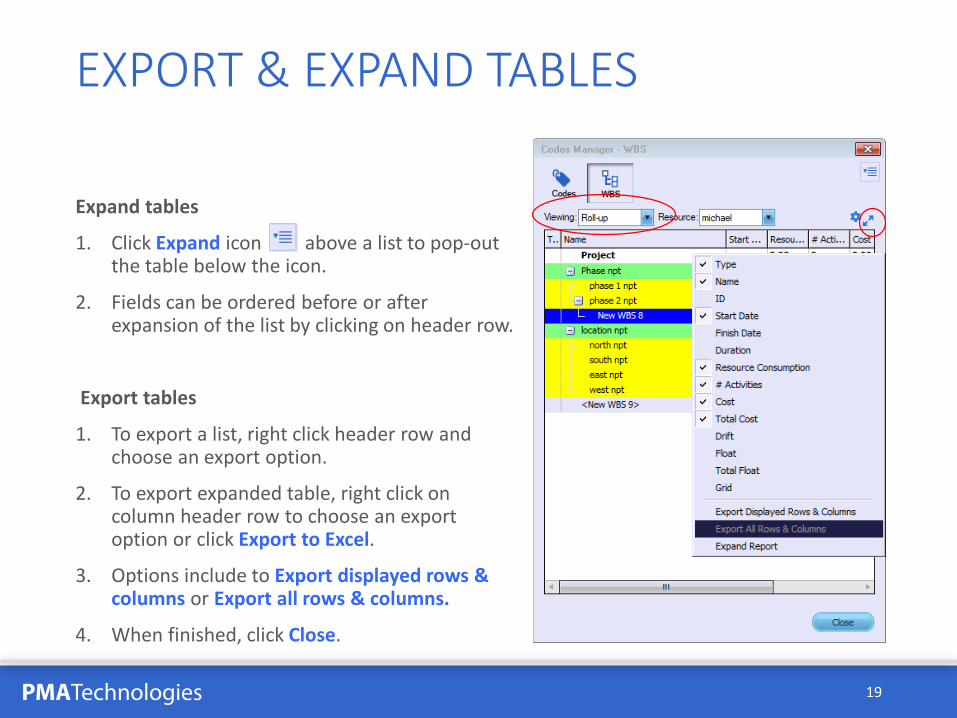
Expand tables
1. Click Expand icon above a list to pop-out the table below the icon.
2. Fields can be ordered before or after expansion of the list by clicking on header row.
Export tables
1. To export a list, right click header row and choose an export option.
2. To export expanded table, right click on column header row to choose an export option or click Export to Excel.
3. Options include to Export displayed rows & columns or Export all rows & columns.
4. When finished, click Close.
19
EXPORT & EXPAND TABLES
PMATechnologies
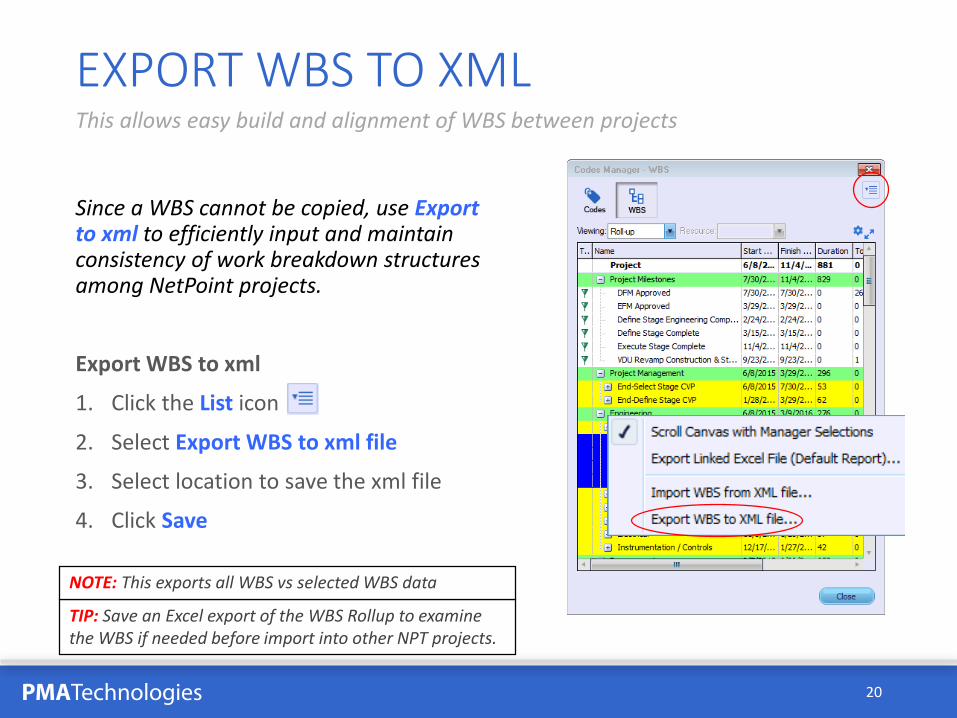
Since a WBS cannot be copied, use Export to xml to efficiently input and maintain consistency of work breakdown structures among NetPoint projects.
Export WBS to xml
1. Click the List icon
2. Select Export WBS to xml file
3. Select location to save the xml file
4. Click Save
20
EXPORT WBS TO XML This allows easy build and alignment of WBS between projects
TIP: Save an Excel export of the WBS Rollup to examine the WBS if needed before import into other NPT projects.
NOTE: This exports all WBS vs selected WBS data
PMATechnologies 21
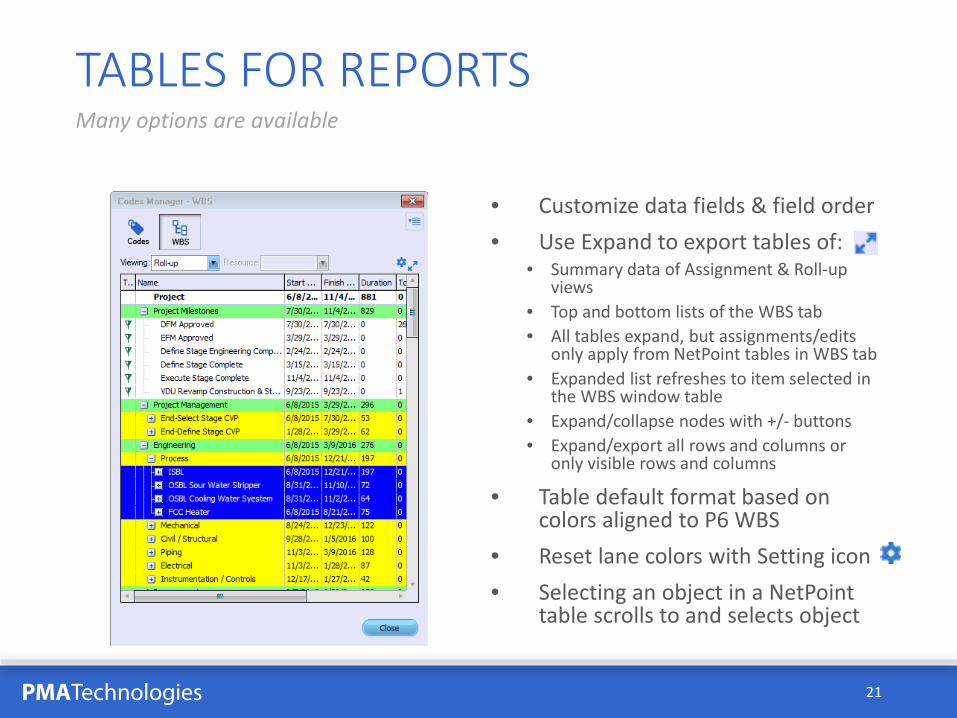
TABLES FOR REPORTSMany options are available
• Customize data fields & field order • Use Expand to export tables of:
• Summary data of Assignment & Roll-up views
• Top and bottom lists of the WBS tab • All tables expand, but assignments/edits
only apply from NetPoint tables in WBS tab• Expanded list refreshes to item selected in
the WBS window table• Expand/collapse nodes with +/- buttons • Expand/export all rows and columns or
only visible rows and columns
• Table default format based on colors aligned to P6 WBS
• Reset lane colors with Setting icon• Selecting an object in a NetPoint
table scrolls to and selects object
PMATechnologies 22
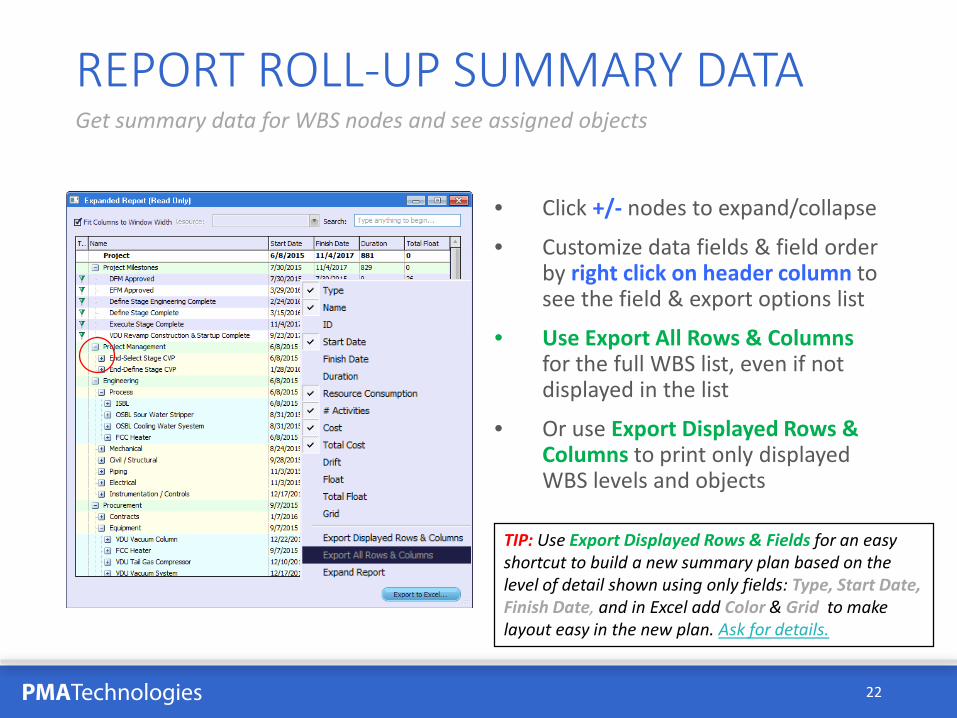
REPORT ROLL-UP SUMMARY DATAGet summary data for WBS nodes and see assigned objects
• Click +/- nodes to expand/collapse
• Customize data fields & field order by right click on header column to see the field & export options list
• Use Export All Rows & Columns for the full WBS list, even if not displayed in the list
• Or use Export Displayed Rows & Columns to print only displayed WBS levels and objects
TIP: Use Export Displayed Rows & Fields for an easy shortcut to build a new summary plan based on the level of detail shown using only fields: Type, Start Date, Finish Date, and in Excel add Color & Grid to make layout easy in the new plan. Ask for details.
PMATechnologies
Thank You!Questions

PMATechnologies
Renee WoolleyDirector of Marketing, Software SolutionsP: (734) 418-7898