www.planet.com.tw ipx-2000/1800 series pbx with vip-450 configuration internet telephony pbx system...
TRANSCRIPT

www.planet.com.tw
IPX-2000/1800 SeriesPBX with VIP-450 Configuration
Internet Telephony PBX System
Copyright © PLANET Technology Corporation. All rights reserved.

www.planet.com.tw
This chapter introduces more than PSTN lines in the IP PBX and install the SIP This chapter introduces more than PSTN lines in the IP PBX and install the SIP voice gateways with FXO interface as extensions of the PBX system, and the amvoice gateways with FXO interface as extensions of the PBX system, and the amount of the PSTN interface will be increased to meet the demands.ount of the PSTN interface will be increased to meet the demands.
The ID of the SIP trunk is 555 and to set the route destination number 91. AccoThe ID of the SIP trunk is 555 and to set the route destination number 91. Accordingly, Users could dials 91 switch to gateway FXO port.rdingly, Users could dials 91 switch to gateway FXO port.
When remote call PSTN number to gateway , FXO start the Hot line dialing to IWhen remote call PSTN number to gateway , FXO start the Hot line dialing to IP PBX and into IVR system.P PBX and into IVR system.

3 / 12
www.planet.com.tw
Case 32: IP PBX-Trunk-Gateway Configuration
Company A, want to expanded PSTN Line decided to create a Company A, want to expanded PSTN Line decided to create a private SIP trunk to connect Gateway.private SIP trunk to connect Gateway.
IP PBX
FXO Gateway
4 / 12
www.planet.com.tw
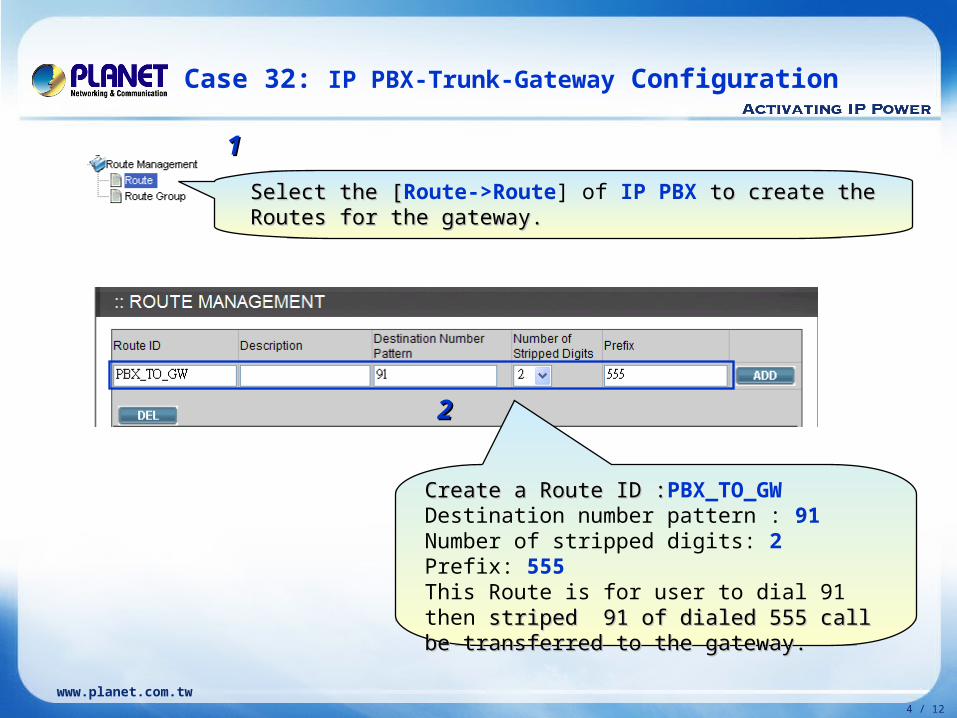
Select the [Select the [Route->Route] of IP PBX to create the Routes for the to create the Routes for the gateway.gateway.
11
Create a Route ID :Create a Route ID :PBX_TO_GWDestination number pattern : 91Number of stripped digits: 2Prefix: 555This Route is for user to dial 91 then striped 91 striped 91 of dialed 555 call be transferred to the gateway. of dialed 555 call be transferred to the gateway.
22
Case 32: IP PBX-Trunk-Gateway Configuration

5 / 12
www.planet.com.tw
33
44
Select the [Select the [Route->Routegroup] of IP PBX to add to add the previous Routes to a Routegroupthe previous Routes to a Routegroup
Create a Routegroup Create a Routegroup RG_GW_TO_PBX, then add the Route TO_GW_1 and Route TO_GW_2 to the to the Routegroup. Routegroup.
Case 32: IP PBX-Trunk-Gateway Configuration
6 / 12
www.planet.com.tw
55
66
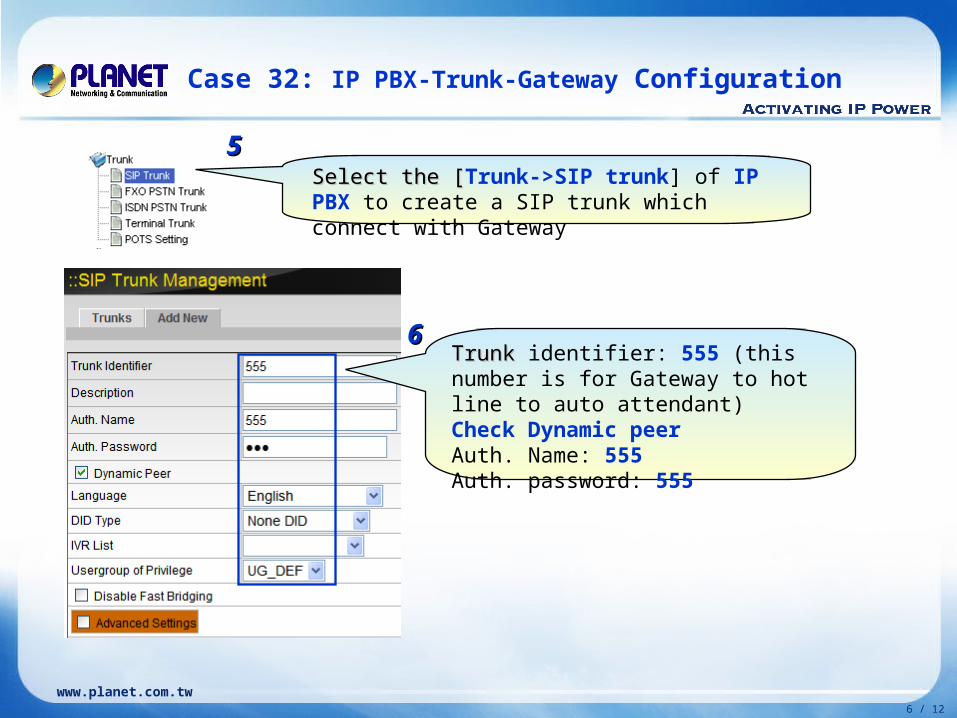
Select the [Select the [Trunk->SIP trunk] of IP PBX to create a SIP trunk which connect with Gateway
Trunk Trunk identifier: 555 (this number is for Gateway to hot line to auto attendant)Check Dynamic peerAuth. Name: 555Auth. password: 555
Case 32: IP PBX-Trunk-Gateway Configuration

7 / 12
www.planet.com.tw
77
88
Select Select the [User->Usergroup] of IP PBX to associate the SIP trunk 555 to corresponding usergroup
Associate the Associate the SIP trunk 555 to the usergroup UG_DEF
Case 32: 32: IPIP PBX-Trunk-GatewayPBX-Trunk-Gateway Configuration Configuration
8 / 12
www.planet.com.tw
99
1010
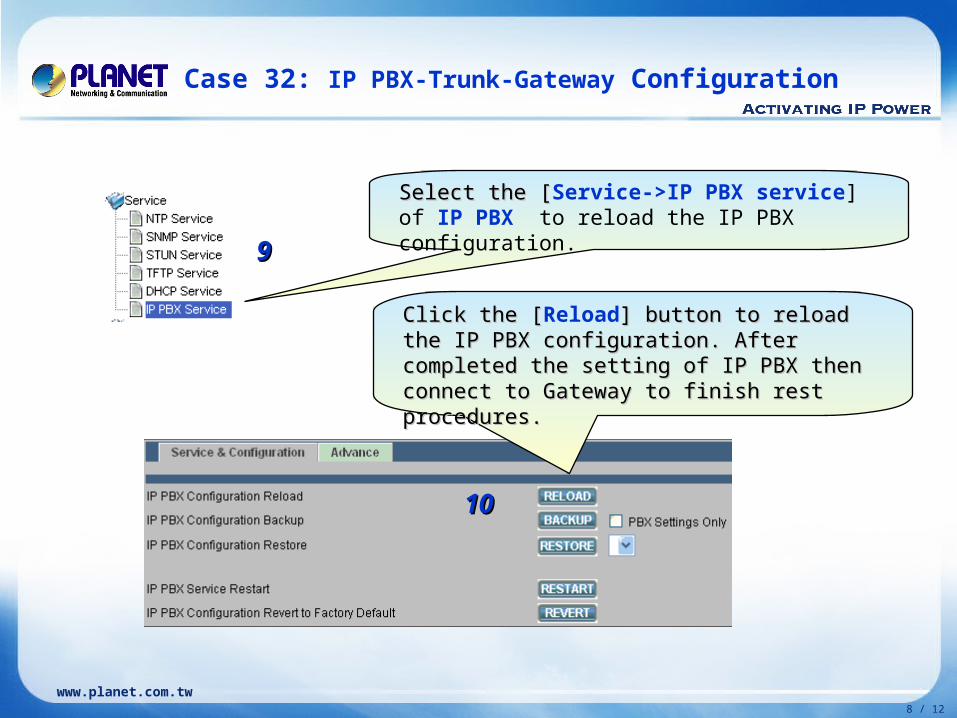
Select the [Select the [Service->IP PBX service] of IP PBX to reload the IP PBX configuration.
Click the [Click the [Reload] button to reload the IP PBX ] button to reload the IP PBX configuration. After completed the setting of IP configuration. After completed the setting of IP PBX then connect to Gateway to finish rest PBX then connect to Gateway to finish rest procedures.procedures.
Case 32: IP PBX-Trunk-Gateway Configuration

9 / 12
www.planet.com.tw
Case 32: IP PBX-Trunk-Gateway Configuration
VIP-480 Configuration
1. Reset to factory settingITG> config erase (Press “y” to erase it)ITG> atpm erase (Press “y” to erase it)ITG> net set fac_default (Press “y” to reboot machine)
2. Network parametersITG> net set ip 192.168.1.10 (Press “n” don’t reboot machine)ITG> net set mask 255.255.255.0ITG> net set gateway 192.168.1.254 (Press “n” don’t reboot machine)
3. Port SettingsITG> set coding 0 dtmf_relay on oobITG> set port 0 dial_in plar 0555ITG> set port 1 dial_in plar 0555ITG> set port 2 dial_in plar 0555ITG> set port 3 dial_in plar 0555

10 / 12
www.planet.com.tw
Case 32: IP PBX-Trunk-Gateway Configuration
4. SIP SettingsITG> set sip reg add 555 300 192.168.1.1 5060 555 123ITG> set sip auto_reg onITG> config activateITG> config store
5. Dial Plan SettingsITG> atpm reqITG> atpm aadd 555 3 3 10 3ITG> atpm aadd 0555 4 4 11 1ITG> atpm hadd 10 2 1 2 3 4ITG> atpm hadd 11 2 11ITG> atpm dadd 11 sip 192.168.1.1ITG> atpm doneITG> atpm storeITG> net reset (Press “y” to reboot machine)

11 / 12
www.planet.com.tw
For example:
1.From IP Phone make a call to FXO.
Step 1. Pickup the handset and hearing a dial-tone, then input a number 91#.
Step 2. You will be hear a ring-back tone afterward, and then get a dial-tone form PSTN line.
Step 3. To input a local phone number, such as 22199518
2.From local phone (PSTN) make a call into IP PBX through FXO.
Step 1. Pickup the handset of local phone and hearing a dial-tone, input number 858075
Step 2. You will be hear a ring-back tone afterward, and then entered the IVR of IP PBX
Step 3. To input a extension number of SIP client, then the SIP client should be ring up.
NOTE:
The mentioned parameters and network settings in this sample be carefully modified to meet the real-world applications.

www.planet.com.tw