zeiss zen (blue edition)
TRANSCRIPT

Quick Guide
ZEISS ZEN (blue edition)

ZEISS ZEN (blue edition)
Original Manual
Carl Zeiss Microscopy GmbHCarl-Zeiss-Promenade 1007745 [email protected]/microscopy
Carl Zeiss Microscopy GmbHZEISS Group Kistlerhofstr. 75 81379 München
Document Name: ZEISS ZEN (blue edition) Quick GuideRevision: 2Language: en-USEffective from: 04/2021
© 2021 Without the prior written consent of ZEISS, this document or any part of it must neither be translated nor reproduced ortransmitted in any form or by any means - including electronic or mechanic methods, by photocopying, recording or by any in-formation or filing system. The right to make backup-copies for archiving purposes shall remain unaffected thereby. Any viola-tions may be prosecuted as copyright infringements.
The use of general descriptive names, registered names, trademarks, etc. in this document does not imply that such names areexempt from the relevant intellectual property laws and regulations and therefore free for general use. This shall also apply ifthis is not specifically referred to. Software programs shall entirely remain the property of ZEISS. No program or subsequent up-grade thereof may be disclosed to any third party, copied or reproduced in any other form without the prior written consent ofZEISS, even if these copies or reproductions are destined for internal use at the customer's only, the only exception being onesingle back-up copy for archiving purposes.
ZEISS reserves the right to make modifications to this document without notice.
Inhalt ZEISS
Inhalt1 Welcome ....................................................................................... 4
2 Starting Software .......................................................................... 5
3 User Interface................................................................................ 6
3.1 Title bar...................................................................................................... 6
3.2 Workspace Configuration........................................................................... 7
3.3 Menu bar ................................................................................................... 7
3.4 Tool bar ..................................................................................................... 7
3.5 Left Tool Area ............................................................................................ 8
3.6 Center Screen Area..................................................................................... 9
3.7 Right Tool Area .......................................................................................... 10
3.8 Document bar ............................................................................................ 10
3.9 Status bar................................................................................................... 10
3.9.1 System Messages........................................................................ 12
4 Adjusting Workspace Appearance................................................. 13
4.1 Setting User Language ............................................................................... 13
4.2 Selecting Screen Design.............................................................................. 13
4.3 Adjusting Workspace Zoom........................................................................ 13
4.4 Showing/Hiding Workspace Areas.............................................................. 13
4.5 Undocking/Docking Tool Windows............................................................. 14
4.6 Activating Show All Mode .......................................................................... 14
5 Step by step to the first image ...................................................... 16
5.1 Configuring Microscope Components......................................................... 16
5.2 Acquiring Camera Image ............................................................................ 17
5.3 Adding Annotations ................................................................................... 19
5.4 Adjusting Live Image Settings..................................................................... 19
5.5 Creating Manual Scaling............................................................................. 20
6 Closing the Software ..................................................................... 21
Quick Guide ZEISS ZEN (blue edition) | en-US | Rev.2 3

1 Welcome ZEISS
1 WelcomeZEN (blue edition) is a modular image acquisition, processing and analysis software for digital mi-croscopy. The abbreviation ZEN stands for ZEISS Efficient Navigation and points out that the soft-ware can be used to control microscopes and imaging systems by ZEISS.
In addition to basic functionality for image acquisition, elementary image processing and annota-tions and image analysis a lot of optional modules for specific microscopy tasks are available.
With ZEN lite the basic version of the software is available for free. Starting from a basic function-ality for image acquisition, simple image processing, image analysis and documentation a lot ofoptional modules are available for ZEN lite as well. More detailed information is available in theproduct brochure.
Disclaimer This product is not intended for use in medical or diagnostic procedures.
Quick Guide ZEISS ZEN (blue edition) | en-US | Rev.2 4
2 Starting Software ZEISS
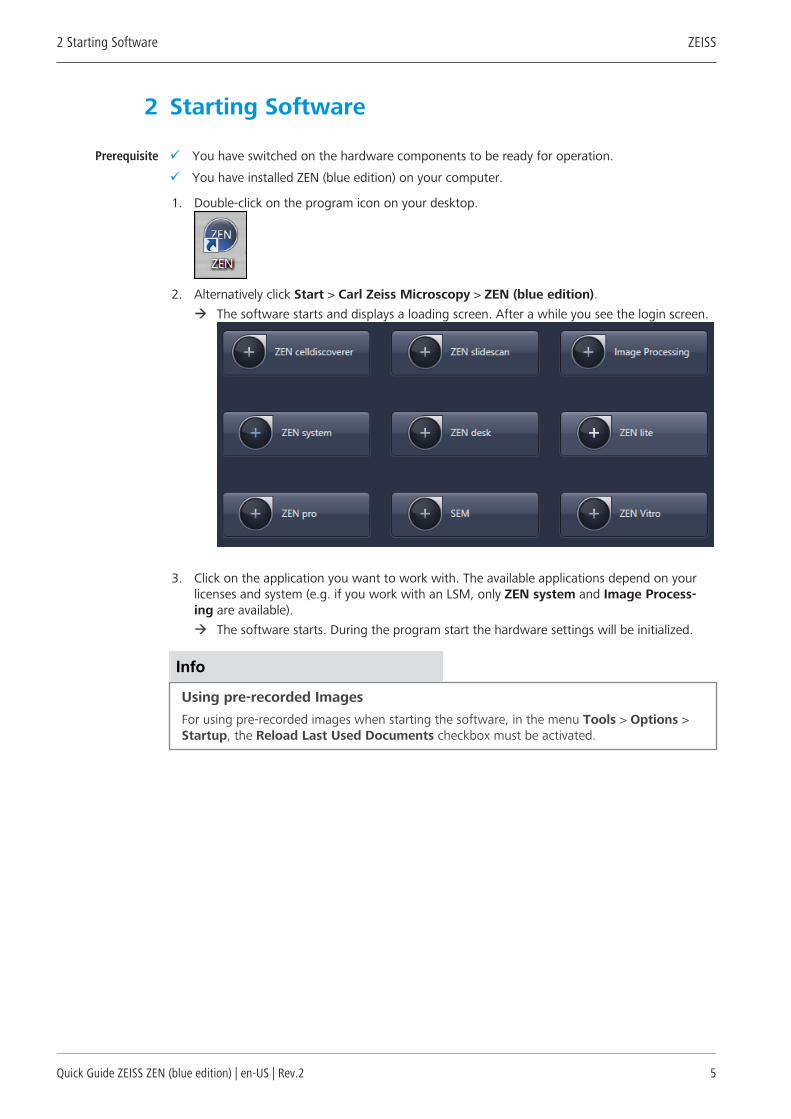
2 Starting Software
Prerequisite ü You have switched on the hardware components to be ready for operation.
ü You have installed ZEN (blue edition) on your computer.
1. Double-click on the program icon on your desktop.
2. Alternatively click Start > Carl Zeiss Microscopy > ZEN (blue edition).à The software starts and displays a loading screen. After a while you see the login screen.
3. Click on the application you want to work with. The available applications depend on yourlicenses and system (e.g. if you work with an LSM, only ZEN system and Image Process-ing are available).à The software starts. During the program start the hardware settings will be initialized.
Info
Using pre-recorded ImagesFor using pre-recorded images when starting the software, in the menu Tools > Options >Startup, the Reload Last Used Documents checkbox must be activated.
Quick Guide ZEISS ZEN (blue edition) | en-US | Rev.2 5

3 User Interface | 3.1 Title bar ZEISS
3 User InterfaceThe software user interface is divided into three main areas.
1 2 3
Fig. 1: User interface
1 Left Tool AreaWith the tabs you can access all the main tools for microscope control (Locate Tab), ac-quisition (Acquisition Tab), image processing (Processing Tab), image analysis (AnalysisTab), and applications (Applications Tab).
2 Center Screen AreaThis area is used to display your images with several image views available. For more in-formation, see Center Screen Area [} 9].
3 Right Tool AreaHere you find the Images and Documents Tool, the Objective Selection and the Stageand Focus controls. Additionally system specific tools can be available here (e.g. DefiniteFocus and ZEN Connect controls).
3.1 Title bar
Parameter Description
Help icon Activates the "drag & drop“ help function. A question mark ap-pears beside the mouse pointer. Move the mouse pointer to aplace in the software where you need help. Left-click on the de-sired location. The online help opens.
Minimize Minimizes the program window.
Quick Guide ZEISS ZEN (blue edition) | en-US | Rev.2 6

3 User Interface | 3.2 Workspace Configuration ZEISS
Parameter Description
Maximize Over 2Screens
Maximizes the program window across 2 screens if available.This option is only possible if you are working with 2 screenswith the same resolution.
Maximize Maximizes the program window to the main screen.
Restore Down Reduces the program window to any selected size.
Close Closes the program window.
3.2 Workspace Configuration
Fig. 2: Workspace Configuration
Here you find settings to adjust your workspace. Select Light/Dark Design of the user interfaceor enlarge the screen with Workspace Zoom slider. You can also save and reload all personal
settings in a workspace configuration. With the Dock all tool windows button in the topright corner you can easily dock all undocked tools by one click.
3.3 Menu bar
Fig. 3: Menu bar
The menu bar contains all the menus you need for managing, editing, and viewing your projects.
3.4 Tool bar
Fig. 4: Tool Bar
Here you gain quick access to important functions, e.g. saving or opening files. Further right youfind more workspace settings, e.g. Design and Workspace selection. Read how to customize theTool bar in chapter Customize toolbar.
Quick Guide ZEISS ZEN (blue edition) | en-US | Rev.2 7

3 User Interface | 3.5 Left Tool Area ZEISS
3.5 Left Tool Area
This area contains the main tabs for microscope and camera settings (Locate tab), image acquisi-tion (Acquisition tab), image processing (Processing tab), and image analysis (Analysis tab). Themain tabs are organized in an order which follows the typical workflow of experiments in bio-science or material science.
Fig. 5: Left Tool Area
Quick Guide ZEISS ZEN (blue edition) | en-US | Rev.2 8

3 User Interface | 3.6 Center Screen Area ZEISS
3.6 Center Screen Area
The Center Screen Area is structured in 4 areas.
1 2 3 4
Fig. 6: Center Screen Area
1 Document barHere you can switch between all your opened documents. For more information, seeDocument bar [} 10].
2 Image ViewsArea where you can switch between different image views by selecting the correspond-ing tab in the list. For more information, see also Image views.
3 View OptionsArea for general and specific view options. For more information, see also General ViewOptions.
4 Image AreaArea where images, reports, and tables are displayed.
Quick Guide ZEISS ZEN (blue edition) | en-US | Rev.2 9

3 User Interface | 3.7 Right Tool Area ZEISS
3.7 Right Tool Area
This area contains mainly the tools for image and file handling (e.g. Image Gallery) and hardwarecontrol (e.g. Stage / Focus tool). Depending on your system configuration, other tools can beavailable. The tools are described in the corresponding chapters of the online help.
3.8 Document bar
Here you see tabs of all open documents. Click on a tab to view the image/document. On theright end of document bar you find buttons to switch view mode from Exposé to Splitter modeand further view options (View menu).
InfoA asterisk (*) next to an image/document title indicates that unsaved changes have beenmade to this document. Save your pictures/documents from time to time in order to avoiddata loss.
Parameter Description
Exposé Mode
Opens the exposé view mode. For more information, see Exposémode.
Splitter Mode
Opens the splitter view mode. For more information, see Splittermode.
Options
Displays the options of the view menu. For more information aboutthe individual options, see View Menu.
3.9 Status bar
The status bar shows important information on the system status:
Parameter Description
Scaling Displays which lateral scaling is currently being used. If you click onthe arrow, the Scaling dialog will be opened. There you have accessto advanced scaling settings and the scaling wizard.
System Informa-tion
Always shows the latest, currently active process that the system isperforming.
Progress bar Displays the progress of the currently active process. Each newprocess added supersedes older still active processes. If you click onthe arrow button, a window opens with a list of all processes inchronological order. You can stop a process that is running using theStop button.
Performance indi-cators
In this group you will see an overview of the performance of individ-ual computer components:
§ Free RAM indicates how much physical memory is still available.
Quick Guide ZEISS ZEN (blue edition) | en-US | Rev.2 10

3 User Interface | 3.9 Status bar ZEISS
Parameter Description
§ Free HD indicates how much space is still available on the harddrive onto which the next image is to be acquired (see Tools > Op-tions > Saving).
§ CPU indicates the usage of the Central Processing Unit.
§ The small status bar provides an overall assessment of the systemusage.
§ GPU indicates the usage of the Graphics Processing Unit by ZENand ZEN related services. It is also visualized by a small status baron its right.Note: This GPU indicator is only visible if you your computer hasMicrosoft Windows 10 version 1709 or higher.
Info: Double-clicking in the Performance Indicators area opens theWindows Task Manager.
Frame Rate Indicates the current frame rate in frames per second (fps) used by theactive camera for producing new images. Please note in most casesthat at speeds greater than 100 frames per second, this value cannotalways be accurately determined.
Pixel Value Displays the gray value to the image at the current position of themouse pointer. In the case of multichannel images the gray value/channel is displayed for up to 4 channels.
Position Displays the X/Y position (in pixel coordinates) of the mouse pointer inthe image.
Information (i) If you click on the icon, a window opens with a System Messages[} 12].
Storage Folder Displays the location where new images are automatically saved. Thispath can be changed in the menu Tools > Options > Saving.
Status: AiryscanDetector Align-ment
If you click on the arrow the Alignment Tool window opens. SeeAiryscan Detector Adjustment.
User Shows the Windows user name of the logged in user.
Time Shows the current Windows system time.
Quick Guide ZEISS ZEN (blue edition) | en-US | Rev.2 11

3 User Interface | 3.9 Status bar ZEISS
3.9.1 System Messages
If you right-click on a system message the Copy button will appear. Left-click on Copy button tocopy the message to clipboard. Then paste it into a text file or an E-Mail. The idea behind is thatyou can easily send error messages to your support team for example. This copy/paste functionworks for all upcoming system messages or error messages within the application as well.
Parameter Description
Information
System information that arises during normal operation. This systeminformation does not lead to an interruption of the workflow. The in-formation window is not displayed automatically.
Warnings
Information that requires input from the user, e.g. a prompt tochange a manual microscope component. This information leads tothe information window being shown briefly. However, it closes againafter a few seconds.
Errors
Error messages indicate a malfunction by the system. In this case theinformation window opens and remains open. The system requires in-put from the user in order to continue.
InfoHundreds of messages can accumulate in the course of a session. A maximum of 300 mes-sages are displayed. To display messages for a certain category, activate or deactivate the cor-responding checkboxes.
Quick Guide ZEISS ZEN (blue edition) | en-US | Rev.2 12

4 Adjusting Workspace Appearance | 4.1 Setting User Language ZEISS
4 Adjusting Workspace Appearance
4.1 Setting User Language
InfoIf the Select Automatically checkbox is activated, the software uses the language which isset in the system settings of your computer. This is the default setting.
Prerequisite ü You have started the application.
1. Go to Tools > Options dialog.à In the group Software the entry General is selected.
2. Deactivate the Select Automatically checkbox to select the language manually.3. Select the user language from the Fixed Language drop-down list.
à A message appears to restart the application.à Note that the availability of additional languages can differ between software versions.
4. Click OK.à The Options dialog closes.
5. Exit and restart software.
4.2 Selecting Screen Design
In the upper right corner of the program window under Design you can select a Light or Darkscreen layout . Optionally, you can change the design with the shortcut Ctrl+D.
4.3 Adjusting Workspace Zoom
1. To zoom in or out of the workspace move the slider left or right.
2. To reset the workspace zoom to default click Reset.
4.4 Showing/Hiding Workspace Areas
1. Click Show/Hide to show or hide screen areas.
Quick Guide ZEISS ZEN (blue edition) | en-US | Rev.2 13

4 Adjusting Workspace Appearance | 4.5 Undocking/Docking Tool Windows ZEISS
4.5 Undocking/Docking Tool Windows
This function allows you to undock/dock a tool window. An undocked tool window can be posi-tioned anywhere on the screen.
1. Click Undock to undock a tool window. Once undocked, the tool window can be movedaround by clicking and dragging it on the blue bar.
2. Click Dock to dock a tool window back to its place in the left tool area.
InfoWith the dock all tools function in the Workspace Configuration you can globally attach allundocked tool windows back to the Left Tool Area.
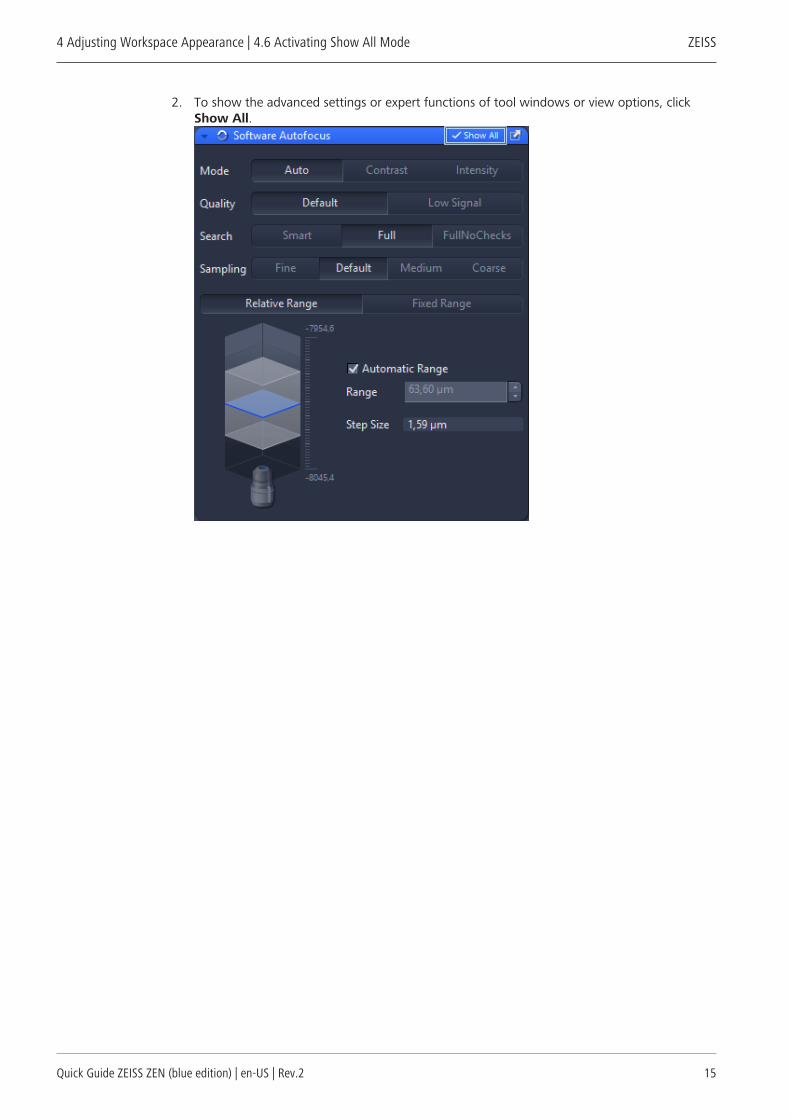
4.6 Activating Show All Mode
1. With the Show All mode deactivated (default setting), only the basic functions of tool win-dows or view options are shown.
Quick Guide ZEISS ZEN (blue edition) | en-US | Rev.2 14
4 Adjusting Workspace Appearance | 4.6 Activating Show All Mode ZEISS
2. To show the advanced settings or expert functions of tool windows or view options, clickShow All.
Quick Guide ZEISS ZEN (blue edition) | en-US | Rev.2 15
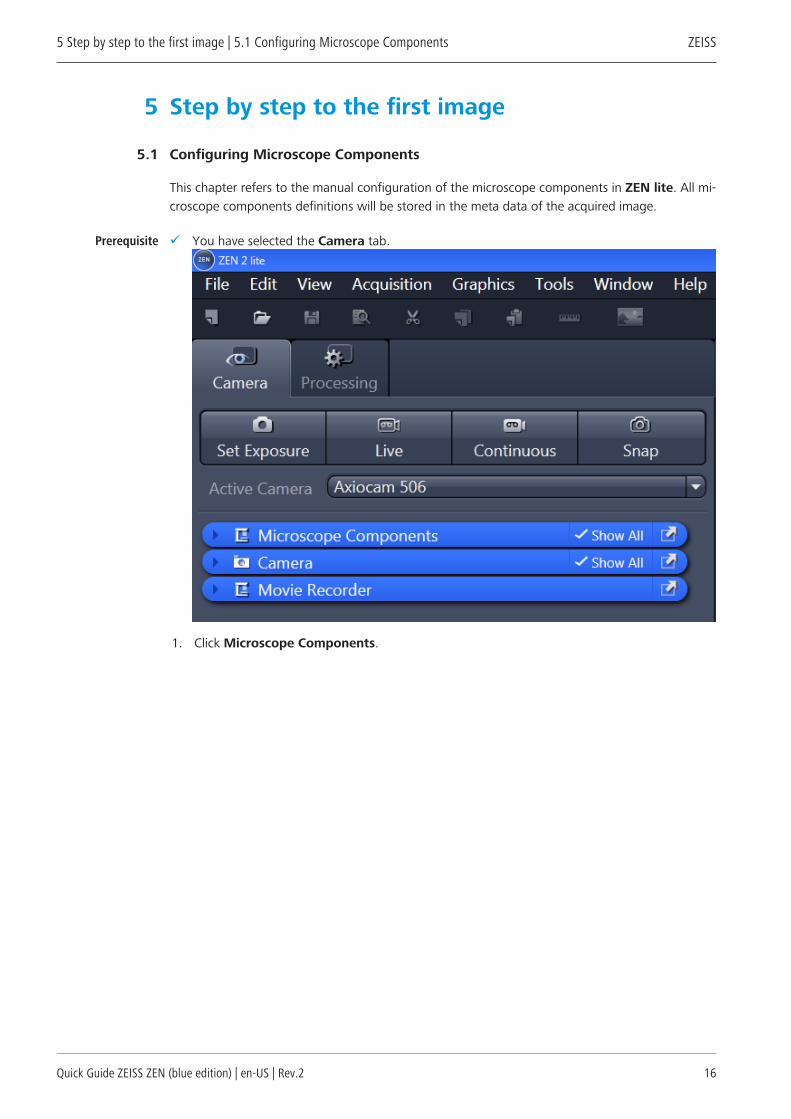
5 Step by step to the first image | 5.1 Configuring Microscope Components ZEISS
5 Step by step to the first image
5.1 Configuring Microscope Components
This chapter refers to the manual configuration of the microscope components in ZEN lite. All mi-croscope components definitions will be stored in the meta data of the acquired image.
Prerequisite ü You have selected the Camera tab.
1. Click Microscope Components.
Quick Guide ZEISS ZEN (blue edition) | en-US | Rev.2 16

5 Step by step to the first image | 5.2 Acquiring Camera Image ZEISS
à The tool will open. Consider that the button Show all is activated.
2. For Objective select that objective you will use for your acquisitions.3. Select all other microscope components you will use (i.e. Optovar, Reflector, etc.).
You have successfully configured your microscope components.
InfoIf you have activated the Select automatically button in the status bar under Scaling (stan-dard settings), the scaling will be calculated on the basis of your definitions. If you want toperform a manual scaling, read the chapter Creating Manual Scaling [} 20].
5.2 Acquiring Camera Image
This topic guides you through acquiring your first camera image with the software.
Prerequisite ü You have connected and configured a microscope camera (i.e. Axiocam 305 color/mono) toyour system.
ü You have started the software.
ü You have configured the microscope components (e.g. objective, camera adapter) und youare using the automatic or manual scaling.
ü You are on the Camera (ZEN lite only) or Locate tab.
Quick Guide ZEISS ZEN (blue edition) | en-US | Rev.2 17

5 Step by step to the first image | 5.2 Acquiring Camera Image ZEISS
ü You see your microscope camera available in the Active Camera section. If not, select thecamera from the list.
1. Position your sample on the microscope and adjust the microscope to see a focused imagethrough the eyepieces.
2. Adjust the tube slider of the microscope to divert the image to the camera (e.g. 50% cam-era and 50% eyepieces).
3. Click Live.à The Live Mode will be activated. In the Center Screen Area you will see the camera
live image. By default the live image shows a cross hair helping to navigate on the speci-men. In the chapter Adjusting Live Image Settings [} 19] you will learn how to optimizelive image display.
4. Click Set Exposure.à The exposure time will be automatically determined and set.
5. Click Snap.
You successfully acquired your first image. Save the image in the file system via the File menu |Save as.
Quick Guide ZEISS ZEN (blue edition) | en-US | Rev.2 18

5 Step by step to the first image | 5.3 Adding Annotations ZEISS
InfoIf you do not see a focused image, please refocus the specimen on the microscope. You mayactivate the focus bar as an additional aid. Right-click in the Center Screen Area to open thecontext menu. Select the entry Focus Bar. The focus bar will be shown.
See also
2 Document bar [} 10]
5.3 Adding Annotations
Annotations are the generic term for all the graphics (e.g. rectangle, arrow, scale), measurements,texts or other metadata (e.g. recording time) that you can add to your image.
Prerequisite ü You have acquired or loaded an image.
1. In the Center Screen Area select Graphics.
2. Click Scale Bar.à The scale bar will appear directly in the image.à To edit an annotation (e.g. color, line width) you can right-click on the annotation in the
image and select Format Graphical Elements from the context menu.
3. Click Draw Arrow.à You can now draw an arrow into the image.
5.4 Adjusting Live Image Settings
Prerequisite ü You have started the Live mode via the Live button and see the camera’s live image in theCenter Screen Area.
ü Under the image area you see the general view options on Dimensions tab, Graphics taband Display tab.
1. In the Dimensions tab activate the Range Indicator checkbox. This will mark overexposed(too bright) areas in the live image in red and underexposed (too dark) areas in blue.
Quick Guide ZEISS ZEN (blue edition) | en-US | Rev.2 19

5 Step by step to the first image | 5.5 Creating Manual Scaling ZEISS
2. On the Display tab click 0.45. The display curve will be adapted to a gamma value of 0.45.This will set the optimum color presentation. If you do not see this button, activate theShow all mode.
3. Move the controls under the display curve left and right in order to directly adjust the val-ues for Contrast (Black) 1 , Gamma 2 , and Brightness (White) 3 in the liveimage.
1 2 3
InfoWith the settings above the display of the live image will be adapted. These settings will alsobe transferred to your acquired image. This will not change the camera settings.
5.5 Creating Manual Scaling
Prerequisite ü You have an object micrometer oriented horizontally on the microscope stage.
ü You have selected all definitions for your microscope correctly in the Microscope Compo-nents tool (ZEN lite only). In our example we use an objective with a 10x magnification.
1. Acquire an image (see Acquiring Camera Image [} 17]) of the scale in your object microme-ter using the objective to be scaled manually.
2. In the bottom status bar click Scaling. In the Scaling dialog deactivate Select Automati-cally.
3. In the Create new scaling section, click Interactive Calibration....à The calibration wizard will appear in the image area.
4. Click Single Reference Line and activate Automatic Line Detection.5. Draw in the reference line along the scale.6. Enter the true distance between both scale lines in the calibration wizard. In our example
this is 500 micrometer.7. Enter a name for the scaling (i.e. Obj 10x) and click Save Scaling.
You performed a manual scaling for your objective. Repeat this sequence for all objectives you willneed a manual scaling for. Always ensure that you did select the correct objective in the tool Mi-croscope Components and for this performed and selected the matching scaling in the statusbar.
Info4 The function Automatic Line Detection calculates the theoretical maximum of the refer-
ence line‘s both end points to the closest scale lines in the image. Thus the distance will becalculated with sub-pixel accuracy.
4 If you have defined a manual scaling for an objective and activate the checkbox SelectAutomatically, the software will use the measured scaling instead of the theoretic one.You will recognize this via the label "Measured" instead of "Theoretic" beside the pixelsize.
Quick Guide ZEISS ZEN (blue edition) | en-US | Rev.2 20
6 Closing the Software ZEISS
6 Closing the Software1. Click File > Exit. Alternatively you can use the short cut Alt+F4 or click Close in the pro-
gram bar.
InfoIf you have not saved your files, the Save Documents dialog will open before the softwarecloses. Select the files you want to save or unselect the files you do not want to save.
Quick Guide ZEISS ZEN (blue edition) | en-US | Rev.2 21

Carl Zeiss Microscopy GmbHCarl-Zeiss-Promenade 1007745 JenaGermany
phone: +49 3641 64 3161fax: +49 3641 64 [email protected]/microscopy
Qui
ck G
uide
ZEI
SS Z
EN (b
lue
editi
on) |
en-
US
| Rev
.2M
odifi
catio
ns re
serv
ed.