1 - sketchup magazine | download tutorial...
TRANSCRIPT


1 | P a g e
1. A Letter to the desk of editor
A letter direct from the editor desk highlighting on November’15 edition
2. Interview
Interview with Ahmed Maher
3. Cover Storey
Sketchup 2016 brings upgraded functionalities for LayOut
4. Article
Facade Design with Sefaira for SketchUp Daylight Optimisation with Sefaira for SketchUp Net Zero Energy Design with Sefaira for SketchUp 3D printing: A New Frontier for Education
5. Blog
CL3VER unveils pro VR Authoring solution for AEC at AU 2015 How to generate walls efficiently with Dibac for Sketchup
6. Tutorial
How to create 3D textures using Sketchup How to design a room with Sketchup, 3D Max and Vray
7. News Room
8. Magazine Details – The Creative team of Sketchup-ur-Space

2 | P a g e
A letter direct from the editor desk highlighting on March edition
Christmas is approaching nearby and we are really in the festive mood. So we want to make our magazine more attractive for our readers.
Our readers will find some interesting articles and tutorials in this issue. In our cover story, we delve into the Layout features of sketchup 2016. The Layout in sketchup 2016 becomes more improved in all aspects ranging from layers and group or small dimensions.
In article section, there are four in-depth articles. The first three articles are presented by Sumele Aruofor, the architecture and marketing associate in Sefaira. The articles focus on how Sefaira streamlines the processes for façade design, daylight optimization & net zero energy design.
In another article Artur Coelho, an ICT/arts teacher from Portugal, has presented an article on how 3d printing technology becomes an integral part of educational society.
In tutorial section, Anita Brown, an awesome SketchUpper and SketchUp Community Member, comes up with some useful tips for generating 3d textures with sketchup. In this tutorial, one can learn how to access Maxwell Render Extension directly inside the sketchup interface with the help of SketchUp plug-in for Maxwell Render for creating densely textured rug.
In the second tutorial, Javier Wainstein, the renowned 3D artist, provides step-by-step guidance to design a room with sketchup, 3DS Max and V-ray.
In blog and news section, the sketchup users will find some interesting stuffs on sketchup.
Hope our readers will like this edition and provide their valuable feedbacks for more improvements.
If you have any queries concerning publication, subscription, troubles navigating the site, please mail us at [email protected]
Best wishes Rajib Dey
Editor

3 | P a g e
Interview with Ahmed Maher, Teaching Assistant, Architecture and Urban Design Program in GUC.
Interviewer: Rajib Dey (Editor-in-chief)
Please make your brief introduction.
My name is Ahmad Maher, I'm from Cairo, Egypt. I am a Teacher Assistant in German University in Cairo - Architecture department, Authorized Instructor for Trimble SketchUp The first in Egypt and Autodesk certified Instructor. Iam also Instructor in CADMasters training Center in Egypt.
For more than 9 years now SketchUp is my main tool for design and visualization, either for Training.
You work as a teaching assistant in Architecture and Urban Design Program in GUC. Tell us something about your professional life.
I am interested in the world of Education, Active Learnings and Architecture, and I trying hard to integrate the Computerized vision in Architecture Learning based on the rational aspects of the world Architecture Community hierarchies. So here in GUC we try to focus on parametric modelling and how to teach the students different ways to use the software in Architecture visualization, specially in our Course "CAD-CAM".
How sketchup streamlines the Architectural and Urban Design Process?
In GUC, it is the first time here to mix the Sketchup, Vray and lumion in Design conceptual methods, so we established "The Morphological visualization Track" with Architectural competition "Morphing or Forming" which is to prepare students for modelling architectural geometry through the development of parametric schemes for architecture. They have to redesign the unused spaces in the campus by Morph it or they should Form anew masses for the new buildings.
When did you first discover sketchup?
My first contact with sketchup was in 2006 it was in my college, Architecture department i felt that i have to find a software to draw my sketches and design and i found that Sketchup is the best way to create 3D models in easy way, so I started to master it by self learning, after that and in 2010 I started my career in Teaching it in the university and in the training centers.

4 | P a g e
How does sketchup impact your workflow?
SketchUp Pro is rewriting the stigma that CAD programs are hard to use. The layout of SketchUp Pro is very intuitive and easy to use, even for the least knowledgeable CAD designers. The added bonus of the 3D Warehouse is a great resource as you'll have constantly new models and symbols to choose from and work with. Although support only lasts for a year, and architectural tools are not plentiful, SketchUp Pro is still a wonderful program for designing and editing 3D models and designs.and we can also use vray or any other render engine or stand alone software to render the outcome of Sketchup.
The latest version of sketchup is sketchup 2015. Provide your valuable feedback on this latest version of sketchup.
SketchUp is owned by Trimble Navigation, best known for their GPS products. They purchased what was formerly Google SketchUp from Google in 2012, and since then have dedicated efforts to ensuring the much-relied-upon SketchUp software continues to reign as a top choice for architects, engineers, building developers, interior decorators, moviemakers — and those just looking to have plain old fun with design technology.New features make it easier and faster to create, access, share and collaborate on 2D drawings and 3D models. SketchUp 2015 offers 64-bit support for Windows or Mac, while IFC file import capabilities allows back-and-forth sharing of IFC files between SketchUp Pro and any other application.
GUC is organizing an exclusive event on Morphalagical visualization with sketchup. Please tell us something about the event.
Yes, as i mentioned before this is the first time here we work on an Architectural competition in the educational curriculum, so we found the "Morphing or forming competition" which is mainly refers to how the students could use their campus spaces to modify, morph and redesign the unused one. We have another track its about interactive Architecture named "Responsive Prototyping track", it is a magnificent experiment to enhance the computerized Architecture vision of students.
How sketchup will evolve in near future?
I think its the time to develop Sketchup as a BIM tool which is a great system to draw and design, and i want to see anew systems of parametric modeling like Grasshopper Plug-in for sketchup.
Is there anything else you would like to focus on sketchup?
I want to say that sketchup is a magnificent tool to design and create 3Ds in minutes, so it must be considered as one of the best softwares in the world.
What suggestions do you want to provide to the newbie urban designers and architects?
Passion If you can be excited and willing to get out of bed in the morning to be an architect and happy to put in the hours and hours of hard work then you are off to a good start. You will become a person that thinks about architecture all day everyday, as it dominates your mind. If this is something you already feel, then you are in a good place, and work won’t seem like work at all!
Creativity and passion for design If design gives you a real buzz and you love to get creative then architecture is a great field for you. Tie that in with some of the skills below you will smash it as an architect!
Problem solver Working in architecture is a constant puzzle. You must be able to identify a problem (preferably before it arises) and find a suitable solution to address the problem. A problem solver with a curious mind – questions everything… how can this be improved, how will this work, how does this go together...?
Be patient – it takes a long time to learn this trade – and you never really know it all. The benefit of this is that if you keep on learning all the different factors of an architects role, you shouldn’t really get bored, and amongst it all you will find the part you love.
Resourceful I consider it to be really important for architects to know the information they need, and have the initiative to go and find it. When you reach a stumbling block, instead of just giving up it is important to be able to find the resources you need to solve the problems you face.

5 | P a g e
Technical knowledge An enthusiasm for the technical side of things is an advantage. A bit of maths, physics and IT will help – as architecture is not just about design. Implementation of your design and ideas in order to make something that produces functional design solutions and can actually be built requires technical ability.
Communication – and listening...and persuasion You are going to be working with clients from different background with different goals and requirements and you have be able to communicate with the client effectively. You will need to be able to listen and understand what your client needs, and often put those needs before your personal tastes, or be able to integrate the two together.
There is a lot of negotiation in architecture, whether you are persuading your client that your design is suitable for their needs or communicating with planners who don’t want to approve your proposal. Either way, it is important to have good people skills to get the job done.
If you don’t have all these qualities there are always actions you can take to improve your ability to become a great architect.
How do you evaluate our magazine?
It`s very helpful Magazine and one of the best Magazines of Sketchup users in the world, the criteria and it could be a next generation of worldwide media announcement about the up comings in Sketchup.

6 | P a g e
Facade Design with Sefaira for SketchUp
Sumele Aruofor
Sheppard Robson’s design team set out to create a specific design aesthetic for the Bechtel House facade, optimise it for good energy and daylight performance whilst working towards high regulatory goals for the project as a whole.

7 | P a g e
Quick Stats Location: London, UK Floor Area: 30,000m2 (322,917ft2) Use Mix: New Build Office Number of Floors: 9-12 Storeys Project Goal
: UK Building Regulation (Part L, Criterion 3) & Building Performance Rating (BREEAM Excellent)
By calculating the impact of several shading device types and depths, the team was able to choose an optimum design that reduced energy use, bad south solar gains and cooling loads. Using Sefaira for SketchUp’s real time analysis, Sheppard Robson were able to understand the impact of shading types and depths, streamlining from about twenty different options to an optimised design that combined high performance, good daylight and a coherent design aesthetic.
Process & Approach
: The team started by focusing on the south block, as it suffered from more solar exposure than the north block. They created simple models of the south block starting analysis on a fully glazed base case (image 1) then testing options with reduced glazing ratios (image 2). Comparing energy use, cooling loads and daylight levels, the team settled on an option with the optimum glazing ratio (image 3).

8 | P a g e
Next, the team focused on reducing south solar gains and the cooling load by testing selected shading options; 0.5m horizontal projections, 0.5m vertical projections, a combination of 0.5m horizontal + vertical projections and a 1.0m Horizontal projection.
Narrowing down to even more bespoke shading solutions, the team tested a tapered vertical fin, a tapered vertical fin with double horizontal shading and double height chamfered panels.
Outcomes
: The optimised tapered vertical fin, tapered vertical fin + 2 horizontal projections and double height chamfered fins were most effective for reducing cooling, energy use and bad south solar gains.

9 | P a g e
Impact on design: The team selected the optimised tapered vertical shading device for the north facade and the tapered + 2 horizontal projections for the south facade.
Taking it one step further, sun path diagrams were made to understand how different building services systems would affect daylight levels within the interior spaces. Comparisons were made between daylight penetration when a “chilled beam + exposed soffit” air delivery system is used and when a “suspended ceiling” system is used.

10 | P a g e
Results & Final Design
North Facade
: The team selected the chilled beam & exposed soffit option, opening up sightlines to the sky and allowing daylight deeper into the room. Upstands at window level offer additional insulation but are kept to a level that does not reduce daylight levels.
Source: sefaira.com
11 | P a g e
Daylight Optimisation with Sefaira for SketchUp
Sumele Aruofor
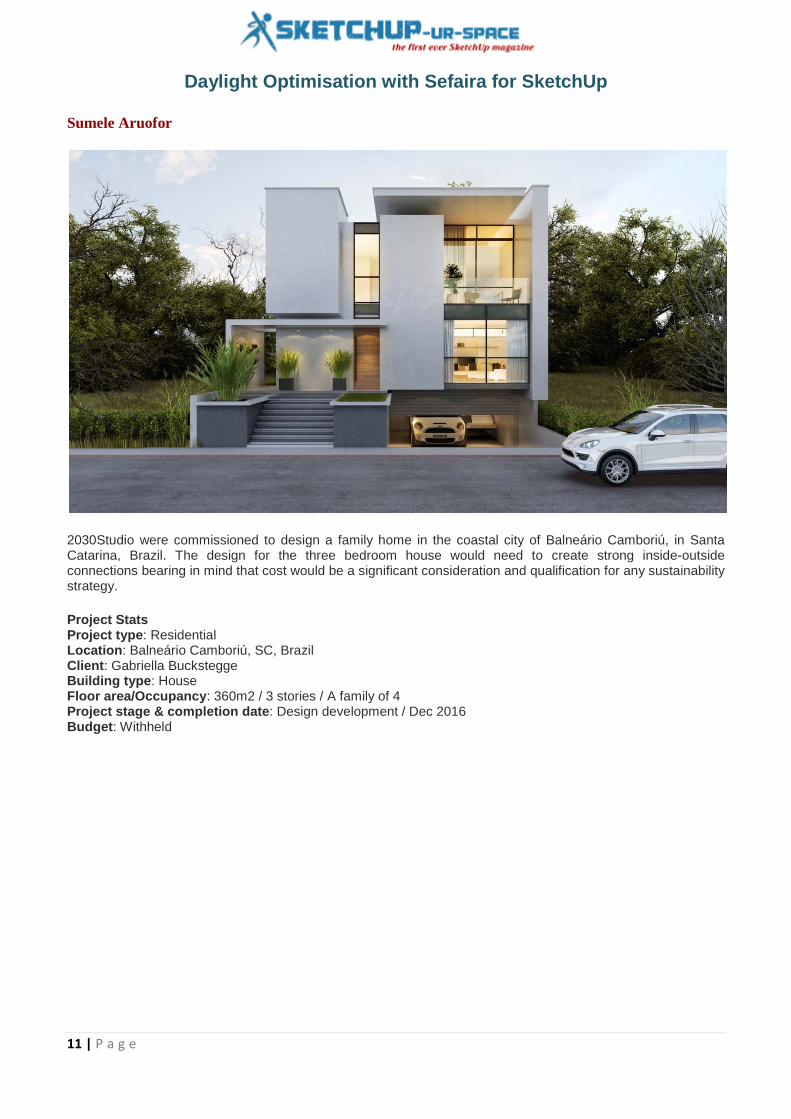
2030Studio were commissioned to design a family home in the coastal city of Balneário Camboriú, in Santa Catarina, Brazil. The design for the three bedroom house would need to create strong inside-outside connections bearing in mind that cost would be a significant consideration and qualification for any sustainability strategy.
Project Stats Project type: Residential Location: Balneário Camboriú, SC, Brazil Client: Gabriella Buckstegge Building type: House Floor area/Occupancy: 360m2 / 3 stories / A family of 4 Project stage & completion date: Design development / Dec 2016 Budget: Withheld

12 | P a g e
Location of the main house and its surroundings
Annual shading analysis
Approach: The 2030Studio team’s initial design, that placed private rooms on the upper floor and the more public spaces below, established a strong connection between inside and outside whilst ensuring privacy for the home’s residents. Large glazed openings frame desirable views of a national nature reserve just behind the site and ground floor spaces open up to connect to the back garden. While these indoor-to-outdoor connections were compelling, the design team was concerned that they would have a negative impact on solar gains and glare within these spaces.

13 | P a g e
To test their assumptions, the team created a whitebox model based on this initial concept, and analyzed it using Sefaira’s realtime plugin and daylight analysis feature.
Initial Sefaira daylight analysis showing overlit and underlit areas
Initial results showed a good sDA level (84%) but a high ASE value (31%). Once the problems were clearly diagnosed, it was possible to develop the concept and improve the overall daylight performance. To tackle the overlit and underlit areas, the team:
• added shading projections and light shelves to the main patio to prevent glare in the spa and dining area;
• introduced clerestory windows to bring daylight deeper into space;
Rendering by 2030Studio showing shading projections and clerestory windows
Results: Using Sefaira, 2030Studio were able to analyze their proposed solutions to ensure better daylight distribution across all spaces; they were able to significantly reduce glare in most spaces, driving ASE levels down from 31% to 9%. Implementing the shading strategies reduced sDA by only 3% — thus keeping the average daylight levels high within all spaces. In addition to a well lit interior and better visual comfort, they were able to reduce EUI by 17% (from 97kWh/m2/yr to 80kWh/m2/yr).

14 | P a g e
Sefaira Daylight Analysis showing improved daylight distribution
2030Studio used Sefaira analysis results and additional renderings to illustrate the impact of shading features on the building’s overall aesthetics as well as how the proposed changes actually improved daylighting throughout the home’s interior.
Rendering by 2030Studio showing shading over the main patio

15 | P a g e
Screenshots showing sDA & ASE levels across 3 floors, before and after the improvements.
Project architect Filipe Boni (LEED AP BD+C) said, “By using Sefaira from the start of the project, we were able to provide the client a straight comparison between a baseline design and the proposed building, focusing on higher levels of comfort and at the same time justifying our design ideas using clear data.
We were able to demonstrate that the proposal provided a much better daylighting balance than the initial concept did. Our client was very happy with the finished report which they felt gave them the right information to help guide decision making. As a result, the next phase of the project became even more fluid since all stakeholders understood the design goals, saving precious time in our short schedule.
We plan to continue to investigate strategies such as improved envelope and renewables, but it’s an inspiring beginning and an example of what we want to do on every project.”
Source: sefaira.com

16 | P a g e
Net Zero Energy Design with Sefaira for SketchUp
Sumele Aruofor
Sterner Design used Sefaira to set and achieve Net Zero Energy goals and deliver great daylighting by tracking the impact of design choices on energy and daylight throughout the design process.
Introduction: Sterner Design was commissioned to design a single family residence nestled into the hillside on a rural site in southeast Iowa. Two clear goals had been set for the Nest Residence:
• To set the project on track to achieve Net Zero Energy status. • To ensure that the primary living spaces achieved great daylight so that the home would be warm and
light-filled, despite being partially underground.
Project Stats Project type: Net Zero Energy target single-family residential Location: Iowa, USA Lead Designer: Carl Sterner Client: Private Building type / program: Single family residence Floor area/Occupancy: 2 stories, 2400ft2 living area (plus unconditioned storage and garage) Project stage & completion date: In design Performance Baseline: IECC 2012 Performance Goal: Net Zero Energy, good daylighting
Approach 1: Delivering Design Options with Good Daylight in an Underground House
In this project, daylight was approached from an experiential point-of-view. Carl Sterner, lead designer and Principal of Sterner Design, set out two benchmarks to evaluate the suitability of design options:
• “Enough daylight”: The first goal was to achieve 200 lux (typical light level for a residence) through daylight alone for at least 60% of year in the primary living areas: living room, dining room, kitchen, and study.

17 | P a g e
• Even distribution: The second goal was to ensure good daylight distribution across these spaces to avoid uncomfortably bright and dim areas, despite having windows primarily on one orientation.
Analysis was used from the very beginning of the project. Using Sefaira’s daylight analysis, Sterner investigated the impact of different conceptual design options on daylight penetration to help understand the daylighting potential of each option.
Designs were not necessarily ruled out due to poor performance; instead, the analysis was used to understand what mitigating steps would need to be taken if these designs were pursued. Options with a narrow floor plate (20 ft or less) were ideal from a daylighting standpoint; deeper floor plates would require more creative (and perhaps expensive) solutions such as skylights. The parallel energy analysis showed that designs with a more compact shape tended to have better energy performance.
Following several design iterations, the team arrived at a concept that combined daylight and energy performance with the client’s requirements and budget. At this stage, Sefaira analysis was used to further refine the design and address potential problem areas. One such area was the northwest corner of the main living area, which was initially dim.

18 | P a g e
To tackle this, Sterner tested the impact of taller windows, light shelves, and ways of “borrowing” light from the well-lit level above. To improve daylight in the NW corner of the lower level, a light well will be built into cabinetry in the study above, achieving even daylight distribution below without the energy and waterproofing drawbacks that accompany conventional skylights.
Approach 2: Achieving Net Zero Energy in a Mixed Climate
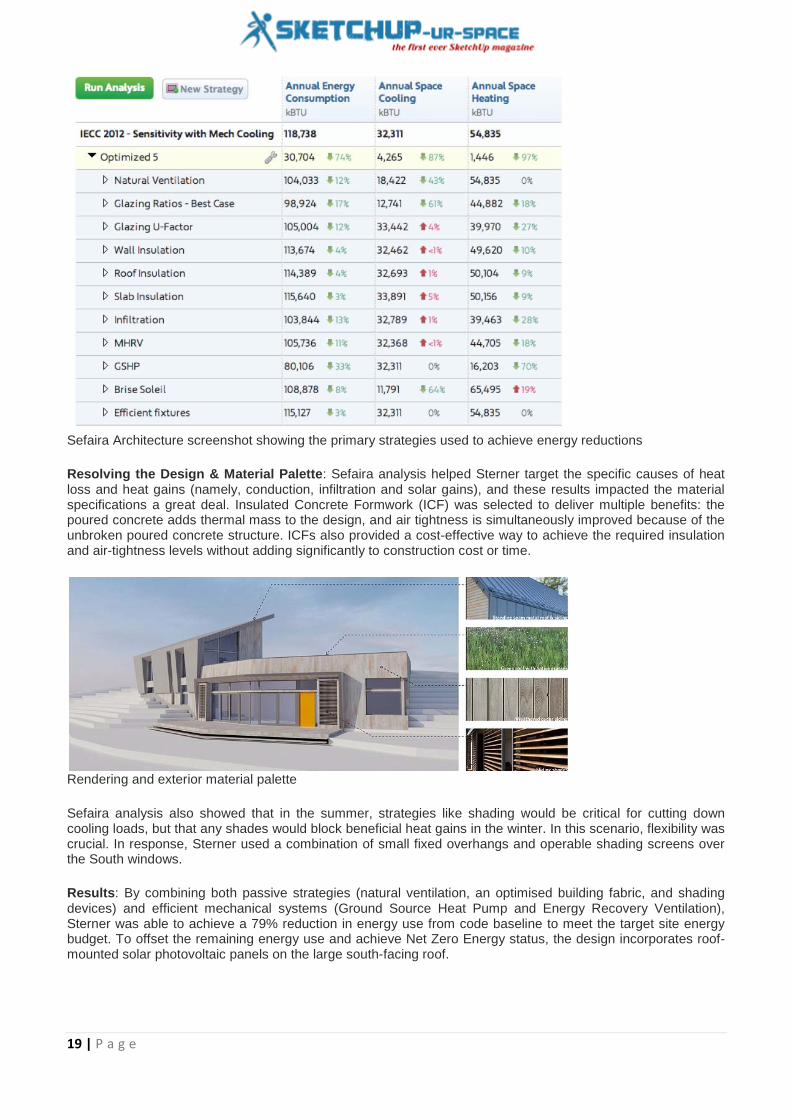
On the energy side, the plan was to reduce overall energy use to the point where the remaining needs could be reasonably generated on-site. Initial analysis put the site energy budget at 30,000 kBTU/year — which meant that a lot needed to be done to get Annual Energy Use down from the initial code baseline of 118,738 kBTU.
Iowa, like much of the American Midwest, poses a difficult climatic challenge. A mixed climate means it is very cold in the winter but quite hot and humid in the summer. To reduce energy use, proposed strategies needed to keep both cooling and heating requirements in balance.
19 | P a g e
Sefaira Architecture screenshot showing the primary strategies used to achieve energy reductions
Resolving the Design & Material Palette
Rendering and exterior material palette
Sefaira analysis also showed that in the summer, strategies like shading would be critical for cutting down cooling loads, but that any shades would block beneficial heat gains in the winter. In this scenario, flexibility was crucial. In response, Sterner used a combination of small fixed overhangs and operable shading screens over the South windows.
: Sefaira analysis helped Sterner target the specific causes of heat loss and heat gains (namely, conduction, infiltration and solar gains), and these results impacted the material specifications a great deal. Insulated Concrete Formwork (ICF) was selected to deliver multiple benefits: the poured concrete adds thermal mass to the design, and air tightness is simultaneously improved because of the unbroken poured concrete structure. ICFs also provided a cost-effective way to achieve the required insulation and air-tightness levels without adding significantly to construction cost or time.
Results: By combining both passive strategies (natural ventilation, an optimised building fabric, and shading devices) and efficient mechanical systems (Ground Source Heat Pump and Energy Recovery Ventilation), Sterner was able to achieve a 79% reduction in energy use from code baseline to meet the target site energy budget. To offset the remaining energy use and achieve Net Zero Energy status, the design incorporates roof-mounted solar photovoltaic panels on the large south-facing roof.

20 | P a g e
Path toward Net Zero Energy: energy reduction strategies and on-site generation
Source: sefaira.com

21 | P a g e
3D printing: A New Frontier for Education
Artur Coelho
First step: ignite curiosity
Today, 3D printing is perceived as a transformative technology which is leaving its mark on society. Although still seen as a novelty by the media, it is today an integral part of manufacturing processes in creative and advanced technology industries, such as, for example, aviation or engineering, who resort to the new manufacturing capabilities and rapid prototyping enabled by a technology that promises to change the paradigm of industrial manufacturing. A change that is already happening in leading industries, but is also reflected in the numerous businesses that are emerging on the consumer domain, such as desktop 3D printer manufacturers, or stores specializing in filament, accessories and 3D printing services that bring this technology for all. Also of note is the explosion of Maker culture, which enhanced by open source hardware has been fundamentally beneficial in the evolution and dissemination of addictive manufacture technologies.
3D printing is already present in our daily lives, conceptually in the popular consciousness fuelled by the media, and in products and services that we often do not realize that were created using these technologies. In a very obvious example, sets and props for the Special Effects in some of the most popular films. In less obvious ones, structural architectural elements, airplane parts or medical models that help surgeons to plan complex operations. Slowly but steadily 3D printing is also coming into our homes and jobs. There are more and more individual users who try and find their own personal uses for RepRaps, Makerbots, beethefirsts and other fused filament printers in commercial and artistic personal projects.
Classrooms are often the last strongholds for penetration of new technologies. The current use of personal computers is only now becoming a daily reality in Portuguese schools. For mobile technologies the outlook is worse. If socially, on a daily basis, tablets and smart phones have become productivity and communication tools, the vast majority of schools still dismiss them as distracting gadgets, notwithstanding some academic experiments that research ways of bringing their communication and productivity gains into educational contexts.
This culture of resistance to new technologies in school results from a powerful combination of several factors. Teachers can be in general conservative and wary of new technologies. Comfortable with the results obtained by traditional methods, they are understandably wary of technological experiments whose results and pedagogical outcomes they cannot anticipate. Other factors include lack of ideas to spark technology use beyond the novelty factor or as a digital form of replicating the work processes of analog learning. Finally, and

22 | P a g e
fundamentally, investment costs and equipment needs. Equipping schools with hardware suitable to their needs is costly. Investments, when they happen, focus on the hardware and generally leave aside the teacher training component. I have personal experience with tracking and implementing projects of this kind in the school where I work, usually in top down, ministerial level, on regional and national approaches. These experiences taught me a hard lesson. Much of the digital technology that is delivered to awaken innovative pedagogies ends up collecting dust in storage rooms or used in very elementary ways. The main flaw in this process is in the ideas. We can give teachers every desirable computer, interactive whiteboard, projector our any other digital tool, but if teachers do not have a conception of how to take advantage of it, they will not use them efficiently. Training helps fighting this problem, as well as sharing hands on, in the field experiences in communities of practice and internet forums, but this is a slow process.
Considering this set of challenging factors, perhaps that's why Gartner, in its Hype Cycle 2015 on 3D printing (http://www.gartner.com/newsroom/id/3117917), was pessimistic when classifying 3D printing in the classroom. The Gartner Hype Cycles welcome describe in a very interesting way the trajectory of emerging technologies in the public consciousness, from the time they exit the labs until their normalization in everyday life. One of their most curious elements of is what they call the peak of expectations, that moment we all felt when a particular technology surprises and awakens in us the desire to have it, but we do not yet know very well how we will use. From that peak the interest decays abruptly, but in the medium term, in what Gartner's analysts describe as the productivity plateau, technologies mature and integrated in daily life. Forecasts by Gartner for Classroom 3D Printing, 3D printing in educational contexts, are not encouraging. The interest is growing, but approaching the peak of expectations which inevitably leads to the denial of its usefulness. They predict that the full implementation of this technology in the educational context is in a horizon beyond ten years time.
This may be a pessimistic vision, but the new pedagogical possibilities brought by 3D printing in school are real. All over the world, teachers and researchers are increasingly testing formal and informal projects that bring 3D printing to the classroom. These projects are crucial, being the first steps that will begin to enable children to contact with this technology. Its main importance lies in the space of ideas. These new projects seek practical activities that take advantage of 3D printing using approaches and methodologies that are integrated into the curriculum and make it into a tool used by children. In doing so, they inspire and generate more ideas (https://instagram.com/morphiapp/).
Kids and grownups alike marvel before 3D printers.
What can our students learn through 3D printing? On a basic level, to demystify the technology, coming into contact with hardware that they know from seeing it on the internet or television but did not suspect that it may be closer to them than they think. This marvelling before the aesthetics of the machine, eying with delight while the precise movements of the extruder build an object layer by layer is an alluring look that I have often seen in

23 | P a g e
children and grownups, either in the classroom or in workshops and demonstrations. But it's still a first step, not the most relevant in pedagogical terms and does not bring anything new to education. It is the equivalent of talking extensively about computers or the Internet, showing them but not allowing pupils to use it.
Designing activities that put pedagogical focus on content creation by students is crucial for an effective use of technology in education, and 3D printing sticks to this principle. More important and relevant than looking at objects, mechanisms, or interactive representations, is to be able to directly create and work with them. In other words, to shift the focus from a passive learning stance to an active, creative, hands-on that research shows is more effective to foster knowledge retention and enables more dynamic abilities in students.
This cute bird is one of the first 3D printed objects designed by our students, a 13 year old girl.
Documented uses of 3D printing, studied either in academic contexts or by innovative teachers who are experimenting and breaking intervention paths at school, involve different aspects. In artistic fields, 3D printing can be used as creation tool for learning artistic techniques. In other areas, one of the first uses is bringing tangibility to ease understanding of abstract concepts such as complex geometric shapes or tessellations in mathematics, or molecular structures in the sciences. In technological areas 3D printers are increasingly used to create mechanisms or elements for Arduino controlled robots. The potential for integration in curricular activities is enormous. Listing all possible uses would be an exhausting and endless task. Every day, somewhere, there is one more teacher in her classroom conceiving a new activity that takes advantage of 3D printing. Sometimes, in unsuspecting levels of education, as shown by elementary school teachers challenging their very young students to model in 3D to print the result (https://instagram.com/p/4PtiIzMKSy/).
So, how can we take advantage of 3D printing to spark learning and creativity? Online repositories of 3D printable content are a good starting point, but if we really want to awaken the potential of these technologies in our students we have to teach them how to model in 3D. In doing so we are teaching them not only the tools that let them create to print in 3D, but also work and design processes that shape their thinking. And, crucially, giving them tools to enhance creativity.
In addition to the new learning capabilities brought about by its curricular integration, 3D printing brings to children, our students, another important ability. To make the most of this technology, one must go beyond printing pre-designed parts and models discovered in online repositories. One has to create, and for that it's necessary to conceive, design, explore solutions, draft, and essentially learn to model in 3D. This is where things become even more interesting. By bringing 3D printing to the classroom, we encourage our students to learn modelling methodologies and workflows, acquire technical knowledge and use software that, in most cases, would not be within their horizons. We can intuit the potential that these factors have on preparing children to face the challenges of STEM areas (Science, Technology, Engineering, Mathematics). I remember,

24 | P a g e
during the Lisbon Mini Maker Faire in 2014, the words of an engineer observing some work done by my students between the ages of nine and fourteen using 3D modelling technologies in the classroom: It is very important, he said, that children learn how to use 3D so that later they more easily able to learn the work processes in engineering. Going beyond specific fields, our goal is not to train little engineers or animators and 3D modellers, but rather providing our students with some comprehensive basic knowledge that will allow them further development later in life on whichever path they choose.
That being said, we are working with young students. Therefore, we have to focus on easy to use tools, that enable them to focus on design and creativity and not on navigating cumbersome or complex user interfaces and failing to learn difficult modelling methodologies. There is a growing number of 3D modelling applications that are precise but easy to use. We have previous experience in teaching 3D modelling and animation to young children, so it was easy to use it to speed up application choices for 3D printing projects. From the large number of 3d modelling software, we are focusing on two that are easy to integrate in class, learn and rapidly create models: Sketchup and Tinkercad.
Learning 3D modelling in Sketchup to create physibles.
Sketchup is, I suspect, quite well known by readers of this magazine. Sketchup is complex, precise, multi-purpose, and so intuitive that children need only some quick lessons to start using it. That speed always amazes me. Being a professional-level software, it also introduces children to the wider world of modelling in architecture and engineering, giving them a glimpse and early start that might be useful for their future career choices. However, Sketchup is also problematic when modelling for 3D printing, which requires non-manifold, watertight meshes. One essential technique while modelling in Sketchup for 3D printing is using the outer shell tool to combine solid groups. Simple pieces are easy to model, but more complex ones sometimes require extensive corrections either in Sketchup or using STL validation tools such as netfabb, Make Printable or Microsoft 3D Builder. It is advisable to install Sketchup's export to STL plug-in, since converting to STL from the collada format tends to disrupt precise measurements. My students are using Sketchup in some cool 3D printing projects were they redesign kitchen utensils and traditional toys.
25 | P a g e
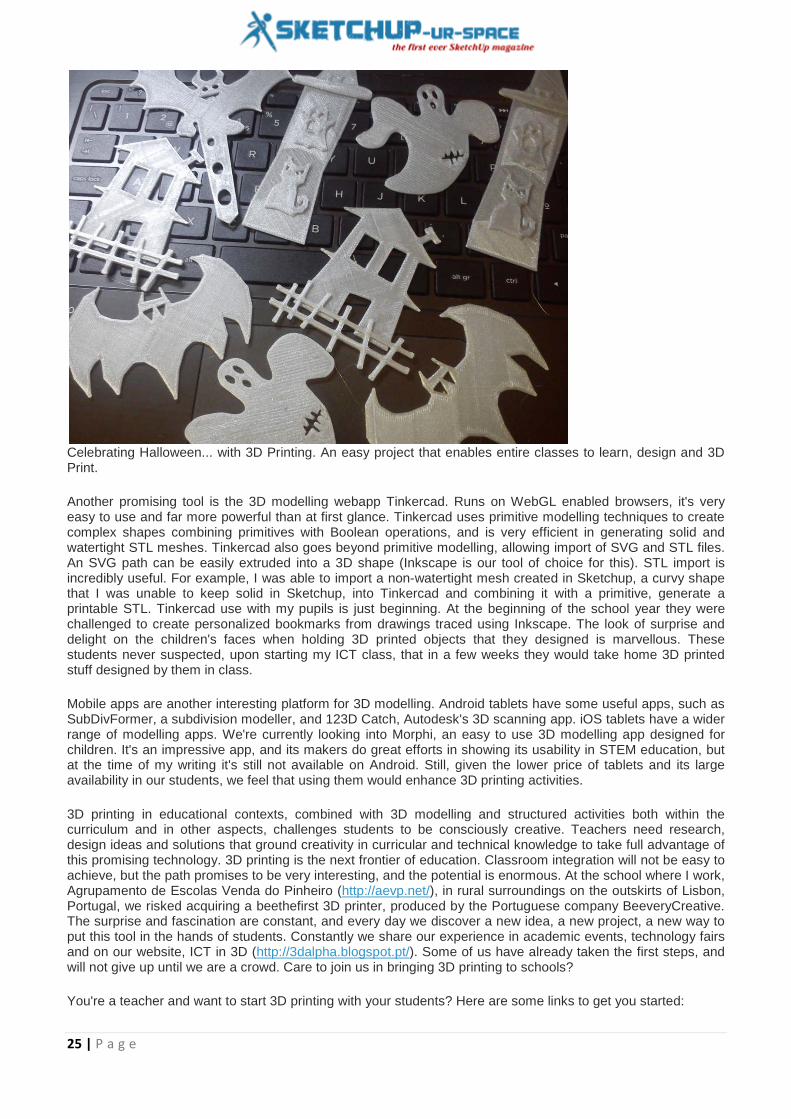
Celebrating Halloween... with 3D Printing. An easy project that enables entire classes to learn, design and 3D Print.
Another promising tool is the 3D modelling webapp Tinkercad. Runs on WebGL enabled browsers, it's very easy to use and far more powerful than at first glance. Tinkercad uses primitive modelling techniques to create complex shapes combining primitives with Boolean operations, and is very efficient in generating solid and watertight STL meshes. Tinkercad also goes beyond primitive modelling, allowing import of SVG and STL files. An SVG path can be easily extruded into a 3D shape (Inkscape is our tool of choice for this). STL import is incredibly useful. For example, I was able to import a non-watertight mesh created in Sketchup, a curvy shape that I was unable to keep solid in Sketchup, into Tinkercad and combining it with a primitive, generate a printable STL. Tinkercad use with my pupils is just beginning. At the beginning of the school year they were challenged to create personalized bookmarks from drawings traced using Inkscape. The look of surprise and delight on the children's faces when holding 3D printed objects that they designed is marvellous. These students never suspected, upon starting my ICT class, that in a few weeks they would take home 3D printed stuff designed by them in class.
Mobile apps are another interesting platform for 3D modelling. Android tablets have some useful apps, such as SubDivFormer, a subdivision modeller, and 123D Catch, Autodesk's 3D scanning app. iOS tablets have a wider range of modelling apps. We're currently looking into Morphi, an easy to use 3D modelling app designed for children. It's an impressive app, and its makers do great efforts in showing its usability in STEM education, but at the time of my writing it's still not available on Android. Still, given the lower price of tablets and its large availability in our students, we feel that using them would enhance 3D printing activities.
3D printing in educational contexts, combined with 3D modelling and structured activities both within the curriculum and in other aspects, challenges students to be consciously creative. Teachers need research, design ideas and solutions that ground creativity in curricular and technical knowledge to take full advantage of this promising technology. 3D printing is the next frontier of education. Classroom integration will not be easy to achieve, but the path promises to be very interesting, and the potential is enormous. At the school where I work, Agrupamento de Escolas Venda do Pinheiro (http://aevp.net/), in rural surroundings on the outskirts of Lisbon, Portugal, we risked acquiring a beethefirst 3D printer, produced by the Portuguese company BeeveryCreative. The surprise and fascination are constant, and every day we discover a new idea, a new project, a new way to put this tool in the hands of students. Constantly we share our experience in academic events, technology fairs and on our website, ICT in 3D (http://3dalpha.blogspot.pt/). Some of us have already taken the first steps, and will not give up until we are a crowd. Care to join us in bringing 3D printing to schools?
You're a teacher and want to start 3D printing with your students? Here are some links to get you started:

26 | P a g e
Morphi http://www.morphiapp.com/ : A cool 3D modelling app for iOS designed for children. Their creators are very focused on STEM education.
Tinkercad: an easy to use, yet powerful and precise web-based 3D modeller.https://www.tinkercad.com/
Makerbot in the Classroom: Looking for curriculum ideas and strategies for classroom 3D printing? Makerbot designed this interesting curriculum.http://pages.makerbot.com/download-makerbot-in-the-classroom.html
El Patrimonio Escultorico en el Aula: Focused on arts education, an interesting source of ideas for 3D printing activities.https://www.academia.edu/11954206/El_Patrimonio_Escult%C3%B3rico_en_el_aula
Invent to Learn Guide to 3D Printing in the Classroom: Some very practical ideas for 3D printing projects http://inventtolearn.com/3d-printing-in-the-classroom/
ICT in 3D: our website, where we share ideas, articles and classroom experiences in 3D modelling and 3D printing at school http://3dalpha.blogspot.pt/

27 | P a g e
CL3VER unveils pro VR Authoring solution for AEC at AU 2015
Luca Vidotto : Marketing Director
CL3VER 3.3 will offer enhanced publishing capabilities through a new desktop app, as well as support for VR and an improved production workflow.
Palo Alto, CA November 26, 2015 - CL3VER 3.3 will be presented in Las Vegas at Autodesk University 2015. At the event, CL3VER and partners ArchVision, Chaos Group and irisVR will also showcase a streamlined architectural visualization pipeline in a dedicated section of the show floor. (booths #1312, #1310, #1213, #1211).
VR solution and a brand new Desktop App: During the show at the booth #1312, CL3VER will demo the major features of the upcoming 3.3 version.
Direct VR authoring from Revit, Sketchup, Max and Rhino Following the trend for the future of Architectural Visualization, CL3VER introduces a VR solution that streamlines VR content creation from Autodesk 3ds Max, Autodesk Revit, SketchUp and Rhino 3D. This effectively makes CL3VER the first 3D content provider that natively support the standard.
New CL3VER Desktop App To provide users with a seamless experience on any device online and offline, CL3VER presents its brand new solution. The CL3VER Desktop App enables users to save and open presentations to Windows and OS X devices making it easier for designers to present their projects anytime and anywhere.
Unified visualization pipeline together with ArchVision, Chaos Group and irisVR
“We are witnessing how emerging technologies are reinventing design and how ideas are now being communicated. However, reinvention comes with new challenges. Together with our partners we will present our solutions to these challenges through real customer cases and offer product demos from experts. Attendees can expect to see how to do everything from accelerating design modeling to approaching virtual reality (VR) through a streamlined workflow.” Viktor Nordstrom CEO of CL3VER
This partnership was born because of a natural flow between these complementary products. ArchVision improves design modeling and visualization with content and content management solutions. Chaos Group is the leading company for rendering solutions, known for its rendering software, V-Ray. CL3VER is the leading authoring platform for engaging interactive 3D presentations. While, irisVR brings 3D models into Virtual Reality on Oculus Rift glasses.
Along with individual booths, there will be a small stage placed in the center of the stand which will act as a theater, featuring live presentations by each company for the duration of the event.
About CL3VER
The company is headquartered in Barcelona, Spain with offices in Palo Alto, California. For more information, visit
: CL3VER provides a cloud based platform for interactive 3D presentations for the web and mobile devices. CL3VER presentations helps professionals in the AEC and Manufacturing industry to engage customers and stakeholders with the power of 3D and the usability of the web.
www.CL3VER.com.

28 | P a g e

29 | P a g e
How to generate walls efficiently with Dibac for Sketchup
Rajib Dey: Editor-in-chief
Robson Jacobsen presents a useful sketchup video that highlights how to generate walls effortlessly with 2015 Dibac for sketchup.
2015 Dibac for SketchUp is a plugin that can be used for generating perfect architectural drawing. This sketchup plugin facilitates the architects to make the drawing of any architectural plans with 2D tools and then obtain the 3D model automatically.
It becomes easier to draw walls, doors, windows, wardrobes and stairs and create them dynamically. With this new 2015 version, any component, carpentry and joinery can be included from the library or even from the 3d warehouse.
2015 Dibac for sketchup supports sketchup 2014 and sketchup 2015 Download this sketchup plugin from www.dibac.com
https://youtu.be/g8r6-bZ9eyc

30 | P a g e
How to create 3D textures using Sketchup
Anita Brown
The SketchUp plug-in for Maxwell Render offers a whole host of functions that enable the user to create a wide range of textured materials. If you're specifically interested in creating a densely textured rug then Maxwell Grass is your friend.
This feature (known as a Maxwell Render extension) can be accessed directly within the SketchUp interface via the SketchUp plug-in for Maxwell Render.
Officially it's called Maxwell Grass but don't let the name throw you: this extension has such a high number of unique parameters that it's possible to create textures that are ideal not only for grass textures, but also carpet and rugs.
Maxwell Grass basically generates geometry for selected groups in SketchUp once the scene has been exported to Maxwell Render.
It's all about the RAM
A densely textured rug created using Maxwell Grass
: Pro tip: If only a small portion of the rug will be visible in the final render, use the Level of Detail parameter to render more blades near the camera and gradually less blades as the distance from the camera increases, thereby saving that precious RAM.
How to get started: To get started, select the group and then click on the Maxwell Grass icon in the SketchUp toolbar. A new window will open with a range of settings. Here you have the ability to specify the parameters of how you'd like the grass (or in this instance fur) to appear.
The Primitive setting is the first step in specifying the colour, shape and thickness of the blades, including the number of points (segments).
In my scene I chose the Cylinder setting and opted for quite thick individual strands. Just remember that RAM usage will increase depending on which type of Primitive you choose and the associated number of points.

31 | P a g e
Maxwell Green is ideal for carpets and fur - click on the image to see a larger version
The density and length of the blades can be specified according to preference and a very useful randomiser can be used to vary the length according to the percentage input.
The Maxwell Grass extension also includes Bend parameters. These control the bending of each strand of blade, at what length it starts bending, the angle it bends, and the bending radius (with randomisers for each).
The Bend parameters are invaluable when trying to recreate the behaviour of densely textured fur rugs and provide a high level of accuracy and realism.
Explore additional functionality of Maxwell Grass by using Maxwell Studio to add gradient and texture maps to further refine and enhance.
Source: www.creativebloq.com

32 | P a g e
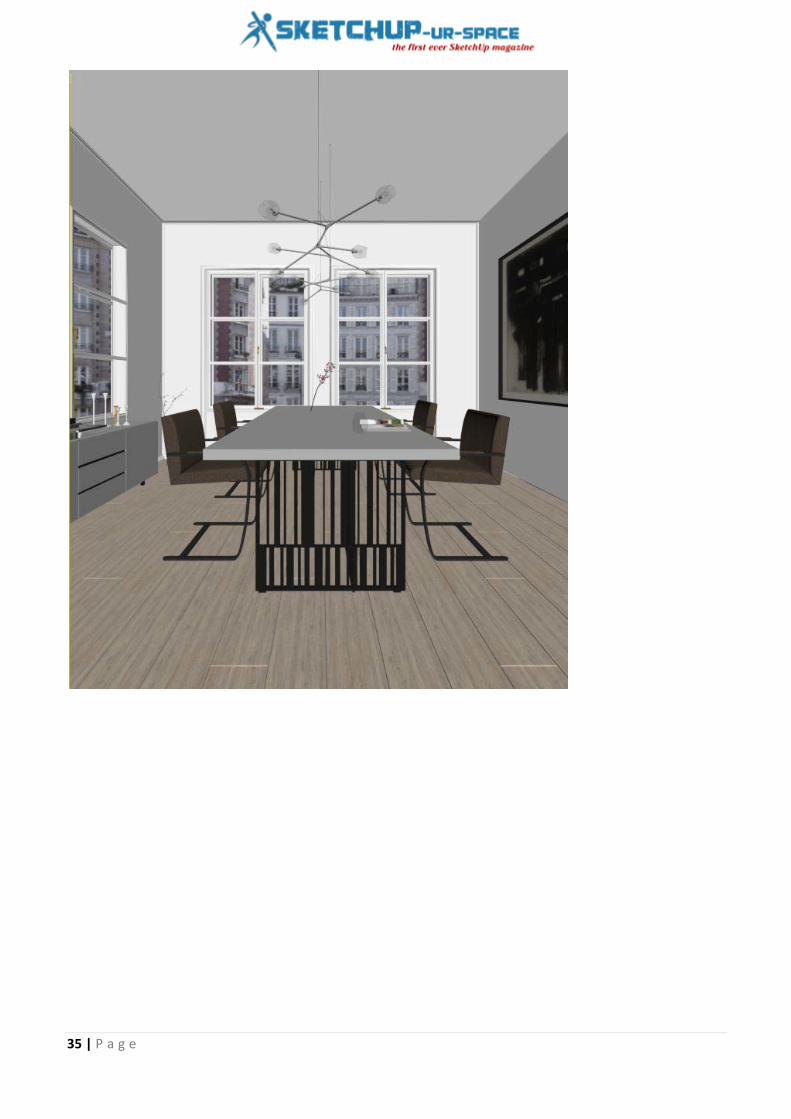
How to design a room with Sketchup, 3D Max and Vray
Javier Wainstein - JW Renders
Hope they serve, of course, you can see my work:
Hello everyone!
After a while of working with 3ds Max and V-Ray, decided to make a brief tutorial to explain a little of my process.
www.jwrenders.com
First, start with the basic geometry (in this case, modeled in SketchUp, and then export it to work it with 3ds max.)
Add elements (in this case, I took a few Archinteriors of Evermotion, such as moldings, or windows, or doors.)

33 | P a g e
Then, I have the lightning.
In this case, it was simple, the Sun, and Vray lights in the windows.
And these are the values of the lights.
34 | P a g e
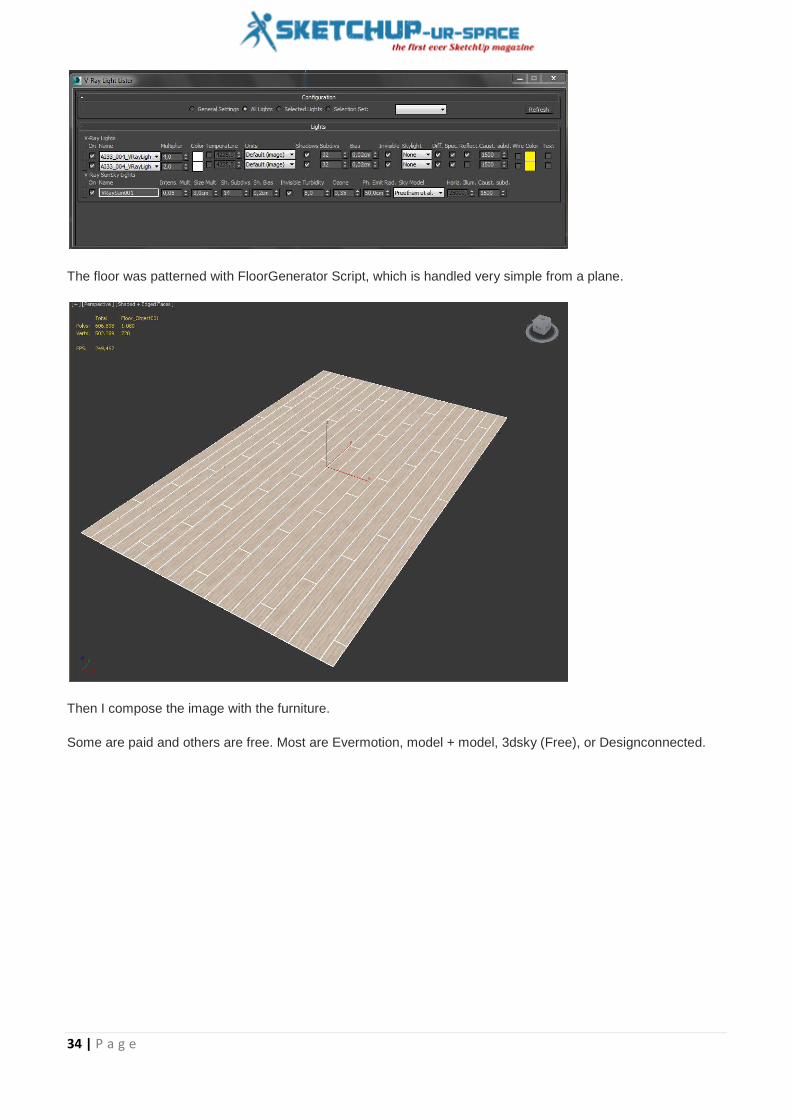
The floor was patterned with FloorGenerator Script, which is handled very simple from a plane.
Then I compose the image with the furniture.
Some are paid and others are free. Most are Evermotion, model + model, 3dsky (Free), or Designconnected.
35 | P a g e

36 | P a g e
This is a render without furniture, can be seen as the lighting is natural and controlled.
The background is a picture in a VRayLight Material (to have intensity), but then Photoshop will overexpose to leave almost blank, simulating the burning outside.

37 | P a g e
These are some of the materials used.

38 | P a g e

39 | P a g e

40 | P a g e

41 | P a g e
Finally, here are All settings used.

42 | P a g e

43 | P a g e

44 | P a g e
And finally, as they were the final images.

45 | P a g e

46 | P a g e

47 | P a g e
Learn to grid materials with v-ray for Sketchup
Rajib Dey : Editor-in-chief
This nice sketchup v-ray tutorial is presented by W design corp. This v-ray tutorial will provide step-by-step guidance on how to grid materials in v-ray for sketchup.
This sketchup tutorial is specifically designed for advanced sketchup users who have good knowledge in modeling and sketchup materials.
https://youtu.be/xeE_KcpZj98

48 | P a g e
Magazine Details – The Creative team of Sketchup-ur-Space
Started in September 2010, Sketchup ur Space (SuS) was the first online magazine devoted to SketchUp, that unique, innovative 3D design tool from Google. It holistically covers features, events, news, updates, reviews and many tips and tricks.
Rajib Dey:[email protected]
Rajib, the editor-in-chief of SketchUp ur Space magazine is the main writer. He is responsible to write the cover story, blog and many other columns. Along with it, He is creating a liaison between the writers and the readers.
Manoj Kumar Singh: [email protected]
Manoj is enthusiastic helps to put the content of the SketchUp up Space magazine in the html version. Manoj is the html developer who beautifully creates each and every edition with care along with the PDF version.
Abhishek Mondal: [email protected]
Abhishek is the designer-in-chief of this magazinewith the help of his creativity Sketchup ur Space has gotten a classy as well as trendy look...