sketchup -ur-spacesketchup-ur-space.com/2015/aug/sketchup-ur-space-aug-2015.pdf · 3d printing. our...
TRANSCRIPT

SKETCHUP
-UR-SPACEAugust2015
COVER STORY
3D Printing with
Sketchup
- Rajib Dey
ARTICLES
NEWS
Review of 3D Max 2016
SketchUp Architectural Entourage (BETA)
BLOGS
TIPS AND TRICKS
How to set up in Ruby Extensions
Online presentation of Brighter 3D
SketchUp 2015 Rendering Software
VFX Direct Digital Media Agency will
perform as the certified sketchup content
developer to generate and distribute 3D
models through 3d warehouse
Creating Arrays in SketchUp
- Ryan Gorman
How to model a leather sofa
with SketchUp
How SketchUp Pro
was utilized to create
the design and
modeling of a port
handling facilities and
instruments
SketchUp Style Builder

1 | P a g e
1. A Letter to the desk of editor
A letter direct from the editor desk highlighting on August’15 edition
2. Interview
Interview with Ahmed Maher
3. Cover Storey
3D Printing with Sketchup
4. Article
Review of 3d Max 2016 SketchUp Architectural Entourage (Beta) How to set up Ruby Extensions in Sketchup
5. Blog
Online presentation of Brighter 3D Sketchup 2015 Rendering Software VFX Direct Digital Media Agency will perform as the certified sketchup content
developer to generate and distribute 3d models through 3d warehouse
6. Tutorial
Creating Arrays in SketchUp How to model a leather sofa with sketchup Some useful tricks and instructions for modeling efficiently with Sketchup
7. News Room
8. Magazine Details – The Creative team of Sketchup-ur-Space

2 | P a g e
A letter direct from the editor desk highlighting on March edition
We have just published the next edition (August 2015) of sketchup ur space. This edition is also enriched with some scholarly articles, useful tutorials, updated news etc.
To start with, the sketchup ur space team has presented an in-depth cover story that is based on sketchup and 3d printing. Our readers will learn how to use various tips to easily make any sketchup design ready for 3d printing.
In article section, there will be three articles. The first article differs from the usual sketchup article as it is written for 3ds max users. The article focuses on the new and advance features of 3ds max 2016. Some outstanding features of 3ds max 2016 have been briefly analyzed here.
The second article is about a sketchup plugin called Sketchup Architectural Entourage that is still in beta development stage. The plugin contains some useful toolset which can convert any 3d design into the masses through sketchup.
The third article will guide the sketchup users on how to install ruby extensions to explore through various sketchup extensions and use them according to your requirements. In order to use sketchup extension, go to sketchup and choose Window---- extension warehouse.
The tutorial section contains three useful tutorials. The first tutorial is presented by Ryan Gorman, the recognized cad instructor and cad designer. In his tutorial Ryan briefly explains how to effectively create an array by applying various sketchup tools.
The second tutorial is a simple tutorial for beginner sketchup users. This tutorial will help you to generate the drawing for making a 3d sofa with sketchup.
The last and final tutorial provides some handy tips and instructions to save huge time and make your modeling process superior with sketchup.
In blog section, there exist two informative write-ups. The first one is about demonstration of Brighter 3D sketchup 2015 software to produce realistic renders out of any sketchup scene.
The second one is about an exciting news that VFX Direct Digital Media Agency will perform as the certified sketchup content developer to generate and distribute 3d models through 3d warehouse.
In interview section, the team of sketchup ur space has interviewed Ahmed Maher, the authorized instructor for Trimble and an assistant teacher in German University in Cairo (architectural department). Mr. Maher has briefly explained various aspects of sketchup in architecture and urban designing.
In news section the readers will get latest happenings in sketchup world as well as about the upcomings in sketchup.
Hope this edition will be highly interesting and instructive for our readers.
If you have any queries concerning publication, subscription, troubles navigating the site, please mail us at [email protected]
Best wishes Rajib Dey
Editor

3 | P a g e
Interview with Ahmed Maher, Teaching Assistant, Architecture and Urban Design Program in GUC.
Interviewer: Rajib Dey (Editor-in-chief)
Please make your brief introduction.
My name is Ahmad Maher, I'm from Cairo, Egypt. I am a Teacher Assistant in German University in Cairo - Architecture department, Authorized Instructor for Trimble SketchUp The first in Egypt and Autodesk certified Instructor. Iam also Instructor in CADMasters training Center in Egypt.
For more than 9 years now SketchUp is my main tool for design and visualization, either for Training.
You work as a teaching assistant in Architecture and Urban Design Program in GUC. Tell us something about your professional life.
I am interested in the world of Education, Active Learnings and Architecture, and I trying hard to integrate the Computerized vision in Architecture Learning based on the rational aspects of the world Architecture Community hierarchies. So here in GUC we try to focus on parametric modelling and how to teach the students different ways to use the software in Architecture visualization, specially in our Course "CAD-CAM".
How sketchup streamlines the Architectural and Urban Design Process?
In GUC, it is the first time here to mix the Sketchup, Vray and lumion in Design conceptual methods, so we established "The Morphological visualization Track" with Architectural competition "Morphing or Forming" which is to prepare students for modelling architectural geometry through the development of parametric schemes for architecture. They have to redesign the unused spaces in the campus by Morph it or they should Form anew masses for the new buildings.
When did you first discover sketchup?
My first contact with sketchup was in 2006 it was in my college, Architecture department i felt that i have to find a software to draw my sketches and design and i found that Sketchup is the best way to create 3D models in easy way, so I started to master it by self learning, after that and in 2010 I started my career in Teaching it in the university and in the training centers.

4 | P a g e
How does sketchup impact your workflow?
SketchUp Pro is rewriting the stigma that CAD programs are hard to use. The layout of SketchUp Pro is very intuitive and easy to use, even for the least knowledgeable CAD designers. The added bonus of the 3D Warehouse is a great resource as you'll have constantly new models and symbols to choose from and work with. Although support only lasts for a year, and architectural tools are not plentiful, SketchUp Pro is still a wonderful program for designing and editing 3D models and designs.and we can also use vray or any other render engine or stand alone software to render the outcome of Sketchup.
The latest version of sketchup is sketchup 2015. Provide your valuable feedback on this latest version of sketchup.
SketchUp is owned by Trimble Navigation, best known for their GPS products. They purchased what was formerly Google SketchUp from Google in 2012, and since then have dedicated efforts to ensuring the much-relied-upon SketchUp software continues to reign as a top choice for architects, engineers, building developers, interior decorators, moviemakers — and those just looking to have plain old fun with design technology.New features make it easier and faster to create, access, share and collaborate on 2D drawings and 3D models. SketchUp 2015 offers 64-bit support for Windows or Mac, while IFC file import capabilities allows back-and-forth sharing of IFC files between SketchUp Pro and any other application.
GUC is organizing an exclusive event on Morphalagical visualization with sketchup. Please tell us something about the event.
Yes, as i mentioned before this is the first time here we work on an Architectural competition in the educational curriculum, so we found the "Morphing or forming competition" which is mainly refers to how the students could use their campus spaces to modify, morph and redesign the unused one. We have another track its about interactive Architecture named "Responsive Prototyping track", it is a magnificent experiment to enhance the computerized Architecture vision of students.
How sketchup will evolve in near future?
I think its the time to develop Sketchup as a BIM tool which is a great system to draw and design, and i want to see anew systems of parametric modeling like Grasshopper Plug-in for sketchup.
Is there anything else you would like to focus on sketchup?
I want to say that sketchup is a magnificent tool to design and create 3Ds in minutes, so it must be considered as one of the best softwares in the world.
What suggestions do you want to provide to the newbie urban designers and architects?
Passion If you can be excited and willing to get out of bed in the morning to be an architect and happy to put in the hours and hours of hard work then you are off to a good start. You will become a person that thinks about architecture all day everyday, as it dominates your mind. If this is something you already feel, then you are in a good place, and work won’t seem like work at all!
Creativity and passion for design If design gives you a real buzz and you love to get creative then architecture is a great field for you. Tie that in with some of the skills below you will smash it as an architect!
Problem solver Working in architecture is a constant puzzle. You must be able to identify a problem (preferably before it arises) and find a suitable solution to address the problem. A problem solver with a curious mind – questions everything… how can this be improved, how will this work, how does this go together...?
Be patient – it takes a long time to learn this trade – and you never really know it all. The benefit of this is that if you keep on learning all the different factors of an architects role, you shouldn’t really get bored, and amongst it all you will find the part you love.
Resourceful I consider it to be really important for architects to know the information they need, and have the initiative to go and find it. When you reach a stumbling block, instead of just giving up it is important to be able to find the resources you need to solve the problems you face.
5 | P a g e
Technical knowledge An enthusiasm for the technical side of things is an advantage. A bit of maths, physics and IT will help – as architecture is not just about design. Implementation of your design and ideas in order to make something that produces functional design solutions and can actually be built requires technical ability.
Communication – and listening...and persuasion You are going to be working with clients from different background with different goals and requirements and you have be able to communicate with the client effectively. You will need to be able to listen and understand what your client needs, and often put those needs before your personal tastes, or be able to integrate the two together.
There is a lot of negotiation in architecture, whether you are persuading your client that your design is suitable for their needs or communicating with planners who don’t want to approve your proposal. Either way, it is important to have good people skills to get the job done.
If you don’t have all these qualities there are always actions you can take to improve your ability to become a great architect.
How do you evaluate our magazine?
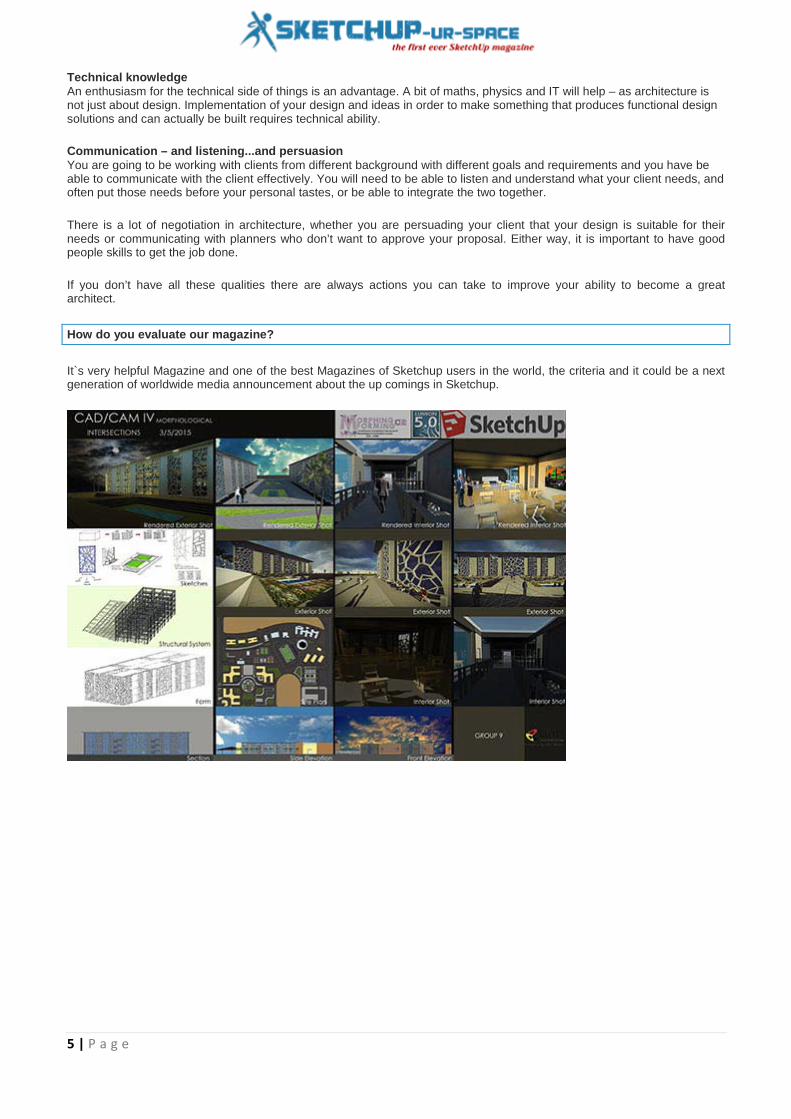
It`s very helpful Magazine and one of the best Magazines of Sketchup users in the world, the criteria and it could be a next generation of worldwide media announcement about the up comings in Sketchup.
6 | P a g e
3D Printing with Sketchup
Rajib Dey : Editor-in-chief
Sketchup is a useful program for effective 3d modeling and design. The sketchup models are 3d printable. Given below some useful tips to transform your sketchup design 3d printable.
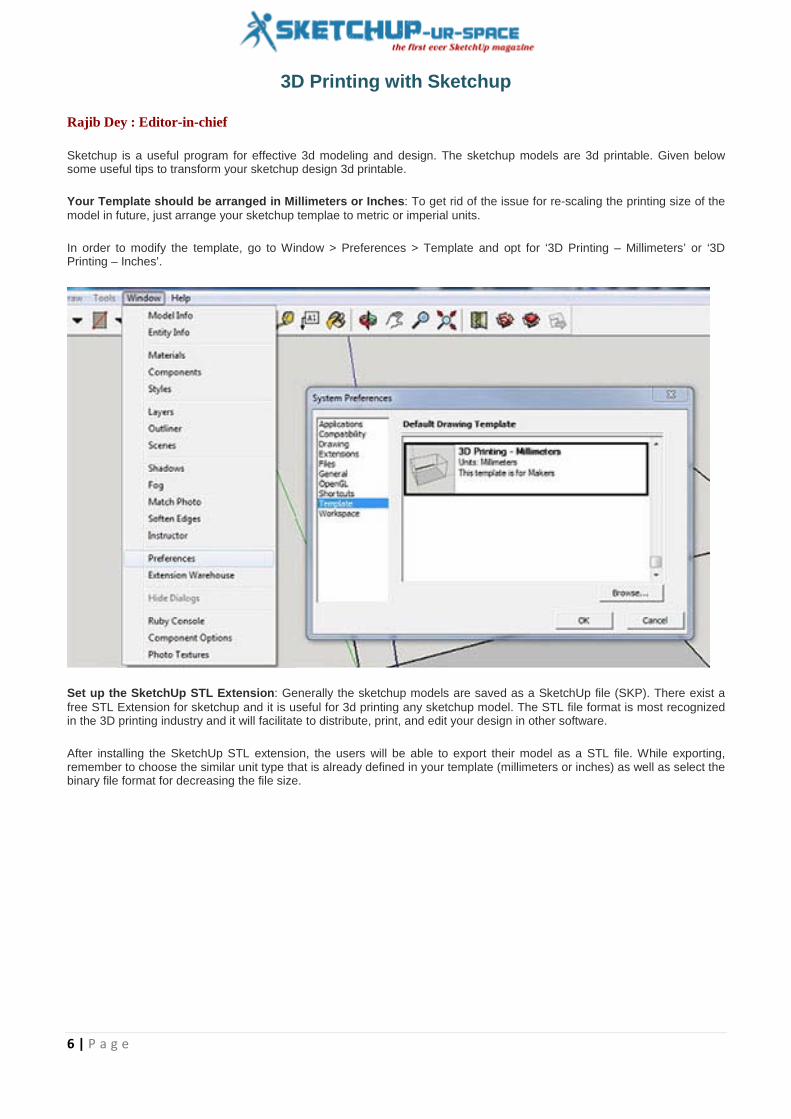
Your Template should be arranged in Millimeters or Inches
: To get rid of the issue for re-scaling the printing size of the model in future, just arrange your sketchup templae to metric or imperial units.
In order to modify the template, go to Window > Preferences > Template and opt for ‘3D Printing – Millimeters’ or ‘3D Printing – Inches’.
Set up the SketchUp STL Extension: Generally the sketchup models are saved as a SketchUp file (SKP). There exist a free STL Extension for sketchup and it is useful for 3d printing any sketchup model. The STL file format is most recognized in the 3D printing industry and it will facilitate to distribute, print, and edit your design in other software.
After installing the SketchUp STL extension, the users will be able to export their model as a STL file. While exporting, remember to choose the similar unit type that is already defined in your template (millimeters or inches) as well as select the binary file format for decreasing the file size.

7 | P a g e
Don't select Paper-Thin Surfaces & Set Wall Thicknesses: To convert your sketchUp model to 3d printable format, all the surfaces should contain a wall thickness. Devoid of defining a wall thickness, a 3D printer can't provide any information on depthness of the model (thick or thin) that is required to make the model 3d printable.
For more information, go through this blog post
Your Model should be Waterproof (Manifold): There should not be any hole in the surface of a printable model. If there is any hole, try to fill up them. This is most vital aspect for generating 3D printable models in SketchUp as sketchup treats the object as solid on the interior and printable.
Refrain from Internal Overlapping: If intersections and walls prevail inside your design, the model becomes complicared as the model must contain one continuous outer shell. So, it is recommened to arrange your model in a 2-dimensional space initially.
Verify wheather your model is solid or not
• Click thrice on your model by applying the select tool (everything will be selected).
: It becomes difficult, to generate watertight models with one persistent outside. For any kind of error, sketchup will alert you.
Given below the processes:
• Right-click on your object and opt for ‘Make Group’. • Right-click on your object further and choose ‘Entity Info’.
While creating design of an object with holes (not watertight) and inerior intersection (not in one shell) the Entity Info window will tell ‘Group’. It signifies that the model is not ready for printing and it should be rechecked. Right-click on it and choose ‘Explode’ to re-edit the components.
If a watertight model is designed in one shell, the Entity Info window will tell ‘Solid Group’ and then it is confirmed that your model is 3d printable.
See inward of Your Model with the ‘Hide Tool’ and ‘X-Ray-Mode’: You can't get any idea by seeing your model from the outside. If there are several modeling errors wihin your model, the object is not ready for 3d print. In the example below, the ‘Entity Info’ window indicates that the object is not solid.

8 | P a g e
In the following example, the ‘Entity Info’ window shows that the object is not solid. As it shows solid from the outside, the inside preview is required to view the activities in inside. Opt for a surface (face) that should be hidden and choose ''Edit’ >‘Hide’. Now you can easily find the errors which are troublesome. Otherwise, it is better to switch into x-ray-mode by selecting ‘View’ > ‘Face Style’ > ‘X-ray’.
Generate an ‘Outer Shell’: It is already discussed that the designs having overlapping objects can cause problems for 3D printers. But there exist an automatical solution for generating one ‘outer shell’ over the overlapping objects as well as removing all internal overlapping parts.
Resolves Reversed Faces (Inverted Normals): There may occur some other issues like inward-facing or reversed faces. It signifies that a surface of your model is facing in the improper direction (generally it denotes that it is facing the inside of the object rather than the outside). These surfaces are turned into light blue colors automatically.
To resolve it, right-click on the inward-facing surface (face) and opt for ‘Reverse Faces’.
Spread Circle/Arc Segments to Obtain Smooth Curves: With its visualization capability, SketchUp makes it possible to smooth the arcs and circles in preview. Even though circles seem to be accurately spherical in SketchUp, they are originally creared with 24 sides.Go to ‘View’ > ‘Hidden Geometry’ to view theses sides. While printing, this circle might appear little edged.
Whie choosing the arc or curve tool, SketchUp will will present their default sides in the bottom right corner. The number of sides can be extended by providing a greater number. Ratify your entry by pressing the ‘Enter’ key and then sketch your arc or circle.
Automatically prepare & fix file: Sometimes, it becomes difficult to detect the small issues. Solid Inspector is a very good sketchup extension that detects issues automatically and easily point out them. But it can't resolve the issue automatically.
SketchUp included a exclusive feature to their 3D Warehouse developed by Materialise. While uploading a model to the 3D Warehouse, the user can turn on “I want this to be 3D printable” button (see video below) to resolve the modeling errors fixed quickly.
https://youtu.be/0S11TgPCQXU
This tool will help to transform your 3d model waterproof as well as download it as an STL file. This the most conveniet and quickest way to obtain a printable file.

9 | P a g e
Review of 3d Max 2016
Rajib Dey : Editor-in-chief
3ds Max 2016 is arrived in the market with a series of new and exciting features like the Physical Camera, the Camera Sequencer and support for Templates. Kelly L Murdock, the recognized freelance consultant and author has briefly analyzed some of its outstanding features :-
Max Creation Graph
Image Courtesy: www.gamedev.net
: Inclusion of MaxScript, a intuitive set of tools, to the scripting interface of 3ds Max 2016. It facilitates the users expanding the functionality of the software in various ways. Any feature can be customized according to the need of the user. But inorder to use it, one should be well versed with programming constructs. To simplify MaxScript, the wizards at Autodesk have introduced a new method to form the custom tools and it is known as Max Creation Graph or MCG for short.
Max Creation Graph refers to a visual interface for generating MaxScript code. It performs by combining various deverse nodes in a manner identical to the Slate Material Editor. These nodes are useful for producing procedural content, modifiers, and unique tools.
While dealing with a unique graph, it can be saved as a compound to be reprocessed for creaing more complicated functionality.
Camera Sequencer: 3ds Max 2016 contains a new Camera Sequencer that facilitates the users to opt for which camera is utilized through which frames. It is easily accomodated inside the timeline devoid of all the overhead. The new Camera Sequencer allows the user to cut amid cameras, trim and reorder shot sequences just dragging inside a revised timeline crearted with the State Sets interface. All these actions are performed keeping the entire animation as it is.
Open SubDiv Support: 3ds Max 2016 provides support for the OpenSubDiv modeling construct. This format can apply the parallel CPU and superior GPU architectures for quicker viewport demonstration. There exist the new crease and creaseSet modifiers inside 3ds Max 2016 to characterize hard edges.

10 | P a g e
Image Courtesy: www.gamedev.net
Cloud Rendering: With 3ds Max 2016, the users can start rendering by the Autodesk 360 cloud servers. Every render costs a number of credits, but it saves significant times at specific times. The Cloud rendering option is provided inside the Render Scene dialog box.
New Physical Camera: With the inclusion of new Physical Camera feature, cameras now contain settings for Shutter Speed, Aperture, Depth of Field and Exposure that simplifies the process for comparing the real-world cameras to the virtual ones.
Iray and mental ray enhancements: 3ds Max 2016 contains the most updated versions of iray and mental ray. Some new features like Light Path Expressions are included in iray. These features allow the users to keep apart specific lights and/or geometry objects on the basis of layers and modify their settings throughout post production. There is a Section Plane option for viewing within a designated section. A new Irradiance render element is also available.
New to mental ray 3.13 is the Light Importance Sampling feature that helps the users to identify which areas are rendered in higher detail. There also exist a new Ambient Occlusion render element.
Superior Skin with the Dual Quaternion Option: The character animation process is simplified with the inclusion of the Dual Quaternion option in the Skin modifier that allows the users to reduce unrealistic effects occured through distorting adjoining bones that turns the underlying skin to be collapsed. The users will be able to paint the skin weights to manage the amount of influence the bones contain across the surface with the Dual Quaternion options. The significant collapse issues can be easily reduced by marketing the areas where collapsing occurs with the skin weighting option.
Support for Stingray: In 3ds max 2016, there is a feature alias a Live Link, it now possible to sync objects, generared in 3ds Max, with the Stingray game engine to view the changes instantly.
The ShaderFX interface is updated to help the users in producing shaders for the Stingray game engine.
Templates: There are various new templates in the Welcome screen. The default templates are used for producing an Architectural Outdoor scene through real-world lighting, an Outdoor HDRI Courtyard template with image-based lighting, a Studio Scene template for indoor lighting configurations as well as an Underwater template. These templates can

11 | P a g e
automatically modify the environment settings together with system units, rendering and lighting settings required for each of the various conditions and offer a quick jumpstart for having superior results.
Image Courtesy: www.gamedev.net
Selection Highlighting: It is designed for new users or for those who deal with a complicated scene and search for the exact object to perform with. The new Selection Highlight feature features the selected object through a blue outline and any other object that can be selected is featured in yellow while hovering the mouse over them. This feature helps you to be ensured that the proper object is selected. The users can access 3ds Max 2016 as a single product. 3ds Max 2016 can also be accessed as part of the Entertainment Creation Suite, assembled with Autodesk Maya, Mudbox, MotionBuilder, Softimage, and Sketchbook Designer. The users can avail 3ds Max 2016 by providing a nominal fee for subscription. To get more details on 3ds Max 2016, visit http://usa.autodesk.com.
To use a free trial version of 3ds Max, visit at www.autodesk.com/3dsmaxtrial.
Image Courtesy: www.gamedev.net
Reference: www.gamedev.net

12 | P a g e
SketchUp Architectural Entourage (Beta)
Rajib Dey: Editor-in-chief
This sketchup plugin is currently in beta development stage. The sketchup users can apply these simplified toolset to transform any 3d design into the masses through sketchup. This toolset provides huge benefits to the beginners as well expert designers by allowing them to use the authentic forgiving modeling process in sketchup. Presently ArchVision provides support for RPC inside sketchup.
ArchVision RPC Plug-ins for SketchUp support Sketchup 2014 and sketchup 2015 (both 32 & 64 bit). Download the plugins from the folloiwng links :-
• ArchVision RPC Plug-in for SketchUp 2014 • ArchVision RPC Plug-in for SketchUp 2015 (32-bit / 64-bit)
Usage Instructions
Current Behavior
• Image supported RPCs (2D, 2.5D, 3D & 3.5D) will demonstrate a single, camera-facing image inside SketchUp • 3D+ content will constantly expose the Preview Icon prior to be rendered through a supporting 3rd Party renderer.
3rd Party Rendering Solutions - Solutions for rendering with 3rd-party renderer are necessary for rendering complete 360 degree 3D and 3D+ RPCs:
• IRender NXT (available now - Click here.) • Podium (in progress) • V-Ray (in progress)
If you require a supplimentary 3rd-party rendering solutions, then send mail [email protected].
Buy it now

13 | P a g e
How to set up Ruby Extensions in Sketchup
Rajib Dey : Editor-in-chief
The extension warehouse was first included in sketchup 2013. In order to use it, open sketchup and go to Window---->Extension Warehouse. Sign with your google account and explore through wide arry of extension categories. You can also look for any particular extension. Afer discovering your favorite extension, just click on install option and abide by the instructions.
SketchUp and .rbz files
• It is suggested that the users should log in their computer as an admin prior to set up any Ruby scripts as it will simplify the installation process and make sure that all the files are set up in the suitable places.
: The SketchUp 8 and newerer versions will facilitate the users to set up zipped Ruby files (.rbz) and open it inside sketchup. If there is a standard (.zip) extension with the plugin, then the extension name can be modified from .zip to .rbz.
Go through the following processes to learn how to set up a SketchUp Ruby plugin script through the .rbz format:
• Go to Window > Preferences (Windows) or SketchUp > Preferences (Mac OS X). The Preferences dialog box is displayed.
• Turn on Extensions. The Extensions panel will be visible. • Select the Install Extension button. The Open dialog box is appear. • Find the Ruby zip file to set up (.rbz). • Select the Open button. The Ruby plugin will be shown in the extension lists.
*.rb files: In case you contains a file having the .rb extension, the plugin can be set up with the placement of the Ruby script file into the exact folder. After that restart SketchUp.
Windows - the default location for various sketchup versions will be as follow:
• SketchUp 2015:C:\Users\YOUR USERNAME\AppData\Roaming\SketchUp\SketchUp 2015\SketchUp\Plugins • SketchUp 2014:C:\Users\YOUR USERNAME\AppData\Roaming\SketchUp\SketchUp 2014\SketchUp\Plugins • SketchUp 2013: C:\Program Files\SketchUp\SketchUp ####\Plugins. • SketchUp 8 and older: C:\Program Files\Google\Google SketchUp #\Plugins.
For Mac OS X - the default location will be as follow:
• Version 2013 and higher: Open a new Finder window, press and hold the Option key from the keyboard, then select Go in the menu bar> Library > Application Support > SketchUp # > SketchUp > Plugins
• Version 8 and earlier:[YOUR USER NAME]/Library/Application Support/Google SketchUp #/SketchUp/plugins • It is recommended to generate your plugins folder in the SketchUp folder by selecting File > New folder in your
Finder window. • After reopening SketchUp, one will find that the script's commands are included with the proper menus. The script
can also function through the Ruby Console (open the "Windows" menu, and then select Ruby Console).
https://youtu.be/PMmIhxwiR8o

14 | P a g e
Online presentation of Brighter 3D Sketchup 2015 Rendering Software
Rajib Dey: Editor-in-chief
Watch the online demonstration of Brighter 3DSketchup 2015 rendering software. Brighter3D can produce naturalistic renders from any sketchup scenes effortlessly by integrating exclusive noiseless rendering technology. Brighter3D can deal with artificial, daylight and HDRI lighting.
Brighter 3D is compatible with sketchup 8, sketchup 2013, sketchup 2014 and sketchup 2015 free or pro version as well as Windows Vista/7/8/8.1 (32 or 64bit). It also supports 64 bit version from SketchUp 2015 64bit.
Image Courtesy: brighter3d.com
Brighter3D is available in free & pro version. The latest version is Brighter3D 2.3 which was introduced in March 2015. This newest version contains 100 presets (Pro) and 10 presets (free).
In order to download a free trial version, visit http://www.brighter3d.com
https://youtu.be/pqPfT19yBFg

15 | P a g e
VFX Direct Digital Media Agency will perform as the certified sketchup content developer to generate and distribute 3d models through 3d
warehouse
Rajib Dey : Editor-in-chief
VFX Direct, LLC, receipient of various adwards as well as creative agency that offers new media solutions, just declared that it will perform as the new 3D Content Developer for SketchUp. As an certified SketchUp Content Developer, VFX Direct will provide 3D modeling and allied services, adhereing to SketchUp standards, for current and future product manufacturing clients who prefer to generate products in 3D model format to be applied in SketchUp Pro. SketchUp is recognized globally as the most suitable 3D modeling program for more than 30 million designers worldwide.
VFX Direct is a prime digital media agency having competence in generating perfect 3D content creation and it offers long lasting commitment to produce solid, value-based strategic alliances with organizations like SketchUp. Over 15 years sketchup has been used as an effective & simplified 3d drawing and planning tools.
VFX Direct will offer a perfect agency approach to the SketchUp Content Developer program. The agency team will involve in resolutely and competently generating 3D models as well as aid in formulating, producing, organizing and controlling a computable 3D model distribution system. This system will be useful for heighest exposure and perfectness. The clients can enjoy tailored hybrid modeling and management solutions if there are couple or ample of SKUs. This will enhance the delivery and finally expand sales.
All the 3D content are available via the Trimble 3D Warehouse and the sketchup users can access more than 2.2 million models annually. The manufacturers can obtain new scopes to relate their products inside the sketchup design community through 3D Warehouse. Sketchup Pro brings huge benefits to various professionals associated with architecture, construction, engineering, commercial interiors, light construction, landscape architecture, kitchen and bath design, urban planning, game design, film and stage, woodworking and several other fields to form 3D plans and layouts.
It is expected that sketchup will make its storng presence in both the product manufacturing and retail markets with its very comprehensive reach and expertize in these markets. Sketchup will facilitate the clients with supplimentary revenue generating, consumer facing touchpoints via branded product listings, action driven metrics, and high volume download results.
With this new approach, a superior greade of professionalism and intentiveness will be added to the 3D design process.
In order to get more updates, visit http://www.vfxdirect.com
Contact VFX Direct: John Secord 850-218-4983 [email protected]

16 | P a g e
Creating Arrays in SketchUp
Ryan Gorman
As a CAD user for over a decade before I began using SketchUP one thing I noticed right away was that SketchUp was “missing” many commands and tools that I rely on heavily when using AutoCAD. For a while I assumed this was a limitation of the software and that I would need to look for a plugin to accomplish those tasks. As my knowledge and understanding of SketchUp grew I realized that SketchUp ‘Thinks’ differently than most CAD programs and many of the tools I thought were missing were actually there all along.
One of those “missing” commands is Array. For longer than I’d like to admit I just assumed SketchUp did not have an array command, and I was happy to just copy (another command that can appear to be missing when you first open SketchUp) over and over and over.
One day I watched a colleague create 25 trees in just a few clicks. I of course asked him how he was able to do that. His reply, “I just arrayed it.” I told him that I’ve never found an array command in SketchUp. So he showed me how he was able to create an array, and explained that while I was correct that there is no Array toolbar or button within SketchUp it is possible to create an array using the method outlined below.
1. Let’s start by drawing a simple 2d rectangle
2. Next lets switch to a top view
3. Double click on the rectangle (this selects the surface and all bounding edges/lines. A single click will select the surface only)
4. Now we will select the
:
Move tool:

17 | P a g e
5. Move the rectangle slightly to the right (press Ctrl to toggle copy on and off while in the move command)
6. After placing the second copy type: ‘ x5 ‘ (notice you now have 6 copies, typing x5 added 5 more copies after placing the original. They will all be placed the same distance apart that was specified/chosen for the first copy)

18 | P a g e
7. Let’s follow the same procedure for all 6 rectangles
• Select all six rectangles • Select the Move tool • Move and place (left-click) the rectangles up slightly • Now Type: x5
8. Your screen should look something like this:

19 | P a g e
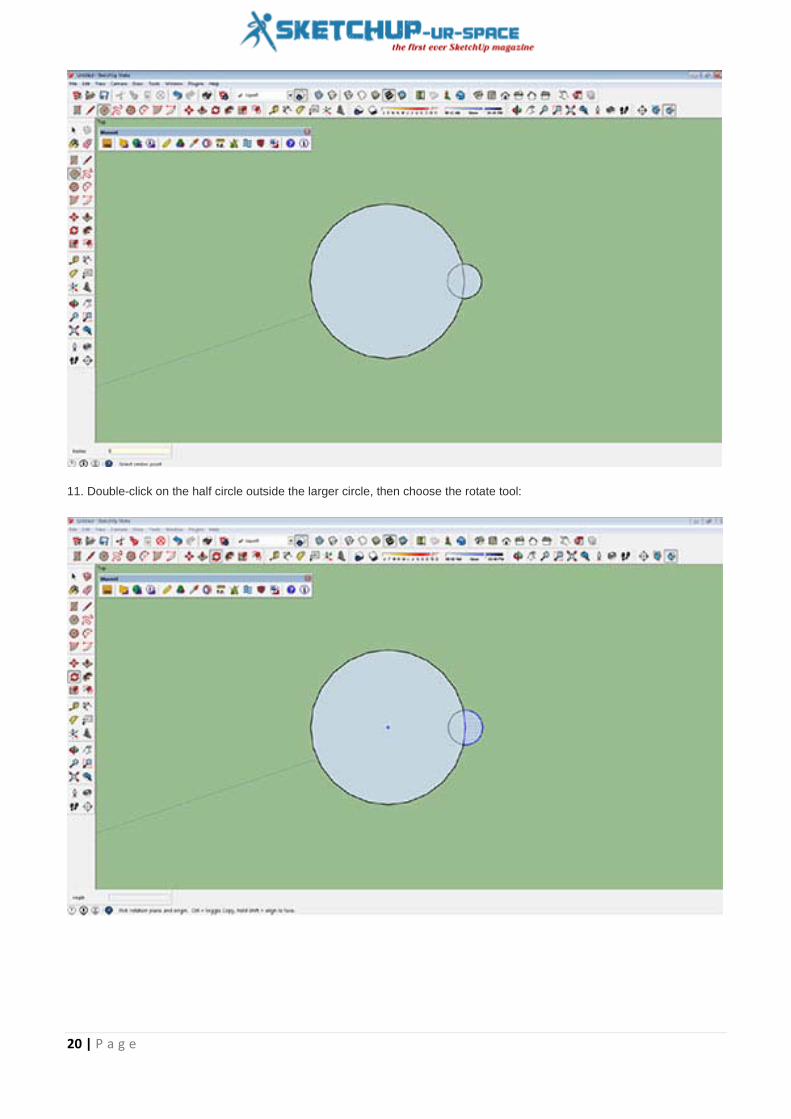
9. Now let’s try a Polar Array. Start by drawing a 3’ diameter circle:
10. Pick an endpoint on the circle you just created and draw an 8” diameter circle. It should look something like this:
20 | P a g e
11. Double-click on the half circle outside the larger circle, then choose the rotate tool:

21 | P a g e
12. Choose the center of the larger circle, press Ctrl to copy
13. Place new half circle 30 degrees
14. Type: X12
ryangorman.carbonmade.com

22 | P a g e
How to model a leather sofa with sketchup
Rajib Dey : Editor-in-chief
Agus Prasetiyawan presents a useful sketchup video that teaches you how to create the 3d model of a leather sofa with sketchup. This sketchup tutorial is designed for beginner's sketchup users.
After learning the step-by-step processes for creating the model, one can upload the model to the sketchup 3d warehouse.
https://youtu.be/kxS4FzkRCU4

23 | P a g e
Some useful tricks and instructions for modeling efficiently with Sketchup
Rajib Dey : Editor-in-chief
Manage your objects: All primary geometries are formed and attributed to layer 0. In order to manipulate their perceptibility the geometries should be created as a group or component and attributed to a particular layer.
Name your groups and components: There should be proper title for groups and components as well as IFC so that these can perform easily with outliner, LayOut and BIM.
Working with materials: All materials must be assigned to faces. If the materials are used with group, the groups deafault colored faces will be replaced with selected color and the users will be unable to modify the coordinates of the texture. Every material should require a distinctive and logical name and the maximum essential texture size.
Inserting Objects: CAD data and 3D Warehouse models must included in a new sketchup model. But before inclusion to the working files, their scale should be verfied properly and unessential layers and geometries should be eliminated.
Working with complex models: While dealing with complicated models, seperate parts of the model must be created in a new sketchup file and then amassed or referenced in the working files like a component.
Keep it simple: Don't use redundant arc and circle segment count so that the size of the model can be reduced. Don't model parts which will be invisible in the final output.
Model with solids: You can apply and adjust your objects conviently, if the objects are generated as solids. In order to perform a quicker workflow, learn the application of solid tools. Try to make the front faces of the object outside to apply the stylistic effects easily as well as make the rendering process troubfree.
Use Scenes to improve workflow: In order to get quicker performance and workflow at the time of modeling, apply scenes to manage layer, shadow, fog and clear stylistic effect and settings. Besides, the users can avail free up viewport space out of dialog boxes and toolbars.
Use components: Apply components above groups when necessary for decreasing the file size, facilitating smooth editing as well as utilize objects more resiliently.
Model Maintenance: The file sizes of sketchup are increased and the performance is affected as the assigned components, materials and styles are still included in the sketchup file after being erased and leftover in the scene. To get rid of the issue, apply purge unused or the cleanup plugin to delete unnecessary edges and merge faces on a regular basis.
Presenting design: Apply scenes to navigate amid views, show section, cut and shadow study animations and manage the clarity of layer. The scenes can also be applied in sketchup viewers and embedded 3d warehouse windows. Crete slide presentations in Layout to support the sketchup presentation. While dealing with complicated models, always deactivate the auto-save option so that the performance can''t be disrupted.
Sharing models: Befor delivering any sketchup file to others, always check the version of sketchup being used by them. It becomes difficult to open newer version files in earlier version of sketchup.
Using scenes from 3d warehouse models: If it is necessary to apply the scenes out of 3d warehouse models, just open them individually rather than opening them in your working files like a component.
Saving your model: Apply save a copy as option in place of save as to preserve the name of original file while taking backups on daily basis.
Camera Clipping: Try to create model adjacent to axis origin to get rid of the issue like camera clipping. Clipping may happen while dealing in parallel projection mode as well as if some geometry is situated remotely from axis origin.
Face flickering: To solve the issues like face flickering or z-fighting, raise up/erase or conceal one of the faces situated on the identical plane.
Cursor trails: If cursor trails are visible while dealing with bigger models, just deactivate fast feedback in the OpenGL preferences or revise your video card drivers.
Disappearing faces: To resove face-creating issues, try to model very small objects in a larger scale.

24 | P a g e
Backface color bleeding
Image Courtesy: sketchupdate.blogspot.com
: Backface colors may visible at the object profile edges, if the models are exposed devoid of edges. This effect can be reduced by modifying the color of the backfaces.
25 | P a g e
How Sketchup Pro was utilized to create the design and modeling of a port handling facilities and instruments
Rajib Dey : Editor-in-chief
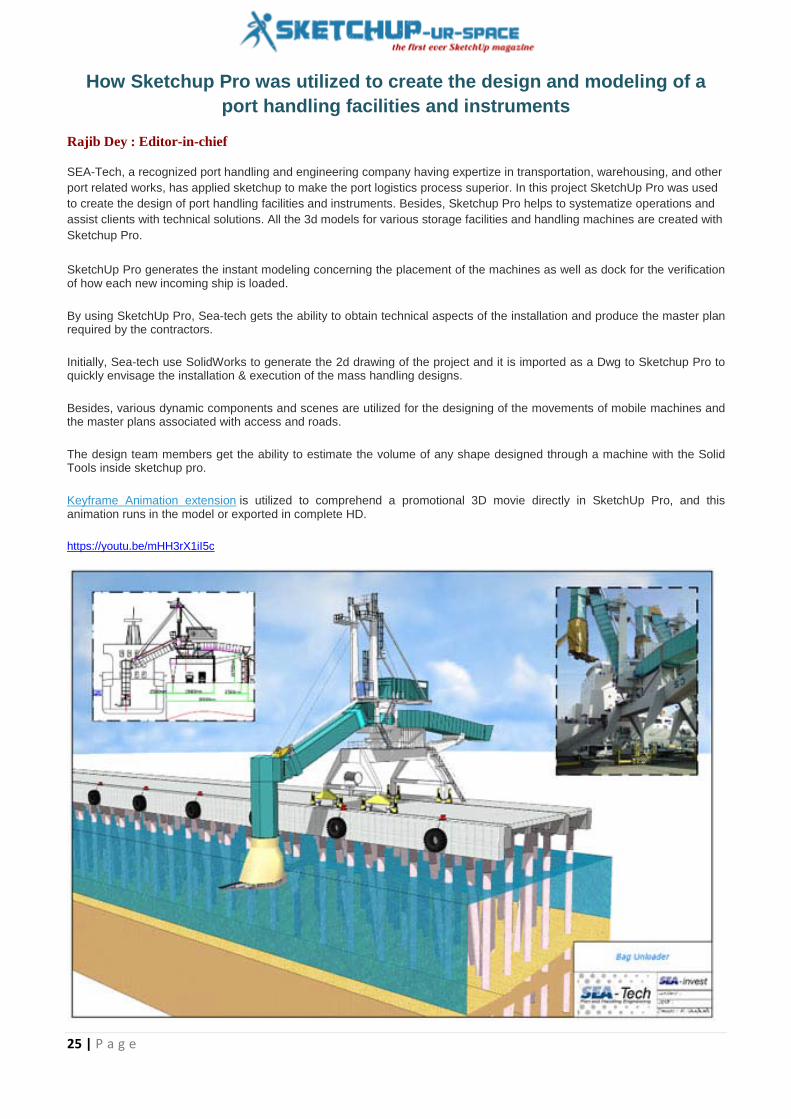
SEA-Tech, a recognized port handling and engineering company having expertize in transportation, warehousing, and other port related works, has applied sketchup to make the port logistics process superior. In this project SketchUp Pro was used to create the design of port handling facilities and instruments. Besides, Sketchup Pro helps to systematize operations and assist clients with technical solutions. All the 3d models for various storage facilities and handling machines are created with Sketchup Pro.
SketchUp Pro generates the instant modeling concerning the placement of the machines as well as dock for the verification of how each new incoming ship is loaded.
By using SketchUp Pro, Sea-tech gets the ability to obtain technical aspects of the installation and produce the master plan required by the contractors.
Initially, Sea-tech use SolidWorks to generate the 2d drawing of the project and it is imported as a Dwg to Sketchup Pro to quickly envisage the installation & execution of the mass handling designs.
Besides, various dynamic components and scenes are utilized for the designing of the movements of mobile machines and the master plans associated with access and roads.
The design team members get the ability to estimate the volume of any shape designed through a machine with the Solid Tools inside sketchup pro.
Keyframe Animation extension is utilized to comprehend a promotional 3D movie directly in SketchUp Pro, and this animation runs in the model or exported in complete HD.
https://youtu.be/mHH3rX1iI5c

26 | P a g e
SketchUp Style Builder
Rajib Dey : Editor-in-chief
Style Builder is new software to create your own unique styles that you can use and share for SketchUp. You can use strokes drawn in any medium (oil pastel, quill pen, burnt stick) to make your model look hand-rendered.
Non Photo Realistic styles can make your models appear hand-rendered, super-technical, and everything in between. You can create, save and organize Styles as well as share Styles with others. With a single click, you can quickly apply a style to any model by selecting it from the new Styles window. Styles provide a unique way to visualize models within SketchUp.
Make your own sketchy-edge Styles for SketchUp
Turn models into sketches: Showing a hand-drawn sketch does two things: It abstracts detail so you and your client can talk about what's essential, and it communicates that your concept is open for discussion. With Style Builder, you can create personalized sketchy Styles that tell the story of your design.
Brand your models: The Styles you create with Style Builder are completely unique. When you apply them to your models, you'll have computer models that look like you made them. After thirty years of CAD, isn't it about time everybody's drawings stopped looking the same?
Use any medium at all
• 1 GHz G5
: Your Styles can be based on any mark you make, in any medium. Marker, pencil, crayon, burnt stick, technical pen, ballpoint, gouache, smudgy finger, pen and ink, highlighter... You get the picture – anything.
The Style Builder Plugin will only work with SketchUp Pro (not the free version of SketchUp).
System Requirement for SketchUp Style Builder-
• 512 MB RAM • >200 MB of available hard-disk space • QuickTime 5.0 and web browser for multimedia tutorials • Video card that is 100% OpenGL compliant • 3-button, scroll-wheel mouse
*Note: If you consider buying a new machine then please pay extra attention to the graphic card. On Windows, we recommend boards with a Quadro FX 1500 and higher chip from nVidia. These cards support OpenGL very well and are very stable because of quality drivers. OpenGL is the 3D system that the Operating System uses for generating 3D display information and therefore is very important to SketchUp Pro.
Download SketchUp Style Builder

27 | P a g e
Magazine Details – The Creative team of Sketchup-ur-Space
Started in September 2010, Sketchup ur Space (SuS) was the first online magazine devoted to SketchUp, that unique, innovative 3D design tool from Google. It holistically covers features, events, news, updates, reviews and many tips and tricks.
Rajib Dey:[email protected]
Rajib, the editor-in-chief of SketchUp ur Space magazine is the main writer. He is responsible to write the cover story, blog and many other columns. Along with it, He is creating a liaison between the writers and the readers.
Manoj Kumar Singh: [email protected]
Manoj is enthusiastic helps to put the content of the SketchUp up Space magazine in the html version. Manoj is the html developer who beautifully creates each and every edition with care along with the PDF version.
Abhishek Mondal: [email protected]
Abhishek is the designer-in-chief of this magazinewith the help of his creativity Sketchup ur Space has gotten a classy as well as trendy look...