3d character creation for the unreal game engine using adobe … · 2019-05-13 · unreal engine,...
TRANSCRIPT

DISTRIBUTION A: Approved for public release; distribution unlimited. Approval given by 88 ABW/PA, 88ABW-2016-5754, 14 Nov 2016
Developed by:
Gaming Research Integration for Learning Laboratory® (GRILL®)
3D Character Creation for the Unreal Game
Engine Using Adobe Fuse

Character Creation 2
Distribution A.
TABLE OF CONTENTS
Table of Contents .......................................................................................................................................................... 2
Introduction ................................................................................................................................................................... 3
Character Creation......................................................................................................................................................... 3
Importing to Unreal Engine ......................................................................................................................................... 13
Creating a Copy of an Animation For Another Character ............................................................................................ 20

Character Creation 3
Distribution A.
INTRODUCTION
The following guide outlines the processes required to create a fully customized character
model using Adobe’s Fuse App and how to add rigging and animations to the character model
using Mixamo. Importing this character model with rigging and animation into Unreal Engine 4
will also be covered as well as how to share animations between character models using the
same rigging skeletons.
CHARACTER CREATION
1. Open Adobe Fuse by either clicking the app directly, or opening the Adobe Creative
Cloud app, selecting “Apps”, and opening the Fuse App. This app is available online for
free through the Adobe website (http://www.adobe.com/products/fuse.html). Make an
account and download the Adobe Creative Cloud, then download the Fuse app. (Fuse is
a large file and may take a long time to download.) Make an account for the Mixamo
website (mixamo.com) as well and download the Unreal Engine
(https://www.unrealengine.com/).
2. Begin in the “Assemble” tab, select the head of the character being created. Click the
tabs on the right to see different parts of the body. They have names that will help to

Character Creation 4
Distribution A.
complete them with their other parts, or the parts can be mixed and matched. To add
clothing or be able to export the character, the character requires all 4 body parts.
3. Using the mouse, left click allows the character to be moved around in all directions to
view it from different angles. A right mouse click while moving the mouse up and down
or while scrolling will zoom in and out of the character. Clicking the scroll wheel down
and moving the mouse changes the location from which the character is viewed.
4. Once the parts are assembled, move the cursor over the different body parts, click, and
drag to adjust the size and placement. For more precise changes, select the “Customize”
tab. On the right side, it shows different tabs that can be opened to show more specific
areas of customization as well as a sliding bar and a numeric field that can be used to
more precisely make changes to the character. Clicking on different places on the
character will automatically open the location of that feature with its slide bar and
numeric field. In each section, there is an option to randomize all features, as well as an
option to randomize all tabs at the bottom of the list.

Character Creation 5
Distribution A.
5. Once the character is customized to the desired specifications, clothing can be added to
the character under the “Clothing” tab. Included under this tab are menus for “Tops”,
“Bottoms”, “Shoes”, and more. Only one item is allowed to be selected from each
menu. Hair, including facial hair, is found under the “Clothing” tab as well. If the
character’s body clips through the clothing, it’s likely the program doesn’t notice the
dimensions of the actual body. To fix this, hover the cursor over where the clipping
occurs, click, and drag the dimensions around. When the click is released, the garment
will shift to account for the change in dimensions. Another, more precise, way to correct
for clipping is to go under the “Customize” tab and change the dimensions of the
character’s specific parts with the slider bar or numerical field to fit within the clothing.
(For example, if the collarbone is too high, it will clip through the collar of the shirt.)
The program recognizes large discrepancies in the way the clothes cover the character,
but smaller ones get missed sometimes, leading to clipping.

Character Creation 6
Distribution A.
6. Under the “Texture” tab is where all customization to the clothing and hair that was
previously applied to the character as well as the character’s actual skin occurs.
Selecting the body of the character allows for changing the skin tone and age, applying
makeup and sun effects, and changing the teeth, eyes, facial hair, detail, roughness, and
metallness. Under the “Facial Hair” tab, the “Buzzed Hair” and the stubble that appears
on some male character’s faces that comes with the character head can be removed, as
it doesn’t automatically disappear when a new hairstyle from the “Clothing” tab is
selected.
7. Any article of clothing under the “Clothing” tab can have its properties changed, each
with varying amounts of customizable properties. All items have the option to change its
“wear”, allowing for a more ragged look as well as an option to make them dirty. In
addition, all of the clothing items allow for the color and material it’s made of to be
altered, offering more customizability despite limited clothing choices.
Character Creation 7
Distribution A.
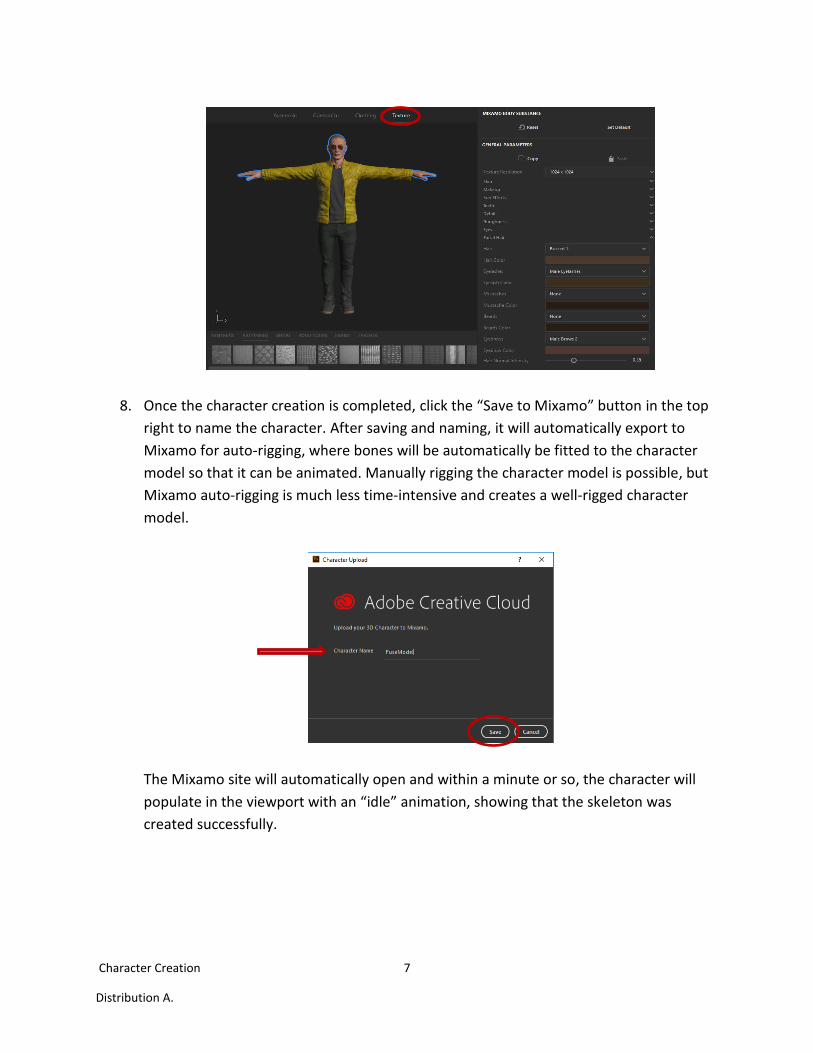
8. Once the character creation is completed, click the “Save to Mixamo” button in the top
right to name the character. After saving and naming, it will automatically export to
Mixamo for auto-rigging, where bones will be automatically be fitted to the character
model so that it can be animated. Manually rigging the character model is possible, but
Mixamo auto-rigging is much less time-intensive and creates a well-rigged character
model.
The Mixamo site will automatically open and within a minute or so, the character will
populate in the viewport with an “idle” animation, showing that the skeleton was
created successfully.

Character Creation 8
Distribution A.
The visual fidelity of the hair may seem poor but this is only due to Mixamo and will be
corrected later. Also note that some things, like hair color, look different from one
application to the next. Going back to Fuse, tweaking the color of something, and
exporting it again may be required to get the desired results. If the export/import has
failed, some materials may import with no color or appear very shiny or reflective. The
viewport might also populate with a message that the import failed. In all of these
cases, refreshing the page could work, however when this does not solve the problem,
the export process can be redone in Fuse.
(The Mixamo site has also proven to be quite slow and unresponsive later in the
process. If something isn’t working right or taking a long time to process, simply refresh
the page.)
There is an option to enable Facial Blendshapes (if facial animation is desired) and
Skeleton LOD (Level of Detail) (i.e. details in hands and fingers). Once the appropriate
options are selected, click “Finish”.
To animate the skeleton immediately, on the next page click “Animate”; to keep it in
the standard “T-Pose”, click “View in My Assets”. The character can be animated at any
time as long as it remains available on the Mixamo account that was used to log in.
When animating, a webpage with 52 pages of animations to choose from will pop up.

Character Creation 9
Distribution A.
There are poses, idle animations, and action animations to select from. Some
animations require multiple parts to appear smooth in the engine. For example to make
a character appear to run, an “idle”, “idle to run”, “run”, and “run to idle” animations
would be needed. The smoother the animation, the more parts are needed. (Some
animations can be split up to give more control over how they look or how the character
acts. For example: some jump animations are split into three separate animations [Begin
Jump, Hover, End Jump] so that the character looks normal jumping short and long
distances.) Each animation has options for customization on the right of the viewport.
9. When a desired animation is achieved, simply click “+ Add To Pack”. This will create a
pack, default named “In-Progress”. (It can be renamed to better suit the animation.)

Character Creation 10
Distribution A.
Select another animation to add and click “+ Add To Pack”. Continue adding them until
all the animations are added. Directly above the pack is an orange button that says “Add
To My Assets”; click this when finished adding animations to the pack.
Under the “My Assets” tab, all of the characters, animations, and downloads that were
saved can be accessed.
Click on an asset to export, and click “Queue Download”. Download the created
character as well as the animations that were chosen for them separately. The character
is under the “My Characters” tab and the animation pack will be under “My
Animations”. Format should be compatible with whatever engine you’re using. For
Unreal Engine, there is a specific “FBX for Unreal Engine 4 (.Fbx)” option. “FBX” and “FBX
For Unity” are separate file types not to be confused with each other.
Leave the pose as “T-Pose”. Click “Queue Download” to be brought to the downloads
page.

Character Creation 11
Distribution A.
Once ready, click “Download” in the “Status” tab.
Mixamo will ask what to do with the file (save, save as, etc.), so proceed appropriately.
The file will finish downloading and then prompt to open the compressed folder that it
is in.
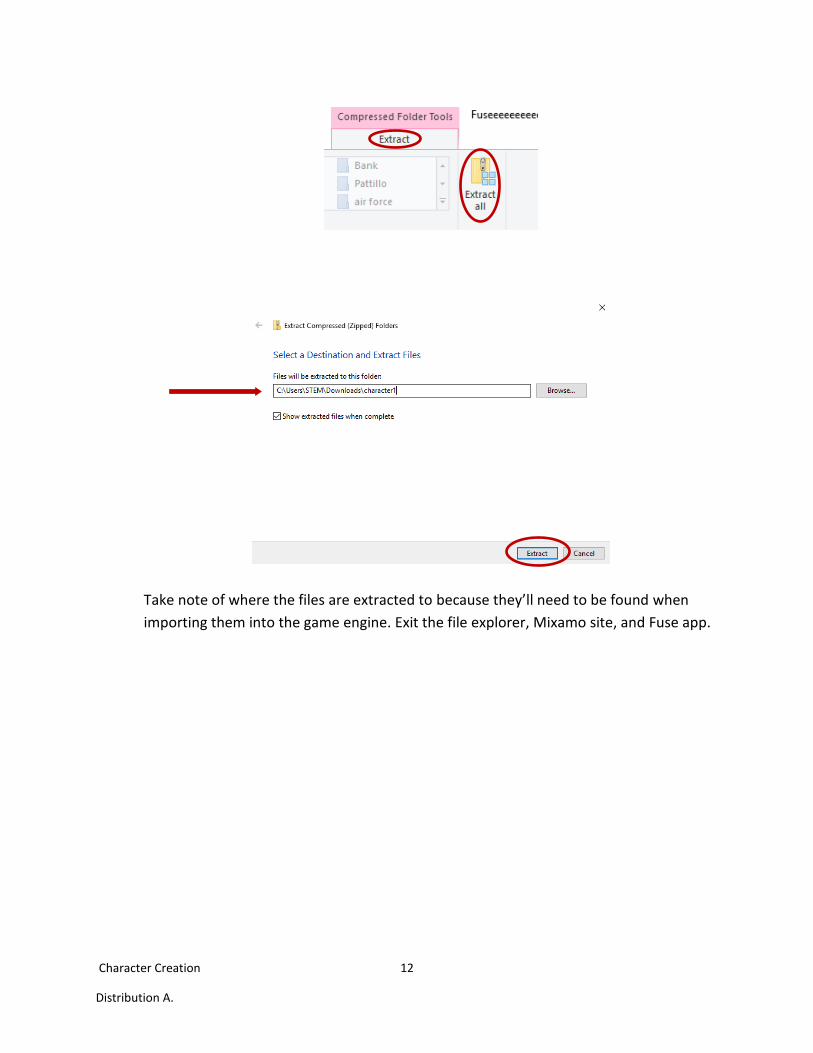
Extract the contents to the appropriate location. This can be done by either clicking
“Extract” at the top of the window that pops up and then “Extract all”, or the files can
be manually highlighted and copied to the desired location.
Character Creation 12
Distribution A.
Take note of where the files are extracted to because they’ll need to be found when
importing them into the game engine. Exit the file explorer, Mixamo site, and Fuse app.

Character Creation 13
Distribution A.
IMPORTING TO UNREAL ENGINE
1. Open “Epic Games Launcher” and launch “Unreal Engine”.
If not already done, a project will need to be created for the characters to exist in. There
are many pre-made projects, or one can be started from a blank default.
2. In the content browser (at the bottom), click “Import” to bring the creation into the
engine. If importing multiple characters, use folders to keep them separate. This makes
it easier to navigate the content, but will also keep the characters from using materials
from other characters (skin, clothes, etc.). Example of file structure: Content >
Characters (file) > Character1 (file) > (import .fbx here)
3. Upon clicking “Import”, find the .fbx file for the character and any animations to import
with it and open it. A pop-up will appear giving options for the import(s). With the actual
character, if a skeletal mesh exists that has already been animated and works with the
character, find the skeleton in the drop down menu. If planning on manually animating
the character, leave the field blank so the engine will create a new skeletal mesh for the
character. More advanced options exist to be adjusted and changed but the defaults will
most likely be fine for the purpose of this process. Click “import” to finish the process.

Character Creation 14
Distribution A.
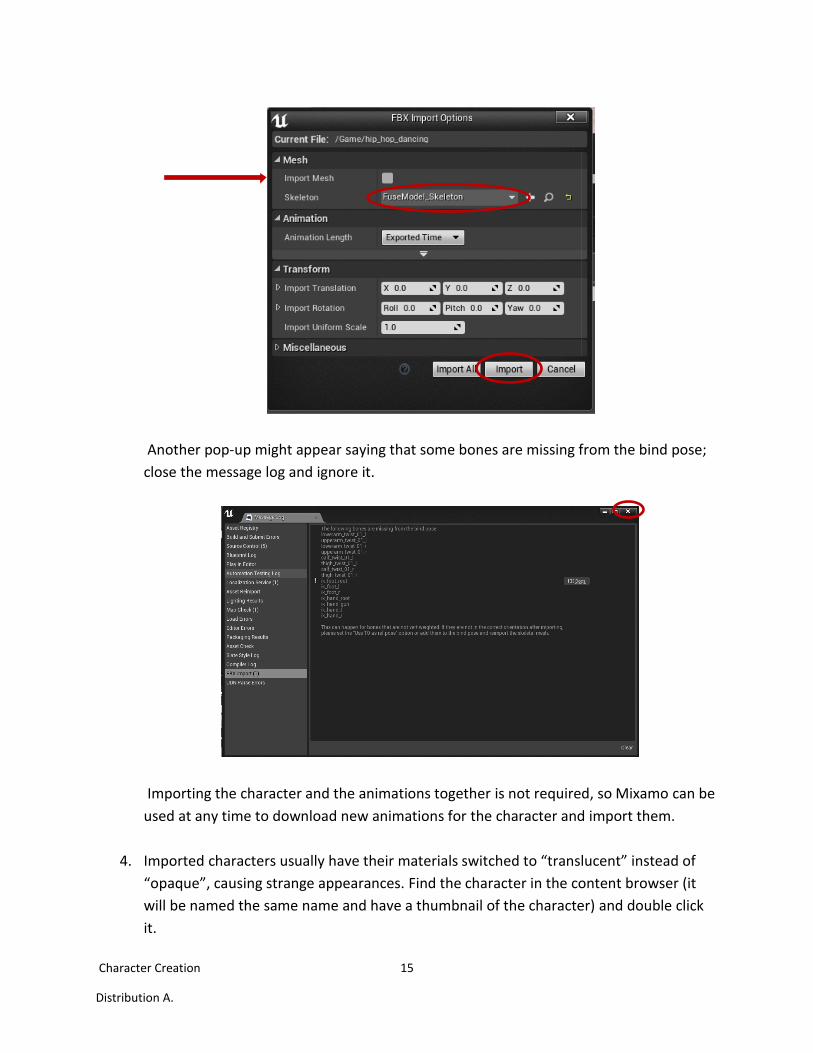
If importing animations as well, another pop up will appear with the name of the
animation file. Under the “Mesh” tab, unselect “Import Mesh” to import it as
“animation only”. Then in the “Skeleton” drop-down menu, select the skeleton of the
character to be used with the animation.
Character Creation 15
Distribution A.
Another pop-up might appear saying that some bones are missing from the bind pose;
close the message log and ignore it.
Importing the character and the animations together is not required, so Mixamo can be
used at any time to download new animations for the character and import them.
4. Imported characters usually have their materials switched to “translucent” instead of
“opaque”, causing strange appearances. Find the character in the content browser (it
will be named the same name and have a thumbnail of the character) and double click
it.

Character Creation 16
Distribution A.
Wait for the shaders to compile (there will be a small window in the bottom right of the
screen that says, “Compiling Shaders”). If they aren’t already compiled, strange
appearances in the character model are common.
To fix this, double-click on the “Bodymat” thumbnail on the left of the viewport.
This will open the material tab.

Character Creation 17
Distribution A.
On the left, under the viewport are tabs to change the material properties. Under the
actual “Material” tab, there is a “Blend Mode” option, likely set to “Translucent”. By
either clicking the little yellow arrow next to it or by selecting it in the drop-down menu,
change the mode to “Opaque”.
At the top of the window, click “Apply” and then “Save”. Sometimes clicking save before
applying will cause the engine to freeze. If the eyelashes on the character are too harsh,
it’s likely the opposite problem. Double-click the “Bodymat_eyelashes” thumbnail and
change the “Blend Mode” option from “Opaque” to “Translucent”. Don’t forget to
“Apply” and “Save”.

Character Creation 18
Distribution A.
If the character isn’t casting a shadow in certain places (i.e. where the clothes are), it’s
because the blend mode for the clothing is set to “Translucent”.
The eyewear (“Eyewearmat”) might also not be visible. Open the material tabs
(“Eyewearmat”, “Hatmat”, “Topmat”, “Bottommat”, etc.) and switch the blend mode
from “Translucent” to “Opaque”. Once finished with the materials, click “Save” and
close the window, returning to the main screen.
5. Click and drag the character into the project. It will still be in “T-Pose” and won’t do
anything until animated.

Character Creation 19
Distribution A.
To help those without prior experience with animating and game engines, Unreal
provides a YouTube channel with a number of tutorials. Below is a link to the YouTube
channel:
https://www.youtube.com/user/UnrealDevelopmentKit
Search for one of the tutorials and watch it from start to finish to learn how the coding
works and how all the different files work together to animate the characters.

Character Creation 20
Distribution A.
CREATING A COPY OF AN ANIMATION FOR ANOTHER CHARACTER
Animations can be shared between characters without going back to Mixamo and
creating new assets for a character. As long as the characters have the same skeleton,
the animation can be “retargeted” to another character. Double-click on the animation.
A window will pop up.
Find the tab called “Asset Browser” in the bottom right. Locate the animation to be
used with the other character, right click it, and click (at the bottom) “Create a copy for
another Skeleton…”.
A window called “Select Skeleton” will appear. Options for skeletons won’t appear until
“Show Only Compatible Skeletons” is deselected under “Retarget Options” under the
“[Source]” viewport. If there are options for retargeting, they will appear under the
“Select Skeleton” tab on the left of the window. Click whichever option is ideal and then
click the “Retarget” button directly below. It will immediately create another asset of
the animation on the second character’s mesh and open a window to view the asset.

Character Creation 21
Distribution A.