anacondadocumentation - anaconda team edition
TRANSCRIPT

Anaconda DocumentationRelease 6.1.4
Anaconda Inc.
Jan 21, 2022


CONTENTS
1 Preparing Environment for Anaconda Team Edition 31.1 Standard environment preparation . . . . . . . . . . . . . . . . . . . . . . . . . . . . . . . . . . . . 31.2 Air gap environment preparation . . . . . . . . . . . . . . . . . . . . . . . . . . . . . . . . . . . . . 5
2 Installing Anaconda Team Edition 92.1 Standard installation . . . . . . . . . . . . . . . . . . . . . . . . . . . . . . . . . . . . . . . . . . . 92.2 Air gap installation . . . . . . . . . . . . . . . . . . . . . . . . . . . . . . . . . . . . . . . . . . . . 112.3 Licenses . . . . . . . . . . . . . . . . . . . . . . . . . . . . . . . . . . . . . . . . . . . . . . . . . 192.4 Backup and restore . . . . . . . . . . . . . . . . . . . . . . . . . . . . . . . . . . . . . . . . . . . . 222.5 Stopping and Uninstalling Anaconda Team Edition . . . . . . . . . . . . . . . . . . . . . . . . . . . 24
3 Administering Anaconda Team Edition 253.1 User management and configuration . . . . . . . . . . . . . . . . . . . . . . . . . . . . . . . . . . . 253.2 Role provisioning: Keycloak admin user with restricted rights . . . . . . . . . . . . . . . . . . . . . 363.3 Proxy mirroring . . . . . . . . . . . . . . . . . . . . . . . . . . . . . . . . . . . . . . . . . . . . . 363.4 Enabling and configuring SSL . . . . . . . . . . . . . . . . . . . . . . . . . . . . . . . . . . . . . . 383.5 LDAPS . . . . . . . . . . . . . . . . . . . . . . . . . . . . . . . . . . . . . . . . . . . . . . . . . . 403.6 Updating your domain . . . . . . . . . . . . . . . . . . . . . . . . . . . . . . . . . . . . . . . . . . 413.7 Common Vulnerabilities and Exposures (CVEs) . . . . . . . . . . . . . . . . . . . . . . . . . . . . 433.8 Mirrors . . . . . . . . . . . . . . . . . . . . . . . . . . . . . . . . . . . . . . . . . . . . . . . . . . 503.9 CVE mirror troubleshooting . . . . . . . . . . . . . . . . . . . . . . . . . . . . . . . . . . . . . . . 583.10 System metrics with Prometheus . . . . . . . . . . . . . . . . . . . . . . . . . . . . . . . . . . . . . 613.11 Upgrading Team Edition . . . . . . . . . . . . . . . . . . . . . . . . . . . . . . . . . . . . . . . . . 64
4 Using Anaconda Team Edition 694.1 Using Conda with Anaconda Team Edition . . . . . . . . . . . . . . . . . . . . . . . . . . . . . . . 694.2 Anaconda Team Edition CLI . . . . . . . . . . . . . . . . . . . . . . . . . . . . . . . . . . . . . . . 704.3 Configuring Navigator to work with Team Edition . . . . . . . . . . . . . . . . . . . . . . . . . . . 724.4 Accessing tooltips . . . . . . . . . . . . . . . . . . . . . . . . . . . . . . . . . . . . . . . . . . . . 734.5 Logging in/out of Team Edition . . . . . . . . . . . . . . . . . . . . . . . . . . . . . . . . . . . . . 734.6 Anaconda Project . . . . . . . . . . . . . . . . . . . . . . . . . . . . . . . . . . . . . . . . . . . . . 744.7 Environments . . . . . . . . . . . . . . . . . . . . . . . . . . . . . . . . . . . . . . . . . . . . . . . 774.8 Channels and subchannels . . . . . . . . . . . . . . . . . . . . . . . . . . . . . . . . . . . . . . . . 804.9 Using packages within channels/subchannels . . . . . . . . . . . . . . . . . . . . . . . . . . . . . . 904.10 History . . . . . . . . . . . . . . . . . . . . . . . . . . . . . . . . . . . . . . . . . . . . . . . . . . 954.11 Packages . . . . . . . . . . . . . . . . . . . . . . . . . . . . . . . . . . . . . . . . . . . . . . . . . 964.12 Jupyter Notebooks . . . . . . . . . . . . . . . . . . . . . . . . . . . . . . . . . . . . . . . . . . . . 1014.13 Authorization tokens . . . . . . . . . . . . . . . . . . . . . . . . . . . . . . . . . . . . . . . . . . . 1024.14 Working with private channels using third-party tools . . . . . . . . . . . . . . . . . . . . . . . . . 106
i

5 Reference materials 1095.1 Release notes . . . . . . . . . . . . . . . . . . . . . . . . . . . . . . . . . . . . . . . . . . . . . . . 1095.2 License types . . . . . . . . . . . . . . . . . . . . . . . . . . . . . . . . . . . . . . . . . . . . . . . 1135.3 Troubleshooting . . . . . . . . . . . . . . . . . . . . . . . . . . . . . . . . . . . . . . . . . . . . . 1145.4 Glossary . . . . . . . . . . . . . . . . . . . . . . . . . . . . . . . . . . . . . . . . . . . . . . . . . 119
ii

Anaconda Documentation, Release 6.1.4
Anaconda Team Edition is our latest generation repository for all things Anaconda. With support for all major op-erating systems, the repository serves as your central conda, PyPI, and CRAN packaging resource for desktop users,development clusters, CI/CD systems, and production containers.
• The clearinghouse for build artifacts (packages and libraries) - along with their metadata - at enterprise scale.
• Comprehensive history of repository events to ensure governance and security.
• Makes it easy to distribute consumable artifacts to end users, package managers and CI servers so that theycan retrieve and store the artifacts and their dependencies during the development lifecycle.
• Integrates with enterprise content management, including CVE alerts.
As the premier providers of open source for data science, AI, and ML, we already help teams build models, applications,dashboards, REST APIs through Anaconda Individual Edition, the conda package and environment manager, and ourpackage repository on Anaconda Cloud. Anaconda Team Edition delivers this rich ecosystem with a governance layerthat ensures your data scientists, your IT department, and your legal department stay in collaboration, not conflict.
CONTENTS 1

Anaconda Documentation, Release 6.1.4
2 CONTENTS
CHAPTER
ONE
PREPARING ENVIRONMENT FOR ANACONDA TEAM EDITION
This section provides guidance on preparing your environment before you install Anaconda Team Edition. Select thepreparation guide applicable to your environement:
1.1 Standard environment preparation
This topic provides guidance for preparing your environment before Standard installation.
1.1.1 Install requirements
Note: The installer provides a single-node installation process.
Software requirements
The installer is a self-extracting binary (ate-x.x.x-installer.sh, where x.x.x is the version number) that contains thenecessary components to run Anaconda Teams services. The basic requirements prior to installation are:
• Any Linux variant capable of supporting Docker
• Docker Engine 1.13.1+ or Docker CE/EE 17.04+ (Supports Compose format 3.1)
• Docker Compose 1.11.0+ (Supports Compose format 3.1)
• If SELinux is enabled, it cannot be in enforcing mode
• Optional: DNS record and TLS/SSL certs (more information below)
Some additional recommendations:
• RHEL7/CentOS7: This is our customers’ most common selection to date, and the variant we have the mostexperience supporting. The versions of Docker and Docker-compose available through the default yum packagerepository are sufficient.
• Ubuntu 20.04 LTS: This has proven to be a reliable choice for customers as well, using the versions of Dockerand Docker-Compose available in the default apt-get package repository.
• RHEL8/CentOS8: Installing ATE on these variants is possible, but requires additional effort. Because RedHathas replaced its Docker offering with Podman, Podman must be removed from the installation Docker and Docker-Compose installed from third-party sources.
• Other Linux variants that provide full support for Docker and Docker-Compose are likely to work as well, butwe invite you to inquire with the Anaconda implementation team for our most up-to-date experience.
3

Anaconda Documentation, Release 6.1.4
For Docker, the default log driver must be configured to the json-file.
For Red Hat systems, please refer to the Default options for modifying docker daemon options. To verify that you’rerunning the json-file, run the following command:
docker info --format '{{.LoggingDriver}}'
Hardware requirements
• 4 CPUs
• 8GB RAM
• 1TB storage space
Warning: Our recommended storage space only accounts for Anaconda’s default channels; if you wish to mirroradditional channels or upload additional packages, please allocate more storage accordingly.
Optional: TLS/SSL certificate requirements
Team Edition can use certificates to provide transport layer security for the cluster. It is required to have your TLS/SSLcerts prior to installation, otherwise self-signed certificates can be generated during the initial installation. You canconfigure the platform to use organizational TLS/SSL certificates after completing the installation.
You may purchase certificates commercially, use Let’s Encrypt, or generate them using your organization’s internalpublic key infrastructure (PKI) system. When using an internal PKI-signed setup, the CA certificate is stored on thefile system. You will need to make sure that the root certificate of your certificate authority is trusted by the serverrunning the application and the workstations used by users of the application.
In either case, the configuration will include the following:
• A certificate for the root certificate authority (CA)
• An intermediate certificate chain
• A server certificate
• A private server key
Optional: DNS requirements
Web browsers use domain names and web origins to separate sites, so they cannot tamper with each other. If you wantto use DNS, you must have it ready prior to installation. This DNS name is what users will use to access the application.
1.1.2 Security requirements
External — accessible outside of server
It is important to protect all services running on the node from outside access. The exceptions are as shown below:
• :80 nginx - only if you are using HTTP
• :443 nginx - only if you are using HTTPS
• :22 ssh - optional; only if you need SSH
Internal — accessible only within server
4 Chapter 1. Preparing Environment for Anaconda Team Edition

Anaconda Documentation, Release 6.1.4
Note: This is only necessary in a multi-node install. Please contact your implementation representative for moreinformation.
Anaconda Team Edition uses several ports for internal communication between components. These ports do not needto be open to the end user.
• :5000 repo - Team Edition API
• :5002 repo-proxy - Team Edition file serving API proxy
• :5000 repo-dispatcher - Team Edition event dispatcher/handler (exposed only for prometheus metrics)
• :5000 repo-worker - Team Edition scheduled jobs worker (exposed only for prometheus metrics)
• :8080 keycloak - keycloak’s /auth/* endpoints are proxied in Nginx
• :5432 postgres - Postgresql database used by Team Edition and Keycloak
• :6379 redis - Redis instance used by Team Edition services
• :9090 prometheus - Prometheus is proxied in Nginx at /Prometheus
To change the postgres user password, run \password postgres when in the shell of the postgres container.
To change the redis user password, follow the instructions under Troubleshooting.
After ensuring all requirements have been met, proceed to Standard installation to install Team Edition.
1.2 Air gap environment preparation
This topic provides guidance for preparing an air-gapped environment and installing an air-gapped environment systemfor a straightforward installation of Anaconda Team Edition, as detailed in Air gap installation.
• Preparing the air-gapped environment
• Installing air-gapped environment system
1.2.1 Preparing the air-gapped environment
Environment requirements
The installer is a self-extracting binary (ate-x.x.x-installer.sh, where x.x.x is the version number) that contains thenecessary components to run Anaconda Team Edition.
The following tools and components are required to install Anaconda Team Edition in your air-gapped environment:
Software requirements
• Any Linux variant capable of supporting Docker (RHEL 7.x/CentOS)
• If SELinux is enabled, it cannot be in enforcing mode
1.2. Air gap environment preparation 5

Anaconda Documentation, Release 6.1.4
• Use FQDN(Fully Qualified Domain Name) or Hostname
• If you are not using DNS: you will use the public IP address of your instance
Hardware requirements
• 4 CPUs
• 8GB RAM
• 1.5TB storage space
– Conda_air gap zip file is~ 700GB
– CVE zip file is ~20MB
Installing packages and CVE files
Artifact download authorization
In order to pull down the conda packages and CVEs, you will need to provide the IP address of the server you aregoing to store the packages and CVEs on. This enables us to grant you access to the S3 bucket where we store thepackages and CVEs.
Note: This will need to be completed prior to scheduling your implementation with Anaconda. The download willtake several hours.
If you prefer not to use a hostname, the public IP address of your environment will be required.
Installing packages and CVEs
In this section, you will install Team Edition packages, move those packages to your air-gapped repository, and configurethe .env file to point to the location of the CVEs.
Warning: Downloading the Anaconda Team Edition Packages may take several hours.
Run the following commands to install the air gap and cve packages:
curl -O https://anaconda-airgap-te.s3.amazonaws.com/conda_main.zipcurl -O https://anaconda-airgap-te.s3.amazonaws.com/conda_msys2.zipcurl -O https://anaconda-airgap-te.s3.amazonaws.com/conda_r.zipcurl -O https://anaconda-airgap-te.s3.amazonaws.com/cve.zip
Warning: Do not unzip the air gap or cve files.
6 Chapter 1. Preparing Environment for Anaconda Team Edition

Anaconda Documentation, Release 6.1.4
DNS and TLS/SSL certificate requirements
Team Edition can use certificates to provide transport layer security for the cluster. It is required to have your TLS/SSLcerts prior to installation; otherwise, self-signed certificates can be generated during the initial installation. You canconfigure the platform to use organizational TLS/SSL certificates after completing the installation.
You may purchase certificates commercially, use Let’s Encrypt, or generate them using your organization’s internalpublic key infrastructure (PKI) system. When using an internal PKI-signed setup, the CA certificate is stored on thefile system. You will need to make sure the root certificate of your certificate authority is trusted by the server runningthe application and the workstations used by users of the application.
You must provide the SSL cert for the hostname your Team Edition instance is running on.
Security requirements
External Ports
These are ports that allow access outside of the server. It is important to protect all services running on the node fromoutside access. The exceptions are as shown below. These ports need to be open to allow access to Anaconda TeamEdition via browser and (optionally) via SSH:
• :80 nginx - only if you are using HTTP
• :443 nginx - only if you are using HTTPS
• :22 ssh - optional; only if you need SSH
Internal Ports
These are ports that allow access within the server and are open on docker containers, exposed only to the dockernetwork. Ideally, Anaconda Team Edition will have a dedicated environment. Anaconda Team Edition uses severalports for internal communication between components. These ports do not need to be open to the end user but theyneed to be reserved, as some bind to the local host network interfaces.
You can run docker ps and reference the PORTS column, as shown in the following example:
• :5000 repo - Team Edition API
• :5002 repo-proxy - Team Edition file serving API proxy
• :5000 repo-dispatcher - Team Edition event dispatcher/handler (exposed only for prometheus metrics)
• :5000 repo-worker - Team Edition scheduled jobs worker (exposed only for prometheus metrics)
• :8080 keycloak - keycloak’s /auth/* endpoints are proxied in Nginx
• :5432 postgres - Postgresql database used by Team Edition and Keycloak
• :6379 redis - Redis instance used by Team Edition services
• :9090 prometheus - Prometheus is proxied in Nginx at /Prometheus
1.2. Air gap environment preparation 7

Anaconda Documentation, Release 6.1.4
1.2.2 Installing air-gapped environment system
Install Docker and Docker Compose. Contact your operating system vendor or IT department for assistance with thisstep.
After ensuring all requirements have been met, proceed to Air gap installation to install Team Edition in your air-gappedenvironment.
8 Chapter 1. Preparing Environment for Anaconda Team Edition
CHAPTER
TWO
INSTALLING ANACONDA TEAM EDITION
The topics in this section provide guidance on the installation process for Anaconda Team Edition. The installer is aself-contained executable that utilizes Docker to load and instantiate the necessary services. While the installer providessome automated installation capabilities, it also provides the building blocks for in-depth runtime customization.
2.1 Standard installation
This topic provides guidance on installing Anaconda Team Edition and verifying your installation.
Note: To successfully install Team Edition, you must have already prepared your environment according to the Stan-dard environment preparation topic.
• Installing Team Edition
• Manual verification of installation
• Next steps
2.1.1 Installing Team Edition
Ensure you are in the same directory as the installer when completing these steps.
Installing with root access
Run the following in bash:
# Replace "x.x.x" with the version number.# Replace "hostname of the target host" with the hostname of the server, which you will# use to access Team Edition. This could be internal or external (accessible from the␣→˓internet)../ate-x.x.x-installer.sh --keep -- --domain <the IP or hostname of the target host> --→˓default-user anaconda
9

Anaconda Documentation, Release 6.1.4
During installation, credentials will be printed as a random string in the terminal for two separate roles:
• Admin - for administration in Keycloak
• “default-user” - for administration in Team Edition UI.
Note: You will need the user names and passwords printed on the screen later, so save them!
Example output:
User anaconda-admin created, realm=dev, roles=adminpassword: J86j193PwaH92tjIN5J78m67User admin created, realm=master, roles=adminpassword: 79g2X1Zx02iY9RKe729MP38Y
Within the ate-x.x.x-installer/ folder is the install.sh script and docker-compose.yml file, which defineshow the Anaconda Teams services are run.
Installing without root access
It is also possible to run the installer without root permission. However, this requires additional manual steps:
Add yourself to the docker group by running the following command:
# Replace <USERNAME> with your Anaconda username.sudo usermod -a -G docker <USERNAME>
Enable port forwarding as root or with sudo:
sudo sysctl net.ipv4.conf.all.forwarding=1sudo iptables -P FORWARD ACCEPT
By default, /opt/anaconda/repo is used as the default path for the installation folder. You can either create the foldermanually by assigning write access to the current user, or use -b (--base-dir parameter of the installer to specify thefolder for installation).
Within the ate-x.x.x-installer/ folder is the install.sh script and docker-compose.yml file, which defineshow the Anaconda Teams services are run.
2.1.2 Manual verification of installation
Services are one-to-one to containers. Therefore, verifying that all major containers are up and not restarting or failingis a good first step.
In a terminal, run:
docker ps
You should see output similar to the following:
10 Chapter 2. Installing Anaconda Team Edition

Anaconda Documentation, Release 6.1.4
It is important to note that each container appears in the output:
• Installer_repo_api
• Installer_nginx_proxy
• Installer_repo_worker
• Installer_repo_dispatcher
• Installer_repo_proxy
• Installer_keycloak
• Installer_postgres
• Installer_redis
It is also important to note that the status of each container is “Up”, and that it does not get stuck in a restart loop.
Finally, you should be able to use a browser to navigate to the domain that you supplied when executing the installer.If you are able to successfully authenticate and use the product, it has installed correctly.
2.1.3 Next steps
After the installation has completed, open a browser and visit the domain you used during the product installation.
Warning: Never delete the install directory containing the docker-compose.yml and .env files.
Further installation options can be seen by running the following command (after the basic installation is complete):
# Replace "x.x.x" with the version number./ate-x.x.x-installer/install.sh --help
This will present you with the following list of possible arguments:
2.2 Air gap installation
This topic provides guidance for installing Anaconda Team Edition in an air-gapped environment.
Note: To successfully install Team Edition in an air-gapped environment, you must have already prepared your envi-ronment according to the Air gap environment preparation topic.
• System validation checks
2.2. Air gap installation 11

Anaconda Documentation, Release 6.1.4
• Installing Anaconda Team Edition
• Installing packages and CVEs in Team Edition
• Restarting and logging in to Team Edition as admin
• Administering Team Edition in Keycloak
• Using Team Edition
2.2.1 System validation checks
Run the following commands to gain information on your system and validate that it is ready for a Team Edition install.
Display what type of processor your system is running, including the number of CPUs present:
$cat /proc/cpuinfo
Report the amount of free and used memory (both physical and swap) on the system, as well as the shared memory andbuffers used by the kernel:
$cat /proc/meminfo
A standard Unix command used to display the amount of available disk space for file systems on which the invokinguser has appropriate read access:
$df -h
Displays the operating system name as well as the system node name, operating system release, operating systemversion, hardware name, and processor type:
$uname -a
Displays the operating system identification data:
$cat /etc/os-release
Docker verification check:
$docker-compose --version
2.2.2 Installing Anaconda Team Edition
Obtain the Team Edition installer and your Team Edition license from your Anaconda representative before pro-ceeding.
Download Anaconda Team Edition:
# Replace <ATE-AIRGAP-INSTALL-URL> with the installer .sh file$ curl -O \ <ATE-AIRGAP-INSTALL-URL>
Make it executable:
12 Chapter 2. Installing Anaconda Team Edition

Anaconda Documentation, Release 6.1.4
$ chmod 700 te-installer-6.1.5-airgap-3d840d9.sh
Install Team Edition and providing ability to view the output file:
# Replace <IP ADDRESS OR DOMAIN> with your IP address/FQDN$ ./ate-installer.sh --keep -- --domain <IP ADDRESS OR DOMAIN> --default-user anaconda 2␣→˓> &1 | ate.install.output
Note: Keep an eye out for the admin credentials generated during the install. You’ll need these usernames andpasswords later.
The credentials will look like the following:
User anaconda created, realm=dev, roles=adminpassword: <anaconda_pw_here>User admin created, realm=master, roles=adminpassword: <admin_pw_here>
Example output:
net.ipv4.conf.all.forwarding = 1Loading Repo images ...Loaded image: nginx:6.1.5Loaded image: keycloak:6.1.5Loaded image: redis-ubi:6.1.5Loaded image: postgres:9.6Loaded image: prom/prometheus:v2.15.2Loaded image: repo:6.1.5Loaded image: repo-proxy:6.1.5Successfully loaded imagesInstalling into /opt/anaconda/repoGenerated secret for repo-servicesecret=978kb2M2BcrWR812PxY8yCvp62906C20realm role=view-usersGenerated secret for repo-account-syncsecret=h4ZkM1892p9gK95W8A68T4T0TA4aK5Z7# Usernames and passwords below:User anaconda created, realm=dev, roles=adminpassword: T2206u7iNFS0226Qy2ro0lX1User admin created, realm=master, roles=adminpassword: 6kd01Rmqz46849gRh8U78Uu3
2.2. Air gap installation 13

Anaconda Documentation, Release 6.1.4
2.2.3 Installing packages and CVEs in Team Edition
After downloading the zip files during air gap environment preparation, move them to the desired location. We haveused /repo/airgap/ in the following example:
mv conda_main_airgap.zip /opt/anaconda/repo/airgap/mv cve.zip /opt/anaconda/repo/airgap/
In the Team Edition base directory, update REPO_CVE_DEFAULT_MIRROR in the .env file to the following:
REPO_CVE_DEFAULT_MIRROR=file://opt/anaconda/repo/airgap/cve.zip
2.2.4 Restarting and logging in to Team Edition as admin
In your base Team Edition directory, run the following commands:
docker-compose stopdocker-compose up -ddocker ps # to make sure all processes are up
Log in to Team Edition, either at http://<DNS> or http://<your instance public IP address>.
Use the following credentials when logging in:
Username: anaconda
Password: your generated password from when you installed Team Edition
On your very first login, you will be redirected to Keycloak to authenticate your access.
2.2.5 Administering Team Edition in Keycloak
Once you’ve been redirected to Keycloak upon login, you can begin setting up your keycloak.
Log in using the following credentials:
Username: admin
Password: your generated password from when you installed Team Edition
Once you have logged in to Keycloak, you will see the main page, as shown below. On the left-hand side, navigate toUsers.
Click on the blue hyperlink in the ID column to take you to the admin profile.
From the Details tab, you can make changes to the profile.
14 Chapter 2. Installing Anaconda Team Edition

Anaconda Documentation, Release 6.1.4
2.2. Air gap installation 15
Anaconda Documentation, Release 6.1.4
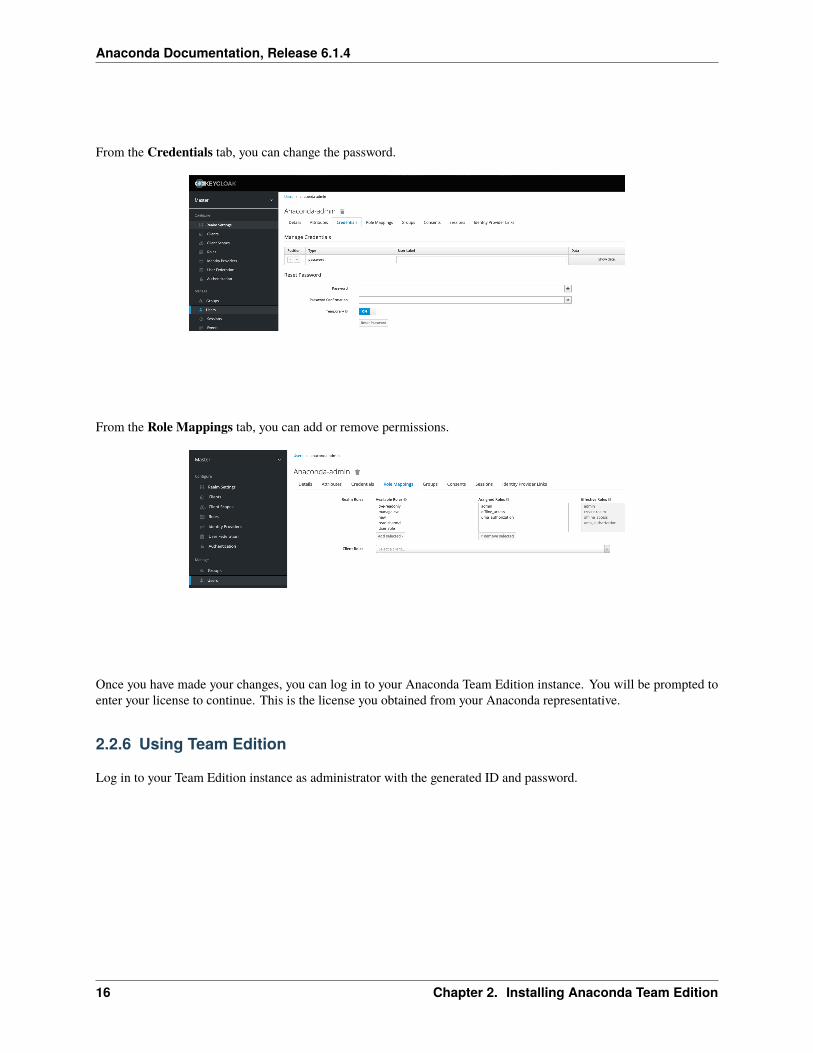
From the Credentials tab, you can change the password.
From the Role Mappings tab, you can add or remove permissions.
Once you have made your changes, you can log in to your Anaconda Team Edition instance. You will be prompted toenter your license to continue. This is the license you obtained from your Anaconda representative.
2.2.6 Using Team Edition
Log in to your Team Edition instance as administrator with the generated ID and password.
16 Chapter 2. Installing Anaconda Team Edition

Anaconda Documentation, Release 6.1.4
Creating a channel
There are a few key things to note when creating a channel:
• If a channel name is already in use, create a new channel with a different name. That channel can then be set asthe default channel on the Settings page under My Account.
• If an email is used as a username, the portion of the email before the “@” symbol (also known as the “local-part”)will be used as the username. Because channel names are restricted to a limited set of characters (a-z 0-9 - _),some characters may be replaced with _. For example, if the email address [email protected] isused as a username, the channel annie_anaconda will be created.
• If you don’t see any way of creating a channel (as shown in the following section), you may be lacking thepermission to do so. Ask your administrator about modifying your permissions to allow you to create channels.
1. Click on the My account button in the top right, and then click Create a Channel. You can also create a channelby clicking the green Create Channel button from your channel page.
2. Fill in a name and description when prompted.
Creating a mirror
In the new channel, create a new mirror by clicking the green Mirror button in the channel.
Ensure Passive is selected at the top.
Note: Mirroring passively reduces the storage space used. You will still get the packages you need, as they are alreadystored in the Team Edition instance.
In the field External Source Channel, enter the file path to the conda_main_airgap.zip file.
2.2. Air gap installation 17

Anaconda Documentation, Release 6.1.4
18 Chapter 2. Installing Anaconda Team Edition

Anaconda Documentation, Release 6.1.4
Once you have created the mirror, you are all set to use Team Edition!
2.3 Licenses
Your license determines the number of users and channels available to your instance as well as the high-availabilitysettings for your account.
Licenses are issued for their designated contract period. New licenses will be issued by Anaconda at the time of renewal.
This topic provides guidance on the following actions:
• Obtaining a license
• Enabling your license
• Viewing your license
• Updating your license
• Understanding licensing limitations
2.3.1 Obtaining a license
You may obtain or upgrade a license through one of the following methods:
1. The Anaconda sales team. Team Edition can be installed on premise (may be air gapped) or in your existingcloud infrastructure.
2. OEM partners.
2.3.2 Enabling your license
Once you have obtained your license, complete the following steps:
1. Run the installer.
2. Once the installer has completed, go to https://<YOUR_DOMAIN>/.
3. Click Login, and then log in using the default administrator username and password created during the installa-tion.
4. You will be presented with a page where you can paste your license and hit Submit.
If the license was accepted, you will be redirected to the Dashboard.
2.3. Licenses 19

Anaconda Documentation, Release 6.1.4
20 Chapter 2. Installing Anaconda Team Edition
Anaconda Documentation, Release 6.1.4
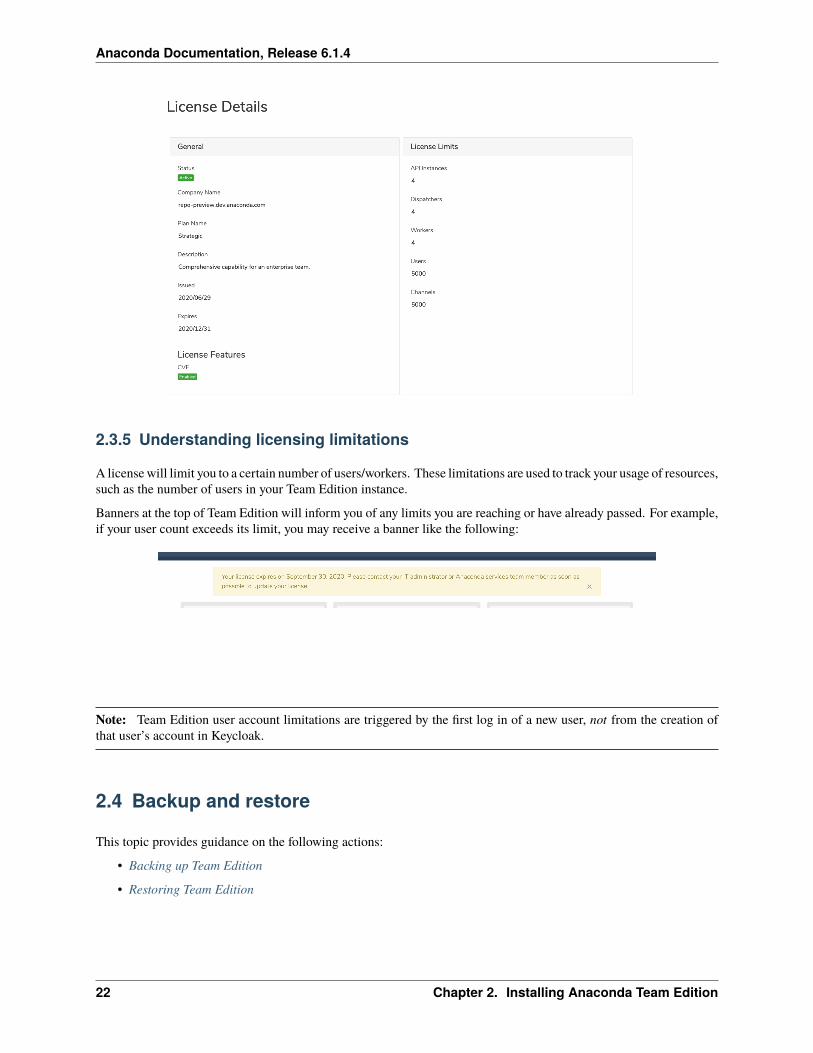
2.3.3 Viewing your license
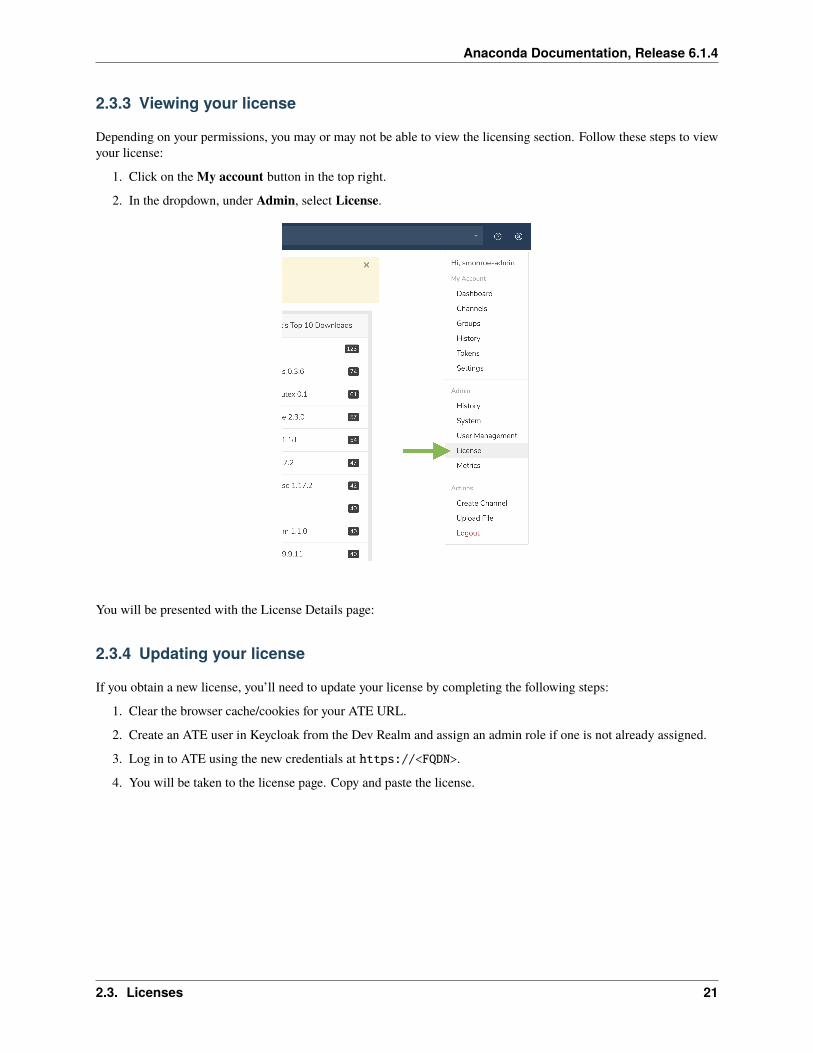
Depending on your permissions, you may or may not be able to view the licensing section. Follow these steps to viewyour license:
1. Click on the My account button in the top right.
2. In the dropdown, under Admin, select License.
You will be presented with the License Details page:
2.3.4 Updating your license
If you obtain a new license, you’ll need to update your license by completing the following steps:
1. Clear the browser cache/cookies for your ATE URL.
2. Create an ATE user in Keycloak from the Dev Realm and assign an admin role if one is not already assigned.
3. Log in to ATE using the new credentials at https://<FQDN>.
4. You will be taken to the license page. Copy and paste the license.
2.3. Licenses 21
Anaconda Documentation, Release 6.1.4
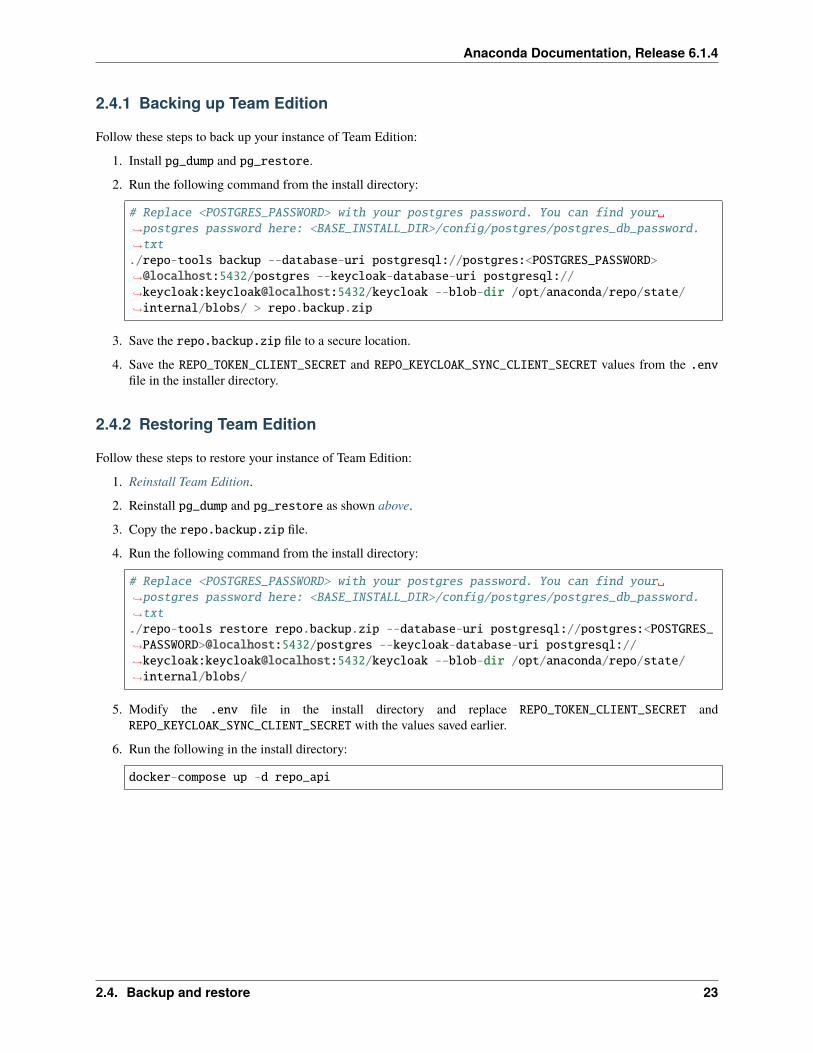
2.3.5 Understanding licensing limitations
A license will limit you to a certain number of users/workers. These limitations are used to track your usage of resources,such as the number of users in your Team Edition instance.
Banners at the top of Team Edition will inform you of any limits you are reaching or have already passed. For example,if your user count exceeds its limit, you may receive a banner like the following:
Note: Team Edition user account limitations are triggered by the first log in of a new user, not from the creation ofthat user’s account in Keycloak.
2.4 Backup and restore
This topic provides guidance on the following actions:
• Backing up Team Edition
• Restoring Team Edition
22 Chapter 2. Installing Anaconda Team Edition
Anaconda Documentation, Release 6.1.4
2.4.1 Backing up Team Edition
Follow these steps to back up your instance of Team Edition:
1. Install pg_dump and pg_restore.
2. Run the following command from the install directory:
# Replace <POSTGRES_PASSWORD> with your postgres password. You can find your␣→˓postgres password here: <BASE_INSTALL_DIR>/config/postgres/postgres_db_password.→˓txt./repo-tools backup --database-uri postgresql://postgres:<POSTGRES_PASSWORD>→˓@localhost:5432/postgres --keycloak-database-uri postgresql://→˓keycloak:keycloak@localhost:5432/keycloak --blob-dir /opt/anaconda/repo/state/→˓internal/blobs/ > repo.backup.zip
3. Save the repo.backup.zip file to a secure location.
4. Save the REPO_TOKEN_CLIENT_SECRET and REPO_KEYCLOAK_SYNC_CLIENT_SECRET values from the .envfile in the installer directory.
2.4.2 Restoring Team Edition
Follow these steps to restore your instance of Team Edition:
1. Reinstall Team Edition.
2. Reinstall pg_dump and pg_restore as shown above.
3. Copy the repo.backup.zip file.
4. Run the following command from the install directory:
# Replace <POSTGRES_PASSWORD> with your postgres password. You can find your␣→˓postgres password here: <BASE_INSTALL_DIR>/config/postgres/postgres_db_password.→˓txt./repo-tools restore repo.backup.zip --database-uri postgresql://postgres:<POSTGRES_→˓PASSWORD>@localhost:5432/postgres --keycloak-database-uri postgresql://→˓keycloak:keycloak@localhost:5432/keycloak --blob-dir /opt/anaconda/repo/state/→˓internal/blobs/
5. Modify the .env file in the install directory and replace REPO_TOKEN_CLIENT_SECRET andREPO_KEYCLOAK_SYNC_CLIENT_SECRET with the values saved earlier.
6. Run the following in the install directory:
docker-compose up -d repo_api
2.4. Backup and restore 23

Anaconda Documentation, Release 6.1.4
2.5 Stopping and Uninstalling Anaconda Team Edition
• Stopping Team Edition
• Uninstalling Team Edition
2.5.1 Stopping Team Edition
To stop your containers, run the following command. This action will not remove your containers, but simply stopthem:
docker-compose stop
To start your containers, run the following command:
docker-compose up
2.5.2 Uninstalling Team Edition
Warning: Make sure you back up logs, the artifacts database, and the postgres database before uninstalling.
To remove Anaconda Team Edition package data, log in with the same user profile you used to install Team Editionand run the following commands in the terminal where Team Edition is installed:
# Replace x.x.x with your current version of Team Editioncd ate-x.x.x-installerdocker-compose downrm -rf /opt/anaconda/repo
To perform a complete uninstall, i.e. to delete Team Edition application and configuration (as opposed to just deletingpackage data), run the following command as well:
# Replace x.x.x with your current version of Team Editionrm -rf ~/ate-x.x.x-installer
24 Chapter 2. Installing Anaconda Team Edition
CHAPTER
THREE
ADMINISTERING ANACONDA TEAM EDITION
This Anaconda Team Edition Administration guide is intended for user management and administration.
3.1 User management and configuration
The topics within this section pertain to user management and configuration.
3.1.1 User roles and permissions
This topic provides guidance on the following actions:
• Understanding roles and permissions
• Default roles and permissions
• Editing default permissions
• Creating custom roles
• Add a new master realm admin user/Reset password
• Adding and editing user roles in Team Edition
Assigning access and permissions to individual users can be too fine-grained and cumbersome for organizations tomanage, so Anaconda Team Edition enables you to assign access permissions to specific roles.
25
Anaconda Documentation, Release 6.1.4
Understanding roles and permissions
Use roles to authorize individual or groups of users to perform specific actions. Default roles allow you to automaticallyassign user role mappings when any user is newly created or imported (for example, through LDAP).
Default user roles
By default, Team Edition contains the following preconfigured roles for the dev realm.
• Admin — the user who, in addition to managing all content, can manage mirrors and CVE data as well
• Author — an authenticated user who can create channels
• Everyone — a non-authenticated user
Permission categories
Within the Team Edition UI, any role created in Keycloak can be assigned these permission categories. Each of thesesupport read/write admin values.
• channel
• channel.default-channel (managing default channel)
• channel.group (managing channel groups)
• channel.mirror (managing channel mirror)
• subchannel
• subchannel.group
• subchannel.mirror
• artifact
• cve
• roles
Each possible permission category can be assigned the value of read, write, manage, or none.
• read — provides the ability to view the resource
• write — provides the ability to view and create the resource
• manage — provides the ability to view, create, and edit the resource
• none - denies the ability to view, create, or edit the resource
Default roles and permissions
These are the permissions assigned to authors and admins by default:
26 Chapter 3. Administering Anaconda Team Edition

Anaconda Documentation, Release 6.1.4
Editing default permissions
It is possible to edit default permission settings for everyone and author roles. It is not possible to edit default settingsfor the admin role.
For example, you can grant CVE access to authors by switching user permissions for CVE from None to Manage inthe User Management dashboard:
Creating custom roles
In order to do this, we must first create and map the role in Keycloak.
Accessing the Keycloak administration console
Follow these steps to access the Keycloak administration console:
1. Click on the My account button in the top right.
2. In the dropdown, under Admin, select User Management.
3. On the User Management screen, click the Manage Users button. You will be directed to the Keycloak loginscreen.
The default admin username is admin, and the admin password can be found in the installer output (an example ofwhich is shown in the Installing with root access section of the install instructions). The installer will generate a randompassword for this user.
Alternatively, you can use <DOMAIN>/auth/admin to reach the Keycloak admin login page.
Additional guides for Keycloak:
3.1. User management and configuration 27
Anaconda Documentation, Release 6.1.4
• Keycloak documentation for server administration
• User management
• Setup and configuration of Keycloak server
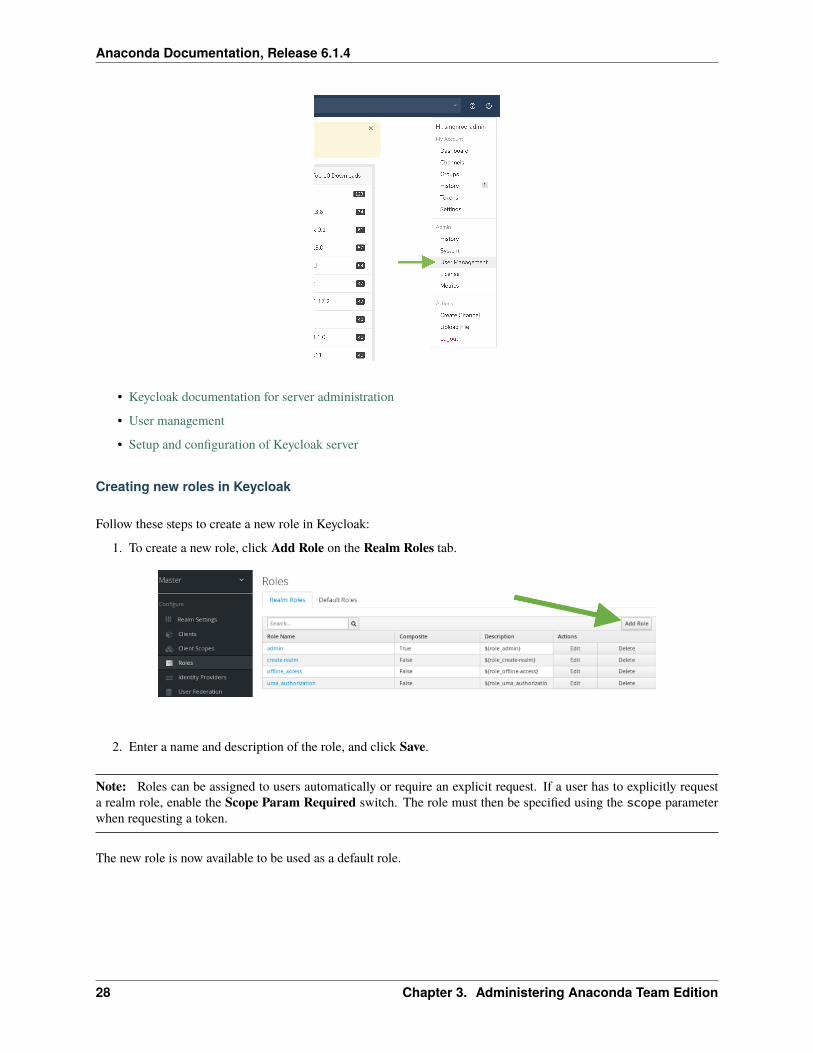
Creating new roles in Keycloak
Follow these steps to create a new role in Keycloak:
1. To create a new role, click Add Role on the Realm Roles tab.
2. Enter a name and description of the role, and click Save.
Note: Roles can be assigned to users automatically or require an explicit request. If a user has to explicitly requesta realm role, enable the Scope Param Required switch. The role must then be specified using the scope parameterwhen requesting a token.
The new role is now available to be used as a default role.
28 Chapter 3. Administering Anaconda Team Edition

Anaconda Documentation, Release 6.1.4
Setting and removing admin roles in Keycloak
Follow these steps to set or remove the admin role for a Team Edition user:
1. In Keycloak, under Manage, navigate to the Users page.
2. Go to the Role Mappings tab.
3. To set the admin role: Under Available Roles, select admin and click Add selected.
To remove the admin role: Under Assigned Roles, select the user and click Remove selected.
4. Log in again and check the available actions.
View existing users in Keycloak
Follow these steps to view a list of existing users currently present in Team Edition:
1. Log in to Keycloak as the admin user.
2. Select DEV realm.
3. In the Manage menu on the left, click Users.
4. On the Lookup tab, click View all users to list every user in the system, or search the user database for all usersthat match the criteria you enter, based on their first name, last name, or email address.
Note: This will search the local user database and not the federated database (such as LDAP) because not all externalidentity provider systems inlcude a way to page through users. If you want users from a federated database to be syncedinto the local database, select User Federation in the Configure menu on the left, and adjust the Sync Settings for youruser federation provider.
3.1. User management and configuration 29

Anaconda Documentation, Release 6.1.4
Create a user in Keycloak
Follow these steps to create a user:
1. In Keycloak, go to the Users section on the left.
2. Click Add user and specify a user name—and optionally provide values for the other fields—before clickingSave.
3. Enter the username and ensure Email Verified is ON. User names containing unicode characters—special char-acters, punctuation, symbols, spaces—are not permitted.
4. Click save, then navigate to the Credentials tab.
5. Ensure Temporary is OFF.
6. Click Set Password.
30 Chapter 3. Administering Anaconda Team Edition

Anaconda Documentation, Release 6.1.4
Add a new master realm admin user/Reset password
Follow these steps from the command line to add a new admin user to the master realm or to reset your admin passwordif you’re locked out or have forgotten your password.
1. Exec into the Keycloak container:
# Replace <KEYCLOAK_CONTAINER_ID> with your keycloak container IDdocker exec -it <KEYCLOAK_CONTAINER_ID> /bin/bash
2. Create a user:
# Replace <USERNAME> with your username and <PASSWORD> with your password/opt/jboss/keycloak/bin/add-user-keycloak.sh -u <USERNAME> -p <PASSWORD> -r master -→˓-roles=admin
3. Restart the server. Restarting the server will delete the container and any current state:
/opt/jboss/keycloak/bin/standalone.sh -Djboss.socket.binding.port-offset=100
4. Log in to Keycloak from the following URL:
#Replace <FQDN> with your fully qualified domain name<https://<FQDN>/auth/admin/master/console>.
Adding and editing user roles in Team Edition
Once roles have been mapped in Keycloak, you can manage users in Team Edition.
1. Click on the My account button in the top right.
2. In the dropdown, under Admin, select User Management.
3. On the User Management screen, you can see the User Roles table listing the current roles. Click on a role toedit it, or click the + icon to add a new role. You can also delete a role by clicking the x icon. This will prompta window to confirm the deletion.
3.1. User management and configuration 31
Anaconda Documentation, Release 6.1.4
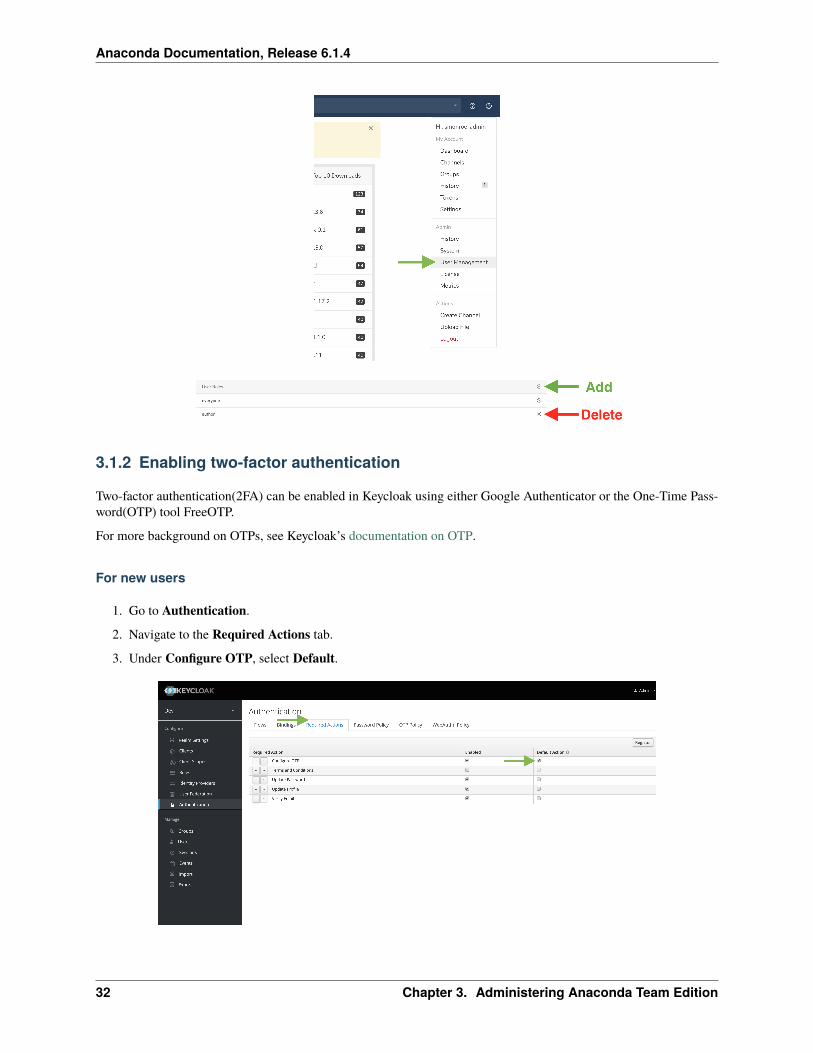
3.1.2 Enabling two-factor authentication
Two-factor authentication(2FA) can be enabled in Keycloak using either Google Authenticator or the One-Time Pass-word(OTP) tool FreeOTP.
For more background on OTPs, see Keycloak’s documentation on OTP.
For new users
1. Go to Authentication.
2. Navigate to the Required Actions tab.
3. Under Configure OTP, select Default.
32 Chapter 3. Administering Anaconda Team Edition

Anaconda Documentation, Release 6.1.4
For existing users
Note: This should be done for every user that does not have an OTP configured.
1. Go to the user profile page.
2. Under Required Field, select Configure OTP.
3.1.3 Okta integration using OpenID Connect Provider (OIDC)
Note: For more detailed integration steps, see Keycloak with Okta OpenID Connect Provider.
Follow these steps to integrate Okta using OIDC:
1. Ensure you have completed the steps in Simple login flow.
2. Start creating th eOIDC Identity Provider integration in the Keycloak.
3. In Okta, create a new OpenID connect application integration and use PUBLIC (make sure it’s not a localhost)redirect uri as a login URL in Okta form.
4. Copy the Client ID and Client Secret from Okta into the Keycloak’s configuration.
5. Under Client Authentication, select Client Secret Sent as POST.
6. By default, use https://{OKTA-DOMAIN}/oauth2/default/v1/authorize and https://{OKTA-DOMAIN}/oauth2/default/v1/token as authorization and token endpoints, respectively.
7. Set openid profile email as default scopes.
3.1.4 Create a dev-users-admin role
By default, the installer creates an admin role, which provides you full management of the Keycloak configuration. Insome cases, you may want to give a user the ability to manange Team Edition users without providing that user withfull permissions to the configuration. In our example, we’ll refer to this role as the dev-users-admin; however, you mayname this role as you like.
For example, you may want to provide a user the ability to view and edit other users’ personal information, credentials,and roles.
Follow these steps to create the dev-users-admin role:
1. Log in as an admin.
2. Go to MASTER realm.
3. Go to Roles and click Add Role.
4. Ensure Composite Roles is ON.
5. Under the Client Roles dropdown, select dev-realm.
6. Assign available roles by selecting those roles and clicking Add selected.
3.1. User management and configuration 33

Anaconda Documentation, Release 6.1.4
3.1.5 Social login integration (GitHub)
For each Keycloak installation, you must create corresponding integrations for the relevant identity provider:
1. Log in as the admin user.
2. Select DEV realm.
3. Naviate to Identity Providers and click Add provider. . . .
4. From the dropdown, select GitHub.
5. Enter the ClientID/Secret from the corresponding GitHub OAuth application settings.
You should then see a GitHub link on the login screen.
34 Chapter 3. Administering Anaconda Team Edition

Anaconda Documentation, Release 6.1.4
3.1. User management and configuration 35
Anaconda Documentation, Release 6.1.4
3.2 Role provisioning: Keycloak admin user with restricted rights
It’s possible to create keycloak admin users with restricted rights. For example, a keycloak user who can only managethe DEV realm users.
Follow these steps to assign a restricted role to a user:
1. Navigate to MASTER realm and create a user.
2. Assign a restricted role to that user. For example, you can create the dev-users-admin role upfront, which givesusers the ability to only manage repo users.
3.3 Proxy mirroring
This topic provides guidance on the following actions:
• Single proxy with upgrade connection
• Multiple proxies (or users) for mirror jobs
• Terminating SSL Proxy
There are a few common setups for situations where mirrors should go through a proxy server, each with their ownspecific requirements and considerations.
These methods can be compounded, meaning you can have an environment that employs any combination of the fol-lowing setups:
3.3.1 Single proxy
A single proxy is used for all outgoing HTTP/HTTPS connections to the internet.
Requirements
• Proxy address/port
• Network access from Anaconda Team Edition (TE) to the proxy server
• Ensuring proper name resolution (if needed)
Implementation
Follow these steps to set up a single proxy:
1. Open your docker-compose.yml file.
2. Add HTTP_PROXY and/or HTTPS_PROXY environment variables to the repo_worker and repo_api containers.For example:
repo_worker:environment:- HTTP_PROXY=http://<PROXY_USER>:<PROXY_PW>@proxypy:8899- HTTPS_PROXY=http://<PROXY_USER>:<PROXY_PW>@proxypy:8899
repo_api:(continues on next page)
36 Chapter 3. Administering Anaconda Team Edition
Anaconda Documentation, Release 6.1.4
(continued from previous page)
environment:- HTTP_PROXY=http://<PROXY_USER>:<PROXY_PW>@proxypy:8899- HTTPS_PROXY=http://<PROXY_USER>:<PROXY_PW>@proxypy:8899
3. Restart the containers by running the following command:
docker-compose up -d $(docker ps|grep repo_worker|cut -d' ' -f1)docker-compose up -d $(docker ps|grep repo_api|cut -d' ' -f1)
3.3.2 Multiple proxies (or users) for mirror jobs
When mirroring through different proxies—whether this is because you’re using a different proxy server or an entirelydifferent user is mirroring—you must apply the correct settings to each respective mirror.
Requirements
The requirements for multiple proxies are the same as the requirements for single proxies; however, you must modifythe settings for each respective proxy.
For example, the proxy URI two users could be named the following:
http://user1:pw1@proxy:8899andhttp://user2:pw2@proxy:8899
Implementation
Note: All updates to the mirror must go through the CLI/PAI, not through the GUI (the proxy setting will be removedif you update from the GUI).
Establish the mirror using conda repo mirror in the cli, or /channel/mirrors via the REST API. This will allowyou to specify the proxy address to be used for the specific mirror:
The following example shows multiple mirrors with different proxy users. It assumes a proxy is available at http://proxy:8899 with basic auth.
If you are using a terminating SSL proxy, see the Terminating SSL proxy section.
# Replace user1/pw1 and user2/pw2 with valid credentials.repo channel --create proxy-exampleconda repo mirror --create proxy-mirror1 \
--channel proxy-example \--source https://repo.anaconda.com/pkgs/main \--only_spec python \--proxy http://user2:pw2@proxy:8899
Here is a second mirror with a different user. You can also use multiple proxies in the same manner, for [email protected] instead of @proxy.
conda repo mirror --create proxy-mirror2 \--channel proxy-example \--source https://repo.anaconda.com/pkgs/main \
(continues on next page)
3.3. Proxy mirroring 37

Anaconda Documentation, Release 6.1.4
(continued from previous page)
--only_spec pandas \--proxy http://user1:pw1@proxy:8899
3.3.3 Terminating SSL Proxy
For a proxy server that terminates the SSL connection, you’ll typically need to distribute the root ca certificate used bythe proxy to TE so it can verify the certs.
Requirements
• Same requirements as those for single proxies
• The ca cert from the proxy server
• All certs for proxies (if multiple proxies are used)
Implementation
For this setup, you must append all required ca certs to the TE repo_api and repo_worker containers. Certs arestored in /conda/ssl/cacert.pem.
Use the following bash function to update existing containers with the root CA for the proxy:
update_proxy_ca() {# usage: update_proxy_ca <path-to-cert>if [[ -f $1 ]]; thenca="$1"
elseecho please provide a path to cert filereturn
fifor c in $(docker ps | awk '/repo_[a,w]/ {print $1}') ; dodocker cp $ca ${c}:/usr/share/pki/ca-trust-source/anchors/proxy.pemdocker exec -ti ${c} sh -c "cat /usr/share/pki/ca-trust-source/anchors/proxy.pem >> /
→˓conda/ssl/cacert.pem"docker exec $c update-ca-trust
done}
3.4 Enabling and configuring SSL
• Enabling SSL
• Configuring SSL
38 Chapter 3. Administering Anaconda Team Edition
Anaconda Documentation, Release 6.1.4
3.4.1 Enabling SSL
By default, the Anaconda Team Edition installation does not require the use of SSL/TLS. To enable SSL/TLS afterinstallation, the following steps must be taken:
1. Edit docker-compose.yml
1. Near the top of the file, uncomment the following lines:
# secrets:# - source: nginx_key# target: /etc/nginx/certs/tls.key# - source: nginx_cert# target: /etc/nginx/certs/tls.crt
2. Further down in the file, under the keycloak key, uncomment this line:
# - PROXY_ADDRESS_FORWARDING=true
2. Edit .env file
1. Change DOMAIN to new FQDN, if applicable.
2. Change NGINX_PROXY_PORT to 443.
3. Change PROTOCOL to https
3. Edit /opt/anaconda/repo/config/nginx/conf.d/repo.conf
1. Near the top of the file, change listen 8080; to listen 8080 ssl;.
2. Add the following lines after the listen 8080 ssl; line:
ssl_certificate /etc/nginx/certs/tls.crt;ssl_certificate_key /etc/nginx/certs/tls.key;ssl_protocols TLSv1.2 TLSv1.3;ssl_ciphers HIGH:!aNULL:!MD5;
4. Add your certificate and private key, named tls.crt and tls.key, to the following directory:
/opt/anaconda/repo/config/nginx/certs
5. Run the following command from the directory containing docker-compose.yml to apply the changes:
docker-compose up -d nginx_proxy
3.4.2 Configuring SSL
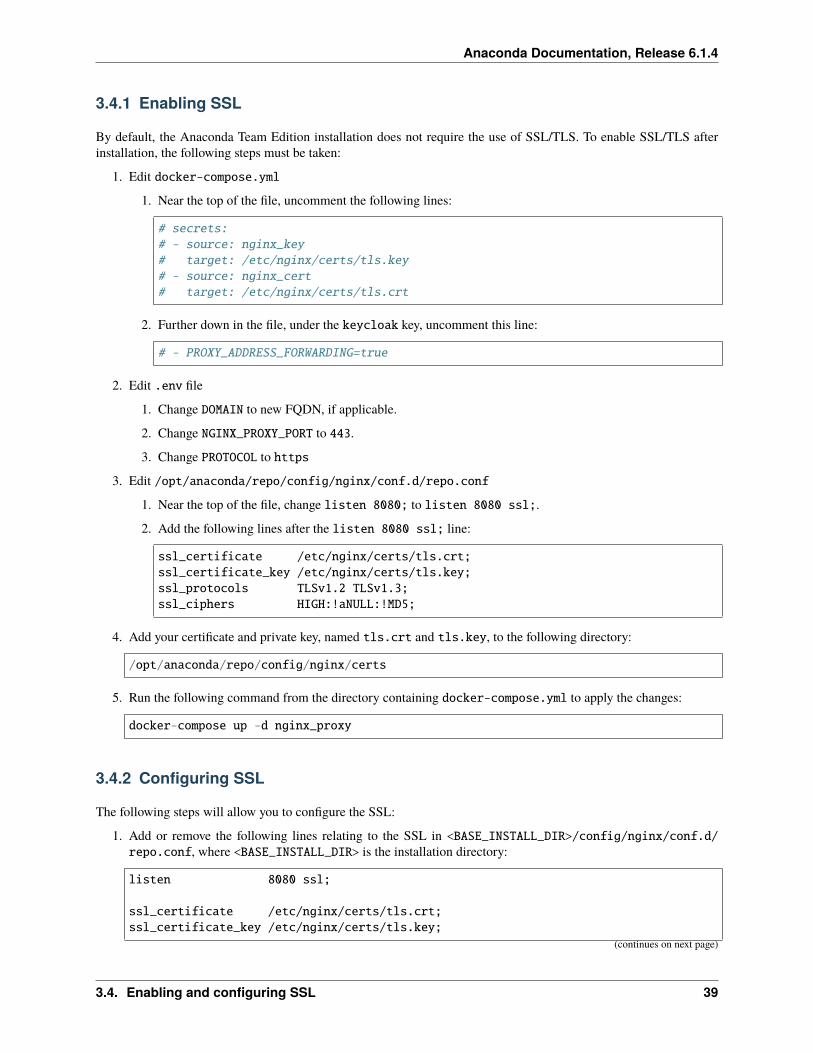
The following steps will allow you to configure the SSL:
1. Add or remove the following lines relating to the SSL in <BASE_INSTALL_DIR>/config/nginx/conf.d/repo.conf, where <BASE_INSTALL_DIR> is the installation directory:
listen 8080 ssl;
ssl_certificate /etc/nginx/certs/tls.crt;ssl_certificate_key /etc/nginx/certs/tls.key;
(continues on next page)
3.4. Enabling and configuring SSL 39
Anaconda Documentation, Release 6.1.4
(continued from previous page)
ssl_protocols TLSv1.2 TLSv1.3;ssl_ciphers HIGH:!aNULL:!MD5;
2. Add or remove certificates from the following directory:
# Replace <BASE_INSTALL_DIR> with your base install directory.<BASE_INSTALL_DIR>/config/nginx/certs
3. Run the following command:
docker-compose up -d nginx_proxy
Refer to nginx’s documentation for the standard SSL configuration procedure.
3.5 LDAPS
LDAPS is used to secure your LDAP connection. Refer to the Keycloak documentation on LDAP for more information.
Keycloak uses the default location within the container:
/opt/jboss/keycloak/standalone/configuration/keystores
Copy in your certificate authority (CA):
# Replace <CA.pem> with your certificate authority.# Replace <container_ID> with your container ID.docker ps|grep cloakdocker cp <CA.pem> <container_ID>:/opt/jboss
Drop into the container:
# Replace <container_ID> with your container ID.docker exec -u root -it <container_ID> /bin/bash
Add the keystore:
# Replace <CA.pem> with your certificate authority.cd /opt/jboss/keycloak/standalone/configuration/keystoreskeytool -keystore truststore -storepass anaconda -noprompt -trustcacerts -importcert -→˓alias ldap-ca -file /opt/jboss/<CA.pem>
Add the following to the CA certs bundle:
# Replace <CA.pem> with your certificate authority.cp /opt/jboss/<CA.pem> /etc/pki/ca-trust/source/anchors/update-ca-trust
This will update the CA certs bundle found in the following file path:
40 Chapter 3. Administering Anaconda Team Edition

Anaconda Documentation, Release 6.1.4
/etc/pki/ca-trust/extracted/java
Restart the container:
# Replace <container_ID> with your container ID.docker ps|grep cloakdocker restart <container_ID>
3.5.1 Troubleshooting
If you have any issues, verify the CA against the LDAPS server:
# Replace <CA.pem> with your certificate authority.openssl s_client -CAfile <CA.pem> -connect ldapserver.com:636
This should return the following string:
Verify return code: 0 (ok)
You can inspect the keystore you created with the following command:
keytool -list -v -keystore /opt/jboss/keycloak/standalone/configuration/keystores/→˓truststore -storepass anaconda
3.6 Updating your domain
If you wish to change your domain—for instance, if you accepted the default domain temporarily until you knew thecorrect domain—then you need to make the change in Anaconda Team Edition and Keycloak for the change totruly take effect.
This topic provides guidance on the following actions:
• Updating the domain in Team Edition
• Updating the domain in Keycloak
3.6.1 Updating the domain in Team Edition
To update the domain in Team Edition, you need to update the domain environment variable:
1. Make a copy of the old .env file for reference and/or recovery purposes:
cp .env .env.old
2. Open the .env file, located in the same directory as the docker-compose.yml file.
3. Update the <DOMAIN> variable to your new domain.
Note: If you have existing clients (tools) configured to use the Team Edition instance using the old DNS name, youwill need to update those clients as well.
3.6. Updating your domain 41

Anaconda Documentation, Release 6.1.4
3.6.2 Updating the domain in Keycloak
1. From Team Edition, click on the My account button in the top right.
2. In the dropdown, under Admin, select User Management.
3. On the User Management screen, click the Manage Users button. You will be directed to the Keycloak loginscreen.
4. Log in to Keycloak using the keycloak master realm admin account, and then go to the Clients page underConfigure.
5. On the Clients page, select repo-service. This is the default client ID.
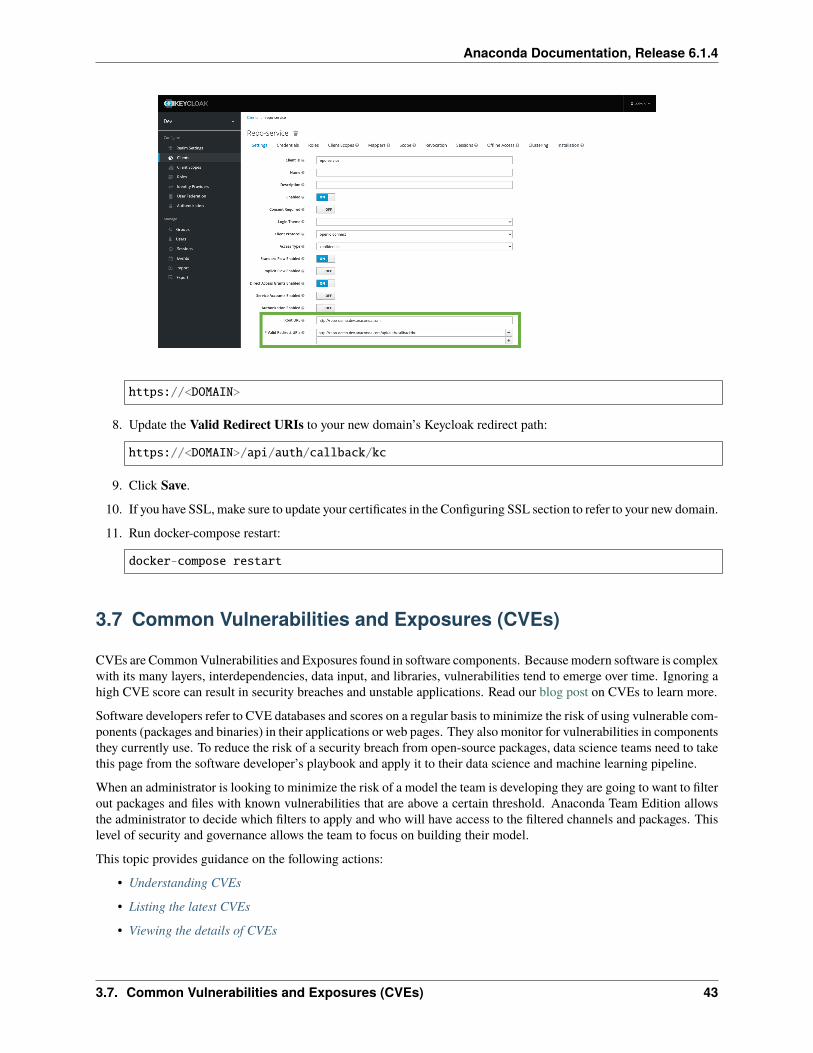
6. On the Repo-service page, scroll down to the Root URL and Valid Redirect URIs settings.
7. Update the Root URL to your new domain:
42 Chapter 3. Administering Anaconda Team Edition
Anaconda Documentation, Release 6.1.4
https://<DOMAIN>
8. Update the Valid Redirect URIs to your new domain’s Keycloak redirect path:
https://<DOMAIN>/api/auth/callback/kc
9. Click Save.
10. If you have SSL, make sure to update your certificates in the Configuring SSL section to refer to your new domain.
11. Run docker-compose restart:
docker-compose restart
3.7 Common Vulnerabilities and Exposures (CVEs)
CVEs are Common Vulnerabilities and Exposures found in software components. Because modern software is complexwith its many layers, interdependencies, data input, and libraries, vulnerabilities tend to emerge over time. Ignoring ahigh CVE score can result in security breaches and unstable applications. Read our blog post on CVEs to learn more.
Software developers refer to CVE databases and scores on a regular basis to minimize the risk of using vulnerable com-ponents (packages and binaries) in their applications or web pages. They also monitor for vulnerabilities in componentsthey currently use. To reduce the risk of a security breach from open-source packages, data science teams need to takethis page from the software developer’s playbook and apply it to their data science and machine learning pipeline.
When an administrator is looking to minimize the risk of a model the team is developing they are going to want to filterout packages and files with known vulnerabilities that are above a certain threshold. Anaconda Team Edition allowsthe administrator to decide which filters to apply and who will have access to the filtered channels and packages. Thislevel of security and governance allows the team to focus on building their model.
This topic provides guidance on the following actions:
• Understanding CVEs
• Listing the latest CVEs
• Viewing the details of CVEs
3.7. Common Vulnerabilities and Exposures (CVEs) 43

Anaconda Documentation, Release 6.1.4
3.7.1 Understanding CVEs
CVE scores
Severity scores are assigned based on the numerical Common Vulnerability Scoring System (CVSS) on a zero to tenscale.
CVSS score Qualitative Rating0 None0.1 - 3.9 Low4.0 - 6.9 Medium7.0 - 8.9 High9.0 - 10 Critical
CVSS 3 and CVSS 2
While both CVSS 3 and CVSS 2 scores and details can be reviewed by clicking through to a specific CVE, CVSS 3 ispresented on the dashboard because it provides a more comprehensive view of CVEs. This is due to two added metrics:Scope and User Interaction.
• Scope — captures whether a vulnerability in one vulnerable component impacts resources in components beyondits security scope.
• User Interaction — captures the requirement for a human user, other than the attacker, to participate in thesuccessful compromise of the vulnerable component.
For more information about CVE scoring, visit NVD.
CVE curation
The CVE curation process can be summarized in four steps:
1. Anaconda sources Team Edition’s CVE information from the National Institute of Standards and Technol-ogy(NIST) National Vulnerability Database (NVD).
2. From there, NVD CVE information is matched with the package names and versions in the Anaconda repository.
3. Each auto-matched CVE is examined for accuracy by Anaconda staff. The CVEs get one or more reviews tocategorize, refine, and improve the reported information.
4. The refined CVE metadata allows you to learn more about each vulnerability and filter out OSS packages thatdon’t meet your security requirements.
Note: After your license is applied, CVEs are automatically applied, brought in to the system, and updated hourly.
In the following topic, you can see how this applies to mirrors.
44 Chapter 3. Administering Anaconda Team Edition

Anaconda Documentation, Release 6.1.4
CVE statuses
CVE descriptions include one of five CVE status categories. “Reported” is a CVE from NIST that has not been reviewedby the Anaconda Team. All other categories have been curated and their labels feature a check mark:
The number beside the CVE name indicates the number of files affected in the organization. N/A indicates no associatedCVEs.
Click on the information icon beside CVEs (located throughout Team Edition) to view descriptions of CVE statuses.
3.7. Common Vulnerabilities and Exposures (CVEs) 45

Anaconda Documentation, Release 6.1.4
CVE labels and tabs
The number located on the CVE tab only indicates the number of CVEs pertaining to the packages within that channel:
Packages have a CVE tag indicating how many CVEs are associated with that specific package:
The CVEs and CVE State columns on artifact pages show the number of CVEs associated with that file and CVEstatus, respectively. The State column shows whether the mirror is active or passive.
46 Chapter 3. Administering Anaconda Team Edition
Anaconda Documentation, Release 6.1.4
3.7.2 Listing the latest CVEs
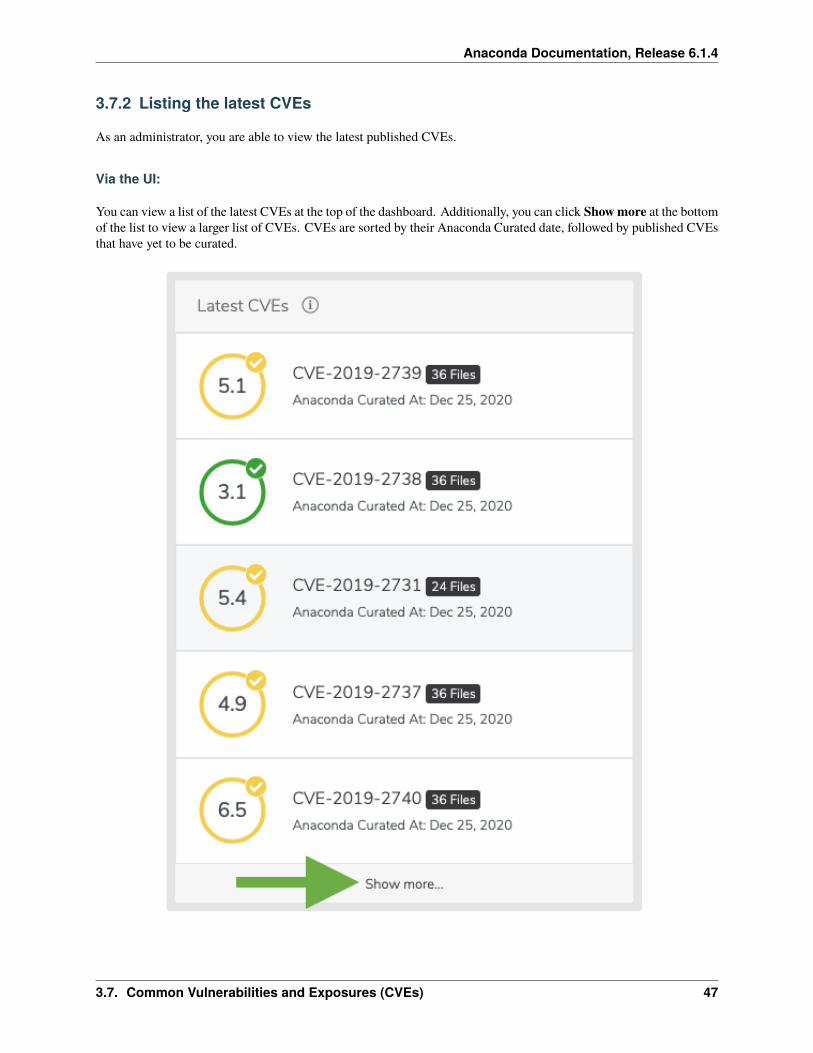
As an administrator, you are able to view the latest published CVEs.
Via the UI:
You can view a list of the latest CVEs at the top of the dashboard. Additionally, you can click Show more at the bottomof the list to view a larger list of CVEs. CVEs are sorted by their Anaconda Curated date, followed by published CVEsthat have yet to be curated.
3.7. Common Vulnerabilities and Exposures (CVEs) 47

Anaconda Documentation, Release 6.1.4
You can also search for CVEs in the search bar at the top of the page.
Via the API:
GET /api/cves
Via the CLI:
conda repo cves --list
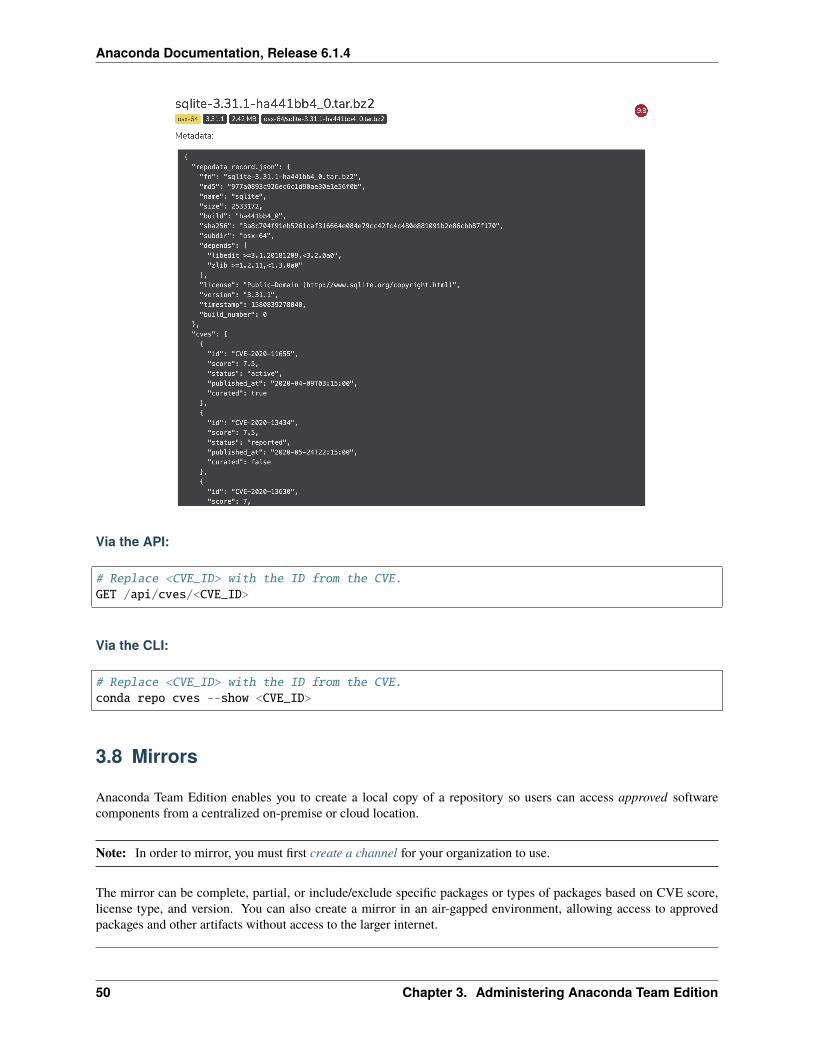
3.7.3 Viewing the details of CVEs
Tip: All users have the ability to view CVEs as long as the admin has assigned the cve:manage role to users.
Via the UI:
You can view a list of the latest CVEs at the top of the dashboard. Additionally, you can click Show more at the bottomof the list to view a larger list of CVEs. From there, click an individual CVE to view further details.
To view the metadata of a CVE, click on the information icon beside its upload date.
You will be presented with the CVE’s metadata.
48 Chapter 3. Administering Anaconda Team Edition

Anaconda Documentation, Release 6.1.4
3.7. Common Vulnerabilities and Exposures (CVEs) 49
Anaconda Documentation, Release 6.1.4
Via the API:
# Replace <CVE_ID> with the ID from the CVE.GET /api/cves/<CVE_ID>
Via the CLI:
# Replace <CVE_ID> with the ID from the CVE.conda repo cves --show <CVE_ID>
3.8 Mirrors
Anaconda Team Edition enables you to create a local copy of a repository so users can access approved softwarecomponents from a centralized on-premise or cloud location.
Note: In order to mirror, you must first create a channel for your organization to use.
The mirror can be complete, partial, or include/exclude specific packages or types of packages based on CVE score,license type, and version. You can also create a mirror in an air-gapped environment, allowing access to approvedpackages and other artifacts without access to the larger internet.
50 Chapter 3. Administering Anaconda Team Edition

Anaconda Documentation, Release 6.1.4
Common use case of channel filtering with multiple mirrors configured to that channel:
You can set up multiple mirrors into a single channel of whatever artifacts you choose. Filters can be set at the channellevel to apply to all mirrors of a channel, or at the mirror level to apply to specific mirrors.
For example, say you want to achieve the following mirroring goals:
1. Prevent all packages with a GPL license from being mirrored
2. Prevent a specific Windows package from getting into the channel
To achieve the first goal, you can exclude packages by all GPL License types via the channel editor. To achieve thesecond goal, you can create separate mirrors—perhaps one for each operating system—that filter by the subdirectory.
This topic provides guidance on the following actions:
• Creating mirrors
– Active or passive mirroring
– Defining your external source and mirror type
– Mirroring filters
∗ CVE filters
∗ Package filters
∗ Date range filters
∗ Viewing channel filters
– Mirror frequency
• Editing mirrors
– Edit mirror frequency
• Viewing mirror history
• Viewing CVEs by channel
• Viewing CVEs by package
3.8.1 Creating mirrors
To create a mirror, click the green Mirror button from any channel page.
You will be presented with the Create mirror page:
Set the details, filters, and frequency you’d like, and then click Submit.
3.8. Mirrors 51

Anaconda Documentation, Release 6.1.4
Active or passive mirroring
Mirroring can be either active or passive. An active mirror would clone channel artifacts with their binary content(files) and metadata. A passive mirror would only clone channel artifacts metadata, while the actual files would befetched on demand (on first request).
Essentially, when you mirror actively, you’re really mirroring passively and manually going through and fetching filesfrom the upstream channel.
Defining your external source and mirror type
Note: Please whitelist the following URLs before mirroring:
• http://repo.anaconda.com/
• http://repo.anaconda.cloud/
• http://anaconda.org/
• http://pypi.python.org/
• http://anaconda.com/
Select the mirror Type that matches the external source channel. You can mirror Conda, PyPI, or CRAN.
Conda
Use http://repo.anaconda.com/pkgs/main as the external source channel for conda type.
PyPI
Use https://pypi.python.org/ as the external source channel for PyPI (python_simple) type.
52 Chapter 3. Administering Anaconda Team Edition

Anaconda Documentation, Release 6.1.4
For the time being, you only need to fill in the Name, External Source Channel, Type, and Project when mirroringPyPI packages—no need to modify package filters.
Note: Make sure to add the specific PyPI packages you’d like to mirror to the Projects cell. Hit enter after typing inthe name of each package. This will turn the name blue, indicating that the package you entered has been accepted.
CRAN
Use https://cran.r-project.org/ as the external source channel for CRAN type.
Mirroring filters
CVE filters
On the Edit mirror page, you have the ability to limit the files being mirrored based on their CVE score. Use the celllabeled CVE score to set the maximum CVE score you’re willing to mirror. Ensure the box to the left is checked.
You also have the ability to omit files that have not gone through Anaconda’s curation process. If this box is checked,packages with at least one Reported CVE will not be mirrored. If this box is left unchecked, those packages will bemirrored regardless. This filter applies only to active mirroring.
Package filters
You can filter which packages will be included in a mirror in the Package Filters section on the Edit mirror page.Include and exclude by package name and license type.
3.8. Mirrors 53

Anaconda Documentation, Release 6.1.4
Filter packages By License Type to include or exclude them from your mirror. See License types for more details onlicenses.
Tip: When limiting the mirror to specific architecture, it’s a good idea to include the noarch package type to ensurethat cross-platform packages are included. For example, if you have no need for Windows compatible packages, youwould include win-32, win-64, and noarch package types.
Date range filters
You can also filter packages by the date the package was modified on the source site.
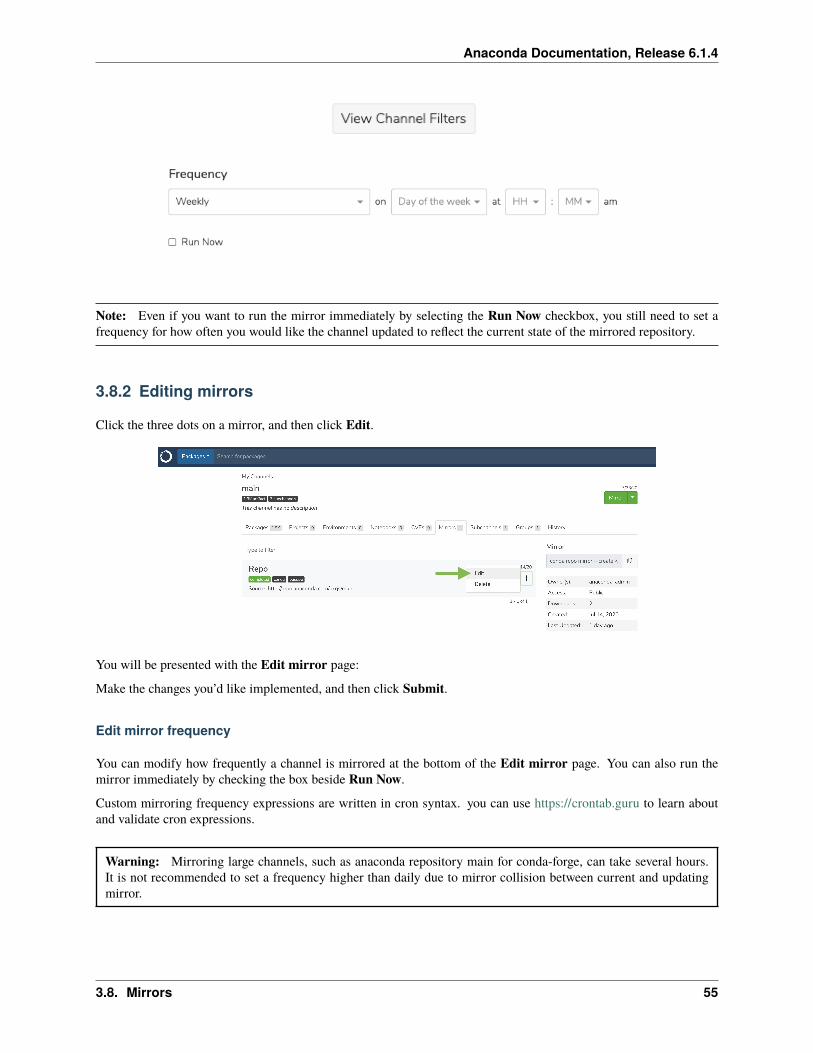
View channel filters
Click the View Channel Filters button at the bottom of the Package Filters section on the Edit mirror page to viewthe filters applied to all mirrors within the channel.
Mirror frequency
You can modify how frequently a channel is mirrored at the bottom of the Edit mirror page. You can also run themirror immediately by checking the box beside Run Now.
Custom mirroring frequency expressions are written in cron syntax. you can use https://crontab.guru to learn aboutand validate cron expressions.
Warning: Mirroring large channels, such as anaconda repository main for conda-forge, can take several hours.It is not recommended to set a frequency higher than daily due to mirror collision between current and updatingmirror.
54 Chapter 3. Administering Anaconda Team Edition
Anaconda Documentation, Release 6.1.4
Note: Even if you want to run the mirror immediately by selecting the Run Now checkbox, you still need to set afrequency for how often you would like the channel updated to reflect the current state of the mirrored repository.
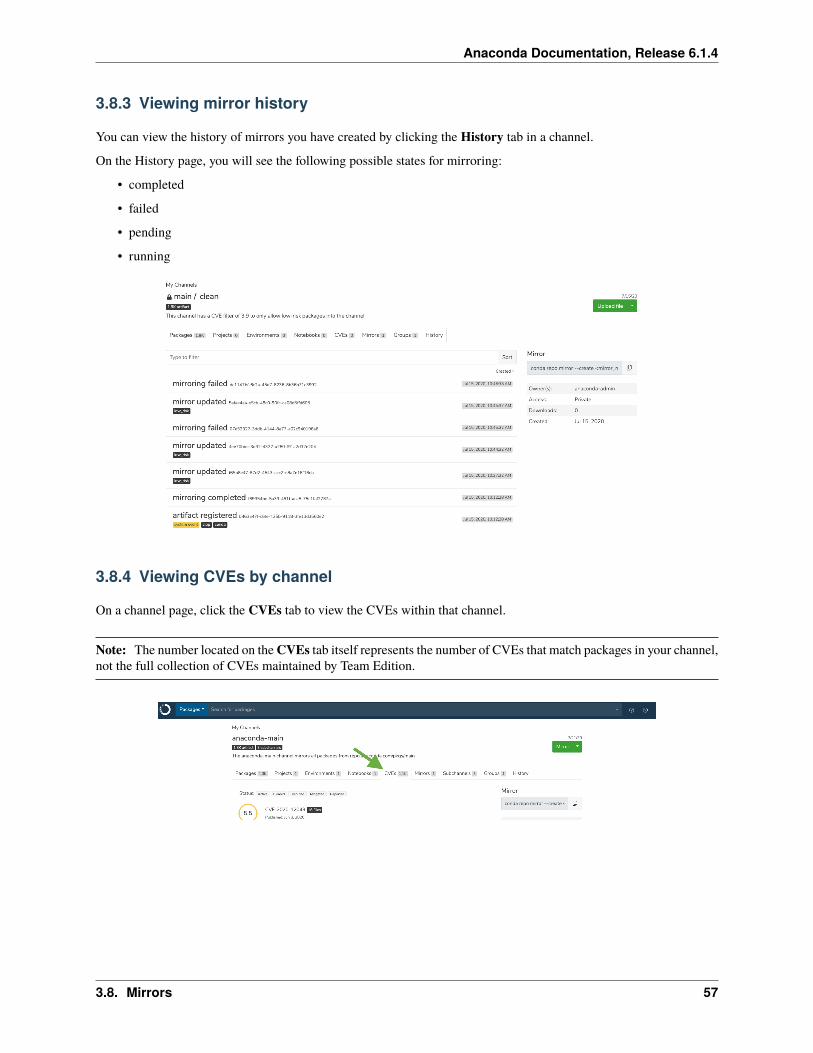
3.8.2 Editing mirrors
Click the three dots on a mirror, and then click Edit.
You will be presented with the Edit mirror page:
Make the changes you’d like implemented, and then click Submit.
Edit mirror frequency
You can modify how frequently a channel is mirrored at the bottom of the Edit mirror page. You can also run themirror immediately by checking the box beside Run Now.
Custom mirroring frequency expressions are written in cron syntax. you can use https://crontab.guru to learn aboutand validate cron expressions.
Warning: Mirroring large channels, such as anaconda repository main for conda-forge, can take several hours.It is not recommended to set a frequency higher than daily due to mirror collision between current and updatingmirror.
3.8. Mirrors 55

Anaconda Documentation, Release 6.1.4
56 Chapter 3. Administering Anaconda Team Edition
Anaconda Documentation, Release 6.1.4
3.8.3 Viewing mirror history
You can view the history of mirrors you have created by clicking the History tab in a channel.
On the History page, you will see the following possible states for mirroring:
• completed
• failed
• pending
• running
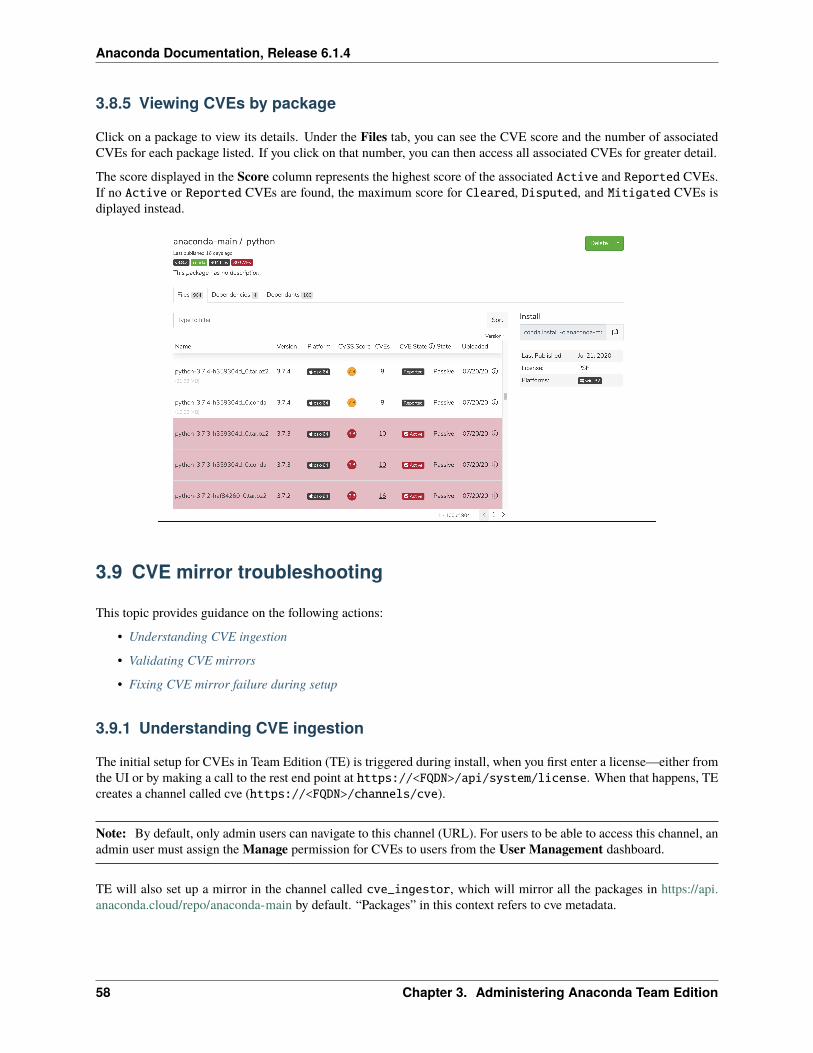
3.8.4 Viewing CVEs by channel
On a channel page, click the CVEs tab to view the CVEs within that channel.
Note: The number located on the CVEs tab itself represents the number of CVEs that match packages in your channel,not the full collection of CVEs maintained by Team Edition.
3.8. Mirrors 57
Anaconda Documentation, Release 6.1.4
3.8.5 Viewing CVEs by package
Click on a package to view its details. Under the Files tab, you can see the CVE score and the number of associatedCVEs for each package listed. If you click on that number, you can then access all associated CVEs for greater detail.
The score displayed in the Score column represents the highest score of the associated Active and Reported CVEs.If no Active or Reported CVEs are found, the maximum score for Cleared, Disputed, and Mitigated CVEs isdiplayed instead.
3.9 CVE mirror troubleshooting
This topic provides guidance on the following actions:
• Understanding CVE ingestion
• Validating CVE mirrors
• Fixing CVE mirror failure during setup
3.9.1 Understanding CVE ingestion
The initial setup for CVEs in Team Edition (TE) is triggered during install, when you first enter a license—either fromthe UI or by making a call to the rest end point at https://<FQDN>/api/system/license. When that happens, TEcreates a channel called cve (https://<FQDN>/channels/cve).
Note: By default, only admin users can navigate to this channel (URL). For users to be able to access this channel, anadmin user must assign the Manage permission for CVEs to users from the User Management dashboard.
TE will also set up a mirror in the channel called cve_ingestor, which will mirror all the packages in https://api.anaconda.cloud/repo/anaconda-main by default. “Packages” in this context refers to cve metadata.
58 Chapter 3. Administering Anaconda Team Edition

Anaconda Documentation, Release 6.1.4
Your token is extracted from the license and used to authenticate to the CVE endpoint; without it, you will not be ableto mirror from api.anaconda.cloud.
The SSL certificate that is used on api.anaconda.cloud is signed by Let’s Encrypt. This is important to know becauserepo.anaconda.cloud is signed by a different CA than repo.anaconda.com.
3.9.2 Validating CVE mirrors
Until your mirrored packages are matched to CVEs, you will not see metadata for those CVEs. In some cases, though,even entering your license does not provide you with mirrored CVE metadata. However, you can verify the CVEs arepresent by going through the following steps:
1. Navigate to your CVE view:
# Replace <FQDN> with your fully qualified domain name.https://<FQDN>/channels/cve
2. List your CVEs on the command line:
conda repo cves --list
3. Use the rest end point with your admin user token:
# Replace <FQDN> with your fully qualified domain name.export api=https://<FQDN>/apiconda repo logintoken=$(conda repo auth -i 2>&1 | grep -Po "Token: \K(.*)")curl -H "X-Auth: $token" $api/channels/cve
4. As an alternate to step 3, you can use the rest end point with a bearer token, in case your user token doesn’t work:
# Replace <FQDN> with your fully qualified domain name.export api=https://FQDN/api/export ATE_USER=<USER> ; export ATE_USER_PW=<PASSWORD>export token=$(curl -sk -X POST -H 'Content-Type: application/json' -d '{"username":→˓"'$ATE_USER'", "password":"'$ATE_USER_PW'"}' ${api}/auth/login | jq -r '.token')curl -k -H 'Authorization: Bearer '$token $api/cves | jq '.'
If after these steps you find that the CVE mirroring did not work as expected, there are a few known causes for thisissue persisting:
• Lack of internet access or proxy. Any setup that does not have internet access or is not routed through a proxywill result in a mirror failure. This is true even if the docker host is able to connect to the internet via a proxysetting.
3.9. CVE mirror troubleshooting 59
Anaconda Documentation, Release 6.1.4
Solution: Ensure your proxy server is configured correctly.
• Terminating proxy is replacing the certs. A terminating proxy (transparent or explicit) or network device maybe replacing the certs you’ve presented to TE, which is using the default request CA bundle (Mozilla) and notthe system store.
Solution: Add your custom root CA to the requests library store.
• Missing root CA certs. This is especially troublesome for the Let’s Encrypt certs on the proxy.
Solution: Even with a proper configuration, it is possible that the proxy itself need to be modified to validate thecertificates on the other side of the connection.
After you’ve ensured that any of the above issues you were having are resolved; api.anaconda.cloud can be reached;and the SSL validated from the API repo container is successful, you may proceed with the following CVE mirror fix:
cd /opt/anaconda # or wherever TE docker-compose.yml is located.docker-compose exec repo_api /bin/sh -c echo | openssl s_client -connect api.anaconda.→˓cloud:443 2>/dev/null | grep "Verify return code"
If the connection is working correctly, you should receive a confirmation like the following:
Verify return code: 0 (ok)
3.9.3 Fixing CVE mirror failure during setup
Note: Ensure you are using TE version 6.1.2 or later before attempting this procedure.
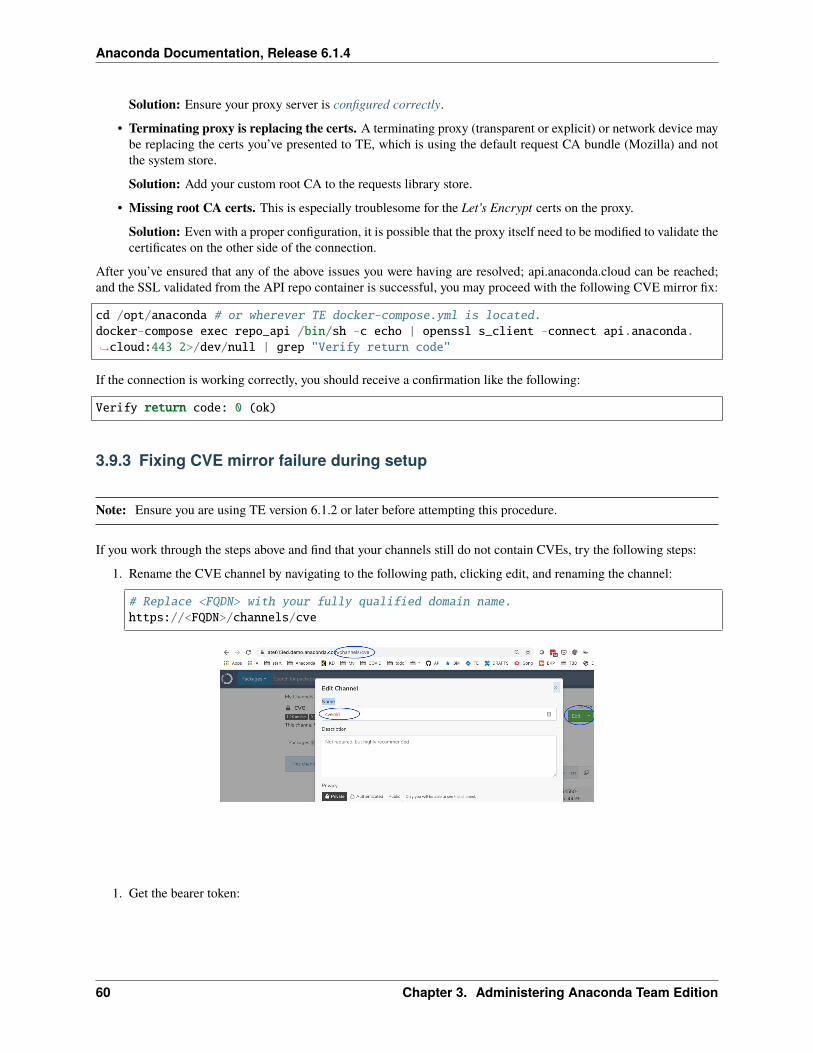
If you work through the steps above and find that your channels still do not contain CVEs, try the following steps:
1. Rename the CVE channel by navigating to the following path, clicking edit, and renaming the channel:
# Replace <FQDN> with your fully qualified domain name.https://<FQDN>/channels/cve
1. Get the bearer token:
60 Chapter 3. Administering Anaconda Team Edition

Anaconda Documentation, Release 6.1.4
# Replace <FQDN> with your fully qualified domain name.export api=https://FQDN/api/export ATE_USER=<USER> ; export ATE_USER_PW=<PASSWORD>export token=$(curl -sk -X POST -H 'Content-Type: application/json' -d '{"username":→˓"'$ATE_USER'", "password":"'$ATE_USER_PW'"}' ${api}/auth/login | jq -r '.token')
2. Call put https://<FQDN>/api/system/license endpoint:
curl -k -X PUT -H 'Authorization: Bearer '$token $api/system/license
3. Verify that the new CVE channel and mirror are created by navigating to your CVE view:
# Replace <FQDN> with your fully qualified domain name.https://<FQDN>/channels/cve
4. Verify that CVE data is now available. If it is, you can safely delete the old CVE channel by navigating to thefollowing path and deleting the channel from the green Edit button’s dropdown options:
# Replace <FQDN> with your fully qualified domain name and <OLD_CVE> with the name␣→˓of the old CVE channel.https://<FQDN>/channels/<OLD_CVE>
3.10 System metrics with Prometheus
Team Edition system performance can be monitored to understand system health, evaluate network traffic, and detectissues. Each of the Team Edition services expose a set of metrics that can be visualized using the built-in Prometheusexpression browser. Metrics are provided in OpenMetrics (Prometheus) format.
3.10.1 Accessing Prometheus
To access your system metrics from the UI, click on the My account button in the top right, and then click Metrics.This will open a new browser tab with the root URL of the Team Edition installation appended with /prometheus/. Forexample, https://yourcompany.com/prometheus/.
3.10. System metrics with Prometheus 61
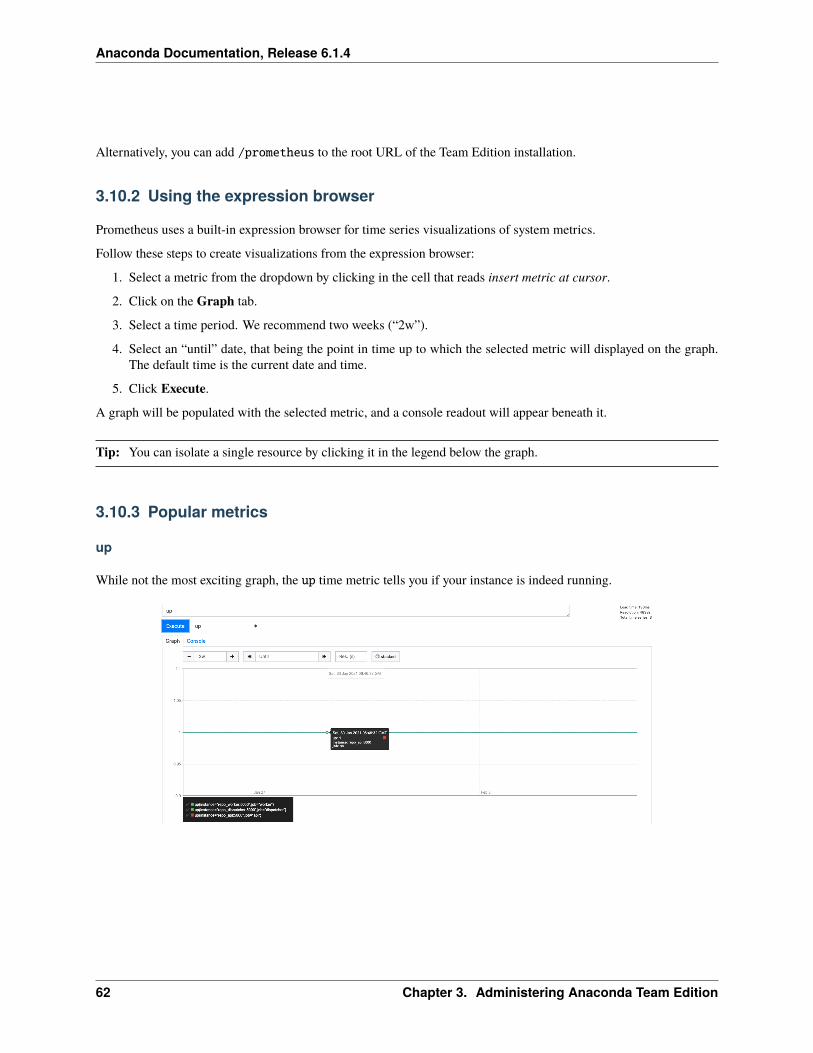
Anaconda Documentation, Release 6.1.4
Alternatively, you can add /prometheus to the root URL of the Team Edition installation.
3.10.2 Using the expression browser
Prometheus uses a built-in expression browser for time series visualizations of system metrics.
Follow these steps to create visualizations from the expression browser:
1. Select a metric from the dropdown by clicking in the cell that reads insert metric at cursor.
2. Click on the Graph tab.
3. Select a time period. We recommend two weeks (“2w”).
4. Select an “until” date, that being the point in time up to which the selected metric will displayed on the graph.The default time is the current date and time.
5. Click Execute.
A graph will be populated with the selected metric, and a console readout will appear beneath it.
Tip: You can isolate a single resource by clicking it in the legend below the graph.
3.10.3 Popular metrics
up
While not the most exciting graph, the up time metric tells you if your instance is indeed running.
62 Chapter 3. Administering Anaconda Team Edition

Anaconda Documentation, Release 6.1.4
process_open_fds
process_open_fds counts the number of files in /proc/PID/fd directory. This tells you how many regular files,sockets, pseudo terminals, etc. you currently have open.
process_max_fds
process_max_fds reads /proc/<PID>/limits and uses the Soft Limit from the Max Open Files row. Interestingly,/limits lists both soft and hard limits. The soft limit is the value the kernel enforces for the corresponding resource,while the hard limit acts as the ceiling for the soft limit.
3.10. System metrics with Prometheus 63
Anaconda Documentation, Release 6.1.4
3.10.4 Setting a file limit alert
Using the two metrics above, process_open_fds and process_max_fds, you can quickly write an alert to warn youwhen a process hits, say, 80% of the limit:
groups:- name: examplerules:- alert: ProcessNearFDLimitsexpr: process_open_fds / process_max_fds > 0.8for: 10m
3.11 Upgrading Team Edition
• Upgrading from 6.1.4 to 6.1.5
• Upgrading from 6.1.3 to 6.1.4
• Upgrading from 6.1.0/6.1.1 to 6.1.3
3.11.1 Upgrading from 6.1.4 to 6.1.5
Install commands
You can see aa full list of install commands by running the following command:
./install.sh --help
Anaconda Team Edition 6.1.5 supports the ability to upgrade from the previous version while keeping the productoperating. You will see this feature in the list as --upgrade-from PREVIOUS_DIR, where PREVIOUS_DIR representsthe location of the previous installation (where the docker-compose.yml is located).
Upgrade steps
Extract the installer
First, extract the installer:
./ate-installer-6.1.5-<HASH>.sh -- --help
You will see the folder ``./ate-installer-6.1.5-<HASH>``, where ``<HASH>`` represents␣→˓your **HASH**
cd into the folder::
#Replace **<HASH>** with your **HASH**cd ./ate-installer-6.1.4-<HASH>
From here, you can run the upgrade.
Default upgrade command
64 Chapter 3. Administering Anaconda Team Edition

Anaconda Documentation, Release 6.1.4
The following is the default command for upgrading to 6.1.5, meaning you may need to add more to the commanddepending on your setup. This could mean appending more directives to your upgrade command, such as those in thefollowing subsections. Run ./install.sh --help to see other options.
# Replace <FQDN> with your fully qualified domain name# Replace <PREVIOUS_DIR> with the location of the previous installation (where the␣→˓docker-compose.yml is located)./install.sh -d <FQDN> --upgrade-from <PREVIOUS_DIR>
For example, say your domain name is team-edition.example.com, and the previous installer is stored in/home/user/installers/ate-installer-6.1.4-xxx, then the proper command would be the following:
./install.sh -d team-edition.example.com --upgrade-from /home/user/installers/ate-→˓installer-6.1.4gi-xxx
HTTPS setup
If your previous setup was for HTTPS, you’ll need to provide the TLS certificate and key:
# Replace <PREV_BASE_DIR> with the base directory where config and file storage are␣→˓saved. The default value is /opt/anaconda/repo.# Replace <FQDN> with your fully qualified domain name# Replace <TLS_CERTIFICATE> and <TLS_KEY> with your TLS cert and key# Replace <PREVIOUS_DIR> with the location of the previous installation (where the␣→˓docker-compose.yml is located)./install.sh -b <PREV_BASE_DIR> -d <FQDN> --tls-cert <TLS_CERTIFICATE> --tls-key <TLS_→˓KEY> --upgrade-from <PREVIOUS_DIR>
Custom implementation considerations
If you’re using a custom implementation, verify your docker-compose.yml and/or repo.conf (nginx configuration)files reflect the upgraded changes.
3.11.2 Upgrading from 6.1.3 to 6.1.4
Install commands
You can see a full list of install commands by running the following command:
./install.sh --help
Anaconda Team Edition 6.1.4 supports the ability to upgrade from the previous version while keeping the productoperating. You’ll see this feature in the list as --upgrade-from PREVIOUS_DIR, where PREVIOUS_DIR representsthe location of the previous installation (where the docker-compose.yml is located).
3.11. Upgrading Team Edition 65

Anaconda Documentation, Release 6.1.4
Upgrade steps
Extract the installer
First, extract the installer:
./ate-installer-6.1.4-<HASH>.sh -- --help
You will see the folder ./ate-installer-6.1.4-<HASH>, where <HASH> represents your hash.
cd into the folder:
# Replace <HASH> with your hashcd ./ate-installer-6.1.4-<HASH>
From here, you can run the upgrade.
Default upgrade command
The following is the default command for upgrading to 6.1.4, meaning you may need to add more to the commanddepending on your setup. This could mean appending more directives to your upgrade command, such as those in thefollowing subsections. Run ./install.sh --help to see other options.
# Replace <FQDN> with your fully qualified domain name# Replace <PREVIOUS_DIR> with the location of the previous installation (where the␣→˓docker-compose.yml is located)./install.sh -d <FQDN> --upgrade-from <PREVIOUS_DIR>
For example, say your domain name is team-edition.example.com, and the previous installer is stored in/home/user/installers/ate-installer-6.1.3-xxx, then the proper command would be the following:
./install.sh -d team-edition.example.com --upgrade-from /home/user/installers/ate-→˓installer-6.1.3-xxx
HTTPS setup
If your previous setup was for HTTPS, you’ll need to provide the TLS certificate and key:
# Replace <PREV_BASE_DIR> with the base directory where config and file storage are␣→˓saved. The default value is /opt/anaconda/repo.# Replace <FQDN> with your fully qualified domain name# Replace <TLS_CERTIFICATE> and <TLS_KEY> with your TLS cert and key# Replace <PREVIOUS_DIR> with the location of the previous installation (where the␣→˓docker-compose.yml is located)./install.sh -b <PREV_BASE_DIR> -d <FQDN> --tls-cert <TLS_CERTIFICATE> --tls-key <TLS_→˓KEY> --upgrade-from <PREVIOUS_DIR>
Custom implementation considerations
If you’re using a custom implementation, verify your docker-compose.yml and/or repo.conf (nginx configuration)files reflect the upgraded changes.
66 Chapter 3. Administering Anaconda Team Edition
Anaconda Documentation, Release 6.1.4
3.11.3 Upgrading from 6.1.0/6.1.1 to 6.1.3
Follow these steps to upgrade your version of Anaconda Team Edition from 6.1.0 or 6.1.1 to 6.1.3:
Note: Upgrading does not require hardware upgrades. Your data integrity will not be impacted.
1. Save the REPO_TOKEN_CLIENT_SECRET and REPO_KEYCLOAK_SYNC_CLIENT_SECRET values from the .envfile in the installer directory for your current version of Team Edition.
2. Run docker-compose stop in your current version’s install directory (most likely in the same location as yourdocker-compose.yml file). This will stop the container(s) and preserve the data.
3. Download, extract, and install the new version of Team Edition using the 6.1.3 installer.
4. Modify the .env file in the new version’s directory and replace REPO_TOKEN_CLIENT_SECRET andREPO_KEYCLOAK_SYNC_CLIENT_SECRET with the values from the old install directory.
5. Run docker-compose up -d repo_api in the new install directory.
6. Re-upload the license:
• Via UI: Sign in as an admin and enter your license key via the following path:
<DOMAIN>/enter-license-key
• Via API:
POST /system/license
3.11. Upgrading Team Edition 67

Anaconda Documentation, Release 6.1.4
68 Chapter 3. Administering Anaconda Team Edition
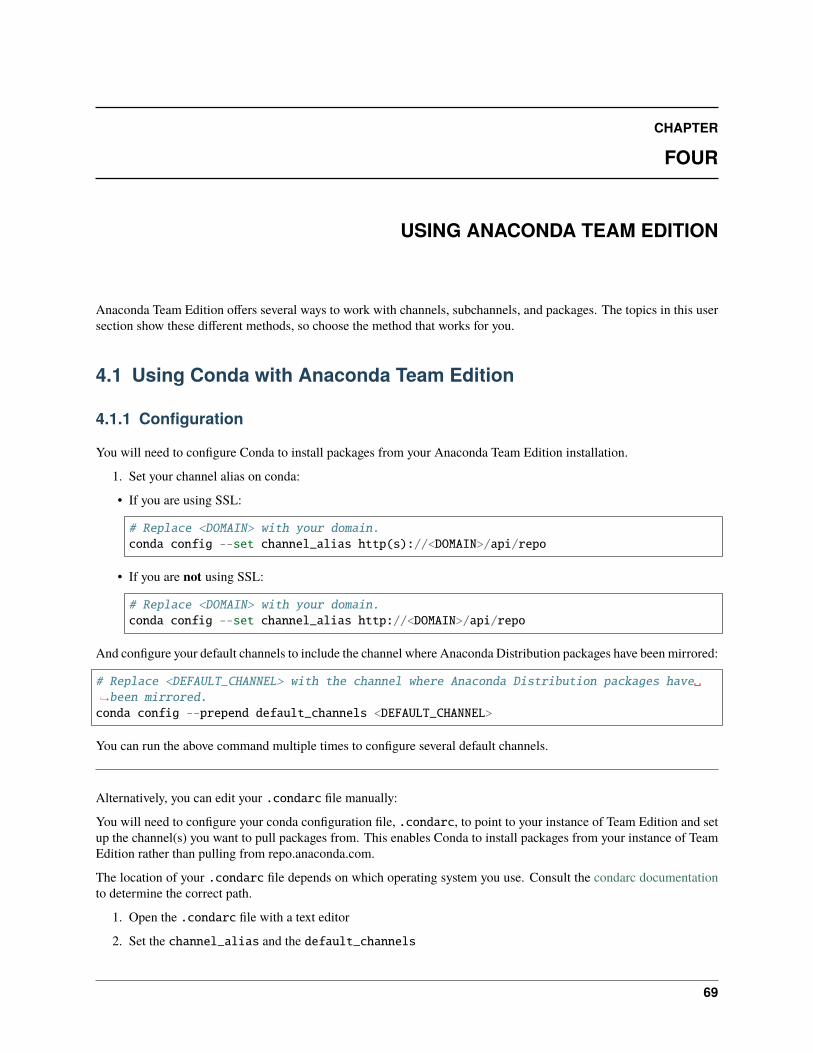
CHAPTER
FOUR
USING ANACONDA TEAM EDITION
Anaconda Team Edition offers several ways to work with channels, subchannels, and packages. The topics in this usersection show these different methods, so choose the method that works for you.
4.1 Using Conda with Anaconda Team Edition
4.1.1 Configuration
You will need to configure Conda to install packages from your Anaconda Team Edition installation.
1. Set your channel alias on conda:
• If you are using SSL:
# Replace <DOMAIN> with your domain.conda config --set channel_alias http(s)://<DOMAIN>/api/repo
• If you are not using SSL:
# Replace <DOMAIN> with your domain.conda config --set channel_alias http://<DOMAIN>/api/repo
And configure your default channels to include the channel where Anaconda Distribution packages have been mirrored:
# Replace <DEFAULT_CHANNEL> with the channel where Anaconda Distribution packages have␣→˓been mirrored.conda config --prepend default_channels <DEFAULT_CHANNEL>
You can run the above command multiple times to configure several default channels.
Alternatively, you can edit your .condarc file manually:
You will need to configure your conda configuration file, .condarc, to point to your instance of Team Edition and setup the channel(s) you want to pull packages from. This enables Conda to install packages from your instance of TeamEdition rather than pulling from repo.anaconda.com.
The location of your .condarc file depends on which operating system you use. Consult the condarc documentationto determine the correct path.
1. Open the .condarc file with a text editor
2. Set the channel_alias and the default_channels
69
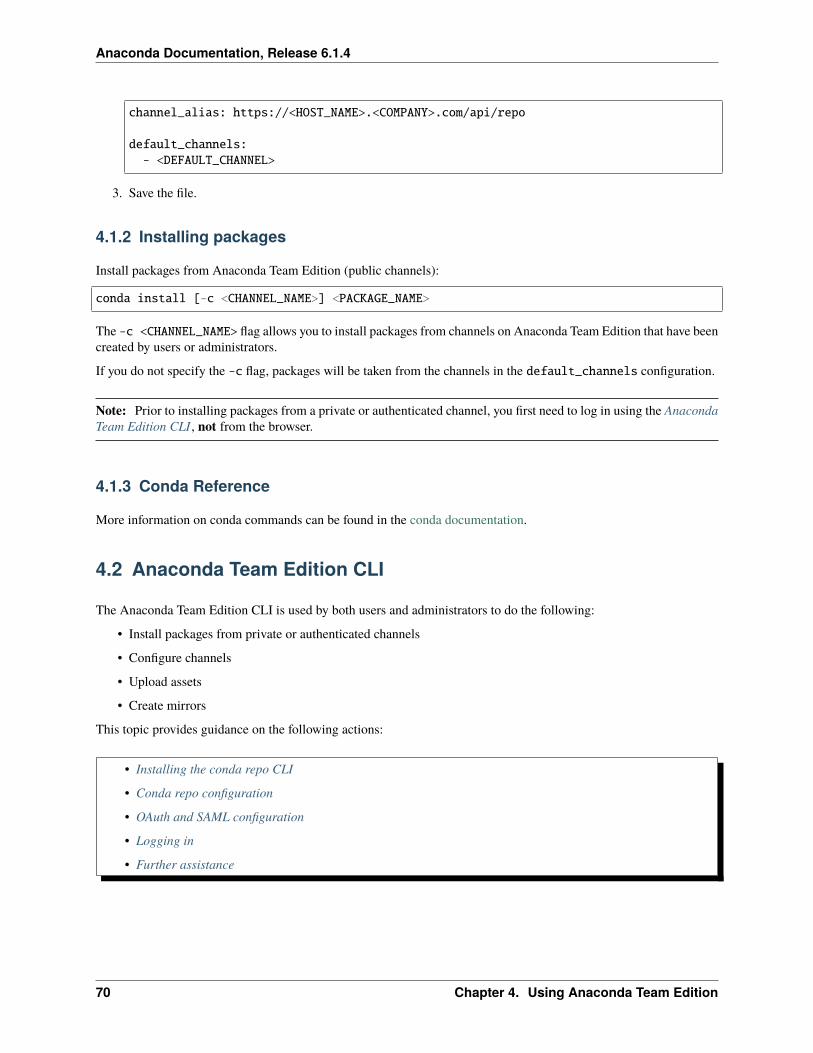
Anaconda Documentation, Release 6.1.4
channel_alias: https://<HOST_NAME>.<COMPANY>.com/api/repo
default_channels:- <DEFAULT_CHANNEL>
3. Save the file.
4.1.2 Installing packages
Install packages from Anaconda Team Edition (public channels):
conda install [-c <CHANNEL_NAME>] <PACKAGE_NAME>
The -c <CHANNEL_NAME> flag allows you to install packages from channels on Anaconda Team Edition that have beencreated by users or administrators.
If you do not specify the -c flag, packages will be taken from the channels in the default_channels configuration.
Note: Prior to installing packages from a private or authenticated channel, you first need to log in using the AnacondaTeam Edition CLI , not from the browser.
4.1.3 Conda Reference
More information on conda commands can be found in the conda documentation.
4.2 Anaconda Team Edition CLI
The Anaconda Team Edition CLI is used by both users and administrators to do the following:
• Install packages from private or authenticated channels
• Configure channels
• Upload assets
• Create mirrors
This topic provides guidance on the following actions:
• Installing the conda repo CLI
• Conda repo configuration
• OAuth and SAML configuration
• Logging in
• Further assistance
70 Chapter 4. Using Anaconda Team Edition

Anaconda Documentation, Release 6.1.4
4.2.1 Installing the conda repo CLI
Install the Anaconda Team Edition CLI (hereafter referred to as simply CLI) the conda-repo-cli package:
conda install conda-repo-cli
Note: The Anaconda Team Edition administrators may also choose to mirror this package into a channel on the server.Contact your administors to determine if conda-repo-cli can be installed from an Anaconda Team Edition channel.
4.2.2 Conda repo configuration
Follow these steps to configure your conda repo site:
• Use the following commands if you are using SSL:
# Replace <SITE_NAME> with the short tag you'll use to identify the fully qualified␣→˓domain name.# Replace <DOMAIN> with your domain.conda repo config --set sites.<SITE_NAME>.url https://<DOMAIN>/apiconda repo config --set default_site <SITE_NAME>
# The following is an example of two sites, one for production and the second for␣→˓development:# conda repo config --set sites.production.url https://prod.my-ate.company.com/api# conda repo config --set sites.development.url https://dev.my-ate.company.com/api
• Use the following commands if you are not using SSL:
# Replace <SITE_NAME> with the short tag you'll use to identify the fully qualified␣→˓domain name.# Replace <DOMAIN> with your domain.conda repo config --set sites.<SITE_NAME>.url http://<DOMAIN>/apiconda repo config --set default_site <SITE_NAME>
For example, <SITE_NAME> may be anaconda-repo and <DOMAIN> may be anaconda-repo.company.com.
4.2.3 OAuth and SAML configuration
If you are using OAuth or SAML, run the following command to go through the standard SAML authorization flowafter configuring your site:
conda repo config --set oauth2 true
when you run conda repo login, a browser window will open for you to log in to Anaconda Team Edition. Afterlogin has completed, the window will display “Token Received.” You can then close the browser window and continueto use the CLI.
4.2. Anaconda Team Edition CLI 71

Anaconda Documentation, Release 6.1.4
4.2.4 Logging in
Run the following code to log in to Team Edition:
conda repo login # You will be prompted to enter your Team Edition username and password
Now you will be able to install packages from private and authenticated channels you have access to.
4.2.5 Further assistance
For a more robust view of conda repo commands, run the following command:
conda repo --help
Similarly, appending --help or the shorthand -h to a command will provide you with further actions you can take,such as the following:
conda repo mirror -hconda repo channel -hconda repo upload -h
4.3 Configuring Navigator to work with Team Edition
Note: You must configure conda prior to using Navigator with Team Edition.
Anaconda Navigator is a desktop graphical user interface (GUI) included in Anaconda distribution that allows youto launch applications and easily manage conda packages, environments, and channels without using command-linecommands. Navigator can search for packages on Anaconda Cloud or in a local Anaconda Repository. It is availablefor Windows, macOS, and Linux.
Learn how to use Navigator in the Anaconda Navigator guide.
Note: Sign in on Navigator is not currently tied to Team Edition.
4.3.1 Viewing environments
Team Edition environments are currently not displayed on the Navigator Environment tab. As Navigator only displaysenvironments on your own machine, you will need to download an environment from Team Edition onto your machineto view it and then import it into Navigator.
72 Chapter 4. Using Anaconda Team Edition
Anaconda Documentation, Release 6.1.4
4.4 Accessing tooltips
Use tooltips and commands to gain more information on items and files.
4.4.1 Via the User Interface:
In the UI, you will see tooltips as you hover over various elements for more information. Additionally, you will see “i”icons that you can click and/or hover over to get more information on a given item or file.
4.4.2 Via the CLI:
To get a list of all possible commands, enter the following:
conda repo --help
4.5 Logging in/out of Team Edition
4.5.1 Logging in to Team Edition
Via the UI:
Visit https://<YOUR_DOMAIN> (or http://<YOUR_DOMAIN> if you are not using SSL) and enter your username andpassword.
Via the CLI:
conda repo login
4.5.2 Logging in if IDP is configured
Via the UI:
Visit https://<YOUR_DOMAIN> (or http://<YOUR_DOMAIN> if you are not using SSL) and enter your username andpassword, or click on a third party login option (for example, GitHub).
Via the CLI:
In order to enable browser-based login for conda repo CLI, you must first set oauth2 to true:
conda repo config --set oauth2 true
Then, run conda repo login.
A browser window will open for you to log in to Anaconda Team Edition. After login has completed, the window willdisplay “Token Received.” You can then close the browser window and continue to use the CLI.
4.4. Accessing tooltips 73
Anaconda Documentation, Release 6.1.4
4.5.3 Logging out of Team Edition
Via the UI:
Click on the user icon in the top right. Click Logout.
Via the CLI:
conda repo logout
4.6 Anaconda Project
Anaconda Project encapsulates data science projects and makes them easily portable. A project makes it easy toreproduce your work and collaborate with other team members. A project automates setup steps such as installing theright packages, downloading files, setting environment variables, and running commands.
Ananconda Project compressed the project directory into a .tar.bz2, .tar.gz or .zip file to make it easier to store andshare with others.
Anaconda Team Edition enables you to upload and share Anaconda Project files within a channel. You can move, copy,and share your project with your team or provide authorized users access to the channel.
This topic provides guidance on the following actions:
• Uploading a project
• Downloading a project
• Viewing project metadata
• Managing a project
4.6.1 Uploading a project
1. Preparation for uploading projects differs depending on your project type. Please follow the relevant guide foryour respective projects:
• sdist and wheels
• cran
• conda-build
1. Click the green dropdown button in the top right corner, and then click Upload File.
2. On the Upload a File screen, select the type of file you’d like to upload from the dropdown.
3. Click the Browse button to find your file and add it to the page.
4. Click Upload.
74 Chapter 4. Using Anaconda Team Edition
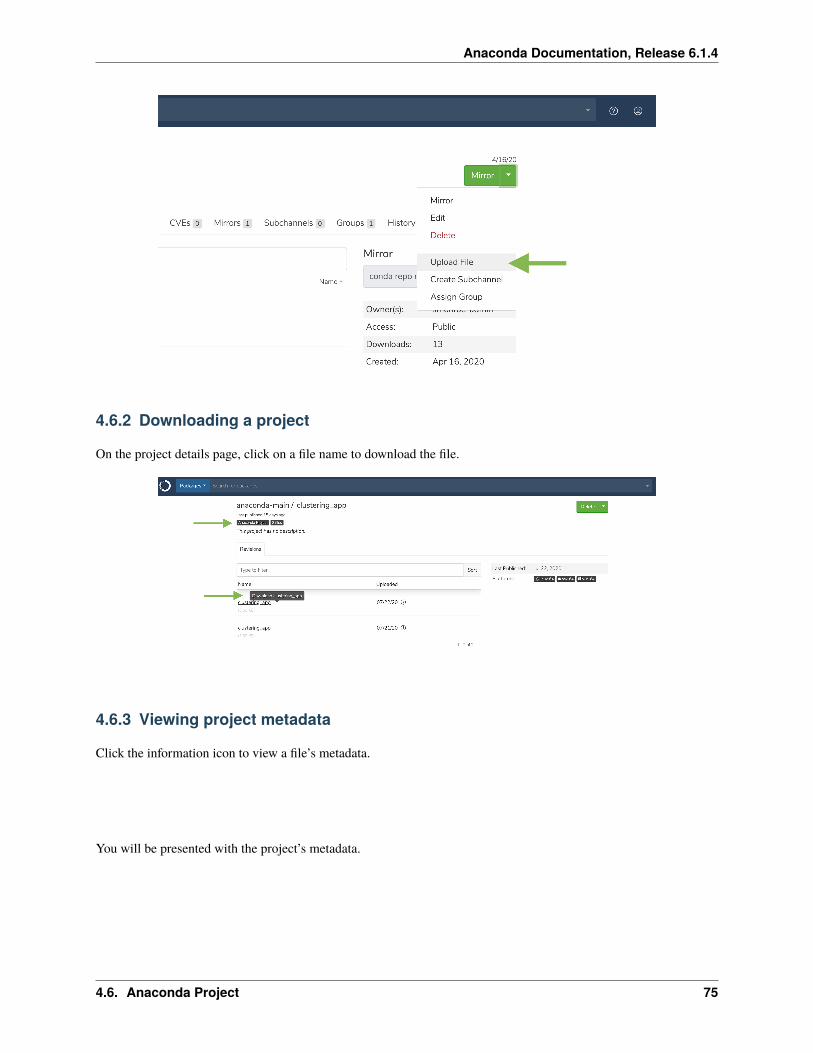
Anaconda Documentation, Release 6.1.4
4.6.2 Downloading a project
On the project details page, click on a file name to download the file.
4.6.3 Viewing project metadata
Click the information icon to view a file’s metadata.
You will be presented with the project’s metadata.
4.6. Anaconda Project 75
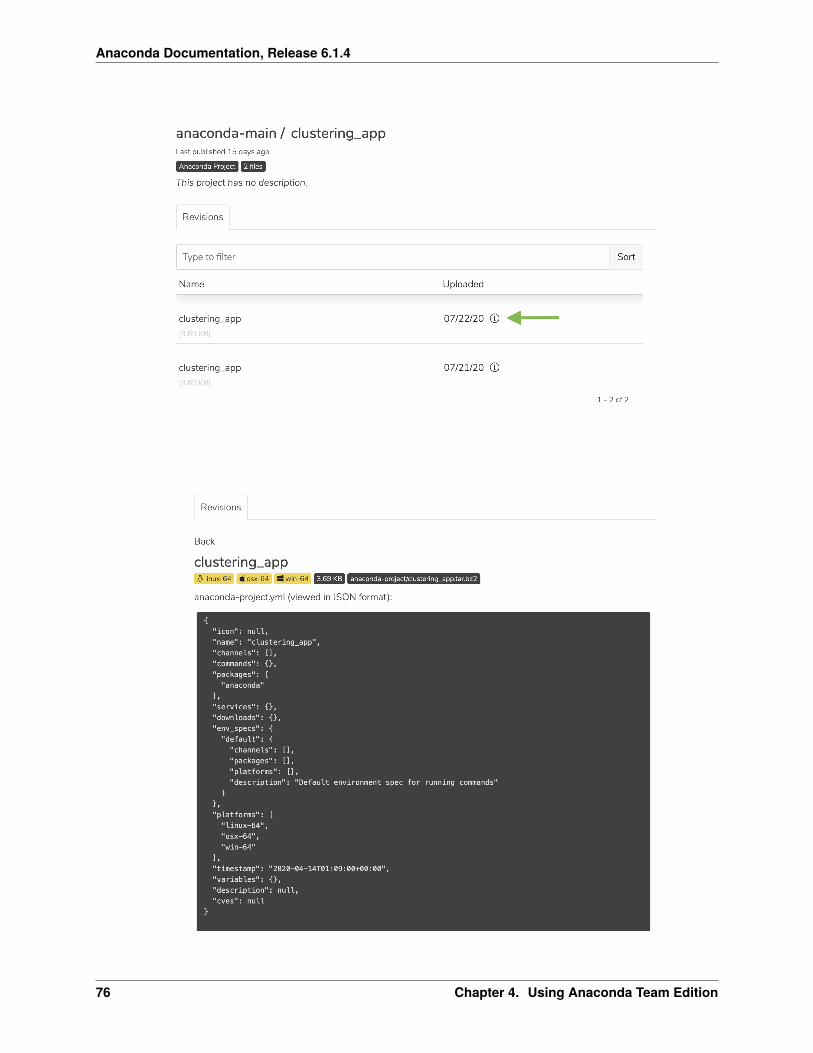
Anaconda Documentation, Release 6.1.4
76 Chapter 4. Using Anaconda Team Edition

Anaconda Documentation, Release 6.1.4
4.6.4 Managing a project
Check the box next to a project. Then, click the dropdown next to the search bar. You may then move, copy, or deletethe project.
4.7 Environments
Anaconda Team Edition enables you to upload, move, copy, share, and download an environment yaml file. An en-vironment is a folder or directory that contains a specific collection of conda packages and their dependencies. Thisallows them to be maintained and run separately without interference from each other.
For example, you may use a conda environment for only Python 2 and Python 2 packages, maintain another condaenvironment with only Python 3 and Python 3 packages, and maintain another for R language packages.
This topic provides guidance on the following actions:
• Uploading an environment.yml file
• Viewing environment dependencies
• Viewing environment metadata
• Managing an environment
4.7.1 Uploading an environment.yml file
1. Create your environment file
2. Click the green dropdown button in the top right corner, and then click Upload File.
3. On the Upload a File screen, select the type of file you’d like to upload from the dropdown.
4. Click the Browse button to find your file and add it to the page.
5. Click Upload.
4.7. Environments 77

Anaconda Documentation, Release 6.1.4
4.7.2 Viewing environment dependencies
On the Environments tab, click anywhere on an environment to view its details.
4.7.3 Viewing environment metadata
Click the information icon to view a file’s metadata.
You will be presented with the environment’s metadata.
78 Chapter 4. Using Anaconda Team Edition

Anaconda Documentation, Release 6.1.4
4.7. Environments 79

Anaconda Documentation, Release 6.1.4
4.7.4 Managing an environment
Check the box next to an environment. Then, click the dropdown next to the search bar. You may then move, copy, ordelete the environment.
4.8 Channels and subchannels
Anaconda Team Edition contains channels and subchannels, which provide a location in the repository where youcan look for artifacts that have been mirrored, uploaded, copied, or moved. Both administrators and users can definechannels and subchannels, determine which artifacts are available in a channel or subchannel, and restrict or grantaccess to specific users or groups.
In Team Edition, we allow for an additional level within your channel, called a subchannel (previously called a label inanaconda.org).
When a user logs in to Team Edition for the first time, a user profile and default channel will be created. If a channelby that name already exists, a default channel will not be created for that user.
This topic provides guidance on the following actions:
• Creating a channel
• Creating a subchannel
• List channels you can access
• Viewing channel details
• Viewing subchannel details
• Editing a channel
• Editing a subchannel
• Creating a group
• Adding members to a group
• Assigning a group to a channel
• Deleting a channel
• Deleting a subchannel
80 Chapter 4. Using Anaconda Team Edition
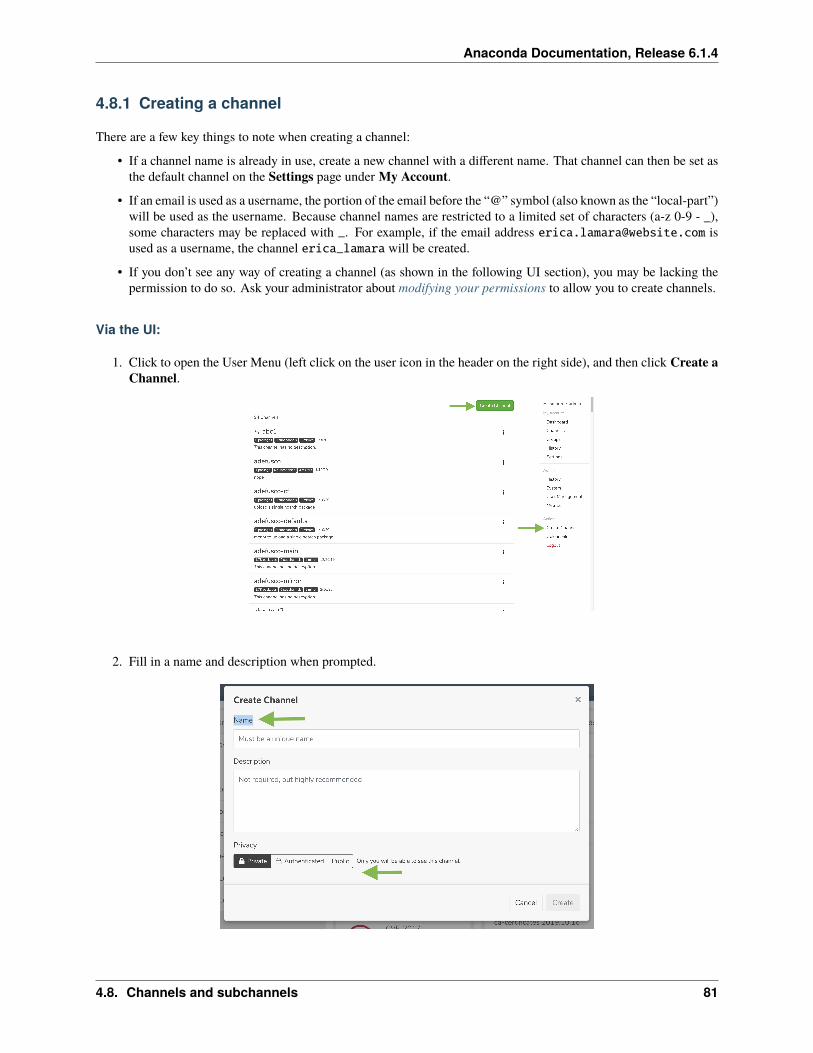
Anaconda Documentation, Release 6.1.4
4.8.1 Creating a channel
There are a few key things to note when creating a channel:
• If a channel name is already in use, create a new channel with a different name. That channel can then be set asthe default channel on the Settings page under My Account.
• If an email is used as a username, the portion of the email before the “@” symbol (also known as the “local-part”)will be used as the username. Because channel names are restricted to a limited set of characters (a-z 0-9 - _),some characters may be replaced with _. For example, if the email address [email protected] isused as a username, the channel erica_lamara will be created.
• If you don’t see any way of creating a channel (as shown in the following UI section), you may be lacking thepermission to do so. Ask your administrator about modifying your permissions to allow you to create channels.
Via the UI:
1. Click to open the User Menu (left click on the user icon in the header on the right side), and then click Create aChannel.
2. Fill in a name and description when prompted.
4.8. Channels and subchannels 81
Anaconda Documentation, Release 6.1.4
You can also create a new channel by clicking on the green button on the top right of the channels list page, or byclicking the plus + icon in the top right of the My Channels list on the dashboard page.
Via the API:
<DOMAIN>/swagger/ui/#/channels/repo.endpoints.channels.channels.post_channel
Via the CLI:
conda repo channel --create <CHANNEL_NAME>
4.8.2 Creating a subchannel
Via the UI:
1. Go to the details page of a channel.
2. You will notice a green button on the right side with an arrow to the right of it. Click that arrow, and then selectCreate subchannel.
3. Fill in a name and description when prompted.
Via the API:
POST /api/channels/<CHANNEL_NAME>/subchannels
Via the CLI:
conda repo channel --create <CHANNEL_NAME>/<SUBCHANNEL_NAME>
4.8.3 List channels you can access
Via the UI:
On the dashboard in the top left you will see a list of channels that you have access to. If you have more than 10 channelsthat you have access to, you can click the Show more button at the bottom of the list of channels. Private channels thatyou don’t have access to don’t show up.
Alternatively, you can click on the user icon in the header and select Channels to get a list of channels that you ownand have access to. If you are an administrator, you will see all channels in your organization.
82 Chapter 4. Using Anaconda Team Edition

Anaconda Documentation, Release 6.1.4
Via the API:
GET /api/channels/
# or
GET /api/account/channels
Via the CLI:
conda repo channel --list
4.8.4 Viewing channel details
Inside each channel is metadata on the channel, such as the name and description. Additionally, you can get a list ofpackages, mirrors, subchannels, groups, and history.
Via the UI:
1. From the dashboard, click on the name of a channel. Alternatively, click on the user menu icon in the far rightof the top navigation.
2. Select channels to see a list of all the channels you have access to, and then click through to view the details.
4.8. Channels and subchannels 83

Anaconda Documentation, Release 6.1.4
or
Type the name of the channel in the search bar at the top of the page and select it from the dropdown.
Via the API:
GET /api/channels/<CHANNEL_NAME>GET /api/channels/<CHANNEL_NAME>/artifactsGET /api/channels/<CHANNEL_NAME>/historyGET /api/channels/<CHANNEL_NAME>/mirrorsGET /api/channels/<CHANNEL_NAME>/subchannels
Via the CLI:
conda repo channel --show <CHANNEL_NAME>conda repo channel --list-packages <CHANNEL_NAME>conda repo channel --list-files <CHANNEL_NAME>
84 Chapter 4. Using Anaconda Team Edition
Anaconda Documentation, Release 6.1.4
4.8.5 Viewing subchannel details
Inside each channel is metadata on the channel, such as the name and description. Additionally, you can get a list ofpackages, mirrors, subchannels, groups, and history.
Via the UI:
1. Go to the channel’s detail page and click on the Subchannels tab.
2. Click on the subchannel to see the subchannel details.
Via the API:
GET /api/channels/<CHANNEL_NAME>/subchannels/<SUBCHANNEL_NAME>GET /api/channels/<CHANNEL_NAME>/subchannels/<SUBCHANNEL_NAME>/artifactsGET /api/channels/<CHANNEL_NAME>/subchannels/<SUBCHANNEL_NAME>/historyGET /api/channels/<CHANNEL_NAME>/subchannels/<SUBCHANNEL_NAME>/mirrors
Via the CLI:
conda repo channel --show <CHANNEL_NAME>/<SUBCHANNEL_NAME>conda repo channel --list-packages <CHANNEL_NAME>/<SUBCHANNEL_NAME>conda repo channel --list-files<CHANNEL_NAME>/<SUBCHANNEL_NAME>
4.8.6 Editing a channel
Inside each channel is metadata on the channel that you can edit, such as the name, description, and privacy.
Via the UI:
1. From the dashboard, click on the name of a channel. Alternatively, click on the user menu icon in the far rightof the top navigation.
2. Select channels to see a list of all the channels you have access to, and then click through to view the details.
3. On the channel details page, click the down arrow next to the large green button and select Edit from the menu.
You will be presented with a modal in which you can edit the details of the channel.
Via the API:
PUT /api/channels/<CHANNEL_NAME>
4.8. Channels and subchannels 85

Anaconda Documentation, Release 6.1.4
Via the CLI:
# lock a channel (set the privacy to private)conda repo channel --lock<CHANNEL_NAME>
# soft-lock a channel (set the privacy to authenticated)conda repo channel --soft-lock <CHANNEL_NAME>
# unlock a channel (set the privacy to public)conda repo channel --unlock<CHANNEL_NAME>
4.8.7 Editing a subchannel
Via the UI:
1. Go to a channel’s detail page and click on the Subchannels tab.
2. Click on the subchannel you wish to view details for.
3. On the subchannel details page, click the down arrow next to the large green button and select Edit from themenu.
You will be presented with a modal in which you can edit the details of the subchannel.
86 Chapter 4. Using Anaconda Team Edition
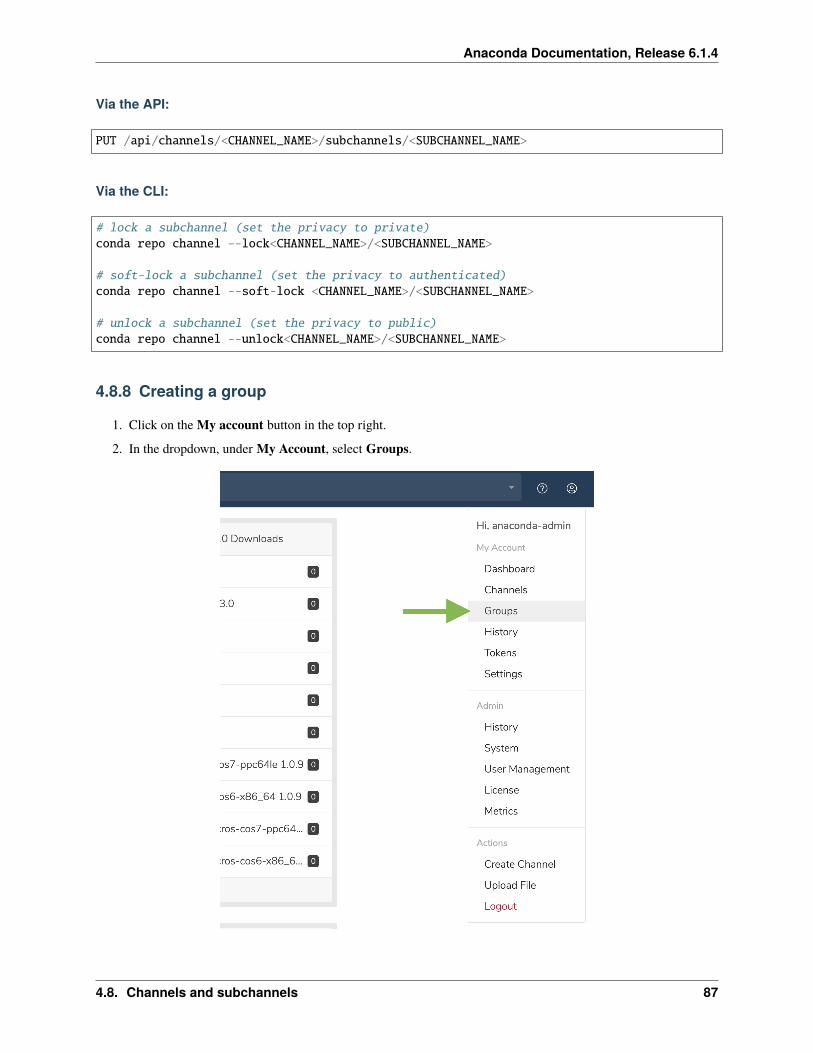
Anaconda Documentation, Release 6.1.4
Via the API:
PUT /api/channels/<CHANNEL_NAME>/subchannels/<SUBCHANNEL_NAME>
Via the CLI:
# lock a subchannel (set the privacy to private)conda repo channel --lock<CHANNEL_NAME>/<SUBCHANNEL_NAME>
# soft-lock a subchannel (set the privacy to authenticated)conda repo channel --soft-lock <CHANNEL_NAME>/<SUBCHANNEL_NAME>
# unlock a subchannel (set the privacy to public)conda repo channel --unlock<CHANNEL_NAME>/<SUBCHANNEL_NAME>
4.8.8 Creating a group
1. Click on the My account button in the top right.
2. In the dropdown, under My Account, select Groups.
4.8. Channels and subchannels 87

Anaconda Documentation, Release 6.1.4
3. On this page, you can see the groups that have already been created. Click the Create Group button to create anew group.
4. Enter a unique group name and description, then click Create.
Note: Members can be added to a group once it is created.
4.8.9 Adding members to a group
1. From the group page, click the Add button to add a new member to the group and assign member permissions.
2. Once the member’s username has populated under Username, you can select their permission level. Click onthe information icon next to the permissions to learn more about the permissions available.
4.8.10 Assigning a group to a channel
1. From the group page, click on the Channels tab.
2. If the group has yet to be assigned to a channel, the following notification will be displayed on the page:
Note: This group is not associated with any channels. Assign this group to a channel.
1. Click on Assign this group.
88 Chapter 4. Using Anaconda Team Edition
Anaconda Documentation, Release 6.1.4
2. In the popup window, the dropdown search bar will list the channels to which you have permission to modify.Select the channel you wish to add your group to.
3. Then, select the permission you wish to assign to the group as a whole, and then click Add.
4.8.11 Deleting a channel
Deleting a channel marks the channel as deleted. Once you delete a channel, all associates artifacts will not be found insearch. However, the files will remain on the disc. The ability to manipulate deleted channels and files will be possiblein a future release of Team Edition.
Via the UI:
On a channel detail page click the green button’s down arrow to reveal other actions, then click Delete.
Alternatively, on the channels list page, you can click the elipses icon . . . on the right of each channel row and chooseDelete.
Via the API:
DELETE /api/channels/<CHANNEL_NAME>
Via the CLI:
conda repo channel --remove <CHANNEL_NAME>
4.8.12 Deleting a subchannel
Via the UI:
On a channel detail page, click on the subchannels tab. Select one or more subchannels, and then select the down arrownext to the filter text field. A menu will appear where you can select Delete to delete the selected Subchannels.
Alternatively, you can click on a subchannel to view its detail page. From there, click on the green button’s down arrowto reveal other actions, then click Delete.
Via the API:
DELETE /api/channels/<CHANNEL_NAME>/subchannels/<SUBCHANNEL_NAME>
4.8. Channels and subchannels 89
Anaconda Documentation, Release 6.1.4
Via the CLI:
conda repo channel --remove <CHANNEL_NAME>/<SUBCHANNEL_NAME>
4.9 Using packages within channels/subchannels
There are several ways to get packages into a channel or subchannel:
• Upload a package file directly to a channel
• Create a mirror configuration and specify the source channel
• Copy/move specific packages from another channel
This topic provides guidance on the following actions:
• Uploading to a channel
• Uploading to a subchannel
• Mirror to/from a channel
• Mirror to/from a subchannel
• Copy/move packages to/from a channel
• Copy/move packages to/from a subchannel
4.9.1 Uploading to a channel
Via the UI:
1. Visit the channel you wish to upload packages to.
2. Click on the action button on the right side of the Mirror button and select the option to Upload.
3. In the modal that appears, select the file from your local computer that you wish to upload.
A toast notification will appear informing you of success or failure.
or
1. Click on the user icon and choose Upload Package.
2. Choose the file to upload and what channel to upload it to.
90 Chapter 4. Using Anaconda Team Edition

Anaconda Documentation, Release 6.1.4
4.9. Using packages within channels/subchannels 91

Anaconda Documentation, Release 6.1.4
Via the API:
POST /api/channels/<CHANNEL_NAME>/artifacts
Via the CLI:
conda repo upload -c <CHANNEL_NAME><FILE_PATH>
4.9.2 Uploading to a subchannel
Via the UI:
1. Visit the subchannel you wish to upload packages to.
2. Click on the action button on the right side and select the option to Upload.
3. In the modal that appears, select the file from your local computer that you wish to upload.
A toast notification will appear informing you of success or failure.
or
1. Click on the user icon and choose Upload Package.
2. Choose the file to upload and what channel/subchannel combination to upload it to.
Via the API:
POST /api/channels/<CHANNEL_NAME>/subchannels/<SUBCHANNEL_NAME>/artifacts
Via the CLI:
conda repo upload -c <CHANNEL_NAME>/<SUBCHANNEL_NAME><FILE_PATH>
4.9.3 Mirror to/from a channel
Via the UI:
1. As an admin user, visit the channel you wish to mirror to (the destination) and click the green Mirror button.
2. Enter the source of the mirror and whether that source is internal (a channel on this repo) or external (a channelon some other repo such as http://www.anaconda.org).
3. Indicate whether you wish for the mirror to be passive (one time only) or active (synced with the source channel).
Additionally, you will be presented with other options for your mirror such as CVE score restrictions and frequency.
92 Chapter 4. Using Anaconda Team Edition

Anaconda Documentation, Release 6.1.4
Via the API:
POST /api/channels/<CHANNEL_NAME>/mirrors
Via the CLI:
conda repo mirror --create<MIRROR_NAME> -c <DESTINATION_CHANNEL> -s <SOURCE> --mode<MODE>
# For example:# conda repo mirror --create tm3 -c mychannel -s "https://conda.anaconda.org/conda-test"␣→˓--mode passive
4.9.4 Mirror to/from a subchannel
Via the UI:
TBD
Via the API:
POST /api/channels/<CHANNEL_NAME>/subchannels/<SUBCHANNEL_NAME>/mirrors
Via the CLI:
conda repo mirror --create<MIRROR_NAME> -c <CHANNEL_NAME>/<SUBCHANNEL_NAME> -s <SOURCE> -→˓-mode<MODE>
# For example:# conda repo mirror --create tm3 -c mychannel/dev -s "https://conda.anaconda.org/conda-→˓test " --mode passive
4.9.5 Copy/move packages to/from a channel
Via the UI:
1. Go to the channel you wish to copy packages to/move packages from.
2. Click on the Packages tab, where you will see a list of all the packages in that channel.
3. Select one or more packages, and then click move or copy to a new or existing channel.
4.9. Using packages within channels/subchannels 93

Anaconda Documentation, Release 6.1.4
Via the API:
POST /channels/<CHANNEL_NAME>/artifacts/bulk
Via the CLI:
conda repo copy <SPEC> -d<DESTINATION_CHANNEL>conda repo move <SPEC> -d<DESTINATION_CHANNEL>
# where dest = <CHANNEL_NAME>[/<SUBCHANNEL_NAME>][::<PACKAGE>[/<VERSION>[/<FILE_NAME>]]]
# If file name is not given, copy all files in the version
# For example:# conda repo copy john::bokeh/1.0.2/bokeh-1.0.2-py37_0.tar.bz2 -d john2# conda repo move john::bokeh/1.0.2/bokeh-1.0.2-py37_0.tar.bz2 -d john2
4.9.6 Copy/move packages to/from a subchannel
Via the UI:
1. Go to the subchannel you wish to copy packages to/move packages from.
2. Click on the Packages tab, where you will see a list of all the packages in that subchannel.
3. Select one or more packages, and then click move or copy to a new or existing channel or subchannel.
94 Chapter 4. Using Anaconda Team Edition
Anaconda Documentation, Release 6.1.4
Via the API:
POST /channels/<CHANNEL_NAME>/artifacts/bulk
Via the CLI:
conda repo copy <spec> -d <CHANNEL_NAME>/<SUBCHANNEL_NAME>conda repo move <spec> -d <CHANNEL_NAME>/<SUBCHANNEL_NAME>
# where dest =<CHANNEL_NAME>/<SUBCHANNEL_NAME>[::<PACKAGE>[/<VERSION>[/<FILE_NAME>]]]
#If filename is not given, copy all files in the version
# For example:# conda repo copy john::bokeh/1.0.2/bokeh-1.0.2-py37_0.tar.bz2 -d john/ts2# conda repo move john::bokeh/1.0.2/bokeh-1.0.2-py37_0.tar.bz2 -d john/ts2
4.10 History
*This page is under construction*
The History page allows you to view and filter past events. You may also click on the event itself to view its metadata.
The following is a list of some events you may see captured in your History log:
• Channel created
• Channel group added
• Group user added
• Artifact registered
• Mirror updated
• Mirroring failed
4.10.1 Viewing history
To access your History page, click on the My account button in the top right.
Note: As a user, you will see your history under the My Account section. As an admin, you will have an additionalsection that displays the history of all events within that instance of Team Edition.
On the History page, you may sort and filter by the type of event. Click on any event to view its metadata.
4.10. History 95

Anaconda Documentation, Release 6.1.4
4.11 Packages
Anaconda Team Edition enables you to upload packages (conda, cran, wheel, egg, sdist, etc.) to the repository andstore them in several different channel structures. Each package contains specific metadata for that package along withthe dependencies and dependents for the package.
This topic provides guidance on the following actions:
• Uploading a package
• Downloading a package
• Viewing package details
• Viewing package metadata
• Managing a package
• Deleting a package
4.11.1 Uploading a package
Preparation for uploading packages differs depending on your package type. Please follow the relevant guide for yourrespective packages:
• sdist and wheels
• cran
• conda-build
96 Chapter 4. Using Anaconda Team Edition

Anaconda Documentation, Release 6.1.4
Via the UI:
1. Click the green dropdown button in the top right corner, and then click Upload File.
2. On the Upload a File screen, select the type of file you’d like to upload from the dropdown.
3. Click the Browse button to find your file and add it to the page.
4. Click Upload.
Via the CLI:
To upload into the default user channel:
# Replace <PACKAGE> with the package nameconda repo upload <PACKAGE>
To upload multiple packages:
# Replace <PACKAGE1> etc. with the package namesconda repo upload <PACKAGE1> <PACKAGE2>
To upload into a specific channel:
# Replace <PACKAGE> with the package name and <CHANNEL_NAME> with the channel nameconda repo upload - <CHANNEL_NAME> <PACKAGE>
By default, the system will try to identify the package type automatically. However, you can also provide the file typeyourself:
# Replace <CHANNEL_NAME> with the channel nameconda repo upload -t conda -c <CHANNEL_NAME> package.tar.bz2
# Or, to upload a notebook:# Replace <CHANNEL_NAME> with the channel nameconda repo upload -t ipynb -c <CHANNEL_NAME> notebook.ipynb
4.11. Packages 97

Anaconda Documentation, Release 6.1.4
4.11.2 Downloading a package
On a package details page, click on a file name to download the file.
4.11.3 Viewing package details
Via the UI:
Click anywhere on a package to view its details.
You can then click the Sort button to sort files by version, size, platform, and name.
Via the API:
GET /api/channels/<CHANNEL_NAME>/artifacts/<ARTIFACT_TYPE>/<ARTIFACT_NAME>GET /api/channels/<CHANNEL_NAME>/artifacts/<ARTIFACT_TYPE>/<ARTIFACT_NAME>/readmeGET /api/channels/<CHANNEL_NAME>/artifacts/<ARTIFACT_TYPE>/<ARTIFACT_NAME>/cvesGET /api/channels/<CHANNEL_NAME>/artifacts/<ARTIFACT_TYPE>/<ARTIFACT_NAME>/filesGET /api/channels/<CHANNEL_NAME>/artifacts/<ARTIFACT_TYPE>/<ARTIFACT_NAME>/dependenciesGET /api/channels/<CHANNEL_NAME>/subchannels/<SUBCHANNEL_NAME>/artifacts/<ARTIFACT_TYPE>/→˓<ARTIFACT_NAME>GET /api/channels/<CHANNEL_NAME>/subchannels/<SUBCHANNEL_NAME>/artifacts/<ARTIFACT_TYPE>/→˓<ARTIFACT_NAME>/readmeGET /api/channels/<CHANNEL_NAME>/subchannels/<SUBCHANNEL_NAME>/artifacts/<ARTIFACT_TYPE>/→˓<ARTIFACT_NAME>/cvesGET /api/channels/<CHANNEL_NAME>/subchannels/<SUBCHANNEL_NAME>/artifacts/<ARTIFACT_TYPE>/→˓<ARTIFACT_NAME>/filesGET /api/channels/<CHANNEL_NAME>/subchannels/<SUBCHANNEL_NAME>/artifacts/<ARTIFACT_TYPE>/→˓<ARTIFACT_NAME>/dependencies
98 Chapter 4. Using Anaconda Team Edition

Anaconda Documentation, Release 6.1.4
Via the CLI:
# Replace <CHANNEL_NAME> with the channel nameconda repo channel --list-file<CHANNEL_NAME> --full-details
4.11.4 Viewing package metadata
Click the information icon to view a file’s metadata.
4.11.5 Managing a package
1. Check the box next to a package.
2. Click the dropdown next to the search bar. You may then move, copy, or delete the package.
4.11. Packages 99

Anaconda Documentation, Release 6.1.4
4.11.6 Deleting a package
Click the green Delete button to delete a package. You will be prompted to confirm that you wish to delete the Package.Click Delete to confirm.
Via the UI:
1. On a package details page, navigate to the Files tab to see all the versions of a given package.
2. Select one or more packages, and then click on the down arrow to the left of the filter field and click Delete.
Via the API:
# Replace placeholders in <BRACKETS> with the applicable informationDELETE /api/channels/<CHANNEL_NAME>/artifacts/<ARTIFACT_TYPE>/<ARTIFACT_NAME>DELETE /api/channels/<CHANNEL_NAME>/subchannels/<SUBCHANNEL_NAME>/artifacts/<ARTIFACT_→˓TYPE>/<ARTIFACT_NAME>
Via the CLI:
# Replace placeholders in <BRACKETS> with the applicable informationconda-repo remove [--family]<CHANNEL_NAME>/<SUBCHANNEL_NAME>[::<PACKAGE>[/<VERSION>[/→˓<FILE_NAME>]]]
100 Chapter 4. Using Anaconda Team Edition
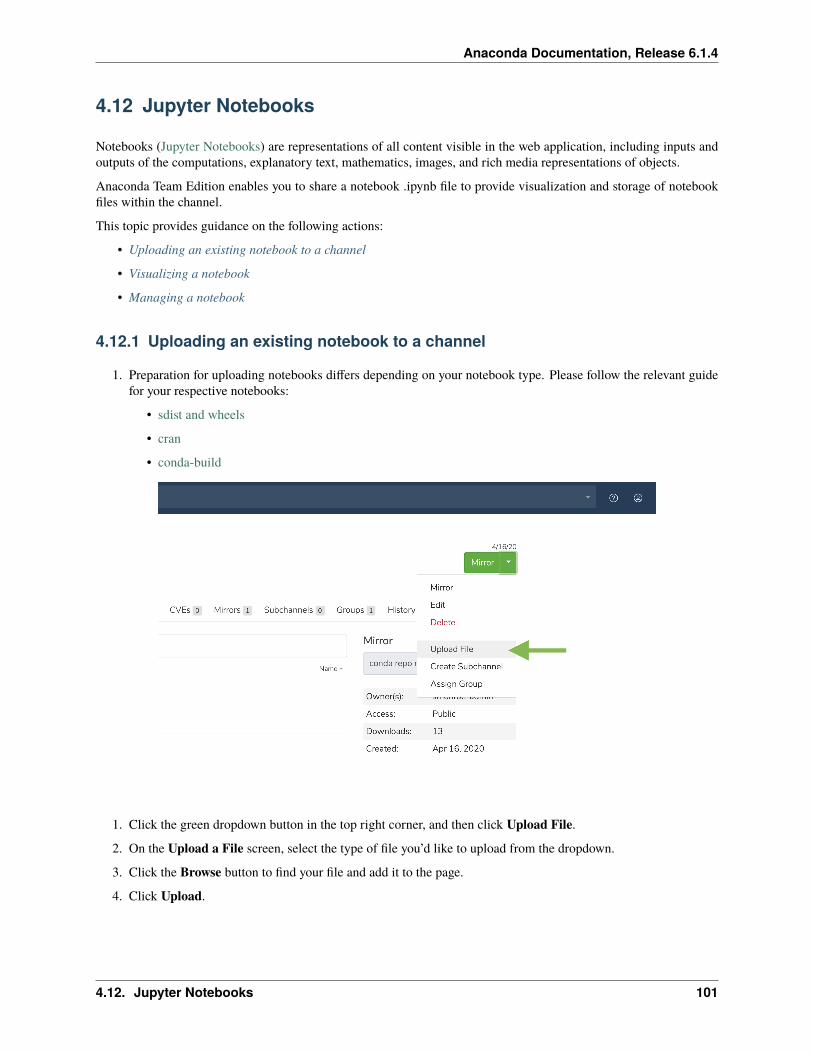
Anaconda Documentation, Release 6.1.4
4.12 Jupyter Notebooks
Notebooks (Jupyter Notebooks) are representations of all content visible in the web application, including inputs andoutputs of the computations, explanatory text, mathematics, images, and rich media representations of objects.
Anaconda Team Edition enables you to share a notebook .ipynb file to provide visualization and storage of notebookfiles within the channel.
This topic provides guidance on the following actions:
• Uploading an existing notebook to a channel
• Visualizing a notebook
• Managing a notebook
4.12.1 Uploading an existing notebook to a channel
1. Preparation for uploading notebooks differs depending on your notebook type. Please follow the relevant guidefor your respective notebooks:
• sdist and wheels
• cran
• conda-build
1. Click the green dropdown button in the top right corner, and then click Upload File.
2. On the Upload a File screen, select the type of file you’d like to upload from the dropdown.
3. Click the Browse button to find your file and add it to the page.
4. Click Upload.
4.12. Jupyter Notebooks 101

Anaconda Documentation, Release 6.1.4
4.12.2 Visualizing a notebook
Click on a file to visualize the notebook.
4.12.3 Managing a notebook
1. Check the box next to a notebook.
2. Click the dropdown next to the search bar. You may then move, copy, or delete the notebook.
4.13 Authorization tokens
Authorization tokens can be created by users and administrators to provide fine-grained access control to resources(channels) or scopes when using the API or CLI. These tokens can be used in place of username-based authentication,particularly for third-party applications or automation tools.
This topic provides guidance on the following actions:
• Understanding tokens
• Understanding scopes
• Listing the available authorization scopes
• Listing the user authorization tokens
• Create a new user authorization token
• Removing a user authorization token
102 Chapter 4. Using Anaconda Team Edition
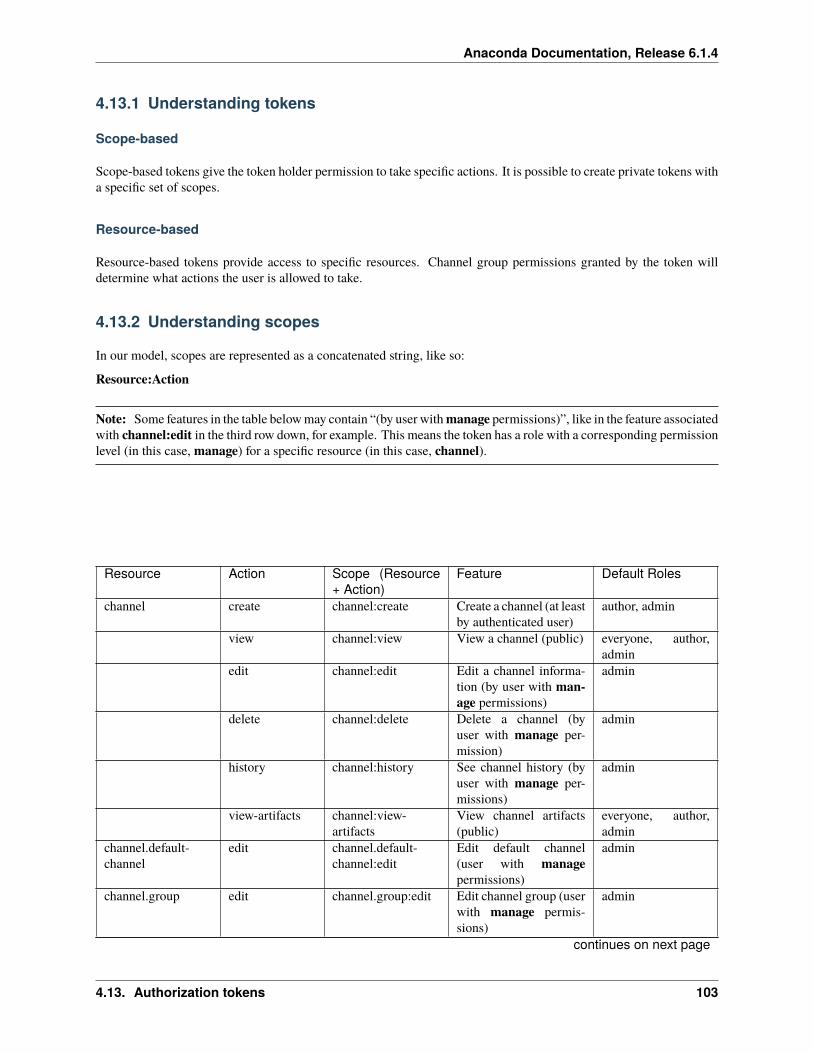
Anaconda Documentation, Release 6.1.4
4.13.1 Understanding tokens
Scope-based
Scope-based tokens give the token holder permission to take specific actions. It is possible to create private tokens witha specific set of scopes.
Resource-based
Resource-based tokens provide access to specific resources. Channel group permissions granted by the token willdetermine what actions the user is allowed to take.
4.13.2 Understanding scopes
In our model, scopes are represented as a concatenated string, like so:
Resource:Action
Note: Some features in the table below may contain “(by user with manage permissions)”, like in the feature associatedwith channel:edit in the third row down, for example. This means the token has a role with a corresponding permissionlevel (in this case, manage) for a specific resource (in this case, channel).
Resource Action Scope (Resource+ Action)
Feature Default Roles
channel create channel:create Create a channel (at leastby authenticated user)
author, admin
view channel:view View a channel (public) everyone, author,admin
edit channel:edit Edit a channel informa-tion (by user with man-age permissions)
admin
delete channel:delete Delete a channel (byuser with manage per-mission)
admin
history channel:history See channel history (byuser with manage per-missions)
admin
view-artifacts channel:view-artifacts
View channel artifacts(public)
everyone, author,admin
channel.default-channel
edit channel.default-channel:edit
Edit default channel(user with managepermissions)
admin
channel.group edit channel.group:edit Edit channel group (userwith manage permis-sions)
admin
continues on next page
4.13. Authorization tokens 103
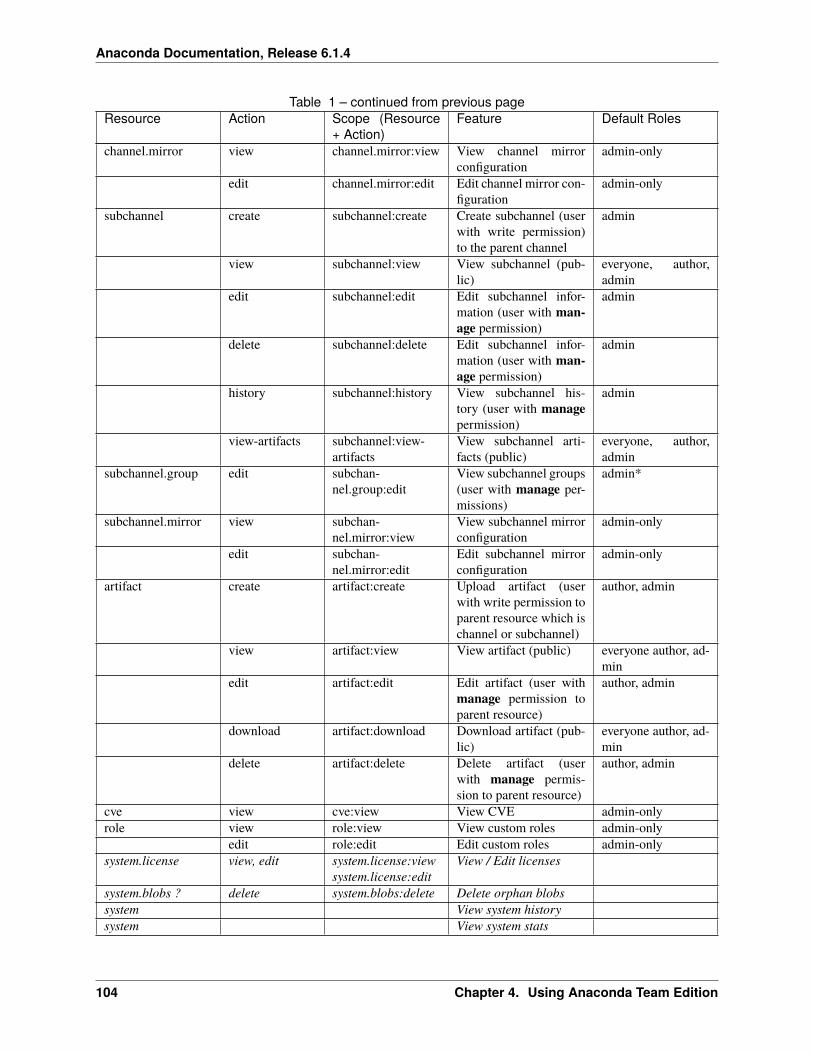
Anaconda Documentation, Release 6.1.4
Table 1 – continued from previous pageResource Action Scope (Resource
+ Action)Feature Default Roles
channel.mirror view channel.mirror:view View channel mirrorconfiguration
admin-only
edit channel.mirror:edit Edit channel mirror con-figuration
admin-only
subchannel create subchannel:create Create subchannel (userwith write permission)to the parent channel
admin
view subchannel:view View subchannel (pub-lic)
everyone, author,admin
edit subchannel:edit Edit subchannel infor-mation (user with man-age permission)
admin
delete subchannel:delete Edit subchannel infor-mation (user with man-age permission)
admin
history subchannel:history View subchannel his-tory (user with managepermission)
admin
view-artifacts subchannel:view-artifacts
View subchannel arti-facts (public)
everyone, author,admin
subchannel.group edit subchan-nel.group:edit
View subchannel groups(user with manage per-missions)
admin*
subchannel.mirror view subchan-nel.mirror:view
View subchannel mirrorconfiguration
admin-only
edit subchan-nel.mirror:edit
Edit subchannel mirrorconfiguration
admin-only
artifact create artifact:create Upload artifact (userwith write permission toparent resource which ischannel or subchannel)
author, admin
view artifact:view View artifact (public) everyone author, ad-min
edit artifact:edit Edit artifact (user withmanage permission toparent resource)
author, admin
download artifact:download Download artifact (pub-lic)
everyone author, ad-min
delete artifact:delete Delete artifact (userwith manage permis-sion to parent resource)
author, admin
cve view cve:view View CVE admin-onlyrole view role:view View custom roles admin-only
edit role:edit Edit custom roles admin-onlysystem.license view, edit system.license:view
system.license:editView / Edit licenses
system.blobs ? delete system.blobs:delete Delete orphan blobssystem View system historysystem View system stats
104 Chapter 4. Using Anaconda Team Edition

Anaconda Documentation, Release 6.1.4
Italicized items in table are under development.
4.13.3 Listing the available authorization scopes
Via the API:
GET /api/system/tokens
Via the CLI:
conda repo auth --list-scopes
4.13.4 Listing the user authorization tokens
Via the API:
GET /api/account/token
Via the CLI:
conda repo auth --list
4.13.5 Create a new user authorization token
Via the API:
POST /api/account/tokens
Via the CLI:
conda repo auth --create -n <NAME>
4.13.6 Removing a user authorization token
Via the API:
DELETE /api/account/tokens/<TOKEN_ID>
4.13. Authorization tokens 105
Anaconda Documentation, Release 6.1.4
Via the CLI:
conda repo auth --remove <TOKEN_ID>
4.14 Working with private channels using third-party tools
In order to access private channels via third-party tools (such as pip, Twine, or R), you must have a user token. Thiscan be done through the conda repo tool or by creating channel-specific, read-only/read-write tokens via UI .
4.14.1 Python packages
Uploading
Twine is a popular tool for uploading Python packages to PyPI-like repositories. Run the following command to uploadPython packages:
twine upload --repository-url http://<DOMAIN>/api/repo/<CHANNEL><PACKAGE> -u <TOKEN> -p x-auth-token
Example
twine upload --repository-urlhttp://demo-repo.com/api/repo/my-pip-channel six-1.13.0-py2.py3-none-any.whl -u␣→˓46e98d3dbf2378bb26e2107867652ee734eb098ea5b96f35 -p x-auth-token
If the token is incorrect, you will receive a 401 error message.
Please refer to the Twine package documentation to learn how to configure your username and password via the con-figuration file or environment variables.
Installing
Similar to pip, Team Edition supports user authentication using Basic Authentication. The following is the properformat for installing pip packages:
pip install --trusted-host <DOMAIN> --index-urlhttp://<TOKEN>:x-auth-token@<DOMAIN>/api/repo/<CHANNEL>/simple <PACKAGE>
Note: x-auth-token is not a placeholder, but is used as the actual password for Basic Authentication.
Example
pip install --trusted-host demo-repo.com --index-urlhttp://46e98d3dbf2378bb26e2107867652ee734eb098ea5b96f35:[email protected]/api/→˓repo/alex-pip/simple six
Make sure to add a trusted host.
Please refer to the pip documentation to learn how to configure the index URL via the configuration file or environmentvariables.
106 Chapter 4. Using Anaconda Team Edition

Anaconda Documentation, Release 6.1.4
4.14.2 R packages
Uploading
Since there is no standard tool for uploading R packages, you can use either the UI or API directly. Run the followingcommand to upload R packages:
curl -v -F filetype=cran_source_package -F content=@<FILENAME>http://<DOMAIN>/api/repo/<CHANNEL> -H"X-Auth: <TOKEN>"
Where <TOKEN> is the x-auth-token.
Example
curl -v -F filetype=cran_source_package -F content=@abc_2.1.tar.gzhttp://demo-repo.com/api/repo/alex-pip -H"X-Auth:␣→˓46e98d3dbf2378bb26e2107867652ee734eb098ea5b96f35"
Please use cran_source_package for source packages and cran_binary_package for binary R packages.
Installing
You can use your domain as a repository URL in the install.packages function by injecting a token into the path:
http://<DOMAIN>/api/repo/t/<TOKEN>/<CHANNEL>/cran
This may look something like the following:
http://demo-repo.com/api/repo/t/46e98d3dbf2378bb26e2107867652ee734eb098ea5b96f35/alex-→˓pip/cran
Example
> install.packages("abc", repos="http://demo-repo.com/api/t/→˓46e98d3dbf2378bb26e2107867652ee734eb098ea5b96f35/repo/alex-pip/cran")
4.14. Working with private channels using third-party tools 107

Anaconda Documentation, Release 6.1.4
108 Chapter 4. Using Anaconda Team Edition

CHAPTER
FIVE
REFERENCE MATERIALS
The following information is provided to help you understand some of the core terminology used in Anaconda TeamEdition and what changes were made between releases.
We also include answers to common questions you may have and workarounds for known issues you may encounterwhile using the platform.
Additional information to help you get the most out of Anaconda features is available at https://support.anaconda.com/.
5.1 Release notes
The following notes are provided to help you understand the major changes made between releases, and therefore maynot include minor bug fixes and updates.
Anaconda Team Edition 6.1.6
What’s new
• Updated Anaconda Team Edition to meet Accessibility compliance
• Enable an end-user to mirror, install and upload CRAN packages in Windows environments
• Provided additional airgap functionality
• Improve the user experience with LDAP
• Refactored and Improved integration with Keycloak
• Ability to add certificates to Keycloak truststore for LDAP
Improvements
• Airgap:
– Documentation on pulling down the package tarball on a schedule.
– Automate the process for updating artifacts.
• LDAP:
– Ability to link users that are assigned a group in Keycloak to the group in Anaconda Team Edition.
– The ability for an admin to grant channel access to groups which can include groups an admin is nota member of.
– The ability for an admin to edit the permission on a group - to increase or decrease permissions.
– The ability for an admin to manage user access using LDAP groups.
109

Anaconda Documentation, Release 6.1.4
– The ability for a user to distinguish between an Anaconda Team Edition group and a group defined inKeycloak
• Added new platforms - Linux-ppc64, Linux-s390x, and osx-arm64
• Azure AD integration with Anaconda Team Edition
• Changed the wording from PyPI to standard python and CRAN to standard r
• Added type to mirror drop-down of standard python and standard r
• The user is now able to install packages from a sub-channel
• conda-repo-cli:
– Added conda-repo-cli whoami command
– Ability to set a certificate file post-install: conda repo config –set ssl_verify cert.cer
– Cleaner error messages to inform the user
– Ability to display CVEs via CLI
– Improvements to help channel: conda repo channel –help
• Keycloak:
– Store and manage users directly in Keycloak
– Store and manage groups directly in Keycloak
– Store and manage roles directly in Keycloak
– Store and manage user-group relations directly in Keycloak
Bug fixes
• CRAN:
– Licensing filtering - user can now utilize the exlude filter for license restriction
– Mirror to include binaries, so that users can install libraries without each user having to (re)compilelibraries
– CRAN mirror configuration page no longer duplicates package filter information
*LDAP:
• User count licensing limit user access.
• Updated the ability tto scroll on dependents and metadata tabs
• CVE score now displays a 0.0 when the CVE has a cleared or mitigated status
• Updated sorting on CVE tab to allow end-user to sort by channel and package
• The edit button is now enabled when a token name is edited
• Removed the need to refresh the page after adding a channel or subchannel to a group
• Corrected the selection select all checkboxes for packages to only work on the current page and not to all pagesrelated to a package or packages within the channel
• The date range in mirror configuration is now hidden due to backend work needed
• Fixed the package search latency issue and refresh problems
110 Chapter 5. Reference materials

Anaconda Documentation, Release 6.1.4
5.1.1 Anaconda Team Edition 6.1.5
Released October 1, 2021
What’s new
• Customer’s now have the ability to install an airgapped instance of Anaconda Team Edition
– Updated install preparation instructions
– Easy to self install
– Centralized location to pull updated packages and associated CVE metadata
• Updated the upgrade and restore path
Improvements
• Improved the warning message when setting a future date in the mirror scheduling tool
• Deleted artifacts wiill no longer show up when customer is performing a search
• Improved CVE filtering
• Updated group role mapping with Active Directory integration for the admin role
• Improved the ability to add or update a license
• Improved mirror performance:
– Default to monthly schedule
– Default to active mirror
– Updated edit function to ensure all current fields are available when editing
– Corrected the double package format of .conda and .tar.bz2
Bug fixes
• Group create button is now active when intiating a group
• Notification now appears when you delete a token
• No longer recieve multiple notifications on mirror deletion
• Searching for a package now displays current package information
• Tokens now grant only specific access
• Mirror event history is displaying current status
• conda-repo cli help now display correct help instructions
5.1.2 Anaconda Team Edition 6.1.4
Released February 4, 2021
What’s new
• Ability to mirror from another installation of Team Edition via https.
• Ability to upgrade Team Edition and maintain current settings and filters.
• Role Mapping: when additional roles are added to User Management, Admin is able to restrict or add additionalpermissions to the end user.
• Ability to mirror from repo.anaconda.cloud.
5.1. Release notes 111
Anaconda Documentation, Release 6.1.4
• Ability to move, copy, and delete artifacts within a package.
• Easily upgrade a license key from the Admin user’s UI dashboard
Improvements
• Improved the support and documentation for custom certificates.
• Mirror frequency and performance issues.
• When you remove a subdirectory, it is removed from the package artifact list upon updating the mirror.
• Added notification that frequency is in UTC time.
• CVE improvements:
– CVEs are now updating in Team Edition every 4 hours to align with NIST.
– All CVEs have the correct status for reporting (Reported or Anaconda Curated: Active, Cleared, Mit-igated, or Disputed).
– Ability to filter by CVE status (Reported or Anaconda Curated: Active, Cleared, Mitigated, or Dis-puted).
– Display the CVE date as shown by NIST for Published and Modified.
– Display the date Anaconda curated the CVE.
Bug fixes
• Dashboard now displays the correct package count for a channel.
• An error duing customer logout experience with Team Edition was caused by a miscommunication between websocket and callback endpoint API.
• Sorting in channels not working as expected.
• Ability to sort all pages of package artifacts by Size, Version, Last Updated, and Platform.
• Ability to sort packages based on Name.
• Issues with conda repo functionality for conda repo channel copy and conda repo upload options have been fixed.
• Index of cache on Team Edition related to If-Modified-Since header has been fixed.
• API to trigger on channel index refresh lead to displaying inconsistent information between the channel andactual artifacts in the channel.
5.1.3 Anaconda Team Edition 6.1.3
Released August 10, 2020
What’s New
• CVEs will be automatically fed to and updated on the Team Edition dashboard, so you no longer have to mirrorthem.
• CVEs will now be pulled down from NIST and listed as Reported (not curated).
• CVEs that are curated by Anaconda will now be designated with a checkmark and a label defining the stage ofcuration.
• You can now search for CVEs in the search bar at the top of Team Edition (Admin only).
• CVEs are displayed using an algorithm. When one or more CVEs are associated with a package, the score thatis displayed is based on the highest score and risk state of a CVE for each file.
112 Chapter 5. Reference materials
Anaconda Documentation, Release 6.1.4
• Clicking on the number of CVEs related to a package file will show a CVE listing view.
• The number of unique CVEs for a package is displayed at the package level.
• When viewing files in a package, the appropriate CVE score (or N/A) will be displayed based on the number ofCVEs and severity.
• The metadata will now display all the CVEs score information.
• All the packages affected by a CVE will be associated with that CVE.
Improvements
• Each CVE status can be seen by clicking on “info” icons and viewing meta information.
• It is now more clear that the CVE number is a clickable link.
• There is greater distinction between Anaconda curated and non-curated CVEs via a checkbox selection.
• More than two mirrors can now be run at the same time.
Bug fixes
• The heirarchy for mirroring filters has been corrected; now, if a package is added to both “include” and “exclude,”the package will be excluded.
• System metering (Prometheus) is now showing up properly.
• Admins can now update user roles and create custom roles.
5.2 License types
Packages used for data science are very often associated with open source licenses that specify how the packagescan be used. While many licenses allow a broad range of usage, some are more restrictive, especially with respectto production environments. Team Edition allows for filtering by license type, which can help organizations governpackage availability before license issues can cause production issues.
The following is a list of OSS licenses and links to further details.
• Affero General Public License (AGPL) - https://opensource.org/licenses/AGPL-3.0
• General Public License 2 (GPL2) https://opensource.org/licenses/GPL-2.0
• General Public License 3 (GPL3) https://opensource.org/licenses/GPL-3.0
• Lesser General Public License (LGPL) https://opensource.org/licenses/GPL-3.0
• Berkeley Source Distribution (BSD) https://opensource.org/licenses/BSD-3-Clause
• Massachusetts Institute of Technology (MIT) https://opensource.org/licenses/MIT
• Apache https://opensource.org/licenses/Apache-2.0
• Python Software Foundation (PSF) https://opensource.org/licenses/Python-2.0
• Public Domain
• Propriatary
• Other
• None
• https://opensource.org/licenses
• https://opensource.org/licenses/alphabetical
5.2. License types 113
Anaconda Documentation, Release 6.1.4
5.3 Troubleshooting
This page details some common issues and their respective workarounds. For Anaconda installation or technical supportoptions, visit our support offerings page.
• 403 error
• Conda: Channel is unavailable/missing or package itself is missing
• SSL-related issues
• Using Redis
5.3.1 403 error
Problem
A 403 errors is a generic Forbidden error issued by a web server in the event the client is forbidden from accessing aresource.
The 403 error you are receiving may look like the following:
Collecting package metadata (current_repodata.json): failed
UnavailableInvalidChannel: The channel is not accessible or is invalid.channel name: pkgs/mainchannel url: https://repo.anaconda.com/pkgs/mainerror code: 403
You will need to adjust your conda configuration to proceed.Use `conda config --show channels` to view your configuration's current state,and use `conda config --show-sources` to view config file locations.There are several reasons a 403 error could be received:
There are a few possible reasons for receiving this error:
• The user has misconfigured their channels in their configuration (for example, the secure location where the tokenis stored was accidentally deleted (most common)
• A firewall or other security device or system is preventing user access (second most common)
• We are blocking their access because of a potential terms of service violation (third most common)
114 Chapter 5. Reference materials

Anaconda Documentation, Release 6.1.4
Solution
1. First, run the following to undo your configuration of Commercial Edition:
conda config --remove-key default_channels
2. Next, install or upgrade the conda-token tool:
conda install --freeze-installed conda-token
3. Lastly, re-apply the token and configuration settings:
# Replace <TOKEN> with your tokenconda token set <TOKEN>
If this doesn’t resolve the issue, we recommend consulting our Terms of Service error page.
5.3.2 Conda: Channel is unavailable/missing or package itself is missing
Problem
After you have configured your .condarc for either Team Edition or Commercial Edition, in some cases you may beunable to install packages. You may receive an error message that the channel or package is unavailable or missing.
Solution
One potential fix for all of these is to run the following command:
conda clean -i
This will clear the “index cache” and force conda to sync metadata from the repo server.
5.3.3 SSL-related issues
If you experience any trouble regarding SSL errors, confirm that you are adhering to the guidance in this section.
Moving CA certs to the docker-host
We recommend mounting the cacert.pem file to the docker-host and concatenating the required root CAs to that fileon the docker-host, rather than copying the file to the containers.
1. First, place a cacert.pem file in ${BASE_INSTALL_DIR}/config/cacert.pem. You can obtain this file fromany conda environment with certifi package installed ($<CONDA_PREFIX>/ssl/cacert.pem) or from oneof the TE docker containers:
# Replace {BASE_INSTALL_DIR} with your base install directory.docker cp $(docker ps | awk '/repo_api/ {print $1}'):/conda/ssl/cacert.pem ${BASE_→˓INSTALL_DIR}/config/cacert.pem
2. Concatenate the necessary root certs in pem format:
5.3. Troubleshooting 115
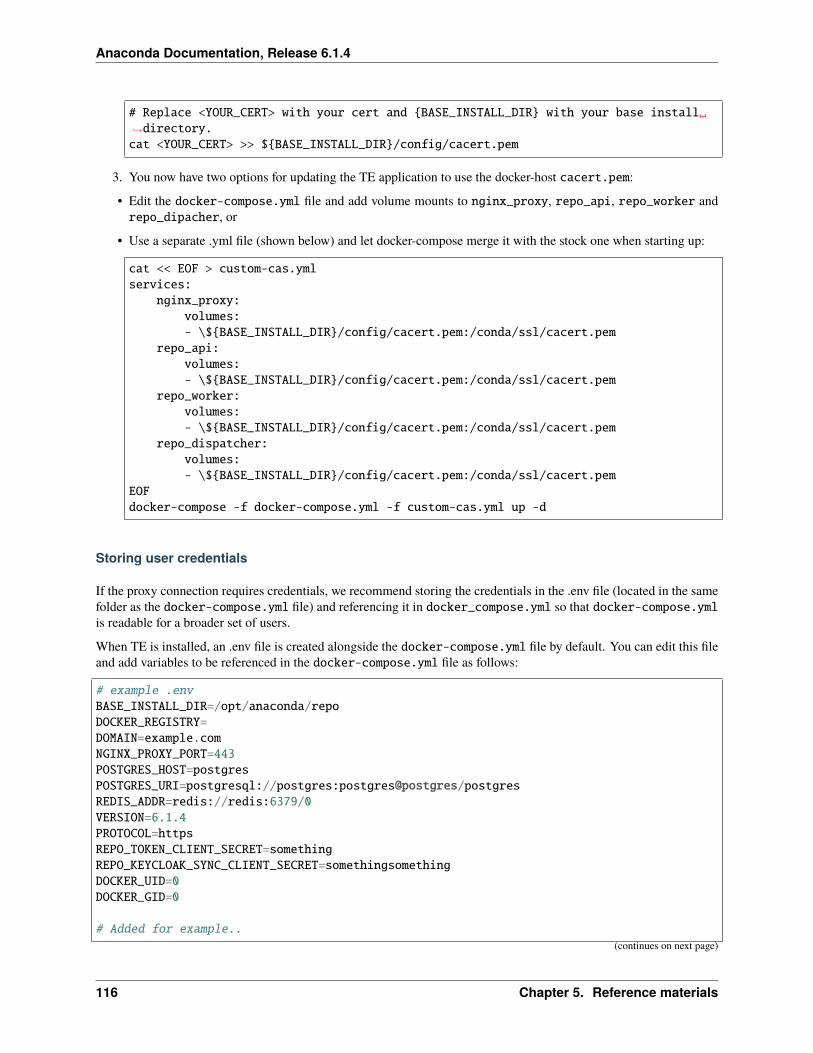
Anaconda Documentation, Release 6.1.4
# Replace <YOUR_CERT> with your cert and {BASE_INSTALL_DIR} with your base install␣→˓directory.cat <YOUR_CERT> >> ${BASE_INSTALL_DIR}/config/cacert.pem
3. You now have two options for updating the TE application to use the docker-host cacert.pem:
• Edit the docker-compose.yml file and add volume mounts to nginx_proxy, repo_api, repo_worker andrepo_dipacher, or
• Use a separate .yml file (shown below) and let docker-compose merge it with the stock one when starting up:
cat << EOF > custom-cas.ymlservices:
nginx_proxy:volumes:- \${BASE_INSTALL_DIR}/config/cacert.pem:/conda/ssl/cacert.pem
repo_api:volumes:- \${BASE_INSTALL_DIR}/config/cacert.pem:/conda/ssl/cacert.pem
repo_worker:volumes:- \${BASE_INSTALL_DIR}/config/cacert.pem:/conda/ssl/cacert.pem
repo_dispatcher:volumes:- \${BASE_INSTALL_DIR}/config/cacert.pem:/conda/ssl/cacert.pem
EOFdocker-compose -f docker-compose.yml -f custom-cas.yml up -d
Storing user credentials
If the proxy connection requires credentials, we recommend storing the credentials in the .env file (located in the samefolder as the docker-compose.yml file) and referencing it in docker_compose.yml so that docker-compose.ymlis readable for a broader set of users.
When TE is installed, an .env file is created alongside the docker-compose.yml file by default. You can edit this fileand add variables to be referenced in the docker-compose.yml file as follows:
# example .envBASE_INSTALL_DIR=/opt/anaconda/repoDOCKER_REGISTRY=DOMAIN=example.comNGINX_PROXY_PORT=443POSTGRES_HOST=postgresPOSTGRES_URI=postgresql://postgres:postgres@postgres/postgresREDIS_ADDR=redis://redis:6379/0VERSION=6.1.4PROTOCOL=httpsREPO_TOKEN_CLIENT_SECRET=somethingREPO_KEYCLOAK_SYNC_CLIENT_SECRET=somethingsomethingDOCKER_UID=0DOCKER_GID=0
# Added for example..(continues on next page)
116 Chapter 5. Reference materials

Anaconda Documentation, Release 6.1.4
(continued from previous page)
PROXY_USER=edenPROXY_PW=eden-password
Then, merge the following with existing compose content in the docker-compose.yml file. Notice the environmentvariable from .env being referenced in the environment variables:
repo_worker:environment:- HTTP_PROXY=http://<PROXY_USER>:<PROXY_PW>@proxypy:8899- HTTPS_PROXY=http://<PROXY_USER>:<PROXY_PW>@proxypy:8899
repo_api:environment:- HTTP_PROXY=http://<PROXY_USER>:<PROXY_PW>@proxypy:8899- HTTPS_PROXY=http://<PROXY_USER>:<PROXY_PW>@proxypy:8899
Local mirrors
Another option is mirroring locally. You can do this by getting packages into an admin-managed channel—say,ananconda/main—and then mirroring filtered packages from that channel to other channels. This will make TEthe source for the mirror. As such, TE needs to be able to validate its own certificate, which in most cases won’t work(in very much the same way PROXY with terminating SSL will not work).
For this to work, then, you will most likely need to update the cacert.pem file of all TE containers. For this reason,we recommend hosting the cacert.pem file on the docker-host instead of the containers.
SSL verification error
Cause
You may receive an SSL verification error if you have SSL enabled with a self-signed certificate.
Solution
Run the following command to disable SSL certificate check:
conda repo config --set ssl_verify False
Run the following to verify the above command worked:
conda repo config --show
OAuth2 with self-signed certificates
Cause
Even if you have ssl_verify set to false while using self-signed certificates and SAML, you may still run into SSLverification errors.
You may receive an error similar to the following:
ConnectionError: HTTPSConnectionPool(host='my_server_endpoint', port=443): Max retries␣→˓exceeded with url: /endpoint (Caused by NewConnectionError('<urllib3.connection.→˓VerifiedHTTPSConnection object at 0x7fb73dc3b3d0>: Failed to establish a new␣→˓connection: [Errno 110] Connection timed out',)) (continues on next page)
5.3. Troubleshooting 117

Anaconda Documentation, Release 6.1.4
(continued from previous page)
Solution
Set an environment variable called a REQUESTS_CA_BUNDLE.
For Windows, run the following:
SET REQUESTS_CA_BUNDLE=<PATH>conda repo login
For Unix, run the following:
export REQUESTS_CA_BUNDLE=<PATH>conda repo login
HTTP 000 CONNECTION FAILED
If you receive this error message, run the following command:
conda config --set ssl_verify false
5.3.4 Using Redis
Cause
By default, Redis does not require a password. Not enabling a password requirement leaves your instance of TeamEdition vulnerable.
Solution
Follow these steps to password protect your instance:
1. In the installation directory, update config/nginx/conf.d/repo.conf to include the add_header directivesomewhere in the server block:
server {...add_header Strict-Transport-Security "max-age=31536000; includeSubDomains"␣
→˓always;...
}
2. Create a directory called redis in the configs directory:
mkdir -p config/redis
3. Create a file called redis.conf inside config/redis with the following contents:
requirepass "mypassword"
4. Update the docker-compose.yml file of TE installation to mount this custom redis config:
118 Chapter 5. Reference materials

Anaconda Documentation, Release 6.1.4
redis:image: ${DOCKER_REGISTRY}redis-ubi:${VERSION}restart: alwaysvolumes:
- ${BASE_INSTALL_DIR}/config/redis/redis.conf:/usr/local/etc/redis/redis.confcommand:- /usr/local/etc/redis/redis.conf
#Alternative:# redis:# image: ${DOCKER_REGISTRY}redis-ubi8:${VERSION}# restart: always# ports:# - 6379:6379# command:# - /usr/local/bin/redis-server# - --requirepass mypassword# If you use this alternative configuration, there's no need to create a config/→˓redis/redis.conf file to mount in.
5. Update REDIS_ADDR variable in .env file to include password:
...REDIS_ADDR=redis://:mypassword@redis:6379/0...
6. Restart docker-compose services so changes are picked up. You can do this using:
docker-compose up -d
5.4 Glossary
Anaconda
Sometimes used as shorthand for the Anaconda Distribution, Anaconda, Inc. is the company behind Anaconda Distri-bution, conda, conda-build and Anaconda Enterprise.
Anaconda Cloud
A cloud package repository hosting service at https://www.anaconda.org. With a free account, you can publish packagesyou create to be used publicly.
Anaconda Distribution
5.4. Glossary 119

Anaconda Documentation, Release 6.1.4
Open source repository of hundreds of popular data science packages, along with the conda package and virtual envi-ronment manager for Windows, Linux, and MacOS. Conda makes it quick and easy to install, run, and upgrade complexdata science and machine learning environments like scikit-learn, TensorFlow, and SciPy.
Anaconda Enterprise
A software platform for developing, governing, and automating data science and AI pipelines from laptop to production.Enterprise enables collaboration between teams of thousands of data scientists running large-scale model deploymentson high-performance production clusters.
Anaconda Navigator
A desktop Graphical User Interface (GUI) included in Anaconda Distribution that allows you to easily use and manageIDEs, conda packages, environments, channels, and notebooks without the need to use the Command Line Interface(CLI).
Anaconda project
An encapsulation of your data science assets to make them easily portable. Projects may include files, environmentvariables, runnable commands, services, packages, channels, environment specifications, scripts, and notebooks. Eachproject also includes an anaconda-project.yml configuration file to automate setup, so you can easily run and shareit with others. You can create and configure projects from the Enterprise web interface or command line interface.
Artifact
A catch-all term for a variety of files that are can be stored or shared. Artifact can mean: packages, notebooks, projects,environments, data sets.
Channel
A location in the repository where Anaconda Enterprise looks for packages. Enterprise Administrators and users candefine channels, determine which packages are available in a channel, and restrict access to specific users or groups.
120 Chapter 5. Reference materials

Anaconda Documentation, Release 6.1.4
Commit
To make a set of local changes permanent by copying them to the remote server. Anaconda Enterprise checks to see ifyour work will conflict with any commits that your colleagues have made on the same project, so the files will not beoverwritten unless you so choose to do so.
Conda
An open source package and environment manager that makes it quick and easy to install, run, and upgrade complexdata science and machine learning environments like scikit-learn, TensorFlow, and SciPy. Thousands of Python and Rpackages can be installed with conda on Windows, MacOS X, Linux and IBM Power.
Conda-build
A tool used to build conda packages from recipes.
Conda environment
A superset of Python virtual environments, conda environments make it easy to create projects with different versionsof Python and avoid issues related to dependencies and version requirements. A conda environment maintains its ownfiles, directories, and paths so that you can work with specific versions of libraries and/or Python itself without affectingother Python projects.
Conda package
A binary tarball file containing system-level libraries, Python and R modules, executable programs, or other com-ponents. Conda tracks dependencies between specific packages and platforms, making it simple to create operatingsystem-specific environments using different combinations of packages.
Conda recipe
Instructions used to tell conda-build how to build a package.
5.4. Glossary 121

Anaconda Documentation, Release 6.1.4
CVEs
Common Vulnerabilities and Exposures found in software components. Because modern software is complex withits many layers, interdependencies, data input, and libraries, vulnerabilities tend to emerge over time. Ignoring a highCVE score can result in security breaches and unstable applications.
Deployment
A deployed Anaconda project containing a Notebook, web app, dashboard or machine learning model (exposed viaan API). When you deploy a project, Anaconda Enterprise builds a container with all the required dependencies andruntime components—the libraries on which the project depends in order to run—and launches it with the security andaccess permissions defined by the user. This allows you to easily run and share the application with others.
Environments
A virtual environment allows multiple incompatible versions of the same (software) package to coexist on a singlesystem. An environment is simply a file path containing a collection of mutually compatible packages. By isolatingdistinct versions of a given package (and their dependencies) in distinct environments, those versions are all availableto work on particular projects or tasks.
Interactive data application
Visualizations with sliders, drop-downs and other widgets that allow users to interact with them. Interactive dataapplications can drive new computations, update plots and connect to other programmatic functionality.
Interactive development environment (IDE)
A suite of software tools that combines everything a developer needs to write and test software. It typically includesa code editor, a compiler or interpreter, and a debugger that the developer accesses through a single Graphical UserInterface (GUI). An IDE may be installed locally, or it may be included as part of one or more existing and compatibleapplications accessed through a web browser.
Jupyter
A popular open source IDE for building interactive Notebooks by the Jupyter Foundation.
122 Chapter 5. Reference materials

Anaconda Documentation, Release 6.1.4
JupyterHub
An open source system for hosting multiple Jupyter Notebooks in a centralized location.
JupyterLab
Jupyter Foundation’s successor IDE to Jupyter, with flexible building blocks for interactive and collaborative comput-ing. For Jupyter Notebook users, the interface for JupyterLab is familiar and still contains the notebook, file browser,text editor, terminal, and outputs.
Jupyter Notebook
The default browser-based IDE available in Anaconda Enterprise. It combines the notebook, file browser, text editor,terminal and outputs.
Live notebook
JupyterLab and Jupyter Notebooks are web-based IDE applications that allow you to create and share documents thatcontain live code in R or Python, equations, visualizations, and explanatory text.
Mirror
Mirroring is the process of accurately copying data from a source and then storing it in a new location. A mirror canbe either a subset of the original or an exact 1 to 1. Mirroring can be in real-time, on a fixed schedule, or a one-timeevent.
Package
Software files and information about the software—such as its name, description, and specific version—bundled intoa file that can be installed and managed by a package manager. Packages can be encapsulated into environments orprojects for easy portability.
5.4. Glossary 123
Anaconda Documentation, Release 6.1.4
Project template
Contains all the base files and components to support a particular programming environment. For example, a PythonSpark project template contains everything you need to write Python code that connects to Spark clusters. Whencreating a new project, you can select a template that contains a set of packages and their dependencies.
Repository
Any storage location from which software or software assets may be retrieved and installed on a local computer.
REST API
A common way to operationalize a machine learning model is through a REST API. A REST API is a web serverendpoint, or callable URL, which provides results based on a query. REST APIs allow developers to create applicationsthat incorporate machine learning and prediction, without having to write models themselves.
Session
An open project, running in an editor or IDE.
Spark
A distributed SQL database and project of the Apache Foundation. While Spark has historically been tightly associatedwith Apache Hadoop and run on Hadoop clusters, recently the Spark project has sought to separate itself from Hadoopby releasing support for Spark on Kubernetes. The core data structure in Spark is the RDD (Resilient DistributedDataset)—a collection of data types, distributed in redundant fashion across many systems. To improve performance,RDDs are cached in memory by default, but can also be written to disk for persistence. Spark Ignite is a project to offerSpark RDDs that can be shared in-memory across applications.
124 Chapter 5. Reference materials