arcgis viewer for flex instruction manualpublicrecords.casselberry.org/instruction/manual.pdf ·...
TRANSCRIPT
Prepared by: Prepared For:
City of Casselberry ArcGIS Viewer for Flex
Instruction Manual January 2014
ArcGIS Viewer for Flex
Instruction Manual

City of Casselberry ArcGIS Viewer for Flex
Instruction Manual January 2014
1. Basic Flex Viewer Functionality Viewer Overview
Navigation Panel
Widgets
Display Menu
Scale Bar
Coordinates
ArcGIS Viewer for Flex Instruction Manual Page 1
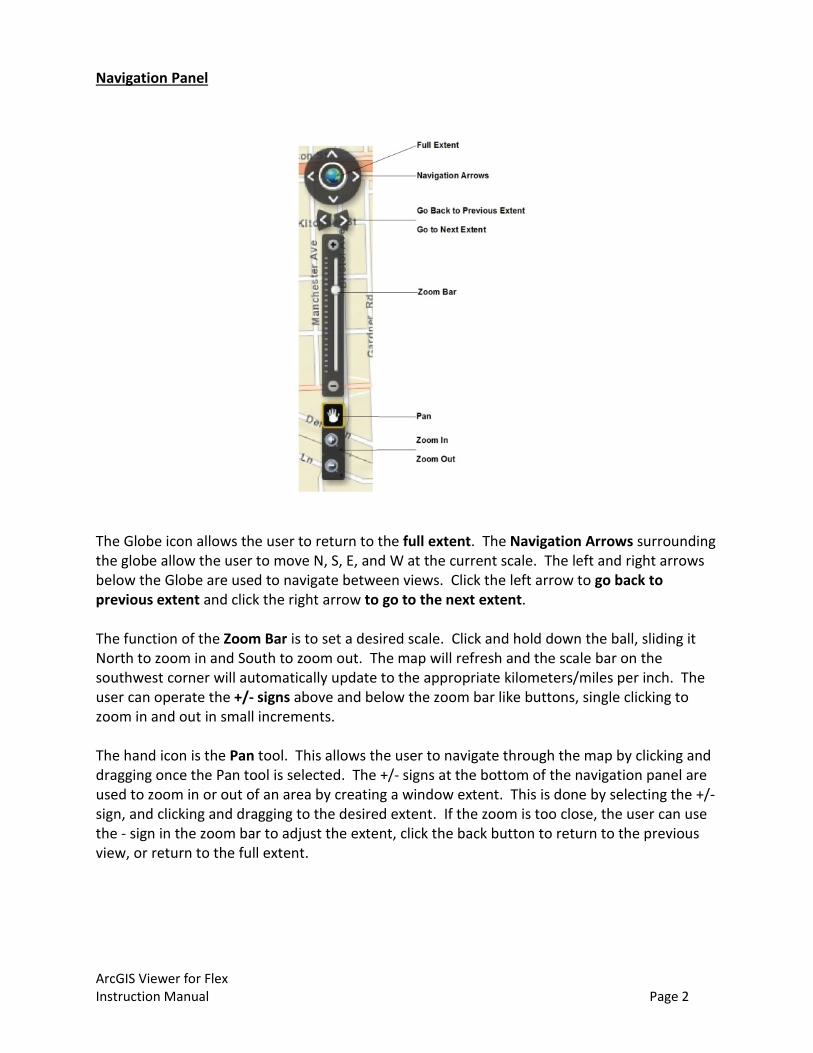
Navigation Panel
The Globe icon allows the user to return to the full extent. The Navigation Arrows surrounding the globe allow the user to move N, S, E, and W at the current scale. The left and right arrows below the Globe are used to navigate between views. Click the left arrow to go back to previous extent and click the right arrow to go to the next extent. The function of the Zoom Bar is to set a desired scale. Click and hold down the ball, sliding it North to zoom in and South to zoom out. The map will refresh and the scale bar on the southwest corner will automatically update to the appropriate kilometers/miles per inch. The user can operate the +/- signs above and below the zoom bar like buttons, single clicking to zoom in and out in small increments. The hand icon is the Pan tool. This allows the user to navigate through the map by clicking and dragging once the Pan tool is selected. The +/- signs at the bottom of the navigation panel are used to zoom in or out of an area by creating a window extent. This is done by selecting the +/- sign, and clicking and dragging to the desired extent. If the zoom is too close, the user can use the - sign in the zoom bar to adjust the extent, click the back button to return to the previous view, or return to the full extent.
ArcGIS Viewer for Flex Instruction Manual Page 2

Display Menu The Display Menu is located on the top right of the Flex Viewer. It includes the display buttons “Layers” and “Basemap”
Click “Basemap” for a street or aerial imagery basemap. Click “Layers” to control the map layer display. The “Layers” window contains individual layers each with their own checkbox. The checked layers are those features currently displayed in the map. The user can adjust the level of detail in the map by checking layers on or off.
Widgets
On the top of the Flex Viewer is the Widget Container. Each Widget performs different actions.
Draw and Measure – The Draw and Measure Widget allows the user to draw features and annotation within the viewer layout. The user can designate feature type or annotation and specify a unit of measure where applicable. A text box will guide the user on how to create each type of feature when the tool is selected. Once a feature has been drawn, the feature and measurement label will adjust to different scales.
• All features and text that are added with the Draw and Measure Widget can be relocated. To move a feature that has been placed in the map, simply click the drawing and drag to desired location.
• To clear all drawings, click “Clear drawings”
Draw/Measure
Print Identify Find Address Google Street View
Table of Contents
ArcGIS Viewer for Flex Instruction Manual Page 3
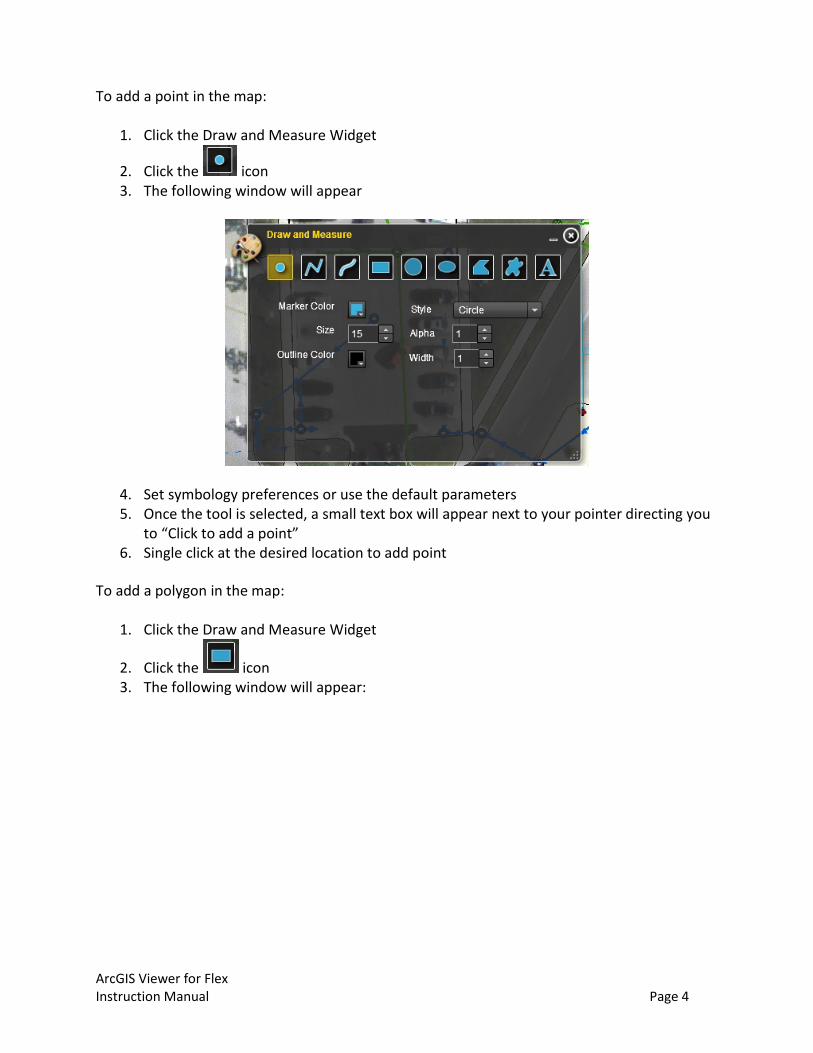
To add a point in the map:
1. Click the Draw and Measure Widget
2. Click the icon 3. The following window will appear
4. Set symbology preferences or use the default parameters 5. Once the tool is selected, a small text box will appear next to your pointer directing you
to “Click to add a point” 6. Single click at the desired location to add point
To add a polygon in the map:
1. Click the Draw and Measure Widget
2. Click the icon 3. The following window will appear:
ArcGIS Viewer for Flex Instruction Manual Page 4
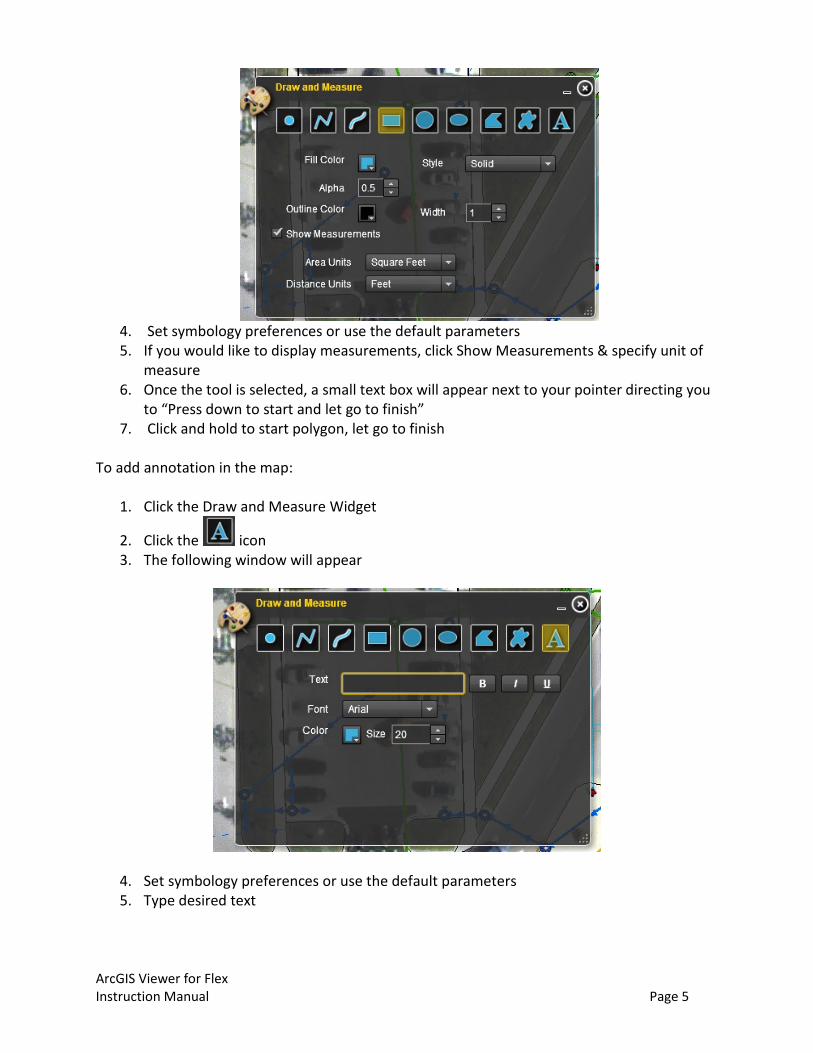
4. Set symbology preferences or use the default parameters 5. If you would like to display measurements, click Show Measurements & specify unit of
measure 6. Once the tool is selected, a small text box will appear next to your pointer directing you
to “Press down to start and let go to finish” 7. Click and hold to start polygon, let go to finish
To add annotation in the map:
1. Click the Draw and Measure Widget
2. Click the icon 3. The following window will appear
4. Set symbology preferences or use the default parameters 5. Type desired text
ArcGIS Viewer for Flex Instruction Manual Page 5
7. Once the tool is selected, a small text box will appear next to your pointer directing you to “Click to add a point”
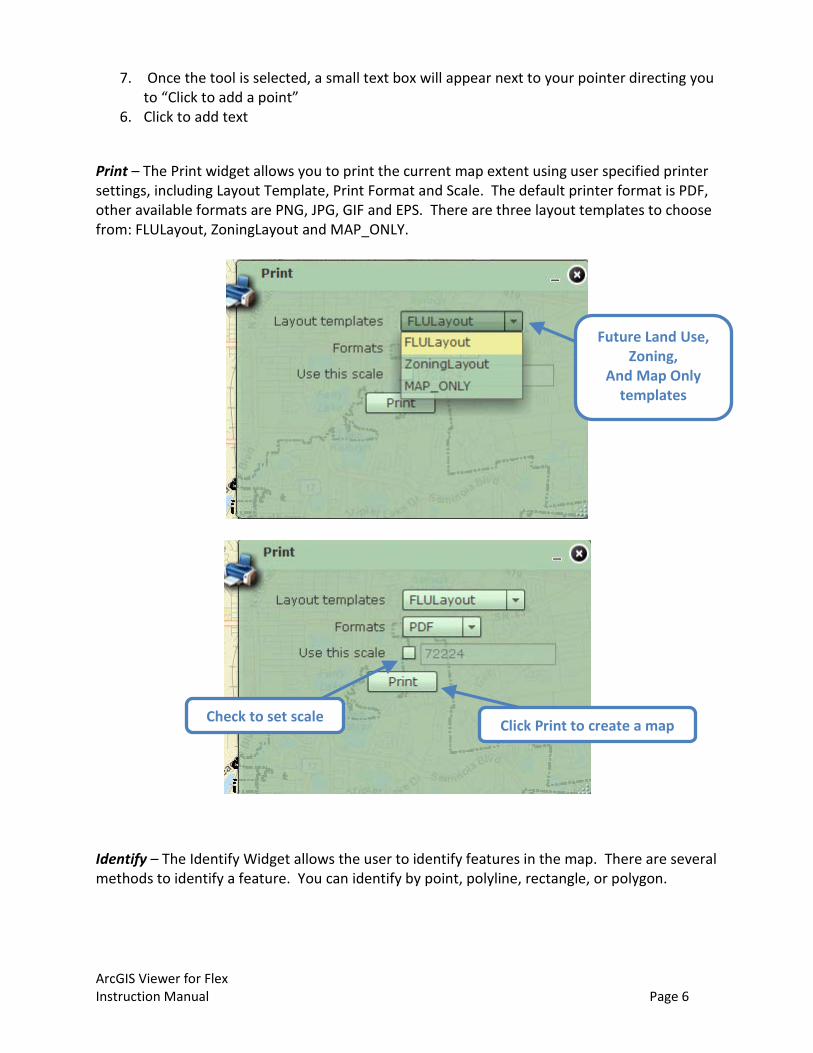
6. Click to add text Print – The Print widget allows you to print the current map extent using user specified printer settings, including Layout Template, Print Format and Scale. The default printer format is PDF, other available formats are PNG, JPG, GIF and EPS. There are three layout templates to choose from: FLULayout, ZoningLayout and MAP_ONLY.
Identify – The Identify Widget allows the user to identify features in the map. There are several methods to identify a feature. You can identify by point, polyline, rectangle, or polygon.
Future Land Use, Zoning,
And Map Only templates
Check to set scale Click Print to create a map
ArcGIS Viewer for Flex Instruction Manual Page 6
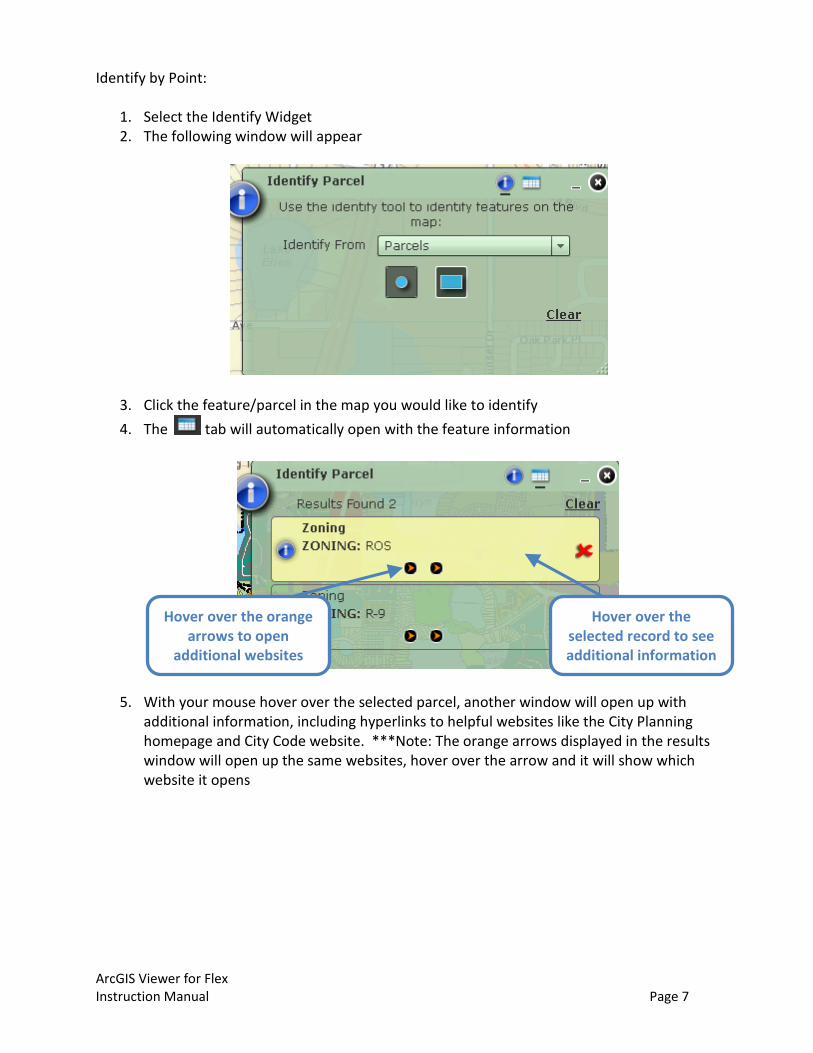
Identify by Point:
1. Select the Identify Widget 2. The following window will appear
3. Click the feature/parcel in the map you would like to identify 4. The tab will automatically open with the feature information
5. With your mouse hover over the selected parcel, another window will open up with additional information, including hyperlinks to helpful websites like the City Planning homepage and City Code website. ***Note: The orange arrows displayed in the results window will open up the same websites, hover over the arrow and it will show which website it opens
Hover over the selected record to see additional information
Hover over the orange arrows to open
additional websites
ArcGIS Viewer for Flex Instruction Manual Page 7
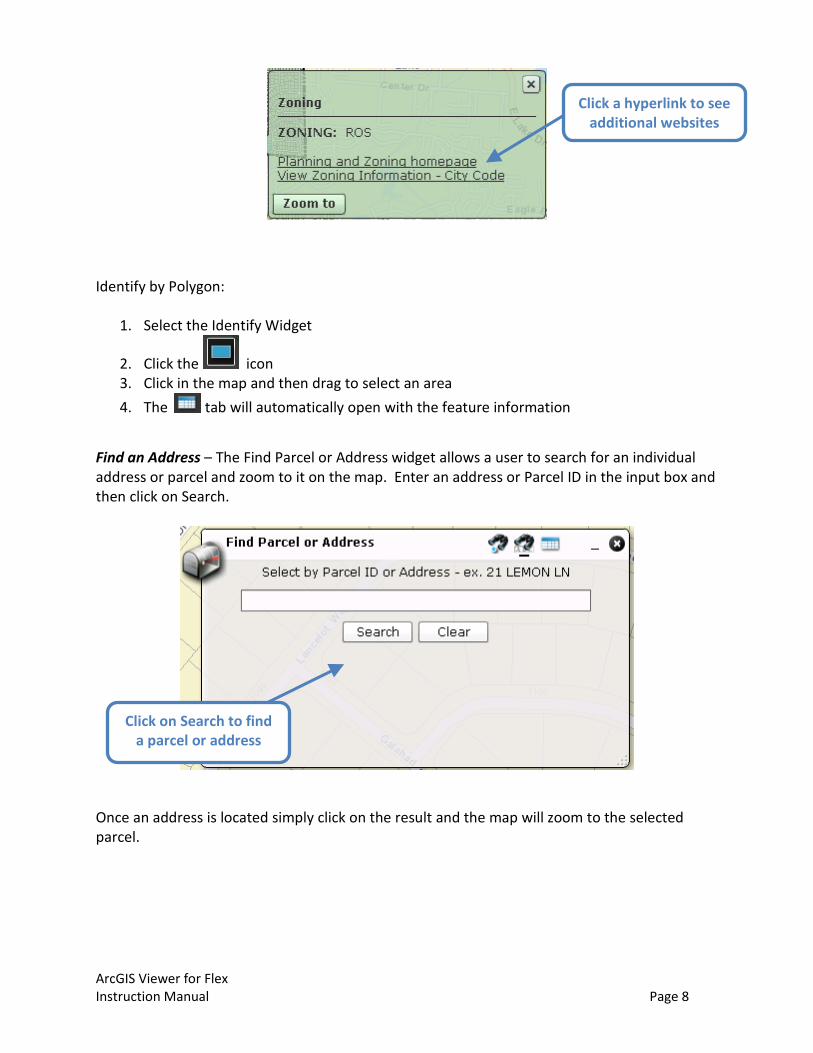
Identify by Polygon:
1. Select the Identify Widget
2. Click the icon 3. Click in the map and then drag to select an area 4. The tab will automatically open with the feature information
Find an Address – The Find Parcel or Address widget allows a user to search for an individual address or parcel and zoom to it on the map. Enter an address or Parcel ID in the input box and then click on Search.
Once an address is located simply click on the result and the map will zoom to the selected parcel.
Click on Search to find a parcel or address
Click a hyperlink to see additional websites
ArcGIS Viewer for Flex Instruction Manual Page 8
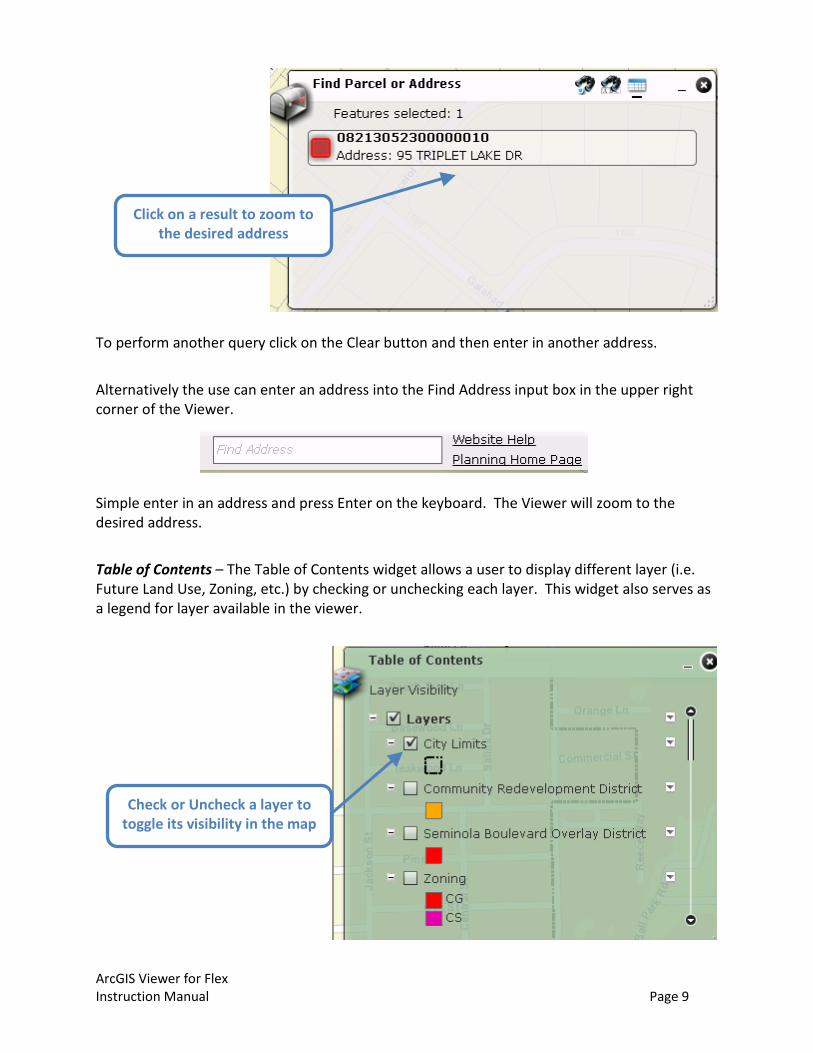
To perform another query click on the Clear button and then enter in another address. Alternatively the use can enter an address into the Find Address input box in the upper right corner of the Viewer. Simple enter in an address and press Enter on the keyboard. The Viewer will zoom to the desired address. Table of Contents – The Table of Contents widget allows a user to display different layer (i.e. Future Land Use, Zoning, etc.) by checking or unchecking each layer. This widget also serves as a legend for layer available in the viewer.
Click on a result to zoom to the desired address
Check or Uncheck a layer to toggle its visibility in the map
ArcGIS Viewer for Flex Instruction Manual Page 9
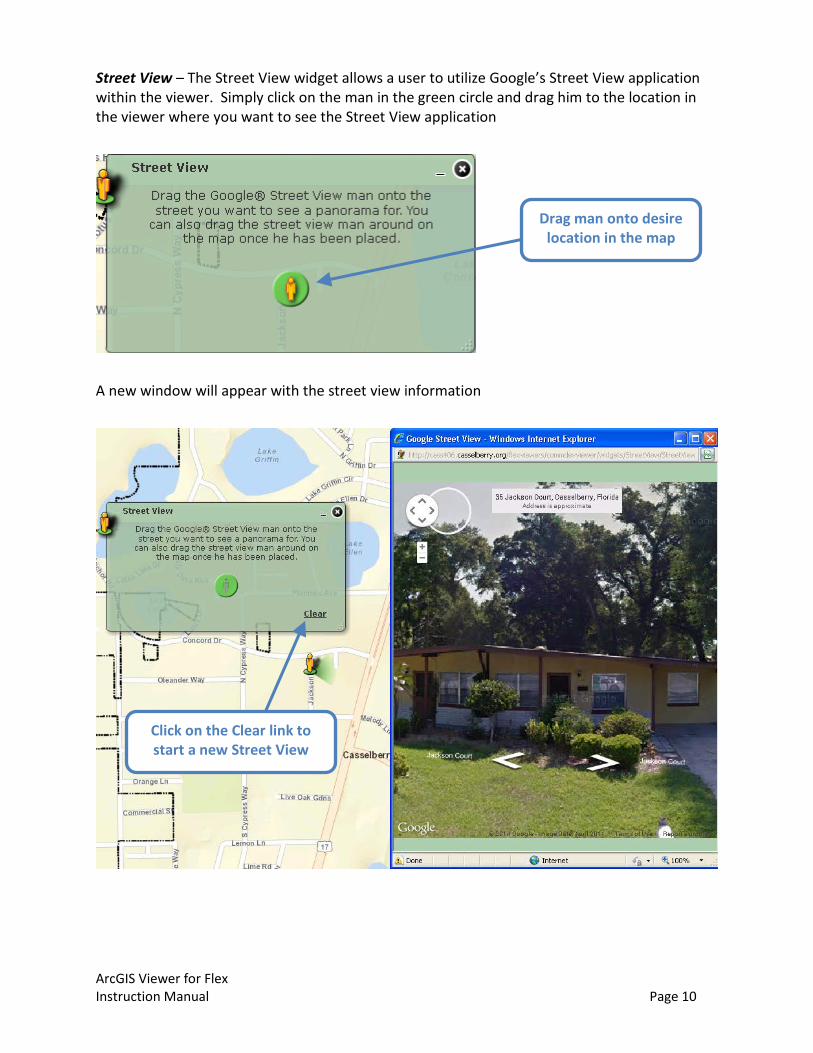
Street View – The Street View widget allows a user to utilize Google’s Street View application within the viewer. Simply click on the man in the green circle and drag him to the location in the viewer where you want to see the Street View application
A new window will appear with the street view information
Drag man onto desire location in the map
Click on the Clear link to start a new Street View
ArcGIS Viewer for Flex Instruction Manual Page 10
2. Frequently Asked Questions (FAQs)
Q: I pressed Print and nothing happened. A: Make sure that your internet browser is not blocking pop ups. Q: When I use the identify widget it is only showing one result. A: You can scroll down in the results box to see additional results. Ensure that the layer you are trying to identify is turned on in the Table of Contents. Q: The address widget isn’t selecting my parcel A: At a minimum you must include street number, name, and city. Adding state and zip code is recommended. Sometimes a road has multiple names, if the locator doesn’t find your address try the alternate name for that road.
ArcGIS Viewer for Flex Instruction Manual Page 11