aufbau- und bedienungsanleitung für die ista breeze ... · aufbau- und bedienungsanleitung für...
TRANSCRIPT

Aufbau- und Bedienungsanleitung
für die iSTA Breeze Windgeneratoren der
i-500 und L- 500 Serie
Installation and operation manual
for the iSTA Breeze wind turbines of the
i-500 and L- 500 Series
Inhaltsverzeichnis
1. Allgemeine Hinweise zu dem Windgenerator
2. Sicherheitshinweise
3. Technische Beschreibung der Anlage
4. Montage der Kleinwindkraftanlage
5. Anschluss an den Laderegler
6. Anschluss an einen Netzeinspeiseinverter
7. Fehlersuche
8. Kontrollen und Wartungsaufgaben
9. Garantiebedingungen
--1--
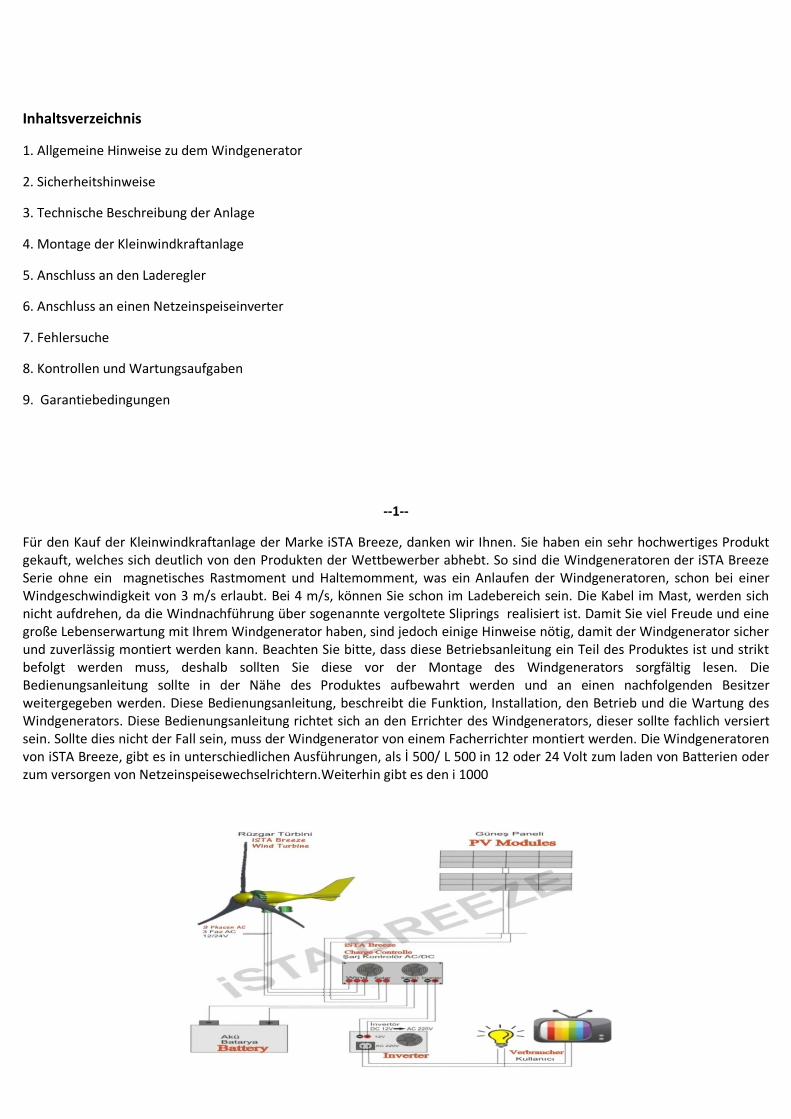
Für den Kauf der Kleinwindkraftanlage der Marke iSTA Breeze, danken wir Ihnen. Sie haben ein sehr hochwertiges Produkt gekauft, welches sich deutlich von den Produkten der Wettbewerber abhebt. So sind die Windgeneratoren der iSTA Breeze Serie ohne ein magnetisches Rastmoment und Haltemomment, was ein Anlaufen der Windgeneratoren, schon bei einer Windgeschwindigkeit von 3 m/s erlaubt. Bei 4 m/s, können Sie schon im Ladebereich sein. Die Kabel im Mast, werden sich nicht aufdrehen, da die Windnachführung über sogenannte vergoltete Sliprings realisiert ist. Damit Sie viel Freude und eine große Lebenserwartung mit Ihrem Windgenerator haben, sind jedoch einige Hinweise nötig, damit der Windgenerator sicher und zuverlässig montiert werden kann. Beachten Sie bitte, dass diese Betriebsanleitung ein Teil des Produktes ist und strikt befolgt werden muss, deshalb sollten Sie diese vor der Montage des Windgenerators sorgfältig lesen. Die Bedienungsanleitung sollte in der Nähe des Produktes aufbewahrt werden und an einen nachfolgenden Besitzer weitergegeben werden. Diese Bedienungsanleitung, beschreibt die Funktion, Installation, den Betrieb und die Wartung des Windgenerators. Diese Bedienungsanleitung richtet sich an den Errichter des Windgenerators, dieser sollte fachlich versiert sein. Sollte dies nicht der Fall sein, muss der Windgenerator von einem Facherrichter montiert werden. Die Windgeneratoren von iSTA Breeze, gibt es in unterschiedlichen Ausführungen, als İ 500/ L 500 in 12 oder 24 Volt zum laden von Batterien oder zum versorgen von Netzeinspeisewechselrichtern.Weiterhin gibt es den i 1000

Für die folgenden Anwendungen, sind die Windgeneratoren zum Batterieladen, am besten in Verbindung mit einem Solarmodul sehr gut geeignet: Straßenbeleuchtungen, Versorgung von Messstationen, Verkehrsleitsystemen, Notrufsystemen, Inselanlagen wie Ferienhäuser, Schrebergärten, Camping, Werbung, Beleuchten von Plakatwänden, zur Grundversorgung bei Entwicklungshilfeprojekten, Wirelesslanaccsesspoints und überall dort, wo kein Stromanschluss vorhanden ist, bzw. die Installation eine Stromanschlusses zu aufwendig ist. Für die Windgeneratoren der Black Serie, gibt es jedoch auch Netzeinspeisewechselrichter, mit welchem Sie den vom Windgenerator erzeugten Strom in das Stromnetz einspeisen können. 4 Diese Informationen, werden als verlässlich erachtet, der Hersteller übernimmt jedoch keinerlei Verantwortung für Ungenauigkeiten oder Auslassungen. Der Nutzer dieser Information sowie des Produktes, trägt die volle Verantwortung und das Risiko. Alle Spezifikationen sind ohne weitere Mitteilungen veränderbar. Windgeneratoren, müssen wie andere elektrische Geräte und Quellen, elektrischer Energie, den örtlichen und staatlichen Bestimmungen, Normen, Richtlinien und Gesetzen entsprechen. In einigen Regionen, benötigen Sie vor der Installation einer Kleinwindkraftanlage eine Bauanzeige oder Baugenehmigung. Bevor Sie mit den Montagearbeiten beginnen, prüfen Sie bitte ob Sie so eine Aufstellgenehmigung haben bzw. benötigen.
--2--
Sicherheitshinweise
Windgeneratoren sind durch die hohe Drehzahl und die erzeugende Spannung, leider nicht ungefährlich, daher lesen Sie mit großer Aufmerksamkeit diese Sicherheitshinweise:
Mechanische Gefahren:
Eine große Gefahr, stellt der sich drehende Rotor da, ab einer gewissenWindgeschwindigkeit, wird dieser sogar transparent, so dass die Gefahr dadurch nicht erkannt wird. Die Kanten der Rotorblätter, sind bedingt durch die
aerodynamische Form, scharfkantig. Daher kann man sich auch an langsam drehenden Rotoren schon verletzen. Berühren Sie den sich drehenden Rotor, niemals, versuchen Sie nie den drehenden Rotor, mit der Hand anzuhalten, montieren Sie den Windgenerator nur an Stellen, wo es ausgeschlossen ist, das jemand den Windgenerator berühren könnte, dies ist besonders auf Booten sehr zu beachten. Die Rotorblätter, sind aus einem Kunststoff hergestellt, welcher selbst großen Windgeschwindigkeiten standhält, trotzdem, sollten Sie sich von drehenden Rotorblättern fernhalten, beim Bruch eines Rotorblattes, kann es zu schwerwiegenden Verletzungen führen. Dies ist besonders dann der Fall, wenn der Rotor, bzw. das Rotorblatt von einem herumfliegenden Gegenstand wie z. B. Einer Leine getroffen wird. Ist ein Rotorblatt beschädigt, ist die Anlage unverzüglich außer Betrieb zu nehmen. Wenn ein Rotorblatt beschädigt ist, kann dies eine so große Unwucht in den Generator bringen, dass der gesamte Mast gefährdet sein kann. Achten Sie daher bitte auch bei der Auswahl Ihres Aufstellungsortes, dass dieser möglichst Sicher ist. Montieren Sie den Windgenerator auf einem Mast nur dann, wenn die Anschlußleitungen am Laderegler oder Netzeinspeisewechselrichter abgeklemmt und kurzgeschlossen ( Der Kurzschluss des Generators, darf nicht vorgenommen werden, wenn der Rotor sich schneller als 100 mal pro Minute dreht) sind oder ein Rotorblatt am Mast festgebunden ist, so das Sie der loslaufende Rotor nicht verletzen kann. Der Mast und die Befestigung des Mastes, müssen so beschaffen sein, dass dieser den entstehenden Kräften durch die Windlast und schwellenden Belastung standhält. Dazu sollte eine Fachkraft beauftragt werden, welche in der Lage ist, die Gefahren und die Installation zu beurteilen. Beachten Sie beim Aufstellen des Mastes, dass Sie dies mindestens zu zweit durchführen und die Vorschriften der Berufsgenossenschaft ausreichend befolgen. Unter dem aufzustellenden Mast, dürfen sich keine Personen aufhalten. Lasten sind während des Hebens durch Seilzüge oder andere Hebegeräte gegen zusichern.
Elektrische Gefahren:
Ein sich im Leerlauf befindender Windgenerator, besonders der 48 Volt Version, kann eine DC Spannung von größeren 200 Volt erzeugen. Schließen Sie daher diese Geräte nur dann an, wenn Sie sachkundig dazu in der Lage sind. Diese Spannungen, können bei Missachtung der Sicherheit, tödlich sein. Fassen Sie daher niemals unisolierte Kabelenden an. Achten Sie darauf, dass ein unisoliertes Kabel Schäden anrichten kann. Die Kabel, Verbindungselemente, Schalter und andre elektrische Komponenten, müssen ausreichend im Querschnitt dimensioniert sein, damit die Kabel sich nicht erwärmen und es evtl. zu einem Brand kommen kann. Der maximale Strom in dem Kabel, kann bei der 500 Watt Anlage in 12 Volt, bis zu 40 Ampere betragen. Kabel sind geschützt zu verlegen, so dass eine mechanische Beschädigung der Kabel ausgeschlossen ist. Ein aufgescheuertes Kabel, birgt Gefahren für die Sicherheit. Zur Absicherung muss in die Zuleitung zu der Batterie, möglichst nahe bei der Batterie, eine Sicherung eingebaut werden. Ein Kurzschluss der Batterieleitungen und / oder Netzleitungen, muss auf jeden Fall verhindert werden. Es ist sicherzustellen, dass die Elektroinstallation nur von Personen mit Fachkenntnissen (Elektrofachkraft) durchgeführt werden, welche in der Lage sind, die Ihnen übertragene Arbeit beurteilen und die möglichen Gefahren erkennen zu können. Die Windgeneratoren, werden mit großer Sorgfalt produziert, jedoch kann es Vorkommen, das ein Windgenerator nicht komplett montiert ist oder sich eine Schraube während des Transportes gelöst hat, daher kontrollieren Sie die einzelnen Baugruppen auf Beschädigungen und Lose Bauelemente, wie z. B. Schrauben. Vor

einem Sturm, sollte der Windgenerator in die Bremse geschaltet werden. Bei einem Orkan, bzw. Orkanböen ist es sinnvoll, wenn ein Rotorblatt am Mast festgebunden wird. Dies ist besonders auf einem Boot zu berücksichtigen.
--3--
Technische Beschreibung der Anlage
Position Beschreibung Anzahl 1 NASE 1 2 M6 x 25 INOX 6 3 Rotorblätter i-500 ( 50cm)------ L-500 (60cm) 3 4 Flansch 1 5 Gehäuse 1 6 Mastverbindung Ø37mm zum einstecken 1 7 Alternator Kappe 1
Es handelt sich bei den Windgeneratoren, dreiphasig, mit neodymmagneten, permanent erregten. Die Windgeneratoren der iSTA Breeze Serie, nutzen die im Wind enthaltene kinetische Energie. Durch die Rotorblätter, wird diese Energie in eine Drehbewegung umgesetzt und im Generator wird diese dann in einen Dreiphasenwechelstrom gewandelt.Die Rotorblätter sind aerodynamisch so gut optimiert, das kaum einen Geräuschpegel wahrnehmbar ist. Bei niedrigen Drehzahlen, bis ca. 600 Umdrehungen pro Minute, ist annähernd gar nichts zu hören. Die Kombination aus einem Halte- und Rastmomentfreien Generator und einem ausgewogenen Rotorblatt, erlaubt es, das sich der Windgenerator bereits ab 3 m/s beginnt zu drehen und der Ladebeginn bei 4 m/s erreicht wird.
--4--
Montage der Kleinwindkraftanlage Bevor Sie die Kleinwindkraftanlage montieren, sollten Sie den passenden Aufstellungsort bei Ihnen finden. Dies ist meist die schwierigste Aufgabe bei der Installation des Windgenerators. Kleine Windmessanlagen, helfen Ihnen dabei nicht wirklich weiter, da je kleiner der Rotor ist diese Ihnen auch die Windgeschwindigkeit in den Verwirbelungen anzeigt. Als Beispiel, nehmen Sie das Schauspiel im Herbst, Außen ist es sehr windig und trotzdem steigt ein Laubblatt vom Boden, durch den Wind angetrieben einfach 1,5m nach oben und senkt sich dann wieder. Dabei müsste das Blatt bei der großen Windgeschwindigkeit eigentlich von links nach rechts, an ihrem Fenster vorbei fliegen. Diese Winde nutzen Ihnen für den Windgenerator nichts, der Windgenerator würde sich nicht drehen, genauso wenig wie das Blatt weg fliegt. Hindernisse stauen den Wind an und lassen den Wind nicht durch, da der Wind jedoch bläst, staut sich der Wind an dem Hindernis an und beginnt sich in sich zu drehen. Der nachfolgende Wind, stößt nun an die durch den Wind komprimierte Luft und kann auch nicht weiter, dies geht so lang weiter, bis der Wind in einem Bogen, um das Hindernis bläst. Als Hindernisse, gelten Häuser, Hecken, Bäume, Hügel usw. Je größer der Rotordurchmesser ist, desto gleichmäßiger muss der Rotor angeströmt werden. Am besten, kann man den Standort auswählen, in dem Sie sich eine lange Stange benötigen und an der Stange in einem Abstand von 2m eine 3m lange und 4cm breite dünne Plastikfolie befestigen, wie z. B. ein Absperrband von Baustellen. Bringen Sie nun diese Stange an den Ort und die Höhe, wo Sie die Montage des Windgenerators beabsichtigen. Führen Sie den Versuch nur dann durch, wenn bei Ihnen der Wind aus der Hauptwindrichtung bläst. Beobachten Sie nun das Verhalten der beiden Flatterbänder. Am besten wäre es, wenn das obere Flatterband lotrecht im Wind steht. Wellt sich das Band und schwenkt in einem Winkel von 30° hin und her, ist dies akzeptabel, ist der Winkel größer oder das Flatterband wickelt sich gar um den Mast auf oder beginnt sich nicht zu strecken, ist der Standort schlecht gewählt und Sie müssen die Höhe oder den Ort ändern. Beachten Sie bitte, dass dieser Vorschlag mit dem Flatterband natürlich von der Windgeschwindigkeit abhängig ist und der Standpunkt sich mit anderen Windgeschwindigkeiten ändert, daher sollte der Versuch nur bei einer durchschnittlichen Windgeschwindigkeitdurchgeführt werden. Als Hilfe, kann auch die folgende Grafik genutzt werden,

jedoch muss ergänzend dazu gesagt werden, dass die dort angegebenen Punkte immer Plus einen Mast von mindestens 4 besser 6 m zu sehen sind.
Ist nun der passende Ort für eine Installation gefunden, muss der Mast ausgesucht werden. Da der Mast recht hoch sein sollte, wäre es sinnvoll, das man den Mast so ausführt, das man zu Wartungsarbeiten an den Windgenerator kommt, also am besten klappbar mit einem Gegengewicht wie eine Schranke. Wird der Mast dünn ausgeführt muss dieser je nach Höhe mehrmals abgespannt werden. Bitte haben Sie dafür Verständnis, dass wir nicht näher auf einen Mast eingehen können, da die Möglichkeiten der Montage eines Mastes schier unbegrenzt sind. Der Mast muss so ausgeführt sein, dass der Windgenerator oben mit einer Windlast von maximal 3250 N den Mast belasten kann. Der Mast der Windkraftanlage, muss nach den geltenden Regeln der Technik geerdet sein. An Land, sollte die Erdung an einem Tiefenerder oder einem Erdungssystem erfolgen, auf Boten sollte die Erdung mit dem Mast bei einem Segelboot oder dem Motorblock eines Motorbootes erfolgen, beachten Sie dabei die gültigen Richtlinien und Bedienungsanleitungen der Hersteller. Wenn der Mast zur Montage des Windgenerators bereit ist und die Bohrungen an der Seite angebracht wurden, sollte nun der Windgenerator montiert werden. Bei jedem Windgenerator, befindet sich ein Satz Rotorblätter. Dieser Satz mit den drei Rotorblättern, ist aufeinander abgestimmt. Ein Satz, darf nur im Ganzen getauscht werden da es sonst zu einer Unwucht im Generator kommen kann. Bitte montieren Sie die Rotorblätter an einem Wind freien Ort, die Rundung des Rotorblatt, muss zum Generator hin zeigen und die Gerade Seite nach vorne. Die Seiten erkennen Sie einfach, wenn Sie auf die Spitze des Rotorblattes schauen. Nehmen Sie nun ein Rotorblatt, die Gegenplatte und eine der M6 Schrauben und befestigen Sie diese erst einmal locker. Achten Sie darauf, dass die Einpressmutter zum Generatorzeigen muss. Nun montieren Sie die zweite Schraube, danach das zweite und dritte Rotorblatt genauso. Ziehen Sie je Rotorblatt nur eine Schraube leicht an.
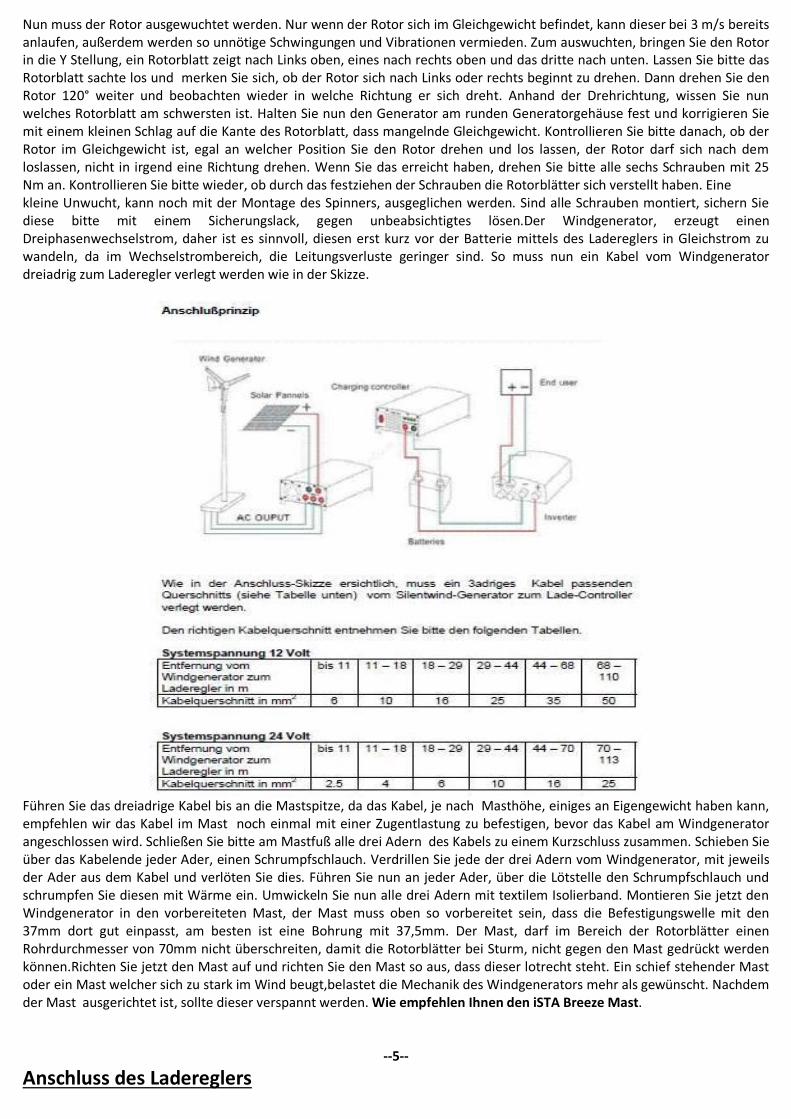
Nun muss der Rotor ausgewuchtet werden. Nur wenn der Rotor sich im Gleichgewicht befindet, kann dieser bei 3 m/s bereits anlaufen, außerdem werden so unnötige Schwingungen und Vibrationen vermieden. Zum auswuchten, bringen Sie den Rotor in die Y Stellung, ein Rotorblatt zeigt nach Links oben, eines nach rechts oben und das dritte nach unten. Lassen Sie bitte das Rotorblatt sachte los und merken Sie sich, ob der Rotor sich nach Links oder rechts beginnt zu drehen. Dann drehen Sie den Rotor 120° weiter und beobachten wieder in welche Richtung er sich dreht. Anhand der Drehrichtung, wissen Sie nun welches Rotorblatt am schwersten ist. Halten Sie nun den Generator am runden Generatorgehäuse fest und korrigieren Sie mit einem kleinen Schlag auf die Kante des Rotorblatt, dass mangelnde Gleichgewicht. Kontrollieren Sie bitte danach, ob der Rotor im Gleichgewicht ist, egal an welcher Position Sie den Rotor drehen und los lassen, der Rotor darf sich nach dem loslassen, nicht in irgend eine Richtung drehen. Wenn Sie das erreicht haben, drehen Sie bitte alle sechs Schrauben mit 25 Nm an. Kontrollieren Sie bitte wieder, ob durch das festziehen der Schrauben die Rotorblätter sich verstellt haben. Eine kleine Unwucht, kann noch mit der Montage des Spinners, ausgeglichen werden. Sind alle Schrauben montiert, sichern Sie diese bitte mit einem Sicherungslack, gegen unbeabsichtigtes lösen.Der Windgenerator, erzeugt einen Dreiphasenwechselstrom, daher ist es sinnvoll, diesen erst kurz vor der Batterie mittels des Ladereglers in Gleichstrom zu wandeln, da im Wechselstrombereich, die Leitungsverluste geringer sind. So muss nun ein Kabel vom Windgenerator dreiadrig zum Laderegler verlegt werden wie in der Skizze.
Führen Sie das dreiadrige Kabel bis an die Mastspitze, da das Kabel, je nach Masthöhe, einiges an Eigengewicht haben kann, empfehlen wir das Kabel im Mast noch einmal mit einer Zugentlastung zu befestigen, bevor das Kabel am Windgenerator angeschlossen wird. Schließen Sie bitte am Mastfuß alle drei Adern des Kabels zu einem Kurzschluss zusammen. Schieben Sie über das Kabelende jeder Ader, einen Schrumpfschlauch. Verdrillen Sie jede der drei Adern vom Windgenerator, mit jeweils der Ader aus dem Kabel und verlöten Sie dies. Führen Sie nun an jeder Ader, über die Lötstelle den Schrumpfschlauch und schrumpfen Sie diesen mit Wärme ein. Umwickeln Sie nun alle drei Adern mit textilem Isolierband. Montieren Sie jetzt den Windgenerator in den vorbereiteten Mast, der Mast muss oben so vorbereitet sein, dass die Befestigungswelle mit den 37mm dort gut einpasst, am besten ist eine Bohrung mit 37,5mm. Der Mast, darf im Bereich der Rotorblätter einen Rohrdurchmesser von 70mm nicht überschreiten, damit die Rotorblätter bei Sturm, nicht gegen den Mast gedrückt werden können.Richten Sie jetzt den Mast auf und richten Sie den Mast so aus, dass dieser lotrecht steht. Ein schief stehender Mast oder ein Mast welcher sich zu stark im Wind beugt,belastet die Mechanik des Windgenerators mehr als gewünscht. Nachdem der Mast ausgerichtet ist, sollte dieser verspannt werden. Wie empfehlen Ihnen den iSTA Breeze Mast.
--5--
Anschluss des Ladereglers

Zum Anschluss eines Ladereglers, beachten Sie bitte die Bedienungs- und Installationsanleitung des Ladereglers . --6--
Anschluss eines Netzwechselrichters Zum Anschluss eines Netzwechselrichters, beachten Sie bitte die Bedienungs- und Installationsanleitung des Netzwechselrichters, Achten Sie darauf, das die meisten Netzwechselrichter eine Gleichspannung benötigen und gegen Überspannung geschützt werden müssen. Der Windgenerator sollte über einen manuellen Stoppschalter verfügen, dieser darf den Windgenerator aber nicht in den Kurzschluss setzen sondern muss den Windgenerator über einen Widerstand abbremsen.
--7--
Fehlersuche Der Windgenerator beginnt sich nicht schnell zu drehen: • Die Bremse am Laderegler ist auf I geschaltet • Beim Verbinden der Kabel ist evtl. ein Kurzschluss zwischen den Adern entstanden • Ein zusätzlich installierter Stopschalter ist eingeschaltet • Die Rotorblätter sind falsch herum montiert • Der Generator schleift am Siphon • Das Lager für die Windausrichtung, ist zu Schwergängig • Die Rotorblätter sind nicht gut ausgewuchtet • Am Laderegler ist keine Batterie angeschlossen • Die Sicherung zur Batterie ist defekt • Es ist zu wenig Wind • Der Windgenerator oder der Laderegler ist kaputt Um den Fehler zu finden, müssen wir nach dem Ausschlussverfahren vorgehen, dazu sollten Sie am Laderegler, die drei Adern des Windgenerators abklemmen. Läuft der Windgenerator nun an, ist der Fehler zwischen Laderegler und Batterie zu suchen, dreht sich der Windgenerator immer noch langsam, ist der Fehler zwischen Laderegler und Windgenerator. Wenn der Windgenerator eine zu kleine Leistung abgibt: • Die Windgeschwindigkeit ist zu gering • Der Standort ist nicht gut gewählt und oder der Mast ist zu kurz • Der Kabelquerschnitt, passt nicht zu der installierten Kabellänge • Die Batterie ist zu klein dimensioniert, so dass die Ladeschlussspannung zu schnell erreicht wird. (die Batterie, sollte mindestens 100 Ah haben.) • Der Rotor ist nicht gut ausgewuchtet Der Windgenerator vibriert auf dem Mast: • Der Rotor wurde nicht gut ausgewuchtet • Der Windgenerator steht nicht lotrecht bzw. der Mast verbiegt sich durch die Windlast • Die Mastaufnahme, hat zuviel Spiel • Der Mast ist nicht ausreichend Stabil 21 Bevor Sie den Hersteller kontaktieren wegen eines nicht zufrieden stellenden Ergebnisses, messen Sie bitte die folgenden Parameter und teilen Sie diese dem Hersteller bei Ihrer Beanstandung folgende Informationen mit: 1. Wie hoch ist die Windgeschwindigkeit 2. Wie hoch ist der Mast 3. Wie ist die Landschaft oder Bebauung in der Nähe des Windgenerators 4. Klemmen Sie die 3 Adern vom Windgenerator am Laderegler ab und Messen Sie dort die Wechselspannung AC zwischen den einzelnen Phasen, von Phase eins nach zwei von zwei nach drei und von drei nach eins. Bei gleichen Wind, sollten diese ungefähr gleich sein 5. Messen Sie die Batteriespannung 6. Welche Verbraucher laufen über die Batterie 7. Sind Solarmodule mit an dem Laderegler angeschlossen und welche Leerlaufspannung haben die Solarmodule und welche Leistung in Wp.Kontrollen und Wartungsaufgaben Damit Sie lange Freude an Ihrem Windgenerator haben, sollten Sie in regelmäßigen Abständen, mal nach Ihrem Windgenerator schauen. Die erste Kontrolle, sollte nach dem ersten Tag der Installation folgen, dann nach einer Woche und dann in einem Quartal, danach, kann zu den längeren Intervallen gewechselt werden. In Küstennähe, empfiehlt sich dies durch die stärkere Beanspruchung und den Salzgehalt, alle 6 Monate, im Binnenland, alle 12 Monate oder aber nach jeder extremen Wettersituation wie Hagel, starke Sturmböen. Am besten nimmt man die Wartung kurz nach dem Winter vor. Die folgenden Punkte sollten bei einer Wartung, bzw. Kontrolle durchgeführt werden: • Achten Sie auf Vibrationen am Mast • Kontrollieren Sie ob der Mast noch lotrecht steht und alle Verspannungen fest sind • Dreht sich der Windgenerator leichtgängig in den Wind • Sind die Rotorblätter noch gut ausgewuchtet? • Ist an den Rotorblättern eine Beschädigung erkennbar, muss der Windgenerator sofort außer Betrieb genommen werden. Achten Sie auf die Rotorblätter, ob es dort kleine Risse gibt oder ob an den Kanten etwas abgebrochen ist. • Sind alle Schrauben am Generator noch fest? • Schauen Sie aufmerksam nach den Kabeln, dass nirgends eine Scheuerstelle entstanden ist.
--8--

Pflege des Windgenerators Es gibt beim Autozubehörhandel, ein Unterbodenschutzwachs, dies ist Transparent, bis leicht gelblich. Sprühen Sie einen alten Putzlappen damit reichlich ein und Putzen Sie den Windgenerator damit ab. Der bleibende Wachsfilm, schützt den Windgenerator vor Witterungseinflüssen und der UV Strahlung, reiben Sie damit auch die Rotorblätter und den Spinner ein. Je glatter die Rotorblätter poliert sind, desto besser läuft Ihr Windgenerator. Im Winter kann an einem gut polierten Rotorblatt wesentlich weniger, bis zu keinem Schnee anhaften.
--9--
Gewährleistung Die Altinel Enerji LTD. gewährleistet, dass dieses Gerät innerhalb von 24 Monaten, ab dem Datum des Erwerbes vom Händler, keine Material- und Verarbeitungsfehler aufweißt, die die Funktion des Windgenerators beeinträchtigt. Sollten in diesem Zeitraum Mängel erkannt werden, sind diese unmittelbar dem Händler mitzuteilen. Die Altinel Enerji LTD. wird dann, den Gewährleistungsanspruch prüfen und das Gerät reparieren oder in den Teilen oder dem gesamten Windgenerator Ersatz liefern. Voraussetzung für die Gewährleistung ist, dass die Sachen nicht unsachgemäß benutzt wurden und der Kunde sich an die Aufbau- und Bedienungsanleitung gehalten hat, dazu gehören auch die Kontrolle und Wartungsaufgaben. Für Schäden die durch den Windgenerator mittelbar oder unmittelbar entstehen, ist die Haftung ausgeschlossen. Schäden durch höhere Gewalt, wie Sturm, Hagel, Blitzschlag Überflutung etc. sind auch von der Verantwortung der Firma Altinel Enerji LTD. ausgeschlossen. Sofern, der Windgenerator oder dessen Komponenten, im Rahmen der Gewährleistung zur Begutachtung, Reparatur oder Austausch, bzw. Ersatz Ab- und wieder Aufgebaut werden muss, sind diese Kosten durch den Kunden zu übernehmen. Ob ein Windgenerator repariert oder Ersatzgeliefert wird, entscheidet die Firma Altinel Enerji LTD. Ansonsten gelten die allgemeinen Geschäftsbedingungen des Hänlers.
English language Table of Contents 10. General information on the wind turbine
11. Safety instructions
12. Technical description of the construction
13. Installation of small wind turbine
13. Connection to the charge controller
15. Following a net supply inverter
16. Troubleshooting
17. Inspections and maintenance tasks
18. Certification and Warranty
--10--
We thank you for purchasing the iSTA breeze brand small wind turbine. You have bought a supreme quality product which clearly stands out from the products of competitors. Thus, the iSTA Breeze series wind turbines are without a magnetic cogging torque and holding torque which permits the starting of wind turbines already with a wind velocity of 3 to m/s. At 4 m / s, you may already be in the charging area. The cable inside the tower will not turn around, because yaw control is realized by so-called gilded slip-rings.
So that you will have much peace of mind and a great life expectancy from your wind turbine, however some references are necessary, so that the wind generator can be installed surely and reliably. Please note that this manual is a part of the product and must be strictly adhered to, so that you should read them carefully before initiating any activity in order to install the wind turbine. The installation and operation manual should kept be near the product and it should be transferred to the subsequent owner. This installation and operation manual describes the function, installation, operation and maintenance of the wind turbine. This installation and operation manual is intended for the installer of the wind turbine who should be technically experienced. If this is not the case, please let the installation be made by a technician. The wind generators of ISTA Breeze is available in different versions, as i 500/500 L in 12 or 24 volts for charging batteries or for supplying of feed-in converter. Furthermore, there is the i 1000

For the following applications, the wind turbines for battery charging are best suited and are perfectly in conjunction with a solar panel:
Street lighting, supply of measuring stations, traffic control systems, emergency systems, grid systems, such as holiday dwellings, allotments, camping, advertisement, lighting of billboards, to basic services for development assistance projects, Wireless LAN access points and anywhere where no power supply is available, or installing a power connection is too expensive. For wind turbines Black Series, but there are also feed-in converter with which you can feed the electricity generated by the wind turbine to the grid.
This information is deemed reliable, however, the manufacturer assumes no responsibility for inaccuracies or omissions. The user of this information and this product bears the full responsibility and the pertaining risk. All specifications can be changed without further notices.
Wind generators, must be in accordance with the other electric devices and springs, electric energy, to the local and state regulations, norms, guidelines and laws. In some regions, you need a building notice or a building permit prior to installing a small wind turbine. Before you begin with the installation work, please check whether you have an installation permit or you require to have one.
--11--
. Safety instructions
Wind generators are unfortunately not harmless by having high number of revolutions and the producing tension, therefore you read these safety guidelines with large attention:
Mechanical hazards:
A major hazard is the rotating rotor since, above a certain wind speed, that it becomes even transparent, so that the danger of this part is not recognized. Due to the aerodynamic shape the edges of the rotor blades are provided with sharp edges. Therefore, one can also hurt himself/herself already by the slowly rotating rotors. Never touch the rotating rotor, never try to stop it with your bare hands, mount the turbine only at the locations where nobody may have the possibility to touch them easily- that is a very important issue especially on boats!
The rotor blades are produced from plastic material that is resistant to even high wind speeds, anyway, you should stay away from rotating rotor blades, where any fracturing of a rotor blade can lead to serious injuries. This is especially the case when the rotor, or the rotor sheet is stroke with a flying object such as a rope for example. When a blade is damaged, the system must be shut down immediately. When a blade is damaged, it can cause a big imbalance in the turbine that could put the entire tower in jeopardy. Please Pay attention hence, also with the choice of your installation location that this place is very secure as much as possible. You may only mount the wind generator to the tower when the connections of the charge controller or the feed-in converter are disconnected and bypassed (short-circuit of the generator may only be done when the rotor turns faster than 100 times per minute) or the rotor is fixed to the tower thus you can not get hurt by the rotating rotor. The tower and the attachments made to the tower must be such that they are able to withstand the forces generated by the wind load and alternating loading. For this matter, a professional technician should be assigned in order to assess the installation. You should take into account when erecting the tower that you carry this out at least in pairs and sufficiently

follow the regulations of the professional association. No person should stand under the tower that is in the process of erection. The loads should be secured while lifting by cable cranes other kind of lifting equipment.
Electrical hazards:
A wind-driven turbine of the 48 volts version particularly that is set in neutral can cause a DC tension that is greater than 200 volts. Therefore connect this type of equipment only when you are knowledgeable in this area. These voltages can be fatal if one does not pay attention to the safety rules. Therefore Never touch to the non-insulated cable ends. Please pay attention to the fact that the uninsulated wires can cause any damage.
The cables, connecting elements, switches and other electrical components, must be sufficiently dimensioned in cross section, so that the cables do not warm themselves up and perhaps they may not lead to a fire. In a 500 Watt system at 12 V, the maximum current may carried up to 40 amps in the cables.
Arrange the cables in order them to be protected so that the possibility of any mechanical damage is excluded. An abraded cable, poses an important danger to the security of trhe system.
For fuse protection, you have to install a fuse on to the feed cable, please carry this out as near to the battery as possible. Short-circuiting of the battery cables and / or power line cables must be avoided what ever the cost is. Please make sure that the electrical installation is carried out only by persons with the knowledge of a specialist (electricians), who are able to assess the work that is entrusted to you and who may recognize the potential hazards. The wind turbines are produced with a big accurateness, however it can happen that a wind turbine was not assembled completely or that a screw disengaged itself during transportation, therefore you should check the individual assemblies for damages and loose construction elements, for example such as screws. Before a storm, the wind turbine should be switched to the brake position. When there is a hurricane or hurricanes, it will be useful for a rotor blade to be fixed securely to the tower. This is especially to be considered on a boat.
--12--
Technical description of the
construction
Position Description Number 1 NOSE 1 2 M6 x 25 stainless Steel 6 3 Blades i-500 (50cm) ------ L-500 (60cm) 3 4 Flange 1 5 Housing 1 6 Pole connection To plug in Ø 37mm 1 7 Alternator cap 1
It is all about with the wind generators that are excited 3-phase, with neodymium magnets constantly. The iSTA Breeze series wind turbines use the kinetic energy within the wind. Through the rotor blades, this energy is converted into a rotary
movement and then it is converted in the turbine generator in to a three phased alternating current.The rotor blades of the system are so perfectly aerodynamically optimized that a noise is hardly noticeable. At low rotational speeds, up to about 600 revolutions per minute, almost there is nothing to hear. The combination of a holding and locking moment-free turbine generator and balanced rotor blades allow the wind generator to start to turn at a rotational speed of 3 m/s and reach to the start of charging at the rotational speed of 4 m/s.
--13-- Installation of small wind turbine Before you carry out the assembly of the small wind turbine, you should find the right location for yourselves. This is generally the most difficult part of the installation of the wind turbine. Small wind measurement systems do not really help you any further, since the the rotor is smaller, this system shows you that the wind speed is in the turbulence region. As an example, take the show in the autumn where it is very windy outside and still a leaf rises from off the ground by the wind and it is just driven 1.5 m upwards and then falls down again. Here, actually the leaf would have to fly past at one's window with the large wind velocity from left to right,. These kind of winds are not useful for the wind turbines, the wind generator would not turn, just as little as the leaf to fly away. Page 5
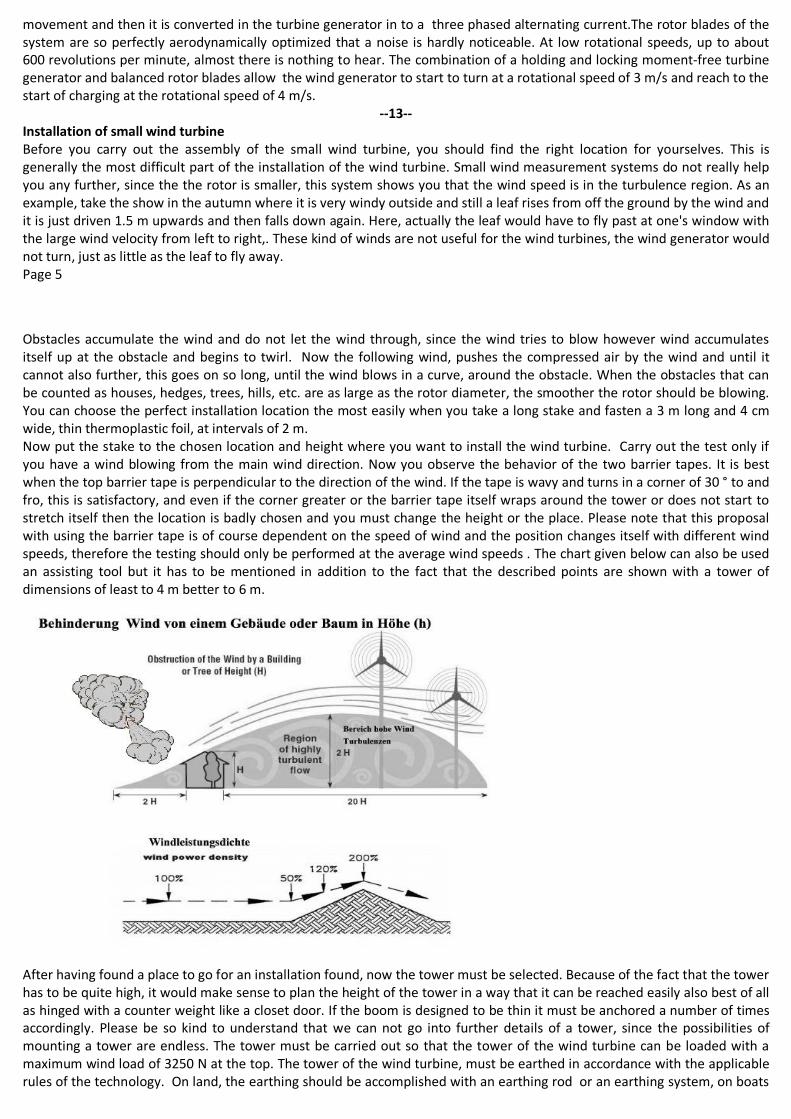
Obstacles accumulate the wind and do not let the wind through, since the wind tries to blow however wind accumulates itself up at the obstacle and begins to twirl. Now the following wind, pushes the compressed air by the wind and until it cannot also further, this goes on so long, until the wind blows in a curve, around the obstacle. When the obstacles that can be counted as houses, hedges, trees, hills, etc. are as large as the rotor diameter, the smoother the rotor should be blowing. You can choose the perfect installation location the most easily when you take a long stake and fasten a 3 m long and 4 cm wide, thin thermoplastic foil, at intervals of 2 m. Now put the stake to the chosen location and height where you want to install the wind turbine. Carry out the test only if you have a wind blowing from the main wind direction. Now you observe the behavior of the two barrier tapes. It is best when the top barrier tape is perpendicular to the direction of the wind. If the tape is wavy and turns in a corner of 30 ° to and fro, this is satisfactory, and even if the corner greater or the barrier tape itself wraps around the tower or does not start to stretch itself then the location is badly chosen and you must change the height or the place. Please note that this proposal with using the barrier tape is of course dependent on the speed of wind and the position changes itself with different wind speeds, therefore the testing should only be performed at the average wind speeds . The chart given below can also be used an assisting tool but it has to be mentioned in addition to the fact that the described points are shown with a tower of dimensions of least to 4 m better to 6 m.
After having found a place to go for an installation found, now the tower must be selected. Because of the fact that the tower has to be quite high, it would make sense to plan the height of the tower in a way that it can be reached easily also best of all as hinged with a counter weight like a closet door. If the boom is designed to be thin it must be anchored a number of times accordingly. Please be so kind to understand that we can not go into further details of a tower, since the possibilities of mounting a tower are endless. The tower must be carried out so that the tower of the wind turbine can be loaded with a maximum wind load of 3250 N at the top. The tower of the wind turbine, must be earthed in accordance with the applicable rules of the technology. On land, the earthing should be accomplished with an earthing rod or an earthing system, on boats

grounding should be carried out with the tower with a sail boat or a motor boat engine block, observing the valid guidelines and instructions of the manufacturer. If the tower is ready for the mounting of wind driven generator and the holes were opened to the sides of the wind driven generator should now be installed. For each wind turbine, there is a set of rotor blades. This set comprised of three blades are synchronized. A set must be exchanged only completely since otherwise it can cause an imbalance in the turbine generator. Please install the blades on a wind-free location, the roundness of the rotor blade must point out to the generator and the line side to the front. The sides you see just when you look at the tip of the rotor blade. Now take a rotor blade, the counter plate and fasten them with one of the M6 screws loose. Make sure that the insert nut must face towards the turbine generator. Then mount the second screw, and then the second and third rotor blades as well. Tighten only one screw per rotor blade slightly.
Now the rotor must be balanced. Only when the rotor is in equilibrium, it can already start to turn at a rotation velocity of 3 m / s, as well as the unnecessary oscillations and vibrations are avoided. For balancing, you bring the rotor in the Y position where a rotor blade shows to the left up, one to the upper right, and the third showing down. Please leave the blade off gently and note whether the rotor starts to rotate to the left or to the right . Then you rotate the rotor 120 degrees and continue to watch it again whether rotates in any direction. By means of the direction of rotation, you can now know which blade is the heaviest. Now hold the generator on the round housing of the turbine generator and correct it with a small slap on the edge of the rotor blade, that is lacking of balance. Please check later on whether the rotor is balanced or not, no matter what position you rotate the rotor and let it go loose, the rotor must not turn in any of the directions after having been released. When you have achieved this, please tighten all six screws with a torque of 25 Nm. Please check again, whether the rotor blades have been displaced by tightening the screws. A small imbalance, can still be compensated with the assembly of the spinner. If All screws are tightened, please secure them up with a locking compound, to prevent any unintended release. The wind-driven generator produces a three phase alternating current, therefore it makes sense to change this into the direct current by means of a charge regulator only shortly before the battery, since in the alternating current range the line losses are lower. Now a three-core cable must be laid just like in the sketch at the wind-driven generator to the charge regulator.
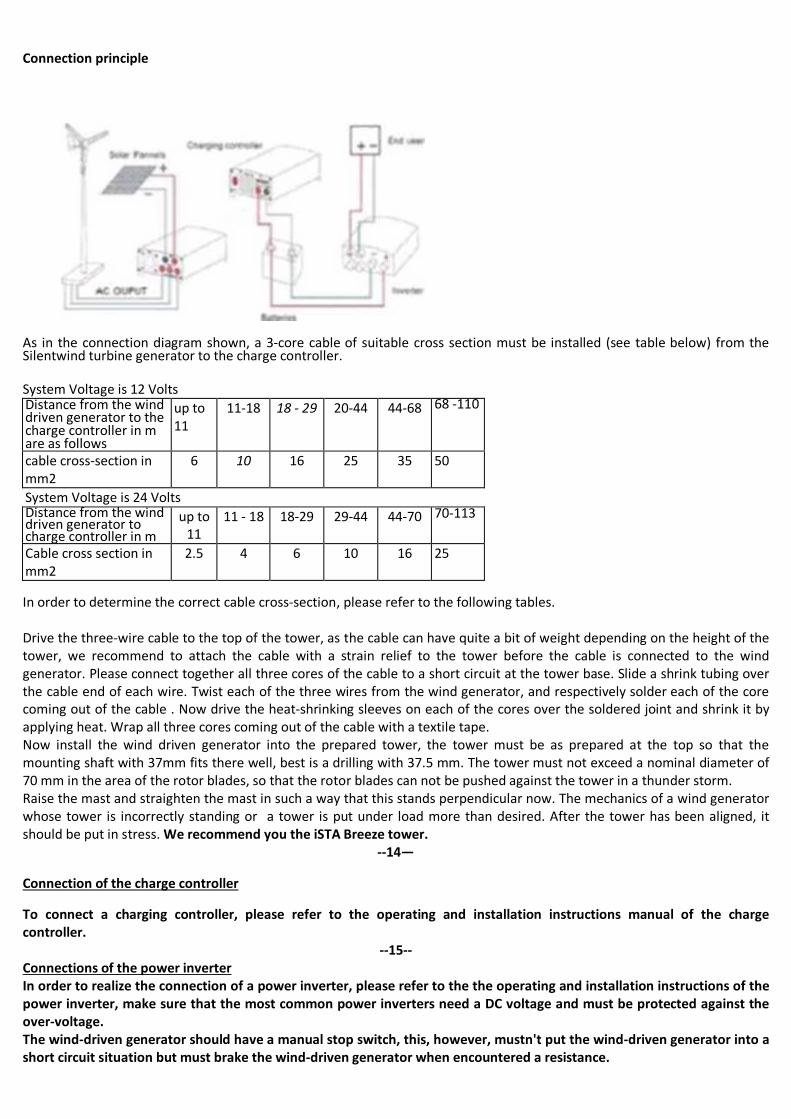
Connection principle
As in the connection diagram shown, a 3-core cable of suitable cross section must be installed (see table below) from the Silentwind turbine generator to the charge controller. System Voltage is 12 Volts Distance from the wind driven generator to the charge controller in m are as follows
up to 11
11-18 18 - 29 20-44 44-68 68 -110
cable cross-section in mm2
6 10 16 25 35 50
System Voltage is 24 Volts Distance from the wind driven generator to charge controller in m
up to 11
11 - 18 18-29 29-44 44-70 70-113
Cable cross section in mm2
2.5 4 6 10 16 25
In order to determine the correct cable cross-section, please refer to the following tables. Drive the three-wire cable to the top of the tower, as the cable can have quite a bit of weight depending on the height of the tower, we recommend to attach the cable with a strain relief to the tower before the cable is connected to the wind generator. Please connect together all three cores of the cable to a short circuit at the tower base. Slide a shrink tubing over the cable end of each wire. Twist each of the three wires from the wind generator, and respectively solder each of the core coming out of the cable . Now drive the heat-shrinking sleeves on each of the cores over the soldered joint and shrink it by applying heat. Wrap all three cores coming out of the cable with a textile tape. Now install the wind driven generator into the prepared tower, the tower must be as prepared at the top so that the mounting shaft with 37mm fits there well, best is a drilling with 37.5 mm. The tower must not exceed a nominal diameter of 70 mm in the area of the rotor blades, so that the rotor blades can not be pushed against the tower in a thunder storm. Raise the mast and straighten the mast in such a way that this stands perpendicular now. The mechanics of a wind generator whose tower is incorrectly standing or a tower is put under load more than desired. After the tower has been aligned, it should be put in stress. We recommend you the iSTA Breeze tower.
--14—
Connection of the charge controller
To connect a charging controller, please refer to the operating and installation instructions manual of the charge controller.
--15-- Connections of the power inverter In order to realize the connection of a power inverter, please refer to the the operating and installation instructions of the power inverter, make sure that the most common power inverters need a DC voltage and must be protected against the over-voltage. The wind-driven generator should have a manual stop switch, this, however, mustn't put the wind-driven generator into a short circuit situation but must brake the wind-driven generator when encountered a resistance.

--16--
Troubleshooting The wind-driven turbine does not start to rotate quickly:
• The brake on the charge controller is turned on at I • When connecting the cables it is possible that a short circuit may be caused between the conductors • An additionally installed a stop switch is turned on • The blades are mounted upside down • The generator grinds on a siphon • The bearings for the wind direction is too Sluggish • The rotor blades are not balanced • At the charge controller no battery is connected • The fuse to the battery is defective • There is not enough wind • The wind turbine or the charge controller is out of order
To find the fault, we must proceed according to the exclusion method, to do this you should disconnect the three veins of the wind-driven generator at the charge regulator. If the wind generator starts now, the mistake is to be searched between loading regulator and battery, the wind generator still slowly turns, the mistake is between loading regulator and wind generator. When the wind turbine gives out a small power output:
• The wind speed is too low • The site is not chosen correctly and or the tower is too short • The cable cross section, does not match the installed cable length • The battery is dimensioned too small, so that the final charge voltage is reached too quickly. (The battery should have
at least 100 Ah.) • The rotor is not well balanced
The wind turbine vibrates on the tower: • The rotor was not well balanced • The wind driven generator is not perpendicular or the tower bends with the wind load • The tower loading capacity has too much play • The tower 21 is not sufficiently stable
Before you contact with your manufacturer for any unsatisfactorily resulting situations, please measure the following parameters and share the following information with your manufacturer along with your complaint:
1. What is the wind speed 2. How high is the tower? 3. How is the natural landscape or buildings in the vicinity of the wind turbine 4. Disconnect the 3 wires from the wind generator to the charge controller and measure the alternating AC voltage
there between the individual phases, from phase one to two from two to three and from three to one. With the same wind, this should be approximately the same
5. Measure the battery voltage 6. Which consumers are running on battery 7. In case that the Solar modules are connected to the charge controller and the idle circuit voltage which have the solar
panels whose power is selected period. --17--
Inspections and maintenance tasks In order to ensure continued peace of mind with your wind turbine, you should check your wind driven generator at regular intervals. The first control should follow the first day of installation, then afterwards a week later and then after a quarter, then, it can be changed to the longer intervals. In the vicinity of the coast, it is recommended every 6 months due to the increased stress and salinity, every 12 months inland or after any severe weather situation such as hail, strong gusts of wind. It's best to carry out field maintenance shortly after the winter. The following points should be performed at a maintenance or inspection:
• Watch for the vibration on the tower • Control whether the tower still stands perpendicularly and all spannings are firm • The wind turbine turns easily in the wind • The blades are still well balanced? • In case that there is a visible damage to the rotor blades, the wind turbine must immediately be taken out of order.
Pay attention to the rotor blades whether there are small cracks or whether something is broken off at the edges. • Are all the screws on the generator tight yet?
• Carefully control the cables, in order to ensure that there is no chafe mark arisen. Maintenance of the wind turbine There is one with the car accessories trade, a subsoil protection wax, this is from transparent to slightly yellowish. Spray plenty of these onto an old rag then clean off the wind driven generator with it. The lasting wax film protects the wind-driven generator from the UV radiation from influences of weather and, you thus also rub on the rotor blades and the spinner. The smoother the rotor blades are polished, the better runs your wind turbine. In winter substantially less, up to no snow can adhere to a well polished rotor blade.
--18-- Warranty The Altinel Enerji LTD guarantees that this device within 24 months from the date of the acquisition of the trader shows no material defects and processing errors which will impair the function of the wind generator. If deficiencies are detected during this period, they should immediately be notified to the seller. The Altinel ENERJI LTD. will then check the warranty claim and repair the unit or provide replacement in parts or the whole of the wind generator. Is a prerequisite for the warranty is that the items were not used inappropriately and that the customer has complied with the construction and operation instructions whereas these include the inspection and maintenance tasks. The liability is excluded for damages that jhave occurred directly or indirectly that are caused by the wind generator. The responsibility of the company The Altinel Enerji LTD. is also excluded for the Damages caused by force majeure, such as storms, hail, lightning, flooding, etc. When the wind turbine or its components have to be rebuilt and decomposed for checkup, repair, change or replacement because of warranty claims, then these costs have to be paid by the customer. The company Altinel Enerji LTD decides whether a wind driven generator will be repaired or a replacement will delivered. Otherwise the general terms and conditions of the dealer are applicable.