bank positive pay - treasury software lin..e...s..y..n...t.a..x..... 32 command...
TRANSCRIPT

© 2013 Treasury Software
Bank Positive Pay

Bank Positive Pay
by Treasury Software

All rights reserved. No parts of this work may be reproduced in any form or by any means - graphic, electronic, ormechanical, including photocopying, recording, taping, or information storage and retrieval systems - without thewritten permission of the publisher.
Products that are referred to in this document may be either trademarks and/or registered trademarks of therespective owners. The publisher and the author make no claim to these trademarks.
While every precaution has been taken in the preparation of this document, the publisher and the author assume noresponsibility for errors or omissions, or for damages resulting from the use of information contained in thisdocument or from the use of programs and source code that may accompany it. In no event shall the publisher andthe author be liable for any loss of profit or any other commercial damage caused or alleged to have been causeddirectly or indirectly by this document.
Printed: December 2013 in Richmond, VA
Bank Positive Pay
© 2013 Treasury Software
Bank Positive PayI
© 2013 Treasury Software
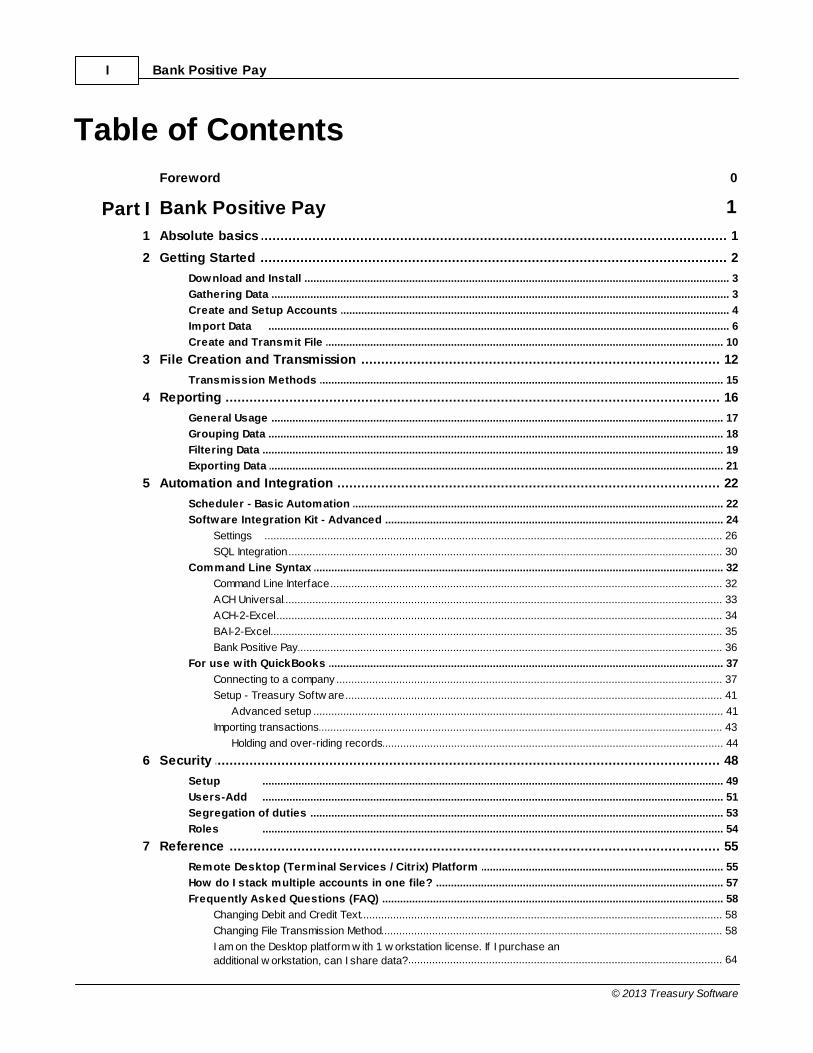
Table of Contents
Foreword 0
Part I Bank Positive Pay 1
................................................................................................................................... 11 Absolute basics
................................................................................................................................... 22 Getting Started
.......................................................................................................................................................... 3Download and Install
.......................................................................................................................................................... 3Gathering Data
.......................................................................................................................................................... 4Create and Setup Accounts
.......................................................................................................................................................... 6Import Data
.......................................................................................................................................................... 10Create and Transmit File
................................................................................................................................... 123 File Creation and Transmission
.......................................................................................................................................................... 15Transmission Methods
................................................................................................................................... 164 Reporting
.......................................................................................................................................................... 17General Usage
.......................................................................................................................................................... 18Grouping Data
.......................................................................................................................................................... 19Filtering Data
.......................................................................................................................................................... 21Exporting Data
................................................................................................................................... 225 Automation and Integration
.......................................................................................................................................................... 22Scheduler - Basic Automation
.......................................................................................................................................................... 24Software Integration Kit - Advanced
......................................................................................................................................................... 26Settings
......................................................................................................................................................... 30SQL Integration
.......................................................................................................................................................... 32Command Line Syntax
......................................................................................................................................................... 32Command Line Interface
......................................................................................................................................................... 33ACH Universal
......................................................................................................................................................... 34ACH-2-Excel
......................................................................................................................................................... 35BAI-2-Excel
......................................................................................................................................................... 36Bank Positive Pay
.......................................................................................................................................................... 37For use w ith QuickBooks
......................................................................................................................................................... 37Connecting to a company
......................................................................................................................................................... 41Setup - Treasury Softw are
......................................................................................................................................... 41Advanced setup
......................................................................................................................................................... 43Importing transactions
......................................................................................................................................... 44Holding and over-riding records
................................................................................................................................... 486 Security
.......................................................................................................................................................... 49Setup
.......................................................................................................................................................... 51Users-Add
.......................................................................................................................................................... 53Segregation of duties
.......................................................................................................................................................... 54Roles
................................................................................................................................... 557 Reference
.......................................................................................................................................................... 55Remote Desktop (Terminal Services / Citrix) Platform
.......................................................................................................................................................... 57How do I stack multiple accounts in one file?
.......................................................................................................................................................... 58Frequently Asked Questions (FAQ)
......................................................................................................................................................... 58Changing Debit and Credit Text
......................................................................................................................................................... 58Changing File Transmission Method
......................................................................................................................................................... 64I am on the Desktop platform w ith 1 w orkstation license. If I purchase an
additional w orkstation, can I share data?

IIContents
II
© 2013 Treasury Software
......................................................................................................................................................... 64What is an account?
......................................................................................................................................................... 65I purchased Positive Pay, but the Main Screen says ACH Universal
......................................................................................................................................................... 65I have one source f ile but multiple databases. How do I split the f ile into the
correct database?
......................................................................................................................................................... 65I have a non-standard date format. How do I use it?
......................................................................................................................................................... 66My date f ield is embedded w ithin text. How do I import it?
......................................................................................................................................................... 66My bank requires a login record
......................................................................................................................................................... 66ActiveX component can't create object
......................................................................................................................................................... 67ADO/MDAC Re-Installing
.......................................................................................................................................................... 67Maintenance - Desktop
......................................................................................................................................................... 68Database Backup
......................................................................................................................................................... 69Restore Database
......................................................................................................................................................... 69Database Archiving
......................................................................................................................................................... 71Dow nload Service Pack
......................................................................................................................................................... 72Desktop Platform Upgrade
.......................................................................................................................................................... 72Legacy Help
......................................................................................................................................................... 72Accounts
......................................................................................................................................... 73Creating An Account
................................................................................................................................... 73Account Creation
................................................................................................................................... 77Account Setup
.......................................................................................................................................................... 82Bank Express Codes
......................................................................................................................................................... 82918
Part II Utilities 84
................................................................................................................................... 841 BAI File Creator
................................................................................................................................... 862 ACH2Excel - ACH Conversion Utility
................................................................................................................................... 893 Notification of Change ABA Merge Utility
Index 94

Bank Positive Pay1
© 2013 Treasury Software
1 Bank Positive Pay
Get up and running in less than one hour. We highly suggest watching our tutorials - less than 15minutes in length, and at the end - you'll be able to create a positive pay file for testing with your bank.
1.1 Absolute basics
Welcome new users.
Have you been asked to create a positive pay transmission file to send to your bank?
Bank Positive Pay enables you to create positive pay transmission files from the data in youraccounting, payroll or other system.
Easy setup - Bank Express CodesBank Positive Pay maintains a library of bank file layouts and transmission information. Contact us foryour bank's code.
We highly recommend that you click the links below to view the tutorials now.
Brevity is critical - and we value your time. The videos are less than 15 minutes in total, and at the end -you will be able to create your transmission file for testing with your bank.
Bank Positive Pay 2
© 2013 Treasury Software
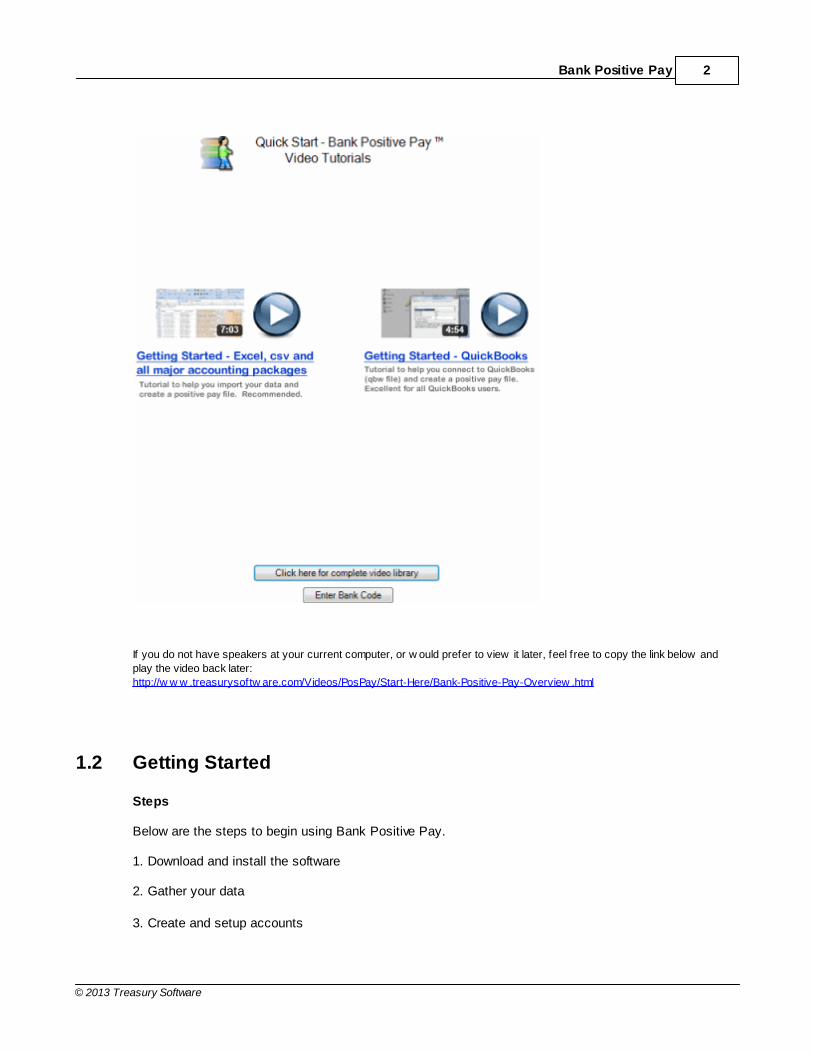
If you do not have speakers at your current computer, or w ould prefer to view it later, feel free to copy the link below and
play the video back later:
http://w w w .treasurysoftw are.com/Videos/PosPay/Start-Here/Bank-Positive-Pay-Overview .html
1.2 Getting Started
Steps
Below are the steps to begin using Bank Positive Pay.
1. Download and install the software
2. Gather your data
3. Create and setup accounts
Bank Positive Pay3
© 2013 Treasury Software
4. Import transactions (from Excel or CSV)
5. Create and transmit your positive pay issue file.
Next: Download and install >>
1.2.1 Download and Install
Download Bank Positive Pay
Download Bank Positive Pay from our website at http://www.treasurysoftware.com/download.aspx
Your email address is important because the installation password is sent to that address.
Install
After the download is complete, double-click the file to begin installation. You will be prompted for theinstall password as mentioned above. Once entered, you will be able to click OK (Note: password iscase sensitive). Click OK.
Proceed through the installer by clicking Next. Accept the default settings.
Next Step
Once the installation is complete, you are ready to begin using positive pay.
Next: Gathering Data >>
1.2.2 Gathering Data
Overview
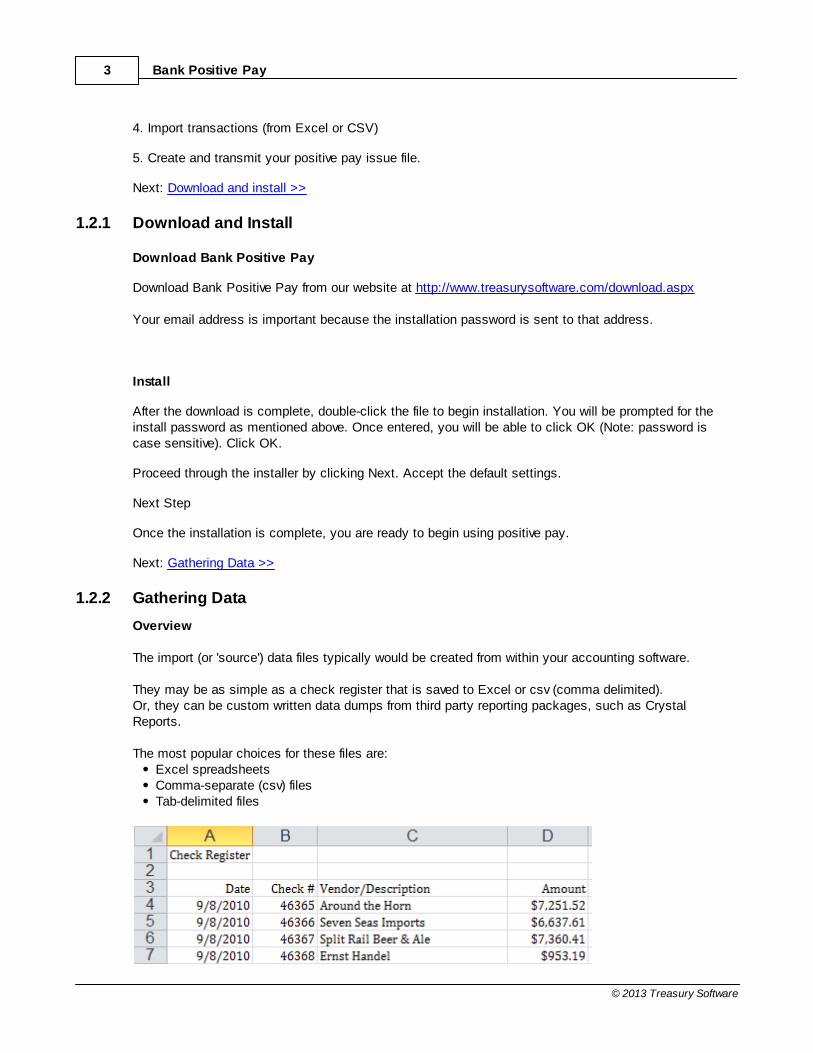
The import (or 'source') data files typically would be created from within your accounting software.
They may be as simple as a check register that is saved to Excel or csv (comma delimited).Or, they can be custom written data dumps from third party reporting packages, such as CrystalReports.
The most popular choices for these files are:Excel spreadsheetsComma-separate (csv) filesTab-delimited files

Bank Positive Pay 4
© 2013 Treasury Software
Basic At a minimum, you will need to create a file with the following fields:Payee name / descriptionAmountCheck numberDate
It is okay to create a file with additional columns.In addition, your file may have blank rows, report headers, summation rows, etc... - this is also okay.The system will skip/ignore non-transactional rows and unmapped columns.
1.2.3 Create and Setup Accounts
Start Bank Positive Pay
Important - Please follow these instructions to create your account. Any data saved in the 'Sample' account will be reset, as it synchronizes with the tutorial.
Start the File Formatter by clicking on the Start Button, selecting Programs (or All Programs), selectingTreasury Software, and clicking the Treasury Software Icon.
The Welcome New Users page will load. Select the Option for “Bank Positive Pay”

Bank Positive Pay5
© 2013 Treasury Software
Create Account
Click File>New Account to create an account for your testing.
Select the option to “Create an Account and Add it to your Catalog” and click Next.
Enter a name for the account. This name is strictly internal and should help you identify the purpose ofthe account. For example,if you are using Positive Pay for payroll, you might name the account Payroll. Once the name is entered, click Next.
Congratulations! You have finished creating the account. Click Finish to begin using this account.
If prompted to edit/modify your transmission information, click No.
Next Step
You are now ready to import data.

Bank Positive Pay 6
© 2013 Treasury Software
Next: Import Data >>
1.2.4 Import Data
Obtaining Import Data
Before importing transaction files into Bank Positive Pay, they must be obtained from your accountingpackage. The exact process depends on the package, but in general you will run an appropriate report,such as a check register, for a given date range and then export this report to an Excel spreadsheet orCSV file. For more information or assistance in this, contact your corporate IT.
Importing Transactions
Click on Import Transactions from the left hand navigation pane to begin the Import Wizard. You can alsostart the Import Wizard by clicking the Import Transactions icon in the center of the homepage.
Bank Positive Pay7
© 2013 Treasury Software
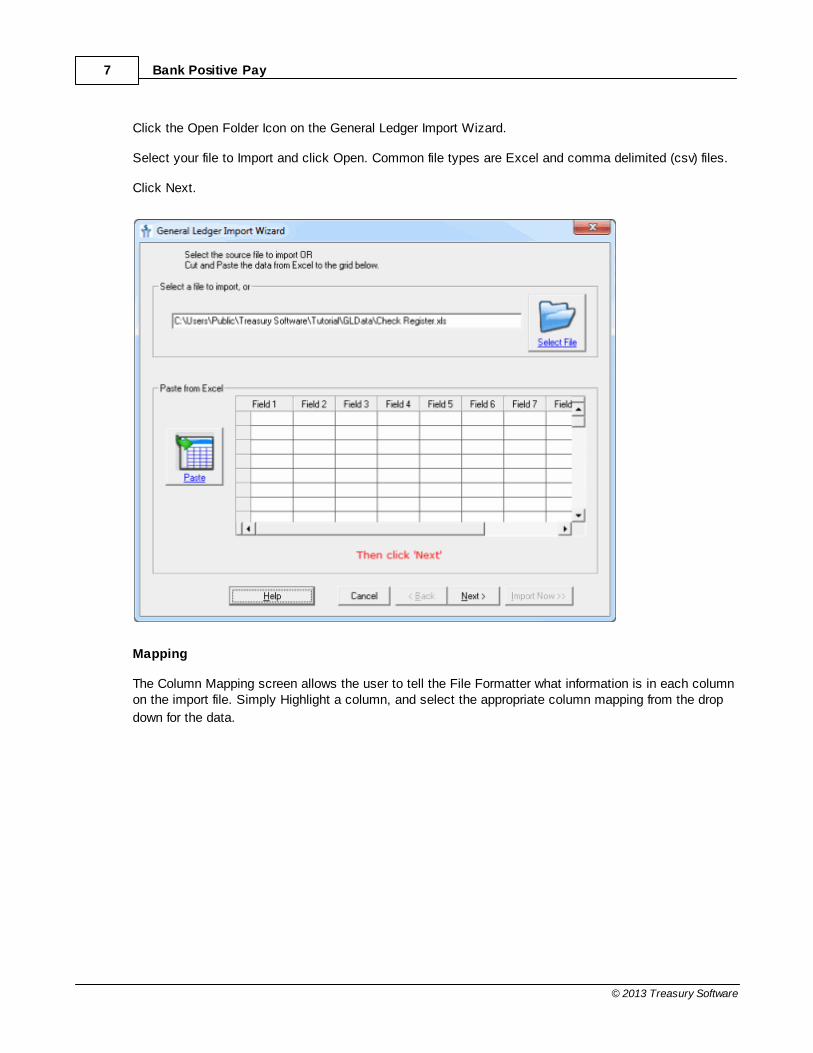
Click the Open Folder Icon on the General Ledger Import Wizard.
Select your file to Import and click Open. Common file types are Excel and comma delimited (csv) files.
Click Next.
Mapping
The Column Mapping screen allows the user to tell the File Formatter what information is in each columnon the import file. Simply Highlight a column, and select the appropriate column mapping from the drop
down for the data.

Bank Positive Pay 8
© 2013 Treasury Software
After selecting the Column Mapping, the section about the column names (F1, F2, F3, etc) will switchfrom Red to Green and list the selected mapping.
Repeat this for all required columns. The required fields are Date, Check number, Amount and Payee(description). When all the necessary columns are mapped, click next to continue the Import Wizard.
Use Amount_Reverse_Sign when neededNegative amounts decrease your balance, and represent checks issued.Positive amounts increase your balance, and typically represent voided checks..
If the Excel or other file that you are importing is displaying the amounts in positive format, and thetransactions represent checks issued - then map the field as Amount_Reverse_Sign. This has the effectof multiplying the amount by a negative 1.
Review Records
This screen will display a list of the importable rows and invalid rows. To review the list of ImportableRecords, click on the “+” sign as shown below.
If the “Amount” and “# of Records” columns are correct, click Next and go to Finish.

Bank Positive Pay9
© 2013 Treasury Software
The grid will display the importable transactions and the basic information.
The Invalid Rows section will list all rows that will not be imported. The software will automatically markHeader rows, footer rows, summation lines, and blank lines as invalid. For each row that is invalid, acheck mark will be placed in the appropriate column indicating why the row was invalid.
Once you have verified the importable information is accurate, click Next. If you wish to Cancel theimport process and try again, simply hit Cancel.
Click Finish to complete the Import Wizard.
Bank Positive Pay 10
© 2013 Treasury Software
Next Step
You are now ready to create and transmit your file.
Next: Create and transmit the issue file >>
1.2.5 Create and Transmit File
Create and Transmit the issue File
You are now ready for the final step: creating the transmission file and transmitting to the bank.
Click on Create File from the left hand navigation pane or alternatively, click the Create File button in the
center of the homepage. Please note prior to 2013 version the Create File icon was

Bank Positive Pay11
© 2013 Treasury Software
The Create File screen is where the file to be uploaded is created.
The second paragraph lists the transmission method. In almost all cases, you will upload your file toyour bank through their website. A transmission method of None will create the positive pay file, at whichpoint you should log on to your bank's website and submit it to them. Your bank will provide you withinstructions for doing so.
The third paragraph displays where the Transmission File will be saved. The default location for the file isthe C:\Program Files\Treasury Software\Version Number\To Bank directory (on XP) or C:\Users\Public\Treasury Software\To Bank (on Vista, Windows 7 and Windows 8). The default file name is the name ofthe account, followed by an underscore and the word ‘transmit’. The file will always have a .TXT fileextension. For example, the account named Payroll would create a transmit file namedPayroll_transmit.txt.
The Review Records link on the Right Side Explorer Bar allows you to access the Reports Section forreview or deletion of Records
Click Create ACH File to create the file.

Bank Positive Pay 12
© 2013 Treasury Software
Positive Pay will ask if you want to view the file. Select Yes if you want to verify the format or review thefile. Otherwise click No.
At this point, transmit the file to your bank using their procedures.
Congratulations! You have completed your first transmission file.
If you have any questions, please consult our FAQ. This contains answers to many common questionsfrom first-time users.
Next Step
Review our FAQ for answers to many common questions.
Next: FAQ >>
1.3 File Creation and Transmission
Creating a transmission file
From the Home Page, click on the 'Create File' icon. Please note prior to 2013 version the Create File

Bank Positive Pay13
© 2013 Treasury Software
icon was
The Create File screen (below) will be displayed.

Bank Positive Pay 14
© 2013 Treasury Software
To create and transmit the file, click
Please note if you are using a version prior to 2013 then click on .
A dialog box will appear asking if you wish to view the created file. Click Yes to view the file. Note: Youcan always view the file later.
Bank Positive Pay15
© 2013 Treasury Software
The file creation and transmission is now complete.
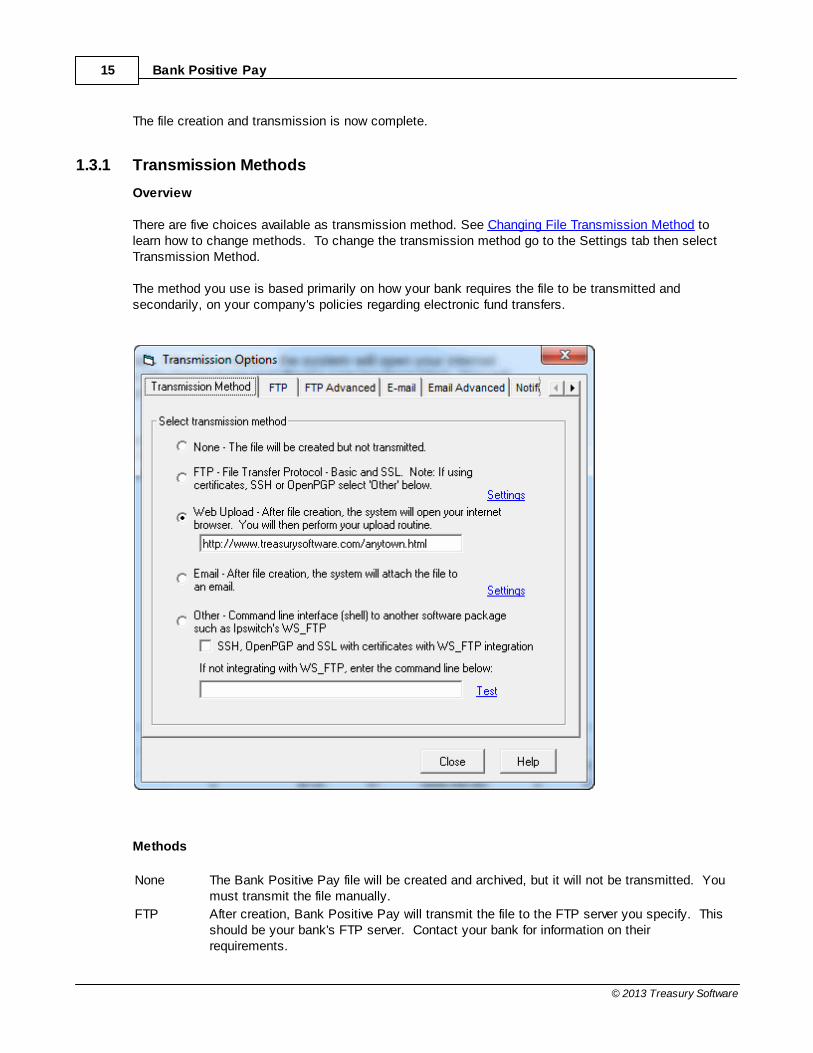
1.3.1 Transmission Methods
Overview
There are five choices available as transmission method. See Changing File Transmission Method tolearn how to change methods. To change the transmission method go to the Settings tab then selectTransmission Method.
The method you use is based primarily on how your bank requires the file to be transmitted andsecondarily, on your company's policies regarding electronic fund transfers.
Methods
None The Bank Positive Pay file will be created and archived, but it will not be transmitted. Youmust transmit the file manually.
FTP After creation, Bank Positive Pay will transmit the file to the FTP server you specify. Thisshould be your bank's FTP server. Contact your bank for information on theirrequirements.

Bank Positive Pay 16
© 2013 Treasury Software
Web Upload After creation, your default Internet browser will be started to a specified web page thatcorresponds to your bank's upload portal. Upload the created file.
Email Bank Positive Pay will email the created file as an attachment to the email addressesspecified. This method is not recommended as it is unsecured.
Other For backward compatibility only. Used to transmit the file using modem commands.
By default, Bank Positive Pay will use Web Upload and load a generic page on the Treasury Softwarewebsite. See Changing File Transmission Method to set up the transmission method as required byyour bank.
1.4 Reporting
Reporting
Positive Pay has a wide selection of industry standard reports which include transactions, profilelistings, audit trail logs and more.
BasicTo run a report click on Reports. Select a report, then a period (if applicable), then click 'Run'.
From the toolbar icons, you can

Bank Positive Pay17
© 2013 Treasury Software
FeaturesOnce you've run a report, you can change the :Columns - add, remove, move, sortGrouping - 'Outlook-style' grouping Filtering - 'Excel-style' filteringand save your changes for use next time.
1.4.1 General Usage
Customizing Fields
You can arrange the fields in any order. To do so, click and drag the column header to its new location.

Bank Positive Pay 18
© 2013 Treasury Software
Custom LayoutsIf you prefer your report differently than the default displayed, simply modify the report to the way youwant it.The saved layout will retain all information in the current report, including filters, groupings, summaryinformation, and field order.
Afterwards, click on the 'Save' icon.
The next time you run the report, it will displayed per your settings.
Note: To remove the custom layout - click the 'Remove' icon, just to the right of the 'Save' icon.
1.4.2 Grouping Data
Grouping Data
Reports are only useful if they can be interpreted quickly and accurately. It is both cumbersome anderror-prone to be forced to scroll through tens or hundreds of records looking for certain ones.
Advanced Reporting allows you to group report data on many different fields to see a breakdown bycategory.
In Figure 1 (below), the Advanced Reporting grid is displaying the All Records report.
Bank Positive Pay19
© 2013 Treasury Software
In this case, the records are grouped by Description. To create a grouping, drag the header into the graybar. It is possible to create multiple groupings. For example, to group by company name inside thedate grouping, drag the Description header onto the gray bar. To un-group, drag the header from the barto a position in the header row.
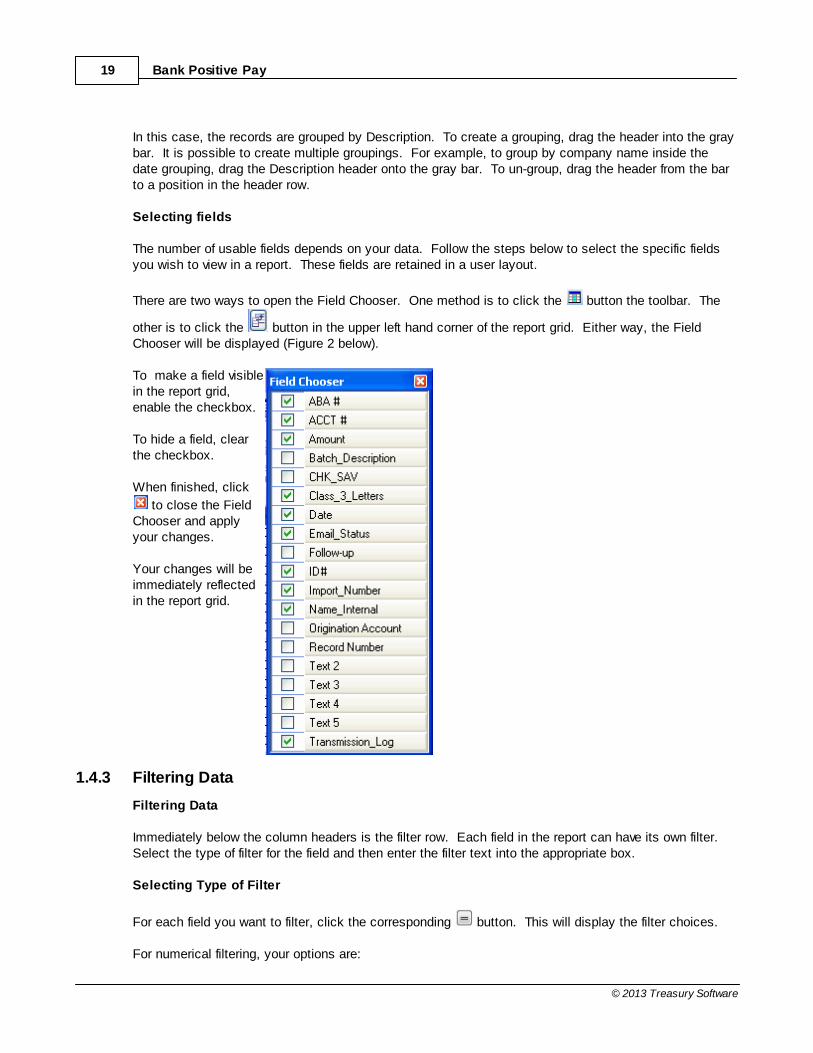
Selecting fields
The number of usable fields depends on your data. Follow the steps below to select the specific fieldsyou wish to view in a report. These fields are retained in a user layout.
There are two ways to open the Field Chooser. One method is to click the button the toolbar. The
other is to click the button in the upper left hand corner of the report grid. Either way, the FieldChooser will be displayed (Figure 2 below).
To make a field visiblein the report grid,enable the checkbox.
To hide a field, clearthe checkbox.
When finished, click
to close the FieldChooser and applyyour changes.
Your changes will beimmediately reflectedin the report grid.
1.4.3 Filtering Data
Filtering Data
Immediately below the column headers is the filter row. Each field in the report can have its own filter. Select the type of filter for the field and then enter the filter text into the appropriate box.
Selecting Type of Filter
For each field you want to filter, click the corresponding button. This will display the filter choices.
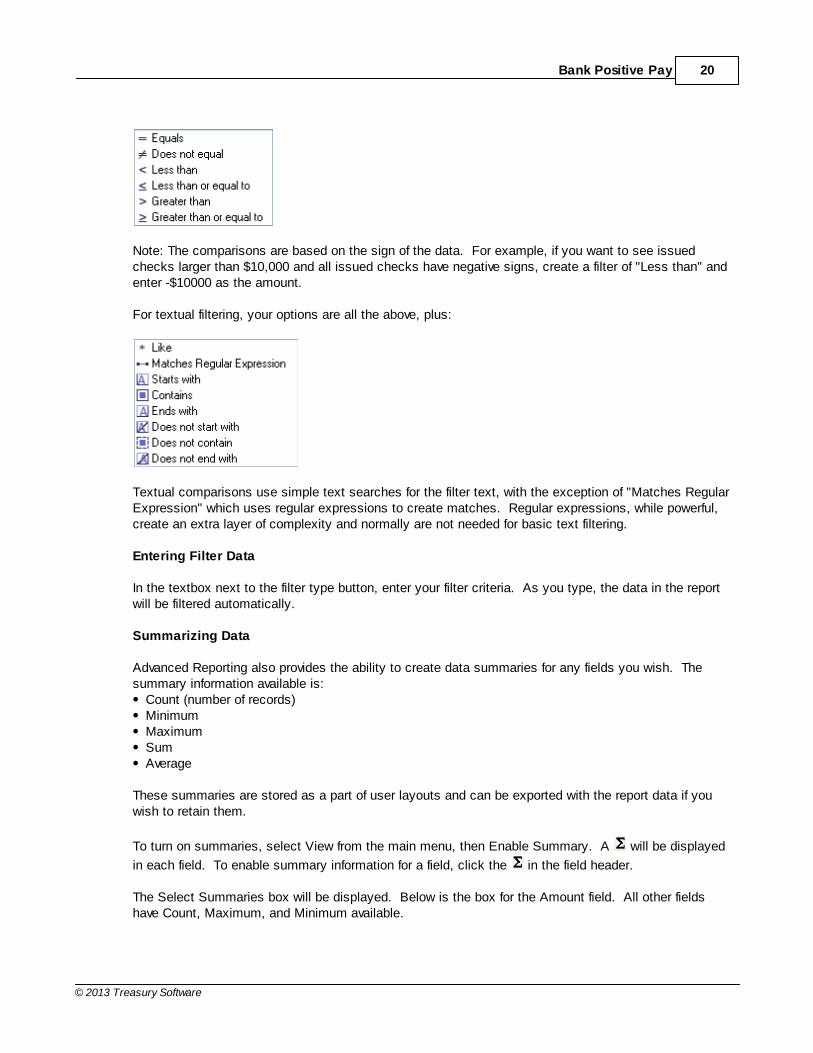
For numerical filtering, your options are:
Bank Positive Pay 20
© 2013 Treasury Software
Note: The comparisons are based on the sign of the data. For example, if you want to see issuedchecks larger than $10,000 and all issued checks have negative signs, create a filter of "Less than" andenter -$10000 as the amount.
For textual filtering, your options are all the above, plus:
Textual comparisons use simple text searches for the filter text, with the exception of "Matches RegularExpression" which uses regular expressions to create matches. Regular expressions, while powerful,create an extra layer of complexity and normally are not needed for basic text filtering.
Entering Filter Data
In the textbox next to the filter type button, enter your filter criteria. As you type, the data in the reportwill be filtered automatically.
Summarizing Data
Advanced Reporting also provides the ability to create data summaries for any fields you wish. Thesummary information available is:
Count (number of records)MinimumMaximumSumAverage
These summaries are stored as a part of user layouts and can be exported with the report data if youwish to retain them.
To turn on summaries, select View from the main menu, then Enable Summary. A will be displayed
in each field. To enable summary information for a field, click the in the field header.
The Select Summaries box will be displayed. Below is the box for the Amount field. All other fieldshave Count, Maximum, and Minimum available.

Bank Positive Pay21
© 2013 Treasury Software
To turn on a summary value, enable the checkbox. When finished, click OK.
The summary information will be displayed after the last row of report data.
To turn off summaries, select View from the main menu, then Disable Summaries. Summaries arestored as a part of the user layout. Summaries are automatically disabled when you switch reports.
1.4.4 Exporting Data
Exporting Data
Your report data can be exported from Advanced Reporting to an Excel spreadsheet or a CSV file. Note: You can export to Excel without having Excel installed, but it must be installed in order to view theexported file.
All export options are accessible through the Export option on the main menu. These options are:
Excel Export - All Records Export all displayed records. Records filtered out will not be included. Allvisible columns will be exported.
Excel 'Copy' - SelectedRecords
Export all manually selected records. All visible columns will beexported.
CSV Export - All Records Same as Excel Export- All Records, but exports to a CSV file
CSV Export - SelectedRecords
Same as Excel 'Copy' - Selected Records, but exports to a CSV file
Data Dump - All Records, AllColumns
Exports all records (regardless of filter) and all columns (visible and notvisible) to a txt file.
Also under the Export menu is the option "Open Excel when exporting to Excel or CSV." Leave thischecked if you wish to load the exported file immediately in Excel (Note: Excel must be installed). Toexport to a file but not view the file, select the option to uncheck it.

Bank Positive Pay 22
© 2013 Treasury Software
1.5 Automation and Integration
Overview
Automation tools are used to enable greater processing efficiency. You can use the Scheduler toschedule file imports and transmissions. You can use Custom Import Menus to import either single filesor entire directories and process everything with one simple mouse click.
1.5.1 Scheduler - Basic Automation
Overview
The Scheduler is used to schedule single file imports and file transmission. If you need to schedulemultiple files during the sameroutine, see Custom Import Menus.
Process
There are two steps to scheduling an automated file import and transmission (from now on called a job).
1. Create the job. This would be the account to be used and the file to be imported.2. Running the job. This instructs Bank Positive Pay on time and frequency the job should be run.
Create the job
Select Automation > Basic Automation from the main menu. The below figure will be displayed.

Bank Positive Pay23
© 2013 Treasury Software
All the accounts are shown in the grid. In this case, Test Pos Pay and test have been created for livedata. They both can be scheduled to run at the same time, or you can choose to schedule just oneaccount. Note: It is not possible to schedule them at different times and days using the Scheduler. SeeCustom Import Menus if you need this type of setup.
To create a job:
Enable the checkbox in the Import column of the account you wish to use.
Click the gray box under the Import G/L File Name to browse for the source file to be imported.
Select how you wish the system to handle transmission of the Positive Pay file. Your choices are:No (Positive Pay file is created, but not transmitted. You must transmit manually).Only when new records importedYes, always (On every job, the file is transmitted using the method you set in
Schedule the job
Click the Scheduler button.
A screen will pop up requiring a Windows username and password. The Scheduler will use thisusername and password to schedule the job. You may leave the password blank, but the job may notrun due to lack of authorization as required by Windows.
After entering username and password, click Next.
The Scheduler will now be displayed (Figure 1 below).
Figure 1 - Scheduler
To schedule a job to run once a day on certain days and at certain times, select the check boxes for

Bank Positive Pay 24
© 2013 Treasury Software
each day and then enter the time in Start Time textbox.
If you need to schedule a job to run multiple times per day, click the "Repeat throughout the day" button.
Information shown in Figure 2 (below) will be displayed in the Scheduler window.
Figure 2 - Repeat throughout day
Click the checkbox.
The job can be scheduled to run in increments of hours or minutes. Enter the length of time between jobruns and then select hours or minutes from the dropdown box.
In the textbox on the right side, you can specify the end time for the schedule.
For example, ABC Company wants to run their job every 30 minutes, but only between 11 AM and 3PM.
In Figure 1, ABC would set the start time to 11:00 AM and choose the appropriate days. In Figure 2,ABC would enable the checkbox, then enter 30 into the first textbox, change dropdown to minutes, andput 3:00PM in the remaining textbox.
When completed, click Finish.
1.5.2 Software Integration Kit - Advanced
This section is devoted to accounting software developers and other third party developers (includingend-users) who are looking to integrate Treasury Software applications into a seamless and automatedprocess for their users.
Our Software Integration Kit (SIK), unlike most automation development kits, is included directly in theruntime edition - and is available to both power users and software developers in a Graphical UserInterface.
Treasury Software's SIK includes full automation tools to seamlessly:--import any file--import all files within a directory--archive (move) the imported files--preserve the audit trail of archived files (append the file name of each file with a date/time stamp toinsure that each file is uniquely named in the archive directory)--provide summary reporting
and, of course
--perform any Treasury Software core module process including:----ACH and Positive Pay file creation----ACH and Positive Pay file transmission

Bank Positive Pay25
© 2013 Treasury Software
----Automated Transaction Matching (ATM) for bank reconciliation
Note: The Software Integration Kit is referenced as the 'Custom Import Menu Setup' in some documents- and will be used here interchangeably.
Select the Settings tab then Software Integration Kit. If using a version prior to 2013 select Automation> Advanced - Software Integration Kit.
You can have up to 20 integration routines per account. Select one that is not being used and click'Add/Edit'.

Bank Positive Pay 26
© 2013 Treasury Software
1.5.2.1 Settings
Settings pages - Basic, Advanced and Automation
Visible - Check this box if you want this process to be available to the user from the main menu (Importsubmenu). This checkbox only drives visibility - it does not activate or inactivate a process.
What do you want to import?File - select the fileFolder - point to a folder. Note: Each of the files should have the same format.SQL Integration - 'Data has been placed into a SQL table by another process (see SQL Integration)
Tip:If you only want to import one file, but the file name is dynamic (keeps changing), then use the folderoption.
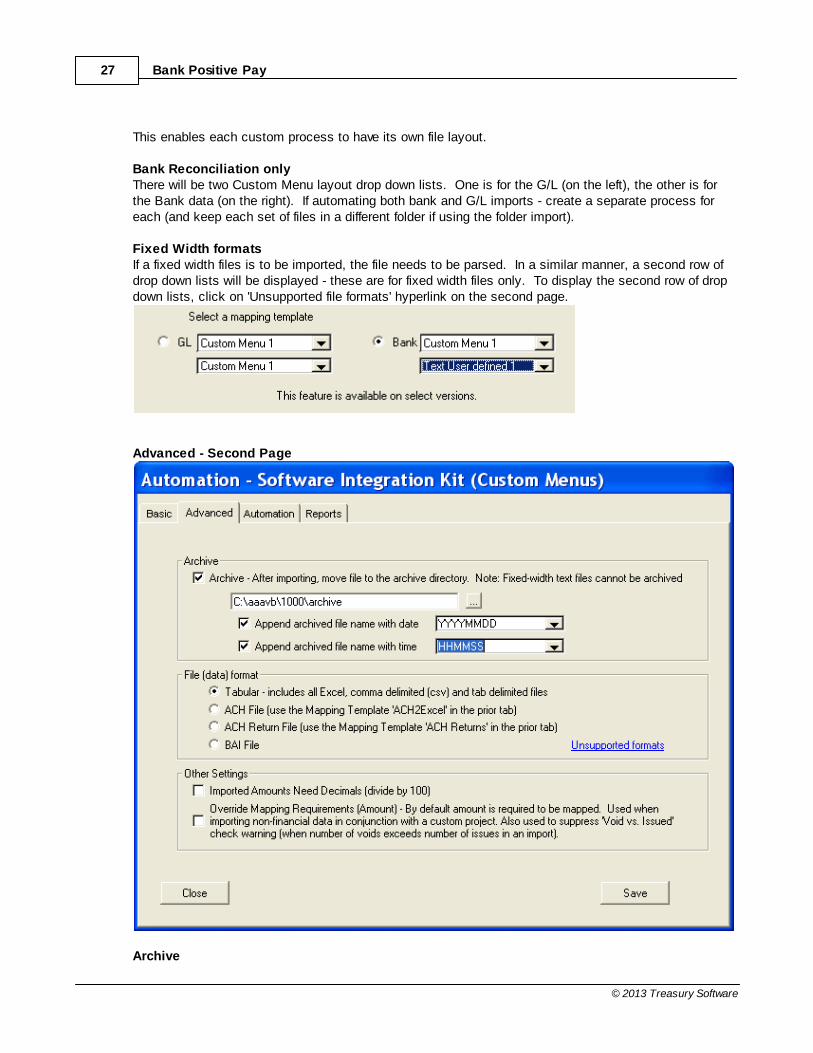
Mapping TemplatesEach custom process has it's own custom import layout. For example, here in the 1st process, thesystem defaults to the Custom Menu #1 template in the drop down list. The 2nd custom process willhave a Custom Menu #2, and so on.
Bank Positive Pay27
© 2013 Treasury Software
This enables each custom process to have its own file layout.
Bank Reconciliation onlyThere will be two Custom Menu layout drop down lists. One is for the G/L (on the left), the other is forthe Bank data (on the right). If automating both bank and G/L imports - create a separate process foreach (and keep each set of files in a different folder if using the folder import).
Fixed Width formatsIf a fixed width files is to be imported, the file needs to be parsed. In a similar manner, a second row ofdrop down lists will be displayed - these are for fixed width files only. To display the second row of dropdown lists, click on 'Unsupported file formats' hyperlink on the second page.
Advanced - Second Page
Archive
Bank Positive Pay 28
© 2013 Treasury Software
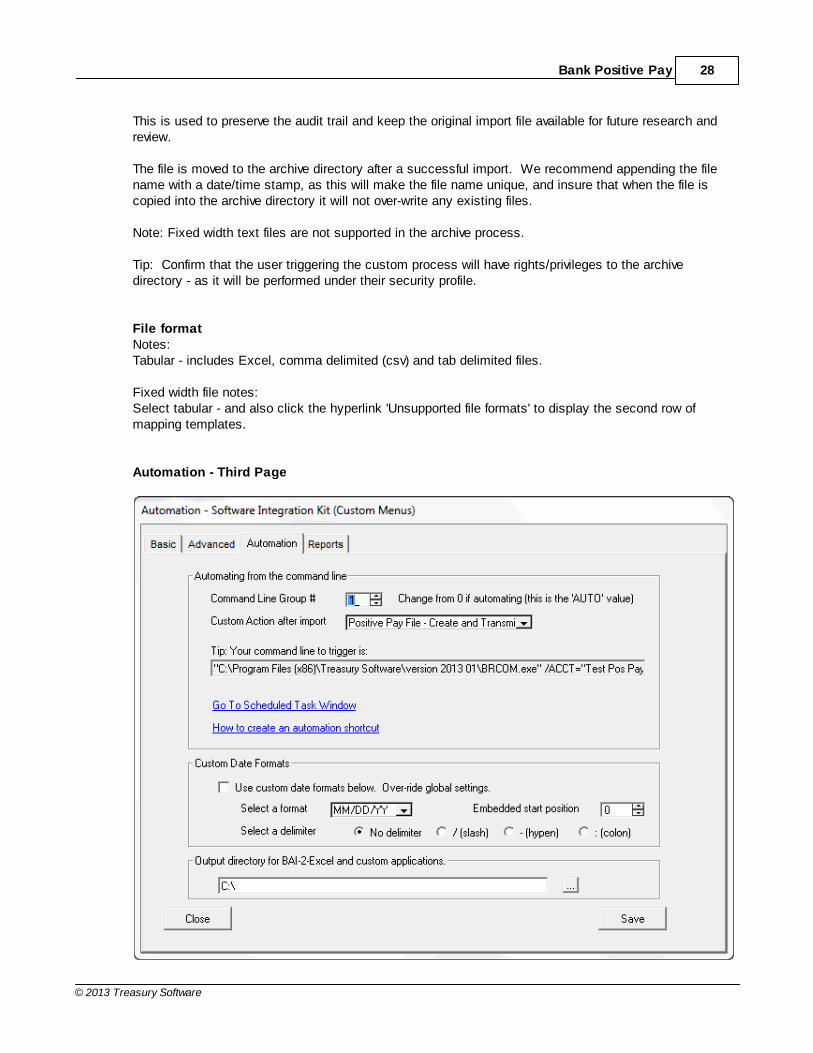
This is used to preserve the audit trail and keep the original import file available for future research andreview.
The file is moved to the archive directory after a successful import. We recommend appending the filename with a date/time stamp, as this will make the file name unique, and insure that when the file iscopied into the archive directory it will not over-write any existing files.
Note: Fixed width text files are not supported in the archive process.
Tip: Confirm that the user triggering the custom process will have rights/privileges to the archivedirectory - as it will be performed under their security profile.
File formatNotes:Tabular - includes Excel, comma delimited (csv) and tab delimited files.
Fixed width file notes:Select tabular - and also click the hyperlink 'Unsupported file formats' to display the second row ofmapping templates.
Automation - Third Page

Bank Positive Pay29
© 2013 Treasury Software
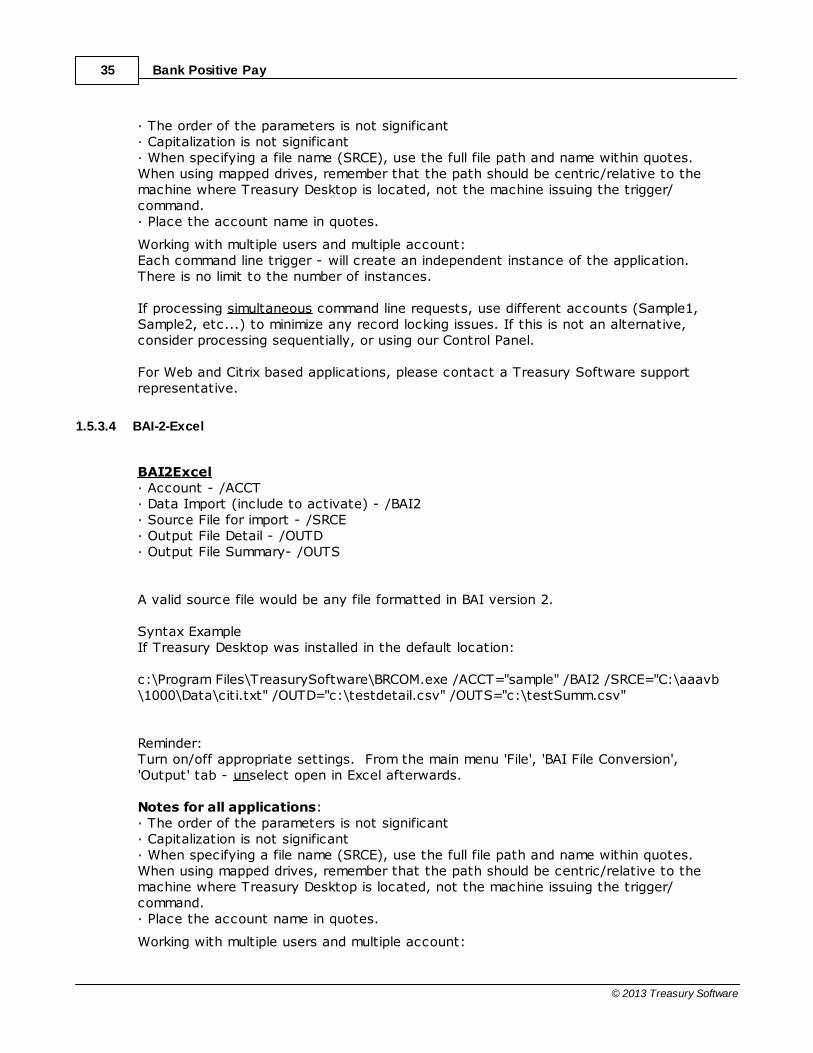
Command Line Group
This enables the process to be triggered from the Command Line Interface.
Processes are triggered by the numeric value set here. Therefore, all twenty processes could be calledfrom a single command line - assuming all has the same value.
The basic syntax for the trigger is:[path]\BRCOM.exe /ACCT="sample" /MENU /AUTO=1
· Account (database) - /ACCT· Include to activate (static to trigger) - /MENU· Group to use (numeric value in the Command Line Group number box)- /AUTOThis example triggers the Custom Import Menu group #1 (AUTO=1) for the 'sample' account.
Chaining multiple processes:Select a numeric value in the Command Line Group number box. When passed to the program, it willtrigger sequentially all custom menu selections with the same value.
Example:You want to trigger three import processes and then create and transmit an Positive Pay file.Import process 1 - Import a single payroll fileImport process 2 - Import all trade payable files in a directoryImport process 3 - Import all customer collection files in a directory
Create three separate custom menus, with all having the same Command Line Group number (1). Asthe processes are sequenced based on the process order (from the list top to bottom), make sure theyare in sequence, as the last one will contain the automation process.
On Import process 3 (only), select the 'Custom Action After Import' to 'Positive Pay File - Create andTransmit'.
Custom Action after importThis can be:ACH File - Create and TransmitPositive Pay File - Create and TransmitAutomated Transaction MatchingSelect as needed.
Custom Date FormatsEnables you to import non-standard date formats.
Question - How do you know if the format is a custom format? Try opening the source file in Excel. If Excel opens the file and the date looks appropriate, you do notneed to enter any settings. However, if Excel has a a problem interpreting the date - so will TreasurySoftware.

Bank Positive Pay 30
© 2013 Treasury Software
1.5.2.2 SQL Integration
SQL Integration
The SQL Integration feature enables other software systems to push data directly into a TreasurySoftware SQL Server (not SQL Express) based platform. This eliminates the need for 'pass-thru' files.
Overview1. Push data into the Treasury Software holding table. The holding table exists in each SQL Serverdatabase.2. Trigger Treasury Software to move the data from the holding table into a permanent table. The systemis triggered to move data by the instructions and settings on this page.
This topic builds on the Software Integration Kit (SIK) documentation. Please refer to SoftwareIntegration Kit (SIK) for an overview, if you have not yet done so.
SettingsOn the basic screen, select 'Data has been placed into a SQL table by another process'. Note: As themapping templates are not used, you can leave the defaults.On the advanced screen (not displayed), leave the default setting 'tabular'. Do not enable archiving asthe system is not working with files.On the Automation screen (not displayed), leave the Custom date feature off.

Bank Positive Pay31
© 2013 Treasury Software
1. Push data into the Treasury Software holding table.The following fields exist in each Treasury Software created SQL Server database. Note: All fields aretext fields and located in the table tblHoldingGLIntegration. All are mandatory unless otherwise noted.
Field name DescriptionMandatory fieldsAmount Can import as signed or absolute amounts, depending on whether or not
you are supplying the Transaction Type codes. Regardless of sign,always include a decimal point as needed. Do not include commas ordollar signs.
Date The effective date, in MM/DD/YY format. Note: The month and day can beone or two digit, the year can be two or four digit.International format? - Use your local regional settings.
Payee Name of receiving partyCheck number The number of the check.
2. Trigger Treasury Software to move the data from the holding table into a permanent table.Trigger the Software Integration Kit using any method (menu structure or command line interface) tomove the data. Once the data is copied into the permanent table the data is automatically deleted from

Bank Positive Pay 32
© 2013 Treasury Software
the holding table.
Notes:--Step 1 of the SQL Integration feature assumes that you have write permissions to the database.
--SQL Express databases by definition, will be unable to accommodate step 1 by their inability to grantaccess.
--Integration is part of the SQL Server add-on service pack. Contact your representative for a copy.
--This integration is designed to be run in an automated fashion. If you trigger the import manually viathe menu structure - once you are at the review records screen, the records have been removed from thetemporary holding table. You can 'Cancel' and not commit them to the permanent table, but if you later choose to re-import therecords, they will need to be re-populated into the temporary table.
1.5.3 Command Line Syntax
automation from other applications.
While the command line interface compliments a number of features which are availablein our in our point and click 'Control Panel', the interface allows for full customization andcontrol of output files location/names. Differences between Control Panel and Command Line automation
Control Panel1. Triggers are preset - at standard date/time and standard intervals.2. Cannot programmatically change file names. Must specify source files or output files.3. Ease of use - has a point and click interface. Command Line Interface:1. Triggers - Can be triggered on command.2. Full control over both source files and output files. Can programmatically change filenames.3. The command line requires an intermediate to advanced knowledge of systems.
1.5.3.1 Command Line Interface
Overview
The Command Line interface is used to schedule import and transmission jobs through the Windowsscheduling system. This is similar to using the Scheduler, but by using the Command Line you are ableto schedule multiple jobs and do not have to load ACH Universal to do so.
Command Line Options
BRCom.exe /ACCT="account" /ACHX [/XMIT] /SRCE="file name"

Bank Positive Pay33
© 2013 Treasury Software
/ACCT - specifies account by name/ACHX - specifies to use the ACH Universal module/XMIT - directs ACH Universal to create and then transmit the file after creation/SRCE - specifies file to be imported (using absolute positioning)
Example:
c:\Program Files\TreasurySoftware\BRCOM.exe /ACCT="sample" /ACHX /XMIT /SRCE="C:\aaavb\1000\Tutorial\GLData\ACH_with_Accounts.xls"
This example imports a source file named ACH_with_Accounts.xls at the specified absolute positioninto the Sample account in ACH Universal (ACHX). After import, the system creates and transmits(XMIT) the NACHA file.
Valid source files include comma delimited text files, tab delimited text files, fixed width text files andExcel worksheets.
Notes for all applications:· The order of the parameters is not significant· Capitalization is not significant· When specifying a file name (SRCE), use the full file path and name within quotes. When usingmapped drives, remember that the path should be centric/relative to the machine where TreasuryDesktop is located, not the machine issuing the trigger/command.· Place the account name in quotes.
Working with multiple users and multiple account:Each command line trigger - will create an independent instance of the application. There is no limit tothe number of instances.
If processing simultaneous command line requests, use different accounts (Sample1, Sample2, etc...) tominimize any record locking issues. If this is not an alternative, consider processing sequentially, orusing our Control Panel.
For Web and Citrix based applications, please contact a Treasury Software support representative.
1.5.3.2 ACH Universal
ACH Universal(ACH File Software)· Account - /ACCT· Data Import (include to activate) - /ACHX· ACH File Creation and Transmittal (include to activate) - /XMIT· Source File for import - /SRCE Syntax ExampleIf Treasury Desktop was installed in the default location: c:\Program Files\TreasurySoftware\BRCOM.exe /ACCT="sample" /ACHX /XMIT /SRCE="C:\aaavb\1000\Tutorial\GLData\ACH_with_Accounts.xls" This example imports a source file (identified with SRCE) for ACH Universal (ACHX). Afterimport, the system creates and transmits (XMIT) the NACHA file. This example takes

Bank Positive Pay 34
© 2013 Treasury Software
place in the sample account (ACCT). Valid source files include comma delimited text files, tab delimited text files, fixed widthtext files and Excel worksheets. Notes for all applications:· The order of the parameters is not significant· Capitalization is not significant· When specifying a file name (SRCE), use the full file path and name within quotes.When using mapped drives, remember that the path should be centric/relative to themachine where Treasury Desktop is located, not the machine issuing the trigger/command.· Place the account name in quotes. Working with multiple users and multiple account:Each command line trigger - will create an independent instance of the application.There is no limit to the number of instances. If processing simultaneous command line requests, use different accounts (Sample1,Sample2, etc...) to minimize any record locking issues. If this is not an alternative,consider processing sequentially, or using our Control Panel. For Web and Citrix based applications, please contact a Treasury Software supportrepresentative.
1.5.3.3 ACH-2-Excel
ACH2Excel· Account - /ACCT· Data Import (include to activate) - /ACH2· Source File for import - /SRCE· Output File - /OUTD Valid source files include ARC, CCD, CIE, CTX, DNE, ENR, POP, PPD, RCK, TEL, TRC, TRX,WEB, XCK. Note: Some formats may require further parsing. Syntax ExampleIf Treasury Desktop was installed in the default location: c:\Program Files\TreasurySoftware\BRCOM.exe /ACCT="sample" /ACH2 /SRCE="C:\transmit.txt" /outd="c:\testACHdetail.csv"
Reminder:Turn on/off appropriate settings. From the main menu 'File', 'ACH File Conversion','Output' tab - unselect open in Excel afterwards.
Notes for all applications:
Bank Positive Pay35
© 2013 Treasury Software
· The order of the parameters is not significant· Capitalization is not significant· When specifying a file name (SRCE), use the full file path and name within quotes.When using mapped drives, remember that the path should be centric/relative to themachine where Treasury Desktop is located, not the machine issuing the trigger/command.· Place the account name in quotes.
Working with multiple users and multiple account:Each command line trigger - will create an independent instance of the application.There is no limit to the number of instances. If processing simultaneous command line requests, use different accounts (Sample1,Sample2, etc...) to minimize any record locking issues. If this is not an alternative,consider processing sequentially, or using our Control Panel. For Web and Citrix based applications, please contact a Treasury Software supportrepresentative.
1.5.3.4 BAI-2-Excel
BAI2Excel· Account - /ACCT· Data Import (include to activate) - /BAI2· Source File for import - /SRCE· Output File Detail - /OUTD· Output File Summary- /OUTS A valid source file would be any file formatted in BAI version 2. Syntax ExampleIf Treasury Desktop was installed in the default location: c:\Program Files\TreasurySoftware\BRCOM.exe /ACCT="sample" /BAI2 /SRCE="C:\aaavb\1000\Data\citi.txt" /OUTD="c:\testdetail.csv" /OUTS="c:\testSumm.csv" Reminder:Turn on/off appropriate settings. From the main menu 'File', 'BAI File Conversion','Output' tab - unselect open in Excel afterwards. Notes for all applications:· The order of the parameters is not significant· Capitalization is not significant· When specifying a file name (SRCE), use the full file path and name within quotes.When using mapped drives, remember that the path should be centric/relative to themachine where Treasury Desktop is located, not the machine issuing the trigger/command.· Place the account name in quotes.
Working with multiple users and multiple account:

Bank Positive Pay 36
© 2013 Treasury Software
Each command line trigger - will create an independent instance of the application.There is no limit to the number of instances. If processing simultaneous command line requests, use different accounts (Sample1,Sample2, etc...) to minimize any record locking issues. If this is not an alternative,consider processing sequentially, or using our Control Panel. For Web and Citrix based applications, please contact a Treasury Software supportrepresentative.
1.5.3.5 Bank Positive Pay
Bank Positive Pay· Account - /ACCT· Data Import (include to activate) - /POSP· ACH File Creation and Transmittal (include to activate) - /XMIT· Source File for import - /SRCE Syntax ExampleIf Treasury Desktop was installed in the default location: c:\Program Files\TreasurySoftware\BRCOM.exe /ACCT="sample" /POSP /XMIT /SRCE="C:\aaavb\1000\Tutorial\GLData\Check Register 2003-04-08csv.csv" This example imports a source file (identified with SRCE) for Bank Positive Pay (POSP).After import, the system creates and transmits (XMIT) the positive pay file. Thisexample takes place in the sample account (ACCT). Valid source files include comma delimited text files, tab delimited text files, fixed widthtext files and Excel worksheets.
Notes for all applications:· The order of the parameters is not significant· Capitalization is not significant· When specifying a file name (SRCE), use the full file path and name within quotes.When using mapped drives, remember that the path should be centric/relative to themachine where Treasury Desktop is located, not the machine issuing the trigger/command.· Place the account name in quotes.
Working with multiple users and multiple account:Each command line trigger - will create an independent instance of the application.There is no limit to the number of instances. If processing simultaneous command line requests, use different accounts (Sample1,Sample2, etc...) to minimize any record locking issues. If this is not an alternative,consider processing sequentially, or using our Control Panel. For Web and Citrix based applications, please contact a Treasury Software supportrepresentative.
Bank Positive Pay37
© 2013 Treasury Software
1.5.4 For use with QuickBooks
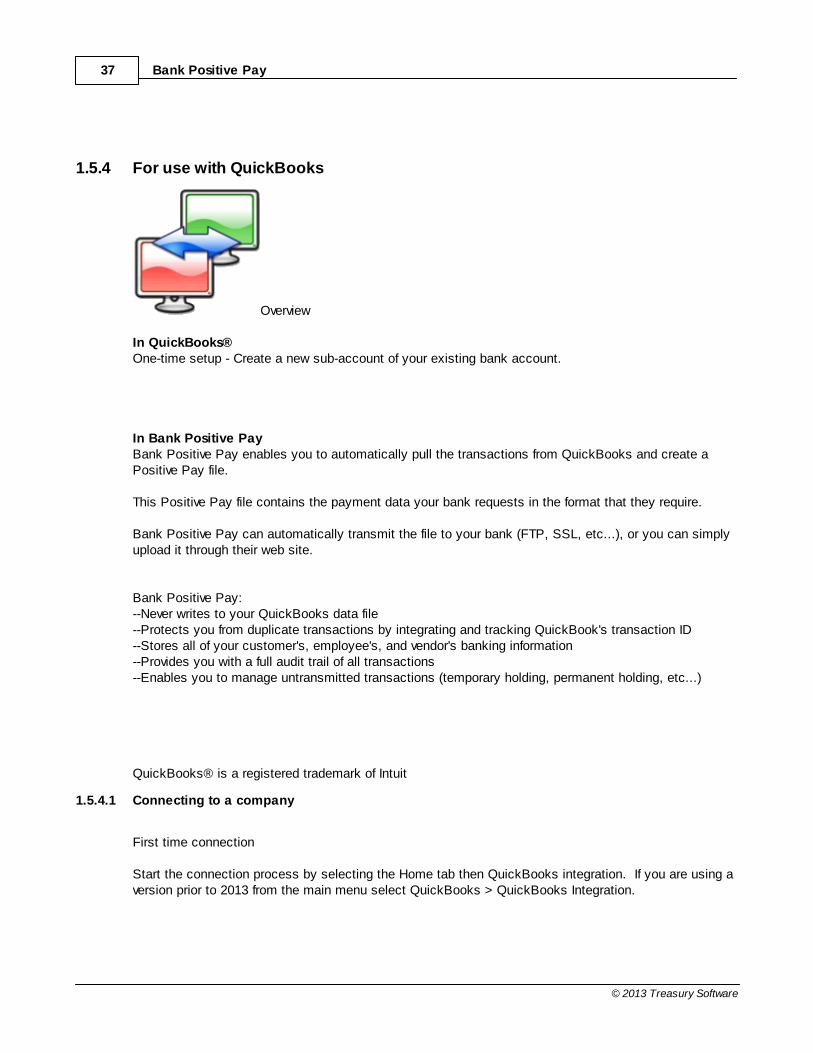
Overview
In QuickBooks®One-time setup - Create a new sub-account of your existing bank account.
In Bank Positive PayBank Positive Pay enables you to automatically pull the transactions from QuickBooks and create aPositive Pay file.
This Positive Pay file contains the payment data your bank requests in the format that they require.
Bank Positive Pay can automatically transmit the file to your bank (FTP, SSL, etc...), or you can simplyupload it through their web site.
Bank Positive Pay:--Never writes to your QuickBooks data file--Protects you from duplicate transactions by integrating and tracking QuickBook's transaction ID--Stores all of your customer's, employee's, and vendor's banking information--Provides you with a full audit trail of all transactions--Enables you to manage untransmitted transactions (temporary holding, permanent holding, etc...)
QuickBooks® is a registered trademark of Intuit
1.5.4.1 Connecting to a company
First time connection
Start the connection process by selecting the Home tab then QuickBooks integration. If you are using aversion prior to 2013 from the main menu select QuickBooks > QuickBooks Integration.

Bank Positive Pay 38
© 2013 Treasury Software
If nothing appears to be happening, QuickBooks is waiting for you to grant permissions. Click on your Windows toolbar to access QuickBooks.
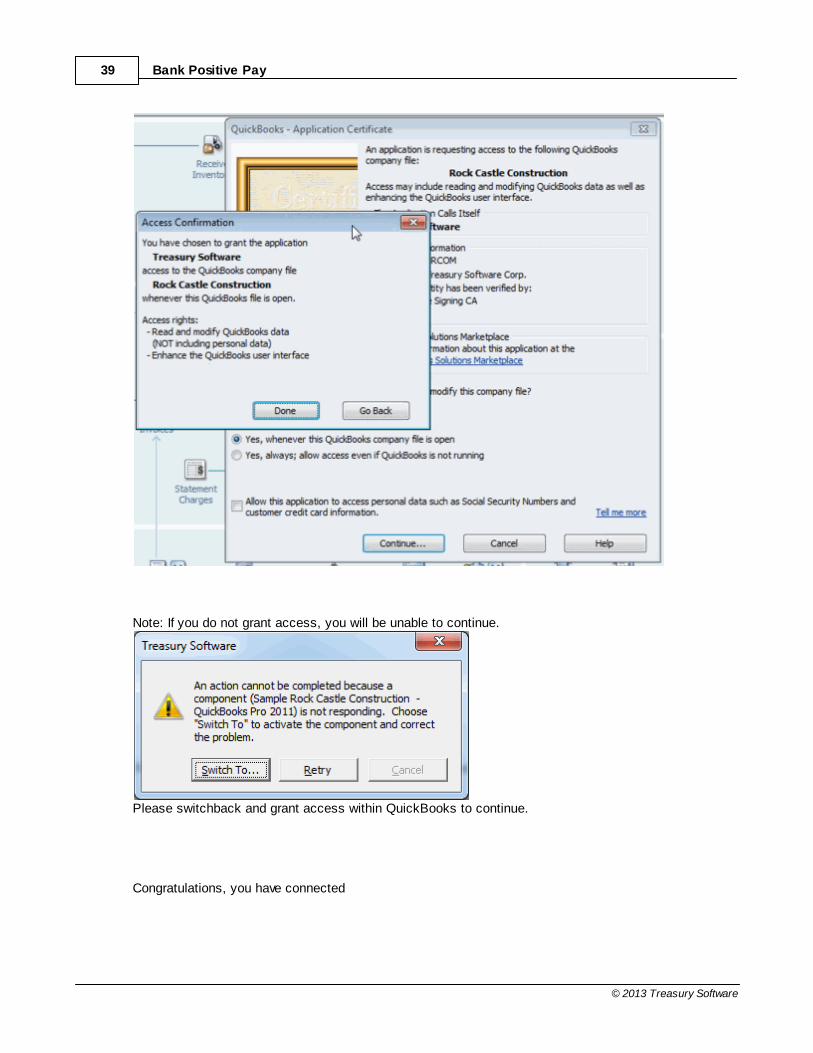
The first time Bank Positive Pay attempts to connect to your QuickBooks company, you will beprompted by QuickBooks to grant access. Note: You can leave the bottom check box un-checked.Please grant access to continue.
QuickBooks will prompt your confirmation. Click 'Done'.
Bank Positive Pay39
© 2013 Treasury Software
Note: If you do not grant access, you will be unable to continue.
Please switchback and grant access within QuickBooks to continue.
Congratulations, you have connected
Bank Positive Pay 40
© 2013 Treasury Software
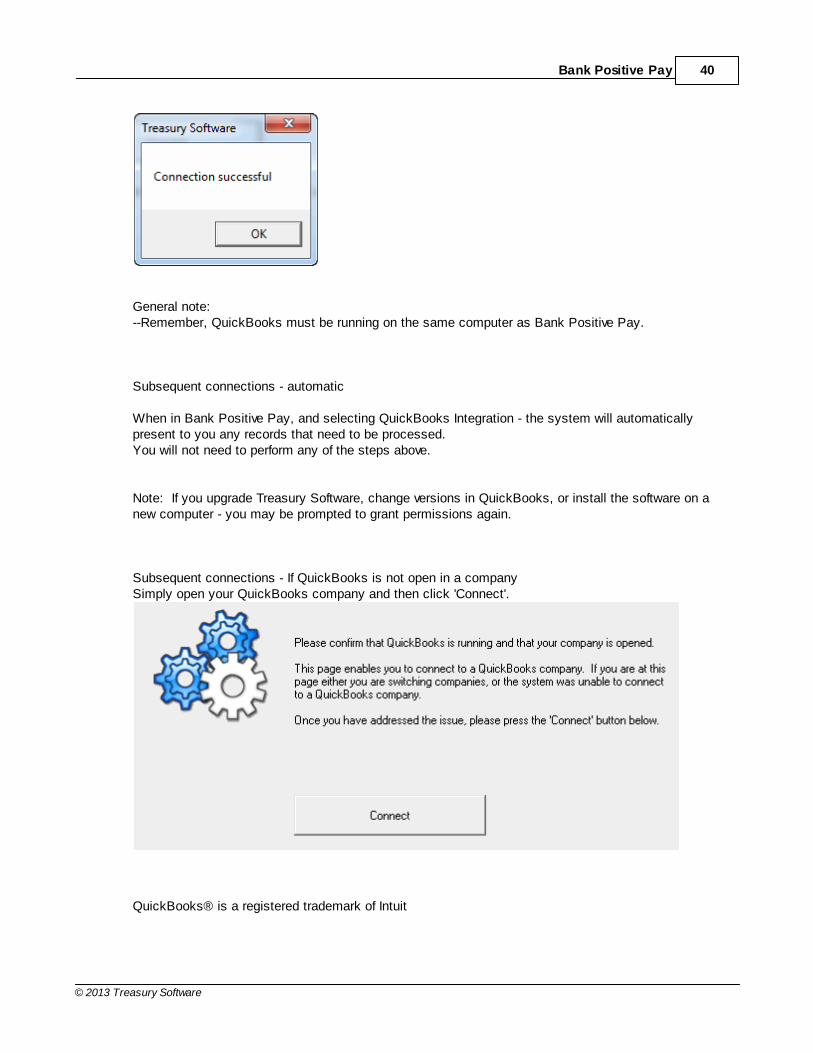
General note:--Remember, QuickBooks must be running on the same computer as Bank Positive Pay.
Subsequent connections - automatic
When in Bank Positive Pay, and selecting QuickBooks Integration - the system will automaticallypresent to you any records that need to be processed.You will not need to perform any of the steps above.
Note: If you upgrade Treasury Software, change versions in QuickBooks, or install the software on anew computer - you may be prompted to grant permissions again.
Subsequent connections - If QuickBooks is not open in a companySimply open your QuickBooks company and then click 'Connect'.
QuickBooks® is a registered trademark of Intuit
Bank Positive Pay41
© 2013 Treasury Software
1.5.4.2 Setup - Treasury Software
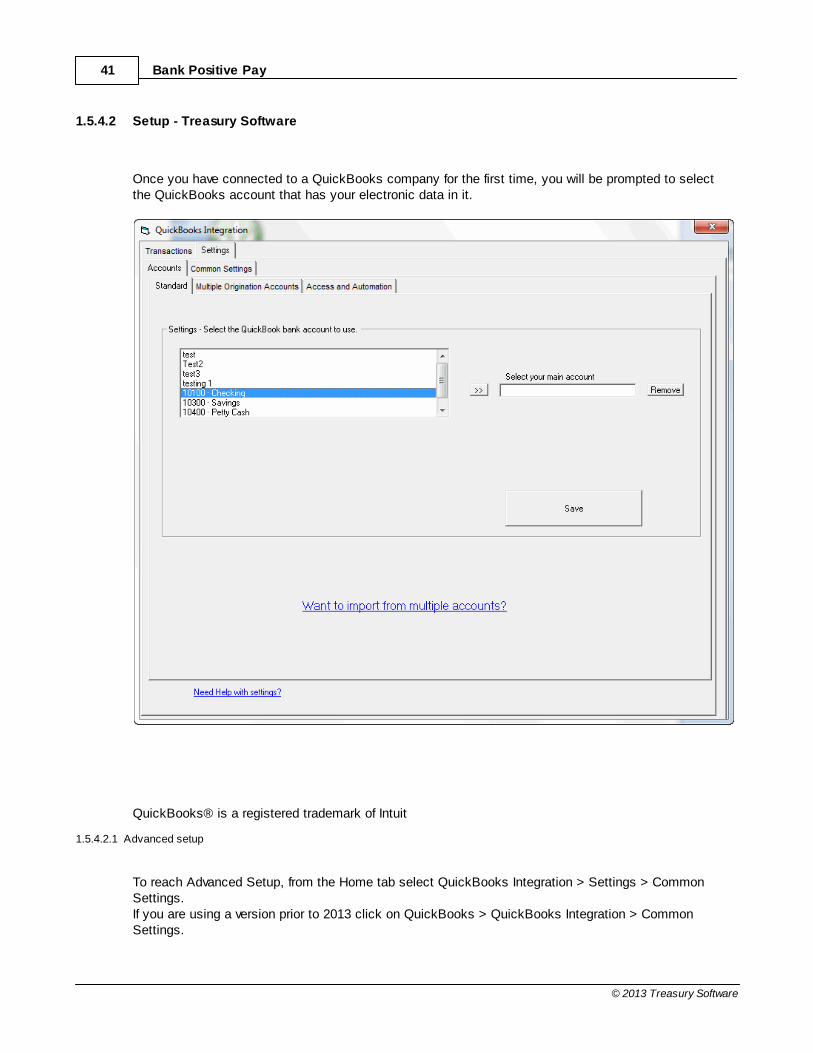
Once you have connected to a QuickBooks company for the first time, you will be prompted to selectthe QuickBooks account that has your electronic data in it.
QuickBooks® is a registered trademark of Intuit
1.5.4.2.1 Advanced setup
To reach Advanced Setup, from the Home tab select QuickBooks Integration > Settings > CommonSettings.If you are using a version prior to 2013 click on QuickBooks > QuickBooks Integration > CommonSettings.

Bank Positive Pay 42
© 2013 Treasury Software
Typically, these settings do not need to be changed.
Effective DateAs you operate your business, each transaction date is recorded per your wishes in QuickBooks.Sometimes you pre-date or post-date transactions, which is fine.
However, when electronic transactions are sent to your bank, they are typically expecting the date yousend them to be in the future - as this is the 'effective date' of the transaction.
To minimize any chance of post-dated transactions, Bank Positive Pay's default setting is the latter ofthe QuickBooks date and the next business date (as displayed in the second option).
You can over-ride this setting as needed here.
Send transactions to Bank Positive PayThe default setting, and for ease of use - is to create a file once transactions are sent from QuickBooksto Bank Positive Pay.
However, you may prefer to over-ride this setting if:--you are editing records in Bank Positive Pay after sending them from QuickBooks--you are manually creating records in Bank Positive Pay--there are internal control measures which require another individual to create the file--bank procedures require batch totals - which you would get from Bank Positive Payor any other advanced situation.
Default From/To Date The transactions page displays by default from 15 days in the past to 15 days in the future.This range should cover any post-dated entries (15 days in the past), as well as any future entries - suchas payroll.

Bank Positive Pay43
© 2013 Treasury Software
If you are constantly changing the default dates on the report, you can save yourself some time andchange the default range here.
QuickBooks® is a registered trademark of Intuit
1.5.4.3 Importing transactions
To reach this transactions screen, from the Treasury Software main menu select the Home tab >QuickBooks Integration.If you are using a version prior to 2013 select QuickBooks > QuickBooks Integration > Transactions.
This screen is a 'Window' into your QuickBooks data. By default, it displays all records in yourQuickBooks account(s) that need be electronically transmitted.
Bank Positive Pay 44
© 2013 Treasury Software
Step #1 - View transactionsThe grid by default displays records which you have not yet processed. You can change the From andTo dates, as well as the default date range (details below).
In a basic situation, the system will display your new transactions - and all of them can be sent to BankPositive Pay. Bank Positive PayBank Positive Pay will then create a transmission file, which is sent toyour bank.
Summary counts and totalsThe summary counts and totals include all transactions which have completed profiles, have not yetbeen sent and have not been marked to be held.
Step #2 - Transmit to Bank Positive Pay
Click on the 'Send transactions to Bank Positive Pay' button to create a file with the eligible records inthe grid. You can then transmit the file to your bank.
QuickBooks® is a registered trademark of Intuit
1.5.4.3.1 Holding and over-riding records
In a perfect world, all of the transactions that you create in QuickBooks are to be sent for immediateelectronic processing.
As we know, this is not always the case. Sometimes payments are held temporarily - or permanentlycanceled and sometimes payments need to be resent.
Marking recordsBank Positive Pay provides you with the tools to do this. Uncheck the checkbox to display your recordcontrols (circled in red).

Bank Positive Pay45
© 2013 Treasury Software
Holding transactions - TemporarySelect the record(s) and click on 'Mark - Do not Import (temporary)'.This will mark the records as 'Do Not Import' during the current submission to Bank Positive Pay.
The records will be automatically displayed as available to be transmitted the next time your view therecords.
Notes:--If you re-run or refresh the grid prior to transmission, this will clear your marked records. You will needto re-mark them.
Holding transactions - PermanentSelect the record(s) and click on 'Mark - Do not Import (permament)'.
If you no longer want a transaction to be transmitted electronically, you can mark the record(s) as 'Mark- Do not Import (permanent)'

Bank Positive Pay 46
© 2013 Treasury Software
Marking records 'Do not transmit' stop the transactions from being imported now - or in the future.
If in the future, you decide that you need to process this record, see the instructions below for 'Mark -Import (over-ride)'.
Mark - Import (over-ride).Select the record(s) and click on 'Mark - Import (over-ride)'.
Use 'Mark - Import (over-ride)' if you need to:--process a transaction that you previously put on a permanent hold, or--you need to re-transmit a record.
An example of re-transmission: If a bank account number that a vendor gave you was wrong - and theoriginal transaction was returned. You can then use the over-ride feature to re-transmit this.
Note: In order to select a record, you'll need to view it. However by default, previously transmittedrecords and those placed on permanent hold - are suppressed from being displayed. See the sectionbelow to display these records.
Displaying previously transmitted and permanent 'on-hold' recordsBy default, Bank Positive Pay will suppress displaying previously transmitted and permanent 'on-hold'records. To display these records, un-check 'Hide transactions already imported'.

Bank Positive Pay47
© 2013 Treasury Software
Why would I want to view these records?Typically, you would not want to view these records - that is why we suppress them by default.However, you would want to display these records for:--1. If you need to re-transmit a transaction that originally failed.--2. If you need to transmit a record that you placed on permanent hold.
QuickBooks® is a registered trademark of Intuit
Bank Positive Pay 48
© 2013 Treasury Software
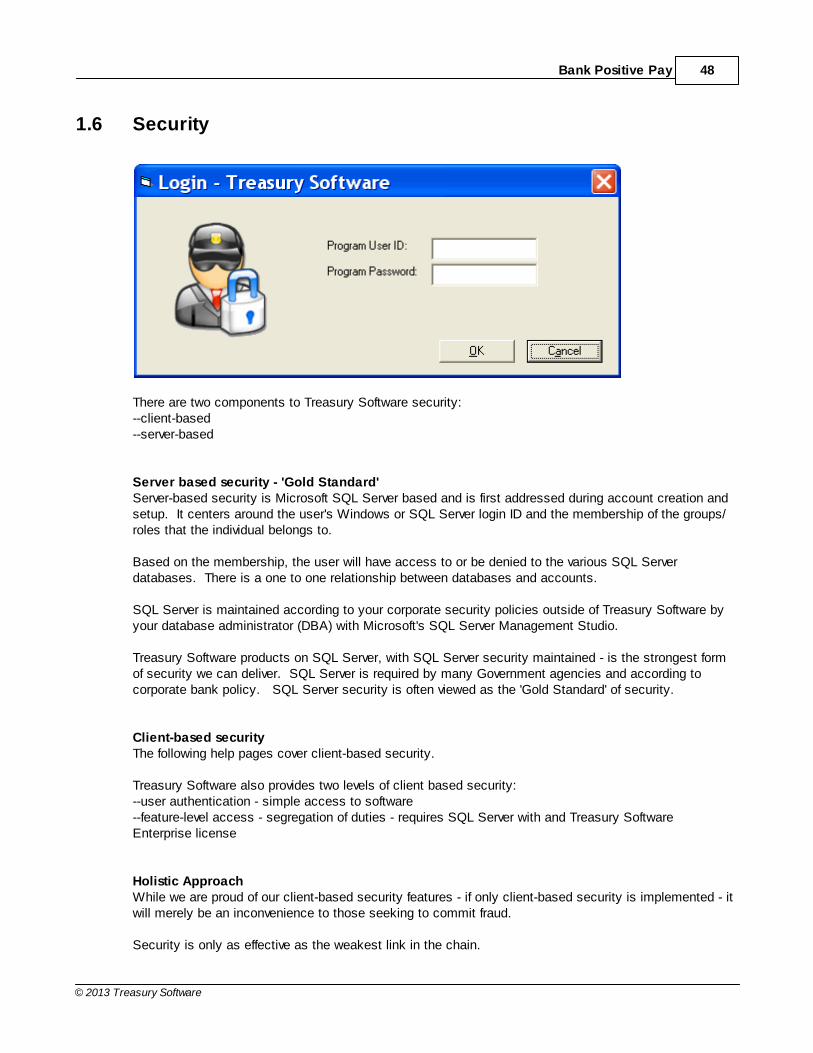
1.6 Security
There are two components to Treasury Software security:--client-based--server-based
Server based security - 'Gold Standard'Server-based security is Microsoft SQL Server based and is first addressed during account creation andsetup. It centers around the user's Windows or SQL Server login ID and the membership of the groups/roles that the individual belongs to.
Based on the membership, the user will have access to or be denied to the various SQL Serverdatabases. There is a one to one relationship between databases and accounts.
SQL Server is maintained according to your corporate security policies outside of Treasury Software byyour database administrator (DBA) with Microsoft's SQL Server Management Studio.
Treasury Software products on SQL Server, with SQL Server security maintained - is the strongest formof security we can deliver. SQL Server is required by many Government agencies and according tocorporate bank policy. SQL Server security is often viewed as the 'Gold Standard' of security.
Client-based securityThe following help pages cover client-based security.
Treasury Software also provides two levels of client based security:--user authentication - simple access to software--feature-level access - segregation of duties - requires SQL Server with and Treasury SoftwareEnterprise license
Holistic ApproachWhile we are proud of our client-based security features - if only client-based security is implemented - itwill merely be an inconvenience to those seeking to commit fraud.
Security is only as effective as the weakest link in the chain.

Bank Positive Pay49
© 2013 Treasury Software
Locking down the 'front door' (client), only to leave the 'back door' (server-data) open is not an idealsecurity model.
Adding to security concerns - The input to Treasury Software is an unprotected file - typically aspreadsheet, and the output for ACH Universal and Positive Pay is an ASCII file.
Client workstation access controlFor those environments requiring high security, we highly recommend the use of Windows OperatingSystem and Network Operating System based features, to limit physical and remote access to theTreasury Software client.
Note: All Treasury Software security is applied on an account by account basis.
1.6.1 Setup
Menu selection and Setup-login
Menu SelectionThe security menu selection by default is hidden. Please note: The displaying/suppression of the menuchoice has no effect on the security level.
To view the menu choice, from the main menu select File > Options > General > System tab and turn'Suppress Security Menu' to 'Display'. You will then need to exit and re-enter this account (display is ona per account basis).
Login - setupTo access the login screen, from the main menu select File > Security > Security Administration
Default User name adminDefault Password password

Bank Positive Pay 50
© 2013 Treasury Software
Once logged in (only an admin can pass through setup security), you will be at the security main page.
Prompt User Integrate with WindowsAuthentication Challenge screen prompting the
user to login each time the userstarts the software and thendetermines whether access shouldbe granted.
Uses the Windows Login ID toauthenticate and then determineswhether access should begranted.
Segregation of duties Same challenge screen as above,plus grants/restricts access tofeatures on a per user/role basis.
Only available on SQL Server witha Treasury Software Enterpriselicense.
Same authentication as above,plus grants/restricts access tofeatures on a per user/role basis.
Only available on SQL Server witha Treasury Software Enterpriselicense.

Bank Positive Pay51
© 2013 Treasury Software
Multiple Accounts - Security is applied on an account by account basisIf you have more than one account, you will need to enter into each account you want to protect andmake your security selection.
Tips:--Do not put security on the Sample account (do not place 'real' account numbers, etc.. in the samplesetup)--Change the default admin password--Use a Windows Operating Screen screen saver with password protection
Note: All Treasury Software security is applied on an account by account basis.
1.6.2 Users-Add
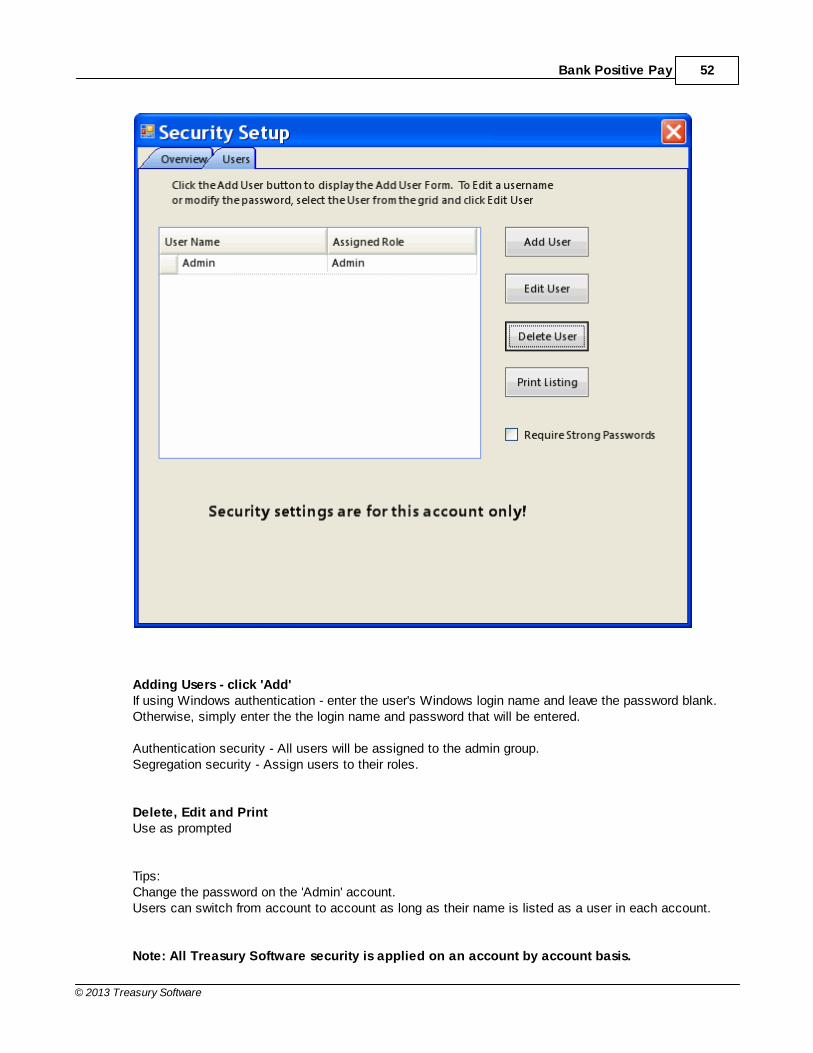
Users
Bank Positive Pay 52
© 2013 Treasury Software
Adding Users - click 'Add'If using Windows authentication - enter the user's Windows login name and leave the password blank.Otherwise, simply enter the the login name and password that will be entered.
Authentication security - All users will be assigned to the admin group.Segregation security - Assign users to their roles.
Delete, Edit and PrintUse as prompted
Tips: Change the password on the 'Admin' account.Users can switch from account to account as long as their name is listed as a user in each account.
Note: All Treasury Software security is applied on an account by account basis.

Bank Positive Pay53
© 2013 Treasury Software
1.6.3 Segregation of duties
Segregation of duties security is available on SQL Server platforms with an Enterprise license fromTreasury Software
PermissionsPermissions are granted on a role by role basis
Notes:--Check the 'Access to the Account' checkbox to allow the user entry into the account. Leaving thisunchecked is the same as removing them from the user list. Use this checkbox when there is atemporary vacancy and you do not want to reset the permissions.--Your tabs will differ slightly based on your applications that you are running.

Bank Positive Pay 54
© 2013 Treasury Software
Note: All Treasury Software security is applied on an account by account basis.
1.6.4 Roles
Segregation of duties security is available on SQL Server platforms with an Enterprise license fromTreasury Software.
Notes:--You only need to maintain roles for Feature level security.--You cannot delete the admin role.
Tip: Create roles before you add users. This way, you only need to be in users once (you don't have togo back).
Note: All Treasury Software security is applied on an account by account basis.
Bank Positive Pay55
© 2013 Treasury Software
1.7 Reference
1.7.1 Remote Desktop (Terminal Services / Citrix) Platform
Remote Desktop (Terminal Services/ Citrix) Platform)
For the purposes of this help page, the term 'Remote Desktop' will include Terminal Services and Citrix.
InstallationFor instructions on initial setup and system requirements, please see our Installation check list at:http://www.treasurysoftware.com/support2-Installation-Citrix.html
Turn On/OffTo turn Remote Desktop on or off:Enter into an account and from the main menu select File > Maintenance > 'Remote Desktop' tab. Check / (uncheck) the 'Enable' check box. Exit and re-enter into the system.
Understanding Remote Desktop ModeSimple (non-Remote Desktop Mode)In a simple desktop or SQL Server environments, when a user starts Treasury Software, the systemlooks for a settings file which contains a catalog of accounts, Treasury Software licensing information,as well as user-based preferences.
Typically only one settings file is on a computer. This file is opened in 'exclusive' mode - in that multipleusers should not read/write to the file. While this is not an issue when a computer is in use by oneperson - it needs to be addressed if the computer is a Remote Desktop Server.
Remote Desktop ModeOnce Treasury Software is turned 'on' for Remote Desktop Mode, the system will protect the originalsettings file. Remember - the settings file is user specific. More than one user should not access thefile at a time.
WARNING - Unexpected results will occur if Treasury Software is installed on a RemoteDesktop Server and Treasury Software's Remote Desktop Mode is not turned 'on'.
Technical discussion - 'Under the hood'SimpleIn a simple environment, the settings file is accounts.brd and is located at c:\Program Files\TreasurySoftware\version xxxx\accounts.brd (or for Windows 7 .c:\Users\Public\Treasury Software\accounts.brd)
Remote DesktopWhen the system is 'switched' to Remote Desktop, the system protects the accounts.brd from beingaccessed.
As each user starts Treasury Software for the first time, the system creates an accounts.brd specific for

Bank Positive Pay 56
© 2013 Treasury Software
that individual, and it is placed in the \users directory.Notes:The accounts.brd file is appended with their login id.The users directory will either below the Program Files\Treasury Software tree (Windows XP), or in theUsers\Public\Treasury Software tree (Vista, Windows 7).
Planning - 'When' to turn on Remote Desktop modeRemember: The system's accounts.brd is used as a template for each user's accounts.brd file. Everything that you do in the system PRIOR to a user logging in for the first time will be included in thatnew user's accounts.brd.
Therefore:If you create two new accounts (ie. Checking and Saving) prior to any users logging in - each user whenlogging in for the first time - will have Checking and Savings accounts in their catalog.
As a corollary, if you are the system administrator and make changes to the system, such as enteringnew license codes - this information will:--not be available to existing users (their accounts.brd's have already been created)--will be available to any new users, as the system will use the updated accounts.brd as a template.
Making system changes after users have already logged in1. Make Treasury Software temporarily unavailable to users.2. Enter into Treasury Software through the Remote Desktop as an administrator - not as a user througha published application (Citrix).3. Enter into an account.4. Turn off the Remote Desktop function (File > Maintenance > Remote Desktop).5. Exit, and then re-enter Treasury Software. Enter into an account. Confirm that the Remote Desktopfunction is off.6. Perform any maintenance, add any licenses, or add any accounts as needed.As a reminder - you are now updating the accounts.brd file. This will be used as a template for each ofyour users.7. Turn the Remote Desktop function back 'on' (File > Maintenance > Remote Desktop).8. Exit the software.
OptionalIf you want to force this change to all existing users, you will need to delete the user settings files. Then, once each user logs in - the system will create a new settings file for them (using the newlyupdated settings file as a template).
Warning - Deleting the user's settings files will reset all of their settings to the default settings file (whichyou just updated).This includes:--License information--Account catalogs--SQL Server server name and authentication method (no effect if using Windows Authentication)--Minor settings
To delete the user's settings files - using Windows Explorer - delete the contents of the \users directory.The files in the folder will have a syntax of [login id]_accounts.brd.
Bank Positive Pay57
© 2013 Treasury Software
The \users directory can be located at c:\Program Files\Treasury Software\version XXXX XX\users\If the folder is empty (on Vista or later), then look to thec:\Users\Public\Treasury Software\users\ directory.
9. Make Treasury Software available again to your users.
For some reason, if there is a setting that you missed - or wish to change - you can repeat this process.
1.7.2 How do I stack multiple accounts in one file?
How do I stack multipleaccounts in one file?
Top Previous Next
Bank Positive Pay > Advanced Topics > How do I stack multiple accounts in one f ile?
How do I stack multiple accounts in one transmission file? First configure Bank Positive Pay as if you were only transmitting one account - that means enteringthe Bank Express Code, entering transmission settings, etc... Perform at least one full test of importing and file creation. OverviewThe process for multiple origination account file creation is essentially the same as for a single filecreation. The only differences are:--the data must contain a field with the account number (if not available, Treasury Software can provideoptional custom scripting)--the transmission file will contain 'stacked' data sets, each set containing different account information--any bank identifiers should all be the same (same bank number)--The file can contain up to three header records, one batch header, and up to an equal number offooters. During the import process, you will map the account number field as the 'Origination_Account' field. During the export process, you will substitute all occurrences of the Bank_Account field with the'Origination_Account' field (including the detail section). Step by StepI. Setup the transmission file formatFrom the main menu select 'File', 'Options', Transmit to Bank', 'Data' tab. Click on 'File Header'. Change the drop down selection box from 'Header - Top' to 'Batch Header'. 1. Enter the header format using the 'Header - Top' as a guide. Note: Substitute 'Origination Account'for 'Bank_Account' in the Batch Header. 2. Switch back to 'Header - Top' and delete the mapping template. Click 'Done'. Click on 'File Footer'. Change the drop down selection box from 'Footer - Bottom' to 'Batch Footer'. 3. Enter the footer format using the 'Footer - Last Line' as a guide. Note: Substitute 'Origination

Bank Positive Pay 58
© 2013 Treasury Software
Account' for 'Bank_Account' in the Batch Footer. 4. Switch back to 'Footer - Last Line' and delete the mapping template. Click 'Done'. Note: You can have any combination of headers and footers, as specified by your bank. II. Setup the Import MappingWhen importing your data, map the field containing your account numbers as the'Origination_Account'. Notes:--This feature requires the account number to be a field on each transaction. Treasury Software canprovide optional scripting/lookup table functionality if this is not available.--The bank number, also known as region number, should be the same for all accounts.--Of course, confirm and arrange with your bank that you will be sending consolidated files. Not allbanks are equipped to handle this.
1.7.3 Frequently Asked Questions (FAQ)
1.7.3.1 Changing Debit and Credit Text
Overview
Debit and Credit text is used in conjunction with the Sign field to identify whether a transaction in a file isa debit or a credit. Follow the steps below to enter the debit and credit text for your data.
Steps
From the main menu select File, then Options, then General.
In the "Text for Debit" field, enter the text to identify a debit transaction. The default is "debit".
In the "Text for Credit" field, enter the text to identify a credit transaction. The default is "credit".
When finished, click Close to save your changes.
1.7.3.2 Changing File Transmission Method
Overview
After creating a Positive Pay file from your data, it must be transmitted to your bank to be processed.
Contact your bank to find out how they wish to receive your Positive Pay files. Follow the instructionsbelow to set up transmission methods based on their preference.
Loading Transmission Options
Select File from the main menu.
Select Options, then Transmit to Bank
Transmission Options screen will be displayed (Figure 1 below).

Bank Positive Pay59
© 2013 Treasury Software
There are five possible methods of transmitting a file to your bank:None File will be created but not transmitted. FTP Transmit via FTP built into Bank Positive Pay. See Settings to modify the FTP settings.Web Upload Transmit via a bank web page portal. Type the portal address into the textbox for Bank
Positive Pay to load the page automatically in your default browser.Email Transmit via email sent by Bank Positive Pay. Not recommended.Other Transmit using an optional method, including modem. Rarely used.
FTP
FTP, File Transfer Protocol, is a method of transferring files. In most situations, you will upload yourfiles to a specific directory on the FTP server that only you have access to. This secures your files fromparties other than the bank from being able to access them.
To modify FTP settings, click the Settings link listed with FTP in Figure 1, or click the FTP tab. Figure 2(below) will be displayed.
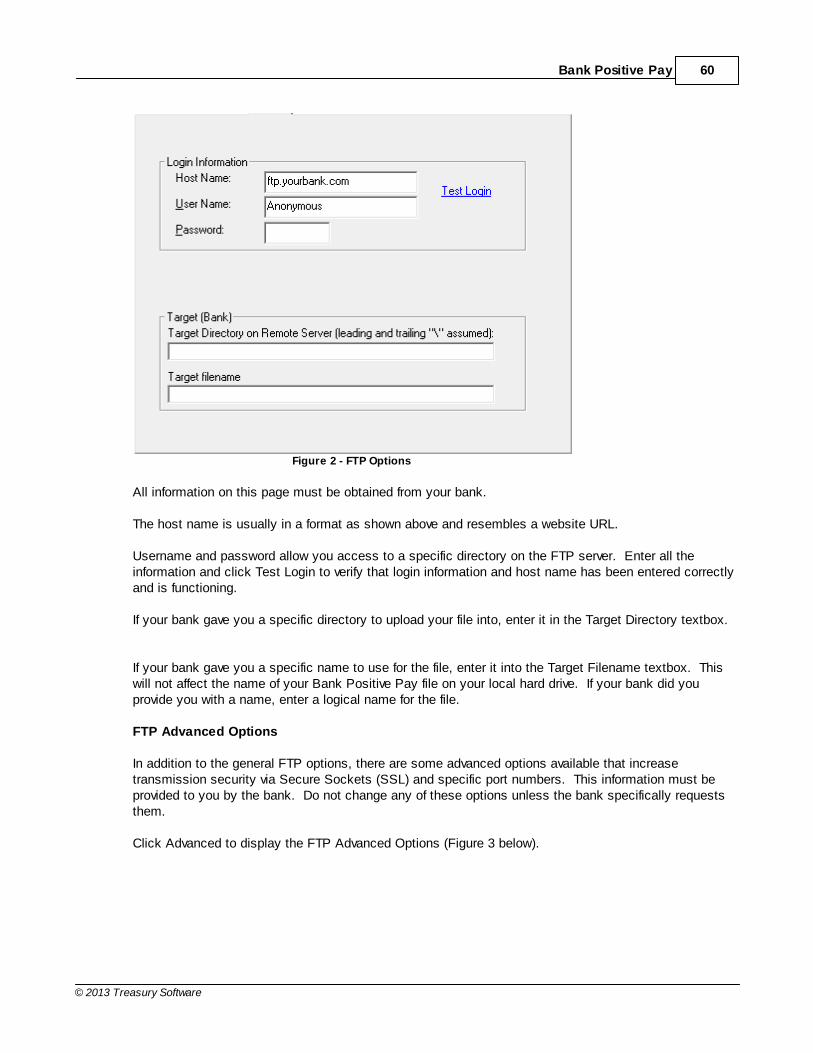
Bank Positive Pay 60
© 2013 Treasury Software
Figure 2 - FTP Options
All information on this page must be obtained from your bank.
The host name is usually in a format as shown above and resembles a website URL.
Username and password allow you access to a specific directory on the FTP server. Enter all theinformation and click Test Login to verify that login information and host name has been entered correctlyand is functioning.
If your bank gave you a specific directory to upload your file into, enter it in the Target Directory textbox.
If your bank gave you a specific name to use for the file, enter it into the Target Filename textbox. Thiswill not affect the name of your Bank Positive Pay file on your local hard drive. If your bank did youprovide you with a name, enter a logical name for the file.
FTP Advanced Options
In addition to the general FTP options, there are some advanced options available that increasetransmission security via Secure Sockets (SSL) and specific port numbers. This information must beprovided to you by the bank. Do not change any of these options unless the bank specifically requeststhem.
Click Advanced to display the FTP Advanced Options (Figure 3 below).

Bank Positive Pay61
© 2013 Treasury Software
Figure 3 - FTP Advanced Options
Secure Sockets Layer, or SSL, is a method of encrypting a transmission stream. To enable it at yourbank's request, click the Bank Uses SSL Security checkbox. Select the type of SSL by clicking theappropriate radio button. Unless notified specifically by the bank, leave Automatic selected.
A Remote Port Number specifies a very specific port number. This offers the FTP server security fromoutside threats. Click Change Port and enter the port number provided by the bank, if any.
If the bank requests a bank transfer mode different than ASCII, click the appropriate radio button.
To set up email transmission, click Settings corresponding to Email or select the Email tab. Note: Email transmission is rare and not recommended as it is not secure.

Bank Positive Pay 62
© 2013 Treasury Software
In the To: textbox, list the email addresses the file should be transmitted to. At least one of theseshould be the email address supplied by your bank for this purpose.In the CC: textbox, list the email addresses you want to copy on the email. To send yourself a copy, listyour email address or leave the Always send a copy to myself checkbox selected. For other people inyour organization that need a copy, see Notification below.In the From: textbox, list the email address to show as originating the email. This may be your personalemail address or an address set up specifically for this purpose.
Enter a Subject to use for each transmission.
Enter the file name to be used for the transmission, regardless of the its name on your local hard drive. This does not rename your local copy.
Enter your mail server. For example, mail.server.com or smpt.server.com.
To configure appropriate settings for the mail server, select the Email Advanced tab.
Email Advanced
In this tab, you will configure the advanced settings of your mail server. After clicking the EmailAdvanced tab, you will see Figure 5 (below).

Bank Positive Pay63
© 2013 Treasury Software
Figure 5 - Email Advanced Options
If you use a Windows program to download your email, such as Outlook of Thunderbird, you can retrievemost of these settings through Tools, then Options.
If your SMTP requires authentication for outgoing emails, click the checkbox.
For SMTP servers (most commonly used server type for sending email), enter the username andpassword.
For POP servers (rare for sending email), enter the server name, username, and password.
If your SMTP server uses a port other than port 25, enter it into the textbox.
Click Close.
Notification
Settings in the Notification tab are for setting up email addresses that should be notified of filetransmissions. For example, if the process of creating and transmitting is automated, you may want anemail sent to your personal address automatically notifying you that this has occurred.
Click the Notification tab to display it (Figure 6 below).

Bank Positive Pay 64
© 2013 Treasury Software
Figure 6 - Notification
To enable notification, click the checkbox.
Enter the email addresses that need to receive the notification in the To: textbox.
Enter the email address to use as the From address in the From: textbox.
Enter an appropriate subject.
1.7.3.3 I am on the Desktop platform with 1 workstation license. If I purchase an additionalworkstation, can I share data?
Q: I'm on the Desktop platform and have 1 workstation. If I purchase an additional workstation license,can I share data between the two?
A: No. You will need to upgrade to the SQL Server Express or SQL Server Platform. With multipleworkstations you can have a separation of data (payroll on one workstation, checking on another), butthe two are unable to share between them.
1.7.3.4 What is an account?
Q: What is an account?
A: An account is the Bank Positive Pay front-end to a database that stores all the data you import. Forexample, a Payroll account access a Payroll database (either a .brd on the Desktop platform or aPayroll database on the SQL Server platform). This manual uses the term "account" instead of"database" because that is how Bank Positive Pay refers to them.

Bank Positive Pay65
© 2013 Treasury Software
1.7.3.5 I purchased Positive Pay, but the Main Screen says ACH Universal
Q: I purchased a license for Positive Pay, but the Main Screen says ACH Universal.
A: Select the Settings tab > Maintenance > Switch Programs.If you are using a version older then 2013. Select File from the main menu, then Programs. SelectPositive Pay Only and click Continue.
1.7.3.6 I have one source file but multiple databases. How do I split the file into the correctdatabase?
Q: I have one source file, but multiple Positive Pay databases. How do I split the file into the appropriatedatabase?
A: Use an import filter. See Filtering Imports.
1.7.3.7 I have a non-standard date format. How do I use it?
Q: I have a non-standard date format. How do I use it in Bank Positive Pay?
A: A non-standard format is a format which isn't supported by your Windows (Control Panel, RegionalSettings) Settings.
A date format of 31/12/2002 is non-standard in the United States, but is standard in the United Kingdom.
To import non-standard formats, use a Custom Date Import (CDI).
From the main menu, select File, then Options, then General.
In the Import tab, set "Custom Date Import (CDI) G/L:" to On
Select Format, (31/12/2002, 2002/12/31, etc...)
Select a separator, (slash, colon, hyphen, none)

Bank Positive Pay 66
© 2013 Treasury Software
If the date is embedded within another field, see My date field is embedded within text.
1.7.3.8 My date field is embedded within text. How do I import it?
Q: My date field is embedded within text. How do I import it?
Use a Custom Date Import (CDI).
From the main menu, select File, then Options, then General.
In the Import tab, set "Custom Date Import (CDI) G/L:" to On
In "CDI: Source Format G/L", select your date format from the dropdown box (31/12/2002, 2002/12/31,etc...)
In "CDI: Separator G/L", select your separator, (slash, colon, hyphen, none)
In "CDI: Embedded Start G/L" enter the date's first position (counting from the left) within the field. Forexample, when date is in a field by itself, this position is 0. If there were three characters prior to thestart of the date, you would enter 4.
1.7.3.9 My bank requires a login record
Q: My bank requires a login record. How do I set up Bank Positive Pay to provide one?
A: A login record, if used by the bank, is the very first line in an Bank Positive Pay file, even before thefile header record. It is used by the bank to identify the sender. Distinct from Bank Positive Payidentification, the bank will use this information for processing and tracking purposes.
1. Obtain the specific login record from the bank.2. Start the software, load the account you have created in Bank Positive Pay.3. Select Settings > Transmission options. If you are using a version prior to 2013. Select File menu >Options > Transmit to Bank.4. Scroll to the Local File tab.5. Key in the login record exactly as specified by the bank into the textbox labeled "Login record"6. Click Close to save your changes.
Bank Positive Pay will now include the login record in every Bank Positive Pay file made in that account.
1.7.3.10 ActiveX component can't create object
This is an environment issue typically related to:--failed installation--ActiveX component became unregistered--lack of permissions/rights to the user--another software package (other than Treasury Software) was installed after ours, and their settingsover-wrote ours.
Steps:Elevate rights1. View the error and confirm that the first error that they are seeing is related to this. If there is another

Bank Positive Pay67
© 2013 Treasury Software
error prior to this, address the other error first.
2. Have their IT representative log into their workstation with administrator rights. See if the issue can bere-created.
If the issue was not re-created - it is a permissions issue. Have their IT rep elevate the user's rights. Pay attention to the rights in the c:\Program Files\Treasury Software directory (and subdirectory). Stophere.
If the issue was not re-created, continue with #3.
Attempt to re-register the component3. Identify the component that is not working (lookup the line code) and attempt to register it.If the Operating System is later than Windows XP, please follow the instructions for registering acomponent at: http://www.treasurysoftware.com/support2-Vista-register-dlls.html
If this is a new installation - uninstall and reinstall. Otherwise perform an upgrade.If this is a new installation and the software has not worked before:4. If they are on desktop, backup their c:\Program Files\Treasury Software\version 201X XX\datadirectory to the their network.
5. Uninstall through the Control Panel. When finished - delete the c:\Program Files\Treasury Software directory
6. Download a current copy of Treasury Software and install it.It is critical that you watch the installation of the software and confirm that there were no errors duringthe installation. It is possible to have an error and 'click through it' to continue.
Test the new installation. If there is still an error, escalate the issue at this point.
1.7.3.11 ADO/MDAC Re-Installing
1 – Yes…After a clean install, the first error message received was the “SwitchPrograms_SampleData”after clicking the ACH Universal Sample Account Demo from the welcome new users screen.
ADO - FAQ - http://support.microsoft.com/kb/183606 (link on the page is to the MDAC download)
MDAC Downloads - http://msdn2.microsoft.com/en-us/data/aa937730.aspx
1.7.4 Maintenance - Desktop
Overview
The articles in this section provide information on backing up and restoring your database (Desktopplatform only) as well as how to upgrade ACH Universal and apply current service packs.
Database
See Database Backup for information related to scheduling and working with database backups.

Bank Positive Pay 68
© 2013 Treasury Software
See Restore Database for information on how to restore a database from a backup.
Archiving
See Database Archiving for information on archiving records. This is for efficiency rather than backuppurposes.
Upgrades and Service Packs
See Upgrade ACH Universal for steps on upgrading ACH Universal to the most recent version.
See Download Service Pack for steps on how to download and install the most recent service pack.
1.7.4.1 Database Backup
Overview
Backing up is a necessary part of working with all data. By backing up Bank Positive Pay on a regularbasis, your data will be current in the event of an emergency and you will minimize data loss. Note: Thisarticle only applies to the Desktop platform. Contact your Database Administrator for procedures andpolicies regarding SQL Server backups.
Database backups are safeguards against unforeseeable computer errors (file corruption, systemfailure). By creating regular database backups, the chance of data loss is minimized as there will be aregular backup in place. Bank Positive Pay is set by default for automatic backups. This can be turnedoff (not recommended) or your own backups scheduled according to your own needs.
Internal Database Storage
Bank Positive Pay stores all information for each account in a .brd file. There is 1 brd file for eachaccount and they share the same name. For example, if you create an account named Payroll, therewill be a Payroll.brd database file that contains all the data imported into that account. Never place thebrd file on a network drive and attempt to share it among multiple workstations. Multiple workstationlicenses should only be used for totally separate database files (through totally separate accounts). Ifyou need to share data, you must use the SQL Server platform.
Regardless of using Bank Positive Pay default backup policy or implementing your own schedule, thebackups are numbered automatically by Bank Positive Pay for identification. The most recent backupwill always have the extension .br1. The next most recent backup will have the extension .br2 and thethird most recent backup will have the extension .br3. If a database restoration is needed, restore usingthe br1 file first (as it is the most recent). By default the backups will be placed into the same directoryas the .brd. It is highly recommended that the backups are always stored in the same directory with thebrd file.
Automatic Backups (not for disaster recovery)
By default Bank Positive Pay will backup your database in a pre-determined schedule.
Note: The program uses this as a protection against database corruption. These backups are stored onthe same drive as the production database, and therefore will not proved for any protection on a harddrive crash or if there is any damage to the computer.
It is highly recommended to leave this option on. If you wish to turn it off:

Bank Positive Pay69
© 2013 Treasury Software
From the main menu, select File, then Options, then General. Select the System tab. Change the "Backup data on exit" option to No. Click Close to save yourchanges.
Manual Backups - Disaster recoveryFrom the main menu, select File > Backup.
We highly recommend backing up to a server that is backed up off-site.
1.7.4.2 Restore Database
Overview
Follow the steps below on the Desktop platform to restore a database backup. For example, if thedatabase becomes corrupted, restoration would be required.
Database Restoration Procedures
Please follow the steps at:http://www.treasurysoftware.com/support2-corrupt-database.html
1.7.4.3 Database Archiving
Database Archiving
Archiving is used to move older records from your main account database to a separate archivedatabase. This offers improved speed and efficiency in working with the main database. The archivedrecords are still accessible through ACH Universal for reports as needed. Archived records can also berestored to the main database should the need arise.
Before archiving records, you must create an account to hold the archive. The archive account nameshould match its main counterpart with "_archive" appended to the name. For example, the archiveaccount for an account "Payroll" should be "Payroll_archive." See Creating An Account for steps in thisprocess.
Select File from the main menu, then Archive/Restore. Click the Archive/Restore tab. You will seeFigure 1 (below).

Bank Positive Pay 70
© 2013 Treasury Software
The textbox shows that the archived records will be stored in Payroll_archive.brd. All records up to8/31/2007 will be archived. All records after that date will remain in the current account database (in thiscase, Payroll).
When the settings are correct, click Start. A prompt will appear containing the number of records to bearchived. Click Yes to archive the records, No to cancel.
When the archive is finished, click OK on the confirmation box. Click Done.
Restoring Archived Records
Follow these steps to restore archived records to the main database.
Select File from the main menu, then Open/Select Account.
Select the archive database (ends in "_archive").
Select File from the main menu, then Archive/Restore. Select the Archive/Restore tab. You will seeFigure 2 (below).
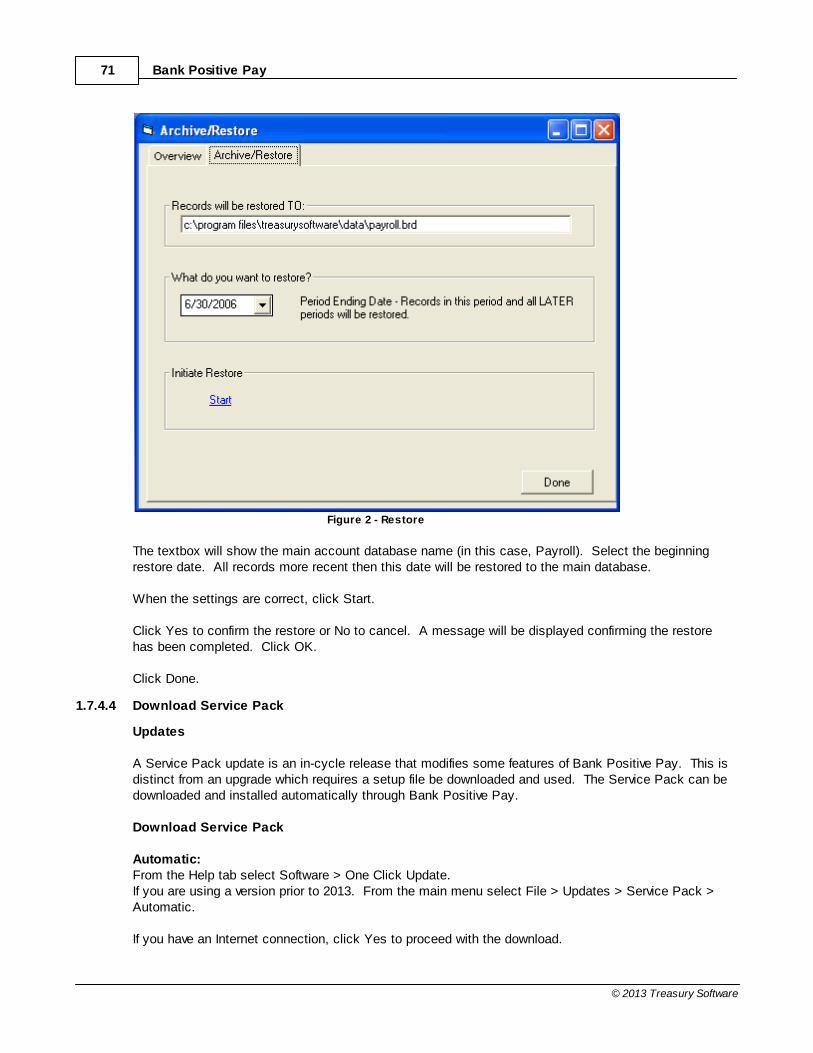
Bank Positive Pay71
© 2013 Treasury Software
Figure 2 - Restore
The textbox will show the main account database name (in this case, Payroll). Select the beginningrestore date. All records more recent then this date will be restored to the main database.
When the settings are correct, click Start.
Click Yes to confirm the restore or No to cancel. A message will be displayed confirming the restorehas been completed. Click OK.
Click Done.
1.7.4.4 Download Service Pack
Updates
A Service Pack update is an in-cycle release that modifies some features of Bank Positive Pay. This isdistinct from an upgrade which requires a setup file be downloaded and used. The Service Pack can bedownloaded and installed automatically through Bank Positive Pay.
Download Service Pack
Automatic:From the Help tab select Software > One Click Update.If you are using a version prior to 2013. From the main menu select File > Updates > Service Pack >Automatic.
If you have an Internet connection, click Yes to proceed with the download.

Bank Positive Pay 72
© 2013 Treasury Software
Bank Positive Pay will automatically download and install the newest service pack if not alreadyinstalled.
When prompted, close and restart Bank Positive Pay to complete the service pack installation.
If you have any issues with the automatic process please try the manual process.
Manual:From the Help tab select Software > Manual Update.If you are using a version prior to 2013. From the main menu select File > Updates > Service Pack >Automatic.
Please follow the steps outlined on the form.
1.7.4.5 Desktop Platform Upgrade
OverviewBank Positive Pay upgrades are released periodically to enhance functionality and offer new features.
Please follow the steps at our Support Center:http://www.treasurysoftware.com/support2-Install-Center.html
1.7.5 Legacy Help
We are proud of our continual development of Bank Positive Pay.
This folder contains help topics relevant to older versions of Bank Positive Pay. While the screens andinstructions may not apply to your version, we have included them to support our existing client base.
1.7.5.1 Accounts
Overview
All data imported into Bank Positive Pay are organized around an account. The account represents abank account used in the Bank Positive Pay files for making payments or receiving payments. This can

Bank Positive Pay73
© 2013 Treasury Software
be a checking account, depository account, or even a savings account.
Read Before Proceeding!
Never use the Sample account for live data. This account is for demonstration purposes only. Everytime Bank Positive Pay is started, data in the Sample account is automatically deleted. This includesany live data. Avoid possible data loss and always use an account created and set up specifically foryour organization's data. See Creating An Account to begin that process.
1.7.5.1.1 Creating An Account
Why create an account?Bank Positive Pay with a built-in account, Sample. Do NOT use this account for live data. The dataimported into Sample is deleted every time the program is started. From the standpoint of yourorganization's data, this is not what you want. The first step in using Bank Positive Pay is to create anaccount for your company data. If you need multiple accounts, follow the steps for each account.
Steps
There are actually two parts to creating an account in Bank Positive Pay.
1. Create the accountIn this step, you give the account a name and set the accounting period.
2. Setup the accountIn this step, you fill out the specifics of the account: Bank account number, Bank ABA/RoutingNumber, and other information that identifies your company in the ACH file.
The steps must be done in this order and both steps are required for an Bank Positive Pay file to becreated.
Next Step
Create the account
1.7.5.1.1.1 Account Creation
Overview
Account Creation is the first step in the process of creating an account for your company data in BankPositive Pay.
Create AccountSelect File from the main menu, then New Account. You will see the Account Creation Wizard (Figure 1below).

Bank Positive Pay 74
© 2013 Treasury Software
Figure 1 - Account Creation Wizard
The two choices are: Create a new account and save it to local catalog (most common choice)Open an already created account and add to local catalog
Leave the default and click Next.
Name The Account
On the next screen (Figure 2 below), name the account.
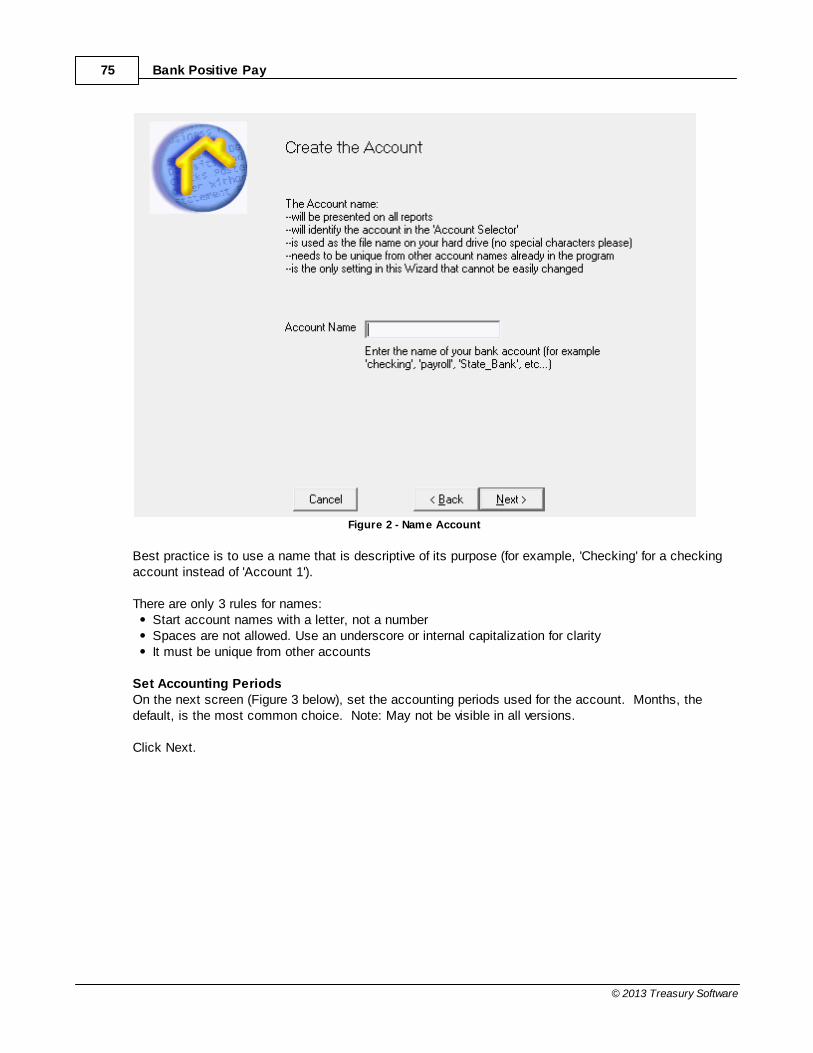
Bank Positive Pay75
© 2013 Treasury Software
Figure 2 - Name Account
Best practice is to use a name that is descriptive of its purpose (for example, 'Checking' for a checkingaccount instead of 'Account 1').
There are only 3 rules for names:Start account names with a letter, not a numberSpaces are not allowed. Use an underscore or internal capitalization for clarityIt must be unique from other accounts
Set Accounting PeriodsOn the next screen (Figure 3 below), set the accounting periods used for the account. Months, thedefault, is the most common choice. Note: May not be visible in all versions.
Click Next.

Bank Positive Pay 76
© 2013 Treasury Software
Figure 3 - Accounting Periods
Switch to New AccountThe next screen (Figure 4 below) allows you to switch to the newly created account and begin using it orstay in the current account. You can always switch to the new account at any time later.
Click Finish..

Bank Positive Pay77
© 2013 Treasury Software
Figure 4
Proceed to Account SetupThe final screen (Figure 5 below) that appears during the account creation process allows you toproceed immediately to Account Setup (click Yes) or skip setup at this time.
Figure 5
Next Step
Account Setup
1.7.5.1.1.2 Account Setup
Overview

Bank Positive Pay 78
© 2013 Treasury Software
In Account Setup, you will enter account information to identify your organization's bank account in theACH file.
Required
You must have already completed Account Creation.
Steps
Select File from the main menu, then ACH Setup.
The ACH Setup Wizard will be displayed. Click Next.
In Figure 1 (below), you will begin to enter the information that identifies your organization in the ACHfile. This is used by your bank, which is processing the ACH file, to identify the proper account to usefor the transactions. Unless explicitly stated, all fields are required.
Figure 1 - ACH Setup (Screen 2 of 6)
Immediate Destination Code The ABA or Routing Number of the bank processing the ACH file. For example, if you are transmittingthe file to ABC Bank, it would be the ABA or Routing Number of ABC Bank.
Immediate Destination NameThe name of the same bank from Destination Code. Maximum length is 23 characters.
Immediate Origin IDThis is bank-assigned. In most cases it is your organization's Federal Tax ID number, althoughsometimes it is the ABA Number. You must obtain this from the bank.
Immediate Origin NameYour company's name, as listed in the bank's records. Maximum length is 23 characters.
After filling out each field, click Next.
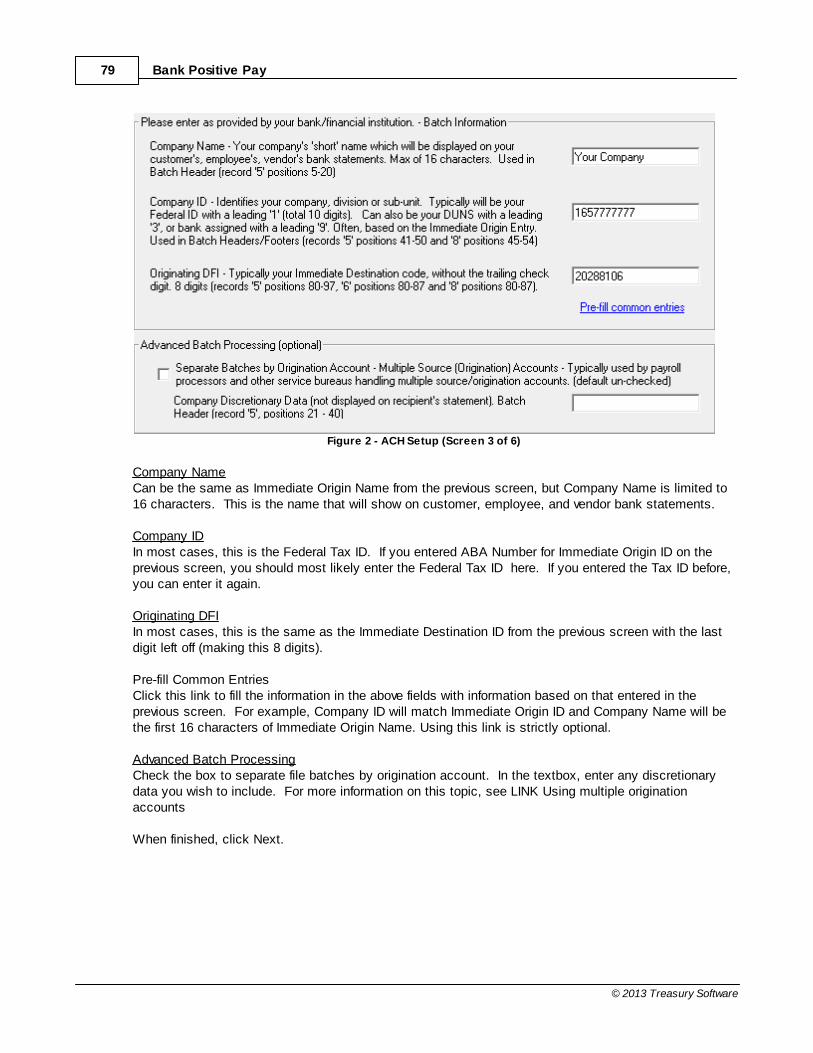
Bank Positive Pay79
© 2013 Treasury Software
Figure 2 - ACH Setup (Screen 3 of 6)
Company NameCan be the same as Immediate Origin Name from the previous screen, but Company Name is limited to16 characters. This is the name that will show on customer, employee, and vendor bank statements.
Company IDIn most cases, this is the Federal Tax ID. If you entered ABA Number for Immediate Origin ID on theprevious screen, you should most likely enter the Federal Tax ID here. If you entered the Tax ID before,you can enter it again.
Originating DFIIn most cases, this is the same as the Immediate Destination ID from the previous screen with the lastdigit left off (making this 8 digits).
Pre-fill Common EntriesClick this link to fill the information in the above fields with information based on that entered in theprevious screen. For example, Company ID will match Immediate Origin ID and Company Name will bethe first 16 characters of Immediate Origin Name. Using this link is strictly optional.
Advanced Batch ProcessingCheck the box to separate file batches by origination account. In the textbox, enter any discretionarydata you wish to include. For more information on this topic, see LINK Using multiple originationaccounts
When finished, click Next.

Bank Positive Pay 80
© 2013 Treasury Software
Figure 3 - ACH Setup (Screen 4 of 6)
Application - Standard Entry Class CodeThe default NACHA format is the PPD format. To change the default to a different format, select it fromthe dropdown box. To use CTX, select the CTX-EDI Subsets radio button. This will use the EPN-STP820 format.
For information on other non-CTX formats, see LINK NACHA FormatsFor information on CTX, see LINK CTX
Offset RecordIf your bank requires an offset record, click this checkbox. In Offset ABA/Routing #, enter the ABA or Routing Number for your organization's bank.In Offset Account #, enter your organization's bank account number.
Only use an offset record if your bank notifies you that it is required.
PreferencesIn the Default Text field, enter the description of the transaction that will show on customer, employee,and vendor bank statements. For example, you might enter "Payroll" for a direct deposit payment to anemployee.In the Default Effective Date dropdown box, select when you want the bank to process the transactionsor what the bank instructs you to enter. For example, some banks want an ACH file two days prior toprocessing. In that case, change the dropdown to Two Days. Note: The bank's rules determine the exact date of processing. Contact your bank for their exactpolicies.
When finished, click Next.

Bank Positive Pay81
© 2013 Treasury Software
Figure 4 - ACH Setup (Screen 5 of 6)
Profile LookupACH Universal has full support of profiles for creating payments. Profiles are not required by ACHUniversal, however, as it is capable of ad hoc payments. When using profiles, the lookup can be doneby Name or by ID Number (most common). You must ensure that the lookup field contains uniquerecords.
Checking or Savings AccountsIf your file contains a field that differentiates an account between a checking account and a savingsaccount, enter the appropriate checking account text into the textfield. ACH Universal will interpret allother text as indicating a savings account.
Consumer or Corporate AccountsSimilar to Checking or Savings Account text above, use text in this field to identify a consumer account. All other text in that field will cause ACH Universal to treat the record as a corporate account.
Pre-notificationPre-notifications are used to test a transmission to ensure all settings are correct before transmitting livedata. A pre-note is indicated in your data by a 0 amount. In the dropdown box, select the transactiontype you wish to test (DR - collecting funds or CR - paying funds).
When finished, click Next.
The next screen is the last screen in the process. In most cases, you can simply click Finish. Forinformation on the additional options, see ACH Setup - Advanced Options LINK.
You have finished creating and setting up an ACH Universal account. You can now begin importing datainto the account and transmitting ACH files.
Next Step
Importing Transactions

Bank Positive Pay 82
© 2013 Treasury Software
1.7.6 Bank Express Codes
Bank Express Codes
Treasury Software maintains an extensive list of positive pay transmission formats for banks of all sizes.
Due to the private nature of the layout, we have been asked by banks (some nicely, some not so nicely),to not post the layouts or make them otherwise publicly available.
We respect their wishes, and provide codes based on the format you have already received from yourbank.
1.7.6.1 918
Bank Express Code 918
This format is identical to 915, but it is used when there are multiple accounts, and the transmissionrecord needs to include the 'master' account number, and not the account number in the detail.
Note: Of course when transmitting the master account, the header record account number, and the
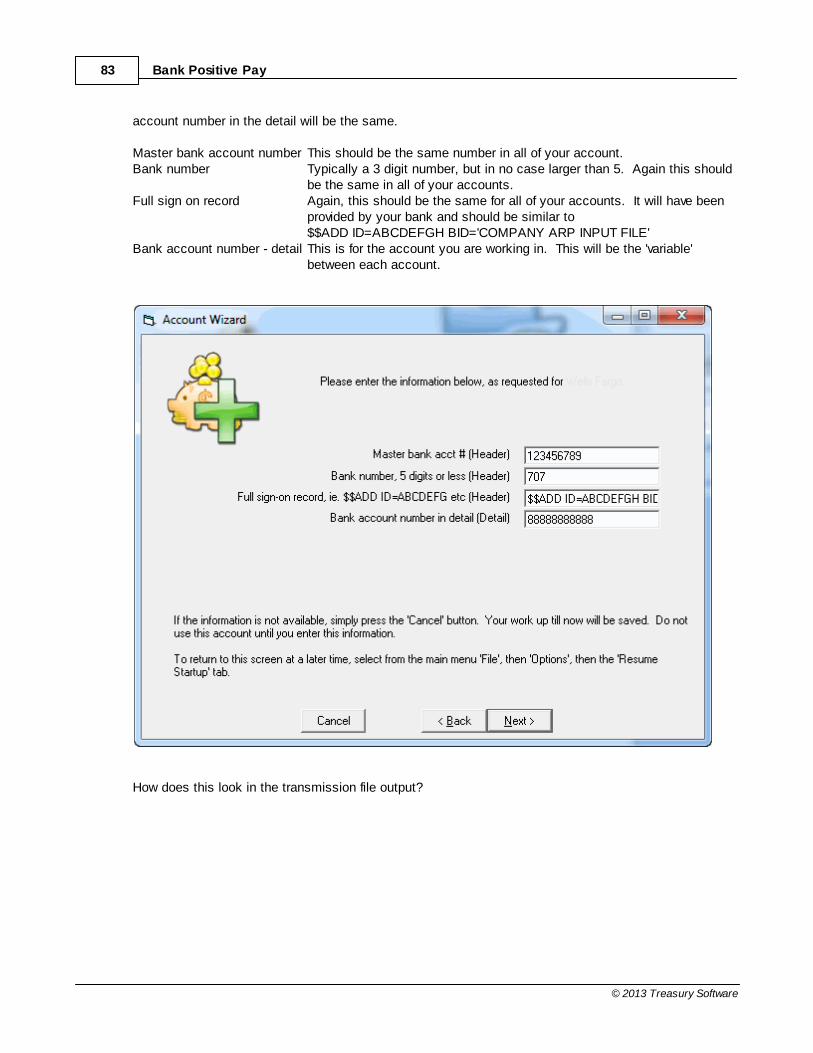
Bank Positive Pay83
© 2013 Treasury Software
account number in the detail will be the same.
Master bank account number This should be the same number in all of your account.Bank number Typically a 3 digit number, but in no case larger than 5. Again this should
be the same in all of your accounts.Full sign on record Again, this should be the same for all of your accounts. It will have been
provided by your bank and should be similar to $$ADD ID=ABCDEFGH BID='COMPANY ARP INPUT FILE'
Bank account number - detail This is for the account you are working in. This will be the 'variable'between each account.
How does this look in the transmission file output?

Bank Positive Pay 84
© 2013 Treasury Software
2 Utilities
Utilities
This is a catch all for the various utilities included in all modules.
Please note that not all utilities will be listed, as this listing may be limited to your license level.
2.1 BAI File Creator
BAI File Creator
Use these instructions to create a BAI 2 formatted file from any any imported file - such as Excel, acomma delimited (csv) file or tab delimited file.
1. Select BAI Utilities upon startup
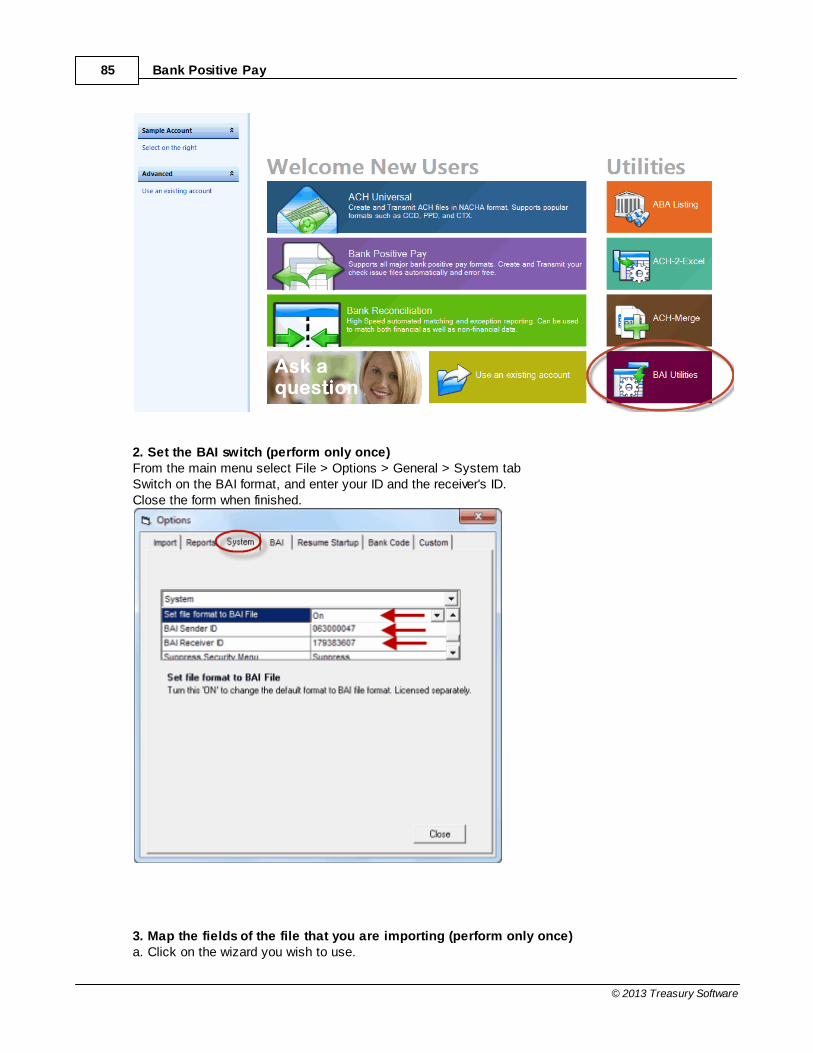
Bank Positive Pay85
© 2013 Treasury Software
2. Set the BAI switch (perform only once)From the main menu select File > Options > General > System tabSwitch on the BAI format, and enter your ID and the receiver's ID.Close the form when finished.
3. Map the fields of the file that you are importing (perform only once)a. Click on the wizard you wish to use.
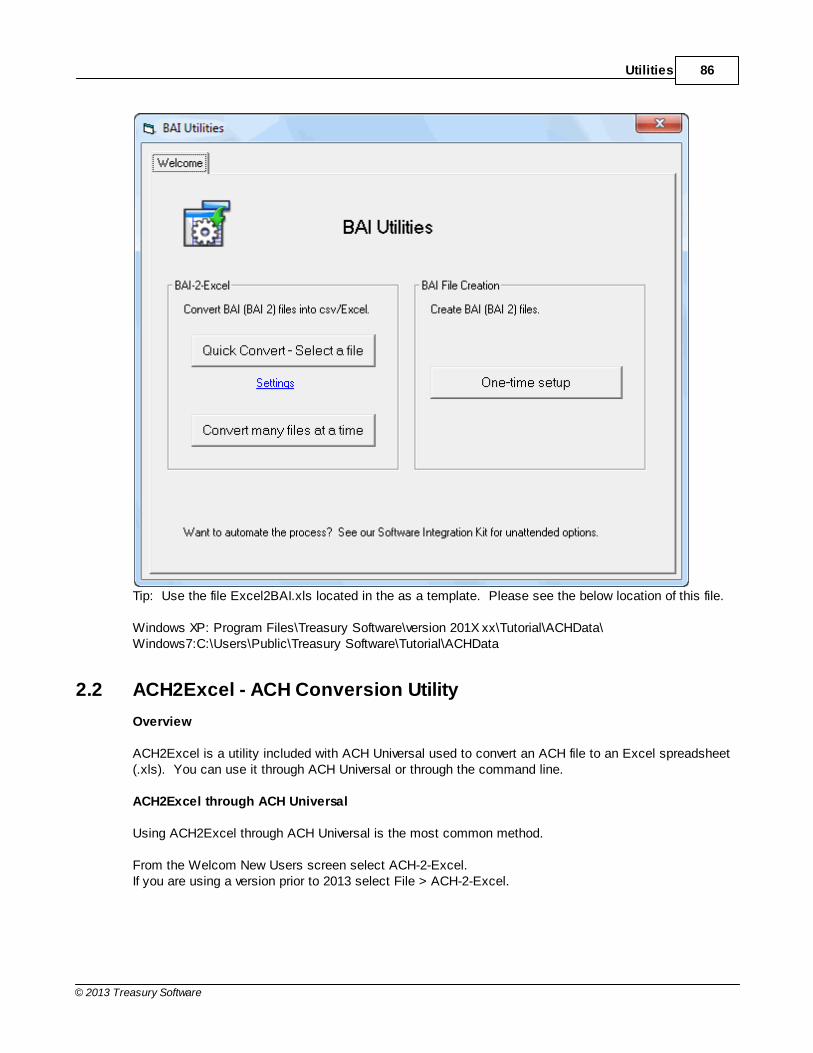
Utilities 86
© 2013 Treasury Software
Tip: Use the file Excel2BAI.xls located in the as a template. Please see the below location of this file.
Windows XP: Program Files\Treasury Software\version 201X xx\Tutorial\ACHData\Windows7:C:\Users\Public\Treasury Software\Tutorial\ACHData
2.2 ACH2Excel - ACH Conversion Utility
Overview
ACH2Excel is a utility included with ACH Universal used to convert an ACH file to an Excel spreadsheet(.xls). You can use it through ACH Universal or through the command line.
ACH2Excel through ACH Universal
Using ACH2Excel through ACH Universal is the most common method.
From the Welcom New Users screen select ACH-2-Excel.If you are using a version prior to 2013 select File > ACH-2-Excel.
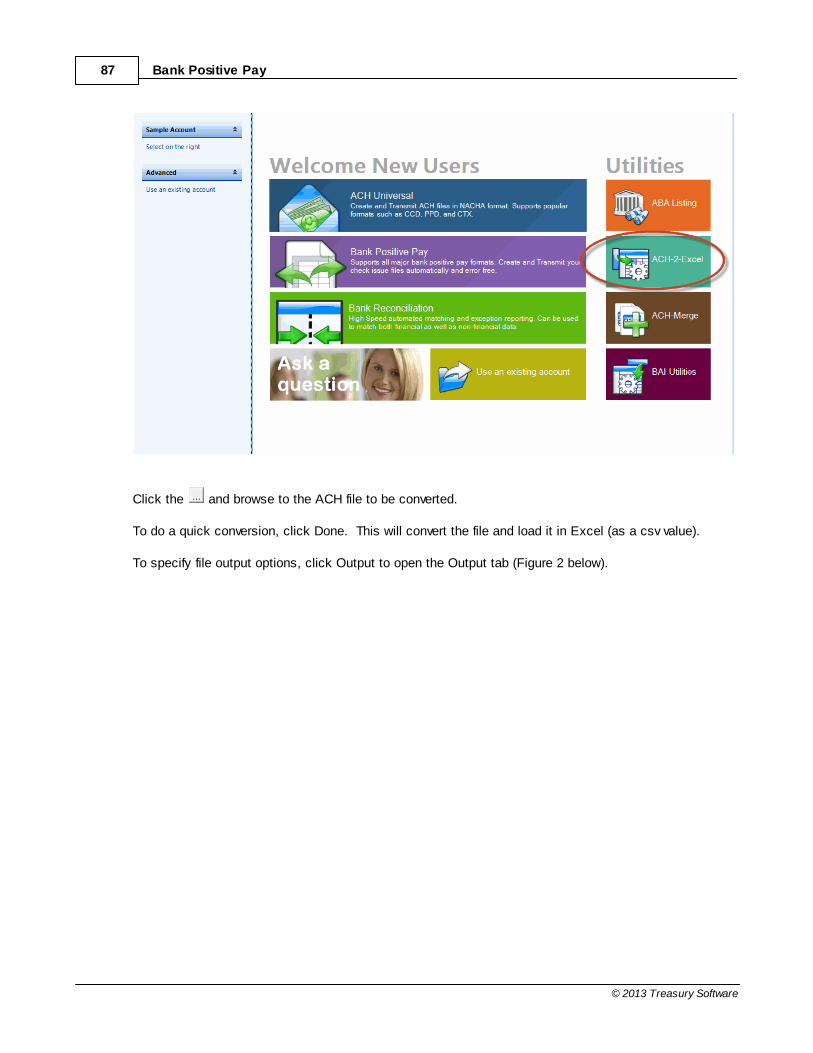
Bank Positive Pay87
© 2013 Treasury Software
Click the and browse to the ACH file to be converted.
To do a quick conversion, click Done. This will convert the file and load it in Excel (as a csv value).
To specify file output options, click Output to open the Output tab (Figure 2 below).

Utilities 88
© 2013 Treasury Software
Figure 2 - ACH2Excel Output tab
To output the conversion to a specific click, enable the Output to 'csv' file located in the directory
checkbox, then click the button to browse to the appropriate directory.
To import the converted file into ACH Universal for further processing (such as an ACH Return File forReturns), enable the checkbox.
Click Done to create the file.
Command Line Options
BRCom.exe /ACCT="account" /ACH2 /SRCE="input file name" /OUTD="output file name"
/ACCT - specifies account by name/ACH2 - specifies to use the ACH2Excel utility/SRCE - specifies file to be used as input (using absolute positioning)/OUTD - specifies file to be used as output (using absolute positioning)Valid source files include ARC, CCD, CIE, CTX, DNE, ENR, POP, PPD, RCK, TEL, TRC, TRX, WEB,XCK. Note: Some formats may require further parsing.
Syntax ExampleIf Treasury Desktop was installed in the default location:
c:\Program Files\TreasurySoftware\BRCOM.exe /ACCT="sample" /ACH2 /SRCE="C:\transmit.txt" /outd="c:\testACHdetail.csv"
Reminder:Turn on/off appropriate settings. From the main menu 'File', 'ACH File Conversion', 'Output' tab - unselect
Bank Positive Pay89
© 2013 Treasury Software
open in Excel afterwards.
Notes for all applications:· The order of the parameters is not significant· Capitalization is not significant· When specifying a file name (SRCE), use the full file path and name within quotes. When usingmapped drives, remember that the path should be centric/relative to the machine where TreasuryDesktop is located, not the machine issuing the trigger/command.· Place the account name in quotes.Working with multiple users and multiple account:Each command line trigger - will create an independent instance of the application. There is no limit tothe number of instances.
If processing simultaneous command line requests, use different accounts (Sample1, Sample2, etc...) tominimize any record locking issues. If this is not an alternative, consider processing sequentially, orusing our Control Panel.
For Web and Citrix based applications, please contact a Treasury Software support representative.
2.3 Notification of Change ABA Merge Utility
Overview
The Notification of Change Merge Utility enables users to Import an ACH file and generate Notification ofChange transactions for each record which has the old ABA number.
The Notification of Change (COR) entry will contain the new ABA number as the corrected data, as wellas 'C02' (Updated ABA number) as the NOC code.
After the Notification of Change transactions are created, you can create an ACH file to send, just likeany other ACH file.
Notes: --Transactions in the ACH file which do not have the old ABA number are ignored.--This utility is only available in the Banking Edition
Setup
We recommend that you print this page prior to starting.
1. Create a new account specifically for this utilityFrom the main menu select File > New > Create and complete the New Account Wizard. Whenfinished, it will prompt you if you want to 'Enter your transmission information now?'. Click Yes.
2. ACH Setup wizard Note: If you did not select 'Yes' in the step above, simply select ACH Setup Wizard from the Home tab.If you are using a version prior to 2013 select File > ACH Setup to start the wizard.
a. On screen 3 of 7 select COR - Notification of Change.
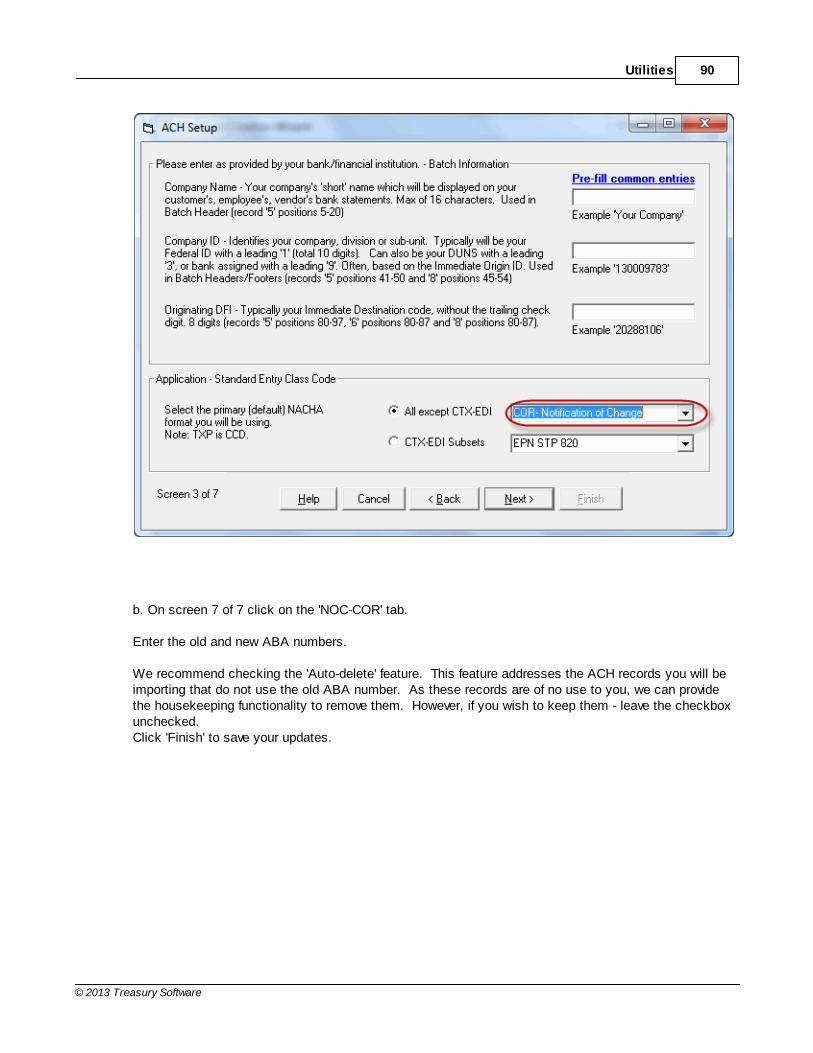
Utilities 90
© 2013 Treasury Software
b. On screen 7 of 7 click on the 'NOC-COR' tab.
Enter the old and new ABA numbers.
We recommend checking the 'Auto-delete' feature. This feature addresses the ACH records you will beimporting that do not use the old ABA number. As these records are of no use to you, we can providethe housekeeping functionality to remove them. However, if you wish to keep them - leave the checkboxunchecked. Click 'Finish' to save your updates.

Bank Positive Pay91
© 2013 Treasury Software
c. Import Safety Locks - recommended (not required):We highly recommend putting the Import Safety Locks 'On'.From the main menu select File > Options > General > Import tab. Scroll to the bottom and turn theSafety Locks 'On'. This prevents your users from accidentally trying to import the ACH file from the main screen icon. Ifthey try to import from the main screen it will only convert their ACH file to Excel, it will not import thefile.

Utilities 92
© 2013 Treasury Software
Use:Import ACH file receivedImport your ACH file received from the Federal Reserve Bank (or other processor) from the main menu atImport > ACH File > ACH File.
Create new ACH file containing NOC'sClick on the 'Create ACH File' button on the home page, then click on the 'Create ACH File' button onthe creation page.

Bank Positive Pay93
© 2013 Treasury Software
Note: The count on the creation page is for all transactions in the file, not just the NOC transactions.
Done - Congratulations!
Index 94
© 2013 Treasury Software
Index- A -Accounts
Archiving records 69
Create 4
Creating a backup 68
Restoring from a backup 69
ACH files
Create 12
Creating 10
Transmit 12
ACH to Excel 86
Automation 22
- B -BAI file creation 84
- C -Citrix 55
Command Line 32
Command line syntax 32
Create Account 4
- D -Dates
Embedded 66
Non-standard 65
Download ACH Universal 3
- I -Importing Overview 6
Integration 22
- L -Login record 66
Login security 48
- M -Multi-user platform 64
- N -NOC - Notification of Change 89
- P -Prenotification
set default Debit or Credit 81
- R -Remote Desktop 55
Reports 16
- S -Scheduler 22
Security 48
Share database 64
Software Integration Kit (SIK) 22
- T -Terminal Services 55
Transmit file to the bank 10
Transmitting ACH file 58
Tutorials 1
- U -Updates 71
Upgrade to new version 72
- V -Videos 1