business process proceduressapidp/... · web viewselect the sfsf ad hoc report created as part of...
TRANSCRIPT
EHP0 to EHP7 for SAP ERP 6.0
June 2014
English
Recruiting in SuccessFactors (FC1)
SAP AGDietmar-Hopp-Allee 1669190 WalldorfGermany
Business Process Documentation

SAP Best Practices Recruiting in SuccessFactors (FC1): BPD
Copyright
© 2014 SAP AG or an SAP affiliate company. All rights reserved.
No part of this publication may be reproduced or transmitted in any form or for any purpose without the express permission of SAP AG. The information contained herein may be changed without prior notice.
Some software products marketed by SAP AG and its distributors contain proprietary software components of other software vendors.
National product specifications may vary.
These materials are provided by SAP AG and its affiliated companies ("SAP Group") for informational purposes only, without representation or warranty of any kind, and SAP Group shall not be liable for errors or omissions with respect to the materials. The only warranties for SAP Group products and services are those that are set forth in the express warranty statements accompanying such products and services, if any. Nothing herein should be construed as constituting an additional warranty.
SAP and other SAP products and services mentioned herein as well as their respective logos are trademarks or registered trademarks of SAP AG in Germany and other countries. Please see http://www.sap.com/corporate-en/legal/copyright/index.epx#trademark for additional trademark information and notices.
© SAP AGPage 2 of 73

SAP Best Practices Recruiting in SuccessFactors (FC1): BPD
Icons
Icon Meaning
Caution
Example
Note
Recommendation
Syntax
External Process
Business Process Alternative/Decision Choice
Typographic Conventions
Type Style Description
Example text Words or characters that appear on the screen. These include field names, screen titles, pushbuttons as well as menu names, paths and options.Cross-references to other documentation.
Example text Emphasized words or phrases in body text, titles of graphics and tables.
EXAMPLE TEXT Names of elements in the system. These include report names, program names, transaction codes, table names, and individual key words of a programming language, when surrounded by body text, for example, SELECT and INCLUDE.
Example text Screen output. This includes file and directory names and their paths, messages, source code, names of variables and parameters as well as names of installation, upgrade and database tools.
EXAMPLE TEXT Keys on the keyboard, for example, function keys (such as F2) or the ENTER key.
Example text Exact user entry. These are words or characters that you enter in the system exactly as they appear in the documentation.
<Example text> Variable user entry. Pointed brackets indicate that you replace these words and characters with appropriate entries.
© SAP AGPage 3 of 73

SAP Best Practices Recruiting in SuccessFactors (FC1): BPD
Contents
1 Purpose.................................................................................................................................. 62 Prerequisites..........................................................................................................................6
2.1 Configuration...................................................................................................................62.2 Master Data and Organizational Data.............................................................................62.3 Business Conditions........................................................................................................62.4 Preliminary Steps............................................................................................................7
2.4.1 Create User IDs in SuccessFactors.........................................................................72.5 Business Roles................................................................................................................7
3 Process Overview Table.........................................................................................................74 Process Steps...................................................................................................................... 12
4.1 Create Position..............................................................................................................124.2 Trigger Job Requisition Creation...................................................................................16
4.2.1 Create Job Requisition in SFSF.............................................................................174.2.2 Update Job Requisition in SAP ERP......................................................................17
4.3 Check Job Requisition (optional)...................................................................................174.4 Maintain Job Requisition Request.................................................................................174.5 Adapt Job Requisition Request.....................................................................................184.6 Process Job Requisition Request..................................................................................194.7 Post Job........................................................................................................................ 204.8 Search for Job...............................................................................................................214.9 Create Account (optional)..............................................................................................214.10 Maintain my Candidate Profile...................................................................................224.11 Apply for Job..............................................................................................................23
4.11.1 Confirm Job Application.........................................................................................244.12 Receive Job Application Confirmation via E-Mail.......................................................244.13 Manage my Job Applications.....................................................................................244.14 View Candidates........................................................................................................254.15 Schedule Candidate for Telephone Interview............................................................264.16 Receive Invitation via E-Mail......................................................................................274.17 Perform Telephone Interview.....................................................................................274.18 Propose Candidates for Interview..............................................................................284.19 Provide Feedback......................................................................................................294.20 Set Up Interviewers...................................................................................................294.21 Invite Candidate to Interview......................................................................................304.22 Receive Invitation via E-Mail......................................................................................314.23 Interview Candidate...................................................................................................314.24 Assess Candidate......................................................................................................314.25 Provide Final Feedback.............................................................................................324.26 Receive Final Feedback via E-Mail............................................................................334.27 Create Offer...............................................................................................................334.28 Approve Offer............................................................................................................344.29 Create and Send Offer Letter.....................................................................................354.30 Accept Offer...............................................................................................................364.31 Receive Decision via E-Mail......................................................................................364.32 Set Candidate Status SendToSAP................................................................................37
© SAP AGPage 4 of 73

SAP Best Practices Recruiting in SuccessFactors (FC1): BPD
4.33 Import Recruiting Data...............................................................................................374.33.1 Set Candidate Status TransferredToSAP..........................................................38
4.34 View Transferred Candidates....................................................................................384.35 Correct Errors (optional)............................................................................................394.36 Enter Hiring Data.......................................................................................................39
4.36.1 Set Candidate Status HiredAtSAP.......................................................................404.37 View Candidate Status...............................................................................................404.38 Trigger Closing of Job Requisition.............................................................................41
4.38.1 Close Job Requisition in SFSF...............................................................................414.38.2 Close Job Requisition in SAP ERP........................................................................414.38.3 Update Candidate Profile with Employee ID..........................................................42
4.39 View Candidate Profile...............................................................................................424.40 Set Unselected Candidate Status..............................................................................424.41 Execute Synchronization of Employee Data Report..................................................43
4.41.1 Receive and Updating Employee Data...................................................................444.41.2 Consolidate Candidate Profile................................................................................44
4.42 View My Candidate Profile.........................................................................................454.43 View Employee Data.................................................................................................45
5 Appendix.............................................................................................................................. 465.1 Ad Hoc Reports in SuccessFactors...............................................................................46
5.1.1 Execut Ad Hoc Report............................................................................................465.1.2 Create Ad Hoc Report............................................................................................475.1.3 Share Report with Another User............................................................................47
© SAP AGPage 5 of 73

SAP Best Practices Recruiting in SuccessFactors (FC1): BPD
Recruiting in SuccessFactors
1 Purpose This document describes the complete attract-to-hire process integrated between SuccessFactors Recruiting and SAP ERP HCM. The audience for this document is the business owner who has both SAP ERP HCM and SuccessFactors in place and needs use them integrated due to concrete business requirements. The aim of a recruiting application in general is to support the hiring manager and recruiter in selecting and hiring the best candidate that has applied for a particular job published based on the job requisition request of the hiring manager.At high level, the complete attract-to-hire process integrated between SuccessFactors Recruiting and SAP ERP HCM is as follows
a vacant position in SAP ERP HCM triggers the creation of a job requisition in SuccessFactors Recruiting
the right candidate can be found through the use of SuccessFactors Recruiting and can be hired using personnel administration features of SAP ERP HCM
after the User ID of the newly hired employee is updated in SuccessFactors Recruiting, he or she can participate in all talent-management processes in SuccessFactors.
In this document we describe this process in detail.
2 Prerequisites
2.1 ConfigurationPlease ensure to follow the correct installation sequence of building blocks as specified in the Prerequisite Matrix.
2.2 Master Data and Organizational DataDefault ValuesThe organizational structure and master data of your company was created in your SAP ERP system during implementation. The organizational structure reflects the structure of your company with organizational units, positions, and jobs. The master data reflects employee specific data.
In case you want existing employees to act as internal candidates for job postings employee specific data needs to be in your SAP ERP system. .
2.3 Business Conditions The business process described in this Business Process Documentation is part of a larger chain of integrated business processes. As a result, you must have completed the following processes and fulfilled the following business conditions before you can start any activities in this process:
© SAP AGPage 6 of 73

SAP Best Practices Recruiting in SuccessFactors (FC1): BPD
Business Condition Scope Item / Package Name
To run through this scope item, the organizational structure must be available.
As example of how to maintain an organizational structure you can refer to scope item Maintain Organization Structure (F03) of SAP Personnel Administration and Organization Management rapid-deployment solution V4.607.
For an initial load into SuccessFactors of the data of all existing employees at a point in time, these employees must have been hired (or rehired) and already exist in the system.
As example of how to enter hiring (or rehiring) data of an employee you can refer to scope item Administer Personnel - Hire / Rehire / External Hire (F05) of SAP Personnel Administration and Organization Management rapid-deployment solution V4.607.
The basic data of the hiring manager, the superior manager of the hiring manager, and the recruiter has been transferred to SuccessFactors. Also, in order to allow existing employees to act as internal candidates for posted job requisitions, their basic data has been transferred to SuccessFactors.
As example of how to transfer basic employee data from ERP to SuccessFactors you can refer to scope item Transfer of SAP ERP HCM Basic Employee Data to SuccessFactors (SF7) of SAP ERP HCM Integration to SuccessFactors rapid-deployment solution V3.607.
© SAP AGPage 7 of 73

SAP Best Practices Recruiting in SuccessFactors (FC1): BPD
2.4 Preliminary Steps2.4.1 Create User IDs in SuccessFactors
UseIn this step, you set up user IDs that are necessary for accessing SuccessFactors.
ProcedureRefer to building block SuccessFactors Recruiting: Role Based Permission (FC7) for a detailed description.
2.5 Business RolesUseThe following business roles are required in SuccessFactors for testing this scope item:
Employee Manager (of the employee) Superior Manager (of the manager) Recruiter System Administrator
Details on how to create these roles are given in building block SuccessFactors Recruiting: Role Based Permission (FC7).
3 Process Overview Table
Process Step UI centric / Back-ground
Business Condition
Business Role
Transaction Code / Program / Job
Expected Results
Create Position UI HR Administrator
PPOME A vacant position and a job requisition in status To be Created are created within the appropriate organizational unit.
Trigger Job Requisition Creation
UI / Back-ground
If no batch job has been scheduled to run this report then the report needs to be triggered by the user in the HR system.
HR Administrator
SE38 ; programRH_SFI_TRIGGER_JOB_REQUISITION
Attributes of the new position, as well as its assigned organizational unit and job are extracted and mapped to SuccessFactors BizX fields due to field mapping customizing.
Create Job Requisition in SFSF
Back-ground
For each vacant position created in SAP ERP HCM a job requisition is created in SuccessFactors BizX via API in status pre-approved.
Update Job Requisition in SAP ERP
Back-ground
The job requisition ID from SuccessFactors is sent back to SAP ERP HCM. The status of
© SAP AGPage 8 of 73

SAP Best Practices Recruiting in SuccessFactors (FC1): BPD
Process Step UI centric / Back-ground
Business Condition
Business Role
Transaction Code / Program / Job
Expected Results
the requisition in SAP ERP is updated to Created.
© SAP AGPage 9 of 73

SAP Best Practices Recruiting in SuccessFactors (FC1): BPD
Process Step UI centric / Back-ground
Business Condition
Business Role
Transaction Code / Program / Job
Expected Results
Check Job Requisition (optional)
UI HR Administrator
PPOME The correctness of the requisition ID in SAP ERP as transferred from SuccessFactors and the status has been verified.
Maintain Job Requisition Request
UI Hiring Manager
SF BizX
Adapt Job Requisition Request
UI Recruiter SF BizX The job requisition has been reviewed and updated, and sent to the superior manager for approval.
Process Job Requisition Request
UI Superior Manager
SF BizX The job requisition has been approved by the Superior Manager and can now be posted.
Post Job UI Recruiter SF BizX The job requisition has been posted on internal and external channels.
Search for Job UI (External/Internal) Candidate
SF BizX The Candidate has received a list of externally and/or internally posted jobs.
Create Account (optional)
UI External Candidate
SF BizX The External Candidate has created user and password on the External Career Site.
Maintain my Candidate Profile
UI (External/Internal) Candidate
SF BizX The candidate profile has been maintained by the same.
Apply for Job UI (External/Internal) Candidate
SF BizX The Candidate has applied for a job.
Confirm Job Application
Back-ground
An automatic confirmation of having received the candidate’s job application has been sent out by the system.
Receive Job Application Confirmation via E-Mail
outside (External/Internal) Candidate
The Candidate has received the confirmation that the company has received his or her job application.
Manage my Job Applications
UI (External/Internal) Candidate
SF BizX The status of job applications has been viewed and submitted job applications have been adapted as necessary.
View Candidates UI Recruiter SF BizX The Recruiter has viewed candidates that have applied to job requisitions.
© SAP AGPage 10 of 73

SAP Best Practices Recruiting in SuccessFactors (FC1): BPD
Process Step UI centric / Back-ground
Business Condition
Business Role
Transaction Code / Program / Job
Expected Results
Schedule Candidate for Telephone Interview
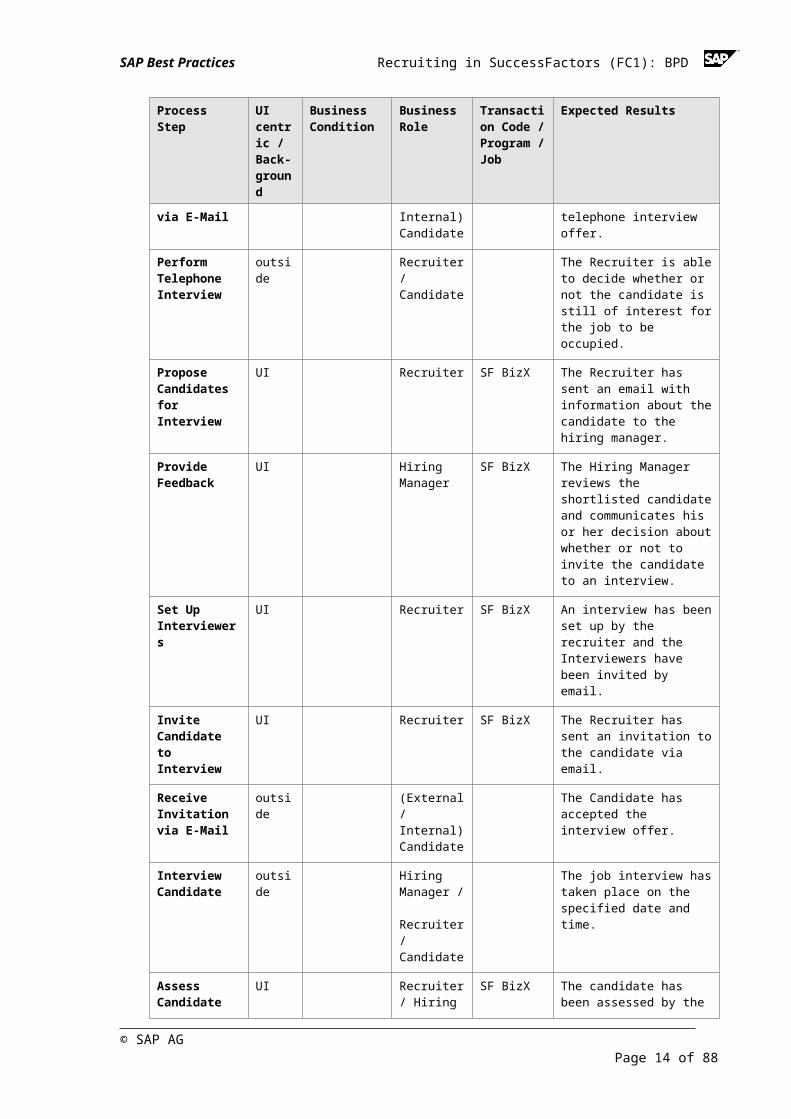
UI Recruiter SF BizX The Recruiter has sent an invitation to a phone interview to the candidate via email.
Receive Invitation via E-Mail
outside (External/Internal) Candidate
The Candidate has accepted the telephone interview offer.
Perform Telephone Interview
outside Recruiter / Candidate
The Recruiter is able to decide whether or not the candidate is still of interest for the job to be occupied.
Propose Candidates for Interview
UI Recruiter SF BizX The Recruiter has sent an email with information about the candidate to the hiring manager.
Provide Feedback
UI Hiring Manager
SF BizX The Hiring Manager reviews the shortlisted candidate and communicates his or her decision about whether or not to invite the candidate to an interview.
Set Up Interviewers
UI Recruiter SF BizX An interview has been set up by the recruiter and the Interviewers have been invited by email.
Invite Candidate to Interview
UI Recruiter SF BizX The Recruiter has sent an invitation to the candidate via email.
Receive Invitation via E-Mail
outside (External/Internal) Candidate
The Candidate has accepted the interview offer.
Interview Candidate
outside Hiring Manager / Recruiter /Candidate
The job interview has taken place on the specified date and time.
Assess Candidate
UI Recruiter / Hiring Manager
SF BizX The candidate has been assessed by the interviewers.
Provide Final Feedback
UI Hiring Manager
SF BizX The Hiring Manager communicates his or her decision about whether or not to hire the candidate.
Receive Final Feedback via E-Mail
outside Recruiter The Recruiter has received the feedback to create an offer to the interviewed candidate.
Create Offer UI Recruiter SF BizX A job offer has been created for the candidate and sent to
© SAP AGPage 11 of 73

SAP Best Practices Recruiting in SuccessFactors (FC1): BPD
Process Step UI centric / Back-ground
Business Condition
Business Role
Transaction Code / Program / Job
Expected Results
the hiring manager for approval.
© SAP AGPage 12 of 73

SAP Best Practices Recruiting in SuccessFactors (FC1): BPD
Process Step UI centric / Back-ground
Business Condition
Business Role
Transaction Code / Program / Job
Expected Results
Approve Offer UI Hiring Manager
SF BizX The job offer has been approved by the Hiring Manager.
Create and Send Offer Letter
UI Recruiter SF BizX The offer letter has been created and sent to the candidate.
Accept Offer outside (External/Internal) Candidate
The Candidate has accepted the offer.
Receive Decision via E-Mail
outside The Recruiter has received the decision of the candidate to accept the offer.
Set Candidate Status SendToSAP
UI Recruiter SF BizX The status of the candidate in SuccessFactors is updated to SendToSAP
Import Recruiting Data
UI / Back-ground
If no batch job has been scheduled to run this report then the report needs to be triggered by the user in the HR system
HR Administrator
HRSFI_RCT_DATA_IMP
Recruiting data has been transferred from SuccessFactors to SAP ERP HCM.
Set Candidate Status TransferredToSAP
Back-ground
As the result of a successful data import, the status of the candidate in SuccessFactors has been set to TransferredToSAP.
View Transferred Candidates
UI HR Administrator
HRSFI_RCT_HIRE
The successfully transferred candidates from SuccessFactors have been viewed.
Correct Errors (optional)
UI HR Administrator
HRSFI_RCT_HIRE
The missing data for the successfully transferred candidates has been added in SAP ERP HCM.
Enter Hiring Data
UI HR Administrator
HRSFI_RCT_HIRE
The hiring data has been entered into the SAP ERP system for candidates who have passed successfully the recruiting process.
Set Candidate Status HiredAtSAP
Back-ground
The status of the candidate within the SuccessFactors talent pipeline has been set automatically to HiredAtSAP.
View Candidate UI Recruiter SF BizX The status of the candidate in
© SAP AGPage 13 of 73
SAP Best Practices Recruiting in SuccessFactors (FC1): BPD
Process Step UI centric / Back-ground
Business Condition
Business Role
Transaction Code / Program / Job
Expected Results
Status SuccessFactors has been viewed.
Trigger Closing of Job Requisition
UI / Back-ground
If no batch job has been scheduled to run this report then the report needs to be triggered by the user in the HR system
HR Administrator
SE38; programRH_SFI_TRIGGER_JOB_REQUISITION
The job requisition integration report has selected all positions change pointer IT1107. Data has been extracted and mapped to SuccessFactors BizX fields due to field mapping customizing.
Close Job Requisition in SFSF
Back-ground
Job requisition is closed in SuccessFactors.
Close Job Requisition in SAP ERP
Back-ground
Job requisition is closed in SAP ERP.
Update Candidate Profile with Employee ID
Back-ground
Candidate profile in SuccessFactors is updated with new User ID.
View Candidate Profile
UI Recruiter The candidate’s profile in SuccessFactors has been viewed.
Set Unselected Candidate Status
UI Recruiter
Execute Synchronization of Employee Data Report
UI / Back-ground
HR Administrator
HRSFI_SYNCH_EMP_DATA
The creation of the new employee’s profile in SuccessFactors has been triggered.
Receive and Update Employee Data
Back-ground
The employee’s master data record has been created automatically in SuccessFactors.
Consolidate Candidate Profile
Back-ground
The candidate profiles (meaning the new employee master data record and his/her profile as external candidate) are consolidated into one and the external candidate profile is removed.
View my Candidate Profile
UI Employee SF BizX The own consolidated candidate profile has been viewed.
View Employee Data
UI Hiring Manager /
SF BizX The profile of the new employee has been viewed.
© SAP AGPage 14 of 73
SAP Best Practices Recruiting in SuccessFactors (FC1): BPD
Process Step UI centric / Back-ground
Business Condition
Business Role
Transaction Code / Program / Job
Expected Results
Recruiter
© SAP AGPage 15 of 73

SAP Best Practices Recruiting in SuccessFactors (FC1): BPD
4 Process Steps
4.1 Create PositionUseThe purpose of this process step for the HR Administrator (OM) is to create a new position in the organizational structure.
In case the new position has similar attributes as an existing one, it can be created by copying the existing position and adjusting some of the attributes.
This will be the trigger to create the job requisition in SuccessFactors.
PrerequisitesTo create the Account Assignment Features infotype (IT1008) and/or the Employee Group/Subgroup infotype (IT1013), the Enterprise Structure must have been configured.If any Job object is associated with a Position, the Job must exist before creating this relationship.The Organizational Unit to which this position reports must exist.
Procedure1. Access the transaction using one of the following navigation options:
SAP Graphical User Interface (SAP GUI)
SAP ECC Menu Human Resources Organizational Management Organizational Plan Organization and Staffing Change
Transaction Code PPOME
© SAP AGPage 16 of 73

SAP Best Practices Recruiting in SuccessFactors (FC1): BPD
2. On the Organization and Staffing Change screen, set the date and preview period:
The SAP HCM system is date driven; before carrying out any processes in Organization Management, it is, therefore, vital to ensure that you have the correct date range displayed for use. To do this, check the date and preview period displayed above the toolbar in the overview area of the screen. To change the detail, select the Date and preview period icon. The Specify date and preview period dialog box is displayed. To change the display period, as required, enter the following data:
Field Name Description User Action and Values Comment
Start date Date on which the new position starts to exist. Default value is today’s date. If
the date displayed is not the one you wish to work with, overwrite it with the appropriate date.
Time period Enables the user to change the duration of the preview period.
Default value is 3 months. If the time period is not as required, overwrite the numeric value and use the dropdown list to select the measure unit, for example, months, days.
This field is located in the Preview period to part of the dialog box.
© SAP AGPage 17 of 73

SAP Best Practices Recruiting in SuccessFactors (FC1): BPD
3. Choose the Execute button to confirm your date selections.4. The Object Manager on the left side contains a search area and a selection area. Use one
search option under Organizational unit to go to the root Organizational Unit displayed in the selection area below. Try to find out your favorite search method.
5. Select the organizational unit where you would like to create the new position by choosing it. Choose the Create button and from there select Incorporates Position.
6. In the detail area, maintain the object attributes for the position created. Starting on the Basic Data tab, enter the following data:
Field Name Description User Action and Values
Comment
Object Abbreviation
The abbreviation represents, or identifies, a specific object (for example, an organizational unit).
Enter an abbreviation of up to 12 characters.
Object Name Contains a brief description of an object (for example, an organizational unit).
Enter a description of up to 40 characters.
Job The name of the job to which the position is assigned.
Select value from dropdown list
Jobs are pre-defined in the jobs catalog. The default value in case of a new position is Not assigned.
Head of own organizational unit
An indicator that specifies the chief position of the organizational unit to which it belongs.Technically, a relationship (A/B 012) is created between the organizational unit and the position.
Flag this field if appropriate
There should be only one chief position per organizational unit
Staffing Status
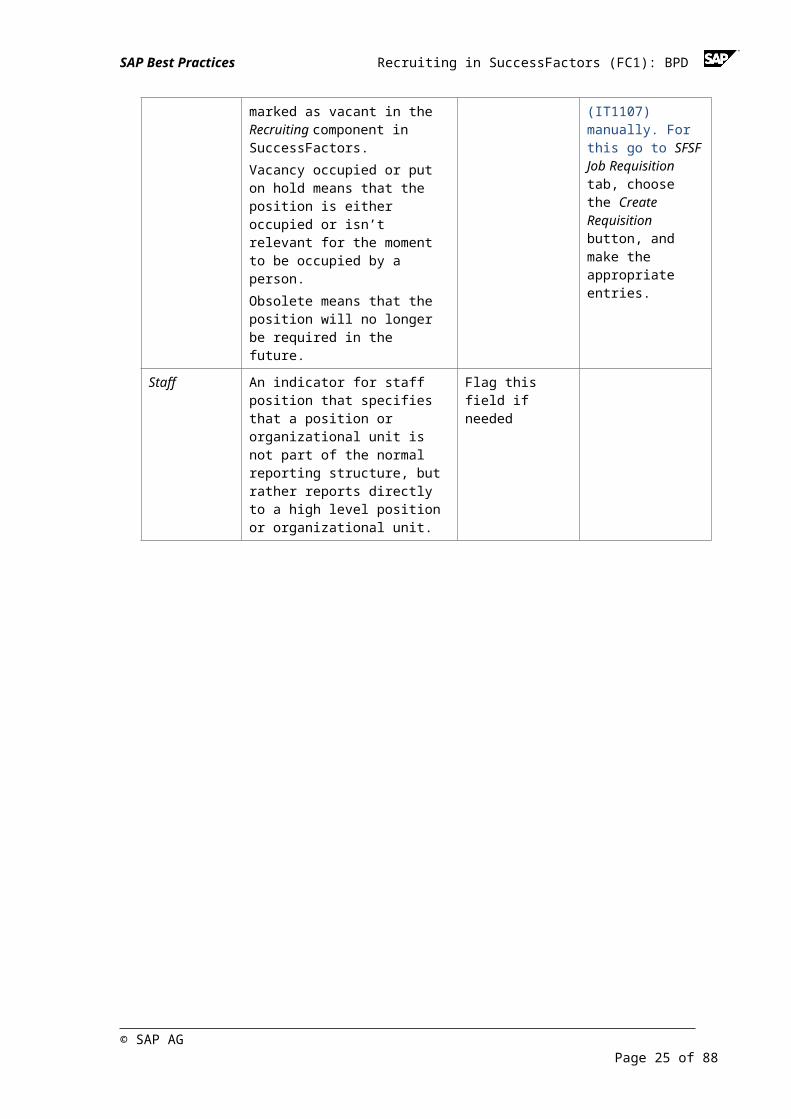
Staffing status of the position.Vacancy open means that the position is vacant, in other words, a person (employee) is to be found for it. The position is marked as vacant in the Recruiting component in SuccessFactors.Vacancy occupied or put on hold means that the position is either occupied or isn’t relevant for the moment to be occupied by a person.Obsolete means that the position will no longer be required in the future.
Select value from drop-down list
In case this field is deactivated at your site, you need to create Infotype SFSF Job Requisition (IT1107) manually. For this go to SFSF Job Requisition tab, choose the Create Requisition button, and make the appropriate entries.
Staff An indicator for staff position that specifies that a position or organizational unit is not part of the normal reporting structure, but rather reports directly to a high level position or organizational unit.
Flag this field if needed
© SAP AGPage 18 of 73
SAP Best Practices Recruiting in SuccessFactors (FC1): BPD
If you have selected a job for which the Planned Compensation infotype (IT1005) has already been created, then you could skip the following section for maintaining the planned compensation. If integration is activated the data of the Planned Compensation infotype (IT1005) of the job are inherited onto position level and defaults in personnel administration, Basic Pay (IT0008).
7. In the Account assignment tab, enter the following data:
Field Name
Description User Action and Values
Controlling Area
The controlling area is the highest organizational unit in Controlling.
Set relevant controlling area
Company Code
The company code is the smallest organizational unit within financial accounting for which a complete self-contained set of accounts can be drawn up for purposes of external reporting. This includes recording of all relevant transactions and generating all supporting documents required for financial statements
Enter relevant company code
Personnel area
A personnel area is an organizational entity of personnel administration representing an area within an enterprise delimited according to personnel administration, time management, and payroll accounting criteria.
Select an appropriate Personnel Area; see the master data section above
Pers. subarea
A personnel subarea is an organizational entity that represents part of a personnel area. It is delimited according to personnel administration, time management, and payroll criteria.
Select an appropriate Personnel Subarea; see the master data section above
© SAP AGPage 19 of 73

SAP Best Practices Recruiting in SuccessFactors (FC1): BPD
8. Maintain employee group and subgroup attributes for the position created by selecting the Work schedule tab and entering the following data:
Field Name Description User Action and Values
Employee group
The employee group is an organizational entity that is governed by specific personnel regulations.
Select an appropriate value, for example, Employee
Employee subgroup
An employee subgroup is an organizational entity within an employee group for which personnel provisions have been defined.
Select an appropriate value.
© SAP AGPage 20 of 73

SAP Best Practices Recruiting in SuccessFactors (FC1): BPD
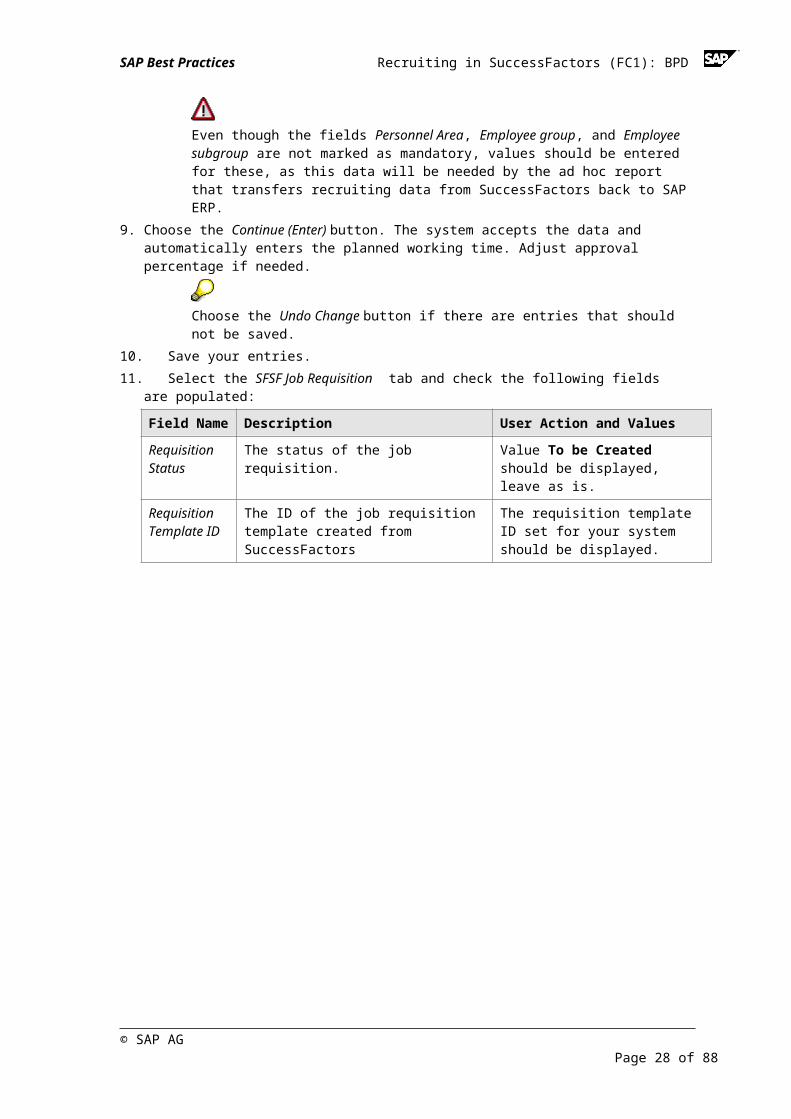
Even though the fields Personnel Area, Employee group, and Employee subgroup are not marked as mandatory, values should be entered for these, as this data will be needed by the ad hoc report that transfers recruiting data from SuccessFactors back to SAP ERP.
9. Choose the Continue (Enter) button. The system accepts the data and automatically enters the planned working time. Adjust approval percentage if needed.
Choose the Undo Change button if there are entries that should not be saved.10. Save your entries. 11. Select the SFSF Job Requisition tab and check the following fields are populated:
Field Name Description User Action and Values
Requisition Status
The status of the job requisition. Value To be Created should be displayed, leave as is.
Requisition Template ID
The ID of the job requisition template created from SuccessFactors
The requisition template ID set for your system should be displayed.
© SAP AGPage 21 of 73

SAP Best Practices Recruiting in SuccessFactors (FC1): BPD
In case you want to create a new position by copying an existing position, proceed as follows:- Select the position to be used as a template for copying, by choosing it- Select the Copy button to open the Copy object dialog box and enter following
data:
Field Name Description User Action and Values
Number of copies
Number of copies. Enter the required number of copies to be made.
Start date Start date of the period in which the position exists.
Enter the effective start date.
End Date End date of the period in which the position exists.
Default value is the system high date, 31.12.9999, leave as is.
Object abbr. Object abbreviation that represents a shortened or contracted form of the position name.
Enter an appropriate short text.
If multiple copies are to be made, these need to be changed after copying.
Name Name of the position(s). Enter an appropriate name.
If multiple copies are to be made, these need to be changed after copying
© SAP AGPage 22 of 73

SAP Best Practices Recruiting in SuccessFactors (FC1): BPD
- Select Continue (Enter) to copy the position(s) and return to the overview area of the Organization and Staffing Change screen. A system message confirms that the object was copied.
- Select each of the newly created, copied positions, by double-clicking them in the overview area, to review Basic data, Account assignment, Work schedule, and SFSF Job Requisition details.
- Change the position attributes, if required. Choose Save. A system message confirms the data has been saved
Result A vacant position (IT1007) and a job requisition in status To be Created (IT1107) are created within the appropriate organizational unit and become effective on the date entered.Change pointer is created in table HRSFI_D_RCT_REQ.The creation of an appropriate job requisition in SuccessFactors is triggered. This can be done either manually, by the HR Administrator, or by scheduling a batch job that is to run on a frequent basis.
In the next process step the manual triggering of the job requisition creation is described.
4.2 Trigger Job Requisition CreationUseThe purpose of this process step for the HR Administrator is to trigger the transfer of the newly created vacant position, and thus the creation of the appropriate job requisition, in SuccessFactors.
This program (RH_SFI_TRIGGER_JOB_REQUISITION) can be scheduled to run frequently to ensure data consistency between SAP ERP HCM and SuccessFactors.
PrerequisitesA vacant position and SFSF job requisition infotype (IT1107) have been created in the organizational structure within SAP ERP.
Procedure1. Access the following transaction in the SAP GUI:
Transaction Code SE38
SAP Program Name RH_SFI_TRIGGER_JOB_REQUISITION
© SAP AGPage 23 of 73

SAP Best Practices Recruiting in SuccessFactors (FC1): BPD
2. Select the Execute button.3. On the Create and Update Job Requisitions in SuccessFactors screen select value “EN” for
Extraction Language field.4. Select the Execute button.
Result The job requisition integration report has selected all positions change pointer IT1107. Attributes of the position, assigned organizational unit and job are extracted and mapped to SuccessFactors BizX fields due to field mapping customizing. Depending on the middleware used, the mapping takes place either in a SAP NetWeaver PI system or a SAP HANA Cloud Integration.Once the processing is complete, a Display logs screen appears, which displays, among other information, messages referring to number of selected requisitions for transfer to SuccessFactors, successfully transferred requisitions, and IDs of created requisitions.
4.2.1 Create Job Requisition in SFSF
UseAs a result of the execution of report RH_SFI_TRIGGER_JOB_REQUISITION for each vacant position created in SAP ERP HCM a job requisition is created in SuccessFactors BizX via API in status pre-approved.
4.2.2 Update Job Requisition in SAP ERP
UseThe job requisition ID from SuccessFactors is sent back to SAP ERP HCM and stored in field Requisition ID on tab SFSF Job Requisition (IT1107) against the position. The status of the requisition is updated to Created.
4.3 Check Job Requisition (optional)UseThe purpose of this process step for the HR Administrator is to check if the requisition ID field in SAP ERP has been correctly filled with the job requisition ID sent from SuccessFactors, and the requisition status has been set accordingly.
Procedure1. Access the transaction using one of the following navigation options:
SAP Graphical User Interface (SAP GUI)
SAP ECC Menu Human Resources Organizational Management Organizational Plan Organization and Staffing Change
Transaction Code PPOME
© SAP AGPage 24 of 73
SAP Best Practices Recruiting in SuccessFactors (FC1): BPD
2. Select the SFSF Job Requisition tab and check the following fields are populated:
Field Name Description User Action and Values
Requisition ID The ID of the job requisition created in SuccessFactors
The imported value from SuccessFactors is defaulted.
Requisition Status
The status of the requisition in SuccessFactors.
Value Created should be displayed, leave as is.
© SAP AGPage 25 of 73

SAP Best Practices Recruiting in SuccessFactors (FC1): BPD
Result The correctness of the requisition ID and status as transferred from SuccessFactors has been verified.
4.4 Maintain Job Requisition RequestUseThe purpose of this process step for the Hiring Manager is to view the newly created job requisition. He/she is allowed to update the participants of the process; in this case he/she assigns the Recruiter to the job requisition.
PrerequisitesJob requisition integration program RH_SFI_TRIGGER_JOB_REQUISITION has been executed from SAP ERP HCM, having as result the creation of a job requisition in SuccessFactors.
Procedure1. Access one of the following menu paths with the Hiring Manager user:
Option 1:
SuccessFactors Menu Path Home Recruiting
© SAP AGPage 26 of 73

SAP Best Practices Recruiting in SuccessFactors (FC1): BPD
Option 2:
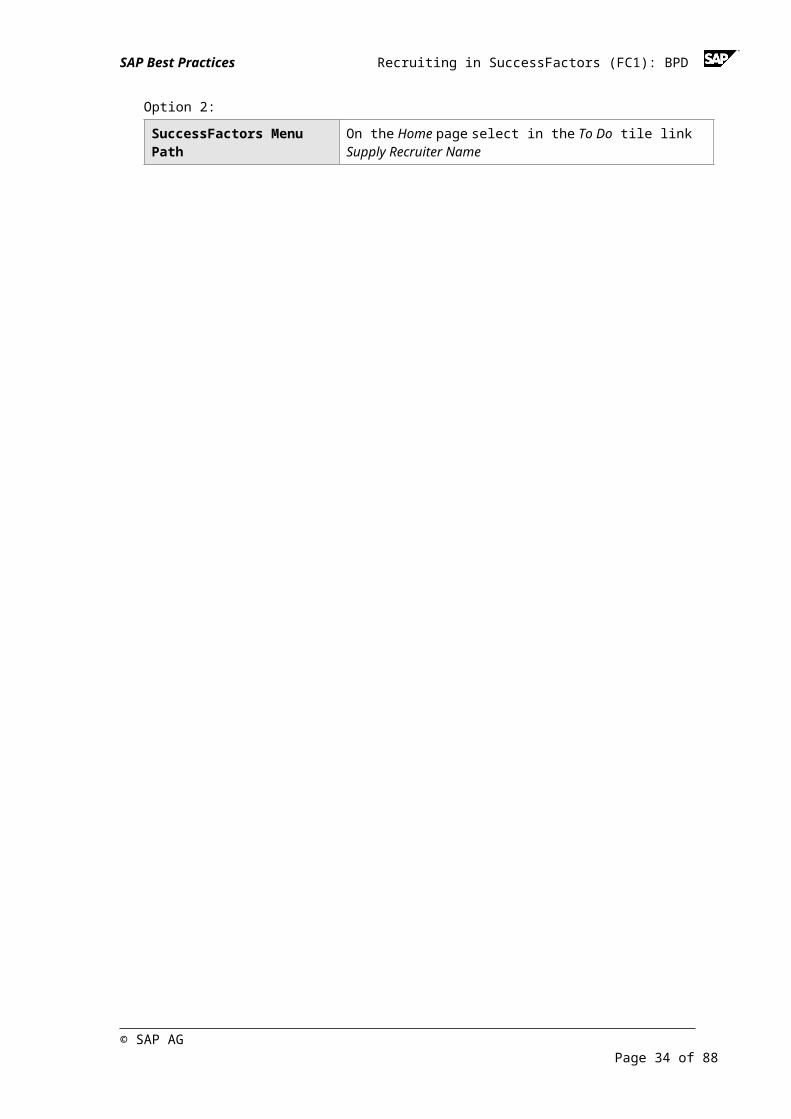
SuccessFactors Menu Path On the Home page select in the To Do tile link Supply Recruiter Name
© SAP AGPage 27 of 73
SAP Best Practices Recruiting in SuccessFactors (FC1): BPD
2. On the Job Requisitions screen a list of all job requisitions is displayed.3. Select the job requisition by hovering over the job title. A dialogue box to the right will be
displayed for Requisition Actions.4. Select the View or Edit Requisition link. The job requisition is displayed and certain fields are
populated from SAP ERP HCM.
On top of the page the Route Map will be displayed. It helps you to identify the way through the process steps.
5. On the Recruiter field select the Find User… link. In the upcoming Find User dialog box search for and select the Recruiter who should be assigned. The name of the Recruiter will show up in the Job Requisition screen in the Recruiter field.
6. Select the Save button.7. Select the Send To Recruiter button.8. Optional enter in the Send To Recruiter part of the <Job Requisition name> screen a
comment for the recruiter. Select the Send To Recruiter button.
In case you need to rework the form, choose the Cancel & Return to Form button.
Result The job requisition has been reviewed by the Hiring Manager and assigned to the Recruiter for further adaption.
4.5 Adapt Job Requisition RequestUseThe purpose of this process step for the Recruiter is to update the newly created job requisition reviewed by the Hiring Manager.
PrerequisitesRecruiter has been assigned to the job requisition.
Procedure1. Access the following menu path with the Recruiter user:
SuccessFactors Menu Path Home Recruiting
© SAP AGPage 28 of 73

SAP Best Practices Recruiting in SuccessFactors (FC1): BPD
2. On the Job Requisitions screen a list of all job requisitions is displayed.3. Select the job requisition by hovering over the job title, a dialogue box to the right will be
displayed for Requisition Actions.4. Select the View or Edit Requisition link. The job requisition form is displayed.
Alternatively you can access the job requisition form directly from your home page by selecting in the To Do list the Recruiting Edit for <job requisition name> link.
5. Update any necessary fields required to complete the job requisition.
In case the Personnel Area, Employee Group, and Employee Subgroup fields have not already been maintained in SAP ERP (see 4.1), maintain them at this point in time.
6. Select Save button. A dialog box shows up asking you to fill some additional fields that appear.
7. Fill the mandatory fields Job Location, Job Function, Job Language, and Job Type by selecting an appropriate value from the drop down, and add the Job Start Date.
The mandatory fields are marked by a red asterisk.8. Add a job description. You can add descriptions intended for internal posting sites and for
external posting sites. Choose the Update button in the Internal Job Description field and enter appropriate details. In the External Job Description field if you choose the Same as Internal button, the job description on the external posting sites will be identic to the one for the internal posting sites. In case you want to have a different description visible on external posting sites, choose the Update button and enter the appropriate details.
If you do not add any job description, the candidate will see only the name of the job requsition and no further details!
9. Maintain the competencies required for the job. Competencies need to be assigned to the job requisition of an error will trigger when attempting to evaluate a candidate in Interview Central.
10. Optional maintain questions the candidate needs to answer during the interview.11. Save your entries.12. Select the Send For Approval button. 13. Optional enter in the Send For Approval part of the <Job Requisition name> screen a
comment for the manager who should approve the job requisition. Select the Send For Approval button.
In case you need to rework the form, choose the Cancel & Return to Form button.
ResultThe job requisition has been reviewed and updated by the Recruiter. The Recruiter sends the job requisition to the Manager’s Manager (Superior Manager) for approval.
4.6 Process Job Requisition RequestUseThe purpose of this process step for the Superior Manager is to approve the job requisition routed from the Hiring Manager and the Recruiter.
© SAP AGPage 29 of 73

SAP Best Practices Recruiting in SuccessFactors (FC1): BPD
PrerequisitesThe job requisition has been reviewed by the hiring manager and recruiter.
Procedure1. Access the following menu path with the Superior Manager user:
SuccessFactors Menu Path Home Recruiting
© SAP AGPage 30 of 73

SAP Best Practices Recruiting in SuccessFactors (FC1): BPD
2. On the Job Requisitions screen a list of new job requisitions is displayed.3. Select the newly created job requisition by hovering over the job title, a dialogue box to the
right will be displayed for Requisition Actions.4. Select the View or Edit Requisition link. The job requisition form is displayed.
Alternatively you can access the job requisition form directly from your home page by selecting in the To Do list the Manager Approval for <job requisition name> link.
5. On the <Job Requisition name> screen, review the form and if satisfied, select the Approve Requisition button.
6. In the Approve Requisition part of the <Job Requisition name> screen select the Approve Requisition button.
In case you need to rework the form, chooose the Cancel & Return to Form button.
ResultThe job requisition has been approved by the Superior Manager. The requisition can now be posted and the essential part of the recruiting process can start.
4.7 Post JobUseThe purpose of this process step for the Recruiter is to post the job requisition to external and internal job sites.
The recruiter can also decide to post the job requisition to external sites or internal sites only.
PrerequisitesJob requisition is approved.
Procedure1. Access the following menu path with the Recruiter user:
© SAP AGPage 31 of 73

SAP Best Practices Recruiting in SuccessFactors (FC1): BPD
SuccessFactors Menu Path Home Recruiting
© SAP AGPage 32 of 73

SAP Best Practices Recruiting in SuccessFactors (FC1): BPD
2. On the Job Requisitions screen a list of open job requisitions is displayed.3. Select the job requisition by hovering over the job title, a dialogue box to the right will be
displayed for Requisition Actions.4. Select the Job Postings link. The Job Postings: <job requisition name> screen is displayed
for internal and external postings.5. Enter a Posting Start Date for Posting Type Intranet Posting.6. Enter a Posting Start Date for Posting Type Corporate Posting.7. Enter also values in the Posting End Date fields, if appropriate.8. Select the Post Job button for the Intranet Posting and for the Corporate Posting.
Intranet posting refers to the internal posting, corporate posting refers to the external posting.
Result The job requisition is posted on the internal and external sites.
Please be aware that Job Indexing needs to be scheduled for your SuccessFactors instance in order for the posted jobs to be returned in search results on the career sites. Please refer to the “Additional steps in SuccessFactors instance” described in the Quick Guide.
Please note, new postings can take several minutes before they are returned in search results on the career sites.
4.8 Search for JobUseThe purpose of this process step for the Candidates is to show how to search for the open job postings on the Career Site.
PrerequisitesJob requisition is posted internally and/or externally.
To find the link to the external job site, logon as Administrator. Under Home Admin Tools (enhanced Admin Tools) select Recruiting Manage Recruiting Sites. In the Action column, select Take Action and select Edit. You will be directed to the Manage Recruiting Sites > Edit Site screen where the URL link can be found.
Procedure1. Depending on your role choose between internal or external candidate access:
SuccessFactors External Job Link
Select the External Job Link for the company, for example:
https://careersd4.successfactors.com/career?company=<company id>
SuccessFactors BizX application Menu Path
As an internal candidate access the following menu path with the employee user:Home Careers
© SAP AGPage 33 of 73
SAP Best Practices Recruiting in SuccessFactors (FC1): BPD
2. On the Career Opportunities screen, enter the following data:
Field Name User Action and Values
Keywords Choose a word from the title or description of a job and mark the appropriate radio button below this field
Job Location Select a value from the drop-down list or leave default value Any
Job Function Select a value from the drop-down list or leave default value Any
Job Language Select a value from the drop-down list or leave default value Any
Job Type Select a value from the drop-down list or leave default value Any
© SAP AGPage 34 of 73

SAP Best Practices Recruiting in SuccessFactors (FC1): BPD
3. Choose the View Jobs button.
ResultThe Candidate receives a list of externally and/or internally posted jobs.
4.9 Create Account (optional)UseThe purpose of this process step for the External Candidates is to show how they can create an account on the External Career Site.In order to apply for a job, the external candidate needs an account on the external career site of the company.
He or she has to create this account when applying for the first time for a job in the company. When applying for further jobs in the same company, the external candidate will use this account for doing so.
Procedure1. Access the following link:
SuccessFactors External Job Link
Select the External Job Link for your company, for example:
https://careersd4.successfactors.com/career?company=<company id>
© SAP AGPage 35 of 73

SAP Best Practices Recruiting in SuccessFactors (FC1): BPD
2. Select the Sign In button at the top of the page.3. On the Career Opportunities: Sign In screen select the Create an account link.4. Enter your Email Address, a Password, your First Name and Last Name.5. Select the Create Account button. You are now logged on to the External Career Site.
ResultThe External Candidate created user and password on the External Career Site.
4.10 Maintain my Candidate ProfileUseThe purpose of this process step for the Candidates is to show how they can maintain their Candidate Profile.
PrerequisitesThe external candidate has an account on the External Career Site.
Procedure1. Depending on your role proceed as follows:
External Candidatea. Access the application as follows:
SuccessFactors External Job Link
Select the External Job Link for the company, for example:
https://careersd4.successfactors.com/career?company=<company id>
© SAP AGPage 36 of 73

SAP Best Practices Recruiting in SuccessFactors (FC1): BPD
b. Select the Sign In link at the top of the page.c. Enter your Email Address and Password.d. Select the Sign In button.e. Select My Profile link.
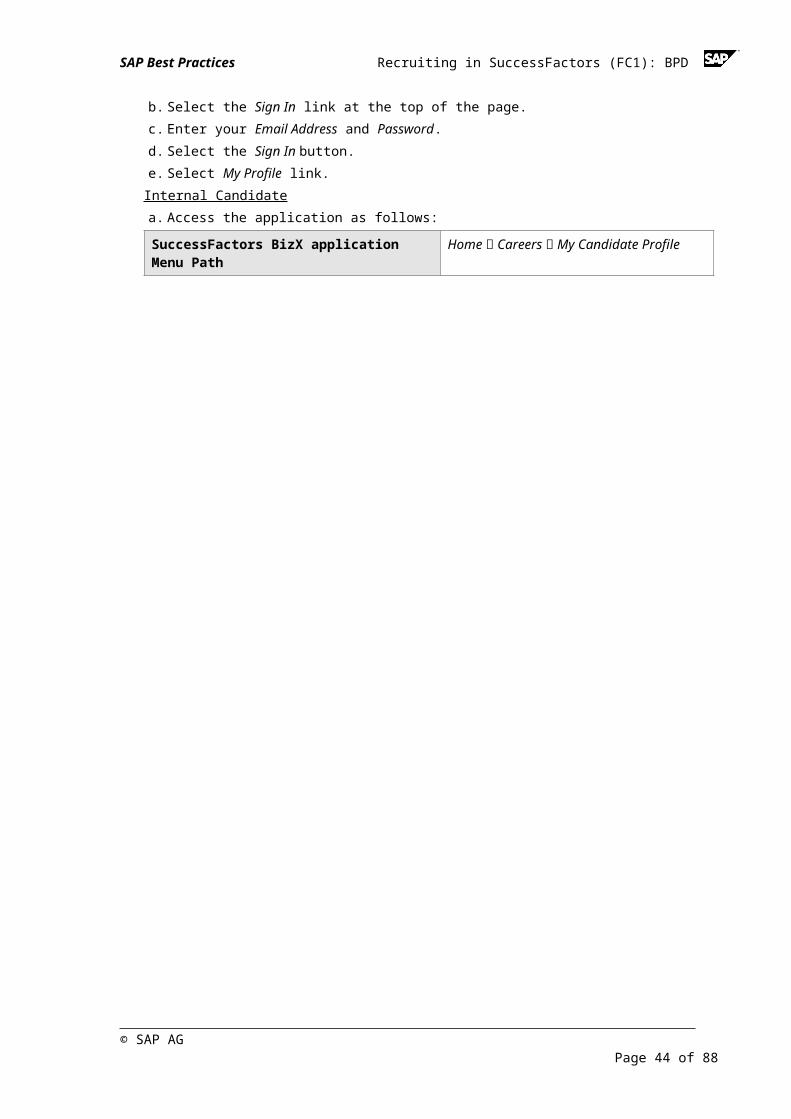
Internal Candidatea. Access the application as follows:
SuccessFactors BizX application Menu Path Home Careers My Candidate Profile
© SAP AGPage 37 of 73

SAP Best Practices Recruiting in SuccessFactors (FC1): BPD
2. To upload your resume select the link Click here to attach your Resume.3. Choose a file by using the Browse function.4. Select the Upload button. Your resume will be attached.5. You can also upload a cover letter by selecting the link Click here to attach your Cover
Letter. Choose a file by using the Browse function. Select the Upload button.6. You can now add information not already present by selecting the plus icon Add in the right
top corner of the different elements, like for example Language Skills, Geographic Mobility, and Address Data in the section More Information.
7. When finished, select Save.
Result The Candidate updated his/her candidate profile and maintained additional fields.
4.11 Apply for JobUseThe purpose of this process step for the Candidates is to show how to apply for open jobs posted on the Career Site.
PrerequisitesJob requisition is posted internally and/or externally.The external candidate has an account on the External Career Site.
Procedure1. Depending on your role proceed as follows:
External Candidatea. Access the application as follows:
SuccessFactors External Job Link
Select the External Job Link for the company, for example:
https://careersd4.successfactors.com/career?company=<company id>
© SAP AGPage 38 of 73

SAP Best Practices Recruiting in SuccessFactors (FC1): BPD
b. Select the Sign In link at the top of the page.c. Enter your Email Address and Password.d. Select the Sign In button.e. Select the Job Search tab.
Internal Candidatea. Access the application as follows:
SuccessFactors BizX application Menu Path Home Careers Job Search
2. On the Career Opportunities Site select the View Jobs button to display all open job requisitions.
3. Select the Select Action button next to the job requisition of interest and select Apply.4. On the My Candidate Profile screen you can add data if you consider it appropriate. Else
select directly the Next button. You are now on the application form screen.5. Review and fill in at least all required fields (marked with a red asterisk) and select the Apply
button.
At this point in time you can also save your application as a draft and continue later on.
6. The application has been sent.
Result The Candidate has applied for a job.Once the candidate has send the job application, the system confirms this automatically, as detailed in the step below.
4.11.1 Confirm Job Application
UseOnce the candidate has sent his or her job application, an automatic confirmation of having received this application is sent out by the system.
4.12 Receive Job Application Confirmation via E-MailUseThe purpose of this process step for the Candidate is to check his/her email account, to see if his or her job application has been received by the company.
This step takes place outside the delivered software and will therefore be described briefly.
Prerequisites
© SAP AGPage 39 of 73

SAP Best Practices Recruiting in SuccessFactors (FC1): BPD
The automatic e-mail notification regarding the receiving of the job application has been sent to the candidate.
Procedure1. Access your Mail account.2. Review the automatic email notification sent by the system.
Result The Candidate has read the email regarding the receiving of his or her job application by the company.
4.13 Manage my Job ApplicationsUseThe purpose of this process step for the Candidates is to show how to manage their submitted job applications on the Career Site.
PrerequisitesThe candidate has applied for a job.The external candidate has an account on the External Career Site.
Procedure1. Depending on your role proceed as follows:
External Candidatea. Access the application as follows:
SuccessFactors External Job Link
Select the External Job Link for the company, for example:
https://careersd4.successfactors.com/career?company=<company id>
© SAP AGPage 40 of 73

SAP Best Practices Recruiting in SuccessFactors (FC1): BPD
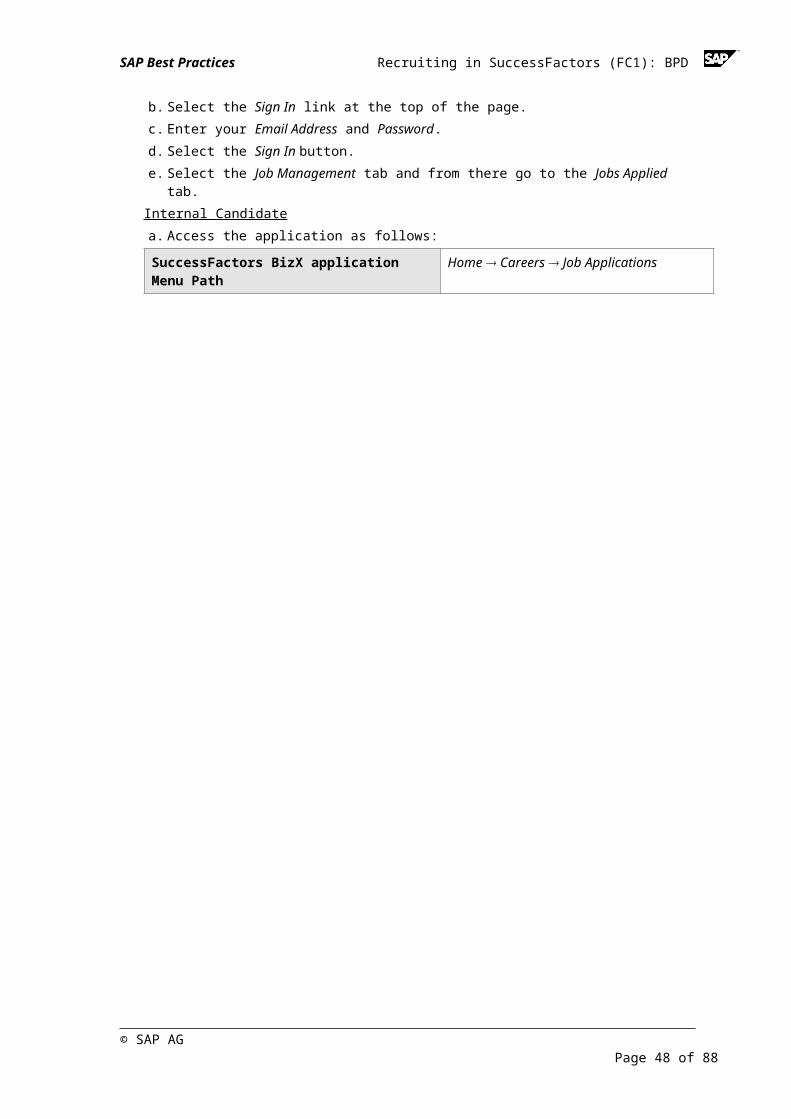
b. Select the Sign In link at the top of the page.c. Enter your Email Address and Password.d. Select the Sign In button.e. Select the Job Management tab and from there go to the Jobs Applied tab.
Internal Candidatea. Access the application as follows:
SuccessFactors BizX application Menu Path Home Careers Job Applications
2. On the Jobs Applied screen you can see the status of your application and what the next steps are.
Candidates may also withdraw their application, if desired, by selecting the Withdraw Application option under the Actions column.
If the system is configured to allow application updates after submission, the candidate may access the application from this screen to make any necessary additions/modifications. Proceed as follows:1. Under Actions select View/Edit Application and Add Attachments.2. Make any necessary additions/modifications.3. Select Update.
If the company has configured Multi-stage application, Candidates will be prompted to complete additional sections of the application at various times after submission via email from the Recruiter. They do this from the Jobs Applied portlet.
Result The Candidate has viewed the status of his/her application and has adapted his/her submitted job application, as necessary.
4.14 View CandidatesUseThe purpose of this process step for the Recruiter is to view candidates that have applied to job requisitions.
PrerequisitesIn order to view and manage candidates that have applied to a job requisition, the Recruiter must be the named Recruiter on the job requisition or be a member of a Recruiting group that is associated with the job requisition.
Procedure1. Access the following menu path with the Recruiter user:
SuccessFactors Menu Path Home Recruiting
© SAP AGPage 41 of 73

SAP Best Practices Recruiting in SuccessFactors (FC1): BPD
2. On the Job Requisitions screen in the displayed list search for the row with your requisition.3. Navigate to the Candidate’s Workbench by:
Selecting the <number> hyperlink in the Candidates column or
The existence of new candidates is shown by (<no. of new candidates> New) in the Candidates column. These candidates have status Applied (or similar) in the Talent Pipeline.
Hover over the job title and select Candidate Actions: Candidate Summary4. In the Candidate’s Workbench you can view candidates in two ways:
View all candidates by selecting the View all candidates link or Filter candidates by status by selecting the appropriate status from the Talent
Pipeline.5. To view the candidate’s details, select a candidate from the Candidates table on the left by
choosing on the candidate’s name.6. A summary view of the candidate is displayed containing among others:
Internal or External Candidate Candidates Name Contact information such as Phone Number and email, Cover Letter and Resume, if submitted Profile data, if maintained Application information Jobs he or she has applied for Screening details, if available Other data as configured as possible display options
Result The Recruiter has viewed candidates that have applied to job requisitions.
4.15 Schedule Candidate for Telephone InterviewUseThe purpose of this process step for the Recruiter is to send out an e-mail to the candidate in order to schedule a brief phone interview.Also it is shown in an exemplary way how to proceed with a candidate’s application by using the Talent Pipeline as a helping tool.
PrerequisitesIn order to view and manage candidates that have applied to a job requisition, the Recruiter must be the named Recruiter on the job requisition or be a member of a Recruiting group that is associated with the job requisition.Candidate is in status Applied.
Procedure1. Access the following menu path with the Recruiter user:
SuccessFactors Menu Path Home Recruiting
© SAP AGPage 42 of 73

SAP Best Practices Recruiting in SuccessFactors (FC1): BPD
2. From the Job Requisitions screen, navigate to the Candidate’s Workbench by hovering over the appropriate job title and selecting Candidate Actions: Candidate Summary.
3. Select the candidate’s name.4. The candidate’s details appear on the right hand side of the screen. Select the Email icon.5. Enter the required details.6. When finished, choose the Next button. 7. Review the e-mail and if satisfied choose the I’m Done button. A system message confirms
that the e-mail has been sent.
Depending on configuration, various emails may be sent to candidates as they are moved into the statuses in the Talent Pipeline. Emails may also be sent to various recruiting roles such as hiring manager, HR business partner, coordinators, etc.
8. Use one of the following methods to move your candidate in the Talent Pipeline from status Applied to status Phone Screen:
From the Candidates table, drag and drop the candidate(s) to a particular status in the Talent Pipeline by grabbing the grid icon next to the candidate’s name.
Flag the check box to the left of the candidate’s name for one or more candidates and choose Action > Advance Candidate to move him/her to the next status in the pipeline.
Flag the check box to the left of the candidate’s name for one or more candidates and choose Action > Move Candidate to a status selected from the drop down.
Select the candidate’s name. In the right part of the screen the candidate’s details are displayed. Choose the Move Candidate button from the page bottom.
While viewing a candidate’s details update the Status field and choose Save.9. For each of these methods you may enter a comment on the status change in the dialog
box.
The comments entered when moving a candidate through the different statuses in the Talent Pipeline are tracked in the Application Status Audit Trail portlet in the candidate’s application details page.
10. Finally select the Apply Updates button in this dialog box.
Result The Recruiter has sent an invitation to a phone interview to the candidate via email.The Candidate has been moved to status Phone Screen.
4.16 Receive Invitation via E-MailUseThe purpose of this process step for the Candidate is to check his/her email account, to see the invitation to a telephone interview.
This step takes place outside the delivered software and will therefore be described briefly.
PrerequisitesAn ad hoc email template has been created in Admin Tools and assigned to the candidate role for the appropriate status in Edit Applicant Status Configuration.The e-mail of the recruiter with invitation for telephone interview has been sent to the candidate.
© SAP AGPage 43 of 73
SAP Best Practices Recruiting in SuccessFactors (FC1): BPD
Procedure1. Access your Mail account.2. Review the email of the recruiter including the invitation to the telephone interview.3. Optional confirm your availability for the telephone interview.
Result The Candidate has read the email with the invitation to the telephone interview and possibly answered that he/she accepts the invitation.
4.17 Perform Telephone InterviewUseThe purpose of this process step for the Recruiter is to perform a telephone interview with the candidate in order to be able to decide if the candidate is still of interest for the job to be occupied.
This step takes place outside the delivered software and will therefore be described briefly.
PrerequisitesCandidate is in status Phone Screen.
ProcedureThe recruiter performs a telephone interview with the candidate on the date and time as specified in the invitation sent to the candidate.
ResultThe Recruiter is now able to decide whether or not the Candidate is still of interest for the job to be occupied.
4.18 Propose Candidates for InterviewUseThe purpose of this process step for the Recruiter is to evaluate the suitability of the candidates for a job. Interesting candidates are proposed for an interview invitation to the hiring manager.
PrerequisitesIn order to view and manage candidates that have applied to a job requisition, the Recruiter must be the named Recruiter on the job requisition or be a member of a Recruiting group that is associated with the job requisition.Candidate is in status Phone Screen.The telephone interview has taken place.
Procedure1. Access the following menu path with the Recruiter user:
SuccessFactors Menu Path Home Recruiting
© SAP AGPage 44 of 73

SAP Best Practices Recruiting in SuccessFactors (FC1): BPD
2. From the Job Requisitions screen, navigate to the Candidate Workbench by hovering over the appropriate job title and selecting Candidate Actions: Candidate Summary.
3. Select status Phone Screen in the Talent Pipeline. Your candidate occurs in the list.4. Choose the candidate’s name to see the details. Optional add a comment about the outcome
of the telephone interview in the Comments portlet by choosing the Add link.5. Forward the candidate’s application to the hiring manager by using the Forward > Forward
To Colleague functionality.6. In the Forward to Colleague dialog box in the Forward to field choose the manager’s name,
review and adapt the proposed message text, and choose the Send button. You may attach the candidate’s resume and cover letter by flagging the appropriate check button.
In this status you can forward the application to another requisition by using the Forward > Forward to Requisitions functionality. With that the candidate will show up in the other requisition in the Forwarded section of the Talent Pipeline.
7. Move the candidate forward to status Short List. Add a comment if appropriate and choose the Apply Update button.
ResultThe Recruiter has sent an email with information about the candidate like resume and cover letter to the hiring manager.The candidate has been moved to status Short List.
4.19 Provide FeedbackUseThe purpose of this process step for the Hiring Manager is to reply to the Recruiter’s email, stating to invite the candidate for an interview.
PrerequisitesCandidate is in status Short List.The hiring manager has received the e-mail from the recruiter in his/her email inbox.
Procedure1. Access the following menu path with the Hiring Manager user:
SuccessFactors Menu Path Home Recruiting
© SAP AGPage 45 of 73

SAP Best Practices Recruiting in SuccessFactors (FC1): BPD
2. On the Job Requisitions screen a list of all job requisitions having you as hiring manager will be displayed.
3. Select the job requisition by hovering over the job title. A dialogue box to the right will be displayed for Requisition Actions and Candidate Actions.
4. To recall the details of the job requisition, select the View or Edit Requisition link below Requisition Actions. The job requisition is displayed.
5. To view details regarding the candidate, select the Candidate Summary link below Candidate Actions.
6. Select status Short List in the Talent Pipeline. The candidate shows up in the list.7. Choose the candidate’s name. Check the details, including profile, resume, and cover letter,
if available.8. Inform the recruiter about your decision to invite the candidate to a face-to-face interview.
You can do this either verbally, or by using the Forward > Forward To Colleague functionality.
ResultThe Hiring Manager reviews the shortlisted candidate and communicates his or her decision to the Recruiter about whether or not to invite the candidate to an interview.
4.20 Set Up InterviewersUseSince the hiring manager has decided to invite the candidate to an interview, the Recruiter sets up the interviewers for the interview with the candidate.
PrerequisitesIn order to schedule interviews for candidates, the candidate(s) must be in a status that has been configured with the feature permission for Interview. This will ensure the Interviewers portlet is enabled.Candidate is in status Short List.
Procedure1. Access the following menu path with the Recruiter user:
SuccessFactors Menu Path Home Recruiting
2. From the Job Requisitions screen, navigate to the Candidate details by hovering over the appropriate job title and selecting Candidate Actions: Candidate Summary.
3. Select status Short List in the Talent Pipeline.4. Select the candidate’s name to view the details.5. In the Interviewers portlet select the Set up Interviewers link.6. In the Set up Interviews for <job requisition title> dialog box, select one or more Interviewers
suggested from the SuccessFactors database. For this choose the Add link and type their names into the Name field.
© SAP AGPage 46 of 73

SAP Best Practices Recruiting in SuccessFactors (FC1): BPD
The list of interviewers should contain at least the hiring manager.
To add additional interviewers select again the Add link.
7. For all interviewers enter the interview date, time and notes, if desired.8. Choose whether to include the candidate’s resume and/or cover letter.9. Choose whether you want to apply the same list of interviewers to all candidates of this job.10. Choose the Send Email button. A system message confirms that the e-mail was sent. In the
Interviewers portlet the list with the interviewers and the interview date are displayed.
At this point in time you can also choose to save the e-mail and send it later.11. Move the candidate to status Interview in the Talent Pipeline. Add a comment if
appropriate and choose the Apply Update button.
ResultAn interview has been set up by the recruiter and the interviewers have been invited by email.Candidate is moved to status Interview.
4.21 Invite Candidate to InterviewUseThe purpose of this process step for the Recruiter is to send out an invitation to the candidate via email.
PrerequisitesIn order to schedule interviews for candidates, the candidate(s) must be in a status that has been configured with the feature permission for interview. This will ensure the Interviewers portlet is enabled.Candidate is in status Interview.
Procedure1. Access the following menu path with the Recruiter user:
SuccessFactors Menu Path Home Recruiting
© SAP AGPage 47 of 73
SAP Best Practices Recruiting in SuccessFactors (FC1): BPD
2. From the Job Requisitions screen, navigate to the Candidate’s Workbench by hovering over the appropriate job title and selecting Candidate Actions: Candidate Summary.
3. Select status Interview in the Talent Pipeline.4. Select the candidate’s name to view the details.5. Select the Email icon.6. Enter the required details.7. When finished, choose the Next button. 8. Review the e-mail and if satisfied choose the I’m Done button. A system message confirms
that the e-mail has been sent.
Emails can be performed by managers, too, and in each phase of the talent pipeline status. The emails are tracked in the Correspondence portlet.
ResultThe Recruiter has sent an invitation to the candidate via email.Candidate is in status Interview.
4.22 Receive Invitation via E-MailUseThe purpose of this process step for the Candidate is to check his/her email account, answering that he/she will attend the interview.
This step takes place outside the delivered software and will therefore be described briefly.
PrerequisitesThe e-mail of the recruiter with invitation for interview has been sent to the candidate.
Procedure3. Access your Mail account.4. Review the email of the recruiter including the interview invitation.5. Confirm your attendance.
Result The Candidate has read the email with the invitation to the job interview and answered that he/she accepts the invitation.
4.23 Interview CandidateUseIn this process step the Hiring Manager and Recruiter, and possibly other members as nominated by the recruiter, interview the Candidate.
This step takes place outside the delivered software and will therefore be described briefly.
PrerequisitesThe candidate has received the invitation to the interview and has answered it positively.
© SAP AGPage 48 of 73

SAP Best Practices Recruiting in SuccessFactors (FC1): BPD
ProcedureThe hiring manager, the recruiter, and possibly other members nominated by the recruiter interview the candidate who has applied for a certain job. The interview takes place on the date and time as specified in the invitation.
ResultThe job interview has taken place on the specified date and time.
4.24 Assess CandidateUseThe purpose of this process step after the job interview for all interviewers (Hiring Manager, Recruiter, and so on) is to assess the candidate.
Each participant at the interview as maintained in the list of interviewers has to execute this step.
PrerequisitesThe interview with the candidate has taken place.Candidate is in status Interview.
Procedure1. Access the following menu path with the appropriate user (Hiring Manager, Recruiter, and so
on):
SuccessFactors Menu Path Home Recruiting Interview Central
© SAP AGPage 49 of 73

SAP Best Practices Recruiting in SuccessFactors (FC1): BPD
2. On the Interview Central screen, in the Candidates table a list of all candidates you have interviewed or you will be interviewing is displayed.
3. In the column Overall Ratings select the Rate now link next to the candidate you want to assess. The Interview Assessment: <job requisition name> screen is displayed.
Alternatively you can access the Interview Assessment: <job requisition name> screen directly from your home page by selecting in the To Do list the <job requisition name> link.
4. On the Interview Assessment: <job requisition name> screen rate the listed competencies for your candidate.
The competencies are visible only if they have been assigned to the job requisition (see details in section 4.5).
5. Select Save.6. In the Overall Rating section choose the Thumbs Up! or Thumbs Down! icon to rate the
candidate.7. Optional you may enter a comment by using the Comments icon next to the Thumbs.8. Select Save.9. Select the I’m Done button.
ResultThe candidate has been assessed by the interviewers.
4.25 Provide Final FeedbackUseThe purpose of this process step for the Hiring Manager is to communicate to the Recruiter his or her final feedback regarding the suitability of the candidate to the posted job requisition.
You can provide your final feedback either verbally or via email. The latter can be done also by using SuccessFactors, which will be described in this document.
PrerequisitesCandidate is in status Interview.
Procedure1. Access the following menu path with the Hiring Manager user:
SuccessFactors Menu Path Home Recruiting
© SAP AGPage 50 of 73

SAP Best Practices Recruiting in SuccessFactors (FC1): BPD
2. On the Job Requisitions screen a list of all job requisitions having you as hiring manager will be displayed.
3. Select the job requisition by hovering over the job title. A dialogue box to the right will be displayed for Requisition Actions and Candidate Actions.
4. To view details regarding the candidate, select the Candidate Summary link below Candidate Actions.
5. Select status Interview in the Talent Pipeline. The candidate shows up in the list.6. Choose the candidate’s name. The details regarding the candidate are displayed.7. Inform the recruiter about your decision to hire the candidate. Do this by using the Forward >
Forward To Colleague functionality.
ResultThe Hiring Manager communicates his or her decision to the Recruiter about whether or not to hire the candidate.
4.26 Receive Final Feedback via E-MailUseThe purpose of this process step for the Recruiter is to check his/her email account, to review the final feedback provided by the hiring manager with respect to the interviewed candidate.
This step takes place outside the delivered software and will therefore be described briefly.
PrerequisitesThe e-mail of the hiring manager with the final feedback has been sent to the recruiter.
Procedure1. Access your Mail account.2. Review the email of the hiring manager.
Result The Recruiter has read the email from the hiring manager containing the feedback to create an offer to the interviewed candidate.
Depending of the configuration, a status Second Interview may be available in case a candidate is planned for an additional interview. In our example we will not use it.
4.27 Create OfferUseThe purpose of this process step for the Recruiter is to generate an offer for the successful candidate after he or she has received the positive feedback from the hiring manager. This offer will be sent to the hiring manager for approval before an offer letter is generated and sent to the candidate.
PrerequisitesThe recruiter has received the Hiring Manager’s decision about whether to hire the candidate.
The candidate must be in a status that is configured with the appropriate feature permission to allow the creation of an offer.
© SAP AGPage 51 of 73

SAP Best Practices Recruiting in SuccessFactors (FC1): BPD
Candidate is in status Interview.
Procedure1. Access the following menu path with the Recruiter user:
SuccessFactors Menu Path Home Recruiting
© SAP AGPage 52 of 73
SAP Best Practices Recruiting in SuccessFactors (FC1): BPD
2. From the Job Requisitions screen, navigate to the Candidate Workbench by hovering over the appropriate job title and selecting Candidate Actions: Candidate Summary.
3. Select status Interview in the Talent Pipeline.4. Since the hiring manager decided to send an offer to this candidate you move the candidate
to status Offer Approval.5. Select status Offer Approval in the Talent Pipeline. Select the candidate’s name to view the
details.6. From the Offer button at the top of the screen, select Offer Approval.7. On the Offer Approval: <candidate name> for <job requisition name> screen select the
appropriate template from the Select Offer Template drop down, For example. Baseline-Salaried Offer Detail.
8. Fill in the required fields of information.
It is recommended to enter an Offer Date, too.9. In the Approvers section enter the hiring manager’s name (additional approvers are
optional). Add a comment if appropriate.10. Select Save.11. Select the Send For Approval button.12. A Confirmation dialog box is displayed asking you to confirm the sending of the offer detail
for approval. Select the Yes button.
ResultThe Recruiter created a job offer and has sent it to the hiring manager for approval.Candidate is moved to status Offer Approval.
4.28 Approve OfferUseThe purpose of this process step for the Hiring Manager is to approve the job offer for the successful candidate.
PrerequisitesCandidate is in status Offer Approval.
Procedure1. Access the following menu path with the Hiring Manager user:
SuccessFactors Menu Path Home To Do
© SAP AGPage 53 of 73

SAP Best Practices Recruiting in SuccessFactors (FC1): BPD
2. Select Pending Offer Approvals for <candidate name> for <job requisition name>.3. On the Offer Approval: <candidate name> for <job requisition name> screen check the
details, add a comment and choose the Approve button to approve the offer.
Alternatively, a routing email notification can be configured to notify the Recruiter when the offer approval has been approved by all approvers.
Should an approver decline to approve the offer, it returns to the Recruiter for revision and will need to be approved again. Update the necessary fields, save and send for approval. This creates a new version of the offer approval.
4. A Confirmation dialog box is displayed asking you to confirm the approval of the offer detail. Select the Yes button.
ResultThe Hiring Manager has approved the job offer.
4.29 Create and Send Offer LetterUseThe purpose of this process step for the Recruiter is to create the offer letter.
PrerequisitesTo generate an offer letter to send to the candidate, the candidate must be in the status where offer letter is enabled.Candidate is in status Offer Approval.
Procedure 1. Access the following menu path with the Recruiter user:
SuccessFactors Menu Path Home Recruiting
© SAP AGPage 54 of 73

SAP Best Practices Recruiting in SuccessFactors (FC1): BPD
2. From the Job Requisitions screen, navigate to the Candidate Workbench by hovering over the appropriate job title and selecting Candidate Actions: Candidate Summary.
3. Select status Offer Approval in the Talent Pipeline.4. Since the hiring manager decided to send an offer to this candidate you move the candidate
to status Offer Letter.5. Select status Offer Letter in the Talent Pipeline. Select the candidate’s name to view the
details.6. From the Offer button at the top of the screen, select Offer Letter.7. The Offer Letter: <candidate name> for <job requisition name> screen is displayed. Select
the appropriate country and language from the Country and Language drop down, and the appropriate offer letter template from the Template drop down.
The chosen template should be of same type as the one chosen for the offer (see section 4.27 for details).
8. Replace the yellow marked tokens, like candidate name, company name, hiring manager, and so on, with appropriate values.
9. Use the Preview button to review the letter and ensure all tokens are populated with the correct information.
10. Select the option for sending the offer letter. Following options are available:a. for sending the offer letter as PDF attachment, select the Email as PDF attachment
button (this is the preferred option)b. for sending the offer letter as text, select the Email as text buttonc. for making a verbal offer, select the Verbal Offer button
The verbal offer is a date stamp to indicate a verbal offer was made.
11. Select the Email as PDF attachment button. You are moved to the next screen. 12. If available, select from the drop down the email template that will be sent to the candidate
with the offer letter file attached to it.13. If available, preview the email template as well and ensure all tokens are populated with the
appropriate information.14. Choose the Next button.15. Review the email, and if satisfied, send the email by choosing the Send button. A system
message is generated confirming that your offer letter was sent successfully via email.16. Choose the I’m Done button. You return to the Candidate’s Workbench.
Result The offer letter has been created and sent to the candidate.Candidate is in status Offer Letter.
4.30 Accept OfferUseThe purpose of this process step for the Candidate is to check his/her email account, answering that he/she will accept the offer.
This step takes place outside the delivered software and will therefore be described briefly.
PrerequisitesThe e-mail of the recruiter with the offer letter has been sent to the candidate.
© SAP AGPage 55 of 73

SAP Best Practices Recruiting in SuccessFactors (FC1): BPD
Procedure1. Access your Mail account.2. Review the email of the recruiter including the offer letter.3. Communicate your decision to accept the offer, for example via email.
Result The Candidate has read the email from the recruiter including the offer letter and answered that he/she accepts the offer.
4.31 Receive Decision via E-MailUseThe purpose of this process step for the Recruiter is to check in his/her email account if the candidate has responded to the offer letter sent.
This step takes place outside the delivered software and will therefore be described briefly.
PrerequisitesThe candidate has sent to the recruiter a positive answer regarding the offer letter.
Procedure1. Access your Mail account.2. Review the email of the candidate.
Result The Recruiter has read the email from the candidate containing the offer acceptance of the same.
Depending on the configuration, a status Offer Accepted might be available. After the candidate has accepted the offer, you can move him or her into this status in the talent pipeline.
4.32 Set Candidate Status SendToSAP
UseThe purpose of this process step for the Recruiter is to set the candidate status to SendToSAP.
The data of the candidates having this status will be transferred to the SAP system. Details to this transfer are given in the next step (section 4.33).
PrerequisitesThe candidate has accepted the offer.Candidate is in status Offer Letter (or Offer Accepted, if available).
Procedure1. Access the following menu path with the Recruiter user:
SuccessFactors Menu Path Home Recruiting
© SAP AGPage 56 of 73

SAP Best Practices Recruiting in SuccessFactors (FC1): BPD
2. From the Job Requisitions screen, navigate to the Candidate Workbench by hovering over the appropriate job title and selecting Candidate Actions: Candidate Summary.
3. Select status Offer Letter (or Offer Accepted, if available) in the Talent Pipeline.4. Move the successful candidate to status SendToSAP.
Result The candidate is now ready to be transferred and hired in the SAP ERP HCM system.Candidate is in status SendToSAP.
4.33 Import Recruiting DataUseRelevant candidate recruiting data from SuccessFactors is imported into the SAP ERP system to enable the HR Administrator to perform the hiring personnel action in the SAP ERP system.
This program (RH_SFI_IMPORT_RECRUITING_DATA) can be scheduled to run frequently to ensure data consistency between SuccessFactors and SAP ERP HCM.
PrerequisitesCandidate must have status SendToSAP in the Talent Pipeline in the Recruiting module in SuccessFactors. Only these applicants will be contained in the SuccessFactors ad hoc report used in the import program RH_SFI_IMPORT_RECRUITING_DATA.
Procedure1. Access the following transaction in the SAP GUI:
Transaction Code HRSFI_RCT_DATA_IMP
© SAP AGPage 57 of 73

SAP Best Practices Recruiting in SuccessFactors (FC1): BPD
2. On the Import Recruiting Data from SFSF screen make the following entries:
Field Name Description User Action and Values Comment
SFSF Ad Hoc Report
Ad hoc report in SuccessFactors for applicants to be hired
Select value from value help and press ENTER. This leads to a defaulted value in field Field Set for Data Import.
Select the SFSF Ad Hoc Report created as part of Configuration Guide SuccessFactors Recruiting Integration (C1N).
© SAP AGPage 58 of 73

SAP Best Practices Recruiting in SuccessFactors (FC1): BPD
3. Choose the Execute button.
ResultThe SAP ERP system triggers a job to use an ad hoc report to retrieve the candidate’s data from SuccessFactors BizX.In a multiple step procedure, the SAP ERP system first sends a request. The synchronous response from SuccessFactors BizX contains a task ID. The SAP ERP system then uses this task ID to periodically query the status of the request. When the request has been processed, the SAP ERP system asks for the result. The replication of data from SuccessFactors to SAP ERP takes place via SAP PI or SAP HCI. Once the processing is complete, a Display Log appears. The success or failure can be seen based on the traffic lights presented. Assuming successful results, the data is transferred to the staging tables for recruiting in SAP and is visible in process step 4.34.The status of the candidate is set automatically in SuccessFactors, as described in the step below.
4.33.1 Set Candidate Status TransferredToSAP
UseAs a result of the successful import of recruiting data in the SAP ERP HCM system, the status of the respective candidate within the SuccessFactors Talent Pipeline is set automatically to TransferredToSAP.
In case of errors in the data import of candidates for which hiring data should be entered in SAP ERP, the status of these specific candidates is set in the SuccessFactors Talent Pipeline automatically to TransferredToSAPError.
4.34 View Transferred CandidatesUseThe purpose of this process step for the HR Administrator is to view the candidates that have been transferred to SAP ERP HCM.Job applications are imported from SuccessFactors with the import interface and the results are stored in the staging table. In this step the data in the staging table is accessed and can then be processed by the HR administrator.
PrerequisitesThe job applications must be imported from SuccessFactors.
Procedure1. Access the following transaction in the SAP GUI:
Transaction Code HRSFI_RCT_HIRE
© SAP AGPage 59 of 73

SAP Best Practices Recruiting in SuccessFactors (FC1): BPD
2. On the Job Applications Transferred from SuccessFactors BizX screen the list of transferred job applications is displayed, together with messages, notes, and details (if available) for each transferred candidate.
3. Check if all successful candidates have been transferred as you expected.4. In case you are not sure if all have been transferred, choose the Appl. Not Transf. button to
view not transferred candidates.
In case of not transferred candidates solve the mentioned errors in SuccessFactors.
ResultThe successfully transferred candidates from SuccessFactors have been viewed.
4.35 Correct Errors (optional)UseThe purpose of this process step for the HR Administrator is to correct errors in SAP ERP in the record of successfully transferred candidates.
Procedure1. Access the following transaction in the SAP GUI:
Transaction Code HRSFI_RCT_HIRE
© SAP AGPage 60 of 73

SAP Best Practices Recruiting in SuccessFactors (FC1): BPD
2. On the Job Applications Transferred from SuccessFactors BizX screen, for the transferred candidate with a red traffic light in the Check column, choose the traffic light to open the Check And Change Data dialog box.
3. This dialog box contains candidate details such as name and date of birth, as well as details about process data, such as personnel action and country grouping.
4. Select for fields Country Grouping and Personnel Action the appropriate values from the drop down and choose the green arrow button (or choose Enter). The traffic light in the Check column turns green. The status of the candidate turns automatically to Start Action.
5. Repeat the activities of this step for each transferred candidate with a red traffic light in the Check column.
ResultThe missing data for the successfully transferred candidates has been added in SAP ERP HCM.
4.36 Enter Hiring DataUseThe purpose of this process step for the HR Administrator is to enter hiring data in the SAP ERP HCM system for the candidate who passed successfully the recruiting process.
PrerequisitesThe job application (and thus the candidate) must have status Start Action.
Procedure1. Access the following transaction in the SAP GUI:
Transaction Code HRSFI_RCT_HIRE
© SAP AGPage 61 of 73

SAP Best Practices Recruiting in SuccessFactors (FC1): BPD
2. On the Job Applications Transferred from SuccessFactors BizX screen, for the candidate with a green traffic light, select the record and choose from the menu bar above the list the Start Action button to initiate the chosen personnel action.
When choosing the Start Action button you are directed to the PA40 screen.
The personnel action to be executed has been entered in field Personnel Action described in the previous step.
3. Process the individual infotype records in the action so that all incoming recruiting data is saved to the system according to the defined field mappings. After saving the last infotype record, you are returned to the Job Applications Transferred from SuccessFactors BizX screen.
4. Choose the Refresh icon to update the status of the candidate. If the action has been completed successfully, the candidate disappears from the list of transferred job applications.
5. Repeat the activities of this step for each transferred candidate with status Start Action.6. Once finished you can check by choosing the Show Completed button for which candidate
hiring data has been entered successfully; these candidates have status Completed.
ResultThe hiring data has been entered into the SAP ERP system for candidates who have passed successfully the recruiting process.The position has been staffed and the Staffing status field (IT1007) has been set to Vacancy occupied or put on hold.The status of the hired candidate is set automatically in SuccessFactors, as described in the step below.
4.36.1 Set Candidate Status HiredAtSAP
UseAs a result of entering hiring data in the SAP ERP HCM system for a successful candidate, the status of the candidate within the SuccessFactors talent pipeline is set automatically to HiredAtSAP.
4.37 View Candidate Status UseThe purpose of this process step for the Recruiter is to view in SuccessFactors the status of the candidate, who has been hired in the SAP ERP system, to check if the status has been updated correctly.
Procedure1. Access the transaction using the following navigation option:
SuccessFactors Menu Path Home Recruiting select the number link in the Candidates column
© SAP AGPage 62 of 73

SAP Best Practices Recruiting in SuccessFactors (FC1): BPD
2. A value of “1” should be displayed in the Talent Pipeline in the HiredAtSAP box. In the Candidates list below the talent pipeline the status of the hired candidate is HiredAtSAP.
ResultThe status of the candidate has been viewed.
4.38 Trigger Closing of Job RequisitionUseOnce the successful candidate has been hired on a particular position, the HR Administrator triggers the closing of the job requisitions in SuccessFactors.
The status is updated by running program RH_SFI_TRIGGER_JOB_REQUISITION. This program can be scheduled to run frequently to ensure data consistency between SAP ERP HCM and SuccessFactors.
PrerequisitesThe vacancy (IT1007) in SAP ERP HCM is filled.
Procedure1. Access the following transaction in the SAP GUI:
Transaction Code SE38
SAP Program Name RH_SFI_TRIGGER_JOB_REQUISITION
2. Select the Execute button.3. On the Create and Update Job Requisitions in SuccessFactors screen select value EN for
Extraction Language field.4. Select the Execute button.
ResultThe job requisition integration report has selected all positions change pointer IT1107. Data is extracted and mapped to SuccessFactors BizX fields due to field mapping customizing. Depending on the middleware used, the mapping takes place either in a SAP NetWeaver PI system or a SAP HANA Cloud Integration.Once the processing is complete, a Display logs screen appears, containing messages referring to the number of selected requisitions for transfer to SuccessFactors, successfully transferred requisitions, and IDs of closed requisitions.As a result the job requisition is closed automatically in both SAP ERP HCM and SuccessFactors.
4.38.1 Close Job Requisition in SFSF
UseAs a result of the execution of the job requisition integration report the status of the job requisition within SuccessFactors is set automatically to SAPClosed.
© SAP AGPage 63 of 73
SAP Best Practices Recruiting in SuccessFactors (FC1): BPD
You can view this in SuccessFactors either by selecting from the drop down on the Job Requisitions screen value Closed Job Requisitions, or by checking in the Job Requisition Detail the value in field Status.
4.38.2 Close Job Requisition in SAP ERP
UseAs a result of the execution of the job requisition integration report the job requisition within SAP ERP HCM is moved automatically to the Closed Job Requisition section in the SFSF Job Requisition tab of the particular position.
You can view this in SAP ERP HCM by entering transaction code PPOME, selecting the appropriate position and checking the information in the Closed Job Requisition section of the SFSF Job Requisition tab.
4.38.3 Update Candidate Profile with Employee ID
UseAs a result of the execution of the job requisition integration report the candidate profile in SuccessFactors is updated with the field Employee ID, which is filled automatically with the SFSF User (ID) from SAP ERP HCM. Thereby a connection between the data of the external candidate who applied via SuccessFactors and that of the new employee who has been hired in SAP ERP HCM is established.
4.39 View Candidate Profile UseThe purpose of this process step for the Recruiter is to view the candidate’s profile in SuccessFactors to check if the value in the Employee ID field has been updated correctly with the SFSF User (ID) from SAP ERP HCM.
Procedure1. Access the transaction using the following navigation option:
SuccessFactors Menu Path Home Recruiting select the Candidates link
© SAP AGPage 64 of 73

SAP Best Practices Recruiting in SuccessFactors (FC1): BPD
2. From the Job Requisitions screen, search for the appropriate (closed) job requisition and select the number link in the Candidates column.
3. In the Candidates table below the Talent Pipeline select the hired candidate.4. A summary view of the candidate is displayed in the right part of the screen. Below the
candidate’s name, next to the Resume link is the View Profile link. Choose this link. A new screen is displayed containing the candidate’s profile.
5. Search for the Employee ID field and check if it is populated with the SFSF User (ID) value from SAP ERP HCM.
The Employee ID is located in the top right part of the screen, immediately below the candidate’s resume link.
ResultThe candidate’s profile in SuccessFactors has been viewed.
4.40 Set Unselected Candidate StatusUseOnce a candidate has been hired on a position, the Recruiter moves the remaining candidates to the appropriate disqualified statuses in SuccessFactors.
Procedure 1. Access the following menu path with the Recruiter user:
SuccessFactors Menu Path Home Recruiting
© SAP AGPage 65 of 73

SAP Best Practices Recruiting in SuccessFactors (FC1): BPD
2. From the Job Requisitions screen, select for the closed job requisition the number link in the Candidates column.
3. Select the status in the Talent Pipeline, other than HiredAtSAP, which contains a candidate.
4. Flag the check box on the left to the candidate’s name and select from the Action dropdown value Disqualify Candidate.
If there are several candidates in the chosen status, you can move them to the same disqualified status all at once by flagging the check boxes next to each candidate.
5. On the Disqualify Candidate dialog box select from the drop down in the Items column an appropriate value (for example Another Candidate Chosen) and choose the Apply Updates button.
Result The not selected (not hired) candidates have been dismissed.
4.41 Execute Synchronization of Employee Data Report UseThe purpose of this process step for the HR Administrator is to perform an initial load of the basic data of the newly hired employees into SuccessFactors. The employee master data record from SAP HCM is sent to SuccessFactors in order to create the user master record within SuccessFactors.
PrerequisitesEmployee has been hired and exists in the SAP ERP HCM system.
Subtype System user name (SY-UNAME) of infotype Communication (IT 0105 / STy 0001) should have been maintained for the employee to ensure a successful transfer of the master data record from SAP ERP to SuccessFactors.
Procedure1. Access the transaction in the SAP GUI:
Transaction Code HRSFI_SYNCH_EMP_DATA
© SAP AGPage 66 of 73

SAP Best Practices Recruiting in SuccessFactors (FC1): BPD
2. Choose the appropriate Report Variant. For this go to the Get Variant … pushbutton and select an appropriate variant from the upcoming dialog box.
3. On the Sync Employee Data with SuccessFactors (with Delta and Inactive Logic) screen, make the following entries:
Field Name Description User Action and Values Comment
Personnel Number
The personnel number of the employee
Enter the personnel number and then choose Enter or use the drop-down list to search for the employee
This field is located in the Selection Criteria section of the screen.
E-Mail The standard email address for an administrator
Enter standard email address of an administrator that the report uses when it cannot determine an email address of the employee to be transferred
Depending on the report variant chosen, a value might be defaulted by the system.
This field is located in the Defaults Setting section of the screen.
Required field
© SAP AGPage 67 of 73
SAP Best Practices Recruiting in SuccessFactors (FC1): BPD
4. In the Fields section of the screen, locate the Email drop-down and change it to Infotype 105 / Subtype 0010.
5. Choose the Execute button to generate the report.
ResultThe new employee objects are replicated and exchanged automatically from the SAP ERP HCM system to the target system, SuccessFactors. The data replication is carried out using middleware integration. The middleware may be a SAP NetWeaver PI system or a SAP HANA Cloud Integration system. In both cases the SAP ERP system sends SOAP messages to SAP PI or SAP HCI, where the SAP ERP fields are mapped to the corresponding SuccessFactors BizX fields.Once the processing is complete, a Display logs screen appears, containing messages referring to the number of successfully transferred employees to SuccessFactors, and the number of employees skipped due to errors in their SAP ERP master data record.
4.41.1 Receive and Updating Employee Data
UseThe data values that were exchanged between the PI or HCI system and the server are now received in SuccessFactorsThe employee’s master data record has been created automatically in SuccessFactors.
4.41.2 Consolidate Candidate Profile
UseA batch program of type “External to Internal Candidate Profile Conversion” from SuccessFactors runs, which compares the User ID of the new hire with the User ID of the external candidate records. When a match is found, the two candidate profiles are consolidated down to one. The external candidate profile is removed.
PrerequisitesUser master data record in SuccessFactors is created and assigned with the correct User ID. The candidate profile is updated with the User ID. The appropriate permission role has been given to the newly hired employee, such that he or she can access the Careers tab.
For details on this refer to building block FC7 SuccessFactors Recruiting: Role Based Permission of this best practice.
The batch program of type “External to Internal Candidate Profile Conversion” is set up within SuccessFactors provisioning instance.
For details on the set up steps necessary for external to internal candidate profile conversion refer to the appropriate section in building block FC2 SuccessFactors Recruiting: Basic Settings of this best practice.
ResultThe candidate profiles are consolidated into one and the external candidate profile is removed.After the conversion has run, the user who has set up the background job receives a notification about the result of the job.
Note that in the summary view of the candidate within the talent pipeline (accessed via the View Profile link; see details in step 4.39) the field Employee ID no longer exists.
© SAP AGPage 68 of 73

SAP Best Practices Recruiting in SuccessFactors (FC1): BPD
4.42 View My Candidate ProfileUseThe purpose of this process step for the former candidate (now Employee) is to view his or her newly consolidated candidate’s profile in SuccessFactors.
Procedure1. Access the transaction using the following navigation option:
SuccessFactors Menu Path Home Careers My Candidate Profile
© SAP AGPage 69 of 73

SAP Best Practices Recruiting in SuccessFactors (FC1): BPD
2. On the <employee name> screen your profile is displayed. The details as maintained in your previously “external candidate” profile are taken over, while your company name and email address have been updated according to your new workplace.
Note that the resume as well as the cover letter (if existing) you have attached to your job application is taken over to your “internal candidate” profile.
Note that the account you had as external candidate on the careers website of the company does not exist anymore.
ResultThe consolidated candidate profile in SuccessFactors has been viewed by the newly hired employee.
4.43 View Employee Data UseThe purpose of this process step for the Hiring Manager is to view in SuccessFactors the profile of his or her newly hired direct reports.
PrerequisitesThe initial load of employee data into SuccessFactors was successful.
Procedure1. Log on to SuccessFactors as a manager.2. Depending on the configuration, there are several options to access the profile of your direct
report:Option 1:a. On the Home page go to the My Team tile. There the names and photos, if available, of your direct reports are displayed.b. Select the appropriate team member. The employee’s public profile is displayed.c. Select the Actions button and from the drop down that shows up select Profile.d. Continue with activity 3.Option 2:a. On the Home page go to the Links tile and choose the Org Chart link. b. On the Org Chart: <manager name> screen the names and photos, if available, of your direct reports are displayed. Select the small icon next to the employee’s name. The employee’s public profile is displayed.c. Select the Take Action link and from there select Go To Profile.d. Continue with activity 3.Option 3:a. Access Employee Profile by accessing Home My Employee Files.b. From the <Manager Name> drop down select the employee of interest located below Direct Reports. The Employee Files screen for the particular employee is displayed.c. Select from the Public Profile drop down from the category Employee Records value Profile (could also be named Talent Profile or something other).d. Continue with activity 3.
3. The Profile is divided in several so-called elements. These elements are, among others, Personal Information, Previous Employment, and Language Skills
© SAP AGPage 70 of 73

SAP Best Practices Recruiting in SuccessFactors (FC1): BPD
4. View the data. Observe that in the Personal Information element the Employee ID field has been populated with the employee’s personnel number from SAP ERP HCM.
ResultThe profile of the selected employee has been viewed.
5 Appendix
5.1 Ad Hoc Reports in SuccessFactors UseThis chapter describes how to create and execute ad hoc reports in SuccessFactors.
5.1.1 Execut Ad Hoc Report
UseThe SuccessFactors user executes an ad hoc report.
PrerequisitesIn order to access Ad Hoc Reports, a user must have the appropriate permissions granted to their role by an administrator.
Procedure1. Log into SuccessFactors.2. Goto Home Reports. On the Reports screen stay on the Analytics tab and choose Ad Hoc
Reports. The list of ad hoc reports that are available for you to run is displayed.3. Select the Report to generate from the list presented. Using the action arrow to the right of
the report name, choose Run Report.4. From the Execute <report name> dialog box, select how to generate the report. You have
following options:a. Run Onlineb. Run Offline
If you flag this radio button you need to select the preferred format from the Format drop down. These formats include CSV, Excel, PDF, and PPT.
c. Download (CSV)d. Export
If you flag this radio button you need to select the preferred format from the Format drop down. These formats include Excel, PDF, and PPT.
5. Choose the Generate Report button.6. Depending on the method in which the report was generated, the report details will be
available for viewing:a. Run Online will display the results on the screen. From here you can page through the
report or choose to download the resultsb. Run Offline will schedule the report and it will run and be available in the Scheduled
Reports area of SuccessFactors. You will receive an email when the report is available.c. Download (CSV) will immediately make the report results viewable in an Excel
workbook, which can be saved in .csv format.d. Export will export the data in the document format you have chosen in the previous
activity.7. After viewing the report results, close the window or save the results for viewing offline later.
© SAP AGPage 71 of 73

SAP Best Practices Recruiting in SuccessFactors (FC1): BPD
Result An existing ad hoc report has been executed and the output has been viewed and, if necessary, saved.
5.1.2 Create Ad Hoc Report
UseThe SuccessFactors user creates a new ad hoc report.
PrerequisitesIn order to access Ad Hoc Reports, a user must have the appropriate permissions granted to their role by an administrator. Additionally, the user must have the permissions to create new reports.
Procedure1. Log into SuccessFactors.2. Goto Home Reports. On the Reports screen stay on the Analytics tab and choose Ad Hoc
Reports. The list of ad hoc reports that are available for you to run is displayed.3. Select the Create New Report button. The Create New Report dialog box opens.4. In this dialog box select from the Report Definition type drop-down list value Recruiting
V2 or Recruiting V2 Secured.5. Choose the Create button.6. The Report Wizard is launched from which you can enter specify report parameters:
General Info taba. Report Nameb. Descriptionc. Report Priority
Columns taba. Select columns of data to include. Sort or group these columns
Configuration taba. Select columns to change their configuration.
Filters taba. Select filters to apply (Filters).
7. Configure the report view by selecting sorting and grouping options (Sort or Group buttons).8. Preview the report by choosing the Preview button. Make changes if required.9. Save and generate the report by choosing the Generate icon.
Result The new report is saved and is available to run from the Ad Hoc Reports list.
5.1.3 Share Report with Another User
UseThe SuccessFactors user shares a newly created ad hoc report with another user.
Procedure 1. Log into SuccessFactors.2. Goto Home Reports. On the Reports screen stay on the Analytics tab and choose Ad Hoc
Reports. The list of ad hoc reports that are available for you to run is displayed.3. Select the report to share from the list presented. Using the action arrow to the right of the
report name, choose Share.
© SAP AGPage 72 of 73

SAP Best Practices Recruiting in SuccessFactors (FC1): BPD
4. In the Share <report name> dialog box search for individuals with whom you want to share the report. You can use for thata. the Quick Search tab to search for individuals by name, orb. the Advanced Search tab to find individuals by group such as departments or location.
5. Select the Share button to share the report.
Result The user(s) with whom the report was shared will be able to run the report from their Ad Hoc Reports list.
© SAP AGPage 73 of 73