cosmetology curriculum | styling hair styling, this lesson provides an introduction to curl and some...
TRANSCRIPT

Book ONE | Student Guide
COSMETOLOGY CURRICULUM | Styling

1. Introduction to Styling Hair..................................................................3 2. Finger Waving Technique........................................................................11 3. Curl Bases and Stems................................................................................18 4. Pin Curls (Flat and Volume)....................................................................22 5. Roller Setting and Curl Variations........................................................34 6. Back-Combing and Back-Brushing.......................................................40 7. Half-Round Brush Air Forming Technique........................................45 8. Round Brush Styling Technique............................................................51 9. Finger Drying and Palm Drying............................................................57 10. Thermal Techniques for Curling...........................................................62 11. Thermal Techniques for Creating Waves.........................................73 12. Thermal Techniques for Smoothing and Straightening.............81 13. French Twist................................................................................................91 14. Draped Style...............................................................................................97 15. Chignon........................................................................................................101 16. Braids and Hair Extensions.....................................................................106
TABLE OF CONTENTS
ii © 2002 Aveda Corporation
COSMETOLOGY CURRICULUM | Styling

© 2002 Aveda Corporation 1-1STYLI NG HAI R
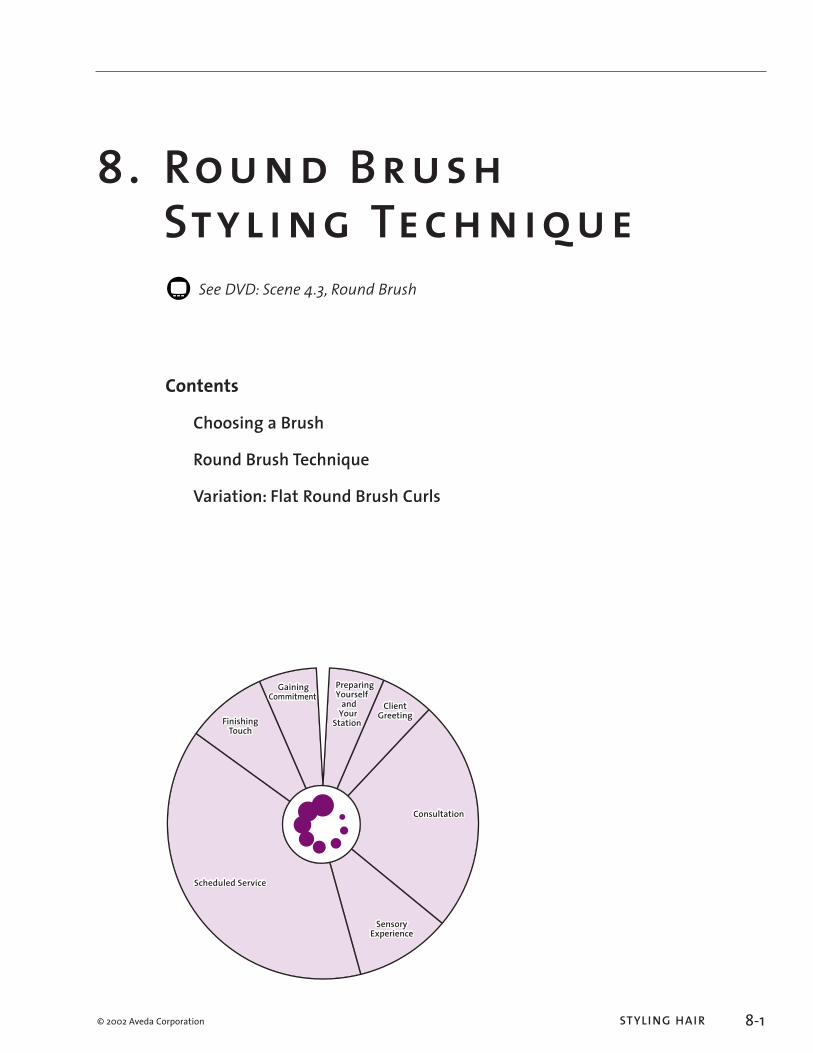
1 . Introduction to Styling Hair
FinishingTouch
GainingCommitment
Preparing Yourself
and Your
StationClient
Greeting
SensoryExperience
Consultation
Scheduled Service
ContentsHistory of Hair Styling
What Is Curl?
The Consultation
Facial Shapes
Profiles
Styling Overview
131733_S-0501Intro Sec11 12/7/04 12:43:35 PM

© 2002 Aveda Corporation 1-3
I NTRODUCTION TO STYLI NG HAI R
STYLI NG HAI R
ObjectivesAfter completing this lesson, you will be able to:• Give a short history of hair styling• Perform a hair styling consultation• Determine a facial shape and profile• Understand the concepts behind setting hair
OverviewThis lesson prepares you for styling hair. After a short history of hair styling, this lesson provides an introduction to curl and some of the basic concepts needed to plan a hairstyle. The single most important element in the art of hair styling is the communication between the hair stylist and client. The consultation is vital to creating a style that will please and flatter the client.
History of Hair StylingThe history of hair styling is as ancient as the recorded history of humankind. Hairdressers were depicted on Egyptian frescoes, urns, and ceremonial coffins. Oils, pomades, waxes, and lotions were used in ancient Greece to give shine and an agreeable aroma to hair. In ancient Rome, women’s hairstyles were frequently waved or curled over the ears or styled in chignons or buns. Tools such as curling papers, ribbons, and hair crimpers came into use during the Middle Ages.In the 1870s, French hairdresser Marcel Grateau turned a curling iron upside down to create a stylish natural-looking wave. This became known as a “Marcel wave,” which remained popular for almost half a century and makes periodic comebacks to this day.
131733_S-0501Intro Sec13 12/7/04 12:43:36 PM

© 2002 Aveda Corporation
STYLI NG HAI R | I NTRODUCTION TO STYLI NG HAI R
1-4 AVEDA I NSTITUTE COSMETOLOGY COU RSE
In the early 20th century, the electric permanent waving machine and heated pressing combs were first used to curl or straighten hair. At about this time, women’s beauty parlors were opened, becoming not only places to have their hair done, but also to socialize. Before that time, curling and straightening hair had been performed in the home.By the late 20th century, chemical means for curling, straightening, conditioning, and coloring hair had been developed to a very sophisticated degree. Today’s tools and products give the professional stylist a vast array of means for styling the hair.
What Is Curl?Curly hair grows up and away from the scalp, forming a curved shape that can range from slightly wavy to coils, spirals, or ringlets.It is possible to alter the shape of hair using moisture, heat, or chemical means. A change in humidity can also cause the hair to curl, as water enters the hair fiber and acts on its protein structure. Wrapping damp hair around a roller causes it to dry in the roller’s shape. Different types, sizes, and positions of rollers can be used to form an infinite variety of styles. With experience, you will become more familiar with possibilities; in the meantime, the lessons in this module will teach you the basics.
131733_S-0501Intro Sec14 12/7/04 12:43:36 PM

© 2002 Aveda Corporation 1-5
I NTRODUCTION TO STYLI NG HAI R
STYLI NG HAI R
The ConsultationWhen performing the consultation, take into account the client’s facial shape and hair characteristics. Facial shape is discussed in the following pages; hair characteristics are covered in Module 3, Lesson 1: What Is Hair?As you work with the client to determine the style to be created, ask questions such as:• How often do you shampoo your hair?• Do you want a daytime or an evening look?• Do you want to be able to replicate the style at home?• What amount of maintenance are you willing to do at
home?And so on. Use your portfolio or magazines for ideas and confirmation.When you have reached agreement, show the client what you plan to do by moving the client’s hair around to demonstrate the planned style. Check how the hair looks on the client, and what the reaction is.
Facial ShapesAlthough the concept of an ideal facial shape and profile may be considered antiquated by some, many clients are interested in achieving the look of an oval shape and straight profile. Rarely will a day go by that a client does not inquire what style is best suited for him or her.There are seven basic facial shapes:• Oval• Pear, also known as triangle• Diamond• Round• Square• Heart• Oblong, also known as slenderEach of these is discussed in the following pages.
131733_S-0501Intro Sec15 12/7/04 12:43:36 PM
© 2002 Aveda Corporation
Pear facial shape
Diamond facial shape
Round facial shape
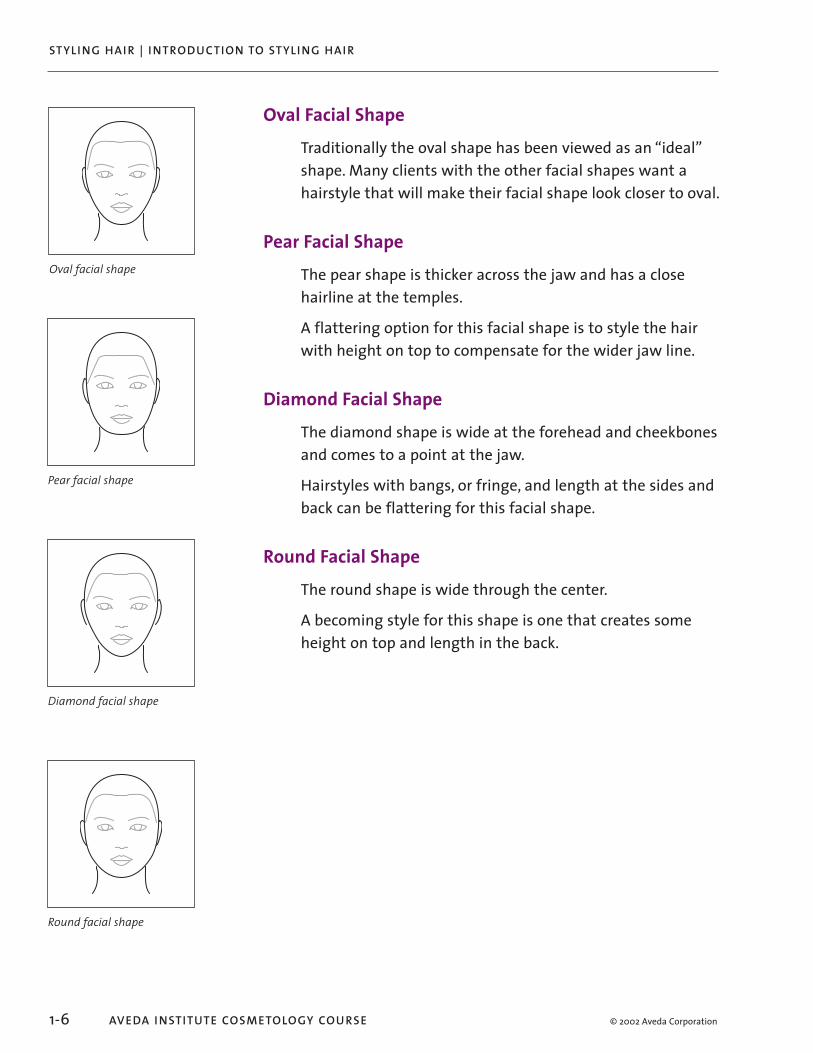
Oval facial shape
STYLI NG HAI R | I NTRODUCTION TO STYLI NG HAI R
1-6 AVEDA I NSTITUTE COSMETOLOGY COU RSE
Oval Facial ShapeTraditionally the oval shape has been viewed as an “ideal” shape. Many clients with the other facial shapes want a hairstyle that will make their facial shape look closer to oval.
Pear Facial ShapeThe pear shape is thicker across the jaw and has a close hairline at the temples.A flattering option for this facial shape is to style the hair with height on top to compensate for the wider jaw line.
Diamond Facial ShapeThe diamond shape is wide at the forehead and cheekbones and comes to a point at the jaw.Hairstyles with bangs, or fringe, and length at the sides and back can be flattering for this facial shape.
Round Facial ShapeThe round shape is wide through the center.A becoming style for this shape is one that creates some height on top and length in the back.
131733_S-0501Intro Sec16 12/7/04 12:43:36 PM

© 2002 Aveda Corporation
Square facial shape
Heart facial shape
Oblong facial shape
1-7
I NTRODUCTION TO STYLI NG HAI R
STYLI NG HAI R
Square Facial ShapeThe square shape has a very strong, wide jaw line and a square hairline.Hair that comes forward onto the face at the sides and has some length is often a flattering option for this shape.
Heart Facial ShapeThe heart shape is wide at the hairline and cheekbone and comes to a slender or pointed chin. This facial shape often has a “widow’s peak” at the front hairline.A pleasing look for this shape is bringing the hair forward onto the forehead and cut one-length in back, increasing the volume at the neck.
Oblong/Slender Facial ShapeAn oblong or slender shape is longer and more slender than the oval facial shape, and may have a slender neck.Flattering hairstyles for this shape often have width through the jaw line, and are not overly long. Fringe or bangs will also compliment a long, slender shape.
Combination Facial ShapesIf the face is divided into three horizontal areas, a client may have a combination of any of the seven major facial shapes.The face may be divided at:• Upper area (the forehead)• Central area (the cheekbones)• Lower area (the jaw line)For example, a client may have an oval forehead and central area in combination with a square lower area.
131733_S-0501Intro Sec17 12/7/04 12:43:37 PM

© 2002 Aveda Corporation
Straight profile
Convex profile
Concave profile
STYLI NG HAI R | I NTRODUCTION TO STYLI NG HAI R
1-8 AVEDA I NSTITUTE COSMETOLOGY COU RSE
ProfilesIt is generally recognized that there are three basic profiles:• Straight• Convex• ConcaveThese profiles may exist in combination with one another.
Changing the Appearance of a ProfileYou can style the hair to change the appearance of a profile. For example, full bangs, or fringe, and hair moving forward on the sides toward the chin will make a convex profile appear straighter. To create a straighter profile effect from a concave profile, move the hair off the forehead, away from the cheeks, and leave it long in the back.
131733_S-0501Intro Sec18 12/7/04 12:43:37 PM

© 2002 Aveda Corporation 1-9
I NTRODUCTION TO STYLI NG HAI R
STYLI NG HAI R
Styling OverviewThe following lessons will give instructions for setting hair with finger waves, pin curls, rollers, curling irons, round brushes, and more. No matter which tools you use, the set must be performed with an emphasis on design. Take into account the desired movement, areas of flatness and volume, and the degree of smoothness or irregularity in the final hairstyle.If the client is a weekly maintenance client, ask whether and how often they comb through the set. This will tell you how firmly to perform back-combing, if it is used.After setting the hair, brush it to relax the curls. This allows the hair to fall into natural waves.• On short hair, begin brushing in the front.• On long hair, it is better to begin in the nape.• Brush permed or naturally wavy hair a bit more than
straight or fine hair.Combining movement in various ways creates a variety of styles. Cultivate artistry and a sense of design to create appropriate movement, volume, and aesthetic quality in your clients’ hairstyles.
SummaryUnderstanding the basics of curl and hair styling will give you a good foundation for creating the best hairstyle for your client’s hair, facial shape, and lifestyle needs. Stylists who understand how to create hairstyles that flatter their clients and exceed their expectations have an extremely loyal clientele.
131733_S-0501Intro Sec19 12/7/04 12:43:37 PM

2-1STYLI NG HAI R © 2002 Aveda Corporation
2. F inger Waving Technique
FinishingTouch
GainingCommitment
Preparing Yourself
and Your
StationClient
Greeting
SensoryExperience
Consultation
Scheduled Service
ContentsHorizontal Finger Waving Process
Variations
131733_S-0502Fing Sec11 12/7/04 12:39:48 PM

2-3
FI NGER WAVI NG TECH N IQU E
STYLI NG HAI R© 2002 Aveda Corporation
ObjectivesAfter completing this lesson, you will be able to:• Create a horizontal finger wave• Create a vertical finger wave• Create a diagonal finger wave (also known as an oblique
finger wave)
OverviewFinger waving is the ultimate dexterity builder and foundation for hair styling. The ability to perform basic finger waving allows you to carry this technique into pin curling, roller setting, and marcel waving. The finger wave itself makes a fashion comeback every few years.Finger waves can be horizontal, vertical, or diagonal to the hairline.
PreparationFor this lesson, you will need:• Standard setup (see Module 3, Lesson 3: Preparing Your
Station)• Setting lotion • Mannequin
131733_S-0502Fing Sec13 12/7/04 12:39:49 PM

Heavy Side
Side parting for finger waves
11 22
Direction of waves in finger waving
STYLI NG HAI R | F I NGER WAVI NG TECH N IQU E
2-4 AVEDA I NSTITUTE COSMETOLOGY COU RSE © 2002 Aveda Corporation
Horizontal Finger Waving ProcessThis is the basic finger waving technique.
1. Form the First Wave 1. Wet the hair and apply enough setting lotion to be
evenly distributed throughout the hair. Pay special attention to the application at the scalp.
2. Apply a side part. The side with the most hair is called the “heavy side.”
Note: These instructions assume that the part is on the left side of the head. Therefore, the heavy side is the right side. However, your client may desire a right side part.
3. Distribute the hair evenly through the crown and the entire head. The hair should be positioned as it will be when the hair style is completed.
4. Place the middle finger of your subordinate hand on the head above where the ridge is to be formed (#1 in the illustration). If right-handed, use your left middle finger and vice versa.
5. Place large teeth of the comb just below (approximately W” below) the finger (not touching it), where the ridge is to be. Make sure that the teeth of the comb are touching the scalp and the comb is perpendicular to the scalp.
6. Draw the comb approximately 1” toward the hairline (this will be the open end of the wave). The comb should remain parallel to the finger and perpendicular to the scalp.
7. Lay the comb down flat against the head. 8. Place your forefinger on top of the comb beneath the
ridge to protect the ridge. The ridge is now between your forefinger and middle finger.
Note: Do not pinch the ridge between your fingers or push up into the ridge with the teeth of the comb.
ridge
open endclosed end
trough
Parts of a finger wave
131733_S-0502Fing Sec14 12/7/04 12:39:49 PM
2-5
FI NGER WAVI NG TECH N IQU E
STYLI NG HAI R© 2002 Aveda Corporation
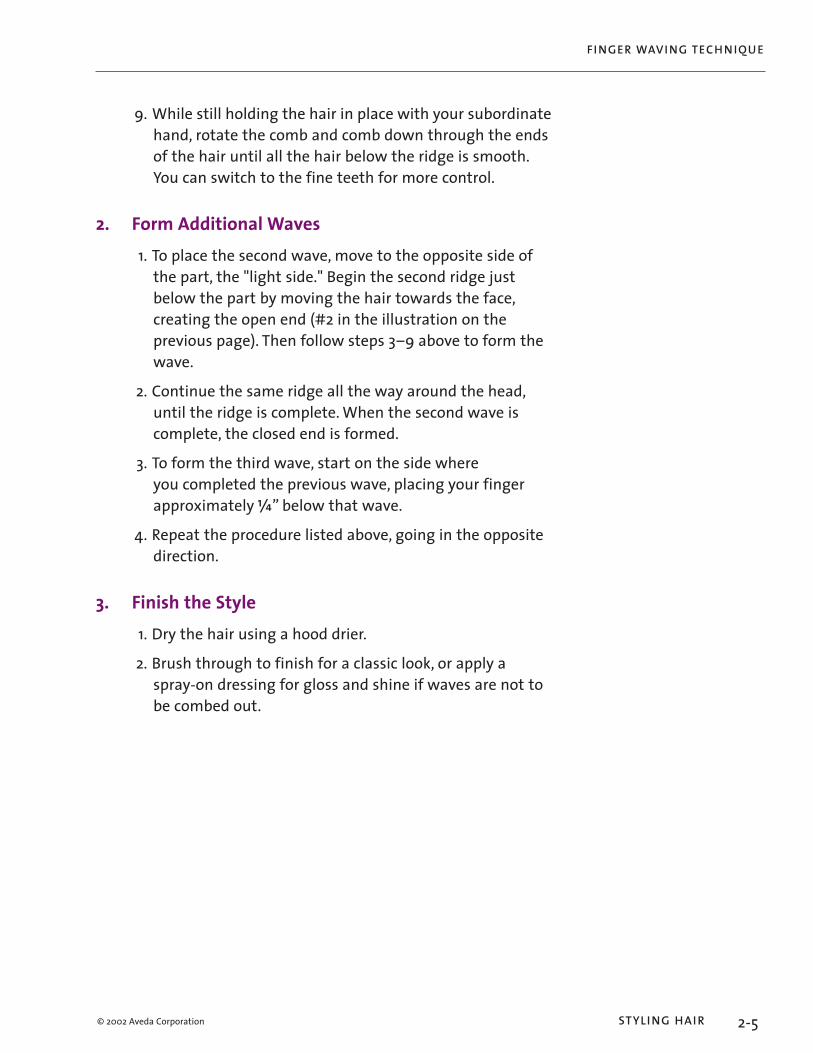
9. While still holding the hair in place with your subordinate hand, rotate the comb and comb down through the ends of the hair until all the hair below the ridge is smooth. You can switch to the fine teeth for more control.
2. Form Additional Waves 1. To place the second wave, move to the opposite side of
the part, the "light side." Begin the second ridge just below the part by moving the hair towards the face, creating the open end (#2 in the illustration on the previous page). Then follow steps 3–9 above to form the wave.
2. Continue the same ridge all the way around the head, until the ridge is complete. When the second wave is complete, the closed end is formed.
3. To form the third wave, start on the side where you completed the previous wave, placing your finger approximately W” below that wave.
4. Repeat the procedure listed above, going in the opposite direction.
3. Finish the Style 1. Dry the hair using a hood drier. 2. Brush through to finish for a classic look, or apply a
spray-on dressing for gloss and shine if waves are not to be combed out.
131733_S-0502Fing Sec15 12/7/04 12:39:49 PM

STYLI NG HAI R | F I NGER WAVI NG TECH N IQU E
2-6 AVEDA I NSTITUTE COSMETOLOGY COU RSE © 2002 Aveda Corporation
VariationsCommon variations on the horizontal finger waving technique described earlier include the following:• Pompadour (can be horizontal, vertical, or diagonal)• Vertical finger waving• Diagonal/oblique finger wavingYou can use a combination of finger waving methods to create a style that meets your client’s needs.
PompadourA pompadour is a style that is not parted and is worn off the face. The set shown here has waves that become horizontal from a circular pattern in the crown.To create this style, follow the procedure listed earlier, starting at the front hairline and working back. Remember to always start at the open end.
Pompadour style
131733_S-0502Fing Sec16 12/7/04 12:39:50 PM

2-7
FI NGER WAVI NG TECH N IQU E
STYLI NG HAI R© 2002 Aveda Corporation
Vertical Finger WavingFinger waving patterns can be created vertically as well as horizontally. The set described here has no part and has waves that flow vertically across the front and sides of the head, forming a pompadour. These waves will meet in back or may be set in a combination pattern. To create this set, use the same procedure as for horizontal finger waving, except for the following:• Stand behind the client.• Comb hair straight back, off the client’s face.• Begin on the left side, directing the wave to the left. • Reverse the direction to form the next wave.• The back of the finished set should fall into a horseshoe
pattern.
1
Hair combed in preparation for vertical wave with first ridge begun at open end
open end
Beginning of second wave at open end
Rear view of completed vertical wave set
Side view of completed vertical finger wave set with ends finished in pincurls
131733_S-0502Fing Sec17 12/7/04 12:39:50 PM

STYLI NG HAI R | F I NGER WAVI NG TECH N IQU E
2-8 AVEDA I NSTITUTE COSMETOLOGY COU RSE © 2002 Aveda Corporation
Diagonal/Oblique Finger WavingDiagonal (also known as oblique) finger waves are often combined with horizontal and vertical patterns. You can start with one pattern and shift to another as you work down the head. For example, you can place your fingers and perform the same procedure diagonally, and then gradually work into a horizontal or vertical pattern.
SummaryIn this lesson, you learned how to create finger waves and combine them into interesting styles. Your ability to create any design is now underway.
Terms to Remember• Closed end• Finger waving• Open end• Pompadour• Ridge• Trough
Completed diagonal waves
131733_S-0502Fing Sec18 12/7/04 12:39:50 PM

3-1STYLI NG HAI R © 2002 Aveda Corporation
3. Curl Bases and Stems
FinishingTouch
GainingCommitment
Preparing Yourself
and Your
StationClient
Greeting
SensoryExperience
Consultation
Scheduled Service
ContentsDefinitions
Other Factors
131733_S-0503Curl.indd Sec11 12/8/04 10:08:55 AM

3-3
CU R L BASES AN D STEMS
STYLI NG HAI R© 2002 Aveda Corporation
ObjectivesAfter completing this lesson, you will be able to:• Identify the four basic curls• Understand when to use each type of curl to create a
unique effect
OverviewHow hair moves after it has been curled depends partly on the curl’s relationship to its base. This lesson presents the theory behind curl movement and tells you how to set curls to achieve the effects you and your client desire.
DefinitionsThe following terms are important to understand because all hair curling techniques are based on them.
BaseThe base is the area of hair that is sectioned out to be curled. The size of the base is determined by the length and diameter of the tool being used to produce the curl.
Pick-Up LineThe pick-up line is a line running parallel to the top section parting that determines the thickness of the subsection.
VolumeVolume is the amount of fullness produced by a curl.
Pick-upLine
Base
Base and pick-up line
131733_S-0503Curl.indd Sec13 12/8/04 10:08:56 AM

STYLI NG HAI R | CU RL BASES AN D STEMS
3-4 AVEDA I NSTITUTE COSMETOLOGY COU RSE © 2002 Aveda Corporation
MobilityMobility is the ability of a curl to move away from its base (to fall this way and that).
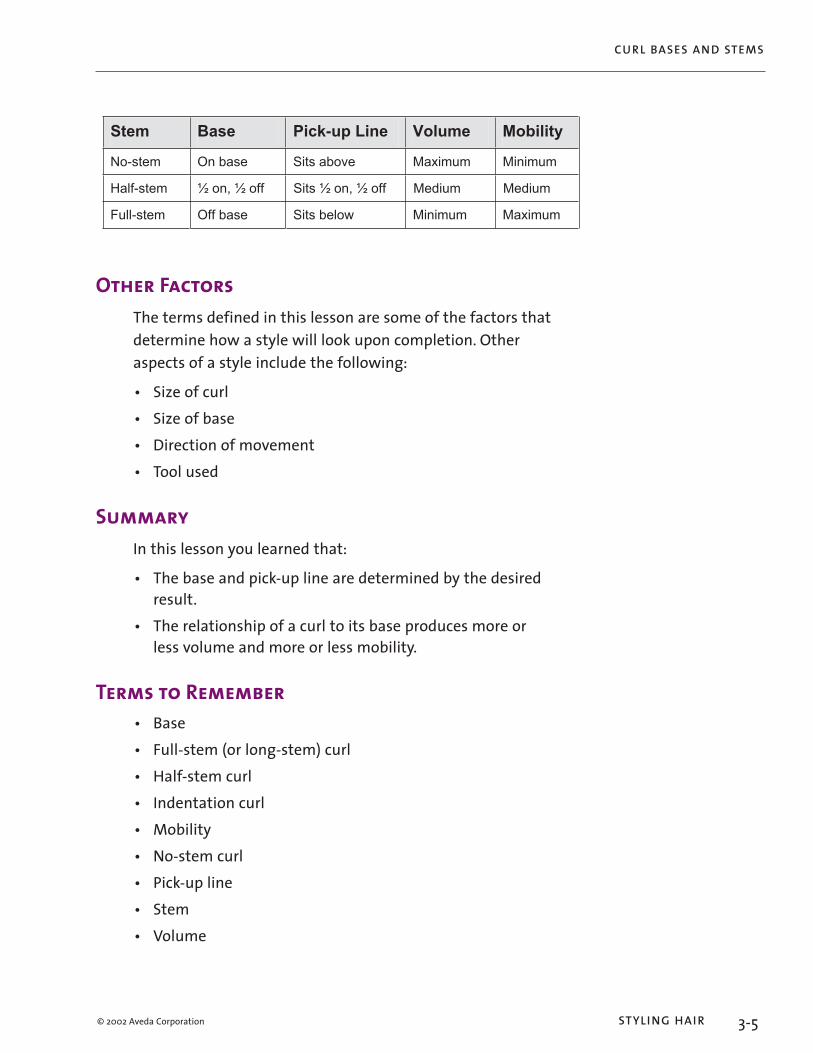
StemThe stem is the length of hair closest to the base that is not rolled around the roller or included in the pin curl. There are three types of stem curls:• No-stem curls produce the strongest volume and least
mobility. Comb the strand 135° from the base; the curl sits on the base.
• Half-stem curls produce medium volume and mobility. Comb the strand 90° from the base; the curl sits half on and half off the base.
• Full-stem curls (also known as long-stem curls) produce the least volume and most mobility. Comb the strand 45° from the base; the curl sits off the base.
The table on the next page shows a comparison of these three kinds of curls.
Indentation CurlAn indentation curl is a curl set in a reverse pattern that lies on its base. Indentation curls are often set from a base 1Vtimes thicker than average. This keeps the hair flatter and closer to the head. These curls are often placed on the side hairlines.
45•
Full-, or long-, stem curl sits off the base below the pick-up line
0•
Indentation curl sits on the base
135•
No-stem curl sits on the base above the pick-up line
90•
Half-stem curl sits half on and half off the base and pick-up line
131733_S-0503Curl.indd Sec14 12/8/04 10:08:56 AM
!"#$ %&'# ()*+,-./0)1#/ 234-$# 536)4)"7/
!"#$%&' ()*+,$&* -.%$*,+"/&* 0,1.'2' 0.).'2'
3,45#$%&' 6*")7*6*"55* -.%$*6*")7*6*"55* 0&8.2' 0&8.2'
9244#$%&' (55*+,$&* -.%$*+&4":* 0.).'2' 0,1.'2'
3-5
CU R L BASES AN D STEMS
STYLI NG HAI R© 2002 Aveda Corporation
Other Factors The terms defined in this lesson are some of the factors that determine how a style will look upon completion. Other aspects of a style include the following:• Size of curl• Size of base• Direction of movement• Tool used
SummaryIn this lesson you learned that:• The base and pick-up line are determined by the desired
result.• The relationship of a curl to its base produces more or
less volume and more or less mobility.
Terms to Remember• Base• Full-stem (or long-stem) curl• Half-stem curl• Indentation curl• Mobility• No-stem curl• Pick-up line• Stem• Volume
131733_S-0503Curl.indd Sec15 12/8/04 10:08:56 AM

© 2002 Aveda Corporation 4-1STYLI NG HAI R
4. Pin Curls (Flat and Volume)
FinishingTouch
GainingCommitment
Preparing Yourself
and Your
StationClient
Greeting
SensoryExperience
Consultation
Scheduled Service
ContentsIntroduction
Basic Pin Curl Set Procedure
Variations
131733_S-0504Pinc Sec11 12/7/04 12:41:13 PM

© 2002 Aveda Corporation 4-3
P I N CU RLS
STYLI NG HAI R
ObjectivesAfter completing this lesson, you will be able to:• Create horizontally placed flat pin curls• Perform a vertical pin curl set• Create diagonal waves on the sides of the head• Create flat pin curls from circular shapings• Perform a volume/stand-up pin curl set
OverviewPin curls are the next step in the basics of hairdressing. Finger waves introduced us to movement and S patterns. Now, pin curls follow the same concept, but add the element of creating volume. Flat pin curls are created by forming subsections of hair into circles from fingerwave-like shapings and clipping them in place. The size of the finished curl is determined by the size of the circle you create. The circles of hair may lie flat against the scalp (flat pin curls) or move up, away from the head (volume, or stand-up, pin curls).This technique builds on what you learned about creating finger waves. Compared to finger waves, pin curls will be:• Stronger• Fuller
PreparationFor this lesson, you will need:• Standard setup (see Module 3, Lesson 3: Preparing Your
Station)• Styling aid• Plastic tail comb• Clippies• Mannequin
131733_S-0504Pinc Sec13 12/7/04 12:41:13 PM
© 2002 Aveda Corporation
Pick-upLine
NoStem
HalfStem
Full/LongStem
No-stem, half-stem, and full/long-stem pin curls
STYLI NG HAI R | P I N CU RLS
4-4 AVEDA I NSTITUTE COSMETOLOGY COU RSE
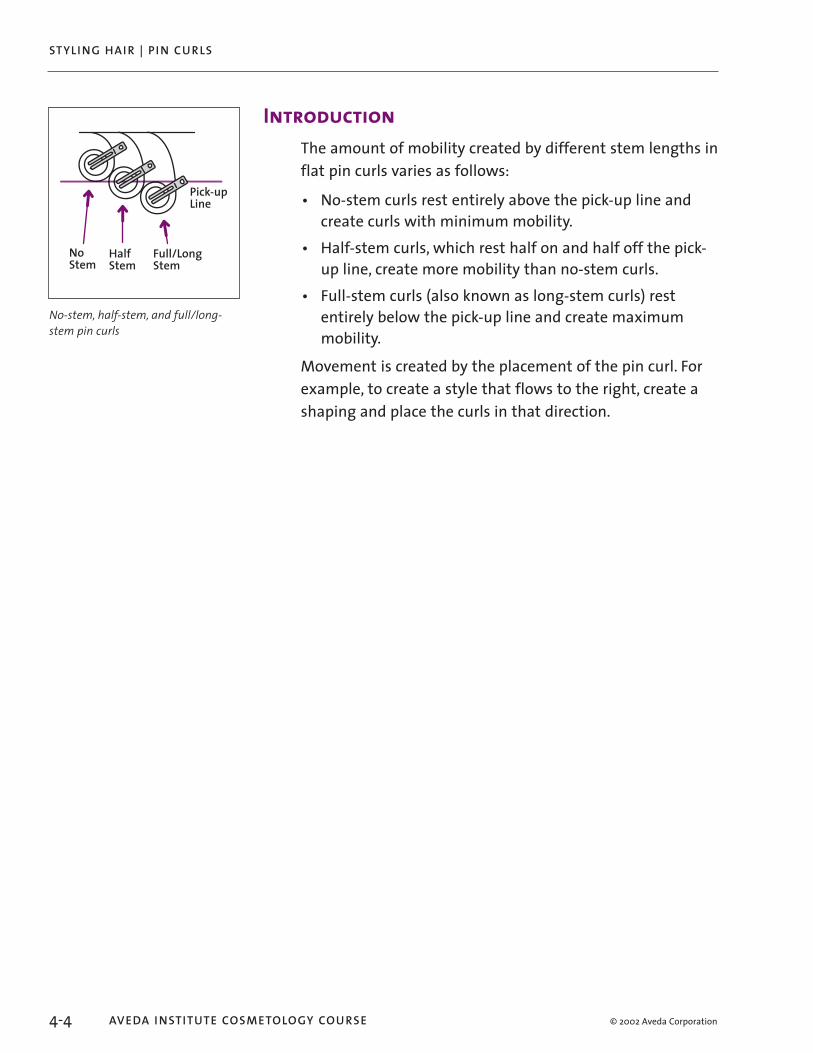
IntroductionThe amount of mobility created by different stem lengths in flat pin curls varies as follows:• No-stem curls rest entirely above the pick-up line and
create curls with minimum mobility.• Half-stem curls, which rest half on and half off the pick-
up line, create more mobility than no-stem curls.• Full-stem curls (also known as long-stem curls) rest
entirely below the pick-up line and create maximum mobility.
Movement is created by the placement of the pin curl. For example, to create a style that flows to the right, create a shaping and place the curls in that direction.
131733_S-0504Pinc Sec14 12/7/04 12:41:13 PM

© 2002 Aveda Corporation
4 o'clock8 o'clock
Combing hair into 4 o'clock and 8 o'clock position
4-5
P I N CU RLS
STYLI NG HAI R
Basic Pin Curl Set Procedure
1. Prepare the Hair 1. Start with hair that is damp or wet. 2. Apply styling aid for control and distribute it evenly from
the scalp to the ends.
2. Create Horizontal ShapingsA shaping is a section of hair that has been formed into a C contour. Alternating C shapings form an S pattern. Follow these steps to form a shaping:
1. Stand straight on to the section you are curling. 2. Form a clockwise shaping by combing the hair to the
4 o’clock position. 3. Holding the hair in place with your first two fingers,
comb the same hair to the 8 o'clock position. 4. Continue the 4 o'clock and 8 o'clock movement until the
shaping is formed for the entire row.
131733_S-0504Pinc Sec15 12/7/04 12:41:13 PM
© 2002 Aveda Corporation
Carving from the shaping
Ribboning the hair
Pick-upLine
Forming curls from the first row of shapings
STYLI NG HAI R | P I N CU RLS
4-6 AVEDA I NSTITUTE COSMETOLOGY COU RSE
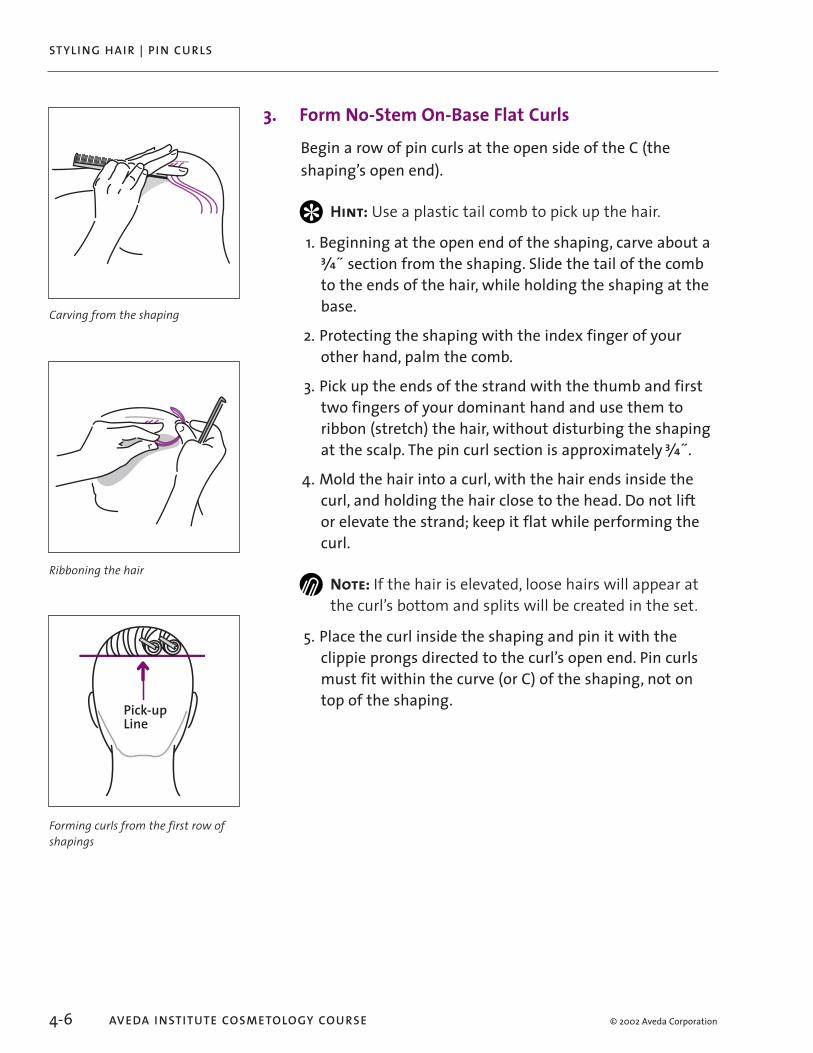
3. Form No-Stem On-Base Flat CurlsBegin a row of pin curls at the open side of the C (the shaping’s open end).
Hint: Use a plastic tail comb to pick up the hair. 1. Beginning at the open end of the shaping, carve about a
X˝ section from the shaping. Slide the tail of the comb to the ends of the hair, while holding the shaping at the base.
2. Protecting the shaping with the index finger of your other hand, palm the comb.
3. Pick up the ends of the strand with the thumb and first two fingers of your dominant hand and use them to ribbon (stretch) the hair, without disturbing the shaping at the scalp. The pin curl section is approximately X˝.
4. Mold the hair into a curl, with the hair ends inside the curl, and holding the hair close to the head. Do not lift or elevate the strand; keep it flat while performing the curl.
Note: If the hair is elevated, loose hairs will appear at the curl’s bottom and splits will be created in the set.
5. Place the curl inside the shaping and pin it with the clippie prongs directed to the curl’s open end. Pin curls must fit within the curve (or C) of the shaping, not on top of the shaping.
131733_S-0504Pinc Sec16 12/7/04 12:41:14 PM

© 2002 Aveda Corporation
A
A Counter-Clockwise
OpenEnd
OpenEnd
B
B Clockwise
Position of curls in alternating rows
Completed pin curl set
4-7
P I N CU RLS
STYLI NG HAI R
6. Complete the row. When finished, all the clippies should be parallel to each other.
7. Continue with the next row. Start at the open end and reverse the shaping.
8. To finish the style, dry the hair, take out the clippies, and thoroughly brush the hair.
VariationsCommon variations on this basic pin curl technique include the following:• Horizontal pattern with side part• Vertical pattern with no part• Diagonal pattern • Circular pattern (pompadour)• Volume/stand-up pin curls• Combination of flat and volume
131733_S-0504Pinc Sec17 12/7/04 12:41:14 PM

© 2002 Aveda Corporation
L-shaped part
Diagonal shaping
11 2233
44
Pin curls in the shaping;Note that the rows alternate directions
STYLI NG HAI R | P I N CU RLS
4-8 AVEDA I NSTITUTE COSMETOLOGY COU RSE
Horizontal Pattern with Side PartTo create this set, use the same procedure as for the basic pin curl set, except for the following:• Create a 3˝ L-shaped part on the left side.• Create a counter-clockwise diagonal shaping from the
front hairline to the back of the part. This is the only row that does not circle around the head. (See row 1 in bottom illustration.)
• Create a second shaping that will flow in a reverse (clockwise) direction around the head. (See row 2 in bottom illustration.)
131733_S-0504Pinc Sec18 12/7/04 12:41:15 PM
© 2002 Aveda Corporation
Clockwise shaping
First two rows of pin curls
Rear view of horseshoe pattern
Side view of horseshoe pattern
4-9
P I N CU RLS
STYLI NG HAI R
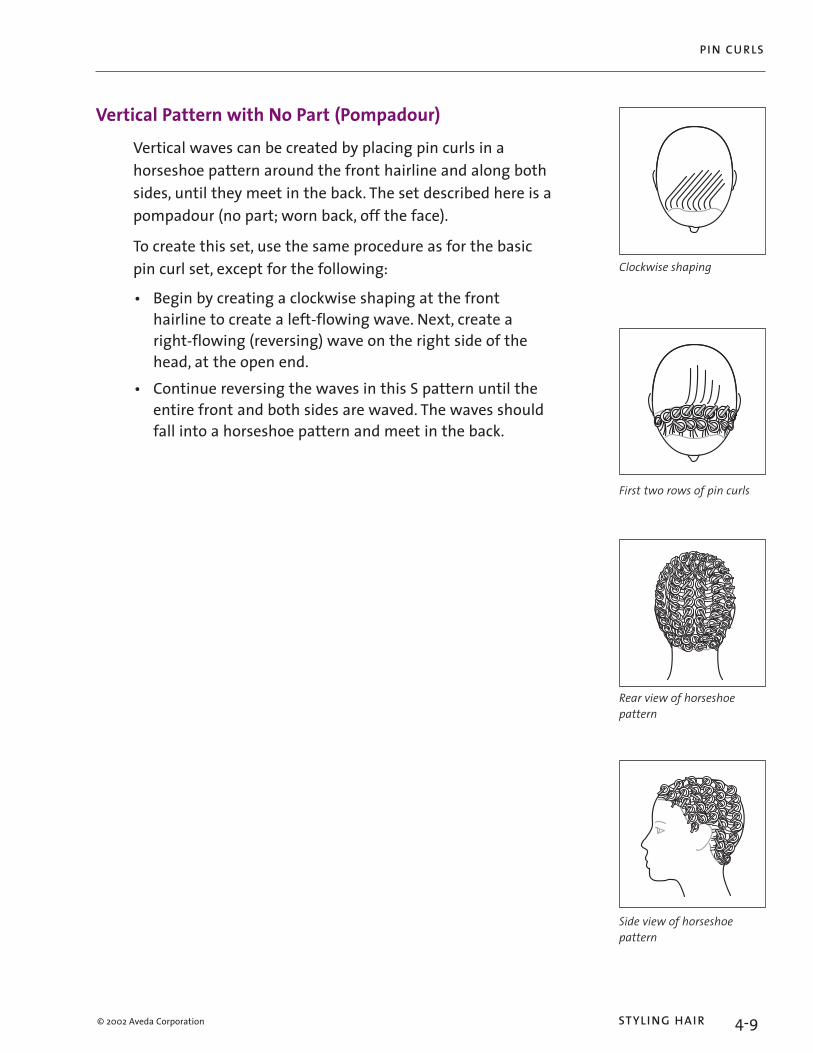
Vertical Pattern with No Part (Pompadour)Vertical waves can be created by placing pin curls in a horseshoe pattern around the front hairline and along both sides, until they meet in the back. The set described here is a pompadour (no part; worn back, off the face).To create this set, use the same procedure as for the basic pin curl set, except for the following:• Begin by creating a clockwise shaping at the front
hairline to create a left-flowing wave. Next, create a right-flowing (reversing) wave on the right side of the head, at the open end.
• Continue reversing the waves in this S pattern until the entire front and both sides are waved. The waves should fall into a horseshoe pattern and meet in the back.
131733_S-0504Pinc Sec19 12/7/04 12:41:15 PM
© 2002 Aveda Corporation
Diagonal clockwise C shaping
Diagonal no-stem pin curls followed by shaping for second row
STYLI NG HAI R | P I N CU RLS
4-10 AVEDA I NSTITUTE COSMETOLOGY COU RSE
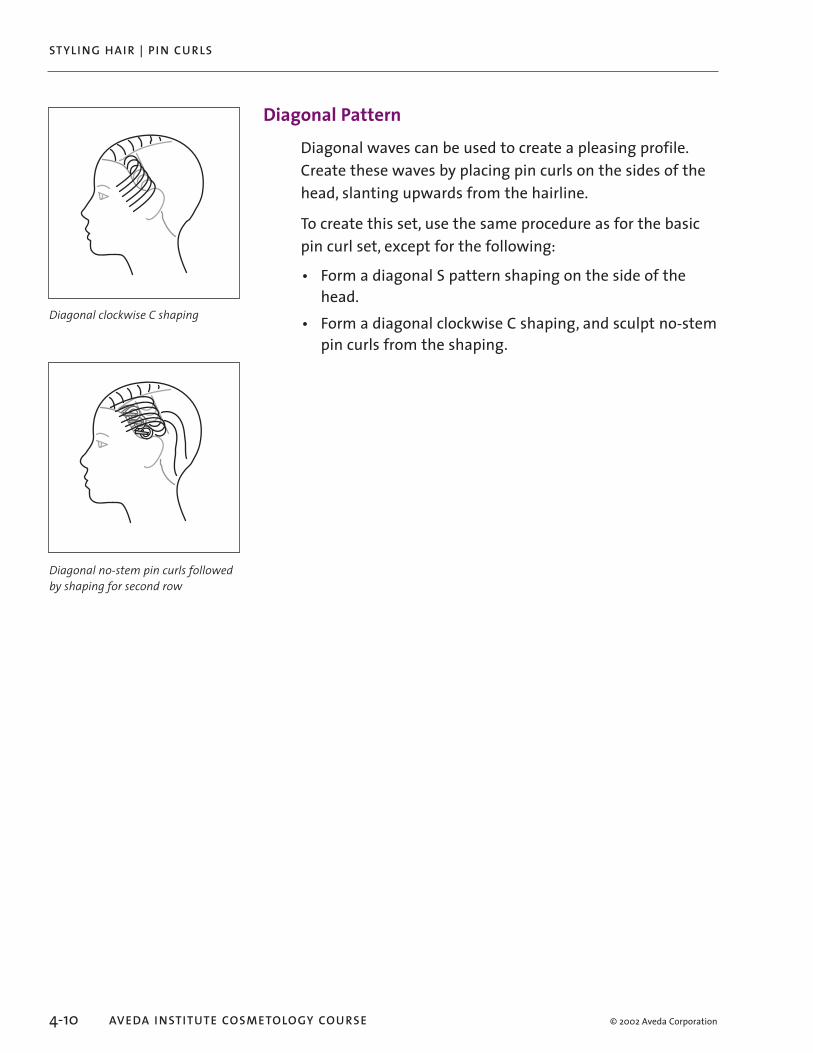
Diagonal Pattern Diagonal waves can be used to create a pleasing profile. Create these waves by placing pin curls on the sides of the head, slanting upwards from the hairline.To create this set, use the same procedure as for the basic pin curl set, except for the following:• Form a diagonal S pattern shaping on the side of the
head.• Form a diagonal clockwise C shaping, and sculpt no-stem
pin curls from the shaping.
131733_S-0504Pinc Sec110 12/7/04 12:41:15 PM

© 2002 Aveda Corporation 4-11
P I N CU RLS
STYLI NG HAI R
Circular Pattern (Pompadour)Circular shapings can be used to create waves that fall in a spherical motion. This technique is often used in the crown area, but may be applied anywhere on the head. The set described here is often called a pompadour.Circular shapings are sometimes called arcs, pivots, or radials.To create this set, use the same procedure as for the basic pin curl set, except for the following:• Form an arc shaping across the front hairline.• The pivot point of the front hairline’s shaping originates
from the “widow’s peak”; subsequent shapings fan out from there.
• Begin at the open end.• The pick-up lines follow the circular shapings.
Horseshoe pattern shaping
Pivot point of first circular shaping
Top view of circular pin curl set
131733_S-0504Pinc Sec111 12/7/04 12:41:15 PM

© 2002 Aveda Corporation
STYLI NG HAI R | P I N CU RLS
4-12 AVEDA I NSTITUTE COSMETOLOGY COU RSE
Volume/Stand-Up Pin CurlsVolume pin curls, or stand-up pin curls, produce strong height and volume in a finished style. These curls are often used in the crown, where most clients prefer volume or lift. This type of setting is similar to roller setting; in effect, you are setting the hair on “invisible rollers.”When creating volume pin curls, keep the following in mind:• The base shape can be square, rectangular or (especially
at the hairline) triangular. Triangular bases at the hairline camouflage separations or splits in the comb-out. They look like this:
• Depending on the desired results, the curls may be formed at 135°, 90°, 45°, or 0°, as with any volume curl.
• Create curls with an open center; the size of the center depends on the desired result. Clip each curl at the scalp with a clippie on the scalp, with the direction of the curl standing up and away from the scalp.
• This technique is most appropriate for straight hair or hair with moderate curl. Tight curls or hair with a high degree of texture should be set on rollers for a smooth result.
• The advantage of volume pin curls over roller curls is decreased drying time.
• Flat pin curls are often used on the sides of the head in combination with volume curls.
Triangular and rectangular bases
Side view of volume pin curls
Rear view of volume pin curls
Volume/stand-up pin curls in the front
131733_S-0504Pinc Sec112 12/7/04 12:41:16 PM

© 2002 Aveda Corporation 4-13
P I N CU RLS
STYLI NG HAI R
SummaryIn this lesson, you learned how to create pin curls, both flat and standing off the scalp. You can combine these curls in different configurations to achieve many different style designs.
Terms to Remember• Circular/horseshoe shaping• Flat pin curls• Full/long-stem curls• Half-stem curls• No-stem curls• Open and closed ends• Pompadour• Ribboning• Shaping• Volume/stand-up pin curls
131733_S-0504Pinc Sec113 12/7/04 12:41:16 PM

© 2002 Aveda Corporation 5-1STYLI NG HAI R
5. Roller Setting and Curl Variations
FinishingTouch
GainingCommitment
Preparing Yourself
and Your
StationClient
Greeting
SensoryExperience
Consultation
Scheduled Service
ContentsIntroduction
Types of Rollers
Standard Roller Placement
Hot Rollers
Ragsetting Process
131733_S-0505Roll Sec11 12/7/04 12:41:35 PM
© 2002 Aveda Corporation 5-3
ROLLER SETTI NG AN D CU R L VARIATIONS
STYLI NG HAI R
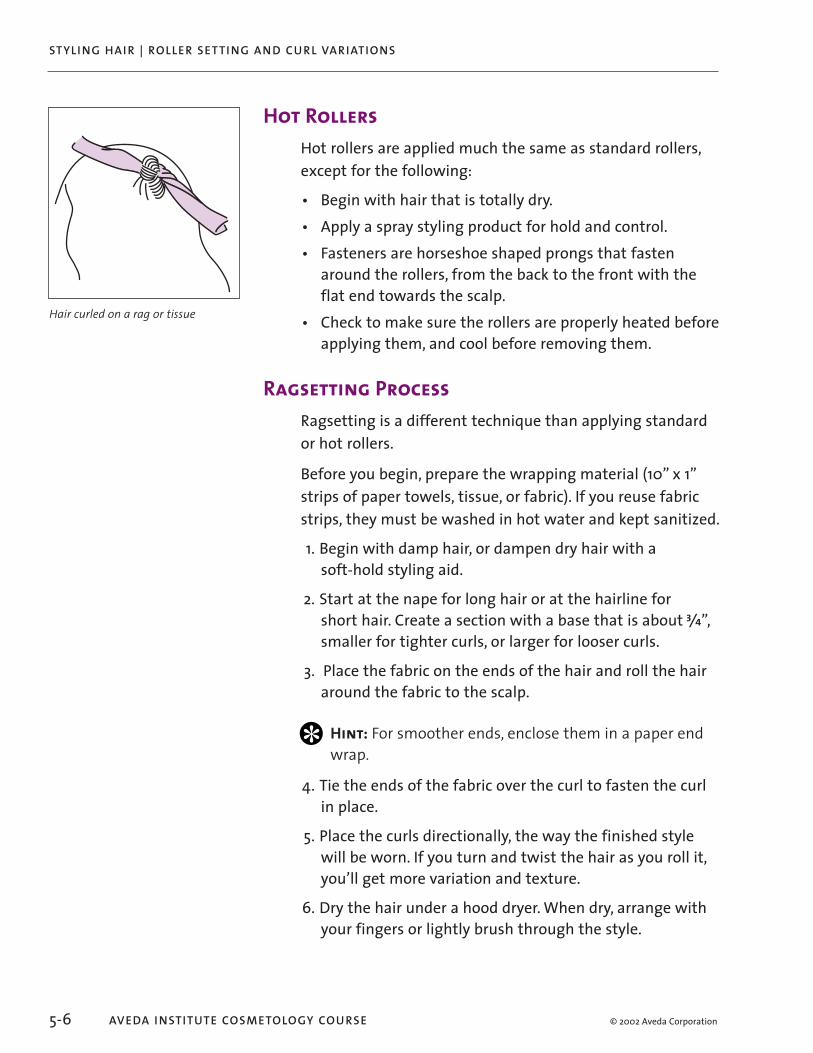
ObjectivesAfter completing this lesson, you will be able to set curls rolled with the following:• Standard rollers• Electric rollers (also known as hot rollers)• Ragset
OverviewRoller setting is closely related to setting with stand-up/volume pin curls, with the following advantages and disadvantages:• Advantage: Curly hair can be stretched and smoothed
more easily with rollers.• Disadvantage: Separations between curls are more
visible because rollers don’t conform to the contours of the head; therefore, careful placement of the rollers is necessary.
You can use electric rollers as a fast alternative to standard rollers, or use ragsetting as a quick, easy way to produce tight waves on long hair.
PreparationFor this lesson, you will need:• Standard setup (see Module 3, Lesson 3: Preparing Your
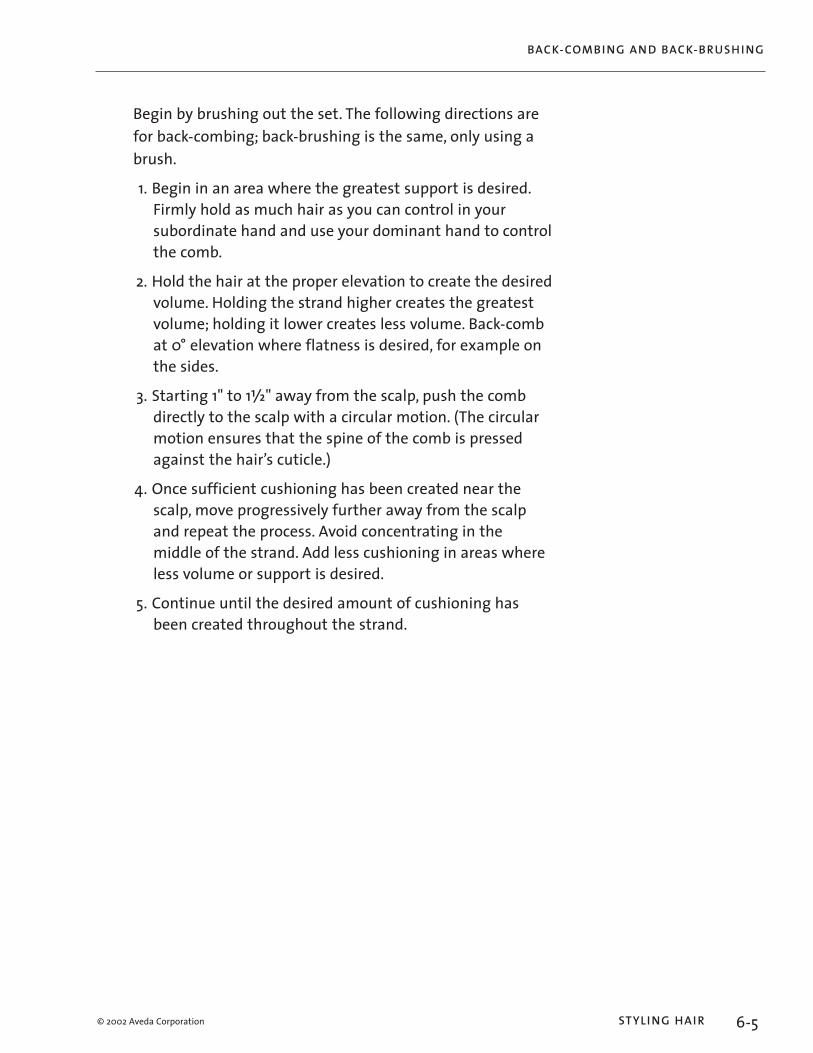
Station)• Setting lotion• Set of rollers• Clippies• Set of electric/hot rollers and fasteners• Facial tissues, paper towels, or strips of fabric• Tail comb• End wraps• Mannequin
131733_S-0505Roll Sec13 12/7/04 12:41:35 PM
© 2002 Aveda Corporation
Standard rollers
Electric rollers
Rags or tissues for setting
STYLI NG HAI R | ROLLER SETTI NG AN D CU RL VARIATIONS
5-4 AVEDA I NSTITUTE COSMETOLOGY COU RSE
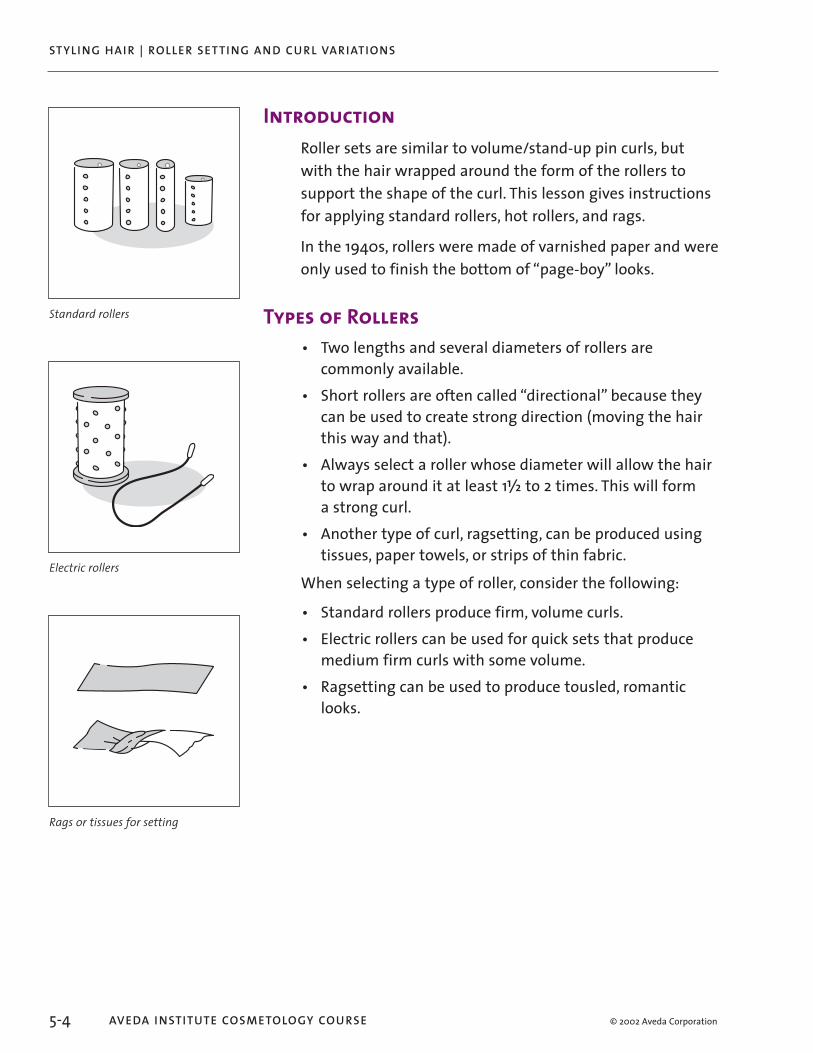
IntroductionRoller sets are similar to volume/stand-up pin curls, but with the hair wrapped around the form of the rollers to support the shape of the curl. This lesson gives instructions for applying standard rollers, hot rollers, and rags.In the 1940s, rollers were made of varnished paper and were only used to finish the bottom of “page-boy” looks.
Types of Rollers• Two lengths and several diameters of rollers are
commonly available.• Short rollers are often called “directional” because they
can be used to create strong direction (moving the hair this way and that).
• Always select a roller whose diameter will allow the hair to wrap around it at least 1V to 2 times. This will form a strong curl.
• Another type of curl, ragsetting, can be produced using tissues, paper towels, or strips of thin fabric.
When selecting a type of roller, consider the following:• Standard rollers produce firm, volume curls.• Electric rollers can be used for quick sets that produce
medium firm curls with some volume.• Ragsetting can be used to produce tousled, romantic
looks.
131733_S-0505Roll Sec14 12/7/04 12:41:35 PM

© 2002 Aveda Corporation
Basic roller set
Roller set with pin curls
5-5
ROLLER SETTI NG AN D CU R L VARIATIONS
STYLI NG HAI R
Standard Roller PlacementRollers are used where strong volume is desired. When rolling hair, position yourself so you are always rolling the hair towards you.
1. Begin with wet hair and apply a styling aid. 2. Section off a rectangular base whose length is W” less
than the length of the roller you’re using. 3. Take a subsection from the base that is the same size as
the diameter of the roller. 4. Holding the hair at 90°, wrap the hair on the roller from
the ends to the scalp. When applied, the roller will rest half on and half off the base.
Note: When applying rollers to the bangs or fringe, you might use lower elevation.
5. Apply a clippie on the bottom of the roller to hold the hair in place and secure the roller. Secure the bottom of the clippie near the scalp. The top of the clippie slips inside the roller.
6. Continue placing rollers in a pattern determined by the style desired.
Note: In roller setting, separations are more visible because a straight roller doesn’t conform to the head. Setting rollers with a diagonal movement, or at a lower elevation, tends to lessen these separations.
7. Dry the hair, remove the rollers and clippies, and brush through, following the brush with the palm of your subordinate hand to control the hair. Shape the hair according to the setting pattern, and spray to finish.
Note: If the hair is not totally dry on the rollers, the set will relax too much. A set that is completely dry should last until the next shampoo.
Roller curls can be set in combination with pin curls, using the pin curls in areas where less volume is desired.
131733_S-0505Roll Sec15 12/7/04 12:41:35 PM
© 2002 Aveda Corporation
Hair curled on a rag or tissue
STYLI NG HAI R | ROLLER SETTI NG AN D CU RL VARIATIONS
5-6 AVEDA I NSTITUTE COSMETOLOGY COU RSE
Hot RollersHot rollers are applied much the same as standard rollers, except for the following:• Begin with hair that is totally dry.• Apply a spray styling product for hold and control. • Fasteners are horseshoe shaped prongs that fasten
around the rollers, from the back to the front with the flat end towards the scalp.
• Check to make sure the rollers are properly heated before applying them, and cool before removing them.
Ragsetting ProcessRagsetting is a different technique than applying standard or hot rollers.Before you begin, prepare the wrapping material (10” x 1” strips of paper towels, tissue, or fabric). If you reuse fabric strips, they must be washed in hot water and kept sanitized.
1. Begin with damp hair, or dampen dry hair with a soft-hold styling aid.
2. Start at the nape for long hair or at the hairline for short hair. Create a section with a base that is about X”, smaller for tighter curls, or larger for looser curls.
3. Place the fabric on the ends of the hair and roll the hair around the fabric to the scalp.
Hint: For smoother ends, enclose them in a paper end wrap.
4. Tie the ends of the fabric over the curl to fasten the curl in place.
5. Place the curls directionally, the way the finished style will be worn. If you turn and twist the hair as you roll it, you’ll get more variation and texture.
6. Dry the hair under a hood dryer. When dry, arrange with your fingers or lightly brush through the style.
131733_S-0505Roll Sec16 12/7/04 12:41:36 PM

© 2002 Aveda Corporation 5-7
ROLLER SETTI NG AN D CU R L VARIATIONS
STYLI NG HAI R
SummaryIn this lesson, you learned how to set hair using standard rollers, hot rollers, and rags or fabric. Along with finger waves and pin curls, you now have the basis for creating many different hair designs.
Terms to Remember• Ragsetting
131733_S-0505Roll Sec17 12/7/04 12:41:36 PM

6-1STYLI NG HAI R © 2002 Aveda Corporation
6. Back-Combing and Back-Brushing
FinishingTouch
GainingCommitment
Preparing Yourself
and Your
StationClient
Greeting
SensoryExperience
Consultation
Scheduled Service
ContentsIntroduction
Back-Combing and Back-Brushing
Completing the Comb-Out
131733_S-0506Back Sec11 12/7/04 12:44:15 PM

6-3
BACK-COMBI NG AN D BACK-BRUSH I NG
STYLI NG HAI R© 2002 Aveda Corporation
ObjectivesAfter completing this lesson, you will be able to brush, comb, and arrange the set or unset hair into the final style.
OverviewStyles are completed by the comb-out or arranging techniques. You relax a set and arrange the hair using brushing, back-combing, and back-brushing techniques. Mastery of these techniques is necessary regardless of styling trends.
PreparationFor this lesson, you will need:• Standard setup (see Module 3, Lesson 3: Preparing Your
Station)• Hair spray• Styling combs• Brushes• Mannequin
131733_S-0506Back Sec13 12/7/04 12:44:16 PM

STYLI NG HAI R | BACK-COMBI NG AN D BACK-BRUSH I NG
6-4 AVEDA I NSTITUTE COSMETOLOGY COU RSE © 2002 Aveda Corporation
IntroductionWhen you create a set, whether with finger waves, pin curls, rollers, or other methods, your emphasis should be on the final style design. Determine the desired movement, areas of flatness, and volume required.When finishing the set, keep the following results in mind:• Blend the setting patterns, working the top into the
sides, etc.• To relax the set, break up the curls so that hair falls into
a natural movement.• Brush permed or naturally wavy hair a bit more than
straight or fine hair, because it holds a stronger curl formation.
• If the client is a weekly maintenance client, ask when she combs through the set. This will tell you how firmly to perform back-combing, if appropriate.
Back-Combing and Back-BrushingBack-combing and back-brushing are techniques in which you push hair down to the scalp to add support and volume.• Back-combing is achieved by pushing short hair within
the haircut down to the scalp to support the longer lengths. As a result, back-combing works well on layered and texturized hair, but not as well on one-length styles.
• Back-brushing is generally used for lighter cushioning than back-combing.
• Back-combing is used when firmer cushioning or a more bouffant (fuller) style is desired.
131733_S-0506Back Sec14 12/7/04 12:44:16 PM
6-5
BACK-COMBI NG AN D BACK-BRUSH I NG
STYLI NG HAI R© 2002 Aveda Corporation
Begin by brushing out the set. The following directions are for back-combing; back-brushing is the same, only using a brush.
1. Begin in an area where the greatest support is desired. Firmly hold as much hair as you can control in your subordinate hand and use your dominant hand to control the comb.
2. Hold the hair at the proper elevation to create the desired volume. Holding the strand higher creates the greatest volume; holding it lower creates less volume. Back-comb at 0° elevation where flatness is desired, for example on the sides.
3. Starting 1" to 1V" away from the scalp, push the comb directly to the scalp with a circular motion. (The circular motion ensures that the spine of the comb is pressed against the hair’s cuticle.)
4. Once sufficient cushioning has been created near the scalp, move progressively further away from the scalp and repeat the process. Avoid concentrating in the middle of the strand. Add less cushioning in areas where less volume or support is desired.
5. Continue until the desired amount of cushioning has been created throughout the strand.
131733_S-0506Back Sec15 12/7/04 12:44:16 PM

STYLI NG HAI R | BACK-COMBI NG AN D BACK-BRUSH I NG
6-6 AVEDA I NSTITUTE COSMETOLOGY COU RSE © 2002 Aveda Corporation
Completing the Comb-OutThe objective of the comb-out is to create a natural-looking finish with no exposed cushioning. Use your mirror constantly as you work.
1. Begin in the nape, or in the front on shorter hair, by smoothing over the hair.
2. Comb or brush over the surface lightly. 3. Spray each area of the style as it has been completed. 4. Continue smoothing the surface until the style is
perfected.
SummaryProcedures for arranging hair can be explained, but there is no substitute for work experience. A variety of styles can be set and finished by being brushed through, or combed out with back-combing or back-brushing. You can use back-combing or back-brushing to add support or volume in various areas of the head; it is not always necessary to apply it to the entire head.
Terms to Remember• Back-brushing• Back-combing• Bouffant• Cushioning
131733_S-0506Back Sec16 12/7/04 12:44:16 PM

© 2002 Aveda Corporation 7-1STYLI NG HAI R
7. Half-Round BrushAir Forming Technique
See DVD: Scene 4.1, Half-Round Brush
FinishingTouch
GainingCommitment
Preparing Yourself
and Your
StationClient
Greeting
SensoryExperience
Consultation
Scheduled Service
ContentsParts of the Half-Round Brush
Half-Round Styling Technique
Variation: Using a Paddle Brush
131733_S-0507Half Sec11 12/7/04 12:41:56 PM
© 2002 Aveda Corporation 7-3
HALF-ROU N D BRUSH
STYLI NG HAI R
ObjectivesAfter completing this lesson, you will be able to:• Use a half-round brush to provide a smooth, beveled look
to one-length or graduated hair• Use a blow dryer to lay down the cuticle of the hair,
creating a smooth and shiny look
OverviewA smooth, half-round finished style is a classic that is always in demand in the salon. This technique is achieved by:• Drying hair smoothly, removing curl or wave.• Sectioning the hair following the way it was sectioned
during the cut.• Locking in the base of the hair. This straightens and
smooths the hair nearest the scalp. For example, relaxed hair with new growth can be straightened in the new growth area with this technique.
• Beveling the rest of the hair shaft and ends. This creates a curve through the strand, beveling the ends under.
Rarely will a day go by in the salon that you don’t use this important technique.
PreparationFor this lesson, you will need:• Standard setup (see Module 3, Lesson 3: Preparing Your
Station)• Half-round brush• Blow dryer and nozzle• Mannequin
131733_S-0507Half Sec13 12/7/04 12:41:56 PM

© 2002 Aveda Corporation
STYLI NG HAI R | HALF-ROU N D BRUSH
7-4 AVEDA I NSTITUTE COSMETOLOGY COU RSE
Parts of the Half-Round BrushThe half-round brush usually comes in two varieties: 7 rows of pins and 9 rows of pins.
Half-Round Styling Technique
1. Pre-Dry and Section the Hair 1. Dry the hair to 80–90% dry by blowing it from side to
side. If the hair isn’t sufficiently dry, the hair will tangle in the brush.
2. Section the hair either in a center part or in a side part to the crown and then continue down the center to the nape.
3. Use the brush to subsection parallel to the perimeter, following the sectioning used in the haircut.
4. Isolate the remaining hair.
HandlePad
Row of Pins
Half-round brush
Part hair in desired style (center or side)
Panel 2 Panel 1
First subsection
131733_S-0507Half Sec14 12/7/04 12:41:57 PM

© 2002 Aveda Corporation 7-5
HALF-ROU N D BRUSH
STYLI NG HAI R
2. Lock in the Base 1. Stand to the left of the area that you are styling. 2. Place the brush with the pins closest to the head resting
at the part. 3. Using your wrist only (not your arm), rotate the brush
approximately 180° until the pins on the opposite side of the brush are at the part.
Note: Take only as much hair into the brush as can be covered by the pins as you rotate the brush. Do not "dip" below that area.
4. Rotate the brush back again, accumulating the hair in the pins across the pad of the brush. The brush should now be facing directly up. This will “lock” hair in the brush.
3. Dry 1. Hold the blow dryer (with the nozzle attached) directly
above the brush. 2. Draw the brush down toward the end of the hair,
following with the blow dryer and directing the air down the hair shaft. Keep the dryer and brush moving all the time and avoid getting too much heat on the client’s scalp.
3. Drop the hair ends out of the brush before they become dry (they should simply fall out)—they will be beveled after the rest of the hair in that panel has been dried and, therefore, need to be damp.
4. After drying the center panel, repeat the process of locking in the hair and dropping the ends on one side and then the other for the remaining panels in that section.
Place pins at part: pins are up
Rotate brush downward 180°: pins are down
Rotate brush back to original position and pull through: pins are up
131733_S-0507Half Sec15 12/7/04 12:41:57 PM

© 2002 Aveda Corporation
STYLI NG HAI R | HALF-ROU N D BRUSH
7-6 AVEDA I NSTITUTE COSMETOLOGY COU RSE
4. Bevel the Hair 1. Change your body position so that the panel of hair you
are drying is directly in front of you. 2. Starting in the middle panel again, bring the brush under
the hair with the pins facing up and the hair lying on the pad of the brush.
3. Using the brush, elevate the hair to approximately 45°, and then draw the brush down the hair shaft, bringing the elevation down to 0° as you approach the ends.
4. As you work the ends, use your wrist to rotate the brush several times, all the time directing the air of the blow dryer down from above.
5. Continue with the Rest of the HairRepeat the procedure for each subsection, following the sectioning of the haircut. You can take more subsections than you did for the haircut, but not fewer. Remember to lock in the upper shaft first, and then bevel the rest.When you’re done, comb or brush the hair into place. It will look polished and shiny.
Beveling the hair
131733_S-0507Half Sec16 12/7/04 12:41:57 PM

© 2002 Aveda Corporation 7-7
HALF-ROU N D BRUSH
STYLI NG HAI R
Variation: Using a Paddle BrushSee DVD: Scene 4.2, Paddle Brush
The paddle brush can be used to smooth and straighten hair. You can also use it to slightly bevel hair by rotating the brush under. If you do not want to create a bevel, draw the brush straight through the ends without rotating it. A paddle brush can be more appropriate than a half-round brush if the client has long hair. The technique for using a paddle brush is the same as a half-round brush.
SummaryThe importance of half-round drying cannot be over-emphasized. Perfecting this technique will provide the well-trained stylist with a useful service to offer a wide variety of clients. This technique is most often applied to one-length and graduated cuts and a variety of hair textures.
Terms to Remember• Bevel• Half-round brush• Locking• Paddle brush
Paddle brush
131733_S-0507Half Sec17 12/7/04 12:41:57 PM
8-1© 2002 Aveda Corporation
8. Round Brush Styling Technique
See DVD: Scene 4.3, Round Brush
FinishingTouch
GainingCommitment
Preparing Yourself
and Your
StationClient
Greeting
SensoryExperience
Consultation
Scheduled Service
ContentsChoosing a Brush
Round Brush Technique
Variation: Flat Round Brush Curls
STYLI NG HAI R
131733_S-0508Roun.indd Sec11 12/9/04 6:31:18 AM

8-3
ROU N D BRUSH STYLI NG TECH N IQU E
STYLI NG HAI R© 2002 Aveda Corporation
ObjectivesAfter completing this lesson, you will be able to:• Use the hard set round brush technique to create firmer
curls• Use the soft set round brush technique to create a soft
curled look• Determine which size of brush to select for the hair and
the look desired• Determine the elevation to use based on the volume
desired
OverviewRound brush setting is a frequently performed technique in hair design. There are two variations: • Hard set: This kind of set creates longer lasting curls.
Weekly or biweekly clients are interested in this form of setting because it lasts until their next visit to the salon.
• Soft set: This set creates a looser, softer curl.The procedure for each set is similar to the half round technique: first you dry the base, and then you form the curl. The procedure for securing the curl is the main difference between the hard and soft sets.
PreparationFor this lesson, you will need:• Standard setup (see Module 3, Lesson 3: Preparing Your
Station)• Setting lotion or styling aid• Hair spray• Double prong clippies• 3 sizes of round brushes
131733_S-0508Roun.indd Sec13 12/9/04 6:31:19 AM
STYLI NG HAI R | ROU N D BRUSH STYLI NG TECH N IQU E
8-4 AVEDA I NSTITUTE COSMETOLOGY COU RSE © 2002 Aveda Corporation
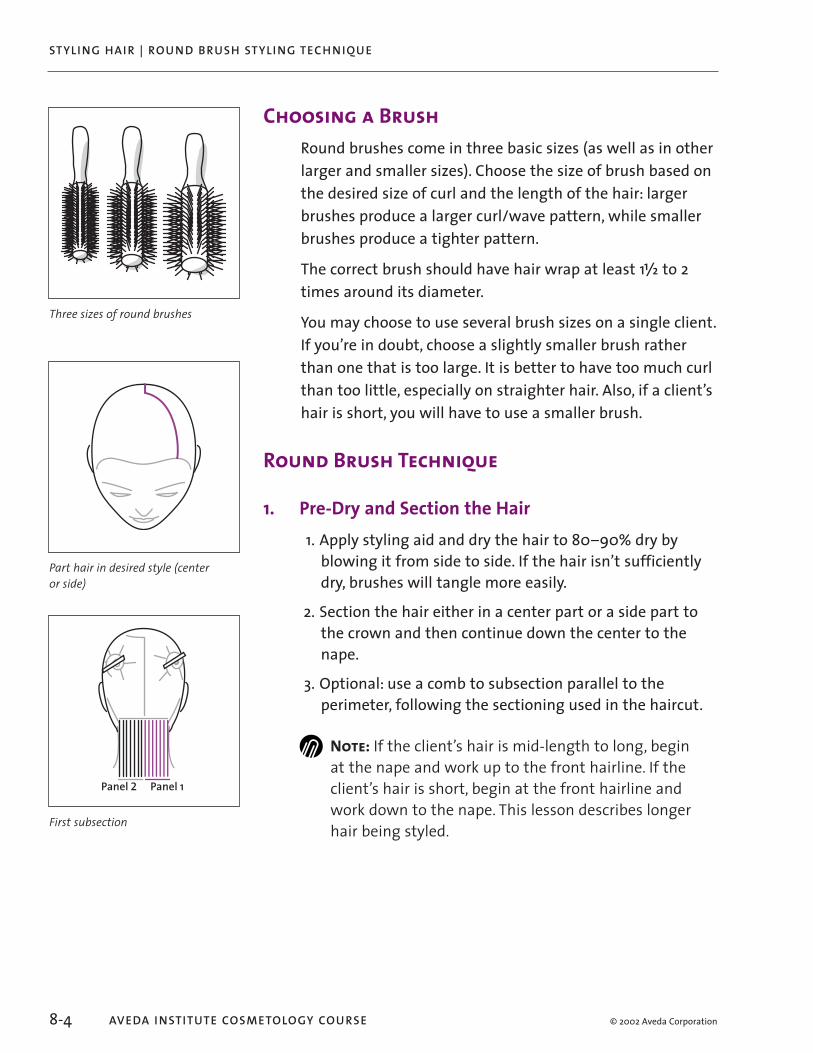
Choosing a BrushRound brushes come in three basic sizes (as well as in other larger and smaller sizes). Choose the size of brush based on the desired size of curl and the length of the hair: larger brushes produce a larger curl/wave pattern, while smaller brushes produce a tighter pattern. The correct brush should have hair wrap at least 1V to 2 times around its diameter.You may choose to use several brush sizes on a single client. If you’re in doubt, choose a slightly smaller brush rather than one that is too large. It is better to have too much curl than too little, especially on straighter hair. Also, if a client’s hair is short, you will have to use a smaller brush.
Round Brush Technique
1. Pre-Dry and Section the Hair 1. Apply styling aid and dry the hair to 80–90% dry by
blowing it from side to side. If the hair isn’t sufficiently dry, brushes will tangle more easily.
2. Section the hair either in a center part or a side part to the crown and then continue down the center to the nape.
3. Optional: use a comb to subsection parallel to the perimeter, following the sectioning used in the haircut.
Note: If the client’s hair is mid-length to long, begin at the nape and work up to the front hairline. If the client’s hair is short, begin at the front hairline and work down to the nape. This lesson describes longer hair being styled.
Three sizes of round brushes
Part hair in desired style (center or side)
Panel 2 Panel 1
First subsection
131733_S-0508Roun.indd Sec14 12/9/04 6:31:19 AM
8-5
ROU N D BRUSH STYLI NG TECH N IQU E
STYLI NG HAI R© 2002 Aveda Corporation
2. Dry the Base 1. Stand directly in front of the section you are styling and
rotate the brush towards you. 2. Pick up a panel of hair that is no wider and no longer
than the length and diameter of the bristles of the brush. 3. Lift the hair to the desired elevation, and place the brush
at the scalp. The higher the elevation, the stronger the base of the curl, and the less mobility. Avoid directing heat at the scalp. Direct the air into the brush.
Note: A standard elevation is 90º for more volume, and 45º for less volume.
4. Keeping the hair at the correct elevation, dry the hair. Concentrate the heat at the base of the hair and avoid too much heat at the scalp. The nozzle can be added to the blow dryer for control.
3. Form the Curl
Note: If you don't want any volume, you can use lower or no elevation at the base and just form curl at the ends.
1. After the base is dried, slide the brush with some curvature toward the mid-shaft and dry the mid-shaft.
2. Slide the brush through the hair ends and dry the ends. 3. Curl the hair around the brush all the way from the ends
to the scalp, while continuously drying and rotating the brush. Check to make sure that all the ends are curled smoothly into the brush, taking care to avoid fish-hooked ends. Unroll the hair and roll it again until the hair is dried evenly.
The next step depends on whether you are doing a hard set or a soft set.
131733_S-0508Roun.indd Sec15 12/9/04 6:31:20 AM

STYLI NG HAI R | ROU N D BRUSH STYLI NG TECH N IQU E
8-6 AVEDA I NSTITUTE COSMETOLOGY COU RSE © 2002 Aveda Corporation
Forming the Hard Set 1. Release the brush from the hair. 2. Quickly re-form the curl using your hands. 3. Clip the curl as you would a volume pin curl. 4. Optional: Apply hair spray if you want a firmer set. 5. Continue with the rest of the hair, forming the curls
in an alternating bricklaying pattern as shown in the illustration.
6. Once the hair has cooled and is dry, release the curls and brush through to finish.
Forming the Soft Set 1. With the hair rolled in the brush at the correct elevation,
hold the blow dryer away from the hair for a few seconds to allow the hair to cool.
Hint: Some blow dryers have a “cool” setting, which you can use to help the hair cool down. This enhances the firmness of the curl.
2. Release the curl. 3. Repeat the procedure of drying in the base and forming
the curl for the remainder of the hair. 4. To finish the set, brush through the hair.
Hard set formation
Final pattern set at 45º
131733_S-0508Roun.indd Sec16 12/9/04 6:31:20 AM
8-7
ROU N D BRUSH STYLI NG TECH N IQU E
STYLI NG HAI R© 2002 Aveda Corporation
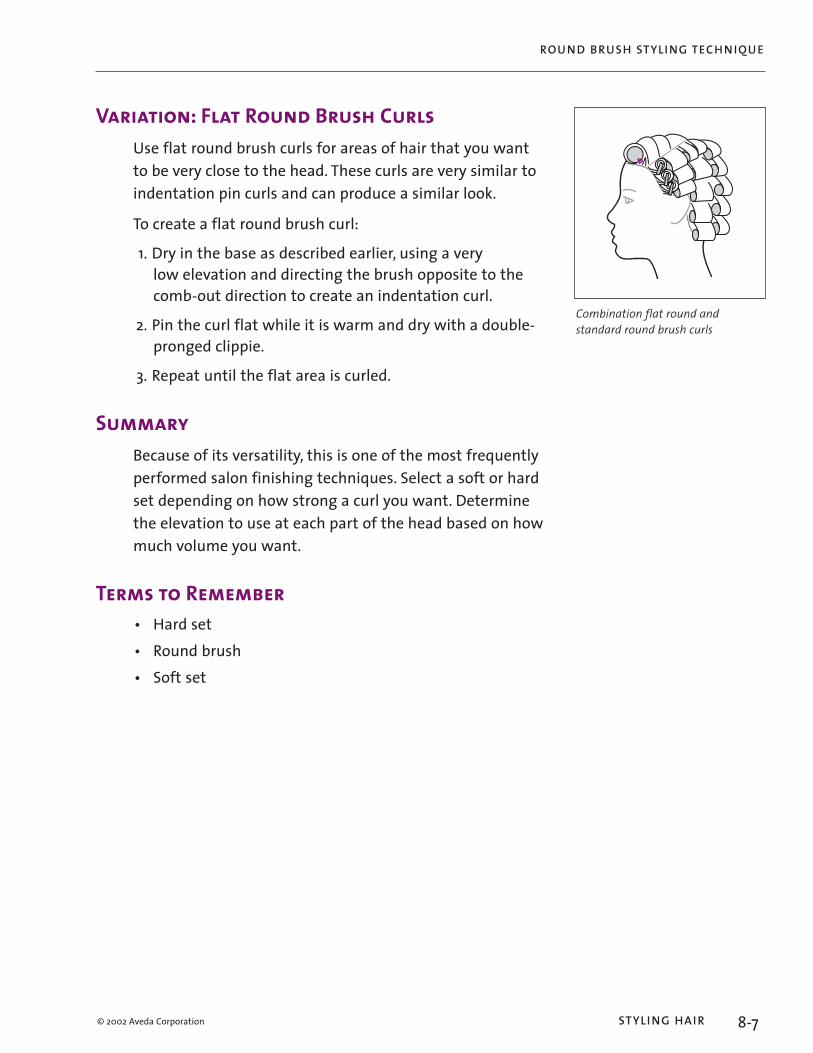
Variation: Flat Round Brush CurlsUse flat round brush curls for areas of hair that you want to be very close to the head. These curls are very similar to indentation pin curls and can produce a similar look.To create a flat round brush curl:
1. Dry in the base as described earlier, using a very low elevation and directing the brush opposite to the comb-out direction to create an indentation curl.
2. Pin the curl flat while it is warm and dry with a double-pronged clippie.
3. Repeat until the flat area is curled.
SummaryBecause of its versatility, this is one of the most frequently performed salon finishing techniques. Select a soft or hard set depending on how strong a curl you want. Determine the elevation to use at each part of the head based on how much volume you want.
Terms to Remember• Hard set• Round brush• Soft set
Combination flat round and standard round brush curls
131733_S-0508Roun.indd Sec17 12/9/04 6:31:21 AM

© 2002 Aveda Corporation 9-1STYLI NG HAI R
9. Finger Drying and Palm Drying
FinishingTouch
GainingCommitment
Preparing Yourself
and Your
StationClient
Greeting
SensoryExperience
Consultation
Scheduled Service
ContentsIntroduction to Drying Techniques
Palm Drying
Diffusing
Scrunching
Finger Drying
Combination Drying
131733_S-0509Palm Sec11 12/7/04 12:42:15 PM

© 2002 Aveda Corporation 9-3
F I NGER DRYI NG AN D PALM DRYI NG
STYLI NG HAI R
ObjectivesAfter completing this lesson, you will be able to style hair using only a blow dryer, with or without a diffuser, and your hands.
OverviewFor clients who want a casual look, you must be able to style hair with a blow dryer and your hands. Variations of finger styling include:• Palm drying (for a rough, textured look)• Diffusing (for maintaining curl)• Scrunching (for maintaining curl volume)• Finger drying (to add curl lift or direction)These techniques can be combined to achieve a finish with a variety of results.
PreparationFor this lesson, you will need:• Standard setup (see Module 3, Lesson 3: Preparing Your
Station)• Water bottle• Blow dryer/diffuser• Mannequin• Styling aid
131733_S-0509Palm Sec13 12/7/04 12:42:15 PM

© 2002 Aveda Corporation
STYLI NG HAI R | F I NGER DRYI NG AN D PALM DRYI NG
9-4 AVEDA I NSTITUTE COSMETOLOGY COU RSE
Introduction to Drying TechniquesThe technique or combination of techniques you use to dry a client’s hair using your hands depends on which of the following results are desired:• More texture (palm drying)• Maintaining existing curl (scrunching or diffusing)• A casually finished style with a touch of direction and
volume (finger drying)
Palm DryingPalm drying is a technique used to make the hair stand up with a sharp, pointed texture.
1. Apply an appropriate styling aid. 2. Use a blow dryer to dry the hair while “scrubbing” your
palm in a circular pattern over the scalp. Continue the movement until the desired texture is achieved.
Note: Palming can be performed directionally (like a flat pin curl). For example, rotating the hair counter-clockwise in one area and clockwise in another area will create random movement throughout the head.
3. Continue until all the hair is dry.
131733_S-0509Palm Sec14 12/7/04 12:42:16 PM

© 2002 Aveda Corporation
Diffuser
9-5
F I NGER DRYI NG AN D PALM DRYI NG
STYLI NG HAI R
DiffusingSee DVD: Scene 4.5, Diffuser
When performing a naturally dried style, the hair will look frizzy if it is dried by blowing it around. Diffusers are used when drying with limited hair movement is desired. This maintains an existing curl. Some diffusers have “fingers” that stand up inside the cone; these are excellent tools for placing longer hair inside to create volume.
1. Apply a styling aid. 2. If there is excessive moisture, remove it using the blow
dryer without the diffuser. In order to maintain curl at the hair ends, concentrate the heat only near the scalp when you do this.
3. Arrange the hair inside the diffuser. To create volume or curl definition in longer hair, lift the hair up and place it inside the diffuser. Adjust the client’s body posture as needed to do this.
4. Diffuse the hair without disturbing or breaking up the curls. Do not pick through the hair with your fingers.
ScrunchingScrunching, like diffusing, is a form of styling for preserving natural wave and curl. As with diffusing, the hair may be slightly pre-dried.
1. Gather the hair from the ends and hold it in the palm of your hand.
2. Working upwards from the nape, hold the hair firmly. Use the blow dryer without the nozzle attachment to direct the air into the hair held in your palm.
3. Continue until the entire head is dried.
131733_S-0509Palm Sec15 12/7/04 12:42:16 PM

© 2002 Aveda Corporation
STYLI NG HAI R | F I NGER DRYI NG AN D PALM DRYI NG
9-6 AVEDA I NSTITUTE COSMETOLOGY COU RSE
Finger DryingFinger drying creates a more defined movement that is similar to classic blow drying.
1. Pre-dry the hair until it is approximately 80–90% dry. This pre-drying can be somewhat directional: backward, forward, etc.
2. Do one or more of the following to create the desired look:• Elevate the hair away from the head with your fingers
where volume is desired.• Work your fingers through hair ends to blow in a
straighter look.• Create curls by holding the hair between your
forefinger and center finger and turning your hand to create movement in the style.
3. Allow the hair to cool in place for strength.
Combination DryingYou can combine several of these techniques to create many different looks.
SummaryThese casual styling techniques are very useful in the salon. Your awareness of every styling technique allows you to create the look you and your client desire. These techniques are very easy to teach to your clients.
Terms to Remember• Diffuser• Finger drying• Palm drying• Scrunching
131733_S-0509Palm Sec16 12/7/04 12:42:16 PM

10-1STYLI NG HAI R © 2002 Aveda Corporation
10. Thermal Techniques for Curling
See DVD: Scene 4.4,Thermal Iron
FinishingTouch
GainingCommitment
Preparing Yourself
and Your
StationClient
Greeting
SensoryExperience
Consultation
Scheduled Service
ContentsHolding the Iron
Creating a Curl
Guidelines for Curling
Variation: Flat Curls
Oven-Heated Thermal (Bumper or Marcel) Irons
131733_S-0510Thrm Sec11 12/7/04 12:44:56 PM

ObjectivesAfter completing this lesson, you will be able to:• Manipulate an electric and oven-heated thermal iron• Determine the correct heat for the hair you’re curling• Produce curls on various hair lengths using the correct
thermal iron technique
OverviewThermal styling is the technique of using heated tools on dry hair to form curls or waves or to smooth and straighten hair. There are several thermal tools that you will be learning to use. This lesson focuses on using thermal irons to create curls.The thermal iron is a versatile tool that you will use daily. It can be used to curl, wave, and straighten hair. This lesson provides an introduction to using a thermal iron and gives you a step-by-step procedure for creating curls.The curls you create with a thermal iron are closely related to those you create with rollers, volume pin curls, and the round brush. Thermal irons can be either electric or oven heated (also known as bumper irons). Both are presented in this lesson.
10-3
TH ERMAL TECH N IQU ES FOR CU RLI NG
STYLI NG HAI R© 2002 Aveda Corporation
131733_S-0510Thrm Sec13 12/7/04 12:44:57 PM

STYLI NG HAI R | TH ERMAL TECH N IQU ES FOR CU RLI NG
10-4 AVEDA I NSTITUTE COSMETOLOGY COU RSE © 2002 Aveda Corporation
PreparationFor this lesson, you will need:• Standard setup (see Module 3, Lesson 3: Preparing Your
Station)• Electric thermal iron• Oven-heated thermal irons• Thermal oven• Large, heat-resistant, styling comb• Styling aid• Tissue or end wraps• Clippies
131733_S-0510Thrm Sec14 12/7/04 12:44:57 PM
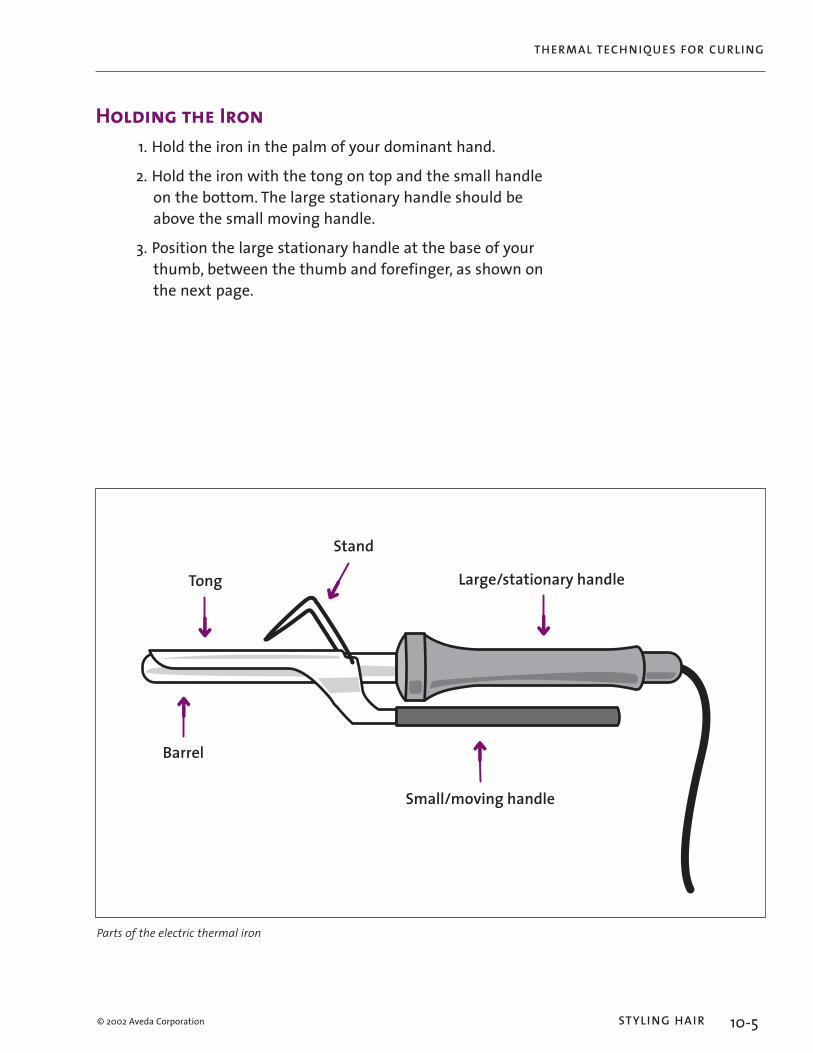
Tong
Barrel
Stand
Small/moving handle
Large/stationary handle
Parts of the electric thermal iron
10-5
TH ERMAL TECH N IQU ES FOR CU RLI NG
STYLI NG HAI R© 2002 Aveda Corporation
Holding the Iron 1. Hold the iron in the palm of your dominant hand. 2. Hold the iron with the tong on top and the small handle
on the bottom. The large stationary handle should be above the small moving handle.
3. Position the large stationary handle at the base of your thumb, between the thumb and forefinger, as shown on the next page.
131733_S-0510Thrm Sec15 12/7/04 12:44:57 PM

STYLI NG HAI R | TH ERMAL TECH N IQU ES FOR CU RLI NG
10-6 AVEDA I NSTITUTE COSMETOLOGY COU RSE © 2002 Aveda Corporation
Opening and Closing the IronWhen opening and closing the iron, hold the large handle stationary and move only the small handle. Moving the small handle causes the tong to open and close. Opening and closing the iron creates a “clicking” sound.To open the iron, push out on the small handle with your little finger. To close it, pull up with your other three fingers (forefinger, middle finger, and ring finger).
Rotating the IronOnce you become comfortable opening and closing the iron, learn how to rotate it for curling hair.To rotate the iron:
1. Open the iron. 2. Place the hair over the barrel. 3. Close and turn the iron toward you.
Holding the CombWhen working with a thermal iron, use a large, heat-resistant comb. The comb serves two purposes:• To manipulate the hair. You rarely need to move the hair
with your fingers when using a thermal iron.• To protect the client’s scalp from the heat of the iron.
When working near the scalp, hold the comb between the scalp and the iron.
Hint: It’s always best to use a comb made of heat-resistant material such as bone or hard rubber.
Hold the comb in your subordinate hand, using only your finger tips. This provides you with the control and flexibility you need for manipulating the hair and the comb.
Holding the thermal iron
Opening the thermal iron
131733_S-0510Thrm Sec16 12/7/04 12:44:57 PM

10-7
TH ERMAL TECH N IQU ES FOR CU RLI NG
STYLI NG HAI R© 2002 Aveda Corporation
Determining the Correct HeatThe temperature of the iron is crucial: too hot an iron can damage hair; too cool an iron will not be effective.The correct heat setting depends on several factors, including the hair texture (whether it is fine or coarse) and how brittle it is as a result of chemical treatment. The following kinds of hair need less heat:• Chemically colored hair• Chemically lightened hair• White hair• Fine hair (children and younger clients)The following kinds of hair need more heat:• Coarse hair• Hair with more texture or curl
Checking for the Correct HeatTo check if an iron is too hot, place an end wrap or piece of white paper between the tong and barrel and hold it there for several seconds. If the paper is scorched, turn down the heat setting or hold the iron in a towel for a few seconds and check it again.You’ll know when an iron is too cool because the hair won’t respond the way you want.
Creating a CurlWith a thermal iron, it is most effective to create the curl starting at the scalp and working to the end. This is a three-step process:
1. Form the base (also known as “rock in the base”). 2. Rotate the hair into the iron. 3. Clip or anchor to the base.
131733_S-0510Thrm Sec17 12/7/04 12:44:58 PM

STYLI NG HAI R | TH ERMAL TECH N IQU ES FOR CU RLI NG
10-8 AVEDA I NSTITUTE COSMETOLOGY COU RSE © 2002 Aveda Corporation
There are three kinds of curls we will be discussing:• Croquignole curls, performed on shorter hair, are
performed end to scalp• Figure 6 curls, which are commonly created in short to
mid-length hair• Figure 8 curls, which are commonly created in long hairAll three kinds of curls use the same procedure for forming the base. The curling part of the process is slightly different for each type of curl, however.
Forming the BaseAs with all curls, those you create with a thermal iron should have a strong base:
1. Make sure that the hair is 100% dry. 2. While holding the iron, pick up a section of the hair using
the little finger of your dominant hand or section with a comb. The size of the base for a thermal iron curl is the diameter of the barrel and about 2V" long.
3. Place hair in comb (teeth up) at the desired elevation. Remember that the higher the elevation, the stronger the base and the less mobile the hair.
4. Apply the iron as close to the scalp as possible, taking care not to touch the scalp.
5. Keeping the tong of the iron slightly open, and using the comb to keep the hair in the iron, rotate the iron toward you gently. Closing the iron will create a “crimp” across the base of the curl. Make sure to keep the hair at the desired elevation as you work.
6. Without letting go of the hair, proceed to creating the curl.
131733_S-0510Thrm Sec18 12/7/04 12:44:58 PM

10-9
TH ERMAL TECH N IQU ES FOR CU RLI NG
STYLI NG HAI R© 2002 Aveda Corporation
Forming Croquignole Curls (for hair under 5” in length)After forming the base, use this curling technique only on the shortest hair (5” or less in length). This curl is performed end to scalp.
1. Do the following all in one motion, immediately after rocking in the base:• Holding the curl at the correct elevation, pull out to
the hair end. Do this by curving the iron with the tong and barrel close together.
• With the comb held at the scalp, roll down to complete the curl.
2. Remove the curl from the iron by gently clicking the iron to the right and moving the hair with the comb.
3. Optional: Clip the curl in place for a firmer set. 4. When the hair cools, remove the clips (if you used them)
and brush the hair through to finish, applying hair spray or other product as necessary.
Forming Figure 6 Curls (for short to mid-length hair)After forming the base, use this curling technique for hair that is 5–13” long.
1. Do the following all in one motion, immediately after rocking in the base:• Holding the curl at the correct elevation, move the
iron away from the scalp.• Use the comb to move the hair along the barrel
toward the handle, and then rotate the iron.• Place the comb under the curl, by the scalp, to protect
the scalp. 2. Rotate the iron, opening and closing it so the hair rotates
freely into a curl. 3. Continue rotating until the full length of the strand is
curled around the barrel. 4. Remove the curl by gently clicking the iron to the right
and moving the hair with the comb off of the barrel.
Forming a figure 6 curl
131733_S-0510Thrm Sec19 12/7/04 12:44:58 PM

STYLI NG HAI R | TH ERMAL TECH N IQU ES FOR CU RLI NG
10-10 AVEDA I NSTITUTE COSMETOLOGY COU RSE © 2002 Aveda Corporation
5. Optional: Clip the curl in place for a firmer set. 6. When the hair cools, remove the clips (if you used them)
and brush the hair through to finish, applying hair spray or other product as necessary.
Forming Figure 8 Curls (for long hair)After forming the base, use this curling technique for hair that is 13" or longer.
1. Do the following all in one motion, immediately after rocking in the base:• Holding the hair at the correct elevation, move the
iron away from the scalp to about mid-shaft.• Use the comb to move the hair along the barrel
toward your hand, near the handle, and then rotate the iron.
Note: At this point, the creation of a figure 8 curl is very similar to the creation of a figure 6 curl.
• Then draw the strand to the opposite side of the curl and pull it over the top of the barrel (use your fingers or comb if necessary).
• Place the comb under the curl, by the scalp, to protect the scalp.
2. Rotate the hair around the tong and barrel, clicking so the hair rotates freely into a curl.
3. Continue rotating until all the hair in the strand is curled around the barrel.
4. Remove the curl from the iron by gently clicking the iron and moving the hair with the comb off the barrel.
5. Optional: Clip the curl in place for a firmer curl. 6. When the hair cools, remove the clips (if you used them)
and brush the hair through to finish, applying hair spray or other product as necessary.
Forming a figure 8 curl
131733_S-0510Thrm Sec110 12/7/04 12:44:58 PM

10-11
TH ERMAL TECH N IQU ES FOR CU RLI NG
STYLI NG HAI R© 2002 Aveda Corporation
Guidelines for CurlingOn long hair, work from the bottom up beginning at the nape, and following the design of the cut. For short hair, create the curls from the front hairline to the nape, again following the design of the cut.
Variation: Flat CurlsUsing the thermal iron, you can create the same kind of pin curl patterns as described in Lesson 4: Pin Curls in this module. To do this:
1. Form the base as described earlier in this lesson. 2. Create curl using the indentation movement (movement
opposite the direction to be combed out). 3. Quickly flatten the warm hair into flat pin curls. 4. Clip the curl as for a pin curl.
The resulting curl combs out flat to the head.
Oven-Heated Thermal (Bumper or Marcel) Irons
The general technique for using oven-heated thermal irons (also referred to as marcel irons and bumper irons) is the same as for electric thermal irons. One advantage of oven-heated irons is that you can get the irons quite hot (hotter than most electric irons) when necessary for strong resistant hair. Oven-heated thermal irons are available in many sizes and styles to create a variety of looks.
Oven-heated thermal iron
131733_S-0510Thrm Sec111 12/7/04 12:44:59 PM

STYLI NG HAI R | TH ERMAL TECH N IQU ES FOR CU RLI NG
10-12 AVEDA I NSTITUTE COSMETOLOGY COU RSE © 2002 Aveda Corporation
Following is a list of guidelines for choosing and using irons:• Ovens or stoves may come with thermostatic controls
(heat dials) or without. Stylists using ovens without these controls need to be more careful about the heat of the tools being used.
• Better tools are made of a mixture of metals that retain the heat more evenly and longer. A well-made iron will hold sufficient heat to perform three curls. Therefore, two irons may be used during the set, alternating so you always have a hot iron.
• Always test to make sure that the irons are not too hot by clamping an end wrap or paper neck strip within the heated irons. If the paper scorches, the iron is too hot; allow it to cool a few minutes outside the oven.
SummaryThermal iron curling is a valuable technique that you will use constantly as a professional stylist. There are two parts to creating a curl: rocking in the base and forming the curl. There are three techniques for forming the curl: one for the shortest hair, one for short to mid-length hair, and one for long hair.If you can use bumper irons heated appropriately for the type of hair, you’ll have the versatility necessary to be a successful stylist.
Terms to Remember• Barrel• Bumper iron• Croquignole curl• Figure 6 curl• Figure 8 curl• Marcel iron• Thermal iron• Tong
131733_S-0510Thrm Sec112 12/7/04 12:44:59 PM

© 2002 Aveda Corporation 11-1STYLI NG HAI R
11 . Thermal Techniques for Creating Waves
FinishingTouch
GainingCommitment
Preparing Yourself
and Your
StationClient
Greeting
SensoryExperience
Consultation
Scheduled Service
ContentsHolding the Iron for Marcelling
Marcel Waving Process
Variation: Surface Marcel
Variation: Vertical and Diagonal Waves
131733_S-0511Thrm2 Sec11 12/7/04 12:42:56 PM
© 2002 Aveda Corporation 11-3
TH ERMAL TECH N IQU ES FOR C R EATI NG WAVES
STYLI NG HAI R
ObjectivesAfter completing this lesson, you will be able to:• Create a traditional marcel waved style• Create a surface marcel style
OverviewDeveloped in the 1870s by the Parisian hairdresser Marcel Grateau, marcel waving is a truly classic style. A marcel is made up of deep regular S waves that lie close to the head.The marcel wave closely resembles finger waves. However, to create marcel waves, you use a thermal iron and start with dry hair. You can create waves throughout the hair or only do a surface marcel. Each is explained in this lesson.Before starting this lesson, make sure that you understand waves as explained in Lesson 2: Finger Waving Technique in this module. Also make sure that you understand the basics of using a thermal iron as explained in Lesson 10: Thermal Techniques for Curling also in this module.
PreparationFor this lesson, you will need:• Standard setup (see Module 3, Lesson 3: Preparing Your
Station)• Two thermal irons• Large, heat-resistant, styling comb• Styling aid
131733_S-0511Thrm2 Sec13 12/7/04 12:42:57 PM

© 2002 Aveda Corporation
Holding the thermal iron when marcelling
STYLI NG HAI R | TH ERMAL TECH N IQU ES FOR CREATI NG WAVES
11-4 AVEDA I NSTITUTE COSMETOLOGY COU RSE
Holding the Iron for Marcelling 1. Hold the iron in the palm of your dominant hand. 2 Hold the iron with the tong on the bottom and the small
handle on top. 3. Hold forearm, comb, and iron parallel to the floor and to
one another to ensure horizontal waves.
Marcel Waving Process
1. Prepare the HairBefore you start marcelling the hair, it is important to part and dry it.
1. Part the hair on the side from the recession to the crown and then vertically to the nape.
2. Dry the hair to 100%. It is preferable that the hair be dried straight.
2. Plan the LookBefore you start the marcel technique, it’s important to create a mental “blueprint” of what the final look will be. Equipped with a plan, your outcome will be assured.• Determine whether you want a full marcel or a surface
one. The full marcel will last longer, but the surface marcel will take less time to create.
• If you are going to do a surface marcel, determine where the first wave will start. If possible, the first wave should reflect the natural movement of the hair.
• Determine the direction of the first wave. This will determine the direction of all the other waves.
• Determine the desired distance between the ridges.
131733_S-0511Thrm2 Sec14 12/7/04 12:42:57 PM

© 2002 Aveda Corporation
Panel 2 Panel 1
Begin in the nape
Direct hair in one direction for the first wave
Direct it in the other direction for the next wave
11-5
TH ERMAL TECH N IQU ES FOR C R EATI NG WAVES
STYLI NG HAI R
3. Marcel the First Panel (Traditional Method) 1. Starting at the nape, create a V” to 1” subsection,
depending on the density of the hair. Divide the subsection into two panels, each narrower than the length of the barrel.
Note: Begin at the top of the panel and work down to the ends.
2. Standing directly in front of the panel being marcelled, use the little finger of your dominant hand to pick up the first panel to be waved.
3. Place the strand momentarily into the comb held in your subordinate hand (teeth are turned up).
4. Apply the iron to the top of the panel, approximately 1” from the scalp, and remove the comb. The hair is now lying between the barrel and the tong.
5. Using the teeth of the comb, move the hair to the right or left depending on which way you want to begin the wave.
6. While still holding the hair with the comb, close the iron. 7. Move the hair further in the desired direction (either left
or right). This strengthens the ridge. 8. While still holding the hair in position with the comb,
rotate the iron away from you, toward the head. 9. Rotate the iron back toward you and open the iron (still
holding the hair in place with the comb). 10. Repeat steps 8 and 9 three times. 11. Slide the open iron lightly down the panel (gently moving
the hair into an S pattern) until it reaches where you want the next ridge to be.
12. Repeat the procedure, moving the hair in the opposite direction. Do this until the entire panel is waved.
131733_S-0511Thrm2 Sec15 12/7/04 12:42:57 PM
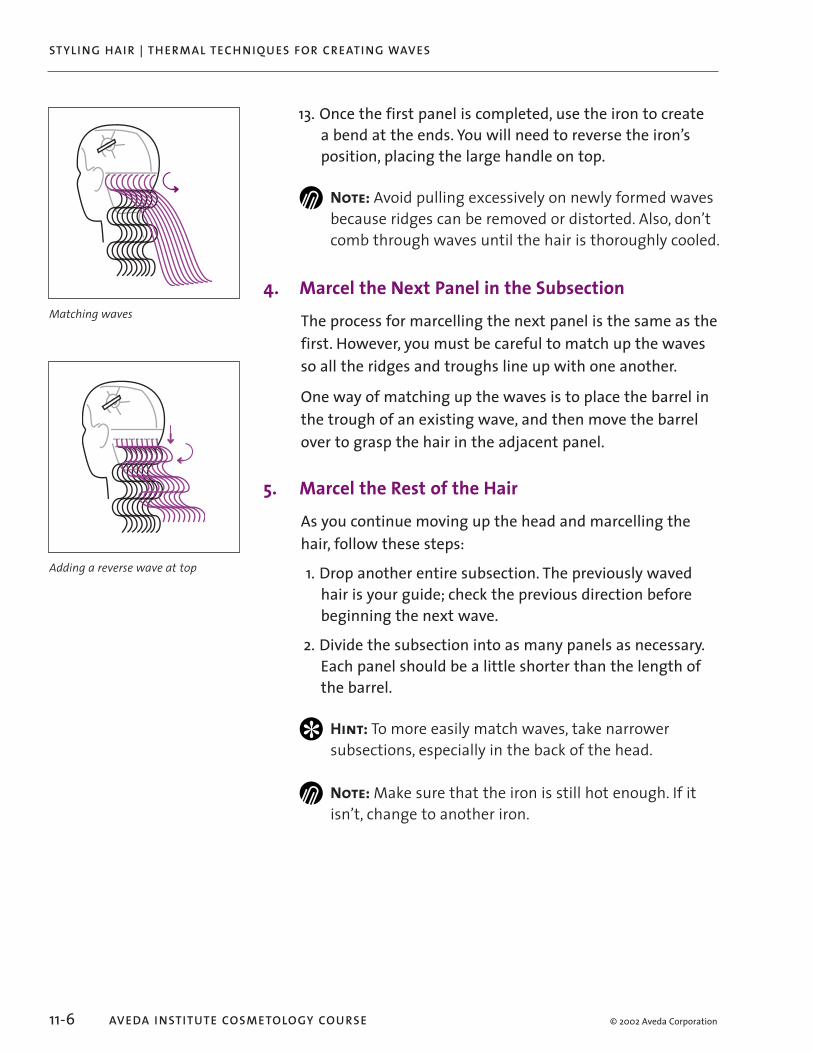
© 2002 Aveda Corporation
Matching waves
Adding a reverse wave at top
STYLI NG HAI R | TH ERMAL TECH N IQU ES FOR CREATI NG WAVES
11-6 AVEDA I NSTITUTE COSMETOLOGY COU RSE
13. Once the first panel is completed, use the iron to create a bend at the ends. You will need to reverse the iron’s position, placing the large handle on top.
Note: Avoid pulling excessively on newly formed waves because ridges can be removed or distorted. Also, don’t comb through waves until the hair is thoroughly cooled.
4. Marcel the Next Panel in the SubsectionThe process for marcelling the next panel is the same as the first. However, you must be careful to match up the waves so all the ridges and troughs line up with one another.One way of matching up the waves is to place the barrel in the trough of an existing wave, and then move the barrel over to grasp the hair in the adjacent panel.
5. Marcel the Rest of the HairAs you continue moving up the head and marcelling the hair, follow these steps:
1. Drop another entire subsection. The previously waved hair is your guide; check the previous direction before beginning the next wave.
2. Divide the subsection into as many panels as necessary. Each panel should be a little shorter than the length of the barrel.
Hint: To more easily match waves, take narrower subsections, especially in the back of the head.
Note: Make sure that the iron is still hot enough. If it isn’t, change to another iron.
131733_S-0511Thrm2 Sec16 12/7/04 12:42:57 PM

© 2002 Aveda Corporation 11-7
TH ERMAL TECH N IQU ES FOR C R EATI NG WAVES
STYLI NG HAI R
3. Starting with the center panel, glide the iron lightly over the hair until it reaches the first ridge of this panel.
4. Hold the hair at an elevation close to the previously waved hair so it can be used to match waves, but high enough so that the iron does not touch the wave underneath.
5. Match the wave to the one below it and marcel in the same direction.
6. Continue the marcel procedure on adjacent panels. 7. Work subsection by subsection, until there is enough
length at the top of a panel to require adding another wave (ridge). This means that there isn’t a wave underneath that part of the hair.
8. Add a wave as necessary, making sure that it goes in the reverse direction of the one directly below it.
9. When waving the sides of the client’s head, stand on the side.
10. When you finish, wait for the hair to cool thoroughly, and then lightly comb the hair.
131733_S-0511Thrm2 Sec17 12/7/04 12:42:58 PM

© 2002 Aveda Corporation
Starting a surface marcel
A completed surface Marcel style
STYLI NG HAI R | TH ERMAL TECH N IQU ES FOR CREATI NG WAVES
11-8 AVEDA I NSTITUTE COSMETOLOGY COU RSE
Variation: Surface MarcelA surface marcel is when only the top layer of the hair is waved. Follow the same procedure as the standard marcel, except as follows:• Start at the “heavy” side of the part in front and wave
the entire front panel.• Then move around the head, matching up the ridges and
troughs, and marcelling only the top layer of hair. Turn the ends under.
Variation: Vertical and Diagonal WavesAlthough marcel waves are usually horizontal, you can create vertical and diagonal waves using the same technique as outlined in this lesson. Make sure to change your hand, comb, and iron positions to reflect the angle of the wave.
131733_S-0511Thrm2 Sec18 12/7/04 12:42:58 PM

© 2002 Aveda Corporation 11-9
TH ERMAL TECH N IQU ES FOR C R EATI NG WAVES
STYLI NG HAI R
SummaryMarcel waving is a classic style that is a combination of these techniques:• Finger waving and thermal iron use• Creating ridges and troughs in a side-to-side direction
using a comb• Carefully matching previously waved hair to the one
you’re waving now• Determining where to add new waves as they become
necessaryYou now know how to perform a full, traditional marcel wave and a surface marcel. Both of these styles become popular every few years and the technique needs to be in every stylist’s repertoire.
Terms to Remember• Marcel wave• Ridge• Surface marcel wave• Trough
131733_S-0511Thrm2 Sec19 12/7/04 12:42:58 PM

12-1STYLI NG HAI R © 2002 Aveda Corporation
12. Thermal Techniques for Smoothing and Straightening
FinishingTouch
GainingCommitment
Preparing Yourself
and Your
StationClient
Greeting
SensoryExperience
Consultation
Scheduled Service
ContentsPick Attachment Technique
Pressing (Silking)
Other Tools for Smoothing and Straightening
131733_S-0512Thrm3 Sec11 12/7/04 12:40:51 PM

12-3
TH ERMAL TECH N IQU ES FOR SMOOTH I NG AN D STRAIGHTEN I NG
STYLI NG HAI R© 2002 Aveda Corporation
ObjectivesAfter completing this lesson, you will be able to:• Determine the best tool to use for smoothing and
straightening various hair textures.• Correctly use a pick attachment to a blow dryer to dry
and smooth highly textured hair.• Correctly use a pressing comb to smooth and straighten
hair.• Correctly use a flat iron to smooth and straighten hair.
OverviewProfessionally, you work with a variety of hair textures and curl configurations, from straight to tightly curled (highly textured). Tightly curled hair requires specific styling skills for manageability. Two fundamental design techniques for highly textured hair are:• Blow pick/air forming• Pressing/silkingIn addition, you can use a flat iron or a thermal iron to straighten hair.Straightening techniques are sometimes used as part of a “Press and Curl,” in which the hair is first straightened, and then it is curled. Usually, this is done on hair that hasn’t been chemically relaxed.
131733_S-0512Thrm3 Sec13 12/7/04 12:40:51 PM

Thermal pick attachment
STYLI NG HAI R | TH ERMAL TECH N IQU ES FOR SMOOTH I NG AN D STRAIGHTEN I NG
12-4 AVEDA I NSTITUTE COSMETOLOGY COU RSE © 2002 Aveda Corporation
PreparationFor this lesson, you will need:• Standard setup (see Module 3, Lesson 3: Preparing Your
Station)• Blow pick attachment (to a blow dryer)• Pressing comb• Thermal oven• Large styling comb (heat resistant)• Pomade• Flat iron• Thermal iron
Pick Attachment TechniqueThe pick attachment to a blow dryer can be used to both dry and straighten highly textured hair, whether it has been chemically relaxed or not. It is sometimes used to prepare the hair for pressing.To straighten hair using a blow dryer pick attachment:
1. Apply a light setting lotion to the hair. 2. Isolate V” to 1” sections starting from the nape and
working up the head. 3. Using moderate tension, hold the ends of a section with
your subordinate hand for control. 4. Starting at the scalp, press the pick through the hair from
above and dry from the scalp to the ends.
131733_S-0512Thrm3 Sec14 12/7/04 12:40:52 PM

12-5
TH ERMAL TECH N IQU ES FOR SMOOTH I NG AN D STRAIGHTEN I NG
STYLI NG HAI R© 2002 Aveda Corporation
Pressing (Silking)Pressing (also known as silking) is the process of running a thermal pressing comb through the hair to straighten and smooth it. This technique is sometimes followed by a thermal iron curling technique to create a curled style (press and curl).There are two kinds of pressing:• Soft Press: Only the underside of the hair is pressed.• Hard Press: Each strand is pressed twice, on the top and
the bottom.The smoother the client wants his or her hair to be, or the more highly textured the hair, the more likely that you will need to perform a hard press.
131733_S-0512Thrm3 Sec15 12/7/04 12:40:52 PM

Handle
Teeth
Spine (barrel)
Oven-heated pressing comb
STYLI NG HAI R | TH ERMAL TECH N IQU ES FOR SMOOTH I NG AN D STRAIGHTEN I NG
12-6 AVEDA I NSTITUTE COSMETOLOGY COU RSE © 2002 Aveda Corporation
Pressing Combs
HistoryThe first heated pressing combs were used around 1900. Since then, they have been continuously used to provide a way of straightening highly textured hair without the use of chemicals. African-American hair stylist “Madame” C. J. Walker, the first self-made female millionaire in the United States, is credited with the development of the pressing comb.
Types of CombsPressing combs can be either oven heated or electric (thermostatically controlled). Most stylists prefer the oven heated variety because they can better control the heat
131733_S-0512Thrm3 Sec16 12/7/04 12:40:52 PM

HandleStand Cord
Thermostat
Teeth
Spine (barrel)
Electric pressing comb
12-7
TH ERMAL TECH N IQU ES FOR SMOOTH I NG AN D STRAIGHTEN I NG
STYLI NG HAI R© 2002 Aveda Corporation
with these tools. This lesson assumes that you are using oven-heated combs.The oven-heated comb is constructed of brass and iron. The handle is heat resistant. However, do not set the handle in the oven.
Pressing Comb MaintenancePressing combs must be cleaned after every treatment.• Remove pomade.• Use fine steel wool with alcohol to sanitize the comb and
remove carbon.• Remove excessive buildup by soaking the comb in a hot
baking soda and water solution.
131733_S-0512Thrm3 Sec17 12/7/04 12:40:52 PM

STYLI NG HAI R | TH ERMAL TECH N IQU ES FOR SMOOTH I NG AN D STRAIGHTEN I NG
12-8 AVEDA I NSTITUTE COSMETOLOGY COU RSE © 2002 Aveda Corporation
Preparing to Press the HairFollow these guidelines before you begin pressing the hair:• Do not press damaged hair, because it can break.• Because pressing can be hard on the hair, recommend a
deep conditioning treatment before or between pressing treatments.
• Check the comb for too much heat the same way as you check a thermal iron. Place an end wrap on the pressing comb. If the paper discolors or turns brown, allow the pressing comb to cool. Excessive heat will burn and weaken the hair shaft.
• Always work with two combs so that one can always be in the oven getting hot.
131733_S-0512Thrm3 Sec18 12/7/04 12:40:52 PM

12-9
TH ERMAL TECH N IQU ES FOR SMOOTH I NG AN D STRAIGHTEN I NG
STYLI NG HAI R© 2002 Aveda Corporation
Soft Press Process 1. If needed for control, apply emollient pomade to hair. 2. Section the hair into four quadrants. 3. Stand behind the client. 4. Starting in the right quadrant and using a heat-resistant
comb, take a horizontal subsection. The size of the subsection depends on the texture and density of the hair. Control the remaining hair with a clip, if necessary.
5. Using your subordinate hand, hold the hair toward you with tension.
6. Insert the teeth of the heated pressing comb from underneath into the hair with the teeth in a horizontal position. Rotate the teeth upward until the spine is close to the scalp, but not touching it.
7. Hold the hair down and toward you. 8. Slide the comb away from you, maintaining tension with
your other hand.
Note: The teeth of the pressing comb only guide the hair; the spine does the straightening.
9. When one pressing comb cools, change to another. When changing to a second iron, remember to check with an end wrap for excessive heat.
Hair divided into four quadrants
1. Insert comb from underneath
2. Rotate teeth up
3. Comb away from you maintaining tension
131733_S-0512Thrm3 Sec19 12/7/04 12:40:52 PM

STYLI NG HAI R | TH ERMAL TECH N IQU ES FOR SMOOTH I NG AN D STRAIGHTEN I NG
12-10 AVEDA I NSTITUTE COSMETOLOGY COU RSE © 2002 Aveda Corporation
Flat iron
Thermal iron
Hard Press Process 1. Perform the soft press process. 2. Move to the front of the client and repeat the technique,
pressing the top of the hair.
Other Tools for Smoothing and Straightening
Flat Iron or Thermal IronUse a flat iron or thermal iron to smooth and straighten or wave the hair. Flat irons may also be used to bevel and gently curl hair.
Note: Solid-body thermal irons are often used in this process because they get hotter than hollow body thermal irons.
To use a flat iron: 1. Section the hair from a side or center part to the crown,
and then vertically to the nape. 2. Hold the hair with a heat-resistant comb in the
subordinate hand. 3. Place the flat iron near the scalp, but not touching it.
Keep the comb in the hair, too. 4. In a single motion, move down the hair with both the
comb and the flat iron. 5. Repeat the process until the hair is smooth and silky.
131733_S-0512Thrm3 Sec110 12/7/04 12:40:53 PM

12-11
TH ERMAL TECH N IQU ES FOR SMOOTH I NG AN D STRAIGHTEN I NG
STYLI NG HAI R© 2002 Aveda Corporation
SummaryThe technique you use to smooth or straighten hair depends on the texture of the hair and the effect you want.For highly textured hair, you can use a pick attachment on the blow dryer to start the straightening process, continuing by pressing the hair with a thermal pressing comb.In addition, you can use a combination of thermal curling, waving, and straightening techniques to develop the best look for your client.
Terms to Remember• Flat iron• Pressing• Silking• Thermal pick
131733_S-0512Thrm3 Sec111 12/7/04 12:40:53 PM

© 2002 Aveda Corporation 13-1STYLI NG HAI R
13. French Twist
FinishingTouch
GainingCommitment
Preparing Yourself
and Your
StationClient
Greeting
SensoryExperience
Consultation
Scheduled Service
ContentsFrench Twist Procedure
131733_S-0513Fren Sec11 12/7/04 12:43:57 PM

© 2002 Aveda Corporation 13-3
FRENCH TWIST
STYLI NG HAI R
ObjectivesAfter completing this lesson, you will be able to create a classic French Twist style, with variations.
OverviewThe French Twist is a timeless upswept style. Important factors for creating this style include a vertical seam in the back of the head (the "twist"), and a smooth, clean finish that conceals the hair pins.
PreparationFor this lesson, you will need:• Standard setup (see Module 3, Lesson 3: Preparing Your
Station)• Hair spray• Styling aid• Bobby pins• Hair pins• Styling comb• Paddle brush• Mannequin
IntroductionThe French Twist is best performed on mid-length, lightly layered hair, although you can create variations on shorter and longer lengths by creating fullness around the ears, or using other styling options as desired.Before applying this style, you can set the hair on electric rollers to add body, or add product to dry hair for control, if necessary.
131733_S-0513Fren Sec13 12/7/04 12:43:57 PM
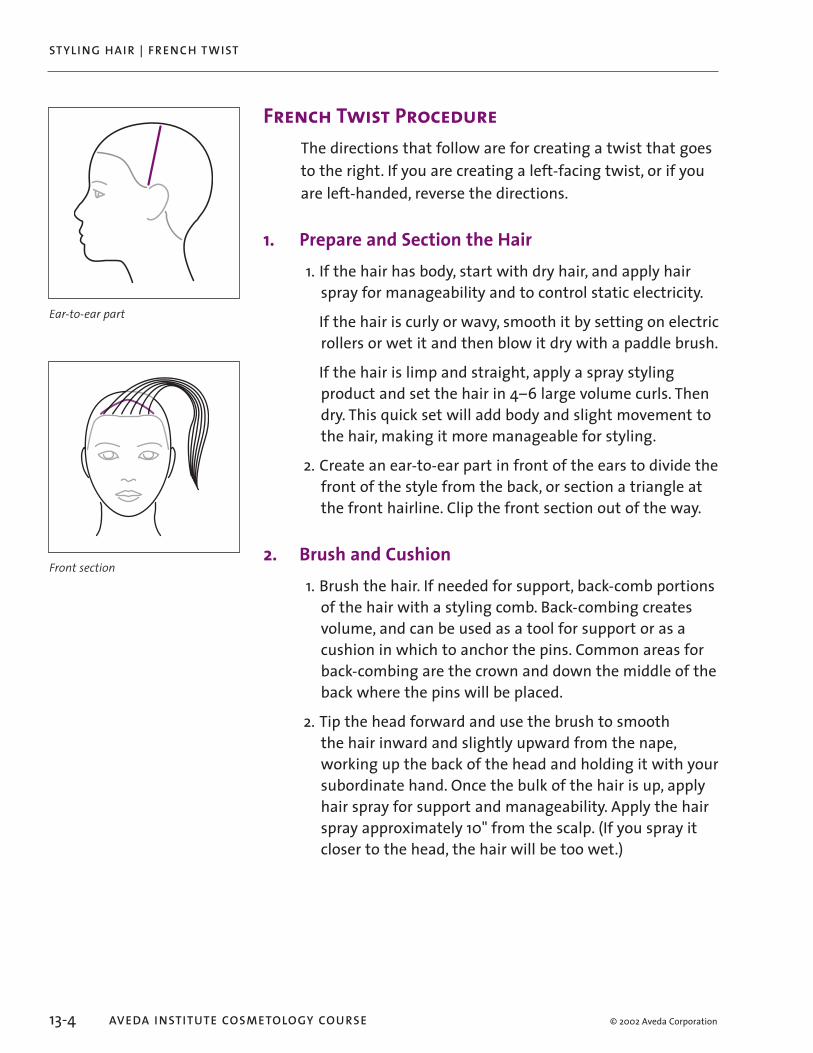
© 2002 Aveda Corporation
Ear-to-ear part
Front section
STYLI NG HAI R | FRENCH TWIST
13-4 AVEDA I NSTITUTE COSMETOLOGY COU RSE
French Twist ProcedureThe directions that follow are for creating a twist that goes to the right. If you are creating a left-facing twist, or if you are left-handed, reverse the directions.
1. Prepare and Section the Hair 1. If the hair has body, start with dry hair, and apply hair
spray for manageability and to control static electricity. If the hair is curly or wavy, smooth it by setting on electric
rollers or wet it and then blow it dry with a paddle brush. If the hair is limp and straight, apply a spray styling
product and set the hair in 4–6 large volume curls. Then dry. This quick set will add body and slight movement to the hair, making it more manageable for styling.
2. Create an ear-to-ear part in front of the ears to divide the front of the style from the back, or section a triangle at the front hairline. Clip the front section out of the way.
2. Brush and Cushion 1. Brush the hair. If needed for support, back-comb portions
of the hair with a styling comb. Back-combing creates volume, and can be used as a tool for support or as a cushion in which to anchor the pins. Common areas for back-combing are the crown and down the middle of the back where the pins will be placed.
2. Tip the head forward and use the brush to smooth the hair inward and slightly upward from the nape, working up the back of the head and holding it with your subordinate hand. Once the bulk of the hair is up, apply hair spray for support and manageability. Apply the hair spray approximately 10" from the scalp. (If you spray it closer to the head, the hair will be too wet.)
131733_S-0513Fren Sec14 12/7/04 12:43:57 PM

© 2002 Aveda Corporation 13-5
FRENCH TWIST
STYLI NG HAI R
3. Place the Pins 1. Hold the hair in position with the palm of your
subordinate hand, with your thumb placed at the center, bottom of the nape.
2. Open a bobby pin: Holding it at the bottom, use a finger at the tip to pry it open.
Note: Do not use your teeth to open bobby pins.
3. Place the flat side of the bobby pin in the hair against the scalp at the nape. Slide the bobby pin in vertically and then hold it securely with the thumb of your subordinate hand on the bottom and the index finger of the same hand on the top of the bobby pin.
4. Place the next bobby pin so its bottom crosses the tip of the previous bobby pin, and the two pins are slightly criss-crossed but nearly vertical. Hold them in place as you did the previous bobby pin.
5. Continue placing bobby pins upwards to the crown in this interlocking pattern. At the crown, place one bobby pin in the reverse (downward-facing) direction to lock the row of bobby pins in place.
6. If the hair at the nape is loose, put a bobby pin over the first one at the nape as a reinforcement.
VariationWithout interlocking the bobby pins, place a staggered row of pins up the back of the head. Start in the nape and work up to the crown.
Opening a bobby pin
Placing the first bobby pin
Placing the second bobby pin
Row of bobby pins
131733_S-0513Fren Sec15 12/7/04 12:43:58 PM
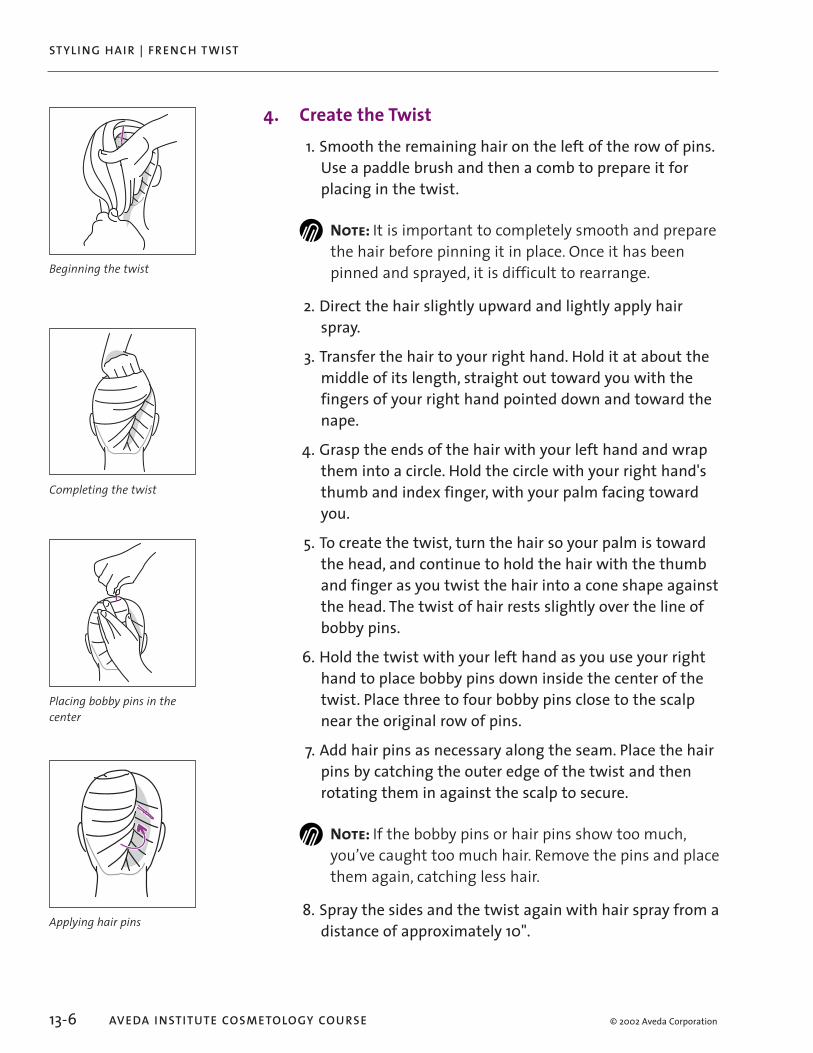
© 2002 Aveda Corporation
STYLI NG HAI R | FRENCH TWIST
13-6 AVEDA I NSTITUTE COSMETOLOGY COU RSE
4. Create the Twist 1. Smooth the remaining hair on the left of the row of pins.
Use a paddle brush and then a comb to prepare it for placing in the twist.
Note: It is important to completely smooth and prepare the hair before pinning it in place. Once it has been pinned and sprayed, it is difficult to rearrange.
2. Direct the hair slightly upward and lightly apply hair spray.
3. Transfer the hair to your right hand. Hold it at about the middle of its length, straight out toward you with the fingers of your right hand pointed down and toward the nape.
4. Grasp the ends of the hair with your left hand and wrap them into a circle. Hold the circle with your right hand's thumb and index finger, with your palm facing toward you.
5. To create the twist, turn the hair so your palm is toward the head, and continue to hold the hair with the thumb and finger as you twist the hair into a cone shape against the head. The twist of hair rests slightly over the line of bobby pins.
6. Hold the twist with your left hand as you use your right hand to place bobby pins down inside the center of the twist. Place three to four bobby pins close to the scalp near the original row of pins.
7. Add hair pins as necessary along the seam. Place the hair pins by catching the outer edge of the twist and then rotating them in against the scalp to secure.
Note: If the bobby pins or hair pins show too much, you’ve caught too much hair. Remove the pins and place them again, catching less hair.
8. Spray the sides and the twist again with hair spray from a distance of approximately 10".
Beginning the twist
Completing the twist
Placing bobby pins in the center
Applying hair pins
131733_S-0513Fren Sec16 12/7/04 12:43:58 PM

© 2002 Aveda Corporation 13-7
FRENCH TWIST
STYLI NG HAI R
5. Style the FrontStyle the front of the hair as needed to create the desired effect. For a classic pompadour look, sweep the front hair up from the ears and twist it around to fold it in to the top of the twist. Other options include creating bangs/fringe, adding a side part, or back-combing for volume.
SummaryThe French Twist is a classic style for medium to long hair. The finish you create determines whether the effect is a sleek daytime or an evening look.
Terms to Remember• French Twist
Completed French Twist
131733_S-0513Fren Sec17 12/7/04 12:43:59 PM

© 2002 Aveda Corporation 14-1STYLI NG HAI R
14. Draped Style
FinishingTouch
GainingCommitment
Preparing Yourself
and Your
StationClient
Greeting
SensoryExperience
Consultation
Scheduled Service
ContentsDraped Style Procedure
131733_S-0514Drap Sec11 12/7/04 12:44:33 PM

© 2002 Aveda Corporation 14-3
DRAPED STYLE
STYLI NG HAI R
ObjectivesAfter completing this lesson, you will be able to create a draped style.
OverviewThis is a style on which you can use your creativity to create a unique look for your clients.This draped style is a tousled, fun style that works especially well on curly hair, but can also be used on straight hair for an unstructured upswept look.To create this style, gather the crown hair into a pony tail and then gather the portions of the hair around the hairline up to form a tousled mass at the top of the crown.
PreparationFor this lesson, you will need:• Standard setup (see Module 3, Lesson 3: Preparing Your
Station)• Hair spray• Wrapped rubber band• Bobby pins• Hair pins• Blow dryer• Mannequin
131733_S-0514Drap Sec13 12/7/04 12:44:33 PM
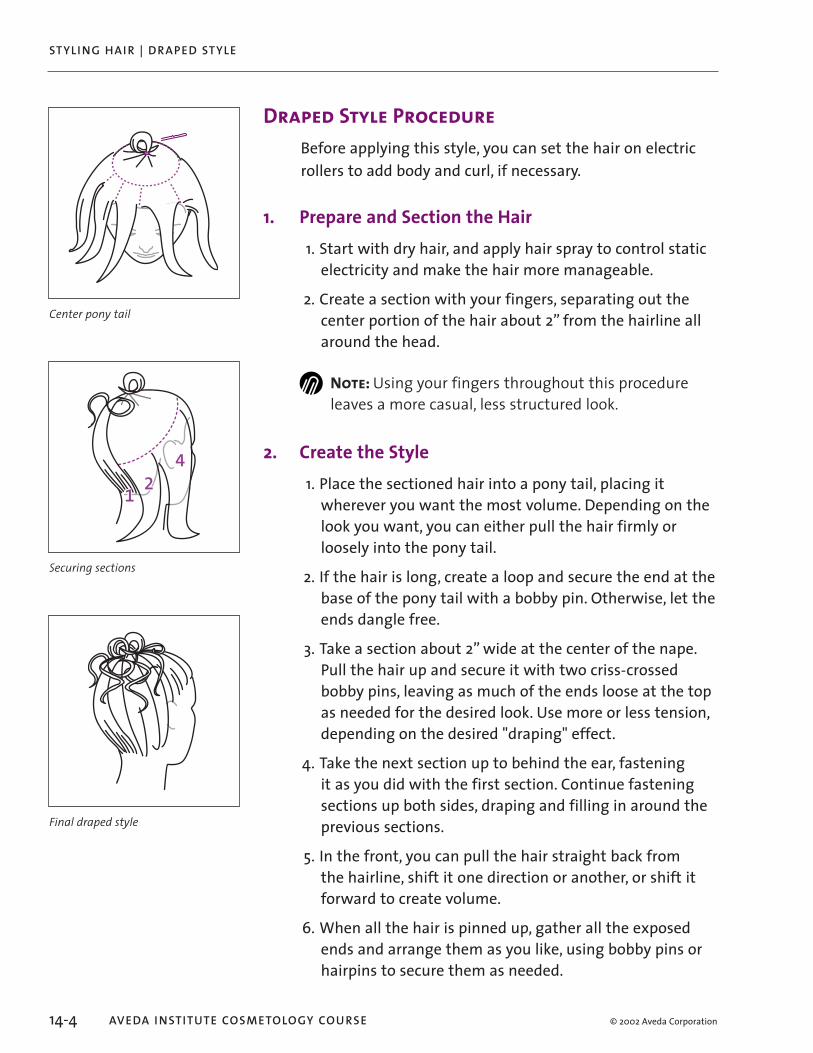
© 2002 Aveda Corporation
Center pony tail
1 25
1 24
Securing sections
Final draped style
STYLI NG HAI R | DRAPED STYLE
14-4 AVEDA I NSTITUTE COSMETOLOGY COU RSE
Draped Style ProcedureBefore applying this style, you can set the hair on electric rollers to add body and curl, if necessary.
1. Prepare and Section the Hair 1. Start with dry hair, and apply hair spray to control static
electricity and make the hair more manageable. 2. Create a section with your fingers, separating out the
center portion of the hair about 2” from the hairline all around the head.
Note: Using your fingers throughout this procedure leaves a more casual, less structured look.
2. Create the Style 1. Place the sectioned hair into a pony tail, placing it
wherever you want the most volume. Depending on the look you want, you can either pull the hair firmly or loosely into the pony tail.
2. If the hair is long, create a loop and secure the end at the base of the pony tail with a bobby pin. Otherwise, let the ends dangle free.
3. Take a section about 2” wide at the center of the nape. Pull the hair up and secure it with two criss-crossed bobby pins, leaving as much of the ends loose at the top as needed for the desired look. Use more or less tension, depending on the desired "draping" effect.
4. Take the next section up to behind the ear, fastening it as you did with the first section. Continue fastening sections up both sides, draping and filling in around the previous sections.
5. In the front, you can pull the hair straight back from the hairline, shift it one direction or another, or shift it forward to create volume.
6. When all the hair is pinned up, gather all the exposed ends and arrange them as you like, using bobby pins or hairpins to secure them as needed.
131733_S-0514Drap Sec14 12/7/04 12:44:33 PM
© 2002 Aveda Corporation 14-5
DRAPED STYLE
STYLI NG HAI R
SummaryThe draped style is a fun, informal style that can be varied for different hair textures and variations in design.
Terms to Remember• Draped style
131733_S-0514Drap Sec15 12/7/04 12:44:34 PM

© 2002 Aveda Corporation 15-1STYLI NG HAI R
15. Chignon
FinishingTouch
GainingCommitment
Preparing Yourself
and Your
StationClient
Greeting
SensoryExperience
Consultation
Scheduled Service
ContentsChignon Style Procedure
Variation: Bow Chignon
131733_S-0515Chignon Sec11 12/7/04 12:45:18 PM
© 2002 Aveda Corporation 15-3
CH IGNON
STYLI NG HAI R
ObjectivesAfter completing this lesson, you will be able to create a classic chignon and several variations.
OverviewThe chignon is a sleek, elegant design for long hair. This style creates an assertive fashion statement for bold day wear or very elegant evening designs.Important factors of the chignon include a “knot” effect and a sleek finish that conceals band fasteners and pins.For a basic chignon, the hair is made into a pony tail, secured in place, and pinned under. However, you can use variations to produce a less structured look.Before applying this style, you can set the hair on electric rollers to add body, if necessary. If the hair is curly or wavy, you can choose to smooth it by wetting it first, and then blowing it dry with a paddle brush.
PreparationFor this lesson, you will need:• Standard setup (see Module 3, Lesson 3: Preparing Your
Station)• Hair spray• Combs• Large and small wrapped rubber bands• Bobby pins• Hair pins• Styling aids• Round brushes• Blow dryer• Mannequin
131733_S-0515Chignon Sec13 12/7/04 12:45:18 PM

© 2002 Aveda Corporation
Placing pony tail
Inserting covered rubber band
STYLI NG HAI R | CH IGNON
15-4 AVEDA I NSTITUTE COSMETOLOGY COU RSE
Chignon Style Procedure
1. Prepare and Section the Hair 1 Start with dry hair, and then apply hair spray to control
static electricity and make the hair more manageable. 2. Create an ear-to-ear part in front of the ears to divide the
front of the style from the back. Clip the front section out of the way.
2. Create the Style 1. Brush the hair for a pony tail just below the occipital
bone. Before wrapping the pony tail, be sure to smooth the hair. Add product for control as needed.
2. Bind the pony tail with a covered rubber band, keeping even tension and pulling the hair close to the scalp.
3. Back comb the hair on the underside of the pony tail to create a firm cushion that will not separate. Apply hair spray to the back-combed underside of the pony tail.
4. Use a styling comb to shape the hair, with your palm on the underside to assist. Apply hair spray lightly on the top for control.
5. Hold and smooth the hair at the elevation that the hair will be placed.
6. Gently pin the pony tail up and out of the way for the moment.
7. Put two bobby pins on opposite sides of a small covered rubber band.
8. Slide one of the bobby pins into the side of the hair about 1” above the existing band, holding on to the bobby pin. Pull the band over the hair, and secure the other bobby pin in the hair on the opposite side. Both bobby pins face inward. This creates a "seam" which hides the pony tail. A hair pin may be added over the band for added hold.
Note: If the hair is less dense, you can use just bobby pins to secure the hair rather than the small covered band.
131733_S-0515Chignon Sec14 12/7/04 12:45:18 PM

© 2002 Aveda Corporation
Completed chignon without front sectioned out
Bow chignon
Securing front hair over the chignon
15-5
CH IGNON
STYLI NG HAI R
9. Release the rest of the pony tail and gently pull this hair down and gather the ends together. Pinch the ends together and make a circle. Bobby pin this curl in under the base of the pony tail.
10. To finish, pull the sides of the chignon close to the head and secure with hair pins.
3. Style the FrontStyle the front of the hair to create the style desired. You can create a part, draping the hair over the ears, or pull the hair straight back to a twist just over the top of the pony tail, and secure it there.
Variation: Bow ChignonOne of the options for finishing the chignon is a bow. Create the bow exactly the same as the classic chignon, except for the following:• Wrap the pony tail base with a small strand of hair taken
from underneath, and pin in place.• Split the pony tail in two, and rotate the strands to each
side rather than under.• Pull a piece of hair out of the top of the pony tail and
wrap it vertically between the two sides to form the middle of the bow (optional).
• Pin the middle and each half of the bow with bobby pins to secure the style.
131733_S-0515Chignon Sec15 12/7/04 12:45:19 PM

© 2002 Aveda Corporation
STYLI NG HAI R | CH IGNON
15-6 AVEDA I NSTITUTE COSMETOLOGY COU RSE
SummaryThe chignon adds an elegant fashion statement to your styling vocabulary. This is a versatile design that is adaptable to many age groups.
Terms to Remember• Bow Chignon• Chignon
131733_S-0515Chignon Sec16 12/7/04 12:45:19 PM

© 2002 Aveda Corporation 16-1STYLI NG HAI R
16. Braids and Hair Extensions
FinishingTouch
GainingCommitment
Preparing Yourself
and Your
StationClient
Greeting
SensoryExperience
Consultation
Scheduled Service
ContentsFrench Braid
Corn Rows
Fishtail: Two-Strand Braid
Braids with Hair Extensions
131733_S-0516Brai Sec11 12/7/04 12:42:35 PM

© 2002 Aveda Corporation 16-3
BRAI DS AN D HAI R EXTENSIONS
STYLI NG HAI R
ObjectivesAfter completing this lesson, you will be able to perform:• French braids• Corn rows (inverted French braids in narrow sections)• Fishtail braids (two-strand braids)• Braids with hair extensions
OverviewThis lesson covers the following types of braids:• French Braid: Three strands worked together with
unexposed knotting. A French braid lies on the scalp.• Corn Rows: Inverted French braids created in narrow
sections that sit up from the scalp.• Fishtails: Two-strand braids made by working strands
over and into the center.• Braids with Hair Extensions: Braids that incorporate
additional natural or synthetic hair.
PreparationFor this lesson, you will need:• Standard setup (see Module 3, Lesson 3: Preparing Your
Station)• Styling aid• Pomade• Combs• Covered rubber bands• Mannequin with long hair• Synthetic braiding hair
131733_S-0516Brai Sec13 12/7/04 12:42:35 PM

© 2002 Aveda Corporation
SubsectionSectionPanel
Vertical panels and sections
Sections
STYLI NG HAI R | BRAI DS AN D HAI R EXTENSIONS
16-4 AVEDA I NSTITUTE COSMETOLOGY COU RSE
French BraidThe French braid is a versatile way to keep long hair arranged and in place. Once you have learned this technique, you will have a good foundation for learning the other braids in this lesson.If necessary, you can use styling lotion or pomade to prepare the hair.
1. Create Sections and SubsectionsCreate a vertical panel. There will be 3 subsections across the front hairline, and 2 subsections in the rest of the sections.
2. Create the Braid FoundationAs you braid the hair, follow these general guidelines:• Switch the hair from hand to hand: when you add on the
left, hold the strands in your right hand, and vice versa.• Keep your hand close to the head shape.• Keep the tension consistent.• Follow the head shape.
1. Divide the first subsection of hair into three parts, placing your index and middle finger between the sections.
2. Bring the left side over the center strand and into the center.
3. Bring the right strand over the new center strand and into the center.
4. Once you have completed the first subsection, begin the second. Pull the hair from the next subsection on the left to the left strand, and bring the larger strand over and into the center.
5. Continue braiding in this fashion until you reach the back hairline.
131733_S-0516Brai Sec14 12/7/04 12:42:36 PM
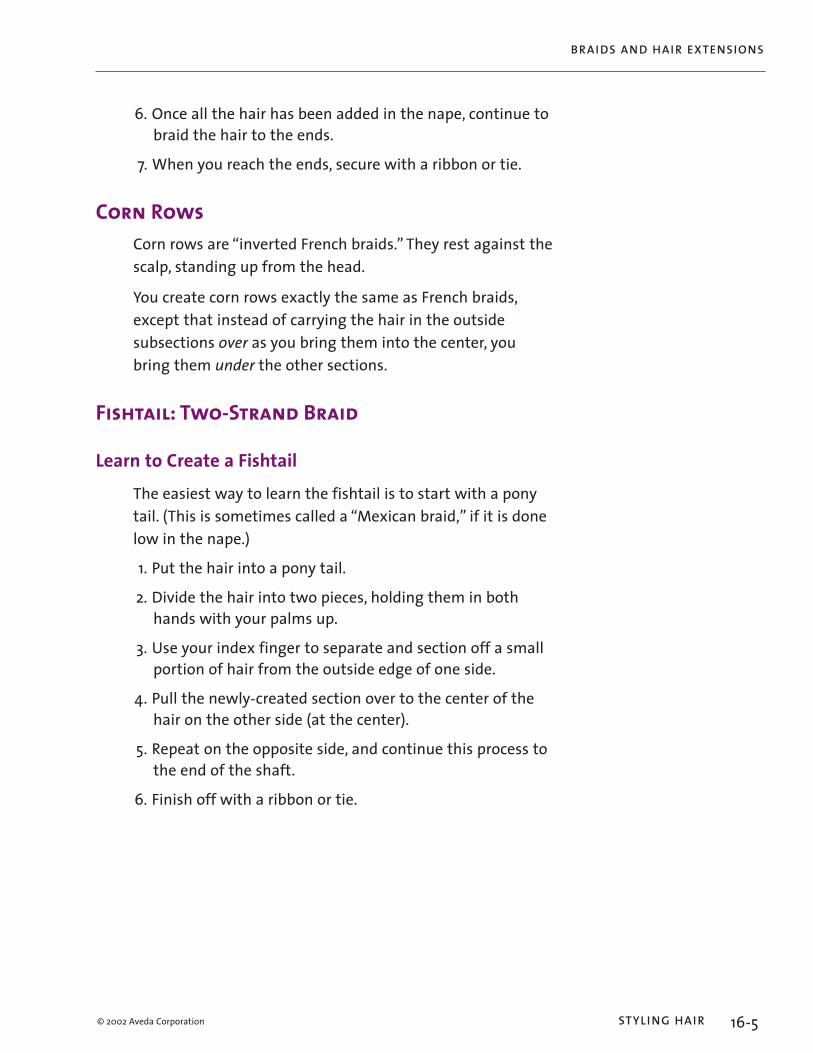
© 2002 Aveda Corporation 16-5
BRAI DS AN D HAI R EXTENSIONS
STYLI NG HAI R
6. Once all the hair has been added in the nape, continue to braid the hair to the ends.
7. When you reach the ends, secure with a ribbon or tie.
Corn RowsCorn rows are “inverted French braids.” They rest against the scalp, standing up from the head.You create corn rows exactly the same as French braids, except that instead of carrying the hair in the outside subsections over as you bring them into the center, you bring them under the other sections.
Fishtail: Two-Strand Braid
Learn to Create a FishtailThe easiest way to learn the fishtail is to start with a pony tail. (This is sometimes called a “Mexican braid,” if it is done low in the nape.)
1. Put the hair into a pony tail. 2. Divide the hair into two pieces, holding them in both
hands with your palms up. 3. Use your index finger to separate and section off a small
portion of hair from the outside edge of one side. 4. Pull the newly-created section over to the center of the
hair on the other side (at the center). 5. Repeat on the opposite side, and continue this process to
the end of the shaft. 6. Finish off with a ribbon or tie.
131733_S-0516Brai Sec15 12/7/04 12:42:36 PM

© 2002 Aveda Corporation
Triangle section for fishtail
Fishtail sections
STYLI NG HAI R | BRAI DS AN D HAI R EXTENSIONS
16-6 AVEDA I NSTITUTE COSMETOLOGY COU RSE
Create a Fishtail at the Hairline
Once you have learned how to do a basic fishtail, you are ready to start the braid at the top of the head.
1. Begin with a triangle section at the front hairline. Cross half the section’s hair over the rest.
2. Continue the braid as described earlier, always adding new hair from parallel sections on alternate sides. Create an ever-enlarging triangle by grasping strands on one side, and then the other.
131733_S-0516Brai Sec16 12/7/04 12:42:36 PM
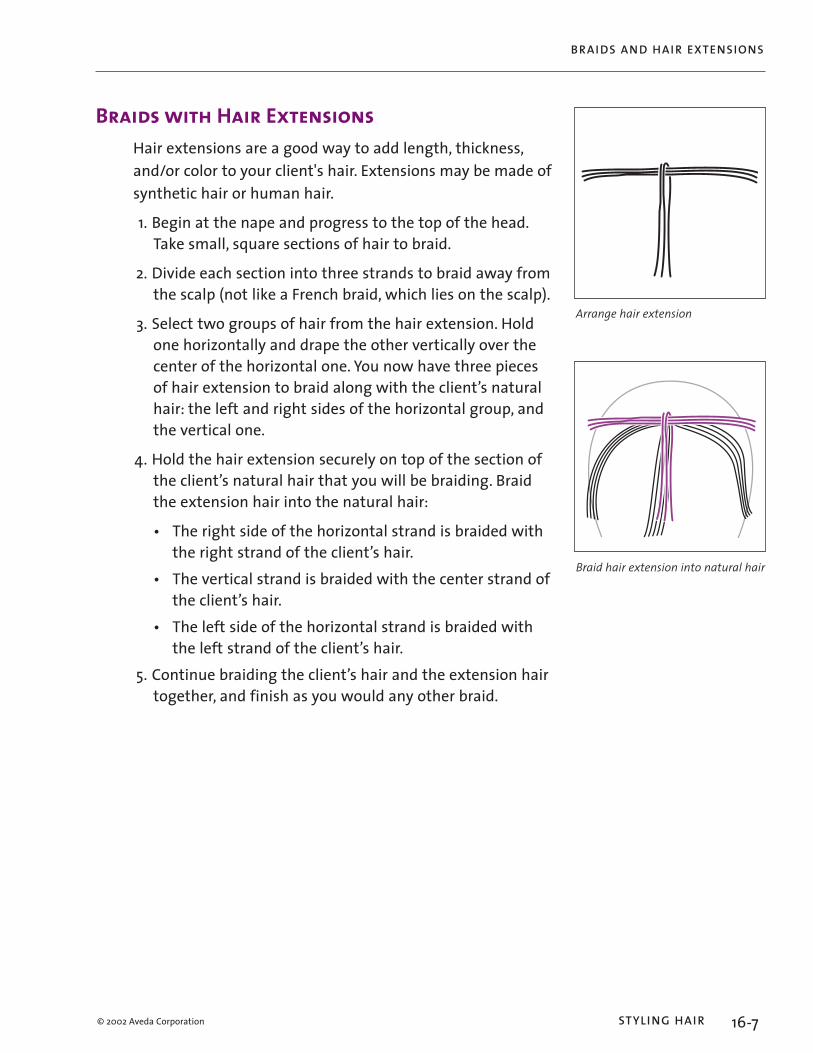
© 2002 Aveda Corporation
Arrange hair extension
Braid hair extension into natural hair
16-7
BRAI DS AN D HAI R EXTENSIONS
STYLI NG HAI R
Braids with Hair ExtensionsHair extensions are a good way to add length, thickness, and/or color to your client's hair. Extensions may be made of synthetic hair or human hair.
1. Begin at the nape and progress to the top of the head. Take small, square sections of hair to braid.
2. Divide each section into three strands to braid away from the scalp (not like a French braid, which lies on the scalp).
3. Select two groups of hair from the hair extension. Hold one horizontally and drape the other vertically over the center of the horizontal one. You now have three pieces of hair extension to braid along with the client’s natural hair: the left and right sides of the horizontal group, and the vertical one.
4. Hold the hair extension securely on top of the section of the client’s natural hair that you will be braiding. Braid the extension hair into the natural hair:• The right side of the horizontal strand is braided with
the right strand of the client’s hair.• The vertical strand is braided with the center strand of
the client’s hair.• The left side of the horizontal strand is braided with
the left strand of the client’s hair. 5. Continue braiding the client’s hair and the extension hair
together, and finish as you would any other braid.
131733_S-0516Brai Sec17 12/7/04 12:42:36 PM
© 2002 Aveda Corporation
STYLI NG HAI R | BRAI DS AN D HAI R EXTENSIONS
16-8 AVEDA I NSTITUTE COSMETOLOGY COU RSE
Hair Extension VariationsPinch braid
A pinch braid is created when you braid an extension into natural hair, but braid only the hair near the scalp. If the client has straight hair, you will probably need to tie or knot the hair extension near the scalp to secure it; highly textured hair may hold well to human hair extensions without fastening. Synthetic straight hair will nearly always need to be tied with thread or fastened.
Full braidIf braided to the ends, a synthetic hair extension can be melted with a lighter to secure the end.
SummaryThese braids are dexterity builders and valuable long hair design assets. They are quick, feminine, attractive styles for long hair.
Terms to Remember• Corn rows• Fishtail• French braid• Hair extension• Pinch braid
131733_S-0516Brai Sec18 12/7/04 12:42:36 PM
