covina super 24 - the incubator shop
TRANSCRIPT
COVINA SUPER 24
Libretto di uso e manutenzione / Manuale informativo per l’incubazione artificiale di uova Notice d’emploi et entretien / Manuel informatif pour l’incubation artificielle d’œufs
Use and maintenance manual / User information manual for artificial incubation of eggs
RIVER SYSTEMS SRL Via Marco Polo, 33 - 35011 Campodarsego (Padova) Italy
Tel. +39-024-9202464 - Fax: +39-024-9216057 - e-mail: [email protected]
Art. 524 Incubatrice semi automatica
Couveuse semi-automatique Semi-automatic incubator
Art. 524/A Incubatrice automatica
Couveuse automatique Automatic incubator
1
INDEX ITALIANO 1 INTRODUZIONE .............................................................................................................................................................................. 5 2 CARATTERISTICHE E DATI TECNICI ......................................................................................................................................... 5 3 SELEZIONE E CONSERVAZIONE DELLE UOVA PER L’INCUBAZIONE ......................................................................... 5 4 PREPARAZIONE E MESSA IN FUNZIONE DELL’INCUBATRICE ...................................................................................... 6 4A IMPOSTAZIONE E REGOLAZIONE DELLA TEMPERATURA .................................................................................... 8 4B INCUBAZIONE DELLE UOVA DI PALMIPEDI (OCA, ANATRA, ECC.) .................................................................. 9 4C INFORMAZIONI PER UNA CORRETTA INCUBAZIONE ........................................................................................... 9 5 CONTROLLO PERIODICO DELLE UOVA DURANTE L’INCUBAZIONE (SPERATURA) ......................................... 10 6 SCHIUSA E NASCITA DEL PULCINO ..................................................................................................................................... 11 7 PRIMI GIORNI DI VITA ............................................................................................................................................................... 12 7A BENEFICI DELLA LAMPADA A RAGGI INFRAROSSI .............................................................................................. 12 7B NUTRIZIONE ........................................................................................................................................................................ 12 8 PROBLEMI CHE SI POSSONO VERIFICARE DURANTE L’INCUBAZIONE ................................................................. 13 9 PULIZIA E STOCCAGGIO DELL’INCUBATRICE A FINE CICLO ...................................................................................... 13 10 AVVERTENZE / SUGGERIMENTI ............................................................................................................................................. 14 11 CONFORMITA’ DELL’APPARECCHIO .................................................................................................................................... 14 12 GARANZIA ...................................................................................................................................................................................... 14 - RICAMBI ................................................................................................................................................................................... 35-36 - LE UOVA .......................................................................................................................................................................................... 37 - SCELTA DELLE UOVA ................................................................................................................................................................. 38 FRANÇAIS 1 INTRODUCTION ........................................................................................................................................................................... 15 2 CARACTERISTIQUES ET DONNEES TECHNIQUES ........................................................................................................... 15 3 SELECTION ET CONSERVATION DES ŒUFS POUR L’INCUBATION ........................................................................ 15 4 PREPARATION ET MISE EN MARCHE DE LA COUVEUSE ............................................................................................. 16 4A REGLAGE DE LA TEMPERATURE ................................................................................................................................... 18 4B INCUBATION D’ŒUFS DE PALMIPEDES (OIE, CANARD, ETC.) ......................................................................... 19 4C INFORMATIONS POUR UNE CORRECTE INCUBATION ...................................................................................... 19 5 CONTROLE PERIODIQUE DES ŒUFS PENDANT L’INCUBATION (MIRAGE) ........................................................ 20 6 ECLOSION ET NAISSANCE DU POUSSIN ........................................................................................................................... 21 7 PREMIERS JOURS DE VIE .......................................................................................................................................................... 22 7A AVANTAGES DE LA LAMPE A RAYONS INFRAROUGES ..................................................................................... 22 7B NUTRITION .......................................................................................................................................................................... 22 8 PROBLEMES QU’ON PEUT RENCONTRER PENDANT L’INCUBATION .................................................................... 23 9 MANUTENTION ET STOCKAGE DE LA COUVEUSE A LA FIN DU CYCLE ................................................................ 23 10 INSTRUCTIONS / CONSEILS .................................................................................................................................................... 24 11 CONFORMITE DE L’APPAREIL ................................................................................................................................................. 24 12 GARANTIE....................................................................................................................................................................................... 24 - PIECES DETACHEES ............................................................................................................................................................. 35-36 - LES ŒUFS ....................................................................................................................................................................................... 37 - SELECTION DES OEUFS ............................................................................................................................................................. 38
2
INDEX ENGLISH 1 INTRODUCTION ........................................................................................................................................................................... 25 2 TECHNICAL SPECIFICATIONS AND DATA ......................................................................................................................... 25 3 EGG SELECTION AND STORAGE FOR INCUBATION ..................................................................................................... 25 4 PREPARATION AND START-UP OF THE INCUBATOR ................................................................................................... 26 4A TEMPERATURE SETTING AND ADJUSTMENT ......................................................................................................... 28 4B INCUBATION OF PALMIPEDS-EGGS (GOOSE, DUCK, ETC.) .............................................................................. 29 4C INFORMATION FOR A CORRECT INCUBATION .................................................................................................... 29 5 PERIODIC CHECK OF EGGS DURING INCUBATION (CANDLING) ............................................................................ 30 6 HATCHING AND BIRTH OF THE CHICK .............................................................................................................................. 31 7 FIRST DAYS OF LIFE .................................................................................................................................................................... 32 7A BENEFITS OF THE INFRARED HEAT LAMP ............................................................................................................... 32 7B NUTRITION .......................................................................................................................................................................... 32 8 PROBLEMS THAT MAY ARISE DURING INCUBATION ................................................................................................... 33 9 MAINTNANCE AND STORAGE OF THE INCUBATOR AT THE END OF THE CYCLE ............................................ 33 10 WARNINGS / ADVICES .............................................................................................................................................................. 34 11 CONFORMITY OF THE APPLIANCE ....................................................................................................................................... 34 12 GUARANTEE .................................................................................................................................................................................. 34 - SPARE PARTS ......................................................................................................................................................................... 35-36 - THE EGGS ....................................................................................................................................................................................... 37 - EGG SELECTION ........................................................................................................................................................................... 38
Version 1.0 – 11.07.2012
3
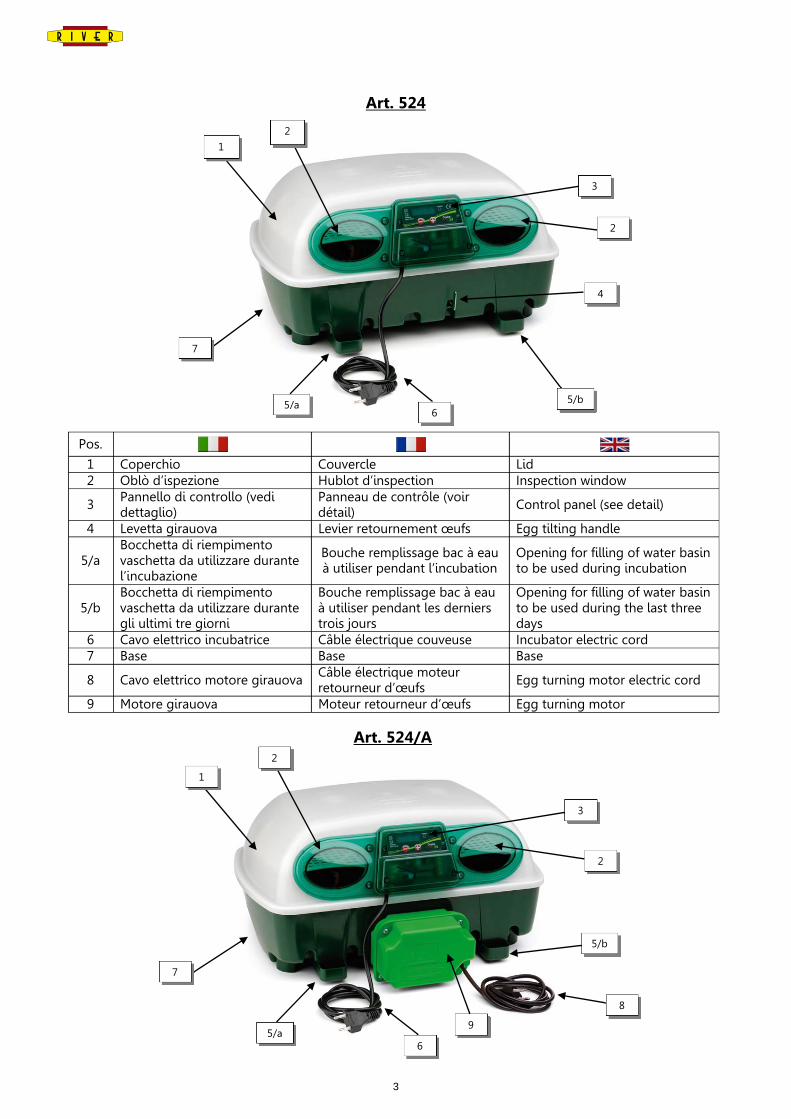
Art. 524
2
Pos. 1 Coperchio Couvercle Lid 2 Oblò d’ispezione Hublot d’inspection Inspection window
3 Pannello di controllo (vedi dettaglio)
Panneau de contrôle (voir détail)
Control panel (see detail)
4 Levetta girauova Levier retournement œufs Egg tilting handle
5/a Bocchetta di riempimento vaschetta da utilizzare durante l’incubazione
Bouche remplissage bac à eau à utiliser pendant l’incubation
Opening for filling of water basin to be used during incubation
5/b Bocchetta di riempimento vaschetta da utilizzare durante gli ultimi tre giorni
Bouche remplissage bac à eau à utiliser pendant les derniers trois jours
Opening for filling of water basin to be used during the last three days
6 Cavo elettrico incubatrice Câble électrique couveuse Incubator electric cord 7 Base Base Base
8 Cavo elettrico motore girauova Câble électrique moteur retourneur d’œufs Egg turning motor electric cord
9 Motore girauova Moteur retourneur d’œufs Egg turning motor
1
3
2
4
5/b6
7
5/a
1
2
3
2
6
7
5/a
5/b
8
9
Art. 524/A
4
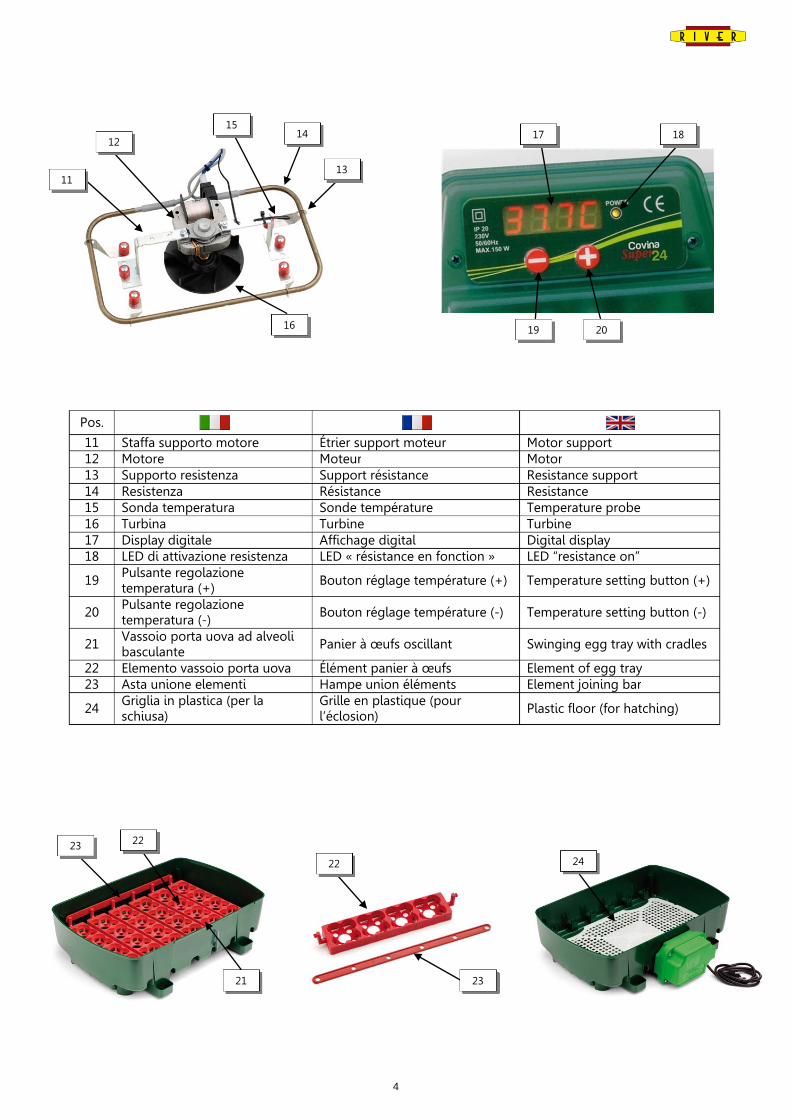
Pos. 11 Staffa supporto motore Étrier support moteur Motor support 12 Motore Moteur Motor 13 Supporto resistenza Support résistance Resistance support 14 Resistenza Résistance Resistance 15 Sonda temperatura Sonde température Temperature probe 16 Turbina Turbine Turbine 17 Display digitale Affichage digital Digital display 18 LED di attivazione resistenza LED « résistance en fonction » LED “resistance on”
19 Pulsante regolazione temperatura (+)
Bouton réglage température (+) Temperature setting button (+)
20 Pulsante regolazione temperatura (-)
Bouton réglage température (-) Temperature setting button (-)
21 Vassoio porta uova ad alveoli basculante
Panier à œufs oscillant Swinging egg tray with cradles
22 Elemento vassoio porta uova Élément panier à œufs Element of egg tray 23 Asta unione elementi Hampe union éléments Element joining bar
24 Griglia in plastica (per la schiusa)
Grille en plastique (pour l’éclosion) Plastic floor (for hatching)
11
1214
13
15
16
17 18
19 20
23
23
22
22
21
24
5
ITALIANO 1 – INTRODUZIONE
L’incubatrice COVINA SUPER 24 è progettata per far nascere pulcini di gallina, fagiano, faraona, quaglia, starna, pernice, tacchino, palmipedi (oca, anatra comune, anatra selvatica, anatra muta, anatra germanata, ecc.), pavone, coturnice, piccione, colino, uccelli esotici e rapaci. L’art. 524 è dotato di un sistema semiautomatico per girare le uova azionato dall’esterno grazie ad una levetta collegata al vassoio portauova ad alveoli posto nella base dell’incubatrice. E’ eventualmente possibile aggiungere in un secondo tempo il motore (art. 556M-1) per far oscillare automaticamente il vassoio portauova. Istruzioni di montaggio fornite col motore. L’art. 524/A è completo di motore per l’oscillazione automatica del vassoio porta uova ad alveoli .
Il calore necessario per l’incubazione viene generato da una resistenza elettrica in acciaio di alta qualità comandata da un affidabile termostato elettronico di precisione che permette di regolare la temperatura all’interno (da 30°C a 40°C) e mantenerla costante e precisa. La temperatura viene impostata premendo i tasti (+) e (-) sul pannello di controllo.
Una ventola a turbina distribuisce in maniera uniforme l’aria calda e umida all’interno dell’incubatrice.
L’umidificazione naturale “a superficie” viene garantita dalle vaschette prestampate sul fondo dell’incubatrice che vengono riempite dall’esterno attraverso le due bocchette poste sui piedini anteriori della macchina, un pratico sistema per non dover più aprire l’incubatrice e dissipare così calore e umidità.
2 – CARATTERISTICHE E DATI TECNICI
Modello incubatrice Covina Super 24 (art. 524) – semiautomatica Covina Super 24 (art. 524/A) – automatica
Tipo di uova da incubare Gallina, fagiano, faraona, quaglia, starna, pernice, tacchino palmipedi (oca, anatra comune, anatra selvatica, anatra muta, anatra germanata, ecc.), pavone, coturnice, piccione, colino, uccelli esotici e rapaci
Tensione nominale Monofase, 230 Volt CE Frequenza nominale 50/60 Hz CE Potenza massima 90 W Consumo medio giornaliero Max. 1 kW/24 ore Display Controllo digitale della temperatura con punto decimale Ventilazione A turbina Termostato Elettronico di precisione +/-0,1°C
Umidità nell’incubatrice 45-55% con acqua in una vaschetta 60-65% con acqua in entrambe le vaschette
Numero di inclinazioni nelle 24 ore
Art. 524: con uova poste nel vassoio portauova ad alveoli: minimo 4 volte Art. 524/A: un’inclinazione ogni due ore
Capacità dell’incubatrice 24 uova di medie/grandi dimensioni oppure 96 uova di piccole dimensioni (es. quaglia) poste nel vassoio portauova ad alveoli
Dimensioni Art. 524: 500x340x255 mm Art. 524/A: 500x380x255 mm
Peso Art. 524: 3,37 Kg Art. 524/A: 3,85 Kg
3 – SELEZIONE E CONSERVAZIONE DELLE UOVA DA INCUBARE
E’ consigliabile incubare uova provenienti dalla propria fattoria. Uova trasportate avranno una percentuale di schiusa inferiore al 50% a causa dello stress di viaggio, vibrazioni, sbalzi di temperatura ed embrioni asfissiati (l’imballo non permette alle uova di respirare). Se comunque si devono usare uova che abbiano viaggiato, prima di incubarle lasciarle riposare per almeno 24 ore, con la punta rivolta verso il basso, in un vassoio portauova.
Scegliere uova provenienti da riproduttori che siano ben sviluppati, ben nutriti e sani.
I riproduttori non devono essere consanguinei (i maschi devono arrivare da un altro allevamento), altrimenti darebbero origine a uova con embrioni deboli destinati a morire in fase di schiusa (il pulcino si sviluppa, ma rimane imprigionato dentro l’uovo in quanto troppo debole per poter rompere il guscio ed uscire).
6
Fare attenzione che i riproduttori siano sessualmente maturi e che vengano rispettate le giuste proporzioni tra maschi e femmine, facendo riferimento alla seguente tabella:
PROPORZIONE TRA MATURITA’ SESSUALE Soggetto Maschio e Femmina Maschio Femmina Gallina 1 6 6/8 mesi 6/8 mesi Fagiana 1 4 6/7 mesi 6/7 mesi Anatra 1 4 8 mesi 4 mesi Oca 1 4 8 mesi 7 mesi Faraona 1 2 8/10 mesi 8/10 mesi Pernice 1 1 10/12 mesi 10/12 mesi Quaglia 1 3 60 giorni 50 giorni Tacchina 1 8 7 mesi 7 mesi
Ricordare che i riproduttori perdono la loro fertilità dopo i 3 anni di età.
L’embrione inizia il suo sviluppo prima dell’incubazione e, di conseguenza, ha bisogno di una cura corretta, altrimenti si avrà una diminuzione delle percentuali di schiusa. Le regole sottostanti aiuteranno ad ottenere uova idonee per l’incubazione: 1. Raccogliere le uova almeno 3-4 volte al giorno. In estate raccoglietele almeno 5 volte al giorno. Non incubare mai
uova che siano state ad una temperatura superiore a +26°C o inferiore a +5°C (oltre questi valori l’embrione muore). Non conservare mai le uova in frigorifero.
2. Non incubare uova sporche: a causa delle temperature d’incubazione e umidità, il materiale organico (feci, sangue, terra, ecc.) contaminerebbe l’embrione causando infezioni e, di conseguenza, la morte del pulcino durante la schiusa.
Mai lavare le uova. Al massimo spazzolarle delicatamente con una spugnetta abrasiva asciutta. 3. Conservare le uova in un locale fresco con una temperatura tra +14°C e +18°C ed un’umidità di circa 65-75%. Si raccomanda di tenere le uova nel vassoio porta uova con la punta rivolta verso il basso. 4. Le uova sono adatte all’incubazione dal secondo al sesto/settimo giorno dalla deposizione. Incubare uova più
vecchie di 8 giorni abbassa di molto la percentuale di nascite, riducendola a quasi zero in caso di uova conservate per più di 15 giorni.
5. Scegliere uova di forma normale (non devono essere allungate, sferiche, ondulate, o con qualsiasi altra malformazione).
6. Il guscio dell’uovo non deve essere crepato, rotto, rugoso, molle, sottile o con punti bluastri (uova vecchie). 7. Permettere alle uova fredde (dalla temperatura di conservazione) di raggiungere lentamente la temperatura della
stanza prima di metterle nell’incubatrice. Il passaggio brusco da +12°C a +38°C provocherebbe della condensa sul guscio che sarebbe causa di una riduzione nelle nascite.
8. Evitare di incubare uova di diverse specie. Non inserire uova in un secondo tempo.
4 - PREPARAZIONE E MESSA IN FUNZIONE DELL’INCUBATRICE
Per il successo delle schiuse è importante scegliere una collocazione adatta per l’incubatrice. Il locale dove posizionare la macchina deve avere una temperatura compresa tra +20°C e +25°C, essere privo di correnti d’aria, pulito (es. non una stalla o un garage), ben aerato e confortevole. Assicurarsi che la macchina non venga esposta ai raggi diretti del sole o collocata vicino a fonti di calore, come termosifoni, stufe, ecc. L’umidità relativa deve essere tra 50% e 75%.
NON UTILIZZARE L’INCUBATRICE IN LOCALI IN CUI LA TEMPERATURA E INFERIORE A +20°C O SUPERIORE A +25°C. Si consiglia pertanto di tenerla in casa.
Non usare o conservare l’incubatrice in locali dove siano presenti sostanze chimiche, velenose, tossiche o infiammabili, anche in piccole concentrazioni, poiché hanno un’influenza negativa sullo sviluppo degli embrioni.
Non utilizzare l’incubatrice dove ci sia il pericolo di spruzzi d’acqua o altre sostanze. Procedere come segue:
A) Posizionare l’incubatrice sopra un tavolo piano e in legno. Il fondo deve appoggiare direttamente sul piano del tavolo per evitare che qualsiasi oggetto (una coperta, una tovaglia, ecc.) possa ostruire i fori di aerazione.
B) Togliere il coperchio e appoggiarlo a fianco dell’incubatrice con la griglia rivolta verso il basso.
7
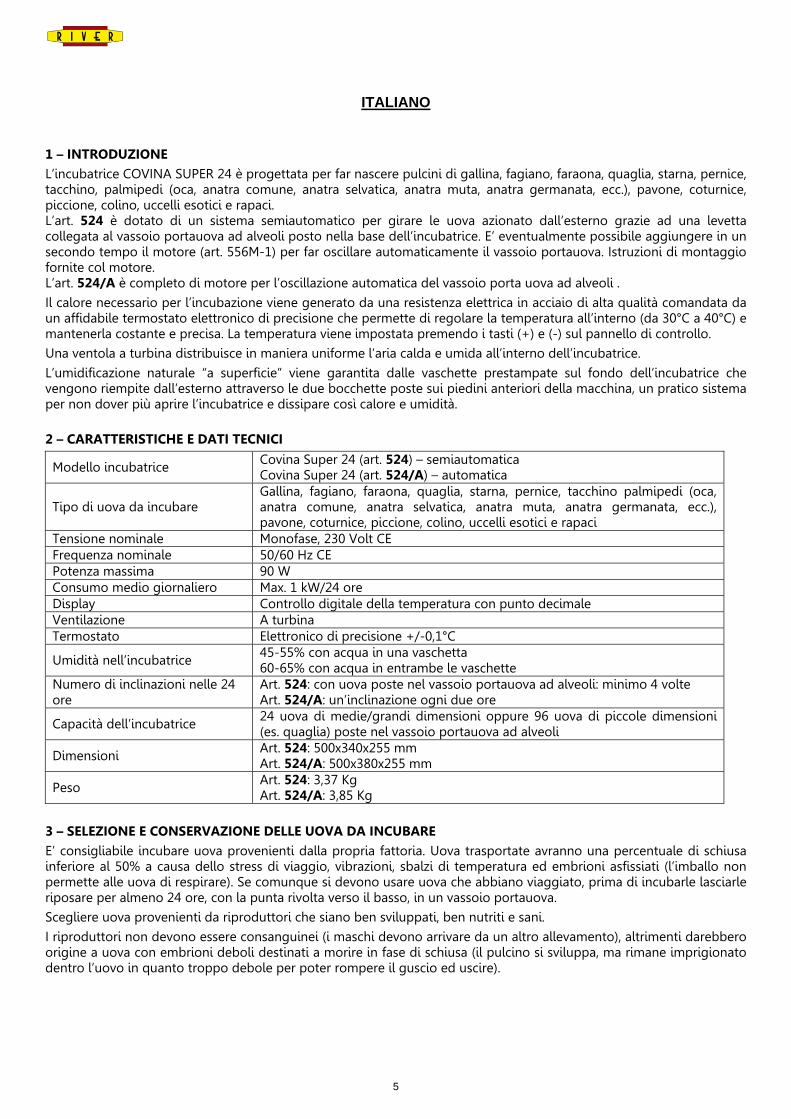
C) Togliere la griglia dalla base dell’incubatrice: essa è necessaria solo per la schiusa (ultimi 3 giorni). MAI LASCIARLA NELL’INCUBATRICE DURANTE IL PERIODO DI INCUBAZIONE!
NB: lasciare la griglia appoggiata in un luogo piano perché non si deformi.
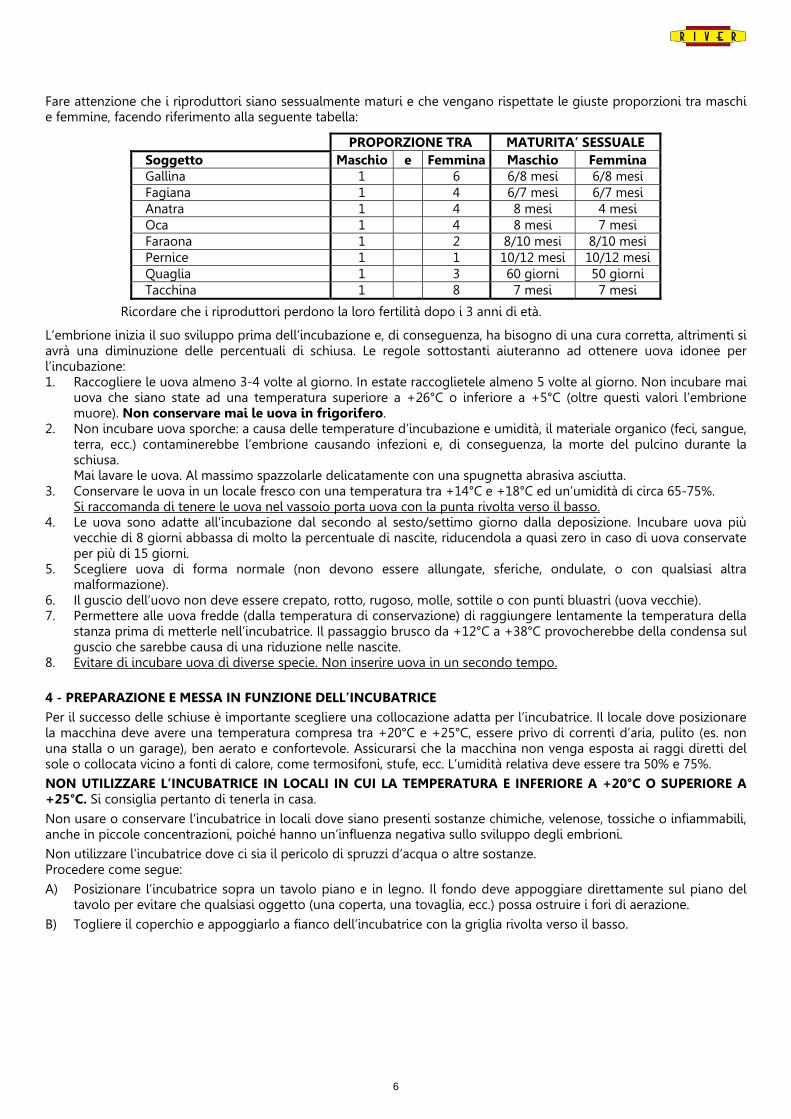
D) Controllare che il vassoio portauova ad alveoli sia posizionato correttamente nelle sue sedi e che le file di alveoli si inclinino liberamente nei due sensi.
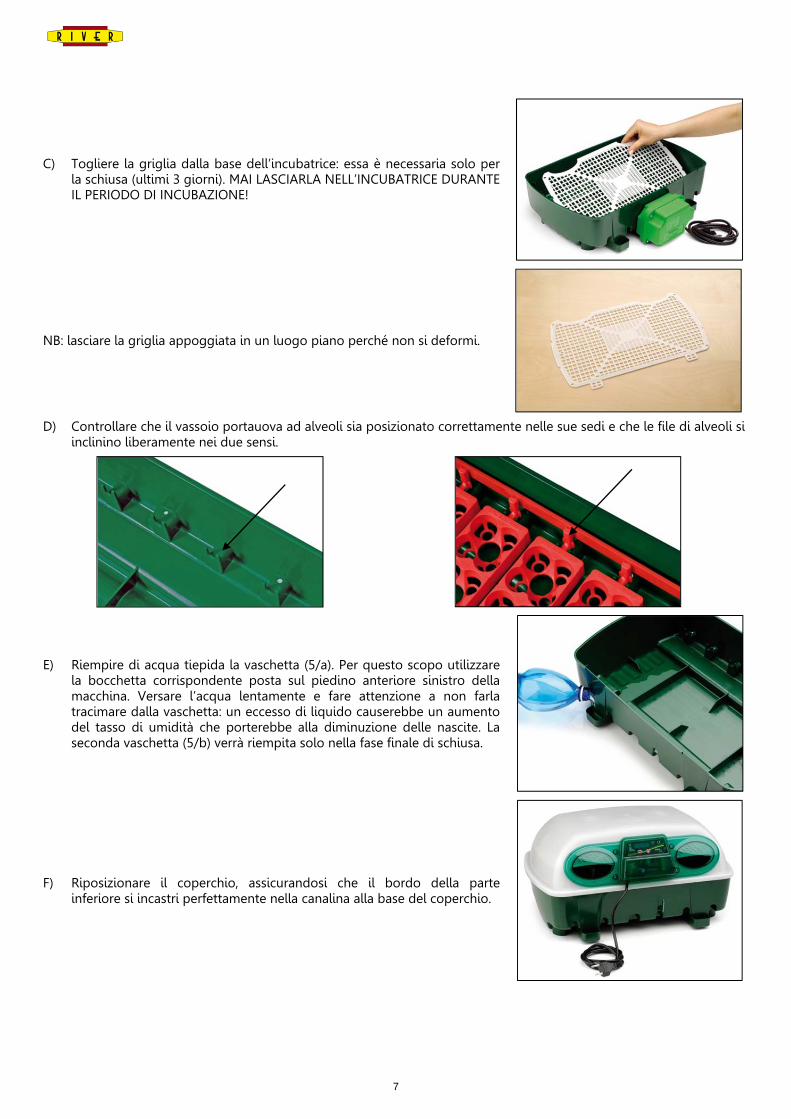
E) Riempire di acqua tiepida la vaschetta (5/a). Per questo scopo utilizzare la bocchetta corrispondente posta sul piedino anteriore sinistro della macchina. Versare l’acqua lentamente e fare attenzione a non farla tracimare dalla vaschetta: un eccesso di liquido causerebbe un aumento del tasso di umidità che porterebbe alla diminuzione delle nascite. La seconda vaschetta (5/b) verrà riempita solo nella fase finale di schiusa.
F) Riposizionare il coperchio, assicurandosi che il bordo della parte inferiore si incastri perfettamente nella canalina alla base del coperchio.
8
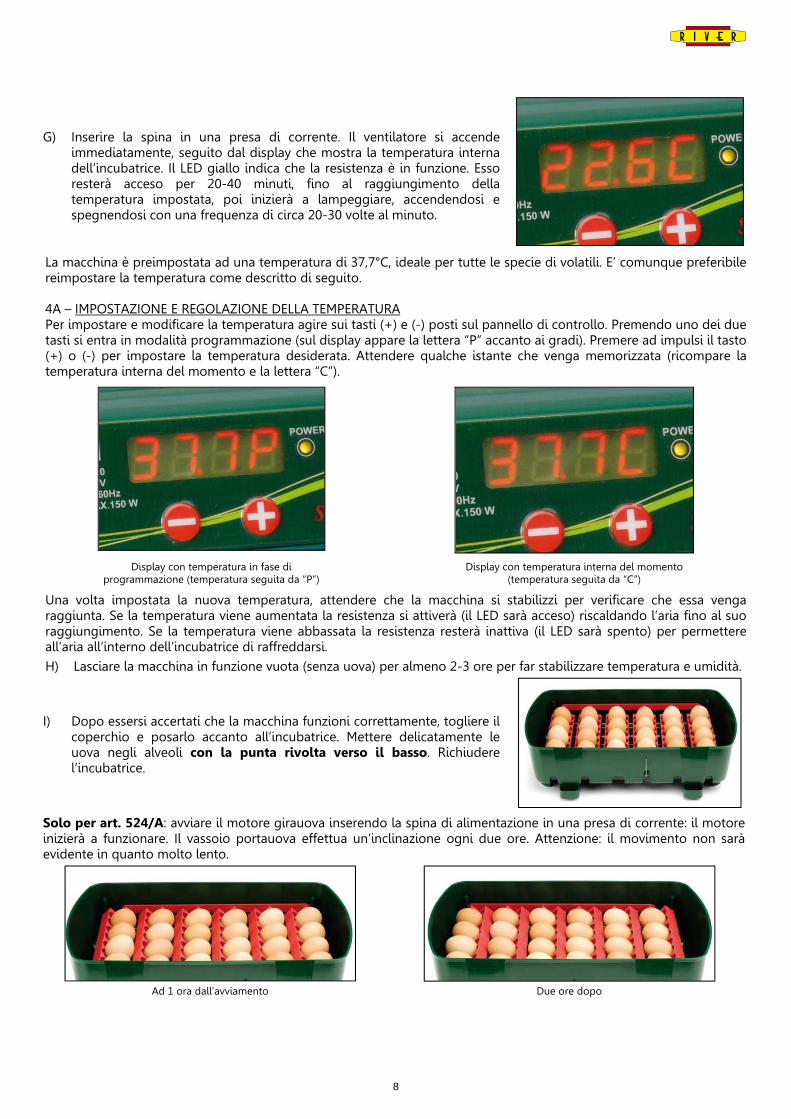
G) Inserire la spina in una presa di corrente. Il ventilatore si accende immediatamente, seguito dal display che mostra la temperatura interna dell’incubatrice. Il LED giallo indica che la resistenza è in funzione. Esso resterà acceso per 20-40 minuti, fino al raggiungimento della temperatura impostata, poi inizierà a lampeggiare, accendendosi e spegnendosi con una frequenza di circa 20-30 volte al minuto.
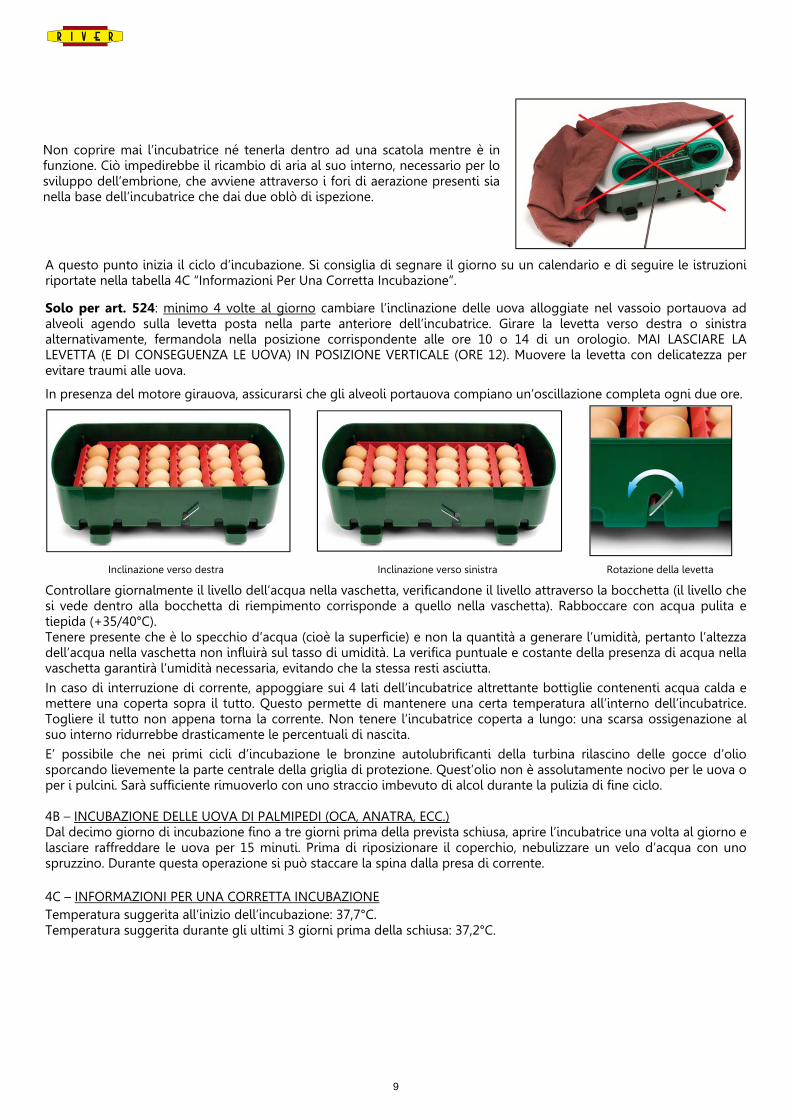
La macchina è preimpostata ad una temperatura di 37,7°C, ideale per tutte le specie di volatili. E’ comunque preferibile reimpostare la temperatura come descritto di seguito. 4A – IMPOSTAZIONE E REGOLAZIONE DELLA TEMPERATURA Per impostare e modificare la temperatura agire sui tasti (+) e (-) posti sul pannello di controllo. Premendo uno dei due tasti si entra in modalità programmazione (sul display appare la lettera “P” accanto ai gradi). Premere ad impulsi il tasto (+) o (-) per impostare la temperatura desiderata. Attendere qualche istante che venga memorizzata (ricompare la temperatura interna del momento e la lettera “C”).
Display con temperatura in fase di
programmazione (temperatura seguita da “P”) Display con temperatura interna del momento
(temperatura seguita da “C”)
Una volta impostata la nuova temperatura, attendere che la macchina si stabilizzi per verificare che essa venga raggiunta. Se la temperatura viene aumentata la resistenza si attiverà (il LED sarà acceso) riscaldando l’aria fino al suo raggiungimento. Se la temperatura viene abbassata la resistenza resterà inattiva (il LED sarà spento) per permettere all’aria all’interno dell’incubatrice di raffreddarsi.
H) Lasciare la macchina in funzione vuota (senza uova) per almeno 2-3 ore per far stabilizzare temperatura e umidità.
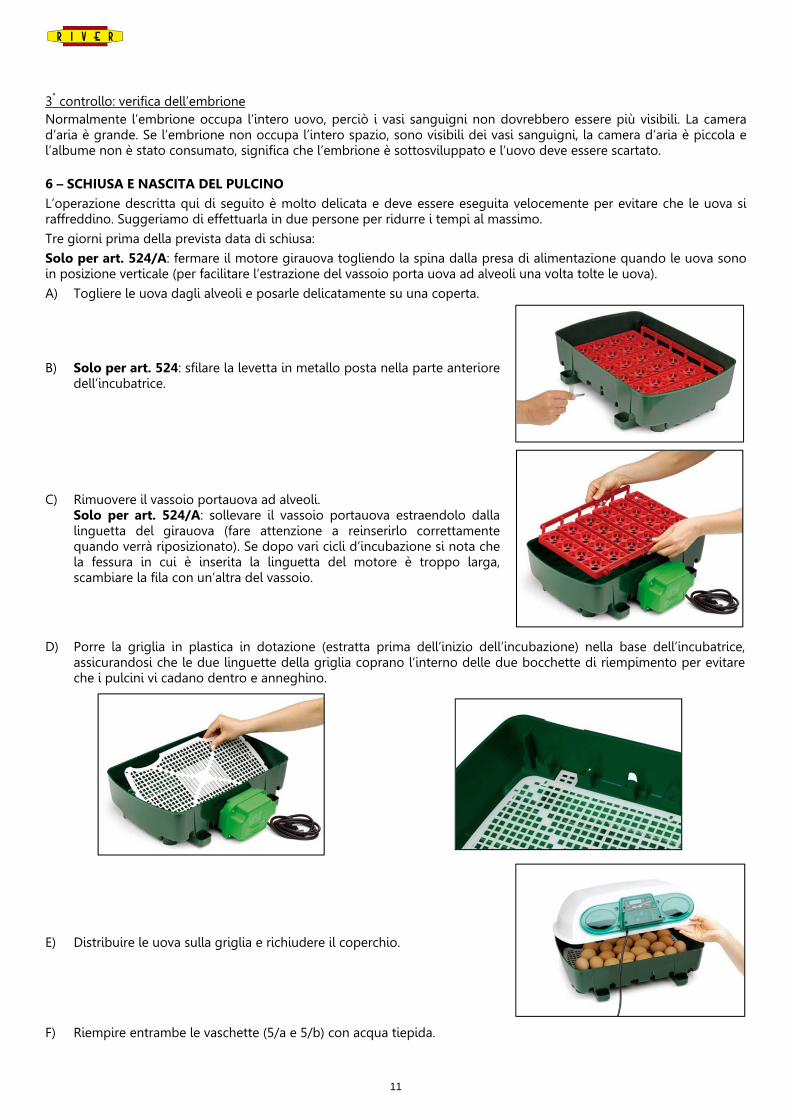
I) Dopo essersi accertati che la macchina funzioni correttamente, togliere il coperchio e posarlo accanto all’incubatrice. Mettere delicatamente le uova negli alveoli con la punta rivolta verso il basso. Richiudere l’incubatrice.
Solo per art. 524/A: avviare il motore girauova inserendo la spina di alimentazione in una presa di corrente: il motore inizierà a funzionare. Il vassoio portauova effettua un’inclinazione ogni due ore. Attenzione: il movimento non sarà evidente in quanto molto lento.
Ad 1 ora dall’avviamento
Due ore dopo
9
Non coprire mai l’incubatrice né tenerla dentro ad una scatola mentre è in funzione. Ciò impedirebbe il ricambio di aria al suo interno, necessario per lo sviluppo dell’embrione, che avviene attraverso i fori di aerazione presenti sia nella base dell’incubatrice che dai due oblò di ispezione.
A questo punto inizia il ciclo d’incubazione. Si consiglia di segnare il giorno su un calendario e di seguire le istruzioni riportate nella tabella 4C “Informazioni Per Una Corretta Incubazione”.
Solo per art. 524: minimo 4 volte al giorno cambiare l’inclinazione delle uova alloggiate nel vassoio portauova ad alveoli agendo sulla levetta posta nella parte anteriore dell’incubatrice. Girare la levetta verso destra o sinistra alternativamente, fermandola nella posizione corrispondente alle ore 10 o 14 di un orologio. MAI LASCIARE LA LEVETTA (E DI CONSEGUENZA LE UOVA) IN POSIZIONE VERTICALE (ORE 12). Muovere la levetta con delicatezza per evitare traumi alle uova.
In presenza del motore girauova, assicurarsi che gli alveoli portauova compiano un’oscillazione completa ogni due ore.
Inclinazione verso destra Inclinazione verso sinistra Rotazione della levetta
Controllare giornalmente il livello dell’acqua nella vaschetta, verificandone il livello attraverso la bocchetta (il livello che si vede dentro alla bocchetta di riempimento corrisponde a quello nella vaschetta). Rabboccare con acqua pulita e tiepida (+35/40°C). Tenere presente che è lo specchio d’acqua (cioè la superficie) e non la quantità a generare l’umidità, pertanto l’altezza dell’acqua nella vaschetta non influirà sul tasso di umidità. La verifica puntuale e costante della presenza di acqua nella vaschetta garantirà l’umidità necessaria, evitando che la stessa resti asciutta.
In caso di interruzione di corrente, appoggiare sui 4 lati dell’incubatrice altrettante bottiglie contenenti acqua calda e mettere una coperta sopra il tutto. Questo permette di mantenere una certa temperatura all’interno dell’incubatrice. Togliere il tutto non appena torna la corrente. Non tenere l’incubatrice coperta a lungo: una scarsa ossigenazione al suo interno ridurrebbe drasticamente le percentuali di nascita.
E’ possibile che nei primi cicli d’incubazione le bronzine autolubrificanti della turbina rilascino delle gocce d’olio sporcando lievemente la parte centrale della griglia di protezione. Quest’olio non è assolutamente nocivo per le uova o per i pulcini. Sarà sufficiente rimuoverlo con uno straccio imbevuto di alcol durante la pulizia di fine ciclo. 4B – INCUBAZIONE DELLE UOVA DI PALMIPEDI (OCA, ANATRA, ECC.) Dal decimo giorno di incubazione fino a tre giorni prima della prevista schiusa, aprire l’incubatrice una volta al giorno e lasciare raffreddare le uova per 15 minuti. Prima di riposizionare il coperchio, nebulizzare un velo d’acqua con uno spruzzino. Durante questa operazione si può staccare la spina dalla presa di corrente. 4C – INFORMAZIONI PER UNA CORRETTA INCUBAZIONE Temperatura suggerita all’inizio dell’incubazione: 37,7°C. Temperatura suggerita durante gli ultimi 3 giorni prima della schiusa: 37,2°C.

10
Fare riferimento alla seguente tabella per ottenere un’incubata di successo:
Specie Tempo di incubazione
Per una corretta umidità all’inizio dell’incubazione
Non girare le uova dopo
Per una corretta umidità durante gli
ultimi 3 giorni prima della schiusa
Gallina 21 giorni Riempire 1 vaschetta d’acqua Giorno 18 Riempire le 2 vaschette d’acqua
Fagiano 23-25 giorni Riempire 1 vaschetta d’acqua Giorno 20 Riempire le 2 vaschette d’acqua
Quaglia 16-17 giorni Riempire 1 vaschetta d’acqua Giorno 14 Riempire le 2 vaschette d’acqua
Faraona 26-28 giorni Riempire 1 vaschetta d’acqua Giorno 23 Riempire le 2 vaschette d’acqua
Tacchino 28 giorni Riempire 1 vaschetta d’acqua Giorno 25 Riempire le 2 vaschette d’acqua
Starna / pernice 23-24 giorni Riempire 1 vaschetta d’acqua Giorno 20 Riempire le 2 vaschette d’acqua
Pavone 28 giorni Riempire 1 vaschetta d’acqua Giorno 25 Riempire le 2 vaschette d’acqua
Oca 29-31 giorni Riempire 1 vaschetta d’acqua Giorno 27 Riempire le 2 vaschette d’acqua
Anatra germanata e selvatica
27-28 giorni Riempire 1 vaschetta d’acqua Giorno 24 Riempire le 2 vaschette d’acqua
Anatra muta 33-35 giorni Riempire 1 vaschetta d’acqua Giorno 30 Riempire le 2 vaschette d’acqua
5 – CONTROLLO PERIODICO DELLE UOVA DURANTE L’INCUBAZIONE (SPERATURA)
La speratura è un’operazione complicata e delicata che può portare a compiere errori ed eliminare uova fecondate. Poiché è facoltativa, se non si ha esperienza, suggeriamo di non effettuarla e di procedere con l’incubazione. Si possono altrimenti controllare periodicamente le uova incubate sottoponendole a speratura. Questa operazione deve essere fatta in una stanza buia, usando un fascio di luce intensa (es. lo sperauova River Systems art. 164), seguendo la tabella riportata qui di seguito:
Specie 1° controllo 2° controllo 3° controllo
Gallina a 8 giorni a 11 giorni a 18 giorni Fagiano a 8 giorni a 12 giorni a 19 giorni Faraona a 8 giorni a 13 giorni a 24 giorni Tacchino a 8 giorni a 13 giorni a 24 giorni Starna / pernice a 8 giorni a 12 giorni a 19 giorni Pavone a 9 giorni a 14 giorni a 24 giorni Oca a 9 giorni a 15 giorni a 24 giorni Anatra germanata e selvatica a 9 giorni a 13 giorni a 24 giorni Anatra muta a 10 giorni a 15 giorni a 25 giorni
Prelevare le uova una ad una dall’incubatrice e controllarle immediatamente. L’uovo può restare fuori dall’incubatrice per massimo 2 minuti. Con un po’ di esperienza, e usando l’apposito strumento, si può eseguire il controllo senza estrarre le uova dall’incubatrice. In questo caso, aprire l’incubatrice ed appoggiare lo sperauova su ciascun uovo. Il fascio di luce permette di vedere l’embrione. Mai girare o scuotere violentemente le uova poiché questo porterebbe alla rottura dei vasi sanguigni e alla conseguente morte dell’embrione.
1° controllo: inizio dell’incubazione Di solito è difficile vedere l’embrione poiché è incorporato del tuorlo: vicino alla camera d’aria e sulla punta sono visibili dei vasi sanguigni. Se l’uovo non è fecondato il suo interno si presenterà uniforme, privo di vasi sanguigni e il tuorlo sarà nel mezzo. In questo caso scartare l’uovo. E’ possibile che in questo stadio non si possa vedere bene all’interno delle uova con guscio spesso o marrone: queste verranno verificate nel secondo controllo.
2° controllo: sviluppo dell’embrione Normalmente è visibile la rete di vasi sanguigni nella punta dell’uovo e l’embrione avrà l’aspetto di una macchia scura. Se i vasi sanguigni non sono visibili significa che l’embrione è morto.
11
3° controllo: verifica dell’embrione Normalmente l’embrione occupa l’intero uovo, perciò i vasi sanguigni non dovrebbero essere più visibili. La camera d’aria è grande. Se l’embrione non occupa l’intero spazio, sono visibili dei vasi sanguigni, la camera d’aria è piccola e l’albume non è stato consumato, significa che l’embrione è sottosviluppato e l’uovo deve essere scartato. 6 – SCHIUSA E NASCITA DEL PULCINO
L’operazione descritta qui di seguito è molto delicata e deve essere eseguita velocemente per evitare che le uova si raffreddino. Suggeriamo di effettuarla in due persone per ridurre i tempi al massimo.
Tre giorni prima della prevista data di schiusa:
Solo per art. 524/A: fermare il motore girauova togliendo la spina dalla presa di alimentazione quando le uova sono in posizione verticale (per facilitare l’estrazione del vassoio porta uova ad alveoli una volta tolte le uova).
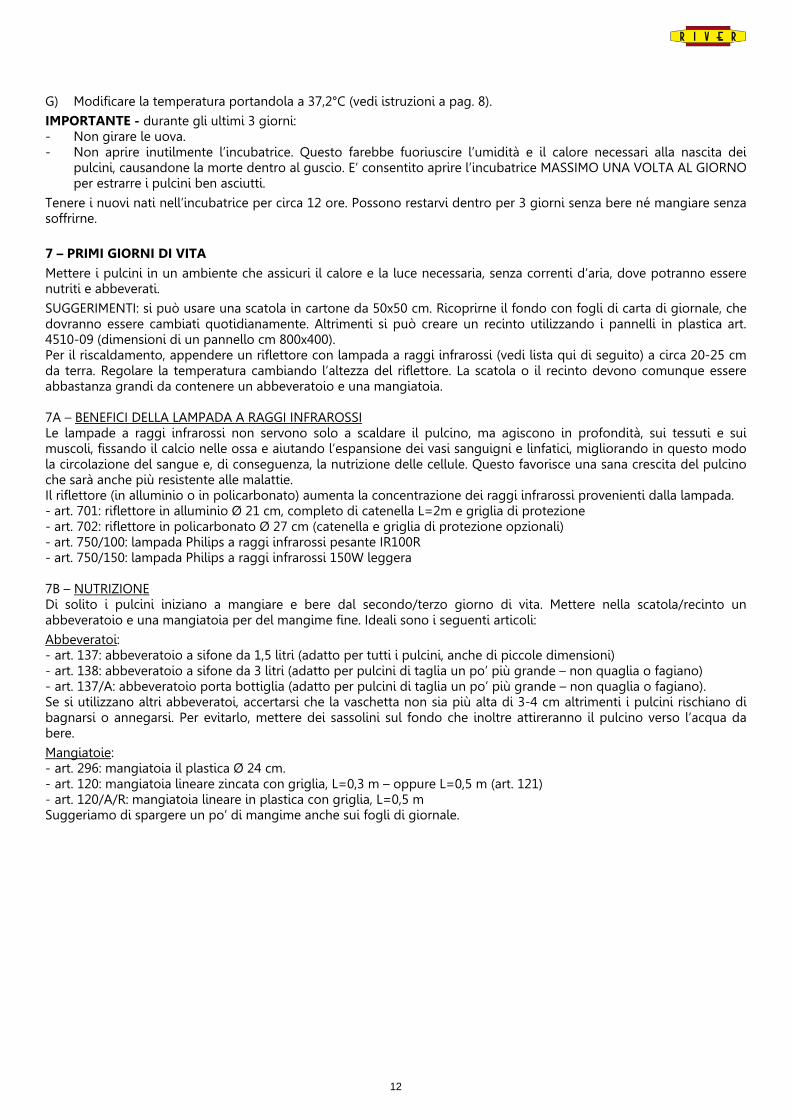
A) Togliere le uova dagli alveoli e posarle delicatamente su una coperta.
B) Solo per art. 524: sfilare la levetta in metallo posta nella parte anteriore dell’incubatrice.
C) Rimuovere il vassoio portauova ad alveoli. Solo per art. 524/A: sollevare il vassoio portauova estraendolo dalla
linguetta del girauova (fare attenzione a reinserirlo correttamente quando verrà riposizionato). Se dopo vari cicli d’incubazione si nota che la fessura in cui è inserita la linguetta del motore è troppo larga, scambiare la fila con un’altra del vassoio.
D) Porre la griglia in plastica in dotazione (estratta prima dell’inizio dell’incubazione) nella base dell’incubatrice, assicurandosi che le due linguette della griglia coprano l’interno delle due bocchette di riempimento per evitare che i pulcini vi cadano dentro e anneghino.
E) Distribuire le uova sulla griglia e richiudere il coperchio.
F) Riempire entrambe le vaschette (5/a e 5/b) con acqua tiepida.
12
G) Modificare la temperatura portandola a 37,2°C (vedi istruzioni a pag. 8).
IMPORTANTE - durante gli ultimi 3 giorni: - Non girare le uova. - Non aprire inutilmente l’incubatrice. Questo farebbe fuoriuscire l’umidità e il calore necessari alla nascita dei
pulcini, causandone la morte dentro al guscio. E’ consentito aprire l’incubatrice MASSIMO UNA VOLTA AL GIORNO per estrarre i pulcini ben asciutti.
Tenere i nuovi nati nell’incubatrice per circa 12 ore. Possono restarvi dentro per 3 giorni senza bere né mangiare senza soffrirne.
7 – PRIMI GIORNI DI VITA
Mettere i pulcini in un ambiente che assicuri il calore e la luce necessaria, senza correnti d’aria, dove potranno essere nutriti e abbeverati.
SUGGERIMENTI: si può usare una scatola in cartone da 50x50 cm. Ricoprirne il fondo con fogli di carta di giornale, che dovranno essere cambiati quotidianamente. Altrimenti si può creare un recinto utilizzando i pannelli in plastica art. 4510-09 (dimensioni di un pannello cm 800x400). Per il riscaldamento, appendere un riflettore con lampada a raggi infrarossi (vedi lista qui di seguito) a circa 20-25 cm da terra. Regolare la temperatura cambiando l’altezza del riflettore. La scatola o il recinto devono comunque essere abbastanza grandi da contenere un abbeveratoio e una mangiatoia. 7A – BENEFICI DELLA LAMPADA A RAGGI INFRAROSSI Le lampade a raggi infrarossi non servono solo a scaldare il pulcino, ma agiscono in profondità, sui tessuti e sui muscoli, fissando il calcio nelle ossa e aiutando l’espansione dei vasi sanguigni e linfatici, migliorando in questo modo la circolazione del sangue e, di conseguenza, la nutrizione delle cellule. Questo favorisce una sana crescita del pulcino che sarà anche più resistente alle malattie. Il riflettore (in alluminio o in policarbonato) aumenta la concentrazione dei raggi infrarossi provenienti dalla lampada. - art. 701: riflettore in alluminio Ø 21 cm, completo di catenella L=2m e griglia di protezione - art. 702: riflettore in policarbonato Ø 27 cm (catenella e griglia di protezione opzionali) - art. 750/100: lampada Philips a raggi infrarossi pesante IR100R - art. 750/150: lampada Philips a raggi infrarossi 150W leggera 7B – NUTRIZIONE Di solito i pulcini iniziano a mangiare e bere dal secondo/terzo giorno di vita. Mettere nella scatola/recinto un abbeveratoio e una mangiatoia per del mangime fine. Ideali sono i seguenti articoli:
Abbeveratoi: - art. 137: abbeveratoio a sifone da 1,5 litri (adatto per tutti i pulcini, anche di piccole dimensioni) - art. 138: abbeveratoio a sifone da 3 litri (adatto per pulcini di taglia un po’ più grande – non quaglia o fagiano) - art. 137/A: abbeveratoio porta bottiglia (adatto per pulcini di taglia un po’ più grande – non quaglia o fagiano). Se si utilizzano altri abbeveratoi, accertarsi che la vaschetta non sia più alta di 3-4 cm altrimenti i pulcini rischiano di bagnarsi o annegarsi. Per evitarlo, mettere dei sassolini sul fondo che inoltre attireranno il pulcino verso l’acqua da bere.
Mangiatoie: - art. 296: mangiatoia il plastica Ø 24 cm. - art. 120: mangiatoia lineare zincata con griglia, L=0,3 m – oppure L=0,5 m (art. 121) - art. 120/A/R: mangiatoia lineare in plastica con griglia, L=0,5 m Suggeriamo di spargere un po’ di mangime anche sui fogli di giornale.
13
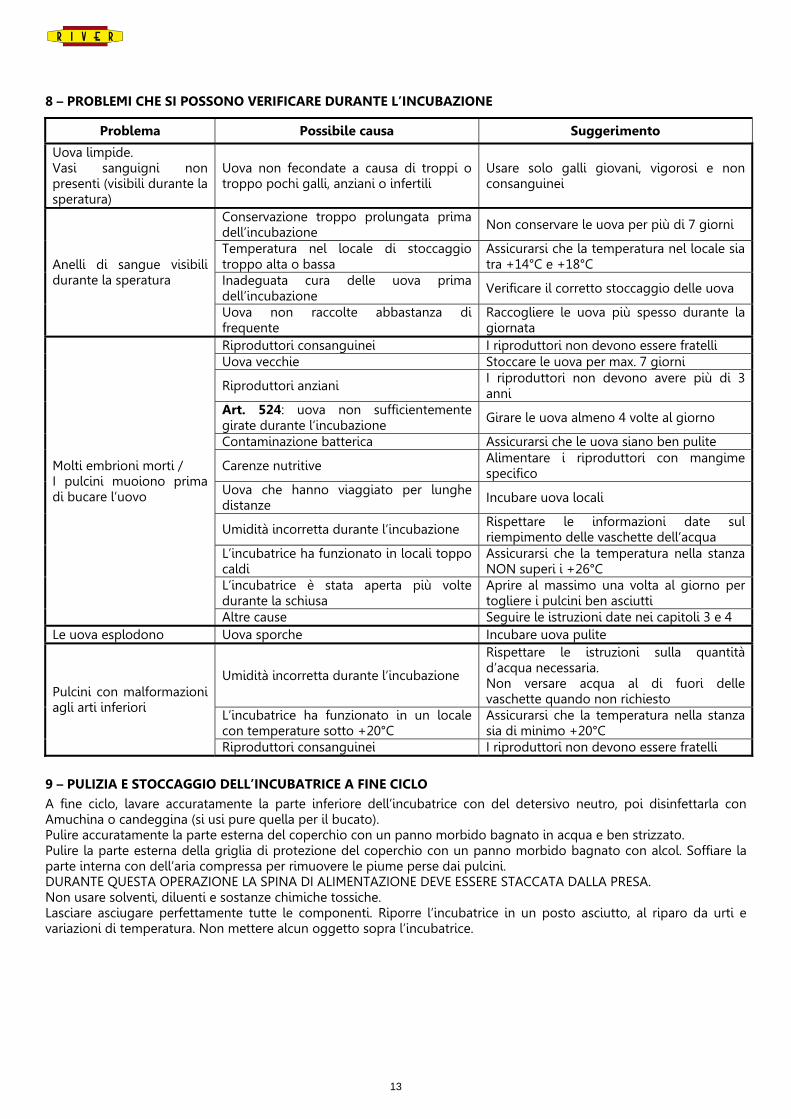
8 – PROBLEMI CHE SI POSSONO VERIFICARE DURANTE L’INCUBAZIONE
Problema Possibile causa Suggerimento
Uova limpide. Vasi sanguigni non presenti (visibili durante la speratura)
Uova non fecondate a causa di troppi o troppo pochi galli, anziani o infertili
Usare solo galli giovani, vigorosi e non consanguinei
Anelli di sangue visibili durante la speratura
Conservazione troppo prolungata prima dell’incubazione
Non conservare le uova per più di 7 giorni
Temperatura nel locale di stoccaggio troppo alta o bassa
Assicurarsi che la temperatura nel locale sia tra +14°C e +18°C
Inadeguata cura delle uova prima dell’incubazione
Verificare il corretto stoccaggio delle uova
Uova non raccolte abbastanza di frequente
Raccogliere le uova più spesso durante la giornata
Molti embrioni morti / I pulcini muoiono prima di bucare l’uovo
Riproduttori consanguinei I riproduttori non devono essere fratelli Uova vecchie Stoccare le uova per max. 7 giorni
Riproduttori anziani I riproduttori non devono avere più di 3 anni
Art. 524: uova non sufficientemente girate durante l’incubazione
Girare le uova almeno 4 volte al giorno
Contaminazione batterica Assicurarsi che le uova siano ben pulite
Carenze nutritive Alimentare i riproduttori con mangime specifico
Uova che hanno viaggiato per lunghe distanze Incubare uova locali
Umidità incorretta durante l’incubazione Rispettare le informazioni date sul riempimento delle vaschette dell’acqua
L’incubatrice ha funzionato in locali toppo caldi
Assicurarsi che la temperatura nella stanza NON superi i +26°C
L’incubatrice è stata aperta più volte durante la schiusa
Aprire al massimo una volta al giorno per togliere i pulcini ben asciutti
Altre cause Seguire le istruzioni date nei capitoli 3 e 4 Le uova esplodono Uova sporche Incubare uova pulite
Pulcini con malformazioni agli arti inferiori
Umidità incorretta durante l’incubazione
Rispettare le istruzioni sulla quantità d’acqua necessaria. Non versare acqua al di fuori delle vaschette quando non richiesto
L’incubatrice ha funzionato in un locale con temperature sotto +20°C
Assicurarsi che la temperatura nella stanza sia di minimo +20°C
Riproduttori consanguinei I riproduttori non devono essere fratelli
9 – PULIZIA E STOCCAGGIO DELL’INCUBATRICE A FINE CICLO
A fine ciclo, lavare accuratamente la parte inferiore dell’incubatrice con del detersivo neutro, poi disinfettarla con Amuchina o candeggina (si usi pure quella per il bucato). Pulire accuratamente la parte esterna del coperchio con un panno morbido bagnato in acqua e ben strizzato. Pulire la parte esterna della griglia di protezione del coperchio con un panno morbido bagnato con alcol. Soffiare la parte interna con dell’aria compressa per rimuovere le piume perse dai pulcini. DURANTE QUESTA OPERAZIONE LA SPINA DI ALIMENTAZIONE DEVE ESSERE STACCATA DALLA PRESA. Non usare solventi, diluenti e sostanze chimiche tossiche. Lasciare asciugare perfettamente tutte le componenti. Riporre l’incubatrice in un posto asciutto, al riparo da urti e variazioni di temperatura. Non mettere alcun oggetto sopra l’incubatrice.

14
10 – AVVERTENZE / SUGGERIMENTI
- Tenere l’apparecchio al di fuori della portata dei bambini; - Non usare o riporre l’apparecchio in ambienti con sostanze corrosive, infiammabili o esplosive; - Non usare l’apparecchio se il cavo elettrico, il circuito elettronico o la griglia di protezione sono danneggiati; - Tenere l’incubatrice al riparo da urti; - Non aprire il frontalino di protezione della scheda elettronica o rimuovere la griglia di protezione della ventola; - Pulire la macchina solo dopo la fine del processo di incubazione. La spina deve essere staccata. - ATTENZIONE: la garanzia non è più valida se vengono eseguite modifiche o manomissioni sulla macchina, o se
questa viene usata impropriamente.
11 – CONFORMITA’ DELL’APPARECCHIO
Questo apparecchio è conforme alle Direttive Europee CE. SR-1 EN 60335, SR EN 55014-1, 2006/95/CE, EMC 2004/108/CE, ROHS 2002/95/CE, CEI EN 60730-2-1/A11, CEI EN 60730-2-9, CEI EN 61032, UNI EN ISO 13732, UNI EN ISO 13857, CEI 48-8.
12 – GARANZIA
La garanzia ha una durata di 1 anno dalla data di acquisto. Nel periodo di garanzia verranno eliminati, gratuitamente, i guasti dell’apparecchio conseguenti a difetti di fabbrica o di materiali, sia riparando il prodotto, sia sostituendo, se necessario, l’intero apparecchio. La garanzia non copre: danni derivanti dall’uso improprio dell’apparecchio, la normale usura conseguente al funzionamento dello stesso, i difetti che hanno un effetto trascurabile sul valore o sul funzionamento del prodotto. La garanzia decade se vengono effettuate riparazioni da soggetti non autorizzati o con parti non originali. Per accedere al servizio durante il periodo di garanzia, è necessario consegnare o far pervenire il prodotto integro, insieme alla prova di acquisto, al vostro rivenditore.
In attuazione delle Direttive 2002/95/CE, 2002/96/CE e 2003/108/CE, relative alla riduzione dell’uso di sostanze pericolose nelle apparecchiature elettriche ed elettroniche, nonché allo smaltimento dei rifiuti, il simbolo del cassonetto barrato, qui rappresentato, indica che il prodotto alla fine della propria vita utile deve essere raccolto separatamente dagli altri rifiuti. L’utente dovrà, pertanto, conferire l’apparecchio giunto a fine vita agli idonei centri di raccolta differenziata dei rifiuti elettronici ed elettrotecnici. L’adeguata raccolta differenziata per l’avvio successivo dell’apparecchio dismesso al riciclaggio, al trattamento e allo smaltimento ambientalmente compatibile, contribuisce ad evitare possibili effetti negativi sull’ambiente e sulla salute e favorisce il riciclo dei materiali di cui è composto l’apparecchio. Lo smaltimento abusivo da parte dell’utente comporta l’applicazione delle sanzioni amministrative previste dalle leggi in vigenti. Le informazioni relative alla corretta procedura dei sistemi di raccolta disponibili si dovranno richiedere al Servizio Locale di Smaltimento Rifiuti.
15
FRANÇAIS 1 – INTRODUCTION
La couveuse COVINA SUPER 24 est conçue pour l’incubation des œufs de poule, faisan, pintade, caille, perdrix, perdrix grise, perdrix bartavelle, dinde, palmipèdes (oie, tous types de canard, etc.), paonne, pigeon, colins, oiseaux exotiques et rapaces. Art. 524 est doté d’un système semi-automatique pour le retournement des œufs activé manuellement de l’extérieur grâce à un levier connecté au panier à œufs placé dans la base de la couveuse. La machine peut être équipée d’un moteur (art. 556M-1) pour faire osciller automatiquement le panier porte œufs (notice d’installation fournie avec le moteur). Art. 524/A est complet de moteur pour l’oscillation automatique du panier à œufs.
Une résistance électrique en acier d’haute qualité crée la chaleur nécessaire. Elle est contrôlée par un thermostat électronique à haute précision qui permet de régler la température dans la couveuse (de 30°C à 40°C) et la maintenir constante et précise. La température est imposée en appuyant sur les boutons (+) et (-) du panneau de contrôle.
Une hélice de ventilation à turbine distribue l’air chaud et humide d’une façon uniforme dans la couveuse.
L’humidification naturelle « à surface » est garantie par les bacs moulés dans le fond de la couveuse. Ils sont remplis de l’extérieur par les deux bouches présentes sur les pieds antérieurs de la machine, un système pratique pour ne plus devoir ouvrir la couveuse en dissipant chaleur et humidité.
2 – CARACTERISTIQUES ET DONNEES TECHNIQUES
Modèle couveuse Covina Super 24 (art. 524) – semi-automatique Covina Super 24 (art. 524/A) – automatique
Types d’œufs à incuber Poule, faisan, pintade, caille, perdrix, perdrix grise, perdrix bartavelle, dinde, palmipèdes (oie, tous types de canard, etc.), paonne, pigeon, colins, oiseaux exotiques et rapaces
Voltage Monophasé, 230 Volt CE Fréquence nominale 50/60 Hz CE Puissance maximum 150 W Consommation moyenne par jour Max. 2 kW/24 heures Affichage Contrôle digital de la température avec point décimal Ventilation A turbine Thermostat Électronique de précision +/-0,1°C Résistance électrique 150W
Humidité dans la couveuse 45-55% avec eau dans un bac 60-65% avec eau dans les deux bacs
Nombre de rotations dans les 24 heures
Art. 524 : avec œufs logés dans le panier : minimum 4 fois Art. 524/A : une inclination toutes les deux heures
Capacité de la couveuse 24 œufs de moyennes/grandes dimensions ou 96 œufs de petites dimensions (es. cailles) logés dans le panier
Dimensions Art. 524: 500x340x255 mm Art. 524/A: 500x380x255 mm
Poids Art. 524: 3,37 Kg Art. 524/A: 3,85 Kg
3 – SELECTION ET CONSERVATION DES ŒUFS POUR L’INCUBATION
Il est recommandé d’incuber des œufs provenant de votre élevage. Les œufs transportés auront un pourcentage d’éclosion au dessous du 50% à cause du stress de voyage, vibrations, écarts de température et embryons asphyxiés (l’emballage ne permet pas aux œufs de respirer). Si vos œufs sont transportés, laissez-les reposer pour au moins 24 heures, la pointe vers le bas, avant de les incuber.
Choisissez œufs provenant de reproducteurs qui soient bien développés, bien nourris et sains.
Les reproducteurs ne doivent pas être consanguins (les mâles doivent arriver d’un autre élevage), sinon ils produiraient œufs aux embryons faibles destinés à mourir pendant l’éclosion (le poussin se développe mais il reste emprisonné dans l’œuf car trop faible pour casser la coquille et sortir).
16
Faire attention à ce que les reproducteurs soient sexuellement mûrs et que les bonnes proportions entre mâles et femelles soient respectées. Faites référence au tableau ci-de suite :
PROPORTION ENTRE MATURITE SEXUELLE Sujet Mâle et Femelle Mâle Femelle Poule 1 6 6/8 mois 6/8 mois Faisan 1 4 6/7 mois 6/7 mois Canard 1 4 8 mois 4 mois Oie 1 4 8 mois 7 mois Pintade 1 2 8/10 mois 8/10 mois Perdrix 1 1 10/12 mois 10/12 mois Caille 1 3 60 jours 50 jours Dinde 1 8 7 mois 7 mois
Rappelez que les reproducteurs âgés plus que 3 ans perdent leur fertilité.
L’embryon commence son développement avant l’incubation, donc il faut en prendre soin de façon appropriée, autrement les pourcentages d’éclosion baisseront. Voici quelques conseils qui peuvent vous aider à obtenir des bons résultats : 1. Ramassez les œufs au moins 3-4 fois par jour et 5 fois pendant l’été. N’incubez jamais d’œufs qui ont été gardés à
une température supérieure à +26°C ou inférieure à +5°C (au delà de ces températures l’embryon meurt). Ne conservez jamais les œufs dans le frigidaire.
2. N’incubez pas d’œufs sales : à cause des températures d’incubation et des taux d’humidité le matériel organique (fientes, sang, terre, etc.) contaminerait l’embryon en causant des infections et, par conséquent, la mort du poussin pendant l’éclosion.
Ne lavez jamais les œufs. Au maximum vous pouvez les brosser doucement à l’aide d’une éponge abrasive sèche. 3. Conservez les œufs dans un endroit frais où la température est entre +14°C et +18°C et l’humidité est environ 65-
75%. Gardez les œufs dans le plateau porte-œufs, la pointe tournée vers le bas. 4. Les œufs doivent être incubés entre le deuxième et le sixième/septième jour de la ponte. L’incubation d’œufs plus
vieux que 8 jours réduit considérablement le pourcentage de naissances, en le réduisant jusqu’à presque zéro dans le cas d’œufs conservés plus que 15 jours.
5. Choisissez des œufs qui ont une forme régulière (pas trop allongés, sphériques, ondulés ou avec toute autre malformation).
6. La coquille de l’œuf ne devra pas être fêlée, cassée, plissée, molle, mince ou avec des taches bleuâtres (œufs vieux).
7. Permettez aux œufs froids (de la température de conservation) d’atteindre doucement la température ambiante avant de les placer dans la couveuse. Le passage brusque de +12°C à +38°C créerait de la buée sur la coquille, ce qui causerait une réduction du taux d'éclosion.
8. Évitez d’incuber des œufs de races différentes. N’insérez pas d’œufs dans un second temps.
4 – PREPARATIONT ET MISE EN MARCHE DE LA COUVEUSE
Pour un bon résultat, il est important de choisir un bon emplacement pour la couveuse. La température dans la place doit être située entre +20°C et +25°C avec une bonne aération mais sans courant d’air et propre (ex. pas une étable ou un garage). Assurez-vous que la couveuse ne soit pas exposée directement aux rayons du soleil ou placée trop près de sources de chaleur, tels que radiateurs, poêles, etc. L’humidité relative doit être entre 50% et 75%.
N’UTILISEZ PAS LA COUVEUSE DANS DES ENDROITS OU LA TEMPERATURE EST INFERIEURE A +20°C OU SUPERIEURE A +25°C. On suggère pourtant de l’utiliser dans votre maison.
N’utilisez pas et ne gardez pas la couveuse dans des endroits où il y a des substances chimiques, toxiques ou inflammables, même en petites quantités, car elles influencent négativement le développement des embryons.
N’utilisez pas la couveuse là où il y a un risque de projections d’eau ou d’autres substances.
Procéder comme suit :
A) Placez la couveuse sur une table plate en bois. Le fond doit poser directement sur la surface de la table pour éviter que tout objet (une couverture, une nappe, etc.) obstrue les trous d’aération.
B) Enlevez le couvercle et posez-le à côté de la couveuse, la grille vers le bas.
17
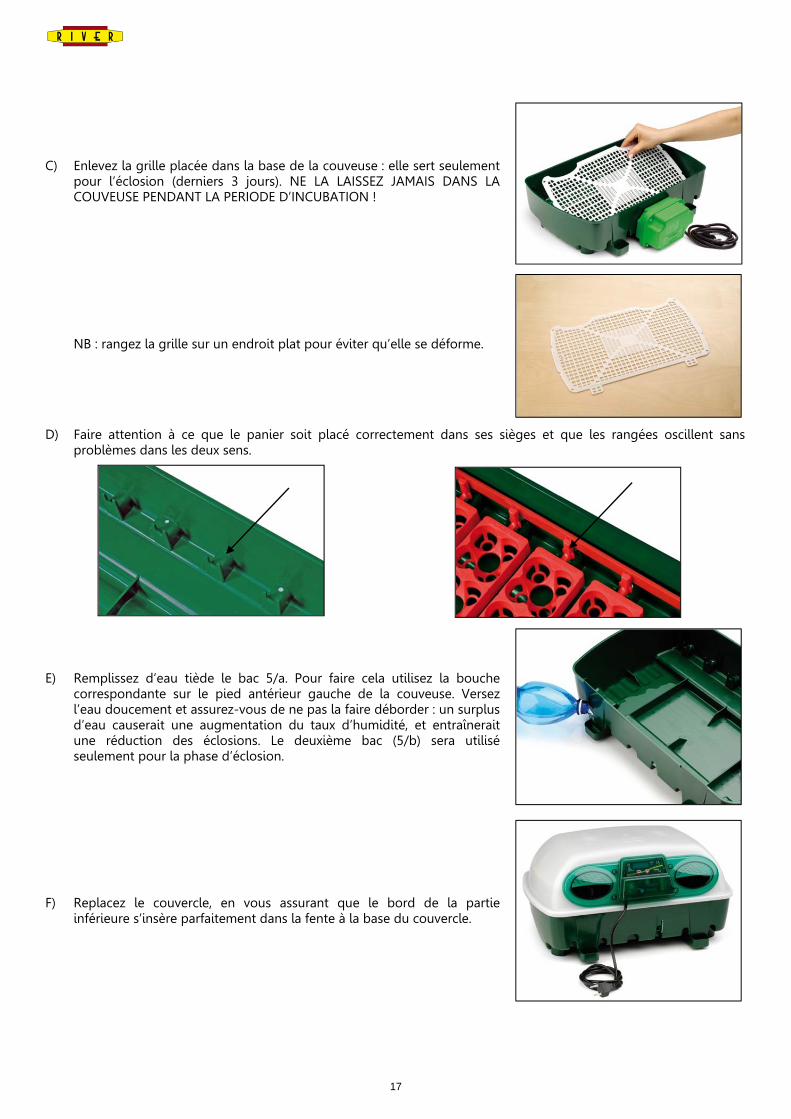
C) Enlevez la grille placée dans la base de la couveuse : elle sert seulement pour l’éclosion (derniers 3 jours). NE LA LAISSEZ JAMAIS DANS LA COUVEUSE PENDANT LA PERIODE D’INCUBATION !
NB : rangez la grille sur un endroit plat pour éviter qu’elle se déforme.
D) Faire attention à ce que le panier soit placé correctement dans ses sièges et que les rangées oscillent sans problèmes dans les deux sens.
E) Remplissez d’eau tiède le bac 5/a. Pour faire cela utilisez la bouche correspondante sur le pied antérieur gauche de la couveuse. Versez l’eau doucement et assurez-vous de ne pas la faire déborder : un surplus d’eau causerait une augmentation du taux d’humidité, et entraînerait une réduction des éclosions. Le deuxième bac (5/b) sera utilisé seulement pour la phase d’éclosion.
F) Replacez le couvercle, en vous assurant que le bord de la partie inférieure s’insère parfaitement dans la fente à la base du couvercle.
18
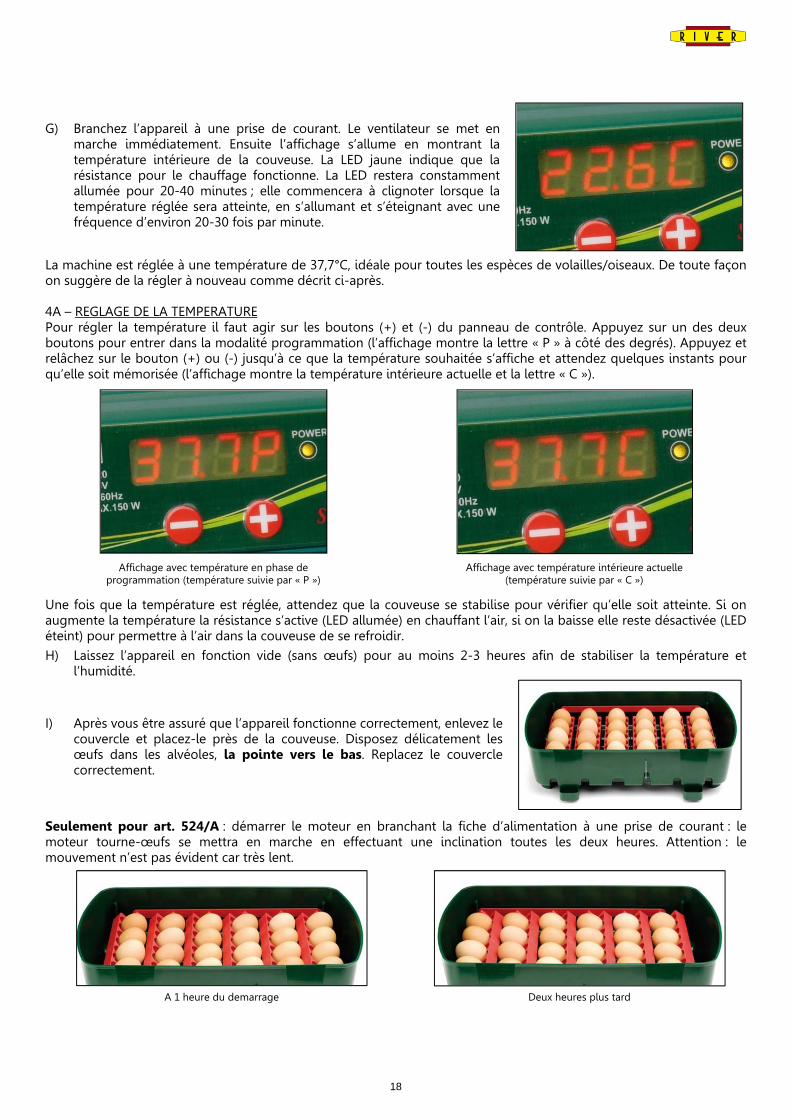
G) Branchez l’appareil à une prise de courant. Le ventilateur se met en marche immédiatement. Ensuite l’affichage s’allume en montrant la température intérieure de la couveuse. La LED jaune indique que la résistance pour le chauffage fonctionne. La LED restera constamment allumée pour 20-40 minutes ; elle commencera à clignoter lorsque la température réglée sera atteinte, en s’allumant et s’éteignant avec une fréquence d’environ 20-30 fois par minute.
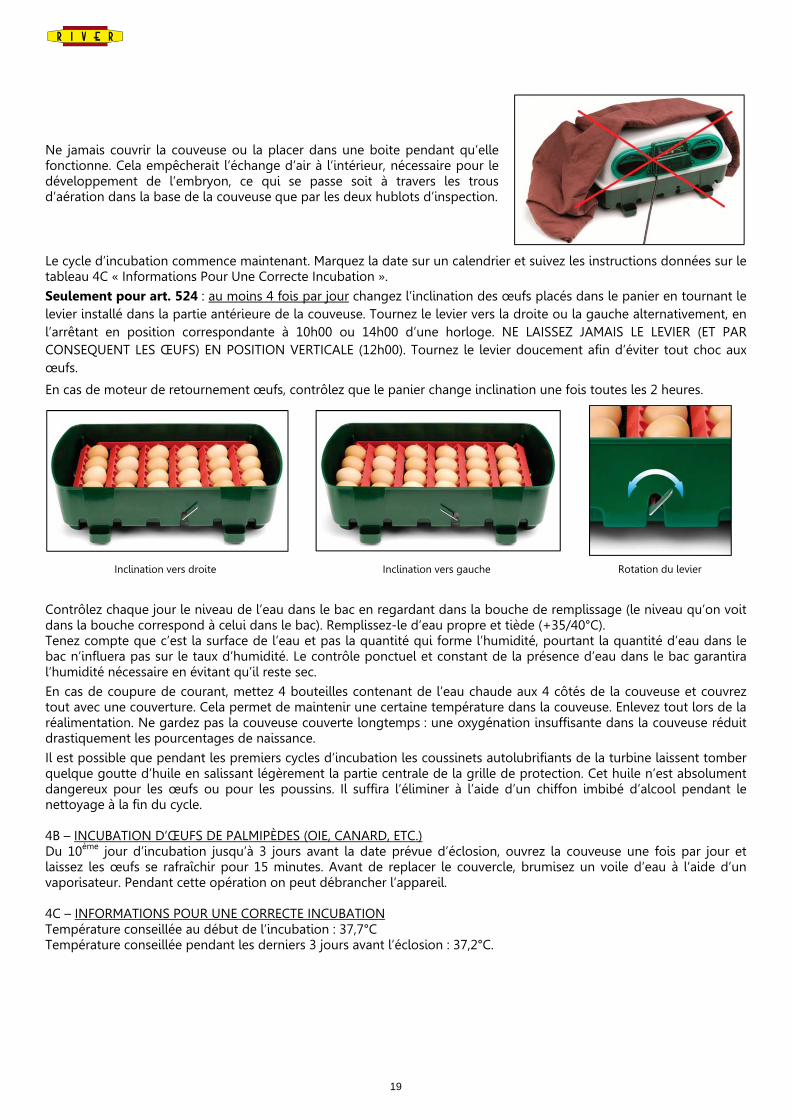
La machine est réglée à une température de 37,7°C, idéale pour toutes les espèces de volailles/oiseaux. De toute façon on suggère de la régler à nouveau comme décrit ci-après. 4A – REGLAGE DE LA TEMPERATURE Pour régler la température il faut agir sur les boutons (+) et (-) du panneau de contrôle. Appuyez sur un des deux boutons pour entrer dans la modalité programmation (l’affichage montre la lettre « P » à côté des degrés). Appuyez et relâchez sur le bouton (+) ou (-) jusqu’à ce que la température souhaitée s’affiche et attendez quelques instants pour qu’elle soit mémorisée (l’affichage montre la température intérieure actuelle et la lettre « C »).
Affichage avec température en phase de
programmation (température suivie par « P ») Affichage avec température intérieure actuelle
(température suivie par « C »)
Une fois que la température est réglée, attendez que la couveuse se stabilise pour vérifier qu’elle soit atteinte. Si on augmente la température la résistance s’active (LED allumée) en chauffant l’air, si on la baisse elle reste désactivée (LED éteint) pour permettre à l’air dans la couveuse de se refroidir.
H) Laissez l’appareil en fonction vide (sans œufs) pour au moins 2-3 heures afin de stabiliser la température et l’humidité.
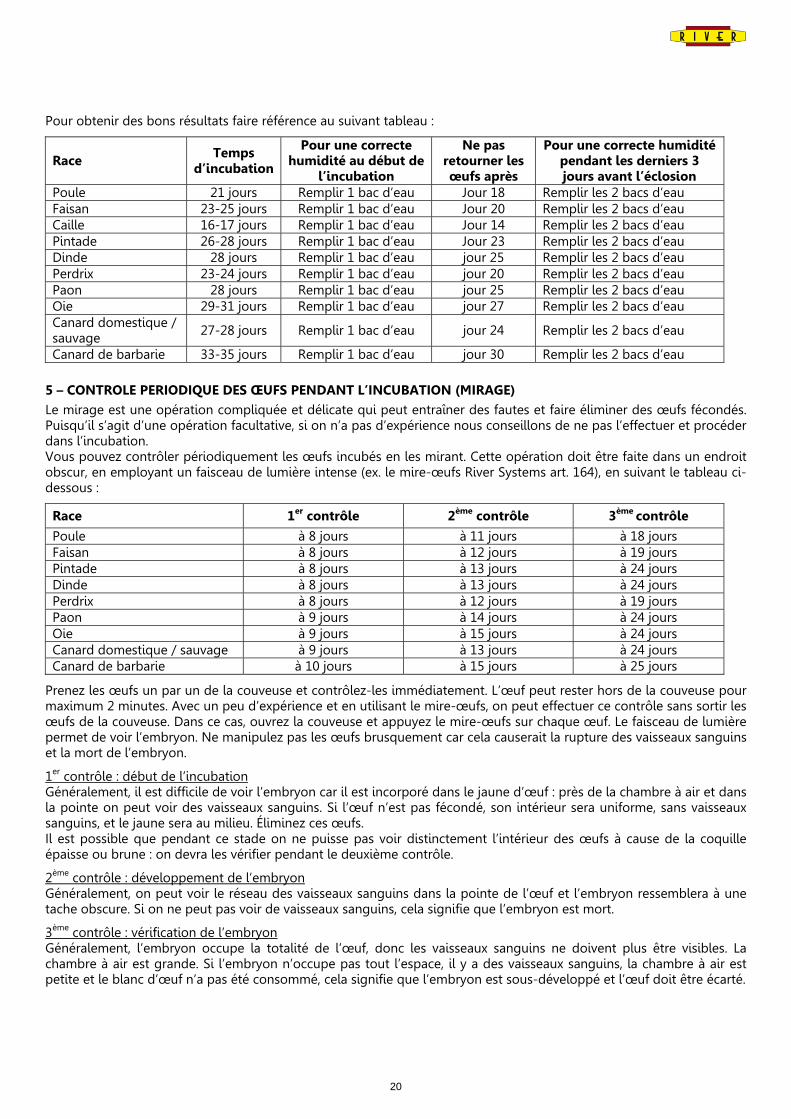
I) Après vous être assuré que l’appareil fonctionne correctement, enlevez le couvercle et placez-le près de la couveuse. Disposez délicatement les œufs dans les alvéoles, la pointe vers le bas. Replacez le couvercle correctement.
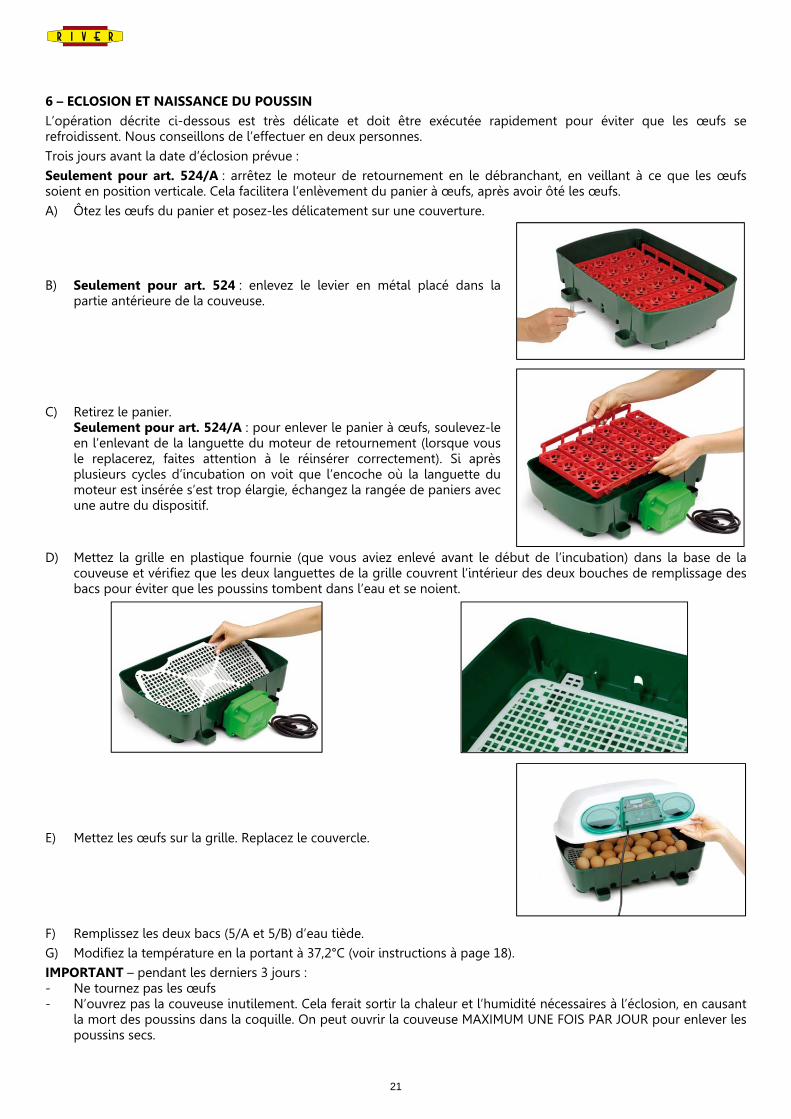
Seulement pour art. 524/A : démarrer le moteur en branchant la fiche d’alimentation à une prise de courant : le moteur tourne-œufs se mettra en marche en effectuant une inclination toutes les deux heures. Attention : le mouvement n’est pas évident car très lent.
A 1 heure du demarrage
Deux heures plus tard
19
Ne jamais couvrir la couveuse ou la placer dans une boite pendant qu’elle fonctionne. Cela empêcherait l’échange d’air à l’intérieur, nécessaire pour le développement de l’embryon, ce qui se passe soit à travers les trous d’aération dans la base de la couveuse que par les deux hublots d’inspection.
Le cycle d’incubation commence maintenant. Marquez la date sur un calendrier et suivez les instructions données sur le tableau 4C « Informations Pour Une Correcte Incubation ».
Seulement pour art. 524 : au moins 4 fois par jour changez l’inclination des œufs placés dans le panier en tournant le levier installé dans la partie antérieure de la couveuse. Tournez le levier vers la droite ou la gauche alternativement, en l’arrêtant en position correspondante à 10h00 ou 14h00 d’une horloge. NE LAISSEZ JAMAIS LE LEVIER (ET PAR CONSEQUENT LES ŒUFS) EN POSITION VERTICALE (12h00). Tournez le levier doucement afin d’éviter tout choc aux œufs.
En cas de moteur de retournement œufs, contrôlez que le panier change inclination une fois toutes les 2 heures.
Inclination vers droite Inclination vers gauche Rotation du levier
Contrôlez chaque jour le niveau de l’eau dans le bac en regardant dans la bouche de remplissage (le niveau qu’on voit dans la bouche correspond à celui dans le bac). Remplissez-le d’eau propre et tiède (+35/40°C). Tenez compte que c’est la surface de l’eau et pas la quantité qui forme l’humidité, pourtant la quantité d’eau dans le bac n’influera pas sur le taux d’humidité. Le contrôle ponctuel et constant de la présence d’eau dans le bac garantira l’humidité nécessaire en évitant qu’il reste sec.
En cas de coupure de courant, mettez 4 bouteilles contenant de l’eau chaude aux 4 côtés de la couveuse et couvrez tout avec une couverture. Cela permet de maintenir une certaine température dans la couveuse. Enlevez tout lors de la réalimentation. Ne gardez pas la couveuse couverte longtemps : une oxygénation insuffisante dans la couveuse réduit drastiquement les pourcentages de naissance.
Il est possible que pendant les premiers cycles d’incubation les coussinets autolubrifiants de la turbine laissent tomber quelque goutte d’huile en salissant légèrement la partie centrale de la grille de protection. Cet huile n’est absolument dangereux pour les œufs ou pour les poussins. Il suffira l’éliminer à l’aide d’un chiffon imbibé d’alcool pendant le nettoyage à la fin du cycle. 4B – INCUBATION D’ŒUFS DE PALMIPÈDES (OIE, CANARD, ETC.) Du 10ème jour d’incubation jusqu’à 3 jours avant la date prévue d’éclosion, ouvrez la couveuse une fois par jour et laissez les œufs se rafraîchir pour 15 minutes. Avant de replacer le couvercle, brumisez un voile d’eau à l’aide d’un vaporisateur. Pendant cette opération on peut débrancher l’appareil. 4C – INFORMATIONS POUR UNE CORRECTE INCUBATION Température conseillée au début de l’incubation : 37,7°C Température conseillée pendant les derniers 3 jours avant l’éclosion : 37,2°C.
20
Pour obtenir des bons résultats faire référence au suivant tableau :
Race Temps
d’incubation
Pour une correcte humidité au début de
l’incubation
Ne pas retourner les œufs après
Pour une correcte humidité pendant les derniers 3 jours avant l’éclosion
Poule 21 jours Remplir 1 bac d’eau Jour 18 Remplir les 2 bacs d’eau Faisan 23-25 jours Remplir 1 bac d’eau Jour 20 Remplir les 2 bacs d’eau Caille 16-17 jours Remplir 1 bac d’eau Jour 14 Remplir les 2 bacs d’eau Pintade 26-28 jours Remplir 1 bac d’eau Jour 23 Remplir les 2 bacs d’eau Dinde 28 jours Remplir 1 bac d’eau jour 25 Remplir les 2 bacs d’eau Perdrix 23-24 jours Remplir 1 bac d’eau jour 20 Remplir les 2 bacs d’eau Paon 28 jours Remplir 1 bac d’eau jour 25 Remplir les 2 bacs d’eau Oie 29-31 jours Remplir 1 bac d’eau jour 27 Remplir les 2 bacs d’eau Canard domestique / sauvage 27-28 jours Remplir 1 bac d’eau jour 24 Remplir les 2 bacs d’eau
Canard de barbarie 33-35 jours Remplir 1 bac d’eau jour 30 Remplir les 2 bacs d’eau
5 – CONTROLE PERIODIQUE DES ŒUFS PENDANT L’INCUBATION (MIRAGE)
Le mirage est une opération compliquée et délicate qui peut entraîner des fautes et faire éliminer des œufs fécondés. Puisqu’il s’agit d’une opération facultative, si on n’a pas d’expérience nous conseillons de ne pas l’effectuer et procéder dans l’incubation. Vous pouvez contrôler périodiquement les œufs incubés en les mirant. Cette opération doit être faite dans un endroit obscur, en employant un faisceau de lumière intense (ex. le mire-œufs River Systems art. 164), en suivant le tableau ci-dessous :
Race 1er contrôle 2ème contrôle 3ème contrôle
Poule à 8 jours à 11 jours à 18 jours Faisan à 8 jours à 12 jours à 19 jours Pintade à 8 jours à 13 jours à 24 jours Dinde à 8 jours à 13 jours à 24 jours Perdrix à 8 jours à 12 jours à 19 jours Paon à 9 jours à 14 jours à 24 jours Oie à 9 jours à 15 jours à 24 jours Canard domestique / sauvage à 9 jours à 13 jours à 24 jours Canard de barbarie à 10 jours à 15 jours à 25 jours
Prenez les œufs un par un de la couveuse et contrôlez-les immédiatement. L’œuf peut rester hors de la couveuse pour maximum 2 minutes. Avec un peu d’expérience et en utilisant le mire-œufs, on peut effectuer ce contrôle sans sortir les œufs de la couveuse. Dans ce cas, ouvrez la couveuse et appuyez le mire-œufs sur chaque œuf. Le faisceau de lumière permet de voir l’embryon. Ne manipulez pas les œufs brusquement car cela causerait la rupture des vaisseaux sanguins et la mort de l’embryon.
1er contrôle : début de l’incubation Généralement, il est difficile de voir l’embryon car il est incorporé dans le jaune d’œuf : près de la chambre à air et dans la pointe on peut voir des vaisseaux sanguins. Si l’œuf n’est pas fécondé, son intérieur sera uniforme, sans vaisseaux sanguins, et le jaune sera au milieu. Éliminez ces œufs. Il est possible que pendant ce stade on ne puisse pas voir distinctement l’intérieur des œufs à cause de la coquille épaisse ou brune : on devra les vérifier pendant le deuxième contrôle.
2ème contrôle : développement de l’embryon Généralement, on peut voir le réseau des vaisseaux sanguins dans la pointe de l’œuf et l’embryon ressemblera à une tache obscure. Si on ne peut pas voir de vaisseaux sanguins, cela signifie que l’embryon est mort.
3ème contrôle : vérification de l’embryon Généralement, l’embryon occupe la totalité de l’œuf, donc les vaisseaux sanguins ne doivent plus être visibles. La chambre à air est grande. Si l’embryon n’occupe pas tout l’espace, il y a des vaisseaux sanguins, la chambre à air est petite et le blanc d’œuf n’a pas été consommé, cela signifie que l’embryon est sous-développé et l’œuf doit être écarté.
21
6 – ECLOSION ET NAISSANCE DU POUSSIN
L’opération décrite ci-dessous est très délicate et doit être exécutée rapidement pour éviter que les œufs se refroidissent. Nous conseillons de l’effectuer en deux personnes.
Trois jours avant la date d’éclosion prévue :
Seulement pour art. 524/A : arrêtez le moteur de retournement en le débranchant, en veillant à ce que les œufs soient en position verticale. Cela facilitera l’enlèvement du panier à œufs, après avoir ôté les œufs.
A) Ôtez les œufs du panier et posez-les délicatement sur une couverture.
B) Seulement pour art. 524 : enlevez le levier en métal placé dans la partie antérieure de la couveuse.
C) Retirez le panier. Seulement pour art. 524/A : pour enlever le panier à œufs, soulevez-le
en l’enlevant de la languette du moteur de retournement (lorsque vous le replacerez, faites attention à le réinsérer correctement). Si après plusieurs cycles d’incubation on voit que l’encoche où la languette du moteur est insérée s’est trop élargie, échangez la rangée de paniers avec une autre du dispositif.
D) Mettez la grille en plastique fournie (que vous aviez enlevé avant le début de l’incubation) dans la base de la
couveuse et vérifiez que les deux languettes de la grille couvrent l’intérieur des deux bouches de remplissage des bacs pour éviter que les poussins tombent dans l’eau et se noient.
E) Mettez les œufs sur la grille. Replacez le couvercle.
F) Remplissez les deux bacs (5/A et 5/B) d’eau tiède.
G) Modifiez la température en la portant à 37,2°C (voir instructions à page 18).
IMPORTANT – pendant les derniers 3 jours : - Ne tournez pas les œufs - N’ouvrez pas la couveuse inutilement. Cela ferait sortir la chaleur et l’humidité nécessaires à l’éclosion, en causant
la mort des poussins dans la coquille. On peut ouvrir la couveuse MAXIMUM UNE FOIS PAR JOUR pour enlever les poussins secs.
22
Gardez les nouveaux nés dans la couveuse pour environ 12 heures. Ils peuvent rester dedans pour 3 jours sans boire ni manger sans en souffrir.
7 – PREMIERS JOURS DE VIE
Mettez les poussins dans un endroit qui leur assure chaleur et lumière, sans courants d’air et où ils pourront être nourris et abreuvés.
CONSEILS: on peut employer une boite en carton de 50x50 cm. Couvrez son fond avec des feuilles de papier journal, qui devront être changés chaque jour. Autrement on peut créer un abri sevrage en utilisant les panneaux en plastique art. 4510-09 (dimensions de chaque panneau cm 800x400). Pour le chauffage, accrochez un réflecteur avec ampoule à rayons infrarouges (voir liste ci-dessous) à environ 20-25 cm du sol. Réglez la température en changeant la hauteur du réflecteur. La boite ou l’abri doivent être suffisamment grands pour contenir un abreuvoir ou une mangeoire. 7A – AVANTAGES DE LA LAMPE A RAYONS INFRAROUGES Les lampes à rayons infrarouges ne servent pas seulement pour chauffer le poussin, mais elles agissent en profondeur, sur les tissus et les muscles, en fixant le calcium dans les os et en facilitant l’expansion des vaisseaux sanguins et lymphatiques, en améliorant ainsi la circulation du sang et, par conséquent, la nutrition des cellules. Cela facilite un sain développement du poussin qui sera aussi plus résistant aux maladies. Le réflecteur (en aluminium ou en polycarbonate) augmente la concentration des rayons infrarouges provenant de l’ampoule. - art. 701 : réflecteur en aluminium Ø 21 cm, complet de chaine L=2m et grille de protection - art. 702 : réflecteur en polycarbonate Ø 27 cm (chaine et grille de protection en option) - art. 750/100 : ampoule Philips à rayons infrarouges lourde IR100R - art. 750/150 : ampoule Philips à rayons infrarouges 150W légère 7B – NUTRITION Généralement les poussins commencent à manger et boire du 2ème/3ème jour de vie. Mettez dans la boite/abri un abreuvoir et une mangeoire pour de la nourriture fine. Nous conseillons les suivants articles :
Abreuvoirs - art. 137 : abreuvoir à siphon de 1,5 litres (bon pour tous les poussins, même de petites dimensions) - art. 138 : abreuvoir à siphon de 3 litres (bon pour poussins de taille un peu plus grande – pas cailles ou faisan) - art. 137/A : abreuvoir porte-bouteille (pour poussins de taille un peu plus grande – pas cailles ou faisan) Si vous utilisez des autres abreuvoirs, veillez à ce que la cuvette de l’eau ne soit pas trop grande : la hauteur indiquée est de 3-4 cm, autrement les poussins risquent de se baigner ou de se noyer. Pour éviter cela nous vous suggérons de mettre des cailloux dans le fond de la cuvette qui serviront aussi à les attirer vers l’eau à boire.
Mangeoires - art. 296 : mangeoire en plastique Ø 24 cm. - art. 120 : mangeoire linéaire galvanisée avec grille, L=0,3 m – ou L=0,5 m (art. 121) - art. 120/A/R : mangeoire linéaire en plastique avec grille, L=0,5 m Nous conseillons d’éparpiller un peu de nourriture aussi sur les feuilles de papier.
23
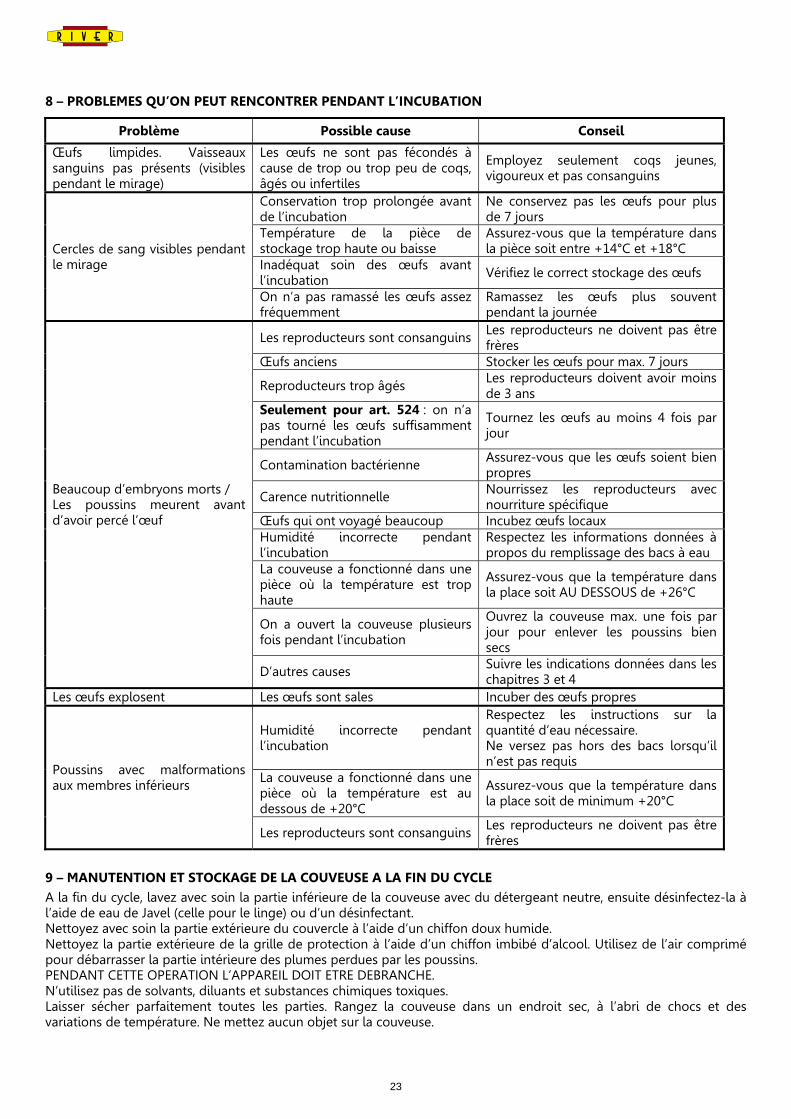
8 – PROBLEMES QU’ON PEUT RENCONTRER PENDANT L’INCUBATION
Problème Possible cause Conseil
Œufs limpides. Vaisseaux sanguins pas présents (visibles pendant le mirage)
Les œufs ne sont pas fécondés à cause de trop ou trop peu de coqs, âgés ou infertiles
Employez seulement coqs jeunes, vigoureux et pas consanguins
Cercles de sang visibles pendant le mirage
Conservation trop prolongée avant de l’incubation
Ne conservez pas les œufs pour plus de 7 jours
Température de la pièce de stockage trop haute ou baisse
Assurez-vous que la température dans la pièce soit entre +14°C et +18°C
Inadéquat soin des œufs avant l’incubation Vérifiez le correct stockage des œufs
On n’a pas ramassé les œufs assez fréquemment
Ramassez les œufs plus souvent pendant la journée
Beaucoup d’embryons morts / Les poussins meurent avant d’avoir percé l’œuf
Les reproducteurs sont consanguins Les reproducteurs ne doivent pas être frères
Œufs anciens Stocker les œufs pour max. 7 jours
Reproducteurs trop âgés Les reproducteurs doivent avoir moins de 3 ans
Seulement pour art. 524 : on n’a pas tourné les œufs suffisamment pendant l’incubation
Tournez les œufs au moins 4 fois par jour
Contamination bactérienne Assurez-vous que les œufs soient bien propres
Carence nutritionnelle Nourrissez les reproducteurs avec nourriture spécifique
Œufs qui ont voyagé beaucoup Incubez œufs locaux Humidité incorrecte pendant l’incubation
Respectez les informations données à propos du remplissage des bacs à eau
La couveuse a fonctionné dans une pièce où la température est trop haute
Assurez-vous que la température dans la place soit AU DESSOUS de +26°C
On a ouvert la couveuse plusieurs fois pendant l’incubation
Ouvrez la couveuse max. une fois par jour pour enlever les poussins bien secs
D’autres causes Suivre les indications données dans les chapitres 3 et 4
Les œufs explosent Les œufs sont sales Incuber des œufs propres
Poussins avec malformations aux membres inférieurs
Humidité incorrecte pendant l’incubation
Respectez les instructions sur la quantité d’eau nécessaire. Ne versez pas hors des bacs lorsqu’il n’est pas requis
La couveuse a fonctionné dans une pièce où la température est au dessous de +20°C
Assurez-vous que la température dans la place soit de minimum +20°C
Les reproducteurs sont consanguins Les reproducteurs ne doivent pas être frères
9 – MANUTENTION ET STOCKAGE DE LA COUVEUSE A LA FIN DU CYCLE
A la fin du cycle, lavez avec soin la partie inférieure de la couveuse avec du détergeant neutre, ensuite désinfectez-la à l’aide de eau de Javel (celle pour le linge) ou d’un désinfectant. Nettoyez avec soin la partie extérieure du couvercle à l’aide d’un chiffon doux humide. Nettoyez la partie extérieure de la grille de protection à l’aide d’un chiffon imbibé d’alcool. Utilisez de l’air comprimé pour débarrasser la partie intérieure des plumes perdues par les poussins. PENDANT CETTE OPERATION L’APPAREIL DOIT ETRE DEBRANCHE. N’utilisez pas de solvants, diluants et substances chimiques toxiques. Laisser sécher parfaitement toutes les parties. Rangez la couveuse dans un endroit sec, à l’abri de chocs et des variations de température. Ne mettez aucun objet sur la couveuse.
24
10 – INSTRUCTIONS / CONSEILS
- Ne laissez pas l’appareil à la portée des enfants ; - Ne pas utiliser ou ranger l’appareil à proximité de substances corrosives, inflammables ou explosives ; - N’utilisez pas l’appareil si le câble électrique, le circuit électronique ou la grille de protection sont endommagés ; - Gardez la couveuse à l’abri des chocs ; - N’ouvrez pas la boite de la centrale électronique et n’enlevez pas la grille de protection du ventilateur ; - Nettoyez l’appareil seulement après la fin du cycle d’incubation. La fiche de courant doit être débranchée. - ATTENTION : la garantie n’est plus valide si on modifie ou altère la machine, ou bien si elle est utilisée
improprement.
11 – CONFORMITE DE L’APPAREIL Cet appareil est conforme aux Directives Européennes CE. SR-1 EN 60335, SR EN 55014-1, 2006/95/CE, EMC 2004/108/CE, ROHS 2002/95/CE, CEI EN 60730-2-1/A11, CEI EN 60730-2-9, CEI EN 61032, UNI EN ISO 13732, UNI EN ISO 13857, CEI 48-8.
12 – GARANTIE
La garantie a une validité d’un an à partir de la date d’achat. Pendant la durée de la garantie, River Systems srl prendra gratuitement à sa charge la réparation des vices de fabrication ou de matière en se réservant le droit de décider si réparer ou, si nécessaire, remplacer l’appareil. Cette garantie s’étend à tous les pays où cet appareil est commercialisé par River Systems srl ou par ses distributeurs. La garantie ne couvre pas : les dommages occasionnés par une utilisation inadéquate et l’usure normale. Cette garantie devient caduque si des réparations ont été effectuées par des personnes non autorisées et si on utilise des pièces détachées non originales. Pour toute réclamation intervenant pendant la période de garantie, remettez ou envoyez l’appareil complet ainsi que la preuve d’achat, à votre revendeur.
En accomplissant les Directives 2002/95/CE, 2002/96/CE e 2003/108/CE, concernant la réduction de l’emploi de matériaux dangereux dans les équipements électriques et électroniques, aussi que la mise au rebut des déchets, le symbole de la poubelle barrée montré ci-dessus indique que le produit, à la fin de sa vie utile, doit être éliminé dans une structure de récupération et de recyclage approprié. L'élimination de ce produit séparément des autres déchets ménagers entraînera une diminution du volume des déchets incinérés ou envoyés en centre d'enfouissement technique et permettra de protéger les ressources naturelles. La mise au rebut abusive comporte l’application des sanctions administratives prévues par les lois en vigueur. Demandez à votre Service Local pour l’Élimination des Déchets les informations pour la correcte procédure à suivre
25
ENGLISH 1 – INTRODUCTION
The COVINA SUPER 24 is designed to hatch hen-eggs as well as pheasant, guinea fowl, quail, partridge, grey partridge, rock partridge, turkey, palmipeds (goose, mallard, all breeds of duck, etc.), peacock, pigeon, exotic birds and birds of prey. Art. 524 is supplied with a semi-automatic egg turning system, manually operated from the outside by means of a small handle connected to the swinging egg tray in the machine. It is possible to retrofit the egg turning motor (art. 556M-1) to automatically tilt the egg tray. Assembly instructions supplied with the motor. Art. 524/A is complete with the motor for the automatic tilting of the swinging egg tray.
A high-quality steel electric resistor produces the heat necessary for incubation. It is controlled by a reliable electronic precision thermostat that allows setting the temperature inside the incubator (from 30°C to 40°C) and keeping it constant and accurate. The temperature is set by pressing the (+) and (-) buttons on the control panel.
A turbine fan uniformly distributes the warm and humid air inside the incubator.
The natural “surface-type” humidification is achieved by the molded water basins at the base of the incubator. The two openings at the front allow for filling the basins from the outside, without opening the incubator, thus preventing any heat and humidity loss.
2 – TECHNICAL SPECIFICATIONS AND DATA
Incubator model Covina Super 24 (art. 524) – semi-automatic Covina Super 24 (art. 524/A) – automatic
Type of eggs to incubate Hen, pheasant, guinea fowl, quail, partridge, grey partridge, rock partridge, turkey, palmipeds (goose, mallard, all breeds of duck, etc.), peacock, pigeon, exotic birds and birds of prey
Rated voltage Single phase, 230 Volt CE Rated frequency 50/60 Hz CE Maximum power 150 W Average daily consumption Max. 2 kW/24h Display Digital temperature setting with decimal point Ventilation Turbine-type Thermostat Electronic precision thermostat +/-0,1°C Electrical resistor 150W
Humidity in the incubator 45-55% with water in one basin 60-65% with water in both basins
Number of egg turnings in 24h Art. 524: with eggs placed in the egg tray: minimum 4 times Art. 524/A: one inclination every two hours
Incubator capacity 24 eggs of medium/large size or 96 small eggs (e.g. quail) placed in the egg tray
Dimensions Art. 524: 500x340x255 mm Art. 524/A: 500x380x255 mm
Weight Art. 524: 3,37 Kg Art. 524/A: 3,85 Kg
3 – EGG SELECTION AND STORAGE FOR INCUBATION
It is advisable to incubate eggs coming from one’s own stock, as eggs that have travelled will have hatching rates below 50% due to stress, vibrations, sudden changes in temperature and asphyxiated embryos (where packaging fails to let the eggs breathe). Anyway, if you use eggs that have travelled, let them rest into an egg tray for at least 24 hours, their point downwards, before incubating them.
Choose eggs from parent stock that are well developed, well fed and healthy.
Parent stock mustn’t be blood-related (males must come from a different source), interbreeding can produce eggs with weak embryos, with a high mortality rate (a weak chick develops but without the strength required to hatch).
Ensure all birds are sexually mature and that the correct ratios between males and females are observed.
26
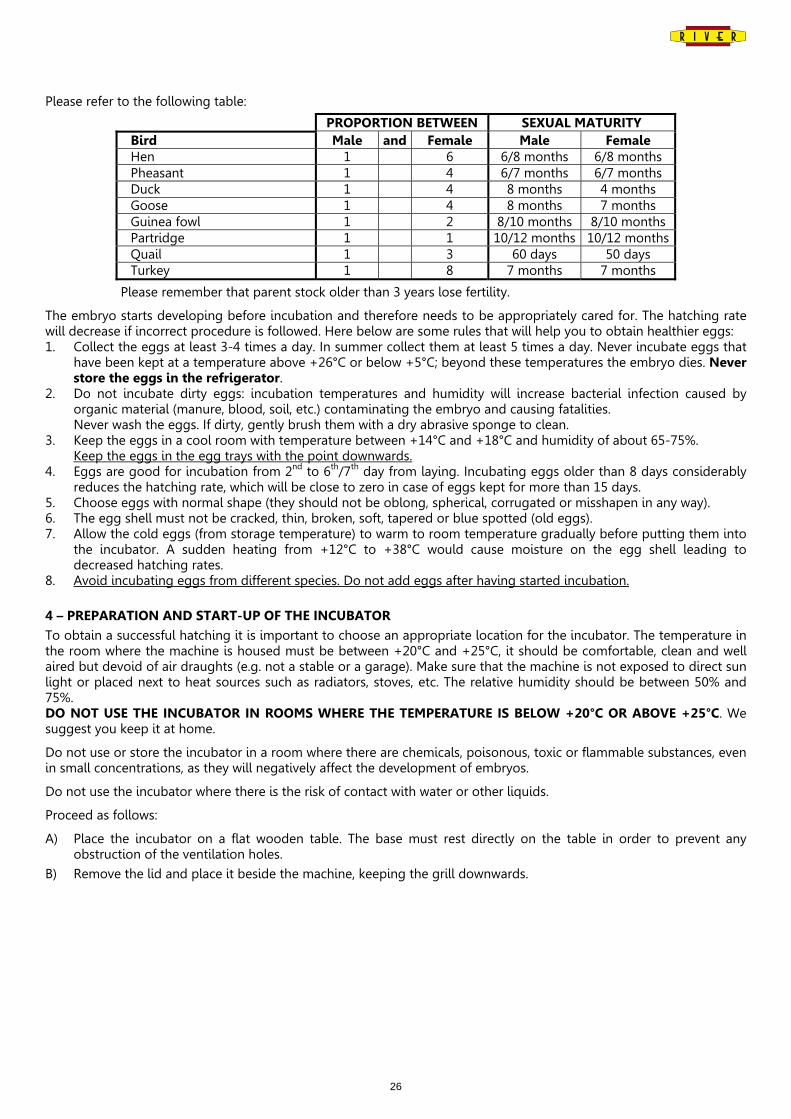
Please refer to the following table:
PROPORTION BETWEEN SEXUAL MATURITY Bird Male and Female Male Female Hen 1 6 6/8 months 6/8 months Pheasant 1 4 6/7 months 6/7 months Duck 1 4 8 months 4 months Goose 1 4 8 months 7 months Guinea fowl 1 2 8/10 months 8/10 months Partridge 1 1 10/12 months 10/12 months Quail 1 3 60 days 50 days Turkey 1 8 7 months 7 months
Please remember that parent stock older than 3 years lose fertility.
The embryo starts developing before incubation and therefore needs to be appropriately cared for. The hatching rate will decrease if incorrect procedure is followed. Here below are some rules that will help you to obtain healthier eggs: 1. Collect the eggs at least 3-4 times a day. In summer collect them at least 5 times a day. Never incubate eggs that
have been kept at a temperature above +26°C or below +5°C; beyond these temperatures the embryo dies. Never store the eggs in the refrigerator.
2. Do not incubate dirty eggs: incubation temperatures and humidity will increase bacterial infection caused by organic material (manure, blood, soil, etc.) contaminating the embryo and causing fatalities.
Never wash the eggs. If dirty, gently brush them with a dry abrasive sponge to clean. 3. Keep the eggs in a cool room with temperature between +14°C and +18°C and humidity of about 65-75%. Keep the eggs in the egg trays with the point downwards. 4. Eggs are good for incubation from 2nd to 6th/7th day from laying. Incubating eggs older than 8 days considerably
reduces the hatching rate, which will be close to zero in case of eggs kept for more than 15 days. 5. Choose eggs with normal shape (they should not be oblong, spherical, corrugated or misshapen in any way). 6. The egg shell must not be cracked, thin, broken, soft, tapered or blue spotted (old eggs). 7. Allow the cold eggs (from storage temperature) to warm to room temperature gradually before putting them into
the incubator. A sudden heating from +12°C to +38°C would cause moisture on the egg shell leading to decreased hatching rates.
8. Avoid incubating eggs from different species. Do not add eggs after having started incubation.
4 – PREPARATION AND START-UP OF THE INCUBATOR
To obtain a successful hatching it is important to choose an appropriate location for the incubator. The temperature in the room where the machine is housed must be between +20°C and +25°C, it should be comfortable, clean and well aired but devoid of air draughts (e.g. not a stable or a garage). Make sure that the machine is not exposed to direct sun light or placed next to heat sources such as radiators, stoves, etc. The relative humidity should be between 50% and 75%. DO NOT USE THE INCUBATOR IN ROOMS WHERE THE TEMPERATURE IS BELOW +20°C OR ABOVE +25°C. We suggest you keep it at home.
Do not use or store the incubator in a room where there are chemicals, poisonous, toxic or flammable substances, even in small concentrations, as they will negatively affect the development of embryos.
Do not use the incubator where there is the risk of contact with water or other liquids.
Proceed as follows:
A) Place the incubator on a flat wooden table. The base must rest directly on the table in order to prevent any obstruction of the ventilation holes.
B) Remove the lid and place it beside the machine, keeping the grill downwards.
27
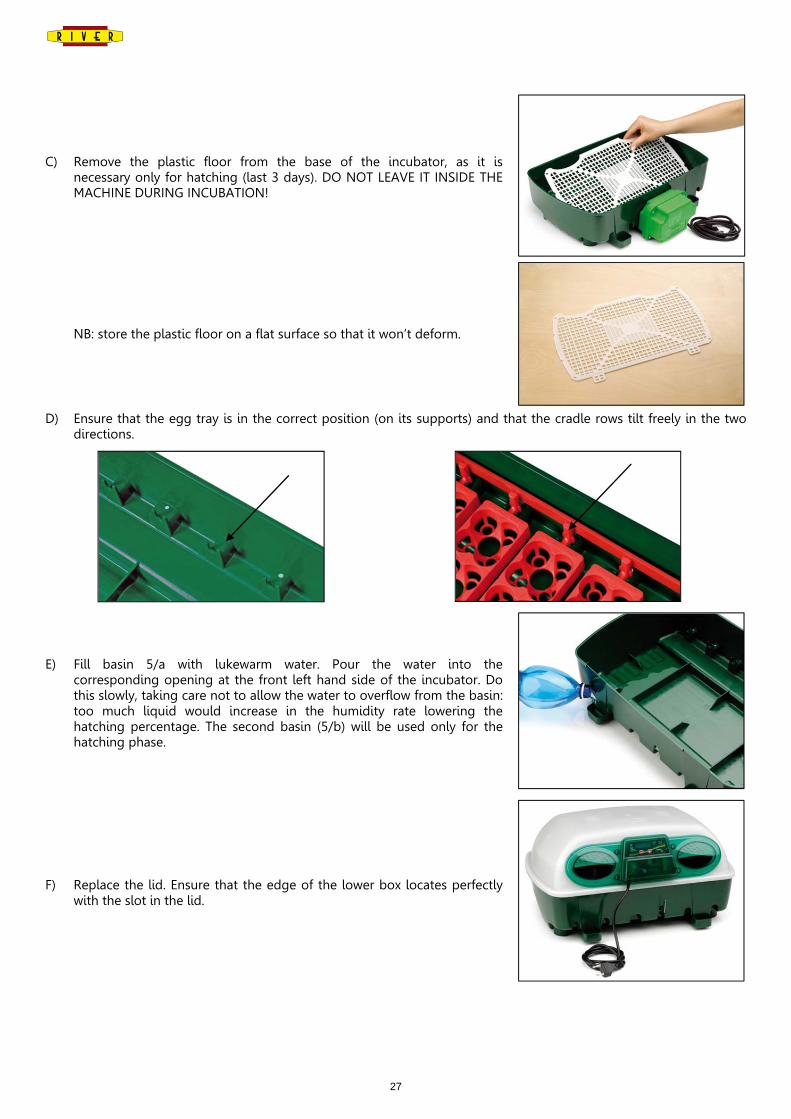
C) Remove the plastic floor from the base of the incubator, as it is necessary only for hatching (last 3 days). DO NOT LEAVE IT INSIDE THE MACHINE DURING INCUBATION!
NB: store the plastic floor on a flat surface so that it won’t deform.
D) Ensure that the egg tray is in the correct position (on its supports) and that the cradle rows tilt freely in the two
directions.
E) Fill basin 5/a with lukewarm water. Pour the water into the corresponding opening at the front left hand side of the incubator. Do this slowly, taking care not to allow the water to overflow from the basin: too much liquid would increase in the humidity rate lowering the hatching percentage. The second basin (5/b) will be used only for the hatching phase.
F) Replace the lid. Ensure that the edge of the lower box locates perfectly with the slot in the lid.
28
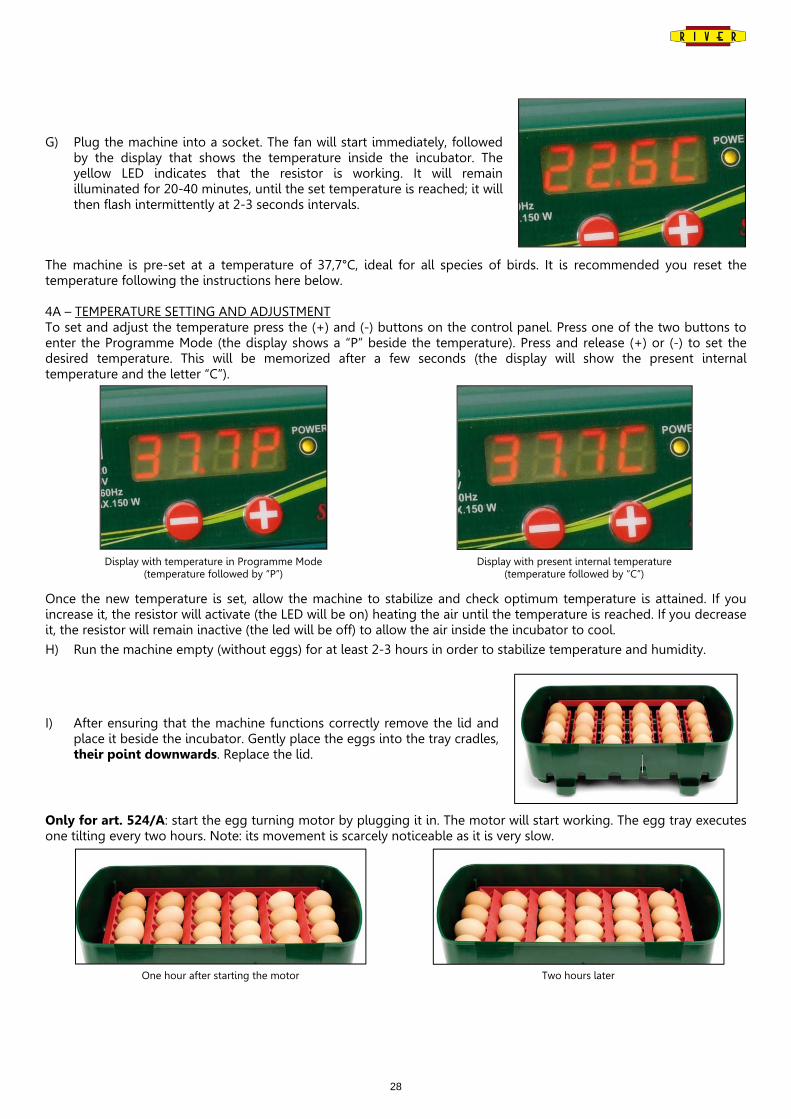
G) Plug the machine into a socket. The fan will start immediately, followed by the display that shows the temperature inside the incubator. The yellow LED indicates that the resistor is working. It will remain illuminated for 20-40 minutes, until the set temperature is reached; it will then flash intermittently at 2-3 seconds intervals.
The machine is pre-set at a temperature of 37,7°C, ideal for all species of birds. It is recommended you reset the temperature following the instructions here below. 4A – TEMPERATURE SETTING AND ADJUSTMENT To set and adjust the temperature press the (+) and (-) buttons on the control panel. Press one of the two buttons to enter the Programme Mode (the display shows a “P” beside the temperature). Press and release (+) or (-) to set the desired temperature. This will be memorized after a few seconds (the display will show the present internal temperature and the letter “C”).
Display with temperature in Programme Mode
(temperature followed by “P”) Display with present internal temperature
(temperature followed by “C”)
Once the new temperature is set, allow the machine to stabilize and check optimum temperature is attained. If you increase it, the resistor will activate (the LED will be on) heating the air until the temperature is reached. If you decrease it, the resistor will remain inactive (the led will be off) to allow the air inside the incubator to cool.
H) Run the machine empty (without eggs) for at least 2-3 hours in order to stabilize temperature and humidity.
I) After ensuring that the machine functions correctly remove the lid and place it beside the incubator. Gently place the eggs into the tray cradles, their point downwards. Replace the lid.
Only for art. 524/A: start the egg turning motor by plugging it in. The motor will start working. The egg tray executes one tilting every two hours. Note: its movement is scarcely noticeable as it is very slow.
One hour after starting the motor
Two hours later

29
Do not cover the incubator or keep it in a box whilst in use. This would prevent the air exchange in the incubator, necessary for the embryo development, that takes place through the ventilation holes present in the base of the incubator and through the two inspection windows.
The incubation cycle starts now. Mark the date on a calendar and follow the instructions shown on table 4C “Information For A Correct Incubation”.
Only for art. 524: change the inclination of the eggs at least 4 times a day by tilting the handle placed in the front of the incubator. The handle must rest alternately at the 10 o’clock position to the left or the 2 o’clock position to the right. NEVER LEAVE THE HANDLE (AND THEREFORE THE EGGS) IN A VERTICAL POSITION (h. 12.00). Move the handle gently in order to avoid shocks to the eggs.
When used with the egg turning motor (art. 556M-1), ensure that the cradles of the egg tray make a complete inclination every two hours.
Inclination rightwards Inclination leftwards Handle rotation
Monitor the water level in the basin by looking into the opening every 24 hours (the level you can see inside the opening corresponds to the one in the basin). Fill up with clean and warm water (+35/40°C).
Please beware that it is the water surface and not its quantity that generates the humidity, therefore the quantity of water in the basin will not affect the humidity rate. The punctual and constant check for the presence of water will provide the necessary humidity, preventing the basin from running out of water.
In case of power failure, surround the four sides of the incubator with bottles containing hot water and cover everything with a blanket. This allows the temperature within the incubator to be retained. Once the power is restored, immediately remove all of these items. Do not keep the incubator covered for long periods: low oxygen levels inside the incubator will drastically reduce the hatching rate.
It is possible that during the first incubation cycles the self lubricating turbine brasses may drip some oil onto the central part of the protection grill. This oil is not harmful to the eggs or to the chicks. Remove it with a cloth moistened with alcohol during the cleaning operations at the end of the cycle. 4B – INCUBATION OF PALMIPEDS-EGGS (GOOSE, DUCK, ETC.) From day 10 of incubation to three days prior the foreseen hatching date, open the incubator and let the eggs cool for 15 minutes each day. Before putting the lid back on, spray a misting of water on the eggs. During this operation you may unplug the machine. 4C – INFORMATION FOR A CORRECT INCUBATION Suggested temperature at the beginning of incubation: 37,7°C Suggested temperature during the last 3 days before hatching: 37,2°C.
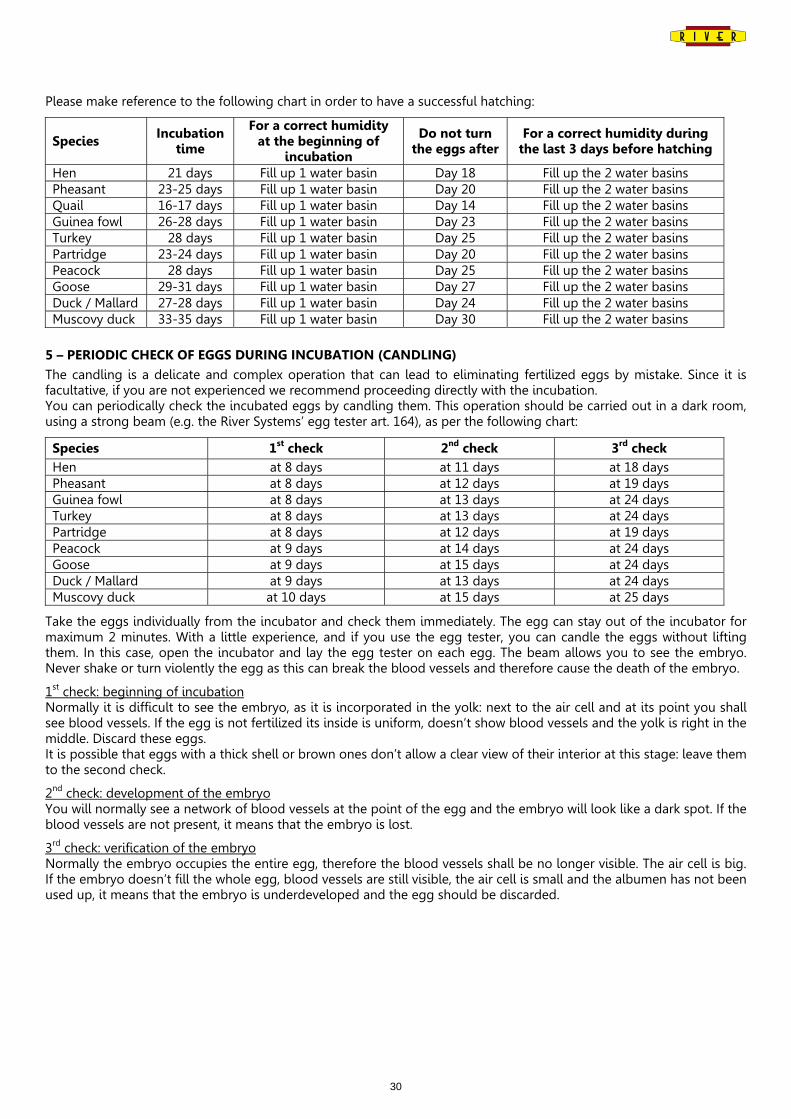
30
Please make reference to the following chart in order to have a successful hatching:
Species Incubation
time
For a correct humidity at the beginning of
incubation
Do not turn the eggs after
For a correct humidity during the last 3 days before hatching
Hen 21 days Fill up 1 water basin Day 18 Fill up the 2 water basins Pheasant 23-25 days Fill up 1 water basin Day 20 Fill up the 2 water basins Quail 16-17 days Fill up 1 water basin Day 14 Fill up the 2 water basins Guinea fowl 26-28 days Fill up 1 water basin Day 23 Fill up the 2 water basins Turkey 28 days Fill up 1 water basin Day 25 Fill up the 2 water basins Partridge 23-24 days Fill up 1 water basin Day 20 Fill up the 2 water basins Peacock 28 days Fill up 1 water basin Day 25 Fill up the 2 water basins Goose 29-31 days Fill up 1 water basin Day 27 Fill up the 2 water basins Duck / Mallard 27-28 days Fill up 1 water basin Day 24 Fill up the 2 water basins Muscovy duck 33-35 days Fill up 1 water basin Day 30 Fill up the 2 water basins
5 – PERIODIC CHECK OF EGGS DURING INCUBATION (CANDLING)
The candling is a delicate and complex operation that can lead to eliminating fertilized eggs by mistake. Since it is facultative, if you are not experienced we recommend proceeding directly with the incubation. You can periodically check the incubated eggs by candling them. This operation should be carried out in a dark room, using a strong beam (e.g. the River Systems’ egg tester art. 164), as per the following chart:
Species 1st check 2nd check 3rd check Hen at 8 days at 11 days at 18 days Pheasant at 8 days at 12 days at 19 days Guinea fowl at 8 days at 13 days at 24 days Turkey at 8 days at 13 days at 24 days Partridge at 8 days at 12 days at 19 days Peacock at 9 days at 14 days at 24 days Goose at 9 days at 15 days at 24 days Duck / Mallard at 9 days at 13 days at 24 days Muscovy duck at 10 days at 15 days at 25 days
Take the eggs individually from the incubator and check them immediately. The egg can stay out of the incubator for maximum 2 minutes. With a little experience, and if you use the egg tester, you can candle the eggs without lifting them. In this case, open the incubator and lay the egg tester on each egg. The beam allows you to see the embryo. Never shake or turn violently the egg as this can break the blood vessels and therefore cause the death of the embryo.
1st check: beginning of incubation Normally it is difficult to see the embryo, as it is incorporated in the yolk: next to the air cell and at its point you shall see blood vessels. If the egg is not fertilized its inside is uniform, doesn’t show blood vessels and the yolk is right in the middle. Discard these eggs. It is possible that eggs with a thick shell or brown ones don’t allow a clear view of their interior at this stage: leave them to the second check.
2nd check: development of the embryo You will normally see a network of blood vessels at the point of the egg and the embryo will look like a dark spot. If the blood vessels are not present, it means that the embryo is lost.
3rd check: verification of the embryo Normally the embryo occupies the entire egg, therefore the blood vessels shall be no longer visible. The air cell is big. If the embryo doesn’t fill the whole egg, blood vessels are still visible, the air cell is small and the albumen has not been used up, it means that the embryo is underdeveloped and the egg should be discarded.
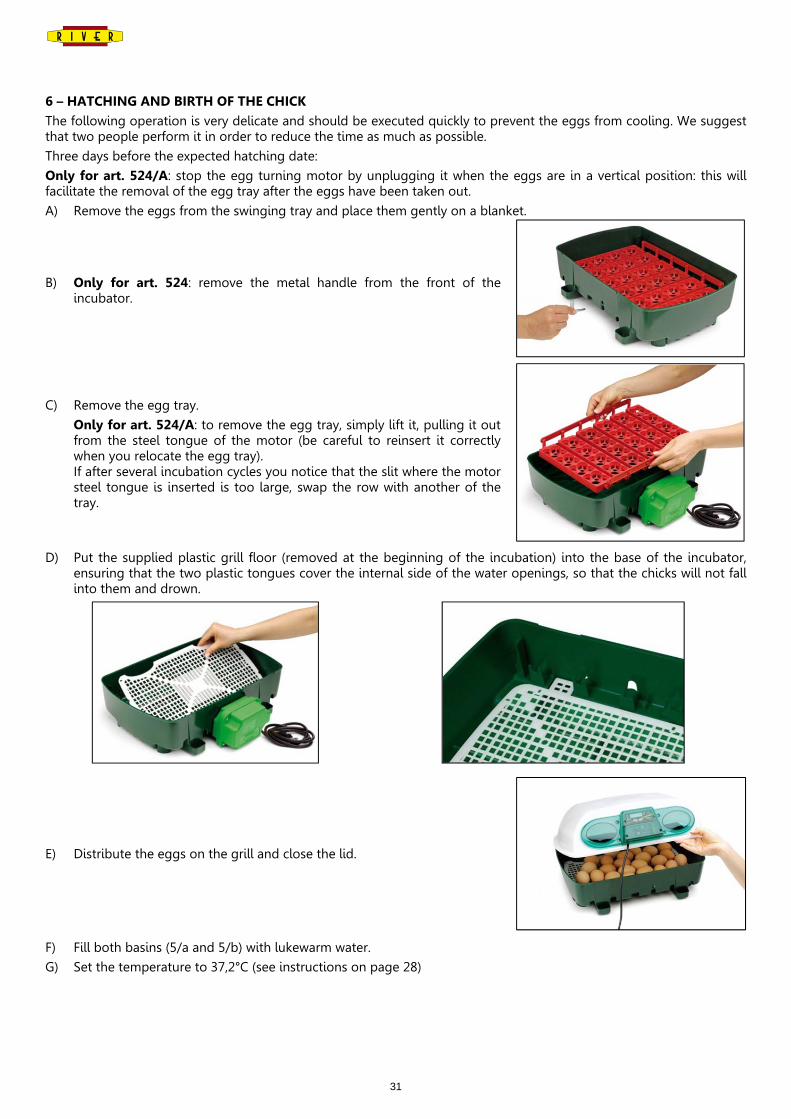
31
6 – HATCHING AND BIRTH OF THE CHICK
The following operation is very delicate and should be executed quickly to prevent the eggs from cooling. We suggest that two people perform it in order to reduce the time as much as possible.
Three days before the expected hatching date:
Only for art. 524/A: stop the egg turning motor by unplugging it when the eggs are in a vertical position: this will facilitate the removal of the egg tray after the eggs have been taken out.
A) Remove the eggs from the swinging tray and place them gently on a blanket.
B) Only for art. 524: remove the metal handle from the front of the incubator.
C) Remove the egg tray.
Only for art. 524/A: to remove the egg tray, simply lift it, pulling it out from the steel tongue of the motor (be careful to reinsert it correctly when you relocate the egg tray).
If after several incubation cycles you notice that the slit where the motor steel tongue is inserted is too large, swap the row with another of the tray.
D) Put the supplied plastic grill floor (removed at the beginning of the incubation) into the base of the incubator, ensuring that the two plastic tongues cover the internal side of the water openings, so that the chicks will not fall into them and drown.
E) Distribute the eggs on the grill and close the lid.
F) Fill both basins (5/a and 5/b) with lukewarm water.
G) Set the temperature to 37,2°C (see instructions on page 28)
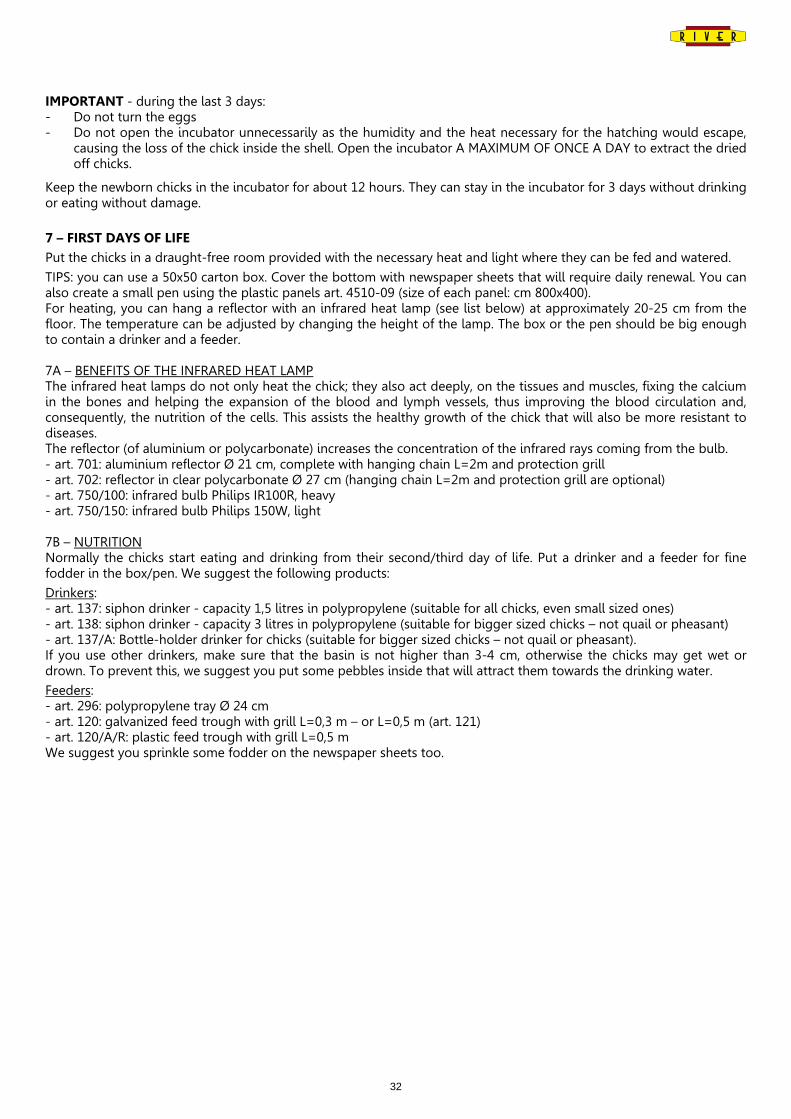
32
IMPORTANT - during the last 3 days: - Do not turn the eggs - Do not open the incubator unnecessarily as the humidity and the heat necessary for the hatching would escape,
causing the loss of the chick inside the shell. Open the incubator A MAXIMUM OF ONCE A DAY to extract the dried off chicks.
Keep the newborn chicks in the incubator for about 12 hours. They can stay in the incubator for 3 days without drinking or eating without damage.
7 – FIRST DAYS OF LIFE
Put the chicks in a draught-free room provided with the necessary heat and light where they can be fed and watered.
TIPS: you can use a 50x50 carton box. Cover the bottom with newspaper sheets that will require daily renewal. You can also create a small pen using the plastic panels art. 4510-09 (size of each panel: cm 800x400). For heating, you can hang a reflector with an infrared heat lamp (see list below) at approximately 20-25 cm from the floor. The temperature can be adjusted by changing the height of the lamp. The box or the pen should be big enough to contain a drinker and a feeder. 7A – BENEFITS OF THE INFRARED HEAT LAMP The infrared heat lamps do not only heat the chick; they also act deeply, on the tissues and muscles, fixing the calcium in the bones and helping the expansion of the blood and lymph vessels, thus improving the blood circulation and, consequently, the nutrition of the cells. This assists the healthy growth of the chick that will also be more resistant to diseases. The reflector (of aluminium or polycarbonate) increases the concentration of the infrared rays coming from the bulb. - art. 701: aluminium reflector Ø 21 cm, complete with hanging chain L=2m and protection grill - art. 702: reflector in clear polycarbonate Ø 27 cm (hanging chain L=2m and protection grill are optional) - art. 750/100: infrared bulb Philips IR100R, heavy - art. 750/150: infrared bulb Philips 150W, light 7B – NUTRITION Normally the chicks start eating and drinking from their second/third day of life. Put a drinker and a feeder for fine fodder in the box/pen. We suggest the following products:
Drinkers: - art. 137: siphon drinker - capacity 1,5 litres in polypropylene (suitable for all chicks, even small sized ones) - art. 138: siphon drinker - capacity 3 litres in polypropylene (suitable for bigger sized chicks – not quail or pheasant) - art. 137/A: Bottle-holder drinker for chicks (suitable for bigger sized chicks – not quail or pheasant). If you use other drinkers, make sure that the basin is not higher than 3-4 cm, otherwise the chicks may get wet or drown. To prevent this, we suggest you put some pebbles inside that will attract them towards the drinking water.
Feeders: - art. 296: polypropylene tray Ø 24 cm - art. 120: galvanized feed trough with grill L=0,3 m – or L=0,5 m (art. 121) - art. 120/A/R: plastic feed trough with grill L=0,5 m We suggest you sprinkle some fodder on the newspaper sheets too.
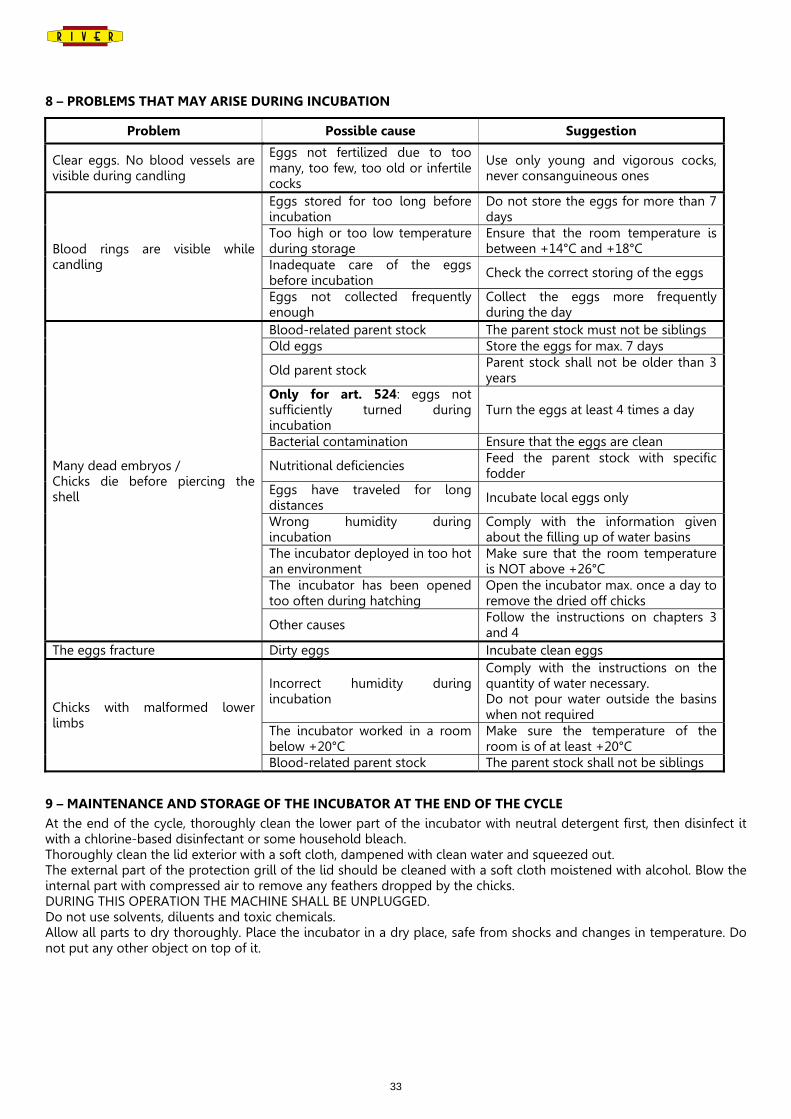
33
8 – PROBLEMS THAT MAY ARISE DURING INCUBATION
Problem Possible cause Suggestion
Clear eggs. No blood vessels are visible during candling
Eggs not fertilized due to too many, too few, too old or infertile cocks
Use only young and vigorous cocks, never consanguineous ones
Blood rings are visible while candling
Eggs stored for too long before incubation
Do not store the eggs for more than 7 days
Too high or too low temperature during storage
Ensure that the room temperature is between +14°C and +18°C
Inadequate care of the eggs before incubation Check the correct storing of the eggs
Eggs not collected frequently enough
Collect the eggs more frequently during the day
Many dead embryos / Chicks die before piercing the shell
Blood-related parent stock The parent stock must not be siblings Old eggs Store the eggs for max. 7 days
Old parent stock Parent stock shall not be older than 3 years
Only for art. 524: eggs not sufficiently turned during incubation
Turn the eggs at least 4 times a day
Bacterial contamination Ensure that the eggs are clean
Nutritional deficiencies Feed the parent stock with specific fodder
Eggs have traveled for long distances Incubate local eggs only
Wrong humidity during incubation
Comply with the information given about the filling up of water basins
The incubator deployed in too hot an environment
Make sure that the room temperature is NOT above +26°C
The incubator has been opened too often during hatching
Open the incubator max. once a day to remove the dried off chicks
Other causes Follow the instructions on chapters 3 and 4
The eggs fracture Dirty eggs Incubate clean eggs
Chicks with malformed lower limbs
Incorrect humidity during incubation
Comply with the instructions on the quantity of water necessary. Do not pour water outside the basins when not required
The incubator worked in a room below +20°C
Make sure the temperature of the room is of at least +20°C
Blood-related parent stock The parent stock shall not be siblings
9 – MAINTENANCE AND STORAGE OF THE INCUBATOR AT THE END OF THE CYCLE
At the end of the cycle, thoroughly clean the lower part of the incubator with neutral detergent first, then disinfect it with a chlorine-based disinfectant or some household bleach. Thoroughly clean the lid exterior with a soft cloth, dampened with clean water and squeezed out. The external part of the protection grill of the lid should be cleaned with a soft cloth moistened with alcohol. Blow the internal part with compressed air to remove any feathers dropped by the chicks. DURING THIS OPERATION THE MACHINE SHALL BE UNPLUGGED. Do not use solvents, diluents and toxic chemicals. Allow all parts to dry thoroughly. Place the incubator in a dry place, safe from shocks and changes in temperature. Do not put any other object on top of it.
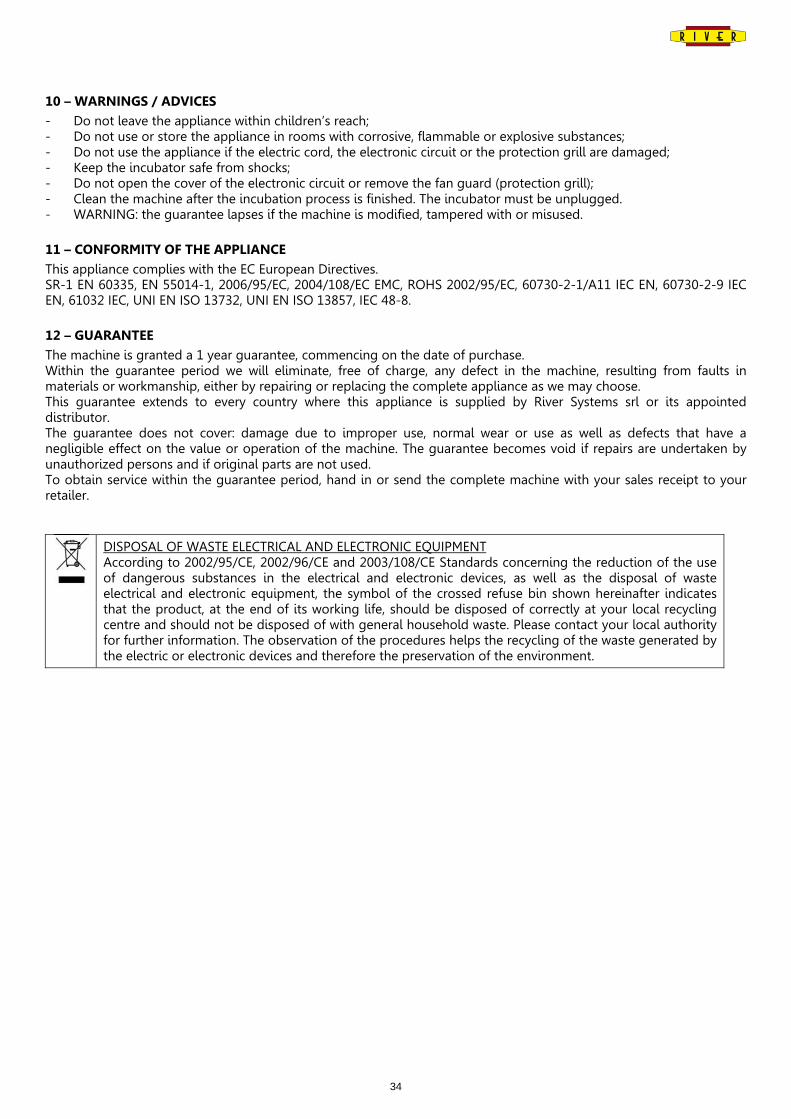
34
10 – WARNINGS / ADVICES
- Do not leave the appliance within children’s reach; - Do not use or store the appliance in rooms with corrosive, flammable or explosive substances; - Do not use the appliance if the electric cord, the electronic circuit or the protection grill are damaged; - Keep the incubator safe from shocks; - Do not open the cover of the electronic circuit or remove the fan guard (protection grill); - Clean the machine after the incubation process is finished. The incubator must be unplugged. - WARNING: the guarantee lapses if the machine is modified, tampered with or misused.
11 – CONFORMITY OF THE APPLIANCE
This appliance complies with the EC European Directives. SR-1 EN 60335, EN 55014-1, 2006/95/EC, 2004/108/EC EMC, ROHS 2002/95/EC, 60730-2-1/A11 IEC EN, 60730-2-9 IEC EN, 61032 IEC, UNI EN ISO 13732, UNI EN ISO 13857, IEC 48-8.
12 – GUARANTEE
The machine is granted a 1 year guarantee, commencing on the date of purchase. Within the guarantee period we will eliminate, free of charge, any defect in the machine, resulting from faults in materials or workmanship, either by repairing or replacing the complete appliance as we may choose. This guarantee extends to every country where this appliance is supplied by River Systems srl or its appointed distributor. The guarantee does not cover: damage due to improper use, normal wear or use as well as defects that have a negligible effect on the value or operation of the machine. The guarantee becomes void if repairs are undertaken by unauthorized persons and if original parts are not used. To obtain service within the guarantee period, hand in or send the complete machine with your sales receipt to your retailer.
DISPOSAL OF WASTE ELECTRICAL AND ELECTRONIC EQUIPMENT According to 2002/95/CE, 2002/96/CE and 2003/108/CE Standards concerning the reduction of the use of dangerous substances in the electrical and electronic devices, as well as the disposal of waste electrical and electronic equipment, the symbol of the crossed refuse bin shown hereinafter indicates that the product, at the end of its working life, should be disposed of correctly at your local recycling centre and should not be disposed of with general household waste. Please contact your local authority for further information. The observation of the procedures helps the recycling of the waste generated by the electric or electronic devices and therefore the preservation of the environment.
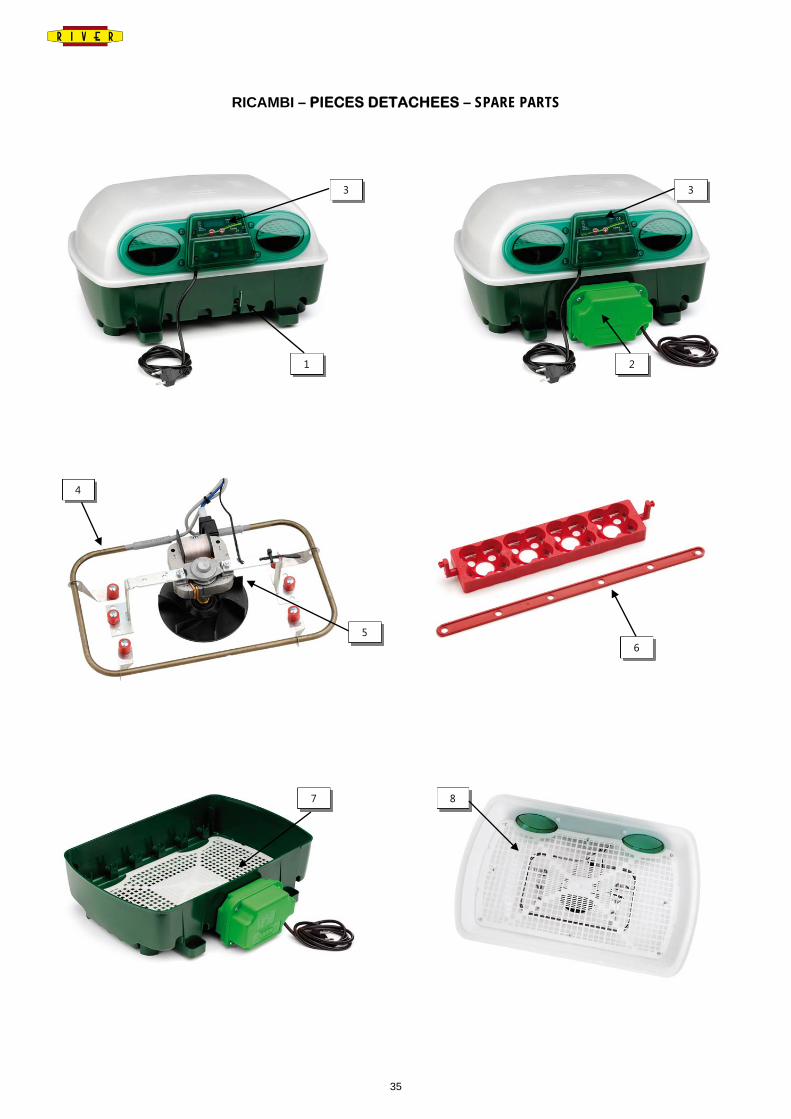
35
RICAMBI – PIECES DETACHEES – SPARE PARTS
1 2
33
4
56
7 8
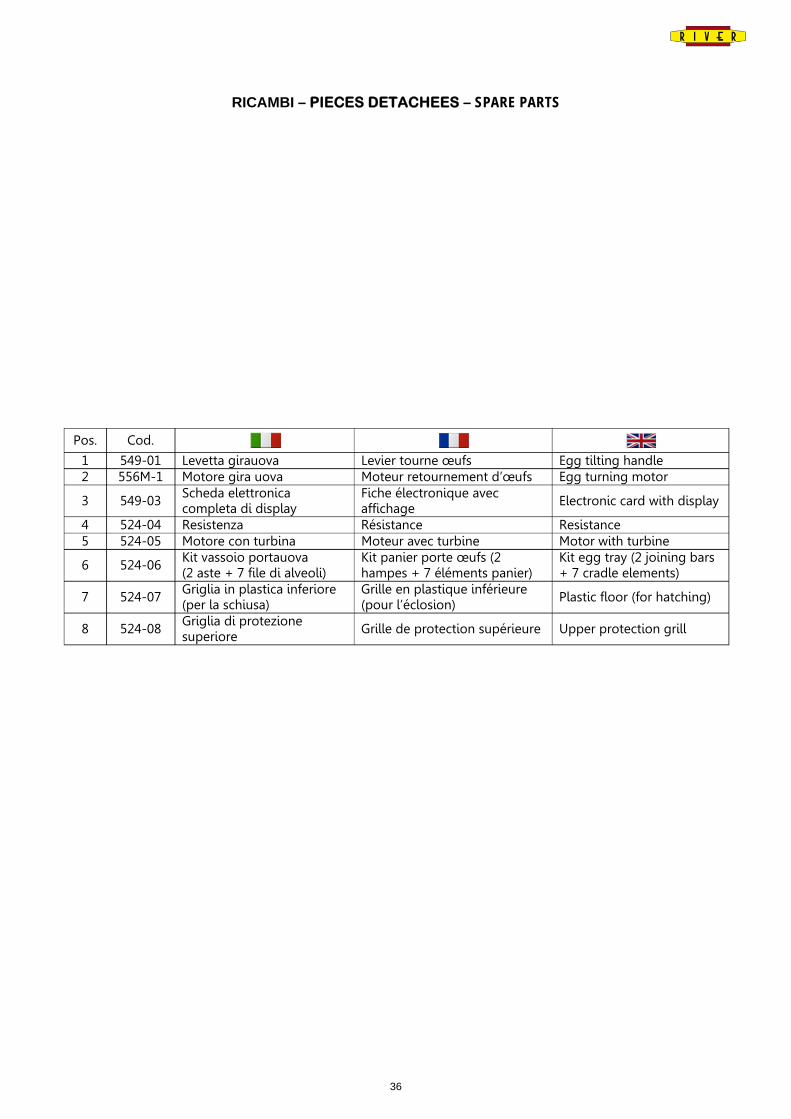
36
RICAMBI – PIECES DETACHEES – SPARE PARTS
Pos. Cod. 1 549-01 Levetta girauova Levier tourne œufs Egg tilting handle 2 556M-1 Motore gira uova Moteur retournement d’œufs Egg turning motor
3 549-03 Scheda elettronica completa di display
Fiche électronique avec affichage Electronic card with display
4 524-04 Resistenza Résistance Resistance 5 524-05 Motore con turbina Moteur avec turbine Motor with turbine
6 524-06 Kit vassoio portauova (2 aste + 7 file di alveoli)
Kit panier porte œufs (2 hampes + 7 éléments panier)
Kit egg tray (2 joining bars + 7 cradle elements)
7 524-07 Griglia in plastica inferiore (per la schiusa)
Grille en plastique inférieure (pour l’éclosion)
Plastic floor (for hatching)
8 524-08 Griglia di protezione superiore
Grille de protection supérieure Upper protection grill
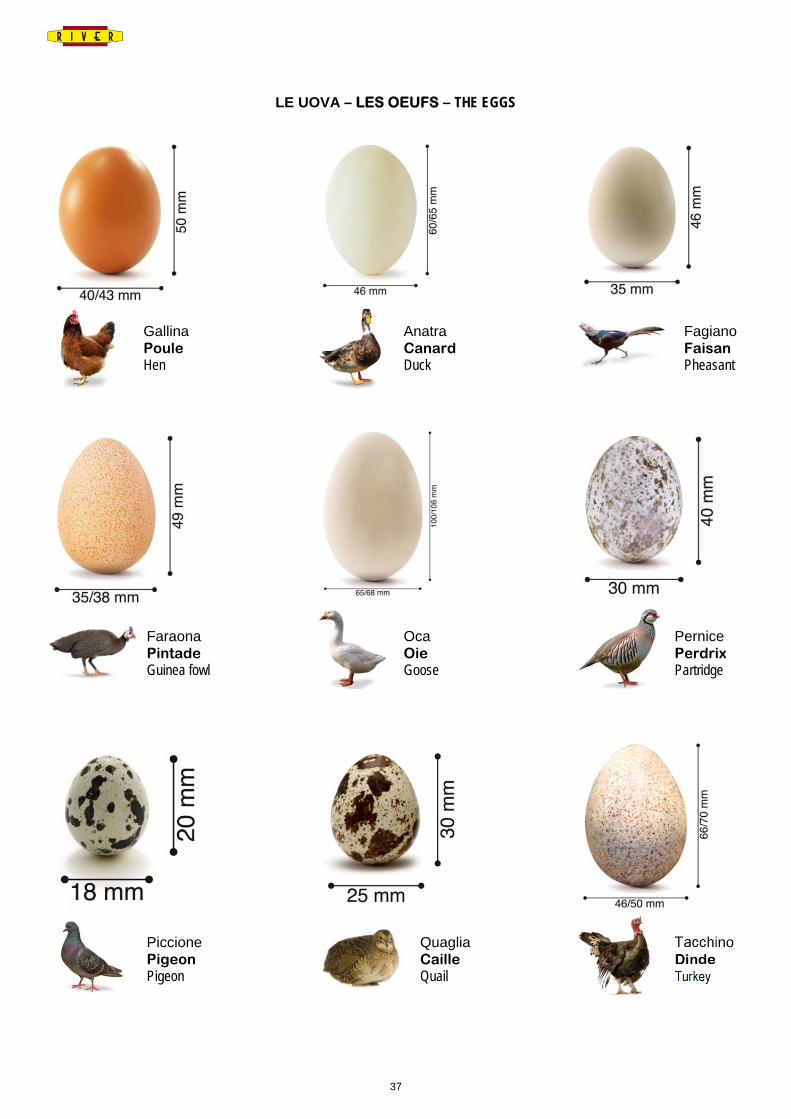
37
LE UOVA – LES OEUFS – THE EGGS
Gallina Poule Hen
Anatra Canard Duck
Fagiano Faisan Pheasant
Faraona Pintade Guinea fowl
Oca Oie Goose
Pernice Perdrix Partridge
Piccione Pigeon Pigeon
Quaglia Caille Quail
Tacchino Dinde Turkey
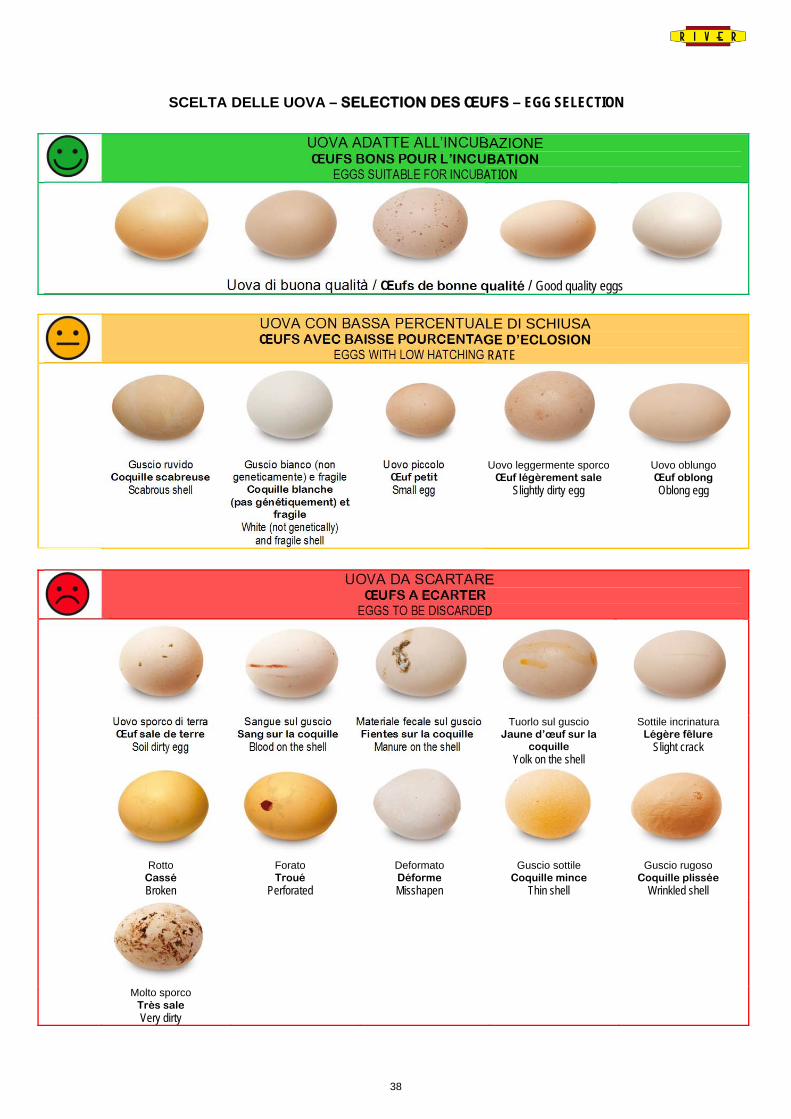
38
SCELTA DELLE UOVA – SELECTION DES ŒUFS – EGG SELECTION
UOVA ADATTE ALL’INCUBAZIONE ŒUFS BONS POUR L’INCUBATION
EGGS SUITABLE FOR INCUBATION
Uova di buona qualità / Œufs de bonne qualité / Good quality eggs
UOVA CON BASSA PERCENTUALE DI SCHIUSA ŒUFS AVEC BAISSE POURCENTAGE D’ECLOSION
EGGS WITH LOW HATCHING RATE
Guscio ruvido
Coquille scabreuse Scabrous shell
Guscio bianco (non geneticamente) e fragile
Coquille blanche (pas génétiquement) et
fragile White (not genetically)
and fragile shell
Uovo piccolo Œuf petit Small egg
Uovo leggermente sporco Œuf légèrement sale
Slightly dirty egg
Uovo oblungo Œuf oblong Oblong egg
UOVA DA SCARTARE ŒUFS A ECARTER
EGGS TO BE DISCARDED
Uovo sporco di terra
Œuf sale de terre Soil dirty egg
Sangue sul guscio Sang sur la coquille
Blood on the shell
Materiale fecale sul guscio Fientes sur la coquille
Manure on the shell
Tuorlo sul guscio Jaune d’œuf sur la
coquille Yolk on the shell
Sottile incrinatura Légère fêlure
Slight crack
Rotto
Cassé Broken
Forato Troué
Perforated
Deformato Déforme Misshapen
Guscio sottile Coquille mince
Thin shell
Guscio rugoso Coquille plissée
Wrinkled shell
Molto sporco Très sale Very dirty
39
Prodotto: Data di consegna: Produit : Date de livraison : Product: ________________________ Delivery date: ________________________
Data, timbro e firma del rivenditore: Date, cachet et signature du revendeur : Date, stamp and signature of the retailer: