customer satisfaction notification n06 instrument and door ...wk2jeeps.com/tsb/csn_wk2_n0613.pdf ·...
TRANSCRIPT

Copyright 2013, Chrysler Group LLC, All Rights Reserved
April 2013
Dealer Service Instructions for:
Customer Satisfaction Notification N06
Instrument and Door Panel Applique Delamination
2012 (WK) Jeep® Grand Cherokee SRT8
NOTE: This notification applies only to the above vehicles equipped with a 6.4L
engine (sales code ESG) built from June 01, 2011 through March 05, 2012
(MDH 060107 through 030523).
The instrument and door panel carbon fiber bezel appliques on about 1,500 of the
above vehicles may delaminate from the bezel.
The three instrument panel carbon fiber bezels must be replaced. The door panel
carbon fiber bezels must be inspected and replaced as required.
Models
IMPORTANT: Some of the involved vehicles may be in dealer used vehicle
inventory. Dealers should complete this repair on these vehicles before retail
delivery. Dealers should also perform this repair on vehicles in for service.
Involved vehicles can be determined by using the VIP inquiry process.
Subject
Repair
Customer Satisfaction Notification N06 Page 2
Instrument and Door Panel Applique Delamination
Part Number Description
CEA1M281AA Instrument Panel Carbon Fiber Bezel Package
Each package contains the following components:
Quantity Description
1 Bezel, Carbon Fiber (right side)
1 Bezel, Carbon Fiber (center)
1 Bezel, Carbon Fiber (left side)
Each dealer, to whom vehicles in the notification were assigned, will receive
enough Instrument Panel Applique packages to service about 20% of those
vehicles.
Part Number Description
CEA1N061AA Bezel, Front Door Carbon Fiber (Left)
Part Number Description
CEA1N062AA Bezel, Front Door Carbon Fiber (Right)
Part Number Description
CEA1N063AA Bezel, Rear Door Carbon Fiber (Left)
Part Number Description
CEA1N064AA Bezel, Rear Door Carbon Fiber (Right)
No special tools are required to perform this service procedure.
Parts Information
Special Tools
Customer Satisfaction Notification N06 Page 3
Instrument and Door Panel Applique Delamination
A. Replace the Instrument Panel Carbon Fiber Bezels
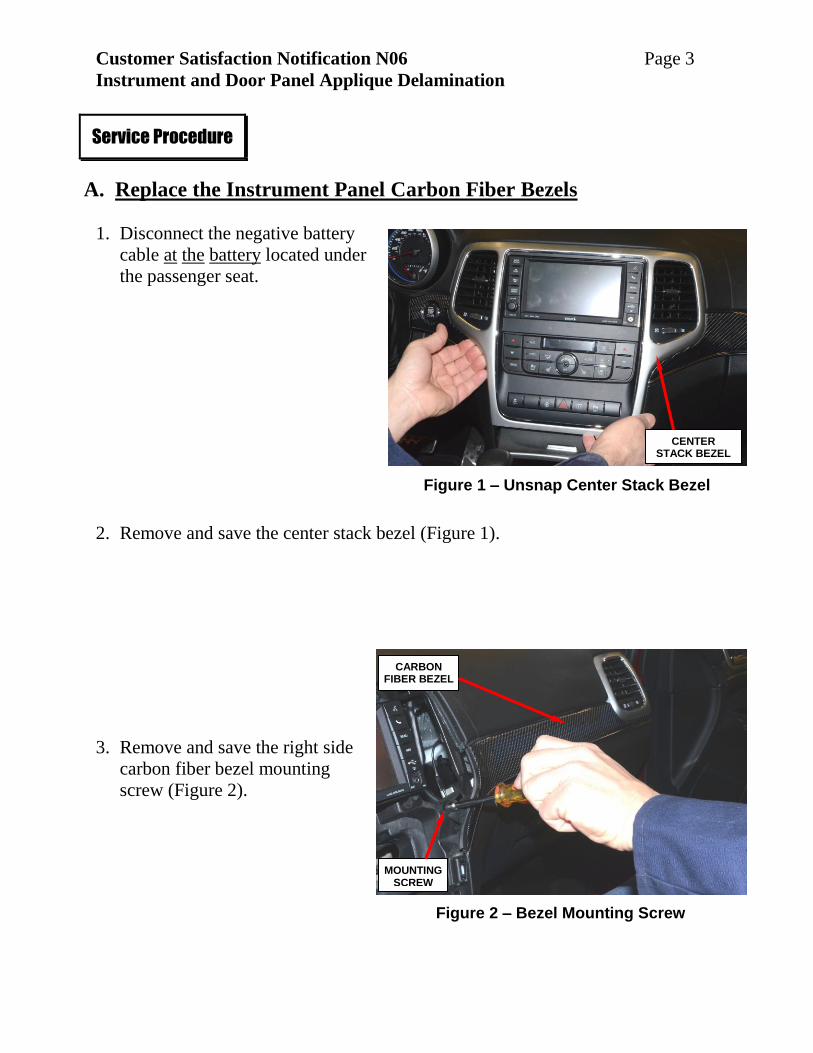
1. Disconnect the negative battery
cable at the battery located under
the passenger seat.
2. Remove and save the center stack bezel (Figure 1).
3. Remove and save the right side
carbon fiber bezel mounting
screw (Figure 2).
Service Procedure
Figure 1 – Unsnap Center Stack Bezel
Figure 2 – Bezel Mounting Screw
CENTER STACK BEZEL
MOUNTING SCREW
CARBON FIBER BEZEL
Customer Satisfaction Notification N06 Page 4
Instrument and Door Panel Applique Delamination
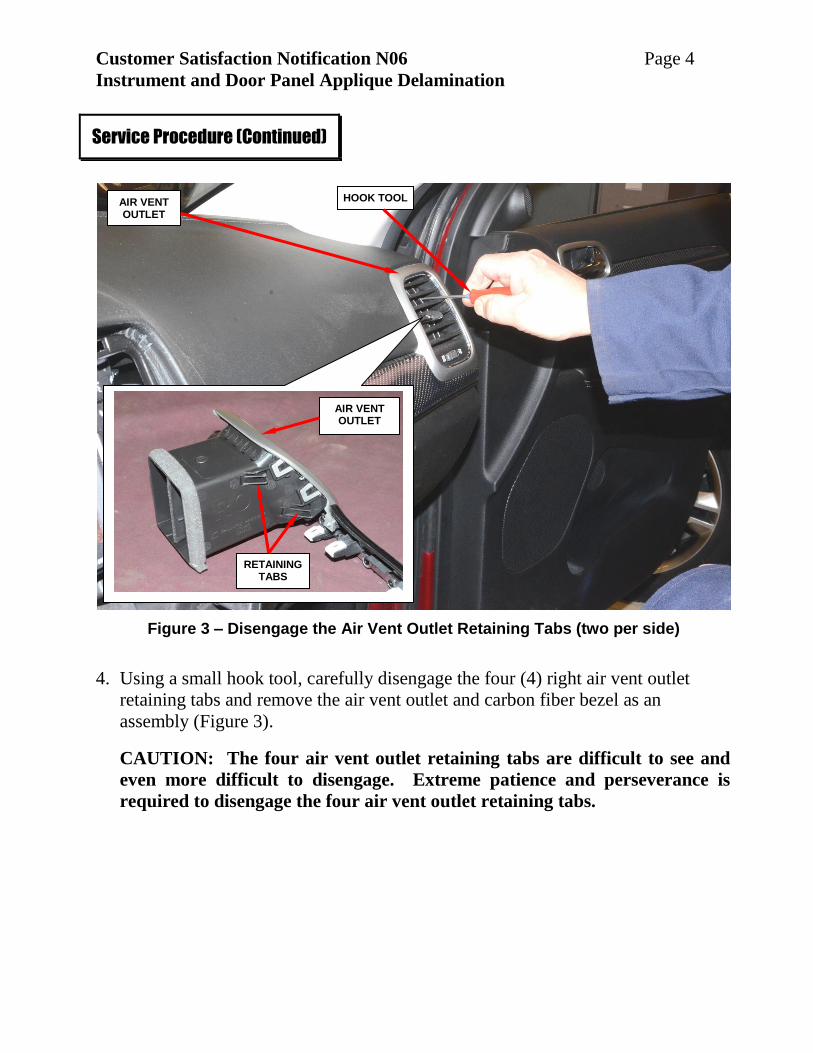
4. Using a small hook tool, carefully disengage the four (4) right air vent outlet
retaining tabs and remove the air vent outlet and carbon fiber bezel as an
assembly (Figure 3).
CAUTION: The four air vent outlet retaining tabs are difficult to see and
even more difficult to disengage. Extreme patience and perseverance is
required to disengage the four air vent outlet retaining tabs.
Service Procedure (Continued)
Figure 3 – Disengage the Air Vent Outlet Retaining Tabs (two per side)
AIR VENT OUTLET
HOOK TOOL
RETAINING TABS
AIR VENT OUTLET
Customer Satisfaction Notification N06 Page 5
Instrument and Door Panel Applique Delamination
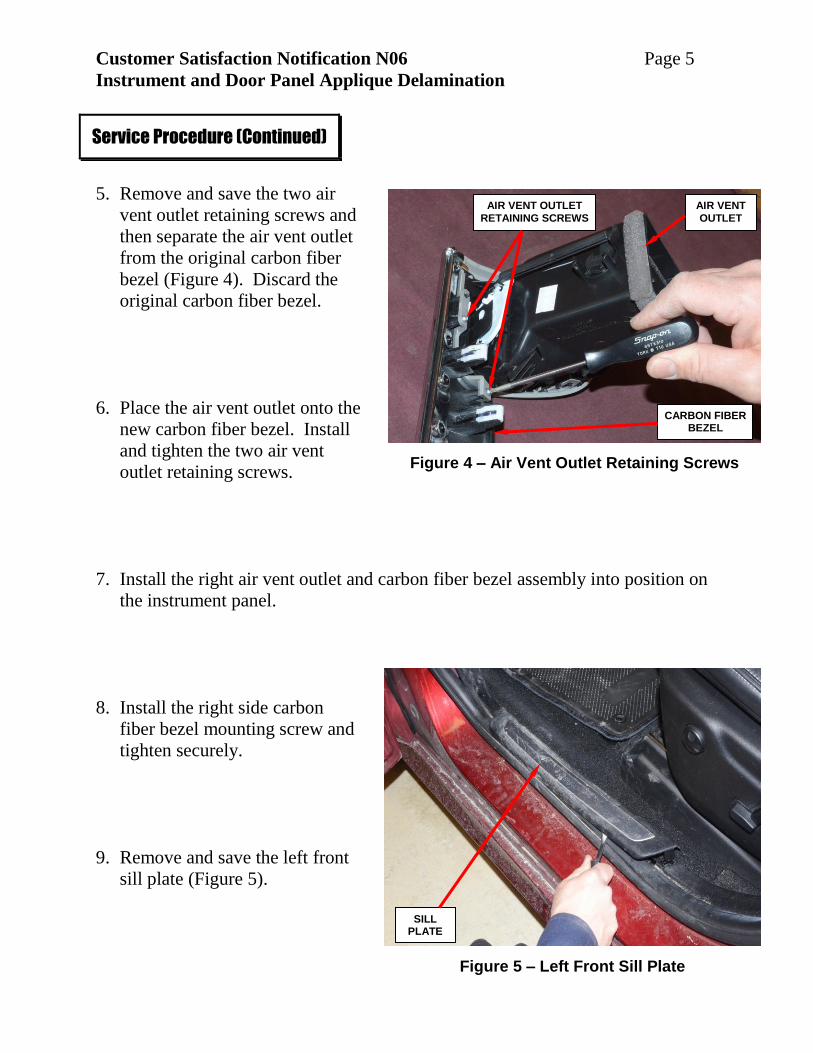
5. Remove and save the two air
vent outlet retaining screws and
then separate the air vent outlet
from the original carbon fiber
bezel (Figure 4). Discard the
original carbon fiber bezel.
6. Place the air vent outlet onto the
new carbon fiber bezel. Install
and tighten the two air vent
outlet retaining screws.
7. Install the right air vent outlet and carbon fiber bezel assembly into position on
the instrument panel.
8. Install the right side carbon
fiber bezel mounting screw and
tighten securely.
9. Remove and save the left front
sill plate (Figure 5).
Service Procedure (Continued)
Figure 4 – Air Vent Outlet Retaining Screws
Figure 5 – Left Front Sill Plate
AIR VENT OUTLET
RETAINING SCREWS
CARBON FIBER BEZEL
AIR VENT
OUTLET
SILL PLATE
Customer Satisfaction Notification N06 Page 6
Instrument and Door Panel Applique Delamination
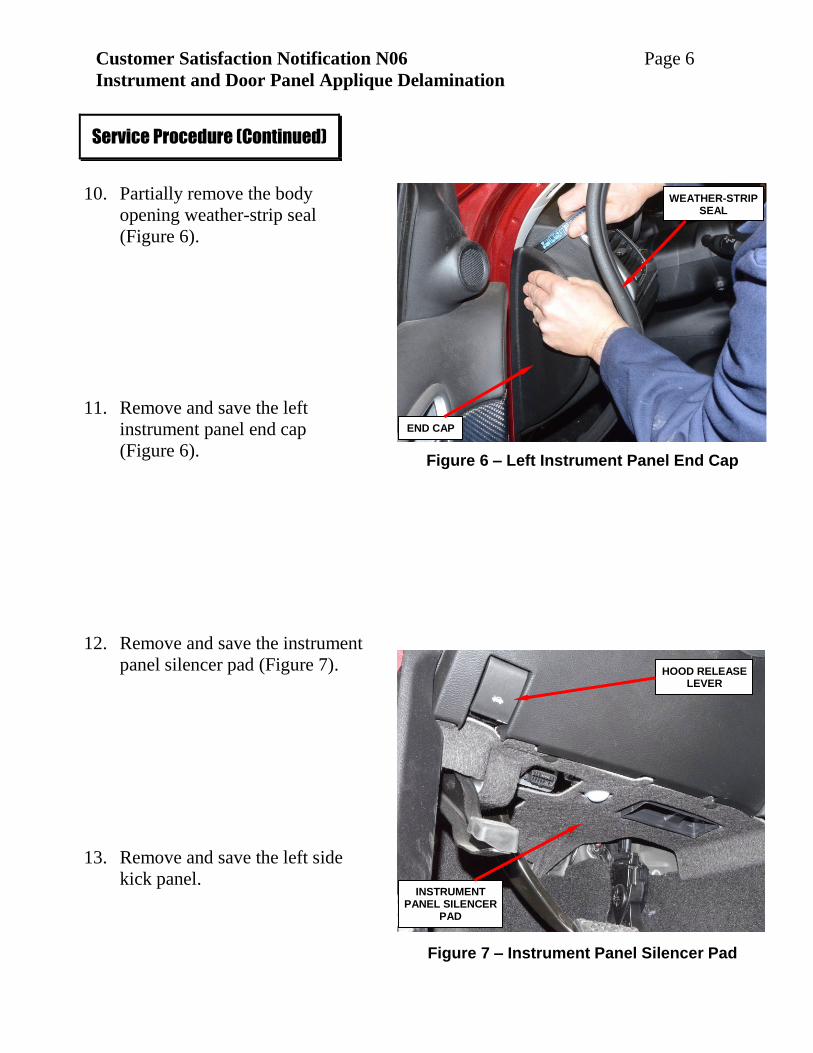
10. Partially remove the body
opening weather-strip seal
(Figure 6).
11. Remove and save the left
instrument panel end cap
(Figure 6).
12. Remove and save the instrument
panel silencer pad (Figure 7).
13. Remove and save the left side
kick panel.
Service Procedure (Continued)
Figure 6 – Left Instrument Panel End Cap
Figure 7 – Instrument Panel Silencer Pad
END CAP
WEATHER-STRIP SEAL
INSTRUMENT PANEL SILENCER
PAD
HOOD RELEASE LEVER

Customer Satisfaction Notification N06 Page 7
Instrument and Door Panel Applique Delamination
14. Disengage the steering column
boot (Figure 8).
15. Remove and save the lower
knee blocker panel (Figure 8).
16. If equipped, remove and save
the “Start” button.
17. Remove and save the center instrument panel carbon fiber bezel retaining screw
(Figure 9).
18. Remove and discard the original
center instrument panel carbon
fiber bezel.
19. Install the new center instrument
panel carbon fiber bezel into
position on the instrument panel
and install the retaining screw.
Tighten the screw securely.
20. If equipped, install the “Start”
button.
Service Procedure (Continued)
Figure 9 – Center Bezel Retaining Screw
Figure 8 – Steering Column Boot
KNEE BLOCKER
PANEL
STEERING
COLUMN BOOT
CENTER INSTRUMENT PANEL CARBON
FIBER BEZEL
RETAINING SCREW
Customer Satisfaction Notification N06 Page 8
Instrument and Door Panel Applique Delamination
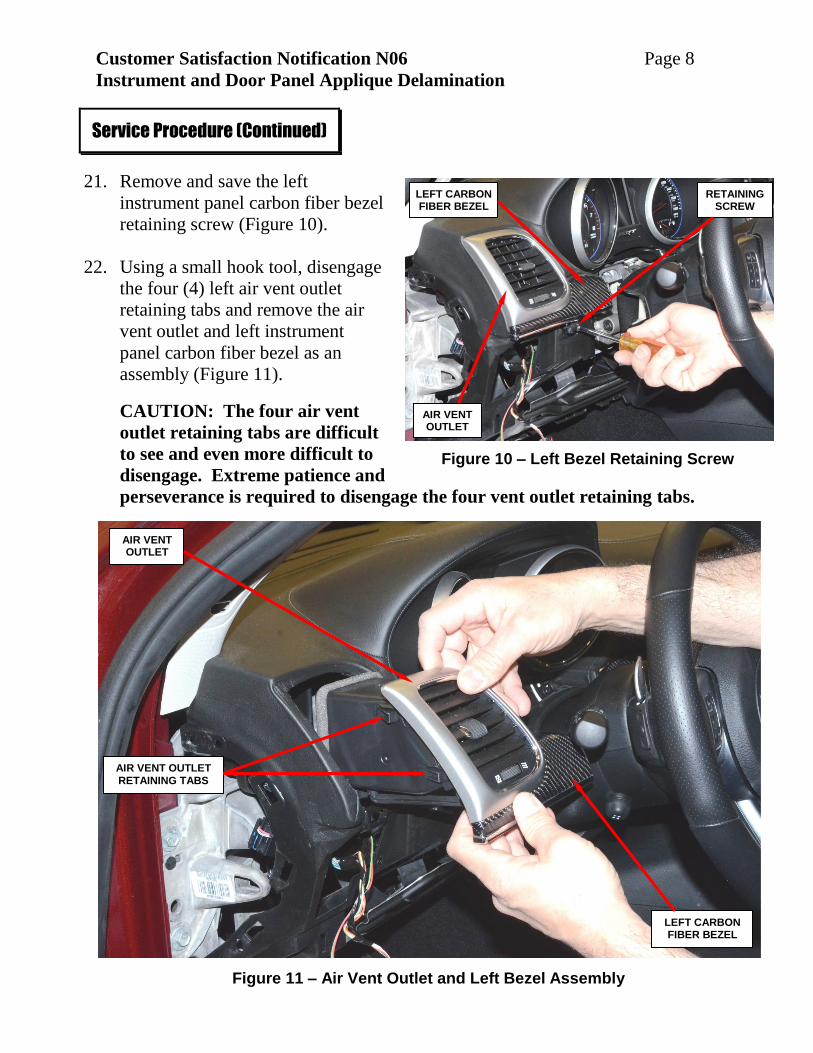
21. Remove and save the left
instrument panel carbon fiber bezel
retaining screw (Figure 10).
22. Using a small hook tool, disengage
the four (4) left air vent outlet
retaining tabs and remove the air
vent outlet and left instrument
panel carbon fiber bezel as an
assembly (Figure 11).
CAUTION: The four air vent
outlet retaining tabs are difficult
to see and even more difficult to
disengage. Extreme patience and
perseverance is required to disengage the four vent outlet retaining tabs.
Service Procedure (Continued)
Figure 10 – Left Bezel Retaining Screw
Figure 11 – Air Vent Outlet and Left Bezel Assembly
AIR VENT OUTLET
RETAINING TABS
RETAINING SCREW
LEFT CARBON FIBER BEZEL
AIR VENT OUTLET
LEFT CARBON FIBER BEZEL
AIR VENT OUTLET
Customer Satisfaction Notification N06 Page 9
Instrument and Door Panel Applique Delamination
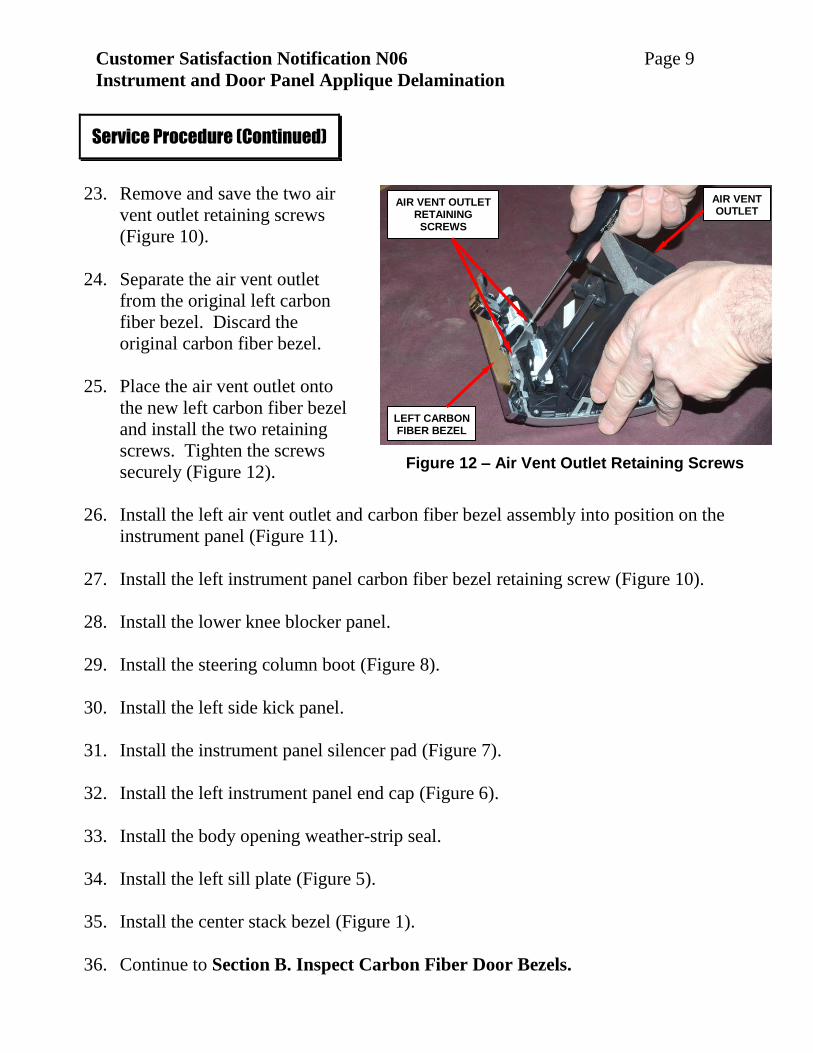
23. Remove and save the two air
vent outlet retaining screws
(Figure 10).
24. Separate the air vent outlet
from the original left carbon
fiber bezel. Discard the
original carbon fiber bezel.
25. Place the air vent outlet onto
the new left carbon fiber bezel
and install the two retaining
screws. Tighten the screws
securely (Figure 12).
26. Install the left air vent outlet and carbon fiber bezel assembly into position on the
instrument panel (Figure 11).
27. Install the left instrument panel carbon fiber bezel retaining screw (Figure 10).
28. Install the lower knee blocker panel.
29. Install the steering column boot (Figure 8).
30. Install the left side kick panel.
31. Install the instrument panel silencer pad (Figure 7).
32. Install the left instrument panel end cap (Figure 6).
33. Install the body opening weather-strip seal.
34. Install the left sill plate (Figure 5).
35. Install the center stack bezel (Figure 1).
36. Continue to Section B. Inspect Carbon Fiber Door Bezels.
Service Procedure (Continued)
Figure 12 – Air Vent Outlet Retaining Screws
AIR VENT OUTLET RETAINING SCREWS
LEFT CARBON FIBER BEZEL
AIR VENT OUTLET
Customer Satisfaction Notification N06 Page 10
Instrument and Door Panel Applique Delamination
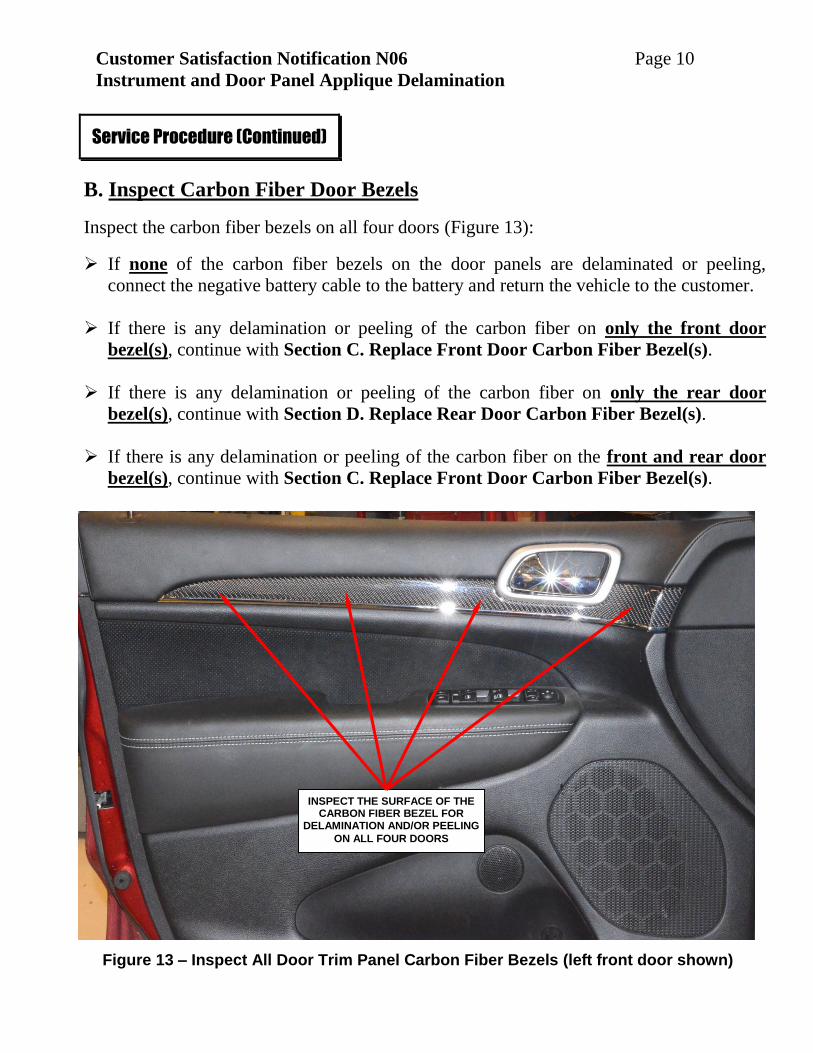
B. Inspect Carbon Fiber Door Bezels
Inspect the carbon fiber bezels on all four doors (Figure 13):
If none of the carbon fiber bezels on the door panels are delaminated or peeling,
connect the negative battery cable to the battery and return the vehicle to the customer.
If there is any delamination or peeling of the carbon fiber on only the front door
bezel(s), continue with Section C. Replace Front Door Carbon Fiber Bezel(s).
If there is any delamination or peeling of the carbon fiber on only the rear door
bezel(s), continue with Section D. Replace Rear Door Carbon Fiber Bezel(s).
If there is any delamination or peeling of the carbon fiber on the front and rear door
bezel(s), continue with Section C. Replace Front Door Carbon Fiber Bezel(s).
Service Procedure (Continued)
Figure 13 – Inspect All Door Trim Panel Carbon Fiber Bezels (left front door shown)
INSPECT THE SURFACE OF THE CARBON FIBER BEZEL FOR
DELAMINATION AND/OR PEELING
ON ALL FOUR DOORS
Customer Satisfaction Notification N06 Page 11
Instrument and Door Panel Applique Delamination
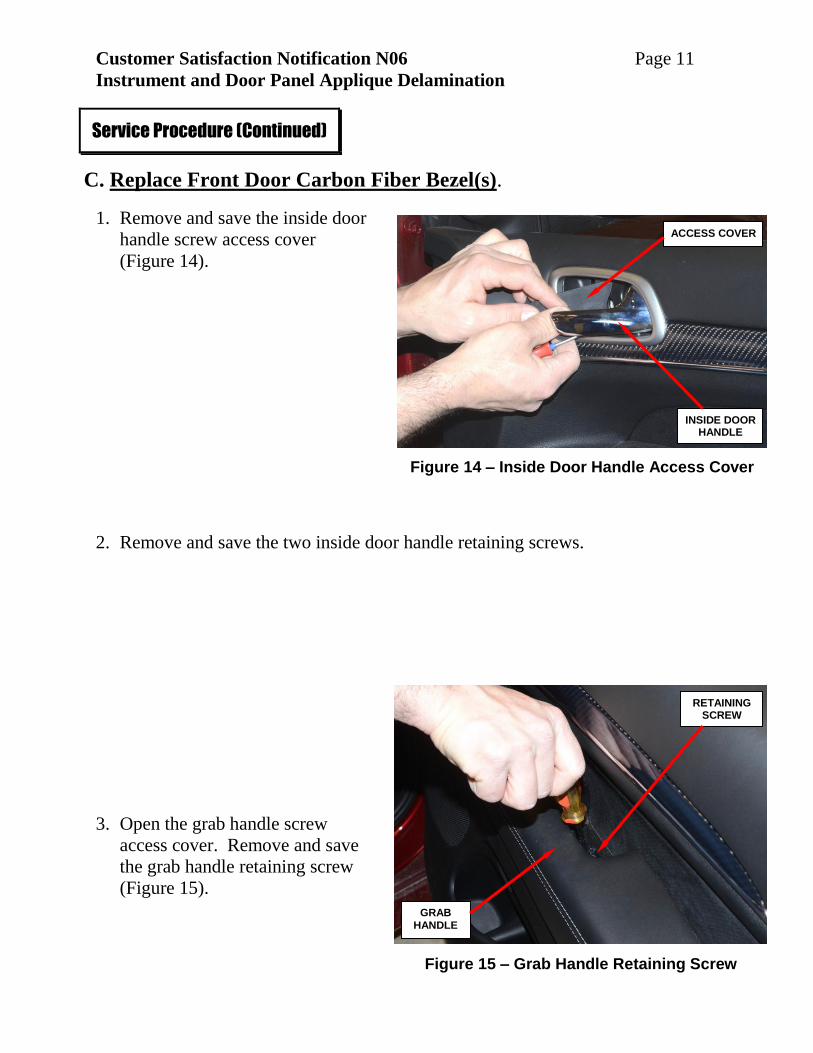
C. Replace Front Door Carbon Fiber Bezel(s).
1. Remove and save the inside door
handle screw access cover
(Figure 14).
2. Remove and save the two inside door handle retaining screws.
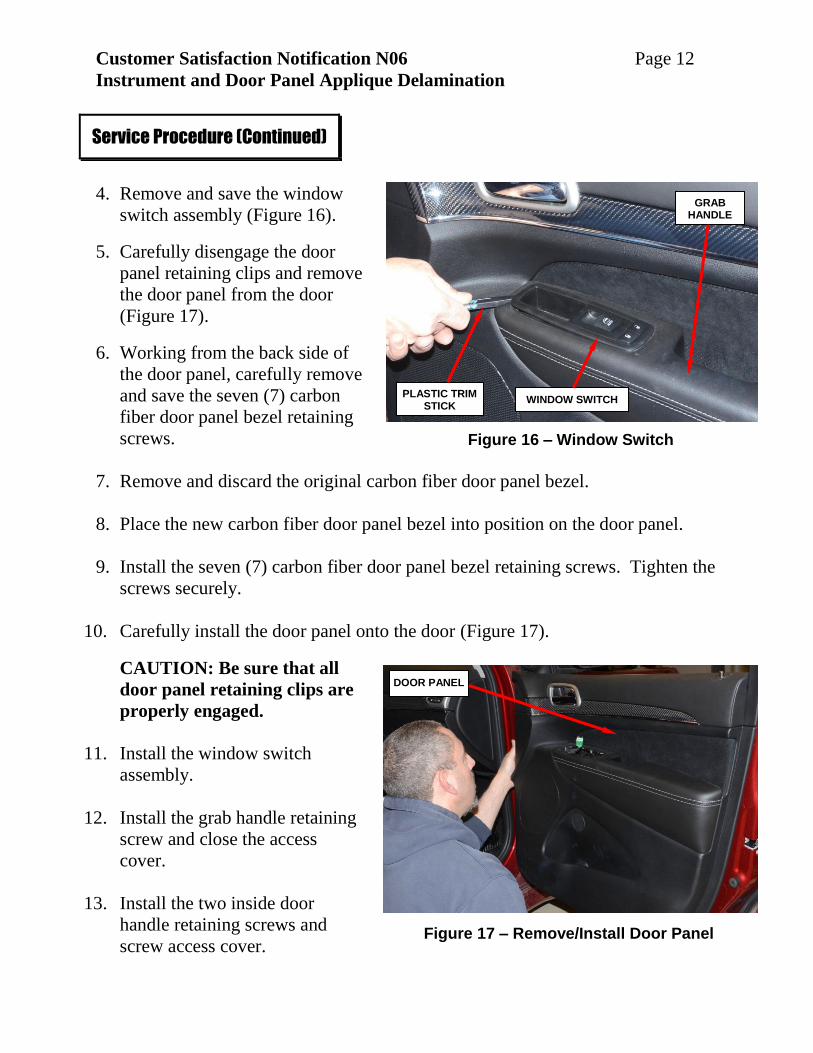
3. Open the grab handle screw
access cover. Remove and save
the grab handle retaining screw
(Figure 15).
Service Procedure (Continued)
Figure 14 – Inside Door Handle Access Cover
Figure 15 – Grab Handle Retaining Screw
INSIDE DOOR HANDLE
ACCESS COVER
GRAB
HANDLE
RETAINING SCREW
Customer Satisfaction Notification N06 Page 12
Instrument and Door Panel Applique Delamination
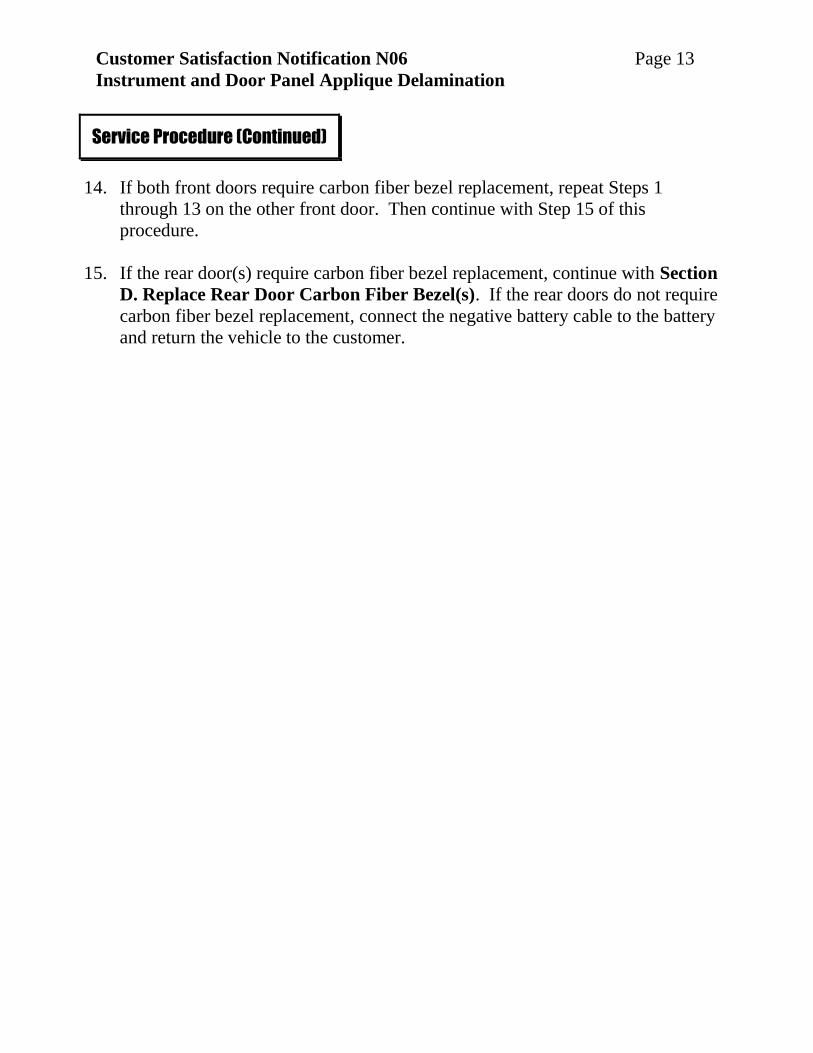
4. Remove and save the window
switch assembly (Figure 16).
5. Carefully disengage the door
panel retaining clips and remove
the door panel from the door
(Figure 17).
6. Working from the back side of
the door panel, carefully remove
and save the seven (7) carbon
fiber door panel bezel retaining
screws.
7. Remove and discard the original carbon fiber door panel bezel.
8. Place the new carbon fiber door panel bezel into position on the door panel.
9. Install the seven (7) carbon fiber door panel bezel retaining screws. Tighten the
screws securely.
10. Carefully install the door panel onto the door (Figure 17).
CAUTION: Be sure that all
door panel retaining clips are
properly engaged.
11. Install the window switch
assembly.
12. Install the grab handle retaining
screw and close the access
cover.
13. Install the two inside door
handle retaining screws and
screw access cover.
Service Procedure (Continued)
Figure 16 – Window Switch
Figure 17 – Remove/Install Door Panel
PLASTIC TRIM STICK
WINDOW SWITCH
DOOR PANEL
GRAB HANDLE
Customer Satisfaction Notification N06 Page 13
Instrument and Door Panel Applique Delamination
14. If both front doors require carbon fiber bezel replacement, repeat Steps 1
through 13 on the other front door. Then continue with Step 15 of this
procedure.
15. If the rear door(s) require carbon fiber bezel replacement, continue with Section
D. Replace Rear Door Carbon Fiber Bezel(s). If the rear doors do not require
carbon fiber bezel replacement, connect the negative battery cable to the battery
and return the vehicle to the customer.
Service Procedure (Continued)
Customer Satisfaction Notification N06 Page 14
Instrument and Door Panel Applique Delamination
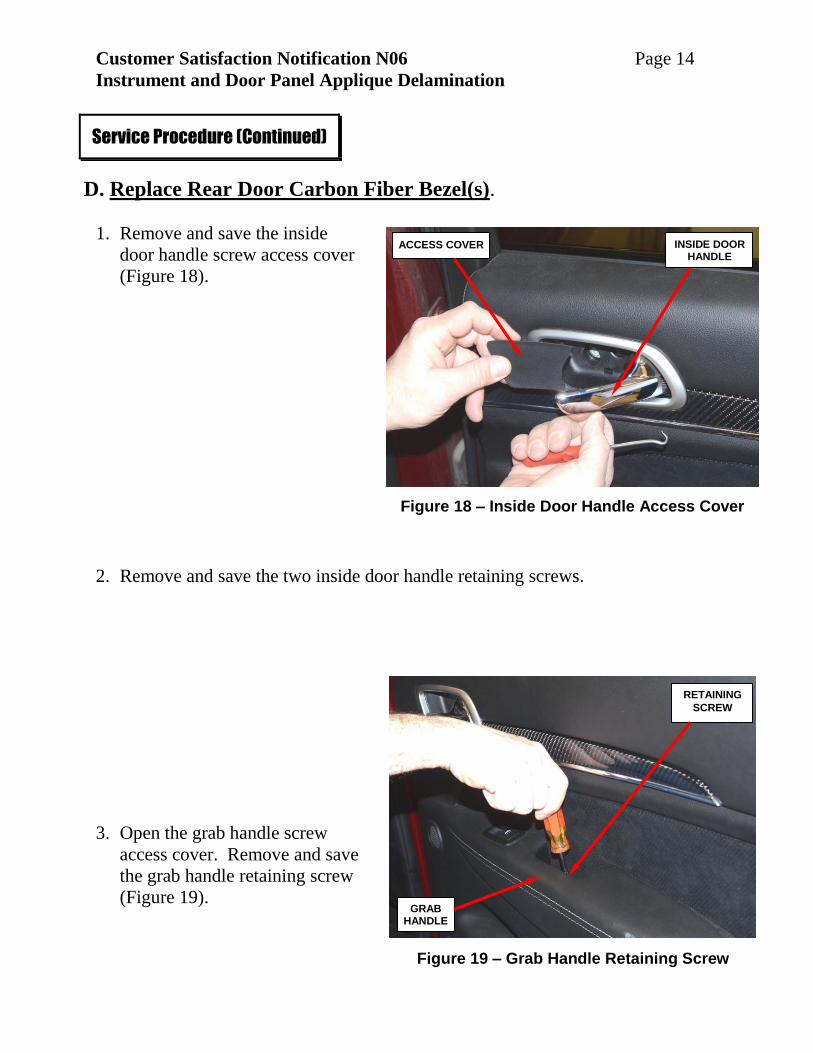
D. Replace Rear Door Carbon Fiber Bezel(s).
1. Remove and save the inside
door handle screw access cover
(Figure 18).
2. Remove and save the two inside door handle retaining screws.
3. Open the grab handle screw
access cover. Remove and save
the grab handle retaining screw
(Figure 19).
Service Procedure (Continued)
Figure 18 – Inside Door Handle Access Cover
Figure 19 – Grab Handle Retaining Screw
INSIDE DOOR HANDLE
ACCESS COVER
GRAB HANDLE
RETAINING
SCREW
Customer Satisfaction Notification N06 Page 15
Instrument and Door Panel Applique Delamination
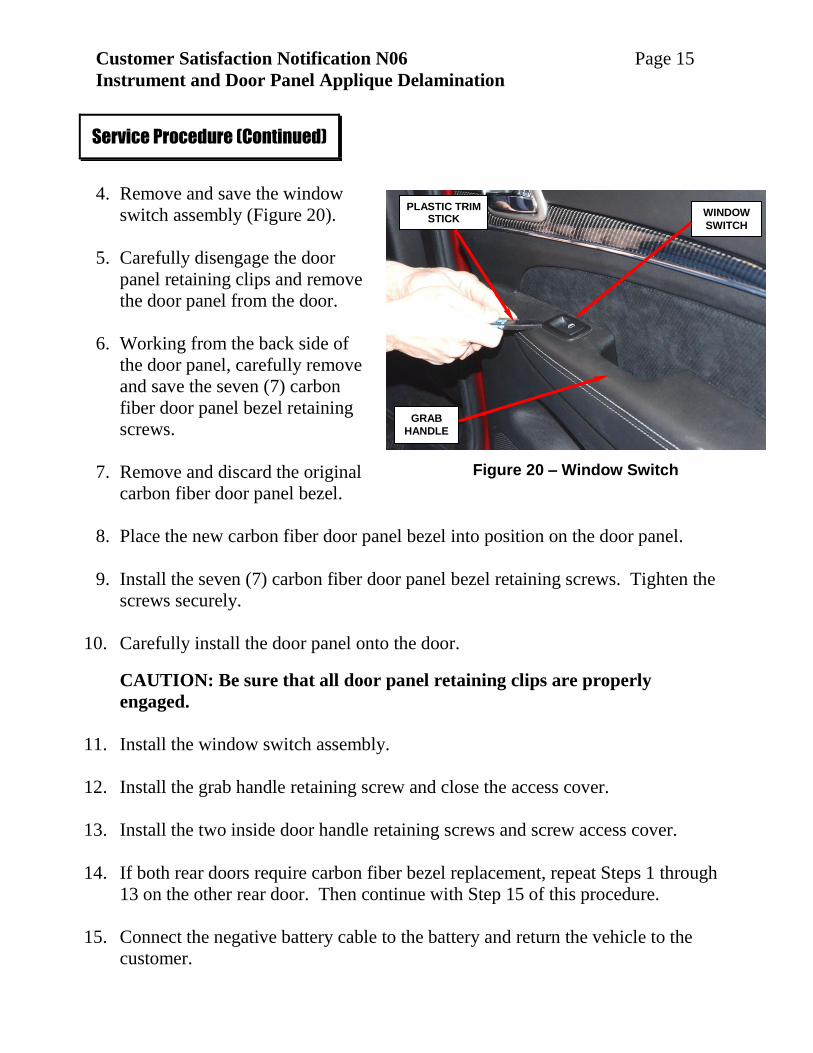
4. Remove and save the window
switch assembly (Figure 20).
5. Carefully disengage the door
panel retaining clips and remove
the door panel from the door.
6. Working from the back side of
the door panel, carefully remove
and save the seven (7) carbon
fiber door panel bezel retaining
screws.
7. Remove and discard the original
carbon fiber door panel bezel.
8. Place the new carbon fiber door panel bezel into position on the door panel.
9. Install the seven (7) carbon fiber door panel bezel retaining screws. Tighten the
screws securely.
10. Carefully install the door panel onto the door.
CAUTION: Be sure that all door panel retaining clips are properly
engaged.
11. Install the window switch assembly.
12. Install the grab handle retaining screw and close the access cover.
13. Install the two inside door handle retaining screws and screw access cover.
14. If both rear doors require carbon fiber bezel replacement, repeat Steps 1 through
13 on the other rear door. Then continue with Step 15 of this procedure.
15. Connect the negative battery cable to the battery and return the vehicle to the
customer.
Service Procedure (Continued)
Figure 20 – Window Switch
GRAB
HANDLE
WINDOW
SWITCH
PLASTIC TRIM STICK

Customer Satisfaction Notification N06 Page 16
Instrument and Door Panel Applique Delamination
Claims for vehicles that have been serviced must be submitted on the
DealerCONNECT Claim Entry Screen located on the Service tab. Claims
submitted will be used by Chrysler to record Customer Satisfaction Notification
service completions and provide dealer payments.
Use the following labor operation numbers and time allowances:
Labor Operation Time
Number Allowance
Replace all instrument panel carbon fiber
bezels and inspect all door panel carbon
fiber bezels 23-N0-61-82 0.7 hours
Related Operation:
Replace one door panel carbon
fiber bezel 23-N0-61-50 0.3 hours
Replace two door panel carbon
fiber bezels 23-N0-61-51 0.6 hours
Replace three door panel carbon
fiber bezels 23-N0-61-52 0.8 hours
Replace four door panel carbon
fiber bezels 23-N0-61-53 1.1 hours
Add the cost of the parts package plus applicable dealer allowance to your claim.
NOTE: See the Warranty Administration Manual, Recall Claim Processing
Section, for complete claim processing instructions.
To view this notification on DealerCONNECT, select “Global Recall System” on
the Service tab, then click on the description of this notification.
Completion Reporting and Reimbursement
Dealer Notification

Customer Satisfaction Notification N06 Page 17
Instrument and Door Panel Applique Delamination
All involved vehicle owners known to Chrysler are being notified of the service
requirement by mail. They are requested to schedule appointments for this service
with their dealers. A generic copy of the owner letter is attached.
Enclosed with each owner letter is an Owner Notification postcard to allow owners
to update our records if applicable.
All involved vehicles have been entered into the DealerCONNECT Global Recall
System (GRS) and Vehicle Information Plus (VIP) for dealer inquiry as needed.
GRS provides involved dealers with an updated VIN list of their incomplete
vehicles. The owner’s name, address and phone number are listed if known.
Completed vehicles are removed from GRS within several days of repair claim
submission.
To use this system, click on the “Service” tab and then click on “Global Recall
System.” Your dealer’s VIN list for each recall displayed can be sorted by: those
vehicles that were unsold at recall launch, those with a phone number, city, zip
code, or VIN sequence.
Dealers should perform this repair on all unsold vehicles before retail
delivery. Dealers should also use the VIN list to follow up with all owners to
schedule appointments for this repair.
VIN lists may contain confidential, restricted owner name and address information that was
obtained from the Department of Motor Vehicles of various states. Use of this information is
permitted for this notification only and is strictly prohibited from all other use.
If you have any questions or need assistance in completing this action, please contact
your Service and Parts District Manager.
Customer Service / Field Operations
Chrysler Group LLC
Owner Notification and Service Scheduling
Vehicle Lists, Global Recall System, VIP and Dealer Follow Up
Additional Information
____________________________________________________________________________________
CUSTOMER SATISFACTION NOTIFICATION N06 INSTRUMENT AND DOOR PANEL APPLIQUE DELAMINATION
Dear: (Name)
At Chrysler Group LLC, you can be assured that we are changing the way we look at quality. To prove
our commitment to quality, the company is investing in and prioritizing improvements for every vehicle
that we build. As part of that commitment, we are also targeting existing vehicles on the road today and
contacting our customers to provide these quality improvements, at no charge, that will help to improve
your ownership satisfaction.
We are recommending the following improvements be performed on some 2012 model year Jeep
Grand Cherokee SRT8 vehicles.
Recommended
Service:
The instrument panel and door panel carbon fiber bezel appliques on your
vehicle (VIN: xxxxxxxxxxxxxxxxx) may delaminate from the bezel.
What your dealer
will do:
Chrysler will service your vehicle free of charge (parts and labor). To do this,
your dealer will replace the instrument panel carbon fiber bezels and inspect the
door carbon fiber bezels and replace them as required. The work will take about an
hour to complete. If the door bezels require replacement an additional hour may be
required. We recommend that you make an appointment with your dealer to
minimize your inconvenience.
What you should
do:
Simply contact your Chrysler, Jeep, or Dodge dealer, at your convenience, to
schedule a service appointment. Your dealer will collect the necessary information
to ensure that the appropriate parts are available so your service can be completed in
a timely manner. Although not required, we recommend bringing this letter with
you to your dealer, when you bring your vehicle in for this service.
If you need help: Please contact the Chrysler Customer Assistance Center at 1-800-853-1403.
If you have already experienced this condition and have paid to have it repaired, please send your original
receipts and/or other adequate proof of payment to the following address for reimbursement: Chrysler
Customer Assistance, P.O. Box 21-8007, Auburn Hills, MI 48321-8007, Attention: Reimbursement.
Once we receive and verify the required documents, reimbursement will be sent to you within 60 days.
Please help us update our records by filling out the attached prepaid postcard, if any of the conditions
listed on the card apply to your vehicle. You may also update this information on the web at
www.jeep.com/ownersreg
We apologize for any inconvenience this service may cause to your schedule. Moving forward we are
committed to providing our customers with world class quality products, ensuring that you have a
positive dealership experience and following up on any issues and concerns that you may have in a
timely manner through our Customer Assistance Center.
Sincerely,
Customer Service / Field Operations
Chrysler Group LLC
Notification Code N06