david bate · david bate has worked in the graphic design industry for over 30 years. he currently...
TRANSCRIPT
A plAin English guidE to thE ComplExitiEs of photoshop
DaviD Bate

speaking photoshop Cs6Adobe Certified Expert, David Bate, demystifies the complexities of Photoshop by teaching you its language. The ability of Photoshop to enhance or transform images is virtually limitless, but how do you get the results you are looking for?
The key to success is learning how to speak to Photoshop, so it understands your vision. This book teaches you how to think like and communicate with Photoshop. You’ll learn which tools work and which ones don’t. More importantly you’ll learn when and why. Armed with this knowledge, you’ll be able to trouble-shoot your way through future image editing challenges.
David Bate has worked in the graphic design industry for over 30 years. He currently teaches Photoshop at Waukesha County Technical College, where he developed and maintains the Photoshop curriculum that is used in the Graphic Design, Web Design and Printing/Publishing programs.
With Speaking Photoshop CS6:
▶ Concepts are explained in easy-to-understand, plain English.
▶ Chapter files let you practice and improve your skills as you learn.
▶ The supplemental Speaking Photoshop CS6 Workbook provides additional exercises for classroom applications or for those who want added practice to perfect their skills.
David Bate

Excerpt from
SpeakingPhotoshop
David Bate CS6
The following excerpt from Speaking Photoshop CS6 explains how to extract images with hair using Photoshop’s Refine Mask command.
Speaking Photoshop CS6 (ISBN 978-0-9882405-0-6) and the optional Speaking Photoshop CS6 Workbook (ISBN 978-0-9882405-1-3) can be purchased online at the following locations:
Amazonwww.amazon.com Amazon’s Look Inside the Book feature lets you preview interior pages of Speaking Photoshop CS6.
Barnes & Noblewww.barnesandnoble.com
Powell’s Bookswww.powells.com
For further information, visit www.speakingphotoshop.com.

273← Chapter 11 →
Splitting Hairs with Refine MaskWe can only accomplish so much using manual masking techniques. If the hair is whispy, tussled or wild, then Refine Mask is a good option. Yet Refine Mask has its limitations, as do all tools, so you’ll often find yourself doing some final clean‑up on the mask using a brush. That’s why it’s so important to be comfortable with the manual masking techniques we just discussed. Refine Mask would have helped with the foxes and bear photos, but I wanted you to become familiar with manual masking techniques first.
▶ Open the images. Open Dina’s Sunset.jpg and Dina.jpg. Dina’s Sunset is yet another wonderful photo from Shari Kastner. Dina is a colleague of mine, and I took this picture of her in the hallway at WCTC when Refine Mask first came out. Since then, I’ve sent Dina to countless locations in my virtual Photoshop world. She’s been on mountain peaks, on glaciers, in front of water falls, and numerous other places. Nothing seems to fluster her. No matter where I send her, she always appears comfortable and natural in her surroundings, thanks in part to Refine Mask.
Shar
i Kas
tner
Dina’s Sunset.jpg
Dave Bate
Dina .jpg

274 ← Extracting Images—A Hairy Proposition →
▶ Prepare the images for Refine Mask. Our Refine Mask extraction starts out just as it did when we did manual masking.
•Drag Dina.jpg onto Dina’s Sunset.jpg. In this case, you won’t need to hold Shift to center Dina on the sunset scene. Place her where you like.
•Select Dina using the selection method of your choice. I used the Quick Selection tool. As you make the selection, take care not to include the shadow behind her right arm. I had to Option+Drag/Alt+Drag with the Quick Selection tool to exclude the shadow.
•Add a layer mask.
•Save the file in Photoshop format and name it Dina Final.psd.
Not very good, is it? There’s that cut‑with‑scissors look that we need to avoid. Can you imagine manually masking around each individual hair to fix that? Fortunately, Refine Mask can isolate those hairs for us.
The problems are pretty obvious. The hair doesn’t blend with the background, and there’s a fine white line along her left sleeve.
Option+Drag/Alt+Drag to deselect the shadow.

275← Chapter 11 →
▶ Become acquainted with the Masks properties. Double‑click the layer mask to bring up the Properties panel. To the right of the Layer Mask icon are two icons. The first one lets you select the layer mask, and the second lets you add a vector mask, which we don’t need. Below that are two sliders. The Density slider reduces the opacity of the layer mask. Drag it to the left and watch how the mask changes from black to gray. Drag the Feather slider to the right, and Dina begins to look like a holy spirit, surrounded by a white aura. That’s a nice effect, but not one we’re looking for right now.
The Refine section has three buttons: Mask Edge, Color Range and Invert. Color Range invokes the Select>Color Range command, and Invert swaps the black and white portions of the mask. We could do the same thing with the keyboard shortcut Command+I/Control+I. The Mask Edge button sends you to the Refine Mask panel, and that’s where all the magic happens. Click Mask Edge, and let’s see what it can do.
▶ Refine Mask viewing options. The Refine Mask panel is organized into four sections: View Mode, Edge Detection, Adjust Edge and Output. View Mode lets you view your image in various ways. Click the down arrow to the right of the View icon to reveal a selection of backdrops. Choosing the proper backdrop is important, because masking flaws can be profoundly noticeable against some backgrounds, yet all but disappear against others. Notice, for example, how much better Dina looks against the white background compared to the black background. That’s because Dina’s original background was basically white. Whenever you extract an image from one background and place it into a similarly colored background, your job is much easier. Our best viewing option is On Layers (type L). This is the background that we want Dina to blend with. As I work in Refine Mask, I often switch back and forth between On Layers (the final destination) and Reveal Layers (the original). The two check boxes, Show Radius and Show Original, don’t work yet, because we haven’t done any mask refining yet. We’ll come back to those.
Click Mask Edge to access the Refine Mask panel.
The Refine Mask panel is organized into four sections. Work from top to bottom and click OK to apply the results.
The View pop-up menu lets you see your image on various backgrounds.

276 ← Extracting Images—A Hairy Proposition →
▶ Edge Detection section. The Edge Detection section is where most of your work will be done. In a nutshell, Refine Mask divides your image into three regions:
1. An area that is completely revealed by the mask.
2. An area that is completely hidden by the mask.
3. A transition area, where Photoshop decides what is revealed or hidden. This area can include transparency.
We made our preliminary decision regarding the areas to be revealed and hidden when we created our initial, rough selection. Now we have to define that transition area, and we do that by creating a Radius.
Drag the Radius slider to the right and watch how Dina’s hair begins to blend into the surroundings. But as the hair loses that dreaded cut‑with‑scissors look, other problems begin to creep in. If you go too far, the edges of her sweater begin to look ghostly and that shadow along her right arm reappears. What’s going on?
Click the Show Radius check box back in the View Mode section. The highlighted region represents the radius we just defined, and that’s the area where we are asking Photoshop to make the masking decisions for us. Drag the Radius slider back and forth and watch that region shrink and grow. Uncheck it when you want to see the full image.
The problem with using the Radius slider for this particular image is that it creates a uniform radius throughout the entire image. But what we really need is a large radius around Dina’s hair, but little to no radius along the well defined lines of her sweater.
A large radius makes the hair blend better, but it adds transparency to the sweater.
Click Show Radius to view the area where Photoshop makes the masking decisions.
Smart Radius narrows the radius in areas that have well defined edges.
This setting creates an 8.2 pixel radius around the edge of the mask, where Photoshop decides what is revealed and what is hidden.

277← Chapter 11 →
The Smart Radius check box tries to address this problem. Adjust the Radius slider so it surrounds the edges of Dina’s hair (approximately 70 pixels works), then click the Smart Radius check box. Did you see how portions of the radius became narrower? Photoshop looked for well defined edges and reduced the radius accordingly. But notice how that shadow along her right arm is still showing. As far as Photoshop is concerned, the color of the shadow is a closer match to Dina’s sweater than it is to the white wall behind her. So it’s logical that Photoshop would include that in the visible portion of the mask. We need to tell Photoshop that the shadow doesn’t belong there. Here’s how we do that:
1. Deselect the Smart Radius option and reduce the Radius slider until the shadow along her right arm disappears.
2. Select the Refine Radius tool to the left of the Edge Detection section. This tool allows us to define our radius region manually. It’s much more flexible than the Radius slider or the Smart Radius option, because we can make the radius as wide or narrow as we want, where we want. Paint over Dina’s hair until it blends nicely. Change the brush size using the square bracket keyboard shortcuts ([ or ]) and make sure you include part of her hair and part of the background as you paint. Photoshop analyzes the colors of Dina’s hair and the wall behind it, then makes a pixel‑by‑pixel decision as to what is revealed and what is hidden. If you mistakenly create a radius that is too large, Option+Drag/Alt+Drag with the Refine Radius tool to erase it. You could also use the Erase Refinements tool to do the same thing. It’s located under the Refine Radius tool.
Use a large radius in areas that need it, such as the hair, but leave it narrow for well defined lines.
The Refine Radius tool lets you create a radius of varying widths.

278 ← Extracting Images—A Hairy Proposition →
▶ Adjust Edge section. The Adjust Edge section lets you fine tune your mask in a number of ways. Smooth removes jagged edges in the mask, not needed in this case. Feather applies an overall softening to the entire mask edge, also not needed here. Contrast is sometimes useful in bringing back ghosted edges of well defined areas caused by high radius values. Unfortunately, increasing the contrast can also cause hair to look too wet, so use it carefully. Shift Edge is probably the most used option. Slide it to the left to contract your selection, and slide it to the right to expand it. Shift Edge is often used to reduce color fringe by contracting the selection. In this case, it helps remove the fine white line along her left arm but at the expense of the hair. Leave all of the Adjust Edge values at zero.
▶ Output section. What do you want to do with your Refine Mask edits? The Output To popup menu lets you alter your existing Selection or Layer Mask, or you could create a New Layer, New Layer with Layer Mask, New Document, or New Document with Layer Mask. Select New Layer with Layer Mask.
The Decontaminate Colors check box eliminates fringe pixels similarly to the manual method discussed with the bear, except that it applies its color directly to the image, not on a clipped layer above it. I prefer the nondestructive method we talked about earlier. It’s almost as easy and it’s more flexible. Leave Decontaminate Colors unchecked.
▶ Check the final result. Back in the View Mode section, click the check box for Show Original to compare before and after results. We’ve come a long way. Just out of curiosity, cycle through the various View options and take note of how nice Dina looks against a white background.
We’ve accomplished what we can in the Refine Mask panel. Click OK to accept the results.
The improvements are obvious, but Dina’s hair looks a little flat in some areas, and there’s a thin white line along her left sleeve.
Adjust Edge lets you make global changes to your mask.
New Layer with Layer Mask gives you the flexibility to edit the refined mask manually or go back to the original.
Decontaminate Colors works similarly to the “Fringe Pixels Layer” trick, but applies the changes destructively to the image, limiting the possibility for future edits.

279← Chapter 11 →
▶ Remove the thin white line. Refine Mask did a great job, but chances are you’ll find a few spots in need of attention. That’s why it’s so important to become well versed in the manual masking techniques we discussed earlier. Let’s start by fixing the thin white line along Dina’s left arm.
Make sure the mask thumbnail is selected and has a border around it. Select the Brush tool, choose a small brush size with 0% hardness, and make your foreground color black. Not only does the sleeve have that thin white line, it also appears to be more in focus than the right arm. How large should the fuzzy brush be in order to achieve the proper focus? That’s strictly a trial and error proposition. I ended up using a 25 pixel diameter brush and eliminated the white line by clicking on the bottom of the sleeve, then moving upwards and clicking again while holding Shift to “connect the dots.” Carefully work your way up the sleeve. If you make a mistake, correct it by painting with white.
▶ Examine the mask for imperfections. Option+Click/Alt+Click on the mask thumbnail to view it by itself. Here you’re apt to find some problem areas that might otherwise go undetected. Most likely, you’ll find some gray areas well within Dina’s hair. Those are areas that Refine Mask attempted to blend but shouldn’t have. Option+Click/Alt+Click the mask thumbnail to return to normal view, and you’ll see that those areas are void of contrast and look too flat. Return to mask view and carefully clean those areas up by painting with white. Check for missing pieces of sweater, too. I had a few of those spots that needed attention. Work carefully and stay away from the outer most edges of frizzy hair. Those areas should look grayish. Work in proper context by toggling constantly between mask view and normal view.
Mask View lets you discover and correct imperfections that would otherwise be hard to catch.
Magnify the image and carefully remove the white line by Clicking and Shift+Clicking your way up the sleeve.
280 ← Extracting Images—A Hairy Proposition →
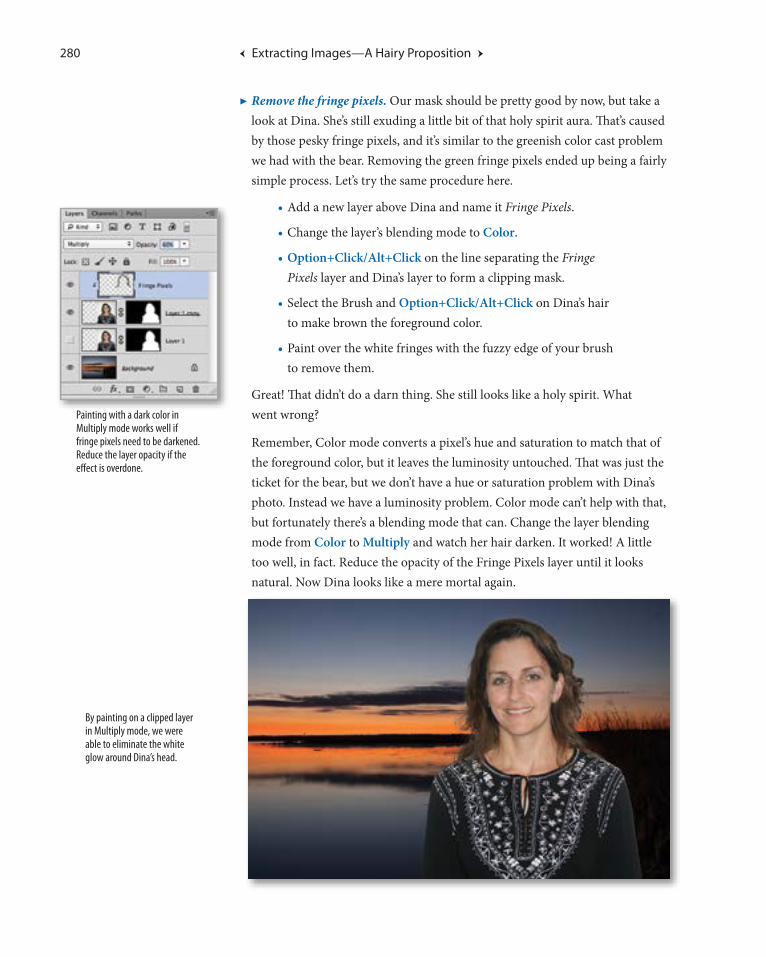
▶ Remove the fringe pixels. Our mask should be pretty good by now, but take a look at Dina. She’s still exuding a little bit of that holy spirit aura. That’s caused by those pesky fringe pixels, and it’s similar to the greenish color cast problem we had with the bear. Removing the green fringe pixels ended up being a fairly simple process. Let’s try the same procedure here.
•Add a new layer above Dina and name it Fringe Pixels.
•Change the layer’s blending mode to Color.
•Option+Click/Alt+Click on the line separating the Fringe Pixels layer and Dina’s layer to form a clipping mask.
•Select the Brush and Option+Click/Alt+Click on Dina’s hair to make brown the foreground color.
•Paint over the white fringes with the fuzzy edge of your brush to remove them.
Great! That didn’t do a darn thing. She still looks like a holy spirit. What went wrong?
Remember, Color mode converts a pixel’s hue and saturation to match that of the foreground color, but it leaves the luminosity untouched. That was just the ticket for the bear, but we don’t have a hue or saturation problem with Dina’s photo. Instead we have a luminosity problem. Color mode can’t help with that, but fortunately there’s a blending mode that can. Change the layer blending mode from Color to Multiply and watch her hair darken. It worked! A little too well, in fact. Reduce the opacity of the Fringe Pixels layer until it looks natural. Now Dina looks like a mere mortal again.
By painting on a clipped layer in Multiply mode, we were able to eliminate the white glow around Dina’s head.
Painting with a dark color in Multiply mode works well if fringe pixels need to be darkened. Reduce the layer opacity if the effect is overdone.

281← Chapter 11 →
▶ Adjust the color palette. Unfortunately Dina still looks a little odd and out of place, and it’s because we have a white balance problem. Her picture was taken indoors with flash, which is color balanced to 5500°K, like daylight. But the background photo was taken during sunset which has a much warmer look than daylight. We need to bathe Dina in orange sunset light to make her appear natural in this setting. There’s a command that can do just that.
Click Dina’s thumbnail and choose Image>Adjustments>Match Color from the Main menu. Before entering this command, you always have to select the layer that you want to change. This is referred to as the Target layer. If the Match Color command is grayed out, perhaps you selected the layer mask thumbnail by mistake.
The top section of the Match Color dialog box lets you adjust the Destination Image. Make sure that Dina’s layer is listed as the Target, but leave the Image Options settings alone.
The bottom Image Statistics section lets you specify a Source for the color. Click the Source pop‑up menu and choose Dina Final.psd (our current file). In the Layer pop‑up menu below that, choose Background for the layer. That’s where our sunset colors are.
Choose Match Color to apply the colors of one layer to a different layer.
In the Image Statistics section, choose Dina Final.psd for the Source and Background for the Layer.

282 ← Extracting Images—A Hairy Proposition →
Look at poor Dina now. She’s even more orange than the sunset. That won’t do. In the Image Options section, move the Fade slider to the right to reduce the effect. I decided on a Fade value of 80. Click OK to accept the Match Color adjustments.
Match Color was applied at full strength in the image on the left and faded to 80% for the image on the right.
▶ Adjust the overall luminosity. One final tweak. Dina looks a little too bright for sunset conditions, especially the white patterns on her sweater. Add a Curves adjustment layer above the Fringe Pixels layer and Option+Click/Alt+Click between the layers to clip it to the Dina layer. We want to darken her, not the background photo.
Click the White Point on the Brightness curve and drag it downwards to darken the image overall. I moved it down until my Output value reached 230. Choose a setting that looks right to you. This adjustment toned everything down, but mostly the whites.
Drag the White Point down for an overall darkening effect, concentrating more heavily on the highlights.
A Fade of 80 undoes 80% of the effect.

283← Chapter 11 →
The final composition has a natural look to it, blending into the background and fitting into the lighting conditions.
Final ThoughtsExtracting an image and placing it into a new background is far more involved than a simple cut and paste, especially if hair is involved. But with good masking techniques, a few compositing tricks, and a good measure of patience, your images will feel at home in their new locations.
Don’t forget to help yourself with a little good planning, too. If you know in advance that you will be placing your subject into a new background, seek out a location with a similarly colored background if possible. Failing that, choose a non‑textured backdrop that contrasts nicely with the subject’s hair. Then let your Photoshop skills take care of the rest.