demo examples exercise cancel flight booking - sap · demo examples exercise cancel flight booking...
TRANSCRIPT

Demo Examples
Exercise
Cancel Flight Booking
Document Version 1.0 – March 2012
SAP NetWeaver 7.31

© Copyright 2012 SAP AG. All rights reserved. No part of this publication may be reproduced or transmitted in any form or for any purpose without the express permission of SAP AG. The information contained herein may be changed without prior notice. Some software products marketed by SAP AG and its distributors contain proprietary software components of other software vendors. Microsoft, Windows, Outlook, and PowerPoint are registered trademarks of Microsoft Corporation. IBM, DB2, DB2 Universal Database, OS/2, Parallel Sysplex, MVS/ESA, AIX, S/390, AS/400, OS/390, OS/400, iSeries, pSeries, xSeries, zSeries, z/OS, AFP, Intelligent Miner, WebSphere, Netfinity, Tivoli, Informix, i5/OS, POWER, POWER5, OpenPower and PowerPC are trademarks or registered trademarks of IBM Corporation. Adobe, the Adobe logo, Acrobat, PostScript, and Reader are either trademarks or registered trademarks of Adobe Systems Incorporated in the United States and/or other countries. Oracle is a registered trademark of Oracle Corporation. UNIX, X/Open, OSF/1, and Motif are registered trademarks of the Open Group. Citrix, ICA, Program Neighborhood, MetaFrame, WinFrame, VideoFrame, and MultiWin are trademarks or registered trademarks of Citrix Systems, Inc. HTML, XML, XHTML and W3C are trademarks or registered trademarks of W3C®, World Wide Web Consortium, Massachusetts Institute of Technology. Java is a registered trademark of Sun Microsystems, Inc. JavaScript is a registered trademark of Sun Microsystems, Inc., used under license for technology invented and implemented by Netscape.
MaxDB is a trademark of MySQL AB, Sweden. SAP, R/3, mySAP, mySAP.com, xApps, xApp, SAP NetWeaver, and other SAP products and services mentioned herein as well as their respective logos are trademarks or registered trademarks of SAP AG in Germany and in several other countries all over the world. All other product and service names mentioned are the trademarks of their respective companies. Data contained in this document serves informational purposes only. National product specifications may vary. These materials are subject to change without notice. These materials are provided by SAP AG and its affiliated companies ("SAP Group") for informational purposes only, without representation or warranty of any kind, and SAP Group shall not be liable for errors or omissions with respect to the materials. The only warranties for SAP Group products and services are those that are set forth in the express warranty statements accompanying such products and services, if any. Nothing herein should be construed as constituting an additional warranty.
Disclaimer
Some components of this product are based on Java™. Any
code change in these components may cause unpredictable and severe malfunctions and is therefore expressively prohibited, as is any decompilation of these components. Any Java™ Source Code delivered with this product is only to
be used by SAP‟s Support Services and may not be modified or
altered in any way. Documentation in SAP Community Network (SDN)
You can find this documentation in SAP Community Network (SDN) titled Demo Examples Exercise Cancel Flight Booking.
SAP AG
Dietmar-Hopp-Allee 16 69190 Walldorf Germany T +49/18 05/34 34 24 F +49/18 05/34 34 20 www.sap.com
SAP EHP 1 for SAP NetWeaver 7.31 – Demo Exercise Cancel Flight Booking
March 2012 3
1 Introduction ................................................................................. 5
1.1 SAP NetWeaver PI Demo Examples ....................................................... 5
1.2 Business Description of the Process Integration Scenario ...................... 5
2 Design ......................................................................................... 6
2.1 Creating the Product Version and Software Component Version ............ 6
2.2 Importing the Software Component Version to the Enterprise Services Repository ......................................................................................... 7
3 Configuration .............................................................................. 7
3.1 Designing System Landscape ................................................................. 8
3.2 Users and Authorizations ........................................................................ 8
4 Design (Proxy Variant) ............................................................... 8
4.1 Defining Namespaces ............................................................................. 8
4.2 Defining the Process Integration Scenario............................................... 9
4.2.1 Creating the Process Integration Scenario .................................................................. 9 4.2.2 Defining the Application Components .......................................................................... 9 4.2.3 Defining Actions and Assigning Interfaces ................................................................... 9 4.2.4 Defining a Connection ................................................................................................ 10
4.3 Defining Interface Objects (Message Type, Data Type) ........................ 11
4.4 Defining a Context Object ...................................................................... 12
4.4.1 Creating the Context Object ....................................................................................... 12 4.4.2 Assigning Context Object to a Service Interface ........................................................ 12
4.5 Defining Mapping Objects...................................................................... 12
4.6 Activating the Development Objects ...................................................... 13
5 Design (IDoc Variant) ............................................................... 13
5.1 Enhancing the Process Integration Scenario ......................................... 13
5.2 Defining an Additional Component View (for IDoc Communication) ...... 13
5.3 Defining Mapping Objects...................................................................... 14
5.4 Activating the Development Objects ...................................................... 14
6 Implementing the Application (ABAP) .................................... 15
6.1 Proxy Generation ................................................................................... 15
6.2 Calling the Proxy from an ABAP Program ............................................. 16
7 Configuration ............................................................................ 16
7.1 Configuring the Process Integration Scenario (Proxy-to-Proxy Communication) ............................................................................................. 17
7.1.1 Selecting the Process Integration Scenario (Component View) and Creating the Configuration Scenario ........................................................................................................... 17 7.1.2 Assigning Communication Components .................................................................... 18 7.1.3 Configuring the Connection ........................................................................................ 18 7.1.4 Generating the Configuration Objects ........................................................................ 18 7.1.5 Manual Editing ............................................................................................................ 19 7.1.6 Final Steps .................................................................................................................. 19
SAP EHP 1 for SAP NetWeaver 7.31 – Demo Exercise Cancel Flight Booking
4 March 2012
7.2 Configuring the Process Integration Scenario (Proxy-to- IDoc Communication) ............................................................................................. 19
7.2.1 Selecting an Process Integration Scenario (Component View) ................................. 19 7.2.2 Assigning Communication Components .................................................................... 20 7.2.3 Configuring the Connection ........................................................................................ 20 7.2.4 Generating the Configuration Objects ........................................................................ 20 7.2.5 Manual Editing ............................................................................................................ 21 7.2.6 Final Steps .................................................................................................................. 21 7.2.7 Configuration for the IDoc Communication in the American Airline system............... 21
8 Executing and Testing ............................................................. 22
8.1 Preparation ............................................................................................ 22
8.1.1 Generating a Flight Booking ....................................................................................... 22
8.2 Executing the Process Integration Scenario CancelFlightBooking ........ 23
8.3 Checking the Results ............................................................................. 23
8.3.1 Checking at the Application Level .............................................................................. 23 8.3.2 Checking Using Process Integration Monitoring ........................................................ 24 8.3.3 Further Tipps & Tricks ................................................................................................ 24
SAP EHP 1 for SAP NetWeaver 7.31 – Demo Exercise Cancel Flight Booking
March 2012 5
1 Introduction This document explains how to develop and test a simple cross-system process integration scenario using SAP NetWeaver Process Integration (SAP NetWeaver PI). The development guide takes you through the most important development steps when designing cross-system processes based on SAP NetWeaver PI.
You will need approximately 2 hours to complete the example without the IDoc variant, and 3 hours with the IDoc variant.
1.1 SAP NetWeaver PI Demo Examples
SAP NetWeaver PI contains demo examples, which demonstrate the basic communication scenarios. The demo examples guide you through the technical concepts and tools step by step.
This guide uses the demo examples as a basis for educational and business development: Educational: The shipped demo examples are fully implemented. This development
guide explains step by step how you can develop a cross-system process yourself. Business: The process integration scenario Canceling a Flight Booking
(CancelFlightBooking) is a possible enhancement of the process integration scenario Booking a Single Flight (SingleFlightBooking). The process integration scenario SingleFlightBooking is shipped as part of SAP Enhancement Package 1 for SAPNetWeaver 7.30.
For more information, see the guide SAP Enhancement Package 1 for SAP NetWeaver PI 7.3 – Demo Examples Configuration.
1.2 Business Description of the Process Integration Scenario
First we will look at the business application case that is the basis for the demo examples and this development guide.
The demo examples use the following communication parties: A travel agency that sells flight tickets for various airlines Several airlines that sell their flight tickets through a travel agency
The travel agency and the airlines communicate electronically using SAP NetWeaver PI.
The demo examples include the process integration scenario Booking a Single Flight (SingleFlightBooking) (shipped as part of SAP EHP1 for SAP NetWeaver 7.30). In this process integration scenario, a travel agency books a flight with an airline. The booking refers to exactly one flight for exactly one passenger. The airline sends a response stating whether the booking was successful or not.
You use this development guide to develop the process integration scenario Canceling a Flight Booking. In this process integration scenario, the travel agency wants to cancel a flight booking that it has made. To do this, the travel agency must change the flight booking order (which it manages) and send a cancellation request to the airline with which it made the booking.
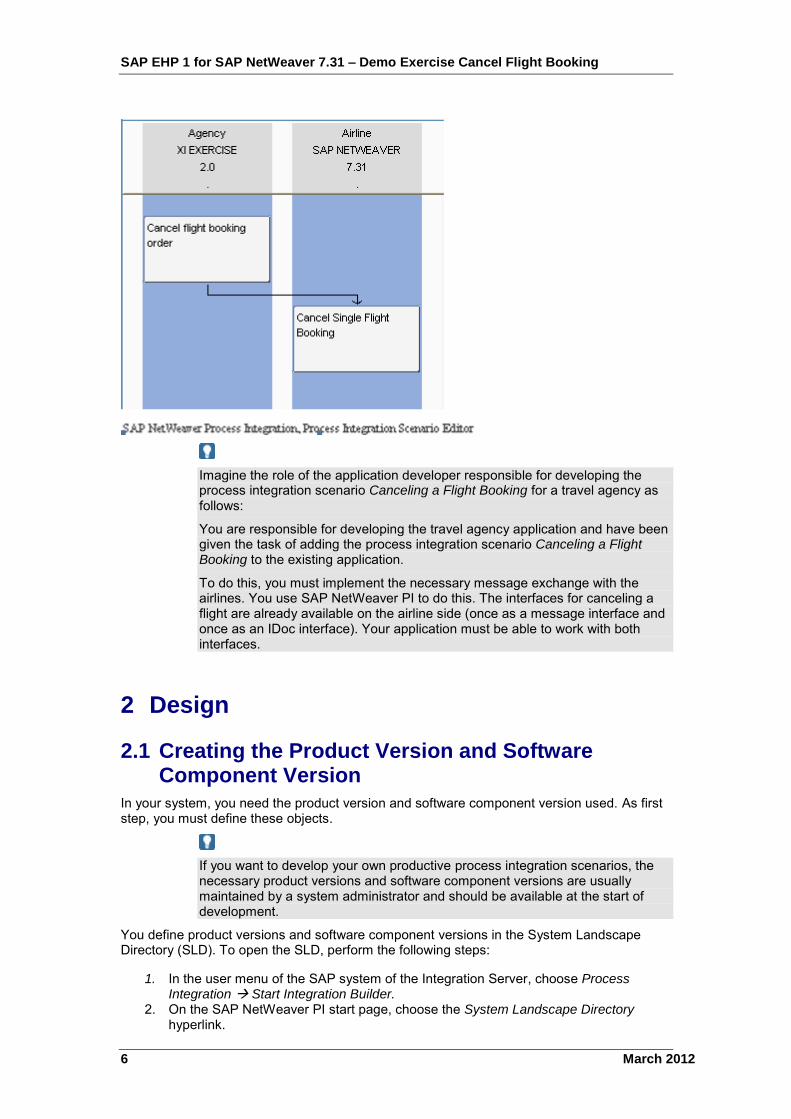
The figure below illustrates the process flow of this process integration scenario (as a component view):
SAP EHP 1 for SAP NetWeaver 7.31 – Demo Exercise Cancel Flight Booking
6 March 2012
Imagine the role of the application developer responsible for developing the process integration scenario Canceling a Flight Booking for a travel agency as follows:
You are responsible for developing the travel agency application and have been given the task of adding the process integration scenario Canceling a Flight Booking to the existing application.
To do this, you must implement the necessary message exchange with the airlines. You use SAP NetWeaver PI to do this. The interfaces for canceling a flight are already available on the airline side (once as a message interface and once as an IDoc interface). Your application must be able to work with both interfaces.
2 Design
2.1 Creating the Product Version and Software Component Version
In your system, you need the product version and software component version used. As first step, you must define these objects.
If you want to develop your own productive process integration scenarios, the necessary product versions and software component versions are usually maintained by a system administrator and should be available at the start of development.
You define product versions and software component versions in the System Landscape Directory (SLD). To open the SLD, perform the following steps: ...
1. In the user menu of the SAP system of the Integration Server, choose Process Integration Start Integration Builder.
2. On the SAP NetWeaver PI start page, choose the System Landscape Directory hyperlink.
SAP EHP 1 for SAP NetWeaver 7.31 – Demo Exercise Cancel Flight Booking
March 2012 7
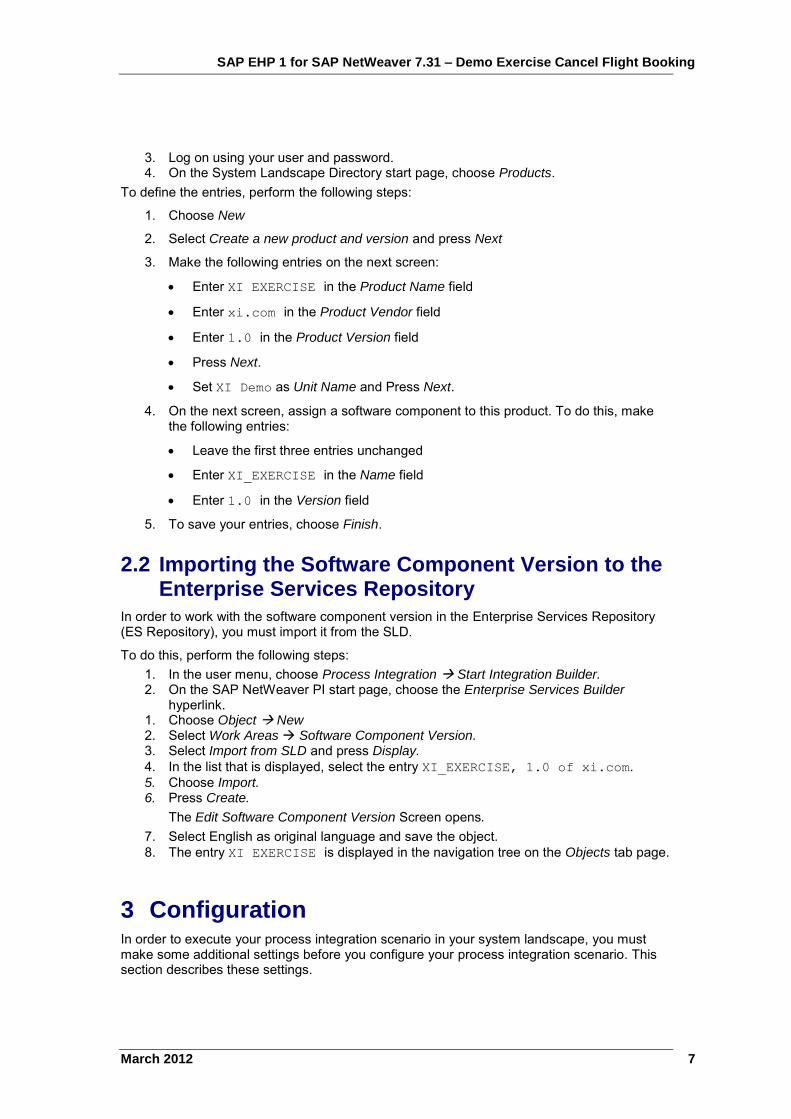
3. Log on using your user and password. 4. On the System Landscape Directory start page, choose Products.
To define the entries, perform the following steps:
1. Choose New
2. Select Create a new product and version and press Next
3. Make the following entries on the next screen:
Enter XI EXERCISE in the Product Name field
Enter xi.com in the Product Vendor field
Enter 1.0 in the Product Version field
Press Next.
Set XI Demo as Unit Name and Press Next.
4. On the next screen, assign a software component to this product. To do this, make the following entries:
Leave the first three entries unchanged
Enter XI_EXERCISE in the Name field
Enter 1.0 in the Version field
5. To save your entries, choose Finish.
2.2 Importing the Software Component Version to the Enterprise Services Repository
In order to work with the software component version in the Enterprise Services Repository (ES Repository), you must import it from the SLD.
To do this, perform the following steps:
1. In the user menu, choose Process Integration Start Integration Builder. 2. On the SAP NetWeaver PI start page, choose the Enterprise Services Builder
hyperlink. 1. Choose Object New 2. Select Work Areas Software Component Version. 3. Select Import from SLD and press Display. 4. In the list that is displayed, select the entry XI_EXERCISE, 1.0 of xi.com. 5. Choose Import. 6. Press Create.
The Edit Software Component Version Screen opens.
7. Select English as original language and save the object. 8. The entry XI EXERCISE is displayed in the navigation tree on the Objects tab page.
3 Configuration In order to execute your process integration scenario in your system landscape, you must make some additional settings before you configure your process integration scenario. This section describes these settings.
SAP EHP 1 for SAP NetWeaver 7.31 – Demo Exercise Cancel Flight Booking
8 March 2012
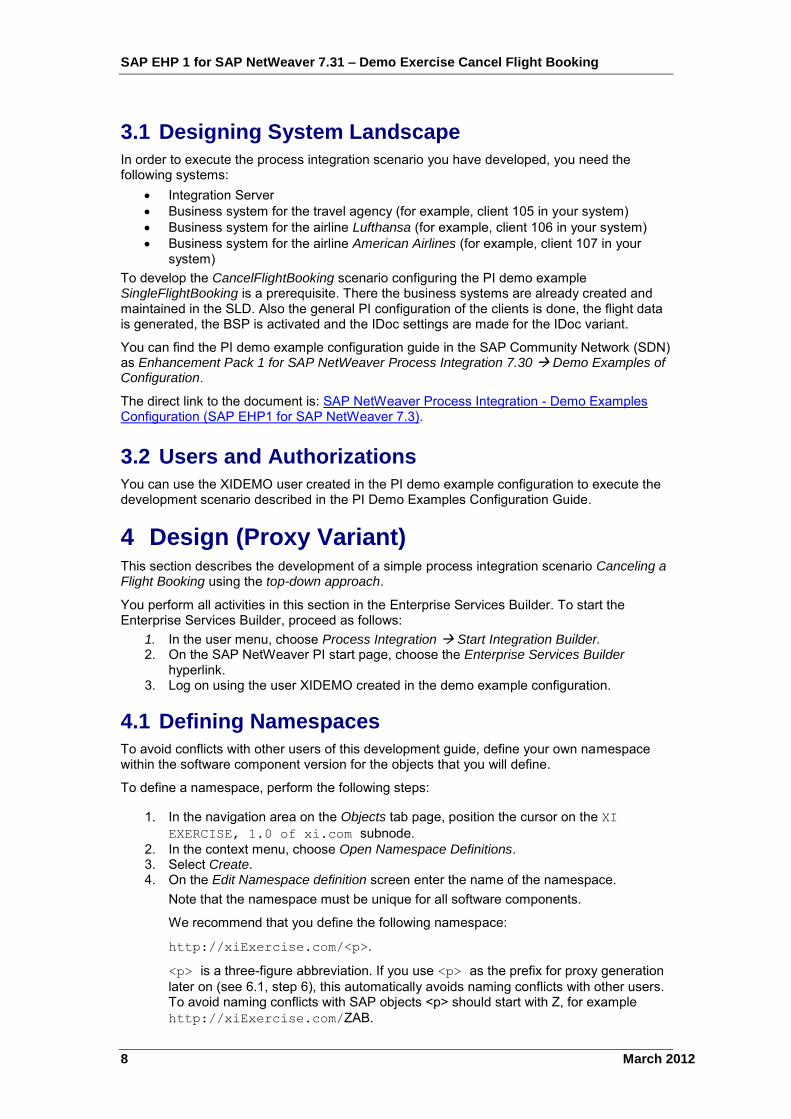
3.1 Designing System Landscape
In order to execute the process integration scenario you have developed, you need the following systems:
Integration Server Business system for the travel agency (for example, client 105 in your system) Business system for the airline Lufthansa (for example, client 106 in your system) Business system for the airline American Airlines (for example, client 107 in your
system) To develop the CancelFlightBooking scenario configuring the PI demo example SingleFlightBooking is a prerequisite. There the business systems are already created and maintained in the SLD. Also the general PI configuration of the clients is done, the flight data is generated, the BSP is activated and the IDoc settings are made for the IDoc variant.
You can find the PI demo example configuration guide in the SAP Community Network (SDN) as Enhancement Pack 1 for SAP NetWeaver Process Integration 7.30 Demo Examples of Configuration.
The direct link to the document is: SAP NetWeaver Process Integration - Demo Examples Configuration (SAP EHP1 for SAP NetWeaver 7.3).
3.2 Users and Authorizations
You can use the XIDEMO user created in the PI demo example configuration to execute the development scenario described in the PI Demo Examples Configuration Guide.
4 Design (Proxy Variant) This section describes the development of a simple process integration scenario Canceling a Flight Booking using the top-down approach.
You perform all activities in this section in the Enterprise Services Builder. To start the Enterprise Services Builder, proceed as follows:
1. In the user menu, choose Process Integration Start Integration Builder. 2. On the SAP NetWeaver PI start page, choose the Enterprise Services Builder
hyperlink. 3. Log on using the user XIDEMO created in the demo example configuration.
4.1 Defining Namespaces
To avoid conflicts with other users of this development guide, define your own namespace within the software component version for the objects that you will define.
To define a namespace, perform the following steps: ...
1. In the navigation area on the Objects tab page, position the cursor on the XI EXERCISE, 1.0 of xi.com subnode.
2. In the context menu, choose Open Namespace Definitions. 3. Select Create. 4. On the Edit Namespace definition screen enter the name of the namespace.
Note that the namespace must be unique for all software components.
We recommend that you define the following namespace:
http://xiExercise.com/<p>.
<p> is a three-figure abbreviation. If you use <p> as the prefix for proxy generation later on (see 6.1, step 6), this automatically avoids naming conflicts with other users. To avoid naming conflicts with SAP objects <p> should start with Z, for example http://xiExercise.com/ZAB.
SAP EHP 1 for SAP NetWeaver 7.31 – Demo Exercise Cancel Flight Booking
March 2012 9
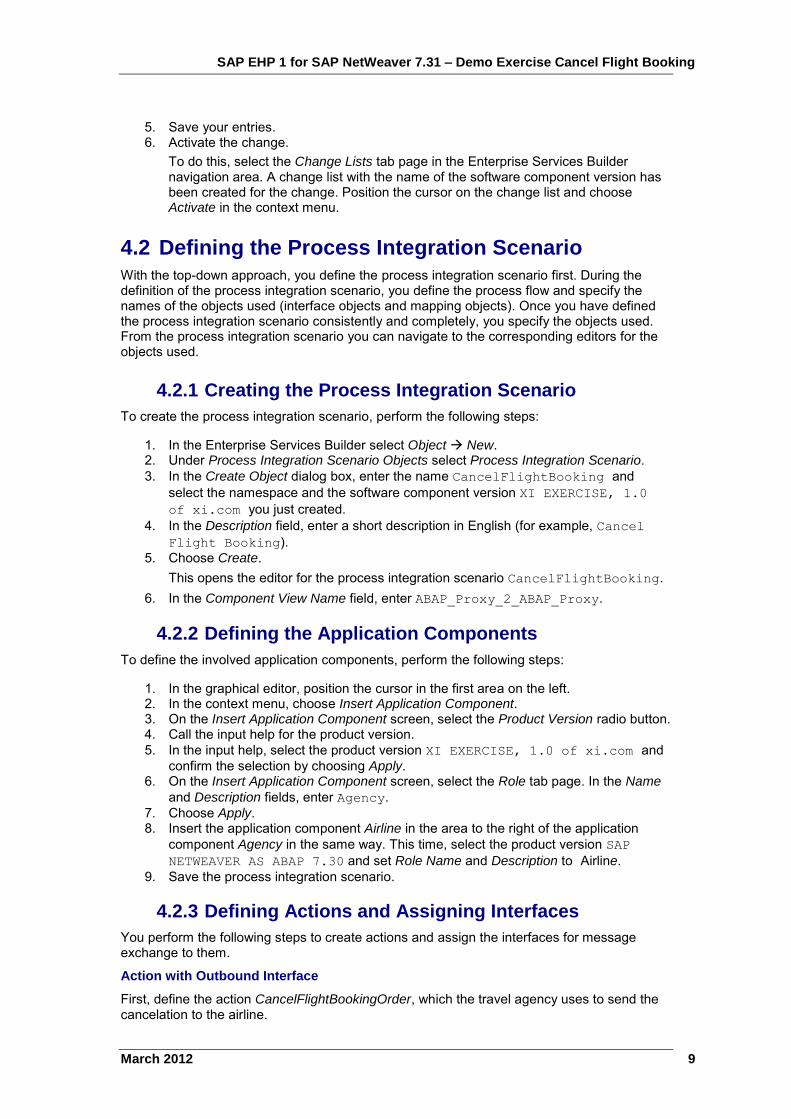
5. Save your entries. 6. Activate the change.
To do this, select the Change Lists tab page in the Enterprise Services Builder navigation area. A change list with the name of the software component version has been created for the change. Position the cursor on the change list and choose Activate in the context menu.
4.2 Defining the Process Integration Scenario
With the top-down approach, you define the process integration scenario first. During the definition of the process integration scenario, you define the process flow and specify the names of the objects used (interface objects and mapping objects). Once you have defined the process integration scenario consistently and completely, you specify the objects used. From the process integration scenario you can navigate to the corresponding editors for the objects used.
4.2.1 Creating the Process Integration Scenario
To create the process integration scenario, perform the following steps: ...
1. In the Enterprise Services Builder select Object New. 2. Under Process Integration Scenario Objects select Process Integration Scenario. 3. In the Create Object dialog box, enter the name CancelFlightBooking and
select the namespace and the software component version XI EXERCISE, 1.0 of xi.com you just created.
4. In the Description field, enter a short description in English (for example, Cancel Flight Booking).
5. Choose Create. This opens the editor for the process integration scenario CancelFlightBooking.
6. In the Component View Name field, enter ABAP_Proxy_2_ABAP_Proxy.
4.2.2 Defining the Application Components
To define the involved application components, perform the following steps: ...
1. In the graphical editor, position the cursor in the first area on the left. 2. In the context menu, choose Insert Application Component. 3. On the Insert Application Component screen, select the Product Version radio button. 4. Call the input help for the product version. 5. In the input help, select the product version XI EXERCISE, 1.0 of xi.com and
confirm the selection by choosing Apply. 6. On the Insert Application Component screen, select the Role tab page. In the Name
and Description fields, enter Agency. 7. Choose Apply. 8. Insert the application component Airline in the area to the right of the application
component Agency in the same way. This time, select the product version SAP NETWEAVER AS ABAP 7.30 and set Role Name and Description to Airline.
9. Save the process integration scenario.
4.2.3 Defining Actions and Assigning Interfaces
You perform the following steps to create actions and assign the interfaces for message exchange to them.
Action with Outbound Interface
First, define the action CancelFlightBookingOrder, which the travel agency uses to send the cancelation to the airline. ...
SAP EHP 1 for SAP NetWeaver 7.31 – Demo Exercise Cancel Flight Booking
10 March 2012
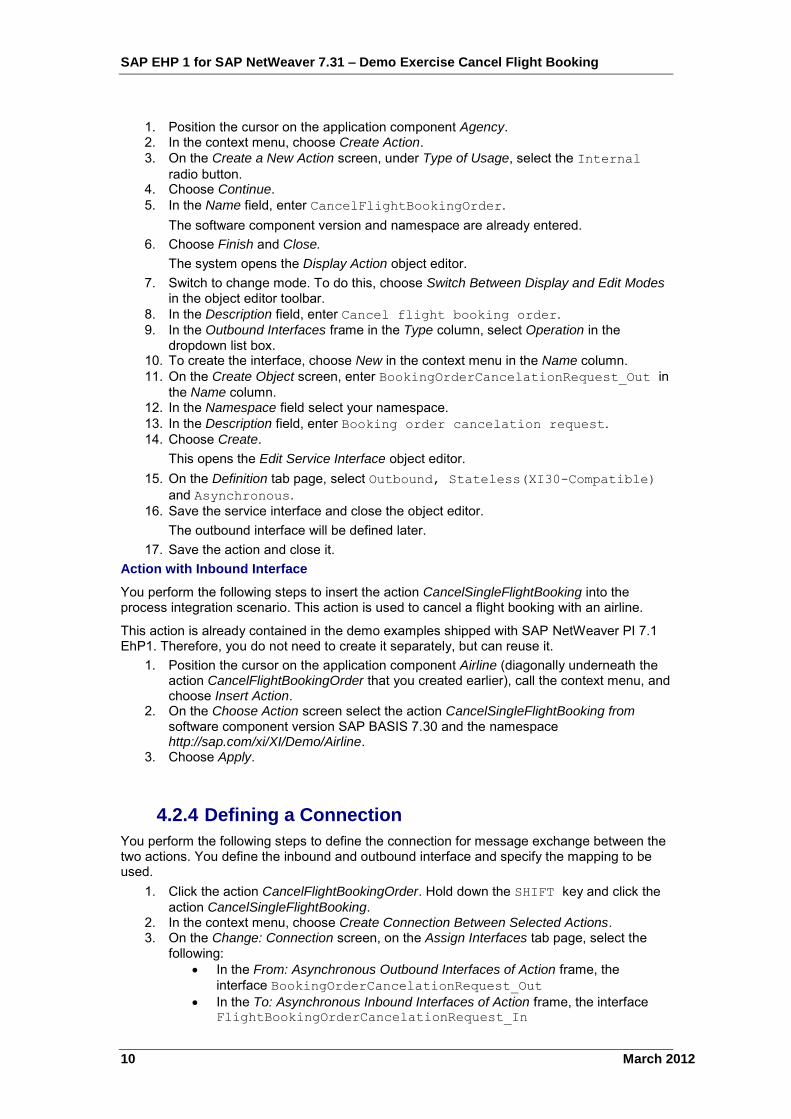
1. Position the cursor on the application component Agency. 2. In the context menu, choose Create Action. 3. On the Create a New Action screen, under Type of Usage, select the Internal
radio button. 4. Choose Continue. 5. In the Name field, enter CancelFlightBookingOrder.
The software component version and namespace are already entered. 6. Choose Finish and Close.
The system opens the Display Action object editor. 7. Switch to change mode. To do this, choose Switch Between Display and Edit Modes
in the object editor toolbar. 8. In the Description field, enter Cancel flight booking order. 9. In the Outbound Interfaces frame in the Type column, select Operation in the
dropdown list box. 10. To create the interface, choose New in the context menu in the Name column. 11. On the Create Object screen, enter BookingOrderCancelationRequest_Out in
the Name column. 12. In the Namespace field select your namespace. 13. In the Description field, enter Booking order cancelation request. 14. Choose Create.
This opens the Edit Service Interface object editor. 15. On the Definition tab page, select Outbound, Stateless(XI30-Compatible)
and Asynchronous. 16. Save the service interface and close the object editor.
The outbound interface will be defined later. 17. Save the action and close it.
Action with Inbound Interface
You perform the following steps to insert the action CancelSingleFlightBooking into the process integration scenario. This action is used to cancel a flight booking with an airline.
This action is already contained in the demo examples shipped with SAP NetWeaver PI 7.1 EhP1. Therefore, you do not need to create it separately, but can reuse it.
1. Position the cursor on the application component Airline (diagonally underneath the action CancelFlightBookingOrder that you created earlier), call the context menu, and choose Insert Action.
2. On the Choose Action screen select the action CancelSingleFlightBooking from software component version SAP BASIS 7.30 and the namespace http://sap.com/xi/XI/Demo/Airline.
3. Choose Apply.
4.2.4 Defining a Connection
You perform the following steps to define the connection for message exchange between the two actions. You define the inbound and outbound interface and specify the mapping to be used.
1. Click the action CancelFlightBookingOrder. Hold down the SHIFT key and click the action CancelSingleFlightBooking.
2. In the context menu, choose Create Connection Between Selected Actions. 3. On the Change: Connection screen, on the Assign Interfaces tab page, select the
following: In the From: Asynchronous Outbound Interfaces of Action frame, the
interface BookingOrderCancelationRequest_Out In the To: Asynchronous Inbound Interfaces of Action frame, the interface
FlightBookingOrderCancelationRequest_In
SAP EHP 1 for SAP NetWeaver 7.31 – Demo Exercise Cancel Flight Booking
March 2012 11
4. Select the Assign Mapping tab page. 5. Position the cursor on the Name field and choose New in the context menu. 6. On the Create Object screen, enter
BookingOrderCancelation_Agency2Airline as the name of the operation-mapping.
7. In the Description field, enter Booking order cancelation (agency to airline).
8. On the Create Object screen, choose Create. This opens the Edit Operation-Mapping object editor.
9. Choose Save. 10. Close the Edit Operation-Mapping editor. 11. On the Change: Connection screen, choose Apply. 12. Save the process integration scenario.
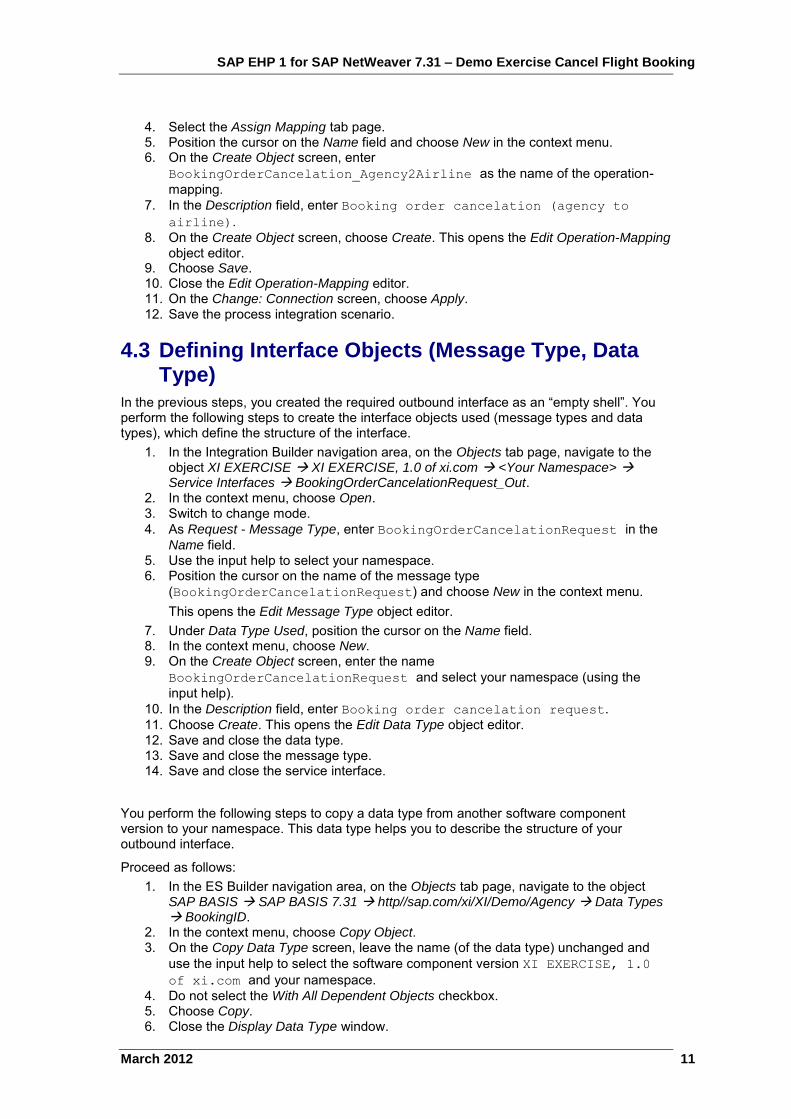
4.3 Defining Interface Objects (Message Type, Data Type)
In the previous steps, you created the required outbound interface as an “empty shell”. You perform the following steps to create the interface objects used (message types and data types), which define the structure of the interface.
1. In the Integration Builder navigation area, on the Objects tab page, navigate to the object XI EXERCISE XI EXERCISE, 1.0 of xi.com <Your Namespace> Service Interfaces BookingOrderCancelationRequest_Out.
2. In the context menu, choose Open. 3. Switch to change mode. 4. As Request - Message Type, enter BookingOrderCancelationRequest in the
Name field. 5. Use the input help to select your namespace. 6. Position the cursor on the name of the message type
(BookingOrderCancelationRequest) and choose New in the context menu. This opens the Edit Message Type object editor.
7. Under Data Type Used, position the cursor on the Name field. 8. In the context menu, choose New. 9. On the Create Object screen, enter the name
BookingOrderCancelationRequest and select your namespace (using the input help).
10. In the Description field, enter Booking order cancelation request. 11. Choose Create. This opens the Edit Data Type object editor. 12. Save and close the data type. 13. Save and close the message type. 14. Save and close the service interface.
You perform the following steps to copy a data type from another software component version to your namespace. This data type helps you to describe the structure of your outbound interface.
Proceed as follows: 1. In the ES Builder navigation area, on the Objects tab page, navigate to the object
SAP BASIS SAP BASIS 7.31 http//sap.com/xi/XI/Demo/Agency Data Types BookingID.
2. In the context menu, choose Copy Object. 3. On the Copy Data Type screen, leave the name (of the data type) unchanged and
use the input help to select the software component version XI EXERCISE, 1.0 of xi.com and your namespace.
4. Do not select the With All Dependent Objects checkbox. 5. Choose Copy. 6. Close the Display Data Type window.
SAP EHP 1 for SAP NetWeaver 7.31 – Demo Exercise Cancel Flight Booking
12 March 2012
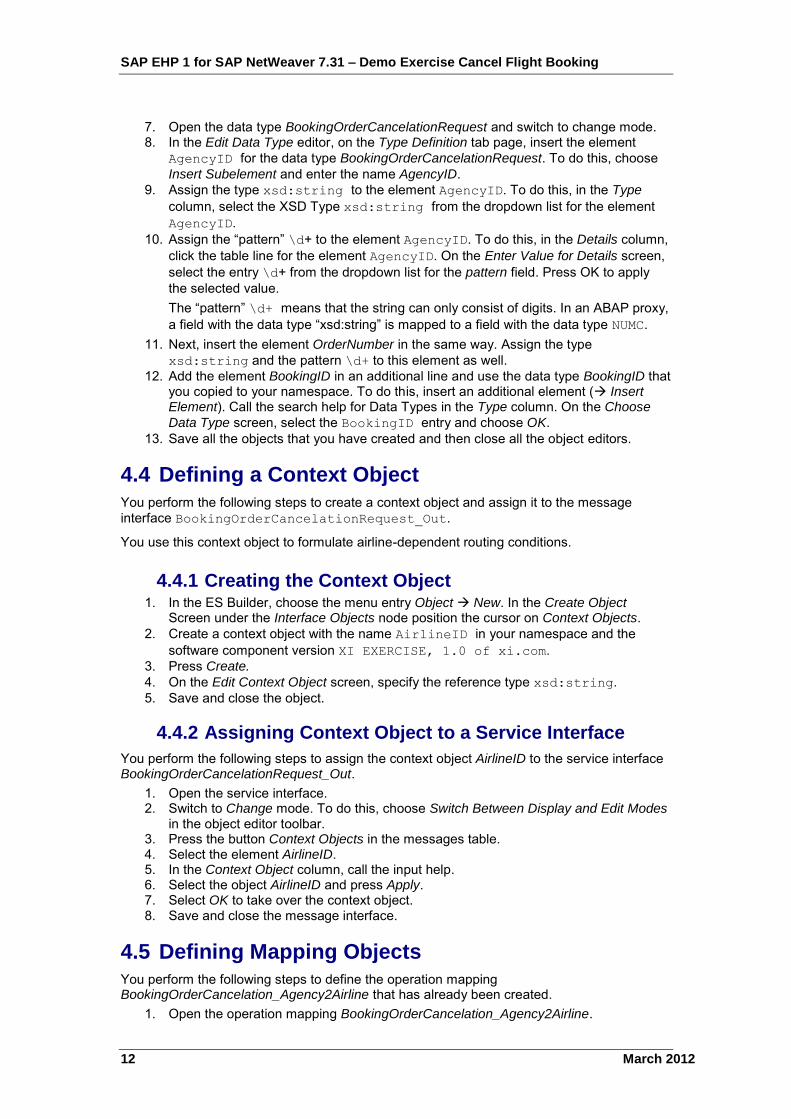
7. Open the data type BookingOrderCancelationRequest and switch to change mode. 8. In the Edit Data Type editor, on the Type Definition tab page, insert the element
AgencyID for the data type BookingOrderCancelationRequest. To do this, choose Insert Subelement and enter the name AgencyID.
9. Assign the type xsd:string to the element AgencyID. To do this, in the Type
column, select the XSD Type xsd:string from the dropdown list for the element AgencyID.
10. Assign the “pattern” \d+ to the element AgencyID. To do this, in the Details column, click the table line for the element AgencyID. On the Enter Value for Details screen, select the entry \d+ from the dropdown list for the pattern field. Press OK to apply the selected value. The “pattern” \d+ means that the string can only consist of digits. In an ABAP proxy, a field with the data type “xsd:string” is mapped to a field with the data type NUMC.
11. Next, insert the element OrderNumber in the same way. Assign the type xsd:string and the pattern \d+ to this element as well.
12. Add the element BookingID in an additional line and use the data type BookingID that you copied to your namespace. To do this, insert an additional element ( Insert Element). Call the search help for Data Types in the Type column. On the Choose
Data Type screen, select the BookingID entry and choose OK. 13. Save all the objects that you have created and then close all the object editors.
4.4 Defining a Context Object
You perform the following steps to create a context object and assign it to the message interface BookingOrderCancelationRequest_Out.
You use this context object to formulate airline-dependent routing conditions.
4.4.1 Creating the Context Object 1. In the ES Builder, choose the menu entry Object New. In the Create Object
Screen under the Interface Objects node position the cursor on Context Objects. 2. Create a context object with the name AirlineID in your namespace and the
software component version XI EXERCISE, 1.0 of xi.com. 3. Press Create. 4. On the Edit Context Object screen, specify the reference type xsd:string. 5. Save and close the object.
4.4.2 Assigning Context Object to a Service Interface
You perform the following steps to assign the context object AirlineID to the service interface BookingOrderCancelationRequest_Out.
1. Open the service interface. 2. Switch to Change mode. To do this, choose Switch Between Display and Edit Modes
in the object editor toolbar. 3. Press the button Context Objects in the messages table. 4. Select the element AirlineID. 5. In the Context Object column, call the input help. 6. Select the object AirlineID and press Apply. 7. Select OK to take over the context object. 8. Save and close the message interface.
4.5 Defining Mapping Objects
You perform the following steps to define the operation mapping BookingOrderCancelation_Agency2Airline that has already been created.
1. Open the operation mapping BookingOrderCancelation_Agency2Airline.
SAP EHP 1 for SAP NetWeaver 7.31 – Demo Exercise Cancel Flight Booking
March 2012 13
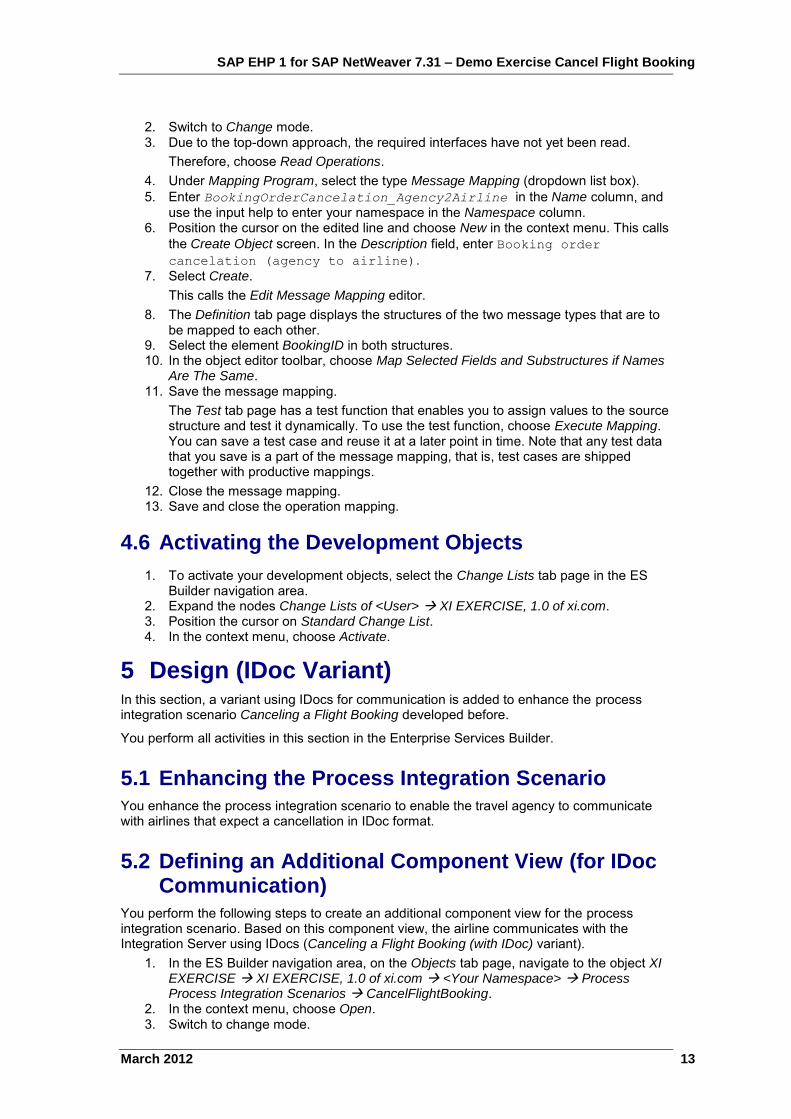
2. Switch to Change mode. 3. Due to the top-down approach, the required interfaces have not yet been read.
Therefore, choose Read Operations. 4. Under Mapping Program, select the type Message Mapping (dropdown list box). 5. Enter BookingOrderCancelation_Agency2Airline in the Name column, and
use the input help to enter your namespace in the Namespace column. 6. Position the cursor on the edited line and choose New in the context menu. This calls
the Create Object screen. In the Description field, enter Booking order cancelation (agency to airline).
7. Select Create. This calls the Edit Message Mapping editor.
8. The Definition tab page displays the structures of the two message types that are to be mapped to each other.
9. Select the element BookingID in both structures. 10. In the object editor toolbar, choose Map Selected Fields and Substructures if Names
Are The Same. 11. Save the message mapping.
The Test tab page has a test function that enables you to assign values to the source structure and test it dynamically. To use the test function, choose Execute Mapping. You can save a test case and reuse it at a later point in time. Note that any test data that you save is a part of the message mapping, that is, test cases are shipped together with productive mappings.
12. Close the message mapping. 13. Save and close the operation mapping.
4.6 Activating the Development Objects ...
1. To activate your development objects, select the Change Lists tab page in the ES Builder navigation area.
2. Expand the nodes Change Lists of <User> XI EXERCISE, 1.0 of xi.com. 3. Position the cursor on Standard Change List. 4. In the context menu, choose Activate.
5 Design (IDoc Variant) In this section, a variant using IDocs for communication is added to enhance the process integration scenario Canceling a Flight Booking developed before.
You perform all activities in this section in the Enterprise Services Builder.
5.1 Enhancing the Process Integration Scenario
You enhance the process integration scenario to enable the travel agency to communicate with airlines that expect a cancellation in IDoc format.
5.2 Defining an Additional Component View (for IDoc Communication)
You perform the following steps to create an additional component view for the process integration scenario. Based on this component view, the airline communicates with the Integration Server using IDocs (Canceling a Flight Booking (with IDoc) variant).
1. In the ES Builder navigation area, on the Objects tab page, navigate to the object XI EXERCISE XI EXERCISE, 1.0 of xi.com <Your Namespace> Process Process Integration Scenarios CancelFlightBooking.
2. In the context menu, choose Open. 3. Switch to change mode.
SAP EHP 1 for SAP NetWeaver 7.31 – Demo Exercise Cancel Flight Booking
14 March 2012
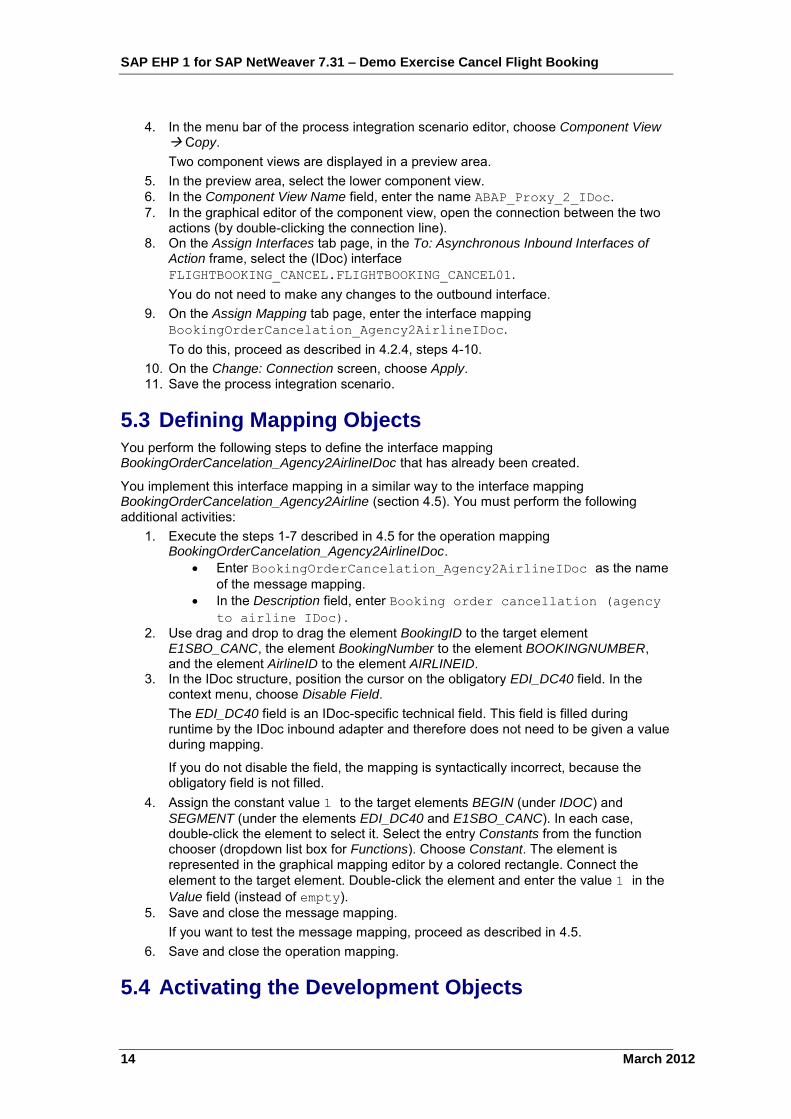
4. In the menu bar of the process integration scenario editor, choose Component View Copy. Two component views are displayed in a preview area.
5. In the preview area, select the lower component view. 6. In the Component View Name field, enter the name ABAP_Proxy_2_IDoc. 7. In the graphical editor of the component view, open the connection between the two
actions (by double-clicking the connection line). 8. On the Assign Interfaces tab page, in the To: Asynchronous Inbound Interfaces of
Action frame, select the (IDoc) interface FLIGHTBOOKING_CANCEL.FLIGHTBOOKING_CANCEL01. You do not need to make any changes to the outbound interface.
9. On the Assign Mapping tab page, enter the interface mapping BookingOrderCancelation_Agency2AirlineIDoc. To do this, proceed as described in 4.2.4, steps 4-10.
10. On the Change: Connection screen, choose Apply. 11. Save the process integration scenario.
5.3 Defining Mapping Objects
You perform the following steps to define the interface mapping BookingOrderCancelation_Agency2AirlineIDoc that has already been created.
You implement this interface mapping in a similar way to the interface mapping BookingOrderCancelation_Agency2Airline (section 4.5). You must perform the following additional activities:
1. Execute the steps 1-7 described in 4.5 for the operation mapping BookingOrderCancelation_Agency2AirlineIDoc.
Enter BookingOrderCancelation_Agency2AirlineIDoc as the name of the message mapping.
In the Description field, enter Booking order cancellation (agency to airline IDoc).
2. Use drag and drop to drag the element BookingID to the target element E1SBO_CANC, the element BookingNumber to the element BOOKINGNUMBER, and the element AirlineID to the element AIRLINEID.
3. In the IDoc structure, position the cursor on the obligatory EDI_DC40 field. In the context menu, choose Disable Field. The EDI_DC40 field is an IDoc-specific technical field. This field is filled during runtime by the IDoc inbound adapter and therefore does not need to be given a value during mapping.
If you do not disable the field, the mapping is syntactically incorrect, because the obligatory field is not filled.
4. Assign the constant value 1 to the target elements BEGIN (under IDOC) and SEGMENT (under the elements EDI_DC40 and E1SBO_CANC). In each case, double-click the element to select it. Select the entry Constants from the function chooser (dropdown list box for Functions). Choose Constant. The element is represented in the graphical mapping editor by a colored rectangle. Connect the element to the target element. Double-click the element and enter the value 1 in the Value field (instead of empty).
5. Save and close the message mapping. If you want to test the message mapping, proceed as described in 4.5.
6. Save and close the operation mapping.
5.4 Activating the Development Objects ...
SAP EHP 1 for SAP NetWeaver 7.31 – Demo Exercise Cancel Flight Booking
March 2012 15
1. To activate your development objects, select the Change Lists tab page in the Enterprise Services Builder navigation area.
2. Expand the nodes Change Lists of <User> XI EXERCISE, 1.0 of xi.com. 3. Position the cursor on Standard Change List. 4. In the context menu, choose Activate.
6 Implementing the Application (ABAP) This section describes all the steps required to implement the component-internal processing on the travel agency side. You create a simple report for canceling a flight booking order and generate an ABAP proxy for your outbound interface for sending the flight booking cancellation to the airline.
The implementation for the airline already exists and you do not need to create it.
You perform all activities in this section in the SAP system of the travel agency, client 105.
6.1 Proxy Generation
ABAP proxy generation enables you to generate an ABAP proxy for an interface in the ES Repository. This generates an ABAP Objects interface and an implementing ABAP Objects class (in the case of an inbound interface) or an ABAP Objects class (in the case of an outbound interface), and all the required data types. The ABAP proxies have the task of sending or receiving messages using SAP NetWeaver PI and converting internal data structures into XML (or the other way round).
In our example, a fully-implemented ABAP Objects class and all the required data types are generated for your outbound interface.
Execute the following steps in the Integration Server Client 001.
1. Start the transaction ABAP Proxy Generation (transaction code SPROXY). 2. In the navigation tree, expand the software component version XI EXERCISE, 1.0 of
xi.com and then your namespace. 3. Expand the Service Interface subnode. 4. Double-click the service interface BookingOrderCancelationRequest_Out. By doing
this, you start proxy creation. 5. On the following screen, select Local Object and enter a prefix in the Prefix field. We
recommend using a three-figure abbreviation and an underscore (for example, ZAB_). The prefix is represented below with <p>_
The prefix is required to avoid naming conflicts with other users of the demo example. You are free to choose any prefix, but it must be unique and it should start with Z to avoid naming conflicts with SAP objects. We recommend that you use <p>_, where <p> is the three-digit abbreviation for your namespace.
If a prefix has already been assigned, this will result in naming conflicts (see step 7). If a naming conflict occurs, choose another prefix. See step 4 in 4.1.
6. Choose Continue. The system determines which objects to generate. 7. Press Finish. 8. To check the log, see Goto Show Log in the menu. 9. In the display area of the ABAP proxy generation transaction, select the Name
Problems tab page. First check which naming conflicts have occurred.
We recommend the following if there is a naming conflict with the prefix: Look at the prefixes that have been used to date. For example, in the Class
Builder (SE24) you can search for classes *CO*CANC* in package $TMP.
SAP EHP 1 for SAP NetWeaver 7.31 – Demo Exercise Cancel Flight Booking
16 March 2012
If the prefix is already used cancel the processing and choose a prefix that has not already been used and restart the proxy generation.
If the names are shortened adjust the names as stated below. 10. The names for the structures that have been created by the system are displayed.
The message type and data type were given the same name in the Integration Builder. However, in the Data Dictionary, you cannot create two different structures with the same name. Therefore, an appendix is added automatically.
To improve readability, we recommend changing the proposed names as follows: Class name: <p>_CO_BOOKING_ORDER_CANCEL Method: BOOKING_ORDER_CANCELATION Data type – field: <p>_BOOKING_ORDER_CANCEL Data type – table structure: <p>_BOOKING_ORDER_CANCELATION Message type - structure: <p>_BOOKING_ORDER_CANCEL_MT
To determine which names the system has given the message type, select the External View tab page. This displays the assignment of names and structures.
11. Save the proxy. 12. Activate the proxy from the menu.
On the Generation tab page, you can display additional details for the generated objects.
6.2 Calling the Proxy from an ABAP Program
To test the generated ABAP proxy, an application program (ABAP program) must exist to call the proxy.
To enable you to concentrate on the Process Integration-specific aspects in this exercise, this application program has already been defined. The name of this program is SXIDEMO_AGCY_FBO_CANCEL.
This means that you do not have to perform the steps required to develop an application program.
To call the generated ABAP proxy in an ABAP program, perform the following steps in the travel agency client 105:
1. In SE38 copy the report SXIDEMO_AGCY_FBO_CANCEL and save the copy as a local object with the name <p>_AGCY_FBO_CANCEL (proposal).
2. Edit the program code of your own report to enable it to call the proxy that you generated above.
For notes, see the comment line of the report.
For more information about proxy programming, see the chapter ABAP Proxy Runtime in SAP Help Portal.
3. Save again, test, and then activate your report.
7 Configuration This section describes the settings required to configure the process integration scenario you have developed.
The configuration assumes the following system landscape: <SID>_105 = Business system of travel agency <SID>_106 = Airline Lufthansa
<SID>_107 = Airline American Airlines
SAP EHP 1 for SAP NetWeaver 7.31 – Demo Exercise Cancel Flight Booking
March 2012 17
The specified business system communication components for the travel agency and airline business systems already exist in the Integration Directory of the system after the SAP NetWeaver PI demo example SingleFlightBooking was executed.
You configure the process integration scenario in the Integration Directory. Therefore, to execute the activities described below, call the Integration Builder (Integration Directory).
1. In the user menu (in the SAP system of the Integration Server), choose Process Integration Start Integration Builder.
2. On the SAP NetWeaver PI start page, choose the Integration Builder hyperlink. 3. Log on using the XIDEMO user. The system opens the Integration Builder.
The central tool is the process integration scenario configurator. For more information about the process integration scenario configurator, see the chapter Configuring Process Integration Scenarios in SAP Help Portal.
7.1 Configuring the Process Integration Scenario (Proxy-to-Proxy Communication)
The following section describes how to configure the process integration scenario CancelFlightBooking so that the travel agency is connected to the airline Lufthansa using proxy-to-proxy communication.
7.1.1 Selecting the Process Integration Scenario (Component View) and Creating the Configuration Scenario
You perform the steps below to do the following: Select the process integration scenario and the component view from the ES
Repository Create the configuration scenario in the Integration Directory to group all the
relevant configuration objects
1. To call the process integration scenario configurator, choose Tools Apply Model from ES Repository in the Integration Builder (Integration Directory) menu bar. This calls a wizard, which you use to select a process integration scenario and create a configuration scenario in the Integration Directory.
2. In the Transfer Model from ES Repository dialog box, choose the input help (for the Name field). This calls an input help, which displays all process integration scenarios from the ES Repository in a list.
3. Select the process integration scenario CancelFlightBooking (software component version XI EXERCISE, 1.0 of xi.com, namespace <Your Namespace>) and choose Apply.
4. In the wizard, choose Continue. 5. On the next screen, you edit the predefined name of the configuration scenario.
Change the name to <p>_XIDemo_CancelFlightBooking. Choose Finish.
The system creates the configuration scenario. 6. Choose Close.
The system calls the process integration scenario configurator. The process integration scenario CancelFlightBooking is displayed in a graphical editor.
7. Check that the component view ABAP_Proxy_2_ABAP_Proxy is selected. If not, choose the Select Component View button and in the preview area of the graphical editor, select the component view ABAP_Proxy_2_ABAP_Proxy and choose Apply.
SAP EHP 1 for SAP NetWeaver 7.31 – Demo Exercise Cancel Flight Booking
18 March 2012
7.1.2 Assigning Communication Components
You perform the following steps to assign communication components to the application components of the process integration scenario.
1. In the graphical editor, click on the lane representing the Agency application component. This calls the Assign Business System Component dialog box for the Agency application component (below the graphical representation of the process integration scenario).
2. In the Assign Business System Components for A2A Communication dialog box, on the Business System Components for A2A tab page click in the input field in the Communication Component column and call the input help. As communication component selection, choose All Business System Components. The system displays all communication components of type Business System.
3. Select the business system <SID>_105 and choose Apply. 4. Click on the lane representing the Airline application component 5. In the Assign Business System Components for A2A Communication dialog box, on
the Business System Components for A2A tab page click in the input field in the Communication Component column and call the input help. As communication component selection, choose All Business System Components. The system displays all communication components of type Business System.
6. Select the business system <SID>_106 and choose Apply.
7.1.3 Configuring the Connection
You perform the following steps to configure the connections of the process integration scenario.
1. In the graphical editor, click on the connection between the lanes representing the two application components. This calls the Configure Connection dialog box for the connection between the actions Cancel Flight Booking Order and Cancel Single Flight Booking.
2. In the Configure Connection dialog box, check that the sender/receiver relations are activated (checkboxes).
3. To specify a receiver communication channel for the relation between the sender communication component <SID>_105 and receiver communication component <SID>_106, click in the input field in the Communication Channel column (for receiver communication component <SID>_106).
4. Call the input help. 5. Select the communication channel GeneratedReceiverChannel_XI and choose
Apply.
7.1.4 Generating the Configuration Objects
You perform the following steps to generate the relevant configuration objects.
1. Choose the push button Create Configuration Objects. 2. Under General, select the Generation radio button. 3. Under Scope of Generation, select the Receiver Determination, Interface
Determination, and Sender/Receiver Agreement checkboxes. 4. Under Change List for Generated Objects, select the Create New radio button. This
means that the changes resulting from the generation are saved in a separate change list with the name of the configuration scenario. The configuration scenario itself is saved in the standard change list.
5. Choose Start. The objects are generated. The generation log is called.
The generation log contains an overview of all information relating to the generation and indicates if any manual editing is necessary for the generated objects.
SAP EHP 1 for SAP NetWeaver 7.31 – Demo Exercise Cancel Flight Booking
March 2012 19
If the generation log displays error situations, this may be because parts of the demo examples had been configured previously in your system, or because you have not configured the process integration scenarios in the specified sequence. In this case, the log contains information on why the generation was not successful. You must correct the problems manually.
7.1.5 Manual Editing
The only manual editing you need to do is to enter the following routing condition in the receiver determination using the context object AirlineID:
AirlineID = LH for assigned receiver <SID>_106
To do this, perform the following steps:
1. In the generation log, expand the Connections area. Open the receiver determination and switch to change mode.
2. In the Configured Receivers area, call the input help in the Condition column to open the Condition Editor for communication component <SID>_106.
3. Use the input help in the Left Operand column to navigate to the Expression Editor. 4. Select the Context Object radio button and choose AirlineID from the input help.
Choose OK to confirm. This takes you to the Condition Editor, where you enter the value LH in the Right
Operand column and apply this by choosing OK. This closes the Condition Editor. 5. Save the receiver determination.
7.1.6 Final Steps
Perform the following final steps:
1. Close the generation log. You can save the generation log as a file.
2. Close the process integration scenario configurator. The message Do you want to keep the changes? appears. Choose Apply.
3. Save the configuration scenario <p>_XIDemo_CancelFlightBooking. 4. Activate the configuration scenario <p>_XIDemo_CancelFlightBooking and all
objects that it uses. Note that there are two change lists: Standard change list (containing the configuration scenario
XIDemo_CancelFlightBooking) Change list XIDemo_CancelFlightBooking (containing all objects of the
configuration scenario) You must activate both change lists.
7.2 Configuring the Process Integration Scenario (Proxy-to- IDoc Communication)
The following section describes how to configure the process integration scenario CancelFlightBooking so that the travel agency is connected to the airline American Airlines using proxy-to-IDoc communication.
7.2.1 Selecting an Process Integration Scenario (Component View)
You perform the following steps to select the process integration scenario and the component view from the ES Repository.
1. Open the configuration scenario <p>_XIDemo_CancelFlightBooking. 2. Switch to change mode.
SAP EHP 1 for SAP NetWeaver 7.31 – Demo Exercise Cancel Flight Booking
20 March 2012
3. In the Edit Configuration Scenario screen choose Model Configurator. 4. Select the push button Select Component View. 5. A new screen appears where the available component views for the process
integration scenario are displayed. 6. In the preview area, select the component view ABAP_Proxy_2_IDoc and choose
Apply.
7.2.2 Assigning Communication Components
You perform the following steps to assign communication components to the application components of the process integration scenario.
1. In the graphical editor, click on the lane representing the Agency application component. This calls the Assign Business System Component dialog box for the Agency application component (below the graphical representation of the process integration scenario).
2. In the Assign Business System Components for A2A Communication dialog box, on the Business System Components for A2A tab page click in the input field in the Communication Component column and call the input help. As communication component selection, choose All Business System Components. The system displays all communication components of type Business System.
3. Select the business system <SID>_105 and choose Apply. 4. Click on the lane representing the Airline application component 5. In the Assign Business System Components for A2A Communication dialog box, on
the Business System Components for A2A tab page click in the input field in the Communication Component column and call the input help. As communication component selection choose All Business System Components. The system displays all communication components of type Business System.
6. Select the business system <SID>_107 and choose Apply.
7.2.3 Configuring the Connection
You perform the following steps to configure the connections of the process integration scenario.
1. In the graphical editor, click on the connection between the lanes representing the two application components. This calls the Configure Connection dialog box for the connection between the actions Cancel Flight Booking Order and Cancel Single Flight Booking.
2. In the Configure Connections dialog box, check that the sender/receiver relation is activated (checkbox).
3. To specify a receiver communication channel for the relation between sender sender communication component <SID>_105 and receiver communication component <SID>_107,, click in the input field in the Communication Channel column (for receiver communication component <SID>_107).
4. Call the input help. 5. Select the communication channel GeneratedReceiverChannel_IDoc and choose
Apply.
7.2.4 Generating the Configuration Objects
You perform the following steps to generate the relevant configuration objects.
1. Choose the push button Create Configuration Objects. 2. Under General, select the Generation radio button. 3. Under Scope of Generation, select the Receiver Determination, Interface
Determination, and Sender/Receiver Agreement checkboxes.
SAP EHP 1 for SAP NetWeaver 7.31 – Demo Exercise Cancel Flight Booking
March 2012 21
4. Under Change List for Generated Objects, select the Create New radio button. This means that the changes resulting from the generation are saved in a separate change list with the name of the configuration scenario.
5. Choose Start. The objects are generated. The generation log is called.
The generation log contains an overview of all information relating to the generation and indicates if any manual editing is necessary for the generated objects.
If the generation log displays error situations, this may be because parts of the demo examples had been configured previously in your system, or because you have not configured the process integration scenarios in the specified sequence. In this case, the log contains information on why the generation was not successful. You must correct the problems manually.
7.2.5 Manual Editing
The only manual editing you need to do is to enter the following routing condition in the receiver determination using the context object AirlineID:
AirlineID = AA for assigned receiver <SID>_107
Proceed as described in 7.1.5.
7.2.6 Final Steps
Perform the following steps:
1. Close the generation log. 2. Close the process integration scenario configurator. 3. Save the configuration scenario <p>_XIDemo_CancelFlightBooking. 4. Activate the configuration scenario <p>_XIDemo_CancelFlightBooking and all
objects that it uses. Note that there are two change lists: Standard change list (containing the configuration scenario
XIDemo_CancelFlightBooking) Change list XIDemo_CancelFlightBooking (containing all objects of the
configuration scenario) You must activate both change lists.
7.2.7 Configuration for the IDoc Communication in the American Airline system
To make sure the Cancel IDoc from the travel agency to the airline American Airlines (client 105 client 107) will be booked by the application IDoc, execute the following steps in client 107.
If you already configured the MultipleFlightBooking of the PI Demo Example in variant Proxy/IDoc these settings are already existing in the system, so you can skip this step!
1. Call the transaction Partner Profiles in client 107. To do this, choose Tools ALE ALE Administration Runtime Settings Partner Profiles (WE20) in the SAP menu.
2. In the Inbound parameters table of Partner <SID>CLNT105 add a new line (Create inbound parameter).
3. In the Partner profiles: Inbound parameters dialog box, in the Message Type field, specify the inbound IDoc. In the dropdown list box, select FLIGHTBOOKING_CANCEL.
4. On the Inbound options tab page, in the Process Code field, select the entry BAPI in the dropdown list box.
SAP EHP 1 for SAP NetWeaver 7.31 – Demo Exercise Cancel Flight Booking
22 March 2012
5. Save your entries. 6. Choose Back.
8 Executing and Testing
8.1 Preparation
You must first generate a flight booking, which you then cancel using the process integration scenario you have developed. There are two suggested variants for the flight booking.
You need a booking order that has been booked but not yet canceled and that has a flight date some time in the future.
8.1.1 Generating a Flight Booking
You can use the process integration scenario SingleFlightBooking to generate a flight booking (as a prerequisite for a cancellation). The process integration scenario is shipped as part of SAP EHP 1 for SAP NetWeaver 7.30. A Business Server Page application (BSP) is available for executing this process integration scenario.
You must first configure the process integration scenario SingleFlightBooking.
For more information about executing this process integration scenario, see the chapter Executing the Process Integration Scenario (for the scenario Booking a Single Flight) in SAP Help Portal.
Perform the following actions in the SAP system of the travel agency (client 105):
1. In the user menu, choose Process Integration Demo Examples Travel Agency: Execute Demo Examples.
2. Log on to the Business Server Pages (BSP) application, if necessary. Use the XIDEMO user. Note that the BSP application is only available in English and is always displayed in English, regardless of the logon language.
3. On the initial screen of the BSP application, select Book Single Flight (radio button) and choose Start.
4. Select the flight for which you want to make a booking. For the proxy variant, choose Lufthansa and one of the flight numbers 0400 or 0401. For the IDoc variant, choose American Airlines and one of the flight numbers 0017 or 0064.
The SAP standard configuration ensures that all flights are available on the first of each month. Therefore, the default setting for the flight date is the first day of next month. We recommend that you select this flight date.
Select a flight class.
Enter the passenger data. 5. Choose Create Booking Order. 6. The dialog box that appears displays the following information: information about the
booking order (for example, order number and order status), the passenger, and the flight. Make a note of the order number.
7. Once the booking order has been sent, the booking status is usually displayed as a yellow traffic light. To update the information and check whether the airline has sent a response in the meantime, choose Refresh.
8. Once the booking order has been confirmed (green traffic light), you can cancel it (see section 8.2).
SAP EHP 1 for SAP NetWeaver 7.31 – Demo Exercise Cancel Flight Booking
March 2012 23
Make a note of the booking order number (under Booking Order Status).
If the booking order could not be confirmed (red traffic light), check your entries and try executing another flight booking again. For example, select a different flight, flight date, or flight class.
8.2 Executing the Process Integration Scenario CancelFlightBooking
Make the cancellation for your order number by using your report (see 6.2) from the travel agency client <SID>_105.
Perform the following steps: ...
1. Call transaction ABAP Editor: Initial Screen (SE38). 2. Call the report defined in 6.2.
Enter the flight booking order. Use the default value 110 as the travel agency number and the number of the booked order (from 8) as the order number.
3. Execute the report. To do this, choose Execute. The report displays the system errors. These are technical problems within message processing (for example, inactive HTTP connections) that occur during the outbound proxy call.
Since the further processing is asynchronous, a message is displayed if no system errors occur, confirming that the message has been sent successfully to the Integration Server.
8.3 Checking the Results
This section describes how to check whether your scenario was executed correctly.
8.3.1 Checking at the Application Level
You can check in the airline systems whether the flight booking was canceled at the airline.
Execute the following activities in the SAP system of the respective airline, that is client 106 for Lufthansa and client 107 for American Airlines.
1. In the user menu, choose Process Integration Demo Examples Airline: Display Flight Data.
2. In the Functions frame, select the Display Booking Data radio button. 3. Enter the selection criteria for displaying the booking data on the Data Browser
screen. Use the airline (CARRID field) and the booking number of the airline (BOOKID).
Alternatively, if you no longer have the booking number, you can use the following fields for your selection: the CARRID field for the airline ID (for example, LH for Lufthansa and AA for American Airlines), the field CONNID for the flight number (for example, 0400), the FLDATE field for the flight date (for example, 01.07.2007), the ORDER_DATE field for the booking date.
4. The system displays a table containing detailed information about the flight booking. Check the CANCELLED field. If CANCELLED = „X‟, your flight booking was canceled and the execution of the process integration scenario was successful.
If CANCELLED <> „X‟, your flight booking has not yet been canceled. Repeat the query after a period of time. If there is no change, continue with 8.3.2.

SAP EHP 1 for SAP NetWeaver 7.31 – Demo Exercise Cancel Flight Booking
24 March 2012
8.3.2 Checking Using Process Integration Monitoring
You can use the monitoring transaction to display the messages that were processed by the Integration Server during execution of the process integration scenario. Use the payload of the message to check directly what business data was exchanged during execution of the process integration scenario. In the event of an error, you receive information on why the execution of the scenario was not successful.
Perform the following actions in the Runtime Workbench:
1. Start the Monitoring by choosing Configuration and Monitoring Home on the PI start page. (transaction SXMB_IFR)
2. Choose Message Overview.
3. Select the Integration Engine as component.
4. Use appropriate filter criteria to restrict the number of XML messages displayed (for example, the processing period).
The processing time is a suitable filter criterion (from ... to ...). You can also limit the namespace of the sender interface to your namespace http://xiExercise.com/<p>.
5. Choose Go.
The system displays the selected messages in a table. You want to locate the messages that were sent during execution.
6. Select the message to be displayed by selecting the appropriate radio button and then choose Open Message.
The tab Payloads displays the message contents for the various versions of the message during processing.
The monitoring transaction in the SAP system of the Integration Server provides an alternative to message monitoring. To call the monitoring transaction, choose Process Integration Monitoring Integration Engine: Monitoring in the user menu. Choose Monitor for Processed XML Messages and then Execute. As in the Monitoring Home, you have the option of limiting the number of messages to be displayed by using suitable filter criteria and displaying the content of selected messages.
For more information about message monitoring, see chapter Message Monitoring in SAP Help Portal.
8.3.3 Further Tipps & Tricks
Below are some useful tips for executing the process integration scenario. To check whether the proxy-to-IDoc communication has been executed successfully,
you can use the transaction WE02 in the client of the airline American Airlines (client 107).
If, in message monitoring on the Integration Server, there is a red flag at the right of the outbound status line (not the status on the far left), this means that the queue outbound processing was unsuccessful. For more information, you can do the following:
o Call transaction SM58 on the Integration Server o Call transaction SM21 in the client of the receiver airline
If an error occurs during proxy-to-IDoc communication, check the RFC destination for the connection from the Integration Server to the American Airlines client and the one from American Airlines to the Integration Server. Do these users exist? Are they
SAP EHP 1 for SAP NetWeaver 7.31 – Demo Exercise Cancel Flight Booking
March 2012 25
locked? Do they have all the necessary authorizations? This is particularly relevant for the following two RFC destinations:
o The one used in the IDoc communication channel of the business system of American Airlines (GeneratedReceiverChannel_IDoc for <SID>_107).
o The one used in the IDoc outbound adapter that read the metadata from the application system: See transaction IDX1 in the Integration Server client.
If there are problems with system availability, the cache update (that is, the transfer of the data entered using the Integration Builder to the runtime area) can take a long time. This causes errors in monitoring. You have two options for checking whether the cache transfer was successful:
o In the Integration Builder menu bar, choose Environment Cache Status Overview and restrict the display of the cache on the following screen to the author.
o Use the PI Monitoring Home. To call the Monitoring Home, choose the Configuration and Monitoring Home hyperlink on the SAP NetWeaver PI start page. On the next screen, select Integration Engine Cache Monitoring. You can limit the display to the cache type or the software component version. If entries are missing, you can try to force a new cache update by changing and activating the change list. This procedure is particularly recommended if there are errors in the mapping area.
For more information about configuring IDoc communication, see the chapter Executing the Process Integration Scenario (for scenario variant Booking a Single Flight (with IDoc)) in SAP Help Portal.