flash cs3 for beginners mbea09 - pkwy.k12.mo.us · modified from the tutorial "flash cs3 for...
TRANSCRIPT

Flash CS4
For Beginners
WEBSITE WITH SCREENCASTS—
http://www.screencast‐o‐matic.com/channels/cQii64CV

~ 2 ~
Flash Interface
Tools Panel and Timeline

~ 3 ~
From‐http://www.customguide.com/pdf/flash‐quick‐reference‐cs3.pdf
1 - Getting Started: Setting Up the Project
• Launch Flash; at the startup screen Create New Flash File (AS 3.0)
• Save the project—File > Save As. Save as Rocket (CS4 format)
• For this project, we are going to create 5 scenes. Bring up the Scene panel by clicking Window > Other Panels > Scene
• In the Scene panel, double‐click the words Scene 1 and rename that to be textintro (press Enter when complete).
• Press the add scene button at the bottom of the Scene ------------------->panel to create another scene. • Rename this scene rocket. Repeat this process of adding scenes until you have these five scenes:
• Save!

~ 4 ~
2 - Properties Panel
• At the bottom of the Flash screen is the Properties panel:
You can set the Stage size, specific settings for the project, frame rate, and background color. For this project, change the size and the background as follows:
o Click ŜŘƛǘ size button and set to 800 x 600 pixels o Click background color swatch and change color to black
• Before you continue, be sure you are in the first scene—textintro. Look at your Scene panel. The active scene is
shown in gray highlight. And, below the timeline, you also see the scene name. Scenes play in the order they are listed and, by default, Flash will then loop (after playing the final scene, it will replay from the beginning). If you are not in the textintro scene, click on it now.
Frame rate is a measurement of how quickly the playhead moves through the Timeline. Frame rates are expressed in frames per second (fps). For Flash animation, the default is 12 fps; the standard frame rate for a theatrical film is 24 fps.
Source: http://www.adobepress.com/articles/article.asp?p=1073917&seqNum=2
~ 5 ~
3 – Text Properties & Frame-by-Frame Animation
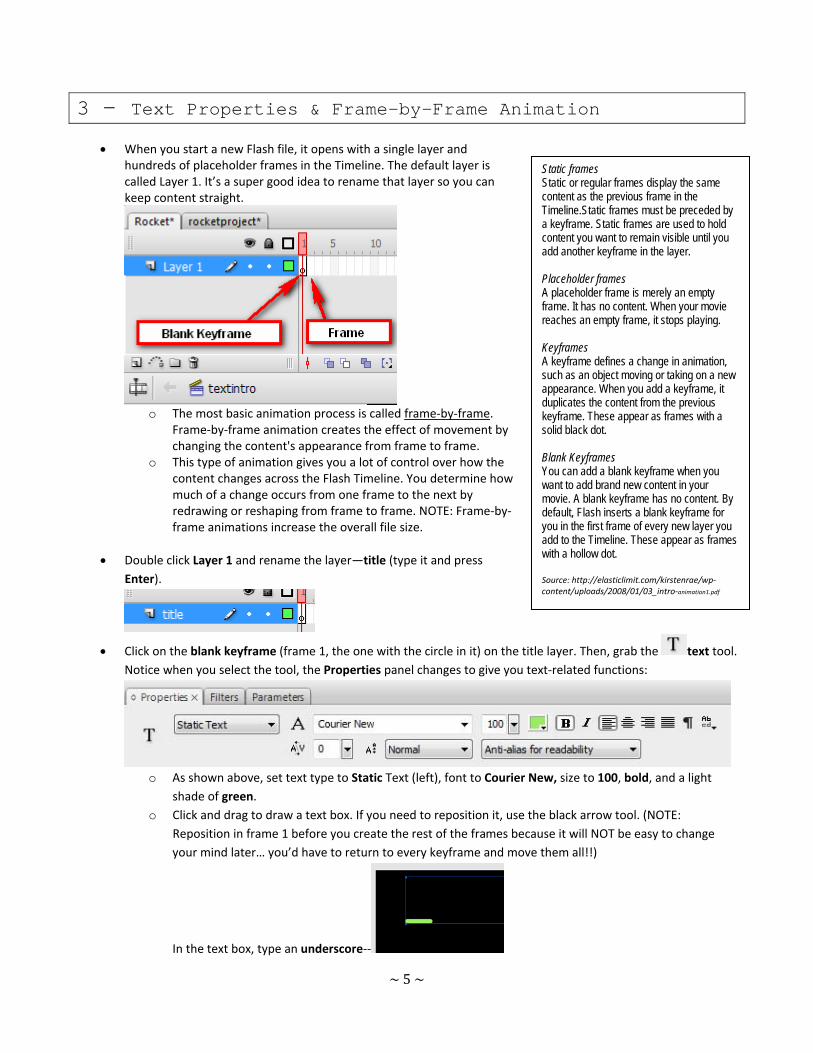
• When you start a new Flash file, it opens with a single layer and
hundreds of placeholder frames in the Timeline. The default layer is called Layer 1. It’s a super good idea to rename that layer so you can keep content straight.
o The most basic animation process is called frame‐by‐frame.
Frame‐by‐frame animation creates the effect of movement by changing the content's appearance from frame to frame.
o This type of animation gives you a lot of control over how the content changes across the Flash Timeline. You determine how much of a change occurs from one frame to the next by redrawing or reshaping from frame to frame. NOTE: Frame‐by‐frame animations increase the overall file size.
• Double click Layer 1 and rename the layer—title (type it and press Enter).
• Click on the blank keyframe (frame 1, the one with the circle in it) on the title layer. Then, grab the text tool. Notice when you select the tool, the Properties panel changes to give you text‐related functions:
o As shown above, set text type to Static Text (left), font to Courier New, size to 100, bold, and a light
shade of green. o Click and drag to draw a text box. If you need to reposition it, use the black arrow tool. (NOTE:
Reposition in frame 1 before you create the rest of the frames because it will NOT be easy to change your mind later… you’d have to return to every keyframe and move them all!!)
In the text box, type an underscore‐‐
Static frames Static or regular frames display the same content as the previous frame in the Timeline.Static frames must be preceded by a keyframe. Static frames are used to hold content you want to remain visible until you add another keyframe in the layer. Placeholder frames A placeholder frame is merely an empty frame. It has no content. When your movie reaches an empty frame, it stops playing. Keyframes A keyframe defines a change in animation, such as an object moving or taking on a new appearance. When you add a keyframe, it duplicates the content from the previous keyframe. These appear as frames with a solid black dot. Blank Keyframes You can add a blank keyframe when you want to add brand new content in your movie. A blank keyframe has no content. By default, Flash inserts a blank keyframe for you in the first frame of every new layer you add to the Timeline. These appear as frames with a hollow dot. Source: http://elasticlimit.com/kirstenrae/wp‐content/uploads/2008/01/03_intro‐animation1.pdf

~ 6 ~
• Notice how your frame 1 now has a solid dot—signifying a keyframe—because you put a textbox on the frame! Click on the next frame (frame 2) and insert a frame by pressing F5 (just a plain old frame to make the letter stay
visible for a total of two frames)
• Click on frame 3. Insert a keyframe—F6, which copies the previous frame for editing. Then, click back in the text box and add an S in front of the underscore. Repeat the previous process—add a frame (F5) in frame 4.
• Repeat the process (keyframe, add a letter, add a frame after it, etc.) until you have spelled out SPACE
FUN.
• After the last one, insert a frame (F5) in frame 85 so that SPACE FUN will stay visible for a total of 7 seconds.
• You have just created a traditional animation sequence. SAVE YOUR WORK!!
• See what your animation looks like so far by pressing Ctrl + Enter (Test Movie) or just Enter (plays on the screen).
o Notice it will go through it, the text will remain on screen for a good while, there will be a quick flash of black (that’s all those extra scenes we haven’t done anything in playing), and then it restarts (loops). That’s pretty much how Flash works!
o You can also Test Scene instead of testing the whole movie. That’s useful from time to time so you don’t have to watch the whole thing when you want to see just one scene that’s in the middle. Ctrl+Alt+Enter to Test Scene (or any of the options are available through the Control pull down menu).
• How did you do? Well, let’s try it again only using drawing tools instead of text. First, create a new layer and name it subtitle.

~ 7 ~
• Now, BE CAREFUL and make sure you are on the subtitle layer in frame 1 (the blank keyframe).
• We want this subtitle to NOT appear until after the title has finished. So, we need to keep it “blank” up until we want something to show. So, click in frame 25 and press F6 to create a new keyframe where we’ll start drawing (notice Flash automatically puts a frame in front of it to keep the “blank” up until then).
• So that we do not accidentally draw on the wrong layer, let’s lock the title layer so it cannot be changed. Press
the second dot that appears to the right of the title layer and a padlock will appear:
That shows that it’s locked; click again on that spot to unlock (not now, though).
• Be sure you are on frame 25 on the subtitle layer and we’re ready to start drawing. Click the pencil tool. o The pencil tool can be altered as follows:
o For example, change the modes and draw a letter S three times—once using straighten, once using
smooth, and once using ink. Notice the way Flash changes what you draw using the first two options. The ink option keeps it exactly as you draw it. Most people will want to use smooth or ink for drawing cursive letters, but it’s totally up to you.
After you’ve done this example, UNDO and delete those letters! We don’t want them!
o Now, set to smooth, green, and size 6 solid, and start drawing (just a teeny part) a cursive letter b. Then, click in the next frame, insert a keyframe, and add on (draw a little bit more). Repeat over and over. You are writing out the word by and your initials.

~ 8 ~
o When completed, it should look something like this:
o Notice that since the movie was already 85 frames long, Flash automatically added an ending frame to
the sequence on the subtitle line. So, it will remain on the screen until the end of the scene. o Test it out! Save and then press Enter to play or Ctrl+Enter to Test Movie. o All done with Scene 1—TEXTINTRO!
REVIEW OF FRAMES
from http://iris.nyit.edu/~kashani/Web_Based_Multimedia_Dev/Flash/
Types of Animation in Flash
Frame-by-frame Each frame contains different content and animation is achieved by running the playhead through the frames. This animation will appear on the timeline as a series of black circles (keyframes) over the course of many frames. Motion tweening Motion tweens occur when an object travels from one point to another. Sometimes motion tween can also mean changing color or scale over time. To author a motion tween in Flash, you place a symbol in the first frame (a keyframe) and one in the last frame (another keyframe) and tell Flash to spread the change in position over a certain number of frames. Shape tweening By tweening shapes, you can create an effect similar to morphing, making one shape appear to change into another shape over time. Flash can also tween the location, size, and color of shapes. Again, start with a keyframe. Then, insert another keyframe later on with a different shape before applying the shape tween.
Source: http://www.entheosweb.com/Flash/shape_tween.asp

~ 9 ~
4– Changing Scenes and Drawing in Flash (plus Gradients)
• When you started this project, you created five scenes. Since
the first is finished, it’s time to work on the second scene—rocket. To change scenes, click the clapboard icon below the timeline (bottom right) and select the scene named rocket:
• In the rocket scene, create a second layer (two total layers)
and name them as follows—planet and rocket (rocket should be the lower layer):
• Next, we will draw a rocket. I know what you’re thinking: “I can’t draw on paper, much less with a computer
mouse.” It’s okay. Seriously. Anyone can draw in Flash. It’s a matter of lines. And with a computer, anyone can draw lines. I promise. So, positive attitude! ☺
o First, we are going to create a symbol and draw the rocket in the symbol. Symbols are reusable, so just in case we want to use the rocket again, we want it to be a symbol. Plus, symbols can do cool things (like fly!). Symbols are saved into the Library (F11 will bring up the library if yours is not visible). So, press Control+F8 or just click on the Insert > New Symbol optionson the drop down menu.
o The New Symbol dialog box appears. Call it rocket1 and change the symbol type to graphic.
o Check out the screenshot on the next page. Notice that when you pressed OK, you left the “normal”
timeline (the one we labeled with planet and rocket layers) and are now inside the rocket1 symbol.
Types of Symbols in Flash Graphic symbols are reusable static images that are used mainly to create animations. Any drawn vector/plain text/imported bitmap (photo), or combinations of these, can be converted into a single controllable object: as a graphic symbol. They typically have only one frame in their timeline. Button symbols are used for timeline navigation. They add interactivity to the movie and respond to mouse clicks, key press or rollovers/rollout, and other actions. You define the graphics associated with various button states (Up/Over/Down/Hit), and then assign actions to the instance of a button. They have 4 frames in their timeline ‐ one each for the up, over and down states, and one to define the hit area of the button. Movie clip symbols are reusable pieces of Flash animation consisting of one or more graphic/button symbols ‐ thus they are flash movies within your flash movie. They have their own non‐restricted Timeline (any number of layers and frames ‐ just like the main timeline) that plays independent of the main movie's Timeline.
Source: http://www.smartwebby.com/Flash/flash_symbols.asp
~ 10 ~
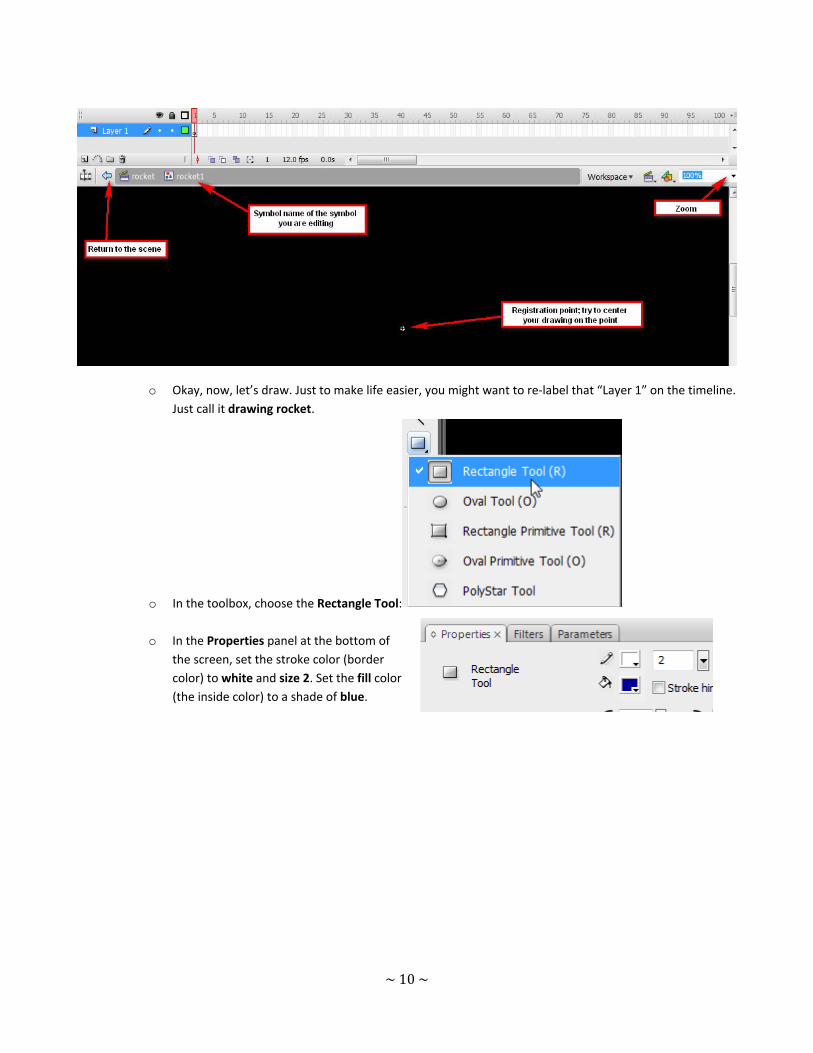
o Okay, now, let’s draw. Just to make life easier, you might want to re‐label that “Layer 1” on the timeline. Just call it drawing rocket.
o In the toolbox, choose the Rectangle Tool:
o In the Properties panel at the bottom of the screen, set the stroke color (border color) to white and size 2. Set the fill color (the inside color) to a shade of blue.

~ 11 ~
o Click and drag across the Stage to create a rectangle:
o Click the Selection Tool (black arrow). Point to the corner of the rectangle (upper right). Notice how the mouse pointer changes to an arrow with a right angle:
This means if you click and drag now, you can modify the corner. So, click and drag that corner down and then click and drag the bottom right corner up. You should create a triangle like this:
o Next, using the Selection arrow, point to a straight side. The mouse should appear as an arrow with a
curve. That allows you to curve a straight line. Click and drag the top and bottom lines to better shape
!Important!
When drawing objects with a stroke and fill, note that the stroke and fill are separate items. You can move the lines separate from the fill inside. It’s an easy mistake to grab the middle (fill) and leave the stroke behind. If you have to move a shape, double click it first to select both the stroke and fill.

~ 12 ~
the rocket ship.
o Choose the Line Tool. We’re going to draw some fins. Use the line tool and draw four lines as shown: (Remember, you can always adjust them with the Selection tool)

~ 13 ~
o Now, use the Selection tool to round out the long straight lines you just drew AND delete the white lines between the fins and the ship (just click with black arrow and press the Delete key):
You might notice that Houston, we have a problem (ha). The fins have no color. Let’s fix it!
o Click the Paint Bucket tool, be sure it’s set to blue fill (it should be), and click in those black fins.
o Now, some rocket thrusters! Draw two more rectangles as shown:
Then, delete the extra white lines. o Finally, adjust the corners near the fins using the Selection Tool.
o Return to the Scene now. Notice that your symbol is neatly
located in your Library (F11). It is not on the Stage because we drew it as a symbol.

~ 14 ~
o Be sure you are on the rocket layer. Click and drag the rocket1 out of the Library and onto the Stage. Just point to the thumbnail of it and click and drag with the Selection tool.
o Now, a point… one thing about symbols is that if you make a change to a symbol, all instances (that’s
what they are called) of the symbol are changed. So, for example, if you changed this from blue to red, it would change everywhere. If you had 15 rockets, they’d all change!
We’re going to make a change. First, we have to get back into “editing” mode since we can’t modify it from here (it has a blue symbol box around it to prove it to you). So, double click the rocket (either the one on the Stage or the one in the Library) to return to symbol editing.
Take the Selection tool and click on the blue fill (it will go all blocky to show you it’s selected); then hunt for the Color panel (top right usually or Window> Color).
We’re going to give it a gradient fill instead of a solid one (because it’s just cooler). Make the following changes to the Color panel:
Make any other changes or additions you’d like to the rocket and then return to the Scene.

~ 15 ~
5– Creating a Movie Clip
• Right now, we have a pretty boring scene…a rocket with a gradient. But, it’s time to add some action. Let’s use
frame‐by‐frame animation and create some fire to add to the rocket! So, create a New Symbol again, but this time, it should be a Movie Clip type. Movie clips animate in place and loop and that’s just what we want.
• Now, just for grins, name the layer inside the fire movie clip flame.
• Now, to draw some fire. Using the Pen Tool, draw something like this. Do not click and drag. Just click, click, click (like the dots in a dot‐to‐dot) until you get back the beginning.
• Now, let’s change the stroke color (it’s probably white) to a red. The Ink Bottle is used to do this. So, click the Ink Bottle Tool, pick a color in the Properties panel, and click the fire outline.
~ 16 ~
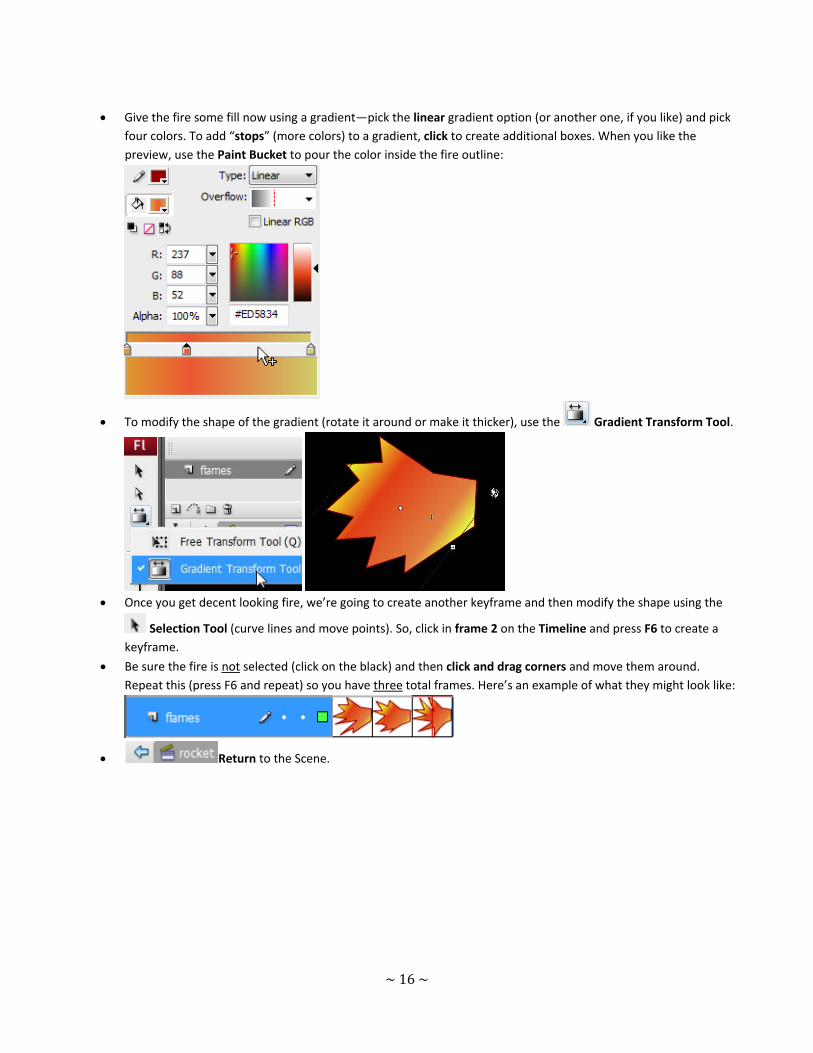
• Give the fire some fill now using a gradient—pick the linear gradient option (or another one, if you like) and pick four colors. To add “stops” (more colors) to a gradient, click to create additional boxes. When you like the preview, use the Paint Bucket to pour the color inside the fire outline:
• To modify the shape of the gradient (rotate it around or make it thicker), use the Gradient Transform Tool.
• Once you get decent looking fire, we’re going to create another keyframe and then modify the shape using the
Selection Tool (curve lines and move points). So, click in frame 2 on the Timeline and press F6 to create a keyframe.
• Be sure the fire is not selected (click on the black) and then click and drag corners and move them around. Repeat this (press F6 and repeat) so you have three total frames. Here’s an example of what they might look like:
• Return to the Scene.
~ 17 ~
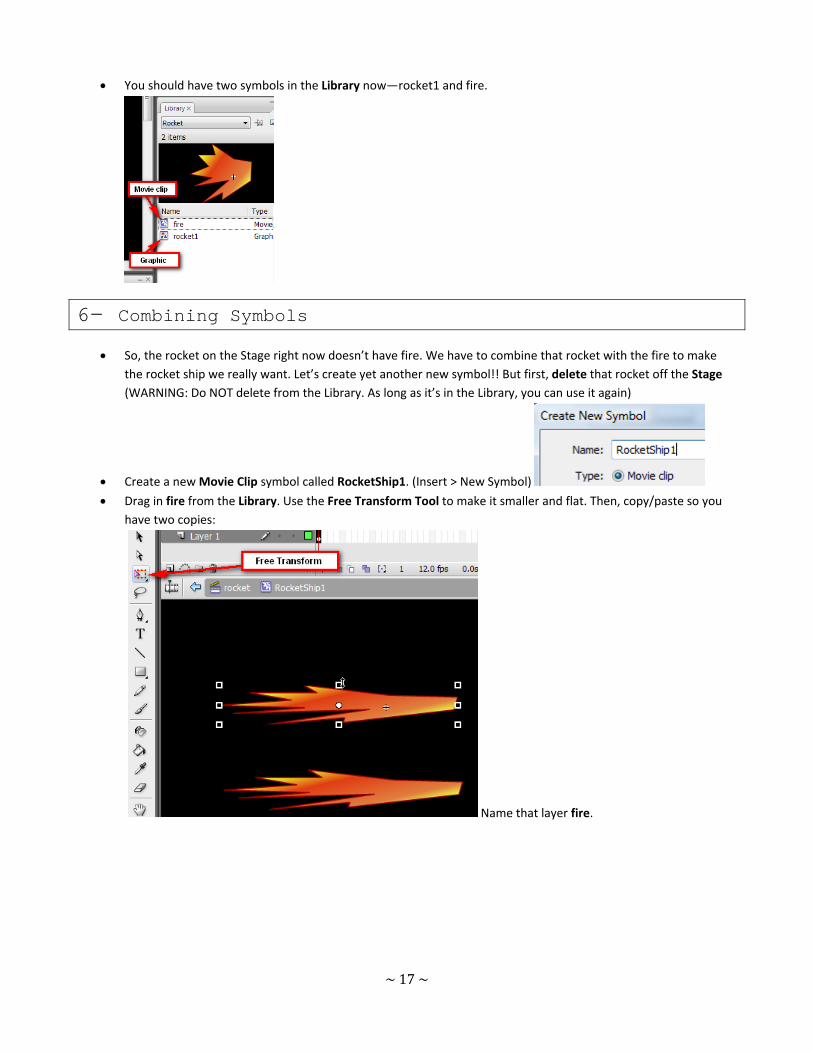
• You should have two symbols in the Library now—rocket1 and fire.
6– Combining Symbols
• So, the rocket on the Stage right now doesn’t have fire. We have to combine that rocket with the fire to make
the rocket ship we really want. Let’s create yet another new symbol!! But first, delete that rocket off the Stage (WARNING: Do NOT delete from the Library. As long as it’s in the Library, you can use it again)
• Create a new Movie Clip symbol called RocketShip1. (Insert > New Symbol)
• Drag in fire from the Library. Use the Free Transform Tool to make it smaller and flat. Then, copy/paste so you have two copies:
Name that layer fire.

~ 18 ~
• Make another layer called rocket and drag the rocket out of the Library. Reposition the fire as needed:
• Return to the Scene and drag RocketShip1 out onto the Stage on the rocket layer.
• Save!! Control > Test Scene to watch the movie clip in action! Wow!
7– Motion Tweening Symbols
• One cool Flash trick is tweening. It takes
the hard work out of animating. Instead of having to create every teeny, tiny frame of an animation, Flash does the “in between” stuff for you! To add a tween, you must have a starting keyframe, an ending keyframe that is different, and a tween inserted from the Properties panel in between the two.
• In the rocket Scene on the rocket layer, resize the RocketShip and place something like this: (hold Shift to keep scale)
Super Important Motion Tween Animation Rules 1. To animate an object, it must be a symbol.
• If it is not a symbol, it will absolutely not work right. 2. You can only animate one object on a layer at the same time.
Be sure to select the correct frame on the correct layer when working with Flash. • If you want two objects to move around at the same time, they
have to be on separate layers. • After one animation on a layer finishes it’s okay to start another
animation on the same layer.
Source: http://www.awdsf.com/courseware/flash/flash2_motion_tweening.htm

~ 19 ~
• Click on frame 60 on the rocket layer. Add a keyframe (F6):
• Click on the new keyframe in 60. Move the RocketShip off the right side of the Stage:
• Now, click the Timeline somewhere between the two frames (doesn’t matter where, just in a frame box, like 30) and notice the Properties panel. Where it says Tween, change from NONE to Motion.
Notice the Timeline now has a long arrow between keyframes. This indicates a motion tween.
• Save! Drag the Playhead across the Timeline (the red thing) and see your rocket fly! Or, press Enter to preview it on the screen. Notice you don’t see the fire going. You have to actually Test Scene (or Test Movie) to see movie clips in action. Since the fire is made of movie clips, click Control > Test Scene and see it truly in action.

~ 20 ~
8– Filters
• Lock the rocket layer since we’ve finished it (click the dot).
• We’re going to create a new symbol and add a filter to it: o Insert > New Symbol o Make it a Movie Clip type, called redplanet o Choose the Oval tool
o Make sure the stroke and fill are the same color (red). You may have to change it back to solid since you created a gradient last time.
o Draw an Oval (click and drag). Then, set the size (200x200px) using the Properties panel:
o Return to the Scene. o Drag the planet from the Library to the top right of the Stage. While it is selected,
click the Filters panel (next to Properties). Then, click the + sign to add a filter.
TIP To use filters, the images must be movie clips or buttons! Graphic type will not allow it.

~ 21 ~
o Choose Glow and set Blur X and Y to about 50. Change the glow color to yellow/light green. It should look something like this:
o Add a frame (F5) at frame 60 so that the planet remains visible for the entire scene. o Save and Test! o Notice the rocket is going behind the planet. To fix that, reposition the layers. Just click on the planet
layer, hold down, and drag it down below the planet layer.
o All better! Check it one more time before you go on.
Flash Filters
• Filters can be applied only to: text, movie clips, or buttons.
• The order filters are applied matters! Try adding multiple filters and rearranging them to see how it affects the clip.
• To remove a filter, click it on the list and press the minus sign.
Available Filters:

~ 22 ~
9– Motion Guide
• Change to the next scene‐‐
• Rename the layer—planet. Drag the planet from the Library to the Stage and position as follows. Use Free Transform to make it bigger (make it hang off the Stage), and repeat the Filter steps to add the glow:
• Insert a frame (F5) at 30. Lock this layer!
• Add another new layer above the planet layer. Name it rocketship.
• Drag the RocketShip out of the Library. Resize (Use Free Transform) to make it small and position in top left corner.

~ 23 ~
• We’re going to create a motion guide so that the rocket follows a path, rather than just going in a straight line. So, create a Motion Guide by clicking the icon. Be sure you are on the RocketShip layer!
Then, Lock the RocketShip layer for a minute.
• Click on the Guide layer. Using the pencil tool, draw a path something like this:
Lock the Guide layer! Unlock the RocketShip layer. Now, click and drag the ship and you’ll see a circle appear inside the rocketship; drag it to the beginning of the line you drew. It should “snap” and connect to the end (if not or if you don’t see the circle appear, check to be sure you have Snap to Objects selected (View > Snapping).
• Click in frame 30 on the RocketShip layer. Insert a keyframe (F6).
• Resize the rocket so it’s bigger and reposition at the end of the path. Be sure the circle snaps into place:
• Click between the keyframes and create a classic tween (in Properties panel or right click).

~ 24 ~
• Save and Control > Test Scene. It follows the path!
• One problem, though. The ship doesn’t turn to follow that path, so it looks strange. There is a little setting in the Properties panel you can change to make this look better—Orient to Path and also scale. We can also make it slow
down as it lands (ease out) as it lands (Ease out):
• Now, save again and take a look!

~ 25 ~
10– Motion Tween with Rotation
• Move to the Control scene. Create the following layers in this order:
• Click the planet layer. Either copy/paste the planet from the previous scene or drag out a new planet and add
the glow again. Resize and make it really big (cover entire bottom). Lock the layer.
• Click the rocket layer. Drag another copy of the rocket out, resize, and position as follows:
• Lock the rocket layer.
• Now, we’re going to create a hatch/door. Click on the door layer. Use the line tool and draw a door. Make it white, 10 px width.

~ 26 ~
• We want to motion tween the door so that it opens. So, we need to convert it to a symbol. Click it to select it and press F8 to convert that to a symbol:
• This is the final position of the door, but not where we want it to start. So, insert a keyframe at 20 (F6) to make this the ending frame and press F5 to insert a frame on the rocket layer so it will stay on the screen.
• If we were to rotate the door now (to close it in frame 1), it won’t rotate properly. Move the rotation point (use the Free Transform tool and move the big white circle in the middle) to the upper left:
It will now rotate on that axis. (Repeat this on frame 20—relocate the rotation point)
• Click back on frame 1 on the door layer and rotate (using Free Transform) to close the hatch.
• Create a motion tween between the first and last keyframe to make the door animate/open (Properties panel or right click).
• Insert a frame (F5) on the planet layer so it stays visible.
• Hold down Shift and click the planet, door, and rocket. Then, copy those (Edit > Copy).
• Change to the next Scene (final).
• Edit > Paste in Place to put those items in their exact same spot. (NOTE: They are all on one layer so you cannot animate them in this next scene or afterward you’d have to create layers and cut/paste in place on each individual layer).
• Return to the control scene.

~ 27 ~
11– Bitmaps
• You can use pre‐made graphics in Flash, but they won’t be as high quality as what you draw.
We’re going to add an alien. o Download this green comic alien—(download the medium PNG file)
http://www.clker.com/clipart‐green‐comic‐alien.html
• Lock every layer except the alien layer. Then, click on the first frame of that layer and File > Import to Stage and select the alien bitmap you downloaded. (Notice that it not only imports it to the Stage, but it also puts him in the Library)
• Move him over to the top right (where he’s not touching anything). To make changes to a bitmap (make it editable) you have to do a function called Trace Bitmap. So, click Modify > Bitmap > Trace Bitmap.
Use the default settings:
• Zoom up on him. He looks pretty good. Now that he’s broken to pieces, we can edit him. Delete the big gray blob below his feet (there will be some little pieces you’ll have to grab separately and delete—just use the Selection tool, click, and press Delete until you get it all).
• Now, click on his green belly. While it is selected, you can change him to a different color. So, pick a different shade of green from the Color panel (or choose another color).
• Now we must convert him to a symbol so we can reuse him. To select all of him, draw a rectangle around him (that’s why we put him where he wasn’t touching anything) using the Selection tool. Press F8 and turn him into a movie clip called alien.
• Delete him from the Stage (but not the Library).
• Insert a blank keyframe (F6) in frame 10 on the alien layer and then drag him in.
• Free Transform and rotate him as follows so he appears to be peeking out. Insert a keyframe at 20 (F6)
• Back at frame 10, move him back into the rocket ship. Then, put a motion tween between 10 and 20 (right click
or Properties panel).
• Insert frame (F5) at 30 on all layers so all remains visible for a little bit.
• Save and Test Movie.

~ 28 ~
12– Fading (Alpha) Symbols
• Go to the final scene. Rename the layer of stuff we copied stuff. Then, add the following new layers:
• We’re going to make the alien “beam in” (fade). Symbols can have their color altered to make them either a
different tint or a different level of transparency. So, lock the stuff layer and click on the alien layer. Drag him in.
• In the Property panel, click Color and choose Alpha:
• Note that 100% means it is 100% visible. 0% means it is invisible. We want to start with it invisible in frame 1 and
make it 100% visible in frame 15. So, go ahead and insert a keyframe (F6) in 15. Then, go back to frame 1 and lower the alpha to 0%. Create a motion tween between frames.
• Now, insert a blank keyframe (right click) in the final frame of the top two layers and a frame (F5) on the stuff layer so it all stays visible:

~ 29 ~
13– Actions & Buttons
• Actions are very powerful (and there are TONS of them). Flash uses Actionscript to control movies. For example,
Test Movie right now. You’ll see it all happen. However, it will loop back to the beginning when it finishes. What if you don’t want it to?? You can use a STOP action to make that happen.
o Actions can be added in the Actions panel (F9). o Flash CS3 uses ActionScript 3, but you can always choose a different version of ActionScript for a movie
(if you are using older tutorials online, you may have to change your version for script to work). o The stop action is universal. On the Actions layer, in frame 15, type this in to create a stop action:
o Press F9 to hide the Actions panel.
• Now, we want to add a button to “replay” the scene at will. We will add it in frame 15 of the button layer. A button is a type of symbol. So, let’s create a new symbol first—Insert > New Symbol
Be sure it is a button type!
• In the button editing mode, create these layers:
• Notice a button has a special timeline. It only has four frames. The first
three have to do with what you see at different times (see info box ). The final is just the area that you can click on to use a button.
• On the button layer, draw a rectangle. You pick the stroke and fill colors, but just make them different. (I chose white and green with a 4 pt stroke). Then, insert a frame in the final (hit) frame (F5) so it stays.
• On the text layer, draw a text box and type the word REPLAY.
• Insert keyframe (F6) in the OVER state. Change the color of the words (highlight the text and change color in the Property panel). This will make your button words change colors when someone points to it with a mouse.
• Insert frame (F5) in the final
The Four Button States Up The appearance of the button when the pointer is not over it. Over The appearance of the button when you place the pointer over it. Down The appearance of the button when you click on it. Hit Defines the area that will respond to a click of the mouse. (does not show)

~ 30 ~
(hit) frame.
• Return to the Scene.
• Drag the button out to frame 15 on the button layer.
• Save and Test Scene. Notice it changes when you hover, but the button doesn’t go anywhere when
you click on it… that requires more Actionscript!
• Bring up the Actions panel (F9 or Window > Actions).
• Click on the Action layer (see the little a from when we put the stop action in??).
• Add the following to the Actions panel (type exactly): NOTE: This is Actionscript 3
replay.addEventListener(MouseEvent.CLICK,onClick) function onClick(event:MouseEvent):void { gotoAndPlay(1,"textintro"); }
• It will look like this:
• Click on the button and give it the instance name—replay. You name instances in the Property panel:
• And, now Save and Test Movie
(Control+Enter). If you typed it correctly, everything should work. The last scene should stop after the alien beams up, and the button should appear. Click it to return to the beginning!
• Final scene timeline:

~ 31 ~

~ 32 ~
Thanks for participating! You may find screencasts helpful for reviewing specific parts of this workshop. Please visit my channel at Screencast-o-matic to see the tutorials. Feel free to use them for your classes or yourself or share them with others!
http://www.screencast-o-matic.com/channels/cQii64CV
or
http://mbeaflash09.notlong.com