game rules grav armor. - brainiac.comdwarfstar.brainiac.com/gravarmor/gravarmor_rules.pdf · 2...
TRANSCRIPT
1
GAME RULES In the 31st Century, the Lerlim Empire was disintegrating. Ever quarrelsome humans fragmented into many splinter groups, opposed by the still considerable military strength of their Empire, while aliens stood clear. A league of successor states formed, and half the spiral arm was aflame with wars on a thousand worlds. Both sides were evenly matched, since the rebels used equipment and industries originally built to serve the Imperial war machine. Against this backdrop are fought the battles of Grav Armor. The premier unit is the grav tank, capable of free flight, or skimming the surface at over 5OO kph. Recon drones fly before and beside it, feeding sensor data back to the main computers on board the vehicle, to enhance data from satellite and electronic input from higher-level headquarters. When an enemy is found and tracking locks on-target, the commander can fire using either remote-controlled self-targeting missiles, or by executing a quick “pop up” to fire a stream of magnetic bolts, particles, or laser beams before dropping down again into terrain cover. However, the enemy is meanwhile dodging and weaving, attempting last-minute jamming or electronic disguises, and as a final resort activates tiny multi-barrel turrets with counter-missiles, aerosol screens, waves of charged particles, etc. These “active” defenses also supplement the offensive weapons for close-range attacks. Running alongside grav tanks are the cheaper but slower hover vehicles. These use a cheaper armor-skirted grav drive. Infantry in articulated, power battle armor have their own minicomputer in each suit, to help them track targets, evade detection, and control hand-launched missiles. Even their laser rifles can be aimed using computer assists — while the infantryman bounds, bobs, and leaps across the terrain of an alien planet. The battles of the 31st Century are epics in the annals of military history. Stirring tales come from many worlds: the heroic stand of the 42nd Lift on Lerbeh II, the long march that allowed Clayton’s daring raid on molten Wendars t, the meatgrinder on R ‘Rac t V, or the incredibly bloody orbital assault directly onto a sector capital at Nerckind III. These are the battles of the men, and the machines, that make up Grav Armor.
2
Introduction Grav Armor is a game of tactical combat between small groups of ground-skimming vehicles and infantry (most of whom have power-assisted armored suits). The game is played in turns. Each turn one player is moving, while the other fires; then roles reverse for the second phase of the turn. Firing occurs before, during, and/or after movement, as the firing player desires — a different approach for this type of game. Firing itself is resolved by comparing various values on the firing unit to values on the target, with an addition for the target’s terrain protection. The two dice are used to determine the exact result of firing. Movement is based on the terrain key and movement values of the units — dice are not used for movement, only in combat.
GAME EQUIPMENT
Grav Armor includes, within the box, a rules booklet, a chart sheet, two dice, a folded sheet of 154 die-cut cardboard counters (each ½” square), and a sheet of six (6) mapboard sections. Small zip-loc storage bags, available at most supermarkets, are ideal for holding counters between games. Rules Booklet The best way to learn Grav Armor is to read quickly this rules booklet once. Then immediately try one of the scenarios, preferably the first or second, even if playing against yourself. Refer back to the rules during your first game, re-reading the fine points as necessary. After the first few games you will understand the rules clearly. Mapboard Sections The game includes six different mapboard sections, marked “1” through “6” in the upper left corners. Different sections are assembled in different ways for each scenario. A grid of hexagons (hexes) is used on the map to regulate terrain location, placement of units, movement, and firing. Each hex has its own unique color, and each color represents a certain type of terrain. The meaning of a color varies from scenario to scenario — a terrain key is given in each scenario. Hexes with red-brown lines on them may be a special type of terrain in some scenarios, while in others the lines are ignored and the background color of that hex is used instead. Mapboard edge hexes, including partial hexes, count as a “full hex” for all game purposes. Counters The colored ½” square cardboard counters represent “units” of men and vehicles, or are “markers” to denote special situations or terrain. Numbers are used to rate the varying abilities of each unit. Generally, the higher the value, the better the unit performs in the game.
3
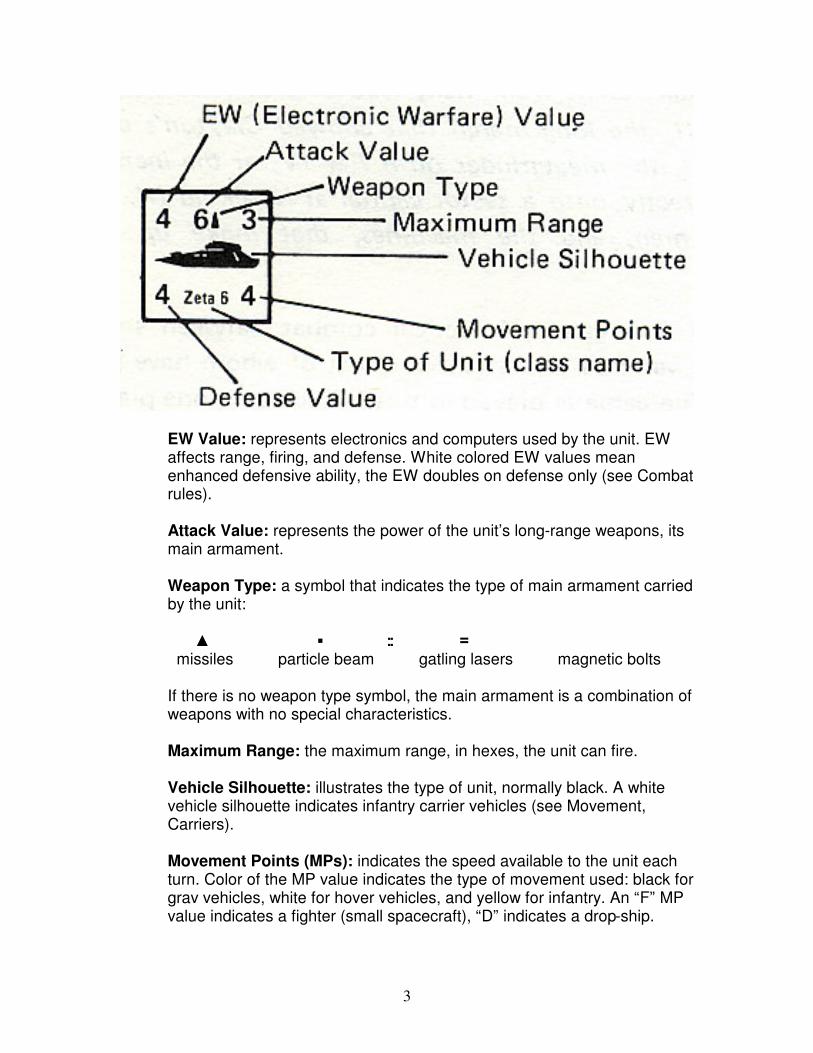
EW Value: represents electronics and computers used by the unit. EW affects range, firing, and defense. White colored EW values mean enhanced defensive ability, the EW doubles on defense only (see Combat rules).
Attack Value: represents the power of the unit’s long-range weapons, its main armament.
Weapon Type: a symbol that indicates the type of main armament carried by the unit:
x� ��������������������������������������������������������������� missiles particle beam gatling lasers magnetic bolts
If there is no weapon type symbol, the main armament is a combination of weapons with no special characteristics.
Maximum Range: the maximum range, in hexes, the unit can fire.
Vehicle Silhouette: illustrates the type of unit, normally black. A white vehicle silhouette indicates infantry carrier vehicles (see Movement, Carriers).
Movement Points (MPs): indicates the speed available to the unit each turn. Color of the MP value indicates the type of movement used: black for grav vehicles, white for hover vehicles, and yellow for infantry. An “F” MP value indicates a fighter (small spacecraft), “D” indicates a drop-ship.
4
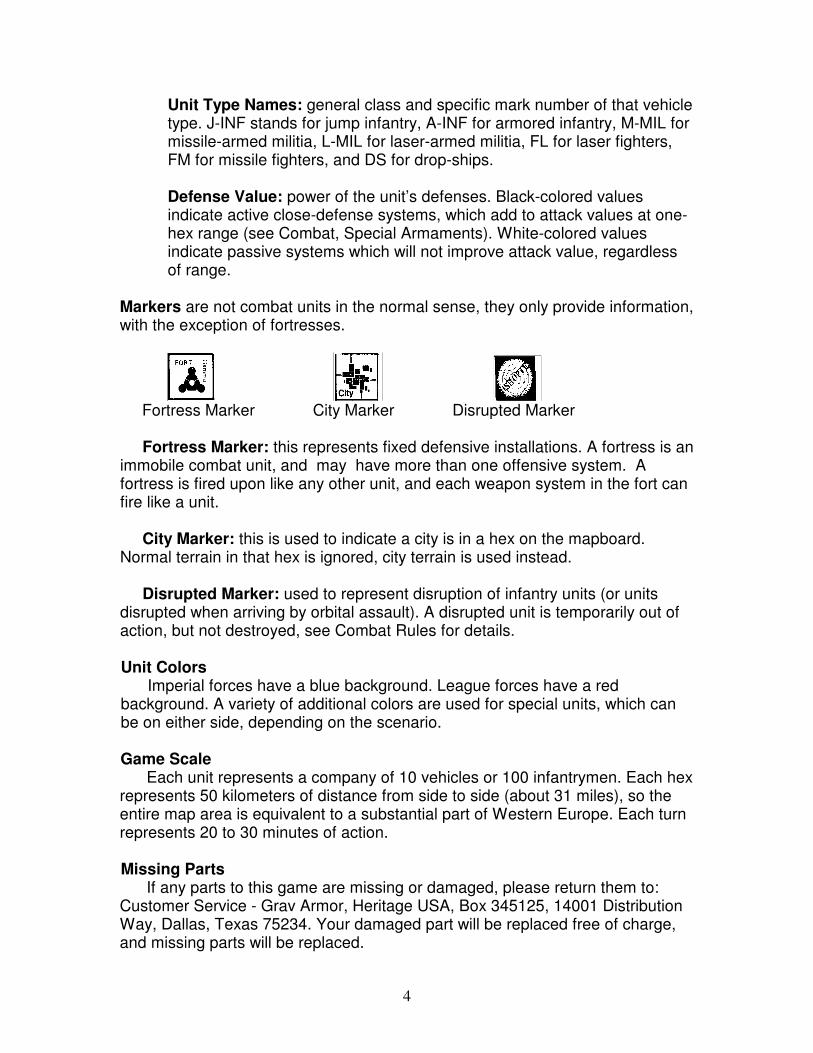
Unit Type Names: general class and specific mark number of that vehicle type. J-INF stands for jump infantry, A-INF for armored infantry, M-MIL for missile-armed militia, L-MIL for laser-armed militia, FL for laser fighters, FM for missile fighters, and DS for drop-ships.
Defense Value: power of the unit’s defenses. Black-colored values indicate active close-defense systems, which add to attack values at one-hex range (see Combat, Special Armaments). White-colored values indicate passive systems which will not improve attack value, regardless of range.
Markers are not combat units in the normal sense, they only provide information, with the exception of fortresses.
Fortress Marker City Marker Disrupted Marker Fortress Marker: this represents fixed defensive installations. A fortress is an immobile combat unit, and may have more than one offensive system. A fortress is fired upon like any other unit, and each weapon system in the fort can fire like a unit. City Marker: this is used to indicate a city is in a hex on the mapboard. Normal terrain in that hex is ignored, city terrain is used instead. Disrupted Marker: used to represent disruption of infantry units (or units disrupted when arriving by orbital assault). A disrupted unit is temporarily out of action, but not destroyed, see Combat Rules for details. Unit Colors Imperial forces have a blue background. League forces have a red background. A variety of additional colors are used for special units, which can be on either side, depending on the scenario. Game Scale Each unit represents a company of 10 vehicles or 100 infantrymen. Each hex represents 50 kilometers of distance from side to side (about 31 miles), so the entire map area is equivalent to a substantial part of Western Europe. Each turn represents 20 to 30 minutes of action. Missing Parts If any parts to this game are missing or damaged, please return them to: Customer Service - Grav Armor, Heritage USA, Box 345125, 14001 Distribution Way, Dallas, Texas 75234. Your damaged part will be replaced free of charge, and missing parts will be replaced.

5
TURN PROCEDURE Grav Armor is played in turns. Each turn has two phases, one for each player. During a phase one player is the “moving player” (moving his units) while his opponent is the “firing player” (firing his units). On the second phase roles reverse, so the moving player is now the “firing player,” and the firing player is now the “moving player.” Each scenario indicates whether a player is the “moving player” or “firing player” first each turn. First Phase (1) Disruption Recovery: the moving player removes disruption markers from any of his disrupted units. Firing player’s units remain disrupted (if already disrupted). (2) Move/Fire: the moving player moves his units one by one. The firing player may fire at any of the moving player’s units: before, during, and/or after any of. the moving player’s moves. The firing player may ask the moving player to halt at any time, in order to conduct firing. Second Phase Role Reversal: the “moving player” of the first phase now becomes the “firing player”, while the “firing player” of the first phase now becomes the “moving player” for the rest of the turn (roles return to normal for the next turn, i.e., they reverse back to the original roles for the first phase of the next turn).
(1) Disruption Recovery: moving player removes disruption markers (as in the first phase). (2) Move/Fire: moving player moves his units, while firing player may shoot before, during and/or after moves (as in the first phase). Procedural Notes The Grav Armor turn procedure is highly unusual, in that one side moves while the other fires. The combat rules describe in more detail firing situations before, during and after movement. Units can move or fire only once per phase. To aid memory regarding which unit(s) have already moved or fired, it is wise to rotate a unit 90° in its hex when it moves or fires. Then, when the phase ends, all units are rotated back to normal “upwards” position, ready for movement or firing on the next phase. Ending the Game The game (scenario) ends when the proper number of turns have elapsed, or one side concedes defeat.
6
MOVEMENT Procedure General Rule: the moving player moves his units one at a time across the hex grid. He must finish moving one unit before beginning to move another. He can move all, some or none of his units in the phase. The firing player cannot move at all. A unit can move in any direction or combination of directions, pro-vided it does not exceed its movement points (see below). A unit need not use all its movement points. Units always move individually, never in groups or stacks (exception; see Carriers, Drop-ships). Movement Points: each unit has a movement point (MP) value. MPs are “expended” by a unit each turn. Each hex “costs” a certain number of MP to enter. The cost varies with the terrain type (see the terrain key for that scenario). MP costs may vary for grav units (with black MPs), hover units (white MPs), and infantry (yellow MPs). Militia infantry with “0” MP cannot move (unless carried). Forts may never move. Movement points cannot be accumulated from turn to turn, nor can they be transferred from one unit to another. Minimum Moves: normally, a unit cannot enter a hex if it lacks sufficient MP to pay the cost. However, a unit with an MP of one (1) or more can always move one hex per turn, regardless of the MPs normally required. A unit with zero MP cannot make this automatic one-hex-per-turn move. Additional Movement Rules Stacking: any number of friendly units can be stacked together in the same hex. Units may freely pass through hexes occupied by friendly units. Enemy Units: a unit may never enter a hex occupied by an enemy unit, even if the enemy is disrupted. However, there are no “zones of control” in Grav Armor, units may pass by enemy units as desired, provided they do not enter the enemy hex. Map Entrance: a unit moving onto the map over the edge pays appropriate MP costs to enter the first hex on the edge, and proceeds from there, MPs permitting. Map Exit: a unit can move off the map over any edge hex. When a unit leaves, it cannot return, and is considered destroyed. A partial exception to this rule is spacecraft climbing to or dropping from orbit.
7
Grav Vehicles & Free Flight Any grav unit (with a black-colored MP) may make a “free flight” move instead of a normal move. When using a free flight move, each hex cost only ½MP to enter, regardless of terrain. The only exception is the final hex of the move, which costs the normal MP to enter. Grav vehicles in free flight are “flying” high above the map. As a result, during the move they are presumed to be in zero (0) combat value terrain, and are automatically detected by any enemy unit within maximum range (normal detection rules and limitations do not apply, see Combat rules for details). Carriers Units with a white vehicle silhouette are infantry carriers. These units may carry one infantry unit inside. Infantry units are picked up and unloaded during the carrier’s move, at no extra cost or penalty to the carrier. Grav carriers cannot be in free flight in either the pick-up or drop-off hex (i.e., must have paid full MP cost to enter that hex, rather than the free flight cost). An infantry unit cannot move the same turn it is carried (the infantry unit’s MP becomes zero the phase it is carried). While an infantry unit is carried, including in the pick-up and drop-off hexes, it is inside the carrier. If the carrier is destroyed by a hit, the infantry unit inside is also hit. A separate hit effect dice roll is made for the infantry (see Combat, Effect of Hits). If the infantry unit survives the hit, it is placed in the hex where the carrier was destroyed. If the carrier is in free flight when hit, the infantry unit is automatically destroyed also (hit effect is automatically “X”). An infantry unit can be carried by only one carrier during a turn, even if the carrier was destroyed, or dropped off the infantry before it finished its move. Disrupted infantry cannot be carried. An infantry unit can be hit alone (with no shot at the carrier) in the pick-up or drop-off hex, if desired (although normally, it is both easier and more advantageous to shoot at the infantry while its in the carrier). Climbing To and Diving From Orbit Certain units have the ability to climb into orbit directly from the map-board, or dive from orbit directly onto the mapboard. Either climbing or diving is done instead of a normal move, and counts as the move of that unit that phase. To climb, the unit simply rises off the map from its current hex, going “straight up.” To dive, the unit simply drops onto any hex of the map, coming “straight down.” A climb or dive occurs entirely within one hex. Orbital altitude is far above the range of any ground-based units (including all units on the map), thus a unit climbing or diving from orbit cannot be hit at the end (climbing) or start (diving) of its move. However, the unit can be fired at while climbing or diving, during its move. During this period, it is considered in terrain
8
with zero (0) combat value, and is automatically detected by any enemy within maximum range.
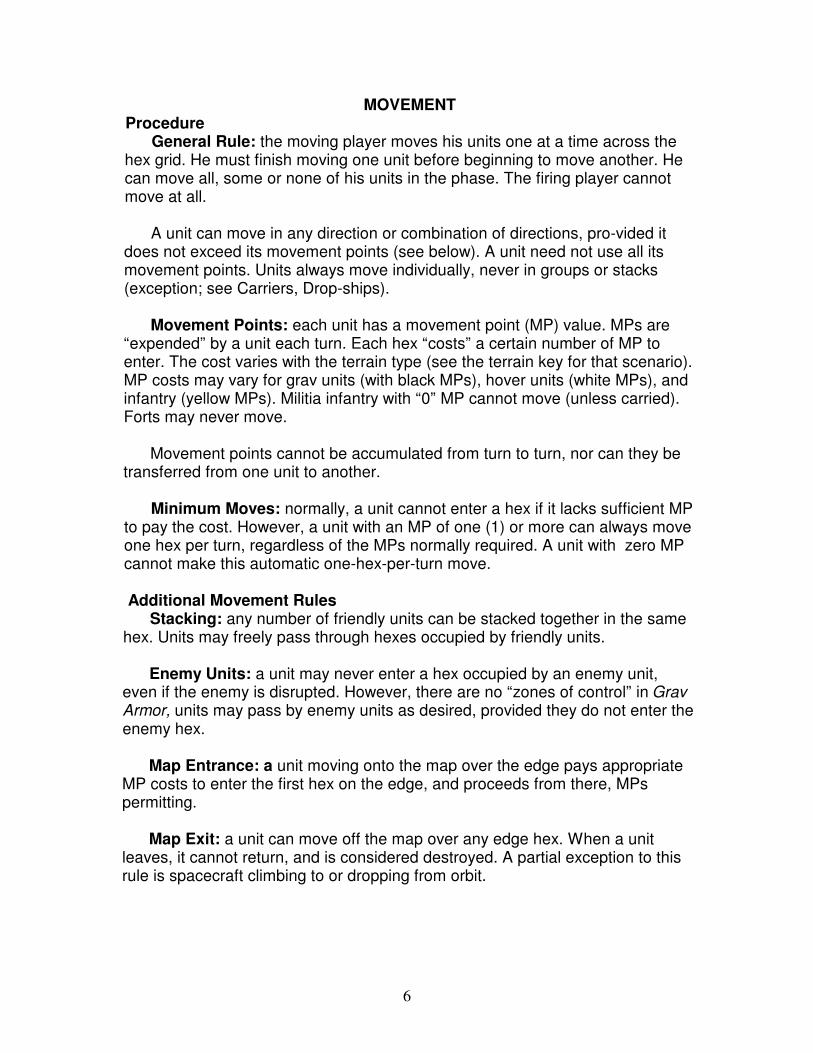
orange
Movement Example The illustration above shows a move of the League player in the first turn of Scenario Two (see that scenario for the terrain key). The Aza-3 grav carrier begins with an armored infantry unit aboard (carried inside). It uses all five of its MP as shown, including 2 MP to enter the final volcanic mountains hex. This terrain would normally destroy any hover or infantry units, but as long as the infantry is inside the grav carrier, it is safe. Therefore, although the infantry could (and normally would) unload after the move, here it would be fatal! However, the infantry could have been unloaded in any of the first three hexes safely, while the grav carrier continued to move. Note, however, that the infantry could not move on its own once it was carried by the grav unit, even if only carried for one hex or one MP. Spacecraft Fighters and drop-ships (indicated by “F” and “D” movement values) are spacecraft, with the ability to climb to or dive from orbit (see above). In addition, these units can travel over the mapboard with infinite speed. This means a fighter or drop-ship can move from one hex to any other hex in a single move. However, the move must be traced through the hex grid, and the unit is in “free flight” during its move. Therefore, the unit is in terrain with zero (0) combat value during the move, and is automatically detected by all enemy units within maximum range. At the end of the move the fighter or drop-ship is presumed to drop to the surface (or hover) and thus uses normal terrain combat value at the end of the move — until it begins moving again.
COMBAT In Grav Armor all “combat” is resolved by one unit firing on another. Each unit is allowed one “shot” each turn (exception: missiles, forts, and “ortillery” with multiple batteries). A shot can be fired only if the enemy is in range and detected. When to Fire The firing player may fire his units whenever he desires, while the moving player is moving his units. Firing is allowed before any movement, before each unit’s move, during any unit’s moves, after a unit’s move, and after all movement.
9
However, each unit of the firing player only can shoot once, regardless of the number of targets available (with a few exceptions). Firing Before Moves: the firing player may shoot at a unit before it moves. Therefore, the target will be in the hex where it began the phase. Normally, the firing player resolves all before-move shooting before any unit moves, for convenience. However, the firing player can ask the moving player to halt play at any time, to give him a chance to fire on units not yet moved. If a unit is trying to leave a hex, the firing player may shoot at it, even though its intention to move has been declared, but the movement not yet executed. Firing During Moves: a unit being moved can be fired upon at any point in its move, including the hex where it started, any hex it enters, and the hex where it finished its move. The firing player must decide in which hex the target will be when firing occurs. The current hex of the moving unit will affect range, detection, and hit procedure. Firing After Moves: when a unit has finished movement, it may be fired upon. Normally this occurs after all movement is finished, but it can occur after any one unit finishes movement if the firing player desires. Notes: in effect, the firing player always has his choice of when and where to “take his shots.” The moving player must give the firing player sufficient time to elect to shoot before continuing movement. However, once movement for a unit is finished, and that of another begun, the firing player may not “turn back the clock” and fire on the earlier unit during its move (although he could fire at it in its final position).
Range & Detection Maximum Range: each unit has a maximum range listed, in hexes. No firing is allowed beyond maximum range, regardless of detection or other circumstances. Range measurement includes the target hex, but not the firer’s hex. Thus a target directly beside the firer (in a neighboring hex) would be at one (1) hex range. The firer may decide how to measure or count the range - he need not select the most direct line. (This represents use of recon drones to search and spot targets.) Detection: in order to fire on a target, the firer must electronically detect it. If the target is within maximum range, detection is computed along the same path of hexes used to measure range. To compute detection, simply add up the combat value of each hex along the path, counting the target hex, but not the firer’s hex. The target is detected if the total is equal to or less than the firer’s EW value. If the terrain total is greater than the firer’s EW value, detection fails, the target cannot be hit by that unit. However, the firing unit could measure range and detection to some other hex instead, in that same phase, or wait to see if the target will move further, into a more accessible spot!
10
Note that a target could be in range, but undetectable, either due to a low firer EW, or very high terrain values. The EW value of the target plays no role in detection. Detection actually represents advanced tracking and targeting as well. Undetected enemy units are still “face up” on the map, since general recon drones and satellites feed general data to all units. Unfortunately, the firing unit must have the “instant feedback” detailed data of its own detection systems to provide sufficient accuracy for firing. Automatic Detection: grav units in free flight, spacecraft moving over the map (including fighters and drop-ships), and any unit diving from or climbing to orbit are all automatically detected by any unit, within that unit’s maximum range. This automatic detection occurs during movement, and does not carry over to after-movement situations. Hit Procedure When a unit shoots, a variety of different values are added and subtracted to get a final “hit value.” If the amount subtracted exceeds the amount added, the difference is a negative (“-“) number. To compute the final hit value, consult the list below: +(add) firing unit’s EW Value +(add) firing unit’s Attack Value +(add) any special armament bonuses for firing unit -(subtract) target unit’s EW Value -(subtract) target unit’s Defense Value -(subtract) combat value of Terrain in hex occupied by target ---------------------------------------------------------------------------------- final hit value is the result Note that terrain in the hexes between the firer and target has no effect on the hit value, only the terrain in the target’s hex. A convenient visual device is to add top left and middle numbers as the total “firepower” (EW+Attack) then add bonuses, and from it subtract total “resistance,” the total of the top left and bottom left numbers, plus terrain the target occupies.
Target Terrain Exceptions: if the target is a grav vehicle in free flight, any unit diving from or climbing to orbit, or a spacecraft moving across the map, the combat value of the terrain in the target’s hex is automatically zero (0). In effect, the last subtraction in the final hit value list is ignored. Firing Table: compare the final hit value (computed above) to the total of a two-dice-roll on the Firing Table. The cross-referenced result will be either a “— “ indicating a miss, or a “H” indicating a hit. Rate of Fire: each unit may fire only once per turn (exception: missiles, see Special Armaments section below).
11
Effect of Hits Vehicles: all grav (black MP) and hover (white MP) units are automatically destroyed by any hit. The unit is immediately removed from the game. All fighters and drop-ships are also destroyed by any hit. Infantry: if an infantry unit (yellow MP) is hit, the hit effects table must be consulted for the result. Roll two dice, subtract the combat value of the hex (where the infantry unit is), and read down to the proper row for that type of infantry unit. All types of militia (M-Mil or L-Mil) use the “Mil” row for results. A result of “-“ means the hit had no effect, “D” means the infantry unit is disrupted, while an “X” means the infantry unit is destroyed. Disruption: when a unit is disrupted, a disruption marker is placed on top of it, A disrupted unit cannot shoot and cannot move until the disruption is removed. Furthermore, once disrupted, any new disruption (before the earlier disruption is removed) will destroy the unit. Disruption markers are removed at the start of the player’s next “moving player” phase. Fortress: if a fortress is hit, the hit effects table must be consulted. As with infantry, roll two dice, subtract the combat value of the hex (where the fort is located), and read down to the “fort” row on the table. A result of “-“ means the hit had no effect on the fort, an “EW-1” means the EW value of every weapon in the fort is reduced by one, an “EW-2” means the EW value of every weapon in the fort is reduced by two, and an “X” means the fort is destroyed instantly (along with all its weapons). EW reductions to a fort are cumulative, and when all weapons are reduced to zero (0) EW, the fort is destroyed, even if no “X” result occurred. An easy way to note EW reductions is to place one unused counter, inverted, on the fort illustration (on the scenario sheet) for every EW point lost. Special Armaments Most units have a symbol after the attack value, indicating the type of main armament used. Each type has certain advantages against certain targets or in certain situations. If a unit has no symbol after the attack value, the main armament is a mixture of types, and has no special advantages. x� ��������������������������������������� = missiles particle beam gatling lasers magnetic bolts Particle Beam: attack value is increased one (+1) against all hover and infantry targets (units with a white or yellow MP color). Magnetic-accelerated Bolts: attack value is increased one (+1) against all grav unit targets (units with black MP colors, including spacecraft).
12
Gatling-mounted Pulse Lasers: attack value is increased two (+2) when fired at one-hex range (into a neighboring hex, regardless of terrain or target). Missiles: may be fired at multiple targets in the same hex. In effect, a missile will attack every unit in the hex. The firer selects the order in which units are attacked. The first unit is attacked with the normal attack value. The second unit is attacked with the normal value minus one (-1), the third unit with the normal value minus two (-2), etc. This continues until each unit in the hex has a shot resolved against it, even if an earlier target was hit. Carriers with infantry aboard are a single target, with the missile shot re-solved against the carrier only, even if the carrier is hit and the infantry must leave it. Actually, each missile “shot” is a barrage of small missiles, each with “seek and destroy” ability (within a limited area), with priorities assigned by . the ‘gunner’ who fired them. As a result, all units in a hex are vulnerable to missiles, although firing priorities mean some attacks will be weaker. Active Defenses Units with defense values printed in black have active defense systems (short-range counter-missiles, rapid-fire mini-turrets, etc.). At one hex range, these weapons also are added to the normal attack value, to increase a unit’s firepower. Normal main armament bonuses are still used, even when active defenses are added. However, with missile armament, the active defenses are added only against the first target in the hex. While the missiles may hit other units in the hex, the active defenses do not add to these other attacks. Enhanced EW Units with a white EW value have enhanced defensive capabilities. Whenever the unit is the target of enemy fire, the EW value doubles. Enhanced EW will function even if the unit is disrupted. Enhanced EW has no effect on detection or normal firing by that unit (the EW value, as printed, is used for both). Fortresses Each fort is similar to a normal unit, except it cannot move. However, a fort may have more than one offensive weapon. Each “weapon system” in a fort is illustrated by a separate rectangle beside the fort illustration on the scenario sheet. The rectangle gives (left to right) the EW value, attack value with main armament, and range of the weapon system (similar to the top row of numbers on a counter). Each weapon system can fire separately, and each system can fire once per turn. Therefore, overall, the fort can fire once for each weapon system. A fort has a single defense value, which applies to the entire fort. The fort as a whole is destroyed, but EW reductions apply to each and every weapon system). Fort defenses are passive - they do not add to the attack values at one-hex range.
13
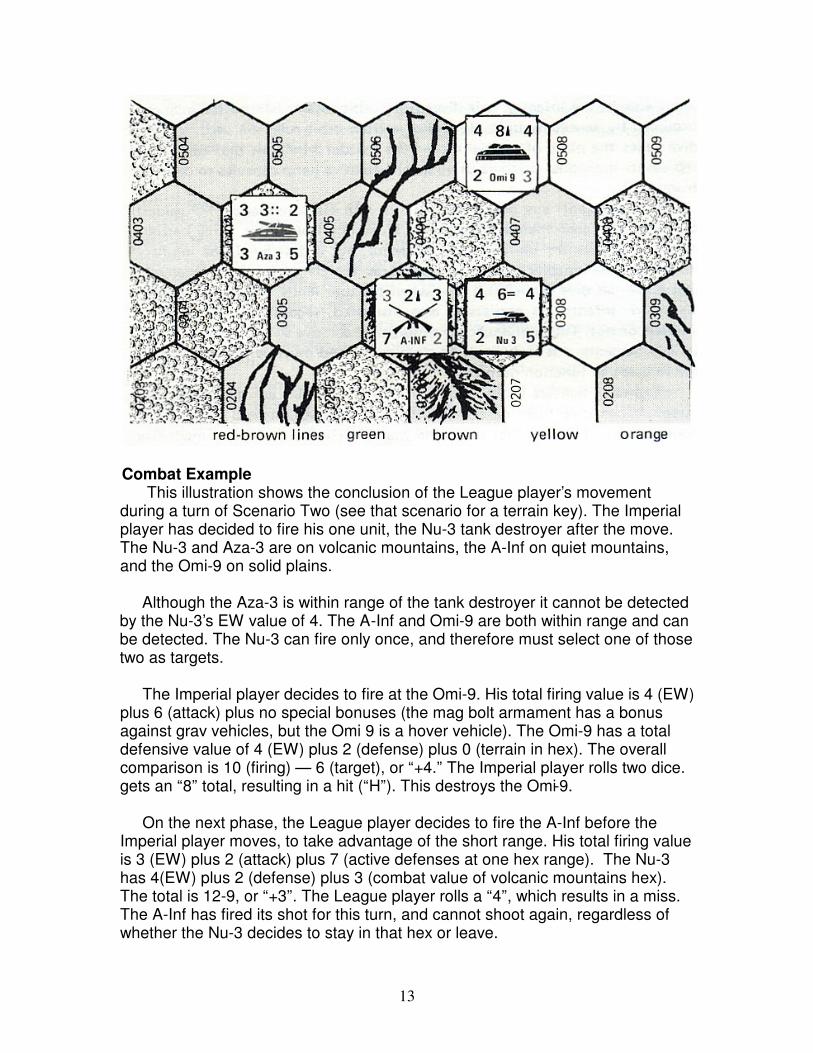
Combat Example This illustration shows the conclusion of the League player’s movement during a turn of Scenario Two (see that scenario for a terrain key). The Imperial player has decided to fire his one unit, the Nu-3 tank destroyer after the move. The Nu-3 and Aza-3 are on volcanic mountains, the A-Inf on quiet mountains, and the Omi-9 on solid plains. Although the Aza-3 is within range of the tank destroyer it cannot be detected by the Nu-3’s EW value of 4. The A-Inf and Omi-9 are both within range and can be detected. The Nu-3 can fire only once, and therefore must select one of those two as targets. The Imperial player decides to fire at the Omi-9. His total firing value is 4 (EW) plus 6 (attack) plus no special bonuses (the mag bolt armament has a bonus against grav vehicles, but the Omi 9 is a hover vehicle). The Omi-9 has a total defensive value of 4 (EW) plus 2 (defense) plus 0 (terrain in hex). The overall comparison is 10 (firing) — 6 (target), or “+4.” The Imperial player rolls two dice. gets an “8” total, resulting in a hit (“H”). This destroys the Omi-9. On the next phase, the League player decides to fire the A-Inf before the Imperial player moves, to take advantage of the short range. His total firing value is 3 (EW) plus 2 (attack) plus 7 (active defenses at one hex range). The Nu-3 has 4(EW) plus 2 (defense) plus 3 (combat value of volcanic mountains hex). The total is 12-9, or “+3”. The League player rolls a “4”, which results in a miss. The A-Inf has fired its shot for this turn, and cannot shoot again, regardless of whether the Nu-3 decides to stay in that hex or leave.
14
ORBITAL ASSAULT & SUPPORT Ortillery Ortillery is a common term for orbital artillery, which includes fire support from spaceships as well as simple orbital weapons platforms. Ortillery is organized in batteries. Each scenario shows the type of battery in a rectangle (with EW value to the left, attack value and armament type to the right), and then the number of batteries of that type noted below (“x1” means one battery, “x2” means two batteries, etc.). Each ortillery battery can fire once per turn, when the owner is the firing player. When Ortillery Fires: ortillery can fire only at the end of the phase, after all enemy units have finished movement. Each ortillery battery can fire once per turn. Ranging Ortillery: an ortillery battery can fire at any hex within range and detected by a friendly unit on the mapboard. Disrupted infantry can range and detect for friendly ortillery. If no friendly unit has the range to a hex, or none can detect that hex, then no ortillery can fire into that hex. Firing Ortillery: each ortillery battery fires once, like a normal unit. Normal firing procedures are used. Ortillery has infinite range, so any hex on the map could be hit, provided the ranging requirements are fulfilled. Ortillery Invulnerability: ortillery is in orbit, invulnerable to any fire from ground units in the game. Although planetary defenses or opposing spaceships could engage ortillery (to distract or destroy it), such activities are beyond the scope of this game. Any such actions are “built in” to the scenario conditions and rules, if they occur at all. Orbital Assaults In scenarios where a player is allowed to make an orbital assault with some (or all) units, one or more of the following techniques may be used, de-pending on the units available. Jump Assault: jump infantry (J-Inf) only can make jump assaults. In a jump assault, the infantry unit dives from orbit to any hex on the map not occupied by an enemy unit. Normal dive from orbit rules are used, and the dive takes the place of normal movement for the J-Inf unit that turn. This represents individual troopers using special ablative jump capsules to descend from orbit. Grav Descent: any grav vehicle (units with black numerical MP values) can use their grav engines to assist in a descent from orbit. Grav carriers could carry infantry units in such a descent, but if destroyed, the infantry inside is automatically destroyed also. Grav vehicle descents are executed like a normal dive from orbit, but when the unit lands, it is automatically disrupted. Infantry in carriers is also disrupted, regardless of whether it unloads or not. This represents
15
the problem of ablative shielding used in grav vehicle descents - it is difficult to clear away, and must be removed before the vehicle can function normally. Fighters: fighters (units with a black “F” for MP) are spacecraft, and therefore can dive from or climb to orbit themselves, instead of making a normal move. Fighters that leave the map by climbing to orbit may dive down from orbit on any later turn. Fighters cannot carry any other units. Drop-ships Drop-ships may carry up to three units each (stacked under the drop ship to represent this). A carrier with an infantry unit inside counts as one unit toward the three unit capacity of a drop ship. A drop ship can dive down from orbit, and upon landing unload the units (in the same phase). Conversely, the drop ship could start on the map-board in a hex with up to three other units, load them, and climb up into orbit. In effect, drop-ships are both large carriers and spacecraft. If a drop-ship is hit while carrying units, both the drop-ship and all units loaded aboard are destroyed. A drop-ship can be used like a normal carrier, to carry units from one part of the map to another, using its spacecraft movement. Again, each drop-ship could carry up to three units each turn, either simultaneously or consecutively. Drop-ships can “shuttle” back and forth from orbit to mapboard, then to orbit again, etc., as long as they remain intact. Units evacuated from the mapboard into orbit by drop-ship cannot return to the map later in the game. Once removed from the map, a unit remains off unless it is a drop-ship or fighter.
SCENARIOS Each scenario is a separate game. The scenario sheet provides all the information for setting up the game, determining the terrain, and gives the victory conditions for both sides. The format for scenarios is explained below. Mapboard Configuration The scenarios illustrate how to lay out the mapboard sections, and orient them to “north”. All sections should be touching as shown. The number on the upper left corner of the mapboard should be oriented in the position shown in the diagram. Hex Identification: each hex has a four-digit identification number (the first column on each mapboard is 0101 through 0112, the last column 0901 through 0912). The hex numbers along mapboard joints are those from the lowest numbered mapboard section.
16
Terrain Key Each scenario has a unique terrain key, since each battle is fought on a different planet. The key indicates the MP costs and combat value for each type of hex. Hexes are identified by their color, with a description. MP costs may vary for hover (white MP values), “inf” of infantry (yellow MP values), and grav (black MP values) units. Hex colors include yellow, light blue, orange, green texture and brown. Each hex always has one dominant color. Red-brown lines, or streaks, are considered “red-brown” hexes if the terrain key has an entry for that color. If there is no entry for red-brown lines then ignore those features and use the background color in the hex. City markers in a hex “convert” the entire hex to city terrain, normal terrain color is ignored. No more than one city is placed in a hex. Special Combat Value Terrain: some terrain has a special combat value when certain units are in it. This combat value only applies when computing detection if the hex was the last hex of movement, or when determining final value for firing. Regardless of what unit occupies the hex, when deter-mining detection through it (to another hex beyond) always use the normal combat value for the hex. Forces Each player in the scenario is given a graphic depiction of his units, which colors to use, how to set up, and whether he moves or fires in the first phase of each turn. The illustration of forces indicates the names of larger regiments, brigades, divisions, etc. that controlled the units, a picture of each type of unit, and a quantity symbol underneath. For example, “x1” indicates one unit is used, “x2” indicates two units of that type are used, etc. Larger organizational names are for “historical interest” only, and have no effect on actual play. Units may be set up on the map, required to move onto the map over a certain edge area, and/or start in orbit, depending on the specific scenario. Units that move onto the map over an edge start spending MPs to move at the first (edge) hex of the map. Forts are illustrated in the scenario, showing a picture of each counter, and then rectangles to illustrate each weapon systems in the forts. For example in scenario four, forts alpha, beta and gamma each have two weapons systems (missiles and gatling lasers).
17
Ortillery batteries are also illustrated, giving the EW value and attack value of each, with the number of batteries of that type noted underneath. Each ortillery battery can fire once each turn, unless otherwise noted. Victory The scenario indicates what each player (Imperial or League) must accomplish to achieve victory. Note that a draw is possible in some scenarios.
CREDITS Grav Armor was designed and developed by Arnold Hendrick. Playtesters were Bill Grant, Albert Pare, Comeron Owen, and Rommie Stults. Graphics design including map and counter art by David Helper, with Tom Maxwell. Cover art by Bob Depew. Printed in USA. Copyright ©1982 by Heritage USA Grav Armor is a trademark of Heritage USA, 1982. [NOTE: See the scanned instructions for the Scenarios.]
NOTES Equipment Tanks: the main battle tank of the era was the Zeta class. This type had improved electronics and armament, compared to the older Del class, which remain in service in some areas. Furthermore, the original main armament of the Dels was the gatling laser, while the Zetas were built to take a wide variety of weapon systems - while relegating gatling lasers to infantry sup-port vehicles. Experimentation with hover-tanks had been abandoned with the ill-fated Lia class. The Xi class was a universally successful heavy tank, but never replaced the Zeta class because of its extreme cost to build. The Empire still maintained a few super-heavy Titan class tanks, popularly known as the “land dreadnoughts.” However, lack of mobility adversely affected operational usage of Titans, while actual battle experienced proved they were hardly superior to heavy tanks such as the Xi class. Although Titans caught the popular imagination, they were inferior as military vehicles. Many types of light tanks were in use, the most common being the Tau 8 type. The Psi 5, although often termed and sometimes used as a light tank, was originally designed as an electronic recon vehicle and ortillery spotter’ The imperials retained the outdated by inexpensive Int class of “armored cars” for local recon work, while the League designed the new Rhu class that was effective, but far too expensive to replace the “workhorse” Tau and Psi.
18
Carriers: the two standard infantry carriers were the Eta 5 and Aza 3 Both had close-support gatling lasers, and were designed to fight in conjunction with the infantry they carried. Although the Aza grav carrier was far more mobile, the Eta was cheaper, and remained standard in many “Lift-infantry units. Support Vehicles: the standard battlefield support vehicles were the Chi class of laser vehicles, and Omi class of missile carriers. The Empire had just introduced the Silon and Siga classes at the start of the League Rebellion wars. The Silons were heavily armed and armored, designed to function as mobile artillery and long-range support, a role they accomplished well despite limited mobility. The Siga, on the other hand, was designed to provide missile firepower to infantry battalions, with one company per battalion and proved valuable, partly because Imperial armor was otherwise not avail-‘ able in places, and partly because Imperial infantry battalions were often seriously understrength. The League designed its own special class of Zho close-assault vehicles to demolish strongpoints, and the potent high-speed Ota missile carriers. Infantry: the standard infantryman was a power-armored trooper carrying a laser rifle and a packet of missiles. The suit’s computer-enhanced systems not only aided weaponry targeting and accuracy, but also controlled electronic defenses. Jump infantry had enhanced electronics and more power-assist mobility, but lighter weapons (fewer heavy missiles per man), and companies of only 60 to 70 strong, instead of the standard 90 to 100. Militia type troops used unpowered armor, and advanced computers and electronics were normally restricted to heavy weapons that the infantry carried disassembled. As a result, without transport the ability of militia to move rapidly was virtually nil. Organization Both the Empire and the League used a battalion as the basic military unit, ostensibly of three companies. Regiments and brigades in theory existed to provide an intermediary organization of 3-5 battalions, but in action an Imperial Division or League Battlegroup HQ was usually assigned a number of battalions for active operations, and that HQ had its own subordinate brigade-level HQs to control groups of battalions. Battalions can be divided into two types: “line” battalions of infantry and armor, and specialized battalions that provided supporting vehicles, special assault vehicles, etc. Often the specialized battalions were broken up and the various companies assigned to line battalions in actual combat. The line battalions, singly or in pairs, with considerable support, usually formed the nucleus of brigade-sized striking groups in a Division/Battlegroup level operation. Course of the Battle The typical area of divisional engagements was a frontage of a thousand kilometers, or an area similar to that of Western Europe on Terra (Sol III). In the game, this is equivalent to a full six-map layout, as in scenarios 3 or 5.
19
Although individual exchanges of fire rarely resulted in the destruction of an entire company, continued heavy combat led to a rapid degradation of electronics and sophisticated systems, which in turn produced high rates of vehicle “casualties.” After a half day to day of heavy fighting, it was not uncommon to find a division with fewer than 10% “runners.” However, up to 85%+ could be repaired within a few days, often by simply replacing a few “black box” components. In planet wide operations, conquest of the terrain was important, since many potential “runners” could be acquired by scavenging the battlefield. Although individual hits were rarely fatal to vehicles, they were very frequently fatal to infantry. However, although 10 hits eliminated a full vehicle company, 10 hits would only eliminate 10% of an infantry company. Thus infantry was the most “survivable” arm on the battlefield, in that it could absorb more firepower before going out of action, even though risk to the individual infantryman was actually higher than that to a vehicle crewman! 8730 Copyright © Heritage USA 1982