handheld digital tire inflator - martins … · bevor sie dieses produkt verwenden, lesen sie...
TRANSCRIPT

M A N U A L
M A R T I N S I N D U S T R I E S . C O M
HANDHELDDIGITALTIRE INFLATORMH-30

ENGLISH 01FRANÇAIS 04ESPAÑOL 07DEUTSCH 10ITALIANO 13
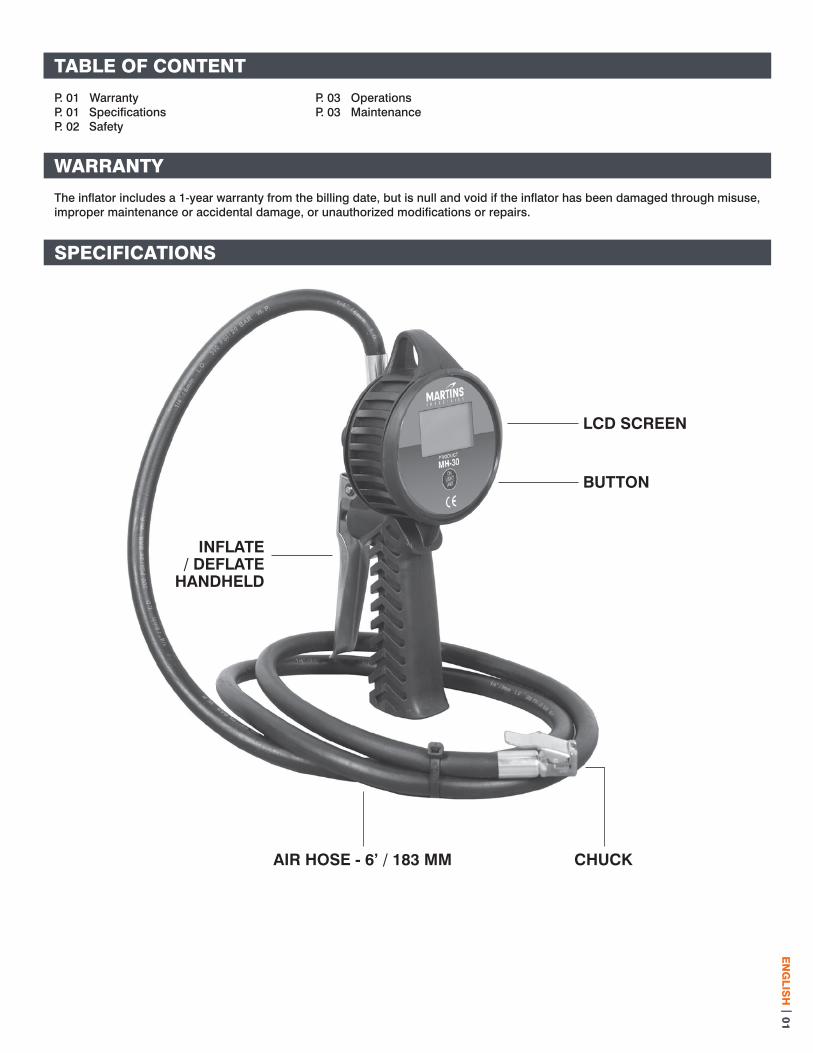
TABLE OF CONTENT WARRANTYTABLE OF CONTENT
P. 03 OperationsP. 03 Maintenance
WARRANTY
The inflator includes a 1-year warranty from the billing date, but is null and void if the inflator has been damaged through misuse,improper maintenance or accidental damage, or unauthorized modifications or repairs.
P. 01 WarrantyP. 01 SpecificationsP. 02 Safety
EN
GL
ISH
| 01
SPECIFICATIONS
INFLATE/ DEFLATE
HANDHELD
AIR HOSE - 6’ / 183 MM CHUCK
BUTTON
LCD SCREEN

02 |
EN
GL
ISH
Dimensions (L x W x H)
Color
Weight
Max outlet air pressure
Max inlet air pressure
Accuracy
Batteries required
Temperature range
Relative Humidity
Meet & Exceed CE / CSA, EC-86/217BS-EN 12645:1999
127 X 102 X 242 mm5” X 4'' X 9-1/2”
Orange
1 KG / 2,2 LB
1200 kPa / 12 BAR / 174 PSI / 12.24 kg/cm2
1350 kPa / 13.5 BAR / 200 PSI / 14.06 kg/cm2
+/-13.79 kPa / +/-0.14 BAR / +/-2 PSI / +/-0.14 kg/cm2
2 X AAA
-10 °C ~ 50°C (14 °F ~ 122 °F)
up to 95 % RH non-condensing
MH-30
SAFETY
BEFORE using this product, read this manual and follow all its Safety and Operating instructions. Failure to do so may result in personal injury and/or property damage. Retain these instructions for future reference.
Inspect before each use. Do not use if broken, bent, cracked, or damaged parts (including labels) are noted.
Do not modify or use this product for any other application than what it has been designed for.
During inactivity period, please store the inflator and keep it away from damp, heat, impact, etc.

EN
GL
ISH
| 03
OPERATIONS
MAINTENANCE
FUNCTIONS
ONPress the button to turn on the inflator.After 90 seconds of inactivity the inflator will turn off automatically.
LIGHTWhen the inflator is on, press the button to turn in the backlight. The backlight will turn off automatically after 5 seconds.
UNITPress the button for more than 3 seconds to enter the unit change settings. Then press the button shortly to choose the desired unit. The selected unit becomes the default measurement unit.The handheld digital tire inflator offers you a choice of 4 tire pressure measurement units: kPa, BAR, PSI and kg/cm2.
INFLATE / DEFLATEInflate: Press the handle all the way to inflate.Deflate: Press the handle half-way to deflate.
BATTERY INSTRUCTION
On top of the left LCD screen, the low battery signal will be flashing continuously as a reminder to change the battery.
A. Remove the rubber on the right side of the inflator.B. Open the side cover.C. Change the batteries (Battery: 2 x AAA).D. Close the cover and the rubber.
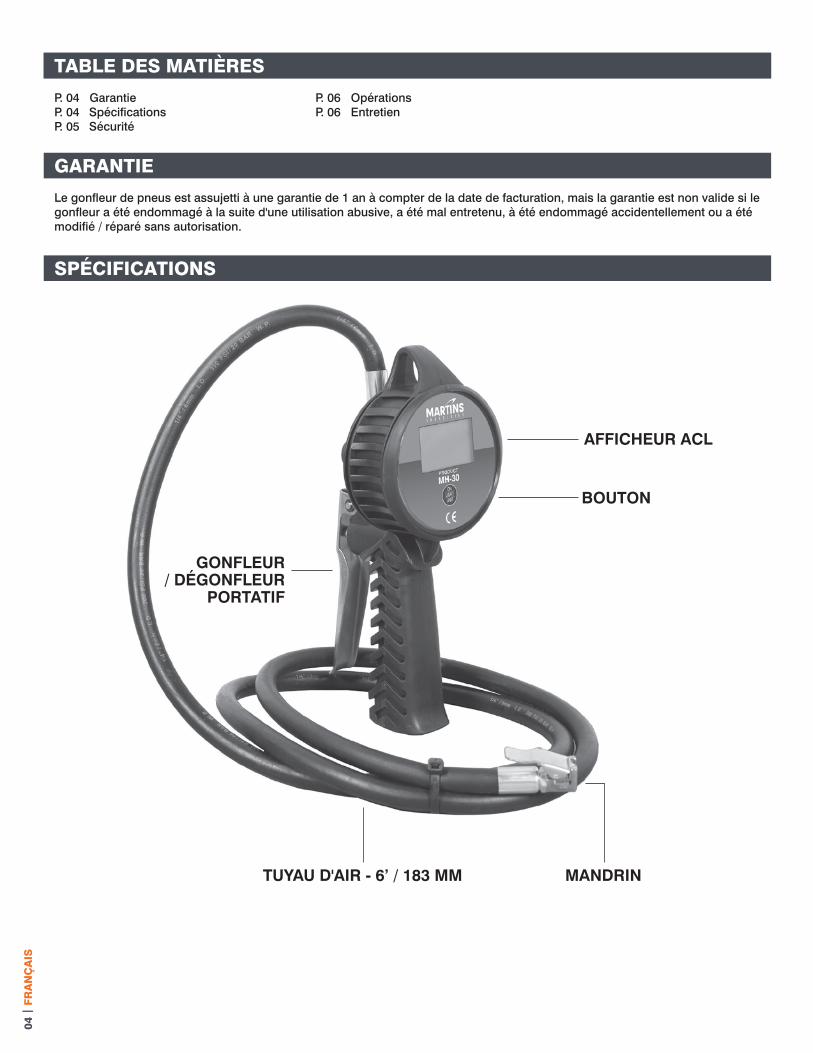
TABLE OF CONTENT WARRANTYTABLE DES MATIÈRES
P. 06 OpérationsP. 06 Entretien
GARANTIE
Le gonfleur de pneus est assujetti à une garantie de 1 an à compter de la date de facturation, mais la garantie est non valide si le gonfleur a été endommagé à la suite d'une utilisation abusive, a été mal entretenu, à été endommagé accidentellement ou a été modifié / réparé sans autorisation.
P. 04 GarantieP. 04 SpécificationsP. 05 Sécurité
SPÉCIFICATIONS
GONFLEUR/ DÉGONFLEUR
PORTATIF
TUYAU D'AIR - 6’ / 183 MM MANDRIN
BOUTON
AFFICHEUR ACL
04 |
FR
AN
ÇA
IS

Dimensions (L x I x H)
Couleur
Poid
Pression max.de sortie de l'air
Pression maximaled'alimentation en air
Précision
Piles requises
Plage de températures
Humidité relative
Atteint et dépasse CE / CSA, EC-86/217BS-EN 12645:1999
127 X 102 X 242 mm5” X 4'' X 9-1/2”
Orange
1 KG / 2,2 LB
1200 kPa / 12 BAR / 174 PSI / 12.24 kg/cm2
1350 kPa / 13.5 BAR / 200 PSI / 14.06 kg/cm2
+/-13.79 kPa / +/-0.14 BAR / +/-2 PSI / +/-0.14 kg/cm2
2 X AAA
-10 °C ~ 50°C (14 °F ~ 122 °F)
Humidité relative jusqu'à 95 %, sans condensation
MH-30
SÉCURITÉ
AVANT d'utiliser ce produit, veuillez lire et suivre toutes les consignes de sécurité et de fonctionnement du présent guide. Tout manquement à ces directives peut entraîner des blessures corporelles ou des dommages matériels. Conserver ces instructions à des fins de consultation future.
Inspecter avant chaque utilisation. Ne pas utiliser l'appareil si des pièces brisées, tordues, fissurées ou endommagées sont signalées (y compris les étiquettes).
Ne modifiez ou n'utilisez pas ce produit pour un autre usage pour lequel il a été conçu.
Durant les périodes d'inactivité, ranger le gonfleur et le conserver à l'abri de l'humidité, de la chaleur, des chocs, etc.
FR
AN
ÇA
IS | 05

FONCTIONS
OPÉRATIONS
06 |
FR
AN
ÇA
IS
ON (MARCHE)Appuyez sur le bouton pour mettre le gonfleur en marche.Après 90 secondes d'inactivité, le gonfleur s'éteint automatiquement.
LIGHT (LUMIÈRE)Lorsque le gonfleur est en marche, appuyez sur le bouton pour activer le rétroéclairage. Le rétroéclairage s'éteindra automatiquement après 5 secondes.
UNIT (UNITÉ)Appuyez sur le bouton pendant plus de 3 secondes pour accéder aux paramètres de changement d'unité. Ensuite, appuyez brièvement sur le bouton pour choisir l'unité désirée. L'unité sélectionnée devient l'unité de mesure par défaut. Le gonfleur de pneus numérique portatif vous offre 4 choix d'unités de mesure de pression des pneus : kPa, BAR, PSI and kg/cm2.
GONFLER / DÉGONFLERGonfler : Appuyer la poignée complètement pour gonfler.Dégonfler : Appuyer la poignée à moitié pour dégonfler.
ENTRETIEN
INSTRUCTIONS RELATIVES AUX PILES
Dans le coin supérieur gauche de l'afficheur ACL, le symbole de pile faible clignotera continuellement pour vous rappeler de changer les piles.
A. Retirez le caoutchouc du côté droit du gonfleur.B. Ouvrez le panneau latéral.C. Changez les piles (2 piles AAA).D. Fermez le panneau et remettez le caoutchouc en place.

TABLE OF CONTENT WARRANTYÍNDICE
P. 09 FuncionamientoP. 09 Mantenimiento
GARANTÍA
Esta bomba de mano de aire incluye garantía de 1 año a partir de la fecha de facturación, que se anulará e invalidará si la bomba ha sufrido deterioro por mal uso, mantenimiento incorrecto, daño accidental o modificaciones o reparaciones no autorizadas.
P. 07 GarantíaP. 07 EspecificacionesP. 08 Seguridad
ESPECIFICACIONES
DE MANO,PARA INSUFLAR
/ DESINFLAR
MANGUERA DE AIRER - 6’ / 183 MM ARROJAR
BOTÓN
PANTALLA LCD
ES
PA
ÑO
L | 07

Dimensiones (L x A x A)
Color
Peso
Presión máxima deaire de salida
Abastecimiento de airede entrada máx.
Precisión
Funciona con baterías
Intervalo de temperatura
Humedad relativa
Cumple y superasus expectativas
CE / CSA, EC-86/217BS-EN 12645:1999
127 X 102 X 242 mm5” X 4'' X 9-1/2”
Naranja
1 KG / 2,2 LB
1200 kPa / 12 BAR / 174 PSI / 12.24 kg/cm2
1350 kPa / 13.5 BAR / 200 PSI / 14.06 kg/cm2
+/-13.79 kPa / +/-0.14 BAR / +/-2 PSI / +/-0.14 kg/cm2
2 X AAA
-10 °C ~ 50°C (14 °F ~ 122 °F)
Hasta 95 % de RH sin condensación
MH-30
SEGURIDAD
ANTES de usar el producto, lea este manual y siga todas las instrucciones de Seguridad y funcionamiento incluidas en él. No hacerlo podría provocar lesiones o daños. Guarde las instrucciones, por si necesita consultarlas en el futuro.
Siempre revise el producto antes de usarlo. Si alguna pieza del producto (incluidas las etiquetas) está rota, doblada, agrietada o deteriorada, no lo use.
No modifique ni utilice este producto para ninguna otra aplicación que no sea para lo que ha sido diseñado.
Durante los periodos de inactividad, guarde la bomba de mano de aire y manténgala en un lugar fresco y seco, donde no reciba golpes, etc.
08 |
ES
PA
ÑO
L

FUNCIONAMIENTO
FUNCIÓN
ES
PA
ÑO
L | 09
MANTENIMIENTO
INSTRUCCIONES SOBRE LAS BATERÍAS
En la parte superior de la pantalla LCD, la señal de batería baja parpadeará continuamente para recordarle que cambie la batería.
A. Retire la goma del lado derecho de la bomba de mano de aire.B. Abra la cubierta lateral.C. Cambie las baterías (2 baterías AAA).D. Cierre la cubierta y la goma.
ON (ENCENDIDO)Presione el botón para encender la bomba de mano de aire.Después de 90 segundos de inactividad, el inflador se apagará automáticamente.
LIGHT (LUZ)Cuando la bomba de mano de aire esté encendida, presione el botón para encender la luz trasera. La luz trasera se apagará automáticamente después de 5 segundos.
UNIT (UNIDAD)Presione el botón durante más de 3 segundos para ingresar a la configuración de cambio de unidad. Luego, presione brevemente el botón para elegir la unidad que desee. La unidad seleccionada se convierte en la unidad de medida predeterminada. La bomba de mano de aire digital para neumáticos cuenta con 4 opciones de unidades de medida de presión para neumáticos: kPa, BAR, PSI and kg/cm2.
INSUFLAR / DESINFLARInsuflar: Presione el mango para inflar completamente.Desinflar: Empuje el mango a la mitad para desinflar.

TABLE OF CONTENT WARRANTYINHALT
P. 12 BetriebP. 12 Wartung
GEWÄHRLEISTUNG
Zu dem Füllgerät gehört eine 1-jährige Garantie ab Rechnungsdatum, die aber verfällt, wenn das Gerät durch Missbrauch, unsachgemäße Wartung, Unachtsamkeit oder nicht autorisierte Veränderungen oder Reparaturen beschädigt wurde.
P. 10 GewährleistungP. 10 SpezifikationenP. 11 Sicherheit
SPEZIFIKATIONEN
HANDGERÄT FÜRAUFPUMPEN/ ABLASSEN
LUFTSCHLAUCHR - 6’ / 183 MM FUTTER
TASTE
LCD-DISPLAY
10 |
DE
UT
SC
H
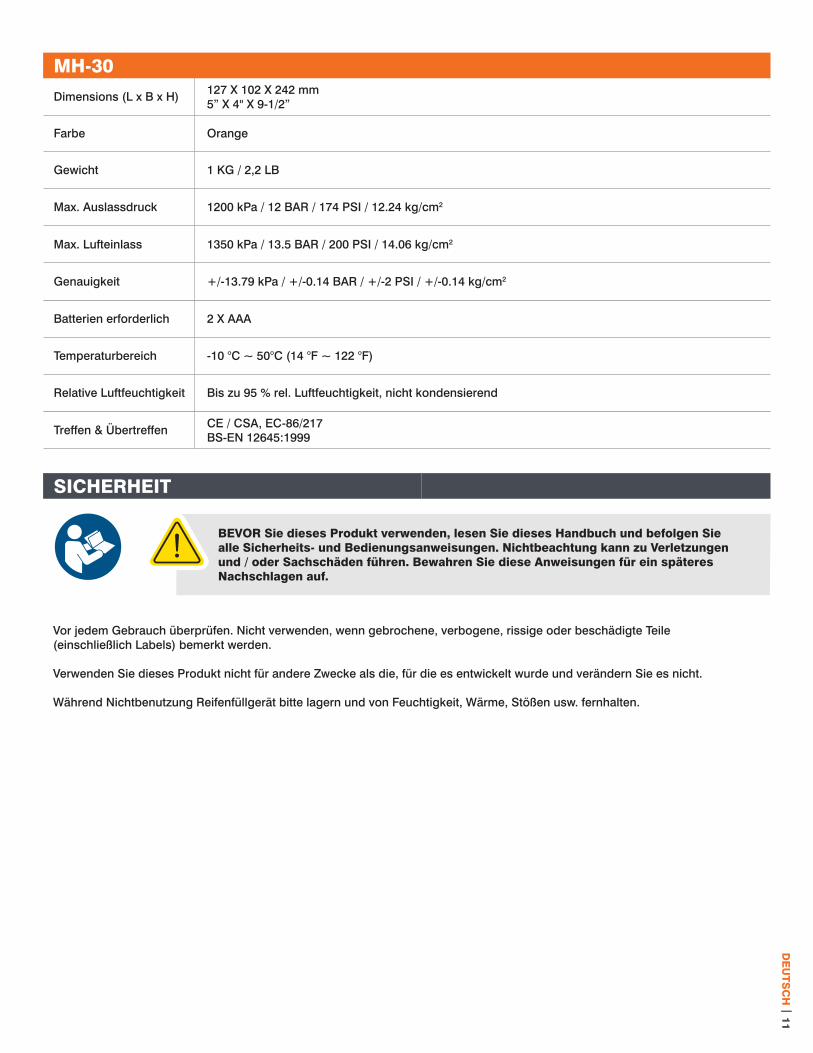
Dimensions (L x B x H)
Farbe
Gewicht
Max. Auslassdruck
Max. Lufteinlass
Genauigkeit
Batterien erforderlich
Temperaturbereich
Relative Luftfeuchtigkeit
Treffen & Übertreffen CE / CSA, EC-86/217BS-EN 12645:1999
127 X 102 X 242 mm5” X 4'' X 9-1/2”
Orange
1 KG / 2,2 LB
1200 kPa / 12 BAR / 174 PSI / 12.24 kg/cm2
1350 kPa / 13.5 BAR / 200 PSI / 14.06 kg/cm2
+/-13.79 kPa / +/-0.14 BAR / +/-2 PSI / +/-0.14 kg/cm2
2 X AAA
-10 °C ~ 50°C (14 °F ~ 122 °F)
Bis zu 95 % rel. Luftfeuchtigkeit, nicht kondensierend
MH-30
SICHERHEIT
BEVOR Sie dieses Produkt verwenden, lesen Sie dieses Handbuch und befolgen Sie alle Sicherheits- und Bedienungsanweisungen. Nichtbeachtung kann zu Verletzungen und / oder Sachschäden führen. Bewahren Sie diese Anweisungen für ein späteres Nachschlagen auf.
Vor jedem Gebrauch überprüfen. Nicht verwenden, wenn gebrochene, verbogene, rissige oder beschädigte Teile (einschließlich Labels) bemerkt werden.
Verwenden Sie dieses Produkt nicht für andere Zwecke als die, für die es entwickelt wurde und verändern Sie es nicht.
Während Nichtbenutzung Reifenfüllgerät bitte lagern und von Feuchtigkeit, Wärme, Stößen usw. fernhalten.
DE
UT
SC
H | 11

BETRIEB
WARTUNG
FUNKTION
BATTERIEANWEISUNG
Oben links auf dem LCD-Display blinkt das Batterie-Signal durchgängig um daran zu erinnern, dass die Batterien gewechselt werden müssen.
A. Entfernen Sie das Gummi auf der rechten Seite des Gerätes.B. Öffnen Sie die seitliche Abdeckung.C. Wechseln Sie die Batterien (Batterie: 2 x AAA).D. Schließen Sie die Abdeckung und das Gummi.
12 |
DE
UT
SC
H
ON (EIN)Drücken den Knopf, um das Gerät zu starten.Nach 90 Sekunden Inaktivität schaltet sich die Aufblasvorrichtung.automatisch aus
LIGHT (LICHT)Wenn das Gerät eingeschaltet ist, drücken Sie auf den Knopf, um die Hintergrundbeleuchtung einzuschalten. Die Hintergrundbeleuchtung schaltet sich nach 5 Sekunden automatisch aus.
UNIT (EINHEIT)Drücken Sie die Taste länger als 3 Sekunden, um zur Änderung der Einheiten zu gelangen. Drücken Sie die Taste kurz, um die gewünschte Einheit auszuwählen. Die ausgewählte Einheit wird zur Standard-Maßeinheit. Das digitale Reifenfüll-Handgerät bietet Ihnen eine Auswahl von 4 Maßeinheiten für die Darstellung des Reifendrucks: kPa, BAR, PSI and kg/cm2.
AUFBLASEN / ENTLEERENAufblasen: Drücken Sie den Griff in die Hälfte abzulassen.Entleeren: Drücken Sie den Griff auf halbem Weg, um zu entleeren.

TABLE OF CONTENT WARRANTYINDICE
P. 15 OperazioniP. 15 Manutenzione
GARANZIA
Il gonfiagomme viene fornito con una garanzia di 1 (un) anno a partire dalla data di fatturazione; tuttavia, la garanzia è nulla se il dispositivo è stato danneggiato da uso improprio, manutenzione impropria, danni accidentali, alterazioni o riparazioni non autorizzate.
P. 13 GaranziaP. 13 SpecificheP. 14 Sicurezza
SPECIFICHE
PORTATILE PERGONFIAGGIO
/ SGONFIAGGIO
TUBO DELL'ARIA - 6’ / 183 MM MANDRINO
PULSANTE
SCHERMO LCD
ITAL
IAN
O | 13

Dimensions (L x L x A)
Colore
Peso
Pressione max. dell'aria in uscita
Pressione max. di alimentazione dell’aria
Precisione
Batterie richieste
Intervallo di temperatura
Umidità relativa
Soddisfa e superai requisiti
CE / CSA, EC-86/217BS-EN 12645:1999
127 X 102 X 242 mm5” X 4'' X 9-1/2”
Orange
1 KG / 2,2 LB
1200 kPa / 12 BAR / 174 PSI / 12.24 kg/cm2
1350 kPa / 13.5 BAR / 200 PSI / 14.06 kg/cm2
+/-13.79 kPa / +/-0.14 BAR / +/-2 PSI / +/-0.14 kg/cm2
2 X AAA
-10 °C ~ 50°C (14 °F ~ 122 °F)
Fino al 95 % di umidità relativa senza condensa
MH-30
SICUREZZA
PRIMA di utilizzare questo prodotto, leggere il manuale e attenersi a tutte le precauzioni e alle istruzioni per l’uso. La mancata osservanza può causare lesioni e/o danni ai beni. Conservare le istruzioni come futuro riferimento.
Ispezionare prima di ogni utilizzo. Non usare in presenza di parti rotte, piegate, fessurate, o danneggiate (dicasi anche per le etichette).
Non alterare né utilizzare questo prodotto per finalità diverse da quelle di progettazione.
Durante un periodo di inutilizzo, conservare il gonfiagomme lontano da umidità, calore, urti, ecc.
14 |
ITA
LIA
NO

IMPIEGO
FUNZIONE
MANUTENZIONE
ISTRUZIONI RELATIVE ALLE BATTERIE
Nella parte superiore sinistra dello schermo LCD, il segnale di esaurimento della batteria lampeggia continuamente come promemoria per la sostituzione della batteria.
A. Rimuovere la protezione in gomma sul lato destro del gonfiagomme.B. Aprire il coperchio laterale.C. Sostituire le batterie (Batteria: 2 x AAA).D. Chiudere il coperchio e la protezione in gomma.
ITAL
IAN
O | 15
ON (ACCENSIONE)Premere il pulsante per accendere il gonfiagomme.Dopo 90 secondi di inattività il gonfiaggio si spegneautomaticamente.
LIGHT (ILLUMINAZIONE)Quando il gonfiatore è acceso, premere il pulsante per attivare la retroilluminazione. La retroilluminazione si spegnerà automaticamente dopo 5 secondi.
UNIT (UNITÀ)Tenere premuto il pulsante per più di 3 secondi per accedere alle impostazioni di modifica dell'unità. Quindi, premere il pulsante una volta per selezionare l'unità desiderata. L'unità selezionata diventa l'unità di misura predefinita. Il gonfiagomme digitale portatile consente di scegliere tra 4 unità di misura della pressione dello pneumatico: kPa, BAR, PSI and kg/cm2.
GONFIARE / SGONFIAREGonfiare: Premere la maniglia per gonfiare completamente.Sgonfiare: Spingere la maniglia in mezzo a sgonfiarsi.


