hasselblad ixpress cfh - karl maybachkarlmaybach.dk/wp-content/uploads/2014/02/ixpress... ·...
TRANSCRIPT

Hasselblad Ixpress CFHUser’s Guide (Provisional Draft 1.0)

2
© 2005 Hasselblad A/S. All rights reserved.
Hasselblad Ixpress CFH User’s Guide (Provisional Draft 1.0),
The information in this manual is furnished for informational use only, is subject to change without notice, and should not be construed as a commitment by Hasselblad A/S.
Hasselblad A/S assumes no responsibility or liability for any errors or inaccuracies that may appear in this manual.
Hasselblad A/S assumes no responsibility or liability for loss or damage incurred during or as a result of using Hasselblad software or products.
Hasselblad, Imacon, Ixpress and FlexColor are trademarks of Hasselblad A/S. Adobe and Adobe Pho-toshop are trademarks of Adobe Systems, Inc. Macintosh, Mac OS and FireWire are registered trade-marks of Apple Computer, Inc. InfoLithium is a registered trademark of Sony Corporation.
Printed in Denmark.
Hasselblad Ixpress CFH User’s Guide (Provisional Draft 1.0)

Table of Contents 3
Table of Contents
Introduction 9
The Ixpress CFH Camera Back 9Role of the Camera Back 9Shooting Modes 10
About This Manual 11Warnings and Restrictions 12
General 12While Using the Camera Back 12While Using Flash Sync 13
System Requirements 13Computer Requirements 13Reading the DNG Image File Format 13
Getting to Know Your Camera Back 15
Camera Back Physical Features 15The Control Panel 16The Standard Preview Display 18
Setting Up 19
Setup Overview 19Using with a Hasselblad H2 Camera Body 19
Attaching to a Hasselblad H2 19Powering the Camera Back on an H2 20Removing the Camera Back 21
Working with Compact Flash Memory Cards 23Inserting a Card 23Removing a Card 26
Working with an Ixpress ImageBank-CF 28Working with a Standard FireWire Hard Disk 29Selecting the Current Medium 30
Hasselblad Ixpress CFH User’s Guide (Provisional Draft 1.0)

Table of Contents4
Working Connected to a Computer 31Connecting to the Computer 31Removing from the Computer 32
Taking Pictures 33
Shooting Modes 33Taking Pictures with FlexColor 33Working Stand-Alone or with an ImageBank-CF or Hard Disk34
Setting Sensitivity and White Balance 35Selecting the ISO Rating 35Setting the White Balance 35
Working with Media and Batches 36Media and Media Types 36Organizing your Work with Batches 38Navigating Media and Batches 38Creating New Batches 41
Using Instant Approval Architecture 41Standard Instant Approval Workflow 42Reading and Changing the Approval Status 43Browsing by Approval Status 44Deleting by Approval Status 44Setting the Default Status 45
Viewing, Deleting and Transferring Images 47
Basic Image Browsing 47Choosing the Current Batch 47Browsing by Approval Status 47
Zooming In and Out 48Zooming in for More Detail 48Thumbnail Views 49
Hasselblad Ixpress CFH User’s Guide (Provisional Draft 1.0)

Table of Contents 5
Preview Modes 50The Standard Preview Display 51Using the Histogram 51Viewing Image Details 52Battery-Saver Mode 53Full-Screen Mode 53Overexposure Indicator 54
Deleting Images 55Transferring Images 56
Transferring to Your Computer 56Transferring to an External Hard Disk or ImageBank-CF 57
Working with the Menus 59
Navigating the Menu System 59Menu System Overview 61MAIN MENU 62
The ISO Setting 62The White Bal Setting 63Selecting the Current Storage Medium 63Setting the Browse Filter 64
MAIN MENU > White Bal 65Using the Auto and Preset Functions 67Entering a Manual Light Temperature 67Setting Light Balance by Measurement 68
MAIN MENU > Storage 70Deleting Images 70Formatting Media 70Copying from the Internal Card 72Creating Batches 74Setting the Default Approval Status 75
MAIN MENU > STORAGE > Delete 76Deleting Singe Images 76Deleting Several Images from the Current Batch 78Deleting Several Images from a Selected Batch 79Deleting Several Images from a Selected Medium 81
Hasselblad Ixpress CFH User’s Guide (Provisional Draft 1.0)

Table of Contents6
MAIN MENU > SETTINGS > User Interface 83Entries of the USER INTERFACE Menu 83Sound Options 84Setting the Date & Time 85Making Display Settings 86
MAIN MENU > SETTINGS > Camera 88Entries of the CAMERA Menu 89Setting up a Sequence 90
MAIN MENU > SETTINGS > Miscellaneous 91Selecting an Interface 91The About box 92Returning the Camera to Its Factory Settings 93
Menu Shortcuts 94
Care and Maintenance 95
Handling and Storage 95Cleaning the CCD Infrared Filter 95
Basic Cleaning Procedure 95Cleaning Using the HAMA Cleaning Fluid and Tissues 96Cleaning with an E-Wipe 96
Cleaning the Housings 97
Using with Other Camera Bodies 99
Using with a Hasselblad H1 Camera 99Mounting to an H1 99Configuring for Use with an H1 99Limitations when Using an H1 100
Using Flash-Sync Mode with Other Cameras 100Attaching the Camera Back 101Powering the Camera Back 101Configuring for Flash Sync Mode 101Making Exposure Settings and Taking Shots 102
Technical Information 103
Technical Specifications 103
Hasselblad Ixpress CFH User’s Guide (Provisional Draft 1.0)

Table of Contents 7
Disposal 104
Hasselblad Ixpress CFH User’s Guide (Provisional Draft 1.0)

Table of Contents8
Hasselblad Ixpress CFH User’s Guide (Provisional Draft 1.0)

IntroductionThe Ixpress CFH Camera Back
9
Introduction
The Ixpress CFH Camera Back
The Ixpress CFH Camera Back is a high-end digital photography solution designed specifically for Hasselblad H2 Cameras. The camera back and body are tightly integrated, sharing a single battery and enabling all exposure and lens settings to be made using the ergonomic controls of the camera body and stored digitally with each shot.
When working in a studio, you can control all the digital camera operations from your computer using the FlexColor software (see the FlexColor Software Reference manual for details). When working without a computer, the camera back's built-in preview screen, digital light meter, histogram display and audio exposure warnings help to ensure a perfect exposure every time. All exposure settings are made using the standard camera controls; additional camera back settings are made using the control panel and on-screen menu system.
The Ixpress CFH Camera Back can also be used with nearly any camera that has been fitted with a standard Hasselblad film-magazine adapter, though with a more limited feature set.
Role of the Camera Back
The camera back is primarily a support system for a light-sensitive element called an area-array CCD (charge coupled device), which acts as computer-readable electronic “film”. The surface of the CCD has millions of tiny, light-sensitive areas, each of which creates one color of one pixel in your digital image. In a color digital image, each pixel has three color components: red, green and blue (abbreviated RGB). The various pixels in the camera back's CCD are filtered to create three images—one of each color—which are later combined by the software to create a single, full-color image.
The camera back receives power either from the camera-body battery (when you are shooting in stand-alone or ImageBank-CF mode) or over the FireWire cable (when you are connected to a computer).
Hasselblad Ixpress CFH User’s Guide (Provisional Draft 1.0)

IntroductionThe Ixpress CFH Camera Back
10
Shooting Modes
As illustrated in Figure 1, the camera back can be used in any of three different shooting modes:
• Stand-alone mode:Turns your Hasselblad H2 camera into an integrated digital camera with no external wires or connections. All focus and exposure settings are made using the standard camera-body controls for maximum speed and ease of use. Images are stored on an internal, removable compact-flash card and power is taken from the same battery that powers the camera. The camera back design matches the colors and contours of the H2 camera, fitting seam-lessly to form a perfectly integrated, medium-format digital camera.
• ImageBank-CF or FireWire Disk mode:Enables you to attach the camera back to a portable hard disk or Ixpress ImageBank-CF via a flexible, light-weight FireWire cable. The ImageBank-CF features massive storage capacity and high-speed data transfer. It is small, lightweight, battery powered and easily clips to your belt, so the solution is just as portable as the stand-alone option. General-use hard disks can also be used, but usually require an external power source. The camera back can also back up its internal images to any external FireWire disk without requiring a computer.
• Studio mode:Enables you to connect your camera directly to your computer and to oper-ate the entire system using Hasselblad FlexColor software. This gives you a large, detailed preview image and the ability to make image corrections as you work. Computer hard-disk storage capacity can be very large and is rel-atively inexpensive, allowing for nearly limitless captures.
Hasselblad Ixpress CFH User’s Guide (Provisional Draft 1.0)

IntroductionAbout This Manual
11
About This Manual
This manual explains how to work with the Hasselblad Ixpress CFH Camera Back. It explains how to mount the back to your camera body, work with com-pact-flash cards, connect to a computer or ImageBank-CF, view preview images on the built-in LCD screen and how to work with the menu system. This manual also provides important warnings and safety details, plus care, cleaning and storage advice.
Though all image-capturing methods available with the Ixpress are discussed here, the instructions in this manual focus on the stand-alone operation of the
Figure 1 Shooting modes
Stand Alone
With an Ixpress ImageBank-CFor FireWire Hard Disk
In the Studio
Hasselblad Ixpress CFH User’s Guide (Provisional Draft 1.0)

IntroductionWarnings and Restrictions
12
camera back when mounted to a Hasselblad H2 camera. For more information about using the camera back with other types of cameras, please see “Using with Other Camera Bodies” on page 99. For more information about using the optional ImageBank-CF, please see your ImageBank-CF manual. For details about how to take pictures and control the camera from your computer using FlexColor digital imaging software, please see your FlexColor manual.
For details about how to use your Hasselblad H2 camera, please see your H2 manual. Because the two products are so tightly integrated, you will need to refer to both manuals often as you learn to use the H2 as a digital camera.
Warnings and Restrictions
General• Read all instructions before attempting to use your new equipment.
• If your equipment requires service, please contact your Ixpress dealer.
• Keep this and all electronic equipment out of children's reach.
While Using the Camera Back• Do not try to hold your camera by the digital back—it is not designed for
this and may come loose, allowing the camera body to drop. Always use the camera-body handle when holding the camera.
• Do not attempt to open your camera back.
• Do not drop the camera back.
• Keep your camera back and all other computer equipment away from mois-ture. If your camera back becomes wet, disconnect from power and allow it to dry before attempting to operate again.
• Always replace the protective CCD/filter cover when the camera back is not connected to your camera—the exposed CCD and filter are vulnerable to damage.
• Never try to remove the glass IR filter from the front of the CCD; this will probably ruin the CCD. If dust manages to get between the CCD and IR fil-ter, please contact your Hasselblad dealer for assistance.
• Store your camera back away from heat and moisture.
• Keep all wires connected to or from your camera back and computer out of the way where they will not be tripped over.
• Never cover the ventilation openings on the camera back.
Hasselblad Ixpress CFH User’s Guide (Provisional Draft 1.0)

IntroductionSystem Requirements
13
While Using Flash Sync
The Ixpress “Flash Sync” connectors are specified for use with low-voltage flash generators. Do not connect to older, high-voltage flashguns. Ixpress com-plies with the ISO-10330 specification, which limits voltages to 24V and cur-rents to 100mA.
System Requirements
Computer Requirements
The camera back includes a CD with the Hasselblad FlexColor image-capture and editing application. Native versions of FlexColor are provided for both Macintosh and Windows platforms. Please see your FlexColor manual for complete system requirements.
For working with the large images captured by Ixpress, you will require a high-performance computer with plenty of memory, advanced graphics capabilities and a recent operating system. In most cases, you will want your computer to include a FireWire interface (FireWire 800 (IEEE 1394b) recommended), which will enable you to load images directly from the camera or ImageBank-CF. To load images stored on the removable compact-flash card, you could instead use a compact-flash card reader, but we still recommend FireWire for maximum flexibility.
Reading the DNG Image File Format
The native file format of the camera back is DNG (digital negative), which is a standard format developed by Adobe for storing raw digital-camera captures. When you shoot to the internal card or external hard disk, the camera back saves images in this format. Many different programs, including Adobe Photo-shop and Hasselblad FlexColor, can read these files.
When you open a DNG file using FlexColor (for example when importing from the camera back) the program converts the image to Hasselblad’s “3f” format and saves the result as a new file. When you shoot directly with Flex-Color, the image is saved as a 3f file only. Like DNG, 3f contains the complete raw image exactly as it was captured by the camera, plus technical details that enable FlexColor to process and display the image correctly. It furthermore
Hasselblad Ixpress CFH User’s Guide (Provisional Draft 1.0)

IntroductionSystem Requirements
14
stores a complete history of the FlexColor settings that you have applied to each image and stores meta-data such as camera settings, image name, photog-rapher, copyright, etc. If you prefer not to use FlexColor, then you can work with the original DNG files using any application that supports that format, including Adobe Photoshop.
From FlexColor, you can optimize and export 3f files to either of the most-common desk-top-processing (DTP) formats: TIFF or JPEG.
Hasselblad Ixpress CFH User’s Guide (Provisional Draft 1.0)

Getting to Know Your Camera BackCamera Back Physical Features
15
Getting to Know Your Camera Back
Camera Back Physical Features
A. Release lever:To remove the camera back from the H2 body, first remove the H2 view-finder, then press and hold the H2 release lever while pulling back on this lever. See “Using with a Hasselblad H2 Camera Body” on page 19 for details.
B. CCD and IR filter:This is the light-sensitive element, which is positioned behind a perma-nently mounted IR filter. Usually, this assembly will either be inside the camera or protected by plastic cover. Always be very careful not to touch or scratch the surface of the filter when it is exposed and to replace the plastic cover whenever the camera back is not mounted to a camera. WARNING: never attempt to remove the glass filter—you will probably ruin the CCD if you do so.
C. Flash sync output:A connector is protected behind a rubber door here. This connector is only needed if you want to use the camera back in flash-sync mode, such as when mounted to a view camera. It is not necessary when you use the camera back with an H2 body. See “Using with Other Camera Bodies” on page 99 for details about how to use this connector.
Figure 2 Controls, buttons, connectors and other physical features of the camera back
A
B
C
EF
D
A
G
H
Hasselblad Ixpress CFH User’s Guide (Provisional Draft 1.0)

Getting to Know Your Camera BackThe Control Panel
16
D. Flash sync input:A connector is protected behind a rubber door here. This connector is only needed if you want to use the camera back in flash-sync mode, such as when mounted to a view camera. It is not necessary when you use the camera back with an H2 body. See “Using with Other Camera Bodies” on page 99 for details about how to use this connector.
E. FireWire connector:Insert a FireWire cable here to connect the camera back to a computer, external hard disk or Ixpress ImageBank-CF. The cable must have a FireWire 800 (IEEE 1394b) connector on this side, but can be connected to either a FireWire 400 or 800 port on the other side (FireWire 800 rec-ommended).
F. Mounting plate:This plate, which as a slot just behind it, fits onto a hooked shelf on the back of the H2 camera body.
G. Front panel and view screen:The front panel provides a color LCD for previewing images and display-ing menus. This is surrounded by a set of buttons for making settings, browsing images and navigating the menu system. Two status lights are also included here. See “The Control Panel” on page 16 for a detailed description of these elements.
H. Flash card panel:Open this panel to install or remove compact-flash cards. See “Working with Compact Flash Memory Cards” on page 23 for details.
The Control Panel
When you are not connected to a computer, you will use the control panel to browse images and make camera-back settings. However, you will still use the camera-body LCD and controls to make focus, exposure and other settings.
The camera back has a large view screen, which displays image previews and menu settings. Surrounding the screen is a set of buttons for browsing images and navigating the menu system. Two of the buttons, located at the bottom-right and -left of the screen, are given an on-screen label that changes accord-ing to the current context (e.g., the bottom-right button sets the approval rating when browsing images, but confirms settings when using the menus).
Hasselblad Ixpress CFH User’s Guide (Provisional Draft 1.0)

Getting to Know Your Camera BackThe Control Panel
17
The following controls and features are provided by the control panel:A. LCD screen: Displays preview images and the menu system.B. Menu button: Opens and closes the menu system. This button is also
used for various other tasks as you work with the menu system. The pre-view screen therefore shows a label next to this button to indicate its effect (see also Figure 4 on page 18).
C. View-mode button: steps through the various view modes for the preview image: standard, histogram overlay, image details, screen off and full-screen (see also Figure 12 on page 50).
D. Zoom-in button: When a preview image is displayed, press here to zoom in. When viewing available batches or media, press here to select. When using the on-screen menus, use this button to set values (see also Figure 11 on page 48).
E. Zoom-out button: When you are zoomed into an image, press here to zoom out again. You can continue to zoom out to view several small images at once and finally to view and select batches and media. When using the on-screen menus, use this button to set values (see also Figure 11 on page 48).
F. Approve button: when viewing images, this button steps through the three approval levels, thereby assigning an approval status to the image currently displayed (or selected) in the preview screen. This is part of the Instant Approval Architecture system—see “Using Instant Approval Architecture” on page 41 for details. This button is also used to confirm some types of menu operations, such as deleting images. The preview screen therefore shows a label next to this button to indicate its effect (see also Figure 4 on page 18).
G. Busy light:Lights red to indicate that the camera back is performing an operation (such as saving a new capture) and is not available for new commands.
Figure 3 The Ixpress CFH control panel
A
B
C
D
E
F
GHI
Hasselblad Ixpress CFH User’s Guide (Provisional Draft 1.0)

Getting to Know Your Camera BackThe Standard Preview Display
18
H. Navigate: this four-way rocker button enables you to step through pre-view images and navigate the menu system. To use it, press the side of the button that corresponds to what you wish to do (e.g., move up, left, right or down).
I. Power light:Lights green to indicate that the camera back is receiving power.
The Standard Preview Display
The standard preview display is the one shown when you first turn on the cam-era and is probably the view you will use most often. It features a preview of your most recent shot and basic information about the camera back settings and the image itself, as detailed below in Figure 4.
Several other display modes are also available, including histogram, capture details, full-screen and battery saver. Please see “Preview Modes” on page 50 for details.
The display furthermore enables you to navigate the menu system and make camera settings; see “Working with the Menus” on page 59 for details.
Figure 4 Features of the standard display
ISO setting White balance Current storage medium
Storage capacity(shots taken / shots remaining)
Image file name
-Button label Approval status and browse-filter indicator
Hasselblad Ixpress CFH User’s Guide (Provisional Draft 1.0)

Setting UpSetup Overview
19
Setting Up
Setup Overview
It is very easy to assemble your digital camera. There are just two basic steps:
1. Mount the camera back to a camera body just as you would a film maga-zine. Depending on which camera you are using, see one of the following for instructions:
• “Using with a Hasselblad H2 Camera Body” on page 19.
• “Using with Other Camera Bodies” on page 99.
2. Attach one or more storage media. Depending on which type of medium you are using, see one of the following for instructions:
• “Working with Compact Flash Memory Cards” on page 23.
• “Working with an Ixpress ImageBank-CF” on page 28.
• “Working with a Standard FireWire Hard Disk” on page 29.
• “Working Connected to a Computer” on page 31.
Using with a Hasselblad H2 Camera Body
Attaching to a Hasselblad H2
1. Remove the CCD/filter cover from the camera back by placing your thumb on the upper recess and pulling the top of the cover away from the camera back. Push downwards on the cover to release the lower catch on the cover from the mounting-support plate of the camera back
CAUTION: be very careful not to touch or scratch the CCD/filter surface while it is exposed.
Store the cover in a place where you can find it again. You must always replace it when you remove and/or store the camera back.
Hasselblad Ixpress CFH User’s Guide (Provisional Draft 1.0)

Setting UpUsing with a Hasselblad H2 Camera Body
20
2. Rest the mounting plate of the camera back on the magazine-support shelf on the camera body, ensuring that they are correctly positioned. The end of the support shelf is angled up at 90 degrees—this fits into the slot behind the mounting plate.
3. Swing the camera back towards the camera body and firmly press into place until you hear a click. If there is resistance, then the retention mech-anism of the camera may have been reset. To fix this, rotate and depress the release button on the camera body.
4. Before you can start shooting, you must have some storage media avail-able. Do one of the following:
• Insert a compact-flash card. See “Working with Compact Flash Mem-ory Cards” on page 23 for details.
• Connect an Ixpress ImageBank-CF. See “Working with an Ixpress ImageBank-CF” on page 28 for details.
• Connect a FireWire hard disk. See “Working with a Standard FireWire Hard Disk” on page 29 for details.
• Connect to a computer. See “Working Connected to a Computer” on page 31 for details.
Powering the Camera Back on an H2
When connected to an H2 camera body, the camera back takes its power from the H2 battery. The entire assembly, including the body and back, is turned on and off using the on/off switch on the camera body. Please see your H2 manual for details about how to install a battery and use the on/off switch.
Hasselblad Ixpress CFH User’s Guide (Provisional Draft 1.0)

Setting UpUsing with a Hasselblad H2 Camera Body
21
Removing the Camera Back
1. Disconnect all cables (if any) from the camera back, including all FireWire and flash-trigger cables.
2. Remove the viewfinder assembly from the camera body by pressing its release button and lifting it up and away from the body. See also your H2 manual for details about removing and replacing the viewfinder assembly.
Hasselblad Ixpress CFH User’s Guide (Provisional Draft 1.0)

Setting UpUsing with a Hasselblad H2 Camera Body
22
3. Rotate and depress the magazine release button on the side of the camera body while you pull back on the release lever at the top of the camera back.
4. Tilt the camera back away from the camera body and pull it away. Cau-tion: the CCD and filter are now exposed; be very careful not to touch or scratch the exposed surface.
5. Replace the CCD/filter cover by hooking the bottom edge of the cover behind the mounting plate of the camera back and then pressing the top of the cover against the back until it clicks into place.
Hasselblad Ixpress CFH User’s Guide (Provisional Draft 1.0)

Setting UpWorking with Compact Flash Memory Cards
23
Working with Compact Flash Memory Cards
When shooting to a compact-flash card, your digital camera is completely self-contained. No additional wires or connectors need to be attached to your cam-era.
The Ixpress CFH Camera Back is shipped with a 1GB compact-flash card, which is able to hold approximately 40 shots. Lossless compression is applied to the images, so the actual size of each capture can vary, thereby affecting the total number of shots you can fit on the card. You can purchase additional, pos-sibly larger-capacity, cards and change them as each card becomes full.
Note that the camera back is able to copy the contents of its flash card to any attached FireWire disk or ImageBank-CF—even when no computer is attached. This enables you to backup your shots and then clear space on the card to keep on shooting. See “Transferring Images” on page 56 for details.
Inserting a Card
1. Open the side-panel door of your camera back by inserting your fingernail into the slot at the front of the door and pulling it open.
2. Behind the door, you can see a slot for the card (A), possibly with a card already inside, and a release button (B) below the slot. If a card is already
Hasselblad Ixpress CFH User’s Guide (Provisional Draft 1.0)

Setting UpWorking with Compact Flash Memory Cards
24
installed, then remove it by pressing the release button twice (see “Removing a Card” on page 26 for a complete procedure).
3. Get your compact-flash card and hold it so that the connector holes face into the slot in the camera back, with the brand label facing in the same direction as the camera back preview screen. Gently press the card into the slot. If you encounter resistance, it might be because you are holding the card backwards or upside down. Experiment until you find the orientation that allows the card to slide in easily.
4. When the card is able to drop very easily nearly all the way into the cam-era back, then you are doing it right. Once you have achieved this, press
A
B
Hasselblad Ixpress CFH User’s Guide (Provisional Draft 1.0)

Setting UpWorking with Compact Flash Memory Cards
25
the card firmly into place until it sinks another couple of millimeters into the camera back and is held fast.
5. Swing the side panel door shut again.
Hasselblad Ixpress CFH User’s Guide (Provisional Draft 1.0)

Setting UpWorking with Compact Flash Memory Cards
26
Removing a Card
1. Open the side panel door of your camera back by inserting your fingernail into the slot at the front of the door and swinging it open.
2. Behind the door, you can see the top edge of the card in its slot (A) and a release button (B) below the slot.
A
B
Hasselblad Ixpress CFH User’s Guide (Provisional Draft 1.0)

Setting UpWorking with Compact Flash Memory Cards
27
3. Press and release the button (B); the button then pops out, jutting out from the camera back.
4. Press the extended release button all the way into the camera back. Some force is required, so it is a good idea to use your thumb to push while you grasp the other side of the camera back with your fingers. As you do this, the card will be pushed out a few millimeters.
Hasselblad Ixpress CFH User’s Guide (Provisional Draft 1.0)

Setting UpWorking with an Ixpress ImageBank-CF
28
5. Grab the card between your thumb and forefinger and pull it away from the camera back.
6. Swing the side panel door shut if you are done, or insert a new card as described in “Inserting a Card” on page 23.
Working with an Ixpress ImageBank-CF
The Ixpress ImageBank-CF is an optional add-on for your digital camera sys-tem. It is essentially an external FireWire hard disk optimized for digital pho-tography, providing extensive storage space and high-speed data transfer. It is small, light and battery powered. You can easily clip it to your belt, so the solu-tion is nearly as portable as the stand-alone camera.
Note: older camera backs of the Ixpress line used a different external disk and controller called simply the “Image Bank”. This older Image Bank is not com-patible with the Hasselblad Ixpress CFH. Use only the Ixpress ImageBank-CF with this camera back.
Hasselblad Ixpress CFH User’s Guide (Provisional Draft 1.0)

Setting UpWorking with a Standard FireWire Hard Disk
29
To use an ImageBank-CF with the camera back, simply assemble the Image-Bank-CF as described in its manual, mount the camera back as described above and connect the two with a standard FireWire 800 (IEEE 1394b) cable. See your ImageBank-CF manual for complete details.
To remove the ImageBank-CF, simply disconnect the FireWire cable. The camera will then revert to saving and browsing images on the internal flash card (if available).
Working with a Standard FireWire Hard Disk
Though we recommend the ImageBank-CF, you can actually connect any external FireWire 400 or 800 (IEEE 1394 or 1394b) disk to the camera back. A wide variety of models are available, but they are not usually battery powered and the camera back cannot supply power over the FireWire cable (as a com-puter can for some hard disk models). These disks must therefore be plugged into a wall socket, which limits portability.
To use an external FireWire disk with the camera back, simply set up the disk as described in its manual, mount the camera back as described above and con-nect the two with a standard FireWire cable. See also Figure 5 on page 29 and your hard disk manual for complete details.
Figure 5 Connections for using the camera back with an ImageBank-CF or external FireWire hard disk.
Hasselblad Ixpress CFH User’s Guide (Provisional Draft 1.0)

Setting UpSelecting the Current Medium
30
To remove the disk, simply disconnect the FireWire cable. The camera will then revert to saving and browsing images on the internal flash card (if avail-able).
A good way to use a FireWire disk with your digital camera is to shoot in stand-alone mode using the internal card and then, when the card is full, con-nect the disk and copy the contents of card to the disk. No computer is required. This enables you to backup your shots and then clear space on the card to keep on shooting. See “Transferring Images” on page 56 for details.
The camera back can be connected to any FireWire storage device, including MP3 players such as the Apple iPod, some models of which hold up to 60GB or more. Because these devices are also battery powered, they will also work well when working on location. However, data transfer to many of these types of devices is normally too slow to use them as media for shooting directly. We therefore recommend them only for backing up from the internal card after shooting.
Selecting the Current Medium
The current medium selection is the device and location to which you will save new shots and from which you can browse using the navigation button. In many cases, the current medium is selected automatically, for example:
• When you are connected to a computer, then images are always saved directly to the computer hard disk. The camera back screen and menu sys-tem are furthermore disabled while connected to a computer.
• When only one medium is connected (e.g., a compact-flash card), then this medium is automatically selected.
However, if you are working away from your computer and have several media attached (e.g., both a card and ImageBank-CF), then you may need to select a medium explicitly if you want to browse its contents and store images new to it.
There are two ways of selecting the current target medium:
• Use the MAIN MENU > Storage entry of the menu system. See “Selecting the Current Storage Medium” on page 63 for details.
• Use the zoom-out button to zoom all the way up to the top level, which shows all connected media, and then zoom in on the appropriate medium and batch. See “Navigating Media and Batches” on page 38 for more infor-mation about selecting media and batches in this way.
Hasselblad Ixpress CFH User’s Guide (Provisional Draft 1.0)

Setting UpWorking Connected to a Computer
31
Working Connected to a Computer
As mentioned in “Shooting Modes” on page 10, when you take pictures while the camera is connected to a computer, you can control all camera functions using the FlexColor software. Even if you never shoot while connected, you will probably connect the camera to your computer each time you want to download your images, though you might instead use a compact-flash card reader and/or connect your ImageBank-CF or FireWire disk directly.
Connecting to the Computer
To connect to your computer, simply attach a FireWire cable from the FireWire port on your computer to the port on the side of the camera back. The port on the camera back is protected behind a hinged door. Simply align the cable con-nector as indicated by the print on the door, then press the cable connector against the door to open it and continue to press the cable into the socket until it stops and is held in place.
Figure 6 Connections for using the camera back with a computer
Hasselblad Ixpress CFH User’s Guide (Provisional Draft 1.0)

Setting UpWorking Connected to a Computer
32
Removing from the Computer
To remove the camera back from the computer, simply disconnect the FireWire cable.
Hasselblad Ixpress CFH User’s Guide (Provisional Draft 1.0)

Taking PicturesShooting Modes
33
Taking Pictures
Shooting Modes
As mentioned in the introduction and illustrated in Figure 1 on page 11, the camera back supports three different shooting modes:
• Stand-alone mode:Images are stored on the internal compact-flash card and all settings are made using either the standard camera controls or the camera back menu system
• ImageBank-CF or Hard Disk mode:Works just like stand-alone mode, but images are saved on an external hard disk, which has a much larger capacity than compact-flash cards. You can use the Ixpress ImageBank-CF or any standard, external FireWire disk. The ImageBank-CF is usually best because it is portable and optimized for digi-tal photography.
• Studio mode:Images are stored on the computer hard disk and shooting is controlled using Hasselblad FlexColor software.
Taking Pictures with FlexColor
When you are connected to a computer, the following rules apply:
• The destination medium and location are controlled from FlexColor.
• All exposure settings, including ISO, aperture and exposure time, are con-trolled from FlexColor.
• Focus is controlled only from the camera and auto-focus is disabled. You must therefore focus manually before shooting.
• The screen and menu system on the camera back are disabled.
• The camera back will take power from the FireWire cable if it is available (not all computers supply power here, notably laptops). This will help con-serve the battery power of the H2. However, you must still have a charged battery connected to the H2; the camera body requires this battery in order to operate.
When initiating a shot from FlexColor, the computer sends a signal to the cam-era back, which triggers the camera shutter and strobe lights (if any). The cam-
Hasselblad Ixpress CFH User’s Guide (Provisional Draft 1.0)

Taking PicturesShooting Modes
34
era back then sends the image back over the FireWire connection to the computer, where it is displayed on the screen and saved as a 16-bit-per-color “3f” file in the currently selected folder of the computer hard disk.
3f is a proprietary Hasselblad format for storing raw captures. It contains the complete raw image exactly as it was captured by the camera, plus technical details that enable FlexColor to process and display the image correctly. It fur-thermore stores a complete history of the FlexColor settings that you have applied to each image and stores meta-data such as camera settings, image name, photographer, copyright, etc. The 3f format is similar to the DNG format used by the camera back when it saves images to its internal card, external hard disk or ImageBank-CF. When you load images into FlexColor from the camera or external media, the DNG files are converted into 3f format. If you prefer not to use FlexColor, then you can work with the original DNG files using any application that supports that format, including Adobe Photoshop.
Please refer to the FlexColor Software Reference manual for further instruc-tions about taking pictures using FlexColor. The remainder of this chapter dis-cusses how to use the camera back mounted to an H2 as a stand-alone digital camera with or without an ImageBank-CF or hard disk.
Working Stand-Alone or with an ImageBank-CF or Hard Disk
When you are not connected to a computer, then all focus and exposure set-tings are made using the camera body, just as when shooting to film. This is possible because of the tight integration between the Ixpress CFH Camera Back and the Hasselblad H2 Camera, which enables the two units to function as one.
There are no practical differences between shooting to the internal card or to an ImageBank-CF or hard disk. However, when several media are mounted, you must be sure to select the correct destination medium (see also “Working with Media and Batches” on page 36).
When you are not connected to a computer, control over the various camera back settings is provided via the built-in menu system (see also “Working with the Menus” on page 59). Most of the usual settings, such as focus, aperture, shutter speed and shutter release, are made using the standard camera-body controls, however.
Hasselblad Ixpress CFH User’s Guide (Provisional Draft 1.0)

Taking PicturesSetting Sensitivity and White Balance
35
Setting Sensitivity and White Balance
The two digital settings that are most relevant while shooting are the ISO and white balance. These are therefore available at the top level of the menu sys-tem so you can get to them quickly and easily. They are also shown on-screen in most preview modes, so you can easily keep an eye on them as your work (see Figure 4 on page 18).
Selecting the ISO Rating
The camera back can be set to use a light-sensitivity rating equivalent to ISO 50, 100, 200 or 400 film. Note, however, that the “natural” sensitivity of the CCD is ISO 50, so you will get best results with this setting if your lighting allows it. As with film, which becomes grainer at higher ISO ratings, the cam-era back will reveal progressively more noise in pictures taken at higher sensi-tivities.
When you are using a Hasselblad H2 camera, the setting is communicated to the camera, so all exposures will be computed accordingly.
To set the rating, use the MAIN MENU > ISO entry in the camera back menu system. See “The ISO Setting” on page 62 for a detailed procedure.
Setting the White Balance
When you are looking at a scene, your eyes naturally adapt to the ambient light color (provided it is nearly white)—your brain then interprets all other colors according to how they relate to this “neutral” color. However, this means that when you take a photo and then look at it later, you might not get the colors you expect because the camera has an absolute idea of what “white” is. The camera back therefore provides a white balance setting, which sets the hue that it should consider to be white and interprets all other colors proportionately.
Unlike many digital cameras, the Ixpress camera back stores images as raw captures, which means they contain an exact image of the CCD (including its original mosaic color filter). You are therefore able to adjust the white balance at any time to equal effect. When you set a color balance, your setting is saved with the image as a pair of light temperature and tone values—the color values measured by each pixel are not altered. Your white balance setting affects the way colors are shown in the camera back screen and will still have the same effect when you first open images on your computer. You can change the set-
Hasselblad Ixpress CFH User’s Guide (Provisional Draft 1.0)

Taking PicturesWorking with Media and Batches
36
ting later using FlexColor or another program that reads DNG files and the effect will be the same as though you had set it before shooting. The easiest way to get it right, however, is to set the best white balance for each setting before you start shooting.
The Ixpress CFH Camera Back provides several options for establishing your white balance, including:
• A general-use automatic function that tries to respond in a way similar to the way your eyes do.
• A wide selection of presets for many common lighting situations, such as sun, shade, flash and indoor lighting.
• An adaptive function that enables you to measure the current lighting condi-tions by taking a shot of a neutral card. The camera back then sets the white balance accordingly.
The best solution for white balance will vary according to each individual situ-ation and the amount of time available. Often, the automatic selection will work fine, while at other times a preset will work better—especially in scenes dominated by a particular strong color. When you are working in a studio, with its controlled environment, you are likely to get the best results using the adap-tive function together with a neutral test card.
To set the white balance, use the MAIN MENU > White Bal entry in the camera back menu system. See “MAIN MENU > White Bal” on page 65 for complete details, including detailed descriptions of the presets and other options.
Working with Media and Batches
As you take pictures, your shots are stored on some type of storage medium (such as a card or hard disk), which is further organized into batches, which work just like folders in a computer operating system. This section explains these terms and tells you how to work with media and batches as you are shoot-ing.
Media and Media Types
The Ixpress CFH can make use of several types of media and can even have several media attached at once. Options include:
• Internal compact flash card: this is a card that contains computer memory. It is small, lightweight and fits inside the camera back. However, these
Hasselblad Ixpress CFH User’s Guide (Provisional Draft 1.0)

Taking PicturesWorking with Media and Batches
37
cards usually have a smaller capacity and higher price-per-megabyte than the other types of media supported. The camera back holds just one card, but if you have several cards, then you can swap them out as each one becomes full. The camera back also has a copy feature, which enables you to copy images from the card to an attached hard disk or ImageBank-CF without requiring a computer; with your images saved off-line, you can then clear the card and keep on shooting.
• Ixpress ImageBank-CF: this is a compact, battery-operated hard disk with a large storage capacity and FireWire interface. It clips to your belt and con-nects to the camera back via a FireWire cable. It is specially designed both for portability and high performance when taking pictures.
• Standard external firewire hard disk: Though we recommend the Image-Bank-CF, you can actually connect any external FireWire disk to the camera back. A wide variety of models are available, but they are not usually bat-tery powered and the camera back cannot supply power over the FireWire cable (as a computer can for some hard disk models). These disks must therefore be plugged into a wall socket, which limits portability.
• Computer: When you work with the camera back connected to your com-puter, then all your shots are stored directly on the computer hard disk (or any other media available to the computer). Please see your FlexColor man-ual for details about how to manage your image files when shooting from a computer.
To view a list of all media connected to your camera back, press the (-) button several times until you are zoomed all the way out to the media level, as shown below in Figure 7.
Figure 7 The media list, as shown by the camera back screen.
Medium-type icon (compact flash)
Medium-type icon (FireWire disk)
Medium name
Number of green, yellow and red shots currently stored on the medium
Medium capacity in bytes and images (approximate)
Hasselblad Ixpress CFH User’s Guide (Provisional Draft 1.0)

Taking PicturesWorking with Media and Batches
38
Organizing your Work with Batches
Batches help you to organize your shots as you work. They function just like folders on a hard disk (in fact, they are folders). Batches have the following properties:
• When you create a new batch, you assign a name to it and it is created as a new folder.
• When you copy images from a compact-flash card, each batch is saved as a sub-folder on the destination disk.
• When deleting multiple images, you are able to restrict your delete com-mand so that it affects just a single batch.
• When browsing images, you will only see images from the current batch.
• You can change between batches by using the navigation controls of the camera back front panel.
• The camera back display shows the date at which each batch was created.
Navigating Media and Batches
The camera back always works with a current medium and a current batch. This is the location at which the camera will save all new shots and the location in which you can browse using the navigator button on the front panel. There are two ways of selecting the current medium and/or batch:
• Using the zoom and navigator buttons of the front panel. This method enables you to select any existing batch and is therefore useful even when only one type of medium is attached. This method is explained in the proce-dure below.
• Using the MAIN MENU > Storage entry of the menu system to choose a medium. This is only relevant when more than one medium is attached (e.g., both a compact flash card and an ImageBank-CF). When you use this
Figure 8 The batch list, as shown by the camera back screen.
Batch name
Date the batch was created
Number of green, yellow and red shots in the batch
Hasselblad Ixpress CFH User’s Guide (Provisional Draft 1.0)

Taking PicturesWorking with Media and Batches
39
function, you will always go to the most recently created batch from the medium you select. Please see “Selecting the Current Storage Medium” on page 63 for a complete description of this method.
To select the current medium and batch using the browse controls:
1. Press the zoom-out button until you are all the way at the top zoom level. If you start with the single-image preview view, then you pass through the following views to get there:
• Single-image preview
• Four-thumbnail view
• Nine-thumbnail view
• Batch list
• Media list
2. You are now looking at a list of media devices currently connected to the camera back. Often, there is only one.
As illustrated in Figure 7 on page 37, each medium shows a name, total size and an estimate for how many images will fit on it. To the right of the medium name is a set of three colored numbers in parentheses. These indi-cate the total number of images of each approval status (green, yellow and red) that currently exist on that medium. For example, if you see a card
Figure 9 Use the (+) and (-) buttons to view media, batches, thumbnails, previews and preview zooms
Media List Batch List 9-Thumbnail View 4-Thumbnail View Normal View Zoomed Continue to press (+)
to zoom further
Hasselblad Ixpress CFH User’s Guide (Provisional Draft 1.0)

Taking PicturesWorking with Media and Batches
40
that shows (18/5/3), then that card contains a total of 26 images: 18 green (approved), 5 yellow (waiting) and 3 red (marked for probable delete).
3. If more than one medium is listed, then use ⇑ and ⇓ to highlight the medium you wish to use. The currently selected medium shows a blue border.
4. Press the zoom-in button to zoom-in on the currently highlighted medium. You now see a list of batches on this medium.
As illustrated in Figure 8 on page 38, each batch shows a folder icon, a name and the date on which it was created. As with the media list, you can read the number of shots of each approval status that are stored in each batch.
5. As with media, use ⇑ and ⇓ to highlight the batch you wish to use. The currently selected batch shows a blue border.
6. Press the zoom-in button to zoom in on the currently highlighted batch. You now see the nine-thumbnail view of your selected batch.
7. You have now set the current medium and batch. Your next new shot will be stored here and the browse buttons will show only the images from this batch.
Hasselblad Ixpress CFH User’s Guide (Provisional Draft 1.0)

Taking PicturesUsing Instant Approval Architecture
41
Creating New Batches
You can create any number of batches on each medium. To create a new batch, first make sure you have selected the correct current medium (see “Navigating Media and Batches” on page 38) and then use the MAIN MENU > STORAGE > Batch entry of the menu system to create the new batch. See “Creating Batches” on page 74 for a detailed procedure.
Using Instant Approval Architecture
The Instant Approval Architecture system helps you to evaluate your images as quickly as you take them. It works by supplying immediate audio feedback, which tells you instantly whether each new picture is exposed correctly or likely to be over- or underexposed. Thereafter, the system enables you to give each image one of three status levels. Though you can use the system any way you like, the intention is that you should assign the levels as follows:
• Green for your best shots
• Yellow for images that need closer inspection
• Red for images that should probably not be used.
WARNING: When the current storage medium is full, red-status images will be deleted (one at a time) to make room for new shots—no warning will be given! You can continue shooting until no red-status images remain; if you then try to take additional new shots you will get a medium-full message.
One of the greatest advantages of digital photography compared to film is that it costs no more to shoot 100 images that it does to shoot one. Photographers therefore tend to take many more pictures when shooting digitally. By assign-ing approval levels as you work, it can be much easier to sort through and select images when you get back to your computer.
Hasselblad Ixpress CFH User’s Guide (Provisional Draft 1.0)

Taking PicturesUsing Instant Approval Architecture
42
Standard Instant Approval Workflow
The standard method of working with the Instant Approval Architecture is as follows:
1. You take a shot.
2. The camera back analyzes the shot to find out if it seems to be over- or underexposed. If it suspects a problem, it does the following:
• Provides audio feedback by making a warning sound, which immedi-ately alerts you to a possible problem even if you are not looking at the screen.
• Downgrades the approval status to yellow.
You should now consider whether to change your exposure settings and retake the shot. Note that some shots may trigger the warning even though they are exposed according to your intentions. You should consider these warnings only as a guideline.
3. If no problem is detected, then the image is saved with green status.
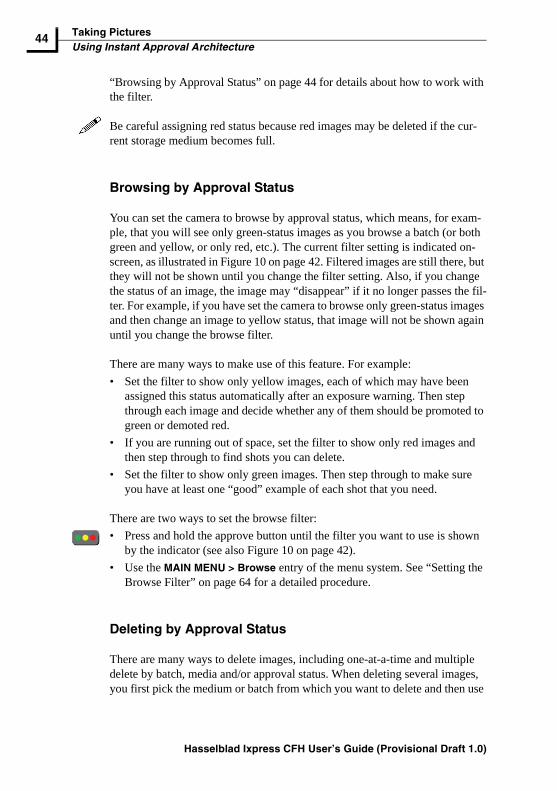
Figure 10 Approval status, filter indicators and controls
Current approval status (green) and browse-filter setting (show all)
Show all
Show green and yellow only
Show green only
Show yellow only
Show red only
Press and hold the up arrow to scroll through the browse filter settings; release when your preferred setting is shown.
Image File Name Green images start with "A", yellow with "B" and red with "C"
Press the approve button to change the status of the currently selected image.
Hasselblad Ixpress CFH User’s Guide (Provisional Draft 1.0)

Taking PicturesUsing Instant Approval Architecture
43
4. When you are browsing through your shots, keep an eye on the approval status of each and consider whether you should promote or demote each shot based on its appearance on the preview screen. You can also apply a browse filter to, for example, browse only red shots when looking for images to delete or to browse only green shots to make sure you have a good version of each shot that you need.
5. When you begin working with the images on your computer, use the approval status as a guide for organizing your work. For example, you might begin by opening and optimizing the green shots and then go to the yellow shots only if you still need more images and then, finally, check the red shots as a last resort.
Note that the system is very flexible so you can use it in any way that you like. For example, you can set the camera to assign all new images a yellow or green status regardless of the exposure warning.
Reading and Changing the Approval Status
The current approval status of each shot is indicated in two ways:
• In most preview modes, the current status in indicated by a colored dot in the bottom-right corner of the screen.
• Each image is given a name that indicates its approval status. Approved (green) image names start with “A” (e.g., “A0000043”); warning (yellow) images start with “B” (e.g., “B0000043”); and images marked for delete (red) start with “C”. Because of this naming convention, you will also be able to sort your image files by status after you have copied them to your computer (e.g., by listing the folder by file name).
See also Figure 10 on page 42 for a diagram showing where you can read the image name and approval status on the screen.
By keeping an eye on the file name and/or colored dot as you browse your images at the single-image, four-thumbnail or nine-thumbnail level, you can easily see the current approval status of each of them.
To change the approval status of the currently displayed or selected image, simply press the approval button until the desired approval status is shown.
Note that you can set the camera to filter by approval status as you browse, which means that some images may be hidden (but they are still there). See
Hasselblad Ixpress CFH User’s Guide (Provisional Draft 1.0)
Taking PicturesUsing Instant Approval Architecture
44
“Browsing by Approval Status” on page 44 for details about how to work with the filter.
Be careful assigning red status because red images may be deleted if the cur-rent storage medium becomes full.
Browsing by Approval Status
You can set the camera to browse by approval status, which means, for exam-ple, that you will see only green-status images as you browse a batch (or both green and yellow, or only red, etc.). The current filter setting is indicated on-screen, as illustrated in Figure 10 on page 42. Filtered images are still there, but they will not be shown until you change the filter setting. Also, if you change the status of an image, the image may “disappear” if it no longer passes the fil-ter. For example, if you have set the camera to browse only green-status images and then change an image to yellow status, that image will not be shown again until you change the browse filter.
There are many ways to make use of this feature. For example:
• Set the filter to show only yellow images, each of which may have been assigned this status automatically after an exposure warning. Then step through each image and decide whether any of them should be promoted to green or demoted red.
• If you are running out of space, set the filter to show only red images and then step through to find shots you can delete.
• Set the filter to show only green images. Then step through to make sure you have at least one “good” example of each shot that you need.
There are two ways to set the browse filter:
• Press and hold the approve button until the filter you want to use is shown by the indicator (see also Figure 10 on page 42).
• Use the MAIN MENU > Browse entry of the menu system. See “Setting the Browse Filter” on page 64 for a detailed procedure.
Deleting by Approval Status
There are many ways to delete images, including one-at-a-time and multiple delete by batch, media and/or approval status. When deleting several images, you first pick the medium or batch from which you want to delete and then use
Hasselblad Ixpress CFH User’s Guide (Provisional Draft 1.0)

Taking PicturesUsing Instant Approval Architecture
45
the MAIN MENU > STORAGE > Delete entry to specify the status of the images to delete. You can choose to delete:
• All red-status images from the selected batch or medium
• All red- and yellow-status images from the selected batch or medium
• All images from the selected batch or medium
See “MAIN MENU > STORAGE > Delete” on page 76 for detailed proce-dures describing each of the delete options.
Setting the Default Status
As outlined in “Standard Instant Approval Workflow” on page 42, the camera normally works by assigning a green status to all images that pass a basic expo-sure test and a yellow status to all images that fail the test. However, you can change this behavior if you prefer an alternative workflow. You have the fol-lowing options:
• Auto: works as described in “Standard Instant Approval Workflow” on page 42).
• Green: gives all new images a green status, regardless of the exposure warning.
• Yellow: gives all new images a yellow status, regardless of the exposure warning.
Regardless of this setting, audio feedback will still be provided if an image is judged to be badly exposed.
Use the MAIN MENU > STORAGE > Default Appr. Level entry to make this setting. See also “Setting the Default Approval Status” on page 75 for a detailed procedure.
Hasselblad Ixpress CFH User’s Guide (Provisional Draft 1.0)

Taking PicturesUsing Instant Approval Architecture
46
Hasselblad Ixpress CFH User’s Guide (Provisional Draft 1.0)

Viewing, Deleting and Transferring ImagesBasic Image Browsing
47
Viewing, Deleting and Trans-ferring Images
Basic Image Browsing
The large, full-color display on the front panel of the camera back enables you to inspect your shots while you are still on-location. The display offers full-screen previews, high-magnification zoom, two levels of thumbnails and anal-ysis tools including a full histogram and a detailed record of camera settings used for each shot.
When you first turn on the camera, the display opens in standard browse mode, showing the last image taken (if any) for the current medium and batch. Like-wise, after each new shot, the display shows a preview of the shot.
To browse the images of the current batch, simply press the left and right arrows of the navigator button.
Choosing the Current Batch
When you browse using the navigator button, you will only see images from the current batch on the current medium. To view another batch, you must nav-igate to it by zooming out to the batch or media level and then zooming in on the appropriate folder. See “Navigating Media and Batches” on page 38 for complete details about how to select the current medium and/or batch.
Browsing by Approval Status
It is possible to set the camera to browse only images of one or more specific approval levels from the current batch. You can use this, for example, to review all of your red-status shots to make sure you don’t need them or to review all of your yellow-status shots to decide whether they should be moved to green or red status. When you use the browse filter, you will not see images excluded by the filter, but they are still there.
Hasselblad Ixpress CFH User’s Guide (Provisional Draft 1.0)

Viewing, Deleting and Transferring ImagesZooming In and Out
48
See “Using Instant Approval Architecture” on page 41 for complete details about how to check and set the browse filter.
Zooming In and Out
As illustrated in Figure 11, below, you can use the (+) and (-) buttons to see various levels of detail in your images. You can furthermore zoom all the way out to view and select batches and media.
Zooming in for More Detail
The preview display has a much lower resolution than your images. You can therefore zoom very far into the images to inspect small details. To do this:
1. Browse to the image you wish to zoom into.
2. Press the (+) button to zoom in one step. The screen updates to show both a zoomed image and a thumbnail image that includes a red box outlining the portion of the images currently shown.
3. You can now do the following as needed:
Figure 11 Use the (+) and (-) buttons to view media, batches, thumbnails, previews and preview zooms
Media List Batch List 9-Thumbnail View 4-Thumbnail View Normal View Zoomed Continue to press (+)
to zoom further
Hasselblad Ixpress CFH User’s Guide (Provisional Draft 1.0)

Viewing, Deleting and Transferring ImagesZooming In and Out
49
• Use the navigator button to move the zoom area if you wish to inspect a different part of the image.
• Zoom further by pressing the zoom-in (+) button more times.
• Zoom back out one step by pressing the zoom-out (-) button.
4. When you are done, press and hold the zoom-out (-) button to return to browsing at the standard zoom level.
Thumbnail Views
Preview thumbnails are small versions of each image, sized to fit either four or nine images on the screen at once. Use them to get an overview of your work so far and to help find specific shots.
To see the thumbnails, start with the standard preview display and press the zoom-out button once to see four thumbnails or twice to see nine. See also Fig-ure 11, above.
When viewing thumbnails, the selected image shows a blue border. When an image is selected, you can zoom in on it using the zoom-in button or delete it using MAIN MENU > STORAGE > Delete (see also “MAIN MENU > STOR-AGE > Delete” on page 76 for a detailed procedure). Use ⇑ and ⇓ to scroll the thumbnails when you have more shots than can be shown.
If you continue to zoom out beyond the nine-thumb view, you will come to the batch list and then to the media list. You can use this to select the current medium and batch for browsing and for storing new images. See “Working with Media and Batches” on page 36 for details.
Hasselblad Ixpress CFH User’s Guide (Provisional Draft 1.0)

Viewing, Deleting and Transferring ImagesPreview Modes
50
Preview Modes
As illustrated in Figure 12, below, you can use the view-mode button to cycle through the available preview modes.
The following modes are available:
• Standard preview: shows a preview image surrounded by a display of few important settings.
• Histogram: shows a preview image overlaid with a histogram.
• Histogram and full details: shows a preview image overlaid with both a histogram and a list of camera settings used for that image.
• Batter saver: turns off the preview, but you can still use the menus and take pictures.
• Full-screen preview: shows the preview only, with no frame or settings information.
Each of these modes is described in detail in the sub-sections below.
Regardless of the current mode, if you zoom in on the image or zoom out to the thumbnails, the display reverts to showing the “standard” preview frame, which shows information about the current image and camera settings around the edges. When you return to the standard zoom level, however, you will then also return to your last-selected preview mode.
Figure 12 Use the view-mode button to cycle through the available preview modes
Hasselblad Ixpress CFH User’s Guide (Provisional Draft 1.0)

Viewing, Deleting and Transferring ImagesPreview Modes
51
Note that the screen can also operate in menu mode, which does not show a preview, but enables you to make camera back settings. To enter menu mode, press the menu (MENU) button. See “Working with the Menus” on page 59 for details.
The Standard Preview Display
The standard preview display is the one shown when you first turn on the cam-era. It features a preview of your most recent shot and basic information about the camera back settings and the image itself, as detailed below in Figure 13.
Using the Histogram
This histogram provides a graph that indicates the total number of pixels at each brightness level, with brightnesses going from black on the left to white on the right. It is a valuable tool for evaluating your exposure. A well-exposed shot usually has a full range of levels, while under- and overexposed shots tend to show levels concentrated at the left or right part of the scale, respectively.
See Figure 14, below, for some examples of how to interpret the histogram.
Figure 13 Features of the standard display
ISO setting White balance Current storage medium
Storage capacity(shots taken / shots remaining)
Image file name
-Button label Approval status and browse-filter indicator
Hasselblad Ixpress CFH User’s Guide (Provisional Draft 1.0)

Viewing, Deleting and Transferring ImagesPreview Modes
52
Viewing Image Details
The full-detail view shows both the histogram and a complete catalog of cam-era settings made for the image.
The camera-setting details are stored with the image, so you can refer to them using FlexColor even after you have loaded the image to your computer and stored it in your archive.
Figure 14 Examples of how to interpret the histogram. The histogram is only an indicator—there are many situations in which a questionable histogram will match a an exposure that is perfectly fine for the intended effect (and vice-versa).
Underexposure
A histogram that is cut-off at the left with few pixels elsewhere indicates a likely underexposure. Many details will be lost in the shadows.
Even exposure
A histogram that is spread across the full range indicates a likely good exposure. There may still be a few pixels at the extremes, indicating a few spectral highlights and saturated shadows, but this is often normal in a good exposure.
Overexposure
A histogram that is cut-off at the right with few pixels elsewhere indicates a likely overexposure Many details will be lost in the highlights.
Hasselblad Ixpress CFH User’s Guide (Provisional Draft 1.0)

Viewing, Deleting and Transferring ImagesPreview Modes
53
Battery-Saver Mode
In this mode, the camera back is fully responsive—so you can take pictures—but the screen is not lit up, thereby saving battery power.
You can enter the menu system while shooting in this mode (which activates the screen until you exit the menu system again) but the approval, zoom and navigator buttons have no effect.
You can also save battery power by turning down the brightness and/or contrast of the display using the entries of the MAIN MENU > SETTINGS > USER INTERFACE > DISPLAY menu. See “Making Display Settings” on page 86 for details.
Other ways to save battery power include setting a display time-out and/or a power-down time-out (each of these is disabled by default). Use MAIN MENU > SETTINGS > USER INTERFACE > Power Down to set a power-down time out. Use MAIN MENU > SETTINGS > USER INTERFACE > DISPLAY > Timeout to set a display time-out. See also “Entries of the USER INTERFACE Menu” on page 83 and “Making Display Settings” on page 86 for details about these set-tings.
Full-Screen Mode
In full-screen mode, you can browse your images at standard preview resolu-tion without any distracting data surrounding them.
Figure 15 In full-details mode, you can read a complete list of camera settings, plus see the histogram and, in the background, a darkened preview of the image.
Hasselblad Ixpress CFH User’s Guide (Provisional Draft 1.0)

Viewing, Deleting and Transferring ImagesPreview Modes
54
Because the current approval setting is not shown in full-screen mode, the approval button has no effect. This will prevent you from accidentally assign-ing the wrong status without knowing it.
Overexposure Indicator
Though the histogram shows you when some of your pixels are overexposed, it does not tell you which ones. In a shot with many bright areas, it can be hard to know whether the key parts of your image are just bright or completely overex-posed. To help you find them, the camera back can provide an overexposure indicator, which shows precisely which areas of your shot are overexposed (i.e., pixels that are saturated at maximum brightness in one or more colors, thereby eliminating details).
When enabled, the overexposure indicator flashes the overexposed pixels from black to white.
Figure 16 In full-screen mode, no distracting data is shown as you browse your shots.
Hasselblad Ixpress CFH User’s Guide (Provisional Draft 1.0)

Viewing, Deleting and Transferring ImagesDeleting Images
55
To enable or disable the overexposure indicator, use the MAIN MENU > SET-TINGS > USER INTERFACE > Mark Overexp. entry. Please see “Entries of the USER INTERFACE Menu” on page 83 for a detailed procedure.
There is also a one-button shortcut for toggling the overexposure marker on and off. To use it, press and hold ⇑ until the indicator is working as you would like (enabled or disabled).
Deleting Images
The camera back enables you to delete images using any of the following tech-niques:
• Delete the currently selected image only.
• Delete all images from the current batch
• Delete all images from the current medium
• Delete all red-status images from the current batch
• Delete all red-status images from the current medium
• Delete all red- or yellow-status images from the current batch
• Delete all red- or yellow-status images from the current medium
To delete a single image, navigate to and select the target image in the browse window, open the menu and select MAIN MENU > STORAGE > Delete.
Figure 17 When the overexposure indicator is enabled, overexposed pixels flash between black and white.
Hasselblad Ixpress CFH User’s Guide (Provisional Draft 1.0)

Viewing, Deleting and Transferring ImagesTransferring Images
56
To delete several images from a given batch or medium, first navigate to and select the batch or medium and then open the menu and select one of the fol-lowing:• MAIN MENU > STORAGE > DELETE > All Red• MAIN MENU > STORAGE > DELETE > All Red & Yellow• MAIN MENU > STORAGE > DELETE > All
There is also a one-button shortcut for deleting images. To use it, select a target image and then press and hold ⇓ until the Delete dialog opens. This dialog also enables you to delete several images from the current batch based on current approval assignments (all red, all red & yellow, or all); other batches are not affected. To delete from other batches and/or entire media, you must still use the menu system commands.
For complete details about how to use the menu system to delete single or mul-tiple images, please see “MAIN MENU > STORAGE > Delete” on page 76.
Transferring Images
Transferring to Your Computer
To transfer images stored on the compact-flash card to your computer, simply connect the camera to a computer using a FireWire cable and then run Flex-Color, which will automate the process. See your FlexColor manual for details.
See also “Connecting to the Computer” on page 31 for details about how to connect to a computer.
Another way to transfer images to your computer is to remove the compact-flash card from the camera back and insert it into a compact-flash card reader connected to your computer. See “Working with Compact Flash Memory Cards” on page 23 for details about how to remove and insert the card.
Images that you have stored on an ImageBank-CF or FireWire hard disk can also be transferred to your computer by connected the external disk to the com-puter with a FireWire cable and then copying the files using the file system. See your ImageBank-CF or hard disk documentation for details.
Hasselblad Ixpress CFH User’s Guide (Provisional Draft 1.0)

Viewing, Deleting and Transferring ImagesTransferring Images
57
Transferring to an External Hard Disk or ImageBank-CF
The Ixpress camera back enables you to work in the field, shooting to the inter-nal card, and then transfer images to an external hard disk even if you do not have a computer with you. In this way, you can combine the total flexibility of shooting without any external connections with the massive storage capacity of an external hard disk.
When the internal card gets full, just connect the camera to a FireWire hard disk or ImageBank-CF, transfer the images, clear the card and return to shoot-ing. The process is nearly as fast as changing a roll of film!
1. Use a FireWire cable to connect the camera back to the external disk and turn both units on.
2. On the camera back, open the menu and select MAIN MENU > STORAGE > Copy. See also “Copying from the Internal Card” on page 72 for a detailed description of how to use the menu system to do this.
3. All batches from the internal card are then copied to the external disk. A new folder is created for each copy, so you will never overwrite previous copies, even if they contain identical images.
Images are not automatically deleted from the card after copying. If you want to delete some or all images to free up some space, then use MAIN MENU > STORAGE > Delete. See also “MAIN MENU > STORAGE > Delete” on page 76.
Hasselblad Ixpress CFH User’s Guide (Provisional Draft 1.0)

Viewing, Deleting and Transferring ImagesTransferring Images
58
Hasselblad Ixpress CFH User’s Guide (Provisional Draft 1.0)

Working with the MenusNavigating the Menu System
59
Working with the Menus
The preview screen on the front panel of the Ixpress Camera Back enables you to navigate the menu system through which you can make camera back set-tings.
When you use the camera back with an H2 camera, some of the settings pro-vided by the camera-back menus can also be made using the controls of the H2 camera body; see your H2 documentation for details. For settings available in both places, it does not matter whether you use the Ixpress menus or their sim-ilar camera body menus—the effect is the same.
Navigating the Menu System
To get to the menus, press the menu (MENU) button on the front panel. The main menu then pops up. Use the navigator button to scroll through the menu items and use the (+) and (-) buttons to change a selected setting. See also “The Control Panel” on page 16 for button diagrams and descriptions.
Any given menu may include both entries and/or sub-menus.
• Entries are settings that are available at the current menu level; each shows its current value next to the entry name. To change a setting, use ⇑ and ⇓ to select to select the appropriate entry and then use the (+) and (-) buttons to select the desired option for that entry.
• Sub-menus do not have settings at the current level; they lead to another menu or dialog. Sub-menus show a right-pointing triangle instead of a value. To open a sub-menu, use ⇑ and ⇓ to select the sub-menu and then press ⇒ to open it. There are several levels of sub-menus.
• When you are in a sub-menu, you can go back to the parent menu by press-ing ⇐.
• Some sub-menus open a dialog. Dialogs require that you either make a set-ting, approve a command or exit the dialog (e.g., to confirm or cancel a delete command).
Hasselblad Ixpress CFH User’s Guide (Provisional Draft 1.0)

Working with the MenusNavigating the Menu System
60
In this manual, when we describe items from the menu system, we use a short-hand text convention of the form: MENU > SUB-MENU > Entry. So, for exam-ple, when the text says to select the MAIN MENU > SETTINGS > USER INTERFACE > Language entry, you should do the following:
1. Press the menu (MENU) button to open the MAIN MENU menu.
2. Use ⇑ and ⇓ to select the Settings submenu.
3. Press ⇒ to open the SETTINGS menu.
4. Use ⇑ and ⇓ to select the User Interface sub-menu.
5. Press ⇒ to open the USER INTERFACE menu.
6. Use ⇑ and ⇓ to select the Language entry, which shows the current lan-guage setting.
• At this point, you will use the (+) and/or (-) buttons to choose a setting for the selected entry.
• When you are done, press the menu (EXIT) button again to close the menu.
Note also that the menu and approval buttons are situated just outside the bot-tom-left and bottom-right corners of the screen. As you work through the vari-ous menu entries, the screen shows a label for each of these buttons. In the text, we therefore give both the generic name for the button and the screen name. For example we will refer to: the menu (MENU) button, the menu (EXIT) but-ton, or the approval (OK) button (see also Figure 18, above).
Figure 18 On-screen elements of the menu system
Current menu name(shown in upper case)
-Button label (here shown as EXIT)
-Button label(here shown inactive)
Entry name (in white) and current setting (in yellow)
Sub-menus show a right-pointing arrow; press the right-arrow on the navigator button to open the sub-menu (or, in
some cases, a dialog window)
Selected entry; the + and - signs indicate that you can use the (+) and (-) buttons to change the value
Hasselblad Ixpress CFH User’s Guide (Provisional Draft 1.0)

Working with the MenusMenu System Overview
61
Menu System Overview
Figure 19, below, shows an overview of how the camera back menu system is organized.
Figure 19 Camera back menu structure
Hasselblad Ixpress CFH User’s Guide (Provisional Draft 1.0)

Working with the MenusMAIN MENU
62
MAIN MENU
The main menu contains those settings that you will need to access most often as you work on an assignment. It also provides sub-menus that give you access to all other settings, most of which you will need less often.
The ISO Setting
You are able to set the light sensitivity of the camera back to match an equiva-lent ISO rating for standard film. When you are using an H2 camera body, the light meter inside the H2 will use this setting when making automatic exposure settings for aperture and/or shutter time.
The ISO rating can be set to 50, 100, 200 or 400.
To set the ISO:
1. Select the MAIN MENU > ISO entry. This is the top entry of the main menu, so it will be selected by default when you enter the menu system.
Figure 20 Entries of the main menu
Hasselblad Ixpress CFH User’s Guide (Provisional Draft 1.0)

Working with the MenusMAIN MENU
63
2. Use the (+) and (-) buttons to step through the available ISO settings until the setting you want is shown.
3. Either move on to another setting by using the navigator button or press the menu (EXIT) button to exit the menu system.
Note that the default sensitivity of the CCD sensor is ISO 50. Higher ISO set-tings result in progressively noisier images (just as higher ISO film become grainer), so we recommend that you use the lowest ISO setting possible for your lighting situation.
The White Bal Setting
Use this entry to set the white balance saved with the image and applied to the preview. Depending on the setting you choose, this entry can also act as a sub-menu and is therefore described in its own section. See “MAIN MENU > White Bal” on page 65 for details.
Selecting the Current Storage Medium
The Storage setting sets the medium on which your camera back will store new images and browse existing images.
Often, you have just one type of storage media available—typically the inter-nal compact-flash card. However, if you have several media attached (e.g., a card and one or more external disks), then you may need to switch between them.
If your selected storage medium has more than one batch (folder) on it, then the batch selected when you use the Storage menu entry will always be the one you most recently created.
Note that you can also select media using just the (+) and (-) buttons while browsing images. This method also enables you to select a batch as you zoom in from media to batch to thumbnails to preview. See “Navigating Media and Batches” on page 38 for complete details about this method.
To use the menu to select the medium to which to save new shots and from which to browse previous shots:
Hasselblad Ixpress CFH User’s Guide (Provisional Draft 1.0)

Working with the MenusMAIN MENU
64
1. Select the MAIN MENU > Media entry. The current setting is displayed here.
2. Use the (+) and (-) buttons to step through the available media until the name for destination/source you wish to use is shown.
3. Either move on to another setting by using the navigator button or press the menu (EXIT) button to exit the menu system.
Setting the Browse Filter
The browse filter compliments the instant-approval system by enabling you to browse through images according to their approval status. You have the fol-lowing choices:
• All: browses all of the images in the current batch, regardless of their approval status. This is the default.
• Red: browses only red-status images from the current batch. These are images that you have marked for likely deletion. You might browse these images to make sure you have not eliminated any usable images and/or to find images that you can delete to make room for new shots.
• Green: browses only green-status images from the current batch. These are images that are marked as acceptable. Usually this means that they did not trigger any exposure warnings and/or that you have inspected them on the preview screen and found them to look OK.
• Yellow: browses only yellow-status images from the current batch. These shots have a “warning” status and are marked for closer inspection. These may be shots that triggered an automatic exposure warning or shots that you have not yet considered, depending on how you are using the approval sys-tem.
• Green & Yellow: browses green and yellow-status images, but does not show red-status images. These are probably images that you have either decided to keep or not yet checked for approval status.
For more information about using the instant-approval system, please see “Using Instant Approval Architecture” on page 41.
Hasselblad Ixpress CFH User’s Guide (Provisional Draft 1.0)

Working with the MenusMAIN MENU > White Bal
65
There is a one-button shortcut for setting the browse filter while you are look-ing at your images. To use it, press and hold the approve button until the filter indicator shows the option you wish to use. Alternatively, you can use the full procedure described below.
To set the browse filter using the menus:
1. Select the MAIN MENU > Browse entry. The current setting is displayed here.
2. Use the (+) and (-) buttons to step through the filter options (described above) until you have selected the filter you wish to use.
3. Either move on to another setting by using the navigator button or press the menu (EXIT) button to exit the menu system.
MAIN MENU > White Bal
The Ixpress CFH Camera Back provides a wide selection of options for estab-lishing your white balance, including automatic, preset and measured. The white balance setting is stored parametrically with each shot and affects the colors shown in the camera back preview screen. However, the original pixel values are not permanently changed, so you can adjust the white balance at any time (using, for example, FlexColor) and the result will be the same as though you had set the white balance before shooting.
Figure 21 Navigating the white balance settings
Hasselblad Ixpress CFH User’s Guide (Provisional Draft 1.0)

Working with the MenusMAIN MENU > White Bal
66
See also “Setting the White Balance” on page 35 for more information.
Table 1, below, summarizes the white balance settings available.
Camera Back Setting
Usage comments
Auto The camera back will attempt to guess the best light tempera-ture based on the content of each exposure.
This setting is the default and is easiest to use, but can some-times be unpredictable, especially when using special lighting or compositions that are heavy in one specific saturated color.
Sunlight For general outdoor use in direct sunlight.
Cloudy For general outdoor use in cloudy weather.
Shadow For general outdoor use in shady locations out of direct sun-light.
Flash For general indoor use when using a typical flash system.
Neon For use when using neon lights.
Tungsten For use when shooting indoors under tungsten lamps.
Manual This setting opens a sub-menu with which you can enter a light temperature manually. Manual settings range from 2500 to 10,000 K in 100 K increments.
Measured This is one of the options of the Manual sub-menu. It requires you to set up a neutral test card and take a shot of it. The camera then computes the white balance setting required to eliminate color cast in the test card.
Table 1 White balance settings
Hasselblad Ixpress CFH User’s Guide (Provisional Draft 1.0)

Working with the MenusMAIN MENU > White Bal
67
Using the Auto and Preset Functions
To select the automatic function or a preset:
1. Select the MAIN MENU > White Bal entry. The current setting is displayed here.
2. Use the (+) and (-) buttons to step through the available white balance set-tings until the setting you want is shown. (See the procedure below for more information about the Manual setting.)
3. Either move on to another setting by using the navigator button or press the menu (EXIT) button to exit the menu system.
Entering a Manual Light Temperature
To enter a manual light temperature value:
1. Select the MAIN MENU > White Bal entry. The current setting is displayed here.
2. Use the (+) and (-) buttons to find the Manual setting.
Hasselblad Ixpress CFH User’s Guide (Provisional Draft 1.0)

Working with the MenusMAIN MENU > White Bal
68
3. Press ⇒ to open the Manual White Balance dialog.
4. Use the (+) and (-) buttons to find the light temperature you want to use. If the temperature you are looking for is close to 10,000, then you will get there fastest using the (-) button; if it is closer to 2500, then use the (+) button. The menu is circular, so you will eventually get to the right setting either way.
5. Press the approve (OK) button when you have found the light temperature you are looking for. This returns you to the main menu.
6. Either move on to another setting by using the navigator button or press the menu (EXIT) button to exit the menu system.
Setting Light Balance by Measurement
To set the white balance by taking a light measurement with the camera back:
1. Get a white or neutral-colored card and illuminate it using the lighting you plan to use for your shot.
2. Focus your camera on the white or neutral-colored card you set up in step one. Make sure the card fills the entire area enclosed by the circle etched in the center of the viewfinder.
3. Set the exposure to ensure that the card is adequately exposed but not overexposed (this is very important).
Hasselblad Ixpress CFH User’s Guide (Provisional Draft 1.0)
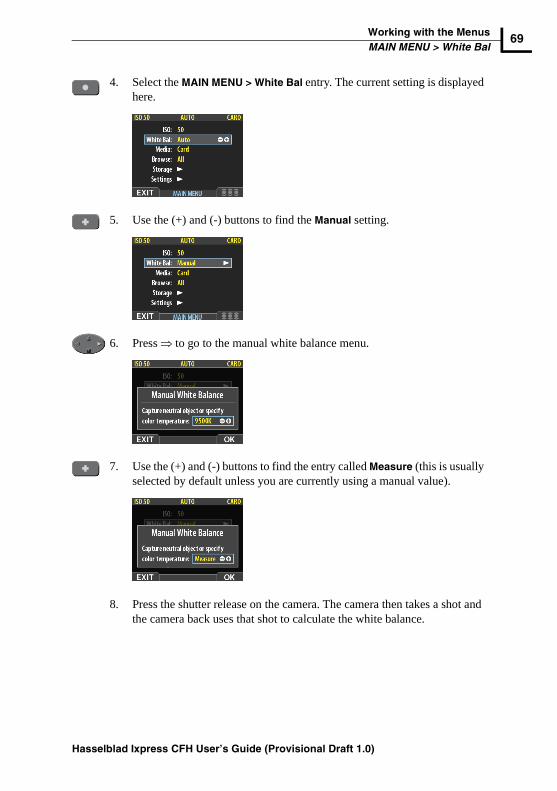
Working with the MenusMAIN MENU > White Bal
69
4. Select the MAIN MENU > White Bal entry. The current setting is displayed here.
5. Use the (+) and (-) buttons to find the Manual setting.
6. Press ⇒ to go to the manual white balance menu.
7. Use the (+) and (-) buttons to find the entry called Measure (this is usually selected by default unless you are currently using a manual value).
8. Press the shutter release on the camera. The camera then takes a shot and the camera back uses that shot to calculate the white balance.
Hasselblad Ixpress CFH User’s Guide (Provisional Draft 1.0)

Working with the MenusMAIN MENU > Storage
70
MAIN MENU > Storage
The Storage menu provides entries for working with storage media. Here, you can format media, copy images from the camera to a hard disk or computer and create new batches on available media. You can also set the initial approval sta-tus (auto, green, yellow) assigned to new pictures.
Deleting Images
Use this entry to delete images. Depending on where you are when you open the menu and the options you choose, this entry can also act as a sub-menu and is therefore described in its own section. See “MAIN MENU > STORAGE > Delete” on page 76 for details.
Formatting Media
The camera back is only able to read and write to media that have been initial-ized to use the FAT32 format, which is also readable by both Windows and
Figure 22 Navigating the storage settings
Hasselblad Ixpress CFH User’s Guide (Provisional Draft 1.0)

Working with the MenusMAIN MENU > Storage
71
Macintosh operating systems. However, new cards or disks sometimes arrive without any formatting, or you might want to convert media that are currently using a format that the camera cannot read.
Each time you get a new compact-flash card, we recommend that you format it using the camera back as described below, even if the camera back is already able to read it. This will enable the camera back to use the card more effi-ciently.
The camera back is capable of formatting any type of medium connected to it, including compact flash cards, FireWire disks and ImageBank-CF units. When you do this, you will erase all data contained on the target medium.
You can also use the format command for the purpose of deleting all images on a disk. This is sometimes faster than using the delete function, but it is not as flexible because all data from all batches will always be erased.
To format media:
1. If you have more than one type of medium connected (e.g., a compact-flash card and ImageBank-CF), then start by selecting the medium you wish to format using the Storage entry of the main menu (see also “Selecting the Current Storage Medium” on page 63).
2. Select MAIN MENU > STORAGE > Format.
3. Press the ⇒ to open the Format Card dialog.
Hasselblad Ixpress CFH User’s Guide (Provisional Draft 1.0)

Working with the MenusMAIN MENU > Storage
72
4. You are now asked to confirm the operation.
• To confirm, press the approve (OK) button.
• To cancel, press ⇐ or the menu (EXIT) button to exit.
5. You now return to the STORAGE menu. Either move on to another setting by using the navigator button or press the menu (EXIT) button to exit the menu system.
Copying from the Internal Card
Usually, you will copy images from the card by connecting the camera to your computer and using FlexColor. However, you might also want to load images from the card to a portable FireWire hard disk or ImageBank-CF, allowing you to erase the card and keep shooting even when you do not have a computer with you. You cannot copy images to the card.
After the copy, the destination disk will have a folder named CARDXXX, where XXX is a number that increments with each new copy operation (e.g., CARD001 for the first copy, CARD002 for the next, etc.). Previous copies are therefore never overwritten (provided you have fewer than 1000 folders of them). Within each CARD folder is a sub-folder for each batch. You cannot use the camera back to browse images copied in this way; you must connect the disk to a computer to browse the copied folders. This operation does not delete the copied images from the card—you must do this manually if you want to free card space after the copy.
To copy images from the compact-flash card to external media.
1. Use a FireWire cable to connect the external media to your camera back (see also “Setting Up” on page 19).
Hasselblad Ixpress CFH User’s Guide (Provisional Draft 1.0)

Working with the MenusMAIN MENU > Storage
73
2. Select MAIN MENU > STORAGE > Copy.
3. Press ⇒ to open the Copy Images dialog.
4. If you have only one disk attached, then skip this step.
If you have more than one disk attached, then press ⇑ to select the From card to entry. Then use the (+) and (-) buttons to select the name of the medium you want to copy to. Finally, press ⇓ to go back to the Are you sure? entry.
5. With the Are you sure? entry selected, you must now confirm the opera-tion.
• To confirm, press the (+) button to change the status to Yes and then press the approve (OK) button to execute the copy.
• To cancel, press ⇐ or the menu (EXIT) button to exit.
6. If you chose to confirm, then camera back now tracks the progress of the copy operation, which can take a few minutes. You can stop the copy at any time by pressing and holding the menu (STOP) button.
Hasselblad Ixpress CFH User’s Guide (Provisional Draft 1.0)

Working with the MenusMAIN MENU > Storage
74
7. You now return to the STORAGE menu. Either move on to another setting by using the navigator button or press the menu (EXIT) button to exit the menu system.
Creating Batches
Batches help you to organize your work. They are similar to folders on a com-puter hard disk. Use the Batch command of the STORAGE menu each time you want to create a new batch.
For more information about batches, please see “Working with Media and Batches” on page 36.
To create a new batch:
1. Select MAIN MENU > STORAGE > Batch.
2. Press ⇒ to open the Create New Batch dialog.
3. The new batch name will always begin with a three-digit number, which automatically increments by one with each new batch. Following this are five letters, which you can assign yourself to help make the batch easier to identify. To set the letters,
• Use ⇐ and ⇒ to select one of the five letters.
• Use the (+) and (-) buttons to step the currently selected letter up or down the alphabet until you have found the letter you want.
• Continue working until you have set the name you want.
Hasselblad Ixpress CFH User’s Guide (Provisional Draft 1.0)

Working with the MenusMAIN MENU > Storage
75
4. Press the approve (OK) button to save the new batch with the name you selected.
5. You now return to the STORAGE menu. Either move on to another setting by using the navigator button or press the menu (EXIT) button to exit the menu system.
Setting the Default Approval Status
The Instant Approval Architecture system helps you to evaluate and mark each image based on how well it has come out. With the default (auto) setting, the system assigns an initial approval status for each new shot based on an analysis of the distribution of exposure levels as follows:
• Green (good): The new shot seems to have been exposed correctly.
• Yellow (warning): The new shot seems to have been over or under exposed.
However, you might choose instead to override this system and have all new shots assigned either as green or yellow, regardless of the exposure analysis results. A typical alternative strategy could be to assign all shots to yellow and then review all of the shots later and promote only the best ones to green status. At the same time you might demote the most doubtful shots to red status.
See also “Using Instant Approval Architecture” on page 41 for complete details about working with the approval system.
To change the default status assigned to each new image:
1. Select the MAIN MENU > STORAGE > Default Appr. Level entry. The cur-rent setting is shown here.
2. Use the (+) and (-) buttons to step through the available settings until the default status you wish to use (auto, green or yellow) is shown.
3. Either move on to another setting by using the navigator button or press the menu (EXIT) button to exit the menu system.
Hasselblad Ixpress CFH User’s Guide (Provisional Draft 1.0)

Working with the MenusMAIN MENU > STORAGE > Delete
76
MAIN MENU > STORAGE > Delete
Use the MAIN MENU > STORAGE > Delete menu to delete images that you do not need, thereby making room for more captures. There are several ways to delete images:
• Delete a single selected image
• Delete all images from a given batch
• Delete all images from a given medium
• Delete all images of a specified approval status (e.g., red) from a given batch or medium.
Deleting Singe Images
There is a one-button shortcut for deleting single images. To use it, you must be in the full-screen preview view (not thumbnail, batch or media view). Select the image you want to delete and then press and hold ⇓ for a second or so. You will then be asked to confirm the delete. Alternatively, you can use the full pro-cedure described below.
Figure 23 Deleting a singe image (and multiple images from the current batch)
Hasselblad Ixpress CFH User’s Guide (Provisional Draft 1.0)

Working with the MenusMAIN MENU > STORAGE > Delete
77
To delete a single image:
1. With the menu closed (e.g., with a preview image showing), use the (+) and (-) buttons to go to the single-image, four-thumbnail or nine-thumb-nail view.
2. Use the navigator button to select the image you wish to delete. When you are viewing thumbnails, the selected image has a colored border around it. When you are viewing singe images, the selected image is the one cur-rently shown.
3. Select MAIN MENU > STORAGE > Delete.
4. Press ⇒ to open the Delete Image dialog.
5. You are now shown a full-size preview of the selected image. A colored border around the preview indicates the approval status of the current image (green, yellow or red).
• To confirm the delete, press the approve (OK) button.
• To cancel, press ⇐ or the menu (EXIT) button to exit.
Note that you can also choose to delete several images from the current batch by selecting one of the other options in the Delete dialog. See “Deleting Several Images from the Current Batch” on page 78 for details.
Hasselblad Ixpress CFH User’s Guide (Provisional Draft 1.0)

Working with the MenusMAIN MENU > STORAGE > Delete
78
6. You now return to the main menu. Either move on to another setting by using the navigator button or press the menu (EXIT) button to exit the menu system.
Deleting Several Images from the Current Batch
The Delete dialog that is shown when you are deleting a single image also gives the option of deleting several images from the current batch, based on approval status. You can choose to delete all red, all red and yellow, or all images in the current batch. (See also Figure 23 on page 76.)
To do this:
1. Starting from the single-image, four-thumbnail or nine-thumbnail view, open the Delete dialog using either the menu system or the button shortcut (see also “Deleting Singe Images” on page 76).
2. Use ⇑ and ⇓ to select the scope of your delete (All red in batch, All yel-low/red in batch, or All in batch).
3. Press the approve (OK) button to confirm the delete.
Hasselblad Ixpress CFH User’s Guide (Provisional Draft 1.0)

Working with the MenusMAIN MENU > STORAGE > Delete
79
Deleting Several Images from a Selected Batch
To delete several images from a selected batch:
1. Starting at the single-image preview display, press the zoom-out (-) button twice to go to the list of batches.
2. Use ⇑ and ⇓ to select the batch from which you wish to delete.
Note that the batch list shows a set of three colored numbers in parenthe-ses to the right of each batch name. These indicate the total number of images of each approval status (green, yellow and red) that exist within each batch. For example, if you see a batch that shows (18/5/3), then the
Figure 24 Menus for deleting several images from a selected batch.
Hasselblad Ixpress CFH User’s Guide (Provisional Draft 1.0)

Working with the MenusMAIN MENU > STORAGE > Delete
80
batch contains a total of 26 images: 18 green (approved), 5 yellow (wait-ing) and 3 red (marked for probable delete).
3. Select MAIN MENU > STORAGE > Delete.
4. Press ⇒ to open the DELETE menu.
5. You must now select the approval status that you wish to delete. All images from the selected batch that are also of the status that you select here will be deleted by the operation. Use ⇑ and ⇓ to select All Red, All Red & Yellow or All. Then press ⇒ to open the delete dialog for your selected status.
6. You are now asked to confirm the delete.
• To confirm, press the (+) button to change the status to Yes and then press the approve button to execute the delete.
• To cancel, either press ⇐ or the menu (EXIT) button to exit.
7. You now return to the main menu. Either move on to another setting by using the navigator button or press the menu (EXIT) button to exit the menu system.
Hasselblad Ixpress CFH User’s Guide (Provisional Draft 1.0)

Working with the MenusMAIN MENU > STORAGE > Delete
81
Deleting Several Images from a Selected Medium
To delete several images from all batches on a selected medium:
1. Starting at the single-image preview display, press the zoom-out (-) button three times to go to the list of media.
2. Use ⇑ and ⇓ to select the medium from which you wish to delete. You will be deleting from all batches stored on that medium.
Note that each listed medium shows a set of three colored numbers in parentheses to the right of the medium name. These indicate the total number of images of each approval status (green, yellow and red) that exist on the medium. For example, if you see a medium that shows (18/5/
Figure 25 Menus for deleting several images from all batches of a selected storage medium.
Hasselblad Ixpress CFH User’s Guide (Provisional Draft 1.0)

Working with the MenusMAIN MENU > STORAGE > Delete
82
3), then the medium contains a total of 26 images: 18 green (approved), 5 yellow (waiting) and 3 red (marked for probable delete).
3. Select MAIN MENU > STORAGE > Delete.
4. Press ⇒ to open the DELETE menu.
5. You must now select the approval status that you wish to delete. All images from the selected medium that are also of the status that you select here will be deleted by the operation. Use ⇑ and ⇓ to select All Red, All Red & Yellow or All. Then press ⇒ to open the delete dialog for your selected status.
6. You are now asked to confirm the delete.
• To confirm, press the (+) button to change the status to Yes and then press the approve button to execute the delete.
• To cancel, either press ⇐ or the menu (EXIT) button to exit.
7. You now return to the main menu. Either move on to another setting by using the navigator button or press the menu (EXIT) button to exit the menu system.
Hasselblad Ixpress CFH User’s Guide (Provisional Draft 1.0)

Working with the MenusMAIN MENU > SETTINGS > User Interface
83
MAIN MENU > SETTINGS > User Interface
The User Interface settings control the way the camera back interacts with you, the photographer. It also presents some battery-saving options and includes date and time settings.
Entries of the USER INTERFACE Menu
To get to the user interface settings, open MAIN MENU > SETTINGS > USER INTERFACE menu. The user interface menu includes both entries and sub-menus.
As with all other menus, use ⇑ and ⇓ to select an entry and then use the (+) and (-) buttons to select values for that entry. The following entries are available here:
• Language:The menu system can be displayed in any of several languages. This menu entry enables you to select your preferred language for the menus.
• Power Down:To help preserve the charge of your camera battery, you can set the camera to power down after a specified period of inactivity. The effect is exactly the same as though you had pressed the off button on the camera. Once it has powered down, you must turn the camera back on before you can take more pictures. Set this to Never to disable this feature (this is the default setting). Set to a value between 3 and 99 minutes to establish a time-out. Note that you can also set a display time-out, which darkens the display to help save battery power, but leaves the camera turned on so it will respond
Figure 26 Navigating the user interface settings
Hasselblad Ixpress CFH User’s Guide (Provisional Draft 1.0)

Working with the MenusMAIN MENU > SETTINGS > User Interface
84
instantly to the shutter release and other buttons; see “Making Display Set-tings” on page 86 for details.
• Mark Overexp.:This feature helps draw your attention to areas of your images that are over-exposed. When this feature is enabled, the single-image preview display will highlight each overexposed pixel by flashing it white and black. Set this entry to Yes to enable the feature; set to No to disable it. See also “Overexposure Indicator” on page 54.
Sound Options
The camera back is equipped with a small speaker, which enables it to make sounds each time you press a button and/or to warn you when a new shot appears to be under- or overexposed. The SOUND menu enables you to turn each of these types of sounds on or off.
To get to the sound settings, open MAIN MENU > SETTINGS > USER INTER-FACE > SOUND menu. As with all other menus, use ⇑ and ⇓ to select an entry and then use the (+) and (-) buttons to select values for that entry.
The following entries are available here, each of which can be set to either On or Off:
• Key Click:This entry controls whether the camera back should make a soft “click” sound each time you press a button.
• Exposure WarningThis entry controls whether the camera back should make a sound to tell you when an image appears to be over- or underexposed. This is part of the
Figure 27 Navigating the sound settings
Hasselblad Ixpress CFH User’s Guide (Provisional Draft 1.0)

Working with the MenusMAIN MENU > SETTINGS > User Interface
85
instant approval architecture, which is described in “Using Instant Approval Architecture” on page 41.
Setting the Date & Time
The camera back has an internal clock that keeps track of the date and time. These are used to mark each shot with the date and time at which it was taken. They are also used to label batches with the date on which each batch was cre-ated.
Note that the date and time are synchronized to your computer whenever you connect it to your camera back. You may therefore never need to set the date and time manually as described in this section.
Figure 28 Navigating the date and time settings
Hasselblad Ixpress CFH User’s Guide (Provisional Draft 1.0)

Working with the MenusMAIN MENU > SETTINGS > User Interface
86
To set the date and time:
1. Select MAIN MENU > SETTINGS > USER INTERFACE > Date & Time.
2. Press ⇒ to open the DATE & TIME menu.
3. The date & time menu includes entries for Year, Month, Day, Hour and Minute. Use ⇑ and ⇓ to select one of these, then use the (+) and (-) buttons to set the value of each entry.
4. When you are done setting the date and time, press the menu (EXIT) but-ton to exit.
Making Display Settings
The Display settings control the brightness and contrast of the display. They also enable you to set a time-out for the display, which works somewhat like a screen saver and can help you save battery power.
Hasselblad Ixpress CFH User’s Guide (Provisional Draft 1.0)

Working with the MenusMAIN MENU > SETTINGS > User Interface
87
To set the display options, open the MAIN MENU > SETTINGS > USER INTER-FACE > DISPLAY menu. As with all other menus, use ⇑ and ⇓ to select an entry and then use the (+) and (-) buttons to select values for that entry.
The following settings are available:
• Timeout:This sets a time-out for the display, which can help you to save battery power. When the time-out is reached, the display will be turned off but the camera will still be turned on, so it will immediately respond to a press of the shutter release or any of the other buttons on the camera back panel. Set to Off to disable the screen time-out (this is the default). You can also set this to any full-minute value between 1 and 20 minutes. Note that you can also set a power-down time-out, which turns off the entire camera; see “Entries of the USER INTERFACE Menu” on page 83 for details.
• ContrastThis sets the level of contrast shown on the screen. Usually, you should leave this set to the default level of 5; however in some viewing environ-ments and/or with some types of images you may wish to increase or decrease this value. A value of 10 provides maximum contrast; a value of 0
Figure 29 Navigating the display settings
Hasselblad Ixpress CFH User’s Guide (Provisional Draft 1.0)

Working with the MenusMAIN MENU > SETTINGS > Camera
88
provides no contrast (a black screen). You can also help save battery power by using a low value here.
• BrightnessThis sets the brightness shown on the screen. Usually, you should leave this set to the default level of 5, however in some viewing environments and/or with some types of images you may wish to increase or decrease this value. A value of 10 provides maximum brightness; a value of 0 provides minimal brightness. You can also help save battery power by using a low value here.
MAIN MENU > SETTINGS > Camera
The CAMERA menu includes settings for configuring the camera back to match your camera body. These settings help to compensate for slight differ-ences between various camera designs. If you always use the camera back with a Hasselblad H2 camera, then you will probably never need these settings. However, if you move the camera back between your H2 and another type of camera (such as an H1 or view camera), then you should use these settings each time you change camera-body types
In addition, the CAMERA menu includes an entry for setting the camera to take a series of shots separated by a configurable time interval.
Figure 30 Navigating the camera settings
Hasselblad Ixpress CFH User’s Guide (Provisional Draft 1.0)

Working with the MenusMAIN MENU > SETTINGS > Camera
89
Entries of the CAMERA Menu
To get to the camera settings, open the MAIN MENU > SETTINGS > CAMERA menu.
As with all other menus, use the navigator button to select an entry and then use the (+) and (-) buttons to select values for that entry.
The following entries are available:
• Body:Use this entry to select the name of the camera to which you have attached the digital back. The selection you make here will affect the availability of other entries of the CAMERA menu. When you are using either a Hasselblad H1 or H2 camera, then select “H1” here.
• Shutter Delay:This setting enables you to make sure the camera back is correctly synchro-nized with the camera shutter. The required delay time is slightly different for each camera back model The camera back automatically uses a default delay based on your body selection—usually, this is the right setting to use. However, if you experience problems, such as sliding colors or other unwanted, otherwise inexplicable effects, then there might be a slight mis-match with your particular unit. To correct this, try experimenting with the delay setting and taking shots until your image looks right. You can always return to the factory-recommended setting by returning this entry to its Default setting.
• Exposure Time:In most cases, the exposure time is controlled by the camera shutter. How-ever, you can also shoot with the shutter wide open all the time, thereby allowing the camera back to set the exposure time. You will probably need to use a light meter to find the correct exposure time for your aperture and ISO settings. You can set the exposure time anywhere between 10 and 32,000 ms, in 10 ms increments.
• Trigger f. Back:With some camera/camera-back combinations, it is possible to take a shot by pressing a button on the camera back rather than using FlexColor or the shutter release on the camera body. Because the firmware is shared by both the Ixpress CF and Ixpress CFH camera backs, this item appears for both backs. However, if you have a CFH back, then this entry has no effect; if you have a CF camera back, then you may be able to trigger an image cap-ture by pressing and holding the power button if you enable this setting and your camera body supports it.
Hasselblad Ixpress CFH User’s Guide (Provisional Draft 1.0)

Working with the MenusMAIN MENU > SETTINGS > Camera
90
Setting up a Sequence
The sequence feature enables you to configure the camera to take several shots, each of which is separated by a selected time interval. The series continues until the configured number of shots have been taken. You might use this to take a quick succession of shots of a moving subject (such as a fashion model) or to take shots that show changes over time (such as taking one shot per hour out the window).
To set up a capture sequence:
1. Select the MAIN MENU > SETTINGS > CAMERA > Capture Seq..
2. Press ⇒ to open the Capture Seq. dialog.
3. Initially, the Delay setting is selected. Use the (+) and (-) buttons to set the delay between each shot (in seconds). You can choose values between 0 seconds and 24 hours. Note that the camera itself requires at least 1.5 sec-onds between pictures, so the value you enter here is added to this.
4. Press ⇑ or ⇓ to move to the Count setting.
Hasselblad Ixpress CFH User’s Guide (Provisional Draft 1.0)

Working with the MenusMAIN MENU > SETTINGS > Miscellaneous
91
5. Use the (+) and (-) buttons to set the number of shots to take in the sequence. When this number of shots has been taken, the camera will stop shooting.
6. Press the approve (OK) button to establish the sequence, which will begin the next time you press the shutter-release button. Press either ⇐ or the menu (EXIT) button to cancel the sequence and return to standard (single-shot) shooting.
Your sequence will take effect the next time you press the shutter-release but-ton. When the sequence is complete, the camera will return to single-shot mode. If you want to take another sequence, you must repeat the above proce-dure.
MAIN MENU > SETTINGS > Miscellaneous
The MISCELLANEOUS menu contains a few settings that did not fit under any of the other menus.
Selecting an Interface
The interface setting controls the way the camera will appear to you computer when you connect it. You have the following choices:
Figure 31 Navigating the display settings
Hasselblad Ixpress CFH User’s Guide (Provisional Draft 1.0)

Working with the MenusMAIN MENU > SETTINGS > Miscellaneous
92
• Camera: the camera will present itself to your computer as a camera. Depending on the way you have configured your computer, this may mean that when you connect the camera, your computer will automatically launch FlexColor, which may then begin importing images, converting them to 3f format and saving them in your local workspace.
• Disk: the camera will present itself to your computer as a mass storage device. This means that it will look like a hard disk, which you can navigate to, open and read using the standard tools for your operating system (e.g., the Finder in Mac OS or the File Explorer in Windows).
To set the interface presented by the camera back to your operating system:
1. Select the MAIN MENU > SETTINGS > MISCELLANEOUS > Interface entry. The current setting is shown here.
2. Use the (+) and (-) buttons to step through the available settings until the interface you wish to use (camera or disk) is shown.
3. Either move on to another setting by using the navigator button or press the menu (EXIT) button to exit the menu system.
The About box
Occasionally, Hasselblad may release updates to the internal software of the camera back (this is called “firmware”). These updates may fix small errors and/or add new features. You will probably receive additional assistance from Hasselblad technical support if and when a new update is available. In this case, it may be important to know the serial number and current firmware revi-sion of your camera back. To find this out:
Hasselblad Ixpress CFH User’s Guide (Provisional Draft 1.0)

Working with the MenusMAIN MENU > SETTINGS > Miscellaneous
93
1. Select MAIN MENU > SETTINGS > MISCELLANEOUS > About.
2. Press ⇒ to open the About CFH dialog, which shows the serial number and firmware version.
3. When you are done reading the information, press the menu (EXIT) button to return to the MISCELLANEOUS menu. Either move on to another set-ting by using the navigator button or press the menu (EXIT) button again to exit the menu system.
Returning the Camera to Its Factory Settings
The Default command returns all settings to the default values as they are set at the factory. Use this command if you suspect your camera is acting strangely as a result of some setting you can not find. This command may also clear prob-lems that have occurred because of a firmware error.
To return your camera to its factory settings:
1. Select MAIN MENU > SETTINGS > MISCELLANEOUS > Default.
Hasselblad Ixpress CFH User’s Guide (Provisional Draft 1.0)

Working with the MenusMenu Shortcuts
94
2. Press ⇒ to open the Default dialog.
3. You are now asked to confirm the operation.
• To confirm, press the approve (OK) button.
• To cancel, press ⇐ or the menu (EXIT) button to exit.
Menu Shortcuts
To help you work faster, the camera back provides shortcuts to some of the most commonly used menu commands that do not otherwise have a dedicated button on the front panel. These are accessible by pressing and holding one of the front-panel buttons for a second or so. These are mentioned where appro-priate elsewhere in this manual, but we summarize them here for your conve-nience.
The following shortcuts are available:
• To delete a single image, select the target image and then press and hold ⇓ until the confirm-delete dialog opens. To delete multiple images, use the menu system as usual. See also “MAIN MENU > STORAGE > Delete” on page 76.
• To toggle the overexposure indicator, press and hold ⇑ until the display begins to flash (or stops flashing) its overexposed areas. See also “Overex-posure Indicator” on page 54.
• To set the browse filter, press and hold the approve button until your pre-ferred filter is indicated. See also “Using Instant Approval Architecture” on page 41.
• To escape from zoom, press and hold the (-) button. This is especially useful when you have zoomed in several steps. See also “Zooming In and Out” on page 48.
Hasselblad Ixpress CFH User’s Guide (Provisional Draft 1.0)

Care and MaintenanceHandling and Storage
95
Care and Maintenance
Handling and Storage• Always replace the protective CCD/filter cover when the camera back is not
mounted on your camera.
• Do not touch the exposed CCD/filter with your fingers.
• Keep all foreign objects out of the CCD opening.
• Store your camera back away from moisture and excessive heat. Please see “Technical Specifications” on page 103 for complete operational and stor-age requirements.
• Protect your camera back from impact—do not drop it.
• Keep the original shipping boxes for storage.
Cleaning the CCD Infrared Filter
If you see dark or colored spots or lines in your images, then you may need to clean the outer surface of camera back’s infrared (IR) filter. In most cases, the careful use of compressed air will be adequate, but sometimes small particles will get stuck to the surface of the IR filter, requiring for a more thorough cleaning, involving either fluid or wipes. For a good safe cleaning, follow descriptions below.
WARNING: never attempt to remove the glass filter from the front of the CCD—you will probably ruin the CCD if you do so. If dust manages to get between the IR filter and CCD, please contact your Hasselblad dealer for assis-tance.
Basic Cleaning Procedure
1. Discharge any static electricity that may have built up on your body by touching the camera back housing.
2. Remove the camera back from your camera body or remove the protective CCD/filter cover (see also “Setting Up” on page 19 if you are not sure how to remove the camera back and/or cover).
Hasselblad Ixpress CFH User’s Guide (Provisional Draft 1.0)

Care and MaintenanceCleaning the CCD Infrared Filter
96
3. Clean the outside surface of IR Filter by spraying it with clean compressed air. If this is not enough, then use one of the procedures outlined below.
4. If you still see spots on your shot after you have cleaned the outside of the infrared filter, then you may have dust on either on the back side of the IR filter or on the CCD itself. This can only be removed at the Hasselblad factory. Contact your Hasselblad dealer for assistance.
5. Replace the protective cover or reattach the camera back to the camera immediately after cleaning.
Cleaning Using the HAMA Cleaning Fluid and Tissues
Note! Hasselblad recommends HAMA Optic Cleaning Fluid 5902.
1. Carefully spray the fluid onto the IR filter at a distance of 10-15 cm (4-5 inches), so that the fluid is applied onto the filter as a thin, even haze. 1-2 sprays are enough. If you apply too little, the fluid will start to dry up before you start wiping the filter. As an alternative you can spray the fluid onto the tissue first, and then apply it to the filter as you wipe it.
2. Fold the tissue several times to match the width of the IR filter—you might use two or three tissues at a time if necessary (to give you a better grip). Be sure to fold the paper so that the coated glossy side faces out-wards—do not use the other side, as it can do more harm than good!
3. Gently place the folded tissue onto the edge of the filter using two or three fingers. Be sure to wipe the entire surface evenly. Sweep the filter only once. Do not wipe the same area twice with the same tissue as you might reapply dirt removed in the first sweep.
4. Finally check if the IR filter has been properly cleaned either by visual inspection or by mounting the camera back to the camera and making a shot. If further cleaning is needed, repeat cleaning procedure.
Cleaning with an E-Wipe
E-wipes are individually packed wet tissues.
1. Tear at the notch to break seal.
Hasselblad Ixpress CFH User’s Guide (Provisional Draft 1.0)

Care and MaintenanceCleaning the Housings
97
2. Remove e-wipe from its packaging and continue without delay.
3. Fold the tissue to match the width of the IR filter.
4. Apply firm pressure using two or three fingers at the edge of the wipe to ensure an even, firm contact with filter surface. Wipe the surface in one unbroken motion.
Note! Do not use same side of the e-wipe twice as you will be likely to reapply any particles removed in the first pass.
5. Finally check if the IR filter has been properly cleaned either by visual inspection or by mounting the camera back to the camera and making a shot. If further cleaning is needed, repeat cleaning procedure.
Cleaning the Housings
If the camera back housing becomes dirty, clean it with a soft, clean cloth lightly moistened with water only. Do not use any other solvents on your cam-era back. Do not allow water to get inside the device.
Hasselblad Ixpress CFH User’s Guide (Provisional Draft 1.0)

Care and MaintenanceCleaning the Housings
98
Hasselblad Ixpress CFH User’s Guide (Provisional Draft 1.0)

Using with Other Camera BodiesUsing with a Hasselblad H1 Camera
99
Using with Other Camera Bodies
Though the Ixpress CFH camera back is primarily designed for use with a Has-selblad H2 camera, it can also be used with a Hasselblad H1 camera or with nearly any camera that has been fitted with an adapter for mounting Hasselblad film cartridges. However, not all camera back features are available with cam-era bodies other than the H2.
Most of this manual assumes that you are using an H2 camera. This chapter explains how to use the camera back with other types of camera bodies and describes how each solution differs from using an H2.
Using with a Hasselblad H1 Camera
The H1 was Hasselblad’s first camera specifically designed for both digital and film-based photography. The CFH and H2 are the next generation in this line. The Ixpress CFH can be fitted on an H1 camera, but the integration is less complete than with an H2 camera.
Mounting to an H1
Mount the CFH Camera Back to your H1 camera just as you would mount a film cartridge. If you have trouble, please see “Attaching to a Hasselblad H2” on page 19 in this manual and your H1 manual for help.
Configuring for Use with an H1
The CFH Camera Back comes pre-configured for use with an H1 or H2 cam-era; both require the same camera-body setting (“H1”), which prepares the camera back to work with either of these two camera bodies. However, if you have been using the camera back with another type of camera (e.g., a view camera), then set the MAIN MENU > SETTINGS > CAMERA > Body entry to “H1”. See “MAIN MENU > SETTINGS > Camera” on page 88 for details.
Hasselblad Ixpress CFH User’s Guide (Provisional Draft 1.0)

Using with Other Camera BodiesUsing Flash-Sync Mode with Other Cameras
100
The camera back remembers your setting, even when turned off. However, you must adjust this setting as required each time you move the camera back to a new type of camera.
Limitations when Using an H1
When you use the CFH with an H1, the following limitations apply when com-pared with the standard H2 operation described elsewhere in this manual:
• You must always work connected to a computer and shoot using FlexColor. This is necessary in order to power the camera back. You must furthermore use a computer that supplies power through its FireWire port; not all com-puters do this (especially laptops).
• Camera settings details are not communicated to the camera back, so these are not stored with each shot as they are with the H2.
Using Flash-Sync Mode with Other Cameras
When set to work in flash-sync mode, the CFH Camera Back communicates with the camera only via the flash-sync cable. When a flash signal comes down the cable, the camera back takes a picture. If you are also using a flash system, the camera back forwards the signal to your flash system at the same time.
To use the camera back with a non-Hasselblad camera in flash-sync mode, your camera must be fitted with an adapter that enables Hasselblad film maga-zines to be attached to it. These adapters are available from several third-party manufacturers. The camera-back mounting fixtures are identical to those of a Hasselblad film magazine, so no additional adapters are required.
Usually, you will use this feature with some type of view camera, such as a Sinar or other technical camera.
NOTE: this functionality is not fully supported. Several technical issues, such as specialized shutter behavior and the method by which your camera sends flash signals down its cable, can result in a non-functioning solution. Future firmware updates for the CFH Camera Back may expand the number of third-party cameras supported by the flash-sync feature.
Hasselblad Ixpress CFH User’s Guide (Provisional Draft 1.0)

Using with Other Camera BodiesUsing Flash-Sync Mode with Other Cameras
101
Attaching the Camera Back
1. Attach your Hasselblad film cartridge adapter to your camera, following the instructions given in your adapter manual.
2. Carefully remove the CCD/filter cover and keep it in a place where you can find it again. You must always replace it when you remove and/or store the camera back. CAUTION: be very careful not to touch or scratch the CCD/filter surface while it is exposed.
3. Attach the camera back directly to your adapter exactly as you would a film magazine.
4. Connect the flash-sync cord from the flash-sync output of your view cam-era to the flash-sync input of the camera back. You must do this even if you are not using a flash because the camera back relies on the flash signal in order to trigger a capture.
5. If you are using a flash system, then connect a flash-sync cord from the flash-sync output of the camera back to the input of your flash system.
6. Connect the camera back to your computer using a FireWire cable.
Powering the Camera Back
When you are using a camera other than an H2, the camera back must get its power via a FireWire cable connected to your computer. You must therefore always work in studio mode using FlexColor when you shoot with a view cam-era. You must furthermore use a computer that supplies power through its FireWire port; not all computers do this (especially laptops).
Configuring for Flash Sync Mode
The CFH Camera Back comes pre-configured for use with an H2 camera. If you want to use it in flash-sync mode, set the MAIN MENU > SETTINGS > CAMERA > Body entry to “Flash Sync”. Depending on your camera model, you may also need to use the Shutter Delay and/or Exposure Time settings in order to get the solution to work correctly. See “MAIN MENU > SETTINGS > Camera” on page 88 for details about these settings.
Hasselblad Ixpress CFH User’s Guide (Provisional Draft 1.0)

Using with Other Camera BodiesUsing Flash-Sync Mode with Other Cameras
102
The camera back remembers your setting, even when turned off. However, you must adjust this setting as required each time you move the camera back to a new type of camera.
Making Exposure Settings and Taking Shots
Cameras other than the H2 are not able to communicate with the camera back. You must therefore make exposure settings as follows when you use a view camera:
1. Select an ISO rating for the camera back using the FlexColor software.
2. Take light-meter readings and set aperture and shutter speed as would be appropriate for exposing film of your selected ISO rating.
3. Using FlexColor, set the camera-back exposure time to be just slightly longer than the value to found for the camera body.
4. Press the shutter release on your camera body to take the picture. This will trigger the camera back, computer and (if connected) flash system via the attached cables.
Hasselblad Ixpress CFH User’s Guide (Provisional Draft 1.0)

Technical InformationTechnical Specifications
103
Technical Information
Technical Specifications
Sensor Size 36.7 x 49 mm
Sensor Resolution 22 Mpixels
Shooting mode Single shot
Bits per color 16 bit (65.536 levels)
Light Sensitivity ISO 50 - 400
Camera Body Support • Hasselblad H2 (all features)
• Hasselblad H1 (limited features)
• View cameras with Hasselblad H-system adapter (limited features)
Max. Exposure Time 32 sec.
Capture Rate (incl. preview) 1.5 sec. per image (for 3 images)
Operating temperature 0 - 45 °C (32 - 113 °F)
Image Storage One or more of the following:
• Internal compact flash card type II (write speed > 20 MB/sec)
• External Ixpress ImageBank-CF
• External FireWire hard disk
• External computer
Batteries None (powered from H2 camera or FireWire cable)
Display Screen 2.2 inch color OLED; 24-bit color
File format Compressed Adobe DNG
Platform support • Macintosh: OS X
• Windows: NT, 2000, XP
Compatible Software Hasselblad FlexColor (included) and Adobe Photoshop CS
Host connection FireWire 800 (IEEE 1394b); can also be connected to FireWire 400 (IEEE 1384) devices, but transfer will be slower.
Table 2 Technical specifications of the Ixpress CFH Camera Back
Hasselblad Ixpress CFH User’s Guide (Provisional Draft 1.0)

Technical InformationDisposal
104
Disposal
If you need to dispose of the camera back, ImageBank-CF and/or batteries, they must be delivered to the local waste plant.
Dimensions 97 x 83 x 56 cm (W x H x D)
Other Features • Histogram Feedback
• Acoustic Feedback
• Instant Approval Architecture
• Back Light
• Active Temperature Control
• Double Duration Circuit
Table 2 Technical specifications of the Ixpress CFH Camera Back
Hasselblad Ixpress CFH User’s Guide (Provisional Draft 1.0)