healthy back anatomy - wordpress.com · anatomy of a healthy spine the major muscles of the back...
TRANSCRIPT


HEALTHY BACKANATOMY

General DisclaimerThe contents of this book are intended to provide useful informationto the general public. All materials, including texts, graphics, andimages, are for informational purposes only and are not a substitutefor medical diagnosis, advice, or treatment for specific medicalconditions. All readers should seek expert medical care and consulttheir own physicians before commencing any exercise program orfor any general or specific health issues. The author and publishersdo not recommend or endorse specific treatments, procedures,advice, or other information found in this book and specificallydisclaim all responsibility for any and all liability, loss, or risk,personal or otherwise, which is incurred as a consequence, directlyor indirectly, of the use or application of any of the material in thispublication.
Thunder Bay PressAn imprint of the Baker & Taylor Publishing Group10350 Barnes Canyon Road, San Diego, CA 92121www.thunderbaybooks.com
Copyright © 2011 by Moseley Road Inc.
Copyright under International, Pan American, and Universal Copyright Conventions.All rights reserved. No part of this book may be reproduced or transmitted in any form or by anymeans, electronic or mechanical, including photocopying, recording, or by any information storage-and-retrieval system, without written permission from the copyright holder. Brief passages (not toexceed 1,000 words) may be quoted for reviews.
“Thunder Bay” is a registered trademark of Baker & Taylor. All rights reserved.
All notations of errors or omissions should be addressed to Thunder Bay Press, Editorial Department,at the above address. All other correspondence (author inquiries, permissions) concerning the contentof this book should be addressed to Moseley Road, Inc., 123 Main Street, Irvington, NY 10533.


HEALTHY BACKANATOMY
A Chiropractor’s Guideto a Pain-Free Back
Philip Striano, DC
San Diego, California

CONTENTS
HEALTHY BACK BASICSAnatomy of a Healthy Spine
The Major Muscles of the Back
Back Pain
Exercising for a Healthy Back
Full-Body Anatomy
CERVICAL EXERCISESFlexion Stretch
Flexion Isometric
Lateral Stretch
Lateral Isometric
Rotation Stretch
Rotation Isometric
Extension Stretch
Extension Isometric
Upper Trapezius Stretch
Levator Scapulae Stretch
Shrug
Turtle Neck
Cervical Stars
THORACIC EXERCISESScapular Range of Motion
Shoulder Stretch I
Shoulder Stretch II

Side Bending
Latissimus Dorsi Stretch
Pectoral Stretch
Open Book Stretch
Chair Twist
Posterior Hand Clasp
Hand Walkout
Hand Walk-Around
Swiss Ball Reverse Fly
Swiss Ball Row
Body Ball Extension
Backward Ball Stretch
CORE EXERCISESSitting Balance
Standing Stability
Standing Extension
Basic Crunch
Abdominal Kick
Half Curl
Prone Trunk Raise
Seated Piriformis Stretch
Piriformis Stretch
Russian Twist
Low Curl-Up
Reverse Bridge Rotation
Reverse Bridge Ball Roll
Medicine Ball Ab Curls

Plank Roll-Down
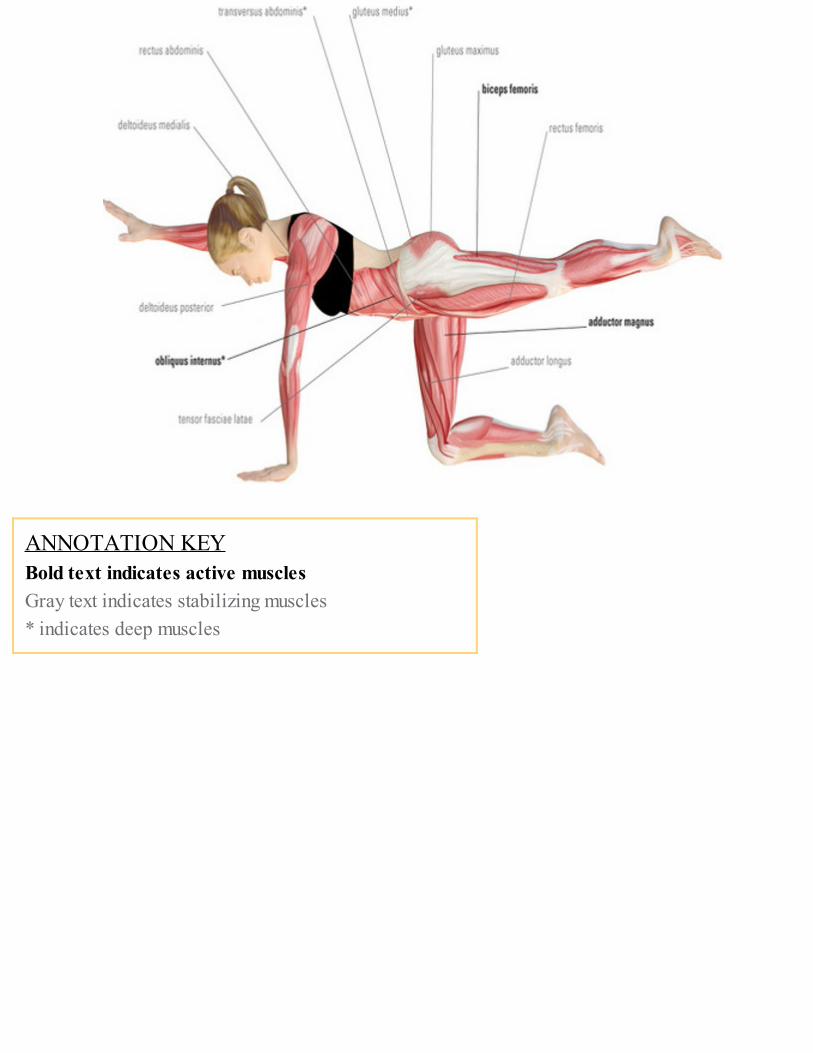
The Pointer
Plank
Front Plank
Side Walking
Jackknife
Rotated Back Extension
Transverse Abs
Crossover Crunch
The Twist
Side-Bend Plank
LUMBAR EXERCISESSupine Pelvic Tilt
Seated Pelvic Tilt
Toe Touch
Knee-to-Chest Hug
Spine Stretch
Lower-Back Rotation
Child’s Pose
Cat and Dog Stretch
Hip Circles
Swimming
Bridge
Bridge with Leg Lift

LOWER-BODY EXERCISESQuadriceps Stretch
Iliotibial Band Stretch
Hamstring Stretch I
Hamstring Stretch II
Forward Lunge
Hip Flexor Stretch
Hip Stretch
Sample Workouts
Glossary
Credits & Acknowledgments

L
HEALTHY BACK BASICS
ower-back and neck pain are some of the most common health problems in adultstoday. They are the second-most prevalent reason for doctors’ visits, especially
lower-back pain. With society having an increasingly older population and peopleliving more sedentary lifestyles, back and neck pain are sure to afflict more people inthe future than they ever have in the past.
There are many contributing risk factors to back and neck pain. A partial list of thesefactors includes age, obesity, physical activity (both too little and too much), poorposture, psychological stress, trauma, and poor work ergonomics.
Through awareness, action, and education, however, you can decrease yoursusceptibility to neck and lower-back pain. Make yourself aware of the potentiallyharmful factors in your lifestyle. Be cognizant of your overall health. Your body isconstantly talking to you—listen to it. Pain and fatigue are two of the warning signsyour body will send you. Take action, eat, rest, play, and exercise properly. Finally,

educate yourself on how to do these things the right way and in the right amount.This book is written to give a generally healthy person the tools to prevent chronic
back and neck pain. If you currently suffer from a serious back or neck injury, pleaseconsult with your physician before starting a stretching or strengthening program.
It is of prime importance to make sure that you warm up your body before doingany of the stretches or strengthening exercises. You do not want to stretch a cold orstagnant muscle—this can lead to tearing of the muscle fibers. Running or walking fora few minutes, or even a hot shower or bath, will warm up your muscles beforeexercise. This will increase blood flow, lubricate your joints, and prepare you for asafe exercise regimen. Make sure to drink plenty of water, around sixty-four ouncesper day. This will prevent dehydration and allow your body to excrete toxins that itwill be breaking down during exercise.
In the event that you do injure yourself, do not put heat on the injured area. Use iceon the injured area for the first forty-eight hours post-injury. To apply ice properly,leave on the injured area for twenty minutes, then take it off for an hour, and repeat.You can repeat multiple times throughout the day. The purpose of the ice is todecrease inflammation. If the ice is left on for more than twenty minutes, you will geta reverse reaction and your body will bring fluid into the area, increasinginflammation and worsening the injury. If you ice properly and immediately after aninjury, you can greatly reduce the duration and intensity of the injury. After the firsttwo days, you can introduce heat to the affected area. It is also advisable to seek adoctor’s opinion if you believe the injury warrants it.

Y
ANATOMY OF A HEALTHY SPINE
our spine is a well-crafted feat of anatomical engineering, forming your body’smain upright support and allowing you to bend forward, backward, and sideways,
as well as to twist and rotate. The spinal column also protects the spinal cord, which isthe main pathway of the nervous system.
The VertebraeTwenty-four bones, called vertebrae, are stacked in a column to make up the spine.The spine is divided into three regions: the cervical vertebrae, the thoracic vertebrae,and the lumbar vertebrae. The cervical vertebrae are the seven vertebrae of the neck.They are known as C1 through C7. The topmost cervical vertebra, called the atlas,supports your skull. The twelve vertebrae of the upper and middle back, the thoracicvertebrae, are called T1 through T12. The vertebrae of the lower back, the lumbarvertebrae, are known as L1 through L5. The L5, the lowest vertebrae, connects to thetop of the sacrum, which is a triangular bone at the base of the spine that fits betweenthe two pelvic bones. At the base of the sacrum, at the very bottom of the spine, is thecoccyx, or tailbone.
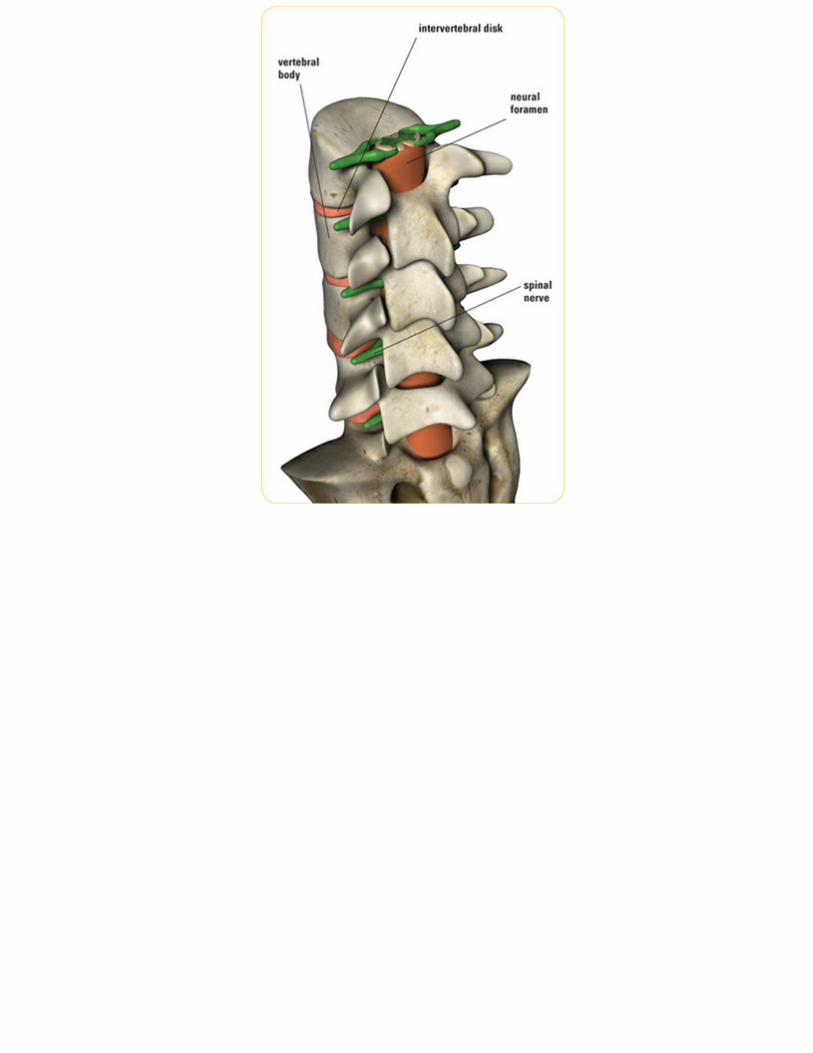
In each of the vertebrae (except for the atlas), a large, round, flat area called thevertebral body makes up the bulk of the bony structure. Attached to the back of eachvertebral body is a bony, triangular ring, which is made up of two kinds of bones: twopedicle bones connect directly to the back of the vertebral body, and two laminabones form the outer rim of the bony ring. Where the lamina bones join is a bony

projection called the spinous process, which is the pointy bone that you can feel andsee at the back of your spine. Two bony knobs, called the transverse processes, alsojut from the sides of each vertebra. Because the vertebrae are stacked in a column, thebony ring forms a tube that allows your spinal cord to pass through, while protectingit on all sides.
A joint, known as the facet joint, connects each adjacent vertebrae to the one belowit. The facet joints are the key links in the spinal chain, allowing the spine to move.Along with the facet joints, thin ligaments that run the length of the spine, as well assmaller ligaments, bind the vertebrae together. A number of muscles attach to thevertebra, controlling the movements of the spine.

SPINAL CURVESWhen you take a look at a healthy back from the side, you can see that the spine curves. Thethoracic spine should curve slighty outward. The outward curve is called kyphosis. The cervicaland lumbar spine both have a slight inward curve called lordosis. Both terms—kyphosis andlordosis—are often used to describe abnormally excessive curvatures of the spine
To add further stability to the spinal column, the twenty-four costae, or rib bones,attach directly to the thoracic spine, twelve on each side. All but the bottommost ribon each side also attach to the sternum, or breastbone, at the front of the chest.
The Spinal DisksSeparating each vertebra is an intervertebral disk that sits on top of the vertebral bodyand acts as a cushion between the bones. Rings of different kinds of tissue make upthis shock-absorbing disk. Outermost is the annulus, which is composed of strong,elastic tissue called cartilage. The middle of the disk, the nucleus, is a slightly softerarea. When you are young, the nucleus contains plenty of water, but as you age, itnormally contains less water and begins to flatten.
The NervesWithin the hollow tube formed by the interconnected vertebrae lies the spinal cord,which extends from the brain to the L2 vertebra. The spinal cord is like a long,branching wire made up of millions of nerve fibers that transmit neural signalsbetween the brain and the body. The spinal cord is the conduit for motor and sensoryinformation, and it also coordinates certain reflexes.
Nerves pass through each vertebra via small tunnels on both sides called the neuralforamina. The nerves of the lumbar spine, called the cauda equina, go to the pelvicorgans and lower limbs.
T
THE MAJOR MUSCLES OF THE BACK
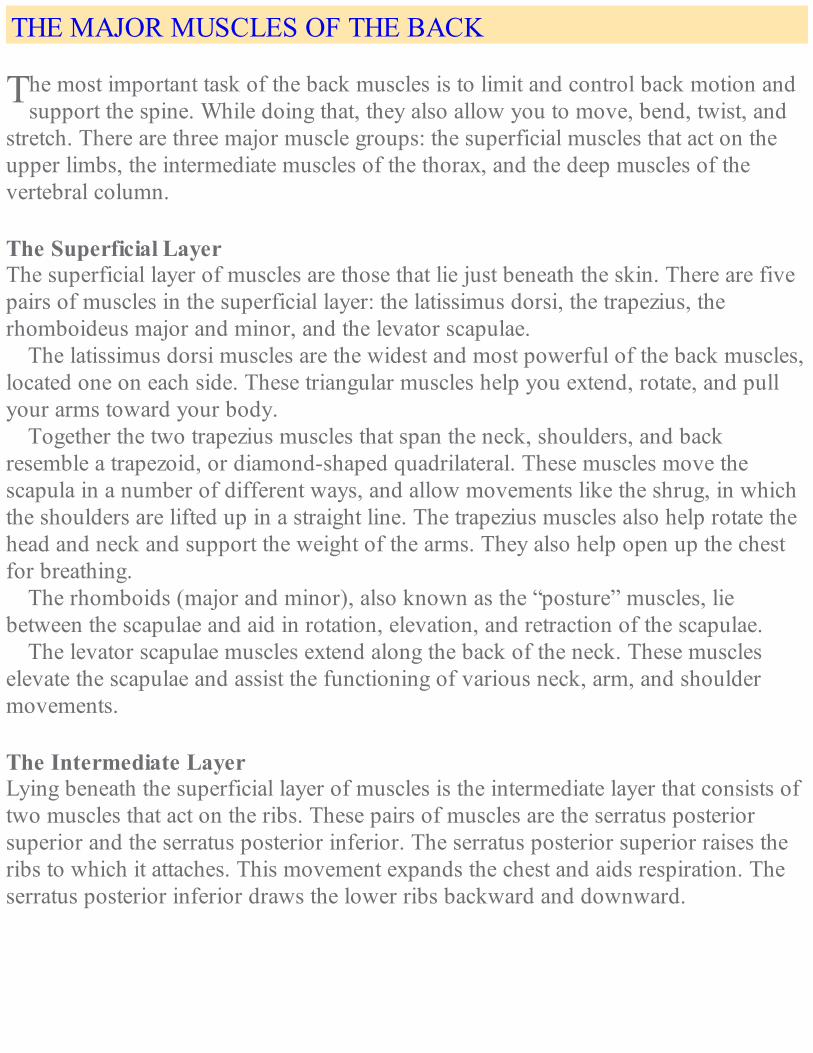
he most important task of the back muscles is to limit and control back motion andsupport the spine. While doing that, they also allow you to move, bend, twist, and
stretch. There are three major muscle groups: the superficial muscles that act on theupper limbs, the intermediate muscles of the thorax, and the deep muscles of thevertebral column.
The Superficial LayerThe superficial layer of muscles are those that lie just beneath the skin. There are fivepairs of muscles in the superficial layer: the latissimus dorsi, the trapezius, therhomboideus major and minor, and the levator scapulae.
The latissimus dorsi muscles are the widest and most powerful of the back muscles,located one on each side. These triangular muscles help you extend, rotate, and pullyour arms toward your body.
Together the two trapezius muscles that span the neck, shoulders, and backresemble a trapezoid, or diamond-shaped quadrilateral. These muscles move thescapula in a number of different ways, and allow movements like the shrug, in whichthe shoulders are lifted up in a straight line. The trapezius muscles also help rotate thehead and neck and support the weight of the arms. They also help open up the chestfor breathing.
The rhomboids (major and minor), also known as the “posture” muscles, liebetween the scapulae and aid in rotation, elevation, and retraction of the scapulae.
The levator scapulae muscles extend along the back of the neck. These muscleselevate the scapulae and assist the functioning of various neck, arm, and shouldermovements.
The Intermediate LayerLying beneath the superficial layer of muscles is the intermediate layer that consists oftwo muscles that act on the ribs. These pairs of muscles are the serratus posteriorsuperior and the serratus posterior inferior. The serratus posterior superior raises theribs to which it attaches. This movement expands the chest and aids respiration. Theserratus posterior inferior draws the lower ribs backward and downward.
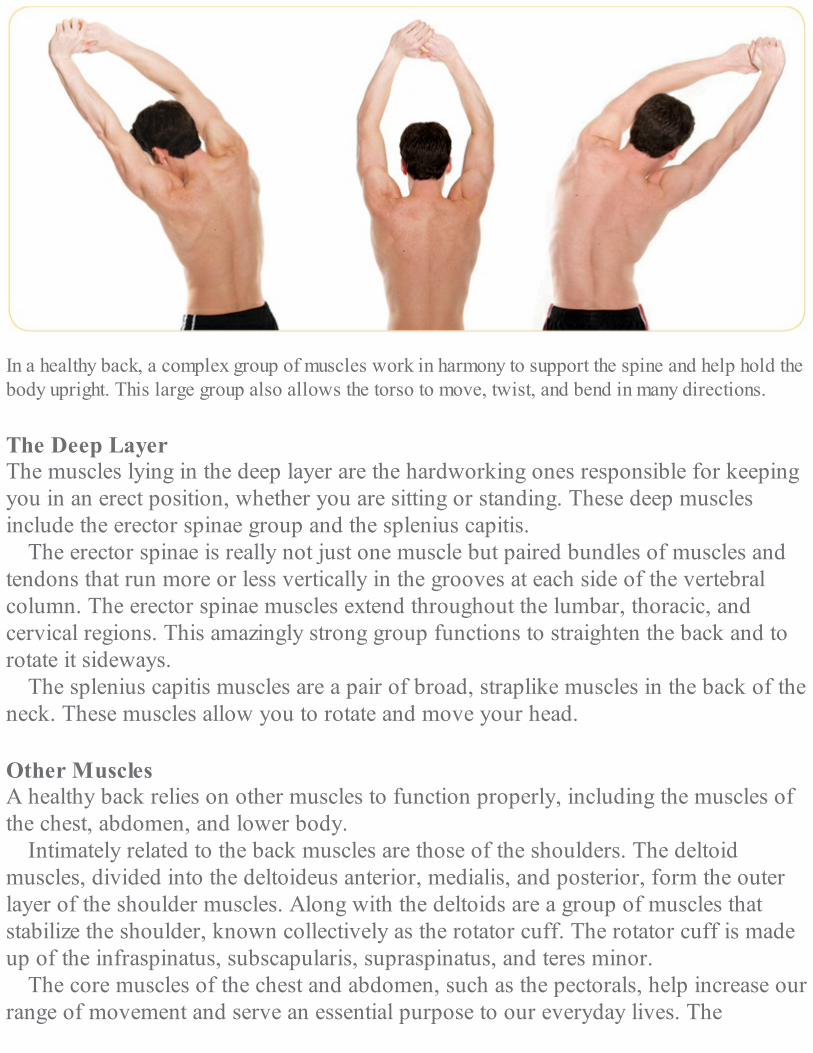
In a healthy back, a complex group of muscles work in harmony to support the spine and help hold thebody upright. This large group also allows the torso to move, twist, and bend in many directions.
The Deep LayerThe muscles lying in the deep layer are the hardworking ones responsible for keepingyou in an erect position, whether you are sitting or standing. These deep musclesinclude the erector spinae group and the splenius capitis.
The erector spinae is really not just one muscle but paired bundles of muscles andtendons that run more or less vertically in the grooves at each side of the vertebralcolumn. The erector spinae muscles extend throughout the lumbar, thoracic, andcervical regions. This amazingly strong group functions to straighten the back and torotate it sideways.
The splenius capitis muscles are a pair of broad, straplike muscles in the back of theneck. These muscles allow you to rotate and move your head.
Other MusclesA healthy back relies on other muscles to function properly, including the muscles ofthe chest, abdomen, and lower body.
Intimately related to the back muscles are those of the shoulders. The deltoidmuscles, divided into the deltoideus anterior, medialis, and posterior, form the outerlayer of the shoulder muscles. Along with the deltoids are a group of muscles thatstabilize the shoulder, known collectively as the rotator cuff. The rotator cuff is madeup of the infraspinatus, subscapularis, supraspinatus, and teres minor.
The core muscles of the chest and abdomen, such as the pectorals, help increase ourrange of movement and serve an essential purpose to our everyday lives. The

abdominal muscles, the rectus abdominis and transversus abdominis, are a series ofmuscles located on the lower midsection of the torso that contract the body forward.The side abdominal muscles, the obliquus externus and internus, are located on eachside of the rectus abdominis. These muscles are involved in flexing the rib cage andthe pelvic bones together, sideward bending of the torso, and rotation of the torso.
The major leg muscles can be broken down into three groups: the quadricepsfemoris, the hamstrings, and the calf muscles. The quadriceps femoris consists of themajor muscles of the front thigh—the vastus lateralis, vastus medialis, vastusintermedius, and rectus femoris. These knee extensor muscles allow us to walk, run,jump, and squat. The hamstrings are the muscles of the back thigh—thesemitendinosus, semimembranosus, and biceps femoris. The hamstrings act uponboth the hip and knee joints. Like the quads, this group of muscles is crucial to ourability to walk, run, and jump.
The major muscles of the calf are the gastrocnemius and the soleus. Both work toraise the heel.

ANNOTATION KEYItalic text indicates bonesGray text indicates muscles* indicates deep muscles

Y
BACK PAIN
our back is an amazing collection of bones, ligaments, tendons, muscles, andnerves, put together so as to be incredibly strong and highly flexible. Still, as with
any complex structure, problems can arise, causing the all-too-common back pain somany of us suffer.
Finding the CauseBack pain finds its roots in a variety of causes, and it can originate in any one of theback’s components. Irritation of the large nerve roots that travel to the legs and armscauses back pain, as does irritation of the smaller spinal nerves. Straining the musclesor injuring the bones and ligaments of the back also results in pain. And for many, theintervertebral disks and the spaces between them are a source of pain.
Cervical PainCervical, or neck, pain is usually caused by a muscle, ligament, or tendon strain. Mostneck pain caused by strain will usually heal with time and nonsurgical treatments, butcertain cervical problems may need more intensive treatment. For example, a cervicalherniated disk produces pain that radiates down the arm, as does foraminal stenosis, anarrowing of the spinal foramen, pinching a nerve in the neck. Treatment options forneck pain will differ depending on the specific diagnosis.
Thoracic PainThe twelve vertebral bodies of the thoracic spine are firmly attached to the rib cageand provide stability and structural support to the upper back, while allowing verylittle motion. The lack of motion in the thoracic area of the spine means that injuries tothis area are rare. Nonetheless, a strain or irritation to the large muscles of the upper

and mid back can produce quite severe back pain.
Lumbar PainThe lumbar spine’s wide range of motion, along with its role as weight bearer for thetorso, means that it is far more prone to injury that the thoracic spine. In fact, half ofthe back’s flexion, or forward bending, occurs at the hips, and the other half occurs atthe lower spine, with most of that occurring at the L4–L5 and L3–L4 segments. Withall this wear and tear, it is no wonder that these are the areas that most often breakdown—and cause pain. The wide range of movement also means the two lowest disks(L4–L5 and L5–S1) take a beating, resulting in a greater chance of herniation. Aherniated disk can cause lower-back pain and often numbness that radiates throughthe leg and down to the foot. This condition is known as sciatica.
The biggest culprit in lower-back pain, however, is muscle strain. Like cervicalstrain, however, these areas will often heal with time and nonsurgical treatments.
Vertebral CompressionTrauma can cause a vertebral compression fracture, but it takes quite a severe traumato break the bones of the spine. The vertebral bodies of your spine are built to supportweight, but bones weakened by age or conditions such as osteoporosis are prone todeveloping compression fractures, and in severe cases can break with little or noforce. The most common site of compression fractures is the lower back. Thesefractures can lead to chronic back pain and progressive spinal misalignment ordeformity.
Disk DegenerationAs we age, the spinal disks dehydrate and stiffen, which makes it harder for them toadjust to compression. For some individuals, this natural aging process can causechronic or acute pain.
Sacral PainBelow the lumbar spine is the sacrum, the bone that makes up the back part of thepelvis. Connecting the sacrum to the iliac bones of the pelvis are the sacroiliac joints.Pain in the sacrum often originates from sacroiliac joint dysfunction. Sacroiliac pain ismore common in men than in women.
Muscle and Ligament PainThe two most common causes of back pain are muscle strains and ligament sprains.But what is the difference between a strain and a sprain? When you abnormally stretch

or tear a muscle, that is a strain. When you tear ligaments (the tough, fibrous bands oftissue that hold bones together) from their attachments, that is a sprain. Although thecauses are different, both produce similar symptoms: pain and muscle spasms. Thesesymptoms result from the inflammation of soft tissue that results from either a strainor sprain. Because the lumbar spine is engaged in almost all movement, lumbarmuscle strains and sprains are the most common back complaints.
PRESSURED AND PINCHED NERVESBecause an intervertebral disk sits directly in front of each neural foramen, a bulged or herniateddisk can narrow the opening—thus putting pressure on the nerve and causing pain.
At the back of the foramen sits a facet joint. Facet joints can form bone spurs; a bone spur canproject into the tunnel, narrowing the hole and painfully pinching the nerve.

P
EXERCISING FOR A HEALTHY BACK:
rofessor Vladimir Janda was a Czechoslovakian-born neurologist and physiatrist,and a renowned practitioner and lecturer in the area of musculoskeletal health care.
Janda’s teachings are accepted and practiced by chiropractors, physical therapists,osteopaths, and medical doctors throughout the world today.
Janda’s observations and research led to his discovery of predictable patterns ofmuscular imbalances throughout the body. He named these imbalances the upper-crossed and lower-crossed syndromes. In short, Janda noticed that prolonged staticpostural positions, such as sitting in a chair all day long or sleeping with multiplepillows under your head, lead to predictable muscle patterns. When a muscle is in afacilitated, or tight, state for an extended period, it will reflexively lead to aninhibition, or weakening, of muscles on the opposite side of the body. This pattern iscalled reciprocal inhibition, in which the normal movement patterns of your bodybecome aberrant and your muscles work out of sequence. This leads to muscles andjoints taking on more work and greater stress, which culminates in joint pain andmyofascial, or soft-tissue, pain.
EXERCISE AIDSA few simple props can help you get the most from your exercise regimen, such as small handweights, medicine balls, and a Swiss ball.
A Swiss ball, which is shown in many of the following exercises, is a large, heavy-dutyinflatable ball, ranging in diameter from 18 to 30 inches. The ball is unstable, and you have toconstantly adjust your balance while performing a movement, which helps you improve yourbalance, proprioception, and flexibility.
Swiss balls were originally developed for use by physical therapy and chiropractic patients,but they are now regular aids in many fitness regimens, including yoga and core training. Swissballs come in a range of sizes, so if you purchase one, be sure to take into consideration yourindividual weight and height.

Upper-crossed and lower-crossed syndromes are most commonly found in peoplewith chronic conditions, with problems that have existed for more than eight weeks.In order to correct these imbalances, you need to identify tight muscles and stretchthem, and also work to strengthen the corresponding weak muscles. Exercising in thisway will lead the body to better balance, or homeostasis, allowing for the properrecruitment pattern of muscles to do ordinary movements. In turn, this will reducemyofascial pain and unnecessary stress and early degeneration of the joints.
Many things can cause chronic muscular imbalances, including poor posture,overuse of muscles, joint dysfunction, poor repetitive biomechanics, trauma, andpsychological stress. To eliminate the imbalances, you must identify the contributingfactors, and then seek treatment and an exercise regimen from appropriate health-carepractitioners. You can stretch and strengthen the appropriate muscles properly, but ifthe provocative agent is not removed, the patterns are destined to repeat themselves.

THE JANDA APPROACH

FULL-BODY ANATOMY
ANNOTATION KEY* indicates deep muscles

ANNOTATION KEY* indicates deep muscles

A
CERVICAL EXERCISES
lthough most neck pain isn’t serious, it’s a common complaint among adults. Fromspending hours hunched in front of our computers to slumping on the sofa to
watch TV, many of us suffer from the effects of poor posture. Sprains and injuries, aswell as ailments such as arthritis or pinched nerves, also result in neck pain and/orcompromised range of motion.
A healthy back starts with a healthy neck, so it makes sense that cervical spineexercises are key components of a healthy back regimen. Many of the followingexercises appear to be quite simple, but if performed correctly they can strengthenyour cervical spine and keep your neck flexible and mobile. Getting the neck movingis essential for relieving all-too-prevalent neck pain or stiffness, but keep in mind thatgood form is a must. Perform the following exercises slowly and carefully—you wantto feel a stretch, not pain.

FLEXION STRETCH
Sit or stand, keeping your neck, shoulders, and torso straight. Place one or both hands behindyour head.
Slowly pull your chin toward your chest until you feel a stretch in the back of your neck.
Hold for ten seconds, and repeat three times.
ANNOTATION KEYItalic text indicates ligamentsBold text indicates active musclesGray text indicates stabilizing muscles* indicates deep muscles
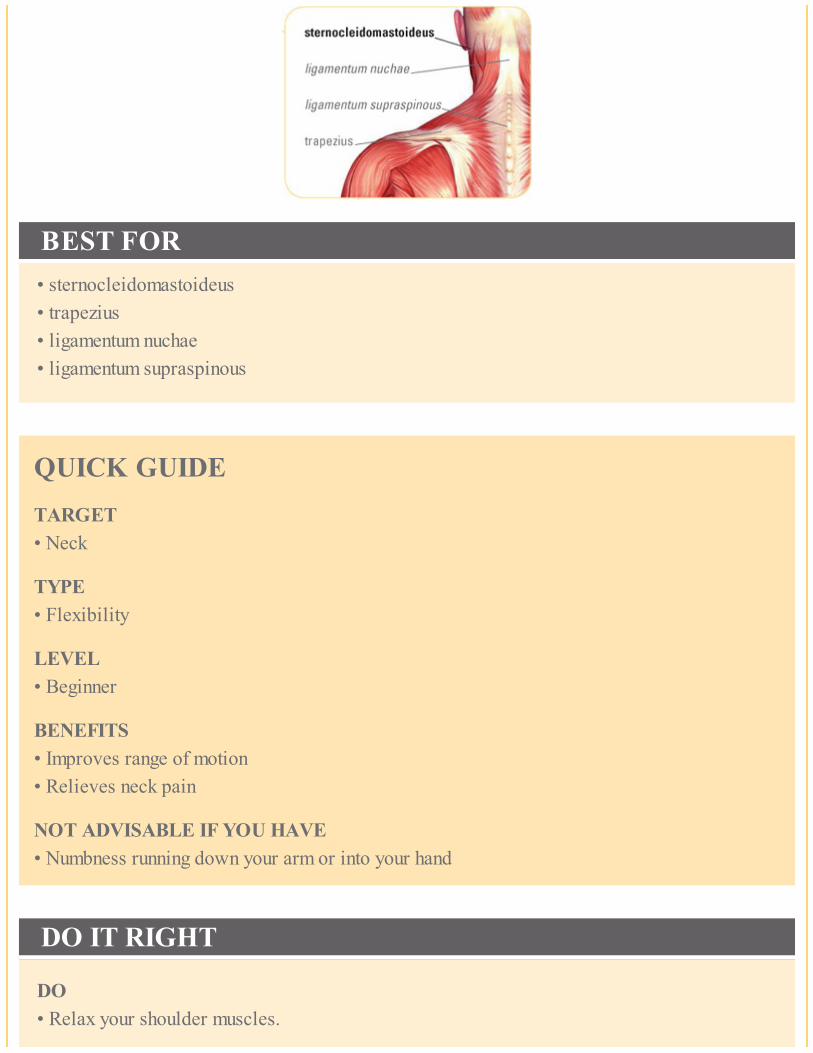
BEST FOR• sternocleidomastoideus• trapezius• ligamentum nuchae• ligamentum supraspinous
QUICK GUIDETARGET• Neck
TYPE• Flexibility
LEVEL• Beginner
BENEFITS• Improves range of motion• Relieves neck pain
NOT ADVISABLE IF YOU HAVE• Numbness running down your arm or into your hand
DO IT RIGHT
DO• Relax your shoulder muscles.

AVOID• Pulling too hard with your hand—this is a gentle stretch.

FLEXION ISOMETRIC
Sit or stand, keeping your neck, shoulders, and torso straight. Slightly flex your neck.
Place your palm against your forehead, and gently push your forehead into your palm, holdingthe position static.
Hold for ten seconds and release. Repeat three times.
ANNOTATION KEYBold text indicates active musclesGray text indicates stabilizing muscles* indicates deep muscles

BEST FOR• sternocleidomastoideus• longus colli• longus capitis• splenius• trapezius
QUICK GUIDETARGET• Neck flexors
TYPE• Strengthening
LEVEL• Beginner
BENEFITS• Strengthens the neck flexors without irritating the ligaments, tendons, or joints
NOT ADVISABLE IF YOU HAVE• Numbness running down your arm or into your hand
DO IT RIGHT
DO• Apply a gentle pressure—overdoing it, especially when you first begin exercising, will make
the neck muscles stiffer.
AVOID• Any movement in the neck.

LATERAL STRETCH
Sit or stand, keeping your neck, shoulders, and torso straight.
Tilt your head so that your right ear moves toward your right shoulder until you feel a distinctstretch in the left side of your neck.
DO IT RIGHT
DO• Relax your shoulder muscles.
AVOID• Rotating your head while tilting it.
Hold for ten seconds, and repeat three times in each direction.
BEST FOR• scalenus• sternocleidomastoideus

• trapezius• rectus capitis lateralis• ligamentum transversum• ligamentum interspinalis• ligamentum capsular facet

ANNOTATION KEY Italic text indicates ligamentsBold text indicates active musclesGray text indicates stabilizing muscles* indicates deep muscles
QUICK GUIDETARGET• Neck lateral flexors
TYPE• Flexibility
LEVEL• Beginner
BENEFITS• Improves range of motion• Relieves neck pain
NOT ADVISABLE IF YOU HAVE• Numbness running down your arm or into your hand

LATERAL ISOMETRIC
ANNOTATION KEYBold text indicates active muscles* indicates deep muscles
DO IT RIGHT
DO• Apply a gentle pressure—overdoing it, especially when you first begin exercising, will make the
neck muscles stiffer.
AVOID• Any movement in the neck.
BEST FOR

• scalenus• sternocleidomastoideus• trapezius• rectus capitis lateralis
QUICK GUIDETARGET• Neck lateral flexorsTYPE• StrengtheningLEVEL• BeginnerBENEFITS• Strengthens the lateral flexors of the neck without irritating the ligaments, tendons, or jointsNOT ADVISABLE IF YOU HAVE• Numbness running down your arm or into your hand
Sit or stand, keeping your neck, shoulders, and torso straight. Place the palm of your right handon the top of your head.
Reach toward the small of your back with your left hand, bending your arm at the elbow.
Tilt your head toward your raised elbow until you feel the stretch in the side of your neck.Press your head into the palm of your hand as you try to tilt your ear to your shoulder,holding the position static.
Hold for ten seconds and release. Repeat three times on each side.

ROTATION STRETCH
Sit or stand, keeping your neck, shoulders, and torso straight. Place your right palm againstyour forehead.
Turn your head slowly to the right, moving gently until you feel a stretch in the left side of yourneck. Hold for ten seconds.
Move your head back to the forward position. Relax.

Place your left palm against your forehead, and turn your head slowly to the left, again movinggently until you feel a stretch in the right side of your neck. Hold for ten seconds.
Move your head back to the forward position. Relax, and then repeat the entire sequence fivetimes.
BEST FOR• splenius• sternocleidomastoideus• levator scapulae• trapezius• ligamentum interspinalis• ligamentum capsular facet
ANNOTATION KEYItalic text indicates ligamentsBold text indicates active musclesGray text indicates stabilizing muscles* indicates deep muscles

QUICK GUIDETARGET• Neck rotatorsTYPE• FlexibilityLEVEL• BeginnerBENEFITS• Improves range of motion• Relieves neck painNOT ADVISABLE IF YOU HAVE• Numbness running down your arm or into your hand
DO IT RIGHT
DO• Relax your shoulder muscles.• Keep your head in a neutral position.
AVOID• Pushing too hard with your hand—this is a gentle stretch.• Flexing or extending your head.

ROTATION ISOMETRIC
DO IT RIGHT
DO• Apply a gentle pressure—overdoing it, especially when you first begin exercising, will make the
neck muscles stiffer.
AVOID• Any movement in the neck.
ANNOTATION KEYBold text indicates active musclesGray text indicates stabilizing muscles* indicates deep muscles
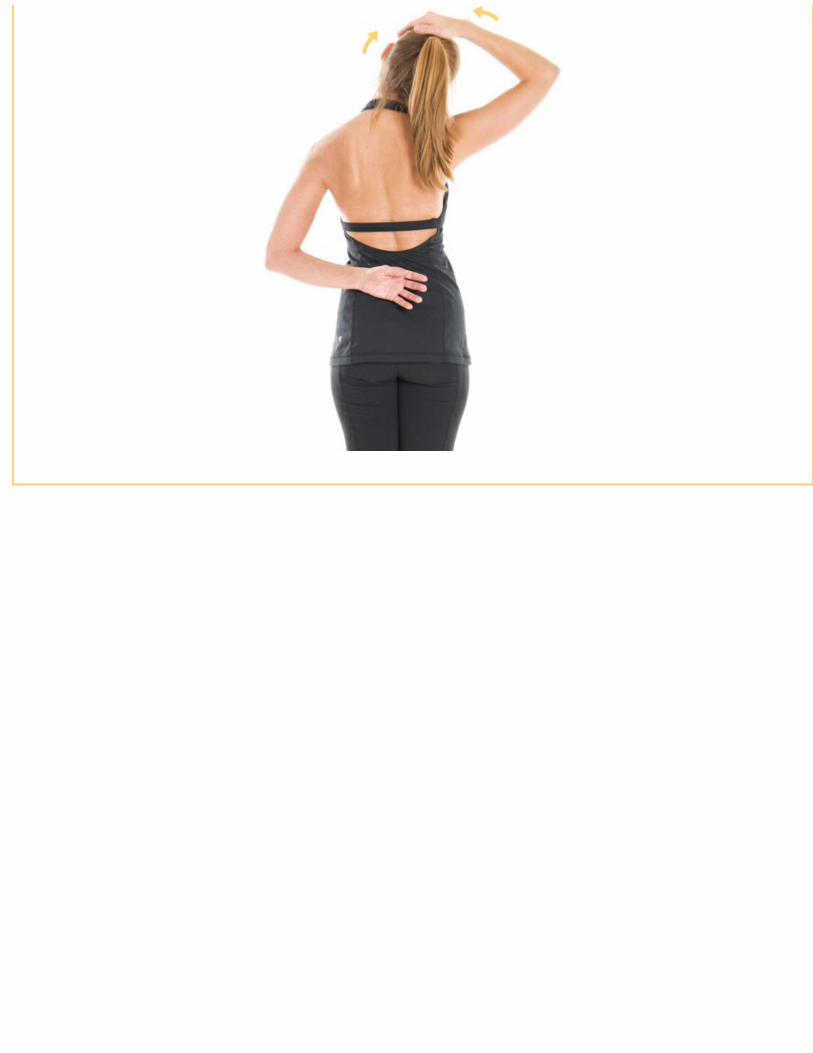
Sit or stand, keeping your neck, shoulders, and torso straight. Keeping your chin level, lookstraight ahead.
Place your left palm against your left temple, and press into your palm as if you were turningyour head to the left.
Hold for ten seconds and release. Repeat three times on each side.
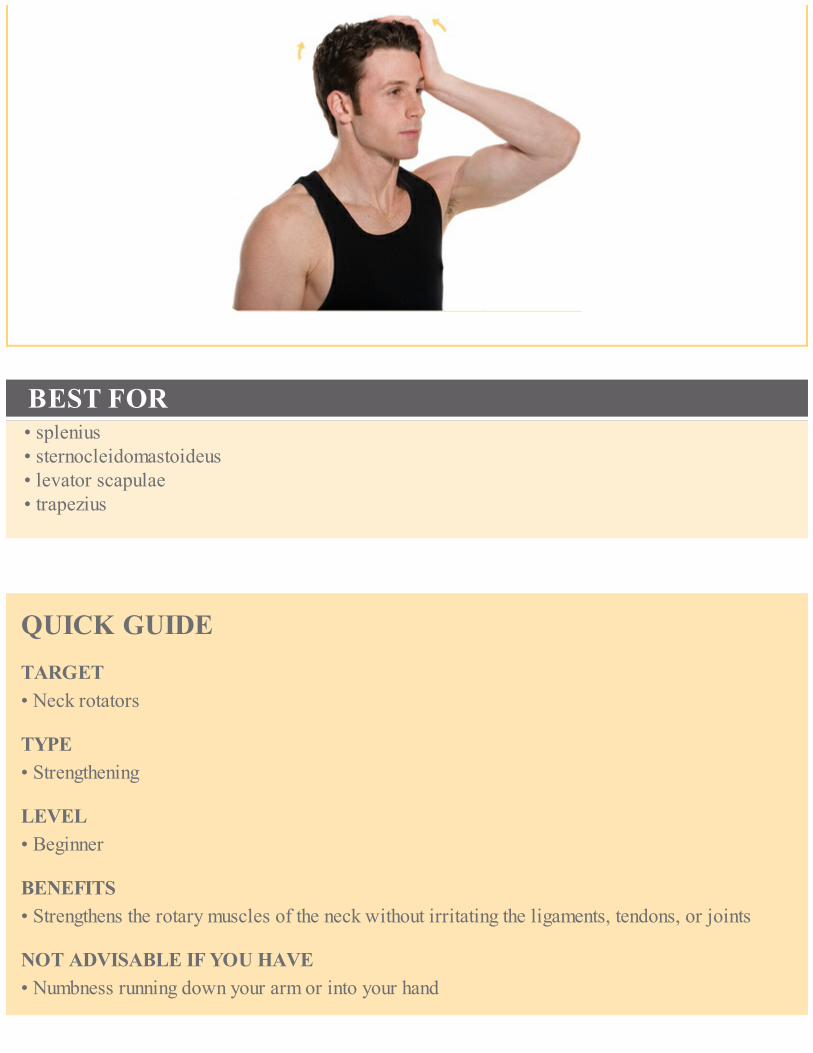
BEST FOR• splenius• sternocleidomastoideus• levator scapulae• trapezius
QUICK GUIDETARGET• Neck rotators
TYPE• Strengthening
LEVEL• Beginner
BENEFITS• Strengthens the rotary muscles of the neck without irritating the ligaments, tendons, or joints
NOT ADVISABLE IF YOU HAVE• Numbness running down your arm or into your hand

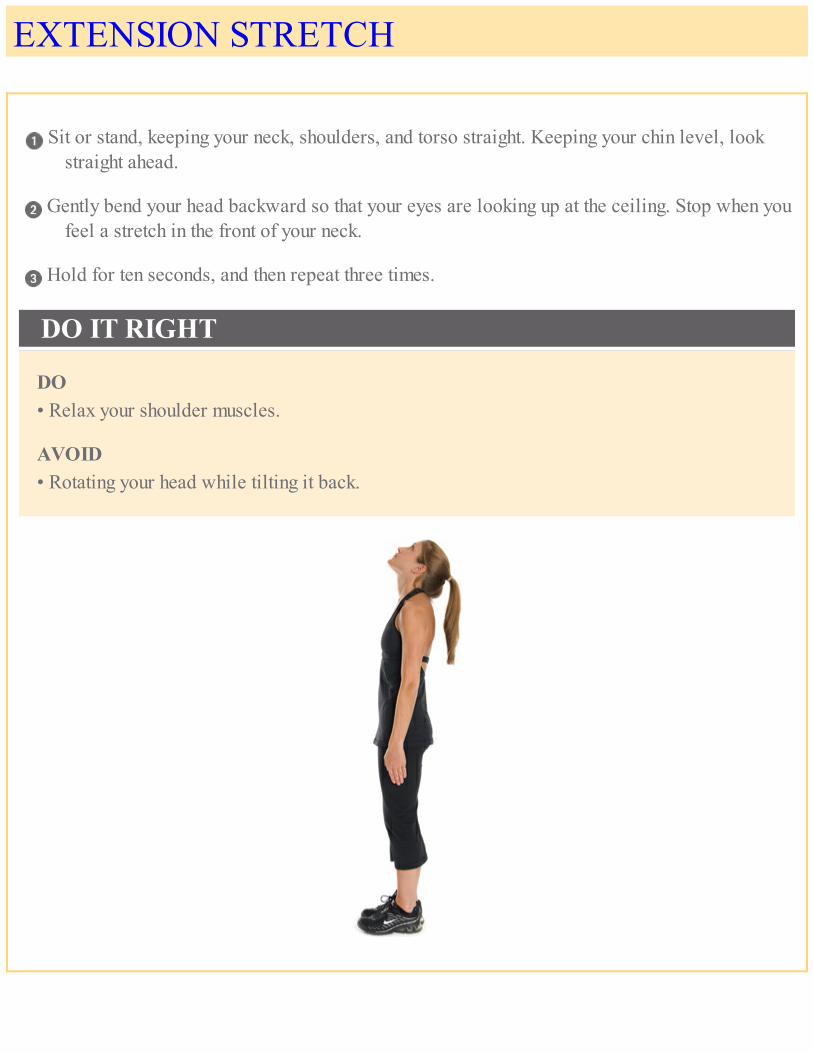
EXTENSION STRETCH
Sit or stand, keeping your neck, shoulders, and torso straight. Keeping your chin level, lookstraight ahead.
Gently bend your head backward so that your eyes are looking up at the ceiling. Stop when youfeel a stretch in the front of your neck.
Hold for ten seconds, and then repeat three times.
DO IT RIGHT
DO• Relax your shoulder muscles.
AVOID• Rotating your head while tilting it back.

ANNOTATION KEYBold text indicates active muscles* indicates deep muscles
BEST FOR• scalenus• sternocleidomastoideus• longus colli• longus capitis
QUICK GUIDETARGET• Neck extensors
TYPE• Flexibility
LEVEL• Beginner
BENEFITS• Improves range of motion• Relieves neck pain
NOT ADVISABLE IF YOU HAVE• Numbness running down your arm or into your hand


EXTENSION ISOMETRIC
ANNOTATION KEYBold text indicates active musclesGray text indicates stabilizing muscles* indicates deep muscles
Sit or stand, keeping your neck, shoulders, and torso straight. Keeping your chin level, lookstraight ahead.
Clasp your hands together and place them behind your head.
Press the back of your head into your palms. Hold for ten seconds and release. Repeat threetimes.
BEST FOR• splenius• semispinalis• trapezius

QUICK GUIDETARGET• Neck extensorsTYPE• StrengtheningLEVEL• BeginnerBENEFITS• Strengthens the extensor muscles of the neck without irritating the ligaments, tendons, or jointsNOT ADVISABLE IF YOU HAVE• Numbness running down your arm or into your hand

DO IT RIGHTDO• Apply a gentle pressure—overdoing it, especially when you first begin exercising, will make the
neck muscles stiffer.AVOID• Any movement in the neck.

UPPER TRAPEZIUS STRETCH
Sit on a Swiss ball with your feet shoulder-width apart.
Reach your left hand down the side of the ball, and spread your palm against the lower part ofthe ball.
With your right hand, grasp the left side of your head, and tilt your head to the right, as if youwere going to touch your right ear to your right shoulder.
Hold for ten seconds, and return to the starting position. Repeat the entire sequence on the otherside.
ANNOTATION KEYBold text indicates active musclesGray text indicates stabilizing muscles* indicates deep muscles
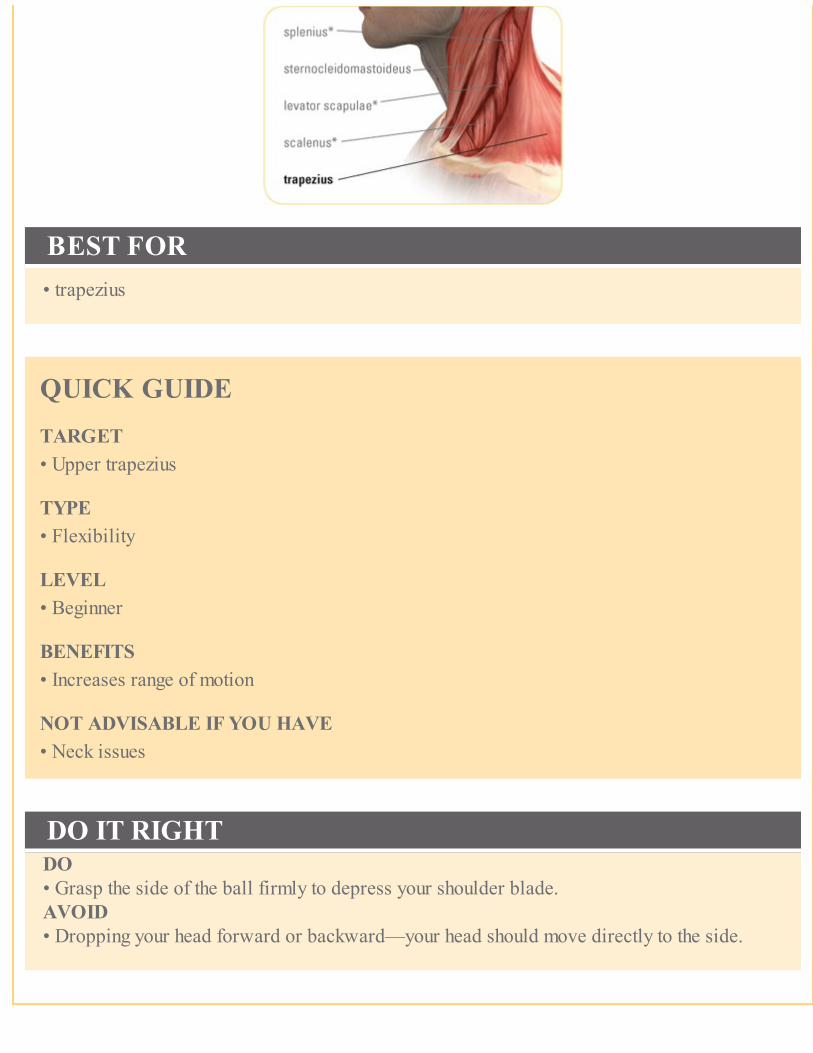
BEST FOR• trapezius
QUICK GUIDETARGET• Upper trapezius
TYPE• Flexibility
LEVEL• Beginner
BENEFITS• Increases range of motion
NOT ADVISABLE IF YOU HAVE• Neck issues
DO IT RIGHTDO• Grasp the side of the ball firmly to depress your shoulder blade.AVOID• Dropping your head forward or backward—your head should move directly to the side.

LEVATOR SCAPULAE STRETCH
Sit on a Swiss ball with your feet shoulder-width apart.
Reach your right hand down the side of the ball, and spread your palm against the lower part ofthe ball.
With your left hand, grasp the posterior right side of your head, and pull your chin in towardyour lateral upper chest until you feel tension from the tip of your shoulder blade to the rightside of your neck.
Hold for ten seconds, and return to the starting position. Repeat three times on each side.
ANNOTATION KEYBold text indicates active musclesGray text indicates stabilizing muscles* indicates deep muscles

BEST FOR• levator scapulae
QUICK GUIDETARGET• Levator scapulae
TYPE• Flexibility
LEVEL• Beginner
BENEFITS• Increases range of motion
NOT ADVISABLE IF YOU HAVE• Neck issues
DO IT RIGHTDO• Grasp the side of the ball firmly to depress your shoulder blade.• Try multiple angles to find tight muscle fibers.AVOID• Excessive lateral flexion.


SHRUG
Sit on a Swiss ball or chair, keeping your back straight and your head and neck centered overthe rest of your spinal column.
With your arms at your side, bend your elbows slightly. Hold your hands with the palms up.

Bring your shoulders down and forward, and then lift them as high as you can. Repeat entire sequence five times.
ANNOTATION KEYItalic text indicates bonesBold text indicates active musclesGray text indicates stabilizing muscles* indicates deep muscles
DO IT RIGHT

DO• Move in a smooth, controlled manner.
AVOID• Rolling your shoulders—lift them directly up and down instead.
BEST FOR• trapezius• levator scapulae• scapula• erector spinae
QUICK GUIDETARGET• Neck• Shoulders• Scapula
TYPE• Flexibility
LEVEL• Beginner
BENEFITS• Improves range of motion• Relaxes tight neck, shoulder, chest, and upper-back muscles• Stabilizes your shoulder blades
NOT ADVISABLE IF YOU HAVE• Pain or numbness running down your arm or into your hand

TURTLE NECK
Sit or stand, keeping your neck, shoulders, and torso straight. Keeping your chin level, lookstraight ahead.
Move your chin in as if you were a turtle going back into its shell until you feel a stretch in theback of your neck. Hold for ten seconds.
Extend your head forward, this time as if you were a turtle coming out of its shell. Hold forfifteen seconds.
Return to the starting position, and repeat five times.

ANNOTATION KEYBold text indicates active muscles* indicates deep muscles
QUICK GUIDETARGET• Neck
TYPE

• Flexibility
LEVEL• Beginner
BENEFITS• Improves range of motion• Corrects forward head protrusion
NOT ADVISABLE IF YOU HAVE• Numbness running down your arm or into your hand
DO IT RIGHT
DO• Move in a smooth, controlled manner.
AVOID• Lifting your chin as you move your head back.
BEST FOR• trapezius• levator scapulae• scapula• erector spinae
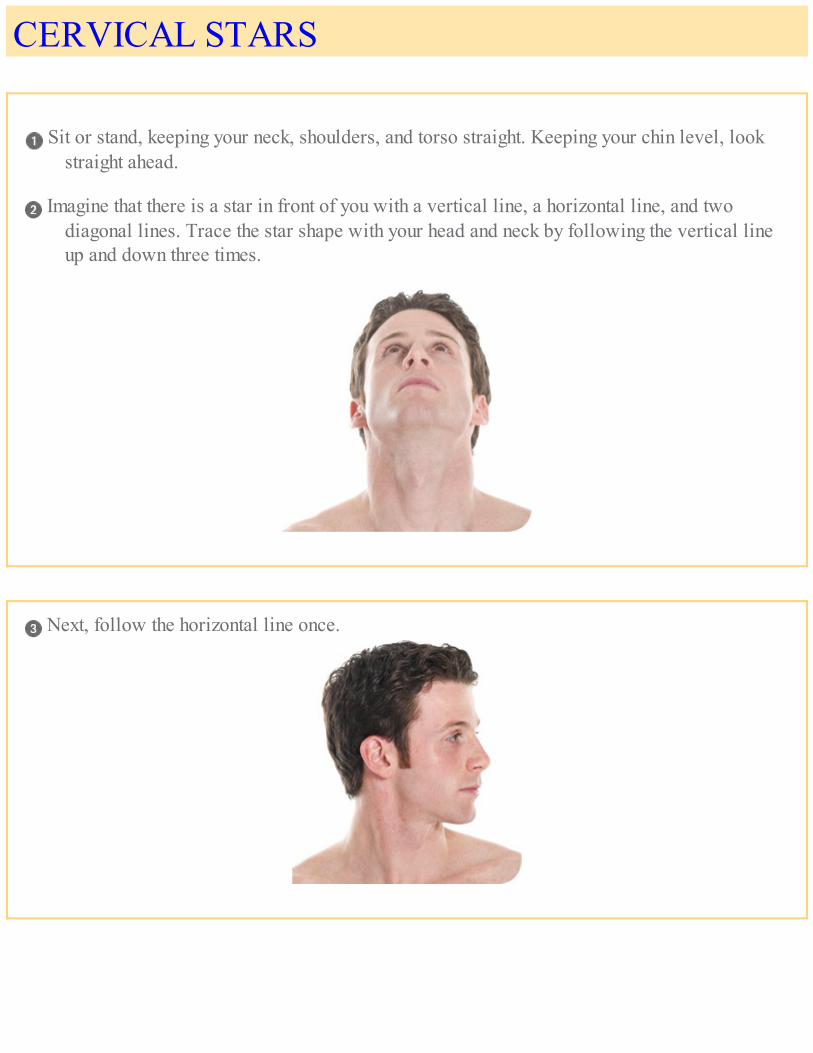
CERVICAL STARS
Sit or stand, keeping your neck, shoulders, and torso straight. Keeping your chin level, lookstraight ahead.
Imagine that there is a star in front of you with a vertical line, a horizontal line, and twodiagonal lines. Trace the star shape with your head and neck by following the vertical lineup and down three times.
Next, follow the horizontal line once.

QUICK GUIDETARGET• Neck rotators• Neck flexors• Neck extensors• Neck lateral flexorsTYPE• FlexibilityLEVEL• BeginnerBENEFITS• Improves range of motion• Relieves neck painNOT ADVISABLE IF YOU HAVE• Numbness running down your arm or into your hand
BEST FOR• splenius• sternocleidomastoideus• levator scapulae• scalenus• semispinalis• trapezius

Finally, trace the two diagonal lines.

Return to the start position, and repeat five times.
DO IT RIGHT
DO• Move in a smooth, controlled manner.
AVOID• Hunching or tensing your shoulders.
ANNOTATION KEYBold text indicates active muscles* indicates deep muscles


A
THORACIC EXERCISES
s with many back complaints, pain in the upper, or thoracic, is often the result ofpoor posture. So many of us spend long days—and nights—sitting bent forward
over a computer keyboard, whether working or “relaxing.” Upper-back pain is alsoprevalent in those who do a lot of lifting, from retail workers stocking store shelves tomothers toting infants. Athletes, from pro pitchers lobbing a fastball to “weekendwarriors” tossing a football, are also prone to thoracic and shoulder pain. As well aspain between the shoulder blades, thoracic issues, whether a result of poor posture,heavy lifting, or injury, can produce symptoms such as difficulty in taking deepbreaths or even pain in the front of the chest.
Working on improving your posture and lifting habits and making sure that you sitin a good chair with a firm back support can help relieve thoracic spine stiffness orpain. And to further promote a healthy back, add exercises that target your thoracicspine, shoulders, and chest.

SCAPULAR RANGE OF MOTION
Sit or stand, keeping your neck, shoulders, and torso in a relaxed, neutral position. Keepingyour chin level, look straight ahead.

With your arms at your side, bend your elbows slightly. Hold your hands with the palms up. Roll your shoulders forward, concentrating on separating your scapula from your spine.
Roll your shoulders back and slightly upward, squeezing your scapulae together.

Roll your shoulders down and backward.
DO IT RIGHTDO• Move your shoulders in a smooth, controlled manner.AVOID• Moving your torso.

ANNOTATION KEYItalic text indicates bonesBold text indicates active musclesGray text indicates stabilizing muscles* indicates deep muscles
BEST FOR• trapezius• levator scapulae• scapula• erector spinae

Lower your shoulders while continuing to squeeze your scapulae together. Lower your shoulders to the neutral starting position. Repeat entire sequence three times.
QUICK GUIDETARGET• Shoulders• Scapula• NeckTYPE• FlexibilityLEVEL• BeginnerBENEFITS• Improves range of motion• Relaxes tight neck, shoulder, chest, and upper-back muscles• Stabilizes your shoulder bladesNOT ADVISABLE IF YOU HAVE• Shoulder injury

SHOULDER STRETCH I
Sit or stand, keeping your neck, shoulders, and torso straight.
Raise your right arm, and bend it behind your head.
Keeping your shoulders relaxed, grasp your raised elbow with your left hand, and gently pullback.
Continue to pull your elbow back until you feel the stretch on the underside of your arm. Holdfor fifteen seconds.
Repeat three times on each arm.
DO IT RIGHT
DO• Keep your dropped elbow close to the side of your head.
AVOID

• Leaning backward.
BEST FOR• triceps brachii• infraspinatus• teres major• teres minor• latissimus dorsi
ANNOTATION KEYBold text indicates active musclesGray text indicates stabilizing muscles* indicates deep muscles
QUICK GUIDETARGET• Shoulders• TricepsTYPE• FlexibilityLEVEL• BeginnerBENEFITS• Improves range of motionNOT ADVISABLE IF YOU HAVE• Shoulder instability

SHOULDER STRETCH II
Stand up straight, with your right arm drawn across your body at chest height. With your lefthand, apply pressure to your right elbow.
Hold for fifteen seconds, release, and repeat three times. Repeat three times on left arm.

BEST FOR• deltoideus posterior• triceps brachii• teres minor• obliquus externus• infraspinatus
DO IT RIGHTDO• Keep your elbow straight while you apply pressure with your hand.AVOID• Lifting your shoulders toward your ears.
ANNOTATION KEYBold text indicates active musclesGray text indicates stabilizing muscles* indicates deep muscles

QUICK GUIDETARGET• ShouldersTYPE• Stretching/flexibilityLEVEL• BeginnerBENEFITS• Stretches posterior deltoidNOT ADVISABLE IF YOU HAVE• Rotator cuff injury• Shoulder instability

SIDE BENDING
Stand, keeping your neck, shoulders, and torso straight.
Raise both arms above your head and clasp your hands together, palms facing upward.

Leaning from the hips, slowly drop your torso to the right.
DO IT RIGHTDO• Elongate your arms and shoulders as much as possible.AVOID• Dropping to the side too quickly.
QUICK GUIDETARGET• Upper back• Obliques
TYPE• Flexibility
LEVEL• Beginner
BENEFITS

• Helps correct bad posture
NOT ADVISABLE IF YOU HAVE• Lower-back pain
ANNOTATION KEYBold text indicates active musclesGray text indicates stabilizing muscles* indicates deep muscles
Keeping a smooth flow, lean your torso to the left. Repeat the entire sequence five times.

BEST FOR• latissimus dorsi• obliquus internus• erector spinae• multifidus spinae
LATISSIMUS DORSI STRETCH
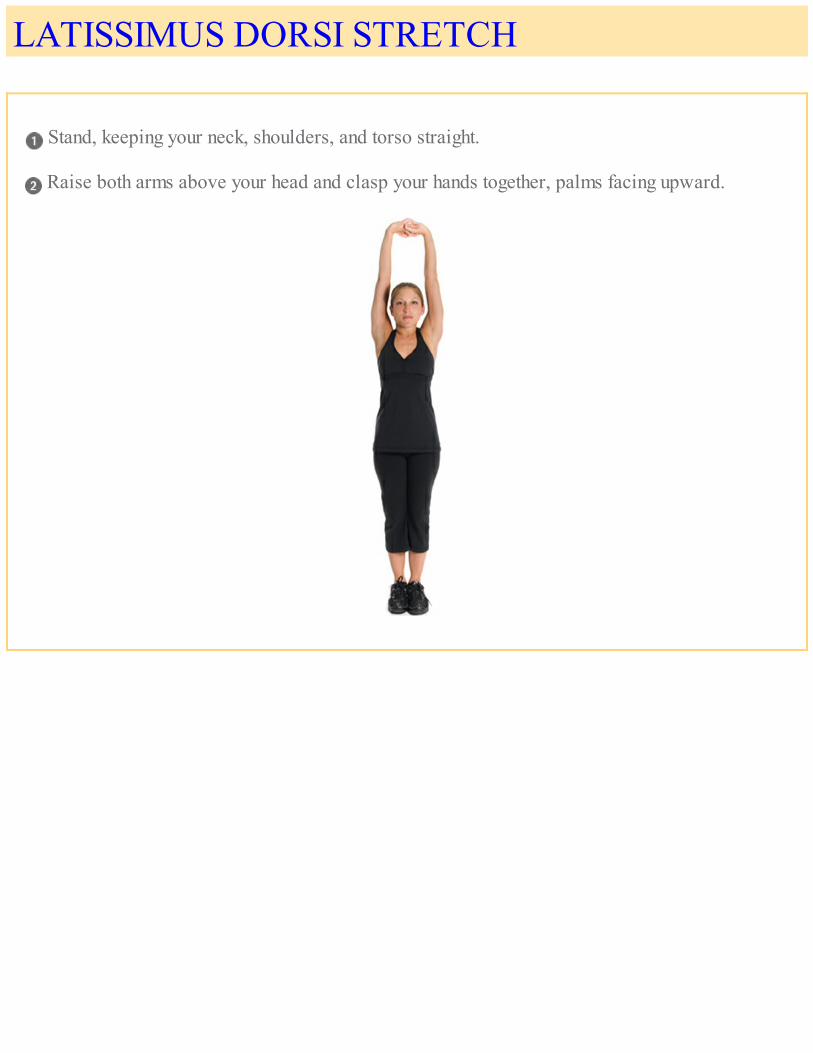
Stand, keeping your neck, shoulders, and torso straight.
Raise both arms above your head and clasp your hands together, palms facing upward.

Keeping your elbows straight, reach to the side to begin tracing a circular pattern with yourtorso.
DO IT RIGHT
DO• Elongate your arms and shoulders as much as possible.
AVOID• Leaning backward as you come to the top of the circle.
QUICK GUIDETARGET• Back• Obliques
TYPE• Flexibility

LEVEL• Beginner
BENEFITS• Helps correct bad posture
NOT ADVISABLE IF YOU HAVE• Lower-back pain
Lean forward and then to the opposite side as you slowly trace a full circle.
Return to the starting position, and then repeat the sequence three times in each direction.
BEST FOR• latissimus dorsi• obliquus internus
ANNOTATION KEYBold text indicates active musclesGray text indicates stabilizing muscles* indicates deep muscles

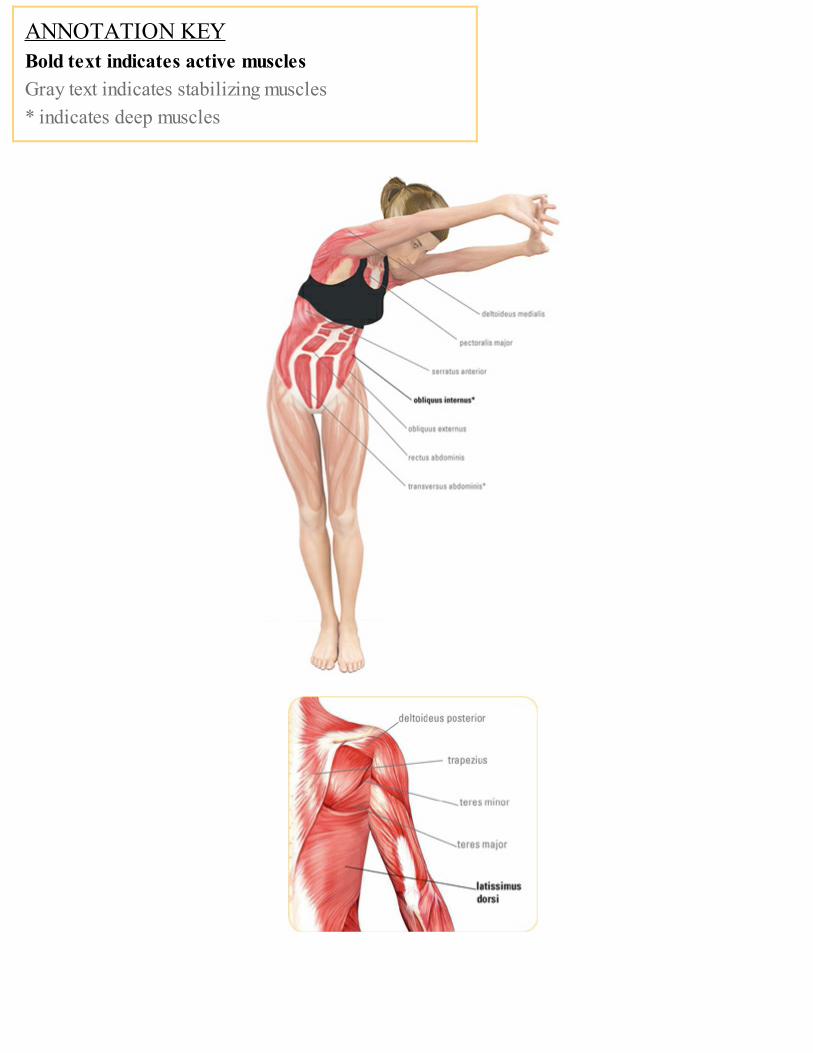
PECTORAL STRETCH
Stand straight with your arms behind your back and your hands clasped together.
Pinch your shoulder blades together as you reach and lift your arms away from your body,making sure to keep your elbows straight.
Hold for fifteen seconds before returning your arms to the starting position. Repeat three times.

ANNOTATION KEYBold text indicates active musclesGray text indicates stabilizing muscles* indicates deep muscles
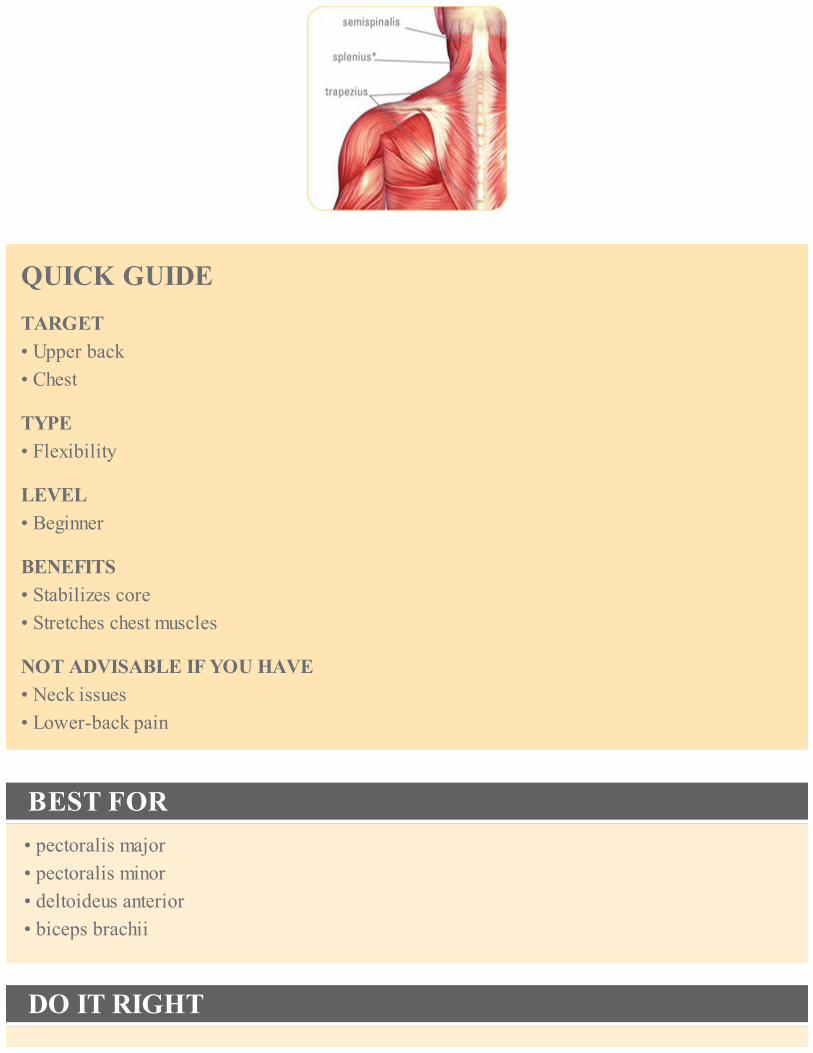
QUICK GUIDETARGET• Upper back• Chest
TYPE• Flexibility
LEVEL• Beginner
BENEFITS• Stabilizes core• Stretches chest muscles
NOT ADVISABLE IF YOU HAVE• Neck issues• Lower-back pain
BEST FOR• pectoralis major• pectoralis minor• deltoideus anterior• biceps brachii
DO IT RIGHT

DO• Keep your elbows straight during the movement.
AVOID• Leaning your trunk too far forward while stretching—this can be harmful to your back.
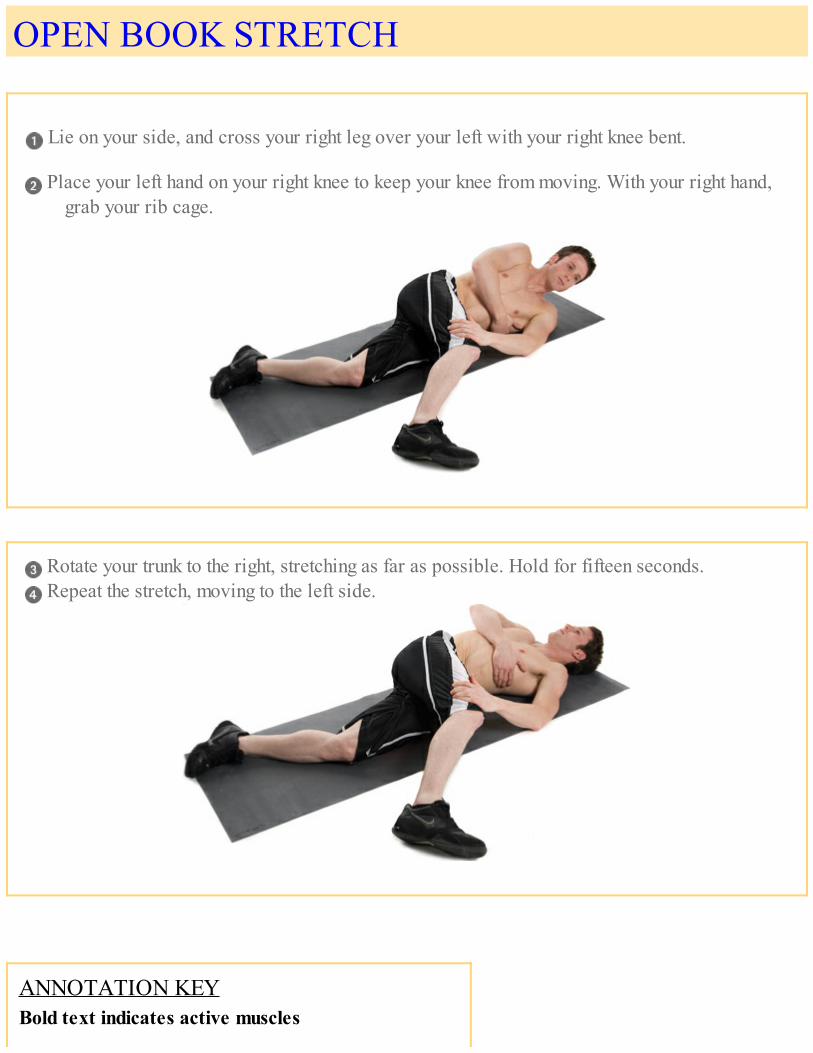
OPEN BOOK STRETCH
Lie on your side, and cross your right leg over your left with your right knee bent.
Place your left hand on your right knee to keep your knee from moving. With your right hand,grab your rib cage.
Rotate your trunk to the right, stretching as far as possible. Hold for fifteen seconds. Repeat the stretch, moving to the left side.
ANNOTATION KEYBold text indicates active muscles
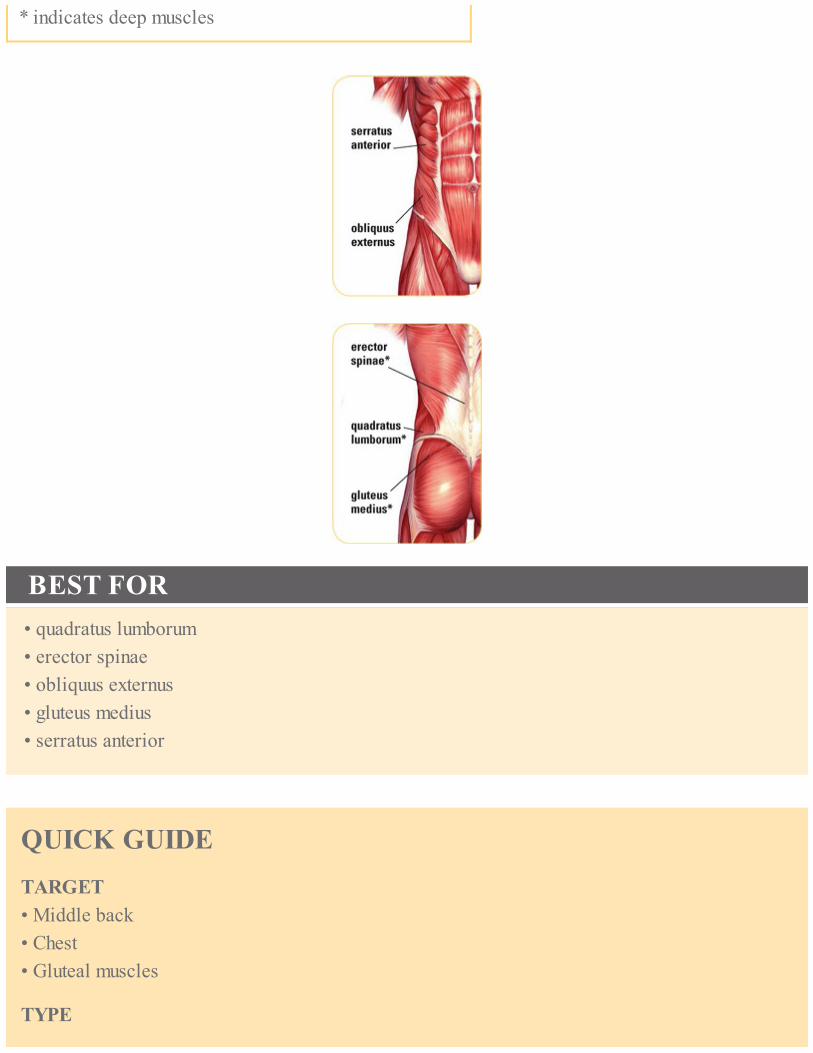
* indicates deep muscles
BEST FOR• quadratus lumborum• erector spinae• obliquus externus• gluteus medius• serratus anterior
QUICK GUIDETARGET• Middle back• Chest• Gluteal muscles
TYPE
• Flexibility
LEVEL• Beginner
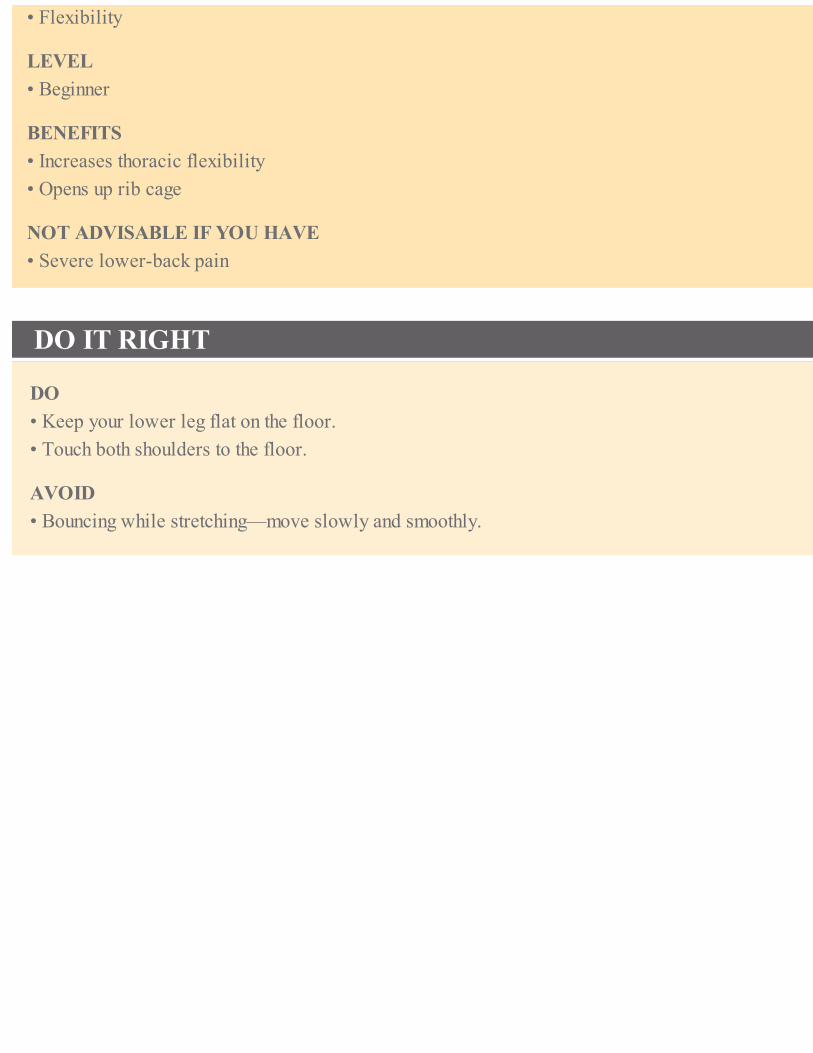
BENEFITS• Increases thoracic flexibility• Opens up rib cage
NOT ADVISABLE IF YOU HAVE• Severe lower-back pain
DO IT RIGHT
DO• Keep your lower leg flat on the floor.• Touch both shoulders to the floor.
AVOID• Bouncing while stretching—move slowly and smoothly.
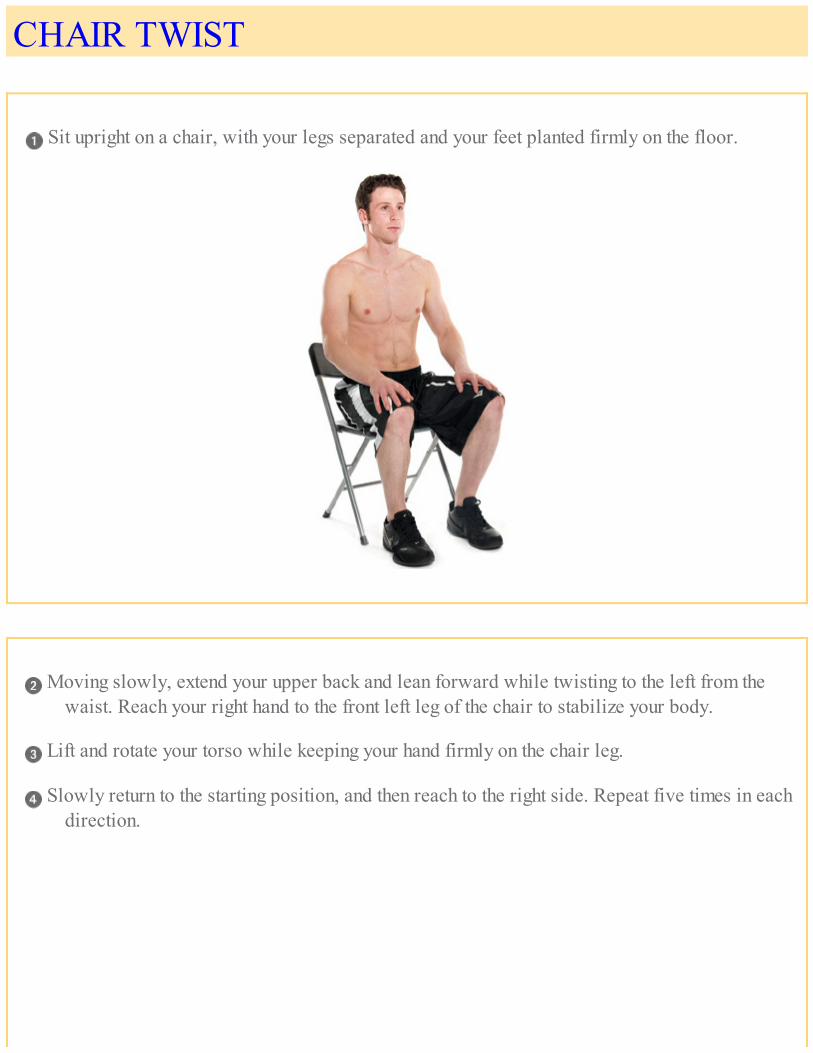
CHAIR TWIST
Sit upright on a chair, with your legs separated and your feet planted firmly on the floor.
Moving slowly, extend your upper back and lean forward while twisting to the left from thewaist. Reach your right hand to the front left leg of the chair to stabilize your body.
Lift and rotate your torso while keeping your hand firmly on the chair leg.
Slowly return to the starting position, and then reach to the right side. Repeat five times in eachdirection.

DO IT RIGHTDO• Move carefully—lower yourself to only as far as you feel a distinct stretch. As you become more
flexible, you can deepen the stretch.AVOID• Lifting your buttocks off the chair.
QUICK GUIDETARGET• Upper back• Back extensors• Obliques
TYPE• Flexibility

LEVEL• Beginner
BENEFITS• Increases thoracic rotation• Stretches rhomboid muscles
NOT ADVISABLE IF YOU HAVE• Torn rotator cuff• Shoulder instability
BEST FOR• iliocostalis thoracis• multifidus spinae• obliquus externus• obliquus internus

ANNOTATION KEYBold text indicates active musclesGray text indicates stabilizing muscles* indicates deep muscles

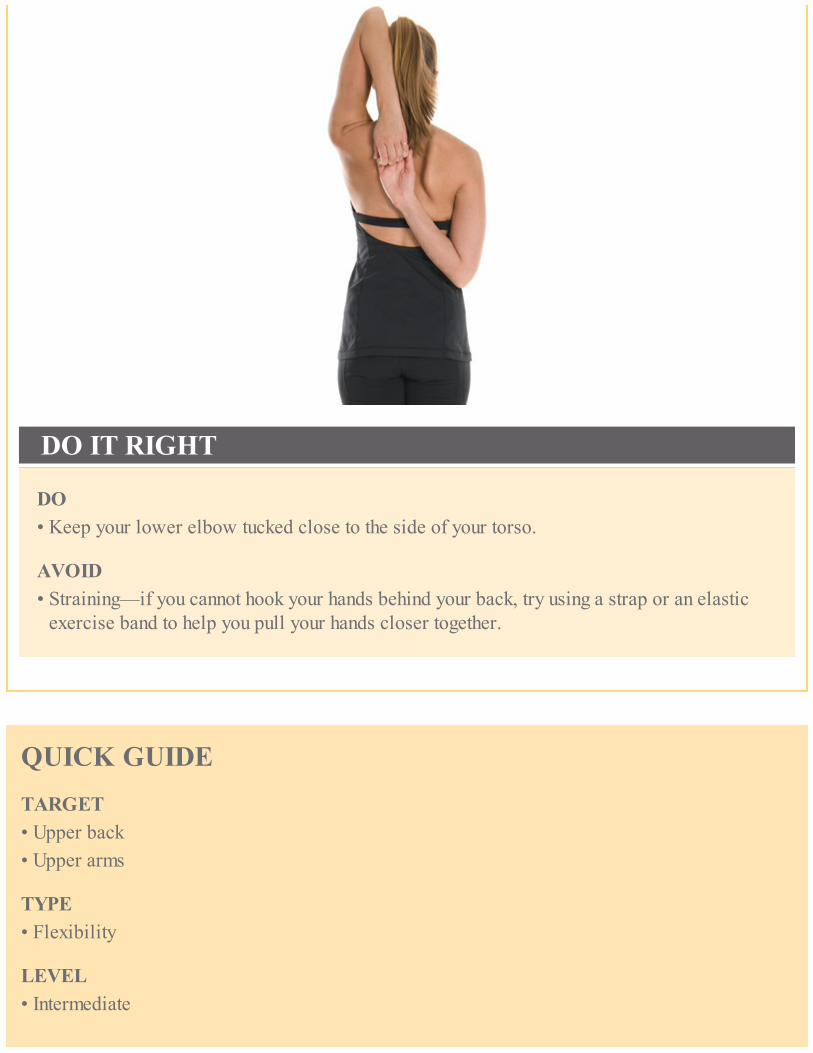
POSTERIOR HAND CLASP
Sit or stand, keeping your neck, shoulders, and torso straight. your arms should hang loosely atyour sides.
Extend your right hand to the side, parallel to the floor.
Bend your elbow, and rotate your shoulder downward so that the palm of your hand facesbehind you. Reach behind your back, palm still up, and draw your elbow into your right side.
Continue to rotate your shoulder downward as you reach upward with your hand until yourforearm is parallel to your spine. your right hand should rest in between your shoulderblades.
Reach your left arm up with your palm facing directly behind you. Bend your elbow, reachingyour left hand down the center of your back.
Hook your hands together behind your back. Lift your chest, and pull your abdominals intoward your spine.
Hold for about thirty seconds to one minute. Release your arms, and repeat with your armsreversed for the same length of time.
DO IT RIGHT
DO• Keep your lower elbow tucked close to the side of your torso.
AVOID• Straining—if you cannot hook your hands behind your back, try using a strap or an elastic
exercise band to help you pull your hands closer together.
QUICK GUIDETARGET• Upper back• Upper arms
TYPE• Flexibility
LEVEL• Intermediate

BENEFITS• Stretches the shoulders, chest, and upper arms
NOT ADVISABLE IF YOU HAVE• Shoulder injury
BEST FOR• rhomboideus• teres minor• subscapularis• latissimus dorsi• deltoideus anterior• deltoideus medialis• deltoideus posterior• triceps brachii• pectoralis major• pectoralis minor
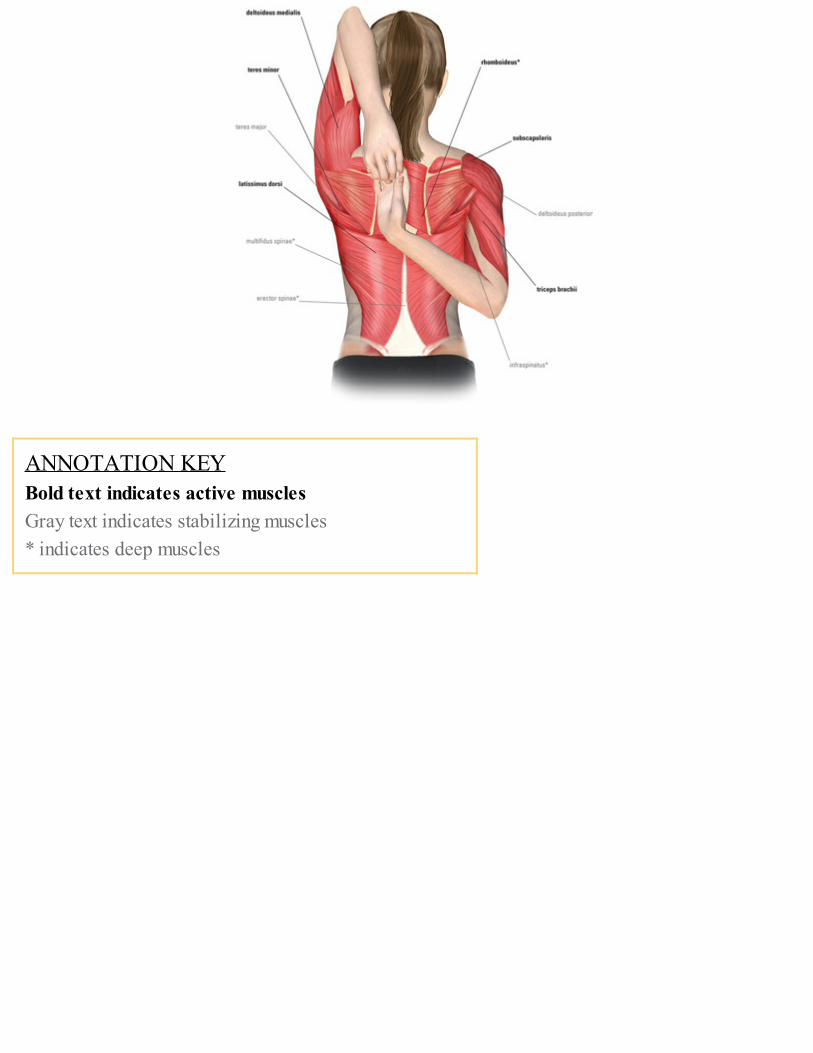
ANNOTATION KEYBold text indicates active musclesGray text indicates stabilizing muscles* indicates deep muscles
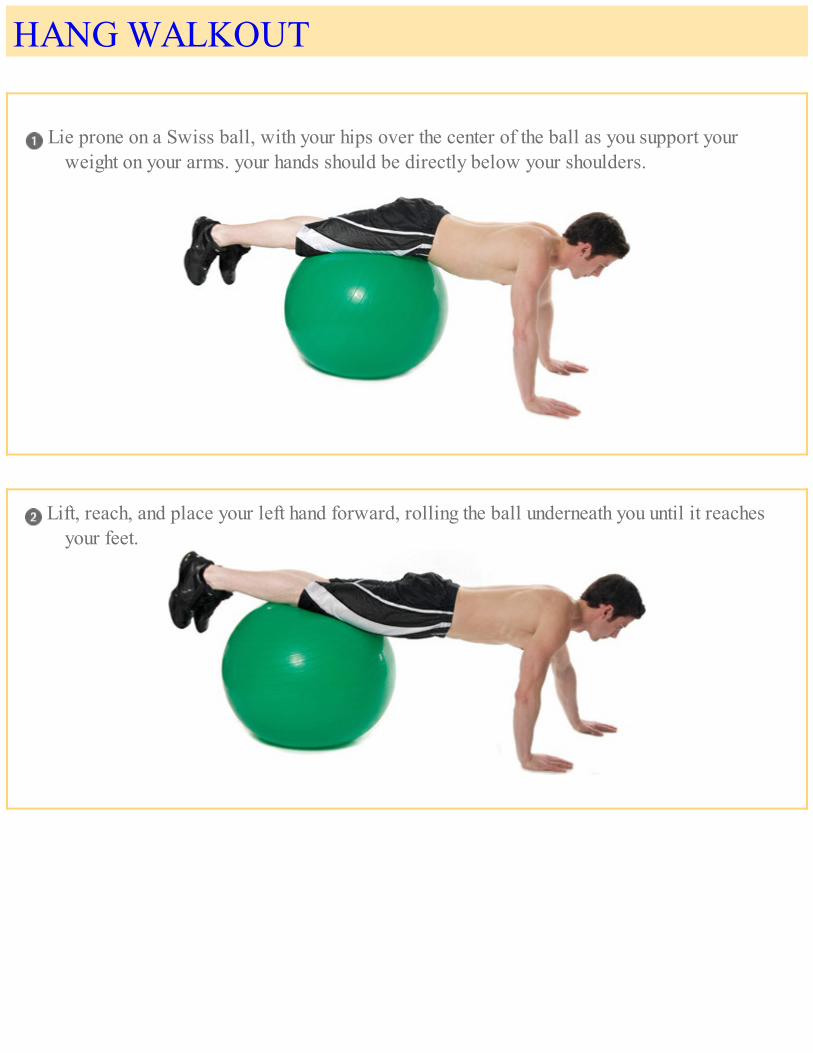
HANG WALKOUT
Lie prone on a Swiss ball, with your hips over the center of the ball as you support yourweight on your arms. your hands should be directly below your shoulders.
Lift, reach, and place your left hand forward, rolling the ball underneath you until it reachesyour feet.
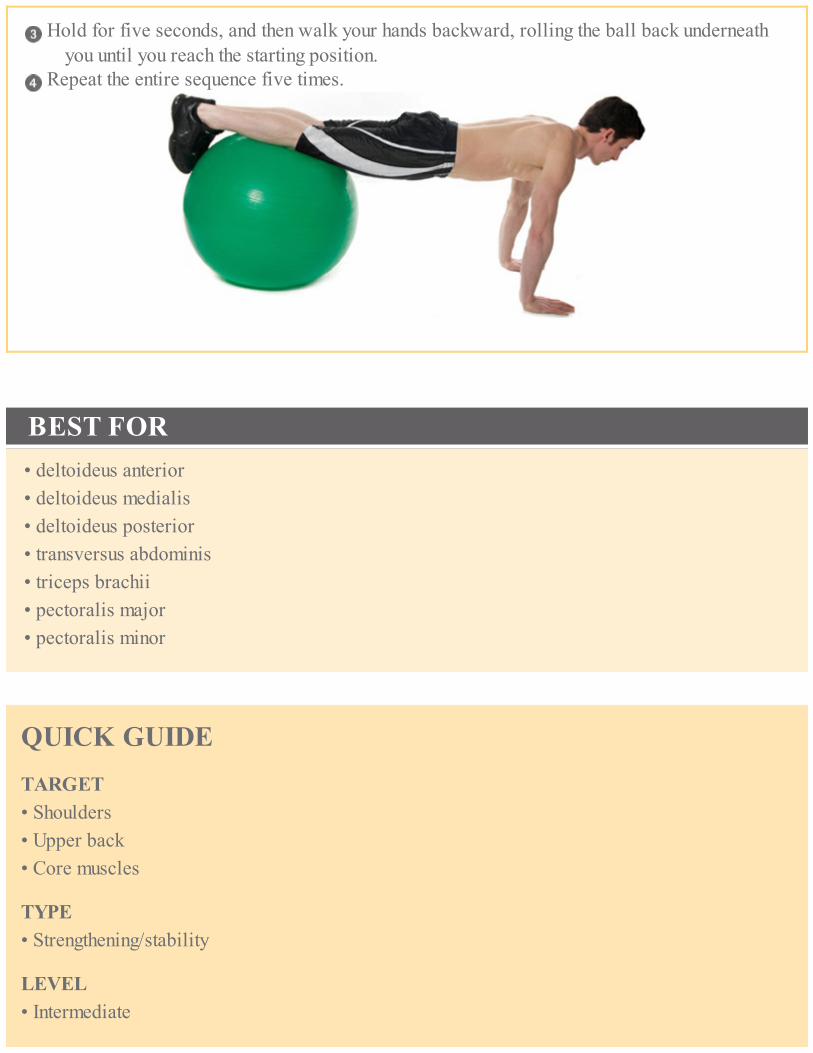
Hold for five seconds, and then walk your hands backward, rolling the ball back underneathyou until you reach the starting position.
Repeat the entire sequence five times.
BEST FOR• deltoideus anterior• deltoideus medialis• deltoideus posterior• transversus abdominis• triceps brachii• pectoralis major• pectoralis minor
QUICK GUIDETARGET• Shoulders• Upper back• Core muscles
TYPE• Strengthening/stability
LEVEL• Intermediate

BENEFITS• Strengthens shoulders• Stabilizes core• Strengthens abdominals
NOT ADVISABLE IF YOU HAVE• Wrist pain• Lower-back pain• Shoulder instability
DO IT RIGHTDO• Form a straight plane from neck to ankles.• Activate your abdominals as you straighten your back.AVOID• Arching your back during the exercise.• Allowing your hips to rotate.• Locking your elbows.• Reaching too far forward—start with a short position reach and progressively increase the length
as you gain stability.
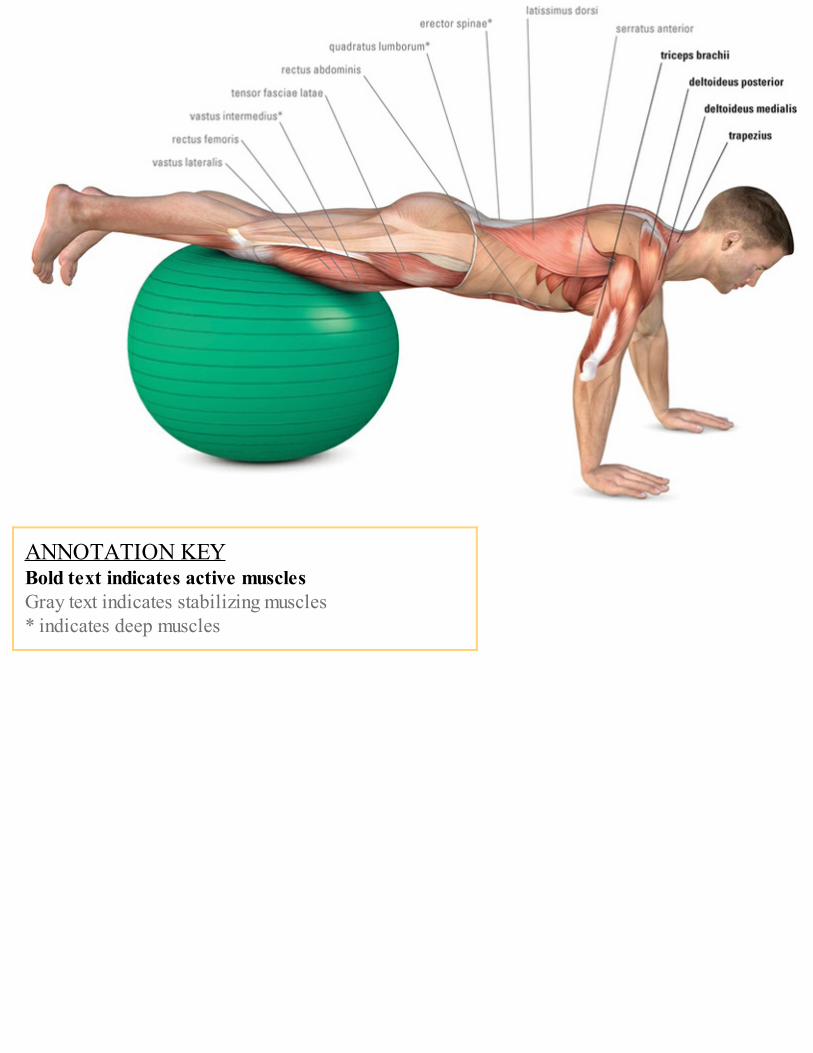
ANNOTATION KEYBold text indicates active musclesGray text indicates stabilizing muscles* indicates deep muscles

HAND WALK-AROUND
Lie prone on a Swiss ball, and move forward until just your shins and upper feet are proppedon the ball as you support your weight on your arms. Your hands should be directly belowyour shoulders.
Lift, reach, and place your left hand to the side, followed by the right hand, as you “walk” in acircle.

Rotate 90 degrees to your left, or a quarter turn, and then hand walk back to the startingposition.
Repeat the entire sequence, moving to the right.
BEST FOR• deltoideus anterior• deltoideus medialis• deltoideus posterior• triceps brachii• transversus abdominis• pectoralis major• pectoralis minor
QUICK GUIDETARGET• Shoulders• Upper back• Core muscles
TYPE• Strengthening/stability
LEVEL• Intermediate
BENEFITS

• Strengthens shoulders• Stabilizes core• Strengthens abdominals
NOT ADVISABLE IF YOU HAVE• Wrist pain• Lower-back pain• Shoulder instability
DO IT RIGHT
DO• Form a straight plane from neck to ankles.• Activate your abdominals as you straighten your back.
AVOID• Arching your back during the exercise.• Allowing your hips to rotate.• Locking your elbows.

ANNOTATION KEYBold text indicates active musclesGray text indicates stabilizing muscles* indicates deep muscles
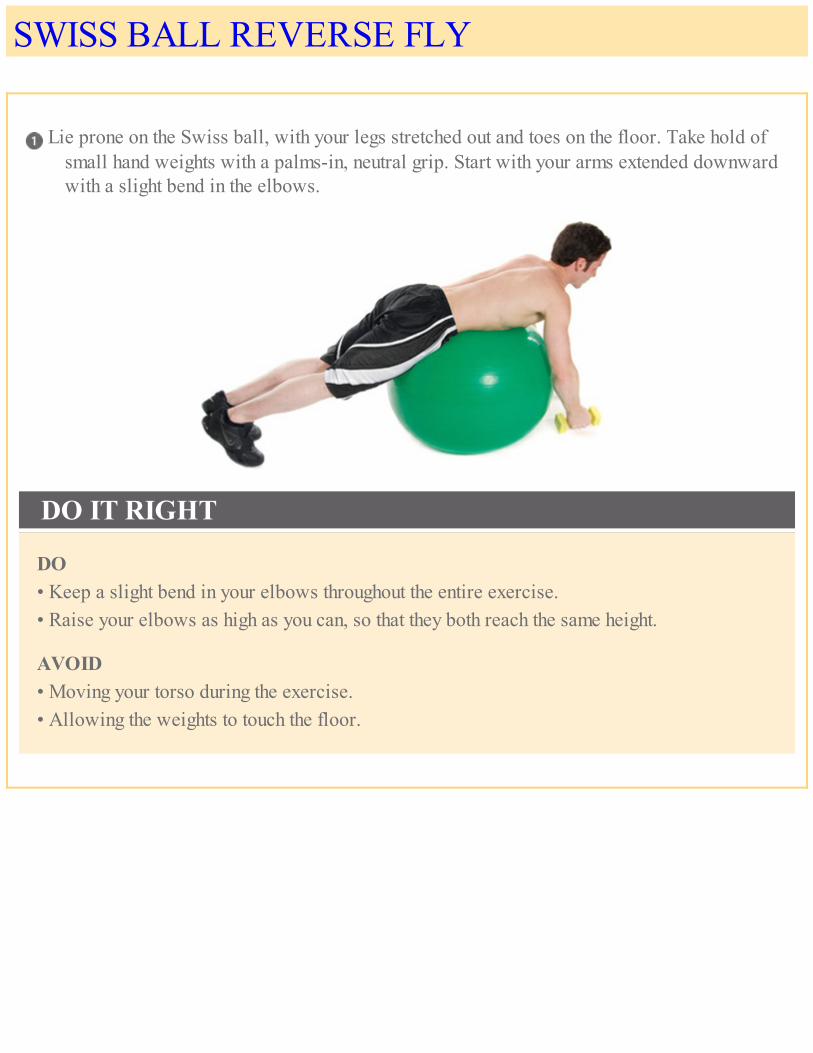
SWISS BALL REVERSE FLY
Lie prone on the Swiss ball, with your legs stretched out and toes on the floor. Take hold ofsmall hand weights with a palms-in, neutral grip. Start with your arms extended downwardwith a slight bend in the elbows.
DO IT RIGHT
DO• Keep a slight bend in your elbows throughout the entire exercise.• Raise your elbows as high as you can, so that they both reach the same height.
AVOID• Moving your torso during the exercise.• Allowing the weights to touch the floor.
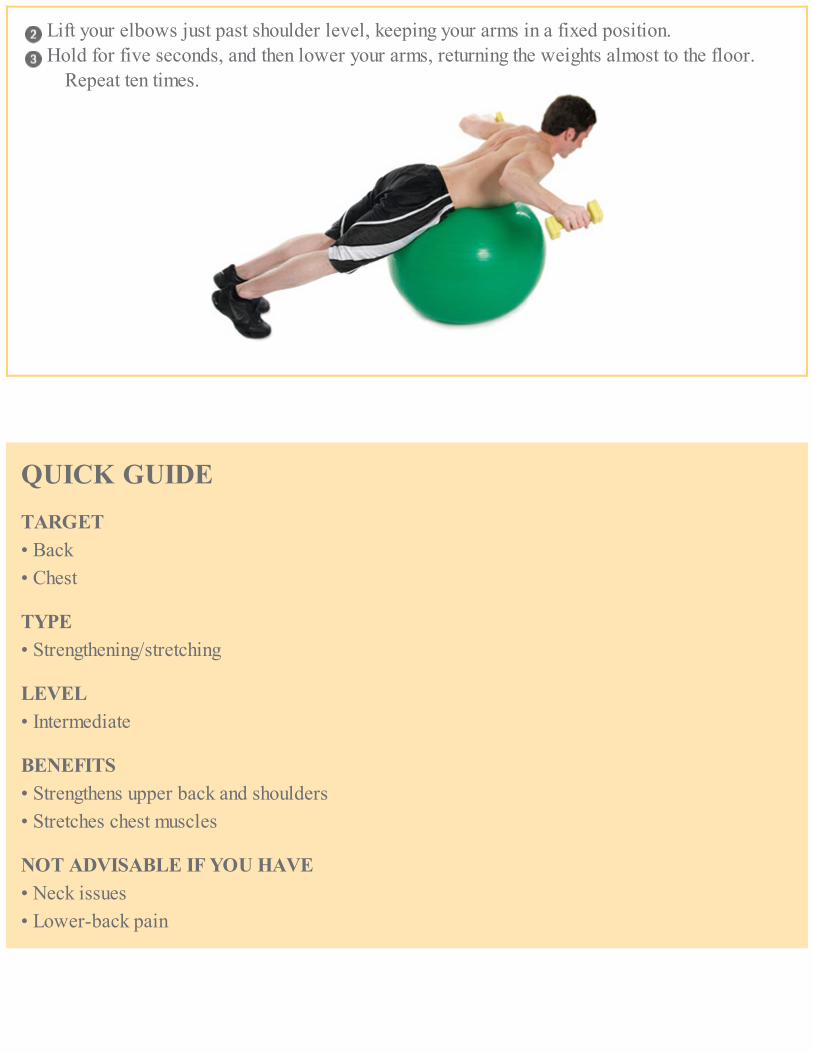
Lift your elbows just past shoulder level, keeping your arms in a fixed position. Hold for five seconds, and then lower your arms, returning the weights almost to the floor.
Repeat ten times.
QUICK GUIDETARGET• Back• Chest
TYPE• Strengthening/stretching
LEVEL• Intermediate
BENEFITS• Strengthens upper back and shoulders• Stretches chest muscles
NOT ADVISABLE IF YOU HAVE• Neck issues• Lower-back pain

BEST FOR• rhomboideus• teres minor• trapezius• deltoideus medialis• deltoideus posterior• triceps brachii• rectus abdominis• transversus abdominis• pectoralis major• pectoralis minor
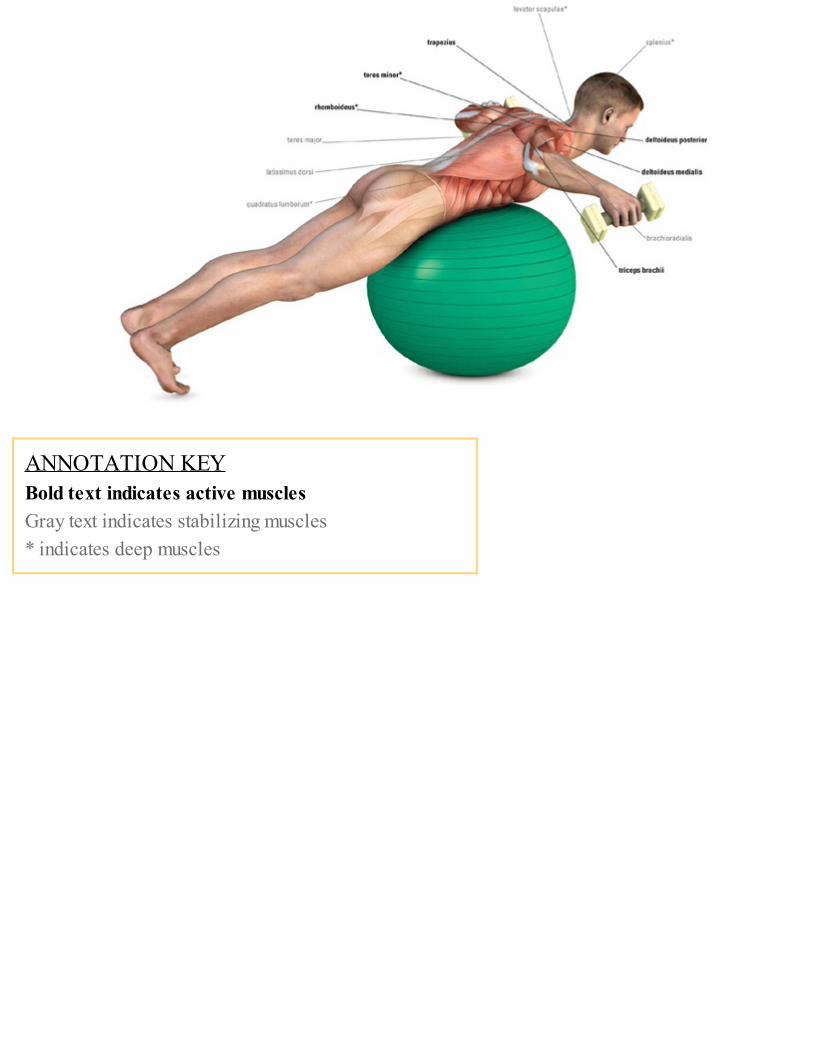
ANNOTATION KEYBold text indicates active musclesGray text indicates stabilizing muscles* indicates deep muscles

SWISS BALL ROW
Place two small hand weights on the side of a Swiss ball. Lie facedown on the ball with yourlegs stretched out straight behind you and your toes on the floor.
Grasp each weight with an overhand grip, with your arms extended down toward the floor,your hands pronated. This is your starting position.
BEST FOR• trapezius• rhomboideus• rectus femoris• deltoideus posterior• biceps brachii• latissimus dorsi• teres major• teres minor
Lift your elbows up past shoulder level, bending your arms at a 90-degree angle.
Pause, squeeze your shoulder blades together, and then extend your arms, returning the weightsback toward the floor.

QUICK GUIDETARGET• Upper back• Shoulders• Upper arms
TYPE• Strengthening
LEVEL• Intermediate
BENEFITS• Strengthens upper back and shoulders• Tones upper arms
NOT ADVISABLE IF YOU HAVE• Severe neck pain• Severe lower-back pain• Shoulder instability
DO IT RIGHT

DO• Keep your forearms vertical throughout the exercise.• Exhale as you flex your arms and lift your elbows, and inhale as you extend your arms down.• Keep your legs straight.
AVOID• Allowing the weights to touch the floor.• Moving your torso.
ANNOTATION KEYBold text indicates active musclesGray text indicates stabilizing muscles* indicates deep muscles

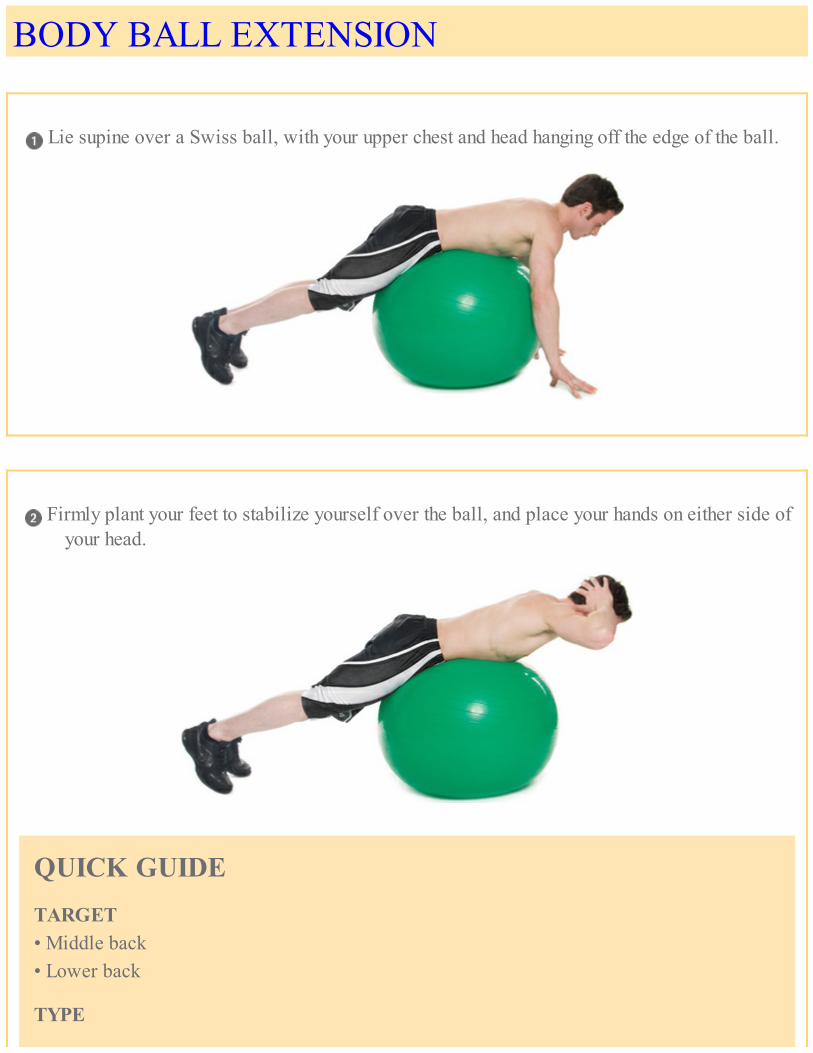
BODY BALL EXTENSION
Lie supine over a Swiss ball, with your upper chest and head hanging off the edge of the ball.
Firmly plant your feet to stabilize yourself over the ball, and place your hands on either side ofyour head.
QUICK GUIDETARGET• Middle back• Lower back
TYPE
• Strengthening/stability
LEVEL• Advanced
BENEFITS• Stabilizes core• Strengthens back extensor muscles• Strengthens abdominals
NOT ADVISABLE IF YOU HAVE• Neck issues• Lower-back pain
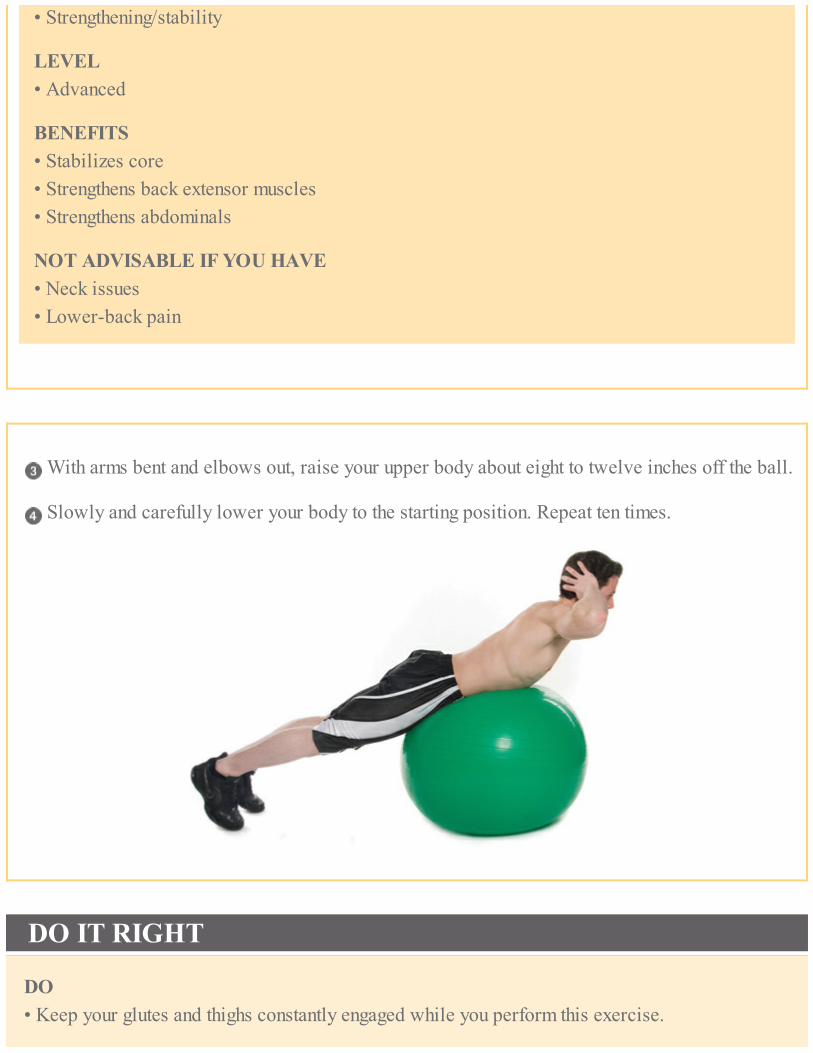
With arms bent and elbows out, raise your upper body about eight to twelve inches off the ball.
Slowly and carefully lower your body to the starting position. Repeat ten times.
DO IT RIGHT
DO• Keep your glutes and thighs constantly engaged while you perform this exercise.

• Keep your lower body taut.• Keep your head in neutral position.• Keep a wide base for extra balance.
AVOID• Elevating your shoulders.• Lifting your hip bones off the ball.
BEST FOR• erector spinae• gluteus maximus• biceps femoris• semitendinosus• semimembranosus• adductor magnus• latissimus dorsi• teres major• triceps brachii• deltoideus posterior• brachialis• brachioradialis• biceps brachii

• trapezius• pectoralis minor• rhomboideus• multifidus spinae
ANNOTATION KEYBold text indicates active musclesGray text indicates stabilizing muscles* indicates deep muscles

BACKWARD BALL STRETCH
Sit on a Swiss ball in a well-balanced, neutral position, with your hips directly over the centerof the ball.
Raise your arms while maintaining good balance, and begin to extend them behind you.

As you continue to extend your hands backward, walk your feet forward, allowing the ball toroll up your spine.
As your hands touch the floor, extend your legs as far forward as you comfortably can. Holdthis position for ten seconds.
To deepen the stretch, extend your arms, and walk your legs and hands closer to the ball. Holdthis position for ten seconds.

To release the stretch, bend your knees, drop your hips to the floor, lift your head off the ball,and then walk back to the starting position.
DO IT RIGHTDO• Maintain good balance throughout the stretch.• Move slowly and in a controlled manner.• Keep your head on the ball until you have dropped your knees all the way down as you release
from the stretch.AVOID• Lateral ball movement.• Holding the extended position for too long, or until you feel dizzy.
QUICK GUIDETARGET• Thoracic and upper lumbar spine• Abdominals
TYPE• Flexibility
LEVEL• Advanced
BENEFITS• Stretches thoracic spine• Increases spinal extension• Stretches abdominals and latissimus dorsi muscles

NOT ADVISABLE IF YOU HAVE• Lower-back pain• Balancing difficulty• Vestibular deficits
MODIFICATIONEasier: Follow steps 1 through 3, but rather than extend your hands to the floor, clasp them behindyour head. Hold this position for ten seconds, and release.
BEST FOR• deltoideus medialis• iliopsoas• latissimus dorsi• serratus anterior• pectoralis major• pectoralis minor• ligamentum longitudinale anterius
ANNOTATION KEYItalic text indicates ligamentsBold text indicates active musclesGray text indicates stabilizing muscles* indicates deep muscles

W
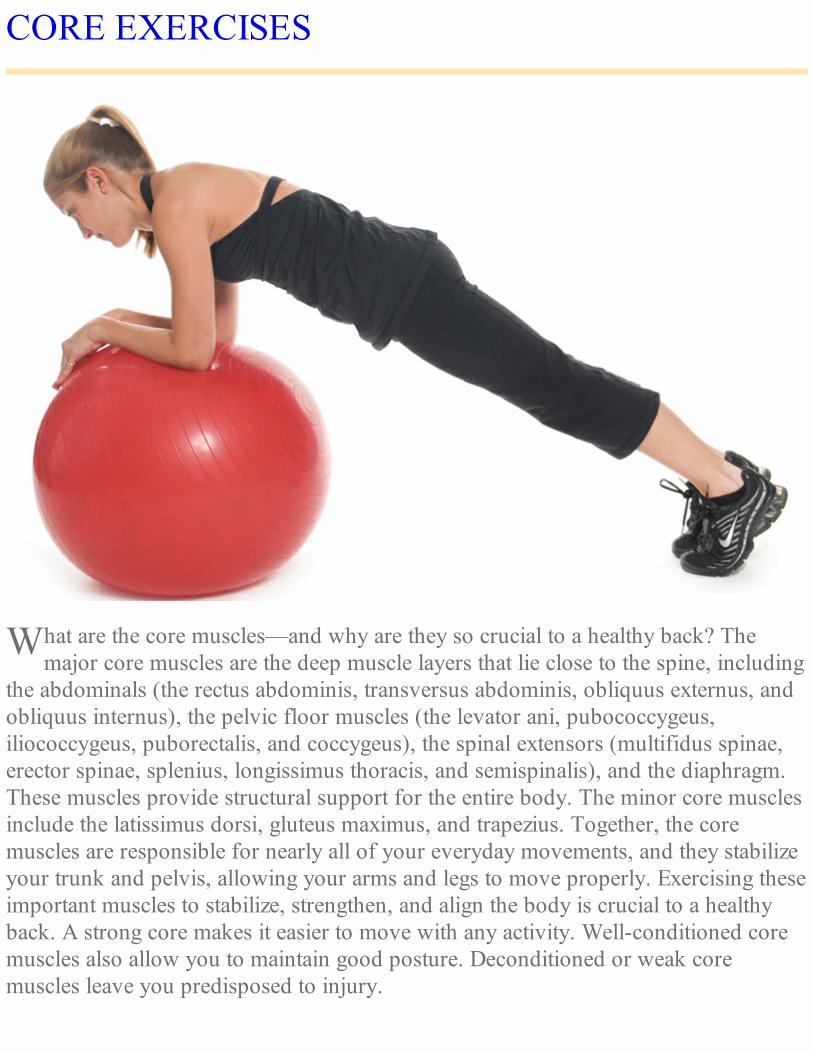
CORE EXERCISES
hat are the core muscles—and why are they so crucial to a healthy back? Themajor core muscles are the deep muscle layers that lie close to the spine, including
the abdominals (the rectus abdominis, transversus abdominis, obliquus externus, andobliquus internus), the pelvic floor muscles (the levator ani, pubococcygeus,iliococcygeus, puborectalis, and coccygeus), the spinal extensors (multifidus spinae,erector spinae, splenius, longissimus thoracis, and semispinalis), and the diaphragm.These muscles provide structural support for the entire body. The minor core musclesinclude the latissimus dorsi, gluteus maximus, and trapezius. Together, the coremuscles are responsible for nearly all of your everyday movements, and they stabilizeyour trunk and pelvis, allowing your arms and legs to move properly. Exercising theseimportant muscles to stabilize, strengthen, and align the body is crucial to a healthyback. A strong core makes it easier to move with any activity. Well-conditioned coremuscles also allow you to maintain good posture. Deconditioned or weak coremuscles leave you predisposed to injury.

SITTING BALANCE
Sit on a Swiss ball with your feet together and your hands resting on the ball at your sides.
Lift one foot off the floor, and hold for five seconds.

Put your foot down, and then lift your other foot. Repeat five times on each leg.
QUICK GUIDETARGET• Abdominals• Quadriceps
TYPE• Strengthening/stability
LEVEL• Beginner
BENEFITS• Stabilizes core• Strengthens abdominals
NOT ADVISABLE IF YOU HAVE• Neck issues• Lower-back pain

BEST FOR• rectus abdominis• transversus abdominis• rectus femoris• vastus lateralis• vastus intermedius• vastus medialis
DO IT RIGHT
DO• Sit up straight, and keep your abdominals activated.
AVOID• Leaning forward as you lift your leg.
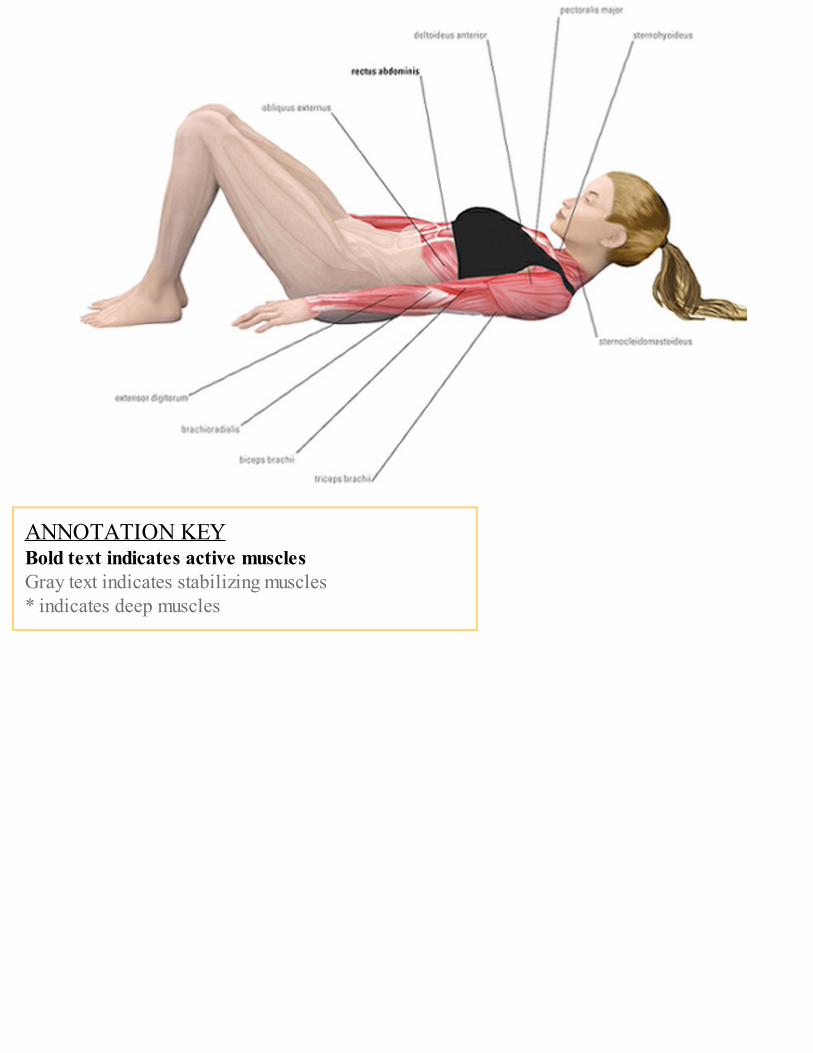
ANNOTATION KEY

Bold text indicates active musclesGray text indicates stabilizing muscles* indicates deep muscles

STANDING STABILITY
Stand on a foam block, balancing on your left leg with your right knee bent. Extend both armsout to the side, parallel to the floor.
ANNOTATION KEYBold text indicates active muscles* indicates deep muscles
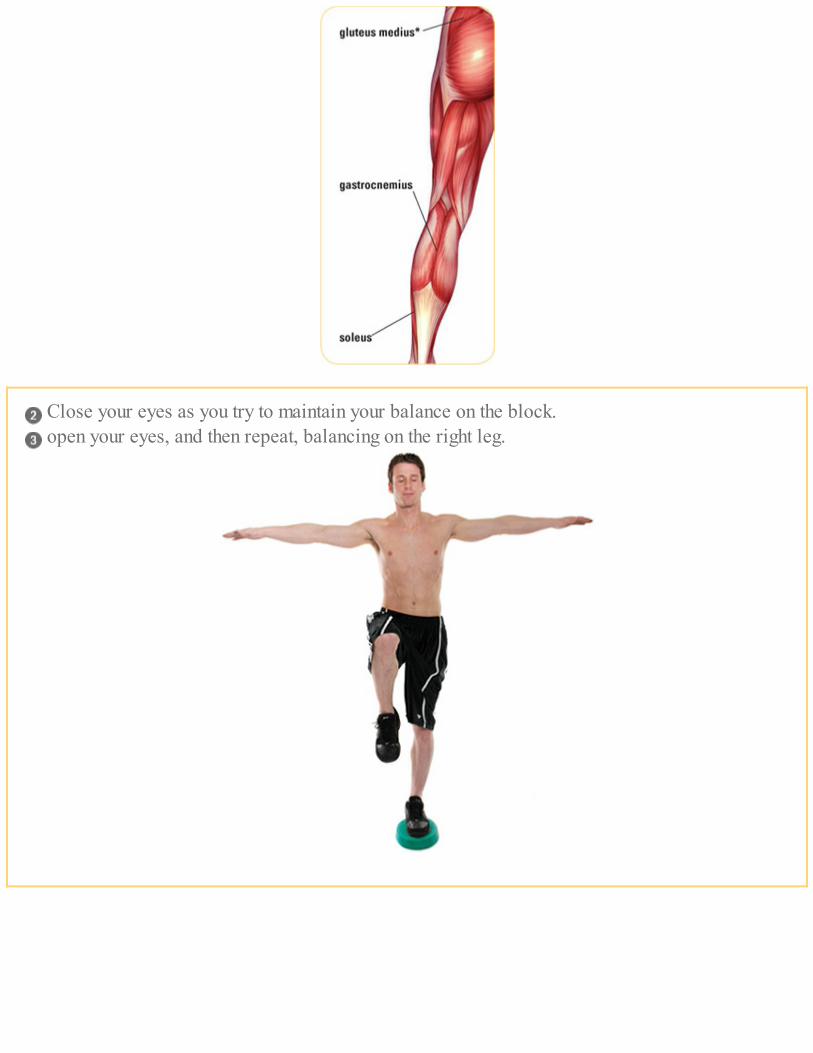
Close your eyes as you try to maintain your balance on the block. open your eyes, and then repeat, balancing on the right leg.

QUICK GUIDETARGET• Abdominals• Gluteal muscles• Inner hip muscles
TYPE• Stability/balance
LEVEL• Beginner
BENEFITS• Stabilizes core• Improves balance
NOT ADVISABLE IF YOU HAVE• Vestibular deficits
DO IT RIGHTDO• Open your eyes if you feel yourself tipping over.• Keep your raised knee parallel to the floor.AVOID• Sloping your shoulders—your arms should form a straight line from shoulder to fingertips.
BEST FOR

• rectus abdominis• transversus abdominis• gluteus medius• iliopsoas• iliacus• gastrocnemius• soleus
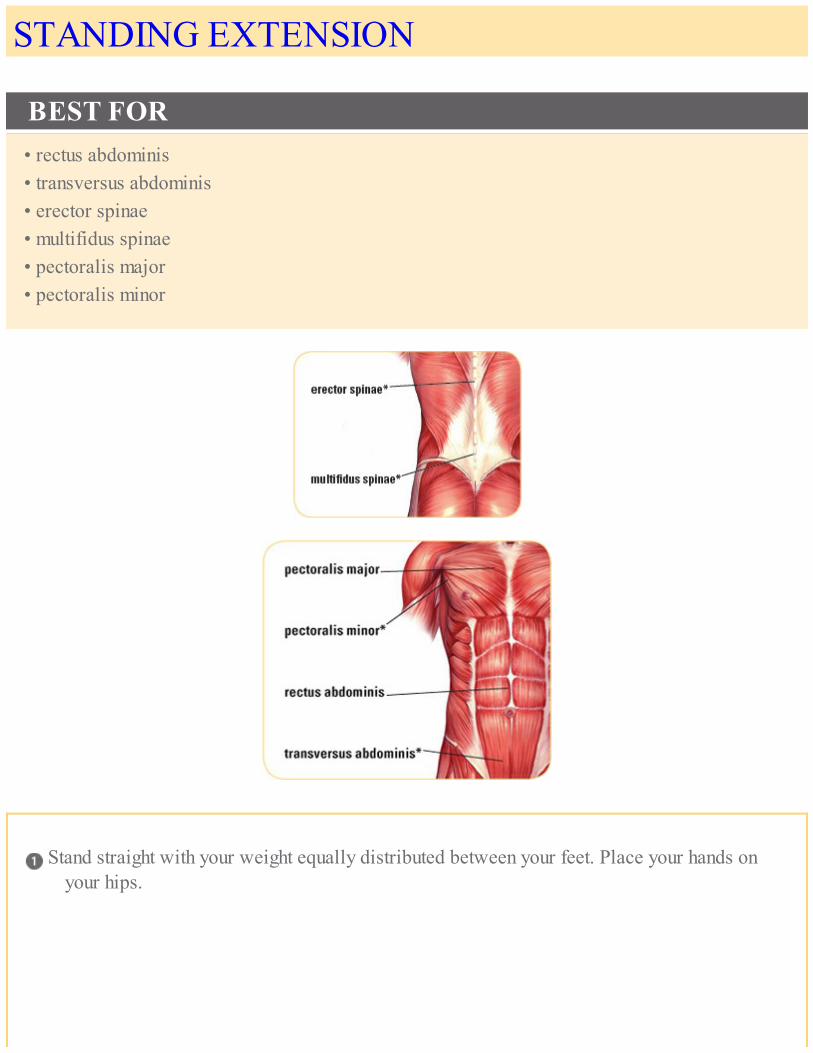
STANDING EXTENSION
BEST FOR• rectus abdominis• transversus abdominis• erector spinae• multifidus spinae• pectoralis major• pectoralis minor
Stand straight with your weight equally distributed between your feet. Place your hands onyour hips.

ANNOTATION KEYBold text indicates active muscles* indicates deep muscles
Arch backward as far as you can comfortably go. Return to the starting position, and repeat ten times.

DO IT RIGHT
DO• Keep your abdominals activated.
AVOID• Hunching your shoulders.
QUICK GUIDETARGET• Abdominals• Lower back
TYPE• Stability
LEVEL• Beginner
BENEFITS• Stabilizes core• Strengthens lower back
NOT ADVISABLE IF YOU HAVE• Neck issues• Lower-back pain

BASIC CRUNCH
Lie supine on the floor with your knees bent and your arms relaxed at your sides.

Clasp your hands behind your head. Keeping your elbows wide, engage the abdominals, andlift your upper torso to achieve a crunching movement.
Slowly return to the starting position. Repeat fifteen times for two sets.
BEST FOR• rectus abdominis• obliquus internus• obliquus externus• transversus abdominis
QUICK GUIDETARGET• AbdominalsTYPE• StrengtheningLEVEL• BeginnerBENEFITS• Strengthens the torso• Improves pelvic and core stabilityNOT ADVISABLE IF YOU HAVE• Back pain• Neck pain

ANNOTATION KEYBold text indicates active musclesGray text indicates stabilizing muscles* indicates deep muscles
DO IT RIGHT
DO• Initiate the movement with your abdominals.• Keep your pelvis in the neutral position during the crunching motion.• Tuck your chin slightly, directing your gaze toward the ceiling.
AVOID• Pulling from the neck.• Raising up more than 25 degrees.


ABDOMINAL KICK
Lie supine on the floor with your knees bent. Pull your right knee toward your chest andstraighten your left leg, raising it about 45 degrees from the floor.
Place your right hand on your right ankle, and your left hand on your right knee (this maintainsproper alignment of leg).

Switch your legs two times, switching your hand placement simultaneously.
QUICK GUIDETARGET• AbdominalsTYPE• StrengtheningLEVEL• BeginnerBENEFITS• Strengthens abdominals• Stabilizes core while extremities are in motionNOT ADVISABLE IF YOU HAVE• Neck issues• Lower-back pain
DO IT RIGHT
DO• Place your outside hand on the ankle of your bent leg, and your inside hand on your bent knee.• Lift the top of your sternum forward.
AVOID• Allowing your lower back to rise off the floor; use your abdominals to stabilize your core while
switching legs.

Switch your legs two more times, keeping your hands in their proper placement. Repeat four tosix times.
BEST FOR• rectus abdominis• transversus abdominis• obliquus internus• biceps femoris• triceps brachii• biceps brachii• tibialis anterior• tensor fasciae latae
ANNOTATION KEYBold text indicates active musclesGray text indicates stabilizing muscles* indicates deep muscles


HALF CURL
Lie supine on the floor with your knees bent and arms straight by your sides. Squeeze your legstogether and keep your feet flat on the floor.
Using your upper abdominals, curl your upper back and shoulders off the mat. Keep your armsparallel to the floor and your lower back on the mat.
Hold for ten seconds. Return to the starting position, and repeat ten times.
QUICK GUIDE

TARGET• Upper abdominals
TYPE• Strengthening
LEVEL• Beginner
BENEFITS• Strengthens core muscles• Increases abdominal endurance
NOT ADVISABLE IF YOU HAVE• Cervical spine issues
BEST FOR• rectus abdominis• latissimus dorsi• pectoralis major• sternohyoideus• sternocleidomastoideus• deltoideus medialis• biceps brachii• triceps brachii
DO IT RIGHT
DO• Keep your arms parallel to the floor.
AVOID• Curling your neck too far forward.• Allowing your feet to raise off the floor.• Raising up too far.
ANNOTATION KEYBold text indicates active musclesGray text indicates stabilizing muscles* indicates deep muscles

PRONE TRUNK RAISE
Lie prone on the floor. Bend your elbows, placing your hands flat on the floor on either side ofyour chest. Keep your elbows pulled in toward your body. Separate your legs hip-widthapart, and extend through your toes. The tops of your feet should be touching the floor.
Inhale, and press against the floor with your hands and the tops of your feet, lifting your torsoand hips off the floor. Contract your thighs, and tuck your tailbone toward your pubis.
QUICK GUIDETARGET• Abdominals• Back
TYPE• Strengthening/stability
LEVEL• Beginner
BENEFITS• Strengthens spine, arms, and wrists• Stretches chest and abdominals• Improves posture
NOT ADVISABLE IF YOU HAVE• Back injury• Wrist injury or carpal tunnel syndrome

Lift through the top of your chest, fully extending your arms and creating an arch in your backfrom your upper torso. Push your shoulders down and back, and elongate your neck as yougaze slightly upward.
Hold for fifteen to thirty seconds, and exhale as you lower yourself to the floor.
BEST FOR• rhomboideus• teres major• teres minor• trapezius

• latissimus dorsi• erector spinae• quadratus lumborum• gluteus maximus• pectoralis major• serratus anterior• rectus abdominis• triceps brachii
DO IT RIGHTDO• Elongate your legs and arms to create full extension.• Make sure that your wrists are positioned directly below your shoulders so that you do not exert
too much pressure on your lower back.AVOID• Lifting your shoulders up toward your ears.• Hyperextending your elbows.• Jutting your rib cage out of your chest.• Dropping your thighs.

ANNOTATION KEYBold text indicates active musclesGray text indicates stabilizing muscles* indicates deep muscles

SEATED PIRIFORMIS STRETCH
Sit upright on a chair, with your legs separated and your feet planted firmly on the floor.
Place your right ankle on your left knee.
QUICK GUIDETARGET• Piriformis• Gluteal musclesTYPE• FlexibilityLEVEL• BeginnerBENEFITS• Stretches and strengthens the gluteal muscles• Stretches the lower backNOT ADVISABLE IF YOU HAVE• Neck issues• Lower-back pain

Lean forward from the hips until you feel a stretch in your buttocks and lower back. Push downon your right knee, and pull up on your right ankle, using the opposite knee as a fulcrum.
Return to the starting position, and repeat with your left leg crossed over the right.
MODIFICATIONMore difficult: Follow steps 1 though 3, and then bend forward more deeply.
DO IT RIGHTDO• Bend only as far as is comfortable.AVOID• Allowing your buttocks to rise from the chair as you lean forward.

BEST FOR• piriformis• gluteus maximus• gluteus medius• gluteus minimus• erector spinae• quadratus femoris
PIRIFORMIS STRETCH
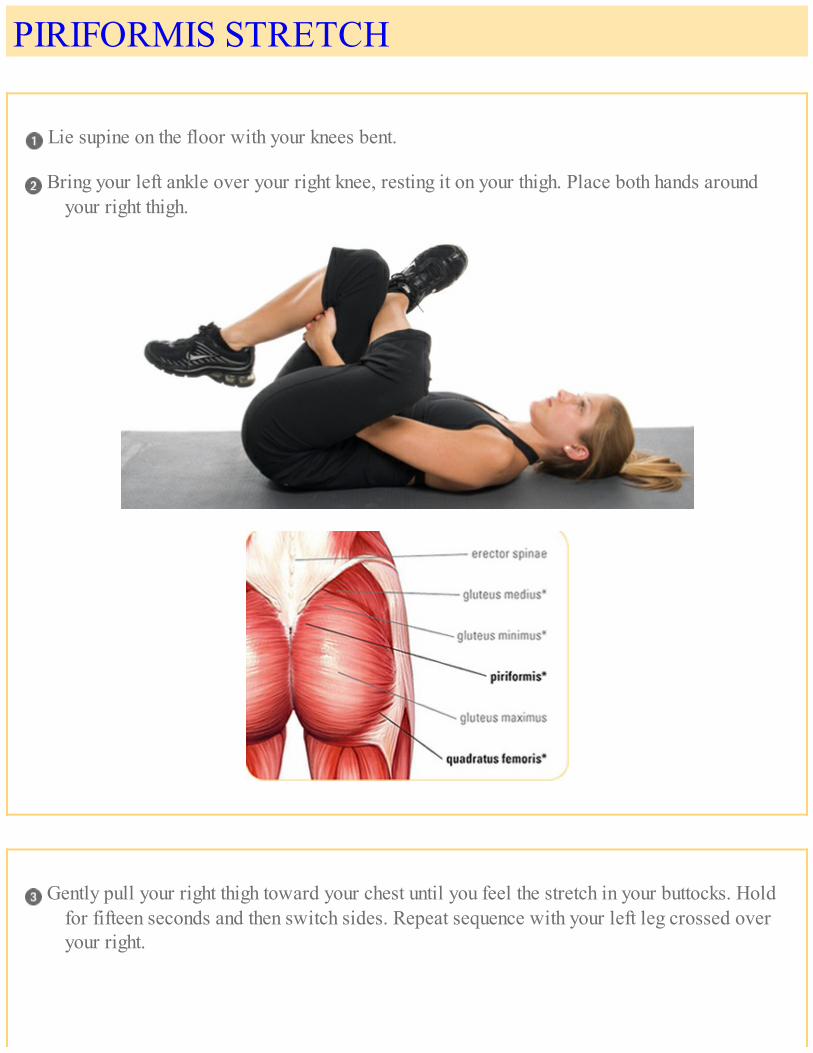
Lie supine on the floor with your knees bent.
Bring your left ankle over your right knee, resting it on your thigh. Place both hands aroundyour right thigh.
Gently pull your right thigh toward your chest until you feel the stretch in your buttocks. Holdfor fifteen seconds and then switch sides. Repeat sequence with your left leg crossed overyour right.

ANNOTATION KEYBold text indicates active musclesGray text indicates stabilizing muscles* indicates deep muscles
QUICK GUIDETARGET• Piriformis• Gluteal muscles
TYPE• Flexibility
LEVEL• Intermediate
BENEFITS• Stretches and strengthens the piriformis and gluteal muscles
NOT ADVISABLE IF YOU HAVE• Hip dysfunction
DO IT RIGHT
DO

• Relax your hips so that you can go deeper into the stretch.
AVOID• Rushing the stretch.
BEST FOR• piriformis• gluteus maximus• gluteus medius• gluteus minimus• erector spinae• quadratus femoris

RUSSIAN TWIST
Sit with your knees bent and your feet flat on the floor. Lift up through your torso. Raise yourarms parallel to the floor so that your hands are outstretched above your knees.
BEST FOR• rectus abdominis• obliquus internus• obliquus externus• transversus abdominis• vastus intermedius• rectus femoris• iliacus• iliopsoas
Rotate your upper body to the right, reaching toward the floor with your hands.

Pass through the center and rotate to the left. Repeat ten times on each side.

QUICK GUIDETARGET• Abdominals• Hip flexors• QuadricepsTYPE• StrengtheningLEVEL• IntermediateBENEFITS• Increases abdominal endurance• Strengthens hip flexorsNOT ADVISABLE IF YOU HAVE• Neck issues• Lower-back pain
MODIFICATIONMore difficult: Lift your feet off the floor, and rotate your torso from side to side, pulling yourknees in and out as you twist.
DO IT RIGHTDO• Keep your feet planted on the floor as you twist.• Squeeze your knees together.• Keep your neck and shoulders relaxed.AVOID• Shifting your feet or knees to the sides as you twist.

ANNOTATION KEYBold text indicates active musclesGray text indicates stabilizing muscles* indicates deep muscles

LOW CURL-UP
Lie supine on the floor with your legs straight and your arms outstretched to the sides. Yourspine should be in a neutral position.
Tighten your abdominals, and without flattening or bending your lower back, curl up yourupper body by raising your head and shoulders off the floor.
Hold for two seconds. Return to the starting position, and repeat ten times.

QUICK GUIDETARGET• Lower abdominals• Neck muscles
TYPE• Strengthening
LEVEL• Intermediate
BENEFITS• Stabilizes core• Strengthens abdominals
NOT ADVISABLE IF YOU HAVE• Neck issues• Lower-back pain
BEST FOR• rectus abdominis• transversus abdominis• pectoralis major• sternohyoideus• sternocleidomastoideus• deltoideus medialis• trapezius
DO IT RIGHT
DO• Curl up without bending your neck if you feel any pain.
AVOID• Bending your knees as you lift your shoulders.

ANNOTATION KEYBold text indicates active musclesGray text indicates stabilizing muscles* indicates deep muscles

REVERSE BRIDGE ROTATION
Lie supine with your shoulders and lower back on a Swiss ball and your feet hip-width apart.Your knees should be bent at 90 degrees.
Pick up a medicine ball with both hands, and position your arms straight up.
Rotate your upper body to the left, rolling onto your left shoulder on top of the Swiss ball. Hold for five seconds, and then slowly roll back to the starting position with the Swiss ball in
the center of your shoulders.

Repeat the exercise, rotating your torso and rolling your shoulders to the right.
BEST FOR• obliquus externus• obliquus internus
QUICK GUIDETARGET• Obliques• AbdominalsTYPE• Strengthening/stabilityLEVEL• IntermediateBENEFITS• Stabilizes core• Strengthens obliques and abdominalsNOT ADVISABLE IF YOU HAVE• Neck issues• Lower-back pain
DO IT RIGHT
DO

• Position the Swiss ball directly between your shoulder blades to start the exercise.• Activate your abdominals so that you maintain neutral alignment.• Keep your hips in line with your knees as you rotate your upper body, to work your spinal
rotators.
AVOID• Bending your arms.• Continuing to rotate the Swiss ball when it is lying directly under one shoulder and both shoulders
are vertical.

ANNOTATION KEYBold text indicates active musclesGray text indicates stabilizing muscles* indicates deep muscles
REVERSE BRIDGE BALL ROLL
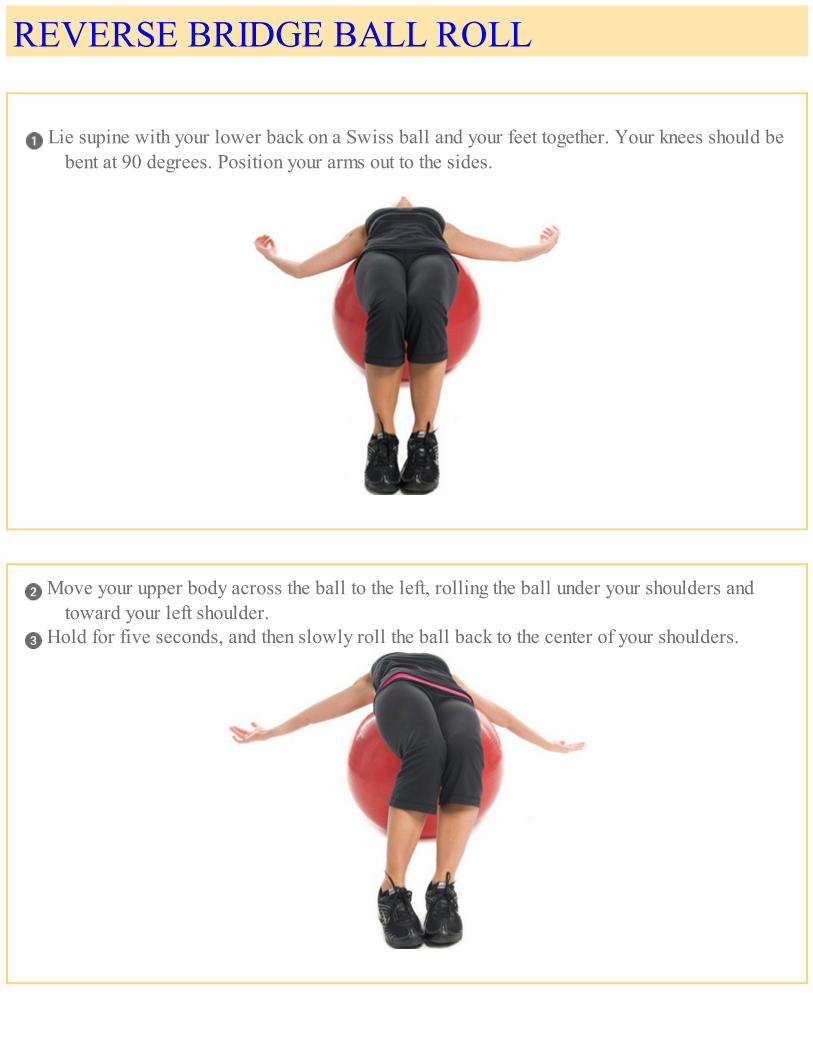
Lie supine with your lower back on a Swiss ball and your feet together. Your knees should bebent at 90 degrees. Position your arms out to the sides.
Move your upper body across the ball to the left, rolling the ball under your shoulders andtoward your left shoulder.
Hold for five seconds, and then slowly roll the ball back to the center of your shoulders.

Return to the starting position, and then roll to the right. Repeat five times on each side.
DO IT RIGHTDO• Exhale as you roll on the ball, and inhale as you return to the starting position.• Hold your body stable as you roll across the ball, working against the ball’s natural rotation.• Increase the space between your feet if necessary to maintain your balance.AVOID• Allowing your pelvis to drop out of alignment—your body should form a straight line from your
shoulders to your knees.• Continuing to rotate the ball when it is lying directly under one shoulder and both shoulders are
vertical.
QUICK GUIDETARGET• Obliques• Abdominals
TYPE• Strengthening/stability
LEVEL• Intermediate

BENEFITS• Stabilizes core• Strengthens obliques and abdominals
NOT ADVISABLE IF YOU HAVE• Severe neck pain• Severe lower-back pain
MODIFICATIONEasier: Rather than keeping your feet together, position them about shoulder-width apart. Thenfollow steps 2 through 4.

ANNOTATION KEYBold text indicates active musclesGray text indicates stabilizing muscles* indicates deep muscles
BEST FOR• rectus abdominis• transversus abdominis• obliquus externus• obliquus internus

MEDICINE BALL AB CURLS
QUICK GUIDETARGET• Abdominals
TYPE• Strengthening/stability
LEVEL• Intermediate
BENEFITS• Strengthens abdominals
NOT ADVISABLE IF YOU HAVE• Severe neck pain• Severe lower-back pain
Lie supine on a Swiss ball, with your knees bent at 90 degrees. Your middle back should beresting against the ball.
Grasp a medicine ball in both hands, and extend your arms straight up toward the ceiling.
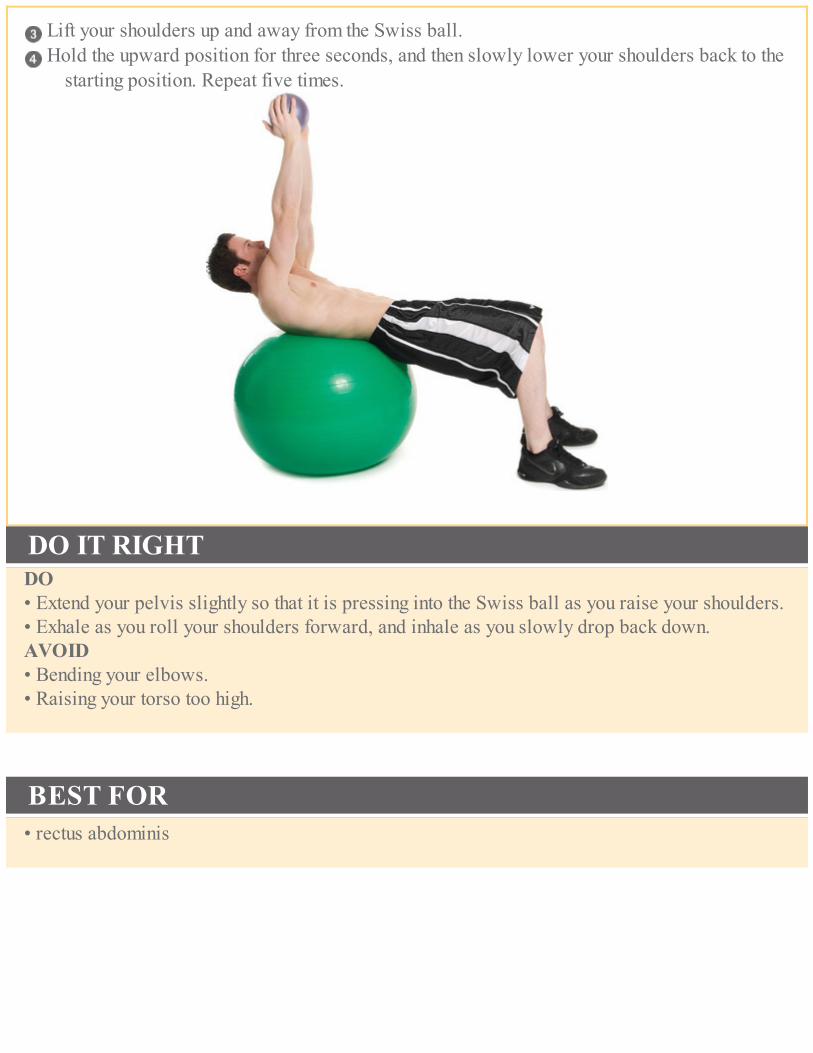
Lift your shoulders up and away from the Swiss ball. Hold the upward position for three seconds, and then slowly lower your shoulders back to the
starting position. Repeat five times.
DO IT RIGHTDO• Extend your pelvis slightly so that it is pressing into the Swiss ball as you raise your shoulders.• Exhale as you roll your shoulders forward, and inhale as you slowly drop back down.AVOID• Bending your elbows.• Raising your torso too high.
BEST FOR• rectus abdominis
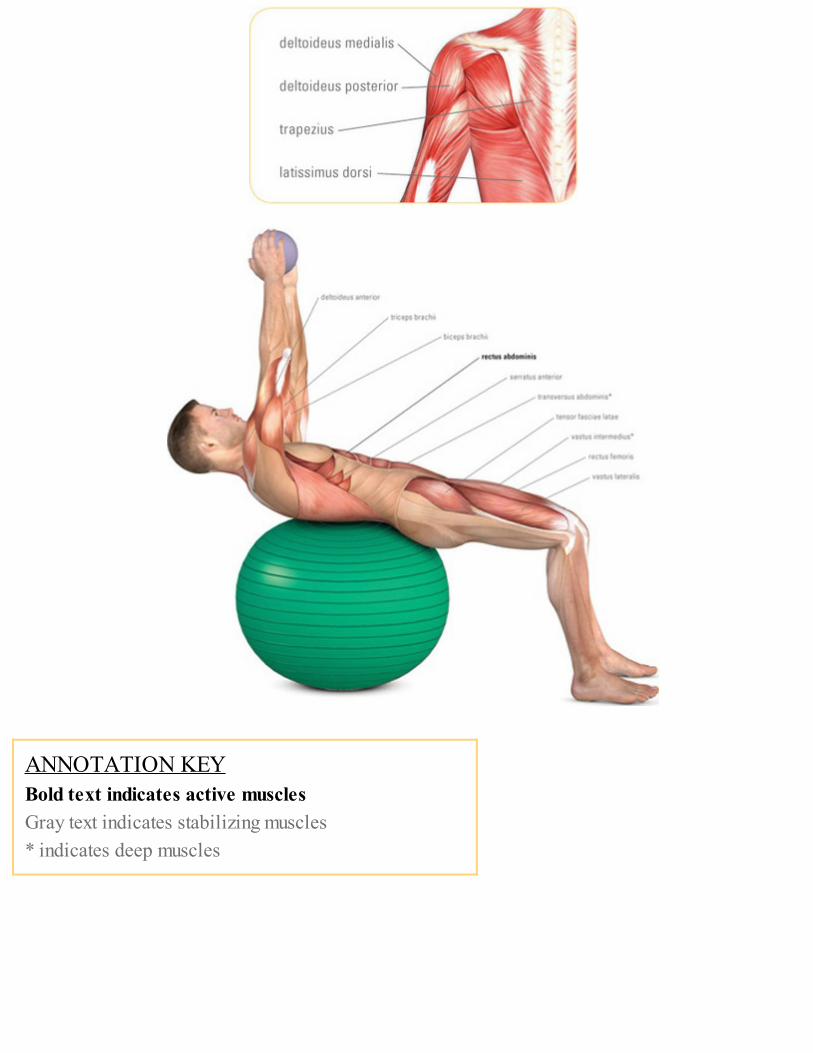
ANNOTATION KEYBold text indicates active musclesGray text indicates stabilizing muscles* indicates deep muscles

PLANK ROLL-DOWN
Stand straight with your weight equally distributed between your feet.
Relaxing your neck, bend from your waist and bring your hands down toward the floor. Placethem in front of your feet so that they are flat on the floor.
Walk your hands away from your feet until your body reaches a plank position, forming astraight line from your shoulders to your heels.

QUICK GUIDETARGET• Abdominals• Pectoral muscles• Upper-arm muscles
TYPE• Strengthening/stability
LEVEL• Intermediate
BENEFITS• Stabilizes core• Strengthens abdominals
NOT ADVISABLE IF YOU HAVE• Wrist pain• Shoulder issues• Lower-back pain

Keeping your arms straight, dip your shoulders three times while maintaining the plankposition.
Walk your hands back to your feet, and return to an upright position. Repeat ten times at a rapidpace.
DO IT RIGHT
DO• Keep your spine and legs straight.• Move slowly and steadily.• Make sure that your abdominals remain up and in.
AVOID• Bending your knees or spine.• Allowing your elbows to bend.
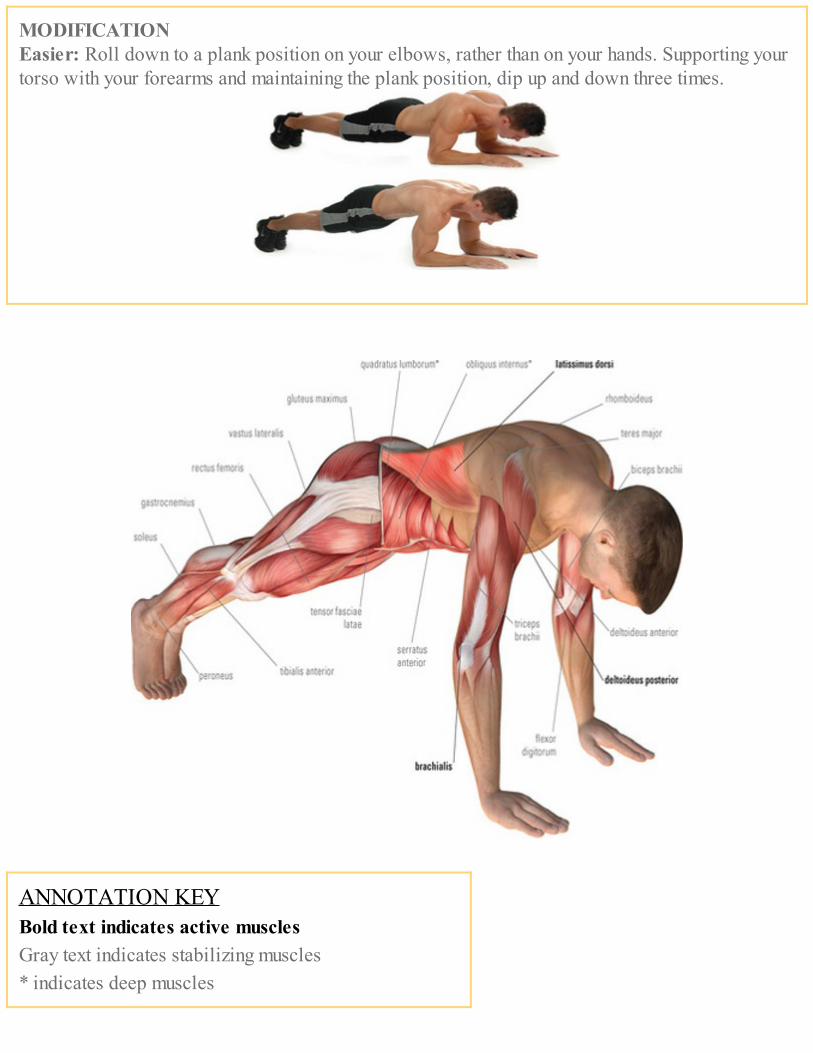
MODIFICATIONEasier: Roll down to a plank position on your elbows, rather than on your hands. Supporting yourtorso with your forearms and maintaining the plank position, dip up and down three times.
ANNOTATION KEYBold text indicates active musclesGray text indicates stabilizing muscles* indicates deep muscles
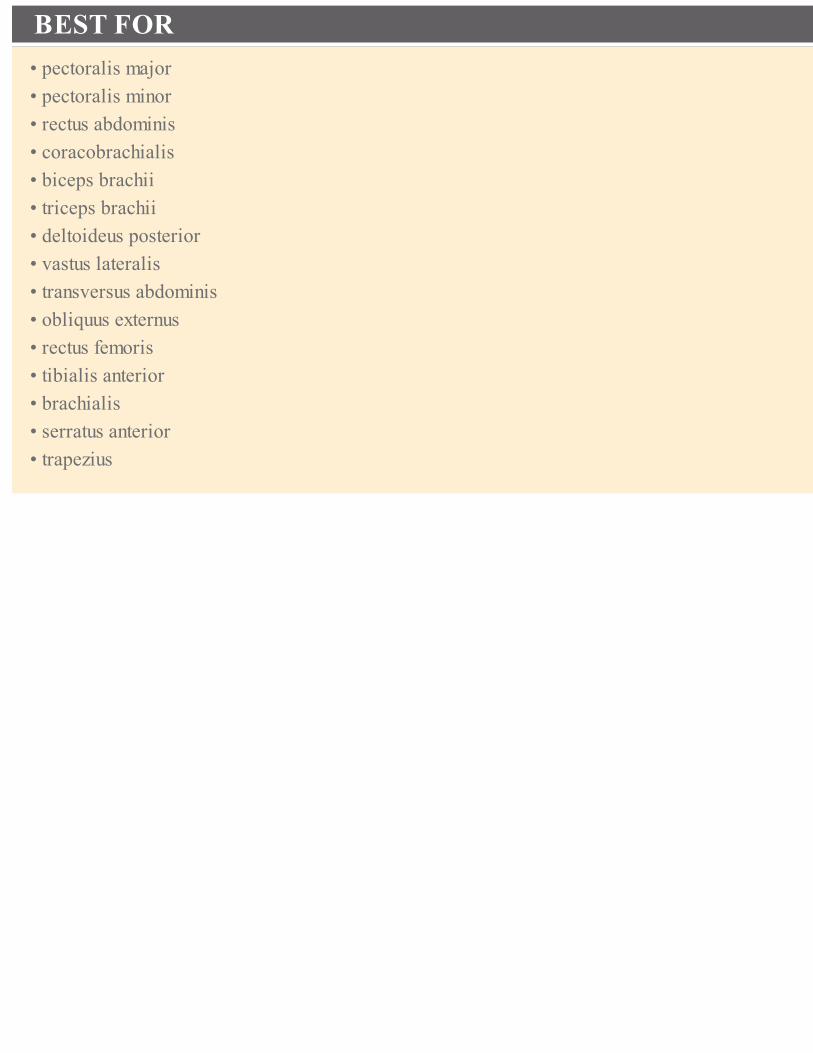
BEST FOR• pectoralis major• pectoralis minor• rectus abdominis• coracobrachialis• biceps brachii• triceps brachii• deltoideus posterior• vastus lateralis• transversus abdominis• obliquus externus• rectus femoris• tibialis anterior• brachialis• serratus anterior• trapezius

THE POINTER
Begin on your hands and knees, with your wrists directly below your shoulders and your kneesdirectly below your hips. Your fingertips should be facing forward with your handsshoulder-width apart. gaze at the floor, keeping your head in a neutral position.
BEST FOR• gluteus maximus• biceps femoris• gluteus medius• deltoideus medialis• adductor magnus• rectus abdominis• transversus abdominis• obliquus internus• tensor fasciae latae• adductor longus• rectus femoris
Slowly slide your left leg backward, and then lift it up as you extend your right arm forwarduntil both your right arm and left leg are parallel to the floor.
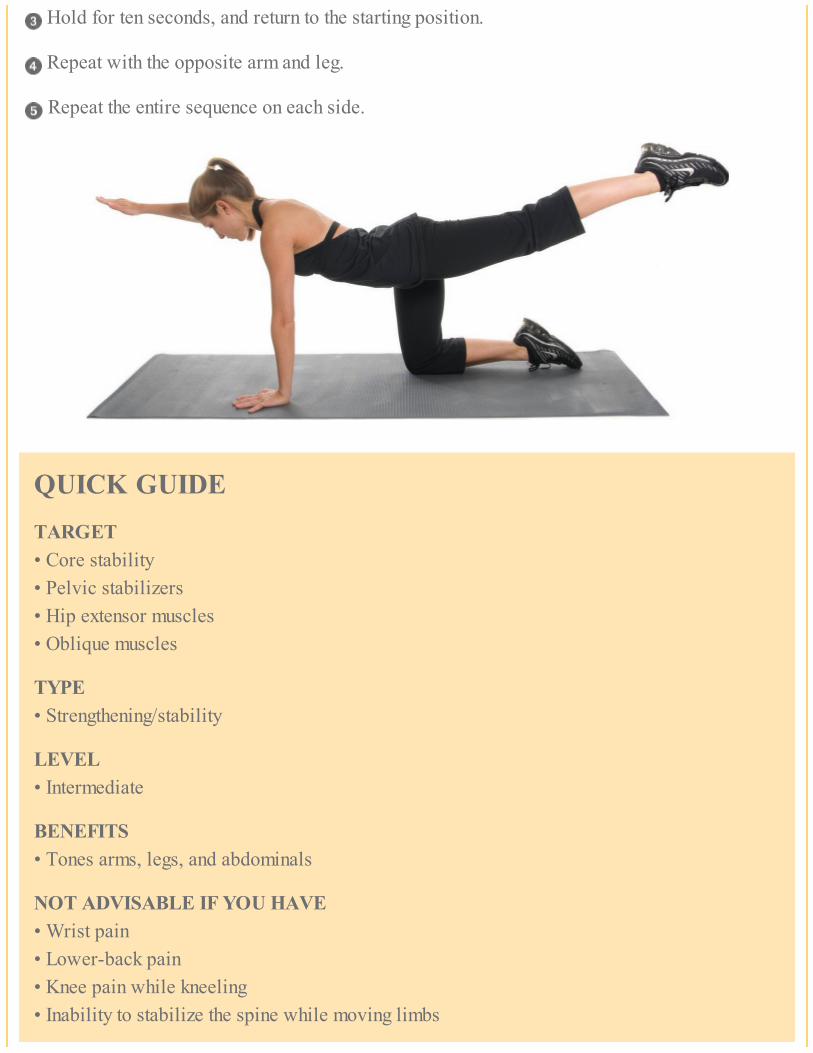
Hold for ten seconds, and return to the starting position.
Repeat with the opposite arm and leg.
Repeat the entire sequence on each side.
QUICK GUIDETARGET• Core stability• Pelvic stabilizers• Hip extensor muscles• Oblique muscles
TYPE• Strengthening/stability
LEVEL• Intermediate
BENEFITS• Tones arms, legs, and abdominals
NOT ADVISABLE IF YOU HAVE• Wrist pain• Lower-back pain• Knee pain while kneeling• Inability to stabilize the spine while moving limbs
DO IT RIGHT
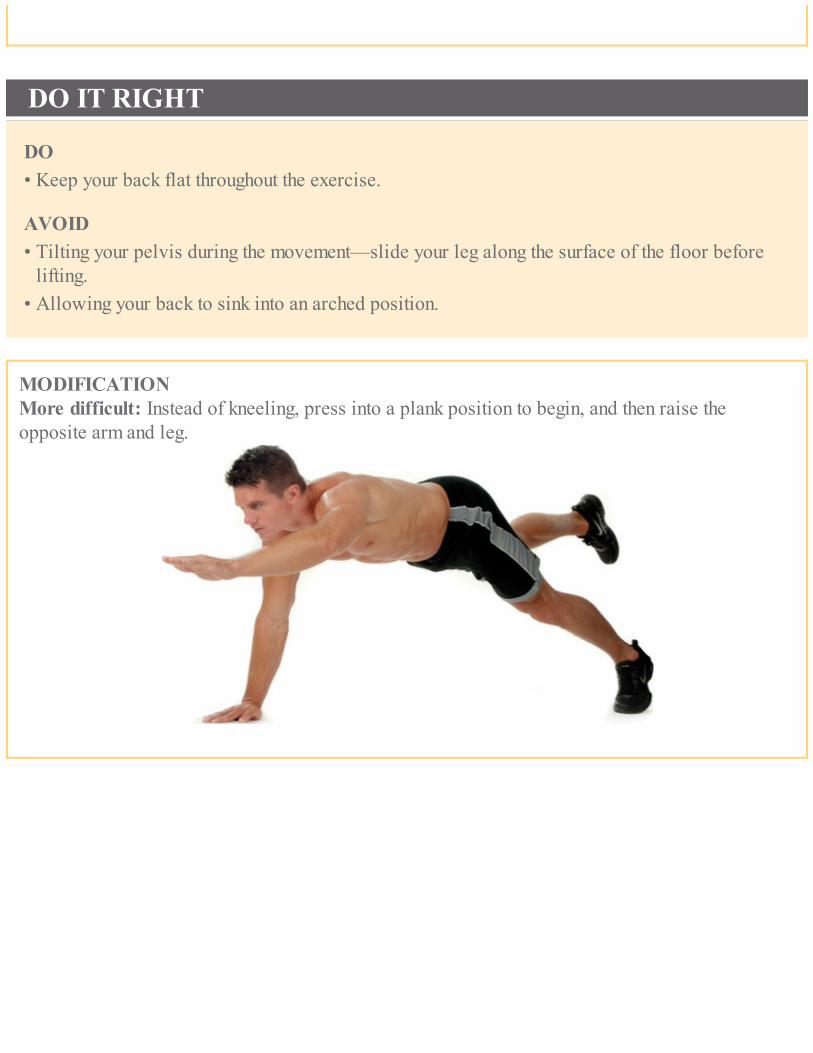
DO• Keep your back flat throughout the exercise.
AVOID• Tilting your pelvis during the movement—slide your leg along the surface of the floor before
lifting.• Allowing your back to sink into an arched position.
MODIFICATIONMore difficult: Instead of kneeling, press into a plank position to begin, and then raise theopposite arm and leg.
ANNOTATION KEYBold text indicates active musclesGray text indicates stabilizing muscles* indicates deep muscles

PLANK
Lie supine on the mat, supporting your upper body on your forearms. Bend your legs, and restyour weight on your knees.
Push through your forearms to bring your shoulders up toward the ceiling as you straighten yourlegs.
With control, lower your shoulders until you feel them coming together in your back. Return to the starting position, and repeat five times.
DO IT RIGHT
DO• Lengthen through your neck.
AVOID

• Allowing your back to sag.• Allowing your shoulders to collapse into your shoulder joints.
QUICK GUIDETARGET• Scapular stabilizers• Core muscles
TYPE• Strengthening/stability
LEVEL• Intermediate
BENEFITS• Stabilizes core• Strengthens abdominals
NOT ADVISABLE IF YOU HAVE• Shoulder injury• Intense back pain
MODIFICATIONEasier: Rather than using your forearms to support your upper body, straighten your arms, holding yourself up on your hands.Then, push through your arms into a plank position.

BEST FOR• deltoideus• rhomboideus• rectus abdominis• biceps brachii• triceps brachii• tensor fasciae latae• rectus femoris• transversus abdominis• obliquus internus• serratus anterior• tibialis anterior
ANNOTATION KEY

Bold text indicates active musclesGray text indicates stabilizing muscles* indicates deep muscles

FRONT PLANK
Sit with your legs parallel and stretched out in front of you. Place your hands behind you withyour fingers pointed toward your hips.
DO IT RIGHT
DO• Keep your pelvis elevated throughout the exercise.
AVOID• Allowing your shoulders to sink into their sockets. If your legs do not feel strong enough to
support your body, slightly bend your knees.
Press up through your arms and lift your chest up, squeezing your buttocks and lifting your hipswhile pressing your heels into the floor. Continue lifting your pelvis until your body forms along line from your shoulders to your feet.

QUICK GUIDETARGET• Hip extensor muscles• Core stabilizers• Arm muscles• Leg muscles
TYPE• Strengthening/stability
LEVEL• Intermediate
BENEFITS• Stabilizes core• Strengthens abdominals
NOT ADVISABLE IF YOU HAVE• Wrist pain• Knee pain• Shoulder injury• Shooting pains down leg
Without allowing your pelvis to drop, raise your straightened right leg.

Slowly lower your leg to the floor, and switch to the left leg. Repeat four to six times on eachside.
ANNOTATION KEYBold text indicates active musclesGray text indicates stabilizing muscles* indicates deep muscles

BEST FOR• gluteus maximus• biceps femoris• deltoideus• rectus femoris• adductor magnus• tensor fasciae latae• rectus abdominis• transversus abdominis• adductor longus• obliquus externus• latissimus dorsi• triceps brachii

SIDE WALKING
Lie supine with your shoulders on a Swiss ball and your feet hip-width apart. your kneesshould be bent at 90 degrees. Tighten your abdominal muscles, and hold your arms out to thesides, parallel to the floor.
QUICK GUIDETARGET• Abdominals• Quadriceps
TYPE• Stability
LEVEL• Intermediate
BENEFITS• Stabilizes core• Strengthens abdominals
NOT ADVISABLE IF YOU HAVE• Neck issues

• Lower-back pain
Slowly walk sideways to the left so that the ball passes from under one shoulder to under theother.
Return to the starting position, and then walk sideways to the left.
Repeat five times in each direction.
DO IT RIGHT
DO• Activate your abdominals so that you maintain neutral alignment, with your body forming a
straight line from shoulders to knees.
AVOID• Allowing your pelvis to drop out of alignment.• Lateral ball movement.
BEST FOR• rectus abdominis• transversus abdominis• rectus femoris• vastus lateralis• vastus intermedius• vastus medialis• adductor brevis• adductor longus• adductor magnus• tensor fasciae latae

ANNOTATION KEYBold text indicates active musclesGray text indicates stabilizing muscles* indicates deep muscles

JACKKNIFE
Place your hands on the floor, with your legs extended so that the tops of your feet rest on topof a Swiss ball. Keep your spine in a neutral position.
Flex your hips, and pull your knees up toward your chest, driving your hips toward the ceilingand retracting your abdomen.

Continue to pull in until your buttocks are resting on top of your heels. Hold for five seconds, and then extend your hips to straighten your legs and return to the
starting position. Repeat entire sequence three times.
QUICK GUIDETARGET• Abdominals• Hip flexorsTYPE• Strengthening/stabilityLEVEL• AdvancedBENEFITS• Stabilizes core• Strengthens abdominals• Hip flexorsNOT ADVISABLE IF YOU HAVE• Neck issues• Lower-back pain
BEST FOR• iliacus• iliopsoas• obliquus externus• obliquus internus• rectus abdominis

• sartorius• tibialis anterior• transversus abdominis
DO IT RIGHT
DO• Keep your chest high and retracted.• Elongate your neck and extend your elbows throughout the movement.• Position your hands on the floor so that they are directly below your shoulders.
AVOID• Bending your elbows.• Allowing your shoulders to elevate toward your ears.
ANNOTATION KEYBold text indicates active musclesGray text indicates stabilizing muscles* indicates deep muscles
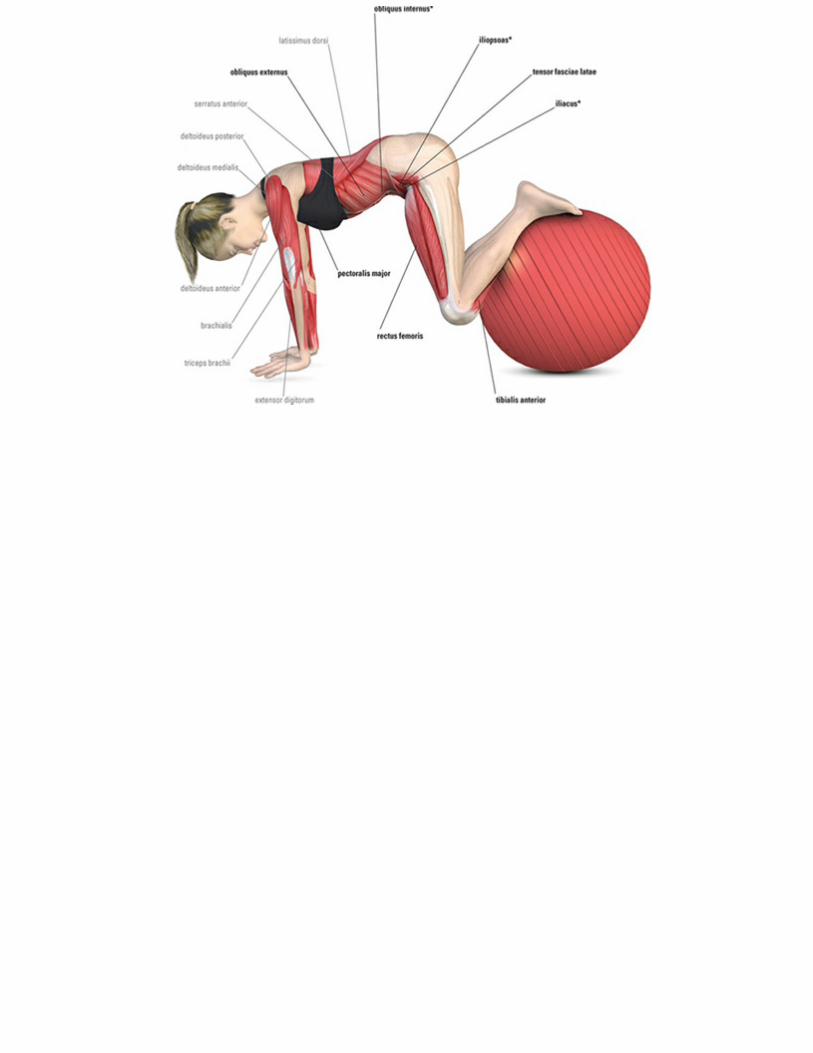

ROTATED BACK EXTENSION
Lie prone on a Swiss ball, so that your navel is on the center of the ball. Extend your legsbehind you, resting on your toes.
Place your hands behind your head, with your elbows out.
DO IT RIGHTDO• Keep your toes firmly planted on the floor.• Keep your arms out at a 90-degree angle to your body with your elbows bent.• Widen your feet for increased stability.AVOID• Shifting your hips as you rotate—hold them square to the ball throughout the movement.

Extend your back, lifting your chest away from the ball, and rotate your torso to the right. Hold for five seconds, and then lower your chest and shoulders back to the starting position.
Repeat, extending your back and rotating your torso to the left. Repeat entire sequence threetimes in both directions.

QUICK GUIDETARGET• Obliques• BackTYPE• Strengthening/stabilityLEVEL• AdvancedBENEFITS• Strengthens back muscles• Strengthens obliquesNOT ADVISABLE IF YOU HAVE• Neck issues• Lower-back pain
BEST FOR• erector spinae• obliquus externus

ANNOTATION KEYBold text indicates active musclesGray text indicates stabilizing muscles* indicates deep muscles

TRANSVERSE ABS
Position yourself on your toes with your arms bent and forearms resting on top of a Swiss ball.
Form a long, straight line from your ankles to your shoulders.
Hold this position for as long as you can.
QUICK GUIDETARGET• Transverse abdominals
TYPE• Strengthening/stability
LEVEL• Advanced
BENEFITS• Stabilizes core
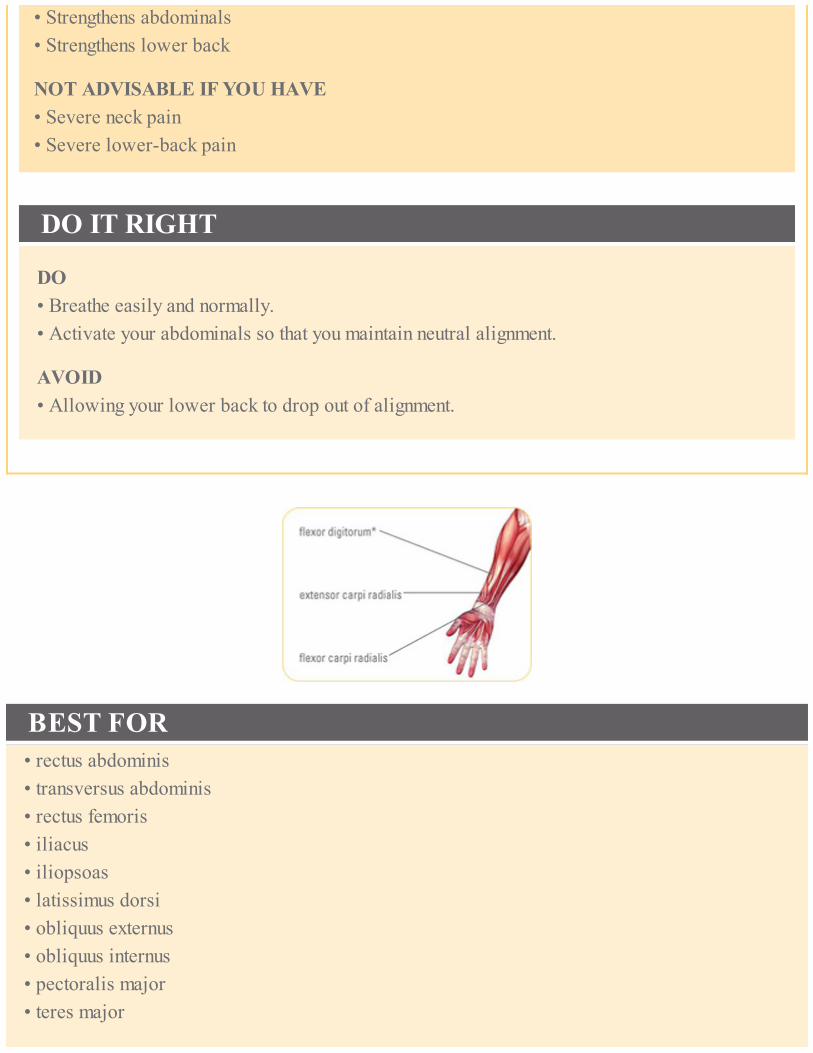
• Strengthens abdominals• Strengthens lower back
NOT ADVISABLE IF YOU HAVE• Severe neck pain• Severe lower-back pain
DO IT RIGHT
DO• Breathe easily and normally.• Activate your abdominals so that you maintain neutral alignment.
AVOID• Allowing your lower back to drop out of alignment.
BEST FOR• rectus abdominis• transversus abdominis• rectus femoris• iliacus• iliopsoas• latissimus dorsi• obliquus externus• obliquus internus• pectoralis major• teres major

• triceps brachii• erector spinae
ANNOTATION KEYBold text indicates active musclesGray text indicates stabilizing muscles* indicates deep muscles
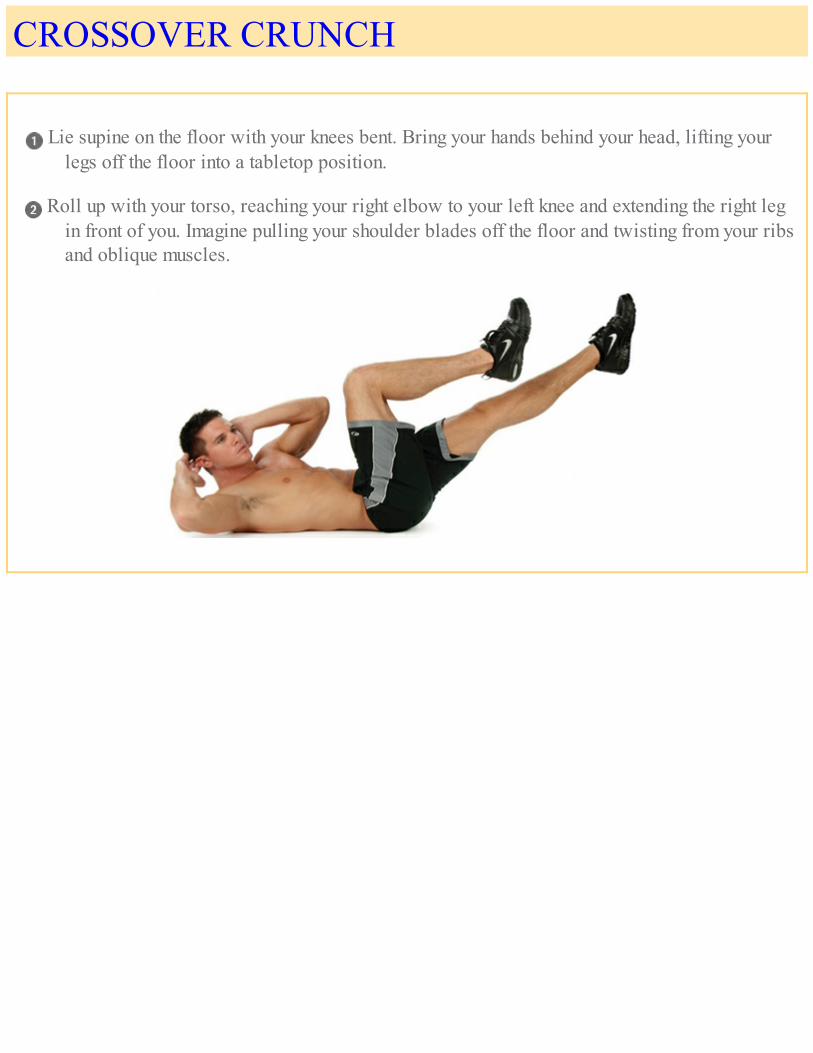
CROSSOVER CRUNCH
Lie supine on the floor with your knees bent. Bring your hands behind your head, lifting yourlegs off the floor into a tabletop position.
Roll up with your torso, reaching your right elbow to your left knee and extending the right legin front of you. Imagine pulling your shoulder blades off the floor and twisting from your ribsand oblique muscles.

Alternate sides. Repeat sequence six times.
DO IT RIGHTDO• Keep your neck long and your chin away from your chest.• Keep both hips on the floor to remain stable.AVOID• Pulling with your hands, bringing your chin toward your chest, or arching your back.• Moving the active elbow faster than your shoulder.
MODIFICATIONEasier: Begin with both feet on the floor. Place the outside of one foot on top of your thigh nearyour knee. Reach your opposite elbow toward the knee of your raised leg. After six repetitions,repeat on the other side.
QUICK GUIDE

TARGET• Abdominals
TYPE• Strengthening
LEVEL• Advanced
BENEFITS• Strengthens abdominals• Stabilizes core
NOT ADVISABLE IF YOU HAVE• Neck issues• Lower-back pain
BEST FOR• rectus abdominis• transversus abdominis• obliquus externus• obliquus internus• rectus femoris• vastus medialis• sartorius• tensor fasciae latae

ANNOTATION KEYBold text indicates active musclesGray text indicates stabilizing muscles* indicates deep muscles

THE TWIST
Start by lying on your right side with your legs outstretched and pressed firmly together. Pressyour right hip into the floor, and use both hands to support your torso.
QUICK GUIDETARGET• Abdominals• Shoulders
TYPE• Strengthening/stability
LEVEL• Advanced
BENEFITS• Provides a total-body workout• Builds endurance
NOT ADVISABLE IF YOU HAVE• Shoulder issues• Back pain• Wrist injury

Position your right hand directly beneath your shoulder and press your body up into a sideplank with side-arm balance.
Drawing your navel into your spine, extend your left arm toward the ceiling.
DO IT RIGHT
DO

• Keep your limbs elongated as much as possible.• Keep your shoulders stable.• Lift your hips up high to reduce the weight on your upper body.
AVOID• Allowing your shoulder to sink into its socket.
Bring your left arm down and across your torso, rotating the upper body to the right. Hold for acount of ten.
Return to the starting position, with your hip on the floor and both hands supporting your torso.Repeat sequence four to six times, and then switch sides.
BEST FOR• latissimus dorsi• rectus abdominis• obliquus internus• obliquus externus• transversus abdominis• adductor magnus• adductor longus• deltoideus
ANNOTATION KEYBold text indicates active muscles

Gray text indicates stabilizing muscles* indicates deep muscles

SIDE-BEND PLANK
Lie on your right side with one arm supporting your torso, aligning the wrist under yourshoulder. Place your left arm on top of your left leg. your legs should be strongly squeezedtogether in adduction, with legs parallel and feet flexed. Draw your navel toward your spine.
BEST FOR• rectus abdominis• obliquus internus• obliquus externus• adductor magnus• pectoralis major• pectoralis minor• triceps brachii• gluteus medius
QUICK GUIDETARGET• Abdominals• Leg abductors and adductors• Latissimus dorsi

TYPE• Strengthening/stability
LEVEL• Advanced
BENEFITS• Stabilizes the spine in neutral position with the support of the shoulder girdle
NOT ADVISABLE IF YOU HAVE• Rotator cuff injury• Neck issues
Press into the palm of your right hand, and lift your hips off the floor, creating a straight linebetween your heels and head.
Slowly lower your hips, returning to the starting position. Repeat sequence five to six times,keeping your legs tight and buttocks squeezed. Repeat on the other side.

MODIFICATIONEasier: Rather than supporting your torso with your arm straight, bend your elbow so that it isaligned below your shoulder.
Press into your forearm to lift your body into the side plank position.
ANNOTATION KEYBold text indicates active musclesGray text indicates stabilizing muscles* indicates deep muscles
DO IT RIGHT
DO

• Lift your hips high to take some weight off your upper body.• Elongate your limbs as much as possible.
AVOID• Allowing your shoulders to sink into their sockets or lift toward your ears.
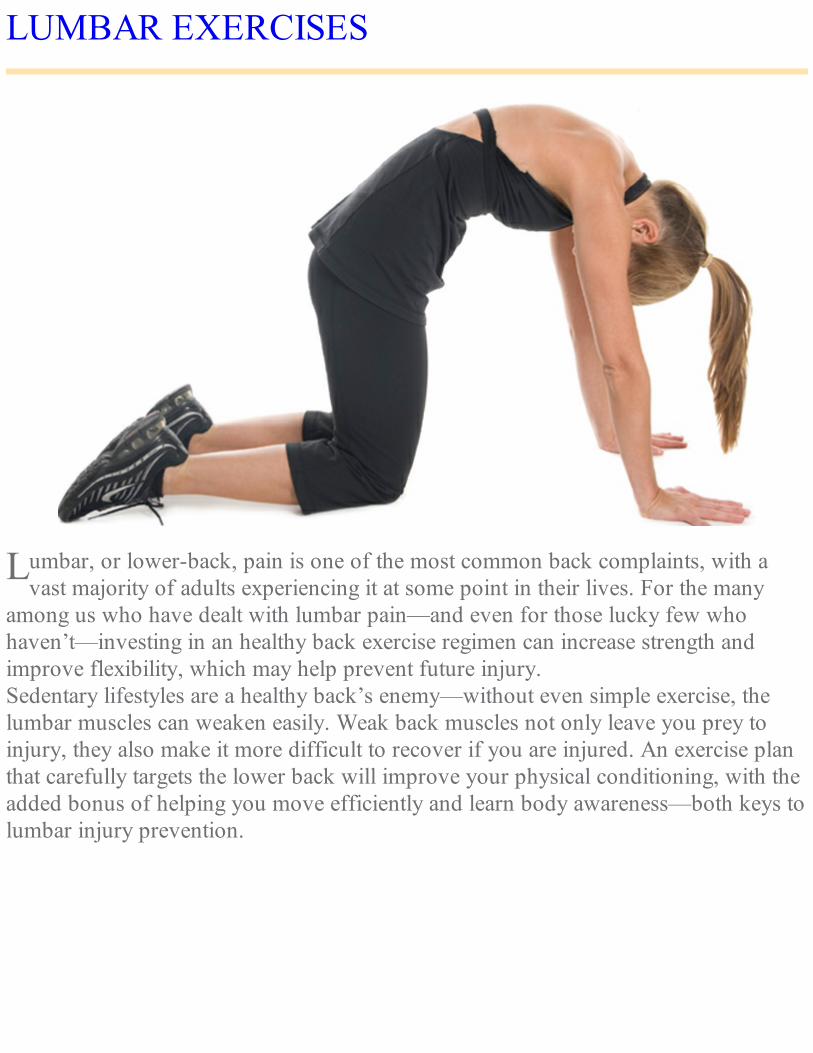
L
LUMBAR EXERCISES
umbar, or lower-back, pain is one of the most common back complaints, with avast majority of adults experiencing it at some point in their lives. For the many
among us who have dealt with lumbar pain—and even for those lucky few whohaven’t—investing in an healthy back exercise regimen can increase strength andimprove flexibility, which may help prevent future injury.Sedentary lifestyles are a healthy back’s enemy—without even simple exercise, thelumbar muscles can weaken easily. Weak back muscles not only leave you prey toinjury, they also make it more difficult to recover if you are injured. An exercise planthat carefully targets the lower back will improve your physical conditioning, with theadded bonus of helping you move efficiently and learn body awareness—both keys tolumbar injury prevention.

SUPINE PELVIC TILT
QUICK GUIDETARGET• Low back• Abdominals
TYPE• Stability
LEVEL• Beginner
BENEFITS• Improves posture• Relieves lower-back pain
NOT ADVISABLE IF YOU HAVE• Severe lower-back pain
Lie in a neutral position on your back with the knees bent and your feet flat on the floor. Thenatural curve of the lumbar spine should cause your low back to be slightly elevated from thefloor.

ANNOTATION KEYItalic text indicates deep ligamentsBlack text indicates jointsBold text indicates active musclesGray text indicates stabilizing muscles* indicates deep muscles
DO IT RIGHT
DO• Use the 2-2-2 method: Take two seconds to get into position, hold for two seconds, and then
release for two seconds. Advance to 2-5-2 as you progress.• Tilt your pelvis toward your abdomen.
AVOID• Lifting your buttocks off the floor.
Exhale, and gently pull your belly button in toward your spine while rotating your hipsposteriorly as you press your low back into the floor, taking the curve out of the low back.
Hold for two seconds, inhale, and return to your neutral position. Repeat this movement ten times.
BEST FOR• rectus abdominis• gluteus maximus• gluteus medius

• gluteus minimus• transversus abdominis• ligamentum interspinalis• ligamentum longitudinale posterius• articulationes zygapophysiales• ligamentum capsular facet

SEATED PELVIC TILT
Sit on a Swiss ball, with your hips directly over the center of the ball.
Tilt your pelvis forward and backward, using the motion of the ball to assist your movement.Repeat the back-and-forth motion ten or more times.
BEST FOR

• rectus abdominis• gluteus maximus• gluteus medius• gluteus minimus• transversus abdominis
DO IT RIGHTDO• Make small movements—a correct pelvic tilt is a very subtle exercise.AVOID• Rounding your back too much—concentrate on moving your pelvis.
QUICK GUIDETARGET• Back• Abdominals• Gluteal musclesTYPE• StabilityLEVEL• BeginnerBENEFITS• Improves posture• Relieves lower-back painNOT ADVISABLE IF YOU HAVE• Severe lower-back pain

TOE TOUCH
Stand up tall and exhale.
DO IT RIGHTDO• Stack your spine one vertebra at a time.• Connect the stretch in your back with the stretch in your hamstrings.• Make the stretch long and smooth.AVOID• Tensing your neck muscles.• Bouncing as you try to reach your hands to your toes—reach down only as far as you can
comfortably extend.
Tucking your head down toward your chest and rolling down one vertebra at a time, reachdown toward your toes. Keeping your weight slightly shifted forward, continue exhaling,rounding your spine.

QUICK GUIDETARGET• Spine
TYPE• Flexibility
LEVEL• Beginner
BENEFITS• Stretches the spine and hamstrings• Refines spinal stacking skills
NOT ADVISABLE IF YOU HAVE• Lower-back pain that radiates down the leg
When you are completely folded over, inhale and begin uncurling your spine, stacking the spinefrom your hips up to your shoulders. Roll your shoulders back and stand up tall. Repeat threetimes.

BEST FOR• latissimus dorsi• erector spinae• rhomboideus• biceps femoris• quadratus lumborum• gluteus maximus

ANNOTATION KEYBold text indicates active musclesGray text indicates stabilizing muscles* indicates deep muscles

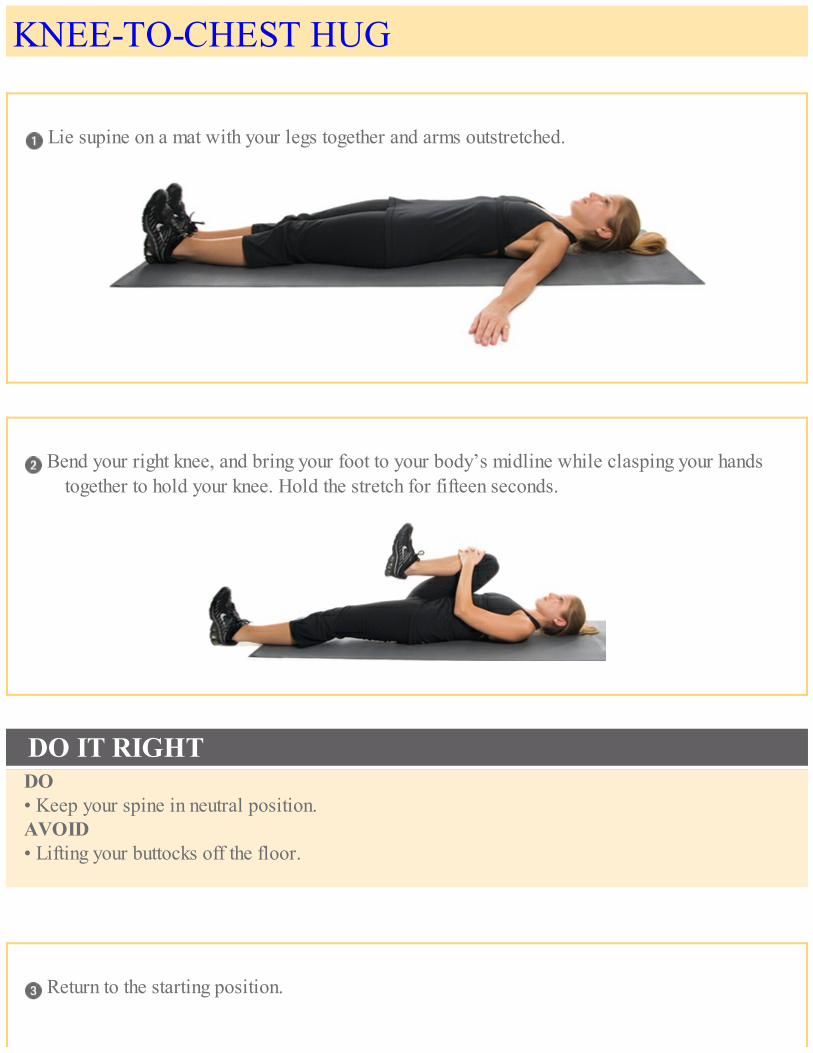
KNEE-TO-CHEST HUG
Lie supine on a mat with your legs together and arms outstretched.
Bend your right knee, and bring your foot to your body’s midline while clasping your handstogether to hold your knee. Hold the stretch for fifteen seconds.
DO IT RIGHTDO• Keep your spine in neutral position.AVOID• Lifting your buttocks off the floor.
Return to the starting position.

Again, clasping your hands together to hold your knee, bend your right knee, but this time rotatethe right leg to the left, bringing the side of your leg against your chest.
Hold the stretch for fifteen seconds, and then return to the starting position. Repeat the entiresequence with the left leg bent.
MODIFICATIONSimilar difficulty: Follow step 1, and then draw both legs to your chest.
BEST FOR• erector spinae• latissimus dorsi• gluteus maximus• gluteus minimus• piriformis

• gemellus superior• gemellus inferior• obturator externus• obturator internus• quadratus femoris
QUICK GUIDETARGET• Lower back• HipsTYPE• FlexibilityLEVEL• BeginnerBENEFITS• Stretches lower back, hip extensors, and hip rotatorsNOT ADVISABLE IF YOU HAVE• Advanced degenerative joint disease
ANNOTATION KEYBold text indicates active musclesGray text indicates stabilizing muscles* indicates deep muscles
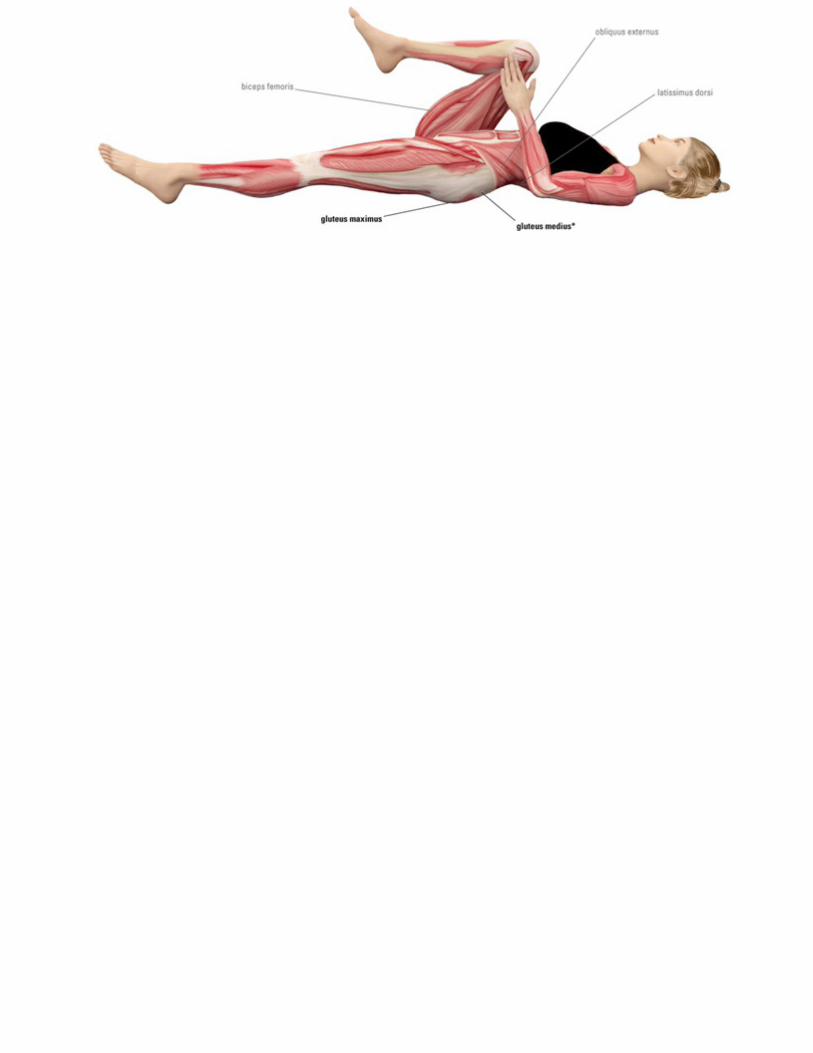

SPINE STRETCH
Lie on your back with your left leg straight and your right leg bent, placing your right foot onyour left shin.
BEST FOR• quadratus lumborum• erector spinae• vastus lateralis• tractus iliotibialis• tensor fasciae latae

Keeping both shoulders on the floor, slowly bring your right leg across your body until you feelthe stretch in the area between your lower back and hips. Stretch only as far as yourshoulders will allow without one of them rising from the floor.
Hold for fifteen seconds, and repeat the sequence three times on each side.
DO IT RIGHTDO• Relax your lower back.AVOID• Allowing your shoulders to lift off the floor.
QUICK GUIDETARGET• Lower backTYPE• FlexibilityLEVEL• BeginnerBENEFITS• Increases lower-back flexibilityNOT ADVISABLE IF YOU HAVE• Severe lower-back pain
ANNOTATION KEYBold text indicates active musclesGray text indicates stabilizing muscles* indicates deep muscles
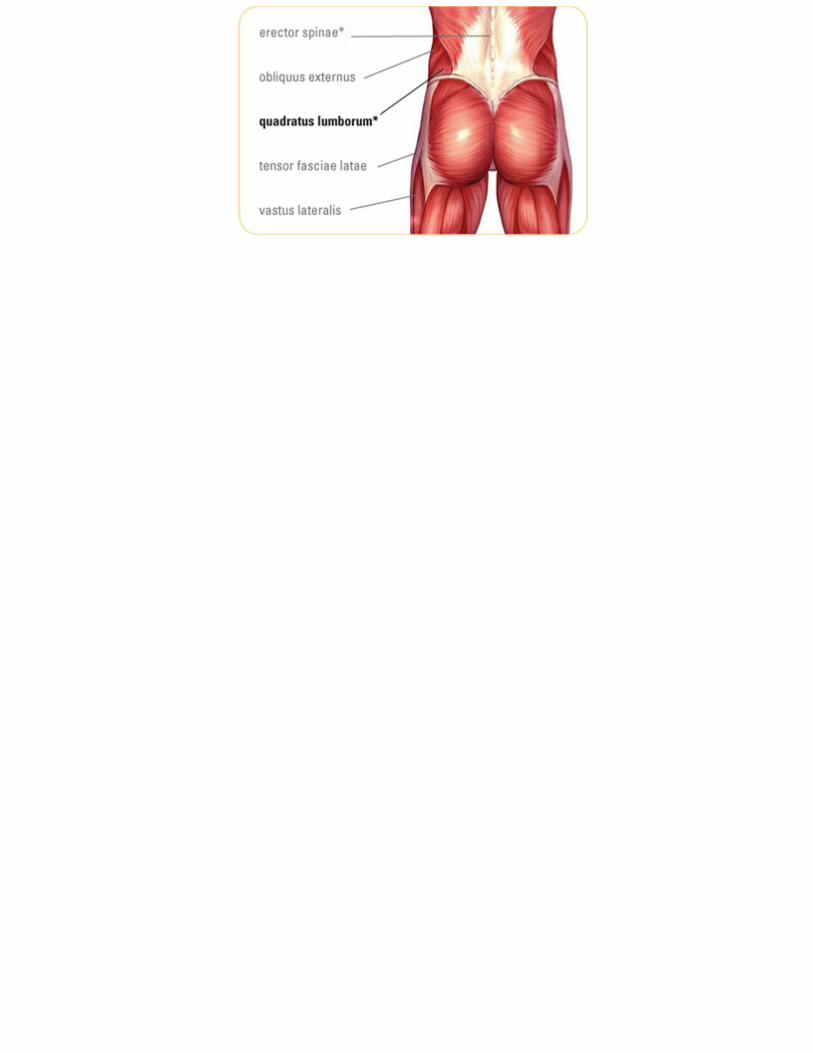

LOWER-BACK ROTATION
Lie flat on the floor with both feet and knees together, and your knees bent.
BEST FOR• quadratus lumborum• erector spinae• obliquus externus
ANNOTATION KEYBold text indicates active musclesGray text indicates stabilizing muscles* indicates deep muscles

Slowly rock your knees from side to side until you feel a stretch along your lower back throughthe hips or until your knees reach the floor.
Hold the stretch for thirty seconds, and then switch sides. Repeat three times on each side.
DO IT RIGHTDO• Keep your lower back and shoulders on the floor.AVOID• Bouncing while stretching—move slowly and smoothly.
QUICK GUIDETARGET• Lower back
TYPE• Flexibility
LEVEL• Beginner
BENEFITS• Increases lower-back flexibility
NOT ADVISABLE IF YOU HAVE• Severe lower-back pain

CHILD’S POSE
Kneel on a mat with your hips aligned over your knees. Bring your legs together so that yourbig toes are touching.
Sit back, resting your buttocks on your heels. Separate your knees about hip-width apart.
DO IT RIGHTDO• Round your back to create a dome shape.AVOID• Rushing the pose. It can take a few minutes to allow your body to deepen into the full stretch.• Compressing the back of your neck.
Lower your chest onto your thighs as you extend your hands in front of your head, elongatingyour neck and spine as you stretch your tailbone toward the mat.
Place your forehead on the mat, and hold this position for thirty seconds to three minutes.

QUICK GUIDETARGET• Lower backTYPE• FlexibilityLEVEL• BeginnerBENEFITS• Stretches and relaxes the backNOT ADVISABLE IF YOU HAVE• Knee injury
BEST FOR• latissimus dorsi• trapezius• deltoideus anterior• deltoideus posterior• rhomboideus• teres major• serratus anterior• gluteus maximus

• erector spinae• quadratus lumborum
ANNOTATION KEYBold text indicates active musclesGray text indicates stabilizing muscles* indicates deep muscles
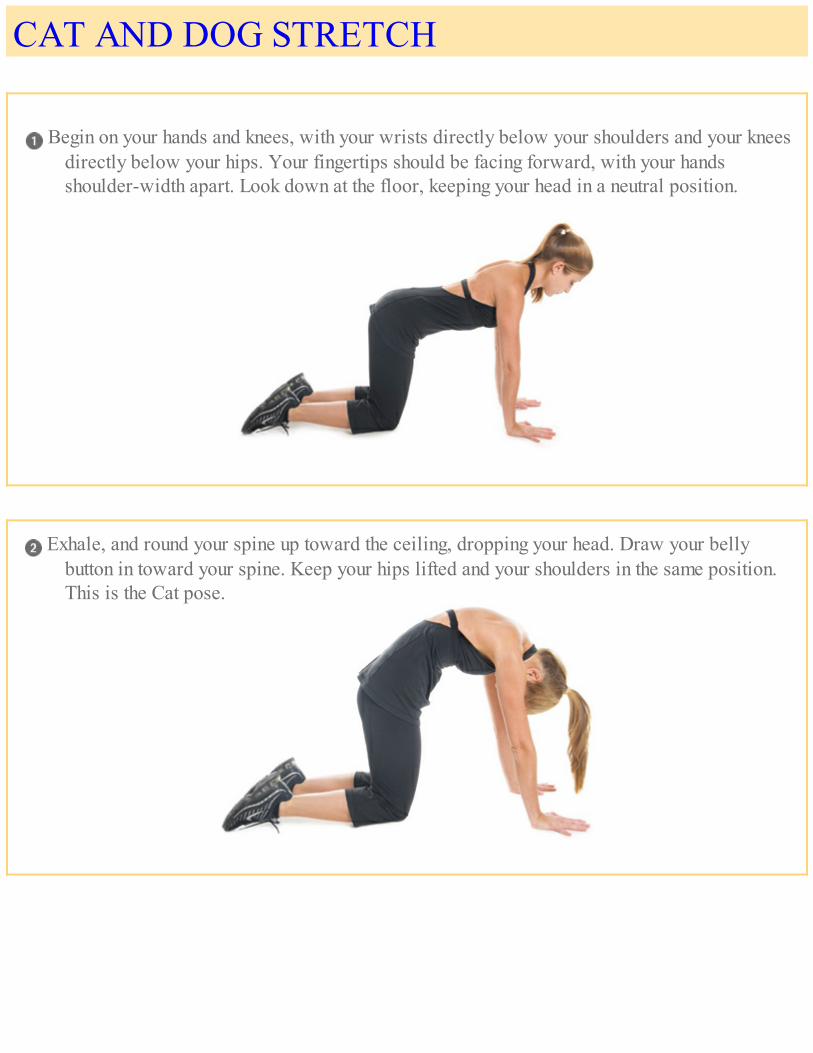
CAT AND DOG STRETCH
Begin on your hands and knees, with your wrists directly below your shoulders and your kneesdirectly below your hips. Your fingertips should be facing forward, with your handsshoulder-width apart. Look down at the floor, keeping your head in a neutral position.
Exhale, and round your spine up toward the ceiling, dropping your head. Draw your bellybutton in toward your spine. Keep your hips lifted and your shoulders in the same position.This is the Cat pose.

Inhale, and uncurl your spine. Remain on your hands and knees. With your next inhalation, arch your spine, lifting your chest forward and your tailbone toward
the ceiling. Look forward. This is the Dog pose. Exhale, and return to a neutral position on your hands and knees. Repeat the entire sequence ten to twenty times.
BEST FOR• erector spinae• multifidus spinae• latissimus dorsi• trapezius• deltoideus posterior• deltoideus anterior• deltoideus medialis• rectus abdominis• transversus abdominis• ligamentum longitudinale posterius• articulationes zygapophysiales

DO IT RIGHTDO• Draw your shoulders away from your neck.AVOID• Arching primarily in your lower back.• Tucking your chin to your chest in the Cat pose.• Jutting your rib cage out in the Dog pose.
QUICK GUIDETARGET• Lower- and middle-back extensors• Abdominals• ObliquesTYPE• FlexibilityLEVEL• BeginnerBENEFITS• Stretches shoulders, chest, abdominals, neck, and spine• Improves range of motionNOT ADVISABLE IF YOU HAVE• Knee injury

ANNOTATION KEYItalic text indicates deep ligamentsBlack text indicates jointsBold text indicates active musclesGray text indicates stabilizing muscles* indicates deep muscles

HIP CIRCLES
Sit on a Swiss ball with your feet together and your hands on your hips.
QUICK GUIDETARGET• Lower back• Hips• Abdominals
TYPE• Flexibility/stability
LEVEL• Intermediate
BENEFITS• Stabilizes core• Stretches lower back
NOT ADVISABLE IF YOU HAVE• Severe lower-back pain

Tighten your abdominal muscles, and use your pelvis to rotate the ball slowly to the right insmall counterclockwise circles.
Return to the starting position, and repeat on the other side.
BEST FOR• erector spinae

• multifidus spinae• transversus abdominis• obliquus externus• quadratus lumborum• infraspinatus• gluteus medius• iliopsoas• iliacus

DO IT RIGHTDO• Keep your circles small. If your feel a crunching in your neck, you are moving too widely.AVOID• Using your legs to initiate the movement.
ANNOTATION KEYBold text indicates active musclesGray text indicates stabilizing muscles* indicates deep muscles

SWIMMING
Lie prone on the floor with your legs hip-width apart. Stretch your arms upward beside yourears on the floor. Engage your pelvic floor, and draw your belly button in toward your spine.
Extend through your upper back as you lift your left arm and right leg simultaneously. Lift yourhead and shoulders off the floor.
Lower your arm and leg to the starting position, maintaining a stretch in your limbs throughout.
Extend your right arm and left leg off the floor, lengthening and lifting your head and shoulders.
Elongate your limbs as you return to the starting position. Repeat six to eight times.
QUICK GUIDETARGET

• Spinal extensors• Hip extensors
TYPE• Stability/strengthening
LEVEL• Intermediate
BENEFITS• Strengthens hip and spine extensors• Challenges stabilization of the spine against rotation
NOT ADVISABLE IF YOU HAVE• Severe lower-back pain• Extreme curvature of the upper spine• Curvature of the lower spine
BEST FOR• gluteus maximus• trapezius• biceps femoris• erector spinae• quadratus lumborum• rhomboideus• latissimus dorsi
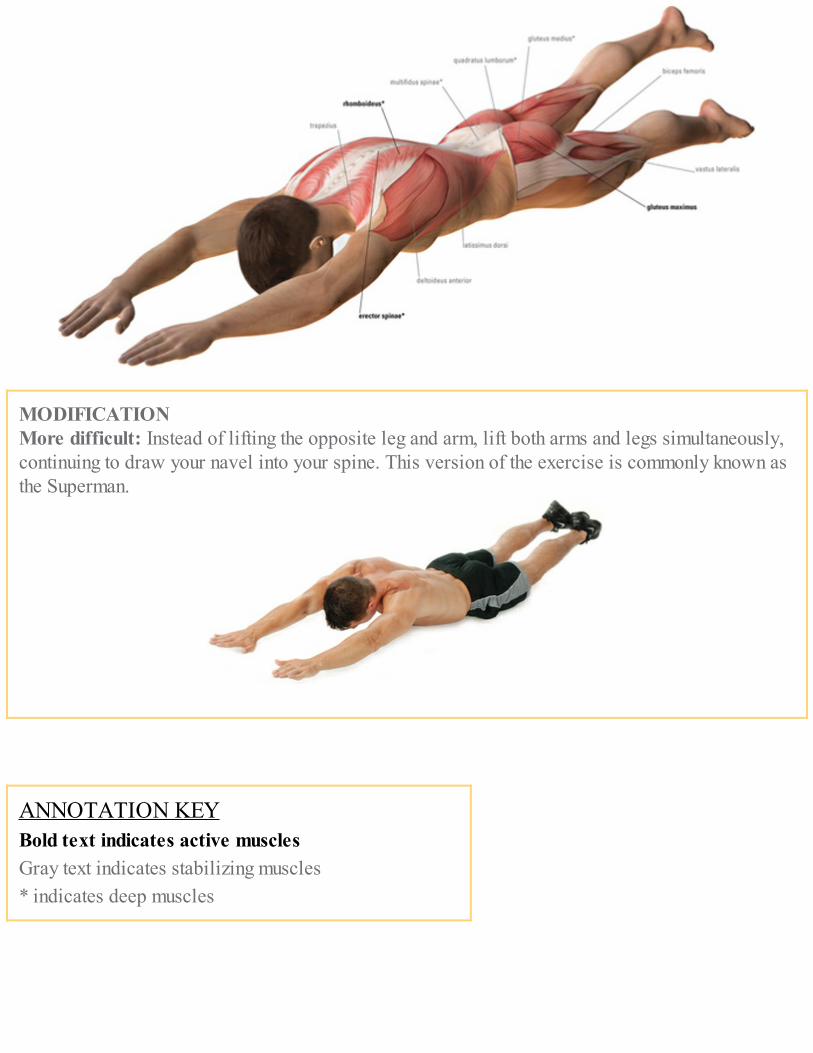
MODIFICATIONMore difficult: Instead of lifting the opposite leg and arm, lift both arms and legs simultaneously,continuing to draw your navel into your spine. This version of the exercise is commonly known asthe Superman.
ANNOTATION KEYBold text indicates active musclesGray text indicates stabilizing muscles* indicates deep muscles

DO IT RIGHTDO• Extend your limbs as long as possible in opposite directions.• Tightly squeeze your buttocks and draw your navel into your spine throughout the exercise.• Keep your neck long and relaxed.AVOID• Allowing your shoulders to lift toward your ears.

BRIDGE
Lie supine on the floor. Bend your knees and draw your heels close to your buttocks. Placeyour hands flat on the floor by your sides.
BEST FOR• erector spinae• iliopsoas• gluteus maximus• gluteus medius• sartorius• rectus femoris
QUICK GUIDETARGET• Lower back• Quadriceps• Gluteal muscles• Chest
TYPE• Strengthening
LEVEL• Intermediate
BENEFITS

• Strengthens thighs and buttocks• Stretches chest and spine
NOT ADVISABLE IF YOU HAVE• Shoulder injury• Back injury• Neck issues
Exhale, and press down through your feet to lift your buttocks off the floor. With your feet andthighs parallel, push your arms into the floor while extending through your fingertips.
Lengthen your neck away from your shoulders. Lift your hips higher so that your torso risesfrom the floor.
Hold for thirty seconds to one minute. Exhale as you release your spine onto the floor, onevertebra at a time. Repeat at least one more time.

DO IT RIGHT
DO• Roll your shoulders under once your hips are raised.• Keep your knees over your heels.• Tighten your buttocks and your thighs.
AVOID• Tucking your chin in toward your chest.• Using your buttocks more than your hamstrings to lift your hips.
ANNOTATION KEYBold text indicates active musclesGray text indicates stabilizing muscles* indicates deep muscles


BRIDGE WITH LEG LIFT
Lie supine on the floor. Bend your knees and draw your heels close to your buttocks. Placeyour hands flat on the floor by your sides.
Exhale, and press down through your feet to lift your buttocks off the floor. With your feet andthighs parallel, push your arms into the floor while extending through your fingertips.
Lengthen your neck away from your shoulders. Lift your hips higher so that your torso risesfrom the floor.

Straighten your right leg so that it is fully extended, forming a straight line from hip to toe.
Hold for thirty seconds to one minute. Return to the bridge position, and switch legs. Repeat the entire sequence at least one more
time.
DO IT RIGHTDO• Your body should form a straight line from sternum to extended toe.• The top of your sternum should be lifted forward.AVOID• Overextending your lumbar spine.
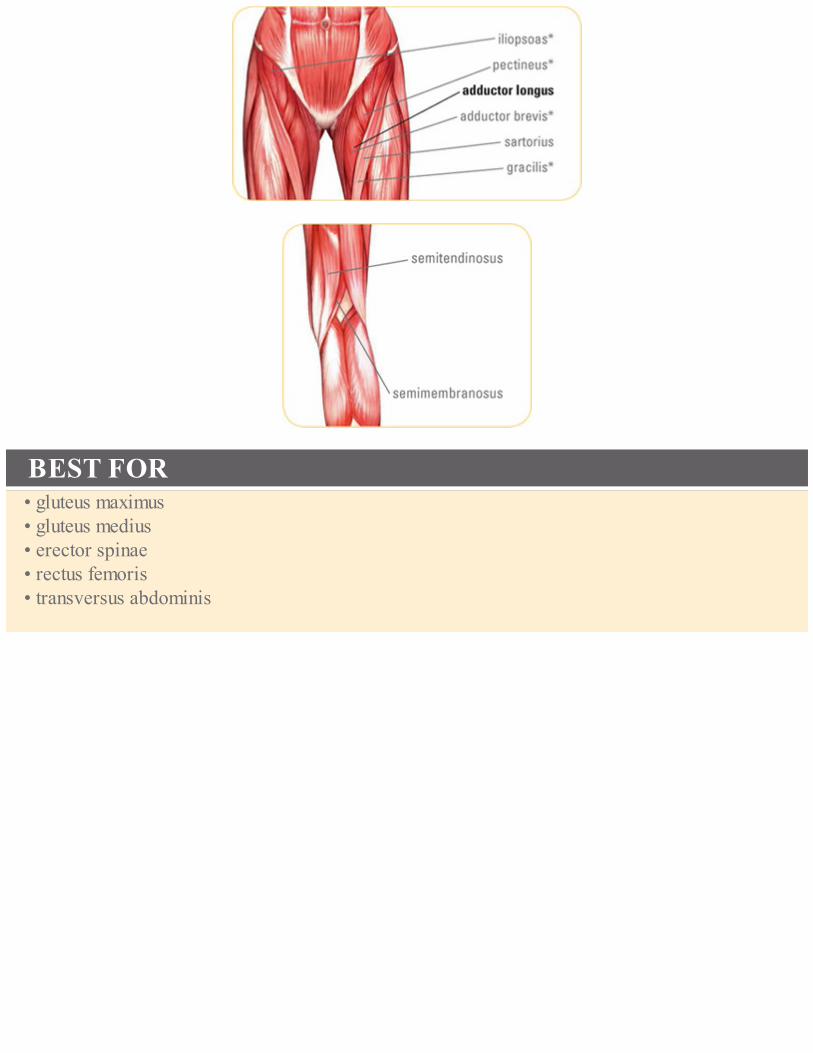
BEST FOR• gluteus maximus• gluteus medius• erector spinae• rectus femoris• transversus abdominis

QUICK GUIDETARGET• Lower back• Quadriceps• Gluteal muscles• AbdominalsTYPE• Strengthening/balanceLEVEL• AdvancedBENEFITS• Strengthens thighs and buttocks• Stretches chest and spineNOT ADVISABLE IF YOU HAVE• Shoulder injury• Back injury• Neck issues

MODIFICATIONMore difficult: Follow steps 1 through 5, and then draw your hands together, keeping your armsstraight. Hold for thirty seconds to one minute. Return to bridge position, and switch legs. Repeatentire sequence at least one more time.
ANNOTATION KEYBold text indicates active musclesGray text indicates stabilizing muscles* indicates deep muscles
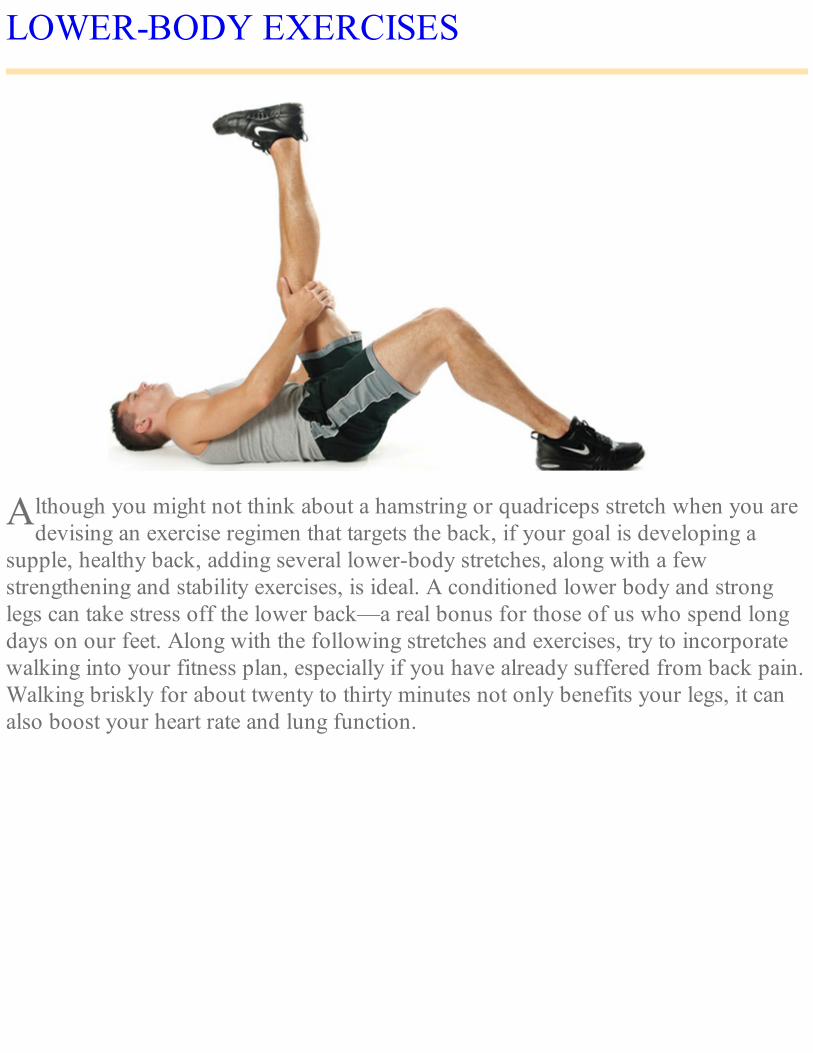
A
LOWER-BODY EXERCISES
lthough you might not think about a hamstring or quadriceps stretch when you aredevising an exercise regimen that targets the back, if your goal is developing a
supple, healthy back, adding several lower-body stretches, along with a fewstrengthening and stability exercises, is ideal. A conditioned lower body and stronglegs can take stress off the lower back—a real bonus for those of us who spend longdays on our feet. Along with the following stretches and exercises, try to incorporatewalking into your fitness plan, especially if you have already suffered from back pain.Walking briskly for about twenty to thirty minutes not only benefits your legs, it canalso boost your heart rate and lung function.

QUADRICEPS STRETCH
Stand with your feet together and your arms hanging loosely at your sides.
Balancing on your right leg, bend your left leg behind you, and grasp your foot with your lefthand.
While pushing your hips forward, pull your heel toward your buttocks until you feel a stretch inthe front of your thigh. Keep both knees together and aligned.
Hold for fifteen seconds. Repeat the sequence three times on each leg.

DO IT RIGHTDO• Keep both knees pressed together.AVOID• Leaning forward with your chest.
QUICK GUIDETARGET• Quadriceps• Hip flexors• Knee extensors• Anterior hip joint capsule
TYPE• Flexibility
LEVEL• Beginner

BENEFITS• Relieves stiffness caused by sitting too long• Increases the flexibility of the thighs, hips, and knees
NOT ADVISABLE IF YOU HAVE• Knee injury• Hip injury
BEST FOR• rectus femoris• vastus lateralis• vastus medialis• vastus intermedius

ANNOTATION KEYBold text indicates active musclesGray text indicates stabilizing muscles* indicates deep muscles

ILIOTIBIAL BAND STRETCH
Standing, cross your left leg in front of your right.
BEST FOR• tractus iliotibialis• vastus lateralis• gluteus maximus• biceps femoris• semitendinosus• semimembranosus

Bend at the waist while keeping both knees straight, and reach your hands toward the floor.
DO IT RIGHT
DO• Keep your knees extended.• Look for a long, smooth stretch.
AVOID• Bouncing as you try to reach your hands to the floor—reach down only as far as you can
comfortably extend.
Hold for fifteen seconds. Repeat the sequence three times on each leg.

QUICK GUIDETARGET• Iliotibial bandTYPE• FlexibilityLEVEL• BeginnerBENEFITS• Stabilizes core• Strengthens abdominalsNOT ADVISABLE IF YOU HAVE• Neck issues• Lower-back pain
ANNOTATION KEYBold text indicates active musclesGray text indicates stabilizing muscles* indicates deep muscles

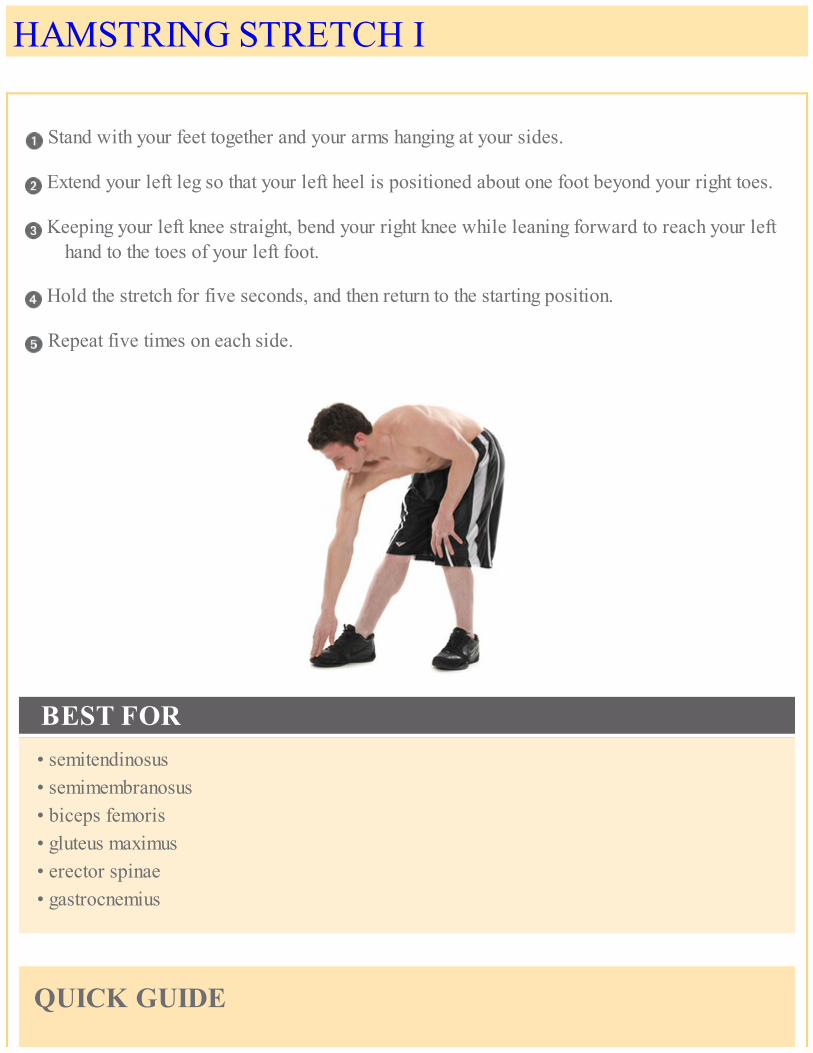
HAMSTRING STRETCH I
Stand with your feet together and your arms hanging at your sides.
Extend your left leg so that your left heel is positioned about one foot beyond your right toes.
Keeping your left knee straight, bend your right knee while leaning forward to reach your lefthand to the toes of your left foot.
Hold the stretch for five seconds, and then return to the starting position.
Repeat five times on each side.
BEST FOR• semitendinosus• semimembranosus• biceps femoris• gluteus maximus• erector spinae• gastrocnemius
QUICK GUIDE
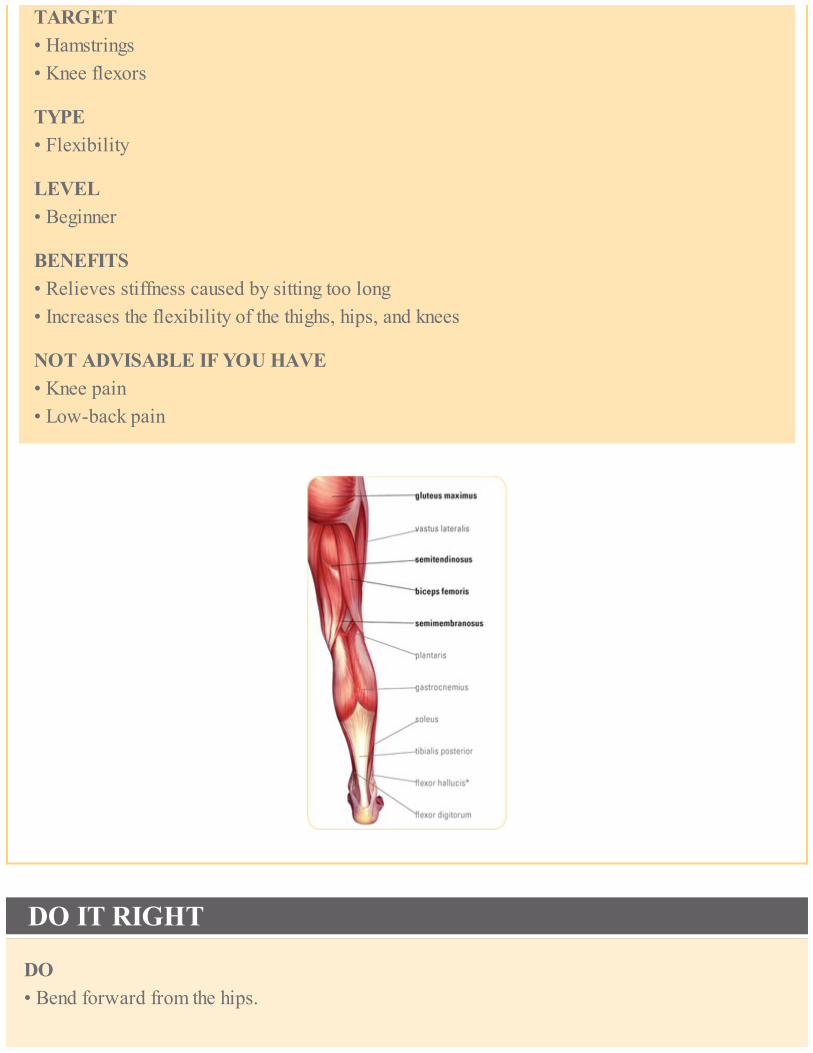
TARGET• Hamstrings• Knee flexors
TYPE• Flexibility
LEVEL• Beginner
BENEFITS• Relieves stiffness caused by sitting too long• Increases the flexibility of the thighs, hips, and knees
NOT ADVISABLE IF YOU HAVE• Knee pain• Low-back pain
DO IT RIGHT
DO• Bend forward from the hips.

AVOID• Bending the extended knee.
ANNOTATION KEYBold text indicates active musclesGray text indicates stabilizing muscles* indicates deep muscles
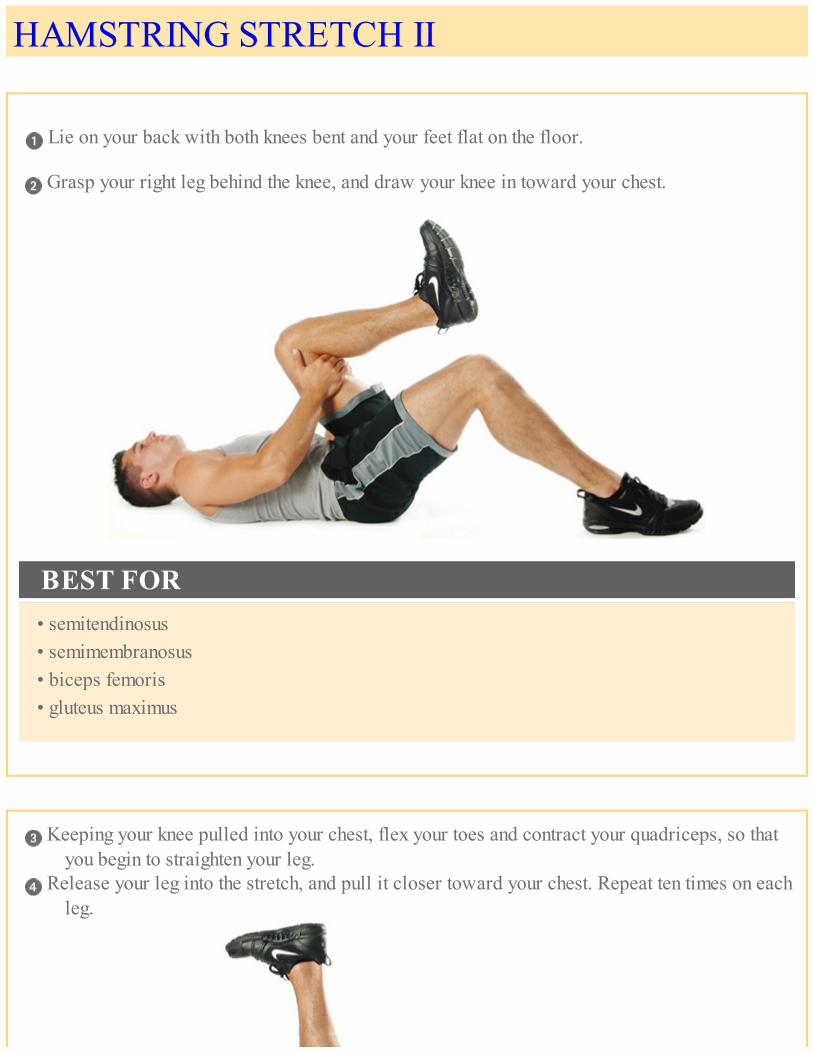
HAMSTRING STRETCH II
Lie on your back with both knees bent and your feet flat on the floor.
Grasp your right leg behind the knee, and draw your knee in toward your chest.
BEST FOR• semitendinosus• semimembranosus• biceps femoris• gluteus maximus
Keeping your knee pulled into your chest, flex your toes and contract your quadriceps, so thatyou begin to straighten your leg.
Release your leg into the stretch, and pull it closer toward your chest. Repeat ten times on eachleg.

QUICK GUIDETARGET• HamstringsTYPE• FlexibilityLEVEL• BeginnerBENEFITS• Relieves stiffness caused by sitting too long• Increases the flexibility of the thighs, hips, and kneesNOT ADVISABLE IF YOU HAVE• Knee pain
DO IT RIGHTDO• Pull your knee toward your chest throughout the movement.• Relax your neck and shoulders.• Flex your toes.AVOID• Rounding your shoulders and lifting your head.• Rolling your stabilizing leg out of neutral position.

FORWARD LUNGE
Stand with your feet together and your arms hanging at your sides.
DO IT RIGHT
DO• Maintain proper position of your shoulders and your whole upper body to lengthen your spine.
AVOID• Dropping your back-extended knee to the floor.
Exhale, and carefully step back with your right leg, keeping it in line with your hips as you stepback. The ball of your left foot should be in contact with the floor as you do the motion.
Slowly slide your right foot farther back while bending your left knee, stacking it directlyabove your ankle.
Position your palms or fingers on the floor on either side of your left leg, and slowly pressyour palms or fingers against the floor to enhance the placement of your upper body and yourhead.
Lift your head and gaze straight forward while leaning your upper body forward and carefullyrolling your shoulders down and backward.

Press the ball of your right foot gradually on the floor, contract your thigh muscles, and pressup to maintain your left leg in a straight position.
Hold for five seconds. Slowly return to the starting position, and then repeat on the other side.
QUICK GUIDETARGET• Quadriceps• Hamstrings• Calf muscles
TYPE• Flexibility/strengthening
LEVEL• Intermediate
BENEFITS• Strengthens legs and arms• Stretches groins
NOT ADVISABLE IF YOU HAVE• Arm injury• Shoulder injury• Hip injury• High or low blood pressure

MODIFICATIONMore difficult: Follow steps 1 through 3, using your right leg as the forward leg. Then positionthe palm of your left hand on the floor. Place your right hand behind your head, and slowly try totouch your elbow to the inside of your right ankle. Return to the starting position, and then repeaton the other side.
BEST FOR• biceps femoris• adductor longus• adductor magnus• gastrocnemius• tibialis posterior• iliopsoas• biceps femoris• rectus femoris

ANNOTATION KEYBold text indicates active musclesGray text indicates stabilizing muscles * indicates deepmuscles

HIP FLEXOR STRETCH
Kneeling on your left knee, place your right foot on the floor in front of you so that your rightknee is bent less than 90 degrees.
Bring your torso forward, bending your right knee so that your knee shifts toward your toes.Keeping your torso in neutral position, press your right hip forward and downward to createa stretch over the front of your thigh. Raise your arms up toward the ceiling, keeping yourshoulders relaxed.
QUICK GUIDETARGET• Quadriceps• Hamstrings
TYPE• Flexibility
LEVEL• Intermediate
BENEFITS• Stretches hip flexors and extensors
NOT ADVISABLE IF YOU HAVE• Severe neck pain

• Severe lower-back pain
DO IT RIGHT
DO• Keep your shoulders and neck relaxed.• Move your entire body as one unit as you go into the stretch.
AVOID• Extending your front knee too far over the planted foot.• Rotating your hips.• Shifting the knee of the back leg outward.
Bring your arms down and move your hips backward. Straighten your right leg, and bring yourtorso forward. Place your hands on either side of your straight leg for support.
Hold for ten seconds, and repeat the forward and backward movement five times on each leg.
MODIFICATIONMore difficult: During the backward movement, raise your back knee off the floor and straightenyour back leg. Keep your hands on the floor.

BEST FOR• iliacus• iliopsoas• biceps femoris• rectus femoris

ANNOTATION KEYBold text indicates active musclesGray text indicates stabilizing muscles* indicates deep muscles

HIP STRETCH
In a seated position, extend your left leg straight in front of you, and bend your right knee.Cross your bent knee over the straight leg, and keep your foot flat on the ground.
Wrap your left arm around the bent knee so that you are able to apply pressure to your leg torotate your torso.
DO IT RIGHT
DO• Keep your neck and shoulders relaxed.• Apply even pressure to your leg with your active hand.• Keep your torso upright as you pull your knee and torso together.
AVOID• Rounding your torso.• Lifting the foot of your bent leg off the floor.• Straining your neck as you rotate.
BEST FOR• adductor longus

• iliopsoas• rhomboideus• sternocleidomastoideus• latissimus dorsi• obliquus internus• obliquus externus• quadratus lumborum• erector spinae• multifidus spinae• tractus iliotibialis• gluteus maximus• gluteus medius• piriformis
Keeping your hips aligned, rotate your upper spine as you pull your chest in toward your knee.
Hold for thirty seconds. Slowly release, and repeat three times on each side.

QUICK GUIDETARGET• Hips• Gluteal muscles• Spine• Obliques
TYPE• Flexibility
LEVEL• Intermediate

BENEFITS• Stretches hip extensors and flexors• Stretches obliques
NOT ADVISABLE IF YOU HAVE• Severe lower-back pain
ANNOTATION KEYBold text indicates active musclesGray text indicates stabilizing muscles* indicates deep muscles

SAMPLE WORKOUTS

Now that you’ve familiarized yourself with a wide variety of healthy back exercises,it’s time to put them to use. Included here is a basic cervical/thoracic routine,
which will help work your neck and upper back. Following are two versions of aprogressive lumbar/core workout. The first is designed to alleviate pain associatedwith forward movements of the lumbar spine, and the second targets those whoexperience pain when extending. The last sample workout combines exercises from allareas to stabilize and build your muscles. These sample workouts will help you getstarted on a consistent exercise routine, but you can create many additionalcombinations using the book’s exercises. Remember to start slowly, taking intoconsideration your overall health and fitness level. Then have fun and mix things uponce you feel comfortable with your routine.

CERVICAL/THORACIC
1. CERVICAL STARSPage 34
2. FLEXION STRETCHPage 22
3. EXTENSION STRETCHPage 28
4. LATERAL STRETCHpage 24

5. ROTATION STRETCHPage 26
6. SHRUGPage 32
7. TURTLE NECKPage 33
8. SCAPULAR RANGE OF MOTIONPage 38

9. SIDE BENDINGPage 42
10. LATISSIMUS DORSI STRETCHPage 44
11. SHOULDER STRETCH IPage 40
OR
SHOULDER STRETCH IIPage 41

12. POSTERIOR HAND CLASPPage 50
13. UPPER TRAPEZIUS STRETCHPage 30
14. LEVATOR SCAPULAE STRETCHPage 31
15. CHAIR TWISTPage 48

16. OPEN BOOK STRETCHPage 47
17. BACKWARD BALL STRETCHPage 62
18. BODY BALL EXTENSIONPage 60
19. ROTATED BACK EXTENSIONPage 102

20. LOW CURL-UPPage 82
21. HALF CURLPage 74
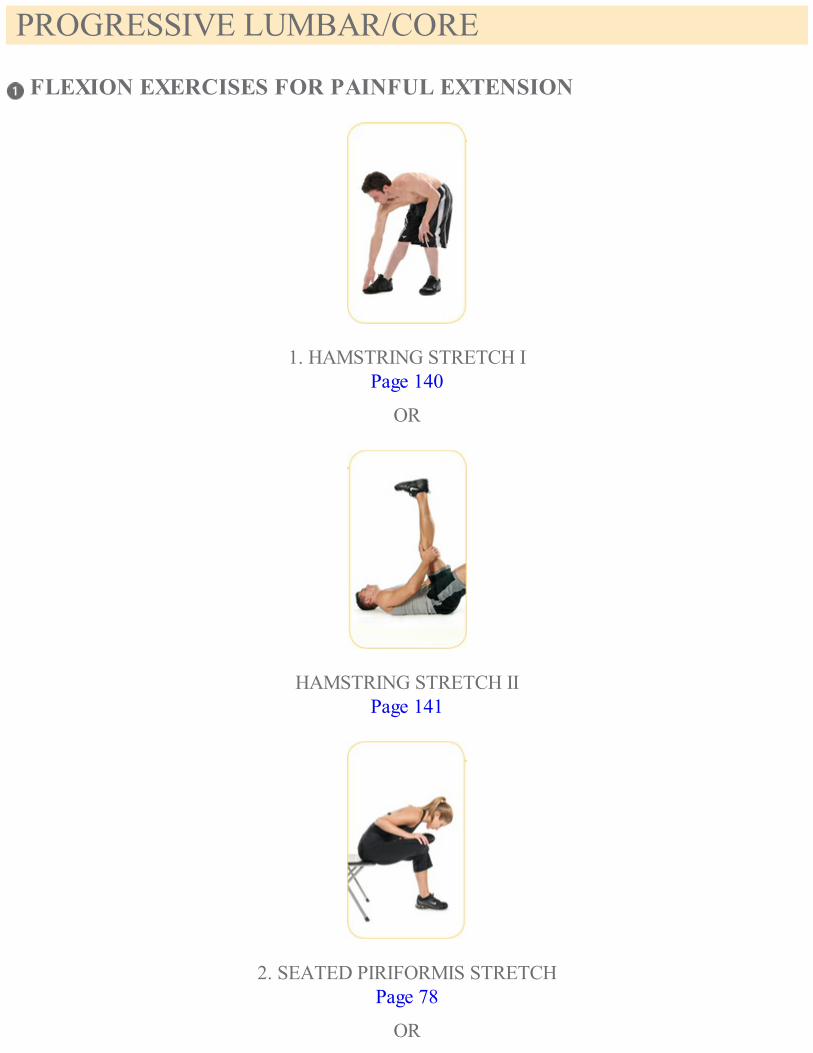
PROGRESSIVE LUMBAR/CORE
FLEXION EXERCISES FOR PAINFUL EXTENSION
1. HAMSTRING STRETCH IPage 140
OR
HAMSTRING STRETCH IIPage 141
2. SEATED PIRIFORMIS STRETCHPage 78
OR

PIRIFORMIS STRETCHPage 79
3. KNEE-TO-CHEST HUGPage 119 (modification)
4. SUPINE PELVIC TILTPage 114
OR
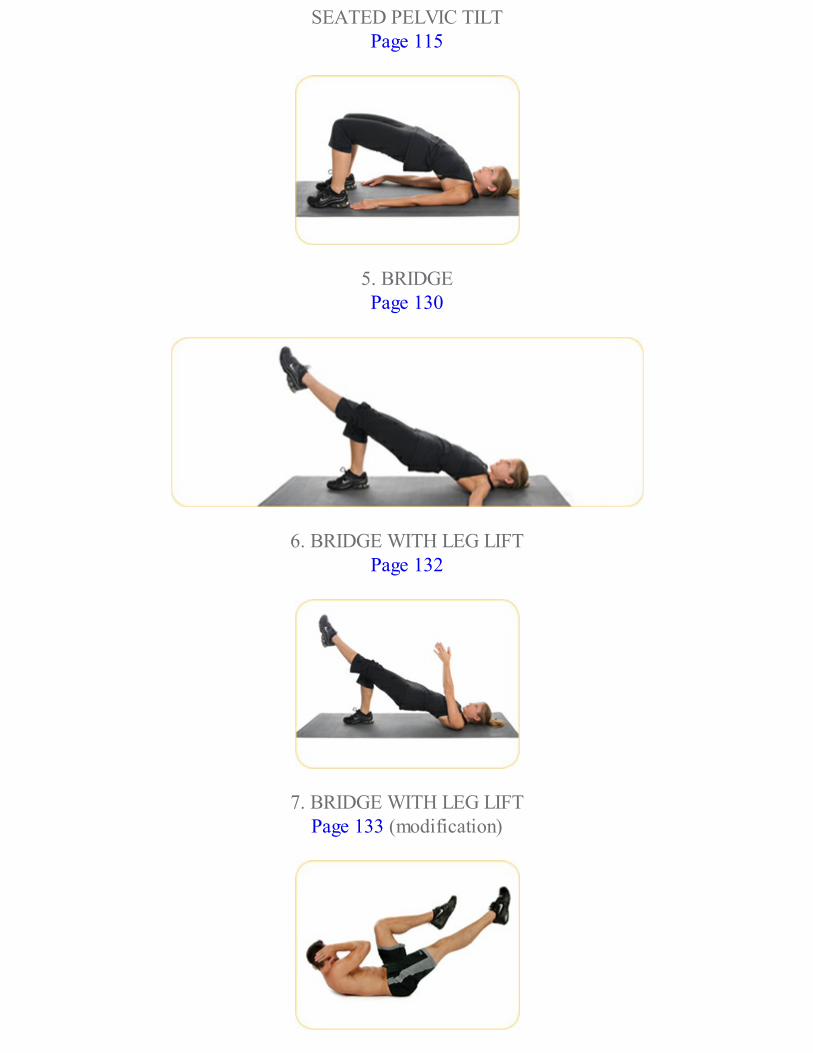
SEATED PELVIC TILTPage 115
5. BRIDGEPage 130
6. BRIDGE WITH LEG LIFTPage 132
7. BRIDGE WITH LEG LIFTPage 133 (modification)

8. CROSSOVER CRUNCHPage 106
9. RUSSIAN TWISTPage 80
EXTENSION EXERCISES FOR PAINFUL FLEXION
1. QUADRICEPS STRETCHPage 136
2. HIP FLEXOR STRETCHPage 144

3. FORWARD LUNGEPage 142
4. LOWER-BACK ROTATIONPage 121
5. SWIMMINGPage 128
6. SWIMMINGPage 129 (Superman modification)
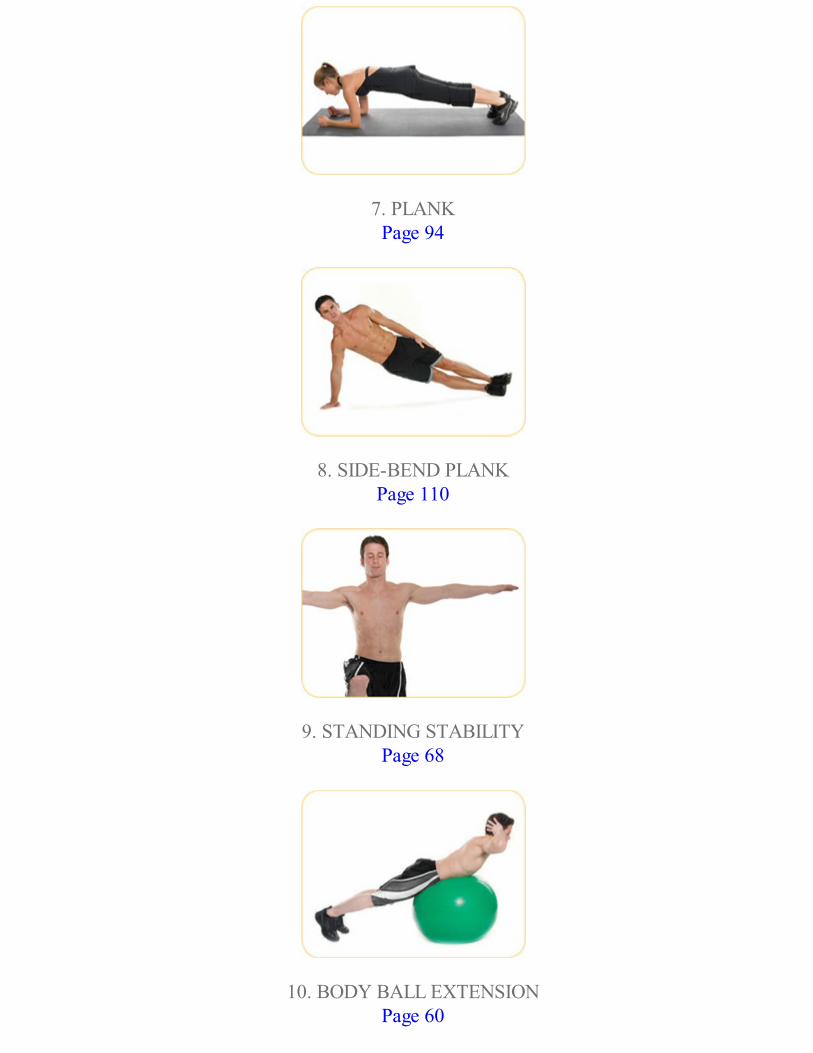
7. PLANKPage 94
8. SIDE-BEND PLANKPage 110
9. STANDING STABILITYPage 68
10. BODY BALL EXTENSIONPage 60

HEALTHY SPINE STABILIZATION & MUSCLEBUILDING
1. FLEXION ISOMETRICPage 23
2. EXTENSION ISOMETRICPage 29
3. LATERAL ISOMETRICPage 25

4. ROTATION ISOMETRICPage 27
5. TURTLE NECKPage 33
6. CAT AND DOG STRETCHPage 124
7. PLANK ROLL-DOWNPage 90

8. PLANKPage 94
9. THE POINTERPage 92
10. SIDE WALKINGPage 98
11. REVERSE BRIDGE BALL ROLLPage 86

12. MEDICINE BALL AB CURLSPage 88
13. REVERSE BRIDGE ROTATIONPage 84
14. TRANSVERSE ABSPage 104
15. JACKKNIFEPage 100

16. BODY BALL EXTENSIONPage 60
17. SWISS BALL ROWPage 58
18. SWISS BALL REVERSE FLYPage 56
19. HAND WALKOUTPage 52

20. HAND WALK-AROUNDPage 54
21. THE TWISTPage 108
22. SIDE-BEND PLANKPage 110
23. BASIC CRUNCHPage 70

24. CHILD’S POSEPage 122

GLOSSARY
GENERAL TERMSabduction: Movement away from the body.adduction: Movement toward the body.alternating grip: One hand grasping with the palm facing toward the body and the other facing away.anterior: Located in the front.biomechanics: The sport science field that applies the laws of mechanics and physics to humanperformance.cardiovascular exercise: Any exercise that increases the heart rate, making oxygen and nutrient-richblood available to working muscles.cardiovascular system: The circulatory system that distributes blood throughout the body, whichincludes the heart, lungs, arteries, veins, and capillaries.cervical: Of, or relating to, the neck. the cervical vertebrae are the seven immediately inferior to theskull.coccygeal: Referring to the coccyx. See coccyx.coccyx: The small tail-like bone at the bottom of the spine.concentric (contraction): Occurs when a muscle shortens in length and develops tension, e.g., theupward movement of a weight in a biceps curl.crossed syndrome: Describes a compromise in the musculoskeletal system, which tightens, orfacilitates, the anterior of one area of the body while at the same time weakening, or inhibiting, theposterior, usually resulting from a predictable pattern of muscular compensation and posturalimbalances in the body. the “upper crossed syndrome” refers to imbalances in the upper torso, and the“lower crossed syndrome” refers to imbalances in the lower torso and legs. these syndromes werefirst described by Czech physiotherapist Dr. Vladimir Janda.crunch: A common abdominal exercise that calls for curling the shoulders toward the pelvis whilelying supine with hands behind head and knees bent.curl: An exercise movement, usually targeting the biceps brachii, that calls for a weight to be movedthrough an arc, in a “curling” motion.eccentric (contraction): the development of tension while a muscle is being lengthened, e.g., thedownward movement of a weight in a biceps curl.ergonomics: the study of designing equipment and devices that fit the human body, its movements, andits cognitive abilities.extension: The act of straightening.extensor muscle: A muscle serving to extend a body part away from the body.

facet joint: The joint between the articular processes of the vertebrae. Also called the zygapophysealjoint.facilitated: Tightened, as in a muscle. See crossed syndrome.flexion: The bending of a joint.flexor muscle: A muscle that decreases the angle between two bones, as bending the arm at theelbow or raising the thigh toward the stomach.fly: An exercise movement in which the hand and arm move through an arc while the elbow is kept ata constant angle.iliotibial band (ITB): A thick band of fibrous tissue that runs down the outside of the leg, beginning atthe hip and extending to the outer side of the tibia just below the knee joint. this band functions incoordination with several of the thigh muscles to provide stability to the outside of the knee joint.inhibited: Weakened, as in a muscle. See crossed syndrome.intervertebral disk: The layer of fibrocartilage between the bodies of adjoining vertebrae.isometric exercise: A form of exercise involving the static contraction of a muscle without anyvisible movement in the angle of the joint.kyphosis: The outward curvature of the spine; excessive kyphosis causes a humped back.lateral: Located on, or extending toward, the outside.ligament: The fibrous tissue that connects bones to other bones.lordosis: The inward curvature of the spine; excessive lordosis causes a swayback.lumbar: Of, near, or situated in the part of the back and sides between the lowest ribs and the pelvis;the lumbar vertebrae are the five vertebrae at the base of the spinal column.medial: Located on, or extending toward, the middle.medicine ball: A weighted ball, often used for rehabilitation and strength training.muscle: The contractile tissue of the body that functions to produce force and cause motion. Cardiacand smooth muscle contraction occurs without conscious thought, and voluntary muscles, which weuse to move the body, can be finely controlled.nerve: A cordlike structure comprising a collection of fibers that convey impulses between a part ofthe central nervous system and some other body region.nervous system: The system of cells, tissues, and organs that regulates the body’s responses tointernal and external stimuli. in humans, it consists of the brain, spinal cord, nerves, ganglia, and partsof the receptor and effector organs. The central nervous system is made up of the brain and spinalcord.neural foramen: The aperture formed between every pair of vertebrae, which allows for the passageof the spinal column.neutral position: A spinal position resembling an S shape, consisting of a lordosis in the lower backwhen viewed in profile.

overhand grip: A grip in which your palms are facing down and away from you, and your thumbs arepointing inward to each other. Also called a pronated grip.physiatrist: A physician specializing in physical medicine and rehabilitation.posterior: Located behind.process: A prominence or projection, as from a bone. the spinous process of the vertebrae projectsbackward from the arches, giving attachment to the back muscles; the transverse processes project oneither side of the arch of a vertebra.pronated grip: See overhand grip.sacral: Referring to the sacrum. See sacrum.sacrum: The large heavy bone at the base of the spine, which is made up of fused sacral vertebrae.the lumbar vertebrae stack immediately on top of the sacrum.scapula: The protrusion of bone on the mid to upper back, also known as the shoulder blade.spinal column: The series of articulated vertebrae, separated by intervertebral disks and heldtogether by muscles and tendons, that extends from the cranium to the coccyx, encasing the spinal cordand forming the supporting axis of the body. Also called the backbone, rachis, vertebral column, orspine.spinal cord: The major column of nerve tissue that is connected to the brain and lies within thevertebral canal and from which the spinal nerves emerge. thirty-one pairs of spinal nerves originate inthe spinal cord: eight cervical, twelve thoracic, five lumbar, five sacral, and five coccygeal.sternum: The elongated, flattened bone forming the middle portion of the anterior wall of the thorax.its upper end supports the clavicles, or collarbones, and its margins articulate with the cartilages ofthe first seven pairs of ribs.Swiss ball: A flexile, inflatable PVC ball measuring approximately 14 to 34 inches in circumferencethat is used for weight training, physical therapy, balance training, and other exercise regimens. it isalso called a stability ball, fitness ball, exercise ball, gym ball, physioball, and many other names.tendon: A tough band of fibrous connective tissue that usually connects muscle to bone.thoracic: Of, relating to, or situated in or near the thorax; the thoracic vertebrae are the twelvebetween the cervical vertebrae and the lumbar vertebrae.thorax: The region of the body formed by the sternum, the thoracic vertebrae, and the ribs, extendingfrom the neck to the diaphragm, and not including the upper limbs.vertebra: The bones that make up the spine.vertebral body: The weight-supporting, solid central part of a vertebra.vertebral canal: The canal formed within the spinal column that contains the spinal cord.vestibular deficit: Difficulties maintaining balance due to inner-ear disorders.warm-up: Any form of light exercise of short duration that prepares the body for more intenseexercises.

zygapophyseal joint: See facet joint.

GLOSSARY
LATIN TERMSThe following glossary explains the Latin terminology used to describe the body’s muscles,ligaments, and bones. Certain words are derived from Greek or French, which has been indicatedin each instance.
CHESTcoracobrachialis: Greek korakoeidés, “ravenlike,” and brachium, “arm”costae: costa, “rib”pectoralis (major and minor): pectus, “breast”
ABDOMENobliquus externus: obliquus, “slanting,” and externus, “outward”obliquus internus: obliquus, “slanting,” and internus, “within”rectus abdominis: rego, “straight, upright,” and abdomen, “belly”serratus anterior: serra, “saw,” and ante, “before”transversus abdominis: transversus, “athwart,” and abdomen, “belly”
NECKlongus capitis: longus, “tall,” and capitis, “of a head”longus colli: longus, “tall,” and collum, “neck”rectus capitis: rego, “straight, upright,” and capitis, “of a head”rectus capitis lateralis: rego, “straight, upright,” capitis, “of a head,” and lateralis, “side”scalenus: Greek skalénós, “unequal”semispinalis: semi, “half,” and spinae, “spine”splenius: Greek spléníon, “plaster, patch”sternocleidomastoideus: Greek stérnon, “chest,” Greek kleís, “key,” and Greek mastoeidés,“breastlike”sternohyoideus: Greek stérnon, “chest,” and Greek hyoeides, “U-shaped”
BACKarticulationes zygapophysiales: articulatio, “joint,” Greek zygo, “yoke,” and Greek apophyses, “anoutgrowth or swelling”
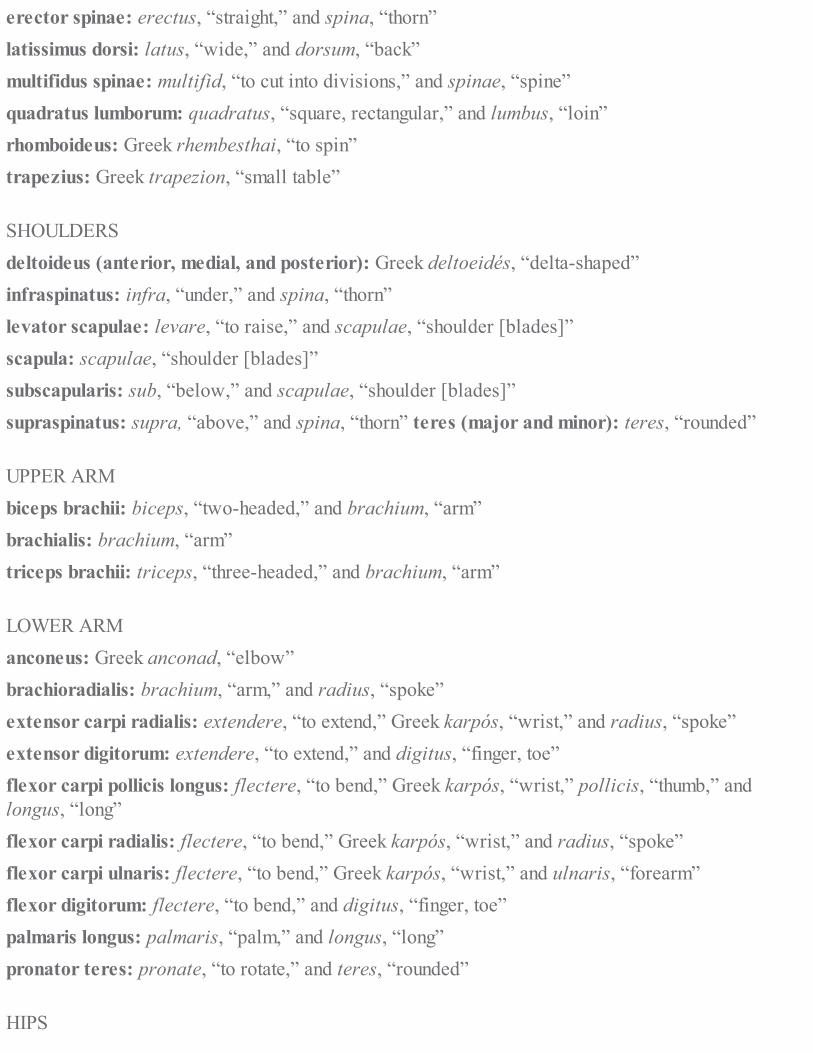
erector spinae: erectus, “straight,” and spina, “thorn”latissimus dorsi: latus, “wide,” and dorsum, “back”multifidus spinae: multifid, “to cut into divisions,” and spinae, “spine”quadratus lumborum: quadratus, “square, rectangular,” and lumbus, “loin”rhomboideus: Greek rhembesthai, “to spin”trapezius: Greek trapezion, “small table”
SHOULDERSdeltoideus (anterior, medial, and posterior): Greek deltoeidés, “delta-shaped”infraspinatus: infra, “under,” and spina, “thorn”levator scapulae: levare, “to raise,” and scapulae, “shoulder [blades]”scapula: scapulae, “shoulder [blades]”subscapularis: sub, “below,” and scapulae, “shoulder [blades]”supraspinatus: supra, “above,” and spina, “thorn” teres (major and minor): teres, “rounded”
UPPER ARMbiceps brachii: biceps, “two-headed,” and brachium, “arm”brachialis: brachium, “arm”triceps brachii: triceps, “three-headed,” and brachium, “arm”
LOWER ARManconeus: Greek anconad, “elbow”brachioradialis: brachium, “arm,” and radius, “spoke”extensor carpi radialis: extendere, “to extend,” Greek karpós, “wrist,” and radius, “spoke”extensor digitorum: extendere, “to extend,” and digitus, “finger, toe”flexor carpi pollicis longus: flectere, “to bend,” Greek karpós, “wrist,” pollicis, “thumb,” andlongus, “long”flexor carpi radialis: flectere, “to bend,” Greek karpós, “wrist,” and radius, “spoke”flexor carpi ulnaris: flectere, “to bend,” Greek karpós, “wrist,” and ulnaris, “forearm”flexor digitorum: flectere, “to bend,” and digitus, “finger, toe”palmaris longus: palmaris, “palm,” and longus, “long”pronator teres: pronate, “to rotate,” and teres, “rounded”
HIPS

gemellus (inferior and superior): geminus, “twin”gluteus maximus: Greek gloutós, “rump,” and maximus, “largest”gluteus medius: Greek gloutós, “rump,” and medialis, “middle”gluteus minimus: Greek gloutós, “rump,” and minimus, “smallest”iliacus: ilium, “groin”iliopsoas: ilium, “groin,” and Greek psoa, “groin muscle”obturator externus: obturare, “to block,” and externus, “outward”obturator internus: obturare, “to block,” and internus, “within”pectineus: pectin, “comb”piriformis: pirum, “pear,” and forma, “shape”quadratus femoris: quadratus, “square, rectangular,” and femur, “thigh”
UPPER LEGadductor longus: adducere, “to contract,” and longus, “long”adductor magnus: adducere, “to contract,” and magnus, “major”biceps femoris: biceps, “two-headed,” and femur, “thigh”gracilis: gracilis, “slim, slender”rectus femoris: rego, “straight, upright,” and femur, “thigh”sartorius: sarcio, “to patch” or “to repair”semimembranosus: semi, “half,” and membrum, “limb”semitendinosus: semi, “half,” and tendo, “tendon”tensor fasciae latae: tenere, “to stretch,” fasciae, “band,” and latae, “laid down”vastus intermedius: vastus, “immense, huge,” and intermedius, “between”vastus lateralis: vastus, “immense, huge,” and lateralis, “side”vastus medialis: vastus, “immense, huge,” and medialis, “middle”
LOWER LEGadductor digiti minimi: adducere, “to contract,” digitus, “finger, toe,” and minimum, “smallest”adductor hallucis: adducere, “to contract,” and hallex, “big toe”extensor digitorum: extendere, “to extend,” and digitus, “finger, toe”extensor hallucis: extendere, “to extend,” and hallex, “big toe”flexor digitorum: flectere, “to bend,” and digitus, “finger, toe”flexor hallucis: flectere, “to bend,” and hallex, “big toe”

gastrocnemius: Greek gastroknémía, “calf [of the leg]”peroneus: peronei, “of the fibula”plantaris: planta, “sole”soleus: solea, “sandal”tibialis anterior: tibia, “reed pipe,” and ante, “before”tibialis posterior: tibia, “reed pipe,” and posterus, “coming after”trochlea tali: trochleae, “a pulley-shaped structure,” and talus, “lower portion of ankle joint”
LIGAMENTSligamentum capsular facet: ligamentum, “bandage,” capsa, “box,” and facies, “face”ligamentum interspinalis: ligamentum, “bandage,” inter, “between,” and spina, “thorn”ligamentum longitudinale anterius: ligamentum, “bandage,” longitudo, “length,” and ante, “infront”ligamentum longitudinale posterius: ligamentum, “bandage,” longitudo, “length,” and post,“behind”ligamentum nuchae: ligamentum, “bandage,” and French nuque, “nape”ligamentum supraspinous: ligamentum, “bandage,” supra, “above,” and spina, “thorn”ligamentum transversum: ligamentum, “bandage” and transversus, “athwart”
CREDITS & ACKNOWLEDGMENTSAll photographs by Jonathan Conklin/Jonathan Conklin Photography, Inc., except Page 14 bygrafvision/Shutterstock and Page 16 by Simon Krzic/Shutterstock
Poster illustrations by Linda Bucklin/Shutterstock
Models: Goldie Karpel, Michael Galizia, and Michael Radon
All anatomical illustrations by Hector Aiza/3D Labz Animation India, except the insets on pages 22,23, 24, 26, 27, 28, 29, 43, 45, 46, 47, 49, 51, 53, 55, 57, 59, 61, 63, 67, 68, 69, 71, 77, 79, 85, 87,89, 95, 101, 103, 105, 111, 114, 117, 119, 120, 121, 123, 125, 127, 131, 133, 139, 140, 145, and 147by Linda Bucklin/Shutterstock and pages 41 and 97 by 3D4Medical; and the illustrations on pages 8and 15 by Alex Mit/Shutterstock; Page 9 by Sebastian Kaulitzkin/Shutterstock; page 10 byBioMedical/Shutterstock; page 17 by Patrick Hermans/Shutterstock, and pages 18 and 19 by LindaBucklin/Shutterstock
ACKNOWLEDGMENTSSince 1994, I have had the distinct privilege of treating thousands of individuals from many differentwalks of life. Healing people and helping them return to the activities of their lives—fromgrandparents playing with their grandchildren to athletes getting back on the field to workers returningto their jobs—has been incredibly rewarding for me.
I want to take this opportunity to thank my parents, Drs. Philip and Theresa Striano, for guiding methrough the years to get to this point in my life. Dad, although my time with you was short, yoursacrifice and conviction for your profession, patients, and family will always be a guiding force forme. I also want to acknowledge my three sisters, Terri, Thomasina, and Tara, for the their love andsupport.
My two boys, Christian and Brandon, you two fill my life with joy and pride—I love you bothwith all my heart! Shelly and Stacy, thank you both for these two divine gifts.
I firmly believe that all people become who they are through their interpersonal interactions withothers. I would like to thank some of these people, who throughout my life, have made me the person Iam today: from Hackley School, the Stern, Allen, Khosrowshahi, Leary, and Chervokas families; fromthe Franklin and Marshall football and lacrosse team, my teammates; and from ACC, the Lifflanders,Pilzers, and Proshop.
Thanks to Dr. Richard Brodsky for helping with the book. Thanks to Cheech for being Cheech.Finally, thanks to Lisa, Sean, and Karen for giving me this opportunity!
The author and publisher also offer thanks to those closely involved in the creation of this book:Moseley Road president Sean Moore; editorial director/designer Lisa Purcell; general managerKaren Prince; art director Brian MacMullen; designers Hwaim Holly Lee and Katie Calak; andeditorial assistant Rebecca Axelrad.