how it works - hrv · “nice to be comfy while you’re saving the planet
TRANSCRIPT
Call 0800 HRV 123 for help and support
Instruction Manual
Using your HRV
Using your HRV Adjusting the Ventilation level
This setting determines how much air your HRV will deliver when the temperature inside
your roof cavity is undesirable – for example, on a cold winter night or hot summer day.
To change this setting, first turn the system OFF with a single press of the ON/OFF button.
The screen will be blank.
Next, hold the temperature button for 3 seconds, until you hear a beep.
The screen will light up displaying 01 in the roof, and another number in the house.
Release the TEMP button as soon as the screen has lit up.
The number shown in the house (bottom figure) is the ventilation level.
Use single presses of the ON/OFF button to cycle this value from 1 (the least aggressive)
through 6 (the most aggressive). You will want to have the ventilation level set as high
as possible, but not so high as to over ventilate on winter nights or summer days.
Choose an appropriate level, and press the FUNC button once to return to normal operation.
Seasonal Suggestions for Ventilation level
Whilst your ventilation level is a personal preference and makes the HRV adaptable to any
home, it is suggested that you lower the ventilation level to 1 during the summer months
and increase it during winter to above 3. Having it above 3 in winter will ensure any
condensation is minimised.
My HRV was installed a couple of days ago, and it seems to be working,but my windows are still fogging up. What’s wrong?
There’s nothing wrong, your HRV is doing its job perfectly! While you should notice an
improvement the very next day, best results are obtained a few weeks down the track,
after your HRV has had time to dry out walls, flooring, bedding and so on.
It’s working great, but I still get a mist occasionally on some windows – why is this?
Even though your home is now dry, especially cold or damp weather conditions may still
lead to some misty windows – certainly far less than what you would have had without the
HRV. Having a party or cooking a big meal will also cause a bit of extra moisture, but your
HRV will set to clearing this out over the next day. No system can guarantee zero
condensation, but rest assured your HRV is getting you as close as is possible!
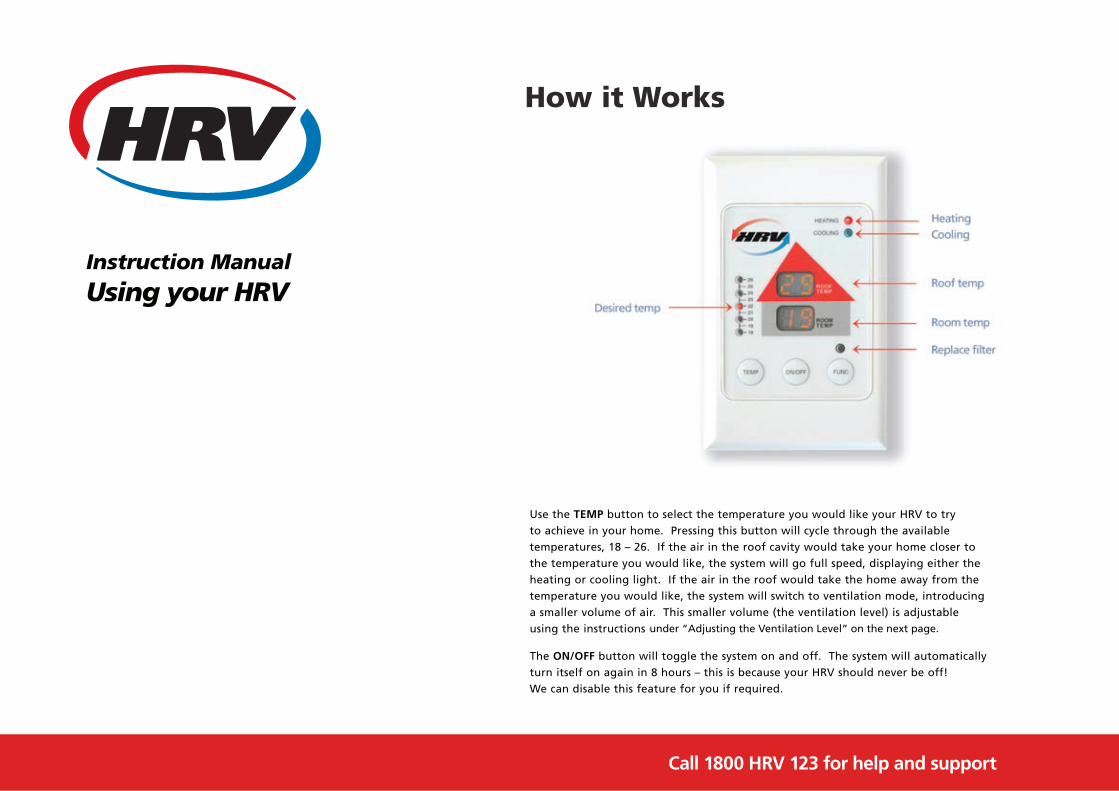
Use the TEMP button to select the temperature you would like your HRV to try
to achieve in your home. Pressing this button will cycle through the available
temperatures, 18 – 26. If the air in the roof cavity would take your home closer to
the temperature you would like, the system will go full speed, displaying either the
heating or cooling light. If the air in the roof would take the home away from the
temperature you would like, the system will switch to ventilation mode, introducing
a smaller volume of air. This smaller volume (the ventilation level) is adjustable
using the instructions on page 3.
The ON/OFF button will toggle the system on and off. The system will automatically
turn itself on again in 8 hours – this is because your HRV should never be off!
We can disable this feature for you if required.
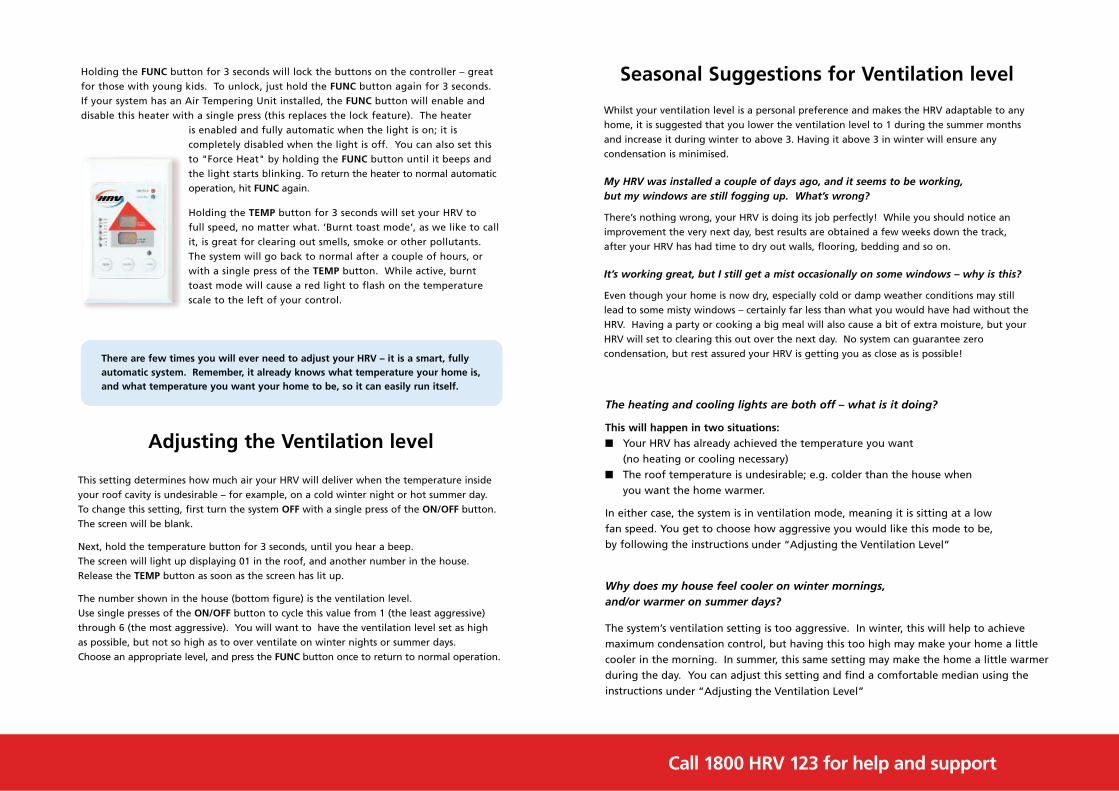
Holding the FUNC button for 3 seconds will lock the buttons on the controller – great
for those with young kids. To unlock, just hold the FUNC button again for 3 seconds.
If your system has an Air Tempering Unit installed, the FUNC button will enable and
disable this heater with a single press (this replaces the lock feature). The heater
is enabled and fully automatic when the light is on; it is
completely disabled when the light is off. You can also set this
to "Force Heat" by holding the FUNC button until it beeps and
the light starts blinking. To return the heater to normal automatic
operation, hit FUNC again.
Holding the TEMP button for 3 seconds will set your HRV to
full speed, no matter what. ‘Burnt toast mode’, as we like to call
it, is great for clearing out smells, smoke or other pollutants.
The system will go back to normal after a couple of hours, or
with a single press of the TEMP button. While active, burnt
toast mode will cause a red light to flash on the temperature
scale to the left of your control.
Air Purifying • Energy Efficient Heating and Cooling • Condensation and Moisture Control • Healthy Home - Healthy Family
There are few times you will ever need to adjust your HRV – it is a smart, fullyautomatic system. Remember, it already knows what temperature your home is,and what temperature you want your home to be, so it can easily run itself.
under “Adjusting the Ventilation Level” on the next page.
Night Mode
Night Mode sets the HRV to 18 degrees for 4 hours, after which it will return to itsprevious setting automatically. Night Mode is best used in summer before going tobed in the evening. Once set, your HRV System will use the cool air in the roof space to bring the room temperature down, and create air flow in the house to help with a more comfortable night sleep.
To activate press and hold the ‘Down’ arrow button until you see the set temperature as a flashing ‘18’. This will occur 3 seconds after the flashing ‘--’ is displayed, so don’t releasethe button until the flashing ‘18’ is seen. To de-activate, press the ‘Up’ or ‘Down’ arrowbutton once.
Filter Gauge
The Filter Gauge is an indicator of how much percentage of use the filter has remaining. To display the filter gauge press the ‘FUNC’ button twice within a second and then afteranother second, press it again. ‘Fil’ will be displayed with a number under it. This number is a percentage of filter use remaining. Over time the number moves towards zero percentand the filter needs to be replaced when it gets close to zero. This will also be indicatedby the Replace Filter Light (see below).
Note: For systems with an ATU, you will need to turn the system off first, by pressing the‘Power’ button.
Replace Filter Light
If the Replace Filter Light is flashing, then it’s time to replace your filter. Doing thiswithout delay will ensure your HRV System continues to work at its best performance.
Power Failure
During a power failure the unit will retain all settings, including the Set Temperature andthe key pads locked state.
Ventilation Mode – Adjusting the Ventilation Level
This setting determines how much air your HRV will deliver when the temperature insideyour roof cavity is undesirable – for example, on a cold winter night or hot summer day. For bad condensation problems a higher setting can be selected. A higher setting willreduce condensation but may also reduce the temperature during cooler times of the year.
To change this setting, first turn the system off by pressing the power button. Next, pressand hold the ‘Down’ arrow button until the display is lit (3 sec) – the display will now show‘01’ beside the ‘Roof Temp’ and another number beside the ‘House Temp’. Press the ‘Power’button to change the setting. The setting can be a number from ‘1’ through to ‘6’.
To exit settings mode press the ‘FUNC’ button when the setting has been made. Settingsmode will exit in 2 minutes, if no key is pressed.
ATU control (ATU system) – Optional
The Air Tempering Unit can run in two modes (Air tempering mode or thermostat mode).Air Temper mode uses a lot less power and only turns on the heater to help reducecondensation. Thermostat mode turns on the heater whenever the HRV system needsto heat.
To enable air tempering mode, briefly press the ‘FUNC’ button once. The ATU symbol will bedisplayed. To disable the air tempering mode briefly press the ‘FUNC’ button again.The ATU symbol will go off.
To enable thermostat mode, press and hold the ‘FUNC’ button for 3 seconds, until the ATUsymbol flashes. To disable the thermostat mode, briefly press the ‘FUNC’ button.The ATU symbol will go off.
Normal Operation
Press the ‘Power’ button if the unit is not already on. Select the desired temperature by using the‘Up’ and ‘Down’ arrow buttons. This temperature can be set from 14 to 24 degrees Celsius. Afterselecting the desired temperature, the HRV system will function automatically all year round.
Turning off the HRV System
In the unlikely event that you want to turn the HRV system off, just press the ‘Power’ button once.The display will turn off. To ensure your house stays fresh and dry, the HRV will automatically poweron again in 8 hours.
Heating Symbol Displayed (Heating Mode)
If the House Temperature is cooler than the Set Temperature, and the Roof Temperature is hotter than the House Temperature, then the HRV System will enter Heating Mode and use thewarmer air in the roof space to raise thetemperature of the house.
Cooling Symbol Displayed (Cooling Mode)
If the House Temperature is warmer than the SetTemperature, and the Roof Temperature is coolerthan the House Temperature, then the HRVSystem will enter Cooling Mode and use thecooler air in the roof space to lower thetemperature of the house.
Ventilation Symbol Displayed(Ventilation Mode)
If the House Temperature is at the SetTemperature, or the Roof Temperature cannot beused to adjust the House Temperature, then theHRV system enters Ventilation Mode. This modewill reduce condensation and provide fresh air inthe house.
Fan Speed Indicator
The Fan Speed Indicator consists of 5 segmentswhich provide a rough indication of the fanspeed. The fan is capable of much finer speedadjustments than the 5 steps indicated.
Burnt Toast Mode
Burnt Toast Mode forces the HRV to run at full fan speed for 1 hour. To enable Burnt Toast Modepress and hold the ‘Down’ arrow button for three seconds. Two beeps will be heard and the settemperature will flash ‘--’. This mode is a boost mode to clear unwanted fumes or to removecondensation that may have been trapped behind a closed curtain.
After 1 hour the system will return to its previous setting automatically. To de-activate, press the‘Up’ or ‘Down’ arrow button once.
Locking the Keypad (non ATU System)
To avoid accidental changing of any settings, the keypad can be locked. Press and hold the ‘FUNC’button until the lock symbol is shown (3 sec). To unlock the keypad press and hold the ‘FUNC’button until the lock symbol goes out (3 sec).
Air Flow Path
The air flow path has three arrows showing where the air is coming from (roof or outside) and alsoif the roof space is being purged. Note, purging roof space and outside air are additional optionsavailable – contact HRV for more information 0800 HRV 123.
How it Works
The display consists of three two digit temperature displays, a fan speed indicator and
symbols to indicate the mode of operation. The top two digit display is the current
roof space temperature and the middle two digit display is the current house
temperature. The temperatures are shown in degrees Celsius. If the temperature
reading is below –9 then the display will show ‘Lo’.
The bottom two digit display is the Set Temperature. This should be adjusted to the
desired temperature that you would like to achieve in your home. This can show from
14 to 24 degrees Celsius, or two flashing dashes when in ‘burnt toast’ mode.
The right side of the display contains the symbols showing the mode of operation.
From top to bottom you have, heating, cooling, ventilation, locked, air tempering,
house with air flow path and fan speed indicator.
Your HRV system creates huge
efficiencies as it dries out your home.
You will find you use less primary
heating ( fireplace, heat pump
or flued gas ) and you won’t need
your dehumidifiers. HRV owners are
saving up to 60% of their energy cost
and reducing their emissions.
Good on you.
“Nice to be comfy whileyou’re saving the planet”
Roof temp
Room temp
Set temp
Heating
Cooling
Ventilation
Locked
Outside air
Fan speed
Roof air
Air tempering
Purge
Call 1800 HRV 123 for help and support
Call 0800 HRV 123 for help and support
Using your HRV Adjusting the Ventilation level
This setting determines how much air your HRV will deliver when the temperature inside
your roof cavity is undesirable – for example, on a cold winter night or hot summer day.
To change this setting, first turn the system OFF with a single press of the ON/OFF button.
The screen will be blank.
Next, hold the temperature button for 3 seconds, until you hear a beep.
The screen will light up displaying 01 in the roof, and another number in the house.
Release the TEMP button as soon as the screen has lit up.
The number shown in the house (bottom figure) is the ventilation level.
Use single presses of the ON/OFF button to cycle this value from 1 (the least aggressive)
through 6 (the most aggressive). You will want to have the ventilation level set as high
as possible, but not so high as to over ventilate on winter nights or summer days.
Choose an appropriate level, and press the FUNC button once to return to normal operation.
Seasonal Suggestions for Ventilation level
Whilst your ventilation level is a personal preference and makes the HRV adaptable to any
home, it is suggested that you lower the ventilation level to 1 during the summer months
and increase it during winter to above 3. Having it above 3 in winter will ensure any
condensation is minimised.
My HRV was installed a couple of days ago, and it seems to be working,but my windows are still fogging up. What’s wrong?
There’s nothing wrong, your HRV is doing its job perfectly! While you should notice an
improvement the very next day, best results are obtained a few weeks down the track,
after your HRV has had time to dry out walls, flooring, bedding and so on.
It’s working great, but I still get a mist occasionally on some windows – why is this?
Even though your home is now dry, especially cold or damp weather conditions may still
lead to some misty windows – certainly far less than what you would have had without the
HRV. Having a party or cooking a big meal will also cause a bit of extra moisture, but your
HRV will set to clearing this out over the next day. No system can guarantee zero
condensation, but rest assured your HRV is getting you as close as is possible!
Use the TEMP button to select the temperature you would like your HRV to try
to achieve in your home. Pressing this button will cycle through the available
temperatures, 18 – 26. If the air in the roof cavity would take your home closer to
the temperature you would like, the system will go full speed, displaying either the
heating or cooling light. If the air in the roof would take the home away from the
temperature you would like, the system will switch to ventilation mode, introducing
a smaller volume of air. This smaller volume (the ventilation level) is adjustable
using the instructions on page 3.
The ON/OFF button will toggle the system on and off. The system will automatically
turn itself on again in 8 hours – this is because your HRV should never be off!
We can disable this feature for you if required.
Holding the FUNC button for 3 seconds will lock the buttons on the controller – great
for those with young kids. To unlock, just hold the FUNC button again for 3 seconds.
If your system has an Air Tempering Unit installed, the FUNC button will enable and
disable this heater with a single press (this replaces the lock feature). The heater
is enabled and fully automatic when the light is on; it is
completely disabled when the light is off. You can also set this
to "Force Heat" by holding the FUNC button until it beeps and
the light starts blinking. To return the heater to normal automatic
operation, hit FUNC again.
Holding the TEMP button for 3 seconds will set your HRV to
full speed, no matter what. ‘Burnt toast mode’, as we like to call
it, is great for clearing out smells, smoke or other pollutants.
The system will go back to normal after a couple of hours, or
with a single press of the TEMP button. While active, burnt
toast mode will cause a red light to flash on the temperature
scale to the left of your control.
Air Purifying • Energy Efficient Heating and Cooling • Condensation and Moisture Control • Healthy Home - Healthy Family
There are few times you will ever need to adjust your HRV – it is a smart, fullyautomatic system. Remember, it already knows what temperature your home is,and what temperature you want your home to be, so it can easily run itself.
“Thank you for choosing HRV”We at HRV pride ourselves on providing superior ventilation systems and superior
service. Our systems have the highest airflow, the smartest control systems, and the
best filtration available to today’s home owner.
I’m excited! But how exactly does my HRV work again?
Your HRV will refresh the air in your home as often as possible and practical, using
warm, dry, purified air extracted from your roof cavity. This will flush out moisture,
odours, dust, pollen and all sorts of other unwanted nasties from your home, whilst
adding extra warmth when available.
Your HRV will constantly strive to achieve the temperature you have requested.
This means that in winter, whenever the roof cavity is warmed by solar energy, the
heating light will come on and your HRV will force all this freely heated air into your
home. Over summer, the system will use chilled night air to target the temperature you
have selected, making your home cooler and more comfortable.
The optional addition of a Summer Kit allows your HRV to draw cool air from the south
side of the house, providing a refreshing cooling effect on hot summer days. This
feature is fully automated. Our 1.1 kilowatt Air Tempering Unit allows the HRV to run
when the roof space is cold, without cooling down your home, boosting the ability of
the system to dry even the dampest and coldest of homes.
Why does my house feel cooler on winter mornings, and/or warmer on summer days?
The system’s ventilation setting is too aggressive. In winter, this will help to achieve
maximum condensation control, but having this too high may make your home a little
cooler in the morning. In summer, this same setting may make the home a little warmer
during the day. You can adjust this setting and find a comfortable median using the
instructions on page 3.
Finally, thanks again for choosing HRV! We trust that your HRV will give you many years of fault-free satisfaction.
HRV can be contacted at the following locations:
Auckland Head Office: (09) 826 8210
Toll free: 0800 HRV 123 (0800 478 123)
Email: [email protected] or [email protected]
Things you can do to help are:
■ Leave heavy blinds and drapes slightly ajar
■ Use burnt toast mode to boost the system in the mornings or early evening
■ Select a more appropriate ( more aggressive ) ventilation level
■ Make sure the outlets are open wide
The heating and cooling lights are both off – what is it doing?
This will happen in two situations:
■ Your HRV has already achieved the temperature you want
(no heating or cooling necessary)
■ The roof temperature is undesirable; e.g. colder than the house when
you want the home warmer.
In either case, the system is in ventilation mode, meaning it is sitting at a low
fan speed. You get to choose how aggressive you would like this mode to be,
by following the instructions on page 3.
HRV A5 Leaftlet.qxp 5/4/07 5:07 PM Page 1
under “Adjusting the Ventilation Level”
under “Adjusting the Ventilation Level”
Call 1800 HRV 123 for help and support