how to use zoom in a meeting - stratford universityits.stratford.edu/sites/default/files/zoom/how to...
TRANSCRIPT
Page 1 of 23
How to Use Zoom in a Meeting
Note: First time you access a Zoom link you may be asked to download the Zoom client. Follow the
instructions to download ZoomInstaller.exe. Click on in the .exe file and it will self-install.
Remember: For additional job aids and videos from Zoom, please go to https://support.zoom.us/hc/en-
us.
Access a Zoom Meeting
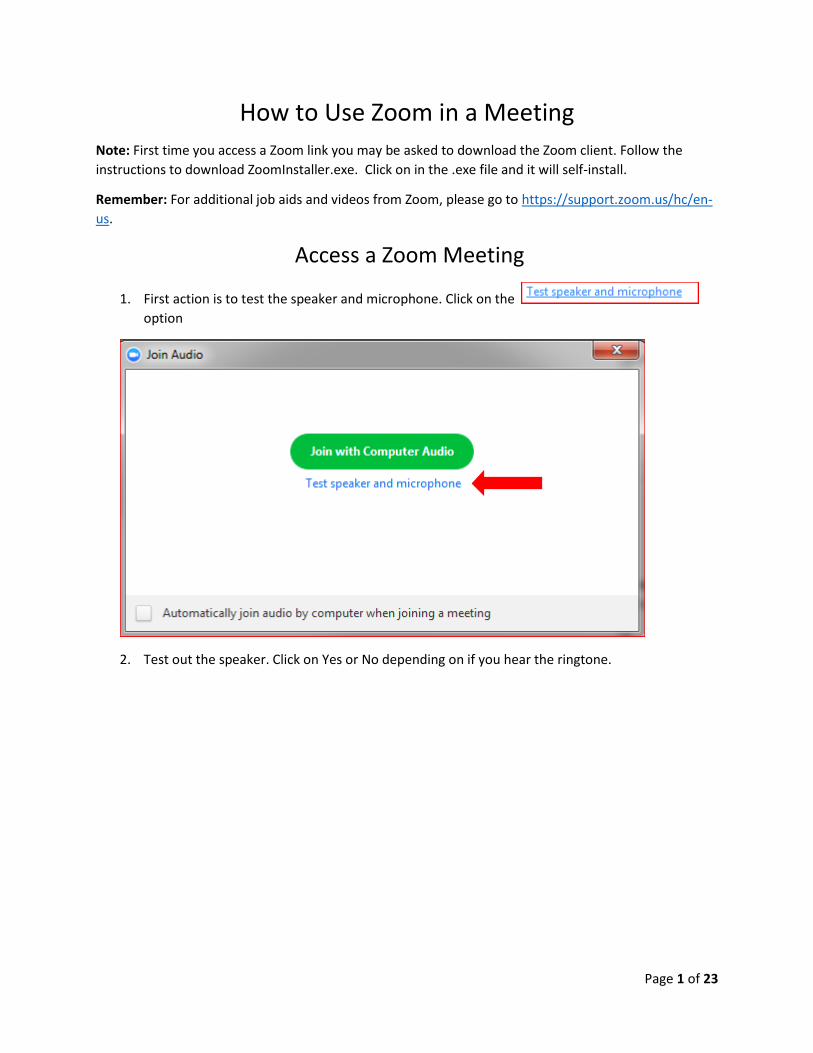
1. First action is to test the speaker and microphone. Click on the
option
2. Test out the speaker. Click on Yes or No depending on if you hear the ringtone.

Page 2 of 23
1. Test out the microphone. Speak into your microphone, pause and listen to the replay. Click on
Yes or No depending on if you hear the replay.
3. When the testing on the audio is done, click on the Join with Computer Audio button

Page 3 of 23
Note: You may want to set your zoom setup by clicking on the box to the left of the text -
Automatically join audio by computer when joining a meeting. If you do this, you won’t have to
go through the audio testing every time.
4. Options available when hosting a zoom meeting:
a a
b c d
e f g h i j k l m n
Page 4 of 23
a. Copy URL - Allow the user to copy the URL of the meeting to send to a participant (Use
Paste or CTRL-V to insert URL into an email, text box, etc.)
b. Join Audio icon – Allow the participant to use their audio
c. Share icon – Allow the user to share their screen
d. Invite Others icon – Allow the user to invite others to this meeting
e. Mute menu option - Allow the user to mute the session
i. Select the microphone, select the speaker, test audio, set audio settings, etc.
f. Start Video menu option – Allow the user to turn on the camera so that the user can be
seen by others
i. Set video settings – Allows the user to configure video settings for the meeting
g. Invite menu option – Allow the user to invite others to this meeting
h. Manage Participant menu option – Allow the user to see and manage all the participants
in this meeting
i. Polls menu option – Allows the user to create polls to use during the zoom session
j. Share menu option – Allow the user to share their screen
i. There can be one or multiple participants that can share
ii. There are also advanced sharing options like who can share, who can start
sharing, etc.
k. Chat menu option – Allow the user to bring up a chat area where all participants can
chat
l. Record menu option - Allow the user to record the meeting
i. User can record to the cloud or a device
m. Breakout Rooms menu option – Allows the user to group students to work together
n. End Meeting menu option – Allow the user to end the meeting
5. Student options available when you are a participant in a Zoom meeting

Page 5 of 23
Note: Participants have less menu options and privileges.
Detail on Icons and Options
1. Copy URL – will copy the URL to the clipboard. Pop-up appears on the screen
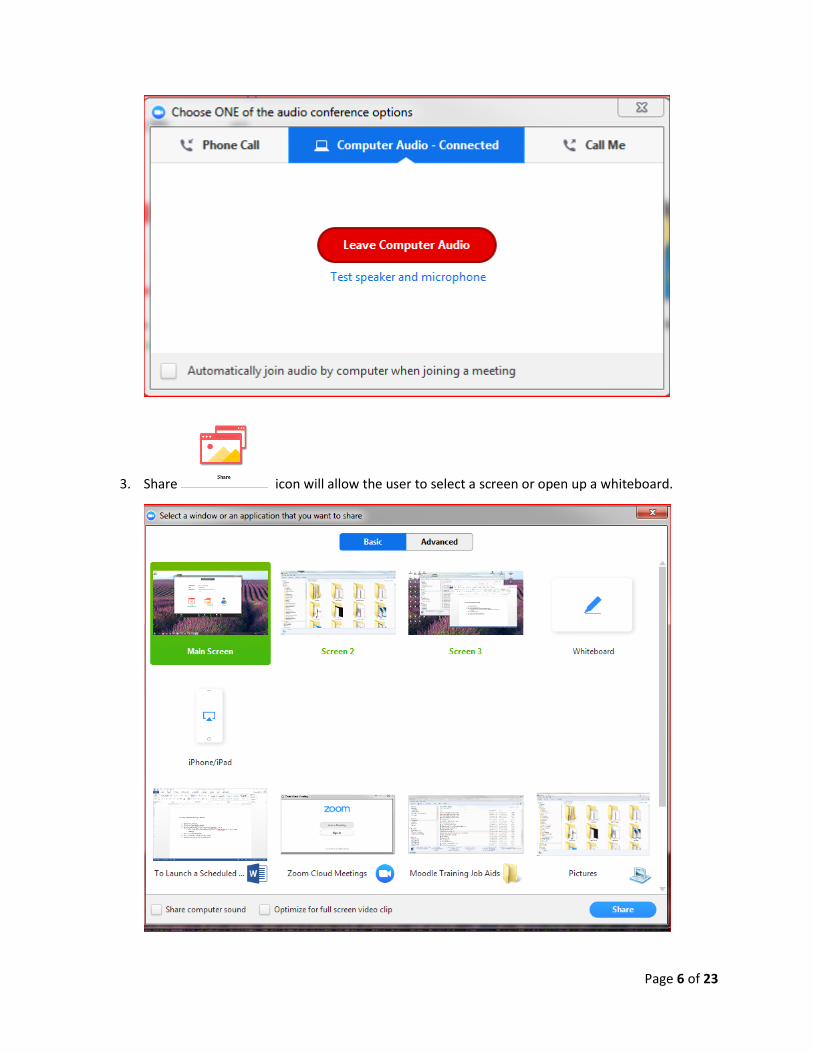
2. Join Audio icon will allow the user to choose one of the audio confernce options
(based on how the zoom meeting was setup:
a. Phone call
b. Computer audio
c. Call me
Page 6 of 23
3. Share icon will allow the user to select a screen or open up a whiteboard.
Page 7 of 23
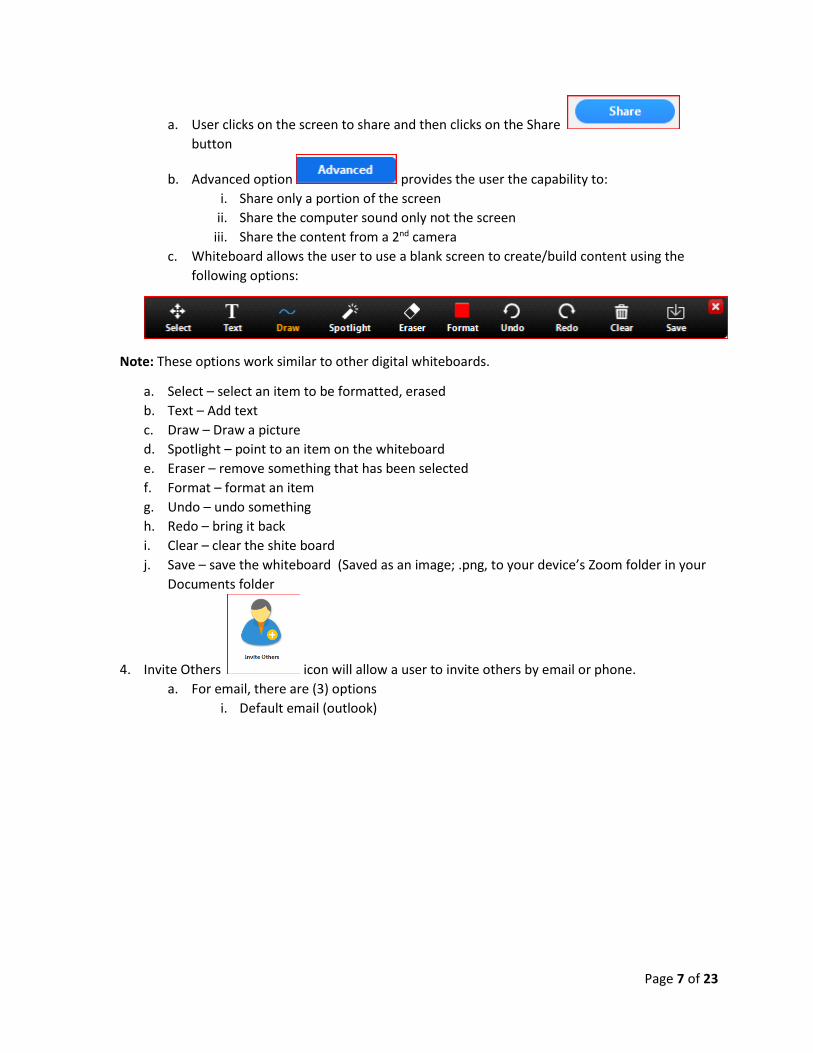
a. User clicks on the screen to share and then clicks on the Share
button
b. Advanced option provides the user the capability to:
i. Share only a portion of the screen
ii. Share the computer sound only not the screen
iii. Share the content from a 2nd camera
c. Whiteboard allows the user to use a blank screen to create/build content using the
following options:
Note: These options work similar to other digital whiteboards.
a. Select – select an item to be formatted, erased
b. Text – Add text
c. Draw – Draw a picture
d. Spotlight – point to an item on the whiteboard
e. Eraser – remove something that has been selected
f. Format – format an item
g. Undo – undo something
h. Redo – bring it back
i. Clear – clear the shite board
j. Save – save the whiteboard (Saved as an image; .png, to your device’s Zoom folder in your
Documents folder
4. Invite Others icon will allow a user to invite others by email or phone.
a. For email, there are (3) options
i. Default email (outlook)
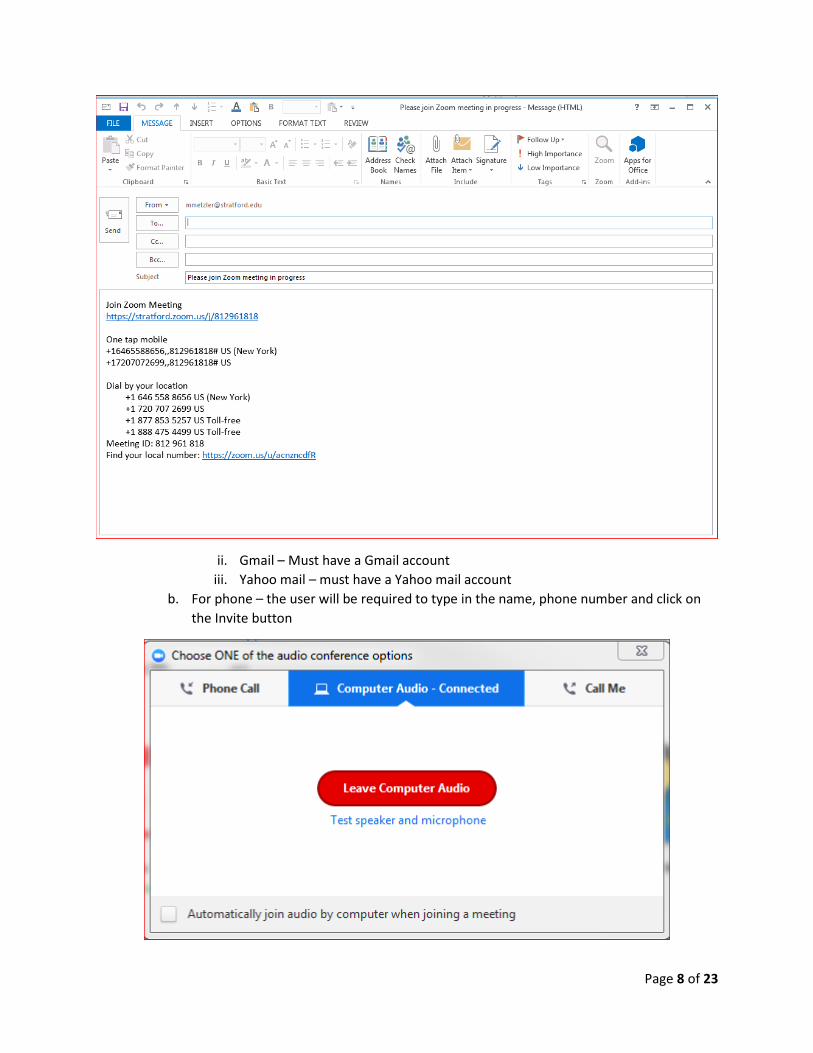
Page 8 of 23
ii. Gmail – Must have a Gmail account
iii. Yahoo mail – must have a Yahoo mail account
b. For phone – the user will be required to type in the name, phone number and click on
the Invite button

Page 9 of 23
c. Use the Copy URL or Copy Initiation to paste into
email, text etc.
5. Mute menu option – allows the user to select the microphone, select the speaker,
test audio, set audio settings, etc.
6. Start Video menu option – Allow the user to turn on the camera so that others
can be seen them and set video setting for how the video works in this meeting
7. Invite menu option – Same as Invite Others icon above
8. Manage Participant menu option list all participants
a. Status icons for user. The more option provides, from left to right:
i. Dislike -
ii. Like -
iii. Clap -
iv. Need a break -
v. Away -
Page 10 of 23
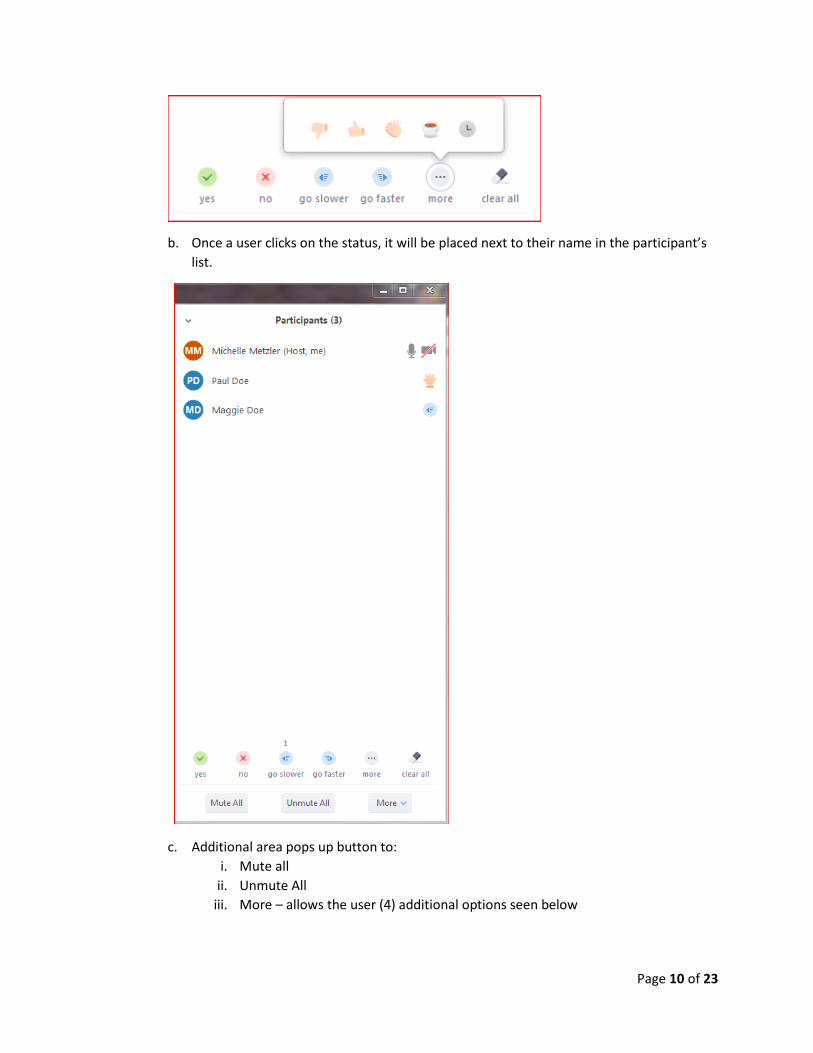
b. Once a user clicks on the status, it will be placed next to their name in the participant’s
list.
c. Additional area pops up button to:
i. Mute all
ii. Unmute All
iii. More – allows the user (4) additional options seen below

Page 11 of 23
9. Polls menu option –is an opportunity that provides engagement. The user can build a
poll before class starts and then access during class for review of content, understanding of the
content, feedback on the course, start a brainstorming sessions, solicit a reaction on a topic,
offer suggestions before a breakout, etc. Steps to create a poll:
a. Click on the Polls menu and then click on the Add a Question
button
i. Add an Question will take the use to their meeting space for this meeting at
strartford.zoom.us so that they can create a poll that will be attached to this
Zoom meeting
Page 12 of 23
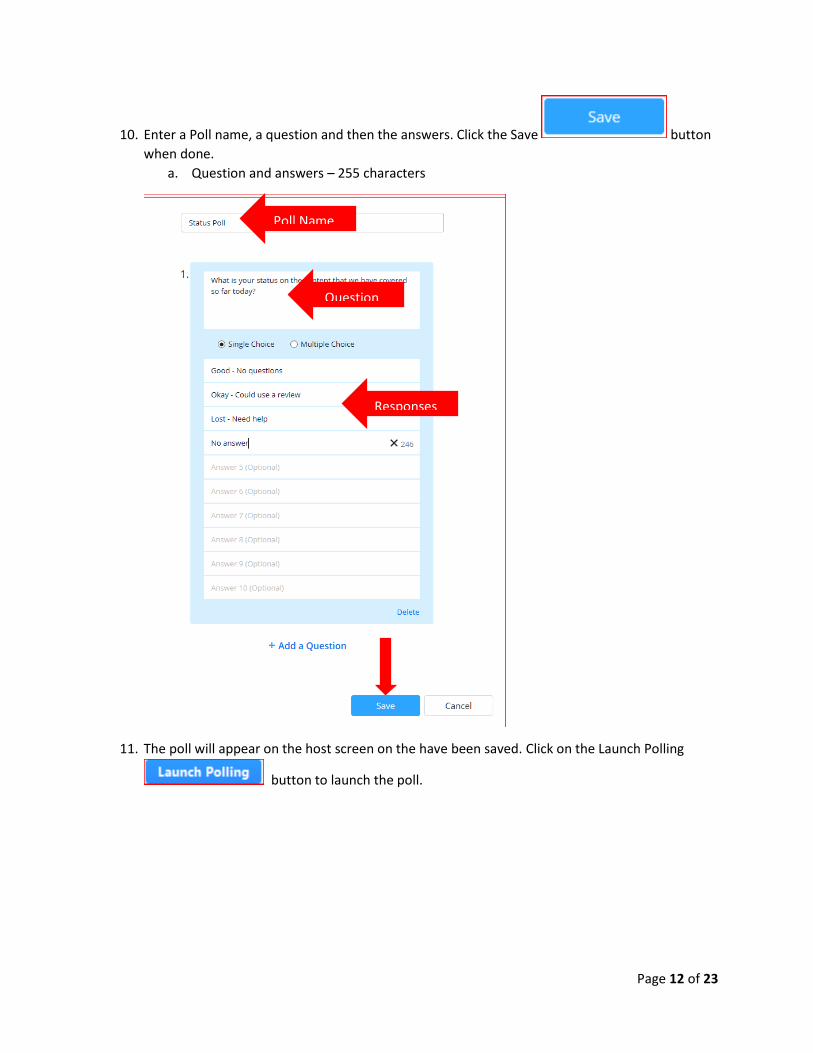
10. Enter a Poll name, a question and then the answers. Click the Save button
when done.
a. Question and answers – 255 characters
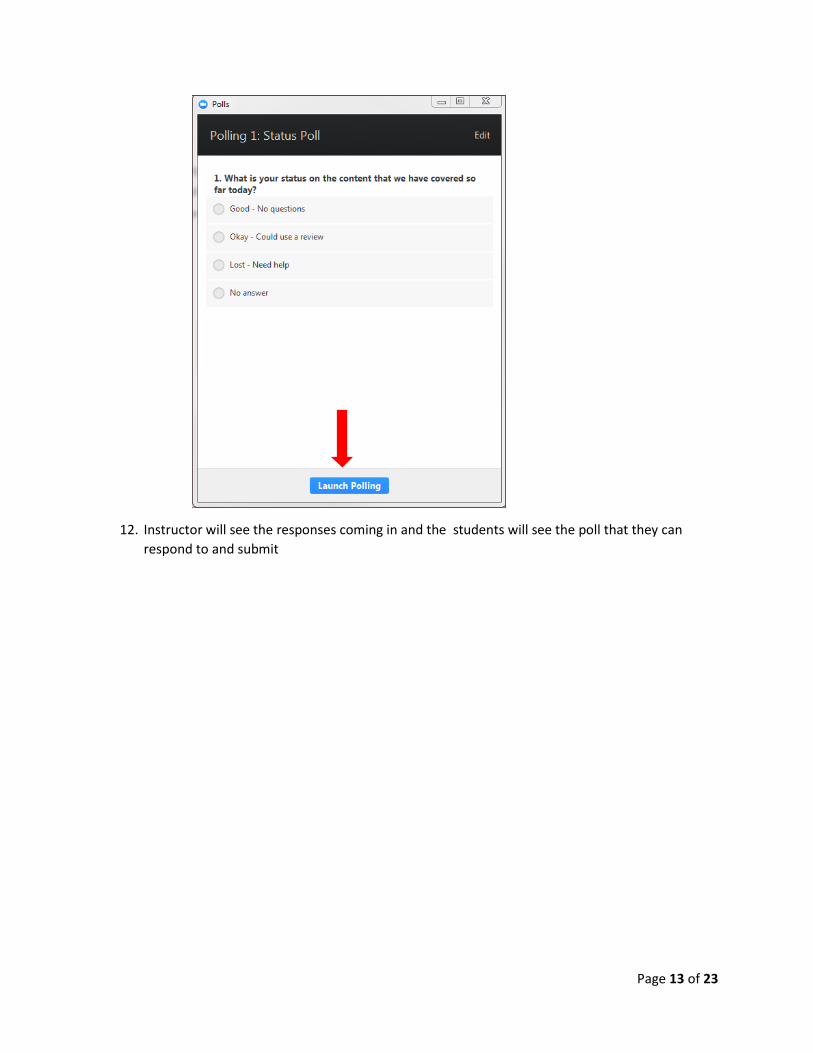
11. The poll will appear on the host screen on the have been saved. Click on the Launch Polling
button to launch the poll.
Poll Name
Question
Responses
Page 13 of 23
12. Instructor will see the responses coming in and the students will see the poll that they can
respond to and submit

Page 14 of 23

Page 15 of 23
a. Instructor will click on the End Polling when the poll is done
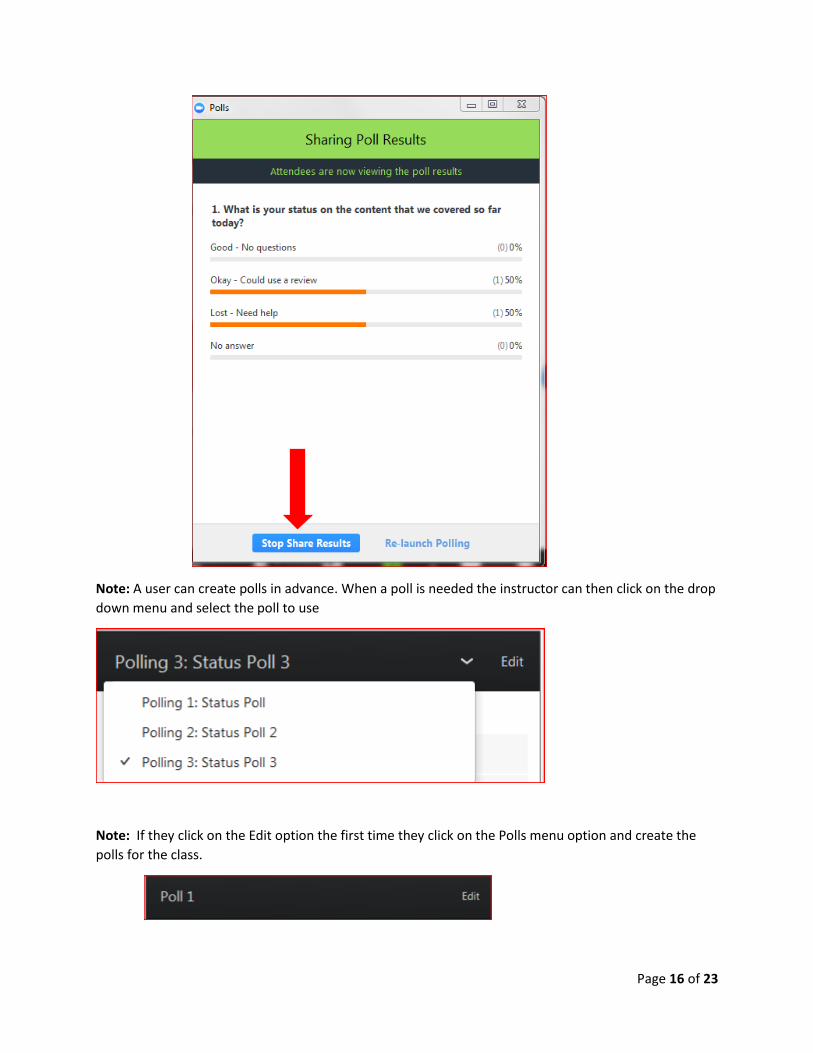
13. Click the Share Results button to share the results with the participants.
14. Click Stop Share Results button when done
Page 16 of 23
Note: A user can create polls in advance. When a poll is needed the instructor can then click on the drop
down menu and select the poll to use
Note: If they click on the Edit option the first time they click on the Polls menu option and create the
polls for the class.
Page 17 of 23
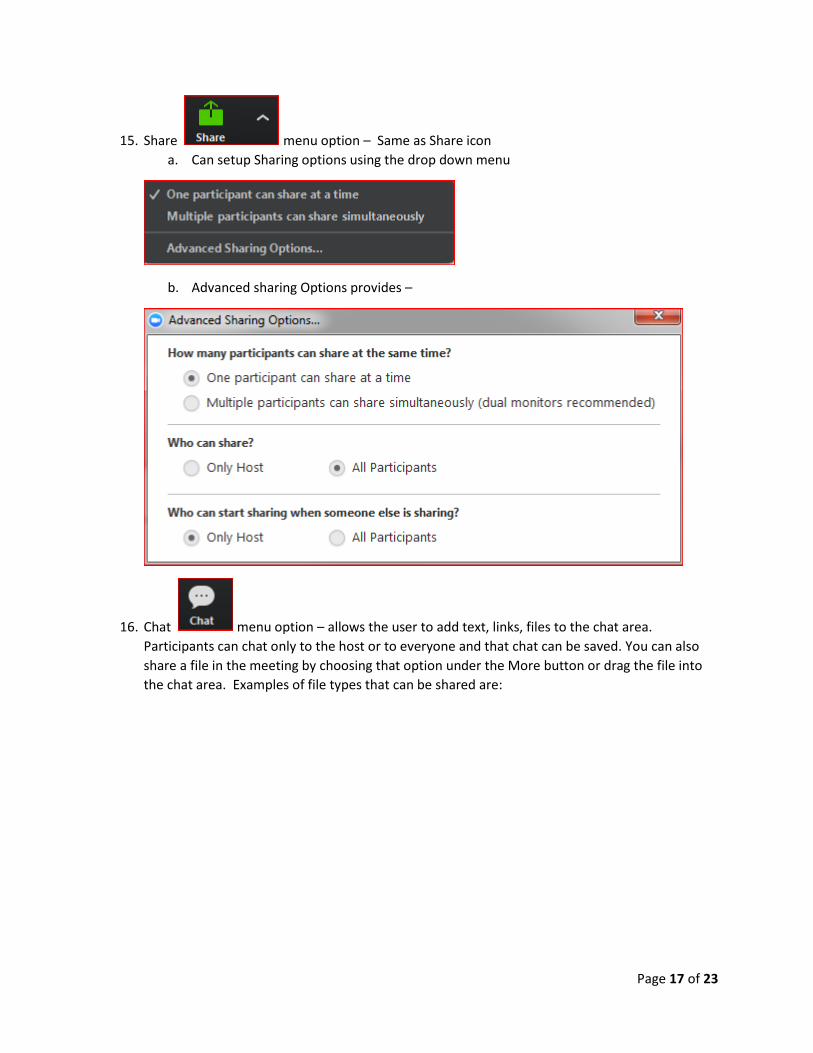
15. Share menu option – Same as Share icon
a. Can setup Sharing options using the drop down menu
b. Advanced sharing Options provides –
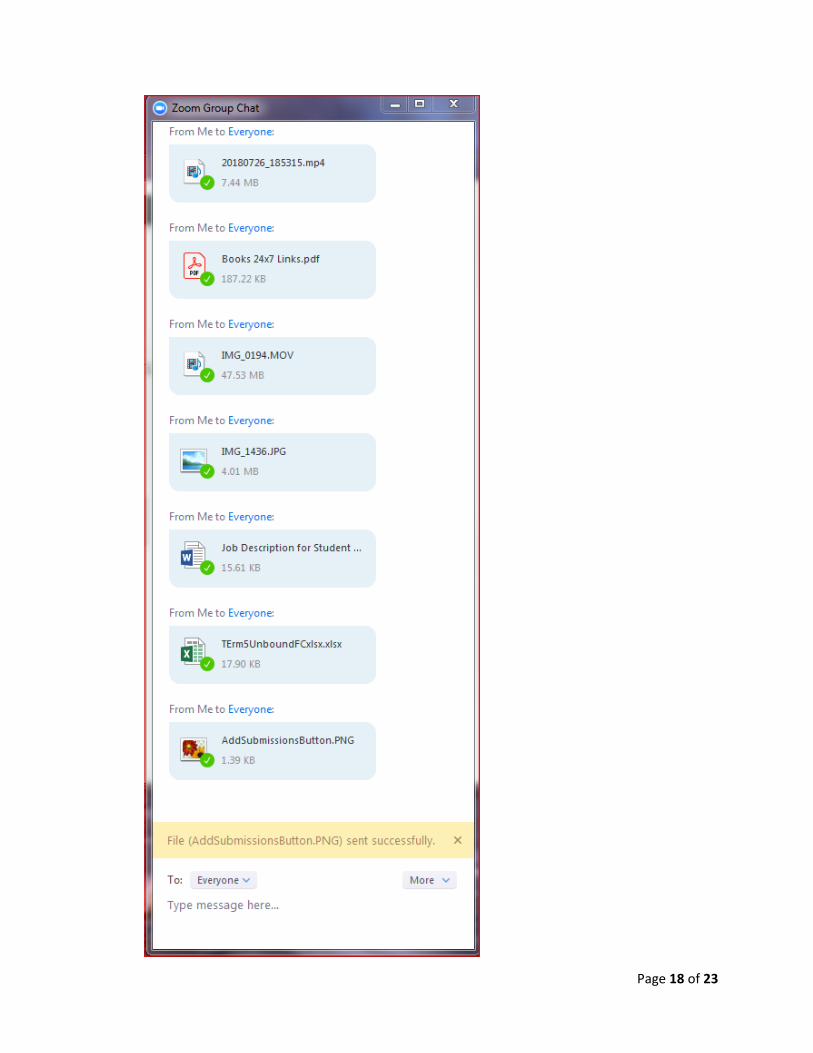
16. Chat menu option – allows the user to add text, links, files to the chat area.
Participants can chat only to the host or to everyone and that chat can be saved. You can also
share a file in the meeting by choosing that option under the More button or drag the file into
the chat area. Examples of file types that can be shared are:
Page 18 of 23

Page 19 of 23
17. Record menu option - Allow the user to record the meeting
a. User can record to the cloud or on this computer
b. Pop-up appears in the top left hand corner that the meeting is being recorded
c. Record button changes to allow for starting and stopping of the recording
d. Record to Computer - is stored as an .mp4 in your device’s Zoom folder in your
Documents folder
e. Record to the Cloud – Zoom will send the user an email when their recording is available
Note: Add the recorded link to a Moodle course or send the link out via email to those that want/need
to view the recorded session.
18. Breakout Room menu option – provides grouping of participants.
a. Click on the Breakout Rooms menu option
b. Select the number of rooms, to automatically or manually and the participants to the
rooms and then click the Create Rooms button
i. If you choose manually you can then click on the Join option and select which
participant to add the room

Page 20 of 23
c. The instructor will click on the Open All rooms button
d. The breakout room will display the following until the students join the break out room
i. Students will receive a popup on their screen to join the breakout room
Page 21 of 23
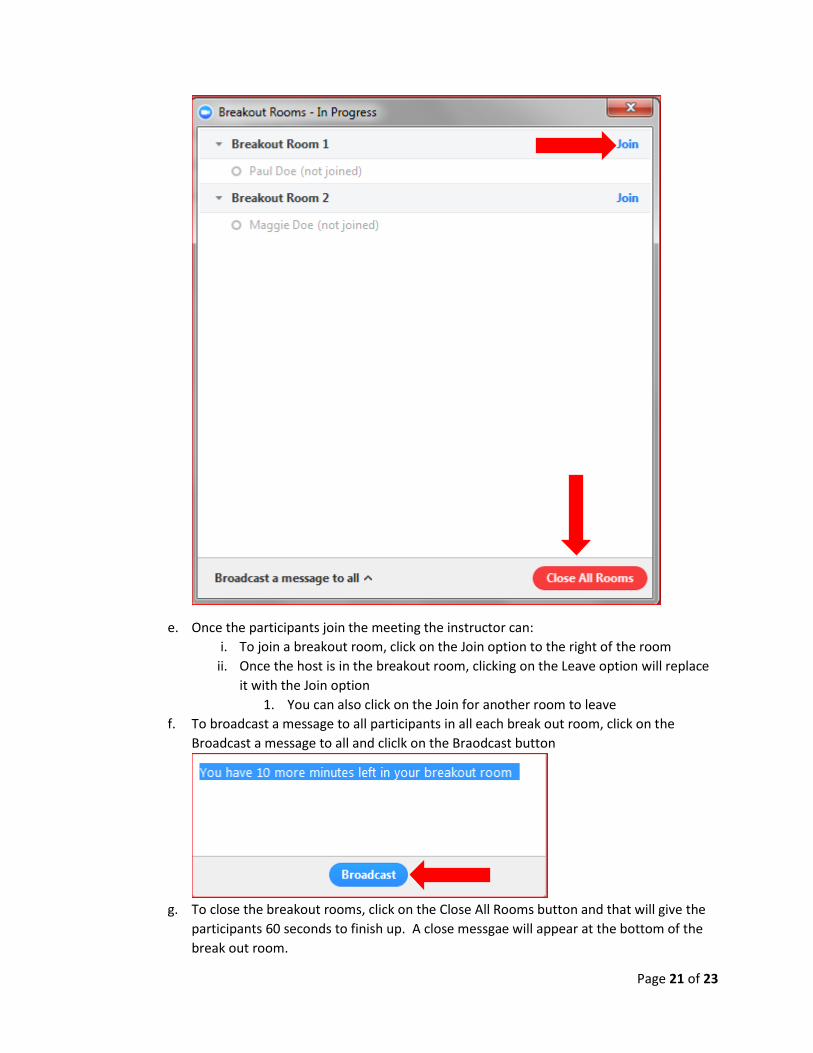
e. Once the participants join the meeting the instructor can:
i. To join a breakout room, click on the Join option to the right of the room
ii. Once the host is in the breakout room, clicking on the Leave option will replace
it with the Join option
1. You can also click on the Join for another room to leave
f. To broadcast a message to all participants in all each break out room, click on the
Broadcast a message to all and cliclk on the Braodcast button
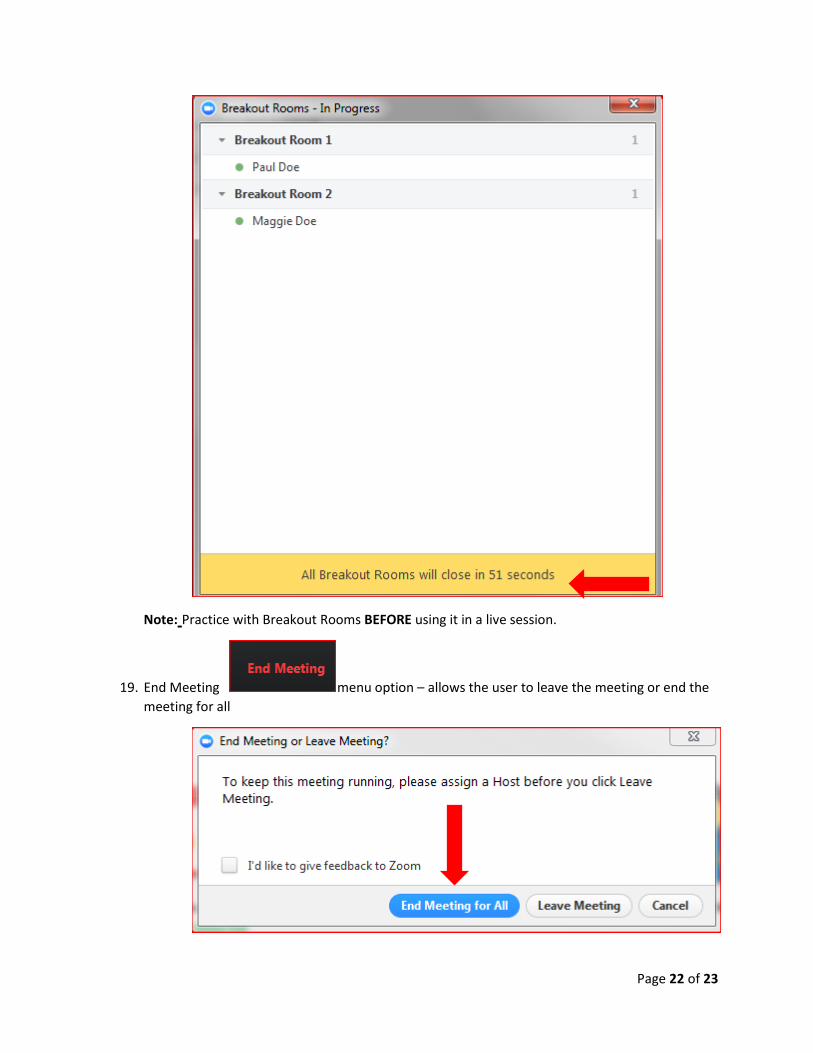
g. To close the breakout rooms, click on the Close All Rooms button and that will give the
participants 60 seconds to finish up. A close messgae will appear at the bottom of the
break out room.
Page 22 of 23
Note: Practice with Breakout Rooms BEFORE using it in a live session.
19. End Meeting menu option – allows the user to leave the meeting or end the
meeting for all

Page 23 of 23
Training Links
Zoom has an extensive library of short training videos:
View Live Training: https://support.zoom.us/hc/en-us/articles/206618765-Zoom-Video-Tutorials
Join Meeting: https://support.zoom.us/hc/en-us/articles/201362193-How-Do-I-Join-A-
Meeting-
Schedule a Meeting: https://support.zoom.us/hc/en-us/articles/201362413-How-Do-I-
Schedule-Meetings-
Meeting Controls: https://support.zoom.us/hc/en-us/articles/201362603-What-Are-the-
Host-Controls-
Breakout Rooms: https://support.zoom.us/hc/en-us/articles/206476093-Getting-Started-
with-Video-Breakout-Rooms
Polling: https://support.zoom.us/hc/en-us/articles/213756303-Polling-for-Meetings
Questions: https://support.zoom.us/hc/en-us/articles/203686015-Getting-Started-with-
Question-Answer
Audio Video, and Sharing Articles- https://support.zoom.us/hc/en-us/categories/201137166
Recording a Zoom Meeting: https://support.zoom.us/hc/en-us/sections/200208179-
Recording
Joining & Configuring Audio & Video:
o https://support.zoom.us/hc/en-us/articles/201362283-How-Do-I-Join-or-Test-My-
Computer-Audio-
o https://support.zoom.us/hc/en-us/articles/201362313-How-Do-I-Test-My-Video-
Sharing Your Screen: https://support.zoom.us/hc/en-us/articles/201362153-How-Do-I-
Share-My-Screen-
Sharing Multiple Screen Simultaneously: https://support.zoom.us/hc/en-
us/articles/115000424286-Sharing-Multiple-Screens-Simultaneously
All About Recordings: https://support.zoom.us/hc/en-us/articles/205347605-Recording-
Management
Different video layouts: https://support.zoom.us/hc/en-us/articles/201362323-How-Do-I-
Change-The-Video-Layout-
Here are a few Zoom training videos on YouTube:
How to Start a Meeting: https://youtu.be/vFhAEoCF7jg
Meeting Controls: https://youtu.be/4w_pRMBEALE
Joining & Configuring Audio & Video (Can be used to assist students with
connecting): https://youtu.be/HqncX7RE0wM
Sharing Your Screen: https://youtu.be/9wsWpnqE6Hw
Note: For additional job aids and videos from Zoom, please go to https://support.zoom.us/hc/en-us.