incontact db connector reference manual db connector manual.pdflaunch the db connector.exe ......
TRANSCRIPT
inContact DB Connector
Reference Manual
Page | 2
Getting Started - DB Connector
inContact DB Connector Reference Manual
Title inContact DB Connector Reference Manual
Revision 062413
Copyright ©2013 inContact, Inc.
Product Code
About inContact
inContact, Inc. provides the market leading on-demand contact center platform, inContact, to over 750 contact centers across the globe. With its roots in telecommunications and network infrastructure, inContact is unique in its offering because it combines a powerful connectivity backbone with a world-class software platform. The inContact platform has grown from a powerful ACD with skills-based routing, CTI, and IVR with speech recognition, to include an innovative online hiring solution, an eLearning and communications application, workforce management functionality, and a customer feedback and survey solution. Because the inContact platform is delivered through a Software-as-a-Service (SaaS) model, inContact customers can realize significant cost savings and flexibility compared to premises-based alternatives. To learn more about inContact, visit www.incontact.com.
Contributors Thanks to our customers for valuable feedback and inContact’s dedicated staff.

Page | 3
Getting Started - DB Connector
Table of Contents
Getting Started - DB Connector ........................................4
Requirements ...................................................................6
DB Connector Groups and Connectors ..............................8
Download and Installation .............................................11
Launch the DB Connector.exe .........................................20
Create a DB Connector Group .........................................22
Create Connectors ..........................................................29
Edit a DB Connector Group .............................................39
Registering Connectors ..................................................47
Starting the DB Connector Service..................................62
Stopping and Removal of DB Connector..........................66
Appendix A - Studio Actions ...........................................72
Page | 4
Getting Started - DB Connector
Getting Started - DB Connector
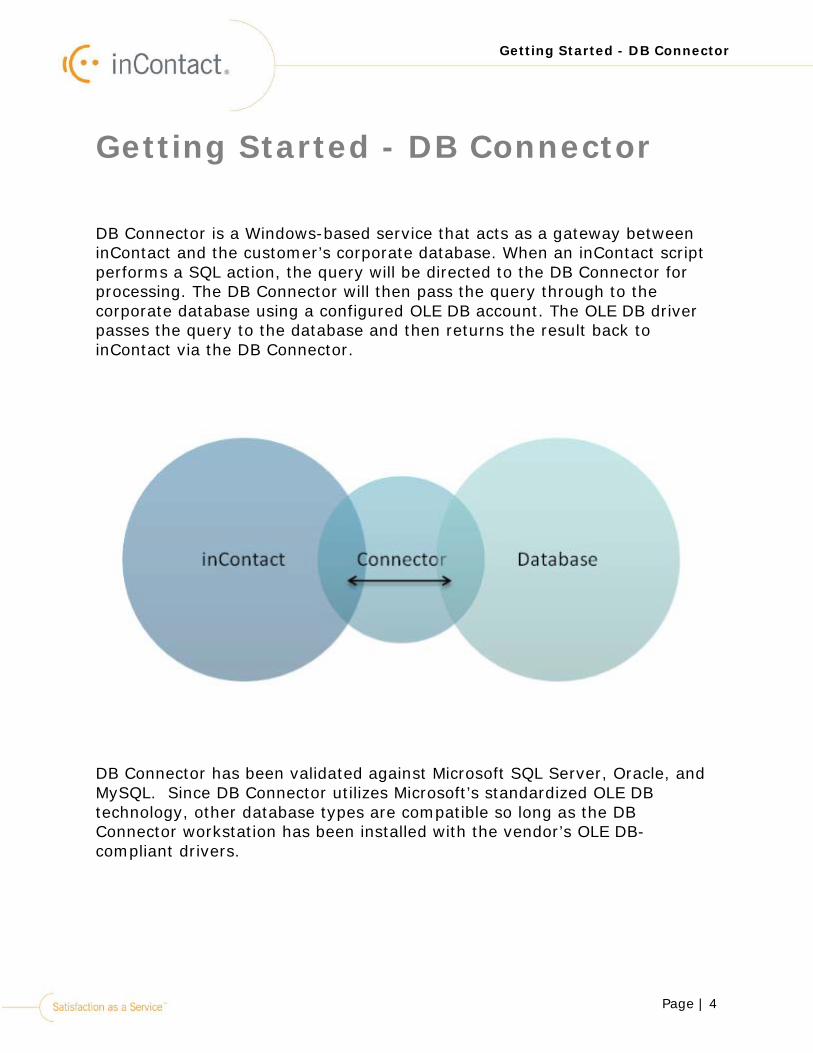
DB Connector is a Windows-based service that acts as a gateway between inContact and the customer’s corporate database. When an inContact script performs a SQL action, the query will be directed to the DB Connector for processing. The DB Connector will then pass the query through to the corporate database using a configured OLE DB account. The OLE DB driver passes the query to the database and then returns the result back to inContact via the DB Connector.
DB Connector has been validated against Microsoft SQL Server, Oracle, and MySQL. Since DB Connector utilizes Microsoft’s standardized OLE DB technology, other database types are compatible so long as the DB Connector workstation has been installed with the vendor’s OLE DB- compliant drivers.

Page | 5
Getting Started - DB Connector
There are two components, the web interface in inContact Central and the DB Connector.exe which is installed on the local computer with access to the database.
Page | 6
Getting Started - DB Connector
Requirements
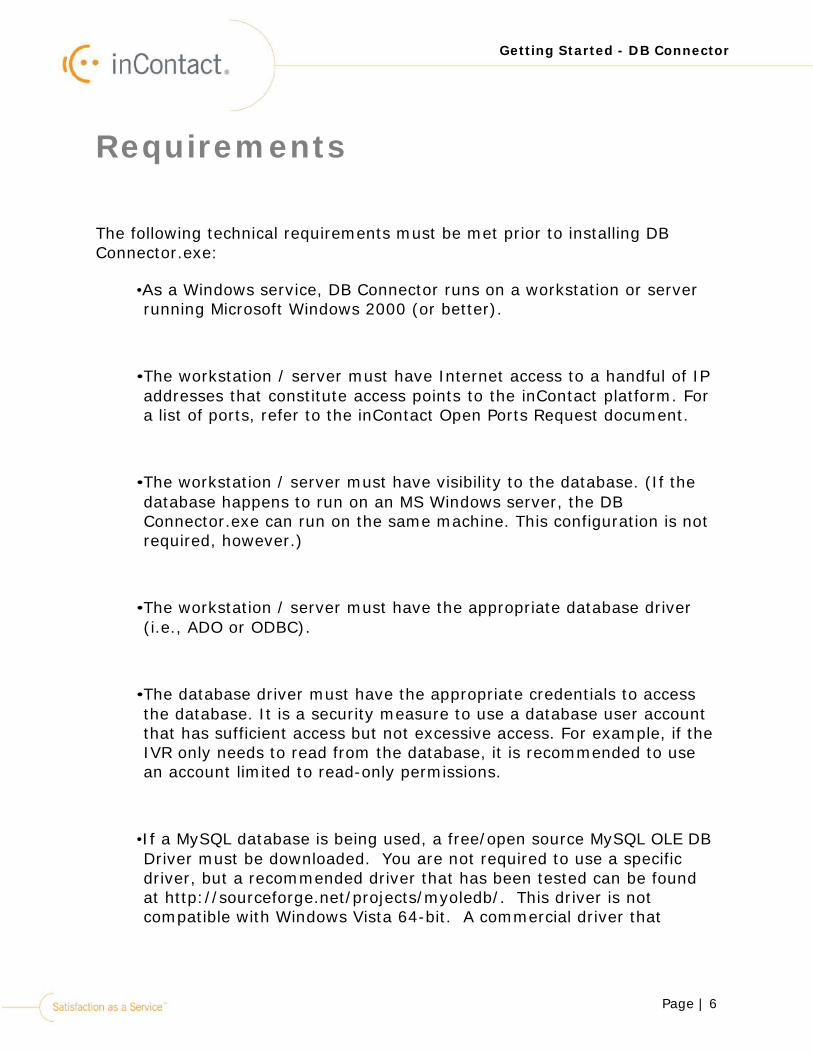
The following technical requirements must be met prior to installing DB Connector.exe:
•As a Windows service, DB Connector runs on a workstation or server running Microsoft Windows 2000 (or better).
•The workstation / server must have Internet access to a handful of IP addresses that constitute access points to the inContact platform. For a list of ports, refer to the inContact Open Ports Request document.
•The workstation / server must have visibility to the database. (If the database happens to run on an MS Windows server, the DB Connector.exe can run on the same machine. This configuration is not required, however.)
•The workstation / server must have the appropriate database driver (i.e., ADO or ODBC).
•The database driver must have the appropriate credentials to access the database. It is a security measure to use a database user account that has sufficient access but not excessive access. For example, if the IVR only needs to read from the database, it is recommended to use an account limited to read-only permissions.
•If a MySQL database is being used, a free/open source MySQL OLE DB Driver must be downloaded. You are not required to use a specific driver, but a recommended driver that has been tested can be found at http://sourceforge.net/projects/myoledb/. This driver is not compatible with Windows Vista 64-bit. A commercial driver that

Page | 7
Getting Started - DB Connector
interfaces with MySQL can be found at http://cherrycitysoftware.com/CCS/Providers/ProvMySQL.aspx
•If an Oracle database is being used an Oracle OLE DB Driver must be downloaded. The recommended driver complies with the OLE DB specification and can be found at http://www.oracle.com/technology/tech/windows/ole_db/index.html
Page | 8
Getting Started - DB Connector
DB Connector Groups and Connectors
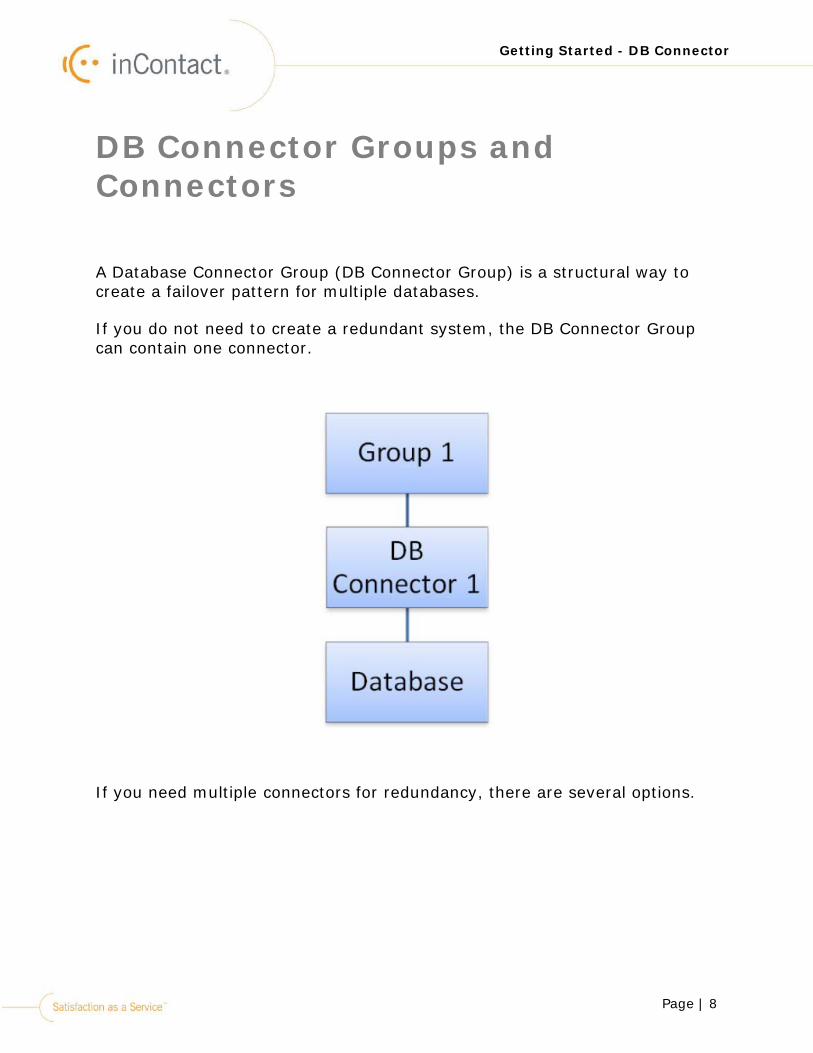
A Database Connector Group (DB Connector Group) is a structural way to create a failover pattern for multiple databases.
If you do not need to create a redundant system, the DB Connector Group can contain one connector.
If you need multiple connectors for redundancy, there are several options.

Page | 9
Getting Started - DB Connector
Scenario 1:
For example, Group 1 has three DB Connectors. This means that there are three separate connection instances to the database. A single connector could fail, and traffic would be re-routed through the second connector. If the second connector failed the third connector would take over. If the database itself failed, the system would be down
Page | 10
Getting Started - DB Connector
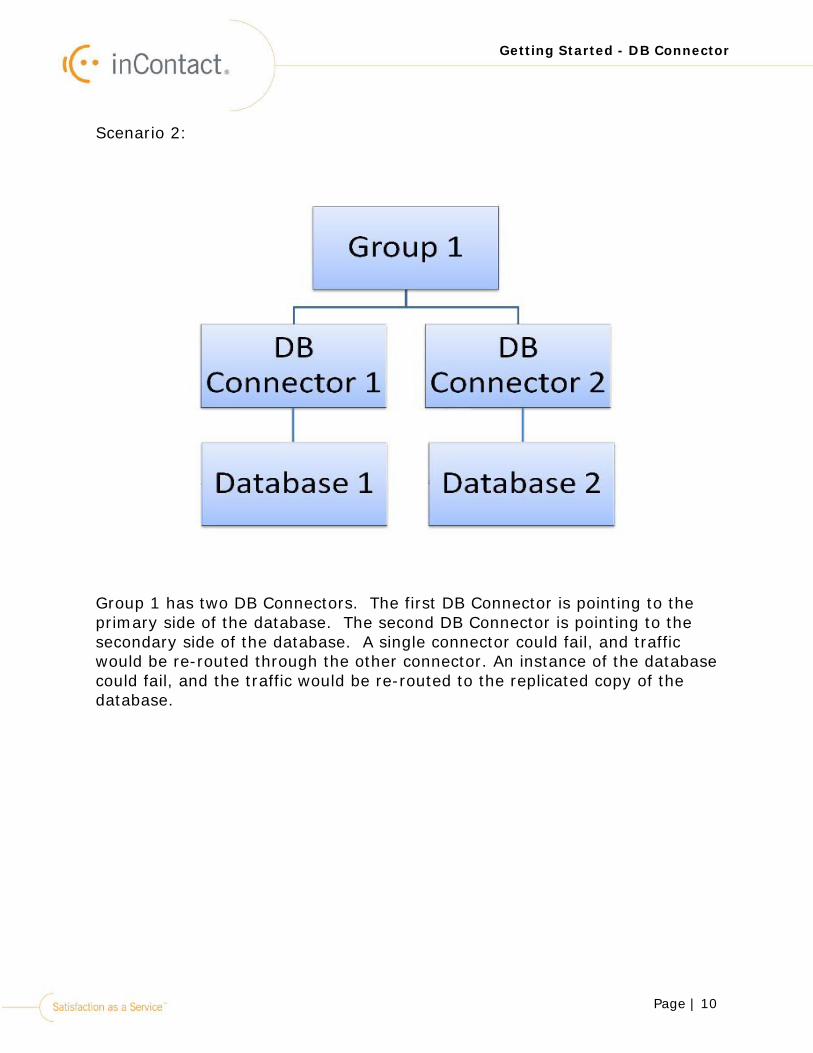
Scenario 2:
Group 1 has two DB Connectors. The first DB Connector is pointing to the primary side of the database. The second DB Connector is pointing to the secondary side of the database. A single connector could fail, and traffic would be re-routed through the other connector. An instance of the database could fail, and the traffic would be re-routed to the replicated copy of the database.

Page | 11
Getting Started - DB Connector
Download and Installation
1.Log in to inContact NG Central.
2.Select the Support > Software Update menu.
3.The Software Update page appears.
4.Select the DBConnector.msi link.
Page | 12
Getting Started - DB Connector
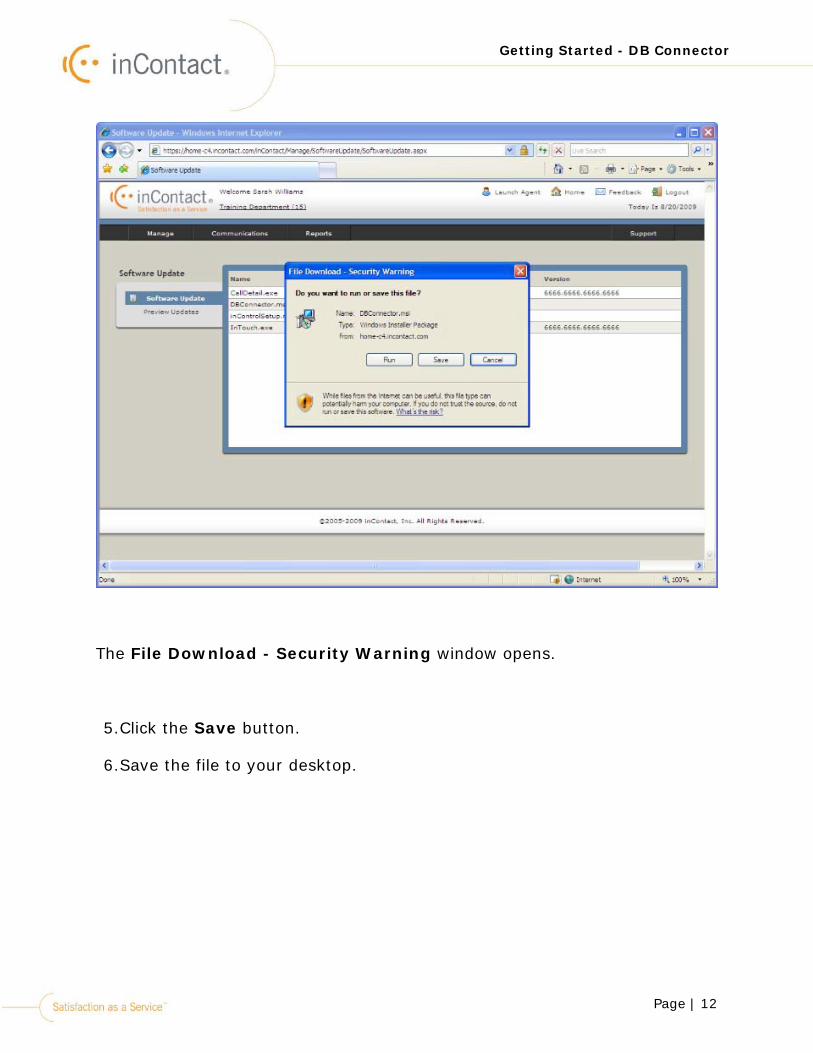
The File Download - Security Warning window opens.
5.Click the Save button.
6.Save the file to your desktop.
Page | 13
Getting Started - DB Connector
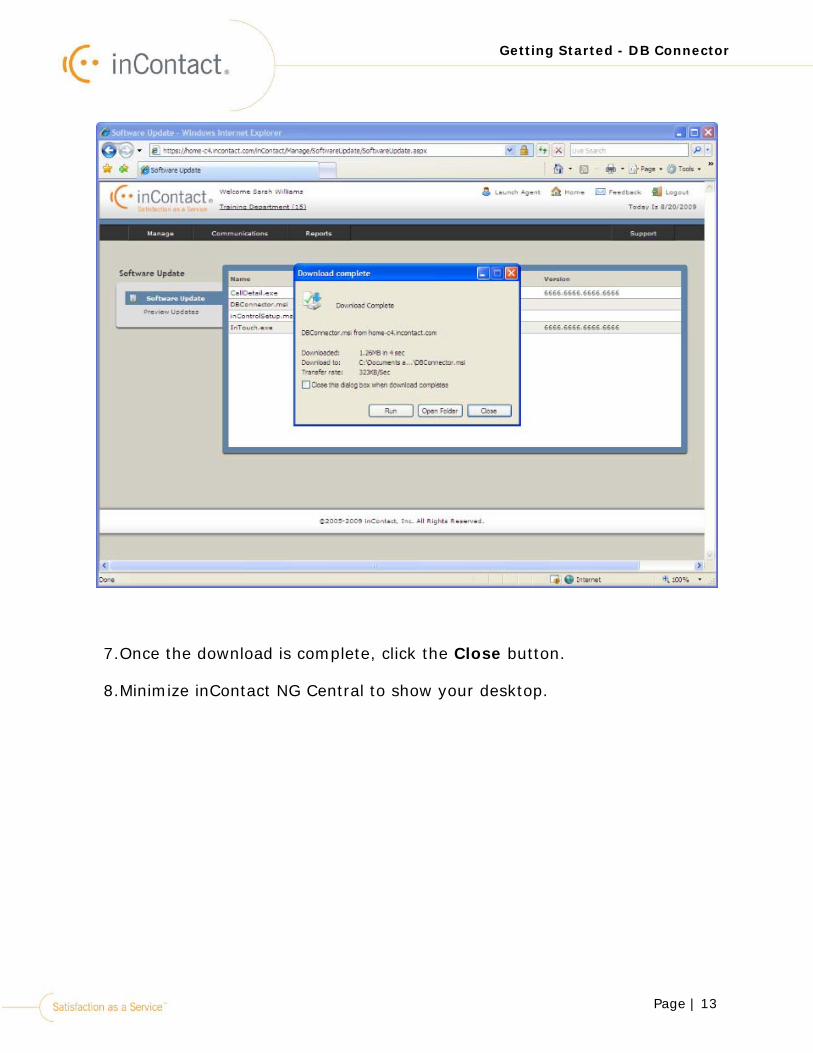
7.Once the download is complete, click the Close button.
8.Minimize inContact NG Central to show your desktop.
Page | 14
Getting Started - DB Connector
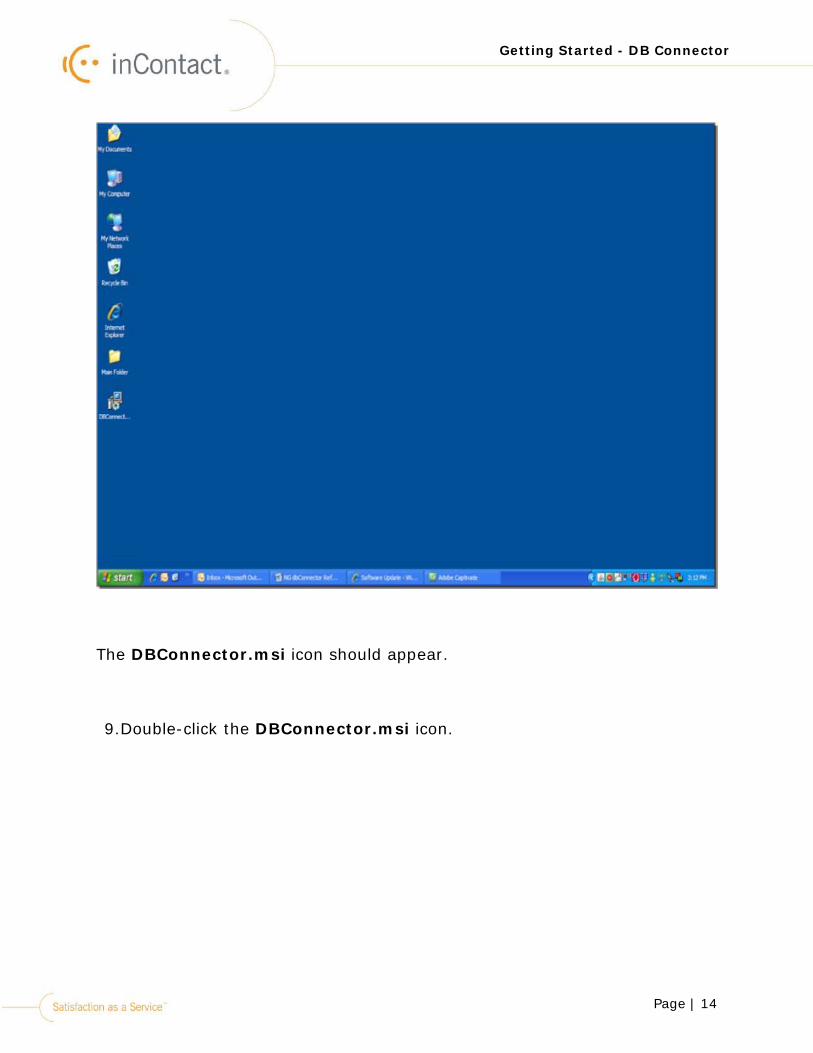
The DBConnector.msi icon should appear.
9.Double-click the DBConnector.msi icon.
Page | 15
Getting Started - DB Connector
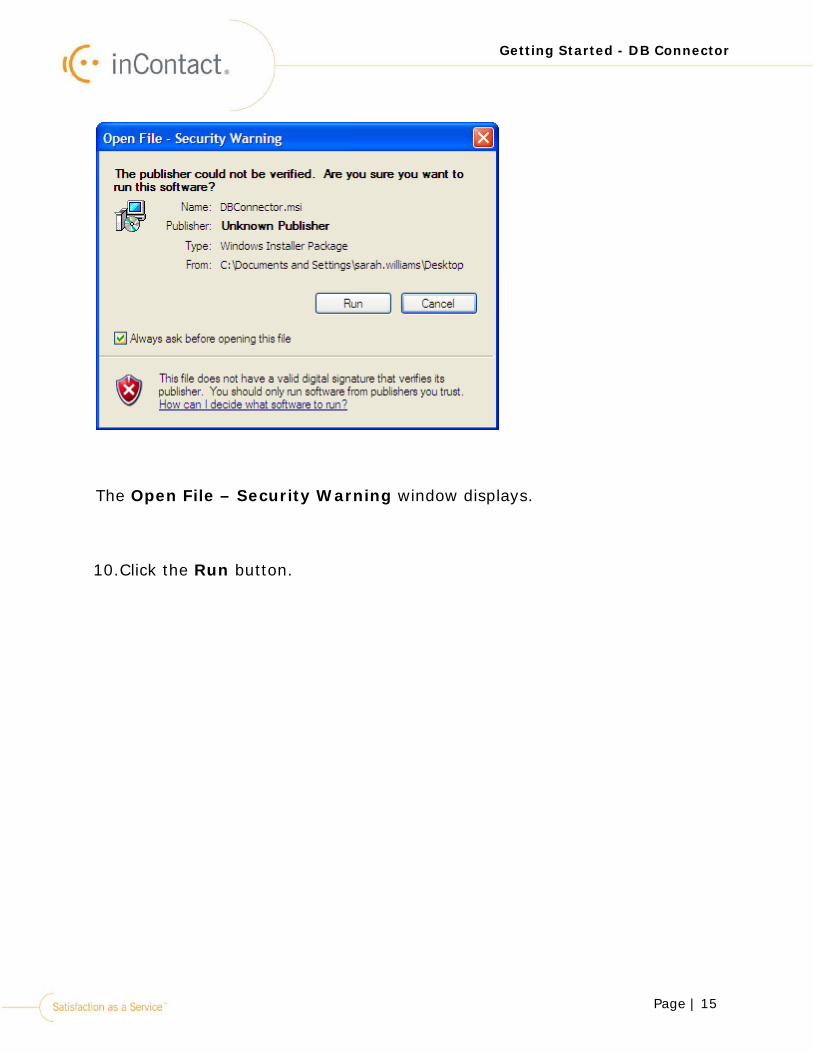
The Open File – Security Warning window displays.
10.Click the Run button.
Page | 16
Getting Started - DB Connector
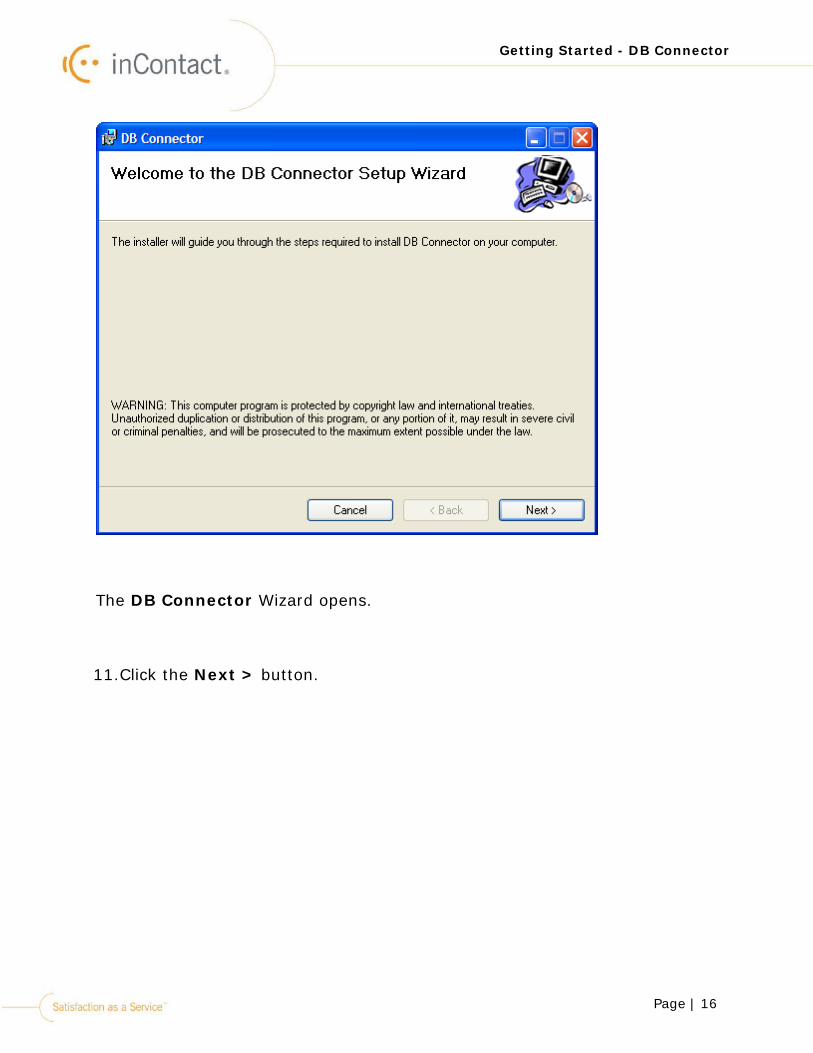
The DB Connector Wizard opens.
11.Click the Next > button.

Page | 17
Getting Started - DB Connector
12.Select the folder in which you would like to save the DB Connector.
13.Select the Just me radio button.
14.Click the Next > button.
Page | 18
Getting Started - DB Connector
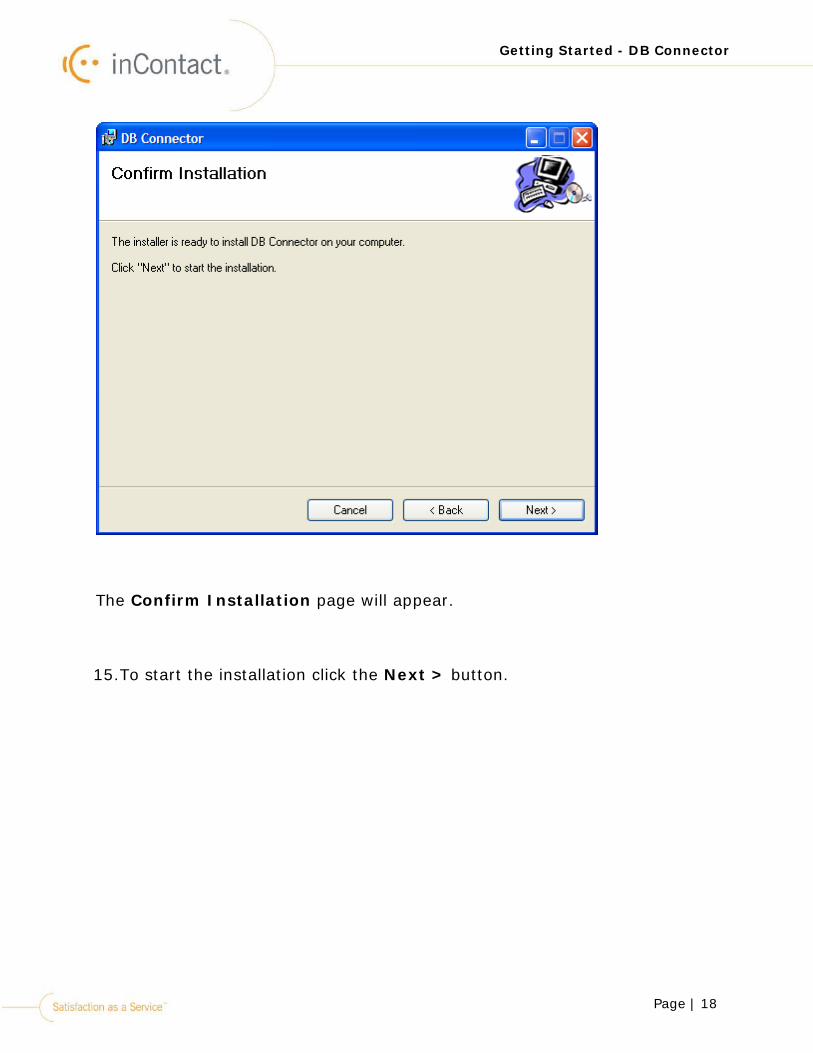
The Confirm Installation page will appear.
15.To start the installation click the Next > button.
Page | 19
Getting Started - DB Connector
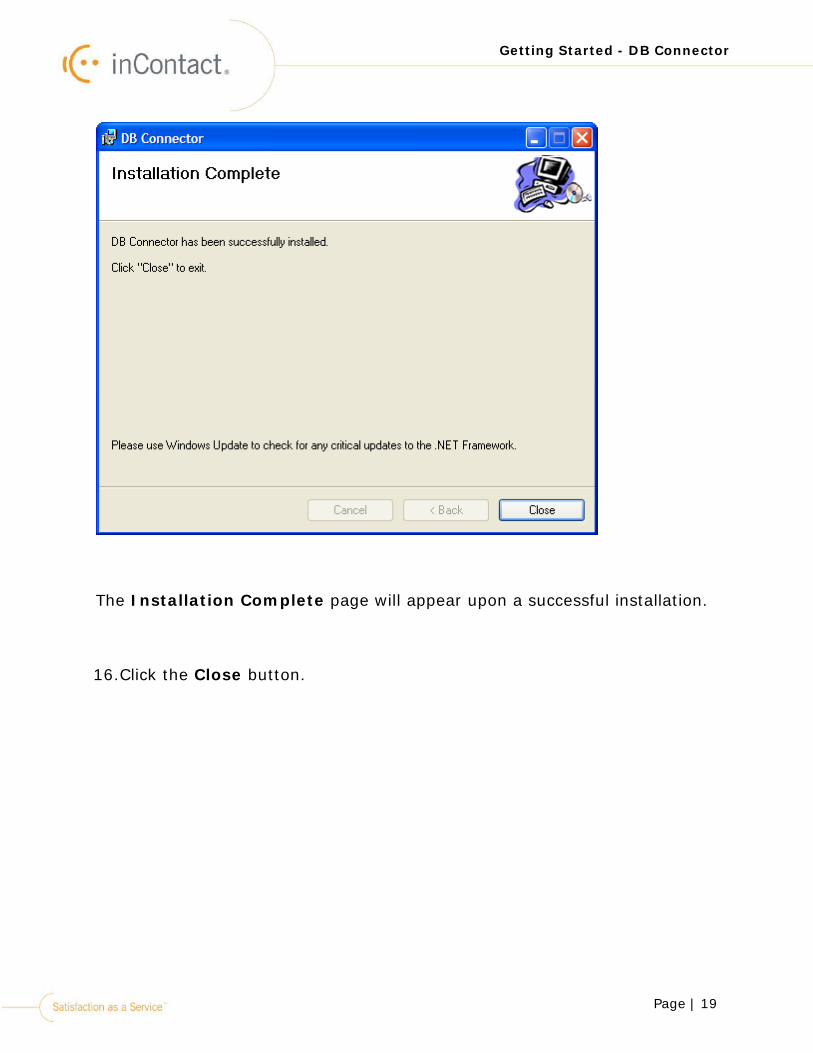
The Installation Complete page will appear upon a successful installation.
16.Click the Close button.
Page | 20
Getting Started - DB Connector
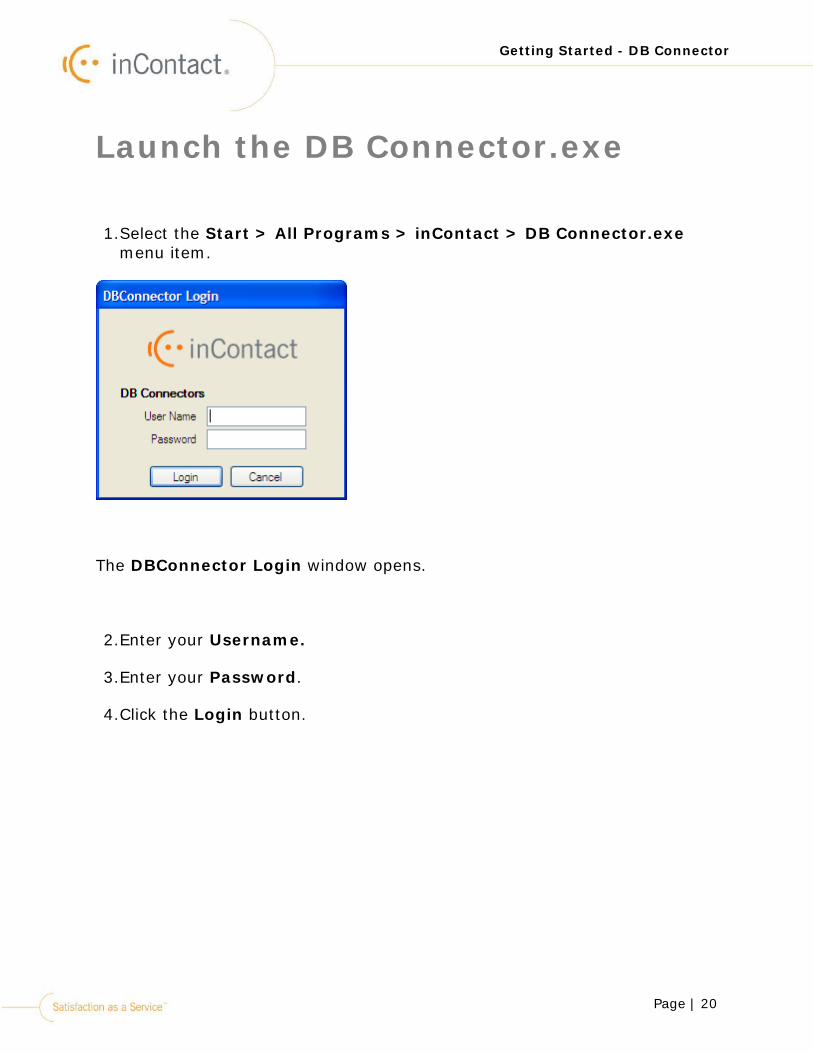
Launch the DB Connector.exe
1.Select the Start > All Programs > inContact > DB Connector.exe menu item.
The DBConnector Login window opens.
2.Enter your Username.
3.Enter your Password.
4.Click the Login button.
Page | 21
Getting Started - DB Connector
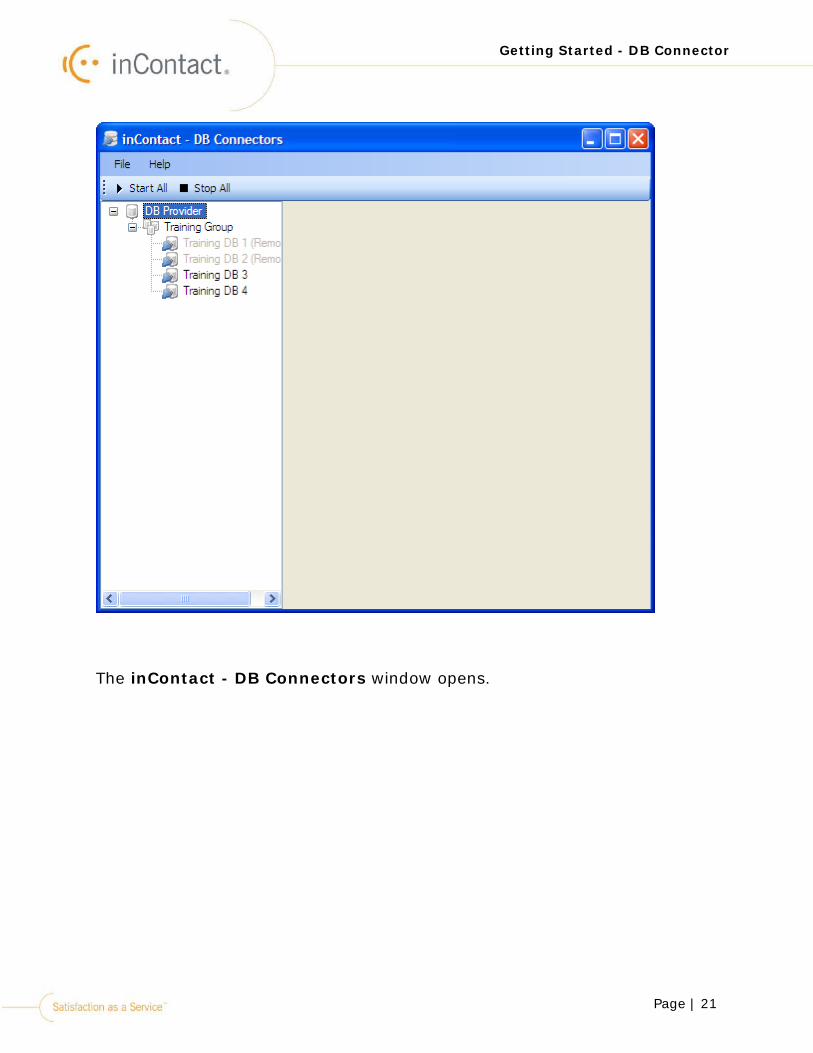
The inContact - DB Connectors window opens.
Page | 22
Getting Started - DB Connector
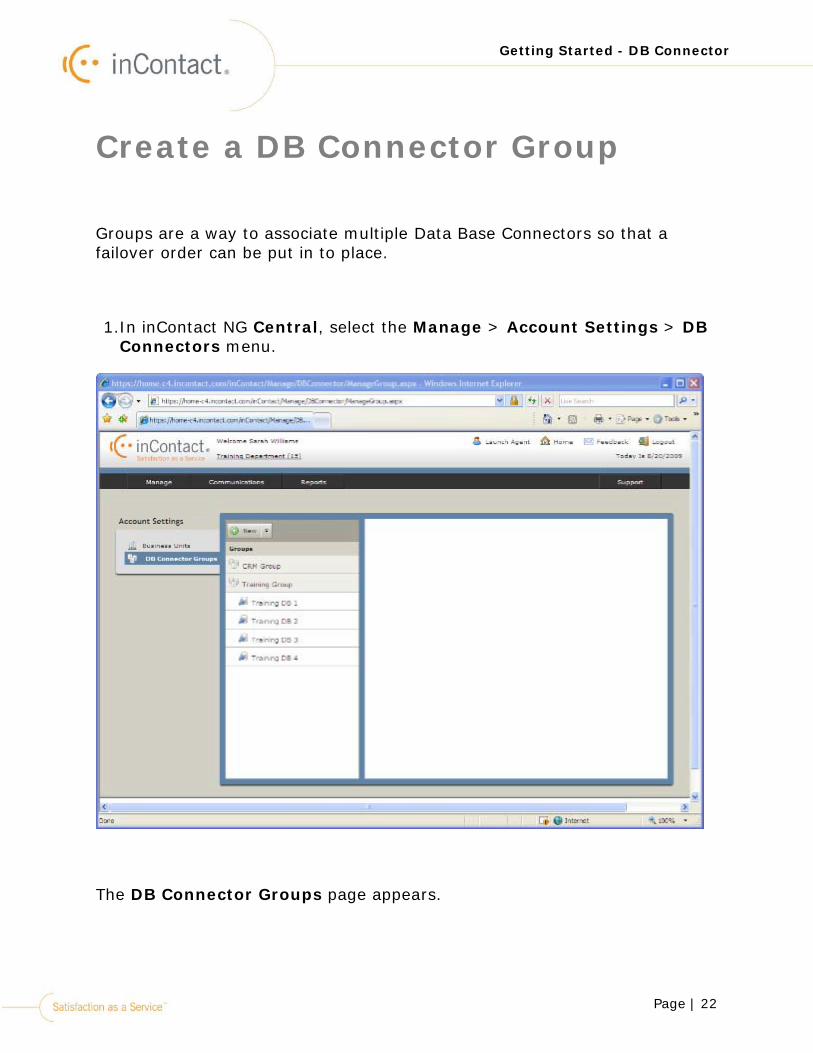
Create a DB Connector Group
Groups are a way to associate multiple Data Base Connectors so that a failover order can be put in to place.
1.In inContact NG Central, select the Manage > Account Settings > DB Connectors menu.
The DB Connector Groups page appears.

Page | 23
Getting Started - DB Connector
2.Click the New button.
3.Select the DB Connector Groups option.
Page | 24
Getting Started - DB Connector
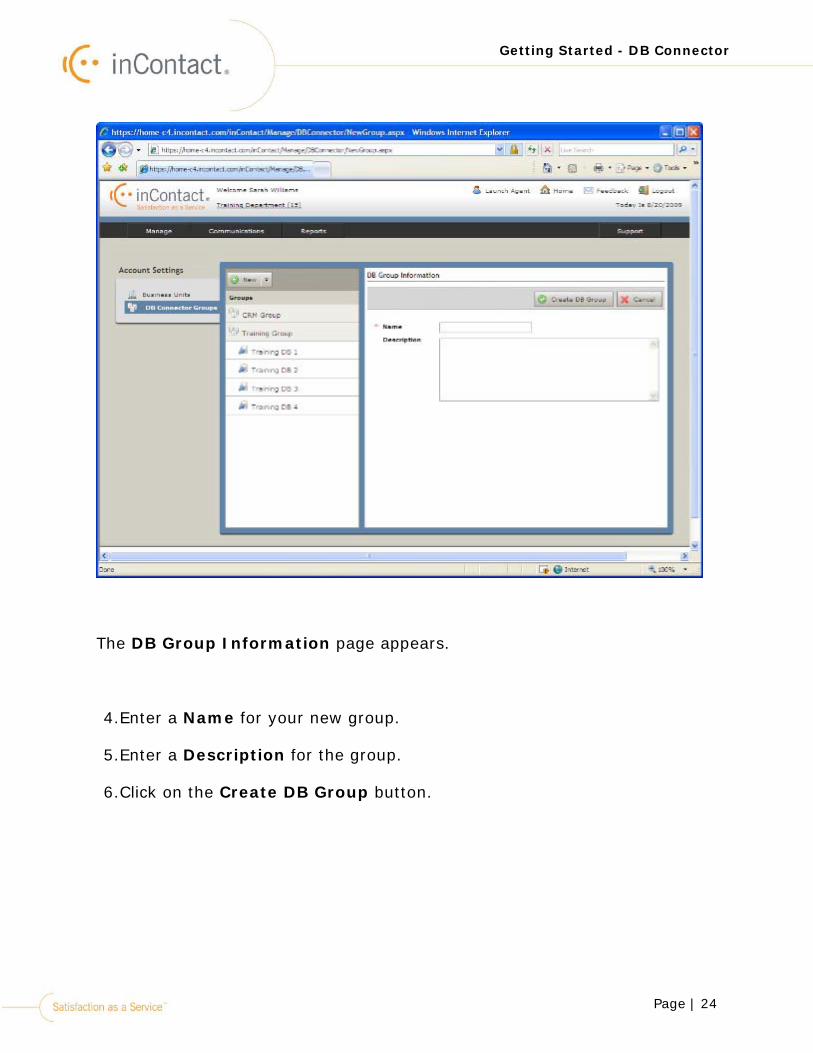
The DB Group Information page appears.
4.Enter a Name for your new group.
5.Enter a Description for the group.
6.Click on the Create DB Group button.
Page | 25
Getting Started - DB Connector
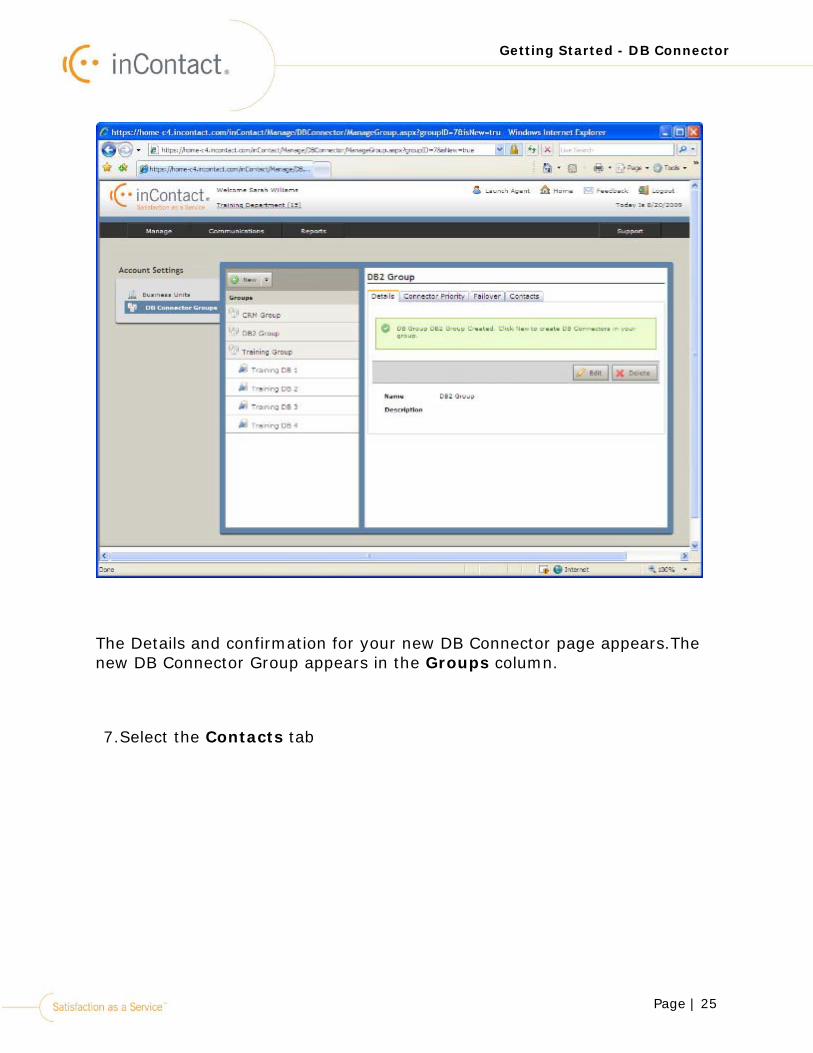
The Details and confirmation for your new DB Connector page appears.The new DB Connector Group appears in the Groups column.
7.Select the Contacts tab
Page | 26
Getting Started - DB Connector
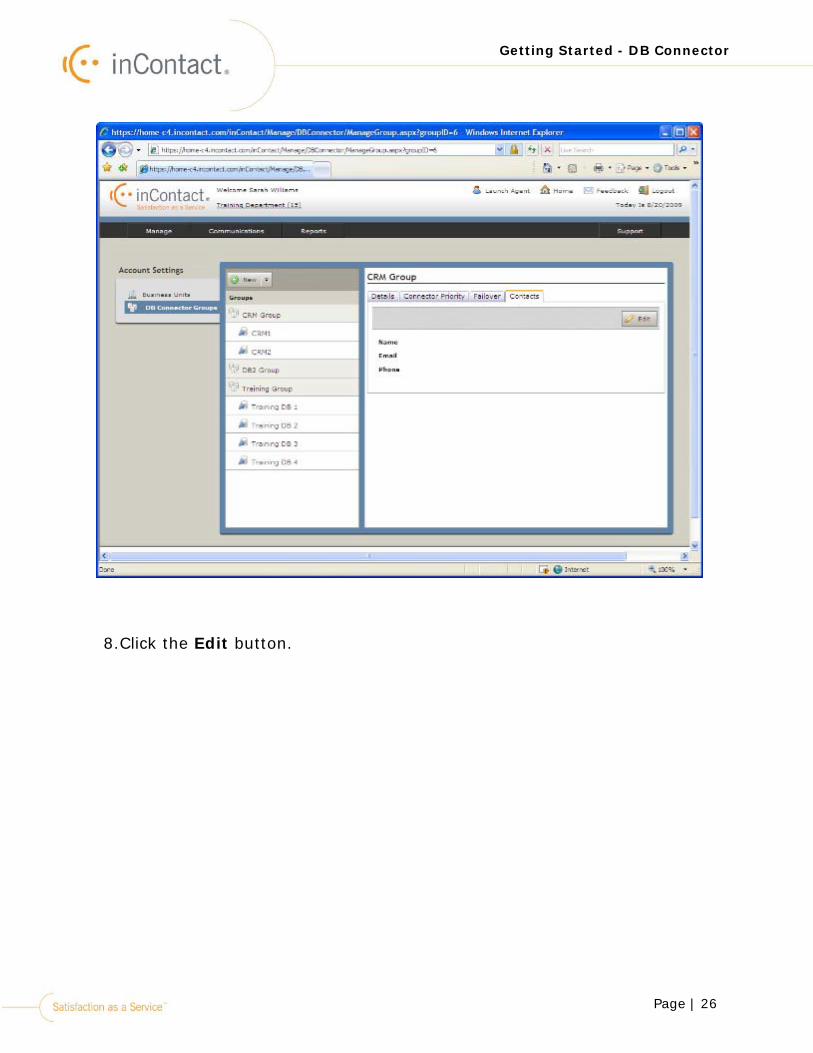
8.Click the Edit button.
Page | 27
Getting Started - DB Connector
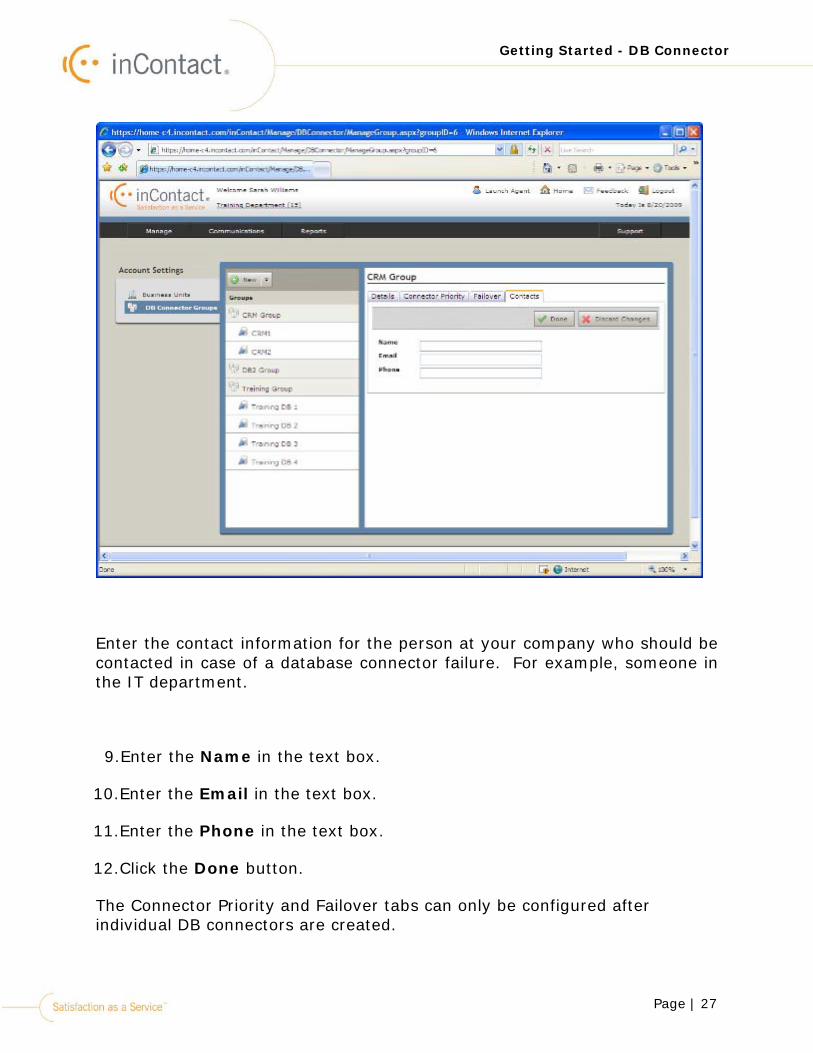
Enter the contact information for the person at your company who should be contacted in case of a database connector failure. For example, someone in the IT department.
9.Enter the Name in the text box.
10.Enter the Email in the text box.
11.Enter the Phone in the text box.
12.Click the Done button.
The Connector Priority and Failover tabs can only be configured after individual DB connectors are created.
Page I 28 Satisfaction as a Service
------
c<:• in Contact. Getting Started- DB Connector
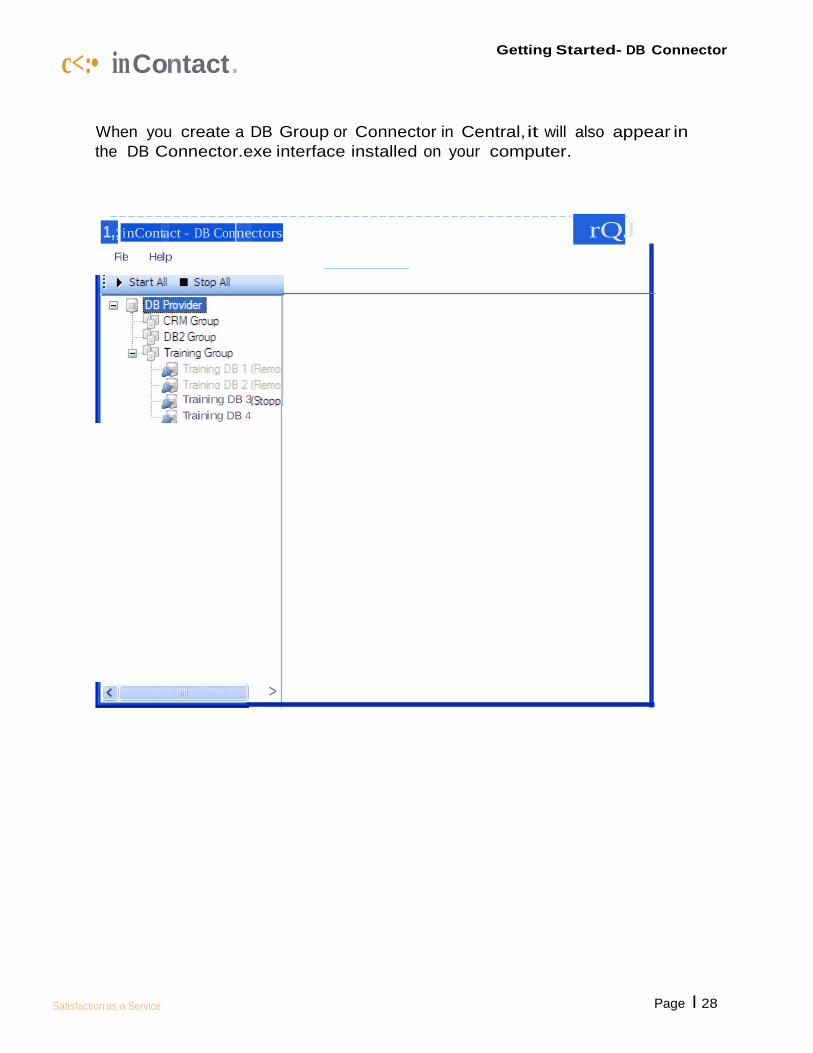
When you create a DB Group or Connector in Central, it will also appear in the DB Connector.exe interface installed on your computer.
--------------------------------------------------- -
1,; inContact - DB Con nectors rQJ
File Help
Training DB 3 Training DB 4
>
Page | 29
Getting Started - DB Connector
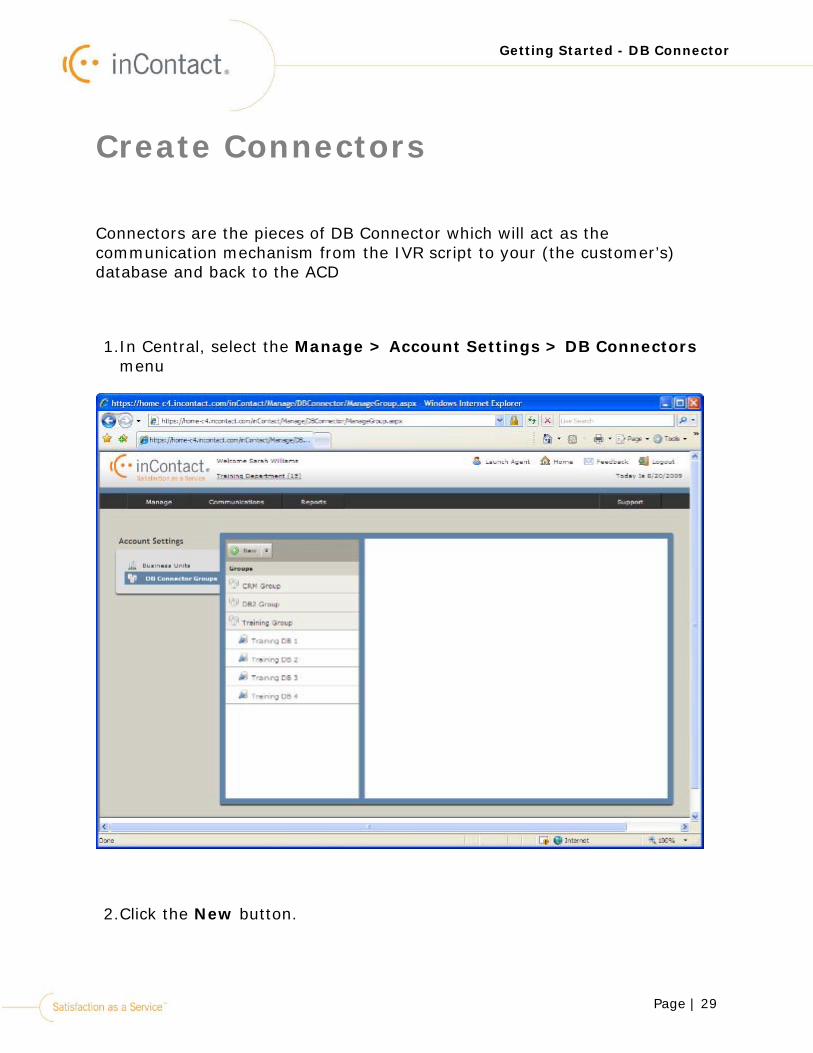
Create Connectors
Connectors are the pieces of DB Connector which will act as the communication mechanism from the IVR script to your (the customer’s) database and back to the ACD
1.In Central, select the Manage > Account Settings > DB Connectors menu
2.Click the New button.
Page | 30
Getting Started - DB Connector
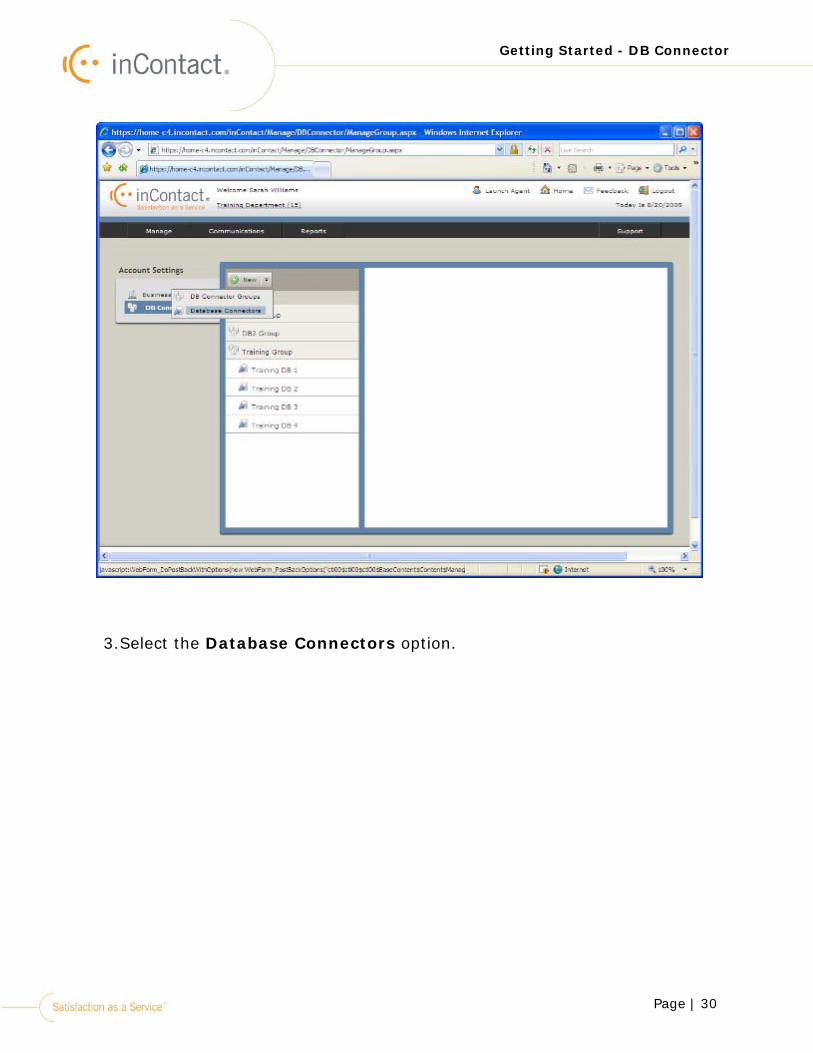
3.Select the Database Connectors option.
Page | 31
Getting Started - DB Connector
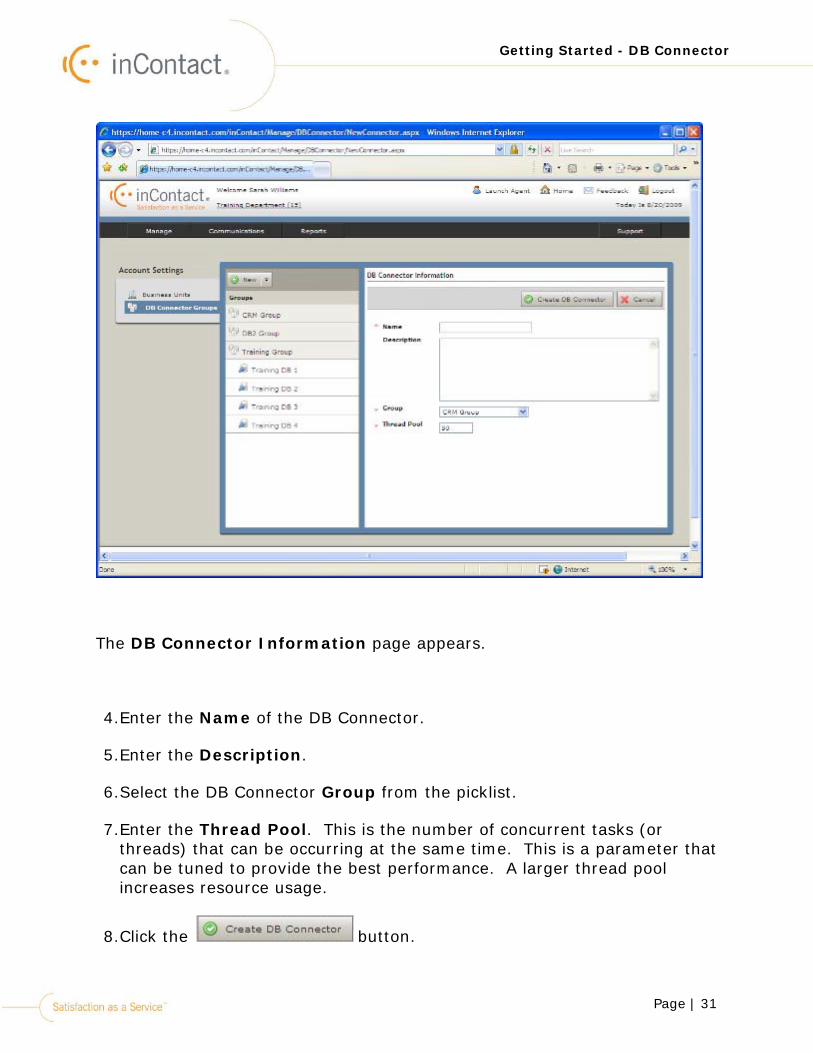
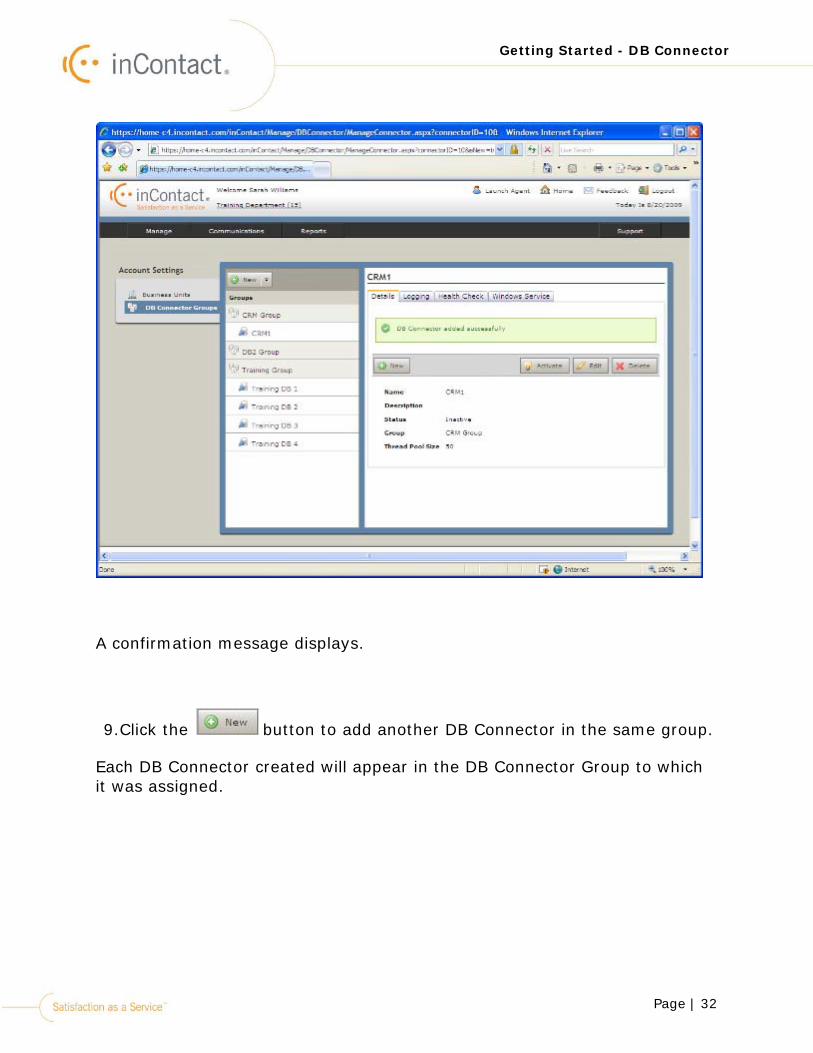
The DB Connector Information page appears.
4.Enter the Name of the DB Connector.
5.Enter the Description.
6.Select the DB Connector Group from the picklist.
7.Enter the Thread Pool. This is the number of concurrent tasks (or threads) that can be occurring at the same time. This is a parameter that can be tuned to provide the best performance. A larger thread pool increases resource usage.
8.Click the button.
Page | 32
Getting Started - DB Connector
A confirmation message displays.
9.Click the button to add another DB Connector in the same group.
Each DB Connector created will appear in the DB Connector Group to which it was assigned.
Page | 33
Getting Started - DB Connector
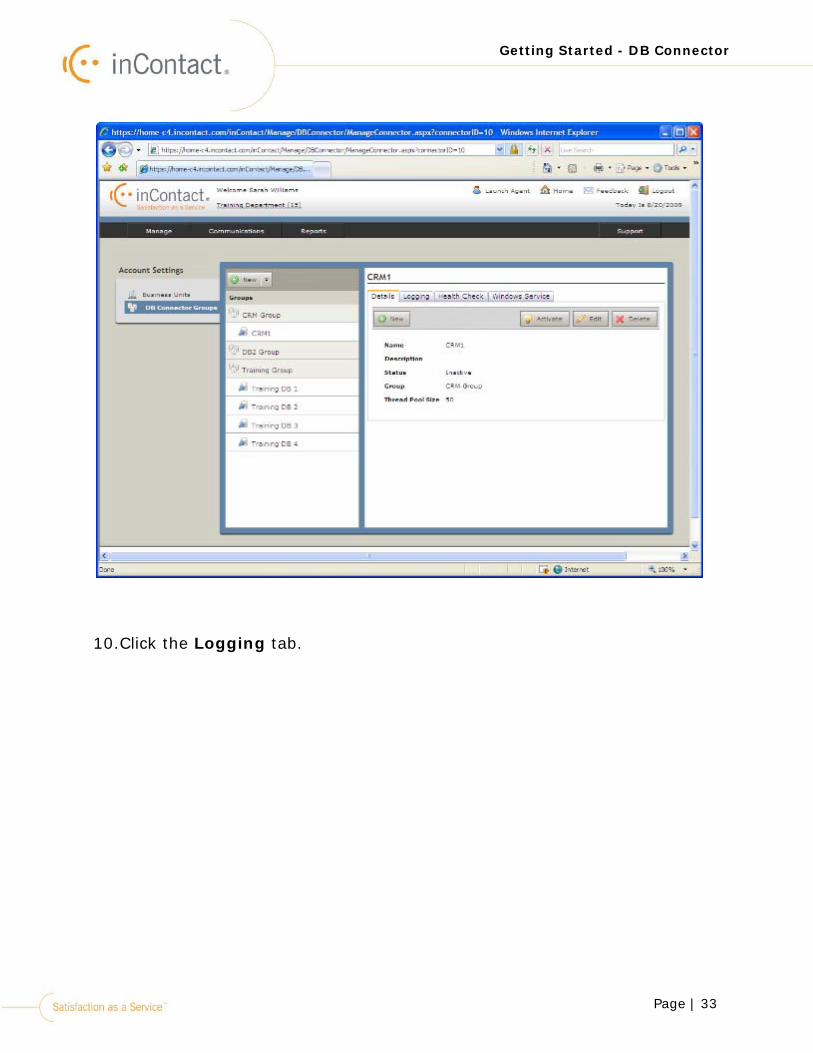
10.Click the Logging tab.
Page | 34
Getting Started - DB Connector
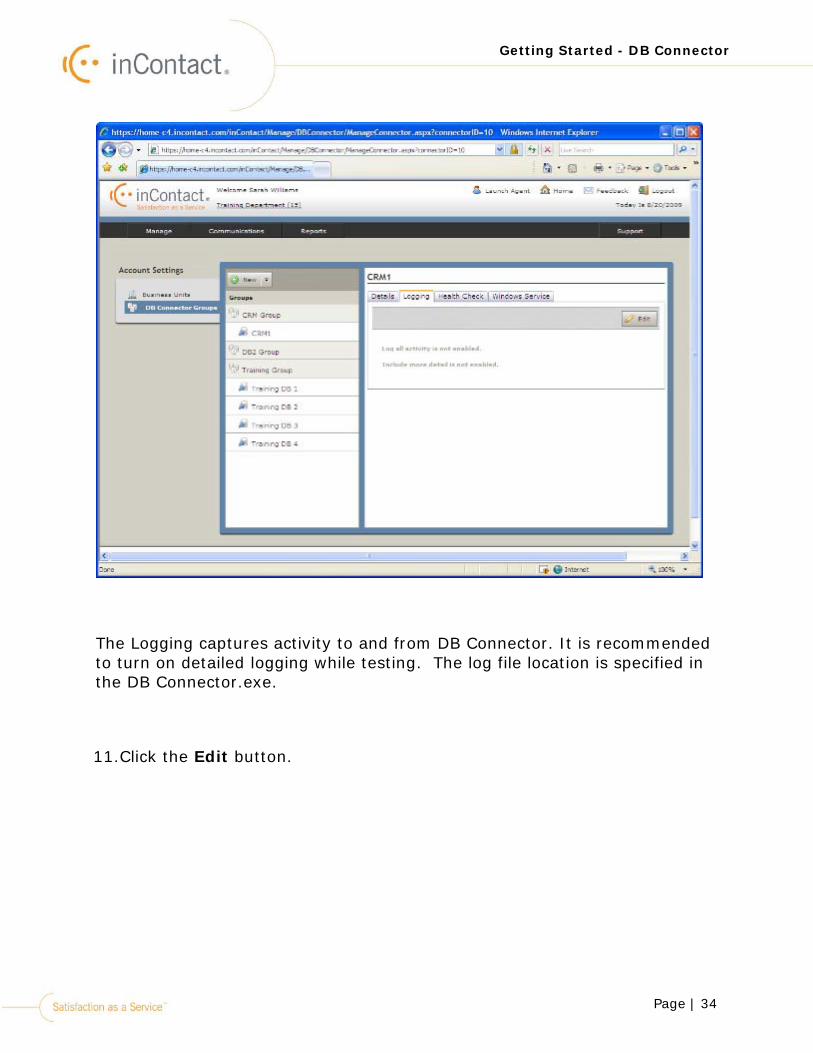
The Logging captures activity to and from DB Connector. It is recommended to turn on detailed logging while testing. The log file location is specified in the DB Connector.exe.
11.Click the Edit button.
Page | 35
Getting Started - DB Connector
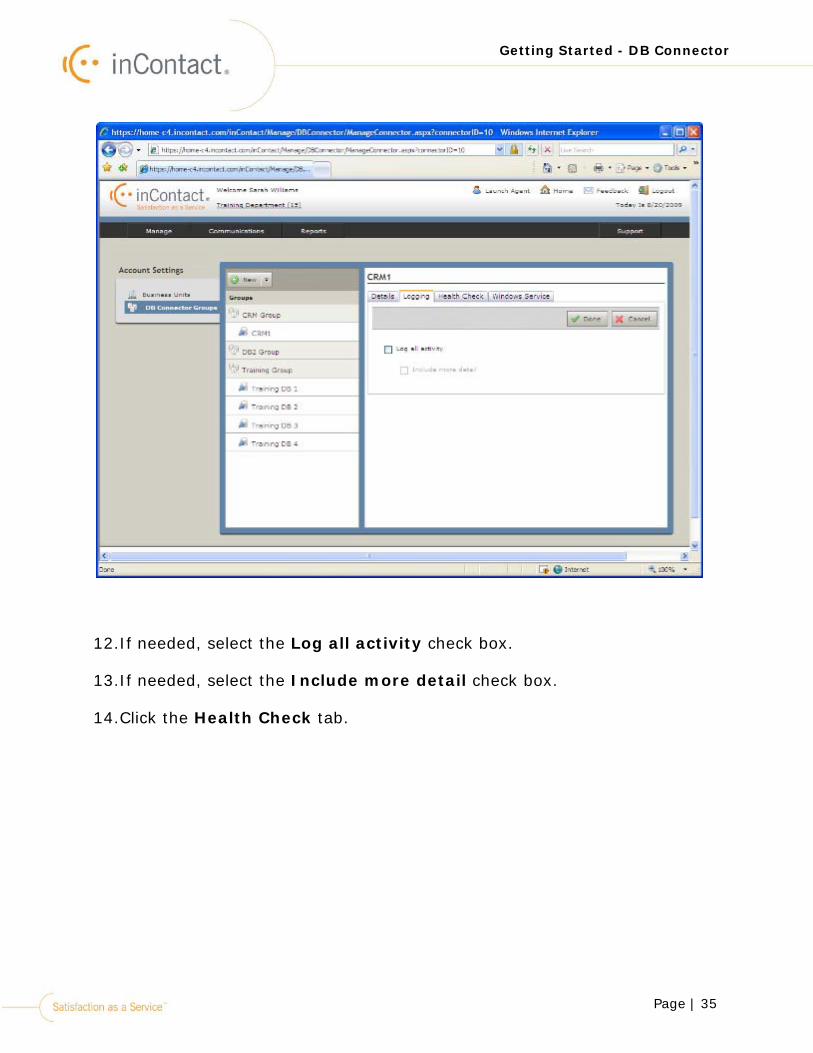
12.If needed, select the Log all activity check box.
13.If needed, select the Include more detail check box.
14.Click the Health Check tab.

Page | 36
Getting Started - DB Connector
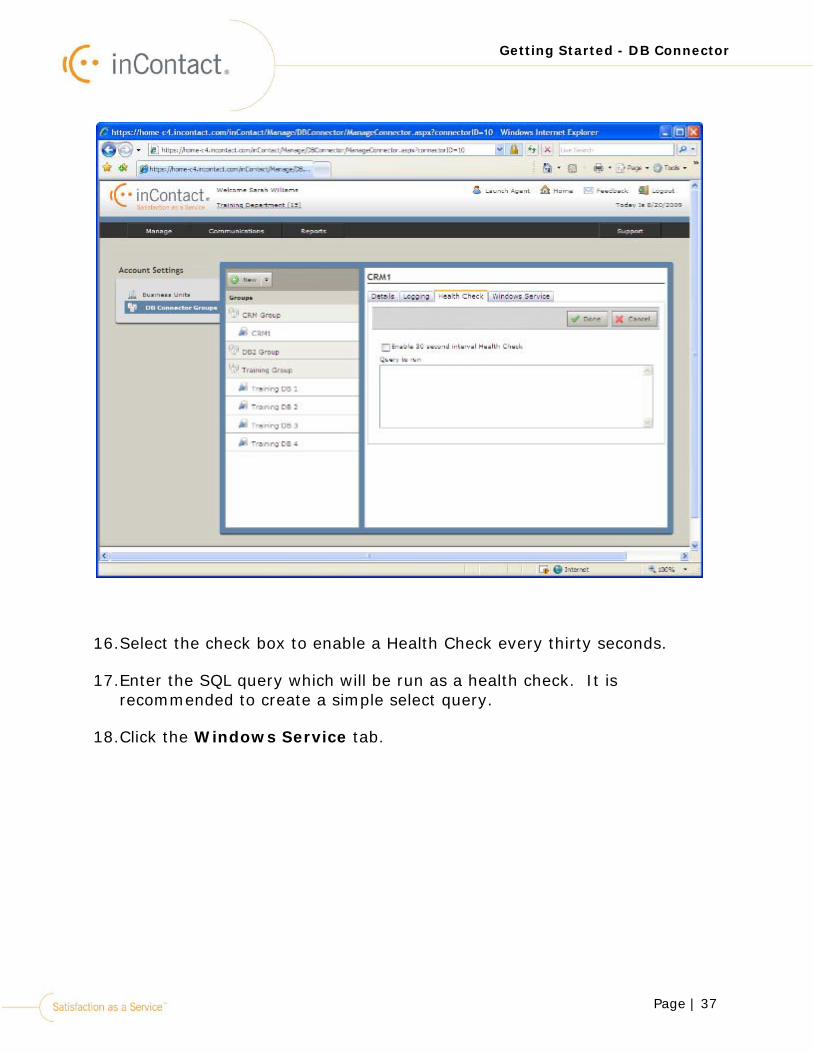
A Health Check queries the database every thirty seconds to make sure there is not a problem with the connection. The Health Check tab allows you to specify the query to be used.
15.Click the Edit button.
Page | 37
Getting Started - DB Connector
16.Select the check box to enable a Health Check every thirty seconds.
17.Enter the SQL query which will be run as a health check. It is recommended to create a simple select query.
18.Click the Windows Service tab.
Page | 38
Getting Started - DB Connector
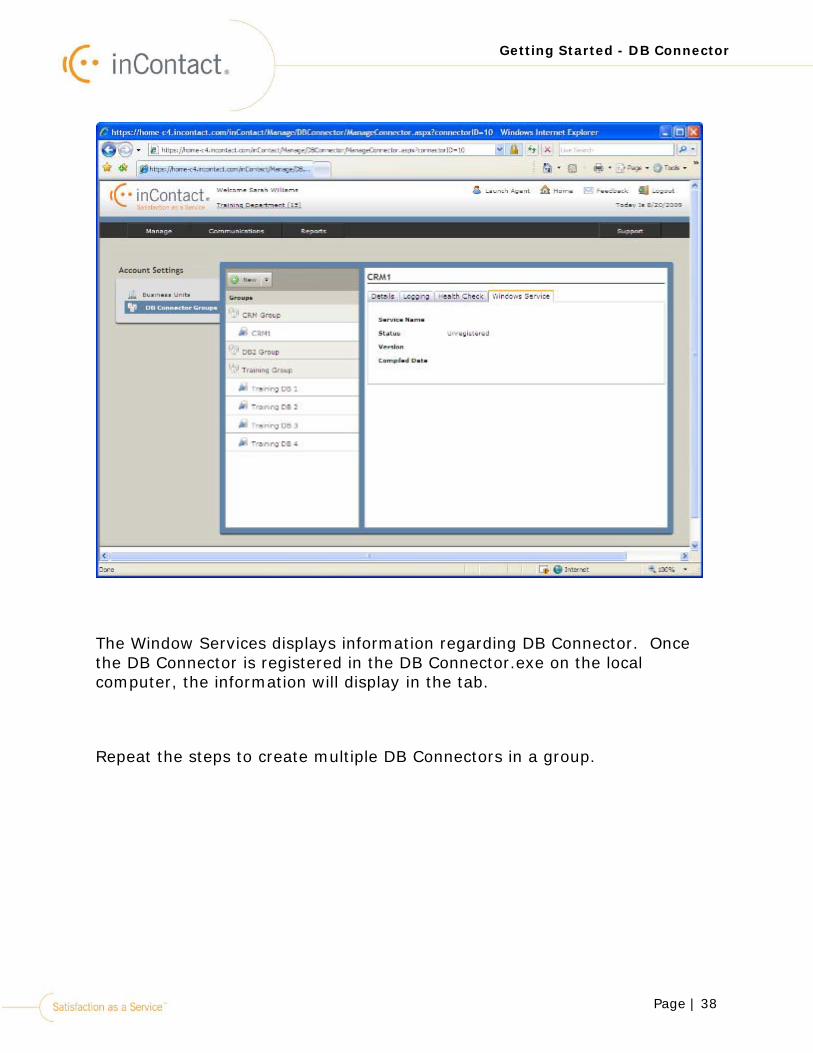
The Window Services displays information regarding DB Connector. Once the DB Connector is registered in the DB Connector.exe on the local computer, the information will display in the tab.
Repeat the steps to create multiple DB Connectors in a group.

Page | 39
Getting Started - DB Connector
Edit a DB Connector Group
Once multiple DB Connectors have been created in a group, the group must be edited to configure Connector Priorities and Failover properties.
1.In Central, select the Manage > Account Settings > DB Connectors menu
2.Click on the DB Connector group.
The Details page for the group appears.

Page | 40
Getting Started - DB Connector
3.Click the Edit button to edit the Name and Description of the Group.
4.Click the Connector Priority tab.
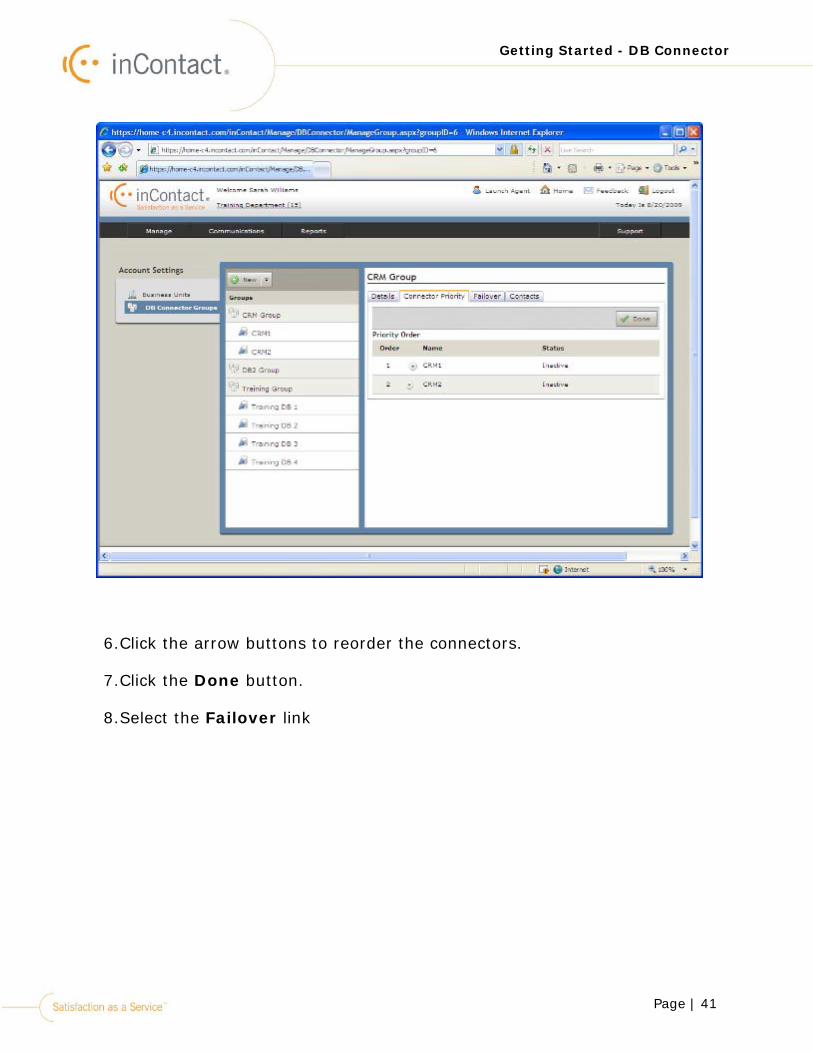
Connector Priority tells the ACD which connector should be getting the commands and which connector will take over in the case of a fail over. By default the priority order is the order in which you made the connectors
5.Click the Edit button to edit the Priority Order.
Page | 41
Getting Started - DB Connector
6.Click the arrow buttons to reorder the connectors.
7.Click the Done button.
8.Select the Failover link
Page | 42
Getting Started - DB Connector
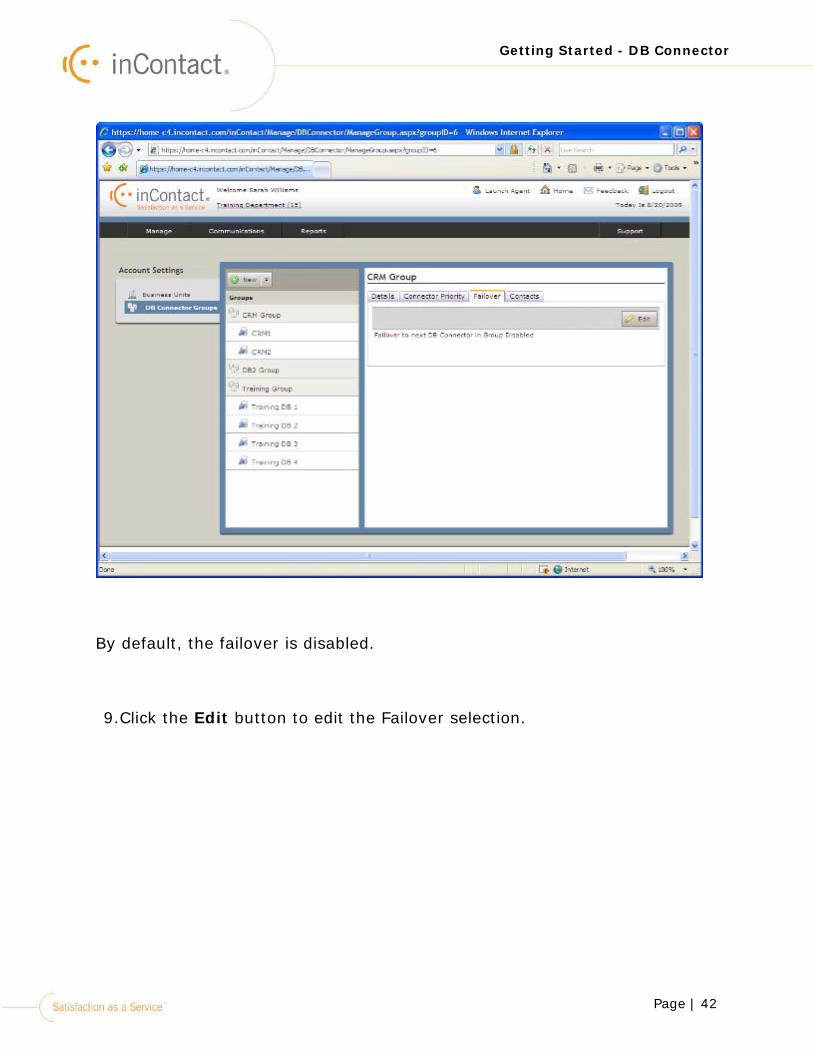
By default, the failover is disabled.
9.Click the Edit button to edit the Failover selection.

Page | 43
Getting Started - DB Connector
10.Select the check box to Allow Failovers.

Page | 44
Getting Started - DB Connector
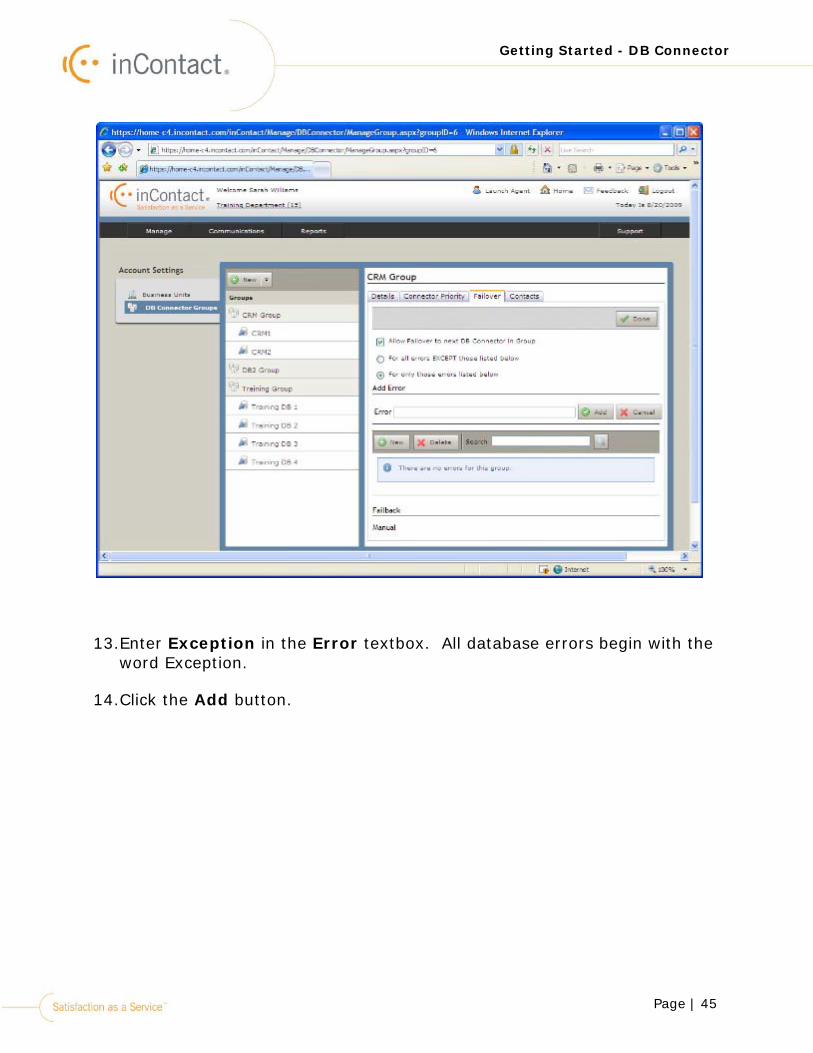
You may enter specific errors that you need to cause a failover. To catch all database errors, perform the following steps:
11.Select the radio button For only those errors listed below.
12.Click the New button.
Page | 45
Getting Started - DB Connector
13.Enter Exception in the Error textbox. All database errors begin with the word Exception.
14.Click the Add button.
Page | 46
Getting Started - DB Connector
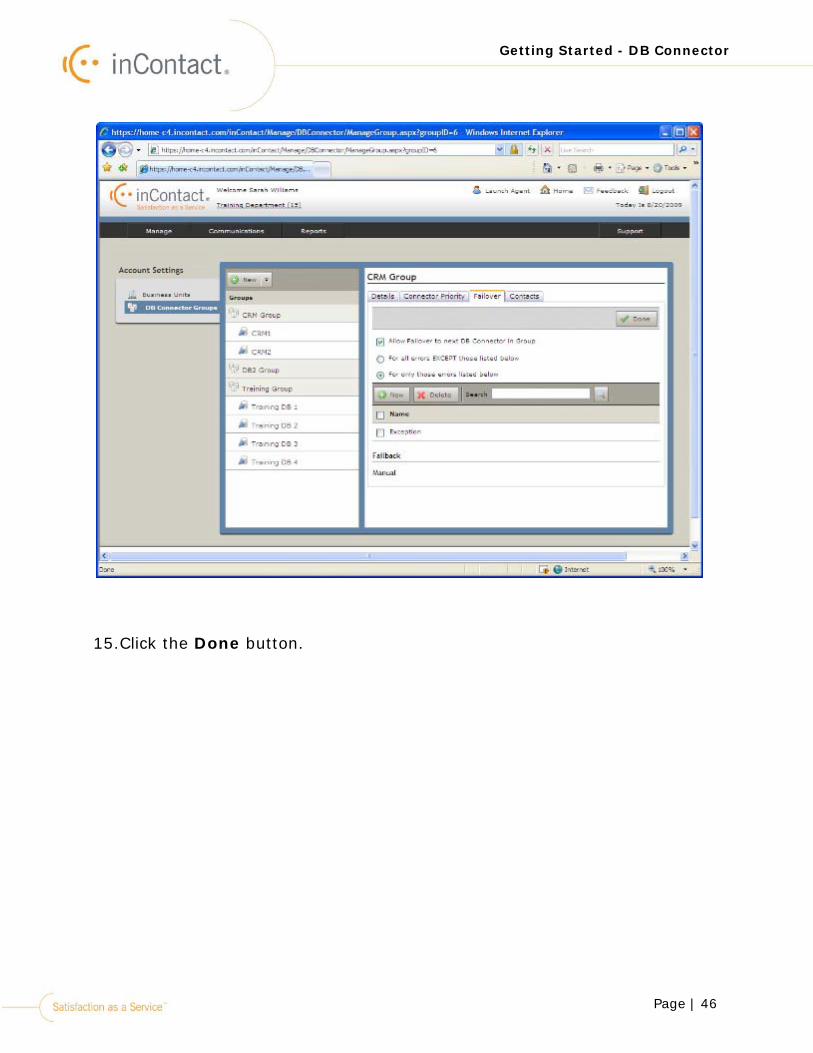
15.Click the Done button.
Page | 47
Getting Started - DB Connector
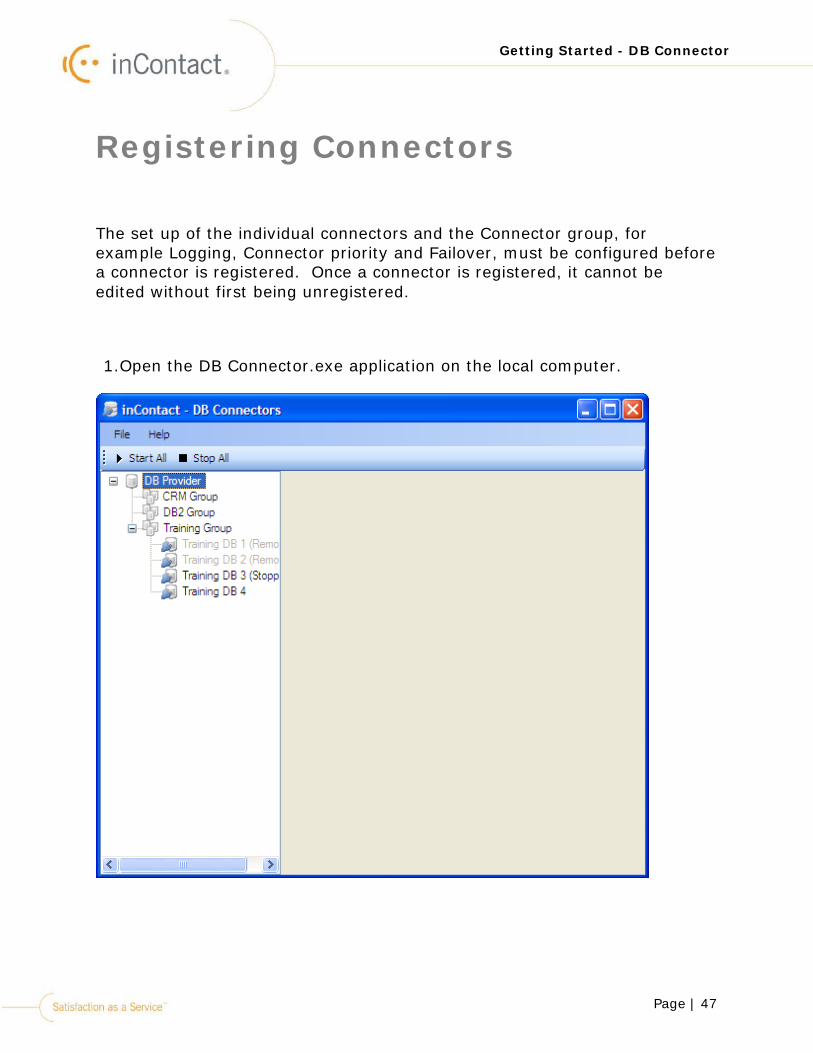
Registering Connectors
The set up of the individual connectors and the Connector group, for example Logging, Connector priority and Failover, must be configured before a connector is registered. Once a connector is registered, it cannot be edited without first being unregistered.
1.Open the DB Connector.exe application on the local computer.
Page | 48
Getting Started - DB Connector
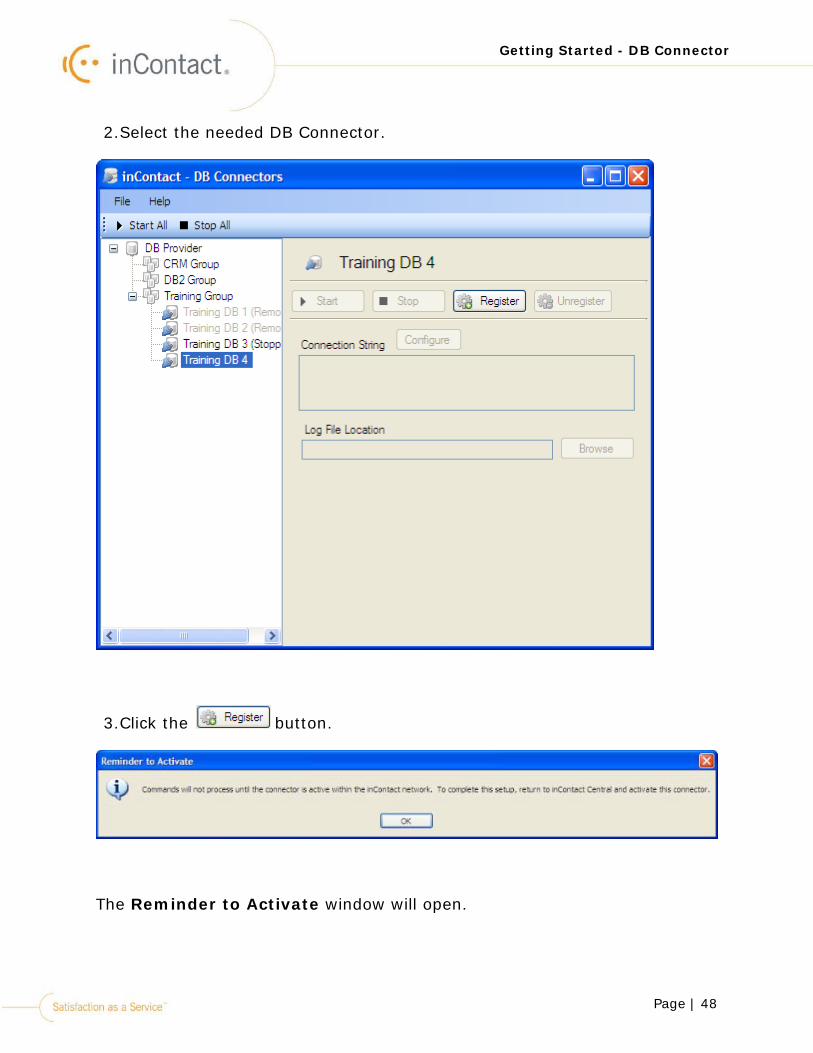
2.Select the needed DB Connector.
3.Click the button.
The Reminder to Activate window will open.
Page | 49
Getting Started - DB Connector
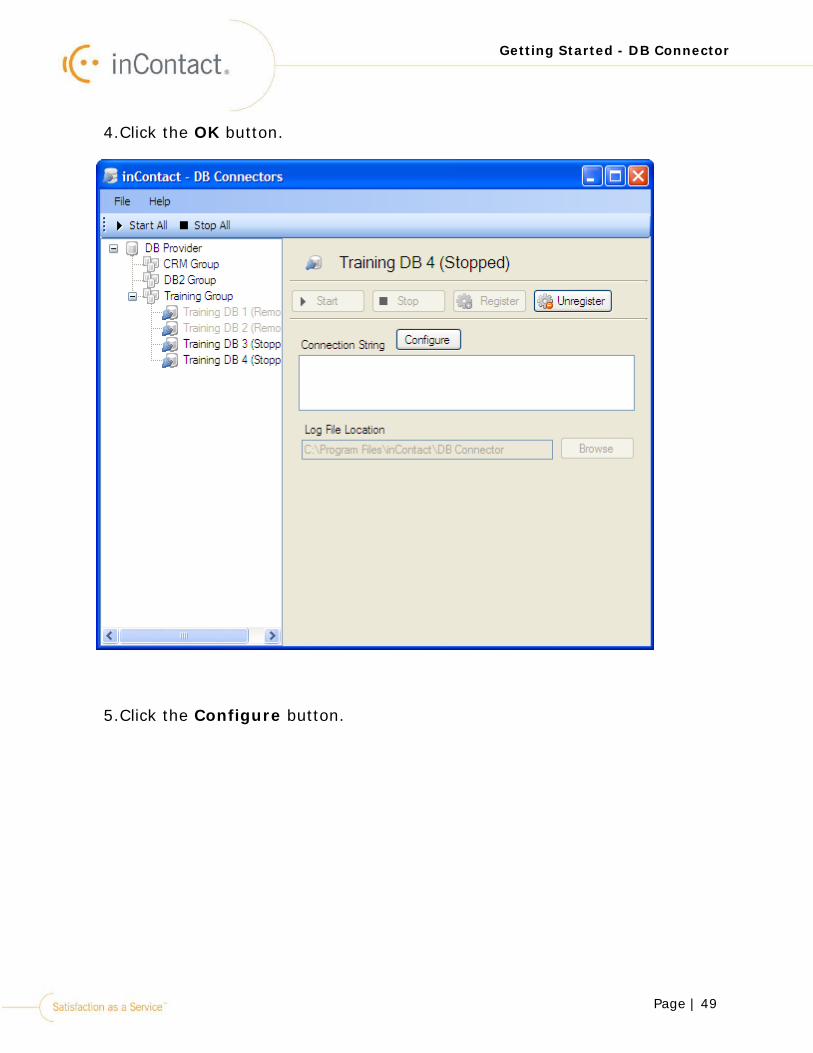
4.Click the OK button.
5.Click the Configure button.
Page | 50
Getting Started - DB Connector
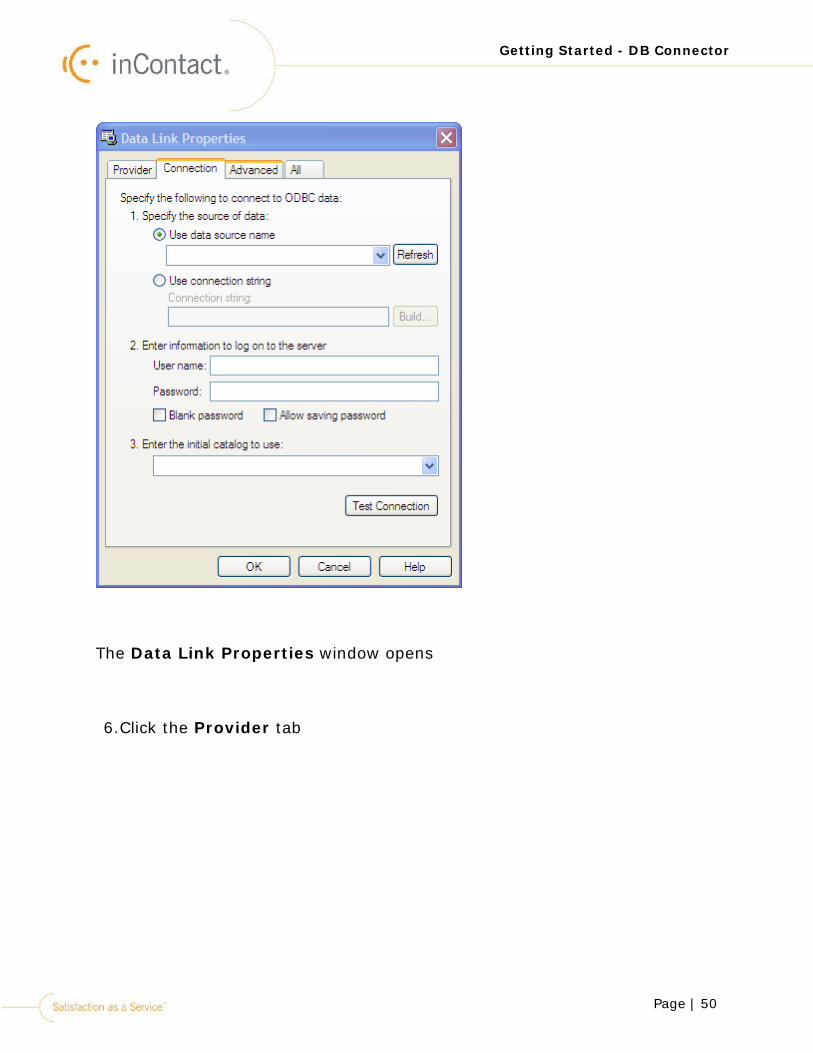
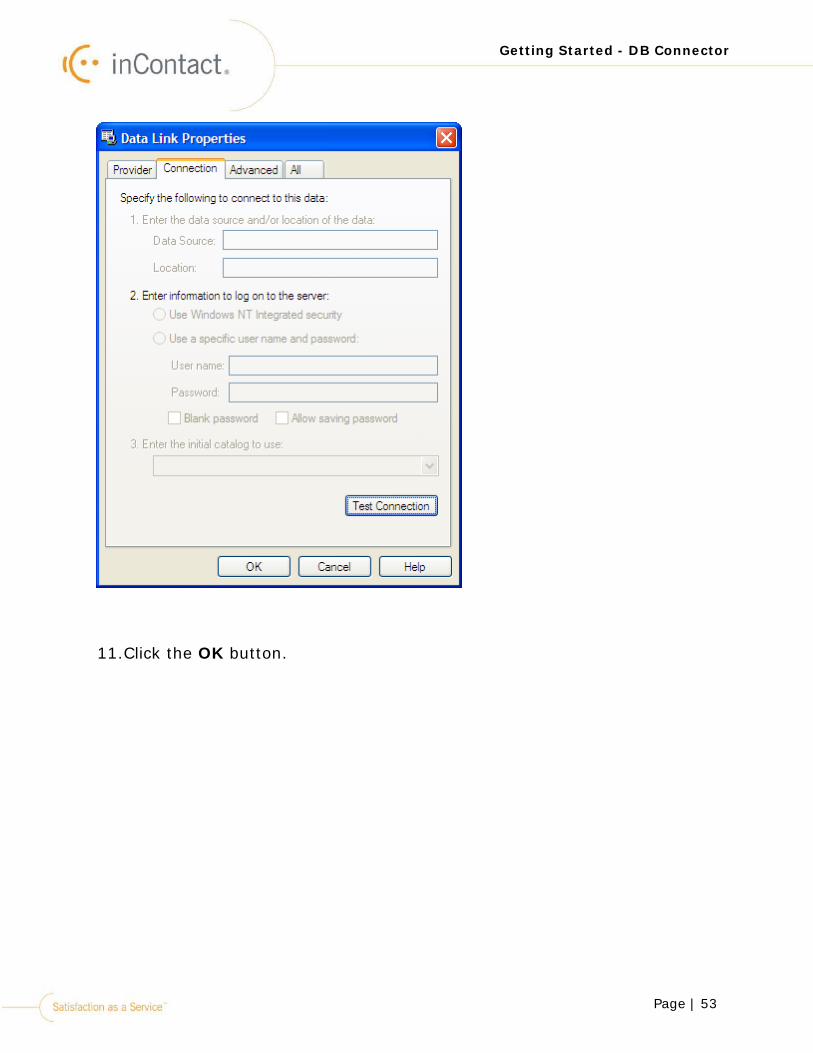
The Data Link Properties window opens
6.Click the Provider tab
Page | 51
Getting Started - DB Connector
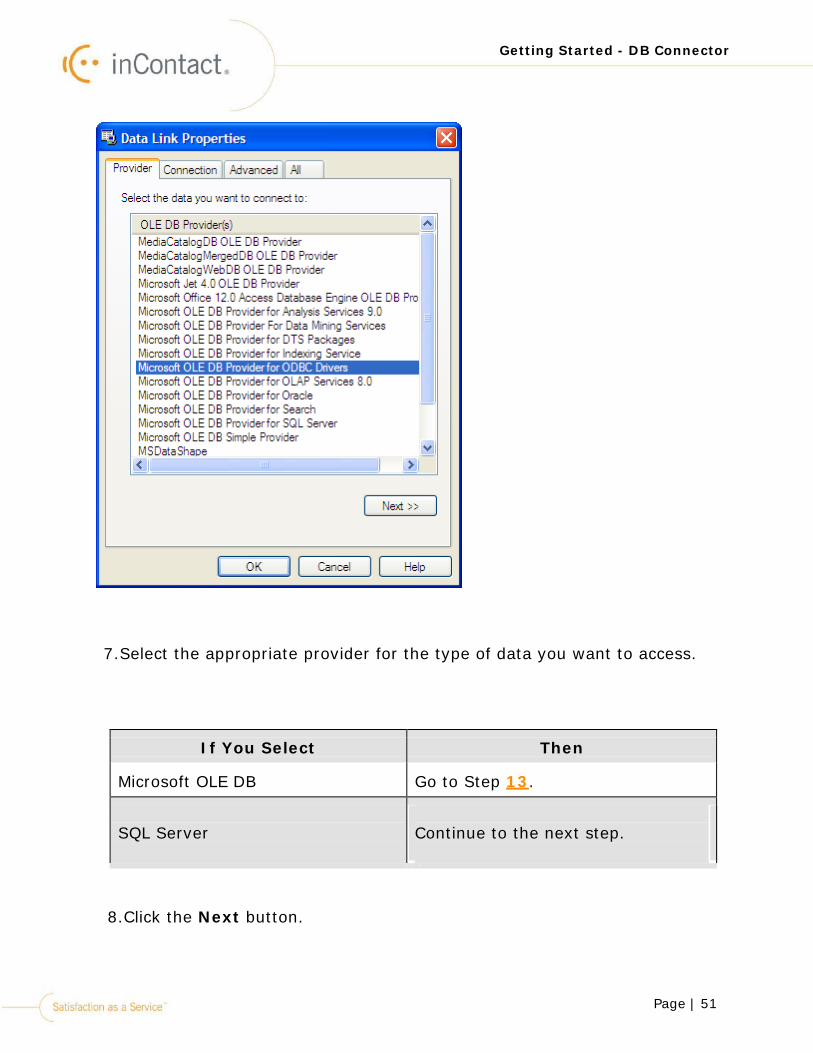
7.Select the appropriate provider for the type of data you want to access.
If You Select Then
Microsoft OLE DB
Go to Step 13. SQL Server
Continue to the next step.
8.Click the Next button.
Page | 52
Getting Started - DB Connector
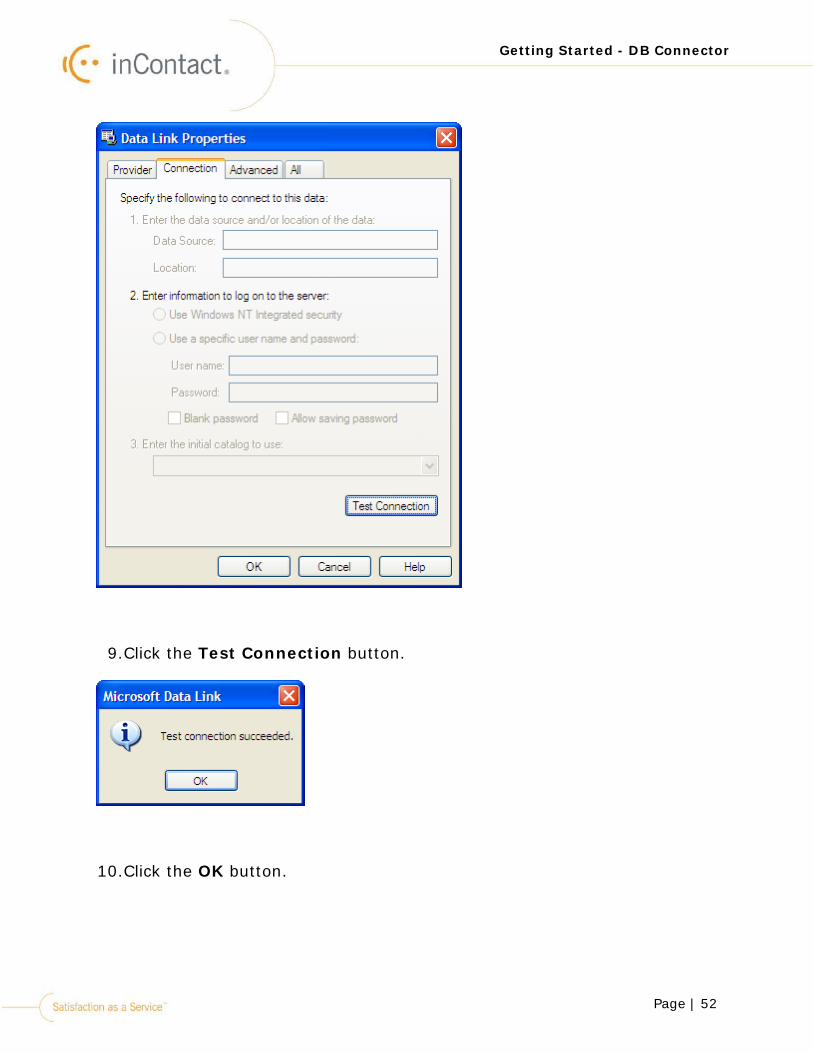
9.Click the Test Connection button.
10.Click the OK button.
Page | 53
Getting Started - DB Connector
11.Click the OK button.
Page | 54
Getting Started - DB Connector
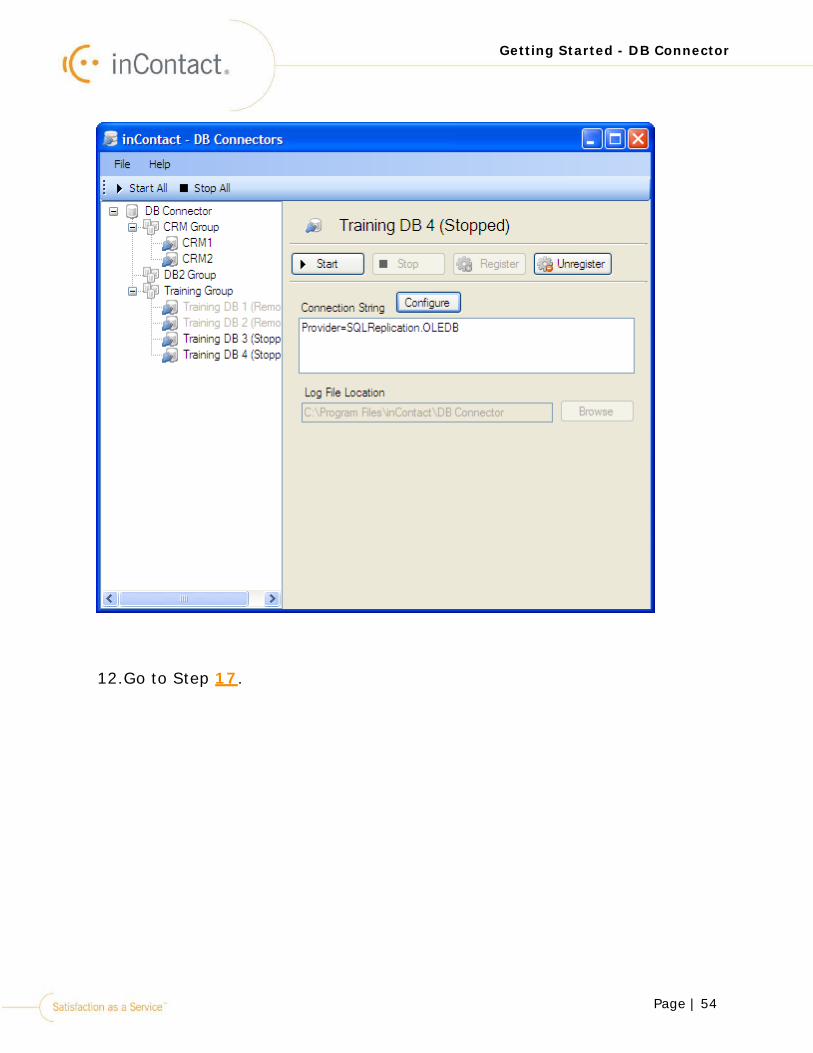
12.Go to Step 17.
Page | 55
Getting Started - DB Connector
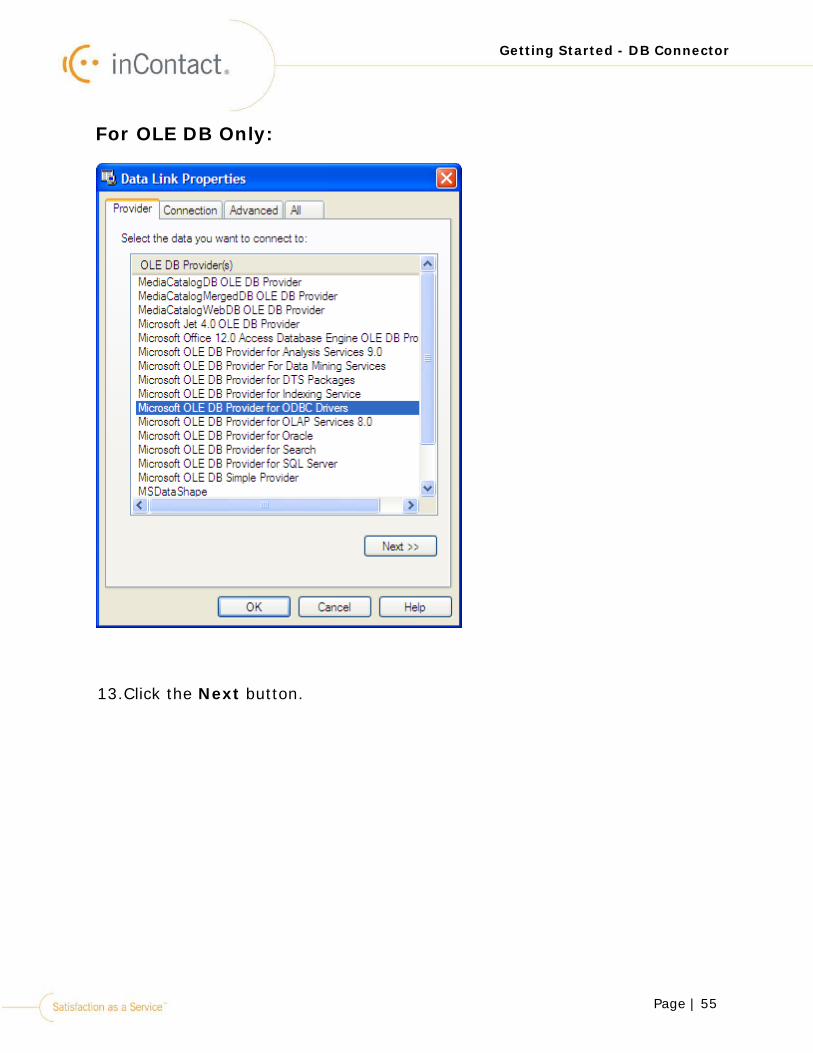
For OLE DB Only:
13.Click the Next button.
Page | 56
Getting Started - DB Connector
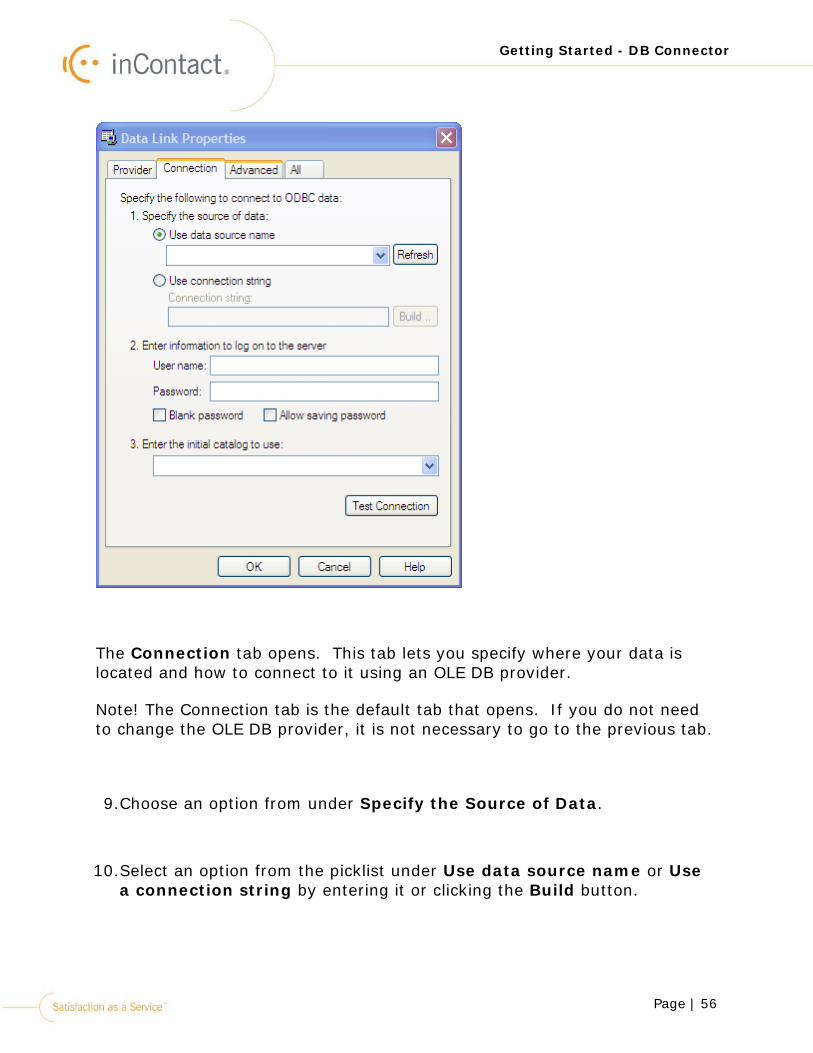
The Connection tab opens. This tab lets you specify where your data is located and how to connect to it using an OLE DB provider.
Note! The Connection tab is the default tab that opens. If you do not need to change the OLE DB provider, it is not necessary to go to the previous tab.
9.Choose an option from under Specify the Source of Data.
10.Select an option from the picklist under Use data source name or Use a connection string by entering it or clicking the Build button.
Page | 57
Getting Started - DB Connector
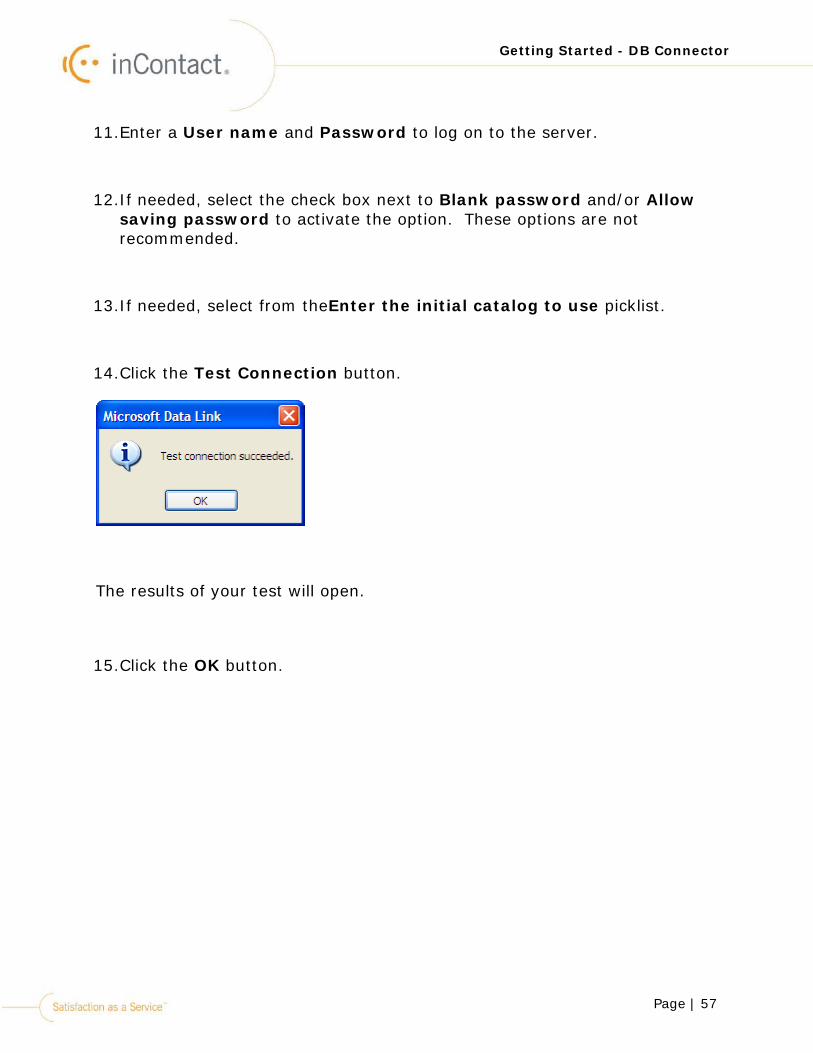
11.Enter a User name and Password to log on to the server.
12.If needed, select the check box next to Blank password and/or Allow saving password to activate the option. These options are not recommended.
13.If needed, select from theEnter the initial catalog to use picklist.
14.Click the Test Connection button.
The results of your test will open.
15.Click the OK button.

Page | 58
Getting Started - DB Connector
16.Click the OK button.
Page | 59
Getting Started - DB Connector
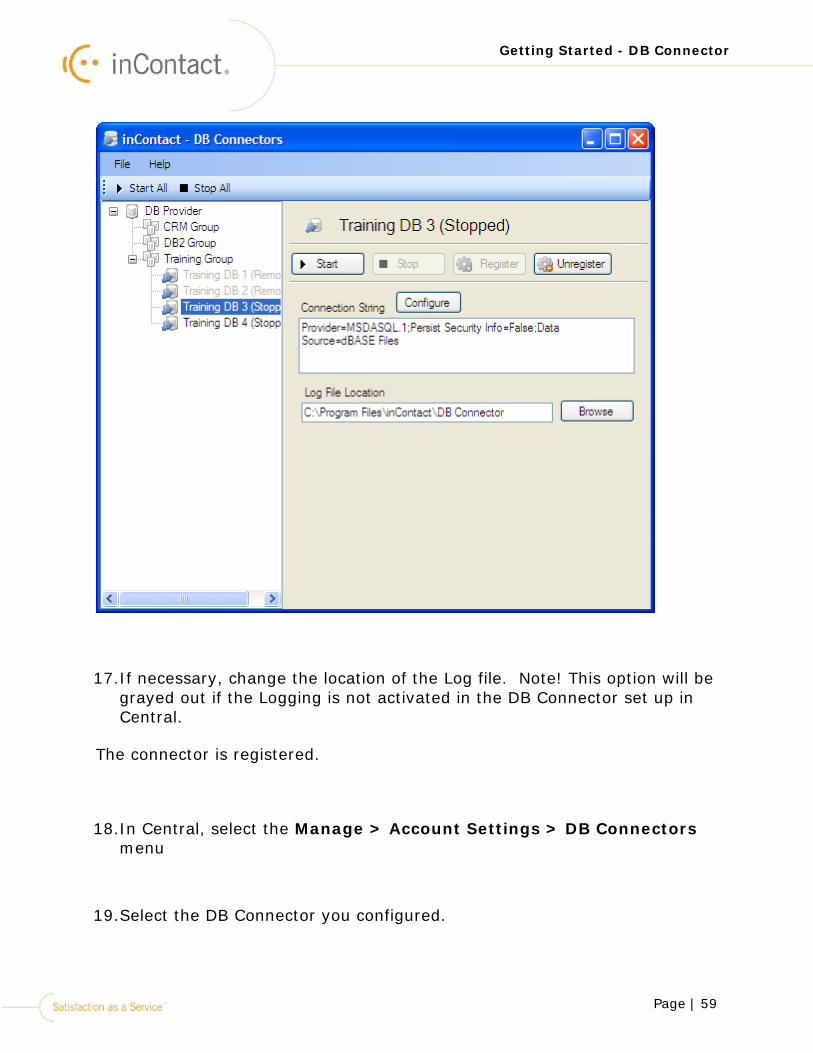
17.If necessary, change the location of the Log file. Note! This option will be grayed out if the Logging is not activated in the DB Connector set up in Central.
The connector is registered.
18.In Central, select the Manage > Account Settings > DB Connectors menu
19.Select the DB Connector you configured.
Page | 60
Getting Started - DB Connector
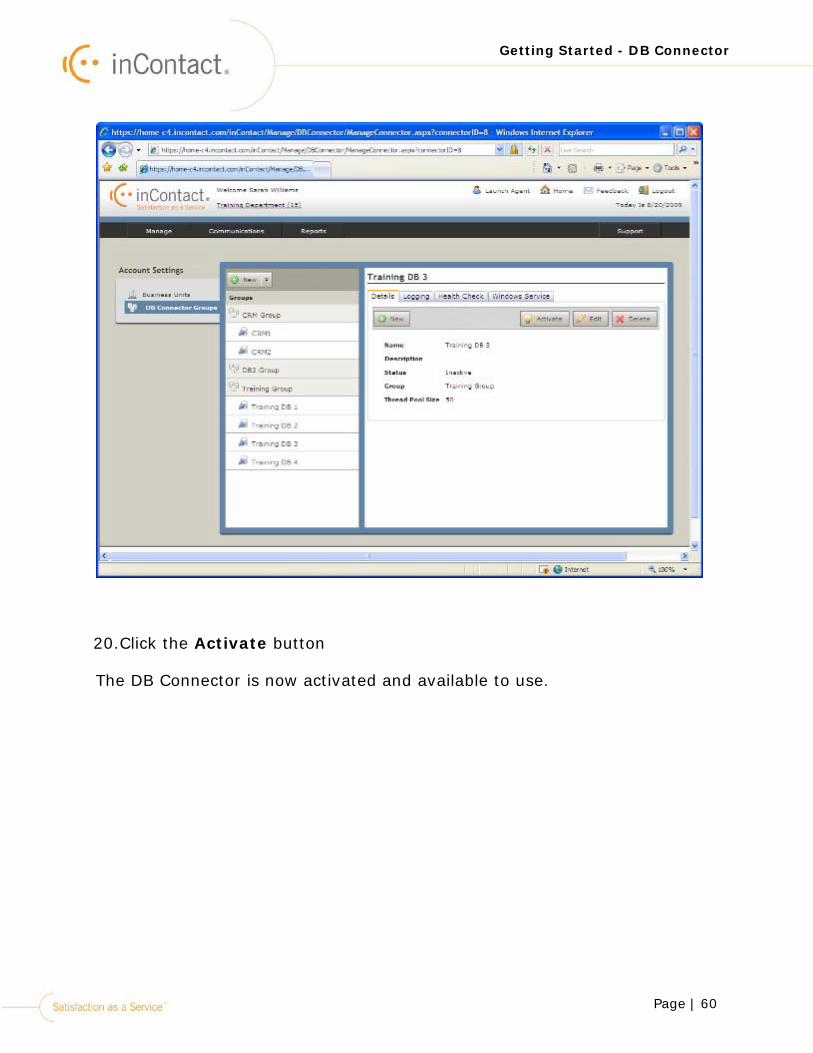
20.Click the Activate button
The DB Connector is now activated and available to use.
Page | 61
Getting Started - DB Connector
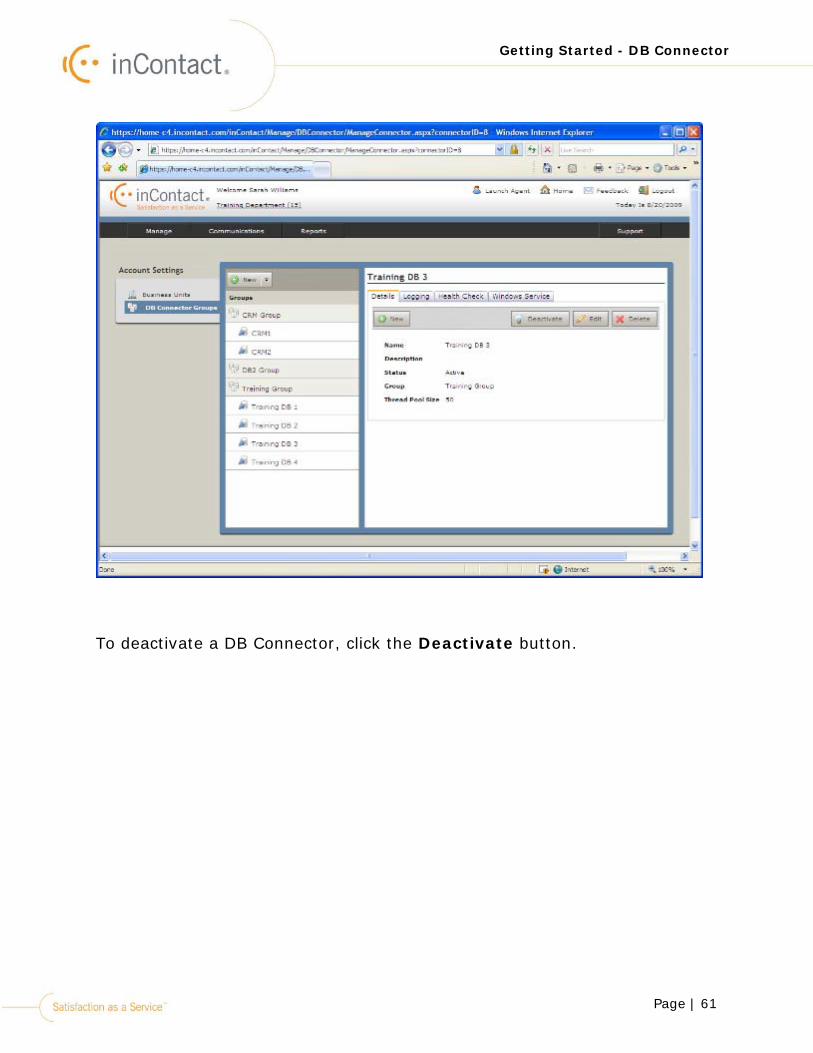
To deactivate a DB Connector, click the Deactivate button.
Page | 62
Getting Started - DB Connector
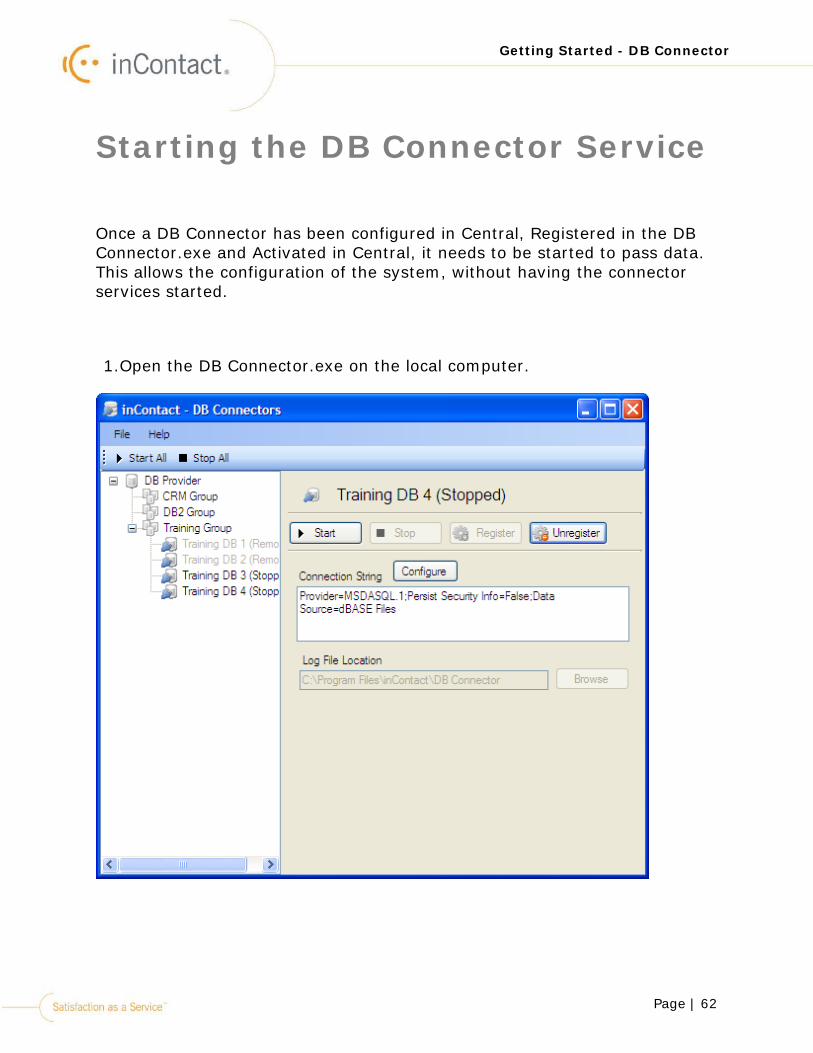
Starting the DB Connector Service
Once a DB Connector has been configured in Central, Registered in the DB Connector.exe and Activated in Central, it needs to be started to pass data. This allows the configuration of the system, without having the connector services started.
1.Open the DB Connector.exe on the local computer.

Page | 63
Getting Started - DB Connector
2.Select the needed DB Connector.
Notice the status of the DB Connector is indicated in parenthesis next to the name. The DB Connector is currently stopped.
3.Click the button
The service will be started.

Page | 64
Getting Started - DB Connector
Notice the status is now started.
4.In Central, return to the DB Connector settings.

Page | 65
Getting Started - DB Connector
The information now displays in the Windows Services tab

Page | 66
Stopping and Removal of DB Connector
Stopping and Removal of DB Connector
To uninstall DB Connector all connectors must first be stopped. Once all connectors are stopped DB Connector may be removed through the Windows Control Panel.
1.Open the DB Connector.exe on the local computer.
Page | 67
Stopping and Removal of DB Connector
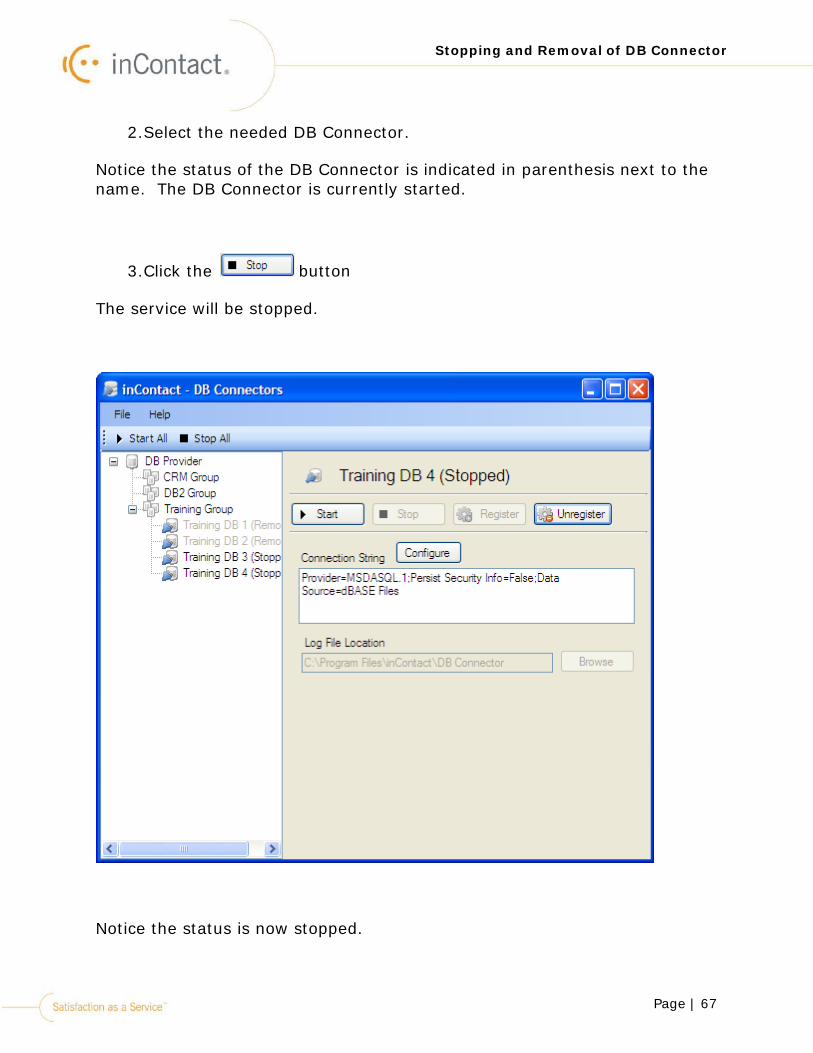
2.Select the needed DB Connector.
Notice the status of the DB Connector is indicated in parenthesis next to the name. The DB Connector is currently started.
3.Click the button
The service will be stopped.
Notice the status is now stopped.
Page | 68
Stopping and Removal of DB Connector
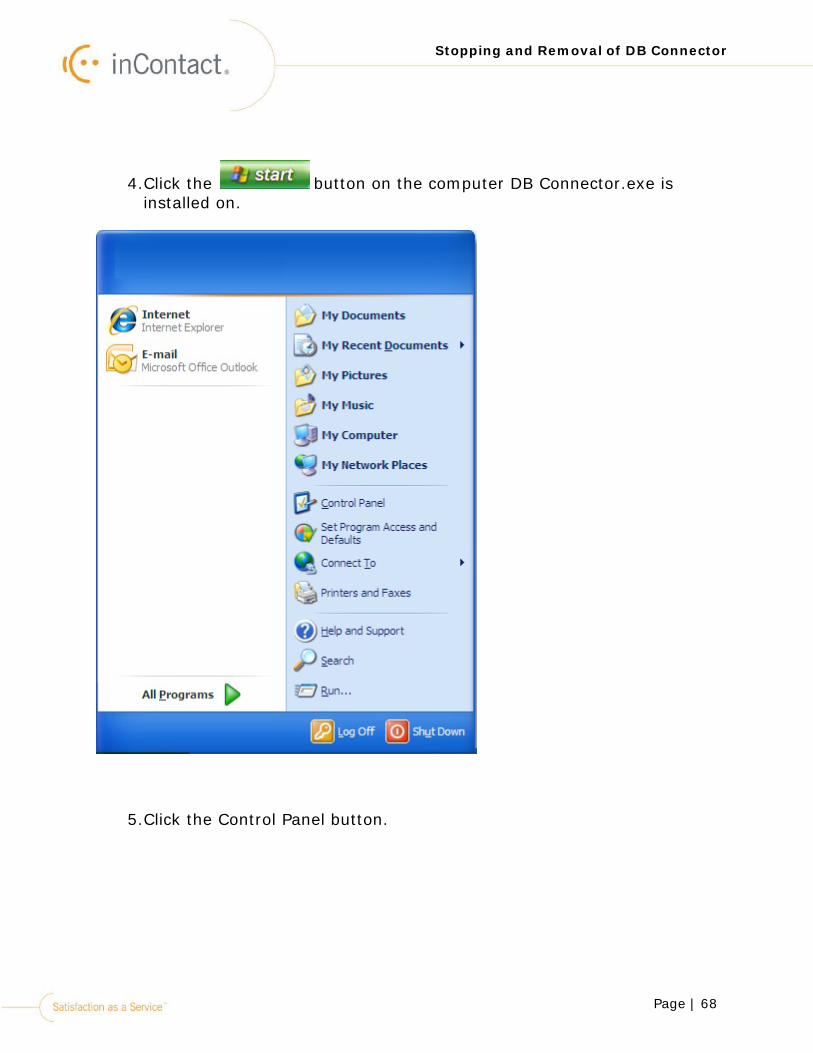
4.Click the button on the computer DB Connector.exe is installed on.
5.Click the Control Panel button.
Page | 69
Stopping and Removal of DB Connector
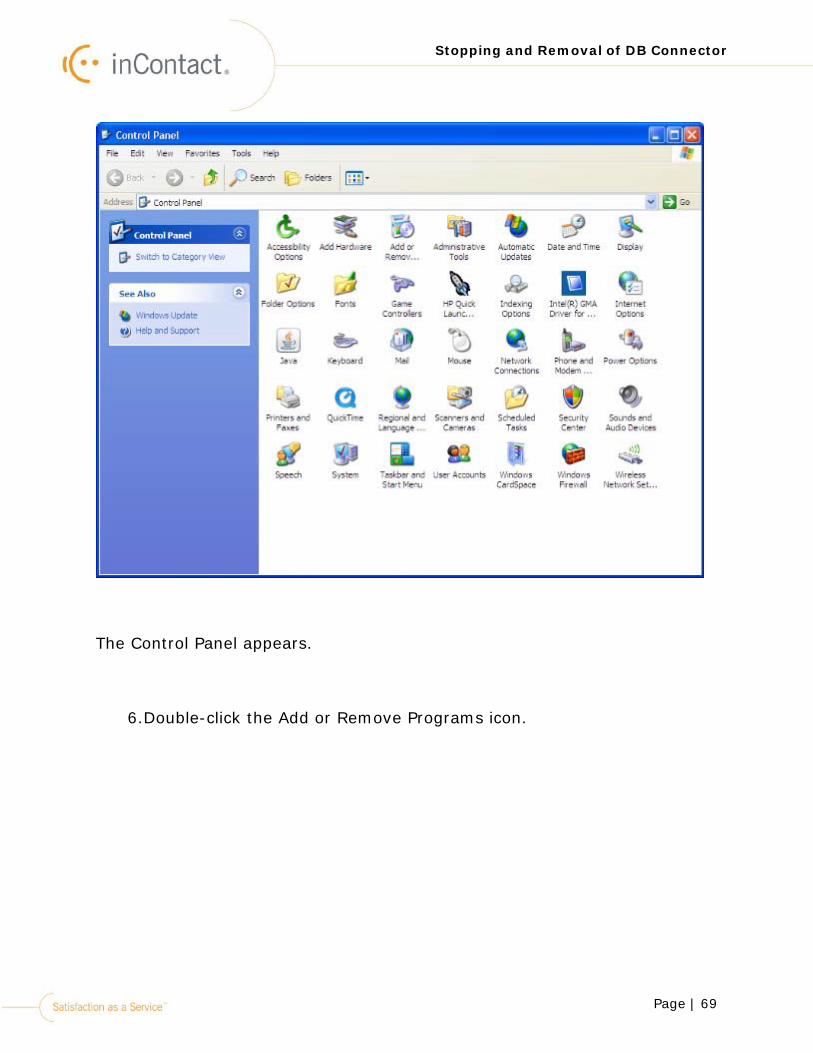
The Control Panel appears.
6.Double-click the Add or Remove Programs icon.
Page | 70
Stopping and Removal of DB Connector
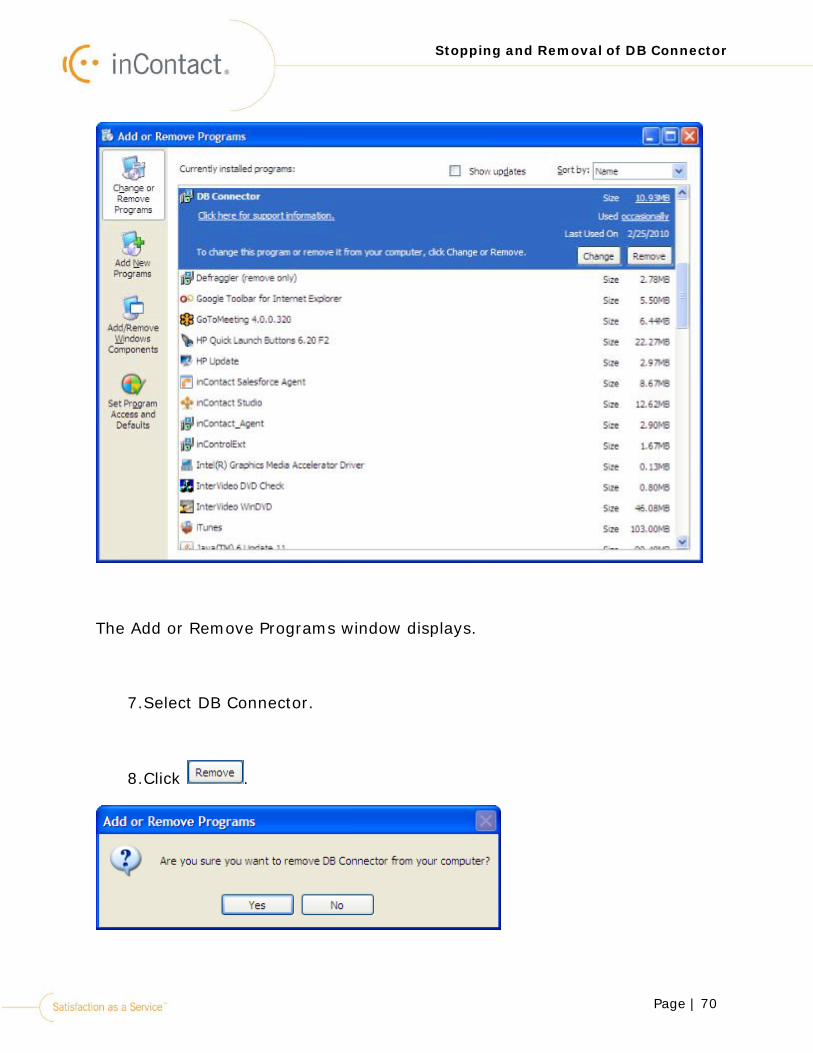
The Add or Remove Programs window displays.
7.Select DB Connector.
8.Click .
Page | 71
Stopping and Removal of DB Connector
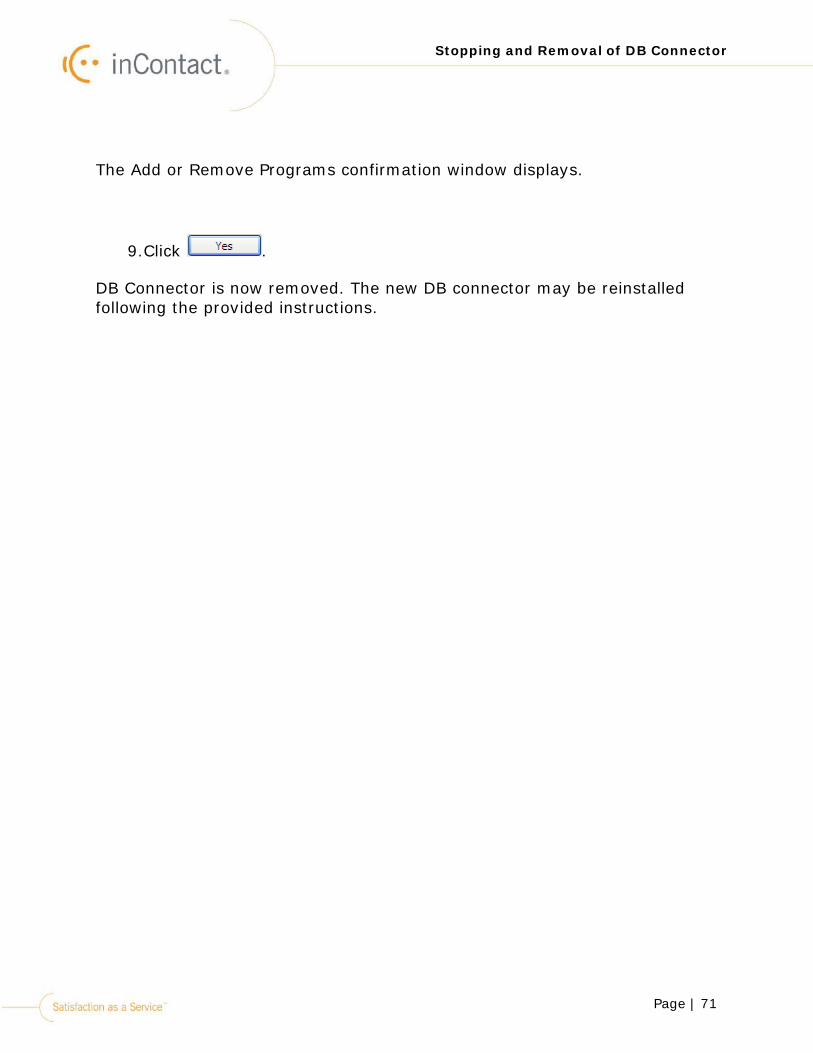
The Add or Remove Programs confirmation window displays.
9.Click .
DB Connector is now removed. The new DB connector may be reinstalled following the provided instructions.
Page | 72
Stopping and Removal of DB Connector
Appendix A - Studio Actions
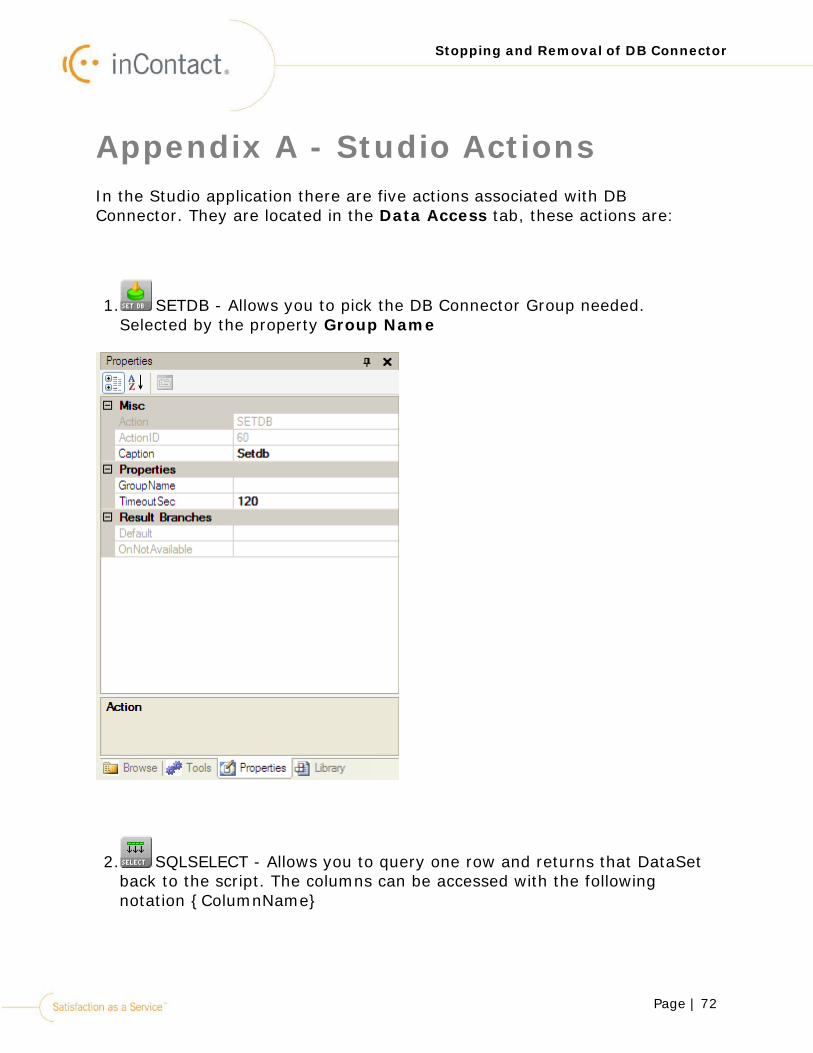
In the Studio application there are five actions associated with DB Connector. They are located in the Data Access tab, these actions are:
1. SETDB - Allows you to pick the DB Connector Group needed. Selected by the property Group Name
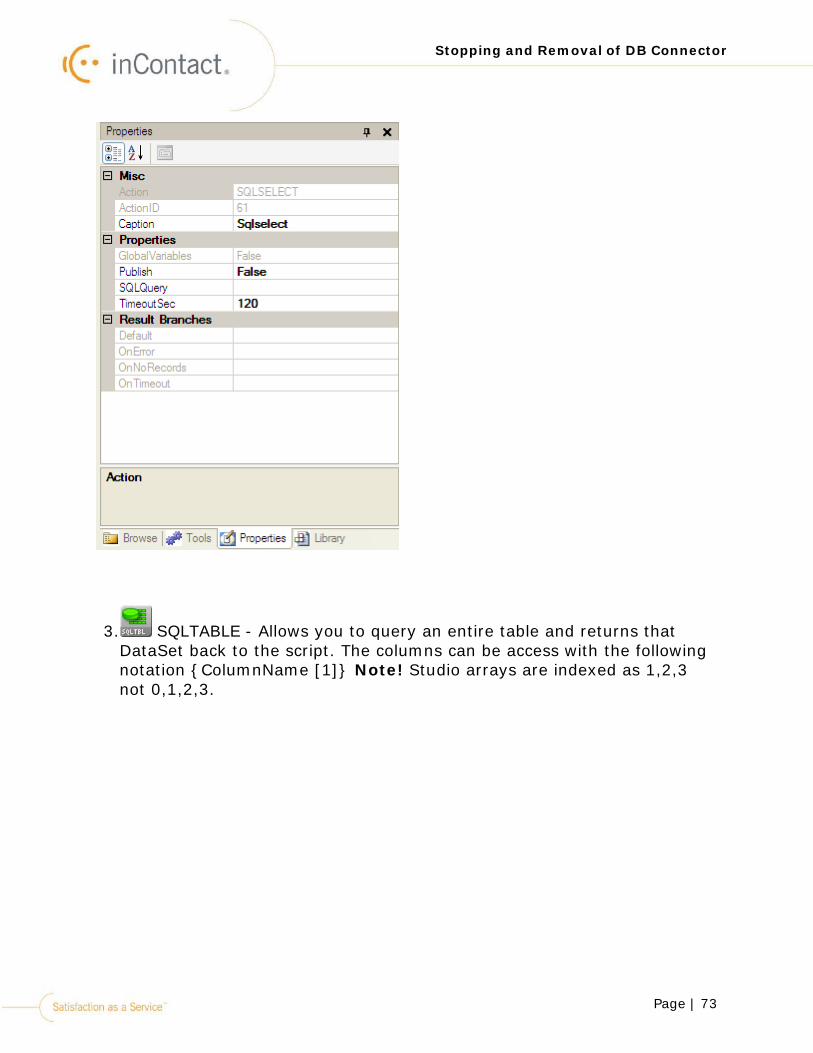
2. SQLSELECT - Allows you to query one row and returns that DataSet back to the script. The columns can be accessed with the following notation {ColumnName}
Page | 73
Stopping and Removal of DB Connector
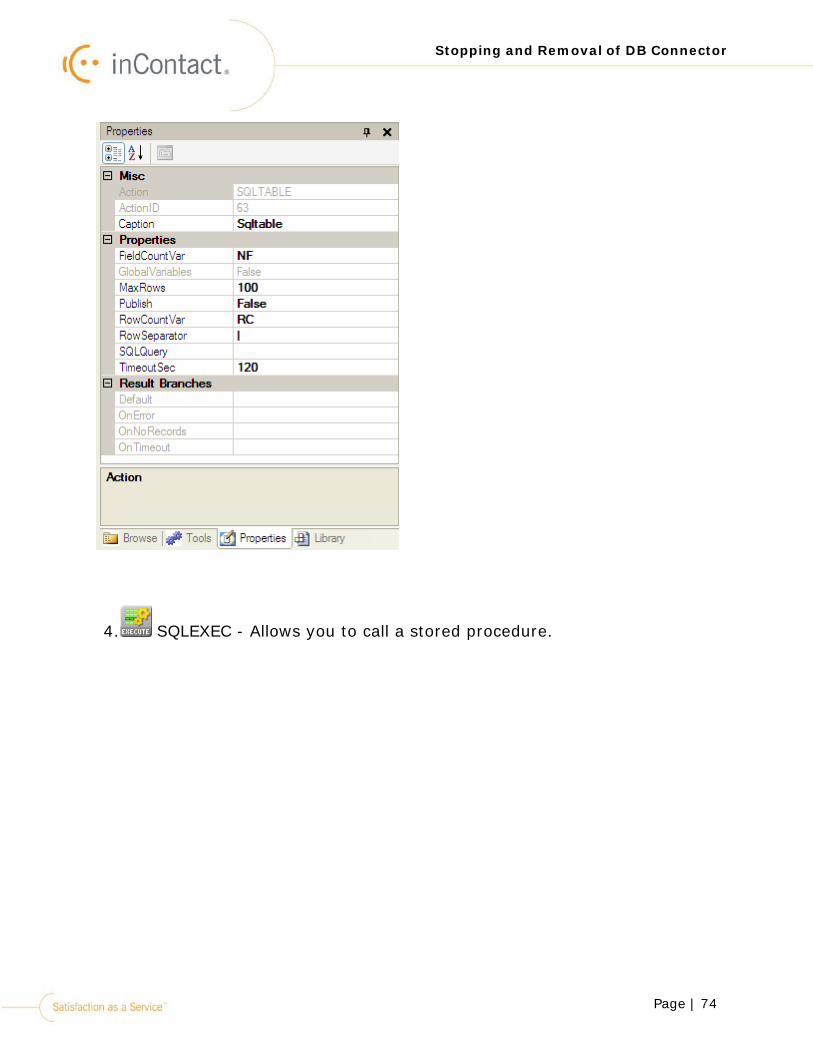
3. SQLTABLE - Allows you to query an entire table and returns that DataSet back to the script. The columns can be access with the following notation {ColumnName [1]} Note! Studio arrays are indexed as 1,2,3 not 0,1,2,3.
Page | 74
Stopping and Removal of DB Connector
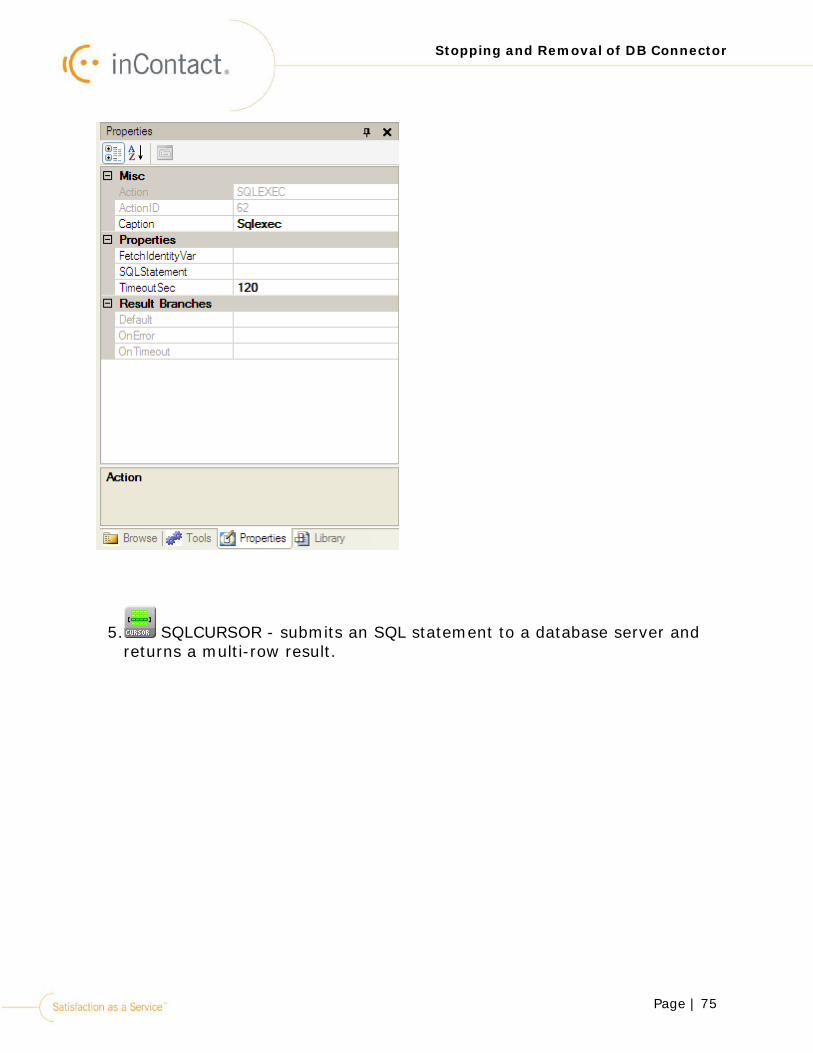
4. SQLEXEC - Allows you to call a stored procedure.
Page | 75
Stopping and Removal of DB Connector
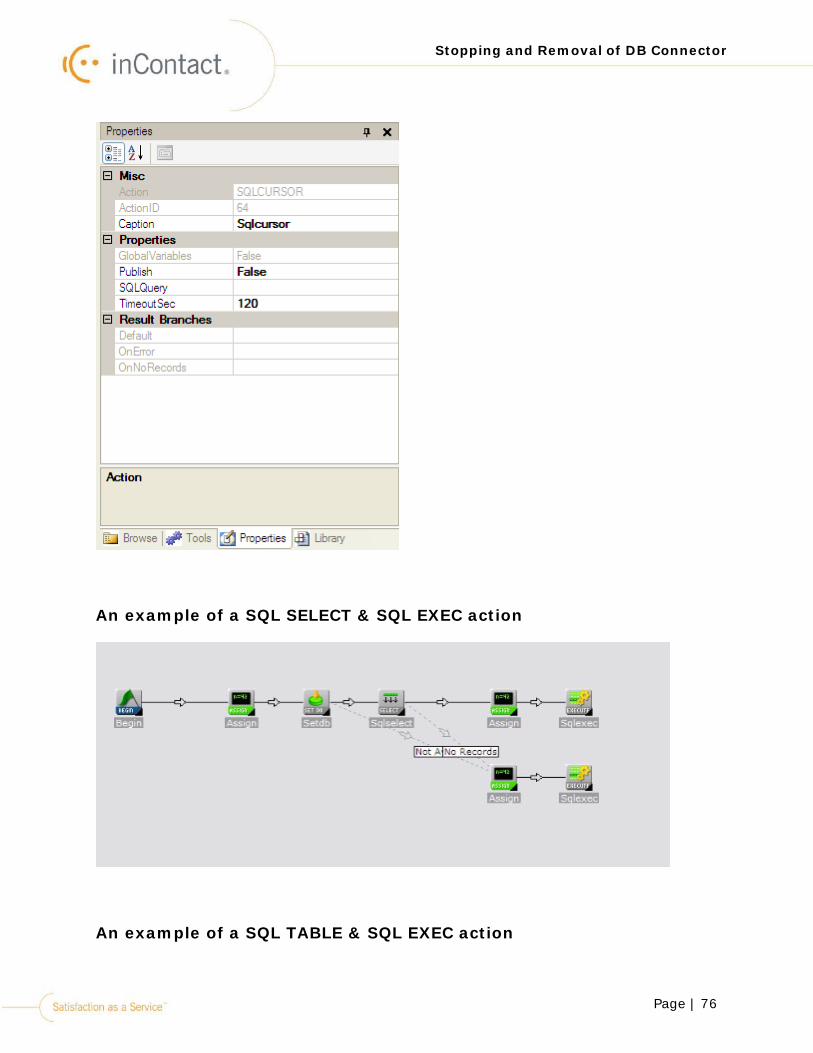
5. SQLCURSOR - submits an SQL statement to a database server and returns a multi-row result.
Page | 76
Stopping and Removal of DB Connector
An example of a SQL SELECT & SQL EXEC action
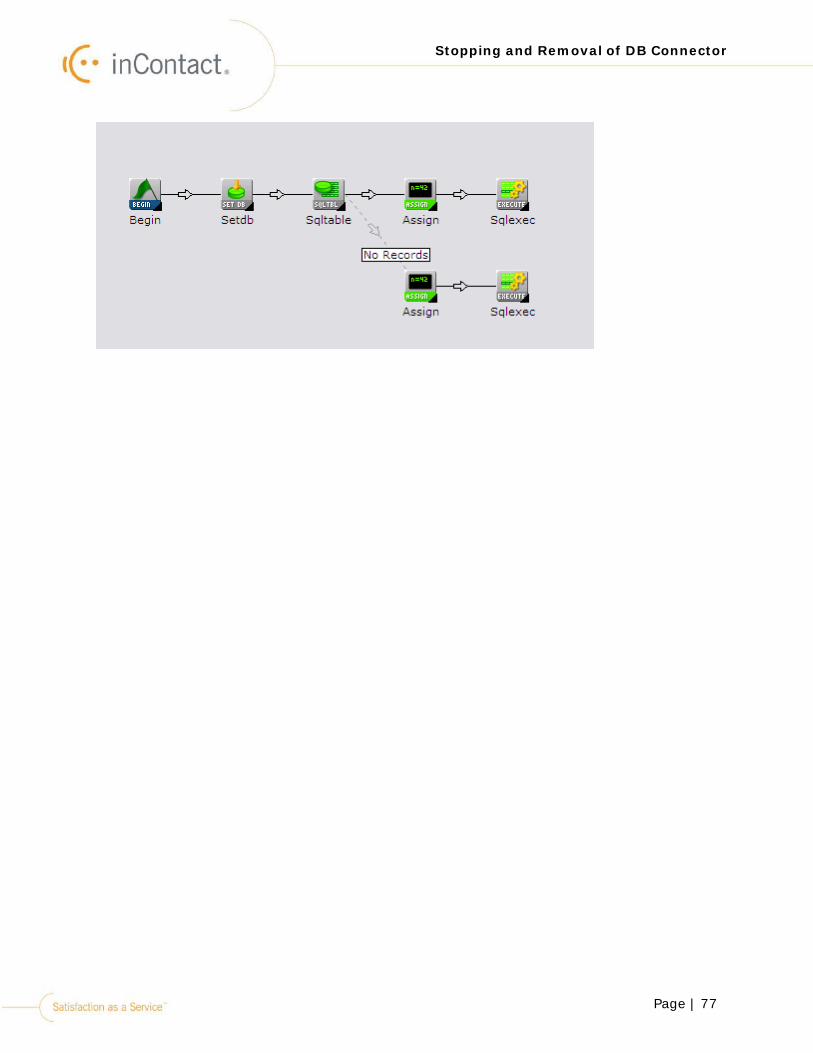
An example of a SQL TABLE & SQL EXEC action
Page | 77
Stopping and Removal of DB Connector