install and config for ibm bpm 8.5.5 - blogs - perficient · pdf fileinstall and config for...
TRANSCRIPT

PERFICIENT
Install and Config For IBM BPM 8.5.5
Install and Configure of BPM v8.5.5
Technical Architect: Chuck Misuraca

Change History
Table 1: Document Change History
Document Revision &
Date
Editor Summary of Change
First Draft 1.0
12/01/14
Chuck Misuraca Initial version

Table of Contents Change History .............................................................................................................................................. 2
Preface .......................................................................................................................................................... 5
IBM BPMv8.5.5 - Product Install: .................................................................................................................. 8
Pre-requisites: ........................................................................................................................................... 8
IBM BPMv8.5 – Create Cell: .......................................................................................................................... 9
Pre-requisites: ........................................................................................................................................... 9
Creating BPM Deployment manager ........................................................................................................ 9
EXAMPLE: ............................................................................................................................................ 10
Starting the deployment manager .......................................................................................................... 12
Creating the Custom profile .................................................................................................................... 12
EXAMPLE: ............................................................................................................................................ 13
Federating the custom profile ................................................................................................................ 14
IBM BPMv8.5.5 - Product Config for a PC: .................................................................................................. 15
pre-requisites: ......................................................................................................................................... 15
IBM BPMv8.5 - DBA instructions for PC: ..................................................................................................... 21
Pre-requisites: ......................................................................................................................................... 21
Create Database ...................................................................................................................................... 21
Create Tables .......................................................................................................................................... 22
Testing the new PC DE environment: ......................................................................................................... 24
IBM BPMv8.5.5 - Product Config for PS: ..................................................................................................... 24
pre-requisites: ......................................................................................................................................... 24
IBM BPMv8.5 - DBA instructions for PS: ..................................................................................................... 32
Pre-requisites: ......................................................................................................................................... 33
Create Database ...................................................................................................................................... 33
Create Tables .......................................................................................................................................... 34
Testing the new PS DE environment: .......................................................................................................... 35
Post Config Setup ........................................................................................................................................ 36
IBM BPM 8.5.5 Info center source: ..................................................................................................... 36
Add nodes to a DE ....................................................................................................................................... 37
Manual Adjustments for large LDAP search results set .............................................................................. 38
Edit wimconfig.xml .................................................................................................................................. 38
Add custom property to BPMPSDB Data source ........................................................................................ 38
Appendix A: Change Passwords on the file repository IDs ......................................................................... 39
For PC or PS DE Admin ID ........................................................................................................................ 39
Update PS with new PC DE admin password: ......................................................................................... 39
Add User on the file repository ............................................................................................................... 39
Appendix B: BPM 8.5.5 beyond the POC .................................................................................................... 40

Preface The document is a runbook for creating IBM BPM 8.5.5 Cells that will contains either a Process
Center(PC) Deployment Environment(DE) or a Process Server(PS) Deployment Environment(DE). Each DE
will have 3 clusters and 6 databases. This will provide for maximum flexibility and scalability.

There will be 12 databases. 6 for Process Center and 6 for Process Server
Process Center Specific
o CELLPCDB for the Cell Common database.
o BPMPCDB for the Process database. BPMDB will be used for ECMDB.
o PDWPCDB for the Performance Data Warehouse database
o CMNPCDB for Deployment Environment Common database for Process Center.
CMNPCDB will be used for BSPCDB.
o MEPCDB for Message Engine.
o BPEPCDB for BPEL Engine
Process Server Specific
o CELLPSDB for the Cell Common database.
o BPMPSDB for the Process database. BPMDB will be used for ECMDB.
o PDWPSDB for the Performance Data Warehouse database
o CMNPSDB for Deployment Environment Common database for Process Server.
CMNPSDB will be used for BSPCDB.
o MEPSDB for Message Engine.
o BPEPSDB for BPEL Engine.

Two DB2 id with dbadm privileges will act as the owner of all the tables associated with each DE.
The PC acts as a repository and a point of governance. So the process server in the PC is used to vetting,
validate and justify the movement from repository to runtime.
The PS has PC components so it can connect and receive deployments. PC DE DEV can connect to
multiple PS DE’s.
Looking forward, there is a PS only DE that does not connect to any PC. It is strictly standalone. It is a
best practice to use PS only DE for Production. This configuration eliminates and changes of an accident
deploy to production. The artifacts have to be exported from a PC as an ear file or deployment package
and then deployed to Production.

IBM BPMv8.5.5 - Product Install: This section is for installing IBM BPM v8.5.5 using the IBM Installation Manager Response files that are
shipped with the product.
Pre-requisites: WebSphere Install Directory name
Non-root ID and password
1) untar BPMv85 install media. Media file names are: BPM_Adv_V855_AIX_1_of_2.tar.gz and
BPM_Adv_V855_AIX_2_of_2.tar.gz
2) put all 2 untar'ed disk images into BPM_Adv_V855_AIX_2_of_2_Folder
3) make copy of response bpmAdv_aix_response_nonroot_64bit.xml
Note: bpmAdv_aix_response_nonroot_64bit.xml is located in directory:
/acme/Software_depot/BPM responsefiles/BPM/
Example name: My_bpmAdv_aix_response_nonroot_64bit.xml
4) edit response file copy.
5) Change Installation Manager install path name to the match directory naming standards for
your IT Shop.
<profile kind='self'
installLocation='/opt/IBM/WebSphere/AppServer/WebSphere/InstallationManager/eclipse'
id='IBM Installation Manager'>
<data key='eclipseLocation'
value='/opt/IBM/WebSphere/AppServer/WebSphere/InstallationManager/eclipse'/>
</profile>
6) Un-comment IMShared and then change the path.
<!--
<preference value="/opt/IBM/IMShared"
name="com.ibm.cic.common.core.preferences.eclipseCache" />
-->
7) Change BPM install path name to the match directory naming standards for your IT Shop.
<profile installLocation='/opt/IBM/WebSphere/AppServer/BPM/v8.5' id='IBM WebSphere
Application Server Network Deployment V8.5'>
<data key='eclipseLocation' value='/opt/IBM/WebSphere/AppServer/BPM/v8.5' />
<data key="cic.selector.nl" value="en" />
<data key='user.import.profile' value='false'/>
<data key='user.select.64bit.image,com.ibm.websphere.ND.v85' value='true'/>
</profile>
8) save response file.
9) set permissions 755 on response file

10) vi
/acme/Software_depot/BPM/BPM_Adv_V855_AIX_2_of_2_Folder/IM/configuration/config.ini
11) INSERT this line:
cic.appDataLocation=/opt/IBM/WebSphere/AppServer/WebSphere/InstallationManager
12) Save config.ini
13) su – wasadmin
14) cd /acme/Software_depot/BPM/BPM_Adv_V855_AIX_2_of_2_Folder
15) run command:
./IM64/userinstc -acceptLicense input
./responsefiles/BPM/My_bpmAdv_aix_response_nonroot_64bit.xml -log /tmp/silent_install.log
16) Do this procedure for every machine that will make up the PC or PS Cell.
IBM BPMv8.5 – Create Cell: This section is for creating the PC or PS Cells. Always create your PC Cell first so you can use the
information in the creation of the PS Cell.
Pre-requisites:
Profile Directory name
Profile names
WAS Cell admin ID and password
Node name
Cell name
DB2 hostname
DB2 port
DB2 ID and PW
Creating BPM Deployment manager
Create a response file named “createBPMDmgrProfileResponse.txt” from the following template.
Replace and thing in “<>” brackets with real values.
create
templatePath=<BPMINSTDIR>/profileTemplates/dmgr.wbiserver
profileName=<DMGR_PROFILE_NAME>
profilePath=<BPMPROFILESDIR>/<DMGR_PROFILE_NAME>

isDefault=false
nodeName=<DMGR_NODE_NAME>
cellName=<DMGR_CELL_NAME>
enableAdminSecurity=true
adminUserName=<WASADMINID>
adminPassword=<WASADMINPW>
dbCreateNew=false
dbDelayConfig=true
dbDriverType=4
dbHostName=<DB2_HOSTNAME>
dbJDBCClasspath=<DB2_DRV_PATH>
dbName=<CELL Level CMN DB>
dbServerPort=<DB_SRV_PORT>
dbType=DB2_UNIVERSAL
dbUserId=<DB2ID>
dbPassword=<DB2PW>
dbDelayConfig=true
dbCreateNew=true
EXAMPLE:
NOTE: for PS hostname will be aix1awas26x
create
templatePath=/opt/IBM/WebSphere/AppServer/BPM/v8.5/profileTemplates/BPM/BpmDmgr
# Or PS
profileName=prof_aix1awas25x_DM_BPMPC_01x
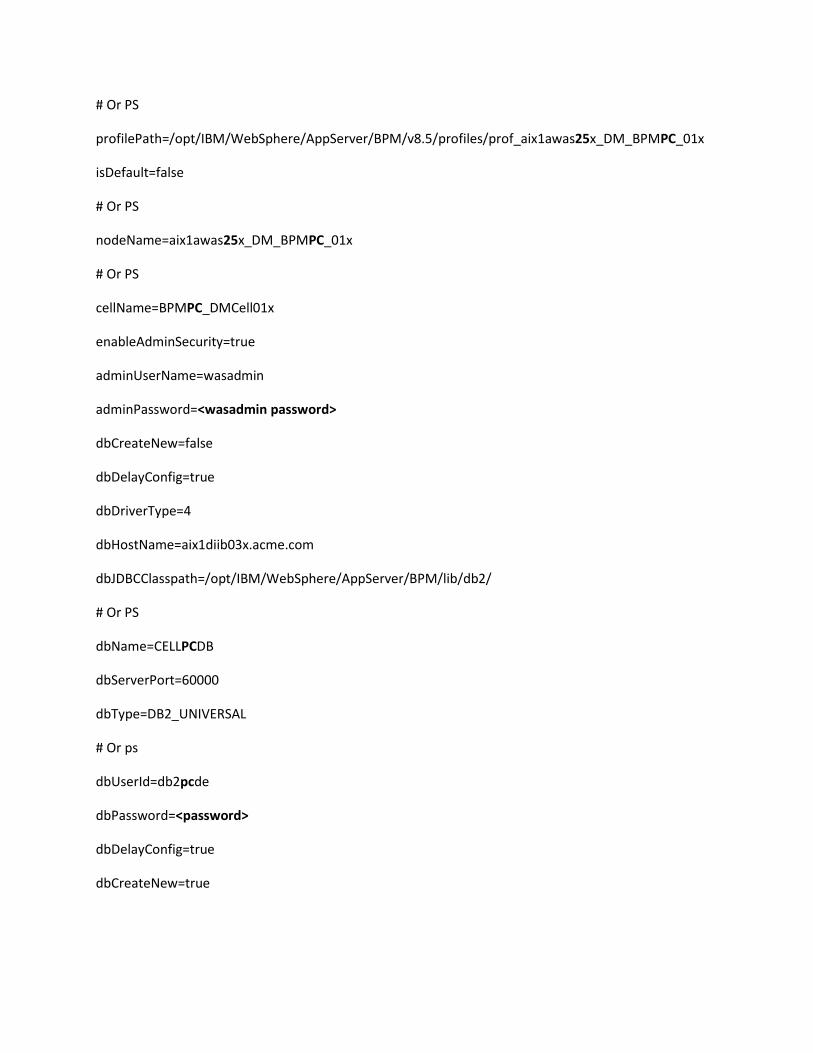
# Or PS
profilePath=/opt/IBM/WebSphere/AppServer/BPM/v8.5/profiles/prof_aix1awas25x_DM_BPMPC_01x
isDefault=false
# Or PS
nodeName=aix1awas25x_DM_BPMPC_01x
# Or PS
cellName=BPMPC_DMCell01x
enableAdminSecurity=true
adminUserName=wasadmin
adminPassword=<wasadmin password>
dbCreateNew=false
dbDelayConfig=true
dbDriverType=4
dbHostName=aix1diib03x.acme.com
dbJDBCClasspath=/opt/IBM/WebSphere/AppServer/BPM/lib/db2/
# Or PS
dbName=CELLPCDB
dbServerPort=60000
dbType=DB2_UNIVERSAL
# Or ps
dbUserId=db2pcde
dbPassword=<password>
dbDelayConfig=true
dbCreateNew=true
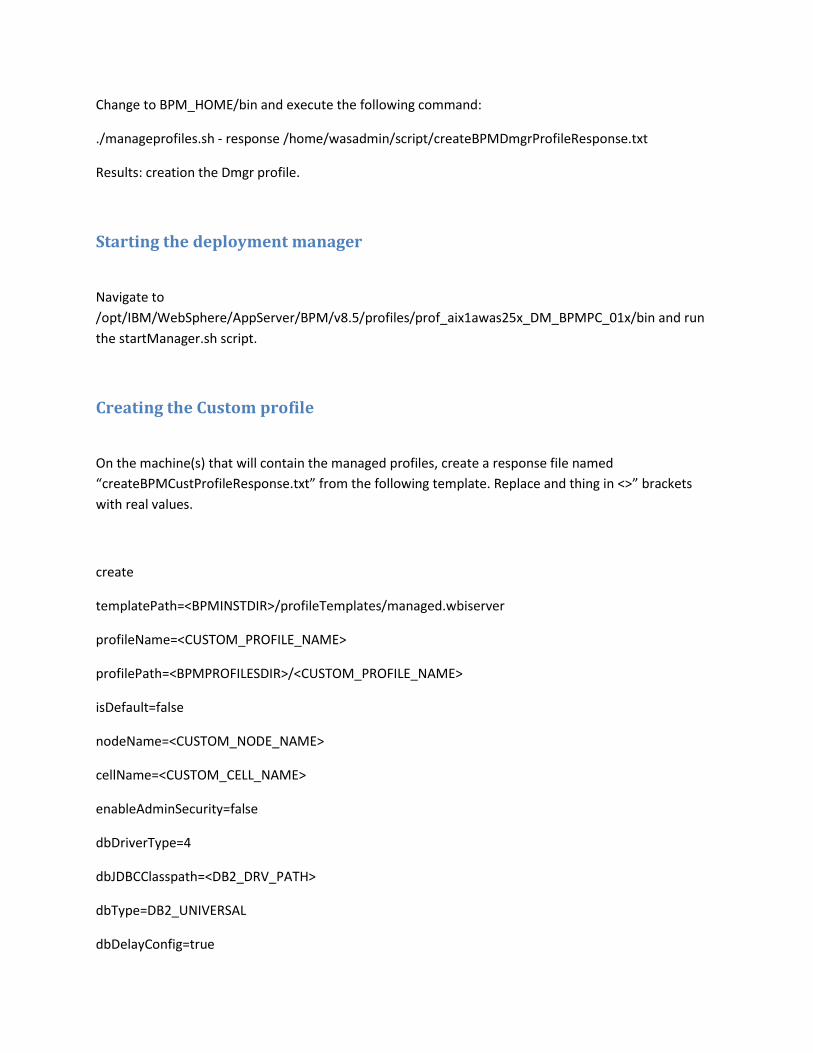
Change to BPM_HOME/bin and execute the following command:
./manageprofiles.sh - response /home/wasadmin/script/createBPMDmgrProfileResponse.txt
Results: creation the Dmgr profile.
Starting the deployment manager
Navigate to
/opt/IBM/WebSphere/AppServer/BPM/v8.5/profiles/prof_aix1awas25x_DM_BPMPC_01x/bin and run
the startManager.sh script.
Creating the Custom profile
On the machine(s) that will contain the managed profiles, create a response file named
“createBPMCustProfileResponse.txt” from the following template. Replace and thing in <>” brackets
with real values.
create
templatePath=<BPMINSTDIR>/profileTemplates/managed.wbiserver
profileName=<CUSTOM_PROFILE_NAME>
profilePath=<BPMPROFILESDIR>/<CUSTOM_PROFILE_NAME>
isDefault=false
nodeName=<CUSTOM_NODE_NAME>
cellName=<CUSTOM_CELL_NAME>
enableAdminSecurity=false
dbDriverType=4
dbJDBCClasspath=<DB2_DRV_PATH>
dbType=DB2_UNIVERSAL
dbDelayConfig=true

dbCreateNew=true
EXAMPLE:
NOTE: for PS hostname will be aix1awas26x
create
templatePath=/opt/IBM/WebSphere/AppServer/BPM/v8.5/profileTemplates/BPM/BpmNode
# Or PS
profileName=prof_aix1awas25x_Node_BPMPC_01x
# Or PS
profilePath=/opt/IBM/WebSphere/AppServer/BPM/v8.5/profiles/prof_aix1awas25x_Node_BPMPC_01x
isDefault=false
# Or PS
nodeName=aix1awas25x_Node_BPMPC_01x
# Or PS
cellName=BPMPC_DMCell01xtmp
enableAdminSecurity=false
dbDriverType=4
dbJDBCClasspath=/opt/ibm/BPM/v8.5/jdbcdrivers/DB2
dbType=DB2_UNIVERSAL
dbDelayConfig=true
dbCreateNew=true
Change to WPS_HOME/bin and execute the following command:
./manageprofile.sh –response /home/wasadmin/script/createBPMCustProfileResponse.txt
Results: creation the Custom profile.
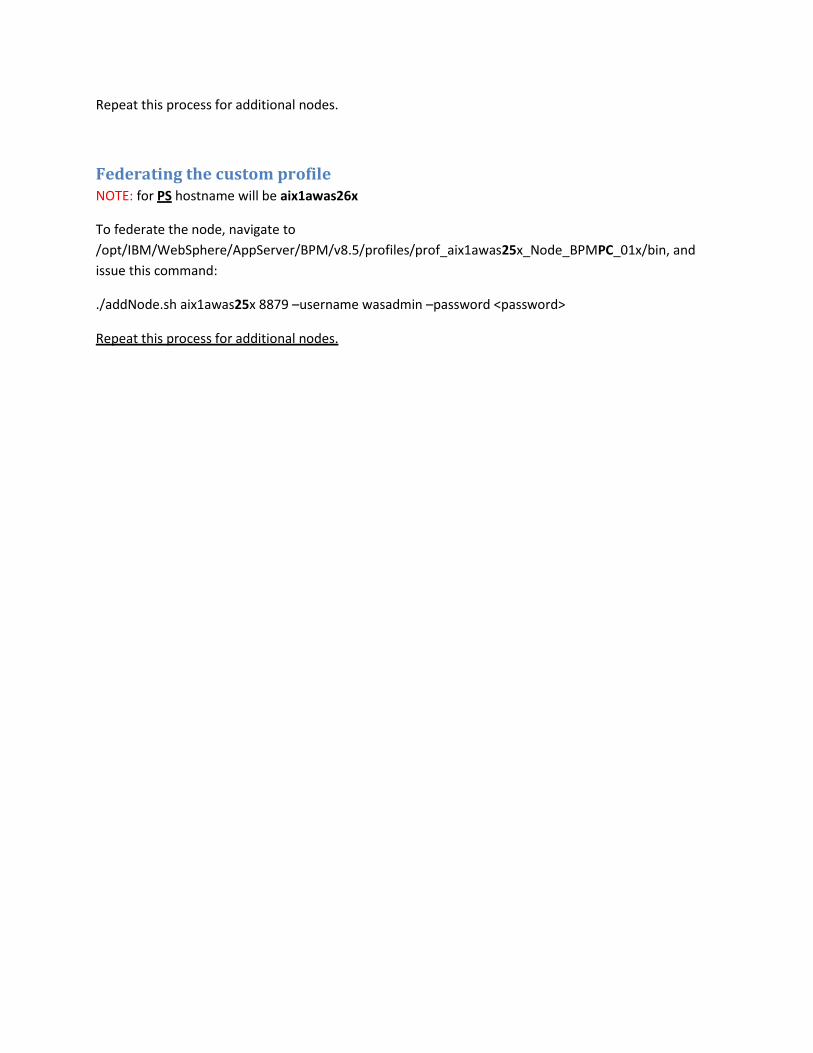
Repeat this process for additional nodes.
Federating the custom profile NOTE: for PS hostname will be aix1awas26x
To federate the node, navigate to
/opt/IBM/WebSphere/AppServer/BPM/v8.5/profiles/prof_aix1awas25x_Node_BPMPC_01x/bin, and
issue this command:
./addNode.sh aix1awas25x 8879 –username wasadmin –password <password>
Repeat this process for additional nodes.
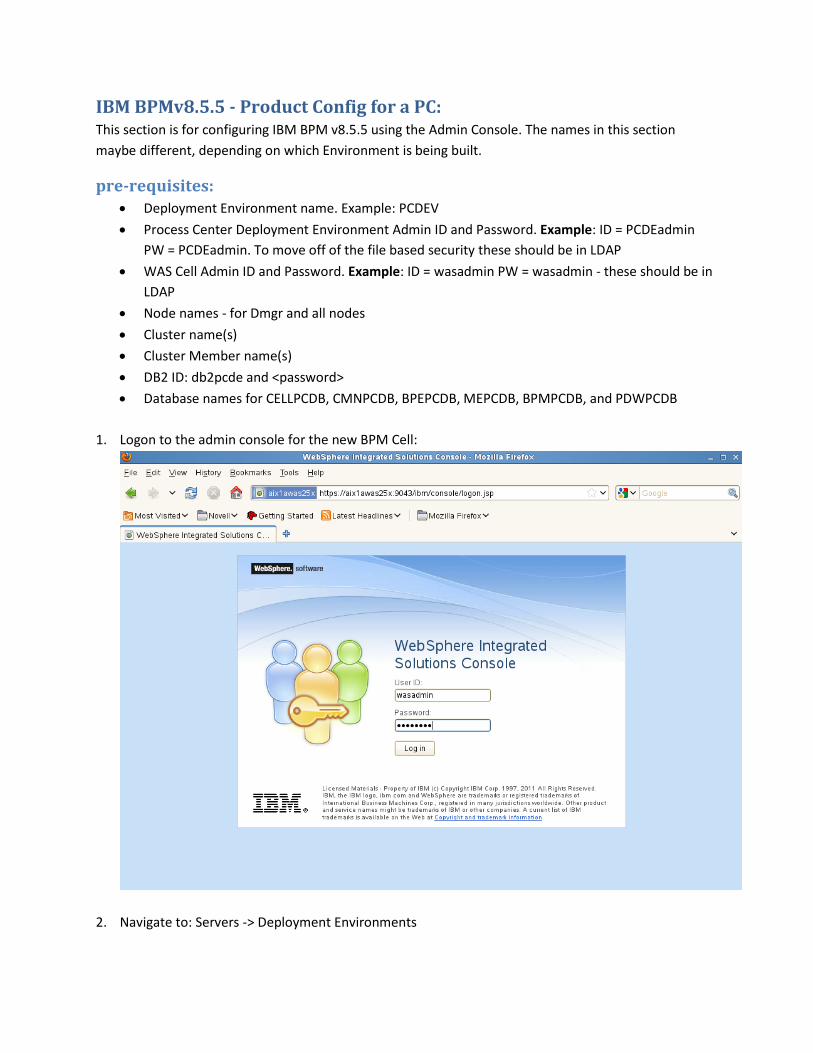
IBM BPMv8.5.5 - Product Config for a PC: This section is for configuring IBM BPM v8.5.5 using the Admin Console. The names in this section
maybe different, depending on which Environment is being built.
pre-requisites: Deployment Environment name. Example: PCDEV
Process Center Deployment Environment Admin ID and Password. Example: ID = PCDEadmin
PW = PCDEadmin. To move off of the file based security these should be in LDAP
WAS Cell Admin ID and Password. Example: ID = wasadmin PW = wasadmin - these should be in
LDAP
Node names - for Dmgr and all nodes
Cluster name(s)
Cluster Member name(s)
DB2 ID: db2pcde and <password>
Database names for CELLPCDB, CMNPCDB, BPEPCDB, MEPCDB, BPMPCDB, and PDWPCDB
1. Logon to the admin console for the new BPM Cell:
2. Navigate to: Servers -> Deployment Environments

3. Click New – We are creating our PC DE.
4. Fill in the panel with your values. See example Below:
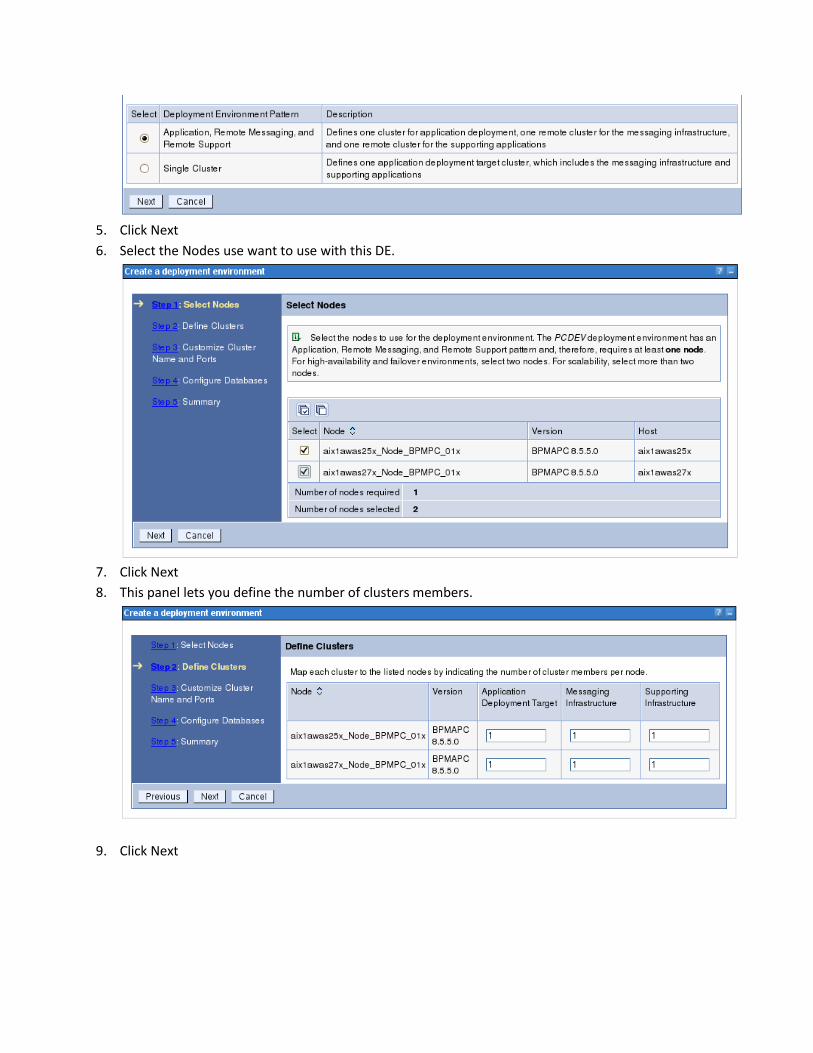
5. Click Next
6. Select the Nodes use want to use with this DE.
7. Click Next
8. This panel lets you define the number of clusters members.
9. Click Next

10. This panel is were clients can implement there naming standards.
11. Click Next
12. This panel is the Database panel. We need to pay close attention to the info we put into this panel.
13. Before We change anything:

14. After we put in our values:
15. We filled in the panel with the info the DBA gave us for the PC. Take note we un-check Create
Tables. We are using a remote DB2 server. Once the PC DE is created all the database scripts will be
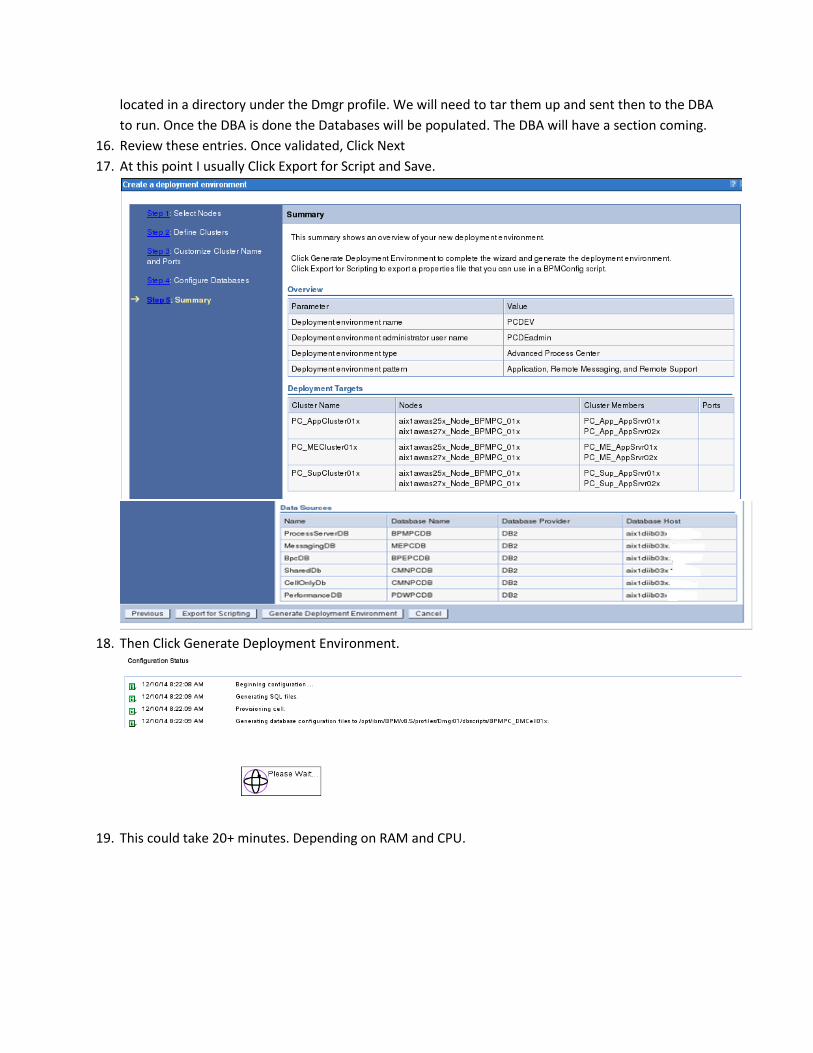
located in a directory under the Dmgr profile. We will need to tar them up and sent then to the DBA
to run. Once the DBA is done the Databases will be populated. The DBA will have a section coming.
16. Review these entries. Once validated, Click Next
17. At this point I usually Click Export for Script and Save.
18. Then Click Generate Deployment Environment.
19. This could take 20+ minutes. Depending on RAM and CPU.

20. Now Click Save Changes
21. Tar up
/opt/IBM/WebSphere/AppServer/BPM/v8.5/profiles/prof_aix1awas25x_DM_BPMPC_01x/dbscripts
and give them to the DBA. With the instructions from the next section.
IBM BPMv8.5 - DBA instructions for PC: This section is for creating tables in the DB2 database created earlier in this doc.
The instructions in this section will demonstrate how to make a script from the contents of the
dbscripts.tar file.
Pre-requisites: DB2 DBA
DB2 instance owner ID and password. Example: db2pcde
The dbscripts.tar from the BPM admins.
Create Database 1. un-tar the dbscripts tar file.
2. su - db2 instance owner id. Example: db2pcde
3. cd /<your location>/dbscripts
4. run command:
find . -name createD*.sh -print > createdbs.sh
5. Edit createdbs.sh

6. Your should see:
./BPMPC_DMCell01x/DB2/CELLPCDB/createDatabase.sh
./PCDEV/DB2/MEPCDB/createDatabase.sh
./PCDEV/DB2/CMNPCDB/createDatabase.sh
./PCDEV/DB2/BPEPCDB/createDatabase.sh
./PCDEV/DB2/PDWPCDB/createDatabase.sh
./PCDEV/DB2/BPMPCDB/createDatabase.sh
7. Change createdbs.sh into what is listed below. Then save it.
cd ./BPMPC_DMCell01x/DB2/CELLPCDB
./createDatabase.sh
cd -
cd ./PCDEV/DB2/MEPCDB
./createDatabase.sh
cd -
cd ./PCDEV/DB2/CMNPCDB
./createDatabase.sh
cd -
cd ./PCDEV/DB2/BPEPCDB
./createDatabase.sh
cd -
cd ./PCDEV/DB2/PDWPCDB
./createDatabase.sh
cd -
cd ./PCDEV/DB2/BPMPCDB
./createDatabase.sh
cd –
8. chmod 755 createdbs.sh
9. Run:
./createdbs.sh
Create Tables
1. run command:
find . -name create* Advanced.sql -print > createTables.sh
find . -name create*Messaging.sql -print >> createTables.sh
2. Edit createTables.sh
3. Your should see:
./BPMPC_DMCell01x/DB2/CELLPCDB/createSchema_Advanced.sql
./PCDEV/DB2/CMNPCDB/createSchema_Advanced.sql
./PCDEV/DB2/BPEPCDB/createSchema_Advanced.sql
./PCDEV/DB2/PDWPCDB/createSchema_Advanced.sql
./PCDEV/DB2/BPMPCDB/createProcedure_Advanced.sql
./PCDEV/DB2/BPMPCDB/createSchema_Advanced.sql
./PCDEV/DB2/MEPCDB/createSchema_Messaging.sql
NOTE: The directory names can change as different environments are built.
***NOTE: Review these sql files before running them. Make sure they meet Corporate IT
Standards.
4. Change createTables.sh into what is similar as below. Then save it. Notice the database you
need to connect to is listed right after DB2 in the directory path.
db2 connect to CELLPCDB
db2 -vtf ./BPMPC_DMCell01x/DB2/CELLPCDB/createSchema_Advanced.sql
db2 connect reset
db2 connect to CMNPCDB
db2 -vtf ./PCDEV/DB2/CMNPCDB/createSchema_Advanced.sql
db2 connect reset
db2 connect to BPEPCDB
db2 -vtf ./PCDEV/DB2/BPEPCDB/createSchema_Advanced.sql
db2 connect reset
db2 connect to PDWPCDB
db2 -vtf ./PCDEV/DB2/PDWPCDB/createSchema_Advanced.sql
db2 connect reset
db2 connect to BPMPCDB
db2 -vtf ./PCDEV/DB2/BPMPCDB/createProcedure_Advanced.sql
db2 -vtf ./PCDEV/DB2/BPMPCDB/createSchema_Advanced.sql
db2 connect reset
db2 connect to MEPCDB
db2 -vtf ./PCDEV/DB2/MEPCDB/createSchema_Messaging.sql
db2 connect reset
5. Run:
chmod 755 createTables.sh
6. Run:
./createTables.sh

Testing the new PC DE environment:
Now that the DBA work is complete.
1. Run: - this will popular product tables.
/opt/IBM/WebSphere/AppServer/BPM/v8.5/profiles/prof_aix1awas25x_DM_BPMPC_01x/bin/b
ootstrapProcessServerData.sh -clusterName PC_AppCluster01x
2. Start the Deployment Environments.
3. For Process Center - Test by using these URLs:
NOTE:
1) You must use a supported Browser - IE 10, Chrome 20 or greater, Safari 5 or greater and
FireFox 10.
2) Always use a new Browser session, never just open anadditional tab.
Process Center EXAMPLES:
Test in this order: - check servers for correct port numbers
http://aix1awas25x:9080/ProcessCenter/login.jsp
http://aix1awas25x:9080/ProcessPortal/login.jsp
http://aix1awas25x:9080/ProcessAdmin/login.jsp
http://aix1awas25x:9082/PerformanceAdmin/login.jsp
IBM BPMv8.5.5 - Product Config for PS: This section is for configuring IBM BPM v8.5.5 using the Admin Console. The names in this section
maybe different, depending on which Environment is being built.
pre-requisites: Deployment Environment name. Example: PSDEV
Process Server Admin ID and Password. Example: ID = PSDEadmin PW = PSDEadmin. To move off
of the file based security these should be in LDAP
WAS Cell Admin ID and Password. Example: ID = wasadmin PW = wasadmin - these should be in
LDAP
Node names - for Dmgr and all nodes
Hostnames. If more than one machines in the cell.
Profile names. Dmgr and node(s).
Cluster name(s)
Cluster Member name(s)
DB2 DE IDs and <passwords>
Database names for CELLPSDB, CMNPSDB, BPEPSDB, BPMPSDB, PDWPSDB and MEPSDB.

1. Logon to the admin console for the new BPM Cell:
2. Navigate to: Servers -> Deployment Environments
3. Click New – We are creating our PS DE.
4. Fill in the panel with your values. See example Below:

5. Click Next
6. Select the Nodes use want to use with this DE.
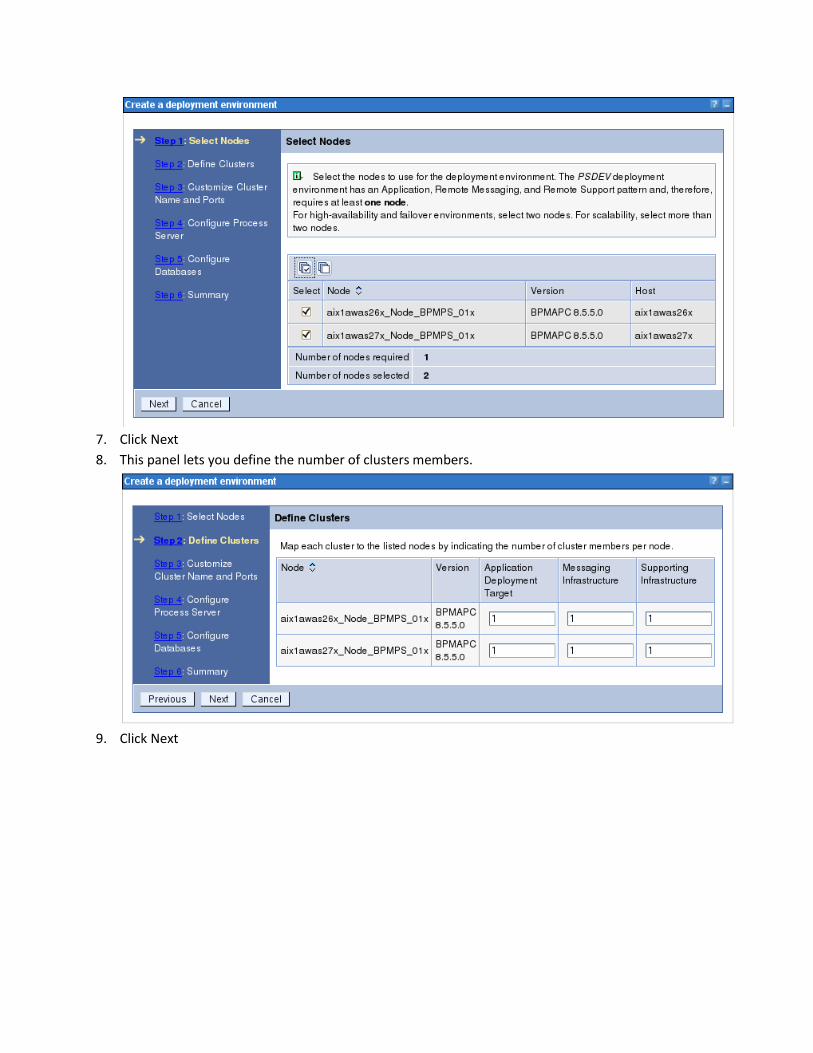
7. Click Next
8. This panel lets you define the number of clusters members.
9. Click Next

10. This panel is were clients can implement there naming standards.
11. Click Next
12. This panel is where the connection info for the PC is entered. The id and password is for the PC
admin. It will be used to make the connection.

13. This panel is the Database panel. We need to pay close attention to the info we put into this panel.
14. Before We change anything:
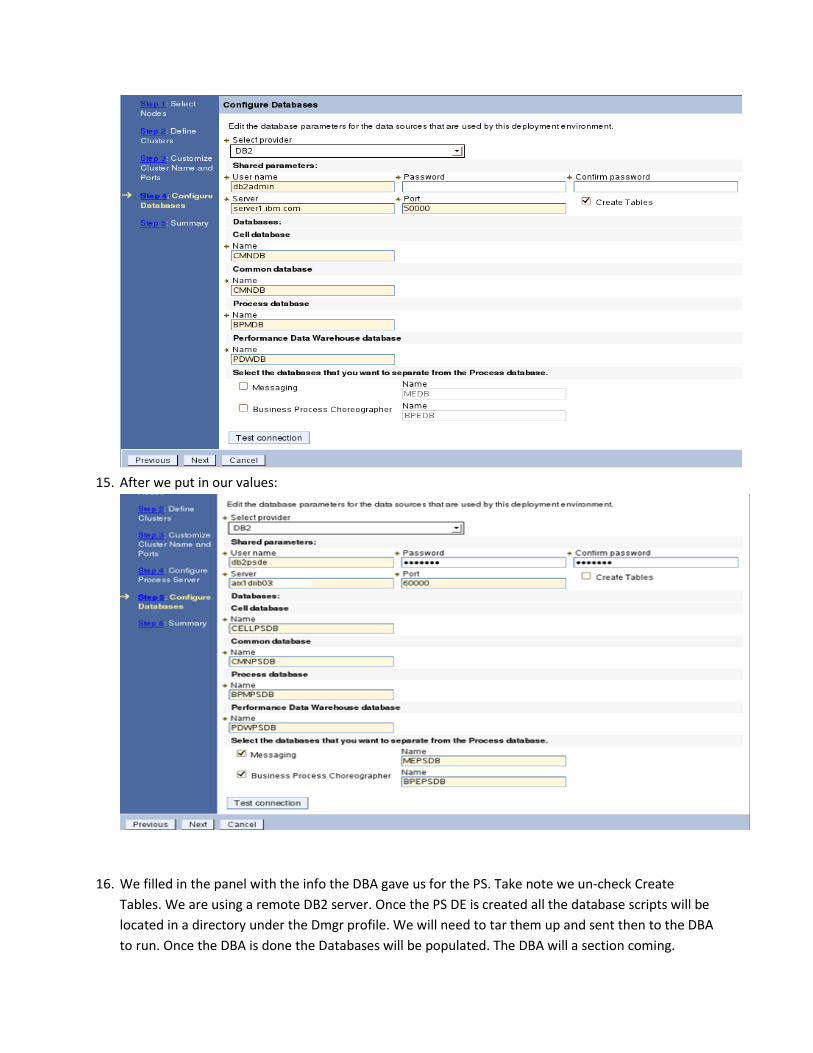
15. After we put in our values:
16. We filled in the panel with the info the DBA gave us for the PS. Take note we un-check Create
Tables. We are using a remote DB2 server. Once the PS DE is created all the database scripts will be
located in a directory under the Dmgr profile. We will need to tar them up and sent then to the DBA
to run. Once the DBA is done the Databases will be populated. The DBA will a section coming.

17. Review these entries. Once validated, Click Next
18. At this point I usually Click Export for Script and Save.

19. Then Click Generate Deployment Environment.
20. This could take 20+ minutes. Depending on RAM and CPU.
21. Now Click Save Changes
22. Tar up
/opt/IBM/WebSphere/AppServer/BPM/v8.5/profiles/prof_aix1awas26x_DM_BPMPC_01x/dbscripts
and give them to the DBA. With the instructions from the next section.
IBM BPMv8.5 - DBA instructions for PS: This section is for creating tables in the DB2 database created earlier in this doc.
The instructions in this section will demonstrate how to make a script from the contents of the
dbscripts.tar file.
Pre-requisites: DB2 DBA
DB2 instance owner ID and password. Example: db2psde
The dbscripts.tar from the BPM admins.
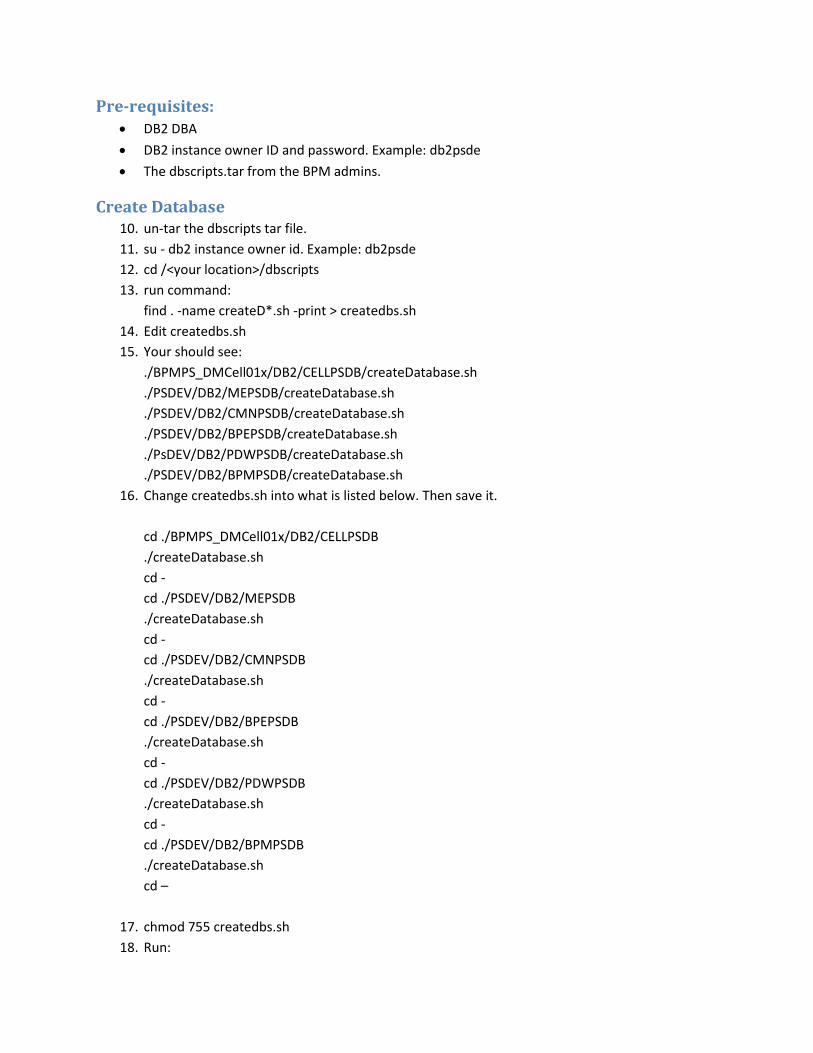
Create Database 10. un-tar the dbscripts tar file.
11. su - db2 instance owner id. Example: db2psde
12. cd /<your location>/dbscripts
13. run command:
find . -name createD*.sh -print > createdbs.sh
14. Edit createdbs.sh
15. Your should see:
./BPMPS_DMCell01x/DB2/CELLPSDB/createDatabase.sh
./PSDEV/DB2/MEPSDB/createDatabase.sh
./PSDEV/DB2/CMNPSDB/createDatabase.sh
./PSDEV/DB2/BPEPSDB/createDatabase.sh
./PsDEV/DB2/PDWPSDB/createDatabase.sh
./PSDEV/DB2/BPMPSDB/createDatabase.sh
16. Change createdbs.sh into what is listed below. Then save it.
cd ./BPMPS_DMCell01x/DB2/CELLPSDB
./createDatabase.sh
cd -
cd ./PSDEV/DB2/MEPSDB
./createDatabase.sh
cd -
cd ./PSDEV/DB2/CMNPSDB
./createDatabase.sh
cd -
cd ./PSDEV/DB2/BPEPSDB
./createDatabase.sh
cd -
cd ./PSDEV/DB2/PDWPSDB
./createDatabase.sh
cd -
cd ./PSDEV/DB2/BPMPSDB
./createDatabase.sh
cd –
17. chmod 755 createdbs.sh
18. Run:

./createdbs.sh
Create Tables
7. run command:
find . -name create* Advanced.sql -print > createTables.sh
find . -name create*Messaging.sql -print >> createTables.sh
8. Edit createTables.sh
9. Your should see:
./BPMPS_DMCell01x/DB2/CELLPSDB/createSchema_Advanced.sql
./PSDEV/DB2/CMNPSDB/createSchema_Advanced.sql
./PSDEV/DB2/BPEPSDB/createSchema_Advanced.sql
./PSDEV/DB2/PDWPSDB/createSchema_Advanced.sql
./PSDEV/DB2/BPMPSDB/createProcedure_Advanced.sql
./PSDEV/DB2/BPMPSDB/createSchema_Advanced.sql
./PSDEV/DB2/MEPSDB/createSchema_Messaging.sql
NOTE: The directory names can change as different environments are built.
***NOTE: Review these sql files before running them. Make sure they meet Corporate IT
Standards.
10. Change createTables.sh into what is similar as below. Then save it. Notice the database you
need to connect to is listed right after DB2 in the directory path.
db2 connect to CELLPSDB
db2 -vtf ./BPMPS_DMCell01x/DB2/CELLPSDB/createSchema_Advanced.sql
db2 connect reset
db2 connect to CMNPSDB
db2 -vtf ./PSDEV/DB2/CMNPSDB/createSchema_Advanced.sql
db2 connect reset
db2 connect to BPEPSDB
db2 -vtf ./PSDEV/DB2/BPEPSDB/createSchema_Advanced.sql
db2 connect reset
db2 connect to PDWPSDB
db2 -vtf ./PSDEV/DB2/PDWPSDB/createSchema_Advanced.sql
db2 connect reset
db2 connect to BPMPSDB

db2 -vtf ./PSDEV/DB2/BPMPSDB/createProcedure_Advanced.sql
db2 -vtf ./PSDEV/DB2/BPMPSDB/createSchema_Advanced.sql
db2 connect reset
db2 connect to MEPSDB
db2 -vtf ./PSDEV/DB2/MEPSDB/createSchema_Messaging.sql
db2 connect reset
11. Run:
chmod 755 createTables.sh
12. Run:
./createTables.sh
Testing the new PS DE environment:
Now that the DBA work is complete.
4. Run: - this will popular product tables.
/opt/IBM/WebSphere/AppServer/BPM/v8.5/profiles/prof_aix1awas26x_DM_BPMPS_01x/bin/b
ootstrapProcessServerData.sh -clusterName PS_AppCluster01x
5. Start the Deployment Environments.
6. For Process Center - Test by using these URLs:
NOTE:
1) You must use a supported Browser - IE 10, Chrome 20 or greater, Safari 5 or greater and
FireFox 10.
2) Always use a new Browser session, never just open a additional tab.
Process Center EXAMPLES:
Test in this order: - check servers for correct port numbers
http://aix1awas26x:9082/bpc
http://aix1awas26x:9080/BusinessSpace
http://aix1awas26x:9082/PerformanceAdmin/login.jsp
http://aix1awas26x:9080/ProcessAdmin/login.jsp
http://aix1awas26x:9080/ProcessPortal/login.jsp

Post Config Setup
This section is a summary following URL. This procedure puts all the steps of getting the communication
of PC and PS in one place.
IBM BPM 8.5.5 Info center source:
http://www-
01.ibm.com/support/knowledgecenter/api/content/SSFTDH_8.5.0/com.ibm.wbpm.admin.doc/topics/ti
ns_cnfg_ssl_nd.html?locale=en
1. Import the Process Server WebSphere® Application Server root SSL certificate into Process Center. a. In the Process Center WebSphere Application Server administrative console, click Security >
SSL certificate and key management > Key stores and certificates > CellDefaultTrustStore > Signer certificates > Retrieve from port.
b. Enter the Host name, secure Port of the Process Server profile (WC_defaulthost_secure), and Alias, and click Retrieve signer information. You can retrieve the signer information for any of the servers listed. Note: The WC_defaulthost_secure profile is located in the WebSphere Application Server
administrative console. Navigate to Servers > Server Types > WebSphere Application
Servers > SERVER_NAME > Ports.
c. Click Apply and save your changes. 2. Import the Process Center root SSL certificate into Process Server.
a. In the Process Server WebSphere Application Server administrative console, click Security > SSL certificate and key management > Key stores and certificates > CellDefaultTrustStore > Signer certificates > Retrieve from port.
b. Enter the Host name, secure Port of the Process Center profile (WC_defaulthost_secure), and Alias, and click Retrieve signer information. You can retrieve the signer information for any of the servers listed. Note: The WC_defaulthost_secure profile is located in the WebSphere Application Server
administrative console. Navigate to Servers > Server Types > WebSphere Application Servers
> SERVER_NAME > Ports.
c. Click Apply and save your changes. 3. Specify HTTPS URLs and ports for all Representational State Transfer (REST) services for your
environment by using the REST service administrative console page. a. Click Services > REST services > REST service providers. b. Select all from the Scope selection pull-down menu. c. Click on the REST service provider in Provider Application field and specify the Host name or
virtual host in a load-balanced environment and the Port. Important: For a REST Services Gateway deployment manager, use the deployment
manager host name and port; do not use the IHS host name and port.
d. Click Apply and save your changes.
4. Set the deploySnapshotUsingHttps property to true to make sure that the Process Center
connects to the Process Server using SSL for online deployment. Run the following commands on both the Process Center and the Process Server. ON aix1awas25x wsadmin -conntype NONE -lang jython

wsadmin> ps = AdminConfig.getid("/Cell:/ServerCluster: PC_AppCluster01x/BPMClusterConfigExtension:/BPMProcessCenter:/BPMServerSecu
rity:/") # You must use BPMProcessCenter or BPMProcessServer depending on
your environment
wsadmin> print AdminConfig.show(ps) #look at deploySnapshotUsingHttps to
see the current value
wsadmin> AdminConfig.modify(ps, [['deploySnapshotUsingHttps', 'true']]) #
default value is false
wsadmin> print AdminConfig.show(ps) #verify your change
wsadmin> AdminConfig.save()
wsadmin> exit
ON aix1awas26x wsadmin -conntype NONE -lang jython
wsadmin> ps = AdminConfig.getid("/Cell:/ServerCluster: PS_AppCluster01x/BPMClusterConfigExtension:/
BPMProcessServer:/BPMServerSecurity:/") # You must use BPMProcessCenter or
BPMProcessServer depending on your environment
wsadmin> print AdminConfig.show(ps) #look at deploySnapshotUsingHttps to
see the current value
wsadmin> AdminConfig.modify(ps, [['deploySnapshotUsingHttps', 'true']]) #
default value is false
wsadmin> print AdminConfig.show(ps) #verify your change
wsadmin> AdminConfig.save()
wsadmin> exit
Note: See below for details on the version support differences:
5. Restart the Process Server and Process Center servers. . Use the WebSphere Application Server administrative console to stop the clusters. a. Stop the node agent and deployment manager. b. Re-start the node agent. c. Re-start the deployment manager. d. Use the WebSphere Application Server administrative console to start the clusters.
6. Verify your configuration. . Log in to the Process Center console using an https connection. a. From the Server tab, click runtime server > configure server and confirm that it is opened in a
secure browser with https.
Add nodes to a DE This section is for adding new nodes to an existing PC or PS.
1) Create a BPM 8.5.5 custom profile on the new machine.
2) addNode.sh to the Cell that is getting the new node.
3) Go to: Servers -> Deployment Environments -> <DEname> -> Deployment Topology
4) Select the new node from the drop down
5) Click Add
6) Set the number of servers per cluster you want.
7) Click OK
8) Click Save
9) Restart environment.
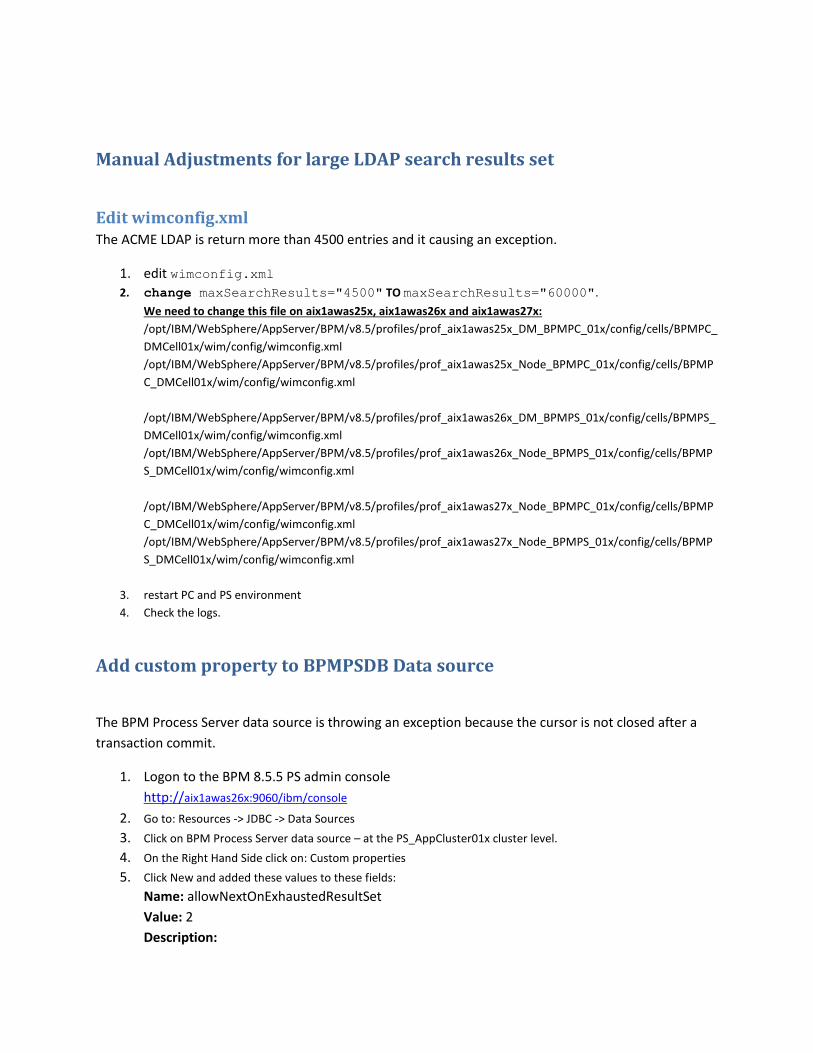
Manual Adjustments for large LDAP search results set
Edit wimconfig.xml The ACME LDAP is return more than 4500 entries and it causing an exception.
1. edit wimconfig.xml
2. change maxSearchResults="4500" TO maxSearchResults="60000".
We need to change this file on aix1awas25x, aix1awas26x and aix1awas27x:
/opt/IBM/WebSphere/AppServer/BPM/v8.5/profiles/prof_aix1awas25x_DM_BPMPC_01x/config/cells/BPMPC_
DMCell01x/wim/config/wimconfig.xml
/opt/IBM/WebSphere/AppServer/BPM/v8.5/profiles/prof_aix1awas25x_Node_BPMPC_01x/config/cells/BPMP
C_DMCell01x/wim/config/wimconfig.xml
/opt/IBM/WebSphere/AppServer/BPM/v8.5/profiles/prof_aix1awas26x_DM_BPMPS_01x/config/cells/BPMPS_
DMCell01x/wim/config/wimconfig.xml
/opt/IBM/WebSphere/AppServer/BPM/v8.5/profiles/prof_aix1awas26x_Node_BPMPS_01x/config/cells/BPMP
S_DMCell01x/wim/config/wimconfig.xml
/opt/IBM/WebSphere/AppServer/BPM/v8.5/profiles/prof_aix1awas27x_Node_BPMPC_01x/config/cells/BPMP
C_DMCell01x/wim/config/wimconfig.xml
/opt/IBM/WebSphere/AppServer/BPM/v8.5/profiles/prof_aix1awas27x_Node_BPMPS_01x/config/cells/BPMP
S_DMCell01x/wim/config/wimconfig.xml
3. restart PC and PS environment
4. Check the logs.
Add custom property to BPMPSDB Data source
The BPM Process Server data source is throwing an exception because the cursor is not closed after a
transaction commit.
1. Logon to the BPM 8.5.5 PS admin console
http://aix1awas26x:9060/ibm/console
2. Go to: Resources -> JDBC -> Data Sources
3. Click on BPM Process Server data source – at the PS_AppCluster01x cluster level.
4. On the Right Hand Side click on: Custom properties
5. Click New and added these values to these fields:
Name: allowNextOnExhaustedResultSet
Value: 2
Description:

Determine whether ResultSet are closed or kept open when committing a transaction. 1
(HOLD_CURSORS_OVER_COMMIT), 2 (CLOSE_CURSORS_AT_COMMIT).
6. Click OK
7. Click Save
8. Restart PS_AppCluster01x members.
Appendix A: Change Passwords on the file repository IDs The Deployment Environment(DE) Admin ID file based password change on either PC or PS is a multi-
step process.
For PC or PS DE Admin ID 1) Run the JACL:
cd <BPM_INSTALL_root>/profiles/*Dmgr*/bin ./wsadmin.sh -conntype NONE Cut and Paste these commands with your info: $AdminTask changeFileRegistryAccountPassword {-userId <DEadmin_ID> -password <DEadmin_new_password>} $AdminConfig save
2) Go in to Auth Aliases and update with new password the DE admin you’re working on. 3) Re-start BPM environment
Update PS with new PC DE admin password: 1) Go To: Servers -> Deployment Environments -> <DEname> -> Additional Properties -> Process
Server Settings 2) Change password 3) Click OK 4) Click Save 5) Go in to Auth Aliases and update the PC DE admin ID with the new password. 6) Click OK 7) Click Save 8) Re-start PS
Add User on the file repository Run the JACL: cd <BPM_INSTALL_root>/profiles/*Dmgr*/bin ./wsadmin.sh -conntype NONE Cut and Paste these commands with your info: $AdminTask addFileRegistryAccount {-userId <ID> -password <new_password>}
$AdminConfig save

Appendix B: BPM 8.5.5 beyond the POC
1. To move beyond a POC an application has to be designed, built and an inventory of features has
to be done.
2. Estimated work load has to be established.
3. The inventory from step 1 and the estimated work load from step 2 need to be run through IBM
Techline. IBM Techline will provide an initial sizing of the environment that will be needed to
meet the estimated work load.
4. Monitoring will need to be setup on the Databases and file systems to assure that there is
enough space available at all times.
5. Memory can be monitored by OS system tools like top, topas … etc.
6. If the estimated work load changes then resource like file system space, CPU and RAM will need
to be re-evaluated.