kendo equipment manual - kendostyle
TRANSCRIPT

- 1 -
Kendo Equipment Manual
(Please don't illegally copy this book)

- 2 -
Table of Contents
Introduction
To do kendo safely…………………………………………………………………………2
1.The shinai 竹刀 1-1.The construction of the shinai(weights and lengths)……………5
How to keep your shinai safe………………………………………………………6 About the shinai ………………………………………………………………………6
1-2.Disassembly of the shinai……………………………………………………………8 1-3.Maintenance of the shinai…………………………………………………9 1-4.Making a shinai out of used parts………………………………………………10 1-5.Fixing the shinai tip……………………………………………………………………11 1-6.Tying the shinai handle………………………………………………………………12 1-7.Tying the nakayui `thong'……………………………………………………………15 1-8.Tuba and tubadome…………………………………………………………………16 1-9.How to carry the shinai………………………………………………………………16
Comparing the shinai and bokutou with a katana…………………………17
2.The Kendogi ‘jacket’剣道衣 2-1.The construction of the kendogi …………………………………………………18
Why are the jackets and trousers made of cotton dyed with indigo? …18 2-2.How to wear the kendogi……………………………………………………19 2-3.How to wash the kendogi…………………………………………………19 2-4.How to fold the kendogi……………………………………………………20
3. The Hakama ‘trousers’袴 3-1.The construction of the hakama…………………………………………………21
About the hakama……………………………………………………………………21 3-2.How to wear the hakama……………………………………………………22 3-3.How to fold and stow the hakama………………………………………………23 3-4.How to wash the hakama…………………………………………………………24
4・The tare‘waist armor’ 垂 4-1.The construction of the tare……………………………………………25
The nafuda ‘name sack ’…………………………………………………25 4-2.How to wear the tare ………………………………………………………………26 4-3.How to keep your tare well…………………………………………………………26

- 3 -
5.The do ‘breastplate’胴 5-1.The construction of the do………………………………………………27
The shokkou………………………………………………………………………28 5-2.Putting on the do……………………………………………………………………29 5-3.How to tie the cords – method A~D……………………………………33 5-4.How to keep your do well ………………………………………………………33
6.The men‘helmet’面 6-1.The construction of the men ……………………………………………34
How to connect the men chikawa………………………………………………35 How to make the men………………………………………………………………35
6-2.Putting on the tenugui ‘men towel’ – Method A~C………………36 6-3.Putting on the men- Method A・B……………………………………39 6-4.How to keep your men………………………………………………………41
Adjusting the lengths of the men cords…………………………………………41
7.The kote ‘gauntlets' 7-1.The construction of the kote………………………………………………42 7-2.Putting on the kote……………………………………………………………………43 7-3.Taking off the kote……………………………………………………………………44 7-4.How to keep your kote well ………………………………………………………44 7-5.Tying the kote cords…………………………………………………………44
8.The equipment bag 8-1.The construction of the equipment bag………………………………………47 8-2.Putting the gear in……………………………………………………………………47 8-3.Taking the gear out……………………………………………………………47
Hanging up your gear…………………………………………………………48
9.Glossary……………………………………………………………………………49
In conclusion ………………………………………………………………………51

- 4 -
Introduction To do kendo safely
We have written an easy to understand, illustrated manual to help kendo players
can maintain their own equipment.
Please read this manual and safely maintain
your shinai and armor.
When you strike with the "shinai", it should look like this:
the leather tip may come off the end and the
bamboo slats poke someone's eye. People have
been blinded like this.
But if your shinai was broken,
But if your shinai has a loose cord,
or out of place nakayui, or a loose nakayui

- 5 -
1.The shinai 竹刀 1-1.The construction of the shinai
tsuba-dome ̀guard stop'鍔止め tsuru ̀cord'弦 nakayui ̀ thong'中結い
tsuka ̀hilt'柄 tsuba ̀guard 鍔' saki-gawa ̀ tip'先革
tsuka-gawa ̀hilt-leather'柄革
4 shaku (121 cm) length of bamboo is cut 10 cm from the roots. It is
then split vertically into 6-8 slats, which will be used to make different
length shinais depending on their weight. Four slats with matching joints
are chosen and then heated and bent into shape before finally being
sanded down to make a single shinai . It is rare for all four slats to come
from the same piece of bamboo.
When you chose your shinai , you think about not only ① length and
weight but also ② balance and ③ types (fat form , fat form , etc.
variously :). next,; ④tsuka-gawa and nakayui and the others.
There are two kinds of leather which is made of these small articles. One
is.gintuki leather , this is stronger than the other( toko leather).The gintuki
leather has skin’s surface.. You would chose gintuki leather.
Shinai weights and lengths
(see: JKF "Kendo tournaments and judging rules" This is changed on April 1, 1999. )
Length and weight are of a fully constructed shinai, not including the tsuba.
※ is minimum diameter of saki-gawa (The unit:cm).
Primary School Junior High
School High
School Adult・Uni-student
using two swords (ni-tou)
Sex When using one swords ( ittou
the longer the shorter
Length Both <=99 <=105 <=111 <=114 <=117 <=120 <=114 <=62
Male >=440 g >=480 g >=510 g >=440 g 280~300 Weight
Female
No limit >=260 g
>=280 g >=370 g >=400 g >=420 g >=440 g >=400 g 250~280
Male 25 26 26 25 24 ※saki-gawa Female 24 25 25 24 24
Nick-name sabuni
3 "shaku" 2 "sun"
Sabuyon 3 "shaku" 4 "sun"
saburoku 3 "shaku"
6 "sun"
sannana 3 "shaku" 7
"sun"
sanpachi 3 "shaku"
8 "sun"
sanku 3 "shaku"
9 "sun"
sannana 3 "shaku" 7
"sun"
Note 1: the JKF places no restrictions on weight for primary school students.
Note 2 :shaku and sun are old Japanese units, 1 sun = 3.03 cm; 1 shaku = 10 sun.

- 6 -
About the shinai
Two kinds of shinai’s bamboo materials
Most of the shinais sold are made of keichiku, a variety of bamboo that
grows in warm areas. Bamboo with a diameter of 7-8 cm is harvested
throughout the year. Its fibers are more dense and stiff, on the other
hand its stiffness means it breaks more easily than madake. In addition,
because it may be heated and then rapidly dried at customs inspections
it looses its natural moisture and oil which makes it even more likely to
split. It is cheaper than Madake bamboo.It grown in regions with large
temperature variations in the seasons is denser and more flexible than
keichiku bamboo. Four year old bamboo with a diameter of 8-12 cm is
harvested from October to February. This bamboo may splinter but
does not split easily. Mosochiku (the largest kind of bamboo) looks
strong but is inflexible so is not used for making shinais.
When you strike your shinai only once, the bamboo will unfortunately
breaks. So, you should cut the edge of the bamboo, and paint the row,
the Vaseline.
And you must remark “Old bamboo is fragile, you must not use”.
Small Knoeledges
You must keep your shinai safe !
So after playing KENDO, you must check and maintain your shinai.
To do kendo safely, it is important that your shinai and armor are kept
in good condition through regular maintenance. Unless the kendo
player (or the parents of young children) understand how the
equipment is constructed and how to look after it, it can be
dangerous. You need to be careful so that your opponent won't be
injured, for example by splinters entering the men or piercing your
opponents arm. People have lost their sight and even their life
when a cracked piece of bamboo pierced their eyes. People who
don't care to look after their shinais but instead treat them with
chemicals or use carbon fiber shinais won't develop this spirit. All you
need to do is start off with a well shaped shinai and look after it
carefully. Instead of checking the diameter you should instead
continually check for splinters and splits.

- 7 -
A limit on the diameter of a shinai
JKF put out the guidance indicator for the accident prevention with the bamboo
sword on November 10, 1998. ① The position of nakayui is 1/4 of the total
lengths of the bamboo sword the sword ahead, ② lengths of sakigawa is 50
millimeters or more. ③ “Minimum diameter” of sakigawa (not length with the
needlework fee but side which was able to be measured small) was ruled on April
1, 1999.
Shinai gauge was made by all-Japan budogu federation. It is made of plastic, can
measure the standard thickness of the shinai . We have three shinai
gauges,24milli (for male under3.6 and femele under3.7), 25milli(for male3.7,
femele3.8・3.9), 26milli(for male3.8・3.9).
“Minimum diameter” Shinai gauge
What makes a good "shinai"?
The most important thing is that it is
both strong and flexible. If you put the tip
of a shinai on the floor and try to bend it,
then it should bend about a third of the way
from the tip (around the nakayui), at the
place you use to strike your opponent. You
should be able to feel it pushing back.
A weak shinai will bend around the guard ("tsuba"). The point at which
the shinai bends is the point where it releases power when you strike.
When you strike with a weak shina" it will bend like a stick from the tsuba
to the tip and then whip back more powerfully than the armor can
protect. It can also pierce the "men"-grill and hurt your opponent and may
cause you to hurt your own wrists and elbows. Weak shinais have the following
characteristics: (1) they bend at the tsuba ; (2) they are often planed down to make
the handle thin enough; (3) they are often thin at the tip, thick in the middle, and
then thin again at the hilt; (4) they tend to be made of less dense bamboo.
Maintaining your shinai while you use it builds up `samurai spirit' and makes
you fully appreciate bamboo.
Bamboo splits and splinters while it is used so requires maintenance.

- 8 -
1-2.Disassembly of the shinai
① Loosen or untie the nakayui
`leather thong'. ④ Take off the leather hilt (tsuka-
gawa).
② Untie the tsuru `cord'.
③ Pull the leather tip (saki-gawa)
off with one hand, while holding
the bamboo slats together with
the other to keep the rubber tip
(saki-gomu 先ゴム) in place.
⑤ Your shinai should now look like
this: (Normally you only need to
completely disassemble the
shinai to smooth or replace a
whole slat.)

- 9 -
1-3.Maintenance of the shinai Removing splinters ① When you have some splinters or a small split, take off the nakayui, tsuru
and tip as described in section (you may have to completely disassemble
the shinai).
② Scrape the splinters off with
firm strokes from the hilt
towards the tip, using a knife,
file or a piece of glass. If you
scrape from tip to hilt, the blade
may dig into the bamboo.
③ Next use some sandpaper to
smooth the surface. Finally rub
in a little wax, Vaseline or
vegetable oil.
Note: If the bamboo actually splits (with or against the grain) you should stop
using it. It is dangerous to tape it up and keep using it.
- 10 -
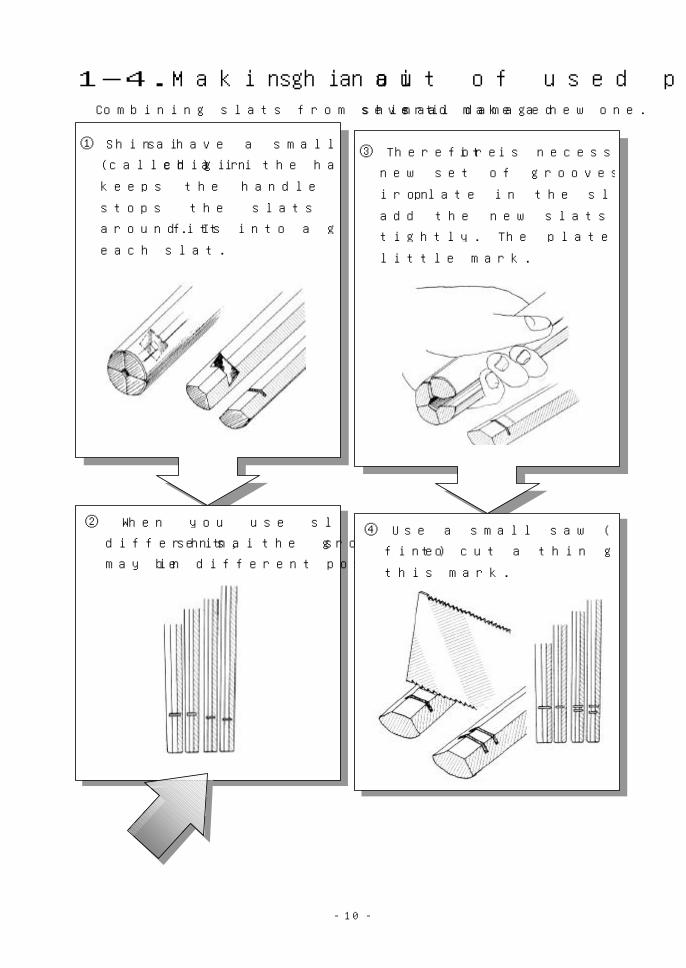
1-4.Making a shinai out of used parts Combining slats from several damaged shinais to make a new one.
① Shinais have a small iron plate
(called a chigiri) in the handle that
keeps the handle together and
stops the slats from moving
around. It fits into a groove cut in
each slat.
③ Therefore it is necessary to cut a
new set of grooves. Leave the
iron plate in the slats it fits then
add the new slats and squeeze
tightly. The plate should leave a
little mark.
② When you use slats from
different shinais, the grooves
may be in different positions.
④ Use a small saw (a hacksaw is
fine) to cut a thin groove along
this mark.

- 11 -
1-5.Fixing the shinai tip 先革
② Fasten the tsuru to the tip (saki-gawa) using a bowline knot.
② Put the rubber tip ("saki-gomu") in the
end. Various diameters of rubber tip are
sold, you should use one that just fits in
the space left by the bamboo, if it is too
small it can be dangerous. Carbon-fiber
shinai's have a special kind of rubber tip
(actually plastic) which should always be
used with them.
③ Slide the leather tip
on.
The construction of the saki-gawa The saki-gawa ‘leather tip’: If the end opens or is holed, get a new one, it
cannot safely be repaired.

- 12 -
1-6.Tsuru:Tying the shinai handle 弦 tsuru is a bowstring made of a chemical fiber or a silk. Fiber. Silk one needs
drawing through to sofen by a eyeleteer before tying.
① First put the hilt leather
(tsuka-gawa) on.
(If the shinai is new it will be
held together with string. Take
this string off.)
② Pass the cord through the nakayui
`leather thong' (that holds the slats
together) and komono `small leather
loop'.
It is a good idea to
tie a knot in the
tsuru to fix the
nakayui.
Using a rubber
sheet (or gloves)
makes it easy!
How to tie the leather cord
The construction of the tsuka and to shorten The hilt (tsuka): Pucker the
pommel (tsuka-gashira) and
sew it as shown below, then
turn it inside out.
To shorten the hilt, cut the end or
closest to the guard or cut the other
side and do like written in the left.

- 13 -
③ Tie the cord securely round the komono. There are three ways.
A B(琴弦はこの方法で) C
① Through the tsuru
to the hole of small
articles
① Through the tsuru
to the slit of small
articles
① Make a circle and
② to round in
surroundings of small
articles
③ passes as shown in
figure
④ trough edge of
tuka’s frap, return
to small articles,
② to round in
surroundings of small
articles
② tying
③ passes as shown in
figure
④ trough edge of
tuka’s frap, return
to small articles,
③ trough edge of
tuka’s frap, return
to small articles,
- 14 -
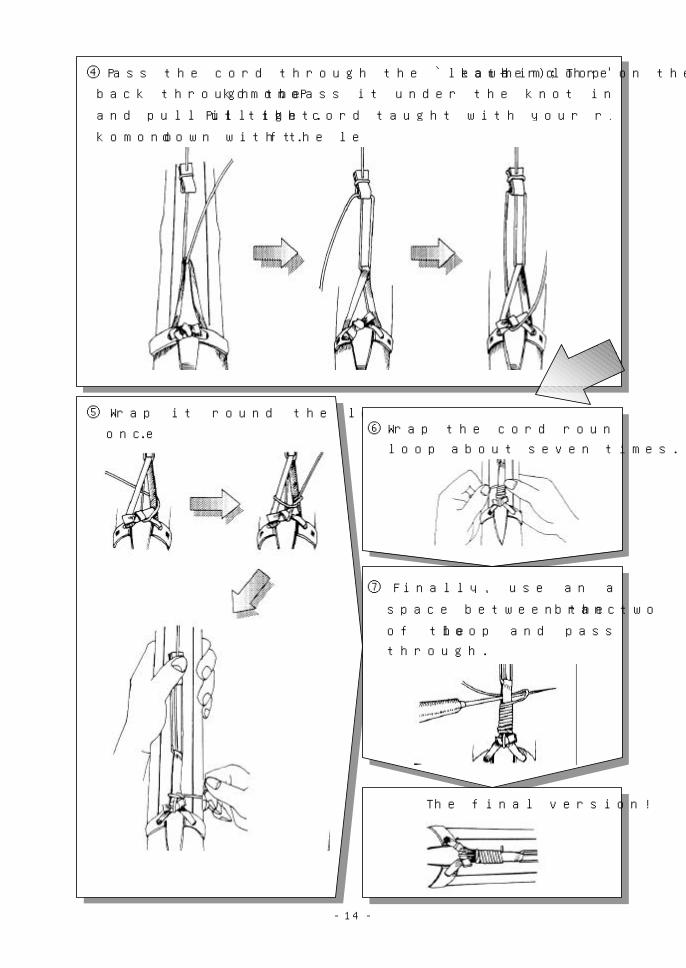
④ Pass the cord through the `leather loop' on the hilt (kawa-himo); Thread it
back through the komono. Pass it under the knot in the hilt's leather loop
and pull it tight. Pull the cord taught with your right hand while you hold the
komono down with the left.
⑤ Wrap it round the loop. Tie it
once. ⑥ Wrap the cord round the leather
loop about seven times.
⑦ Finally, use an awl to make a
space between the two branches
of the loop and pass the cord
through.
The final version!

- 15 -
1-7.Tying the nakayui ‘thong'中結い ① Wrap the nakayui
t̀hong' thrice round
the shinai rough side
up.
② Thread it under
the cord and
cross it back.
③ Thread under the
tsuru from the
other side.
④ Loop it round
and under the
last loop.
⑤ Again loop it round
the tsuru, cross over
and pass it under
the last loop.
⑥ Repeat this once
more, then cut off
any excess leather.
左右に締まることで、動か
なくなります。
What should I do for emergency repairs if the nakayui breaks?
Cut the hole open and take it off. Then make a new hole, attach it as
shown and start again.

- 16 -
1-8.Tsuba 鍔(つば)・Tuba-dome 鍔止め(つばどめ) Tsuba is a round one of leather or a chemical product, and within nine
centimeters in the diameter. Tsuba is not only for guarding other party's hitting ,
but also for tying bamboos. The hole of one made of the leather is growing
bigger, while using.
Tsuba of the science product is cheaply. You can use any though various color,
because JKF does not provide for the color.
You prepare a just good size r the handle of the Shinai. If it’s size is not
suitable or the corner of the hole of guard is sharp, tsuka would be broken.
About three kinds of Tuba-dome are sold. It is made of rubber.
1-9.How to carry the shinai (The shinai bag) Bags can hold from 1to 3”shinais”. Some have a shoulder strap. Bags can be
made from many materials such as cotton or leather or others , and come in
many colors Feel free to design and make it own!
Because this belt wears out easily, let's treat politely.
- 17 -
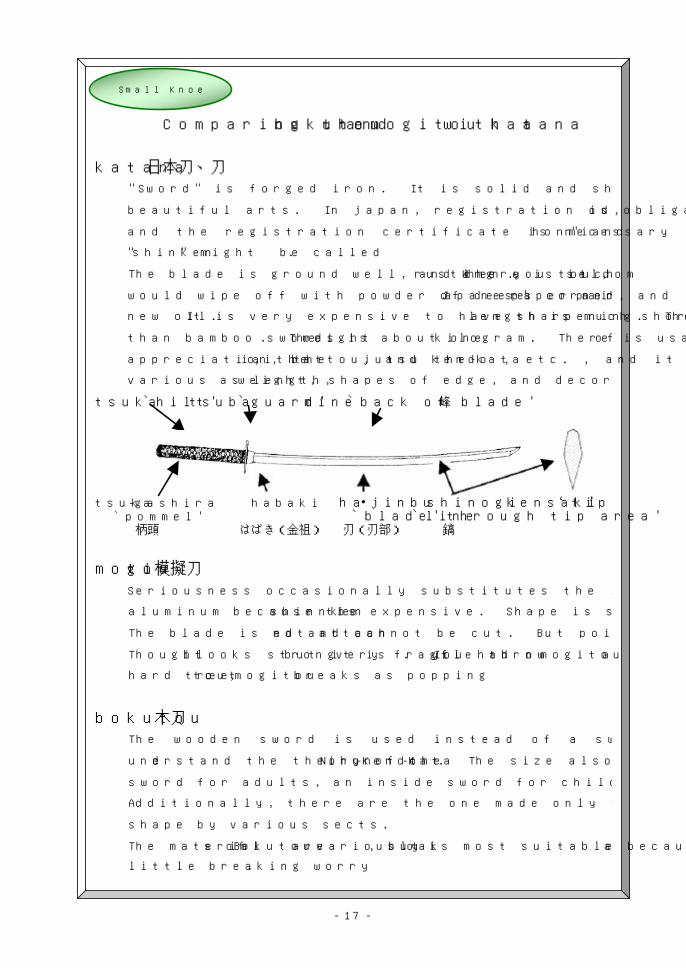
Comparing the bokutou and mogitou with a katana
katana日本刀、刀 "Sword" is forged iron. It is solid and sharp. It is one of Japanese famous
beautiful arts. In japan, registration is obligated by the gun swords method,
and the registration certificate is necessary for possession. "honmi" and
"shinken" might be called.
The blade is ground well, and there is seldom rusting . When you touch it , you
would wipe off with powder of deer's corner, and Japanese paper and paint
new oil. It is very expensive to have sharpening. The length is much shorter
than bamboo swords. The weight is about one kilogram. There is usages of
appreciation, the iai , the battoujutsu , and the kendo-kata, etc. , and it is
various as length, weight, shapes of edge, and decoration (handle and sheath).
tsuka `hilt' tsuba `guard' mine `back of blade'峰
tsuka-gashira habaki ha・jinbu shinogi kensaki‘tip’ `pommel' `blade' `line through tip area' 柄頭 はばき(金祖) 刃(刃部) 鎬
mogitou模擬刀
Seriousness occasionally substitutes the imitation sword of the alloy such as
aluminum because the shinnken is expensive. Shape is serious and is just like.
The blade is not attached and cannot be cut. But point of blade is hurmful.
Though it looks strong but it is very fragile. If you had thrown mogitou a
hard tree to cut , mogitou breaks as popping
bokutou木刀
The wooden sword is used instead of a sword and a mock sword to
understand the theory of the Nihon-Kendo-Kata. The size also has a large
sword for adults, an inside sword for children, and the knife for the kendo type.
Additionally, there are the one made only for pretense and the one of various
shape by various sects.
The materials of Bokutou are variously, but oak is most suitable because of a
little breaking worry.
Small Knoeledges

- 18 -
Collar えり
襟(eri) Sleeve そで
袖(sode)
むねひも
胸紐
Umanori うまのり
馬乗(後ろの切り込み)The slit for riding on a horse
Size:You prepare the one which hides the elbow. For the child, you
prepare the large one, and sow the shoulder shorten occasionally.
(reference P.15)
Material; There are four kinds of material. ① Generally adult's one is double
thorn, dyed with indigo. ② Thin yellow one is not indigo dyed, called
"KINARI", ③ White one is bleached. ④ A white cloth has been
sewn with a black string like the lattice, it is made for children, it is
light and easily to move . Besides these, there is the hand-sewn one
which is very expensive.
Why are the jackets and trousers made of cotton
dyed with indigo?
Partly for tradition's sake. However indigo-dyed cotton is also the
best choice because it is not easily damaged by sweat, looks nicer the
more you use it and is also a mild disinfectant.
Small Knoeledges
2.The kendogi‘jacket’剣道衣 2-1.The construction of the kendogi
Strings
Of Chest

- 19 -
2-2.How to wear the kendogi
2-3.How to wash the kendogi You might not to wash out the dye it is better to lightly hand wash the clothes
in water and quickly dry them rather than to use detergent in a washing
machine.
First of all, you connect inside strings. Next, you connect outside strings. You
prevent the nape of the neck from opening. Moreover, so as not to wrinkle,
you put on length the back.
Note: To keep their jackets properly
closed, some women use a hook, or
velcro, or even tape.
When child's kendo clothes are large You apply the sign half of length from the center of the back to the
needlework eyes of the shoulder. Length by which you want to shorten the
sleeve is assumed to be “a”. You weave from the sign ahead and sew
half the length of “a”.

- 20 -
2-4.How to fold the kendogi
How to fold Japanese clothes
④ You fold
the collar to
the triangle.
⑤ Break off
the sleeve.
⑥ You turn
inside out,
and break
off the other
sleeve.
set up
the sleeve.
⑦ Finished.
① You apply the
sign half of length
from the center of
the back to the
needlework eyes
of the shoulder.
② You pile up a
right and left
collar.
③ You pile up a right
and left sleeve
while suppressing
the collar.
You put out sideward
needlework eyes up.
② ③ ④

- 21 -
3.The hakama‘trousers’袴 3-1.The construction of the hakama
koshi-ita 腰板 hakama-obi 袴帯
About the hakama
There are many kinds of hakama: hunting, field, long and short, but
only two types are still worn today: men's (horse-riding) and women's
(undivided hakama, with no back plate). Wearing a hakama with a
stiff back plate straightens your spine, while keeping the collar of your
jacket on the back of your neck, pulls your chin in and gives you
perfect posture.
A hakama has five pleats in the front and one at the back. The five
pleats represent the five Confucian relationships of :righteousness
between ruler and minister; affection between father and son;
attention to their separate functions between husband and wife; order
between elder and younger brothers and faithfulness between friends;
as well as the five Confucian virtues of humanity, righteousness,
propriety, wisdom and faithfulness. The single pleat reminds us that
just as loyalty and filial piety are one and the same we should follow
the true path without double dealing. The hakama is designed so that
we should think of these things whenever we put it on.
Small Knoeledges

- 22 -
3-2.How to wear the hakama
① Step into the
hakama and hold
them to your waist.
② Wrap the front
sashes (himo)
behind you, then
cross them in
front ...
③ and tie them in a
bow behind you.
④ Slip the peg
attached to the
koshi-ita into
the sashes.
koshi-ita `back plate'
⑤ Tie the back sashes
in front of you.
⑥ Tuck the extra
length of the
sashes round the
tied ones.
The hem should
be lower at the
front than the
back.

- 23 -
3-3.How to fold and stow the hakama
⑤ Fold the longer front sashes to a
half, then a quarter of their length,
and cross them over.
⑦ You finished the
left side.
⑧ The right is also the
same.
⑥ Tie up the shorter front
sashes.
⑨ You passes through a
left string.
① Put the
hakamaface
down on a flat
place such as
the floor.
Use your right
hand to place
the right trouser
leg, then smooth
the back pleat.
② Turn the
hakama
over, so the
front faces
up, settle both
legs and then
stretch it
vertically.
③ Fold the
five pleats
so they lie
straight.
④ Fold both
sides in to
the middle,
then fold it
lengthwise
three times.

- 24 -
3-4.How to wash the hakama You can machine wash hakama made of synthetic fibers.
If you wash hakama made of indigo-dyed cotton in a machine, the indigo
will leach out and the pleats will disappear.
How to wash the hakama made of indigo-dyed cotton
③ Hang it up to dry upside down, with the pleats in place.
If you wash it like this the pleats won't disappear and will stay wrinkle free.
If you spin dry it, it will wrinkle, and if you iron it ,it shines.
After the hakama dries, You fold, put under the square cushion of the
chair , and you sits or you presses under the mattress, and the pleat
attaches clearly.
① Wash the folded
hakama in the bath
room, by pressing it
under water.
②Don't wring it out, just refold it and
smooth the water out.
- 25 -
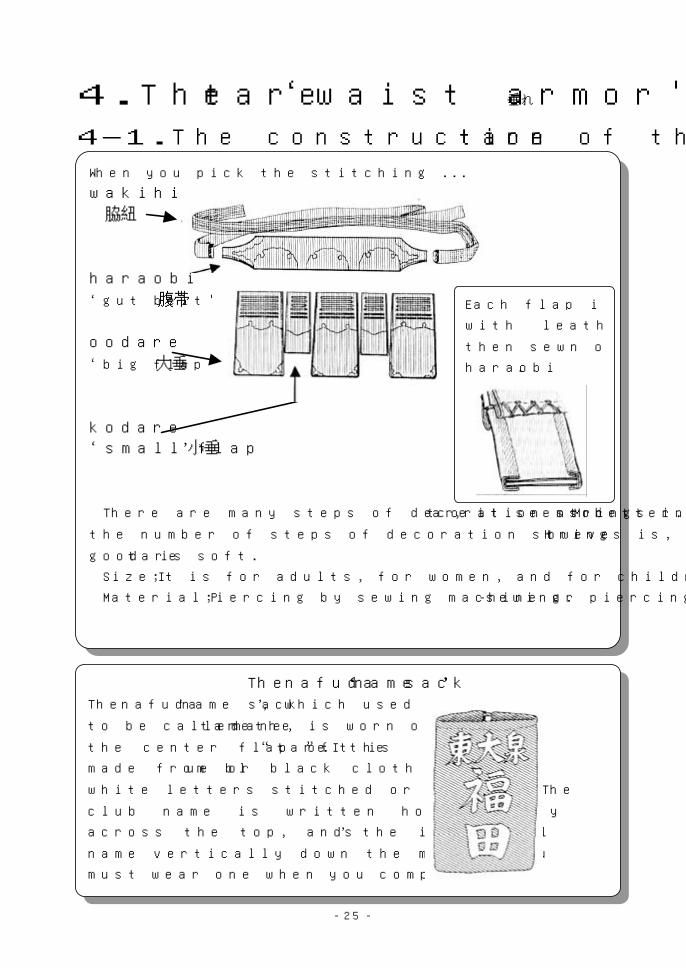
4.The tare ‘waist armor'垂れ 4-1.The construction of the tare
When you pick the stitching ... wakihimo 脇紐 haraobi ‘gut belt'腹帯 oodare ‘big flap'大垂 kodare ‘small flap’小垂
There are many steps of decoration strings in tare, it seems better. More
the number of steps of decoration strings is, the more expensive. However,
good tare is soft.
Size;It is for adults, for women, and for children (size and smallness).
Material;Piercing by sewing machine or piercing by hand-sewing.
Each flap is rimmed
with leather and
then sewn onto the
haraobi.
The nafuda ‘name sack’ The nafuda ‘name sack’, which used
to be called the tare mane, is worn on
the center flap of the “ tare ” .It is
made from blue or black cloth with
white letters stitched or sewn on. The
club name is written horizontally
across the top, and the individual’s
name vertically down the middle. You
must wear one when you compete.

- 26 -
4-2.How to wear the tare
4-3.How to keep your tare well.
① Kneel in seiza, put the tare on
your lap, wrap the cords round
behind you
② They should cross just under the back plate.
② then tie them in a bow under the
center flap.
① If you don't keep the cords flat, they will break at the kinks. Iron them
occasionally.
② Brush the tare occasionally with a toothbrush.
③ When the surface wears out, leather etc. are had to be applied before
inside bedding ground comes out. When the strings wears out, you must
repair.
Coil the cords round the ends. If they are flat , just fold them.

- 27 -
5.The do ‘breastplate'胴 5-1.The construction of the do (
むな ちかわ
胸乳革chikawa
or chigawa 雲飾 kumokazari
胴胸(どうむね) 刺(さ)し sashi
doumune 曙光 shokkou
足 ashi or 小胸
komune or 持ち出し
胴台(どうだい)doudai 胴横乳革 side leather loops'
へりかわ
縁革herikawa
The do is composed of some parts, and it is the combination and there are
various one. Ypu will choose in consideration of weight, the decoration, and
the price, etc. though the size is suitable, it is not in the function as a
protector.
Size; There is a standard for adults, for women, and for children, etc. The
size changes in the height of dodai, the height of width and chestguard,
and width, etc.
Material; There are three kinds of materials of
Belly guard about leather, the nylon resin,
“Yamato trunk” or“carbon trunk” and
paper “fiber trunk”. The dodai of leather
is made from strips of heavy bamboos
(43、50、60) lashed together with fine
bamboos and kite thread. It is then covered
with water-buffalo hide and lacquered.
There is variously a color. Hardness on the
surface is same as the person's fingernail.
So It is necessary to note it will be damaged
by the one which is harder than the
bamboo sword .The belly and chest guards are laced together with two
strips of leather.
Chest
guard
Belly guard
do target
do-yoko-chichi-gawa

- 28 -
5-2.Putting on the do
As the do is a target, you have to
put it in the proper position,
where you can move easily. Don't
try to reduce the target area, or
protect your ribs or throat from
bad cuts and thrusts by tying the
do too high.
○ ×
Shokkou
(Embroidery of the do Chest guard and The tsuki area (the throat flap) of the men ‘helmet')
The Nakanishi Chuzou began to use the bamboo sword and the protector for
middle term of Edo. The Shokkou began to be used before long to decorate though
the armor in those days did not have the decoration. The shokkou has a variety of
patterns and a variety of colors. Not only the one to defend the life only but also
beauty Bushi was demanded of armor for having in the Warring State Period of
Japan.
Small Knoeledges
Fixing the do-yoko-chichi-gawa ‘side leather loops'
Fixing the do cords.
① ②
Method of
connecting two
Method of dividing of each in two, and connecting four
The hole of Belly guard

- 29 -
① Kneel in seiza, rest the do on your
thighs, then cross the long cords
behind you and tie them through
the leather loops.
② Tie the short cords behind you
in a bow.
There are many ways to tie the do .
All that is important is that it it is easy to adjust and doesn't come off when
you move. Four examples of typical A-D are shown here.
About undermentioned A and B, I show you two aspects, which are
from the front and from me.
A B
C D

- 30 -
How to tie the cords - method・A
Seen from in front Seen from your point of view

- 31 -
How to tie the cords - method・B
Seen from in front Seen from your point of view

- 32 -
method・C method・D
Seen from in front Seen from in front

- 33 -
5-3.How to keep your do well.
① Salinity and the waste matter included in the
sweat hurt armor. Then, after practices, the
sweat must be wiped off.
Occasionally clean the decorative section
(shokkou) with a toothbrush.
Beause the string and chigawa are articles of
consumptions, when these are rubbing and
decreasing, you change new one.
② Put the tare on the do. We recommend the method of coiling them round
the ends, to avoid them twisting and tearing.
(ア)Tie the do cords flatly.
(イ)Tie the do cords loosely. (ウ)Tie the do cords tightly
How to attach the leather loops (chichi-gawa) (the right and left should be mirror images).
Use an awl to widen the holes and pass the loops through.

- 34 -
6.The men ‘helmet' 面 6-1.The construction of the men
The target points
mengane monomi tenchi
tomegawa
uchiwa agomaki nijuuago men futon
The tsuki area (the throat flap)
Size:Shape and the size of the head and the face are
various because of the person. Then, length in
surroundings to the mandible of the head in
amount is measured. You order in that length. And,
you actually matches and adjusts men. Back of the
head does not go out so much, and Men is made the one that the
positions of eyes are suitable, and fit for the sight-seeing monomi.
Material:The material of Mengane is iron, a duralumin, a stainless steel,
titanium, and German silver. The protections of side are 13 in the
adult for the boy 14(There are as many as 15 large-scale) usual.
The purpose of the other side's having painted red is to prevent
light being reflected, and to see the outside brightly.
How to shape the men flaps. When you just bought respect and it is
not easy to move hard, shape is applied to
the side bedding. About three days are
diagonally folded to the way below, and
binds firmly. You will come to put and
never to have a pain in the god and the
ear if you do like this.
the sight-seeing

- 35 -
How to connect the men chikawa Tie the men-chichi-gawa `leather loops' to the fourth bar(from the bottom).
It is the third bar for childrens men which has only 13 protections.
How to make the men The construction of the men
The men is made as follows:
(1) Straw is wrapped around the men grill.
(2) The chin pad is attached.
(3) The inner frame is made.
(4) The inner frame and men-buton are attached
with strings
(5) The inner frame and men-buton are attached
with water-buffalo leather. (Water buffalo
leather is soft when it is wet, so it is fastened
on while it is damp and then dried.)
(6) Finally the leather is painted with urushi
lacquer to stop it from becoming damp.
Note: If you leave your men wet, the leather will
swell up and distort, so it is important that you
dry it after you use it.

- 36 -
6-2.Putting on the tenugui‘men towel’
This is the easiest method. Fold it so it fits your head exactly.
A.For beginners
① Lay the tenugui in front of
you and fold it in half
lengthways.
② Fold it in about a third from
each end.
③ Turn it over.
⑤ Put it on, with the thick side
facing the front.
④ Insert the corners into the
doubled over central section.
⑥ It should hide your ears, and the
thick part should be on your
forehead.

- 37 -
① Fitting it exactly. Be careful not to make it too thick over your ears as it will
become painful.
B.
① Hold the ends of the tenugui. ② Bring the tenugui to your
forehead and slide it up until the
edge lies on your forehead, with
your hair gathered within.
③ Bring the right corner of the
tenugui to above and behind
your left ear, holding it taught.
Keep it in place with the other
side of the tenugui.
⑤ Lift up the flap formed in front
of your face.
④ Bring the left corner round to
above and behind your right ear,
and tuck it in.
⑥ Your ears will be exposed.

- 38 -
Wrapping it around your head.
C.
① Hold both ends of the tenugui,
bite the middle of the edge and
draw it back over your head.
② Wrap it round your head, left to
right and then right to left.
③ Swap hands and tie the two
ends in front of your
forehead.
⑤ Pull it down on both sides.
④ Lift up the front and tuck it in.
⑥ Your ears will be hidden.

- 39 -
6-3.Putting on the men
You should wear the “men” so that you can see from the monomi, the
slightly wider gap between the 6th and 7th bars. If you are looking out from
the monomi then your posture should be correct.
○
If the jaw is not stored like the right, it
is dangerous. The impact comes
directly to the throat, and there is
danger by which back of the head is
hit when falling in addition in the pain
when pierced when respect is hit.
The back of your
head should not
poke out. The monomi
‘view slit’
Your jaw
and forehead
should fit exactly.
The "men"
cords should
extend about
40cm below
the knot.
×

- 40 -
Putting on the men A Putting on the men B
① Take the cords from the fourth
or fifth bar of the men grill, cross
them behind the men then pass
them through the top bar and
back behind again.
② Gather the cords in your hands,
open the men, put your chin in
and pull it over your head.
① Put your chin in and put the men
on, then cross the cords, once
behind your head and then in
front of your jaw.
③ Firmly tie the cords in a bow so
that the men will not twist and
adjust the lengths of cords so
they are even.
② Cross the cords behind your
head once more and then pass
them through the topmost bar of
the men grill.
③ Firmly tie the cords in a bow so
that the men will not twist and
adjust the lengths of cords so
they are even.

- 41 -
6-4.How to keep your men well.
When you have finished using the "men", immediately wipe it with a well-
wrung damp cloth and then dry it. Sweat and dirt breed germs and will
smell.
Even when the outside dries it is hard to
dry the inside, so you should hang it in a
well ventilated place, or put newspaper
or a desiccant inside.
When the cloth on the inside of men
futon and the edge of men futon rubs
against each other to the shoulder can
thin completely, let's have Mr. protector
shop apply the cloth and leather before
inside cotton and the rug are seen.
Adjusting the lengths of the men cords Put your "men" on and tie the cords. Adjust the cords so that they are hang
40cm below the knot, and then cut off any excess.
① Unthread the
ends for 3 or 4 cm.
Take two or three
of the threads and
twist them into two
strands.
② Wrap the two
strands once
round the whole
cord.
③ Tie them tightly
and arrange them
neatly.

- 42 -
7.The kote ‘gauntlets'小手・甲手 7-1.The construction of the kote
Kashira ‘hand part'
namako ‘sea slugs' (There may be none, one or two, they add flexibility)
kote-bu or hiji ‘elbow' ‘forearm part' (Cylindrical section)
The kote is made of indigo dyed cloth and deer hide, silk (or equivalent)
ornamental thread, cotton or blanket material, the hand-part is made of
deer hair (or equivalent) and two cords.
Size; It is not easy to use when it is too large, and when it is small, can
<hand> do the diligence.
Material; Kote is made with the hair of the deer in the decoration string of a
cotton cloth of the indigo dye, deer's skin, artificial leather (clarino),
and silk (or, chemical fiber), cotton, rugs (or, it is old blanket), and
heads (or, chemical cotton) and two etc. small hand strings.

- 43 -
7-2.Putting on the kote
7-3.Taking the kote off
7-4.How to keep your kote well
Put on the kote by pushing the glove.
If you pull the forearm section you will deform the kote and hurt the joint.
The kote will come off easily if you push from the elbow.
If you pull beyond the joint, you will deform the kote and hurt the joint.
Sweat and dirt make the kote smell, so we recommend you dry it soon after
use.(Recently washable kote made of artificial leather and fabric have
come onto the market.)
When you've finished training, stretch out the palm leather as shown in the
picture and dry it. Occasionally rub it.
Like the men, the interior of the kote is hard to dry. You should hang it in a
well ventilated place, or put newspaper or a desiccant inside.

- 44 -
7-5.Tying the kote cords
次のページへ
② Threading the cord from the outside, make a series of loops.
Wind about 3cm of scotch tape to the end of the cord and make it into
a point.
① Start to thread. First pass the cord from the outside nearest the
elbow and tie off the end.

- 45 -
④ symmetry
③ The knot that joins the forearm part to the hand part.
⑤ Lace the cords like a shoelace.
⑥

- 46 -
⑩ The finishing touches
Gather the two cords together.
Tie each cord to the other.
Retie them to each other.

- 47 -
8.The equipment bag 防具袋 8-1.The construction of the equipment bag
The carrying bag is for carrying your gear, not storing it. If you
need to leave the gear in for a while then you should use newspaper
and desiccants to help keep it dry, and you need to be careful of mold.
8-2.Putting the gear in
8-3.Taking the gear out
① Fold the "hakama" and lay them
on the bottom.
↓
② Wrap the "tare" round the "do"
and put them in.
↓
③ Put the "men" in.
↓
④ Put the "kote" in.
↓
⑤ Fold the "kendogi" and put it in.
① Take out the kendogi and kote.
② Put the kote in front of and to the right of your right knee and then put
your men on them.
③ Spread the tenugui on top of the men.
④ Take the do out and place the tare so your name faces the front, and
take your hakama out.
① ② ③ ④
Note: The "kote" can face forwards or sideways or even be placed in front of
your left knee, depending on the custom where you practice.

- 48 -
Hanging up your gear
Q: What is the leather loop on the back of the do for?
A: As shown in the diagram below, the men cords can be looped so as to
make the men easy to carry and hang up. In the old days, the gear was
hung from the ceiling of the dojo and special windows were opened to
let the wind blow over it.
When you carry it, put the
shinai bag through here:
Note: Some people loop the cord round the kote’s hand part, but it
damages them.
Small Knoeledges

- 49 -
9.Glossary Names or words Explanations or notes page
Bokuto or bokken wooden sword 17 chichi-gawa leather loops 27,28,33,35 chigiri small iron plate in the shinai handle 10 do breastplate 27 do-yoko-chichi-gawa side leather loops(of the do) 27,28 dodai do plate 27 dojo training hall 48 ha blade 17 hakama trousers 21 haraobi gut belt 25 hiji elbow 42 himo cord, sash or string 41,44 jinbu blade 17 kanji Chinese characters kashira hand part (of the "kote") 17 katana Japanese sword 17 kawa-himo leather loop (on the hilt leather) 12
keichiku a kind of bamboo (that grows in warm areas) 6
keikogi training jacket 18 kendogi training jacket 18 kensen sword tip 5 kissaki sword tip 17 komono small leather loop (on the tsuru) 13 koshi-ita back plate (of the hakama) 21 kote gauntlets 42 kote-bu forearm part (of the kote) 42 men helmet 34 men-buton-bu the men futon area 34 men-chichi-gawa leather loops (on the men 34,35 men-gane men grill' 34
madake one of Japanese bamboo (Phyllostachys bambusoides) 6
mine back of blade 17 mono-uchi cutting area (of the shinai) 17 monomi the wide gap (in the men grill) 34
mosochiku a thick-stemmed bamboo (Phyllostachys pubescens) 6
nakayui leather thong' (on the shinai) 15 namako sea slugs (on the kote) 42 ootare big flap 25 ni-tou two swords 5 saburoku 3-shaku 6-sun shinai'(111cm) 5

- 50 -
saki-gawa leather tip 11 saki-gomu rubber tip 8,11 san-nana 3-shaku 7-sun shinai'(114cm) 5 sanku 3-shaku 9-sun shinai'(120cm) 5 sanpachi 3-shaku 8-sun shinai'(117cm) 5 seiza formal kneeling position 29 shaku old Japanese unit 30.3 cm (10-sun) 5 shinai bamboo sword 5 shinogi line through tip area 17
shokkou decorative section (on the do and men-tare) 28
sun old Japanese unit: 3.03 cm 5 tare waist armor 25 tenugui men towel 36 tsuba guard 5,16 tsuba-dome guard stop 5 tsuka hilt 5 tsuka-gashira pommel 5 tsuka-gawa hilt-leather 5 tsuki throat target area 34 tsuki-tare-bu the throat flap 34 tsuru cord (on the shinai) 5,8,12

- 51 -
In conclusion
To do kendo safely, it is important to that your "shinai" and armor
are kept in good condition through regular maintenance. Unless the
kendo player (or the parents of young children) understand how the
equipment is constructed and how to look after it it can be dangerous.
But kendo equipment doesn't come with a manual, unlike most things in
today's world. Therefore we have written an easy to understand,
illustrated manual to help kendo players can maintain their own
equipment.
Kendo is something you need to learn, where you receive instruction
from teachers and seniors. From that point of view, there is no need
for a manual. However we think this manual will be worth it if it
helps to make kendo safer.
We hope this manual is useful to kendo players everywhere.
First Japanese edition 1 Jul 1994 Second Japanese edition 1 Oct 1994
Third Japanese edition 1 Jul 1998 Second English edition 1 July 2001
Author/Illustrator Yasuji Ishiwata Author/Translator Francis Bond and Yasuji Ishiwata Address enquiries to the publisher:Fukuda Kikaku
2-6-43 Honcho, Asaka-shi, Saitama-ken, Japan 351-0011 TEL(048)465-5771 FAX(048)465-9370
E-Mail:budogu@big.or.jp http://www6.big.or.jp/~ budogu
Reproduction strictly prohibited.
We want to advocate expanding kendo and to make kendo safer. We don’t intend to get money. It costs too much money to publish this book. So, this book is not published and not sold. But you can see at internet. Please not copy for sale.