lab 1g: horizontally forced pendulum & chaotic motion
TRANSCRIPT

58:080 Experimental Engineering
Lab 1g: Horizontally Forced Pendulum & Chaotic Motion
OBJECTIVE
The objective of this lab is to study horizontally forced oscillations of a pendulum. This will be
done trough the comparison of experimental measurements with a numerical model. The
comparison will be made in the time domain as well in the frequency domain through the
computation of the FFT (Fast Fourier Transform) of the data. Phase diagrams will be also
compared. This simple system shows that the nonlinear oscillations carried by the pendulum can
eventually became chaotic, meaning that the resulting trajectories of the pendulum are random
and cannot be computed deterministically.
Figure 1: Experimental Setup
EQUIPMENT
The experimental setup includes the pendulum itself mounted over a moving carriage
which is driven in a rectilinear oscillatory motion trough a crank-and-rod mechanism
powered by a 12V DC motor. The crank is attached to the shaft of the motor and causes
an oscillatory motion by connecting the crank with the carriage through a rod. Note that
the oscillatory motion will not be a pure sine. The moment of inertia of the pendulum can
be adjusted by shifting the mass position to change the system dynamics. The movement
of the pendulum is recorded with a rotary motion sensor PASCO CI-6583 which sends a
sequence of pulses trough a data acquisition card (DBK203A) and is then converted to
Encoder
Pendulum
with
adjustable
mass
length
Crank-and-rod mechanism
Motor PS
Encoders PS
Carriage

angular position by means of the DasyLab program [1]. The carriage position is also
recorded trough a similar mechanism but only motion frequency is inferred from this. It
is important to note that the rotary motion sensor sends pulses, so it does not have a
natural zero: it counts from whatever initial position is in. To properly set the zero,
ALWAYS start the experiment from a known position, typically the pendulum at rest and
the carriage to the foremost right position.
POCEDURE
Familiarization with the System
Prior to executing the experiment, familiarize yourself with the experimental setup, the
data acquisition system, the DasyLab worksheet and the MATLAB scripts [2]. The
MATLAB scripts (Appendix A) will allow you to process the experimental data, to run a
numerical model for the system and to compare both results.
Experiment
1. Measure the mass of the bronze weight and pendulum bar. Also measure the bar
length.
2. Unplug the encoders from the power supply (PS). Turn on the encoders’ power
supply and set it to 5V. Once you are sure of the voltage set up, plug in the
encoders to the PS. (Two plugs in series in both the PS + and - terminals).
3. You are not going to use the carriage yet, so leave the motor PS off.
4. Open the DasyLab worksheet. Make sure you understand what you are seeing in
each plot window and digital meters. Change the write data modules setup so you
save your data to your working directory.
5. Set the position of the mass on the pendulum to a length of 18cm to the center of
rotation.
6. With the pendulum bar perfectly static in vertical position launch the data
acquisition. Move the pendulum until you have 10° angle and leave it to freely
oscillate. The motion of the pendulum will be damped, so the amplitude of the
angle will decrease over time. Acquire data until you reach 5° amplitude.
Modeling
7. Load the data into the MATLAB environment; use the getdata script to do this.
Identify from your experimental data your initial condition time (see Appendix A
for some tips) and take note of your initial angle and velocity.
8. Run the modeling script, pendsolv, with your initial conditions and with crank
radius 0a , i.e. no movement of the carriage, and set damping coefficient
to Nms12.0 .
9. Plot the experimental and numerical data together using the Matlab plot functions.
Subtract the initial time shift of your experimental data to the time data (see
appendix A).
10. Change the damping coefficient beta until you get the correct damping of the
system, the previous one is a good guess.
11. You can customize and then to save your plots using MATLAB, or you can save
your data to a text file and load it with your preferred graphic processor.

12. Use the spectra script to obtain the FFT of the experimental and numerical time
evolutions. Plot them and use the zoom and pan tools to adjust the view and
measure the natural frequency of the pendulum using the cursor tool.
13. Make phase diagrams. Make conclusions about the numerical method used in
computing the experimental data derivatives.
14. Once you’ve finished the previous steps, execute a clean all in the command line.
Be sure you’ve finished the previous steps; this command will erase all the
current data in memory.
Deterministic Dynamics of the System
Through this study you will investigate the system dynamics when the pendulum
oscillations. Do not promote very large motions, which in general correspond to a
chaotic, non-deterministic behavior.
Experiment
1. Leave the pendulum length unchanged, i.e. 18cm.
2. Set the crank radius to 5.7-5.8 cm (maximum amplitude). Use the carriage rule to
do this. REMEMBER: the crank radius is half the carriage stroke amplitude!!
3. Unplug the DC motor from its PS. Turn on the PS and set it to 4V. Plug the DC
motor in. You should obtain an excitation period of 1.42±0.02 s with this voltage.
4. Set the carriage to its rightmost position (zero initial velocity) and set the
pendulum at rest.
5. Begin the data acquisition.
6. Enable the output of the motor PS and record data for about 3min so you can get
the initial transient and following periodic oscillations.
Modeling
7. Load the experimental data into the MATLAB environment.
8. pendsolv will solve the pendulum dynamics beginning with a zero displacement
of the carriage. You will have to identify this zero crossing in your experimental
data. Plot the xc variable and use the zoom, pan and cursor tools to identify a
good zero crossing point. Take note of the x position, the array index.
9. Run the script qindexvalue to show angular position and velocity at this index.
These will be your initial conditions for the model.
10. Run the model with correct crank radius and initial conditions. Use
again Nms12.0 as initial guess to the damping coefficient.
11. Plot numerical and experimental data together and change the damping coefficient
until you get the best results.
12. Find the FFT using spectra. Can you identify the peaks in this spectrum? Are
they what you expected?
13. Make the phase diagrams.
14. Once you finish, perform a clean all at the command line.
Repeat the steps 1-13 but this time using cma 3.22.2 , cmL 18 , VV 6 (period
about 0.87 sec). This time you will see larger oscillations when compared with the
previous case so nonlinear effects became important and you will see that in the spectrum

of the data there appear more peaks than in the previous small amplitude, linear case.
This time the damping coefficient is going to be smaller, about Nms012.0 .
Transition to Chaotic Behavior
This last series of comparisons will show you a very interesting characteristic of this
particular system: the transition to a chaotic dynamics.
Experiment
1. Change the pendulum length to 9cm.
2. Use a crank radius of about 5.7-5.8cm.
3. Put the carriage to its rightmost position and set the pendulum at rest.
4. Set the motor PS to 5V; this should correspond to a period of about 1.14sec.
5. Start the data acquisition and turn on the motor PS output. Acquire data for about
2min.
Modeling
6. Load the data into MATLAB.
7. This time we are not going to compare time evolutions (but you can do it if you
want) and we will be more interested in the FFT. Run the simulation just with
resting initial conditions and the values of the damping coefficient between 0.012
and 0.09.
8. Compute the FFT of the experimental data and numerical simulation. Can you
identify discrete picks like in the previous cases?
9. Execute a clean all.
Perform steps 1-9 but this time supply the motor with 6V (period of about 0.92sec). You
should obtain a random motion of the pendulum in which it spins completely around its
axis. If the motion does not appear to be chaotic, stop the experiment and repeat steps 3-
5 until the motion is chaotic. Remember, this should be a chaotic behavior, so every time
you restart the experiment, you obtain a different time evolution.
What happens to the angle time evolution computed numerically if you slightly change
the initial conditions? (say you change the initial angle from 0 degrees to 0.1 degrees).
Note: In this case, since the motion of the pendulum is random, we do not compare the
angle time evolution. So in these cases the FFT of the time evolution is a very good way
of comparing results since in the FFT you have all the dynamic information.
PreLab questions:
If a pendulum system has small oscillations, (i.e. you can consider a linear approximation
of the equations developed in the Appendix B), what frequencies do you expect to
observe in the FFT?
REFERENCES
1. DasyLab V-8.00.04. Nov 3 2004.
2. MATALB The Language of Technical Computing V-7.3.0.267 (R2006b).

58:080 Experimental Engineering
Lab 1g
Appendix A: First MATLAB Steps and Tips. Pendulum Scripts.
Introduction Matlab is a commercial "Matrix Laboratory" package which operates as an interactive
programming environment. Matlab is well adapted to numerical experiments since the
underlying algorithms for Matlab's built-in functions and supplied m-files are based on the
standard libraries LINPACK and EISPACK. Matlab program and script files always have
filenames ending with ".m". The programming language is exceptionally straightforward
since almost every data object is assumed to be an array. Graphical output is available to
supplement numerical results.
Matlab is very well documented program. There are several sources from which you can
obtain help and get started
a. At the command prompt type “help + command_name”, and you will obtain
information about “command_name”. You can use the help command for the
scripts of this lab.
b. Pressing “F1” will cause the Matlab documentation to appear. You can navigate
the help tree in “Contents”, look for key-words in “index” or take a look to
several demo scripts in “Demos”.
c. On the internet there are plenty of websites dedicated to explain Matlab use, from
basics tutorials to more specific applications such a control, signal processing,
neural networks and fuzzy logic, finite elements, image processing, etc.
Running Matlab When you run Matlab for the first time, a big window will appear separated in three regions, as
shown in Figure 1. The upper left section is a small window containing the “Current
Directory” and “Workspace” tab. In the Current Directory tab you can change your working
directory, while in Workspace tab you can see the current variables that you created and available
to work.
a. The “Command History” window shows you the history of all the commands that you
executed in at the prompt.
b. The “Command window” is where you execute commands and through which you have
most of the interaction with the environment.

We are not going to explain so much about Matlab use and we will limit ourselves to the basics
we need to run the pendulum experiment lab, but we encourage you to learn this powerful
development and test platform.
Using the command line The command line, or prompt, appears in Matlab as the window labeled “Command window”. In
this window you will see a “>>” symbol, indicating that the program is waiting for you to
introduce commands.
For this lab we are going to use the following scripts1:
1. getdata
2. pendsolv
3. qindexvalue
4. mphasediag
5. spectra
To obtain help about this script just type at the command line help followed by the script name,
eg: >> help getdata.
1 Scripts are small or big pieces of code written in Matlab language. Usually they consist of a sequence of
commands that, instead of executing them one by one at the command line, you put them all together in a
single file and then you execute this file, making your work easier.
Current Directory tab
Workspace tab
Command history
Prompt
Figure 1: Matlab development environment

You can see the contents of these scripts just typing edit followed by the script name. A text
editor will open and you will be able to edit the script. Is not necessary, but try to look at the lab
scripts and see if you understand them.
In the following, a brief explanation of how to call these scripts is given. For all the scripts, the
quantities in brackets are return values and quantities in parenthesis are inputs. The use of a
semicolon at the end suppresses the display of returned values in the command window; recall
that these quantities can be vectors of 10000 elements in our lab and you will not want to see
them. Immediately after executing the script, you will see the return values at the workspace.
getdata:
With this script you load and obtain the derivatives of the data previously acquired with
DasyLab.
You will call it at the command line as:
>> [pt p dp p2 dp2 p3 dp3 txc xc]=getdata('H:\Data\alumns\run4\’);
In this example you tell to getdata that run4 is the directory where you saved your data with
Dasylab.
IMPORTANT: getdata will try to read pend.ASC and carriage.ASC files from the path you
supply. These file names are set in the DasyLab worksheet, don’t change these names!!!.
The returned values are:
pt: time instances.
p: angle at the corresponding time instances.
dp: first order derivative (forward difference). dt
ppdp nn
1
p2: index rearrangement in p. When combined with dp2, this provides a second order
approximation of the derivative for phase diagrams.
dp2: second order derivative (centered difference). dt
ppdp nn
22 11
p3: angle at intermediate time instances. When used with dp3 (same as dp), this provides
a second order approximation of the derivative for phase diagrams. 2
3 1
2/1
nnn
pppp
dp3: same as dp.
pendsolv:
This is the solver that you will use to obtain a numerical solution of the pendulum system. The
governing equations are described in Appendix B. These are solved trough a fourth-order Runge-
Kutta of fixed step size. The input parameters for this solver are the pendulum masses and lengths
(see Appendix B for the definition of these quantities), the crank-and-rod parameters and the
numerical solver parameters such as final time, time step and initial conditions.
You will call it at the command line as: >> [tt xx dxx fo Last]=pendsolv(L,l,h,d,M,m,a,b,beta,g,T,tf,dt,xini);
Where the input quantities are:
1. The model parameters(refer to Appendix B):

a. L: mass M distance to rotation point of pendulum, [cm]. b. h: bar length, [cm]. c. l: length from pendulum rotation point to bar bottom, [cm]. d. d: length from pendulum rotation point to bar top, [cm]. e. M: mass of the bronze mass, [gr]. f. m: mass of the bar, [gr]. g. a: crank radius, [cm]. h. b: rod length. i. beta: damping factor, [Nms]. j. g: gravity acceleration, [m/s^2]. In MKS g=9.81 m/s^2. k. T: Excitation frequency, [sec].
2. Simulation parameters:
a. tf: Final simulation time, [sec]. b. dt: Time step, [sec]. c. xini: vector of length two for angle and velocity initial
conditions. xini(1): angle, [degrees] and xini(2): velocity,
[degrees/sec].
The output parameters are:
a. tt: Time instances. b. xx: angle at each time instance, [degrees]. c. dxx: velocity at each time instance, [degrees/s]. d. fo: natural frequency for small amplitudes, [Hz]. e. Last: Equivalent length.
qindexvalue:
with this simple script you will obtain angle and velocity of the experiment at a certain index
value previously obtained trough the zero crossing identification of the carriage displacement.
Suppose as an example that the index that you obtained was 54, then
>> [angle vel]=qindexvalue(p,dp,54)
will show you the angle and velocity of the experimental data at point index 54. Note that we are
not using semicolons to show the data output.
spectra:
This script is used to compute the FFT of a function. If you want to compute the FFT of the
numerical data, you execute
>> [f y]=spectra( [pt p] );
And you can plot it using
>> plot(f,y)
The returned value in y is normalized such you can interpret it as the amplitude of the sine
function with frequency f.
Plots in Matlab
Brief summary of the plot command.

Here are summarized the most important commands to rapidly obtain a plot using Matlab.
Basically, to make plots in Matlab, you use the plot command. This command is relatively easy
to use, you just have to supply it with your “x” and “y” values. For example, imagine that you
have the variables pt and p output from getdata. If you want to see this data in a plot you just
have to perform at the command line
>> plot(pt,p)
This command will open a window with your data plotted on it. You can use the zoom and pan
icons in the figure window to expand/contract your graph and move around it until you see what
you want. Use the insert menu to rapidly add labels, legends, and much more. Once you add a
label or legend, you can edit its font by right-clicking on it and selecting font. Figure 2 illustrates
some of the figure window major features
In this lab you want to compare experimental and numerical data. You can do that plotting both
data together. Consider for example you have pt and p as a result of a getdata, and that you also
have tt and xx as a result of a pendsolv. You can plot both data performing at the command line
>> plot(pt,p,tt,xx)
If you want to shift the experimental data in time, say by a time shift of 2.3 sec (you will be doing
this in this lab), you just have to perform
>> plot(pt-2.3,p,tt,xx)
Figure 2: Figure window
Insert menu
Zomm tools Pan tool Cursor tool

Making phase diagrams.
Phase diagrams are a very useful tool in analyzing a dynamic system. They consist in
two dimensional graphs made plotting a certain variable versus another variable for the
same time. For the pendulum, the obvious and only choice is to plot angular velocity
versus angle.
For the numerical phase diagram you just have to execute
>> plot(xx,dxx)
Make another plot for the experimental diagram. In this case you can choose between
several derivatives
>> plot(p,dp)
>> plot(p2,dp2)
>> plot(p3,dp3)
Using the cursor to identify the zero crossing of the carriage. In this lab you will have to identify the zero crossing of the carriage displacement to model the
correct phase in your model. In order to do this you will make use of the Matlab cursor. You can
use the cursor tool through the cursor button in the Matlab figure window.
When you press the cursor button, your mouse cursor will change into a sight like cursor. With
it, you can pick anywhere in the line plot. A square dot with a coordinate box indicating data
position will appear. You can move this square with the arrows keys, see figure 3 below.
The displacement of the carriage is in the variable xc. You should plot it typing
>> plot(xc)

Figure 3: Cursor
58:080 Experimental Engineering
Cursor tool
Coordinate box

Lab1g
Appendix B: Pendulum Equations of Motion and Modeling
Pendulum Motion In this appendix we will derive the equations of motion for the pendulum system. Figure 1 shows
a scheme of the system. It consists of a thin rod of mass m with its top attached to a moving cart
and a mass M of adjustable position on the rod. The position of the cart will be described by the
x coordinate and the rotation of the pendulum from its equilibrium position will be denoted by
.
Figure 2 shows a detail of the rod and mass. This figure defines the lengths and geometry of the
model.
M
m
x
Figure 1: Scheme of a pendulum over a horizontal moving cart.

Since the point to which the pendulum is fixed is moving with the cart, it is easiest to
derive the equations of motion for a non-inertial frame of reference in which the
rotational axis of the pendulum remains fixed. Let us denote )(txx as the function
describing the motion of the cart. Then the pendulum will be under the influence of a
non-inertial force of magnitude ixmMF ˆ)( , applied on the center of mass of the
pendulum, where i is the unit vector in the x axis direction.
The center of mass of the pendulum can easily be obtained:
mM
dlmMSCM
2/)(
The conservation of momentum states that torque with respect to certain point will induce
a change in the angular momentum calculated with respect the same point. Here, the best
choice for this point is the rotation axis of the pendulum. Then, the conservation of
momentum is
Tdt
dL
In our case, since the motion of the pendulum is restricted to a plane, this equation
becomes a scalar relationship and the angular momentum is simply related to the angular
velocity by IL , where the moment of inertia I is simply a scalar quantity.
This moment of inertia can easily be calculated as the sum of the moment of inertia of the
bar and the moment of inertia of the mass. The moment of inertia of the bar with respect
to the axis of the pendulum can be calculated using the parallel axis theorem.
d l
L
L
h
Figure 2: Detail of the pendulum road.
These procedures give as result for the angular moment of inertia of the bar
)(3
33 dlh
mIb
2MLII b
Now, the total torque applied to the system is the sum of three contributions, due to
gravity force, the non-inertial force and the friction force. The first two forces are
applied to the center of mass of the system. For the friction forces it will be assumed that
friction torque is proportional to the angular velocity. Then, the total torque is
CMCM SxmMSmMgT )cos()()sin()(
Putting all together and rearranging terms the equations of motion for the pendulum
result in
)cos(1ˆ)sin(
*
2
0 xL
In this equation *
0 / Lg is the natural frequency, CMSMm
IL
)(
*
is the
equivalent length (which is the length of a point mass pendulum with exactly the same
dynamics as this pendulum), and I
ˆ .
Then, once the motion of the cart is imposed, it is possible to solve for the angular motion
provided the adequate initial conditions are given.
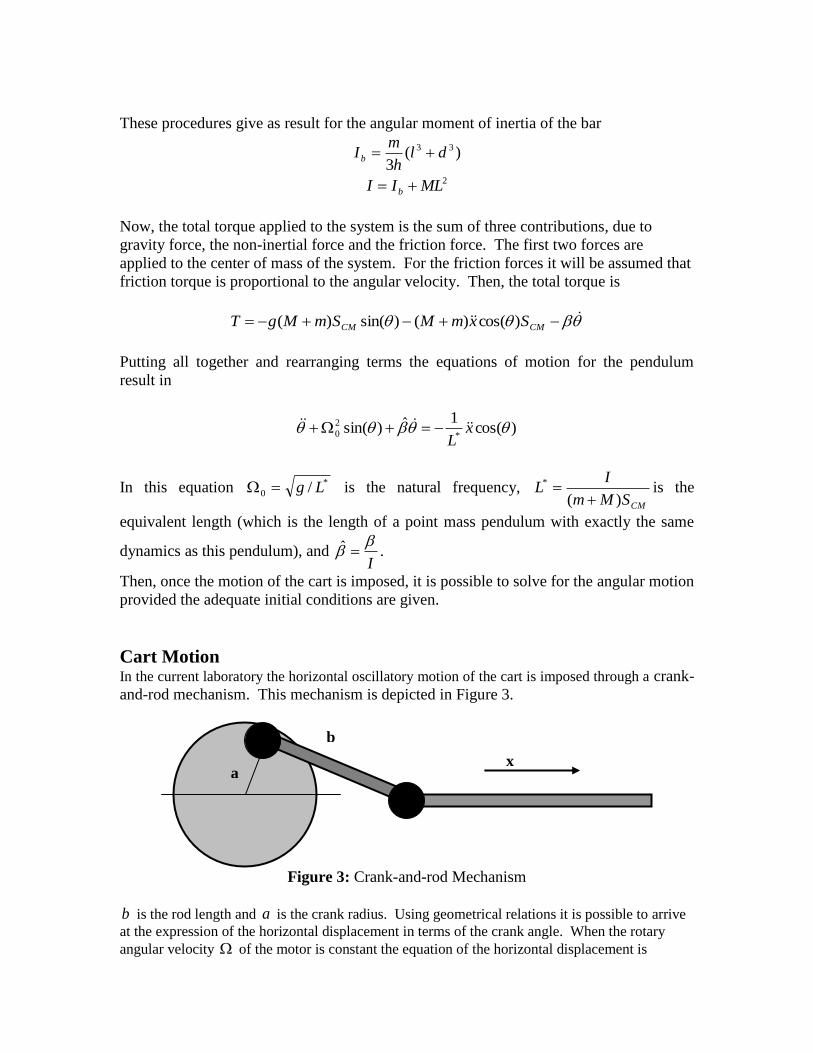
Cart Motion In the current laboratory the horizontal oscillatory motion of the cart is imposed through a crank-
and-rod mechanism. This mechanism is depicted in Figure 3.
Figure 3: Crank-and-rod Mechanism
b is the rod length and a is the crank radius. Using geometrical relations it is possible to arrive
at the expression of the horizontal displacement in terms of the crank angle. When the rotary
angular velocity of the motor is constant the equation of the horizontal displacement is
b
a x

2
2
2
1)(cos1)sin()(b
a
a
bt
b
a
a
btatx
It is instructive to realize that when the relation b
a is small, this relation can be separated into
powers of b
a and the higher order terms can be neglected. This process gives
)2cos(14
1)sin( t
b
at
a
x
Then, when this crank-and-rod mechanism is used not only an oscillation of frequency is
present, but also a component of twice the excitation frequency. This is observed in the
pendulum experiment when the displacement of the pendulum is analyzed through the use of the
Fourier transform.
Small Amplitude Oscillations We can study the oscillations carried by the pendulum when the motion amplitude is small. So,
making the approximations )sin( and 1)cos( , and inserting the approximation for
small b
a ratio for the cart motion, we obtain the linearized equation for the pendulum motion
)2cos()sin(ˆ 2
*
2
0 tb
at
L
a
So, knowing that the solution to an inhomogeneous differential equation like this is
composed of the sum of a homogeneous solution and a particular solution, can you
predict which frequency components will be present in our experiment for small
amplitude motions?