lpd - orionsupport.orionpackaging.com/pdf_manuals/lpd 2.0.pdf · 1. page 1-1 orion machine manual...
TRANSCRIPT

LPD StretchwrapperSYSTEM MANUAL
Revision Date - 5 August 2008Machine Manual
100 Crescent DriveCollierville, TN 38017Phone: (901) 888-4170
Toll Free: (800) 333-6556FAX: (901) 365-1071
PN: 729221

© 2008 Pro Mach. All Rights Reserved.Section 106 of the 1976 Copyright Act forbids any party other than the author (Pro Mach) to: Reproduce owned workin copies or phonorecords, to prepare derivative works based upon the work; to distribute copies or phonorecords ofthe work to the public by sale or other transfer of ownership, by rental or lease. Copyright protection subsists from thetime the work is created in fixed form. The copyright in the work of authorship immediately becomes the property ofthe author who created the work (Pro Mach.) Only the author or those deriving their rights through the author can right-fully claim copyright.
Liability WaiverThe information in this manual is subject to change without notice and does not represent a commitment on the partof Pro Mach and assumes no responsibility for any errors that may appear in this manual. In no event will Pro Machor its employees, partners, contracted workers/ companies or any association who participates in the writing of thismanual be liable for technical or editorial omissions made herein; nor for direct, indirect, special, incidental, or conse-quential damages resulting from the use or defect of this manual.

Orion Machine ManualRevision 2.0 LPD Stretchwrapper1 May 2008 Table of Contents
Page I
Table of ContentsChapter 1: Introduction and Safety
Introduction. . . . . . . . . . . . . . . . . . . . . . . . . . . . . . . . . . . . . . . . . . . . . . . . . . . . . . . . . . . . 1-1About this Manual . . . . . . . . . . . . . . . . . . . . . . . . . . . . . . . . . . . . . . . . . . . . . . . . . . 1-2Copyright Notice . . . . . . . . . . . . . . . . . . . . . . . . . . . . . . . . . . . . . . . . . . . . . . . . . . . 1-2
Safety. . . . . . . . . . . . . . . . . . . . . . . . . . . . . . . . . . . . . . . . . . . . . . . . . . . . . . . . . . . . . . . . . 1-3System Safety Recommendations. . . . . . . . . . . . . . . . . . . . . . . . . . . . . . . . . . . . . . 1-4Hazard Messages . . . . . . . . . . . . . . . . . . . . . . . . . . . . . . . . . . . . . . . . . . . . . . . . . . 1-5Operation Safety . . . . . . . . . . . . . . . . . . . . . . . . . . . . . . . . . . . . . . . . . . . . . . . . . . . 1-6Maintenance Safety . . . . . . . . . . . . . . . . . . . . . . . . . . . . . . . . . . . . . . . . . . . . . . . . . 1-7Lockout and Tagout Recommendations . . . . . . . . . . . . . . . . . . . . . . . . . . . . . . . . . 1-8
Electrical System . . . . . . . . . . . . . . . . . . . . . . . . . . . . . . . . . . . . . . . . . . . . . 1-8Pneumatic and Vacuum Systems . . . . . . . . . . . . . . . . . . . . . . . . . . . . . . . . . . . . . . 1-9
Installation and First Time Power Up . . . . . . . . . . . . . . . . . . . . . . . . . . . . . . . . . . . . . . 1-10Unloading. . . . . . . . . . . . . . . . . . . . . . . . . . . . . . . . . . . . . . . . . . . . . . . . . . . . . . . . 1-10Inspection . . . . . . . . . . . . . . . . . . . . . . . . . . . . . . . . . . . . . . . . . . . . . . . . . . . . . . . 1-10Machine Installation . . . . . . . . . . . . . . . . . . . . . . . . . . . . . . . . . . . . . . . . . . . . . . . . 1-11Assembly Procedure . . . . . . . . . . . . . . . . . . . . . . . . . . . . . . . . . . . . . . . . . . . . . . . 1-11
Chapter 2: System DescriptionMachine Specifications . . . . . . . . . . . . . . . . . . . . . . . . . . . . . . . . . . . . . . . . . . . . . . . . . . 2-1Machine Floor Plan. . . . . . . . . . . . . . . . . . . . . . . . . . . . . . . . . . . . . . . . . . . . . . . . . . . . . . 2-2
Chapter 3: System OperationOperating Procedures . . . . . . . . . . . . . . . . . . . . . . . . . . . . . . . . . . . . . . . . . . . . . . . . . . . 3-1
Control Panel . . . . . . . . . . . . . . . . . . . . . . . . . . . . . . . . . . . . . . . . . . . . . . . . . . . . . . 3-1Before Starting Machine Operation . . . . . . . . . . . . . . . . . . . . . . . . . . . . . . . . . . . . . 3-1Loading The Film. . . . . . . . . . . . . . . . . . . . . . . . . . . . . . . . . . . . . . . . . . . . . . . . . . . 3-2How to Start and Shut Down Your Wrapping System . . . . . . . . . . . . . . . . . . . . . . . 3-3
POWER SWITCH . . . . . . . . . . . . . . . . . . . . . . . . . . . . . . . . . . . . . . . . . . . . . 3-3START AND EMERGENCY STOP SWITCHES. . . . . . . . . . . . . . . . . . . . . . 3-3
Opening the Main Control Panel . . . . . . . . . . . . . . . . . . . . . . . . . . . . . . . . . . . . . . . 3-3Main HMI Control Panel . . . . . . . . . . . . . . . . . . . . . . . . . . . . . . . . . . . . . . . . . . . . . . . . . . 3-4Quick Start Setup . . . . . . . . . . . . . . . . . . . . . . . . . . . . . . . . . . . . . . . . . . . . . . . . . . . . . . . 3-6
To Set Carriage Speed Up . . . . . . . . . . . . . . . . . . . . . . . . . . . . . . . . . . . . . . . . . . . 3-6To Set Carriage Speed Down . . . . . . . . . . . . . . . . . . . . . . . . . . . . . . . . . . . . . . . . . 3-6To Set the Number of Top Wraps . . . . . . . . . . . . . . . . . . . . . . . . . . . . . . . . . . . . . . 3-6
HMI Screens . . . . . . . . . . . . . . . . . . . . . . . . . . . . . . . . . . . . . . . . . . . . . . . . . . . . . . . . . . . 3-7Power Up Screen. . . . . . . . . . . . . . . . . . . . . . . . . . . . . . . . . . . . . . . . . . . . . . . . . . . 3-7Main Menu. . . . . . . . . . . . . . . . . . . . . . . . . . . . . . . . . . . . . . . . . . . . . . . . . . . . . . . . 3-7Modify Wraps. . . . . . . . . . . . . . . . . . . . . . . . . . . . . . . . . . . . . . . . . . . . . . . . . . . . . . 3-7Autoheight Photoeye Screen. . . . . . . . . . . . . . . . . . . . . . . . . . . . . . . . . . . . . . . . . . 3-8

Machine Manual OrionLPD Stretchwrapper Revision 2.0 Table of Contents 1 May 2008
Page II
Wrap Order Screen . . . . . . . . . . . . . . . . . . . . . . . . . . . . . . . . . . . . . . . . . . . . . . . . . 3-8Broken Film Alarm Screen. . . . . . . . . . . . . . . . . . . . . . . . . . . . . . . . . . . . . . . . . . . . 3-8Service Debug or Password Select Screen. . . . . . . . . . . . . . . . . . . . . . . . . . . . . . . 3-9Service Debugging Screen . . . . . . . . . . . . . . . . . . . . . . . . . . . . . . . . . . . . . . . . . . . 3-9Password Screen. . . . . . . . . . . . . . . . . . . . . . . . . . . . . . . . . . . . . . . . . . . . . . . . . . 3-10Input Status Screen . . . . . . . . . . . . . . . . . . . . . . . . . . . . . . . . . . . . . . . . . . . . . . . . 3-10Alarm List/ History Screen . . . . . . . . . . . . . . . . . . . . . . . . . . . . . . . . . . . . . . . . . . . 3-11Alarm History Screen. . . . . . . . . . . . . . . . . . . . . . . . . . . . . . . . . . . . . . . . . . . . . . . 3-11Factory Reset Screen . . . . . . . . . . . . . . . . . . . . . . . . . . . . . . . . . . . . . . . . . . . . . . 3-11Advanced Parameters Password Screen . . . . . . . . . . . . . . . . . . . . . . . . . . . . . . . 3-12Positioning Screen. . . . . . . . . . . . . . . . . . . . . . . . . . . . . . . . . . . . . . . . . . . . . . . . . 3-12Positioning Turntable/ InstaCut Screen . . . . . . . . . . . . . . . . . . . . . . . . . . . . . . . . . 3-12Turntable Advanced Parameters Screens. . . . . . . . . . . . . . . . . . . . . . . . . . . . . . . 3-13InstaCut Advanced Parameters Screens. . . . . . . . . . . . . . . . . . . . . . . . . . . . . . . . 3-13Advanced Parameters Positioning/ Timers Screens . . . . . . . . . . . . . . . . . . . . . . . 3-14
Chapter 4: TroubleshootingHMI Screen Diagrams. . . . . . . . . . . . . . . . . . . . . . . . . . . . . . . . . . . . . . . . . . . . . . . . . . . . 4-1
Chapter 5: MaintenanceMaintenance . . . . . . . . . . . . . . . . . . . . . . . . . . . . . . . . . . . . . . . . . . . . . . . . . . . . . . . . . . . 5-1
Motor Maintenance . . . . . . . . . . . . . . . . . . . . . . . . . . . . . . . . . . . . . . . . . . . . . . . . . 5-1Reducer Oil Change . . . . . . . . . . . . . . . . . . . . . . . . . . . . . . . . . . . . . . . . . . . . . . . . 5-1Ring Bearing Maintenance (*optional) . . . . . . . . . . . . . . . . . . . . . . . . . . . . . . . . . . . 5-2Tower Raceways Maintenance . . . . . . . . . . . . . . . . . . . . . . . . . . . . . . . . . . . . . . . . 5-3Chain Maintenance . . . . . . . . . . . . . . . . . . . . . . . . . . . . . . . . . . . . . . . . . . . . . . . . . 5-3Cleaning The Stretch Rollers. . . . . . . . . . . . . . . . . . . . . . . . . . . . . . . . . . . . . . . . . . 5-3Maintenance Log . . . . . . . . . . . . . . . . . . . . . . . . . . . . . . . . . . . . . . . . . . . . . . . . . . . 5-5
Appendix A: Index

Orion Machine ManualRevision 2.0 LPD Stretchwrapper1 May 2008 List of Figures
Page I
List of FiguresChapter 1: Introduction and Safety
Fork Tube Access Sticker . . . . . . . . . . . . . . . . . . . . . . . . . . . . . . . . . . . . . . . . . . . 1-10
Chapter 2: System DescriptionMachine Layout . . . . . . . . . . . . . . . . . . . . . . . . . . . . . . . . . . . . . . . . . . . . . . . . . . . . 2-2
Chapter 3: System OperationLoading the Film . . . . . . . . . . . . . . . . . . . . . . . . . . . . . . . . . . . . . . . . . . . . . . . . . . . 3-2HMI Panel . . . . . . . . . . . . . . . . . . . . . . . . . . . . . . . . . . . . . . . . . . . . . . . . . . . . . . . . 3-4Power Up Screen. . . . . . . . . . . . . . . . . . . . . . . . . . . . . . . . . . . . . . . . . . . . . . . . . . . 3-7Main Menu. . . . . . . . . . . . . . . . . . . . . . . . . . . . . . . . . . . . . . . . . . . . . . . . . . . . . . . . 3-7Modify Wraps Screen . . . . . . . . . . . . . . . . . . . . . . . . . . . . . . . . . . . . . . . . . . . . . . . 3-7Autoheight On/ Off Screen. . . . . . . . . . . . . . . . . . . . . . . . . . . . . . . . . . . . . . . . . . . . 3-8Wrap Order Screen . . . . . . . . . . . . . . . . . . . . . . . . . . . . . . . . . . . . . . . . . . . . . . . . . 3-8Broken Film Alarm Screen. . . . . . . . . . . . . . . . . . . . . . . . . . . . . . . . . . . . . . . . . . . . 3-8Service Debug or Password Select Screen. . . . . . . . . . . . . . . . . . . . . . . . . . . . . . . 3-9Service/ Debugging Screen . . . . . . . . . . . . . . . . . . . . . . . . . . . . . . . . . . . . . . . . . . . 3-9Password Screen. . . . . . . . . . . . . . . . . . . . . . . . . . . . . . . . . . . . . . . . . . . . . . . . . . 3-10Input Status Screen . . . . . . . . . . . . . . . . . . . . . . . . . . . . . . . . . . . . . . . . . . . . . . . . 3-10Alarm List/ History Screen . . . . . . . . . . . . . . . . . . . . . . . . . . . . . . . . . . . . . . . . . . . 3-11Alarm History Screen. . . . . . . . . . . . . . . . . . . . . . . . . . . . . . . . . . . . . . . . . . . . . . . 3-11Factory Reset Screen . . . . . . . . . . . . . . . . . . . . . . . . . . . . . . . . . . . . . . . . . . . . . . 3-11Advanced Parameters Password Screen . . . . . . . . . . . . . . . . . . . . . . . . . . . . . . . 3-12Positioning Screen. . . . . . . . . . . . . . . . . . . . . . . . . . . . . . . . . . . . . . . . . . . . . . . . . 3-12Positioning Screen. . . . . . . . . . . . . . . . . . . . . . . . . . . . . . . . . . . . . . . . . . . . . . . . . 3-12Turntable Advanced Parameters . . . . . . . . . . . . . . . . . . . . . . . . . . . . . . . . . . . . . . 3-13InstaCut Advanced Parameters Screen . . . . . . . . . . . . . . . . . . . . . . . . . . . . . . . . 3-13Advanced Parameters Screen. . . . . . . . . . . . . . . . . . . . . . . . . . . . . . . . . . . . . . . . 3-14Timers AH Photoeye Delay Screen . . . . . . . . . . . . . . . . . . . . . . . . . . . . . . . . . . . . 3-14Punch Dwell and End Cycle Delay Screen . . . . . . . . . . . . . . . . . . . . . . . . . . . . . . 3-14Tension and H Speed Delay Screen . . . . . . . . . . . . . . . . . . . . . . . . . . . . . . . . . . . 3-14Film FLT and Cycle Watchdog Timers Screen . . . . . . . . . . . . . . . . . . . . . . . . . . . 3-14
Chapter 4: TroubleshootingPage 1 HMI Screen Flowchart. . . . . . . . . . . . . . . . . . . . . . . . . . . . . . . . . . . . . . . . . 4-1Page 2 HMI Screen Flowchart. . . . . . . . . . . . . . . . . . . . . . . . . . . . . . . . . . . . . . . . . 4-2
Chapter 5: MaintenanceCleaning Stretch Rollers . . . . . . . . . . . . . . . . . . . . . . . . . . . . . . . . . . . . . . . . . . . . . 5-4

Machine Manual OrionLPD Stretchwrapper Revision 2.0 List of Figures 1 May 2008
Page II

Orion Machine ManualRevision 2.0 LPD Stretchwrapper1 May 2008 Introduction and Safety Contents
Page I
Introduction and Safety ContentsIntroduction. . . . . . . . . . . . . . . . . . . . . . . . . . . . . . . . . . . . . . . . . . . . . . . . . . . . . . . . . . . . 1-1
About this Manual . . . . . . . . . . . . . . . . . . . . . . . . . . . . . . . . . . . . . . . . . . . . . . . . . . 1-2Copyright Notice . . . . . . . . . . . . . . . . . . . . . . . . . . . . . . . . . . . . . . . . . . . . . . . . . . . 1-2
Safety. . . . . . . . . . . . . . . . . . . . . . . . . . . . . . . . . . . . . . . . . . . . . . . . . . . . . . . . . . . . . . . . . 1-3System Safety Recommendations. . . . . . . . . . . . . . . . . . . . . . . . . . . . . . . . . . . . . . 1-4Hazard Messages . . . . . . . . . . . . . . . . . . . . . . . . . . . . . . . . . . . . . . . . . . . . . . . . . . 1-5Operation Safety . . . . . . . . . . . . . . . . . . . . . . . . . . . . . . . . . . . . . . . . . . . . . . . . . . . 1-6Maintenance Safety . . . . . . . . . . . . . . . . . . . . . . . . . . . . . . . . . . . . . . . . . . . . . . . . . 1-7Lockout and Tagout Recommendations . . . . . . . . . . . . . . . . . . . . . . . . . . . . . . . . . 1-8Pneumatic and Vacuum Systems . . . . . . . . . . . . . . . . . . . . . . . . . . . . . . . . . . . . . . 1-9
Installation and First Time Power Up . . . . . . . . . . . . . . . . . . . . . . . . . . . . . . . . . . . . . . 1-10Unloading. . . . . . . . . . . . . . . . . . . . . . . . . . . . . . . . . . . . . . . . . . . . . . . . . . . . . . . . 1-10Inspection . . . . . . . . . . . . . . . . . . . . . . . . . . . . . . . . . . . . . . . . . . . . . . . . . . . . . . . 1-10Machine Installation . . . . . . . . . . . . . . . . . . . . . . . . . . . . . . . . . . . . . . . . . . . . . . . . 1-11Assembly Procedure . . . . . . . . . . . . . . . . . . . . . . . . . . . . . . . . . . . . . . . . . . . . . . . 1-11

Machine Manual OrionLPD Stretchwrapper Revision 2.0 Introduction and Safety Contents 1 May 2008
Page II

1.
Page 1-1
Orion Machine ManualRevision 2.0 LPD Stretchwrapper1 May 2008 Introduction and Safety
Introduction and Safety
IntroductionThank you for choosing Orion stretch-wrapping equipment. It is a wise choice, which will benefit your company now and in the future.
Orion uses a unique combination of functional, rugged steel structure and sophisticated control systems to offer equipment high in durability and low in maintenance require-ments. Our advance control systems mean that Orion equipment can be operated safely and efficiently without the need for special operator expertise.
Please read this manual carefully and keep it handy. Following these simple operating instructions will insure the safe and efficient performance of this machine while simple maintenance procedures will guarantee a long and productive life of the equipment.
Note: This manual covers standard features of the machine. Certain options may not be fully covered due to their unique application. Every effort has been made to ensure document accuracy how-ever, Orion Packaging retains the right to change specifications without notice.
In order to acquire more information about custom made features of your machine and to provide quicker service, the following information is required when making an inquiry:
1)Model LPD Stretchwrapper
2)Serial Number
Built in Alexandria Minnesota, USA

Machine Manual OrionLPD Stretchwrapper Revision 2.0Introduction and Safety 1 May 2008
Page 1-2
About this ManualOrion is committed to helping you maximize the productivity of your system. This manual is specifically designed for your packaging system, to assist you in the operation and maintenance of your new equipment. Please take the time to familiarize yourself with the contents of this manual.• Section 1 is the Introduction and Safety section. This section discusses safety, terms
and conditions of the sale, hazard messages, and installation information. • Section 2 is the System Description section. This section will discuss machine specifi-
cations. Section 2 also includes a machine overview with a brief description of each section of the machine. A Machine Layout Drawing is found at the end of this section.
• Section 3 is the System Operation section. This section describes the operator control panels, the Human Machine Interface, and operational procedures.
• Section 4 is the Troubleshooting section. A HMI Flow chart is found in this section.• Section 5 is the Maintenance section. In this section you will also find a suggested
maintenance schedule including a maintenance log. Assembly drawings conclude this section.
• Section 6 is the Electrical Programs section. This section is where the customer should store copies of the system software. Electrical prints are folded and placed in this sec-tion for your convenience.
• Section 7 is the Miscellaneous section. This section includes an index and any other pertinent information for the system.
Copyright Notice© 2008 Pro MachSection 106 of the 1976 Copyright Act forbids any party other than the author (Pro Mach) to:Reproduce owned work in copies or phonorecords, to prepare derivative works based uponthe work; to distribute copies or phonorecords of the work to the public by sale or other trans-fer of ownership, by rental or lease. Copyright protection subsists from the time the work is created in fixed form. The copyrightin the work of authorship immediately becomes the property of the author who created thework (Pro Mach.) Only the author or those deriving their rights through the author can right-fully claim copyright.

Orion Machine ManualRevision 2.0 LPD Stretchwrapper1 May 2008 Introduction and Safety
Page 1-3
SafetyOrion's stretch wrappers should be operated with caution and common sense as any other industrial equipment. To prevent injury and/or electrical shocks, careful operation of the machine and awareness of its many automatic functions is required.
Note: All electrical power and compressed air must be disconnected prior to all inspection, maintenance or repair work.
At Orion, we are committed to building quality packaging and material handling equip-ment. To achieve this, our machines must be efficient, easy to maintain, and safe to oper-ate.Before attempting to operate the equipment, become familiar with the safety recommen-dations and operational components of your LPD Stretchwrapper. You should also become familiar with the technical information pertaining to components used within the system, including their operating and safety features. This information is located in the Vendor Data Manual and in other literature supplied with the equipment. To maximize machine safety and efficiency you must operate the machine correctly and comply with the safety features described.
Stay alert and remember: Safety is the responsibility of everyone who operates or ser-vices your BEC system.

Machine Manual OrionLPD Stretchwrapper Revision 2.0Introduction and Safety 1 May 2008
Page 1-4
System Safety RecommendationsSafeguarding personnel that operate and/or maintain automated equipment is the primary consideration. Because it is very dangerous to enter the operating space (work envelope) of a machine during operation, adequate safeguards must be in place and safety precau-tions must be observed.
The following general precautions are recommended for all personnel who perform sys-tem operation or maintenance.• Do lockout-tagout procedures whenever you do maintenance and repair work.• All personnel who repair, maintain, or operate the equipment need to know the loca-
tion of all EMERGENCY STOP buttons. • Do not operate the equipment with any of the safety guards removed.• Do not wear neckties, loose clothing, or long loose-hanging hair around any equip-
ment.• Observe and follow the DANGER, WARNING, and CAUTION messages throughout
this manual, in vendor manuals, and displayed on the equipment. • DO NOT use steps or stands that allow anyone to reach over guards.• Personnel should attend all available safety and operational training courses.• Personnel should know and follow the recommended safety procedures whenever
they must enter the packaging systems motion area.• Personnel should not enter the packaging system while control power is "ON".• Personnel should not power up the system if someone is in the packaging system. • The system should be powered down when not in use. • Personnel should pay special attention to all the posted warnings and cautions located
on any devices. Observe all safety and/or precautionary steps and procedures when working with the system.
• Personnel should keep the system clean to make it easier to spot hazards.
Orion Machine ManualRevision 2.0 LPD Stretchwrapper1 May 2008 Introduction and Safety
Page 1-5
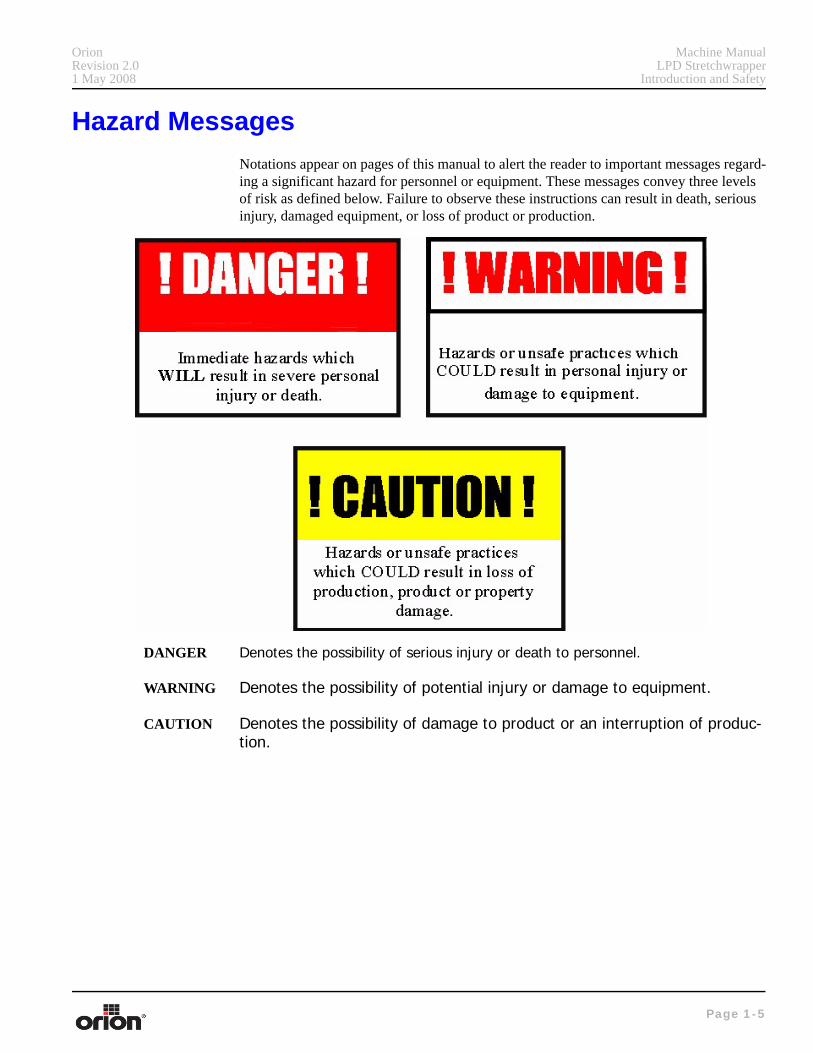
Hazard MessagesNotations appear on pages of this manual to alert the reader to important messages regard-ing a significant hazard for personnel or equipment. These messages convey three levels of risk as defined below. Failure to observe these instructions can result in death, serious injury, damaged equipment, or loss of product or production.
DANGER Denotes the possibility of serious injury or death to personnel.
WARNING Denotes the possibility of potential injury or damage to equipment.
CAUTION Denotes the possibility of damage to product or an interruption of produc-tion.

Machine Manual OrionLPD Stretchwrapper Revision 2.0Introduction and Safety 1 May 2008
Page 1-6
Operation SafetyThe following safety precautions are recommended for all personnel who will operate this LPD Stretchwrapper.• Operators should immediately report unsafe working conditions to a supervisor.• The operator should understand the function of the entire system including all external
devices and equipment that interact with the system.• Before starting operation, the operator should understand the complete task that the
system is designed to accomplish.• The operator should know the location and functional status of all devices (switches,
sensors, control signals) that can cause the system to move.• The operator should know where each EMERGENCY STOP button is located for
both main and external control devices.• Do not hesitate to use them in an emergency.• The operator should make sure all safety devices are functioning and periodically
checked for proper operation.• The operator should ensure that all personnel are outside the system before starting
operation.• The operator should never enter, or allow others to enter the system during automatic
operation.

Orion Machine ManualRevision 2.0 LPD Stretchwrapper1 May 2008 Introduction and Safety
Page 1-7
Maintenance SafetyThe following safety precautions are recommended for all personnel who are responsible for the maintenance or service this LPD Stretchwrapper.• Personnel should ensure that all safety devices are functioning and periodically
checked for proper operation before performing maintenance.• Before performing any maintenance, service, or inspection inside the main control
panel, the 3-phase power source should be turned off and locked out.• Maintenance should be performed on the system with the power OFF. Lockout and tag
out procedures should be followed to protect personnel from injury and to indicate the equipment is being serviced.
• Place a lock on the main electrical disconnect, as shown below, while performing maintenance.
• Personnel should pay careful attention to all devices that may be powered or capable of motion, such as conveyors and pneumatic devices.
• Release or block all stored energy devices (hydraulic or pneumatic) that may present a danger when working with the system. Before working with pneumatic devices, shut off the air supply and purge the air lines.
• Be aware when removing a servomotor or brake that the associated mechanical part will fall unless supported in some manner.
• Use only specified replacement parts. Never use non-specific fuses that have not been specified. Potential fire and/or damage may result.
• Before restarting the system, ensure personnel are not in the system and that the sys-tem and external devices are operating properly.

Machine Manual OrionLPD Stretchwrapper Revision 2.0Introduction and Safety 1 May 2008
Page 1-8
Lockout and Tagout RecommendationsElectrical System
(See OSHA 1910.147 & OSHA 1910.333 (b)(2) for exception to procedures)
To avoid hazards of electrical shock or other personal injuries, the main power disconnect for the system and any other separate sources of power for the system shall be locked out & tagged as a safety precaution during entry and maintenance to the system.
To accomplish this, set the Main Power Disconnect operating handle to the "OFF" position and install a personal locking device through the padlock hole on the operating handle. Attach a Danger tag to the handle containing a statement prohibiting unauthorized opera-tion of the disconnect and removal of the tag signed by the individual responsible for lock-ing out the system. If several personnel are performing maintenance, each individual shall install a lockout device and tag.
A qualified person shall verify that the equipment is de-energized by:
1. Operating controls to verify equipment cannot be restarted.2. Using test equipment to test circuits and electrical parts that will be exposed to person-
nel.
Stored electric energy that might endanger personnel shall be released by discharging the circuits. Check appropriate equipment manuals on exact procedures.
To re-energize equipment, a qualified person shall conduct tests and visual inspections, as necessary, to verify that all tools, electrical jumpers, shorts, grounds, and other such devices have been removed, so that equipment can be safely energized. Personnel exposed to the hazards associated with re-energizing equipment shall be warned to stay clear of equipment. Each lock and tag shall be removed by the person who applied it or under their direct supervision. A visual determination that all personnel are clear of the equipment shall be accomplished before the operating handle on each Main Power Disconnect is placed to the "ON'' position.

Orion Machine ManualRevision 2.0 LPD Stretchwrapper1 May 2008 Introduction and Safety
Page 1-9
Pneumatic and Vacuum SystemsTo avoid hazards of moving mechanisms, pinch points and other personal injuries, the main compressed air supply valve for the system shall be locked out & tagged as a safety precaution during entry and maintenance to the system.
1. To accomplish this, turn the Main Air Supply valve to the "OFF" position and install a personal locking device through the padlock hole on the valve handle.
2. Also attach a Danger tag to the handle containing a statement prohibiting unautho-rized operation of the disconnect and removal of the tag signed by the individual responsible for locking out the system.
If several personnel are performing maintenance, each individual shall install a lockout device and tag. Qualified personnel shall vent any stored or accumulated air in pneumatic/vacuum devices before working on them. Check appropriate equipment manuals on exact procedures.
To re-supply compressed air to the equipment, a qualified person shall conduct visual inspections, as necessary, to verify that mechanisms are properly connected, as well as all tools and other objects have been removed so that equipment can safely operate. Personnel exposed to pneumatic/vacuum hazard areas shall be warned to stay clear of equipment. Each lock and tag shall be removed by the person who applied it, or, under their direct supervision. A visual determination that all personnel are clear of the equipment shall be accomplished before the main air supply valve is turned to the “ON'' position.

Machine Manual OrionLPD Stretchwrapper Revision 2.0Introduction and Safety 1 May 2008
Page 1-10
Installation and First Time Power Up
UnloadingMachine can be easily unloaded and transported by a forklift with a minimum capacity of 2500 lbs.
1. Carefully insert the forks into the lifting tubes to the maximum possible depth. Depending on the model, a forklift access may be either at the turntable end of the machine frame, the tower end or both. Look for the forklift tube access stickers shown below.
2. Lift the machine (or other part of system) only to the necessary height to move it with no bouncing or friction on the floor.
3. Sit the machine down assuring uniform contact with the floor, which is necessary to ensure correct and smooth operation.
Inspection1. Remove all packing and supporting additions - these may include the blocks under the
carriage and the restraining bar over the table.
Note: When removing the stretchwrap film covering the machine, care must be taken not to cut any of the electrical wires and/ or polyure-thane covering on the film carriage rollers.2. Perform a visual inspection of the electrical and mechanical parts for loosened joints
and / or broken connections. Any suspected shipping damage must be reported imme-diately to the freight carrier. Any transport damage cannot be claimed to Orion Pack-aging Inc.
Items that are vulnerable to damage and must be inspected are as follows:• Motors and transmissions• Junction boxes
Figure 1 - 1Fork Tube Access
Sticker

Orion Machine ManualRevision 2.0 LPD Stretchwrapper1 May 2008 Introduction and Safety
Page 1-11
• Electrical conduits• Proximity and limit switches• Photocells3. Check around the turntable to ensure that there is no crippling of the movable parts i.e.
casters, center axle or drive assembly.4. Verify the following:• Check wires and conduits for crushed sections or loose fittings.• Verify the film carriage to be sure that it is correctly aligned with the tower• Verify the tension on the lift belt.• Verify all the dials and knobs on the control panel for smooth action.
Machine InstallationAfter the visual inspection has been completed, the electrical power and the compressed air (Optional) shall be connected as specified on the diagrams supplied with the machine. An electrical diagram is provided with each machine in the envelope attached to the panel box.
Make sure the machine is on a level surface. Orion Packaging insist on a dedicated circuit be used for this wrapper. Extension cords are not allowed and can void your warranty.
Assembly ProcedureNote: The structural frames of the machine have to be installed on a lev-
eled floor. The base deviation from vertical must not exceed 1/4" on the distance of 10 feet (angle: 0 degrees 6').
Move the wrapper into its final position. If the wrapper is to be secured to the floor, we recommend that the wrapper base section be bolted to the floor by the 1/2" concrete floor anchors (leg & shield or expandable type-Red Heads).

Machine Manual OrionLPD Stretchwrapper Revision 2.0Introduction and Safety 1 May 2008
Page 1-12

Orion Machine ManualRevision 2.0 LPD Stretchwrapper1 May 2008 System Description Contents
Page I
System Description ContentsMachine Specifications . . . . . . . . . . . . . . . . . . . . . . . . . . . . . . . . . . . . . . . . . . . . . . . . . . 2-1Machine Floor Plan. . . . . . . . . . . . . . . . . . . . . . . . . . . . . . . . . . . . . . . . . . . . . . . . . . . . . . 2-2

Machine Manual OrionLPD Stretchwrapper Revision 2.0 System Description Contents 1 May 2008
Page II

2.
Page 2-1
Orion Machine ManualRevision 2.0 LPD Stretchwrapper1 May 2008 System Description
System Description
Machine SpecificationsThe LPD Stretchwrapper is designed to wrap full pallets. ORION PACKAGING SYSTEMS INC.SEMI-AUTOMATIC PALLET WRAPPER SPECIFICATIONS LPD StretchwrapperSpiral Semi-Automatic Medium Duty High ProfileMaximum load size 55"L x 55" W x 80" H Standard (additional height is optional)Weight Capacity 5,000 Ibs. DynamicUtilities 115 / 1PH / 60HZ 20 Amp Service (25 amp capacity recom-mended for severe duty)Turntable 63" Diagonal Structural Steel Plate TurntableDura-Glideä Turntable Support System Quiet in Operation, Maintenance FreeTurntable Drive Up to 15 RPM Variable Turntable Speed VFD Controlled Motor**Heavy Duty Chain Drive with automatic spring loaded chain tensionerElectronically Adjustable Acceleration/Deceleration and running speeds (At VFD)Positive Alignment Feature (True home position)Control Features CSA Approved, NEMA 12 Control PanelState of the art, AB PLC Logic ControlUser Friendly PLC with HMI panel input.Next Generation Revo-Logicä Exact Wrap Counting TechnologySeparate Top I Bottom Wrap Count Selectors with countdown displayVariable Speed Film Carriage Up/Down ControlFilm Carriage manual mode Raise/Lower Switch Photocell for Automatic Load Height DetectionTurntable Jog PushbuttonSemi-automatic reinforce wrap feature with countdown featureFilm Delivery InstaThread full corner compensating powered film drive. 260 % Stretch from the factory. 20" Film Tension Delivery System. **Optional 30" Full Authority, Corner compensating, VFD powered prestretch Electronic Film Tension Control Adjustment on the Panel < or = 90 ga film capacity. Higher gauge film requires a heavy film upgrade.Film Carriage Elevator Drive High strength belt lift. Variable Frequency Drive MotorMulti-Point UHMW Precision Carriage Guidance SystemStructural Features Structural steel!!!! construction throughout (no plastic here)Easy access to all componentsLimited proprietary parts for ease of maintenanceForklift Portable Base DesignHeavy Gauge Metal Enclosed Mast DesignHinged Mast for Ease of Shipping, PortabilityEstimated Shipping Weight 1,400 Ibs.Visit Website at www.orionpackaging.com

Machine Manual OrionLPD Stretchwrapper Revision 2.0System Description 1 May 2008
Page 2-2
Machine Floor PlanThe drawing below depicts the machine dimensions and general layout as sold.
WARNING After receiving, do not throw away ramp mounting brackets.
Figure 2 - 1Machine Layout

Orion Machine ManualRevision 2.0 LPD Stretchwrapper1 May 2008 System Operation Contents
Page I
System Operation ContentsOperating Procedures . . . . . . . . . . . . . . . . . . . . . . . . . . . . . . . . . . . . . . . . . . . . . . . . . . . 3-1
Control Panel . . . . . . . . . . . . . . . . . . . . . . . . . . . . . . . . . . . . . . . . . . . . . . . . . . . . . . 3-1Before Starting Machine Operation . . . . . . . . . . . . . . . . . . . . . . . . . . . . . . . . . . . . . 3-1Loading The Film. . . . . . . . . . . . . . . . . . . . . . . . . . . . . . . . . . . . . . . . . . . . . . . . . . . 3-2How to Start and Shut Down Your Wrapping System . . . . . . . . . . . . . . . . . . . . . . . 3-3Opening the Main Control Panel . . . . . . . . . . . . . . . . . . . . . . . . . . . . . . . . . . . . . . . 3-3
Main HMI Control Panel . . . . . . . . . . . . . . . . . . . . . . . . . . . . . . . . . . . . . . . . . . . . . . . . . . 3-4Quick Start Setup . . . . . . . . . . . . . . . . . . . . . . . . . . . . . . . . . . . . . . . . . . . . . . . . . . . . . . . 3-6
To Set Carriage Speed Up . . . . . . . . . . . . . . . . . . . . . . . . . . . . . . . . . . . . . . . . . . . 3-6To Set Carriage Speed Down . . . . . . . . . . . . . . . . . . . . . . . . . . . . . . . . . . . . . . . . . 3-6To Set the Number of Top Wraps . . . . . . . . . . . . . . . . . . . . . . . . . . . . . . . . . . . . . . 3-6
HMI Screens . . . . . . . . . . . . . . . . . . . . . . . . . . . . . . . . . . . . . . . . . . . . . . . . . . . . . . . . . . . 3-7Power Up Screen. . . . . . . . . . . . . . . . . . . . . . . . . . . . . . . . . . . . . . . . . . . . . . . . . . . 3-7Main Menu. . . . . . . . . . . . . . . . . . . . . . . . . . . . . . . . . . . . . . . . . . . . . . . . . . . . . . . . 3-7Modify Wraps. . . . . . . . . . . . . . . . . . . . . . . . . . . . . . . . . . . . . . . . . . . . . . . . . . . . . . 3-7Autoheight Photoeye Screen. . . . . . . . . . . . . . . . . . . . . . . . . . . . . . . . . . . . . . . . . . 3-8Wrap Order Screen . . . . . . . . . . . . . . . . . . . . . . . . . . . . . . . . . . . . . . . . . . . . . . . . . 3-8Broken Film Alarm Screen. . . . . . . . . . . . . . . . . . . . . . . . . . . . . . . . . . . . . . . . . . . . 3-8Service Debug or Password Select Screen. . . . . . . . . . . . . . . . . . . . . . . . . . . . . . . 3-9Service Debugging Screen . . . . . . . . . . . . . . . . . . . . . . . . . . . . . . . . . . . . . . . . . . . 3-9Password Screen. . . . . . . . . . . . . . . . . . . . . . . . . . . . . . . . . . . . . . . . . . . . . . . . . . 3-10Input Status Screen . . . . . . . . . . . . . . . . . . . . . . . . . . . . . . . . . . . . . . . . . . . . . . . . 3-10Alarm List/ History Screen . . . . . . . . . . . . . . . . . . . . . . . . . . . . . . . . . . . . . . . . . . . 3-11Alarm History Screen. . . . . . . . . . . . . . . . . . . . . . . . . . . . . . . . . . . . . . . . . . . . . . . 3-11Factory Reset Screen . . . . . . . . . . . . . . . . . . . . . . . . . . . . . . . . . . . . . . . . . . . . . . 3-11Advanced Parameters Password Screen . . . . . . . . . . . . . . . . . . . . . . . . . . . . . . . 3-12Positioning Screen. . . . . . . . . . . . . . . . . . . . . . . . . . . . . . . . . . . . . . . . . . . . . . . . . 3-12Positioning Turntable/ InstaCut Screen . . . . . . . . . . . . . . . . . . . . . . . . . . . . . . . . . 3-12Turntable Advanced Parameters Screens. . . . . . . . . . . . . . . . . . . . . . . . . . . . . . . 3-13InstaCut Advanced Parameters Screens. . . . . . . . . . . . . . . . . . . . . . . . . . . . . . . . 3-13Advanced Parameters Positioning/ Timers Screens . . . . . . . . . . . . . . . . . . . . . . . 3-14

Machine Manual OrionLPD Stretchwrapper Revision 2.0 System Operation Contents 1 May 2008
Page II

3.
Page 3-1
Orion Machine ManualRevision 2.0 LPD Stretchwrapper9 May 2008 System Operation
System Operation
Operating Procedures
Control PanelAny wiring that has been disconnected to facilitate transport is marked with a number located on the junction box to which the wiring must be reconnected. Any wire run that appears too short or long may indicate that the position of the mechanical components is incorrect. Verify the status of all assemblies before proceeding.
In the case of the free standing panel (console) place it adjacent to the system and anchor firmly to the floor. Connect the liquid tight (rigid conduit) to the main junction box located on the wrapper main frame next to the tower.
Before Starting Machine OperationVerify that the machine is properly connected to the electrical source. The electrical requirements depend on the machine type and features. For this information, please see the machine electrical diagram provided with the machine operation manual. The control panel layout for the machine is shown on the drawing.
CAUTION Before preceding the machine operation familiarize yourself with the EMERGENCY-STOP button and all functions, switches and pushbuttons.
Machine Manual OrionLPD Stretchwrapper Revision 2.0System Operation 9 May 2008
Page 3-2
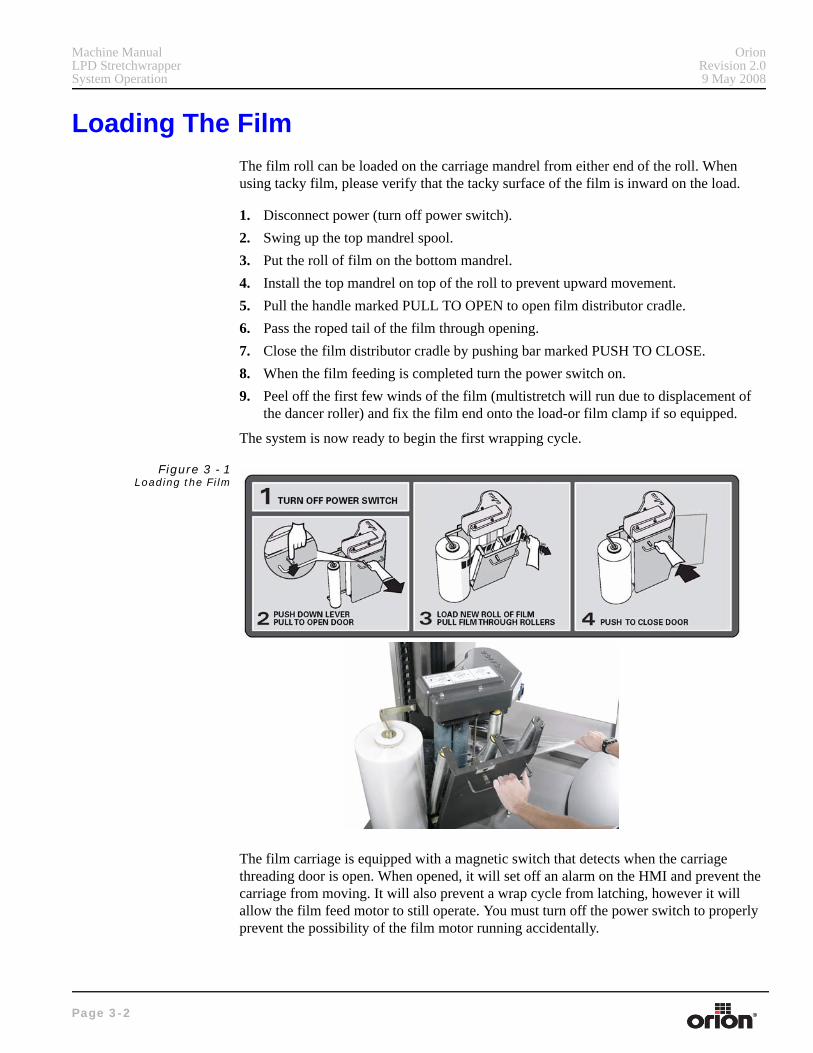
Loading The FilmThe film roll can be loaded on the carriage mandrel from either end of the roll. When using tacky film, please verify that the tacky surface of the film is inward on the load.
1. Disconnect power (turn off power switch).2. Swing up the top mandrel spool.3. Put the roll of film on the bottom mandrel.4. Install the top mandrel on top of the roll to prevent upward movement.5. Pull the handle marked PULL TO OPEN to open film distributor cradle.6. Pass the roped tail of the film through opening.7. Close the film distributor cradle by pushing bar marked PUSH TO CLOSE.8. When the film feeding is completed turn the power switch on.9. Peel off the first few winds of the film (multistretch will run due to displacement of
the dancer roller) and fix the film end onto the load-or film clamp if so equipped.
The system is now ready to begin the first wrapping cycle.
The film carriage is equipped with a magnetic switch that detects when the carriage threading door is open. When opened, it will set off an alarm on the HMI and prevent the carriage from moving. It will also prevent a wrap cycle from latching, however it will allow the film feed motor to still operate. You must turn off the power switch to properly prevent the possibility of the film motor running accidentally.
Figure 3 - 1Loading the Film

Orion Machine ManualRevision 2.0 LPD Stretchwrapper9 May 2008 System Operation
Page 3-3
How to Start and Shut Down Your Wrapping SystemPOWER SWITCH
Located on the panel door, the lockable power switch has two settings:• ON - connects a power source to the machine.• OFF - disconnects the power source.START AND EMERGENCY STOP SWITCHES• The START switch is used to start the cycle once the load is on the turntable. • The cycle may be stopped at anytime by pressing the STOP button.
The FLEX series machines are engineered to give the operator different levels of opera-tion, the front panel or USER settings, and MENU DRIVEN parameters.
The front panel controls have the majority of needed commands and can be accessed at any time.
The menu driven parameters offer even more flexibility and protection from being acci-dentally changed during normal operation.
Opening the Main Control PanelWARNING Before opening the main panel, follow the Electrical Lockout Procedure
described in the Safety Chapter of this manual.
The door cannot open until the power disconnect switch is in the OFF position.
1. Perform the Electrical Lockout Procedure.2. Loosen the wingnuts on the panel clamps along the edge of the door.3. Once loose, turn the clamps until they no longer hold the door shut.4. Pull the panel door open. The electrical components inside the panel are de-energized.
The only area of the Main Panel that remains energized is above the disconnect switch. This area is energized with high voltage electricity (200+ VAC). DO NOT remove the plastic guard that covers this area.

Machine Manual OrionLPD Stretchwrapper Revision 2.0System Operation 7 August 2008
Page 3-4
Main HMI Control PanelThe Main Operator Control Station for this LPD Stretchwrapper is designed around an Human Machine Interface. The Human Machine Interface (HMI) directs control of the machine. The HMI control features are described, in detail, later in this section.
The operator control scheme for the packaging system is based on a simple, menu driven design. Interactive displays serve as both control input devices and visual output devices, providing the operator both automatic and manual control features for directing machine operations.
Figure 3 - 2HMI Panel
Table 3-1. Main Panel Button Descriptions
BUTTON DESCRIPTION
ESC (Escape) allows you to exit the page you are on.
DEL (Delete) is deactivated and is not usable. It is reserved for later software updates.
MOD (Modify) Must be pressed when you wish to edit a parameter.
ENTER Acts as a SAVE command and must be pressed anytime a parameter needs to be saved.
MENU This is the master page button. All of the parameters not accessible by the front panel are here.
DOWN This is a dual acting button. It's primary role is to lower the carriage in manual mode but it also acts as the down cursor when in the programming mode.

Orion Machine ManualRevision 2.0 LPD Stretchwrapper7 August 2008 System Operation
Page 3-5
Changing HMI SettingsTo change a setting on the HMI to either on or off, or to increase or decrease the numeric value of a setting:
1. Press ESC until the home screen displays.2. Press MENU until the main menu screen displays.3. Arrow to highlight the PARAMETER you with to modify.4. Press MOD.5. Use ARROW KEYS, found under the HMI display, to change the setting. 6. Press ENTER to save the setting.
UP This is a dual acting button. It's primary role is to raise the carriage in manual mode but it also acts as the up cursor when in the programming mode.
REINFORCE WRAP (UP)
This button allows you to start the banding function and increase the number of revolutions for banding.
REINFORCE WRAP (DN)
This button allows you to decrease the number of revolutions for banding.
FILM TENSION (UP)
This button allows you to increase the amount of film force applied to the load.
FILM TENSION (DN)
This button allows you to decrease the amount of film force applied to the load.
SPEED UP/ DOWN
These buttons allow you to increase or decrease the film carriage vertical movement speed.
PAUSE RESET This button will either pause the wrap cycle (stop the wrap cycle and retain the memory so it can pick up where it left off) or reset a cycle (stop the cycle and make the wrap cycle start from the beginning).
TABLE PGM SPEED
(Programmable Speed) This very useful button allows the operator to access a second (slower) turntable rotation speed.
Table 3-1. Main Panel Button Descriptions (Continued)
BUTTON DESCRIPTION

Machine Manual OrionLPD Stretchwrapper Revision 2.0System Operation 9 May 2008
Page 3-6
Quick Start Setup
To Set Carriage Speed Up1. Locate the carriage SPEED UP buttons. 2. Press the up or down keys until the carriage speed indicated on the panel reads "50."
Note: The recommended base setting is 50.
To Set Carriage Speed Down1. Locate the carriage SPEED DOWN buttons. 2. Press the up or down keys until the carriage speed indicated on the panel reads "35."
Note: The recommened base setting is 35.
To Set the Number of Top Wraps1. Press ESC until the HOME Screen appears.2. Press the MENU key on the HMI's face.3. Press the red DOWN cursor until you get to the SETTINGS page.4. With the WRAP MENU open, press the red RIGHT cursor to get to the wraps selec-
tors.5. Press MOD on the HMI's face once to access the top wraps or twice to access the bot-
tom wraps. 6. Press the red UP or DOWN arrows to change the wrap values. 7. Press ENTER on the HMI's face to save your selection.
Complete the following, and your ready to start wrapping.
Make sure that:
1. E-stop is pulled to it's outer stop.2. Film is correctly threaded through the carriage.3. Film is attached to the load. (or clamp, OPTIONAL)4. Area around the machine is clear.5. Press START.

Orion Machine ManualRevision 2.0 LPD Stretchwrapper9 May 2008 System Operation
Page 3-7
HMI Screens
Power Up ScreenThis is screen that you will see at power up. You may navigate to other screens from here. Press ESC until the home screen appears.
Main MenuThis is the start of the main menu. Press the menu button to get to this screen. Press MENU until the main menu screen appears.
Modify WrapsTo change the value of the wraps you must press mod and highlight the value you with to change. Use the arrow up and down to increase or Decrease the value.
Figure 3 - 3Power Up Screen
Figure 3 - 4Main Menu
Figure 3 - 5Modify Wraps Screen

Machine Manual OrionLPD Stretchwrapper Revision 2.0System Operation 9 May 2008
Page 3-8
Autoheight Photoeye ScreenArrow down through the menu screen to get to the Auto-height screen you must press mod and highlight the box shown to change for on to off. Use arrow keys to change. After change you must press enter to save settings.
Press the right cursor button to access the photocell ON-OFF value. The Autoheight pho-tocell can be turned on or off from here. This controls the return signal from the eye, which is useful when wrapping dark or reflective loads.
Wrap Order ScreenArrow down through the menu screen to get to the wrap order screen you must press mod and highlight (top wraps 1st) to change top first to bottom first use arrow keys to change. After change you must press enter to save settings.
Broken Film Alarm ScreenArrow down through the menu screen to get to the Broken film alarm screen you must press mod, then highlight the box shown to change on or off. Use arrow keys to change. After change you must press enter to save settings.
Figure 3 - 6Autoheight On/ Off
Screen
Figure 3 - 7Wrap Order Screen
Figure 3 - 8Broken Film Alarm
Screen

Orion Machine ManualRevision 2.0 LPD Stretchwrapper9 May 2008 System Operation
Page 3-9
Service Debug or Password Select ScreenArrow down to get to the service/debugging or password screen depending on the arrow that is flashing will depend on what screen you will Go to next.
Service Debugging ScreenThis is the Debugging screen. This page is useful primarily to repair personnel when trou-bleshooting the machine. You can access the input and output screens from here.
Figure 3 - 9Service Debug orPassword Select
Screen
Figure 3 - 10Service/ Debugging
Screen

Machine Manual OrionLPD Stretchwrapper Revision 2.0System Operation 9 May 2008
Page 3-10
Password ScreenMany of the parameters are locked out from normal access. These parameters require extra attention and understanding of operation and if modified incorrectly, can lead to machine malfunction. Please contact your local Orion Packaging Distributor for pass-codes.
Follow the following procedure example for modifying password protected parameters.
1. Press ESC until the home screen appears. See “Power Up Screen” on page 3 - 7.2. Press MENU until the main menu screen appears. See “Main Menu” on page 3 - 7.3. Use the cursor down button until the PASSWORD icon is highlighted.4. Press the right cursor to go to the PASSWORD VIEW screen.5. Press the MOD button on the HMI face. At this point the **** should illuminate. You
can now enter the password supplied by your Orion Packaging distributor. If you see "ABC" in the lower left hand of the screen, then the password has been accepted.
6. Press ENTER to save the password, and you are now able to access all parameters and value screens.
This is the password page. To be able to access certain pages and parameters. Please con-tact your Orion distributor for details.
Note: In the service and debug screen you must enter the password to get to the Alarm List and the Factory Reset screen.
Input Status ScreenThis screen is useful primarily to repair personnel when troubleshooting the machine. You can access the input and output screens from here.
Figure 3 - 11Password Screen
Figure 3 - 12Input Status Screen

Orion Machine ManualRevision 2.0 LPD Stretchwrapper9 May 2008 System Operation
Page 3-11
Alarm List/ History ScreenHere you can retrieve all of the alarms that occurred with the machine for reference pur-poses.
Alarm History ScreenArrow over to view the list and history.
Note: The machine must remain powered up to retain memory.
Factory Reset ScreenThis screen is access to Factory reset. This can be turned on to either lock in the factory (ORION) settings, or to simply get the machine back to the original factory settings.
Arrow down through the menu screen to get to the Factory Reset and enter the password highlight the word off shown to change from off to on; use arrow keys to change. After change you must press enter to save settings.
Figure 3 - 13Alarm List/ History
Screen
Figure 3 - 14Alarm History Screen
Figure 3 - 15Factory Reset Screen

Machine Manual OrionLPD Stretchwrapper Revision 2.0System Operation 9 May 2008
Page 3-12
Advanced Parameters Password ScreenIn the main menu enter the pass word then back out to the advanced parameters and arrow over. You must enter the pass word to get to the advanced parameters section.
Positioning ScreenThese are the sub sections under the advanced parameter menu.
Positioning Turntable/ InstaCut ScreenThis is the Positioning screen. Scroll down to see all of the available options. This is a password protected page and not intended for operators to access.
Figure 3 - 16Advanced Parameters
Password Screen
Figure 3 - 17Positioning Screen
Figure 3 - 18Positioning Screen

Orion Machine ManualRevision 2.0 LPD Stretchwrapper9 May 2008 System Operation
Page 3-13
Turntable Advanced Parameters ScreensOn this screen, you may set the low speed and home stop positions for the turntable. This allows the technician to set the slow down position and stopping position of the turntable.
InstaCut Advanced Parameters ScreensOn this screen you may set the punch position and film break position for the optional Instacut.
Figure 3 - 19Turntable Advanced
Parameters
Figure 3 - 20InstaCut AdvancedParameters Screen

Machine Manual OrionLPD Stretchwrapper Revision 2.0System Operation 9 May 2008
Page 3-14
Advanced Parameters Positioning/ Timers ScreensThe advanced parameter screens allow the technician to change timers in the machine pro-gram. These screens are password protected.
CAUTION It is not recommended to change advanced parameters unless you are a trained technician.
Figure 3 - 21Advanced Parameters
Screen
Figure 3 - 22Timers AH Photoeye
Delay Screen
Figure 3 - 23Punch Dwell and End
Cycle Delay Screen
Figure 3 - 24Tension and H Speed
Delay Screen
Figure 3 - 25Film FLT and Cycle
Watchdog TimersScreen

Orion Machine ManualRevision 2.0 LPD Stretchwrapper16 April 2008 Troubleshooting Contents
Page I
Troubleshooting ContentsHMI Screen Diagrams. . . . . . . . . . . . . . . . . . . . . . . . . . . . . . . . . . . . . . . . . . . . . . . . . . . . 4-1

Machine Manual OrionLPD Stretchwrapper Revision 2.0 Troubleshooting Contents 16 April 2008
Page II

4.
Page 4-1
Orion Machine ManualRevision 2.0 LPD Stretchwrapper16 April 2008 Troubleshooting
Troubleshooting
HMI Screen DiagramsThe following diagrams are designed to aid in navigating the HMI screens on your LPD Stretchwrapper.
Figure 4 - 1Page 1 HMI Screen
Flowchart

Machine Manual OrionLPD Stretchwrapper Revision 2.0Troubleshooting 16 April 2008
Page 4-2
Figure 4 - 2Page 2 HMI Screen
Flowchart

Orion Machine ManualRevision 2.0 LPD Stretchwrapper1 May 2008 Maintenance Contents
Page I
Maintenance ContentsMaintenance . . . . . . . . . . . . . . . . . . . . . . . . . . . . . . . . . . . . . . . . . . . . . . . . . . . . . . . . . . . 5-1
Motor Maintenance . . . . . . . . . . . . . . . . . . . . . . . . . . . . . . . . . . . . . . . . . . . . . . . . . 5-1Reducer Oil Change . . . . . . . . . . . . . . . . . . . . . . . . . . . . . . . . . . . . . . . . . . . . . . . . 5-1Ring Bearing Maintenance (*optional) . . . . . . . . . . . . . . . . . . . . . . . . . . . . . . . . . . . 5-2Tower Raceways Maintenance . . . . . . . . . . . . . . . . . . . . . . . . . . . . . . . . . . . . . . . . 5-3Chain Maintenance . . . . . . . . . . . . . . . . . . . . . . . . . . . . . . . . . . . . . . . . . . . . . . . . . 5-3Cleaning The Stretch Rollers. . . . . . . . . . . . . . . . . . . . . . . . . . . . . . . . . . . . . . . . . . 5-3Maintenance Log . . . . . . . . . . . . . . . . . . . . . . . . . . . . . . . . . . . . . . . . . . . . . . . . . . . 5-5

Machine Manual OrionLPD Stretchwrapper Revision 2.0 Maintenance Contents 1 May 2008
Page II

5.
Page 5-1
Orion Machine ManualRevision 2.0 LPD Stretchwrapper1 May 2008 Maintenance
Maintenance
MaintenanceAll general information about machine maintenance is based on normal machine working conditions: indoor, moderate dust and low moisture environment, and maximum rotation of 15 RPM. They should be regarded as guidelines, reviewed and corrected according to requirements of actual use and conditions.
Motor MaintenanceAC motors require little maintenance. Simply blow out debris with compressed air on a regular basis.
Reducer Oil ChangeAll external cap screws and plugs on the reducing transmission should be checked for tightness after the first week. It is recommended to change the oil every six months or at least 1800 hours of operation, whichever comes first. When adding or changing oil, the transmission should never be filled above the oil level mark indicated, because leakage and overheating may occur. Below is the list of the type of lubricant that should be used. List of recommended reducer oils:
Note: For most applications, Mobil One Synthetic 75/90 gear lube is a pre-ferred lubricant.
Table 5-1. Recommended Reducer Lubricants
MANUFACTURER LUBRICANT
American Oil Co. American Cyl Oil no: 196-L
Cities Service Oil Co. Citgo Cyl Oil 100-5
Gulf Oil Corp. Gulf Senate 155
Mobil Oil Corp. Mobil 600 W Suer-r Cyl. Oil
Philips Oil Corp. Andes S 180
Texaco Inc. 624 + 650T Cyl.Oil
Shell Oil Co. Velvata Oil J82
Union Oil of Cal. Red Line Worm Gear Lube 140

Machine Manual OrionLPD Stretchwrapper Revision 2.0Maintenance 1 May 2008
Page 5-2
Ring Bearing Maintenance (*optional)The ring bearing (located under the turntable) should be re-lubricated internally and exter-nally.
Internally: Locate ONE of the four grease fittings located directly on the ring bearing. Pump one full shot of grease into only ONE of the fittings every six months. This should be plenty of lubrication for most applications. Pumping too much grease into the ring bearing can destroy the ring bearing by dislocating the rubber grease seal.
Externally: by lubricating and wiping the chain drive with oily cloth. The frequency of lubrication depends on entirely upon the usage of the machine and environment in which the machine is placed (dust, moisture etc.). Machines working under extremely dirty con-ditions should be lubricated every 400 operating hours but at minimum, every 2 months. Longer lubrication intervals may occur only when machine is working under very clean and dry conditions but should be not be longer than 6 months.
List of recommended lubricants for the ring bearing lubrication.
Table 5-2. Recommended Ring Bearing Lubricants
MANUFACTURER LUBRICANT
BP Energrease LS2
Castrol Speeroll AP2
Esso Beacon 2
Gulf Crown Grease 2
Mobil Mobilus 2
Shell Avania Grease R2
Texaco Glissando FT 2
Valvoline LB-2

Orion Machine ManualRevision 2.0 LPD Stretchwrapper1 May 2008 Maintenance
Page 5-3
Tower Raceways MaintenanceThe film distributor (carriage) is sliding on the plastic guides attached behind its back plate. The section of the tower on which the plastic guides move (raceways) should be cleaned and re-greased approximately every 600 hours of machine operation.
Note: If the machine works in a dusty and corrosive environment, the race-ways should be re-greased more often (at least every 100 hours).
Chain MaintenanceTo clean the stretch chain, wipe it with an oily cloth once a service.quarter.
When machine is working in a dusty and damp environment, it may be necessary to repeat the cleaning operation more often.
Regarding chain lubricants please use the most common chain lubricants on the market. With time, the chain will tend to stretch.
The turntable is equipped with automatic chain tensioner and does not need any adjust-ment.
Note: First chain tension inspection must be done after the first two weeks of machine usage.
Cleaning The Stretch RollersThe film carriage requires the most attention when cleaning. The film carriage requires regular cleaning even if there are no product spills into the carriage area. Absolutely DO NOT use wash down methods on the film carriage.• As the film goes though the rollers, a static charge develops from the film and pulls air
borne dust and contaminants into the rollers. The glue that is impregnated to the film, called Tackifier, traps these contaminants to the rollers. Finally, the aluminum pres-sure rollers on the threading gate press the debris into the rollers causing the rubber rollers to glaze.
• If the rollers become glazed, the film may slip, causing film shear, thus causing film payout to be inconsistent or cause the film to tear regularly. This is completely normal under continued use and occurs on every stretch wrapper made-no matter who the manufacturer is.
• The rubber rollers are recommended to be cleaned at every 2000 hours of running. Do not clean the rollers more than once a month unless special circumstances demand. This can cause the rollers to dry out. The cleaning requires only a stiff nylon bristle brush, rubbing alcohol (only)*, and compressed air. The procedure is as follows.
• (See Next Page)

Machine Manual OrionLPD Stretchwrapper Revision 2.0Maintenance 1 May 2008
Page 5-4
CAUTION This procedure should only be performed by qualified service personnel.
1. Raise carriage to chest height.2. Disconnect power from the machine.3. Remove the film from the carriage.4. Open the threading gate.5. With the brush wet with rubbing alcohol, lightly scrub both rubber rollers while rotat-
ing them. The goal is to just get any debris out of the rollers.
Note: Rubbing alcohol is recommended because it is light enough to pen-etrate the rubber and it evaporates quickly.
6. After the entire rollers' surface has been cleaned, apply compressed air to the rollers to dry quickly.
7. Re-apply power.8. Re-load film as discussed earlier.
See illustration below. Your carriage may differ in appearance.
Figure 5 - 1Cleaning Stretch
Rollers

Orion Machine ManualRevision 2.0 LPD Stretchwrapper1 May 2008 Maintenance
Page 5-5
Maintenance Log
Table 5-3. Maintenance Log
DATE INITIALS COMMENT

Machine Manual OrionLPD Stretchwrapper Revision 2.0Maintenance 1 May 2008
Page 5-6


NO. PART No. WEIGHT PRESTRETCH %40B33 017078 3.2 39540B32 016671 3.1 38040B30 011463 2.9 35040B28 011462 2.7 32040B27 014461 2.6 30540B26 011460 2.5 29040B25 011459 2.5 27540B24 435715 2.4 26040B23 428647 2.1 24540B22 014456 1.9 23040B21 011455 1.7 21540B20 011454 1.6 20040B19 011453 1.4 18540B18 010968 1.1 17040B17 011452 0.9 15540B16 011451 0.8 14040B15 013134 0.7 12540B14 012403 0.6 11040B13 012402 0.5 9540B12 010748 0.4 80
PRESTRETCH CHANGE AVAIBILITYDESCRIPTION
18
DR
IVE
SPR
OC
KET
40B.
. -3
/4 B
OR
E


Orion Machine ManualRevision 2.0 LPD Stretchwrapper1 May 2008 Appendix A: Index
Page A-1
EEMERGENCY STOP, 1-6FFloor Plan, 2-2HHazard Messages, 1-5IInstallation, 1-10MMaintenance Log, 5-5Maintenance Safety, 1-7OOperation Safety, 1-6PPinch Points, 1-9RRun Speeds, 2-2TTorque Limiter, 5-5
A. Appendix A: Index

Machine Manual OrionLPD Stretchwrapper Revision 2.0 Appendix A: Index 1 May 2008
Page A-2